setting up a new project · pdf file · 2012-03-12this section provides assistance...
TRANSCRIPT

SETTING UP A NEW PROJECT 112
Setting Up a New Project
This section provides assistance in setting up your ATLAS.ti project in the most efficient manner and for maximum work productivity.
Objectives
Working with ATLAS.ti involves users, files, and computers. An ATLAS.ti project can be as simple as a single person working with a single Hermeneutic Unit (HU) and a few primary documents (PDs) on a single stand-alone computer. It can be as complex as large teams working on different computers in a network or even at different geographic locations; working on several projects at once; moving files between users, computers, and networks; merging partial projects into compiled projects, and many other conceivable constellations.
If you have a single project, work on a single computer, and have no plans to share your work with others, you do not need to concern yourself too much with elaborate project management issues. Keeping in mind a few simple rules is sufficient to make your work with ATLAS.ti smooth and hassle-free. Please see Scenario 1 for a simple project approach.
Project management, however, becomes an issue if your projects and your work environment are more complex than this most basic scenario.
What’s in a project? In short, an ATLAS.ti project consists of an HU and its associated document files.
ATLAS.ti project management involves an understanding of how ATLAS.ti handles and accesses documents (see “The ATLAS.ti Referencing Model“ on page 105). It concerns itself with ways to fine-tune data-source access for a maximum of robustness and flexibility, but first and foremost, proper project management involves decisions regarding where HUs and documents are to be stored. Most, problems can be avoided by a little informed planning about issues such as file locations and paths and the need to copy, move, and distribute your HUs across disks, networks, and computers.
HU management is the least problematic if you can store all project-related documents in the same folder along with the HU itself or in a subfolder (see
ATLAS.ti 6 USER MANUAL

SETTING UP A NEW PROJECT 113
Figures 52 and 53 on page 109). However, ATLAS.ti also easily facilitates the distribution of files across the file system and across different computers and networks. These procedures are also discussed in this section.
There are various types of ATLAS.ti users: there are those who have stronger or weaker computer skills, those who work alone or in teams, those who work only at one location or at two or more locations, etc. Accordingly, we have created various project scenarios to illustrate "best practices" in some of the most typical situations.
Each scenario illustrates a specific use case and describes strategies for setting up new projects. This includes issues such as selecting the ideal location for data files and how to best move or backup entire projects.
The scenarios are presented in order of increasing complexity. All scenarios include specific characteristics and easy-to-follow instructions for setting up the project. For most projects, however, Scenario 1 will likely reflect the project management procedures that will be used.
Project Planning and Setup
The scenarios below aim to provide concrete examples of how to create and maintain consistent projects. In real-life situations, you may find that it sometimes makes sense to combine scenarios to achieve the best result.
Scenarios 1 to 3 below can be used by single users and teams. However, as team project management is somewhat more complex, a special section for team project management has been included as well. See Error: Referencesource not found on page Error: Reference source not found).
Before starting a new project, give some thought to the location of the documents and the HU. Choosing a proper location can make your work significantly easier, especially when it comes to teamwork. Maximum flexibility can be achieved by storing all associated documents in a common folder hierarchy.
For simple projects, one would typically choose to store the HU and the documents into the same folder.
If a common location for the documents is not possible, (e.g., your documents are scattered across the file system or the local area network), certain rules should be followed. See “Scenario 2: Multiple Document Paths“ on page 117ff. However, whenever feasible, data source documents should be stored in a common location, in the following referred to as the “project folder”).
Of course, instead of piling all documents into a single folder, you may create appropriate sub folders within the main project folder. This allows for convenient separation of a potentially large number of files into different media types or sub topics. However, after a project has been set up this way, sub
ATLAS.ti 6 USER MANUAL
Various project scenarios are presented.

SETTING UP A NEW PROJECT 114
folders should never be moved independently of the main project folder (see figures 52 and 53 on page 109).
Set up options for team projects are described in “Team Scenario 1: Theteam is sharing the same data source files on a shared drive“ on page 157 and “Team Scenario 2: Teams that do not always or never have access to ashared drive“ on page 165.
Splitting a project and merging the split projects later can be accomplished in all of the scenarios presented.
Such a “Split & Merge approach” makes sense not only for teamwork but is also feasible for a “solitary” researcher working on individual aspects of a problem. See “Merging Hermeneutic Units” on page 171 for further details on her to merge projects.
Before splitting a project, it is best to first create a "Master" version which already either contains or references all commonly used resources like documents and codes. For details, see the scenarios below. From the Master project version, a number of copies can be created to distribute to team members in a teamwork setting.
Merging HUs later requires a certain discipline with respect to the Master version. For instance, PDs must not be rearranged, or they won’t match in the merging process.
Scenario 1 (recommended): Working with One Project Folder - for Single Users and TeamsAll data files related to your project and your HU will be stored in the same folder hierarchy.
Example
You work on your own on a single project at one computer (desktop or laptop). Your project contains different media types like RTF and PDF files. If you only have text files, consider scenario 3 working with internal files (see “Scenario 3: Working with One Project File (for projects that use text filesexclusively)“ on page 118.
Project Set up
• Create a new folder for your project.
• Copy all documents to be used by your project into this folder, and use sub folders if you desire an added degree of structure.
• Open ATLAS.ti and assign the documents (DOCUMENTS / ASSIGN / ASSIGN)
• To save the HU click on FILE / SAVE and navigate to the main project folder as destination.
• Enter a name for the HU and click on the SAVE button.
ATLAS.ti 6 USER MANUAL

SETTING UP A NEW PROJECT 115
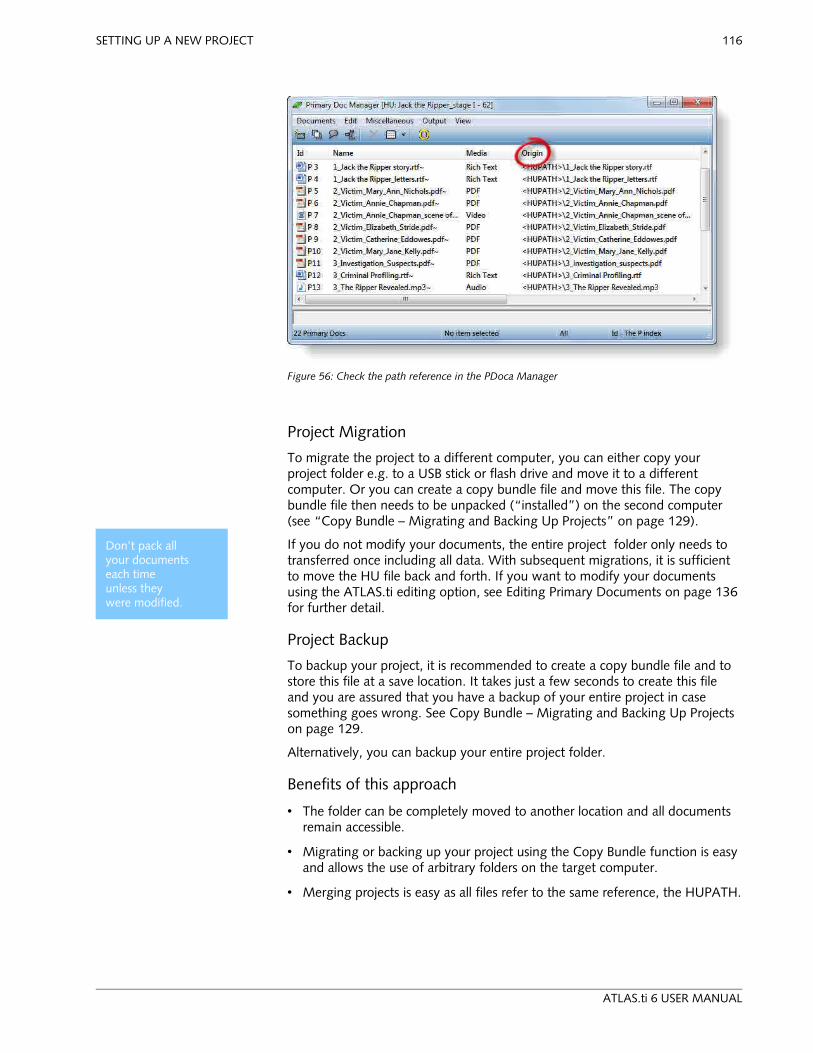
This results in a project located in ONE folder. All documents automatically receive the special <HUPATH> as reference. You can check this in the Primary Document Manager. Look for the column “origin”.
ATLAS.ti 6 USER MANUAL
Figure 55: One-folder project set up, with and without sub folders
SETTING UP A NEW PROJECT 116
Project Migration
To migrate the project to a different computer, you can either copy your project folder e.g. to a USB stick or flash drive and move it to a different computer. Or you can create a copy bundle file and move this file. The copy bundle file then needs to be unpacked (“installed”) on the second computer (see “Copy Bundle – Migrating and Backing Up Projects” on page 129).
If you do not modify your documents, the entire project folder only needs to transferred once including all data. With subsequent migrations, it is sufficient to move the HU file back and forth. If you want to modify your documents using the ATLAS.ti editing option, see Editing Primary Documents on page 136 for further detail.
Project Backup
To backup your project, it is recommended to create a copy bundle file and to store this file at a save location. It takes just a few seconds to create this file and you are assured that you have a backup of your entire project in case something goes wrong. See Copy Bundle – Migrating and Backing Up Projects on page 129.
Alternatively, you can backup your entire project folder.
Benefits of this approach
• The folder can be completely moved to another location and all documents remain accessible.
• Migrating or backing up your project using the Copy Bundle function is easy and allows the use of arbitrary folders on the target computer.
• Merging projects is easy as all files refer to the same reference, the HUPATH.
ATLAS.ti 6 USER MANUAL
Don’t pack all your documents each time unless they were modified.
Figure 56: Check the path reference in the PDoca Manager

SETTING UP A NEW PROJECT 117
Consideration for teams
• Sharing documents is restricted to HUs that reside in the same folder. Thus, if you work in a team, each team member needs a copy of the project folder or access to the project folder on a shared drive. If you work on a shared folder, each team member needs to work within her or his own HU file. These files then need to be merged from time to time into a MASTER HU. See “Merging Hermeneutic Units“ on page 171 for a more detailed explanation.
Scenario 2: Multiple Document PathsNot all documents can be accessed from a single folder hierarchy. Some documents are located in distinct, separate folders that cannot be incorporated under a common root.
Examples
• Legacy data archives that cannot easily be moved to more appropriate locations because of size or access restrictions.
• Documents that are located on a variety of media, such as CDs, DVDs, hard disks, possibly on different computers.
Project Set up
• Store the documents in the desired folders.
• Create the HU in an appropriate location. (See “Creating a HermeneuticUnit” on page 66.)
• Assign documents from their respective folders. Drag & Drop is an efficient technique here. See “Assigning Documents using Drag & Drop“ on page 79.
This procedure results in a project where all documents are assigned with their absolute paths (see “Absolute Paths“ on page 108).
Project Migration
The project cannot easily be migrated to a different computer, unless the data files can be accessed via a shared location like a network drive and the absolute path references remains intact or can be recreated.
When the drives and the network are available on the target system, a Copy Bundle file can be used to migrate the project.
If drives and networks are not available, see the section on “Modifying theProject Setup“ on page121, especially the sub sections on path mapping and changing paths.
Project Backup
The recommended option for this scenario is to create a copy bundle file. See “Copy Bundle – Migrating and Backing Up Projects“ on page 129. If this is not possible, you need to backup the HU plus each single document.
ATLAS.ti 6 USER MANUAL

SETTING UP A NEW PROJECT 118
Benefits of this approach
• Archive-friendly: documents can stay where they are and do not need to be placed in a common folder.
• The HU is not tied to the location of its documents and may be copied and moved anywhere without losing functionality, as long as references point to the correct locations of the documents.
Drawbacks
• Copying or moving an HU to other environments is not as smooth. For instance, if a server that hosts PDs is changed (e.g., new or changed disk drives), these documents can no longer be reached unless the path reference is changed (see “Adjusting References“ on page 122). When you migrate such a project using Copy Bundle, the situation on the target computer can differ considerably from the computer on which the project was created.
Scenario 3: Working with One Project File (for projects that use text files exclusively)If you plan to use only textual documents, an approach that does not use any references at all may be a solution. No files other than the HU itself are involved in this scenario.
This approach is also recommended for work with sensitive data material. When saving the HU, the data material is highly compressed and therefore unreadable outside ATLAS.ti ("pseudo-encryption"). In addition, the HU can be password-protected. This should make unauthorized access reasonably difficult.
Issues to Consider – Size and Length of Documents
As the documents become part of the HU file, the size of the HU increases. When working with external files, it is hard to bump up the size of an HU file beyond 1 MB even if you write a lot of comments and memos.
An example project we created with about 1600 pages of transcripts and 360.000 words based on 40 interview transcripts resulted in an HU file size of 700 KB. Another HU containing 10 internal documents of 90 pages each and a total of 650.000 words resulted in an HU size of 1,5 MB.
Both projects were easy to handle. Thus, if your project data contains more than 650.000 words, it is still possible to work with internal files. You need to keep in mind that very long documents take a while to load. This is true in Word and also true in ATLAS.ti. You may want to consider splitting very long documents into a number of smaller subdocuments of only about 100 pages each. For analysis purposes, all subdocuments can be added to a primary document family containing all parts of the long documents.
If the documents contain images, this will increase the size of the HU file considerably.
ATLAS.ti 6 USER MANUAL

SETTING UP A NEW PROJECT 119
Team Capability
You can use this scenario when working in teams. Then you need to copy the HU file containing all embedded documents and send it or give it to team members. The work of the various team members can later be combined by merging the various copies of the HU.
If you use this scenario for a team project, modifying documents is NOT possible. If documents are edited, you will end up with various versions of them after the merge process. The modified versions can only be added to the project, but not merged with the original version. See “Merging HermeneuticUnits“ on page 171.
Project Setup
This is how it works: you generate a new empty text document within ATLAS.ti and then you copy and paste the contents that you want to analyze into it:
Open ATLAS.ti and select the main menu option DOCUMENTS / ASSIGN / NEW TEXT DOCUMENT.
Enter a name for the document into the window that opens.
The document is loaded in edit mode.
Copy the text you want to analyze, e.g. from Word, and paste it into the primary document.
Save the document and leave edit mode: Click on the Edit button and select the option SAVE AND LEAVE EDIT MODE.
Proceed in the same way with all other documents that you want to analyze.
Save the HU file: FILE / SAVE.
Make sure that you always create a backup copy of this file and store it at a safe location!
Reference for internal documents
Internal documents are referenced as @embedded in the PDoc Manager. Open your PDoc Manager and look at the column “Origin” after having created a few internal documents.
ATLAS.ti 6 USER MANUAL
Figure 57: Save the content of the newly created internal document and quit edit mode

SETTING UP A NEW PROJECT 120
Project Transfer
Simply copy the HU file and move it to a different location. As your data is now assigned as internal document, there is only one single file that contains your entire project.
Project Backup
Create a copy of the HU file.
Benefits
• The project is a single file as no external documents are used. As the content is pasted into the new internal ATLAS.ti document rather than directly imported from Word, file size is reduced. The size of the HU file including internal documents is much smaller than the sum of the original Word files.
• It is easy to backup, copy, migrate, or delete the project using Windows file functions.
• Data protection: If sensitive documents are part of the HU, they are stored securely within the HU file. Since this file is highly compressed, the documents become fairly unreadable outside ATLAS.ti. Unauthorized access within ATLAS.ti can be prevented by a password protecting the HU.
Drawbacks
• Increased loading and storage times and an increased demand for computer memory, as the HU gets larger.
• When using this setup for a team project, the embedded documents should not be modified after the MASTER HU has been distributed to all team members.
ATLAS.ti 6 USER MANUAL
Figure 58: Path reference for internal documents

SETTING UP A NEW PROJECT 121
Modifying the Project Setup
Optimizing PathsIn case you read the instructions on the HUPATH setup too late or you want to optimize the setup of an already existing project, it is possible to turn absolute path references into special path references.
The option “Optimize Paths” does two things at the same time:
• Translates a path into the HU or TBPATH if possible. As both options are more flexible than an absolute path reference.
• Replaces an invalid path that was redirected with its mapped path, making this redirection obsolete.
Only those PDs with accessible data sources are included in the path optimization.
“Optimize Path” can be applied to all or a selection of PDs. If you select the option DOCUMENTS / DATA SOURCE MANAGEMENT / OPTIMIZE PATHS from the main menu, optimization for all PDs is initiated. When using the equivalent option offered in the PD Manager, only the currently selected PDs are optimized.
Changing Absolute Path References to the HUPATHBefore you open ATLAS.ti, you need to move your documents in the Windows File Manager:
Either move all documents + the HU file into one common folder, or move the HU file into the main folder on the top level if you store your documents in sub folders. If documents have been edited, make sure that all log files stay together with their source files in the same folder (see “Editing PrimaryDocuments“ on page 136 for further detail).
Then open ATLAS.ti and briefly check whether you can load all documents. Even before optimizing paths, ATLAS.ti should be able to access all documents. If there is a problem, create an accessibility report (DOCUMENTS / DATA SOURCE MANAGEMENT / ACCESSIBILITY REPORT). The accessibility report indicates the potential cause of the problem (see “Troubleshooting“ on page 433). Fix the problem before you continue with path optimization.
Next, select DOCUMENTS / DATA SOURCE MANAGEMENT / OPTIMIZE PATHS from the main menu.
ATLAS.ti goes through all documents and exchanges path references if a more optimal solution is possible.
ATLAS.ti 6 USER MANUAL
Data sources must be accessible for the Optimize Path procedure

SETTING UP A NEW PROJECT 122
Open the Primary Document Manager and look at the column “Origin”. You should now see the entry <HUPATH> in front of each document if the optimization process was successful.
Changing Absolute Path References to the TBPATH
The same principles work for documents stored in the TBPATH hierarchy. This means you store your data either directly in the Textbank Folder (not recommended) or in subfolders within the Texbank Folder (recommended). The HU file is stored at a different location; this can be anywhere.
To access the Textbank Folder, select EXTRAS / EXPLORER / TEXTBANK FOLDER.
To set the location for the Textbank Folder, select EXTRAS / PREFERENCES / GENERAL PREFERENCES, tab: Paths Textbank Paths→ .
Adjusting ReferencesThe very concept of external references assumes that the locations of data source files are not changed after they have been assigned to the HU. However, some situations make it necessary to update invalid references to PDs.
Redirection of hanging references becomes an issue when an existing project needs to be adapted to an altered environment (computer or network) or if such a modification is in preparation.
"System modifications" are fairly common occurrences, such as moving folders to disks with more available space, or moving to a new computer altogether. From your project’s view, this is also a modification. These cases are similar in that (absolute) paths to documents, which worked well before, now no longer point to the correct document files. It now becomes necessary to give these projects a little help in finding all their documents.
Two Ways to Adjust References
Redirection (Mapping paths): Dynamically uses an alternate path for one, many, or all documents when needed.
Change Path: Permanently changes the path reference to the document for each PD that needs it.
The change path option changes the external reference that is used by ATLAS.ti to access a data source file permanently. The redirection option, in comparison, creates additional alternatives, leaving the original reference untouched. Based on these differences, the two options can be used for different purposes:
Use the change path option to do the following:
• To move the data source for a PD to a different location on your computer.
• To modify the path for a single or only a few PDs after documents have been moved.
• To change the name of a data source file reference.
Use the redirection option for the following purposes:
ATLAS.ti 6 USER MANUAL

SETTING UP A NEW PROJECT 123
• To create alternative access routes to your data source files if the location has changed for many or all of your PDs. This may occur when a system is restructured.
• To create an alternative access route if a drive that was used to assign PDs (e.g., Z:) is not available on your computer, which may happen after migrating to another computer.
How ATLAS.ti loads Primary Documents
If a document cannot be found under its original reference (file name and path), two procedures are initiated: first “Path Mapping” is tried, then “Fallback.”
• If a PD’s data source cannot be loaded, ATLAS.ti inspects the mapping file to find a valid substitution for the path that is causing the error.
• If a mapping file is found, and a mapping exists for the original path, the program tries to load the file from an alternative path.
• If this does not produce a valid path, then the fallback paths are checked, which are the HUPATH or the TBPATH.
• If even this last attempt to load the file fails, you will see an error message.
A "redirected" PD is indicated as such in the status bar at the bottom of the screen.
Redirection is also displayed in the Document Manager’s Location column. It shows where a data source file was actually found:
In the above example, the file “Observational notes.rtf” was assigned using an absolute path references: C:\Users\...etc.. This was later changed. This file and the HU file were moved into a common folder. Therefore, the file can now be access via the HUPATH.
If selecting the optimize paths option, the reference shown in the column “Origin” will be changed to <HUPATH>.
Redirection should be used with some caution, because every additional alternative to find a matching document increases the probability that you will actually end up accessing the wrong document: same name, different folder, and different revision. This is a problem if you have edited a document and saved various versions in different locations. You should try to make sure that
ATLAS.ti 6 USER MANUAL
Figure 59: Entry in the status bar if a file is redirected
Figure 60: Redirected path information in the Primary Document Manager

SETTING UP A NEW PROJECT 124
older documents are not accidentally and erroneously referenced because of too many mapping alternatives. A much safer way to handle references is to change the original reference to match the actual location, in other words: CHANGE PATH.
Path MappingPath mapping works as follows:
A precondition is that the user has defined path mappings using the mapping tool described below. If a document reference cannot be resolved, ATLAS.ti looks into the mapping table for optional replacement paths for the one that does not work. More than one replacement path can match a single path. All replacement paths are tried in the order they were defined. If a valid replacement is found, it will be used.
Mapping affects the complete hierarchy below the map entry. For instance, if an invalid path z:\tb\ is mapped to c:\textbank\, path z:\tb\projectX\ and then path c:\textbank\projectX would be tried in addition unless a more restrictive mapping precedes this entry.
How to create path mappings
From the menu (HU Editor or Document Manager), select DOCUMENTS / DATA SOURCE MANAGEMENT / EDIT PRIMARY-DOCUMENT MAPPINGS.
The Path Map Editor opens:
ATLAS.ti 6 USER MANUAL
If you can avoid Path Mapping altogether – great! But there are a few situations where it might be necessary.

SETTING UP A NEW PROJECT 125
The figure above shows a mapping example for pathZ:\My files\ATLASti project data\.
With this mapping, the documents:
Z:\My files\ATLASti project data\interview_3.rtf and
Z:\My files\ATLASti project data\Special\interview_4.rtf
would also be assumed at:
H:\My files\ATLASti project data\interview_3.rtf and
H:\My files\ATLASti project data\Special\interview_4.rtf
in case they are not accessible at their original location.
It is possible to define more than one replacement alternative for a given path. However, we strongly advise against making use of such multi-mappings! As we have already pointed out, chances of accessing a wrong document with the same name increase with multiple alternatives.
To enter a path to be mapped:
Into the ‘From:’ entry field on the left side of the Path Map Editor, type in either the full path, select a path from the drop-down list, or click on the file browser symbol. Generally, useful options (non-accessible paths used in the current HU) are already offered in the drop-down list.
Once a path is entered or selected, click on the Add Path button. The path will be added to the list of currently mapped paths.
Now enter (or choose from the drop-down) a replacement path into the ‘To:’ field on the right side of the Path Map Editor in the same fashion:
ATLAS.ti 6 USER MANUAL
Figure 61: Primary Documens Path Mapping Editor

SETTING UP A NEW PROJECT 126
Click on the Add Path button.
Repeat steps 3 to 6 for every path to be mapped.
Press Apply or Apply & Close to store and activate the new mapping(s).
Redirection: Fallback
A “fallback” path is used when a mapping does not exist or a valid path cannot be found. In addition, the fallback option must be switched on in the Path Map Editor.
The HUPATH is searched first, and if the document cannot be found, it looks into the TBPATH.
Change Paths for one PD at a timeUsing the “Change Path” option, you can modify the reference of a single PD in a specific HU to its data source. You can modify the path, the file name, or both. Furthermore, the special path can be changed, or an absolute path can be replaced by a special path, if appropriate.
If you change the path for a perfectly accessible document, ATLAS.ti “thinks” that you want to move this document to a new location. Change Path is the best option to do this. But use caution: you are changing conditions for a specific HU. In case you use Change Path to move a document that is also assigned in other HUs, this document will no longer be found. In such multi-project settings, path mapping, which affects ALL HUs and all of their PDs (of the current user), may be the preferred option.
In the Primary Document Manager, select the PD whose reference should be changed.
Right click and select DATA SOURCE MANAGEMENT / CHANGE PATH from the context menu. If you attempt to change the path for an accessible document, a warning will pop up.
The Change Path dialog opens with the current path displayed.
The drop-down list to the left shows the current reference type, here:Absolute. Click on the down arrow to change to TBPATH or HUPATH if necessary.
ATLAS.ti 6 USER MANUAL
Figure 62: Change path dialog

SETTING UP A NEW PROJECT 127
The field to the right displays the documents path name relative to the reference type. You can now enter a new file name or path name. Alternatively, you can use the Browse button to select a new location (using the previous file name). Hold down the Ctrl-key if you prefer a file browser to select the new file to be used.
If you are happy with the result, close this dialog by clicking OK.
If a valid document was detected at the old location, another dialog box asks for confirmation to move the file reference from its current location to the new location.
If you click Yes, the file is moved and the PD’s reference is updated accordingly.
If you click No, the reference is changed but the file is not moved (do this, for example, if there already is a valid file in the target folder). If you click Cancel, you are back in the Change Path dialog box.
You can cancel the procedure at any time by clicking the Cancel button.
You must save the HU to make these changes permanent.
Turning External into Internal DocumentsYou may want to consider this possibility when you already work on a smaller project only containing textual documents and you do no longer want to deal with external files, or if you have assigned doc or docx files and you found out too late that you cannot edit these files. Turning them into internal documents creates an editable version of these files. All coding done so far is transferred as well.
And this is how it works:
Create an internal document for every document that you want to convert (DOCUMENTS / ASSIGN / NEW TEXT DOCUMENT)
Then load a primary document that you want to convert. Highlight the entire text (Ctrl+A) and copy the entire text (Ctrl+C).
Load the new internal file and enter into edit mode by clicking on the Edit button.
Paste the text into new internal document (Ctrl+V). The coding is transferred to the new document as well.
Save the document and leave edit mode.
Repeat this process for all documents that you want to convert.
Disconnect all documents that are now converted into internal files (Right click on the document in the Primary Document Manager and select DISCONNECT from the context menu, or click on the Disconnect button).
Save the HU (FILE / SAVE).
ATLAS.ti 6 USER MANUAL