setting up a wireless network with the plwk400ecx.images-amazon.com/images/i/91k2j0qlcas.pdf ·...
TRANSCRIPT

Setting up a wireless network with the
PLWK400
Powerline networking is a way to extend your network using the electrical outlets in your
house. This works by adding a powerline adapter to your network. Setting up a powerline
network requires a set of powerline adapters plugged into each electrical outlet where the
network extension is needed.
The Linksys PLWK400 consists of the PLE400 Powerline 1-port Fast Ethernet and PLW400
Powerline AV Wireless Network Extender that lets you easily set up a powerline network in
your home. This article will guide you on how to create a network using your powerline
adapters.
IMPORTANT: To set up your powerline network, you should:
• Make sure you already have Internet access and a working home network.
• Make sure that the wireless devices that you want to connect to the PLW400 have a
working wireless feature. An easy way to test this is to first try to connect it to your wireless
router.
Basic powerline network
Creating a basic powerline network is now made possible using your plug and play powerline
adapters. This setup assumes that all the devices are located on the same floor of your house and
that you have an active Internet connection.
QUICK TIP: PLW400 is a wireless powerline adapter that will allow you to connect wireless
computers and devices to your existing powerline network.
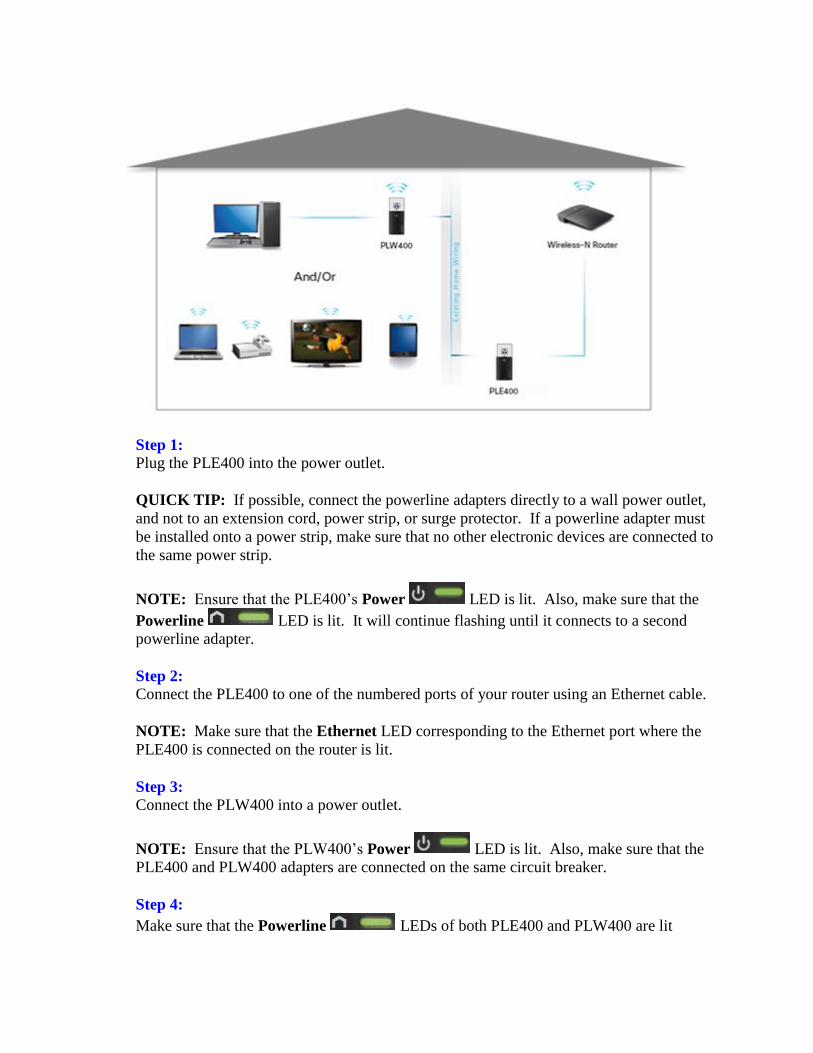
Step 1: Plug the PLE400 into the power outlet.
QUICK TIP: If possible, connect the powerline adapters directly to a wall power outlet,
and not to an extension cord, power strip, or surge protector. If a powerline adapter must
be installed onto a power strip, make sure that no other electronic devices are connected to
the same power strip.
NOTE: Ensure that the PLE400’s Power LED is lit. Also, make sure that the
Powerline LED is lit. It will continue flashing until it connects to a second
powerline adapter.
Step 2: Connect the PLE400 to one of the numbered ports of your router using an Ethernet cable.
NOTE: Make sure that the Ethernet LED corresponding to the Ethernet port where the
PLE400 is connected on the router is lit.
Step 3: Connect the PLW400 into a power outlet.
NOTE: Ensure that the PLW400’s Power LED is lit. Also, make sure that the
PLE400 and PLW400 adapters are connected on the same circuit breaker.
Step 4:
Make sure that the Powerline LEDs of both PLE400 and PLW400 are lit
solidly. This indicates that the connection between the powerline adapters has been
established. If one of the Powerline LEDs is not lit, click here.
Step 5: Connect the PLW400 to the router wirelessly. For detailed instructions, click here.
Step 6: Connect your wireless devices to the PLW400.
QUICK TIP: If possible, position the PLW400 near the wireless devices that you want
to connect. Also, avoid obstructions such as metal file cabinets, mirrors, and thick walls
between the PLW400 and any wireless device that you want to connect to avoid
connection problems.
You should have successfully set up a wireless network with the PLWK400 now.
PLW400 Frequently Asked Questions
TABLE OF CONTENTS
HARDWARE INFORMATION
1. What is the PLW400?
2. What is the warranty period of the PLW400?
3. What are the minimum requirements to support PLW400?
4. How can I tell if the two (2) AC Power Jacks are on the same circuit?
SECURITY SUPPORTED
1. How do I configure each network adapter with advanced security?
LEDs
1. What LEDs does the PLW400 Powerline adapter have?
2. What colors are the LEDs and what do they mean?
PORTS AND BUTTONS
1. What ports and buttons does the PLW400 Powerline adapter have?
TROUBLESHOOTING
1. How do I connect my PLW400?
2. What should I do if none of the LEDs turned on after I installed the Powerline adapter?
3. What should I do if the Ethernet LED does not turn ON after I connected a wired
device to the powerline adapter?
4. What should I do if I cannot connect to other computers on my local network or to the
Internet?
5. What does it mean if the LEDs are flashing on my PLW400?
FIRMWARE UPGRADE METHOD
1. How do I upgrade the firmware on the PLW400?
SPECIAL FEATURES
1. What is the transfer rate of the PLW400?
2. Does the PLW400 have a web-based setup page?
3. Does the PLW400 support TCP/IP for standard routers?
4. What is the internal power supply used by the PLW400?
HARDWARE INFORMATION
1. What is the PLW400?
The PLW400 is a Powerline 1-Port Fast Ethernet Network Adapter and Access point in one
device. This adapter provides easy setup and lets you connect wireless networking devices to
your powerline network.
2. What is the warranty period of the PLW400?
The warranty period is dependent on the country of purchase.
3. What are the minimum requirements to support PLW400?
A computer or other device with Ethernet adapter
Available AC power jack on the same circuit
Other Powerline AV enabled Device
4. How can I tell if the two (2) AC Power Jacks are on the same circuit?
NOTE: Make sure first that the PLW400 is configured on the same power jack as the rest of the
Powerline equipments.
After configuring the PLW400 on one power jack, move it to another power jack you would like
to use. If the Powerline LED lights up, then it is on the same circuit and should work fine. If the
LED does not light, try other nearby power jacks.
SECURITY SUPPORTED
1. How do I configure each network adapter with advanced security?
Step 1: On the first adapter, press and hold the HomePlug Simple Connect button for at least one
(1) second until the Powerline LED begins flashing slowly. This means that the adapter
creates a new network key for the Powerline network.
Step 2: On each of the other adapters, press and hold the HomePlug Simple Connect button for at
least one (1) second, until the Powerline LED begins flashing slowly. When the LED
stops flashing, it is an indication that the new network key has been shared with that
adapter.
LEDs
1. What LEDs does the PLW400 Powerline adapter have?
The PLW400 has Powerline, Ethernet, Wireless, Wi-Fi Protected Setup™ (WPS) and Power
LEDs.
2. What colors are the LEDs and what do they mean?
Powerline LED - turns ON when the adapter is connected to the Powerline network. The
LED flashes to indicate network activity.
Ethernet LED - turns on when a wired network device is turned on and connected to the
adapter’s Ethernet (network) port. The LED flashes to indicate network activity.
Wireless LED - turns on when a wireless network device is connected to your PLW400.
Wi-Fi Protected Setup™ LED - flashes while a wireless network device is connecting
with your PLW400 using Wi-Fi Protected Setup™.
Power LED - turns on when the adapter is connected to a powered electrical outlet.
PORTS AND BUTTONS
1. What ports and buttons does the PLW400 Powerline adapter have?
Ethernet port - This Ethernet port connects a computer or another networking device to
the PLW400.
Reset button – Restores your powerline adapter to factory defaults. To do this, press and
hold the Reset button for at least 10 seconds using a pin or a pointed object.
HomePlug Simple Connect button - Configures advanced security (the network
password) for your powerline network.
Wi-fi Protected Setup™ button - connect with other wireless network devices that have
a Wi-Fi Protected Setup™ button.
TROUBLESHOOTING
1. How do I connect my PLW400?
IMPORTANT: Before proceeding, make sure that the power switch on the right side is set to I
(ON). If your home network already has security set up (recommended):
Step 1: Connect the PLW400 to a power outlet near your main wireless router.
Step 2: On the PLW400, press and hold the Wi-Fi Protected Setup™ button at least one (1)
second, until the WPS LED flashes.
Step 3: On your wireless router, press the Wi-Fi Protected Setup™ button for two (2)
minutes. The PLW400 retrieves the security settings from the router and connects to your
wireless network.
Step 4: Move your PLW400 to a power outlet near the wireless network device(s) you want to
connect. Typically, this area is not covered well by your home’s wireless network
router. The Powerline LED flashes, and then stays solid when the connection to the rest
of the Powerline network is finished. Your home’s wireless network is now available in
the area surrounding the PLW400.
Step 5: Connect the wireless network device to the wireless network in the usual manner. For
instructions, see your wireless network device’s user documentation. The PLW400’s
Wireless LED flashes, and then stays solid when a wireless network device successfully
connects.
2. What should I do if none of the LEDs turned on after I installed the Powerline adapter?
Step 1: Disconnect the adapter from the power outlet.
Step 2: Disconnect the Ethernet cable from the adapter.
Step 3: Wait five (5) seconds.
Step 4: Re-connect the Ethernet cable to the adapter.
Step 5: Re-connect the adapter to the power outlet.
NOTE: If this solution does not work, make sure that the electrical outlet is working
properly. Plug a different device into the power outlet, and try to switch it on.
3. What should I do if the Ethernet LED does not turn ON after I connected a wired device
to the powerline adapter?
When the Ethernet port detects a local network connection, the Ethernet LED should turn ON. If
it does not, do the following:
Make sure that the Ethernet cable is securely connected to the adapter.
Make sure that the Ethernet cable is securely connected to the computer or other network
device.
Make sure that the Ethernet adapter on your computer is working properly.
4. What should I do if I cannot connect to other computers on my local network or to the
Internet?
If you did not set up advanced security for the Powerline network, follow these instructions:
Step 1: Locate the Powerline adapter connected to the computer that cannot connect.
Step 2: On the right side of the adapter, use a pointed object to press and hold the Standby/Reset
button for at least ten seconds. This resets the adapter to its factory default settings.
If you have set up advanced security for the Powerline network, check the following:
1. Make sure all adapters on the Powerline network have been configured with the same
network password. The network password must be identical in order for them to
communicate with each other.
2. If you are adding a new adapter to a pre-existing Powerline network with a unique
network password.
5. What does it mean if the LEDs are flashing on my PLW400?
Refer to the following LED behavior to help diagnose the problem:
POWERLINE:
Off- Not connected to Powerline network
Flashing fast- Send/Receive data
Flashing slow- Pairing
Solid- Connected to Powerline network
ETHERNET:
Off- Not connected to Ethernet network
Flashing- Send/Receive data
Solid- Connected to Ethernet network
POWER:
Off- Device power off
Solid- Device power on and ready
Flashing fast momentarily- Factory default, Device wakeup from standby mode
Flashing fast indefinitely- Pairing error/system error
Flashing slow- Device in standby mode
WIRELESS:
Off- The Wireless LED lights off when the wireless feature is disabled
Solid- The Wireless LED lights up when the wireless feature is enabled
Flashing- Send/Receive data
WI-FI PROTECTED SETUP™:
Off- The WPS LED lights off when the WPS feature is disabled
Solid- this LED flashes while a wireless network device is connecting with your PLW400
using Wi-Fi Protected Setup™
Flashing- The LED flashes when a WPS session is active
FIRMWARE UPGRADE METHOD
1. How do I upgrade the firmware on the PLW400?
There are two (2) ways to upgrade the firmware of your powerline adapter:
Using the Linksys Powerline AV Utility - Launch the utility and under Network Status
tab, select PLW400. Go to the Administration tab then click on the Upgrade button
under Firmware Upgrade.
Using the web-based set-up page - Access the web-based setup page and go to
Administration tab > Firmware Upgrade sub-tab. Click on the Browse button and
look for the firmware file you have downloaded then click the Start Upgrade button.
SPECIAL FEATURES
1. What is the transfer rate of the PLW400?

The transfer rate is 200 mbps at physical layer, and it supports the 802.11b, 802.11g or 802.11n
standard wireless clients.
2. Does the PLW400 have a web-based setup page?
Yes.
3. Does the PLW400 support TCP/IP for standard routers?
Yes.
4. What is the internal power supply used by the PLW400?
100-240V AC/ 50-60 Hz.
Installing the PLW400
Powerline networking is a way to extend your network using the electrical outlets in your
house. This works by adding a Powerline adapter to your network. Setting up a Powerline
network requires a set of Powerline adapters plugged into each electrical outlet where the
network extension is needed.
The PLW400 is a Powerline 1-Port Fast Ethernet Network Adapter and Access point in one
device. You can connect one (1) wired device and several wireless devices to it. Follow the
steps below to install your PLW400.
IMPORTANT: Before setting up your PLW400, you should do the following:
Make sure you already have Internet access and a working home Powerline
network. Make sure that the wireless devices that you want to connect to the PLW400
have a working wireless feature. An easy way to test this is to first try to connect the
wireless network device to your home’s wireless router while near the router.
There are two (2) ways in installing your PLW400:
Using Wi-Fi Protected SetupTM (WPS)
Using advanced security
Using Wi-Fi Protected SetupTM (WPS)
This configuration is recommended if your home network has a security already set up or if your
router has a Wi-Fi Protected SetupTM (WPS) feature.
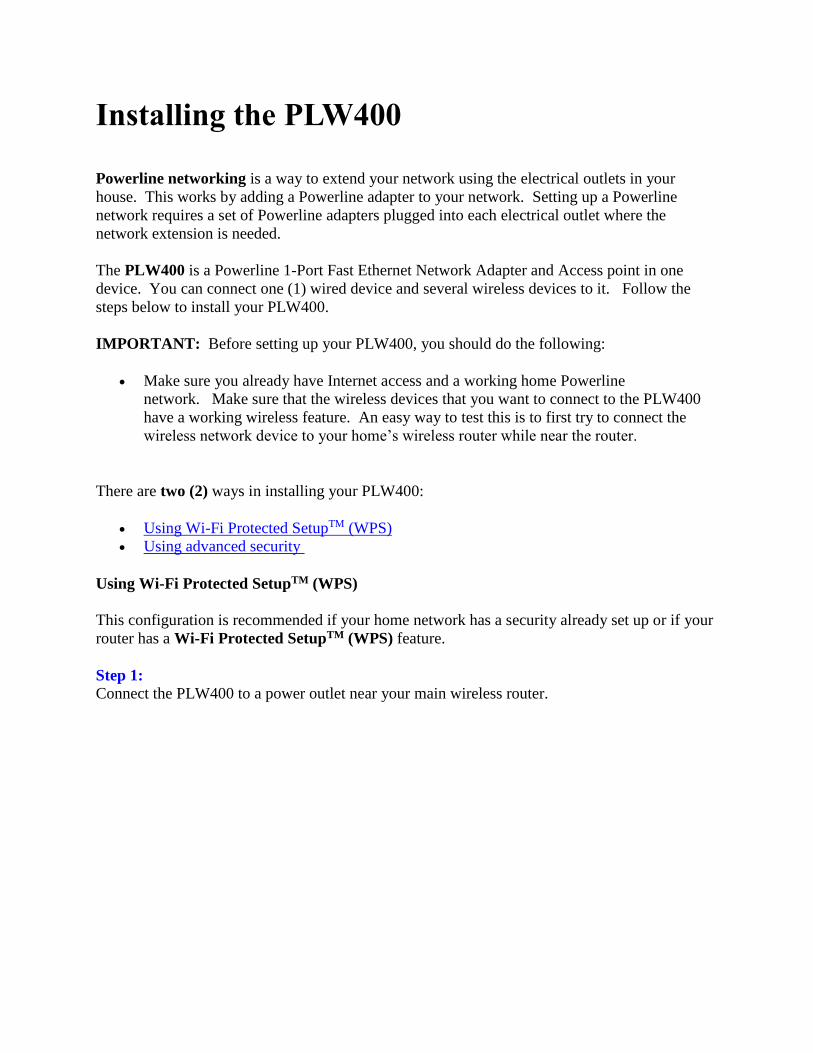
Step 1: Connect the PLW400 to a power outlet near your main wireless router.
NOTE: Make sure that the power switch on the right side is set to I (ON).
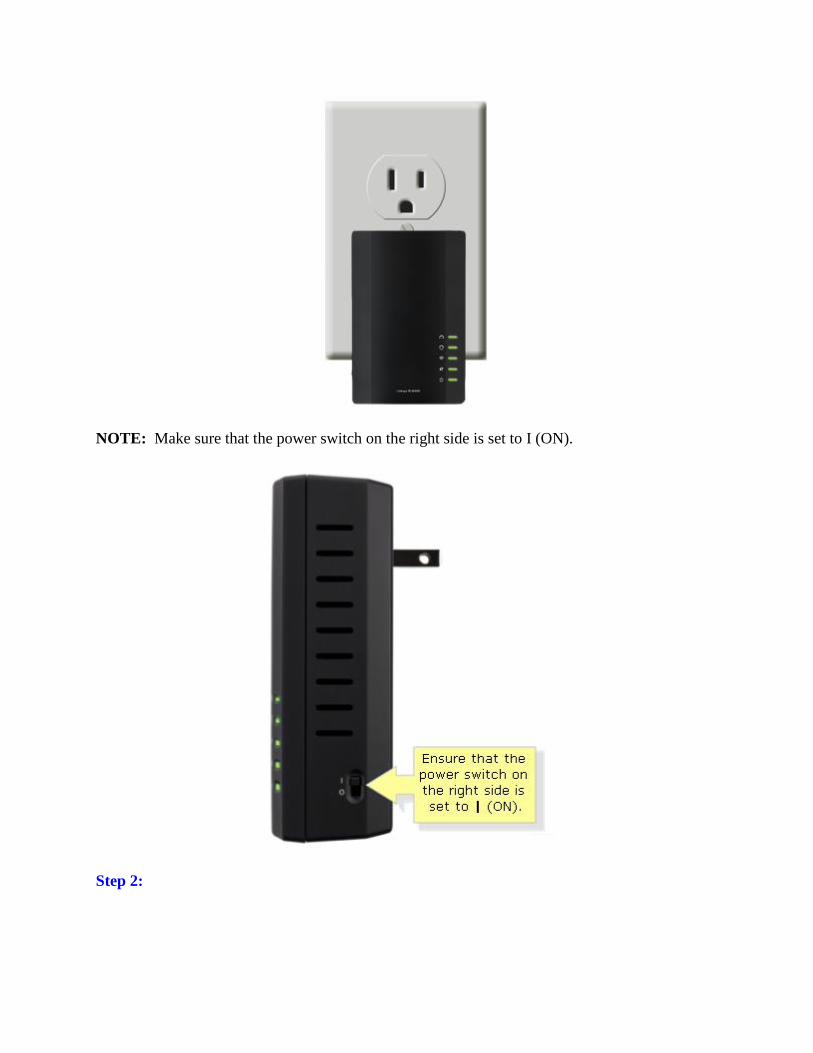
Step 2:
On the PLW400, press and hold the Wi-Fi Protected SetupTM button for at least one
(1) second, until the Wi-Fi Protected SetupTM LED flashes.
Step 3:
Within two (2) minutes, press the Wi-Fi Protected SetupTM button on your wireless
router. The PLW400 retrieves the security settings from the router and connects to your wireless
network.
NOTE: It is important to check your router’s wireless settings on the web-based based setup
page as the previous settings of your router may change once you press the Wi-Fi Protected
SetupTM button.

NOTE: The location of the Wi-Fi Protected SetupTM button may vary depending on the
router model.
Step 4: Move your PLW400 to a power outlet near the wireless network device(s) you want to
connect. Typically, this area is not covered well by your home’s wireless network router.
NOTE: The Powerline LED flashes, and then stays on when the connection to the
rest of the Powerline network is finished. Your home’s wireless network is now available in the
area surrounding the PLW400.
Step 5: Connect your wireless network device to the wireless network in the usual manner. For
instructions, see your wireless network device’s user documentation.
QUICK TIP: The PLW400’s Wireless LED flashes, and then stays on when a
wireless network device successfully connects to your network.
NOTE: If you’re having difficulty connecting the adapters using Wi-Fi Protected SetupTM, or
if you’d like to set more advanced options, you can use the configuration utility.
Using advanced security
To configure your network adapter with advanced security, follow the steps below:
NOTE: The devices connected to the Powerline adapters will temporarily lose Internet
connection during the security setup.
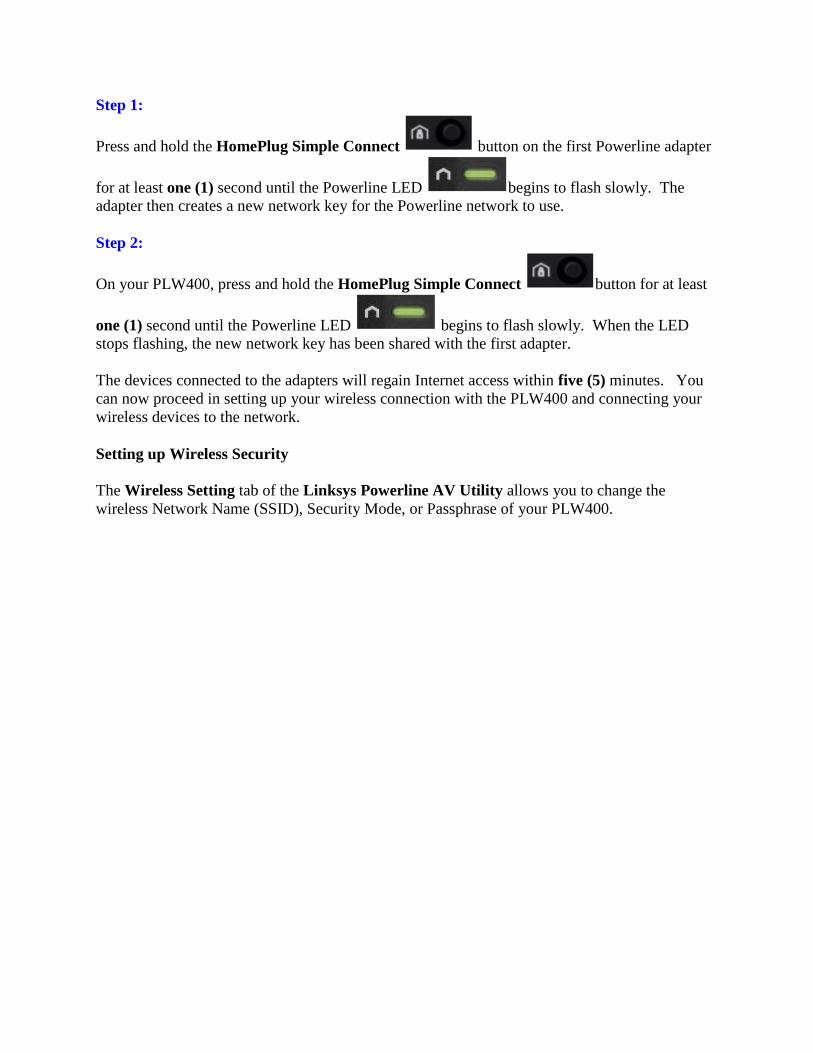
Step 1:
Press and hold the HomePlug Simple Connect button on the first Powerline adapter
for at least one (1) second until the Powerline LED begins to flash slowly. The
adapter then creates a new network key for the Powerline network to use.
Step 2:
On your PLW400, press and hold the HomePlug Simple Connect button for at least
one (1) second until the Powerline LED begins to flash slowly. When the LED
stops flashing, the new network key has been shared with the first adapter.
The devices connected to the adapters will regain Internet access within five (5) minutes. You
can now proceed in setting up your wireless connection with the PLW400 and connecting your
wireless devices to the network.
Setting up Wireless Security
The Wireless Setting tab of the Linksys Powerline AV Utility allows you to change the
wireless Network Name (SSID), Security Mode, or Passphrase of your PLW400.

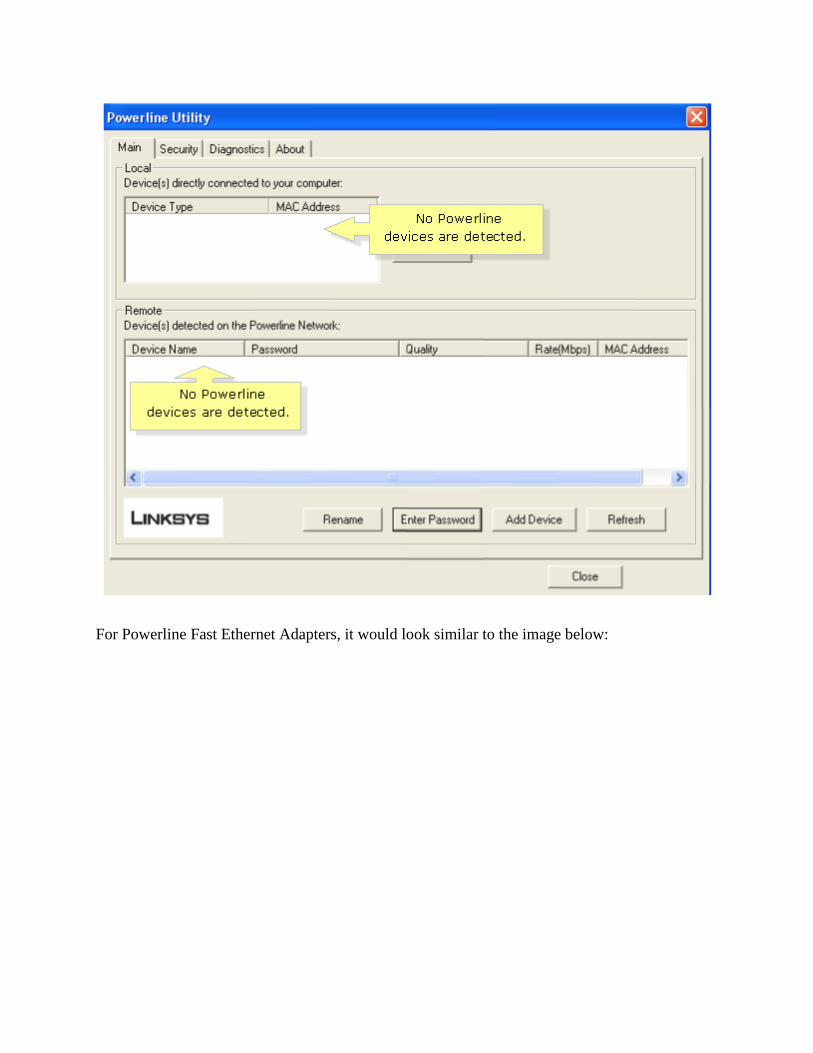
You will know if a Powerline adapter is not detected in the Powerline network if the HomePlug
LED on your Powerline adapter is OFF and if there’s no device that will show up on the
Powerline Utility just like in the image below:
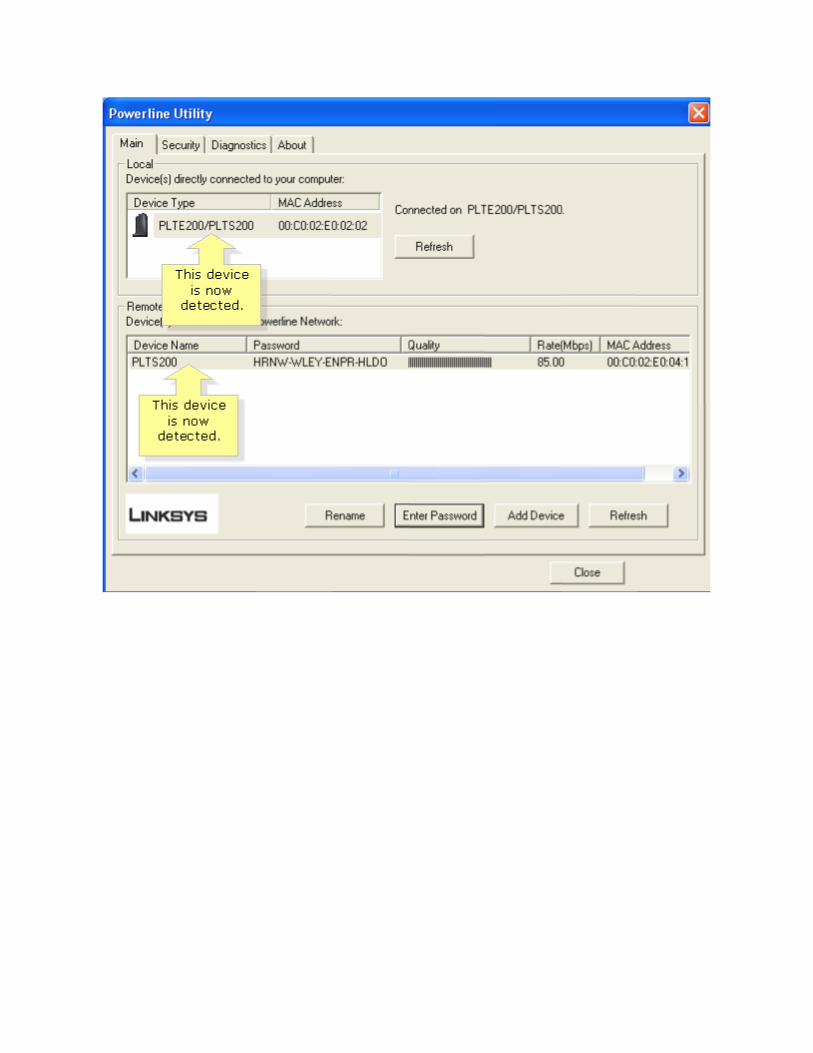
For Powerline Fast Ethernet Adapters, it would look similar to the image below:

For Powerline Gigabit Ethernet Adapters, this is how it would look like:
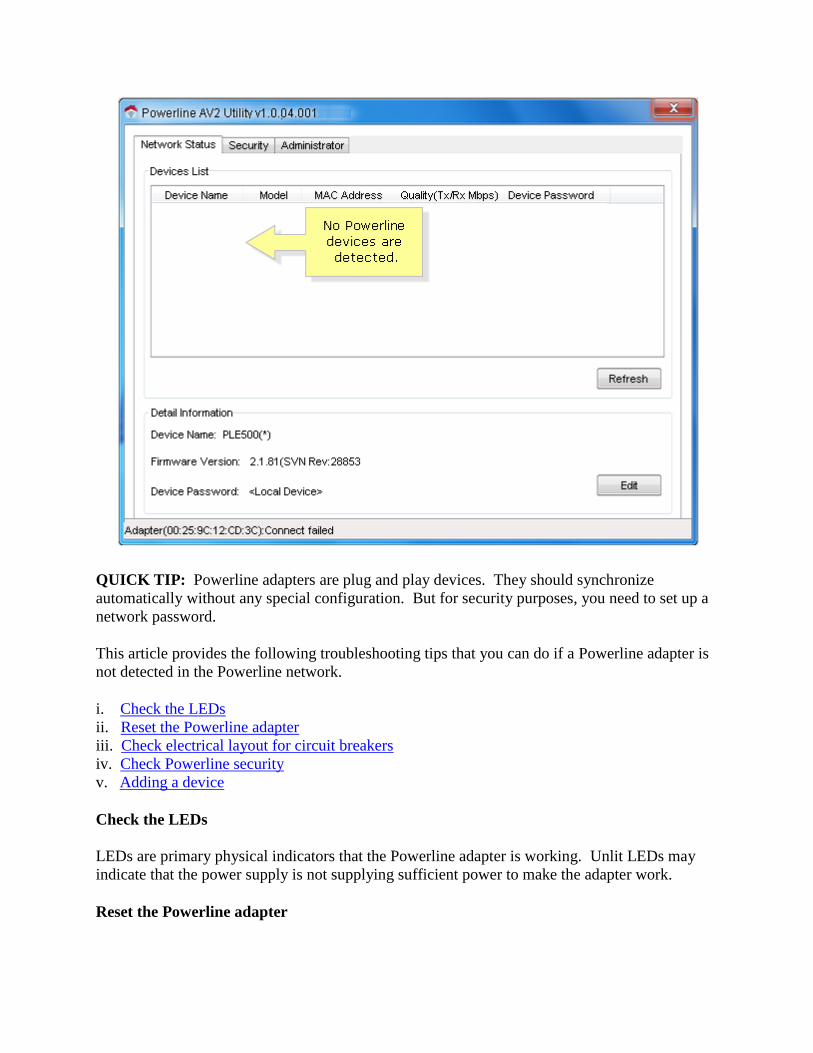
QUICK TIP: Powerline adapters are plug and play devices. They should synchronize
automatically without any special configuration. But for security purposes, you need to set up a
network password.
This article provides the following troubleshooting tips that you can do if a Powerline adapter is
not detected in the Powerline network.
i. Check the LEDs
ii. Reset the Powerline adapter
iii. Check electrical layout for circuit breakers
iv. Check Powerline security
v. Adding a device
Check the LEDs
LEDs are primary physical indicators that the Powerline adapter is working. Unlit LEDs may
indicate that the power supply is not supplying sufficient power to make the adapter work.
Reset the Powerline adapter
A Powerline adapter may need to be reset in order to be detected by other Powerline adapters in
the Powerline network. To do this, press and hold the Standby/Reset button , which is
located at the bottom or side of the Powerline adapter, for at least 10 seconds using a pin or a
pointed object.
Check electrical layout for circuit breakers
Ensure that the electrical outlets where the Powerline adapters get their connection belong to the
same circuit breaker. Otherwise, your Powerline adapters will NOT be able to communicate
with each other.
QUICK TIP: Refer to your building’s electrical layout to know if your power outlets belong to
the same circuit breaker.
NOTE: If possible, connect each Powerline adapter directly to a wall power outlet, and not to
an extension cord, power strip, or surge protector. If a Powerline adapter must be installed on a
power strip, make sure that no other electronic devices are connected to the same power strip.
Check Powerline security
Make sure that all devices on the Powerline network have been configured with the same
Network Password. The Network Password of all devices must be identical in order for them to
communicate with each other.
NOTE: If your Powerline network is not yet secured, set up the security on the Powerline
Utility of Powerline Ethernet Adapters
To check the Powerline security:
Step 1: Access the Powerline Utility by clicking Start > All Programs > Linksys > Powerline
Utility.
Step 2: Click the Security tab and check the Network Password.

Step 3: Check the other devices in the Powerline network. Make sure all adapters are configured
with the same network password. Otherwise, reconfigure them with the same password. .
Adding a device
If the device is not detected, you can manually add the Powerline device to the network using the
Add Device option. Powerline AV Ethernet adapters and Powerline Turbo Bridge adapters have
this option on the Main screen of their Powerline Utility.
To add a device:
Step 1: Access the Powerline Utility by clicking Start > All Programs > Linksys > Powerline
Utility.
Step 2: On the Main tab of the Powerline Utility, click the Add Device button if you want to add

a new Powerline adapter to a pre-existing Powerline network with a unique Network
Password.
Step 3: When the Add Device to Network window appears, enter the Device Name and the
Device Password in their corresponding fields then click Submit.
NOTE: The device password is located at the back of the Powerline adapter, on the label,
under Device Password.

A pop-up window similar to the image below will appear telling you that the device is
already added to your network.

NOTE: The image below shows that the Powerline device has been detected.