setup for microsoft cluster service - vmware.com · monospace used for commands, filenames,...
TRANSCRIPT

Setup for Microsoft Cluster ServiceESX Server 3.0 and VirtualCenter 2.0

You can find the most up-to-date technical documentation at:
http://www.vmware.com/support/pubs
The VMware Web site also provides the latest product updates.
If you have comments about this documentation, submit your feedback to:
© 2006 VMware, Inc. All rights reserved. Protected by one or more of U.S. Patent Nos. 6,397,242, 6,496,847, 6,704,925, 6,711,672, 6,725,289, 6,735,601, 6,785,886, 6,789,156, 6,795,966, 6,880,022, 6,961,941, 6,961,806 and 6,944,699; patents pending.
VMware, the VMware “boxes” logo and design, Virtual SMP and VMotion are registered trademarks or trademarks of VMware, Inc. in the United States and/or other jurisdictions.
All other marks and names mentioned herein may be trademarks of their respective companies.
VMware, Inc.3145 Porter DrivePalo Alto, CA 94304www.vmware.com
ii VMware, Inc.
Setup for Microsoft Cluster ServiceRevision: 20060615Item: VI-ENG-Q206-221

VMware, Inc. iii
Contents
Preface . . . . . . . . . . . . . . . . . . . . . . . . . . . . . . . . . . . . . . . . . . . . . . . . . . . . . . . . . . . . . . . . viiAbout This Book . . . . . . . . . . . . . . . . . . . . . . . . . . . . . . . . . . . . . . . . . . . . . . . . . . . . . viiiIntended Audience . . . . . . . . . . . . . . . . . . . . . . . . . . . . . . . . . . . . . . . . . . . . . . . . . . . viiiDocument Feedback . . . . . . . . . . . . . . . . . . . . . . . . . . . . . . . . . . . . . . . . . . . . . . . . . . viiiVMware Infrastructure Documentation . . . . . . . . . . . . . . . . . . . . . . . . . . . . . . . . . viiiConventions and Abbreviations . . . . . . . . . . . . . . . . . . . . . . . . . . . . . . . . . . . . . . . . . .ix
Abbreviations Used in Graphics . . . . . . . . . . . . . . . . . . . . . . . . . . . . . . . . . . . . . . .ixTechnical Support and Education Resources . . . . . . . . . . . . . . . . . . . . . . . . . . . . . . .ix
Self‐Service Support . . . . . . . . . . . . . . . . . . . . . . . . . . . . . . . . . . . . . . . . . . . . . . . . . . xOnline and Telephone Support . . . . . . . . . . . . . . . . . . . . . . . . . . . . . . . . . . . . . . . . xSupport Offerings . . . . . . . . . . . . . . . . . . . . . . . . . . . . . . . . . . . . . . . . . . . . . . . . . . . . xVMware Education Services . . . . . . . . . . . . . . . . . . . . . . . . . . . . . . . . . . . . . . . . . . . x
Chapter 1 Introduction . . . . . . . . . . . . . . . . . . . . . . . . . . . . . . . . . . . . . . . . . . . . . . . 1What Is Clustering? . . . . . . . . . . . . . . . . . . . . . . . . . . . . . . . . . . . . . . . . . . . . . . . . . . . . 2
Applications That Can Use Clustering . . . . . . . . . . . . . . . . . . . . . . . . . . . . . . . . . . 2Clustering Software . . . . . . . . . . . . . . . . . . . . . . . . . . . . . . . . . . . . . . . . . . . . . . . . . . 2Clustering Hardware . . . . . . . . . . . . . . . . . . . . . . . . . . . . . . . . . . . . . . . . . . . . . . . . . 2Traditional Clustering and VirtualCenter Clustering . . . . . . . . . . . . . . . . . . . . . 3
Clustering Services and Virtual Machines . . . . . . . . . . . . . . . . . . . . . . . . . . . . . . . . . 3Clustering Virtual Machines on a Single Host (Cluster in a Box) . . . . . . . . . . . . 3Clustering Virtual Machines Across Physical Hosts
(Cluster Across Boxes) . . . . . . . . . . . . . . . . . . . . . . . . . . . . . . . . . . . . . . . . . . . . 4Clustering Physical Machines and Virtual Machines (Standby Host) . . . . . . . . 6
Prerequisites . . . . . . . . . . . . . . . . . . . . . . . . . . . . . . . . . . . . . . . . . . . . . . . . . . . . . . . . . . 7Prerequisites for Cluster in a Box . . . . . . . . . . . . . . . . . . . . . . . . . . . . . . . . . . . . . . 7Prerequisites for Clustering Across Boxes . . . . . . . . . . . . . . . . . . . . . . . . . . . . . . . 8Prerequisites for Standby Host Clustering . . . . . . . . . . . . . . . . . . . . . . . . . . . . . . . 8Shared Storage Summary . . . . . . . . . . . . . . . . . . . . . . . . . . . . . . . . . . . . . . . . . . . . . 9
Caveats and Restrictions . . . . . . . . . . . . . . . . . . . . . . . . . . . . . . . . . . . . . . . . . . . . . . . . 9Potential Issues After Setup . . . . . . . . . . . . . . . . . . . . . . . . . . . . . . . . . . . . . . . . . . 10
Adding Disks Before Networking . . . . . . . . . . . . . . . . . . . . . . . . . . . . . . . . . . . . . . . 10Verifying QLogic HBA Settings for MSCS . . . . . . . . . . . . . . . . . . . . . . . . . . . . . . . . 10

Setup for Microsoft Cluster Service
iv VMware, Inc.
Chapter 2 Clustering Virtual Machines on One Physical Host . 13Process Overview . . . . . . . . . . . . . . . . . . . . . . . . . . . . . . . . . . . . . . . . . . . . . . . . . . . . . 14
Task 1: Creating and Customizing the First Node . . . . . . . . . . . . . . . . . . . . . . . 14Task 2: Creating the Second Node . . . . . . . . . . . . . . . . . . . . . . . . . . . . . . . . . . . . . 14Task 3: Adding Storage and Configuring IP Addresses . . . . . . . . . . . . . . . . . . 14Task 4: Installing and Configuring Microsoft Cluster Service . . . . . . . . . . . . . 16
Creating the First Node . . . . . . . . . . . . . . . . . . . . . . . . . . . . . . . . . . . . . . . . . . . . . . . . 17Installing the Guest Operating System . . . . . . . . . . . . . . . . . . . . . . . . . . . . . . . . . 18
Creating the Second Node . . . . . . . . . . . . . . . . . . . . . . . . . . . . . . . . . . . . . . . . . . . . . . 18Adding Hard Disks to Both Nodes . . . . . . . . . . . . . . . . . . . . . . . . . . . . . . . . . . . . . . 19Installing Microsoft Cluster Service . . . . . . . . . . . . . . . . . . . . . . . . . . . . . . . . . . . . . . 21
Chapter 3 Clustering Virtual Machines Across Physical Hosts . 23Process Overview . . . . . . . . . . . . . . . . . . . . . . . . . . . . . . . . . . . . . . . . . . . . . . . . . . . . . 24
Task 1: Creating and Customizing the First Node . . . . . . . . . . . . . . . . . . . . . . . 24Task 2: Creating and Customizing the Second Node . . . . . . . . . . . . . . . . . . . . . 24Task 3: Adding Storage and Configuring IP Addresses . . . . . . . . . . . . . . . . . . 24Task 4: Setting Up Microsoft Cluster Service . . . . . . . . . . . . . . . . . . . . . . . . . . . . 26
Creating the First Node . . . . . . . . . . . . . . . . . . . . . . . . . . . . . . . . . . . . . . . . . . . . . . . . 27Installing the Guest Operating System . . . . . . . . . . . . . . . . . . . . . . . . . . . . . . . . . 27
Creating the Second Node . . . . . . . . . . . . . . . . . . . . . . . . . . . . . . . . . . . . . . . . . . . . . . 28Adding Hard Disks to Both Nodes . . . . . . . . . . . . . . . . . . . . . . . . . . . . . . . . . . . . . . 28Installing and Running Microsoft Cluster Service . . . . . . . . . . . . . . . . . . . . . . . . . . 30
Running Microsoft Cluster Service . . . . . . . . . . . . . . . . . . . . . . . . . . . . . . . . . . . . 30
Chapter 4 Clustering Physical and Virtual Machines . . . . . . . . . . . . 31Process Overview . . . . . . . . . . . . . . . . . . . . . . . . . . . . . . . . . . . . . . . . . . . . . . . . . . . . . 32
Task 1: Creating the First Node (Physical Machine) . . . . . . . . . . . . . . . . . . . . . . 32Task 2: Creating and Customizing the Second Node (Virtual Machine) . . . . . 32Task 3: Setting Up Microsoft Cluster Service . . . . . . . . . . . . . . . . . . . . . . . . . . . . 33Task 4: Creating Additional Physical/Virtual Pairs . . . . . . . . . . . . . . . . . . . . . . 33
Creating the First Node . . . . . . . . . . . . . . . . . . . . . . . . . . . . . . . . . . . . . . . . . . . . . . . . 33Creating the Second Node . . . . . . . . . . . . . . . . . . . . . . . . . . . . . . . . . . . . . . . . . . . . . . 34Installing the Guest Operating System . . . . . . . . . . . . . . . . . . . . . . . . . . . . . . . . . . . 35Installing Microsoft Cluster Service . . . . . . . . . . . . . . . . . . . . . . . . . . . . . . . . . . . . . . 35Running Microsoft Cluster Service . . . . . . . . . . . . . . . . . . . . . . . . . . . . . . . . . . . . . . 36
VMware, Inc. v
Contents
Chapter 5 Upgrading Clustered Virtual Machines . . . . . . . . . . . . . . . 37Overview . . . . . . . . . . . . . . . . . . . . . . . . . . . . . . . . . . . . . . . . . . . . . . . . . . . . . . . . . . . . 38Upgrading Cluster in a Box . . . . . . . . . . . . . . . . . . . . . . . . . . . . . . . . . . . . . . . . . . . . . 38
Upgrading CIB: Shared RDMs and Boot Disks in Separate VMFS Volumes . 38Upgrading CIB: RDMs and Boot Disks in Same VMFS Volume . . . . . . . . . . . 39
Upgrading Cluster Across Boxes . . . . . . . . . . . . . . . . . . . . . . . . . . . . . . . . . . . . . . . . 40Using Shared Pass‐through RDMs . . . . . . . . . . . . . . . . . . . . . . . . . . . . . . . . . . . . 41Using Files in Shared VMFS‐2 Volumes . . . . . . . . . . . . . . . . . . . . . . . . . . . . . . . . 41
Upgrading Clusters Using Physical to Virtual Clustering . . . . . . . . . . . . . . . . . . . 42
Appendix A Setup Checklist . . . . . . . . . . . . . . . . . . . . . . . . . . . . . . . . . . . . . . . 43
Index . . . . . . . . . . . . . . . . . . . . . . . . . . . . . . . . . . . . . . . . . . . . . . . . . . . . . . . . . . . . . . . . . . 47
Setup for Microsoft Cluster Service
vi VMware, Inc.

VMware, Inc. vii
Preface
This preface describes the contents of Setup for Microsoft Cluster Service and provides pointers to technical and educational resources.
This preface discusses the following topics:
! �About This Book� on page viii
! �Intended Audience� on page viii
! �Document Feedback� on page viii
! �VMware Infrastructure Documentation� on page viii
! �Conventions and Abbreviations� on page ix
! �Technical Support and Education Resources� on page ix
Setup for Microsoft Cluster Service
viii VMware, Inc.
About This BookThis manual, Setup for Microsoft Cluster Service, first discusses the types of clusters you can implement using Microsoft Cluster Service in conjunction with virtual machines. It then gives prerequisites and step‐by‐step instructions for each type of cluster, and concludes with a checklist.
Intended AudienceThe information presented in this manual is written for system administrators who are familiar with both VMware technology and Microsoft Cluster Service. See �VMware Infrastructure Documentation� for information on VMware Infrastructure.
NOTE This is not a guide to using Microsoft Cluster Service. Use your Microsoft documentation for information on installation and configuration of Microsoft Cluster Service.
Document Feedback If you have comments about this documentation, submit your feedback to:
VMware Infrastructure DocumentationThe VMware Infrastructure documentation consists of the combined VirtualCenter and ESX Server documentation set.
You can access the books in the VMware Infrastructure document set at:
http://www.vmware.com/support/pubs
VMware, Inc. ix
Preface
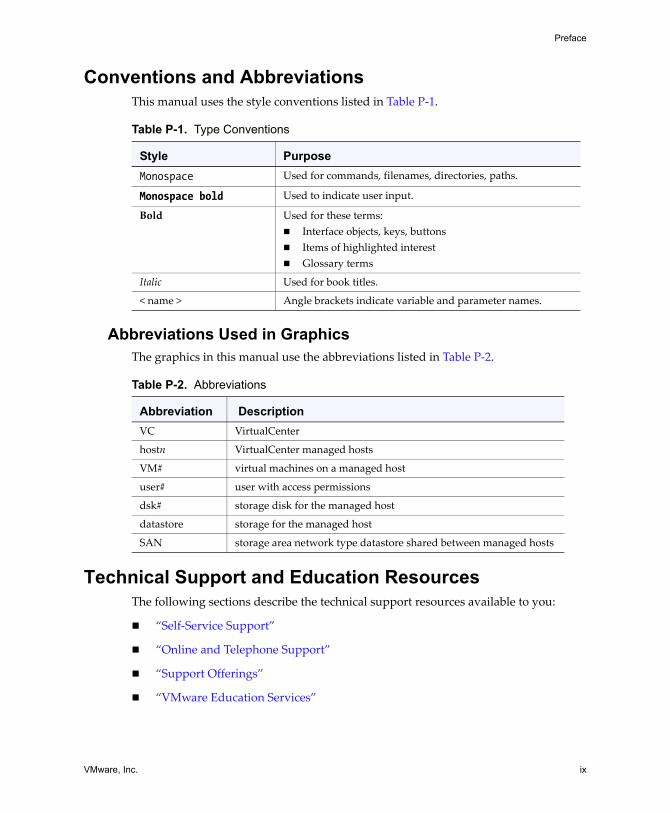
Conventions and AbbreviationsThis manual uses the style conventions listed in Table P‐1.
Abbreviations Used in GraphicsThe graphics in this manual use the abbreviations listed in Table P‐2.
Technical Support and Education ResourcesThe following sections describe the technical support resources available to you:
! �Self‐Service Support�
! �Online and Telephone Support�
! �Support Offerings�
! �VMware Education Services�
Table P-1. Type Conventions
Style PurposeMonospace Used for commands, filenames, directories, paths.
Monospace bold Used to indicate user input.
Bold Used for these terms:! Interface objects, keys, buttons! Items of highlighted interest! Glossary terms
Italic Used for book titles.
< name > Angle brackets indicate variable and parameter names.
Table P-2. Abbreviations
Abbreviation DescriptionVC VirtualCenter
hostn VirtualCenter managed hosts
VM# virtual machines on a managed host
user# user with access permissions
dsk# storage disk for the managed host
datastore storage for the managed host
SAN storage area network type datastore shared between managed hosts

Setup for Microsoft Cluster Service
x VMware, Inc.
Self-Service SupportUse the VMware Technology Network for self‐help tools and technical information:
! Product Information � http://www.vmware.com/products/
! Technology Information � http://www.vmware.com/vcommunity/technology
! Documentation � http://www.vmware.com/support/pubs
! Knowledge Base � http://www.vmware.com/support/kb
! Discussion Forums � http://www.vmware.com/community
! User Groups � http://www.vmware.com/vcommunity/usergroups.html
For more information about the VMware Technology Network, go to http://www.vmtn.net.
Online and Telephone SupportUse online support to submit technical support requests, view your product and contract information, and register your products. Go to http://www.vmware.com/support.
Customers with appropriate support contracts can use telephone support for the fastest response on priority 1 issues. Go to http://www.vmware.com/support/phone_support.html.
Support OfferingsFind out how VMwareʹs support offerings can help you meet your business needs. Go to http://www.vmware.com/support/services.
VMware Education ServicesVMware courses offer extensive hands‐on labs, case study examples, and course materials designed to be used as on‐the‐job reference tools. For more information about VMware Education Services, go to http://mylearn1.vmware.com/mgrreg/index.cfm.

VMware, Inc. 1
CHAPTER 1 Introduction
This chapter introduces clustering and discusses the different types of clusters in the following sections:
! �What Is Clustering?� on page 2
! �Clustering Services and Virtual Machines� on page 3
! �Prerequisites� on page 7
! �Caveats and Restrictions� on page 9
! �Adding Disks Before Networking� on page 10
! �Verifying QLogic HBA Settings for MSCS� on page 10
Setup for Microsoft Cluster Service
2 VMware, Inc.
What Is Clustering?Administrators cluster machines to provide services via a group of servers, with the goal of achieving high availability, scalability, or both.
For example, assume a single node serves a database. If that node crashes, the clustering software restarts the database on another node. The database application knows how to recover from a crash, and near‐continuous availability is achieved.
Applications That Can Use ClusteringTo take advantage of clustering services, applications need to be clustering aware. With a clustering‐aware application, users can continue their tasks seamlessly even if the application is moved to a different host. This is possible:
! With stateless applications, such as Web servers and VPN servers.
! With applications that have built‐in recovery features, such as database servers, mail servers, and file servers.
Clustering SoftwareSeveral different companies supply clustering software that can be used in conjunction with virtual machines. However, VMware tests clustering with Microsoft Cluster Service, and only Microsoft Cluster Service is supported.
Microsoft Cluster Service (MSCS) provides failover support for applications such as databases, file servers, and mail servers.
NOTE Clustering services are often used in conjunction with load balancing software, such as Microsoft Network Load Balancing. Because VMware does not perform testing using that product, this guide does not include corresponding procedures.
Clustering HardwareA typical clustering setup includes:
! Disks that are shared between nodes.
Shared disks are needed for applications that use dynamic data, such as mail servers or database servers. The shared disks must be on a storage area network (SAN) using Fibre Channel (FC).
! Extra network connectivity between nodes for monitoring heartbeat status.
VMware, Inc. 3
Chapter 1 Introduction
Traditional Clustering and VirtualCenter ClusteringThis document discusses traditional clustering (hot standby) using Microsoft Cluster Service. VMware also supports a cold standby clustering solution using VMware HA in conjunction with VirtualCenter clusters.
VMware HA functionality, as well as the differences between the two approaches, is discussed in the VirtualCenter Resource Management Guide.
Clustering Services and Virtual MachinesUse of clustering services in virtual machines provides high availability with less hardware (such as machines and network adapters).
Several scenarios are possible for clustering in virtual machines:
! �Clustering Virtual Machines on a Single Host (Cluster in a Box)�
! �Clustering Virtual Machines Across Physical Hosts (Cluster Across Boxes)� on page 4
! �Clustering Physical Machines and Virtual Machines (Standby Host)� on page 6
Clustering Virtual Machines on a Single Host (Cluster in a Box) A cluster in a box consists of two clustering virtual machines on a single physical machine. A cluster in a box supports two virtual machines on the same ESX Server host connected to the same storage (either local or remote).
This scenario supports simple clustering for dealing with software or administration errors, as well as failures in the guest operating system. It cannot protect you in case of hardware failures. It can also be useful for testing cross‐host clustering before distributing the virtual machines across multiple hosts.

Setup for Microsoft Cluster Service
4 VMware, Inc.
Figure 1-1. Cluster in a Box
Figure 1‐1 shows a two‐node cluster on a single physical machine; each node is running clustering software.
Chapter 2, �Clustering Virtual Machines on One Physical Host,� discusses how to set up a cluster in a box using Microsoft Cluster Service.
Clustering Virtual Machines Across Physical Hosts (Cluster Across Boxes)
A cluster across boxes consists of virtual machines on different physical machines. In this scenario, the storage is on a shared physical device, so both virtual machines can access the data. If either the virtual machine or the physical machine on Node1 becomes unavailable, the data is still available from the virtual machine on Node2.
Using this type of cluster, you can deal with the hardware failure on the physical machine.
physical machine
storage
virtual machineNode2
virtual machineNode1
clustersoftware
clustersoftware

VMware, Inc. 5
Chapter 1 Introduction
Figure 1-2. Cluster Across Boxes
Figure 1‐2 shows a two‐node cluster using two physical machines; each node is running clustering software.
Chapter 3, �Clustering Virtual Machines Across Physical Hosts,� discusses how to set up a cluster across boxes using Microsoft Cluster Service.
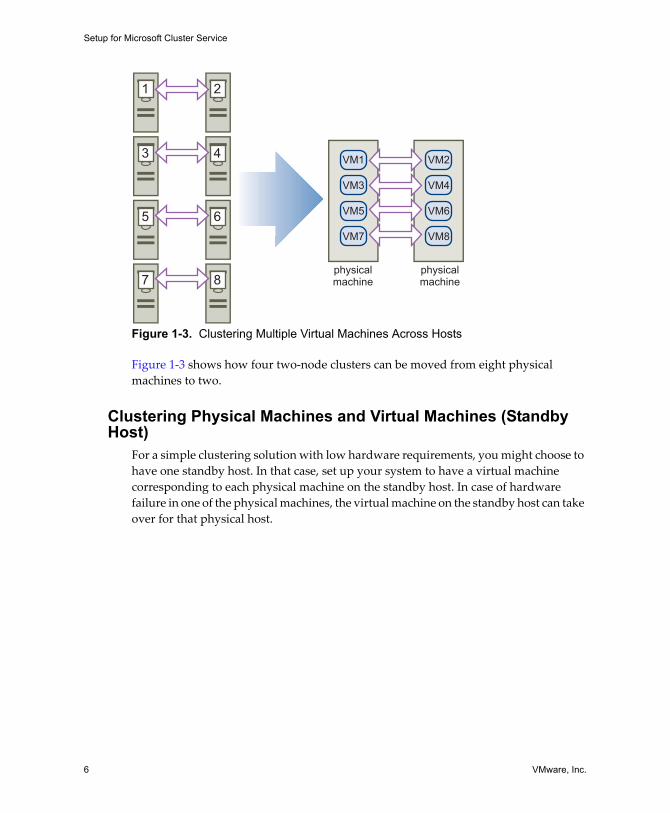
Clustering Multiple Virtual Machines Across Multiple Physical HostsYou can expand the cluster‐across‐boxes model and place multiple virtual machines on multiple physical machines. For example, you can consolidate four clusters of two physical machines each to two physical machines with four virtual machines each. This setup protects you from both hardware and software failures. At the same time, this setup results in significant hardware cost savings.
physical machine physical machine
storage
virtual machineNode2
virtual machineNode1
clustersoftware
clustersoftware
Setup for Microsoft Cluster Service
6 VMware, Inc.
Figure 1-3. Clustering Multiple Virtual Machines Across Hosts
Figure 1‐3 shows how four two‐node clusters can be moved from eight physical machines to two.
Clustering Physical Machines and Virtual Machines (Standby Host)
For a simple clustering solution with low hardware requirements, you might choose to have one standby host. In that case, set up your system to have a virtual machine corresponding to each physical machine on the standby host. In case of hardware failure in one of the physical machines, the virtual machine on the standby host can take over for that physical host.
physicalmachine
physicalmachine
VM1
VM3
VM5
VM7
VM2
VM4
VM6
VM8
1
3
5
7
2
4
6
8

VMware, Inc. 7
Chapter 1 Introduction
Figure 1-4. Clustering Physical and Virtual Machines
Figure 1‐4 shows a standby host using three virtual machines on a single physical machine. All virtual machines are running clustering software.
PrerequisitesUsing Microsoft Cluster Service in any of the scenarios discussed above requires careful preparation. This section lists the prerequisites for the ESX Server host and the virtual machine. For additional software prerequisite information, see the Microsoft document at
http://www.microsoft.com/downloads/details.aspx?FamilyID=96f76ed7‐9634‐4300‐9159‐89638f4b4ef7&displaylang=en#EIAA
Appendix A, �Setup Checklist,� summarizes prerequisites for different types of clusters.
Prerequisites for Cluster in a BoxTo set up a cluster in a box, you must have:
! An ESX Server host with two physical network adapters: one for the service console and one for communication between the two virtual machines and the clients of the clustered applications.
physicalmachine
clustersoftware
clustersoftware
virtualmachinecluster
software
virtualmachinecluster
software
virtualmachinecluster
software
clustersoftware

Setup for Microsoft Cluster Service
8 VMware, Inc.
! Access to SAN storage (recommended) or to a shared local disk.
! A local SCSI controller.
You can set up shared storage for a cluster in a box using either a virtual disk or a remote LUN using raw device mapping (RDM) in virtual compatibility mode (non‐pass‐through RDM).
When you set up the virtual machine, you need to configure:
! Two virtual network adapters.
! At least two virtual hard disks that are shared among the two virtual machines (one quorum disk and one data disk). When you create the hard disks as described in this document, the system automatically creates the associated virtual SCSI controllers.
Prerequisites for Clustering Across BoxesThe prerequisites for clustering across boxes are similar to those for cluster in a box, with these exceptions:
! On each ESX Server host, you need at least two physical network adapters dedicated to the cluster (plus one network adapter dedicated to the service console).
! You must use an RDM in either physical or virtual compatibility mode (pass‐through RDM or non‐pass‐through RDM). You cannot use virtual disks for shared storage.
NOTE The RDM requirement is different in ESX Server 3.0 than in ESX Server 2.x.
! Shared storage must be on a SAN.
Prerequisites for Standby Host ClusteringThe prerequisites for standby host (N+1) clustering are similar to those for clustering across boxes:
! On the ESX Server host dedicated to the cluster, you need two physical network adapters for use by the virtual machines (plus one network adapter dedicated to the service console).
! You must use RDM in physical compatibility mode (pass‐through RDM). You cannot use virtual disk or RDM in virtual compatibility mode (non‐pass‐through RDM) for shared storage.

VMware, Inc. 9
Chapter 1 Introduction
! No multipathing software can be running in the physical machine.
! For the FC HBA (QLogic or Emulex) in the physical Windows machine you must use the SCSIport Miniport driver. Cluster failover operations fail if you use the STORport Miniport driver.
Shared Storage SummaryThe following table illustrates which shared storage setup is allowed for which clustering solution. The recommended options are shown in bold.
Caveats and RestrictionsThis section summarizes caveats and restrictions. The software listed as supported has been tested by VMware. Other software has not been tested.
! Each virtual machine by default has five PCI slots available. A cluster uses four of these slots (two network adapters and two SCSI host bus adapters), leaving one PCI slot for a third network adapter (or other device), if needed.
! VMware virtual machines currently emulate only the SCSI‐2 disk reservation protocol and do not support applications using SCSI‐3 disk reservations.
! You must use 2GB FC HBAs with one of the drivers listed in the checklist. See Appendix A.
! You must use LSILogic virtual SCSI adapter.
! You must use VMXNet (not vlance).
! You can use only 32‐bit virtual machines (not 64‐bit virtual machines).
! You can use only 2‐node clustering.
! iSCSI clustering is not supported on iSCSI or NFS disks.
! The STORPort driver is not supported in the guest operating system. Only the SCSI miniport driver is supported.
Table 1-1. Shared Storage Summary
Cluster in a Box
Cluster Across Boxes
N+1 Clustering
Virtual disks Yes No No
Pass‐through RDM(physical compatibility mode)
No Yes Yes
Non‐pass‐through RDM(virtual compatibility mode)
Yes Yes No
Setup for Microsoft Cluster Service
10 VMware, Inc.
! NIC teaming is not supported with clustering.
! The boot disk for the virtual machine must be stored on local storage.
! Boot from SAN for the ESX Server host is not supported.
! Mixed HBA environments (QLogic and Emulex) on the same host are not supported.
! Mixed environments using both ESX Server 2.5 and ESX Server 3.0 are not supported.
! Clustered virtual machines cannot be part of VMware clusters (DRS or HA).
! You cannot use VMotion on virtual machines that run cluster software.
Potential Issues After Setup! Set the I/O time to sixty seconds or more by setting
HKEY_LOCAL_MACHINE\System\CurrentControlSet\Services\Disk\TimeOutValue.
The system may reset this value if you recreate a cluster. You must set it again in that case.
! If you clone a virtual machine with RDMs, the RDMs are converted to virtual disks during the conversion process. Remove all RDMs before cloning, then remap them after cloning is complete.
Adding Disks Before NetworkingWhen you add disks to a virtual machine that runs a Microsoft Windows operating system, Microsoft Windows consolidates the IP addresses of that virtual machine. After you have added the disks, you usually have one valid IP address and one invalid IP address.
For all clusters, you must always add all disks before you configure networking. If you later add disks because of increased storage requirements, you must check (and possibly correct) the networking setup.
Verifying QLogic HBA Settings for MSCSIf you use Microsoft Cluster Service to cluster virtual machines between your ESX Server hosts, you must use shared storage. If you intend to access shared LUNs on a SAN using a QLogic HBA, you must use particular values for some QLogic HBA configuration settings.

VMware, Inc. 11
Chapter 1 Introduction
To verify the QLogic HBA settings
1 Reboot the ESX Server host.
2 Enter the QLogic HBA configuration utility during bootup. Under Advanced Configuration Settings, ensure that the following settings are used:
Field SettingEnable Target Reset Yes
Full LIP Login Yes
Full LIP Reset No
Setup for Microsoft Cluster Service
12 VMware, Inc.
VMware, Inc. 13
CHAPTER 2 Clustering Virtual Machines on One Physical Host
This chapter guides you through creating a two‐node MSCS cluster on a single ESX Server machine.
! �Process Overview� on page 14
! �Creating the First Node� on page 17
! �Creating the Second Node� on page 18
! �Adding Hard Disks to Both Nodes� on page 19
! �Installing Microsoft Cluster Service� on page 21

Setup for Microsoft Cluster Service
14 VMware, Inc.
Process OverviewThis section gives an overview for creating a cluster on a single physical machine (cluster in a box). The process consists of four tasks, discussed in detail in the rest of this chapter.
Task 1: Creating and Customizing the First NodeThis task is discussed in detail in �Creating the First Node� on page 17. It consists of these major steps:
1 Creating the virtual machine for Node1 with two virtual network adapters.
2 Putting the boot disk on local storage.
3 Installing the operating system.
4 Powering down the first node.
Task 2: Creating the Second NodeThis task is discussed in detail in �Creating the Second Node� on page 18. The task consists of cloning the Node1 virtual machine and choosing the Node1 ESX Server host as the destination.
Task 3: Adding Storage and Configuring IP AddressesThis task is discussed in detail in �Adding Hard Disks to Both Nodes� on page 19. It consists of these major steps:
1 Adding two remote disks, one for the quorum disk and one for the shared storage disk, to Node1.
2 Configuring the guest operating system�s private and public IP addresses. See the documentation for the Microsoft operating system you are using for information.
Figure 2‐1 shows your setup at this point:

VMware, Inc. 15
Chapter 2 Clustering Virtual Machines on One Physical Host
Figure 2-1. Cluster in a Box, Node1 Setup
3 Adding hard disks and configuring IP addresses to Node2. The private and public networks must match those of Node1, and the two nodes must point to the same shared storage.
The completed setup is shown in Figure 2‐2.
Figure 2-2. Cluster in a Box Complete Setup
physicalmachine
virtual machineNode1
local storage
FC
VNIC1 VNIC2
NIC1
VSCSI1 VSCSI2
SCSI1 SCSI2
virtual switch1 virtual switch2
remote storage
virtual switch2 (private)
virtual switch1(public)
physical machine
virtual machineNode1
FC
VNIC1 VNIC2
NIC1
VSCSI1 VSCSI2
virtual machineNode2
VNIC1VNIC2
VSCSI1VSCSI2
SCSI2
remote storage
local storage
SCSI1

Setup for Microsoft Cluster Service
16 VMware, Inc.
Task 4: Installing and Configuring Microsoft Cluster ServiceInstall Microsoft Cluster Service first on one, then on the other virtual machine, following the instructions in the Microsoft documentation.
NOTE Microsoft Cluster Service is included in the installation for Windows 2003 servers. For Windows 2000 servers, you must install the software.
VMware, Inc. 17
Chapter 2 Clustering Virtual Machines on One Physical Host
Creating the First Node Creating the first node involves creating the virtual machine, adding disks, and installing the operating system. This section steps you through each of these tasks.
To create and configure the first node�s virtual machine
1 Launch a VI Client and connect to the ESX Server host or a VirtualCenter Server. Use the user name and password of the user who will own the virtual machine.
2 In the inventory panel, right‐click the host and choose New Virtual Machine, then make the following selections using the wizard:
Next, you need a second SCSI controller and two or more shared disks for shared access to clustered services and data.
Page SelectionWizard Type Typical.
Name and Location Choose a name and location you want to use. This example uses Node1.
Resource Pool Select the resource pool for the virtual machine, or the host if there are no resource pools.
Datastore This page allows you to choose the location for the virtual machine configuration file and the virtual machine disk (.vmdk) file. Choose the local datastore. Note: The virtual machine configuration file and the .vmdk file should always be stored on the local disk.
Guest Operating System Choose the Windows Server 2000 or Windows Server 2003 operating system you intend to install.
CPUs Use the default unless you have special requirements.
Memory Use the default unless you need additional memory and your server supports it.
Network Change NICs to Connect to 2, then select the second net‐work for the second NIC. You need one NIC for the private network, the second NIC for the public network.
Virtual Disk Capacity If you need a primary SCSI disk larger than 4GB, enter the appropriate value in the Capacity field.
Ready to Complete Click OK to create the virtual machine.
Setup for Microsoft Cluster Service
18 VMware, Inc.
Installing the Guest Operating SystemA new virtual machine is like a physical computer with a blank hard disk. You need to install an operating system to use it.
To install one of the Microsoft 2003 Server operating systems
1 Insert the installation CD‐ROM for your guest operating system.
2 Select the virtual machine and choose Power on from the right‐button menu.
Because no operating system is installed, the virtual machine checks the CD‐ROM drive and finds the installation CD‐ROM.
3 Follow the installation instructions in the operating system documentation.
4 When you�re done, remove the CD‐ROM from the server�s CD‐ROM drive.
Creating the Second NodeCreating the second node involves cloning the Node1 virtual machine and adding disks that point to the shared storage. This section guides you through the tasks.
To clone the Node1 virtual machine
1 Shut down the guest operating system and power off the virtual machine.
2 In the VI Client�s inventory panel, select Node1 and choose Clone from the right‐button menu. Make the following selections with the wizard:
You have now created a virtual machine with two network adapters on which the operating system is already installed.
Page SelectionName and Location Choose a name and location you want to use (for example,
Node2).
Resource Partition Select the resource pool for the virtual machine, or select the host if there are no resource pools.
Datastore This wizard allows you to choose the location for the virtual machine configuration file and the .vmdk file. Choose the local datastore.
Customization Choose Do not customize.
Ready to Complete Click OK to create the virtual machine.

VMware, Inc. 19
Chapter 2 Clustering Virtual Machines on One Physical Host
Adding Hard Disks to Both NodesAfter you have created the two virtual machines with the operating systems installed, you can add two or more hard disks to each virtual machine as shared resources. One hard disk will be the quorum disk; the second will be the shared storage disk.
NOTE For Node1, point each disk to a different location. For Node2, choose the same locations as you did for Node1.
To prepare for adding disks
You must zero out the disks you use with a cluster in a box scenario. You have these options:
! To create and zero out in one sweep, type the following at the command line:
vmkfstools -c <size> -d eagerzeroedthick /vmfs/volumes/<mydir>/<myDisk>.vmdk
! To zero out an existing disk, type the following at the command line:
vmkfstools [-w |--writezeroes] /vmfs/volumes/<mydir>/<myDisk>.vmdk
! If you wish to save time, and donʹt mind having stale data as it exists on the physical medium in your virtual disk, type the following at the command line:
vmkfstools -c <size> -d thick /vmfs/volumes/<mydir>/<myDisk>.vmdk
NOTE You must repeat this process for each virtual disk you want to use as a shared disk in the cluster. For example, if you have one quorum disk and one shared storage disk, you must run the tool on both disks.
To add a quorum disk and shared storage disk
1 Select the virtual machine you just created and choose Edit Settings.
2 Click Add, select Hard Disk, and click Next.
3 Select Choose an existing virtual disk and select one of the disks you prepared (see �To prepare for adding disks�).
NOTE You can also use a mapped SAN LUN set to virtual compatibility mode. In that case, you don�t need to run the vmkfstools commands listed in �To prepare for adding disks�.
4 Choose a new virtual device node. For example choose SCSI(1:0) and use the default mode.

Setup for Microsoft Cluster Service
20 VMware, Inc.
NOTE This must be a new controller. You cannot use SCSI 0.
5 Click Finish.
When you�re done, notice that the wizard has created both a new hard disk and a new SCSI controller.
6 Select the new SCSI controller and click Change Controller Type. Make sure the controller is set to LsiLogic (the default). BusLogic is not supported when you use MSCS with ESX Server 3.0 or later.
7 In the same panel, set SCSI Bus Sharing to Virtual and click OK.
8 Repeat steps 1 through 6 but choose a new target device, such as SCSI (1:1), on the controller that was just created.
For additional disks, you can repeat step 9.
After you�ve completed setting up Node1, repeat the process to add two disks to Node2. Point the quorum disk to the same location as the Node1 quorum disk, and the shared storage disk to the same location as the Node1 shared storage disk.
NOTE When adding an RDM or virtual disk to the second node, choose Use existing disk.
CAUTION If you decide to clone a virtual machine with an RDM setup, all RDMs are converted to virtual disks. You should therefore unmap all RDMs before cloning, then remap them after cloning is complete.

VMware, Inc. 21
Chapter 2 Clustering Virtual Machines on One Physical Host
Installing Microsoft Cluster ServiceThe final task is to install Microsoft Cluster Service.
NOTE Microsoft Cluster Service is already installed for Windows 2003 servers. For Windows 2000 servers, you need to install the software.
Refer to the Microsoft documentation for information. One document about installing Microsoft Cluster Service is at the following location:
http://www.microsoft.com/downloads/details.aspx?FamilyID=96f76ed7‐9634‐4300‐9159‐89638f4b4ef7&displaylang=en#EIAA

Setup for Microsoft Cluster Service
22 VMware, Inc.

VMware, Inc. 23
CHAPTER 3 Clustering Virtual Machines Across Physical Hosts
This chapter guides you through creating an MSCS cluster that consists of two virtual machines on two ESX Server hosts.
NOTE Although this process is similar to the process for setting up a cluster in a box, steps are repeated for ease of use.
The chapter consists of the following sections:
! �Process Overview� on page 24
! �Creating the First Node� on page 27
! �Creating the Second Node� on page 28
! �Adding Hard Disks to Both Nodes� on page 28
! �Installing and Running Microsoft Cluster Service� on page 30
Setup for Microsoft Cluster Service
24 VMware, Inc.
Process OverviewThis section gives an overview of creating a cluster. The process consists of four tasks.
Task 1: Creating and Customizing the First NodeThis task is discussed in detail in �Creating the First Node� on page 27. It consists of these major steps:
1 Creating the virtual machine for Node1 with two network adapters and local storage for the boot disk.
NOTE The ESX Server host must have two physical network adapters for virtual machines, in addition to the network adapter for the service console.
2 Installing the operating system on Node1.
Task 2: Creating and Customizing the Second NodeThis task is discussed in detail in �Creating the Second Node� on page 28. The task consists of cloning the Node1 virtual machine and choosing the second server as the destination.
Task 3: Adding Storage and Configuring IP AddressesThis task is discussed in detail in �Adding Hard Disks to Both Nodes� on page 28. It consists of these major steps:
1 Adding remote disks, one for the quorum disk and one or more for the shared storage disk, to Node1.
NOTE These disks must point to SAN LUNs. RDM in physical compatibility mode (pass‐through RDM) is recommended.
2 Configuring the guest operating system�s private and public IP addresses. See the documentation for the Microsoft operating system you are using for information.
VMware, Inc. 25
Chapter 3 Clustering Virtual Machines Across Physical Hosts
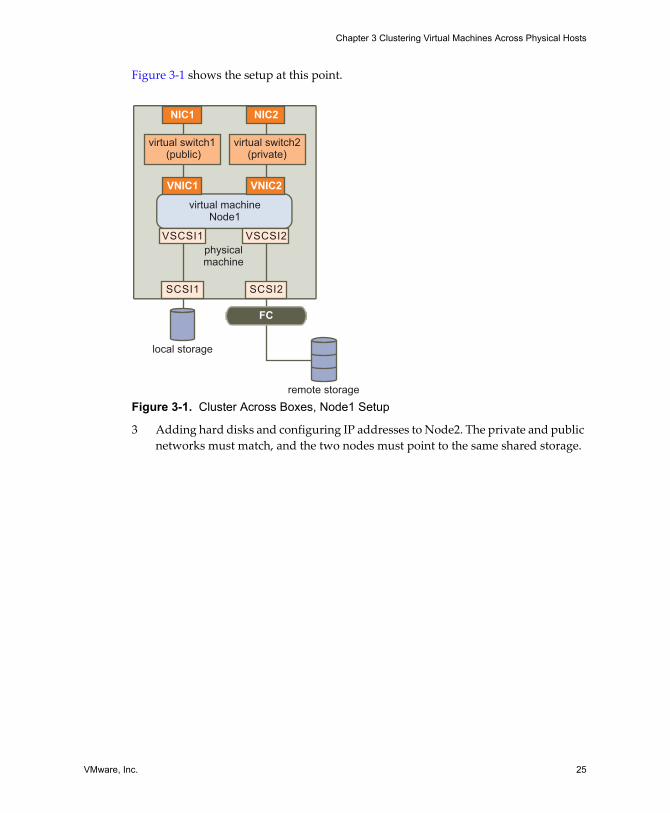
Figure 3‐1 shows the setup at this point.
Figure 3-1. Cluster Across Boxes, Node1 Setup
3 Adding hard disks and configuring IP addresses to Node2. The private and public networks must match, and the two nodes must point to the same shared storage.
physicalmachine
virtual machineNode1
local storage
FC
VNIC1 VNIC2
NIC1 NIC2
VSCSI1 VSCSI2
SCSI1 SCSI2
virtual switch1 (public)
virtual switch2(private)
remote storage

Setup for Microsoft Cluster Service
26 VMware, Inc.
The completed setup looks as follows.
Figure 3-2. Cluster Across Boxes Complete Setup
Task 4: Setting Up Microsoft Cluster ServiceAfter you have set up the two nodes with virtual machines that have the appropriate disk and network configuration, you can install Microsoft Cluster Service. See �Installing and Running Microsoft Cluster Service� on page 30.
NOTE Microsoft Cluster Service is included in the installation for Windows 2003 servers. For Windows 2000 servers you need to install the software.
physicalmachine
physicalmachine
virtual machineNode1
local storage
FC
VNIC1 VNIC2
NIC1 NIC2
VSCSI1 VSCSI2
SCSI1 SCSI2
local storage
virtual machineNode2
FC
VNIC1VNIC2
NIC1NIC2
virtual switch2 (private)
virtual switch1(public)
virtual switch1 (public)
virtual switch2(private)
VSCSI1VSCSI2
SCSI1SCSI2
remote storage

VMware, Inc. 27
Chapter 3 Clustering Virtual Machines Across Physical Hosts
Creating the First Node Creating the first node involves creating the virtual machine and installing the operating system. This section guides you through these tasks.
To create the first node�s virtual machine
1 Launch a VI Client and connect to the ESX Server host. Use the user name and password of the user who will own the virtual machine.
2 In the inventory panel, right‐click the host and choose New Virtual Machine. Make the following selections with the wizard:
Installing the Guest Operating SystemA new virtual machine is like a physical computer with a blank hard disk. You need to install an operating system to use it.
To install one of the Microsoft 2003 Server operating systems
1 Insert the installation CD‐ROM for your guest operating system.
2 Select the virtual machine and choose Power on from the right‐button menu.
Because no operating system is installed, the virtual machine checks the CD‐ROM drive and finds the installation CD‐ROM.
Page SelectionWizard Type Typical.
Name and Location Choose a name and location you want to use, such as Node1.
Resource Pool Select the resource pool for the virtual machine, or the host if there are no resource pools.
Datastore This page allows you to choose the location for the virtual machine configuration file and the .vmdk file. Choose a local datastore.
Guest Operating System Choose the Windows 2003 Server operating system you intend to install.
CPUs Use the default suggested for your operating system.
Memory Use the default unless you need additional memory and your server supports it.
Network Change NICs to Connect to 2, then select the second net‐work for the second NIC.
Virtual Disk Capacity If you need a primary SCSI disk larger than 4GB, enter the appropriate value in the Capacity field.
Ready to Complete Click OK to create the virtual machine.
Setup for Microsoft Cluster Service
28 VMware, Inc.
3 Follow the installation instructions in the operating system documentation.
4 When you�re done, remove the CD‐ROM from the server�s CD‐ROM drive.
Creating the Second NodeCreating the second node involves cloning the Node1 virtual machine and adding disks that point to the storage shared with Node1. This section guides you through the tasks.
To clone the Node1 virtual machine
1 Shut down the guest operating system and power off the virtual machine.
2 In the VI Client�s inventory panel, select Node1 and choose Clone from the right‐button menu. Make the following selections with the wizard:
You have now created a virtual machine with two network adapters on which the operating system you chose for Node1 is already installed.
Adding Hard Disks to Both NodesAfter you have created the two virtual machines with the operating system installed, you need to add two hard disks. One hard disk will be the quorum disk, and the second will be the shared storage disk.
NOTE For the first node, point each disk to a different location. For the second node, choose the same locations as you did for the first node.
Page SelectionName and Location Choose a name you want to use (for example, Node2) and
the datacenter in which both hosts are located.
Host or Cluster Choose the second host for the cluster setup.
Resource Partition Select the resource pool for the virtual machine, or select the host if there are no resource pools.
Datastore This page allows you to choose the location for the virtual machine configuration file and the .vmdk file. Choose a local datastore.
Customization Choose Do not customize.
Ready to Complete Click OK to create the virtual machine.
VMware, Inc. 29
Chapter 3 Clustering Virtual Machines Across Physical Hosts
To add a quorum disk and shared storage disk
1 Select the virtual machine just created and choose Edit Settings.
2 Click Add, select Hard Disk, and click Next.
3 In the Select a Disk page, choose Mapped SAN LUN and click Next.
Your hard disk points to a LUN that uses RDM.
4 In the LUN selection page, choose an unformatted LUN and click Next.
Ask your SAN administrator which of the LUNs are unformatted. You can also see all formatted LUNs in the host�s Configuration tab and deduce which LUNs are unformatted by comparing the list of formatted LUNs with the list in the LUN selection page.
5 In the Select Datastore page, select the local datastore, which is also the location of the boot disk, then click Next.
This is the location where the RDM (mapping) is stored.
6 Select Physical compatibility mode, then click Next.
A SCSI Controller that uses physical compatibility mode is created when the virtual hard disk is created.
7 Choose a new virtual device node, for example choose SCSI(1:0) and use the default mode.
NOTE This must be a new SCSI Controller. You cannot use SCSI 0.
8 Click Finish to complete creating the disk.
When you�re done, notice that the wizard has created both a new SCSI controller and a new hard disk.
9 Select the new SCSI controller and click Change Controller Type. Select LsiLogic in the dialog box that appears.
MSCS on ESX Server 3.0 is not supported in conjunction with BusLogic.

Setup for Microsoft Cluster Service
30 VMware, Inc.
10 In the same panel, set SCSI Bus Sharing to Physical, then click OK.
11 Repeat steps 1 through 8 but choose a new Virtual Device Node such as SCSI (1:1).
After you�ve completed setting up Node1, repeat the process to add two disks to Node2. Point the quorum disk to the same location as the Node1 quorum disk, and the shared storage disk to the same location as the Node1 shared storage disk. To do so, create a new mapped SAN LUN that points to a disk shared with Node1.
Installing and Running Microsoft Cluster ServiceThe final task is to install Microsoft Cluster Service.
NOTE Microsoft Cluster Service is already installed for Windows 2003 servers. For Windows 2000 servers you need to install the software.
Microsoft provides a document about installing Microsoft Cluster Service at the following location:
http://www.microsoft.com/downloads/details.aspx?FamilyID=96f76ed7‐9634‐4300‐9159‐89638f4b4ef7&displaylang=en#EIAA
Running Microsoft Cluster ServiceMicrosoft Cluster Service should operate normally in the virtual machine after it is installed.

VMware, Inc. 31
CHAPTER 4 Clustering Physical and Virtual Machines
This chapter guides you through creating an MSCS cluster in which each physical machine has a corresponding virtual machine.
NOTE Although this process is similar to (but not the same as) the process for setting up a cluster in a box, steps are repeated for ease of use.
The chapter consists of the following sections:
! �Process Overview� on page 32
! �Creating the First Node� on page 33
! �Creating the Second Node� on page 34
! �Installing the Guest Operating System� on page 35
! �Installing Microsoft Cluster Service� on page 35
! �Running Microsoft Cluster Service� on page 36

Setup for Microsoft Cluster Service
32 VMware, Inc.
Process OverviewThis section gives an overview and some explanation of the process of creating clusters. See �Clustering Physical Machines and Virtual Machines (Standby Host)� on page 6 for background information.
The process consists of four tasks.
Task 1: Creating the First Node (Physical Machine)This task is discussed briefly in �Creating the First Node� on page 33. You might not need to customize the physical machine. However, your setup must fulfill the following requirements:
! The physical machine must have network adapters.
! The physical machine must have access to the same storage on a SAN as the ESX Server host on which you will run the virtual machines.
! The operating system you want to use throughout the cluster must have been installed.
NOTE No multipathing software can be running in the physical machine.
Task 2: Creating and Customizing the Second Node (Virtual Machine)
This task is discussed in detail in �Creating the Second Node� on page 34. It consists of the following major steps:
1 Creating a virtual machine that is set up for clustering across boxes.
2 Making sure the shared storage visible from Node1 (the physical machine) is also visible from Node2 (the virtual machine).
3 Installing the operating system.
NOTE The ESX Server host must have two physical network adapters for the virtual machines, one for the public network, and one for the private network. (The host also has a network adapter for the service console.)

VMware, Inc. 33
Chapter 4 Clustering Physical and Virtual Machines
Task 3: Setting Up Microsoft Cluster ServiceSet up Microsoft Cluster Service, first for the physical machine and then for the virtual machine.
NOTE Microsoft Cluster Service is already installed for Windows 2003 servers. You need to install the software for Windows 2000 servers.
NOTE In contrast to the other two cluster types, this cluster type requires a small amount of customization. See �Installing Microsoft Cluster Service� on page 35.
Task 4: Creating Additional Physical/Virtual PairsFor each physical machine you repeat tasks 1 and 2 to set up an additional virtual machine on the ESX Server host and cluster the two systems.
Creating the First Node Because the first node is a physical machine, no instructions for creating the first node are included in this chapter. See the Microsoft Cluster Service documentation for all prerequisites and caveats.
! Make sure the physical machine has at least two network adapters.
! Make sure the physical machine has access to the same storage on a SAN as the ESX Server host.

Setup for Microsoft Cluster Service
34 VMware, Inc.
Creating the Second NodeCreating the second node involves creating a virtual machine that has two network adapters (one for the private and one for the public network) and adding disks that point to shared storage. This section guides you through the tasks.
To create the second node
1 Launch a VI client and connect to the ESX Server host. Use the user name and password of the user who will own the virtual machine.
2 In the inventory panel, right‐click the host and choose New Virtual Machine, then make the following selections with the wizard:
You need a shared SCSI controller and shared SCSI disks for shared access to clustered services and data. The next section sets up the disks for Node2 to point to the quorum disk and shared storage disks for Node1.
To add a quorum disk and shared storage disk
1 Select the virtual machine you�ve just created and choose Edit Settings.
2 Click Add, select Hard Disk, and click Next.
3 In the Select a Disk page, choose Mapped SAN LUN and click Next.
Page SelectionWizard Type Typical.
Name and Location Choose a name and location you want to use, such as Node2.
Resource Pool Select the resource pool for the virtual machine, or the host if there are no resource pools.
Datastore This page allows you to choose the location for the virtual machine configuration file and the .vmdk file. Choose a datastore on local storage.
Guest Operating Sys‐tem
Choose the Windows Server 2000 or Windows Server 2003 operating system you want to install later.
CPUs Use the default.
Memory Use the default unless you need additional memory and your server supports it.
Network Change NICs to Connect to 2, then select the second network for the second NIC.
Virtual Disk Capacity If you need a primary SCSI disk larger than 4GB, enter the appropriate value in the Capacity field.
Ready to Complete Click OK to create the virtual machine.

VMware, Inc. 35
Chapter 4 Clustering Physical and Virtual Machines
Your hard disk points to a LUN using RDM.
4 In the LUN selection page, choose the LUN that is used by Node1.
5 In the Select Datastore page, select the local datastore, which is also the location of the boot disk, and click Next.
6 Select Physical compatibility mode and click Next.
7 Select a virtual device node on a different SCSI Controller than the one that was created when you created the virtual machine.
This SCSI Controller is created when the virtual hard disk is created.
8 Click Finish to complete creating the disk.
When you�re done, notice that the wizard has created both a new device node and a new hard disk.
9 Select the new SCSI controller, set SCSI Bus Sharing to Physical, and click OK.
10 Repeat steps 1 through 6 but choose a disk. You should use the same virtual adapter.
Installing the Guest Operating SystemA new virtual machine is like a physical computer with a blank hard disk. You need to install an operating system to use it.
To install one of the Microsoft 2003 Server operating systems
1 Insert the installation CD‐ROM for your guest operating system.
2 Select the virtual machine and choose Power on from the right‐button menu.
Because no operating system is installed, the virtual machine checks the CD‐ROM drive and finds the installation CD‐ROM.
3 Follow the installation instructions in the operating system documentation.
4 When you�re done, remove the CD‐ROM from the server�s CD‐ROM drive.
Installing Microsoft Cluster ServiceThe final task is to install Microsoft Cluster Service.
NOTE Microsoft Cluster Service is already installed for Windows 2003 servers. For Windows 2000 servers, you need to install the software.
Setup for Microsoft Cluster Service
36 VMware, Inc.
Microsoft provides a document about installing Microsoft Cluster Service at the following location:
http://www.microsoft.com/downloads/details.aspx?FamilyID=96f76ed7‐9634‐4300‐9159‐89638f4b4ef7&displaylang=en#EIAA
In some complex storage solutions, such as an FC switched fabric, a particular storage unit might have a different identity (target ID or raw disk ID) on each computer in the cluster. Although this is a valid storage configuration, it causes a problem when you later want to add a node to the cluster.
To avoid identity target problems
1 Disable the storage validation heuristics by clicking the Back button to return to the Select Computer page.
2 In the Select Computer page, click the Advanced button and select the Advanced (minimum) configuration option.
Running Microsoft Cluster ServiceMicrosoft Cluster Service should operate normally in the virtual machine after it is installed.

VMware, Inc. 37
CHAPTER 5 Upgrading Clustered Virtual Machines
This chapter discusses how to upgrade clusters that use VMFS‐2 to VMFS‐3. It presents a comprehensive discussion of all cases in the following sections:
! �Overview� on page 38
! �Upgrading Cluster in a Box� on page 38
! �Upgrading Cluster Across Boxes� on page 40
! �Upgrading Clusters Using Physical to Virtual Clustering� on page 42
NOTE Upgrading is supported only from ESX Server 2.5.2 to ESX Server 3.0.

Setup for Microsoft Cluster Service
38 VMware, Inc.
OverviewUsing VMFS‐2, you had a number of options for setting up your MSCS cluster:
! For virtual machines clustered on a single physical host (cluster in a box), you could use a public VMFS in one of two ways:
! Using non‐passthrough RDMs
! Using shared virtual disks
! For virtual machines clustered on multiple physical hosts (cluster across boxes), you had three options:
! Shared disks on shared VMFS
! Two pass‐through RDMs backed by the same LUN on public volume
! A single pass‐through RDM on a shared VMFS volume
! For clusters of physical and virtual machines (N+1 clustering), you used a public volume using pass‐through RDM.
This chapter steps you through the upgrade process for each of these options.
NOTE Upgrading is supported only from ESX Server 2.5.2 to ESX Server 3.
Upgrading Cluster in a Box With VMFS‐2, a cluster in a box setup uses a public VMFS. By default, the general upgrade process, discussed in the Installation and Upgrade Guide, includes upgrading of public VMFS‐2 volumes to VMFS‐3. If you did not upgrade the VMFS used by the cluster during the upgrade process, you can upgrade using the VI Client later.
See the Installation and Upgrade Guide for more information on upgrading.
Upgrading CIB: Shared RDMs and Boot Disks in Separate VMFS Volumes
This section steps you through upgrading a cluster in a box that uses shared non‐passthrough RDMs that reside in a different VMFS‐2 volume than the base disks for the cluster virtual machines.
To perform the upgrade
1 Power off all clustered virtual machines.
2 Upgrade the ESX Server host from ESX Server 2.5.2 to ESX Server 3.0.

VMware, Inc. 39
Chapter 5 Upgrading Clustered Virtual Machines
3 If you did not upgrade the VMFS‐2 volume where your cluster .vmdk files are kept to VMFS‐3 during upgrade of the host, do it now:
a Select the upgraded host in a VI Client and click the Configuration tab, then click Storage.
b Select the volume.
c Click Upgrade to VMFS‐3.
4 If necessary, upgrade the volume where your shared RDM files are located and upgrade those files, as in the previous step.
5 Right‐click each cluster virtual machine in the inventory panel and click Upgrade Virtual Hardware.
6 Power on each virtual machine and verify cluster setup.
If the virtual machine fails to power on with error message Invalid Argument, you have a misconfigured cluster setup. The virtual disk used in ESX 2.x is not allowed to power on in ESX 3.0 because ESX 3.0 checks for invalid disk types.
7 Import the old virtual disk to the new virtual disk, as follows:
vmkfstools -I /vmfs/volumes/vol1/<old-virtdisk>.vmdk /vmfs/volumes/vol2/<myVMDir>/<new-virtdisk>.vmdk
! old-virtdisk.vmdk � the virtual disk from which you are importing
! new-virtdisk.vmdk � the new virtual disk to which you are importing
8 Rename old-virtdisk.vmdk and edit the .vmx file to point to new-virtdisk.vmdk.
9 Power on the node and verify that the cluster service starts without problems.
Upgrading CIB: RDMs and Boot Disks in Same VMFS VolumeThis section steps you through upgrading a cluster in a box that uses shared non‐passthrough RDMs that reside in the same VMFS‐2 volume as the base disks for the cluster virtual machines.
To perform the upgrade
1 Upgrade the ESX Server host from ESX Server 2.5.2 to ESX Server 3.0.
2 Select the upgraded host in a VI Client and click the Configuration tab, then click Storage.

Setup for Microsoft Cluster Service
40 VMware, Inc.
3 Upgrade the VMFS‐2 volume where your cluster .vmdk files and your shared RDM files are located to VMFS‐3, as follows:
a Select the volume where the files are located.
b Click Upgrade to VMFS‐3.
This upgrades the VMFS‐2 volumes to VMFS‐3 and relocates the .vmx file for the cluster virtual machines into the upgraded VMFS‐3 volume in a directory structure.
NOTE This relocates both shared RDMs and the first cluster node�s .vmx file.
4 Right‐click the second cluster node�s virtual machine in the inventory panel and click Upgrade Virtual Hardware.
An error like the following results:
VMware ESX Server could not completely upgrade your virtual disk “/vmfs/volumes/2a3330116-da-11....vmdk due to the following error: The system cannot find the file specified.”
This is because of step 3, where the cluster�s virtual machines were relocated to the first node�s directory.
5 Ignore the error.
The system updates your virtual hardware regardless of the error. You can verify this by viewing the .vmx file entries of the second cluster node.
6 Manually edit the .vmx file of the second cluster virtual machine so that the entries of the quorum disk and any other shared disk point to the shared RDM files that are now inside the first node�s directory inside the VMFS‐3 partition.
7 Power on each virtual machine and verify cluster setup.
Upgrading Cluster Across Boxes There are two types of clusters across boxes. This section explains how to upgrade clusters across boxes using shared pass‐through RDMs and how to upgrade clusters across boxes with shared file systems.

VMware, Inc. 41
Chapter 5 Upgrading Clustered Virtual Machines
Using Shared Pass-through RDMsThis section explains how to upgrade a cluster with pass‐through RDMs for each node.
To upgrade the cluster
1 Upgrade the ESX Server host from ESX Server 2.5.2 to ESX Server 3.0.
2 Select the upgraded host in a VI Client and click the Configuration tab, then click Storage.
3 Upgrade the VMFS‐2 volume where your shared pass‐through RDM files are kept to VMFS‐3:
a Select the volume.
b Click Upgrade to VMFS‐3.
4 Select the volume where the boot disk for the cluster virtual machine is located and upgrade it as in Step 3.
This upgrades the volume and relocates the .vmx files related to the virtual machines inside the volume. The new directory structure is organized for easy management.
5 Right‐click on the cluster virtual machine in the inventory panel on the left and choose Upgrade Virtual Hardware from the right‐button menu.
6 Repeat the steps for the Node2 host.
7 Power on the virtual machines and verify the cluster.
Using Files in Shared VMFS-2 VolumesThis section explains how to upgrade a cluster across boxes if you used shared files in a shared VMFS‐2 volume.
To upgrade your cluster
1 Before upgrading to VMFS‐3, change the shared VMFS‐2 volume from shared to public, as follows:
vmkfstools -L lunreset vmhba<C:T:L>:0vmkfstools -F public vmhba<C:T:L:P>
2 Perform the host upgrades from ESX Server 2.5.2 to ESX Server 3.0.
3 Select the first upgraded host in a VI Client and click the Configuration tab, then click Storage.

Setup for Microsoft Cluster Service
42 VMware, Inc.
4 Upgrade the VMFS‐2 volume where your cluster .vmdk files are kept to VMFS‐3:
a Select the volume.
b Click Upgrade to VMFS‐3.
5 Create LUNs for each shared disk (i.e. one LUN for each shared disk).
6 For each disk, create a separate RDM for each cluster node backed by the same physical device.
a Create the RDM and import the virtual disk to this RDM.
vmkfstools -i /vmfs/volumes/vol1/<old-virtdisk>.vmdk /vmfs/volumes/vol2/<myVMDir>/<rdm-for-vm1>/<myrdm.vmdk> -d rdmp:/vmfs/
devices/disks/vmhbax.y.0
! old-virtdisk.vmdk ‐ the virtual disk from which you are importing
! myrdm.mdk ‐ the new RDM for Node1
! vmhbax.y.z ‐ the LUN that backs the RDM
7 Edit the .vmx file to point to the RDM instead of the shared file:
scsi<X>:<Y>.<filename> = “rdm-fxy vm/.vmdk
8 Power on the nodes and verify that the cluster service starts without problems.
Upgrading Clusters Using Physical to Virtual ClusteringIf you are using a physical to virtual cluster using VMFS‐2, you use a public disk that is mapped using RDM from the virtual machine.
By default, the upgrade process converts your VMFS‐2 disks to VMFS‐3. You can also explicitly convert VMFS‐2 volumes later if you did not convert them as part of the default conversion.
VMware, Inc. 43
APPENDIX A Setup Checklist
Administrators who are setting up Microsoft Cluster Service on ESX Server 3 can use this appendix as a checklist.
The appendix includes information in the following tables:
! Table A‐1 �Requirements for Non‐clustered Disks.�
! Table A‐2 �Requirements for Clustered Disks.�
! Table A‐3 �Other Clustering Requirements.�
Setup for Microsoft Cluster Service
44 VMware, Inc.
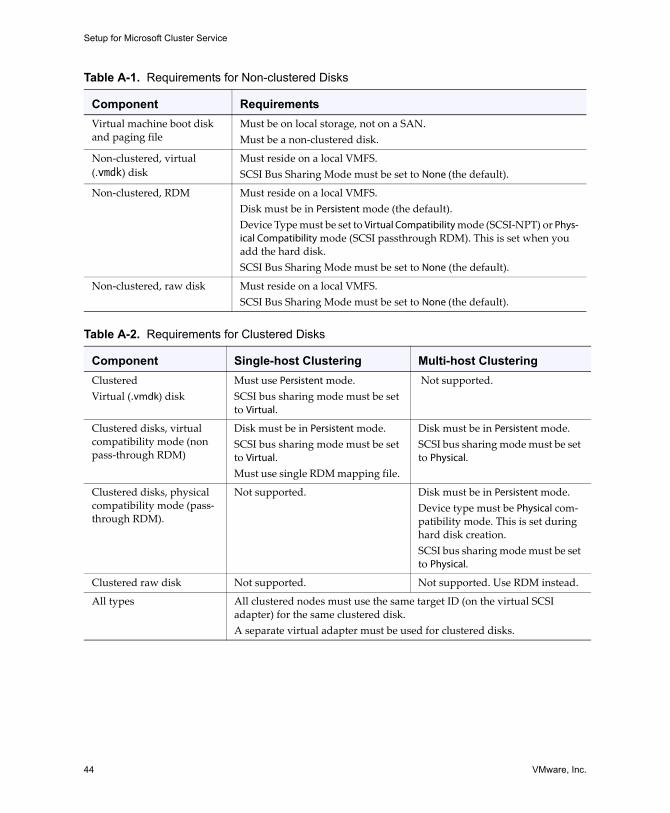
Table A-1. Requirements for Non-clustered Disks
Component RequirementsVirtual machine boot disk and paging file
Must be on local storage, not on a SAN.Must be a non‐clustered disk.
Non‐clustered, virtual (.vmdk) disk
Must reside on a local VMFS.SCSI Bus Sharing Mode must be set to None (the default).
Non‐clustered, RDM Must reside on a local VMFS.Disk must be in Persistent mode (the default).Device Type must be set to Virtual Compatibility mode (SCSI‐NPT) or Phys-ical Compatibility mode (SCSI passthrough RDM). This is set when you add the hard disk. SCSI Bus Sharing Mode must be set to None (the default).
Non‐clustered, raw disk Must reside on a local VMFS.SCSI Bus Sharing Mode must be set to None (the default).
Table A-2. Requirements for Clustered Disks
Component Single-host Clustering Multi-host ClusteringClusteredVirtual (.vmdk) disk
Must use Persistent mode.SCSI bus sharing mode must be set to Virtual.
Not supported.
Clustered disks, virtual compatibility mode (non pass‐through RDM)
Disk must be in Persistent mode.SCSI bus sharing mode must be set to Virtual.Must use single RDM mapping file.
Disk must be in Persistent mode.SCSI bus sharing mode must be set to Physical.
Clustered disks, physical compatibility mode (pass‐through RDM).
Not supported. Disk must be in Persistent mode.Device type must be Physical com‐patibility mode. This is set during hard disk creation. SCSI bus sharing mode must be set to Physical.
Clustered raw disk Not supported. Not supported. Use RDM instead.
All types All clustered nodes must use the same target ID (on the virtual SCSI adapter) for the same clustered disk.A separate virtual adapter must be used for clustered disks.
VMware, Inc. 45
Chapter A Setup Checklist
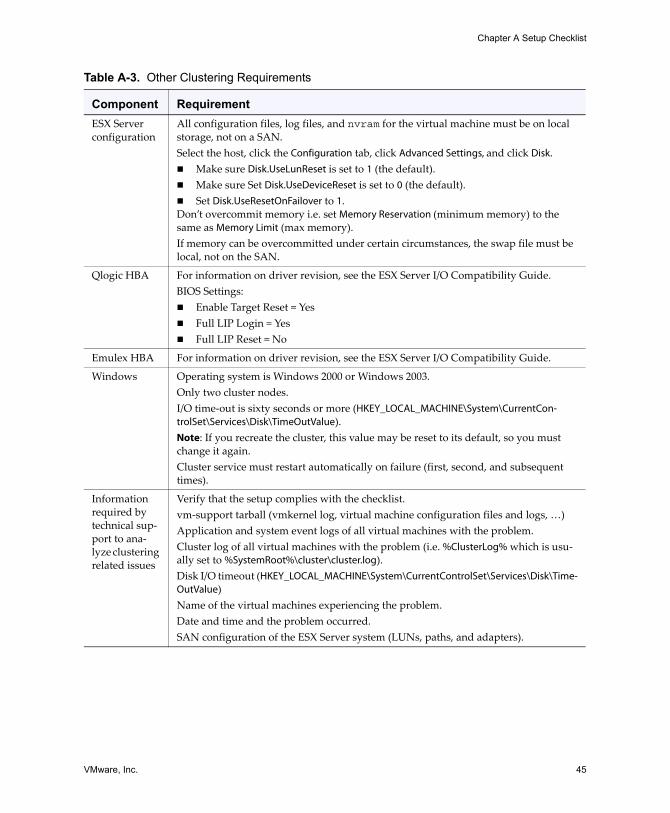
Table A-3. Other Clustering Requirements
Component RequirementESX Server configuration
All configuration files, log files, and nvram for the virtual machine must be on local storage, not on a SAN.Select the host, click the Configuration tab, click Advanced Settings, and click Disk.
! Make sure Disk.UseLunReset is set to 1 (the default).! Make sure Set Disk.UseDeviceReset is set to 0 (the default).! Set Disk.UseResetOnFailover to 1. Don�t overcommit memory i.e. set Memory Reservation (minimum memory) to the same as Memory Limit (max memory).If memory can be overcommitted under certain circumstances, the swap file must be local, not on the SAN.
Qlogic HBA For information on driver revision, see the ESX Server I/O Compatibility Guide.BIOS Settings:! Enable Target Reset = Yes! Full LIP Login = Yes! Full LIP Reset = No
Emulex HBA For information on driver revision, see the ESX Server I/O Compatibility Guide.
Windows Operating system is Windows 2000 or Windows 2003.Only two cluster nodes. I/O time‐out is sixty seconds or more (HKEY_LOCAL_MACHINE\System\CurrentCon-trolSet\Services\Disk\TimeOutValue).Note: If you recreate the cluster, this value may be reset to its default, so you must change it again. Cluster service must restart automatically on failure (first, second, and subsequent times).
Information required by technical sup‐port to ana‐lyze clustering related issues
Verify that the setup complies with the checklist.vm‐support tarball (vmkernel log, virtual machine configuration files and logs, �)Application and system event logs of all virtual machines with the problem.Cluster log of all virtual machines with the problem (i.e. %ClusterLog% which is usu‐ally set to %SystemRoot%\cluster\cluster.log).Disk I/O timeout (HKEY_LOCAL_MACHINE\System\CurrentControlSet\Services\Disk\Time-OutValue)Name of the virtual machines experiencing the problem.Date and time and the problem occurred.SAN configuration of the ESX Server system (LUNs, paths, and adapters).
Setup for Microsoft Cluster Service
46 VMware, Inc.

VMware, Inc. 47
Index
Aacross boxes 23
introduction 4prerequisites 8
adding storage 14, 24applications 2
Ccaveats 9cloning node1 18, 28cluster across boxes 23
first node 27introduction 4�5prerequisites 8second node 28upgrading 40�41
cluster in a box 13first node 17introduction 3prerequisites 7second node 18upgrading 38�39
clustering applications 2clustering hardware 2clustering physical and virtual
machines 6, 31first node 33second node 34
clustering software 2
clustering virtual across physical hosts 23
introduction 4prerequisites 8
clustering virtual machines on one host 13
introduction 3prerequisites 7
configuring IP addresses 14, 24
Ddisks
adding before networking 10adding to nodes (across boxes) 28adding to nodes (in-a-box) 19quorum 19, 29, 34shared 19, 29, 34
Ffirst node
creating (across boxes) 27creating (in-a-box) 17creating (standby host) 33
Gguest operating system
installing 18, 27, 35
Hhardware 2HBA settings 10�11

Setup for Microsoft Cluster Service
48 VMware, Inc.
Iin-a-box 13
introduction 3prerequisites 7
introduction 6IP addresses 14, 24
KKnowledge base x
MMicrosoft Cluster Service
configuring 16installing 16, 21, 30, 35running 30, 36setup 33
MSCSconfiguring 16installing 16, 21, 30, 35running 30, 36setup 33
NN+1
prerequisites 8networking
effect of adding disks 10node1
cloning 18, 28
Ooperating system
installing 18, 27, 35
Pprerequisites 7
QQLogic HBA settings 10�11quorum disk 19, 29, 34
Rrestrictions 9
Ssecond node
creating (across boxes) 28creating (in-a-box) 18creating (standby host) 34
server operating systeminstalling 18, 27
setuptroubleshooting 10
shared storage disk 19, 29, 34shared storage summary 9standby host 31
introduction 6prerequisites 8upgrading 42
storage 14, 24quorum disk 19, 29, 34shared 19, 29, 34
Uupgrade 39upgrading 38
cluster across boxes 40�41cluster in a box 38�39overview 38standby-host cluster 42
VVMware community forums x