sga web site administration user guide
TRANSCRIPT

SGA web site administration user guidehttp://e-sga.org/typo3
Revision 1.4Friday, November 30, 2007

SGA web site administration user guide
SGA web site administration user guide ......................................................................................... 2 1. General Typo3 backend administration ....................................................................................... 3
1.1. Text documentation .............................................................................................................. 3 1.2. Videos ................................................................................................................................... 3
2. Elections (st_election) .................................................................................................................. 4 2.1. Main Menu – The election list .............................................................................................. 4 2.2. Adding a new election .......................................................................................................... 5 2.3. Deleting an election .............................................................................................................. 6 2.4. Editing an existing election ................................................................................................... 6
2.4.1. Adding a new position for a given election .................................................................... 7 2.4.2. Deleting a position .......................................................................................................... 7 2.4.3. Adding a new candidate for a given position ................................................................. 7 2.4.4. Deleting a candidate ....................................................................................................... 7
2.5. Election results and security Audit ....................................................................................... 8 3. Membership (st_membership) ................................................................................................... 11
3.1. Member information ........................................................................................................... 12 3.1.1. Send members their account information ..................................................................... 12 3.1.2. Edit a member’s payment history ................................................................................. 13 3.1.3. Edit a member’s information: ....................................................................................... 15
3.2. Periods and Fees ................................................................................................................. 17 3.2.1. Adding a new period of payment ................................................................................. 17 3.2.2. Edit an existing period of payment ............................................................................... 17 3.2.3. Delete an existing period of payment ........................................................................... 19
3.3. Port members ...................................................................................................................... 19 3.3.1. Import members ............................................................................................................ 19 3.3.2. Export members ............................................................................................................ 19 3.3.3. Generating an XML file from a MS Access database .................................................. 19
4 Newsletters .................................................................................................................................. 21 5 Direct Mail .................................................................................................................................. 21
5.1 Recipient Lists ..................................................................................................................... 22 5.2 Quick Mail ........................................................................................................................... 22 5.3 Sending a page to a mailing list ........................................................................................... 23
5.3.1 Preparing the mailing ..................................................................................................... 23 5.3.2 Sending the mailing to your recipients list .................................................................... 24

1. General Typo3 backend administration
As any good open-source community project, TYPO3 relies on a solid documentation base. Sincethere is no need to re-invent what already exists, we will present what documentation is availableon the typo3.org website.
1.1.Text documentationFor the conventional mind, there is a good written documentation base at:http://typo3.org/documentation/document-library/
A special interest should be given to the ‘Getting Started’ guide as this is where you’ll find over90% of the information you will need to manage your TYPO3 website
1.2.VideosIf you prefer a more interactive approach, the TYPO3 team also offers most of its documentationin video format. From editing page content to user management, the list of covered subjects isdiversified and complete. Just hit the following link to get a glimpse of what is available:http://typo3.org/documentation/videos/
For Microsoft Windows users, the videos are available in WMV format. For each WMV video,you can choose from 3 audio tracks: English, German or Danish. The WMV videos are availableby visiting the following link: http://typo3.org/documentation/videos/wmv-format/
In all cases, how to download and play those videos is well explained, as well as how to select thedesired language in Microsoft Windows Media Player.
Topics of interests are:• Getting started:
o General principleso Edit and create pages and contento Backend moduleo The list module and clipboardo User management (Administrator)
• The How-To Collection:o Set Page Permissions (Administrator)o Mount a File Folder (Administrator)o Anything that picks up your curiosity
3

2. Elections (st_election)The extension ‘Elections’ is composed of two parts: Theback-end administration module and the front-end content.This tutorial will describe the back-end module. To accessthe module, left-click on the Elections icon located in themodules toolbar, under Tools as highlighted on Screenshot1. Clicking on this icon will bring up the main election list.
Screenshot 1
2.1.Main Menu – The election listThe election list is the module’s entry point. It details a handful of information for each electionregistered, a list of possible operations for a given election and the possibility to create a newelection.
Screenshot 2
Let’s take the time to have an overview of all the information presented. For a given election, 6fields of information are presented:Name Name given to the election at creation time. Freeform text.Description Description given to the election at creation time. Freeform text.Start Date Date at which the election will first appear in the front-end and give
SGA members the possibility to place their votes.End Date Last date possible for SGA members to register their votes. After this
date, the election will disappear from the front-end and the results willbe instantly available in the back-end.
4

Disable If disabled, the election will appear as non-existent / deleted in thefront-end but will remain available from the back-end module. Anyelection can be disabled at any time without any constraints.
Publish Results LEGACY. Used to publish results in front-end. Since no results areever published, this field is presently useless.
Edit election The ‘pencil’ icon (Screenshot 2 – 2). Edit election details, as well aspositions and candidates associated to this election. More details insections 2.4 thru 2.4.4
Delete election The ‘trashcan’ icon (Screenshot 2 – 3). Delete given election if it hasno current positions and it’s not yet started. More details in section 2.3
Results and audit The ‘bar graph’ icon (Screenshot 2 – 4). Consult results and/orperform a security audit. More details in section 2.5
Also available, but not directly in the list, is the ‘new election’ icon (Screenshot 2 – 1), used tocreate a new election. The process of creating a new election is presented in section 2.2.
2.2.Adding a new electionOnce you have left-clicked on the ‘new election’ icon in the main election list, you are presenteda form similar to the one shown in Screenshot 3.
Screenshot 3
There are 6 fields to fill out before you can create your new election: Election name Name given to identify the election. Freeform text.Description Description given to detail the election. Freeform text.Start date(dd-mm-yyyy)
Date at which the election will first appear in front-end. SGA members willnot be able to place their vote for this election before its start date.
End date(dd-mm-yy)
Last date possible for SGA members to register their votes. After this date,the election will disappear from front-end and the results will be instantlyavailable in the back-end.
5

Password & repeatpassword
Secret password used to run a security audit on the election. This passwordmust be kept confidential. If you loose this password, there is no way torestore it as it is not kept anywhere in the system. A lost passwordmeans that it will be impossible to run a security audit on this election.Repeat the password to ensure it was typed correctly.
Once all fields are filled, you can hit the ‘Submit’ button to proceed with election creation. Atanytime, you can hit the ‘Back to main election list’ button to cancel the operation and return tothe main menu.
2.3.Deleting an electionAs explained in section 2.1, clicking the ‘trashcan’ icon (Screenshot 2 – 3) will delete anelection. This action must be confirmed. As soon as the trashcan is clicked, a confirmationnotice will pop up. Clicking cancel will cancel the operation. Clicking yes will proceed with theremoval of election. There are 2 conditions that need to be verified in order for an election to bedeleted:
• It must have no current positions associated to it;• It must not have been started, meaning the start date must not have been reached already.
In both cases, an error message will be returned to the administrator to inform him of whatcondition(s) failed.
2.4.Editing an existing electionOnce you click on the ‘pencil’ icon (Screenshot 2 – 2) in the main election list, you are presentedwith a form similar to the one presented in Screenshot 4.
Screenshot 4
Four (4) fields can be edited here:Election name Already described in 2.1 and 2.2
6

Description Already described in 2.1 and 2.2Disable Yes/No field. Already described in 2.1. Check
this field to disable instantly the election infront-end. It will remain available from theadministration module. Any election can bedisabled at any time without any constraintswhatsoever.
Show Results LEGACY. Presently useless as results are neverpublished in front-end.
It is also from this form that positions will be managed (and their associated candidates). Thebottom part of the form gives us information about the current positions associated to theelection. As in 2.1 for the elections, you can use the ‘pencil icon’ (Screenshot 4 – 3) or the‘trashcan icon’ (Screenshot 4 – 2) to edit or delete a position respectively. There is also the ‘addposition’ icon (Screenshot 4 – 1) similar to the one presented in 2.1.
2.4.1.Adding a new position for a given electionOnce you click on the ‘add position’ icon (Screenshot 4 – 1), you are presented a simple formwith a single text field: the position name. Once filled, you can hit the Submit button to proceedwith position creation. You can also click the ‘Back to election details’ to return to the previousform or ‘Back to main election list’ to go back to main menu.
2.4.2.Deleting a positionThis task is similar to deleting an election (see 2.3). As soon as the ‘trashcan icon’ (Screenshot 4– 2) is clicked, a confirmation notice will pop up. Clicking cancel will cancel the operation.Clicking yes will proceed with the removal of position. There are 2 conditions that need to beverified in order for a position to be deleted:
• It must have no current candidates associated to it;• The associated election must not have been started, meaning the start date must not have
been reached already.
In both cases, an error message will be returned to the administrator to inform him of whatcondition failed.
2.4.3.Adding a new candidate for a given positionIf you click the ‘pencil icon’ (Screenshot 4 – 3), you will be presented a new form giving detailsabout existing candidates for the given position. From there, you can click the ‘add candidateicon’ (similar to the ‘add election’ or ‘add position’ icons). You’ll then have to fill a text fieldwith the name of the candidate and hit the ‘Submit’ button.
2.4.4.Deleting a candidateIf you click the ‘pencil icon’ (Screenshot 4 – 3), you will be presented a new form giving detailsabout existing candidates for the given position. From there, you can click the ‘trashcan icon’
7
associated with the candidate you want to delete. As in the case of elections (see 2.3) or positions(see 2.4.2), you’ll have to confirm this operation before it is processed.
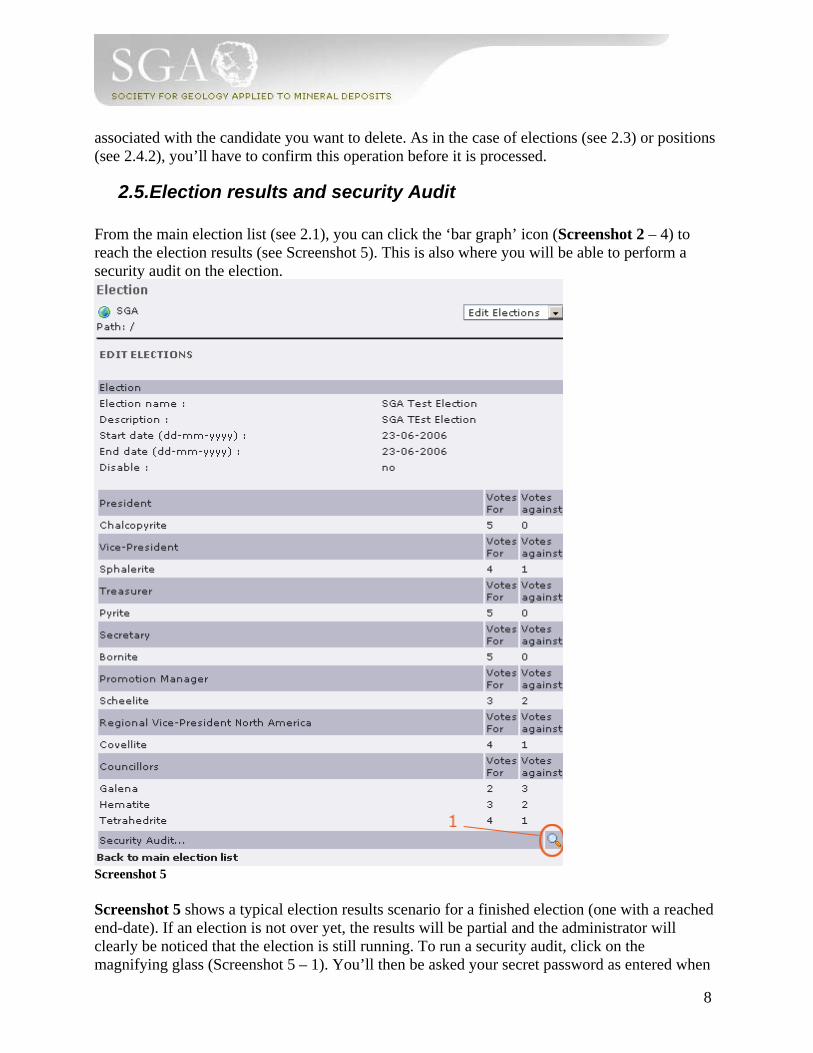
2.5.Election results and security Audit
From the main election list (see 2.1), you can click the ‘bar graph’ icon (Screenshot 2 – 4) toreach the election results (see Screenshot 5). This is also where you will be able to perform asecurity audit on the election.
Screenshot 5
Screenshot 5 shows a typical election results scenario for a finished election (one with a reachedend-date). If an election is not over yet, the results will be partial and the administrator willclearly be noticed that the election is still running. To run a security audit, click on themagnifying glass (Screenshot 5 – 1). You’ll then be asked your secret password as entered when
8

you created the election (see 2.2). If the password is correct, the audit will be performed. Atypical audit result looks like Screenshot 6.
Screenshot 6
If something went wrong, if the election was cheated or if the database is corrupted, administratorwill be noticed accordingly. IMPORTANT NOTICE: entering the wrong password will also
9

give a notice of corrupted data. What happens is that the encrypted data cannot be correctlydecrypted and thus is considered corrupt by the system.
This is another good opportunity to state that the password associated with an election shouldbe kept secure and not be forgotten!
1

3. Membership (st_membership)
The extension ‘Membership’ is composed of two parts: Theback-end administration module and the front-end content.This tutorial will describe the back-end module. To accessthe module, left-click on the Membership icon located in themodules toolbar, under Tools as highlighted on Screenshot7. Clicking on this icon will bring up the membershipmodule.
Screenshot 7
In TYPO3, there is a common practice for backend modules to have a dropdown menu for thedifferent parts of an extension. The Membership module adopted this practice and has 3 sub-sections available in its menu, as illustrated in Screenshot 8.
Screenshot 8
This is an overview of those 3 sub-sections before we go any further:
Member Information This is where you can have basic memberinformation as well as a payment history. Itis also here that all annual membershippayment will be recorded. See section 3.1for more details.
Periods and Fees Add/Edit/Delete periods of payment.Editing a period of payment let you modifythe grace period, the fees for each group ofmembers and the link used to refer to thesaferpay online payment system. Seesection 3.2 for more details.
Port Members Importation and Exportation of allmembers’ information. See section 3.3 formore details.
1

3.1.Member information
Once the Member information option has been selected from the Membership module’sdropdown menu, you are presented with a table similar to the one presented in Screenshot 9.
Screenshot 9
You have a list of all registered members in the system. You can then send members theiraccount information (Screenshot 9 – 1 and 3, see section 3.1.1) or edit a member’s personal dataand payment history (Screenshot 9 – 2, see section 3.1.2).
Note that you can also re-order the list by the options given in the box, then by clicking the‘Show fields’ button (Screenshot 9 – 4). The page will reload and re-order the list of members.
3.1.1.Send members their account informationThe membership module gives an administrator the possibility to send login information to usersby email. The concerned user will receive an email containing his account username andpassword in order to access the restricted area of the SGA website. There are two possible waysto do this:
All members at once Clicking the “Send all members theiraccount information by email” link(Screenshot 9 – 1 ) will pop up aconfirmation window. If confirmed, a mailwill be sent to each SGA member.
Specific user Clicking on the ‘envelope icon’ (Screenshot9 -3) will pop up a confirmation window. Ifconfirmed, a mail will be sent to theselected SGA member.
1

3.1.2.Edit a member’s payment history
Clicking the ‘pencil icon’ from the main form (Screenshot 9 - 2) will bring up another form,similar to the one presented in Screenshot 10, presenting the different periods of paymentregistered in the system and the user’s current payment status for each period.
Screenshot 10
1

Screenshot 11
Periods which are unpaid will be clearly identified with an ‘Unpaid’ notice in the ‘Paid on?’column and will have a ‘pencil icon’ (Screenshot 10 - 1) visible, giving the administrator thepossibility to add a payment for the period concerned. If more than one type of period exist for agiven year, the field 'Period' will give a more detailed description. The mention 'paid' will appearin the last column to see which price and format the user has chosen (ex: 'print and electronic' or'electronic only'). The unselected option will be disabled. (Screenshot 11)
Clicking this ‘pencil icon’ will bring a form similar the one presented in Screenshot 12:
Screenshot 12
1

After you have verified the year, the user and the amount of given payment, you can fill in thedate at which payment was made and click the submit button to add the new payment to the system. The date of payment field has a default value set to the current date. As always, you canclick the ‘Back to Members listing’ link to cancel the operation and go back to main form.
3.1.3.Edit a member’s information:To edit a current member’s information, you need to click on the pencil icon from the mainMember information page (Screenshot 9 – 2).
You will then click on the ‘Edit Member Information’ (Screenshot 10 - 2).
You will then be sent to a page similar to Screenshot 13:
1

Screenshot 13This page is used to modify the member’s informations. After you are done modifying themember’s informations, you must click on the ‘Submit’ button (Screenshot 13, 1), to savemember’s informations.
1

3.2.Periods and FeesOnce the Periods and Fees option has been selected from the Membership module’s dropdownmenu, you are presented with a table similar to the one presented in Screenshot 14Screenshot 9.
Screenshot 14
From here, you have an overview of registered Periods of payment. You can then either add anew period of payment (Screenshot 14 – 1, see section 3.2.1 ), edit a period (Screenshot 14 – 2,see section 3.2.2) or delete a period (Screenshot 14 – 3, see section 3.2.3).
3.2.1.Adding a new period of paymentClicking the ‘add new period’ icon (Screenshot 14 – 1) will automatically add a new period to thelist. The period will be disabled by default, meaning it will not be visible in front-end, thus, notyet available for members to place their payment. To enable the period and/or to modify the graceperiod, fees and saferpay url for the different member groups, you’ll have to edit the period ofpayment (see section 3.2.2).
3.2.2.Edit an existing period of paymentOnce the pencil icon (Screenshot 14 – 2) is clicked, you’ll be presented with a screen similar toScreenshot 15. From there, you can edit all details related to a given period:
• Is the period disabled? A disabled period is not available in front-end and invisible toSGA members.
• What is the Grace period (in days)? In other words, how long will members keep accessto restricted area of the website after then period’s end date if they have not paid theirmembership fee?
• For each member group :o What is the yearly fee in euros?o What is the URL used to link to the saferpay online payment system for this
group? Different group have different fees and thus different URLs.o What is the description that will be shown on the frontend when the user need to
choose between options, like 'print and electronic' or 'electronic only' format forregular clients? This description will follow 'group membership' in the descriptioncolumn.
1

Screenshot 15
1

One all information has been filled, click on the Submit button to record the new data.
3.2.3.Delete an existing period of paymentClicking the trashcan icon (Screenshot 14 – 3) will pop up a confirmation notice and, ifconfirmed, will delete given period and all associated member payments (if any are recorded).
3.3.Port membersOnce the Port Members option has been selected from the Membership module’s dropdownmenu, you are presented with a table similar to the one presented in Screenshot 16.
Screenshot 16
From there, you have 2 options, either you import members from an XML file (see 3.3.1) or youexport members to a CSV file (see 3.3.2).
3.3.1.Import membersThe process of importing member data is straightforward once you have the XML file ready. Fora procedure of how to generate the XML file from an Access database, see section 3.3.3. Click onthe Browse… button (Screenshot 16–2). In the file-selector window that pops up, select the XMLfile to import from. One your file is selected and you can see its path in the address bar(Screenshot 16–1), click the Send File button (Screenshot 16–4) to launch importation. Youshould then see a report of what members were imported.
3.3.2.Export membersSimply click on the ‘Export SGA members to CSV file’ link (Screenshot 16–3). A Save Filedialog will ask you whether you want to open the generated CSV file or save it to disk.
3.3.3.Generating an XML file from a MS Access databaseIn Microsoft Access, use the export function. Click File->Export. You will then be taken to awindow similar to the one presented in Screenshot 17 (our sample screenshots are in French butthe English version should be identical).
1

Screenshot 17
As in the Screenshot, select XML from the File type dropdown menu. Give a name to your fileand select in which directory you want to save it. Then click the Export button. A new window,similar to Screenshot 18 (again, sample screenshot is in French). Check the first checkbox: Data(XML) only. Leave the two other blank, then click OK.
Screenshot 18
The XML file is then generated and should be placed in the directory where you chose to save it.
2

4 NewslettersAdding a newsletter is nothing more thanadding a page under the ‘SGA News’ branchin the page tree (Screenshot 19 – 2). Youthen need to edit the page’s properties:
• enable the ‘hide in menu’ option;• set the ‘start’ time field, which will
become the publication date;• uncheck the ‘hide’ field to unhide
the newsletter in frontend;• Optionally set the page type to
‘external url` if you want thenewsletter to redirect automaticallyto a static web page or a media file(pdf, word, etc.);
The added page will be the container for thenew newsletter, ready for use as anystandard page under TYPO3. The cacheswill be cleared automatically upon creation or modification of any pages under the ‘SGA News’node. Changes will automatically be reflected in the frontend. If you do not want a newsletter toshow up in frontend, it should be hidden in the page properties.
5 Direct Mail
Direct mail is a TYPO3 extension generally used to manage mailing lists. It also feature a quickmail system which we’ll cover here. The official documentation can be found on the TYPO3website (typo3.org) under the extension section although it covers the installation andmanagement rather than the functionalities.
Once you have clicked on the Direct Mail module icon (Web->Direct Mail), the main contentarea will list the available direct mail folders. In our case, there should be only one, entitled‘Direct Mail Module’. Clicking on ‘Direct Mail Module’ brings us to the main Direct Mailinterface. As usual with all modules in typo3, you have an option menu, located at the upper rightof the screen. This menu gives 7 options:
• Newsletters• Direct Mails• Recipient Lists• Mail Engine Status• Quick Mail• Categories Conversion• Module Configuration
2
Screenshot 19

Only the Recipient Lists and Quick Mail options are of interest to us. Recipient Lists (section4.1), as the name implies, will help us manage mailing lists. Quick Mail (section 4.2) will beused to actually send mails.
5.1 Recipient Lists
Once you select ‘Recipient Lists’ in the option menu, the module will print all the lists currentlyavailable.
Screenshot 20From here you can create a new recipient list (Screenshot 20 – 3), edit an existing list type, titleand description (Screenshot 20 – 1) or edit the members signed to a given list (Screenshot 20 –2). You should look at how the ‘all members’ list is made in order to understand how to createnew lists.
5.2 Quick MailSelecting ‘QuickMail’ in the option menu brings you to a usual mail form.
2

Screenshot 21
The only important point here is to use the ‘Many mails, one for each recipient’ option.Otherwise, the mail could be considered as spam by many mail clients since we are using mailinglists of over 100 addresses (over 800 addresses for the ‘all members’ list at time of writing thisdocument). Once you are ready, click ‘Send message to all recipients of list immediately’ to sendthe email. A confirmation message will be printed, listing all the addresses that will receive theemail.
5.3 Sending a page to a mailing listTo start sending a mailing to a list of recipients, you first need to modify the page that you wantto send.
5.3.1 Preparing the mailingTo do this, you need to click the ‘Page’ module, in the top left menu. Then, select‘html_mailing’, under ‘DirectMail Module’, in the page tree.
2

You will then be sent to a page that looks like this:
You can then edit the page’s content as you would add/edit any TYPO3 content.
5.3.2 Sending the mailing to your recipients listTo send your mailing list to a list of recipients, you first need to select the ‘Direct Mail’ modulein the module list. Then, select ‘html_mailing’, under ‘Direct Mail Module’ folder in the pagetree.
2

You will then be sent to a page that looks like this:
You will then select the html_mailing link shown on the image above.
This will send you to this page:
You will then select, in the top right listbox, the ‘Fetch and compile mail content’.
This will send you to this page:
2

You will then click on the ‘Fetch and compile content’ button.
This will send you to this page:
You will then select the ‘Mass-send mail’ option, in the top right listbox.
This will send you to this page:
2

On this page, you need to select your recipient list, then click on the ‘Send to all subscribers inrecipient list’ button. This will prepare a mailing in the engine.
This will send you to this page:
To send the mailing right now, you need to select the ‘Mailer Engine Status’ option, in the upper-right listbox.
2
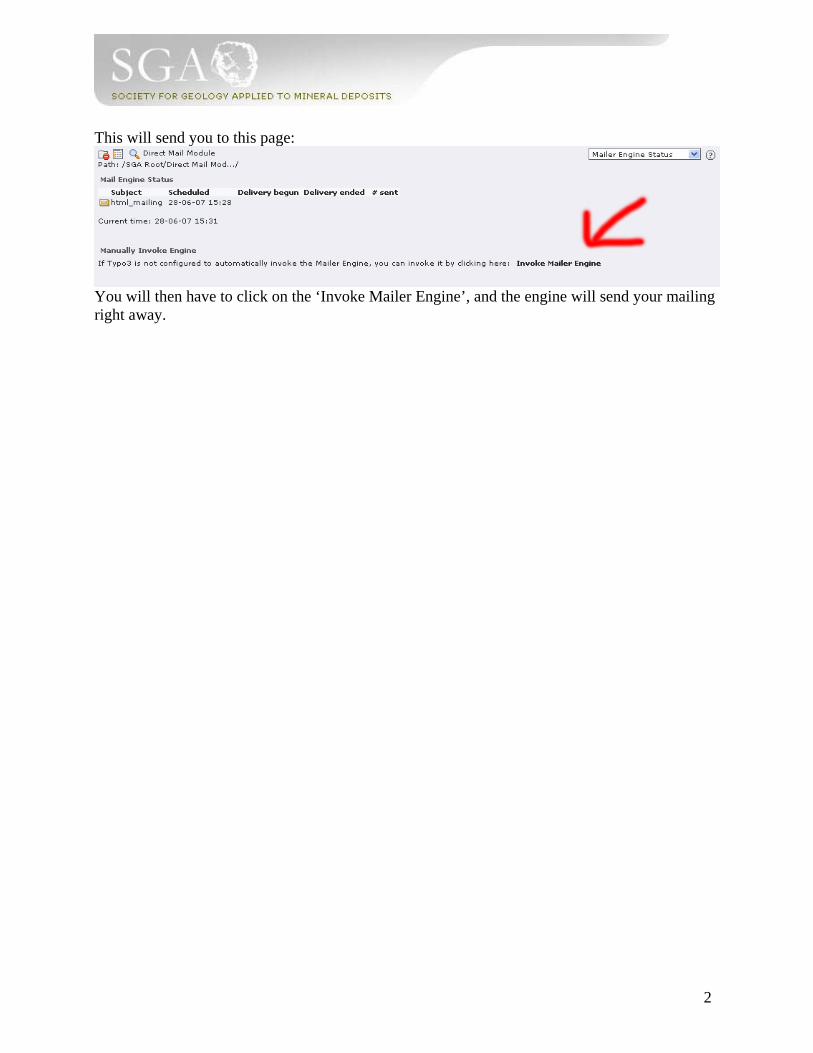
This will send you to this page:
You will then have to click on the ‘Invoke Mailer Engine’, and the engine will send your mailingright away.
2