shark sd100cncshark.com/downloads/sd100_user_manual.pdf · next wave cnc will repair the shark...
TRANSCRIPT

Shark SD100 (Barracuda)
User’s Manual
®
2 Shark SD100 (Barracuda) User’s Manual
Copyright 2020 Next Wave CNC All Rights Reserved.
Shark SD100 (Barracuda) is the registered trademarks of Next Wave CNC.
Ready2Control-Basic is copyrighted by Next Wave CNC. All rights reserved.
All other trademarks are the property of their respective owners.
Information in this manual is subject to change without notice.
The newest version of this manual can be downloaded from the Help menu in the
Ready2Control-Basic software – see page 34
The Shark SD100 (Barracuda) comes with the unique opportunity to trade up to a larger Shark HD model. If you outgrow your Shark SD100 (Barracuda) and decide to trade it in on the purchase of a larger Shark HD model, your Shark SD100 (Barracuda) will be refurbished by Next Wave CNC and donated to a school (in your name) in cooperation with The MiLL National Training Center, Colorado Springs, Colorado. (www.themillco.org)
Please save the original box to help facilitate shipping if you plan to upgrade.
For further details contact [email protected]

304/2020
To Our Customers ………………………………………………….…………………..… 4
System Requirements ……….………….…………….…………….…..…..……....... 4
Technical Support …….…………………….……………………….……………………. 4
Product Warranty ..….…………….……………………………….…………………..… 5
Safety …………………………………….………………………………………..….………… 6
START HERE:Overview (READ FIRST) ……….………….…….…………….…..………....... 7
1. Create a Portal Account ……….…………...……….………………………..… 8
2. Install Ready2Control-Basic Software ……….……….….…………..…… 11
3. Machine Setup ……………………..…………………….…………..….…….…… 20
4. Ready2Control-Basic Workflow .………..…………..……..…..…………… 26
5. Ready2Cut Projects ………………………...….…………….,……...…………… 30
6. Install Vectric VCarve Desktop software .…………………...…………… 31
Ready2Control-Basic Overview
Main Window ………………..……….…………………………………………….… 33
Menu Bar ……………………….………………………………………….……… 34
Update Icons ………………………………….………….………….…………… 35
Job List Panel ……………………….………………………………………….… 36
Viewport ……………………….…………………………………………………… 38
Machine Controls ……………………….…………………………..………… 39
Keypad Enabled view ……………………….…………………………… 39
Keypad Disabled View ……………………….………….……………… 40
General Settings Window ………….…………………...…….…………… 42
Theme Settings ……………………………………………….…………… 43
Speed Settings ……………………………………….……….….………… 43
Control Settings ……………………….……………………….…..……… 44
Viewport Settings ……………………………..…….……...…………… 46
Report an Issue ……………………………………………….…………… 48
More Settings Menu ……………………….………………………………… 49
How to Update the Machine Firmware ……………………….….……………. 52How to Update Ready2Control-Basic Software …………….………………. 56 How to Zero Z with a Touchplate ……….……….……………….….…………… 59
Maintenance ……….……….…………………………………………….…….…………… 62
Resources ……….……….…………………………………………...……………………… 63
Table of Contents Page

4 Shark SD100 (Barracuda) User’s Manual
Back to TOC
To Our Customers
Thank you for purchasing a Shark SD100 (Barracuda). Included with your purchase are software licenses for Ready2Control-Basic and Vectric VCarve Desktop.
The Ready2Control-Basic software runs on your computer and includes a broad set of machine control tools useful in operating your Shark SD100 (Barracuda) from your computer.
The Vectric VCarve Desktop software includes a broad set of CNC project design tools. Design tutorials and software support can be found at www.vectric.com
Pease read this manual carefully. It provides setup and operational information for your Shark SD100 (Barracuda), Ready2Control-Basic andVCarve Desktop software. This manual has been written with the assumption that the user is experienced with the basic operation of a computer as well as the technical knowledge required to safely operate power tools.
System RequirementsReady2Control-Basic and Vectric VCarve Desktop software can be used on any PC computer that is running Windows 10 and has a USB output port.
The Shark SD100 (Barracuda) uses 110v power. Cutting files can be run on the Shark SD110 using a computer running Windows 10 and Ready2Control-Basic software. The Shark SD100 (Barracuda) can also be controlled with a Control Pendant, which is an optional accessory that is available from your local Next Wave CNC distributor or online at NextWaveCNC.com.
Technical Support If you need technical assistance with Ready2Control-Basic software or any of your Next Wave Automation products please visit our Support webpage at: NextWaveAutomation.com/support or email our support team at [email protected] Include your product model number, date of purchase, and any other pertinent information that may be helpful such as .tap files, .crv files, screen captures, and photos of your setup or problem.Ready2Cotrol-Basic also has a build-in “Issue Reporting” tool that sends your Ready2Control-Basic software questions directly to our software team. See page 48 for more information.

505/2020
Back to TOC
Warranty
Shark SD100 (Barracuda)Next Wave Automation warrants that the Shark SD100 (Barracuda) to be free from defects in material and workmanship for ONE YEAR from the date of purchase. The warranty applies only to the original retail purchaser of the Shark SD100 (Barracuda) when purchased from an authorized Next Wave CNC distributor. This warranty covers parts and labor to correct the defect. It does not cover the cost of shipping the machine and/or parts to Next Wave Automation for repair.
This warranty does not apply to defects arising from normal wear and tear, misuse, abuse, negligence, accidents, unauthorized repairs, alterations, or lack of maintenance. This warranty is void if the Shark SD100 (Barracuda) or any portion of the Shark SD100 (Barracuda) is modified without the prior written permission from Next Wave CNC, or if the Shark SD100 (Barracuda) is located or has been used outside the country where the Shark SD100 (Barracuda) was purchased.
Please contact Next Wave Automation to take advantage of this warranty. If Next Wave Automation determines the Shark SD100 (Barracuda) is defective in material or workmanship, then Next Wave CNC will at its expense and upon proof of purchase send replacement parts to the original retail purchaser necessary to cure the defect. Next Wave CNC will repair the Shark SD100 (Barracuda) provided the necessary components are returned to Next Wave CNC, shipping prepaid, with proof of purchase and within the warranty period.
Next Wave CNC disclaims all other express or implied warranties, including fitness for a particular purpose. Next Wave CNC shall not be liable for death, injuries to persons or property, or incidental, consequential, contingent or special damages arising from the use of the Shark SD100 (Barracuda) machine.
Ready2Control-Basic softwareNext Wave CNC warrants Ready2Contol to perform as intended and will provide customer support to the original purchaser when purchased from an authorized retail distributor. Warranty only applies to the current version or the support needed to update a past version. The cost of the software upgrade (if any) is not covered by the warranty.
Next Wave Automation, LLC, [email protected]
600 W. Boundary St., Perrysburg, Ohio 43551 USAMain Office Phone (419) 318-4822

6 Shark SD100 (Barracuda) User’s Manual
Back to TOC
When operating machinery always wear the appropriate ear and eye protection and follow all safety instructions per your
machine’s owner’s manual and related equipment manuals.
1. Read safety and operating instructions before using your Shark SD100 (Barracuda).
2. Take time to fully understand how to safely operate your Shark SD100 (Barracuda).
3. Setup your Shark SD100 (Barracuda) per the instruction in this manual.
4. Always wear appropriate eye and hearing protection when operating your Shark SD100 (Barracuda) and accessories.
5. DO NOT machine metal with your Shark SD100 (Barracuda).
6. Never attempt to adjust the work piece or move the Shark SD100 (Barracuda) while the it is running.
7. If needed, use the Cancel or Pause buttons to Stop or Pause your Shark SD100 (Barracuda) in the middle of an operation.
8. Never leave your Shark SD100 (Barracuda) unattended while it is running.
9. While operating your Shark SD100 (Barracuda) , keep a multipurpose dry chemical fire extinguisher nearby. It must be rated for both A & C fires.
10. For added safety and convenience, connect your CNC to a 110-115V power strip with an on/off switch. This provides an additional way to turn off the machine in case of an emergency.
11. Follow all Safety instructions provide with your Shark SD100 (Barracuda) and accessories.
12. Follow accepted safety precautions and practices for woodworking and machining.

705/2020
Back to TOC
The START HERE instructions are divided into 6 major sections. They cover the steps involved in setting up your tool to use with the Ready2Control-Basic software.
IMPORTANT• Follow the steps in order. • Don’t skip any steps unless instructed to do so.
START HERE Sections
1. Create a Next Wave Portal Account ………….…….…………… 8
2. Install Ready2Control-Basic software ….…..……………..…… 11
3. Machine Setup …...………………....….……….…..……….….……… 20
4. Ready2Control-Basic Workflow .………….…....…….…..……… 26
5. Ready2Cut projects (with machining tips) …….…..…...…… 30
6. Installing Vectric VCarve software ………………......…..……… 31
PROBLEMS?If something doesn’t seem to be working correctly, try repeating the previous step(s) a couple times –it’s easy to miss a step. If that doesn’t solve the problem, please contact our Tech Support team by email or phone at:
Email: [email protected]: (419)491-4520 Available 9am – 5 pm Monday-Friday (Eastern time).
START HERE – OVERVIEW (READ FIRST)

8 Shark SD100 (Barracuda) User’s Manual
Back to TOC
Section 1 - Create a Next Wave Portal Account
1.1 You will use your computer to control the Shark SD100 (Barracuda). BUT DO NOT CONNECT THE TWO AT THIS TIME
1.3 The Next Wave Portal Login screen will appear. Click on SIGN UP*
* If you already have a Next Wave Portal Account click on Login and skip Step 1.8 on Page 10
1.2 Open a web browser on the computer you plan to use with your Shark SD100 (Barracuda) and go to https://portal.nextwaveautomation.com
905/2020
Back to TOC
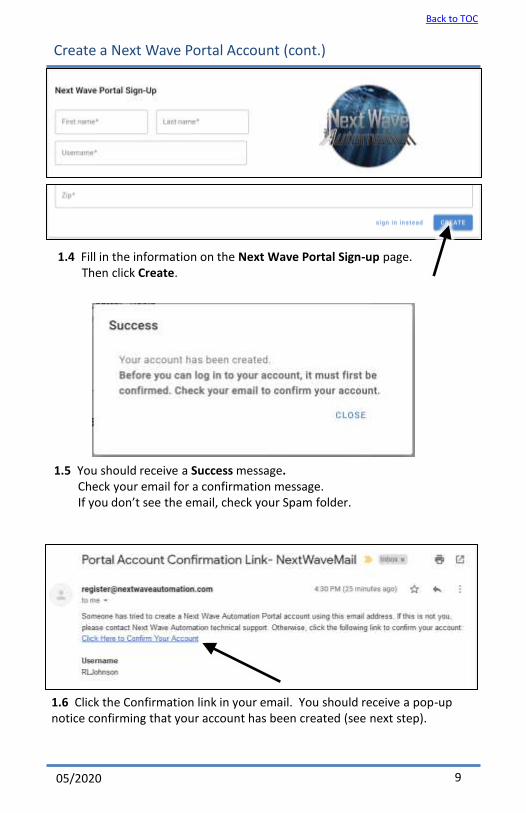
Create a Next Wave Portal Account (cont.)
1.5 You should receive a Success message. Check your email for a confirmation message. If you don’t see the email, check your Spam folder.
1.4 Fill in the information on the Next Wave Portal Sign-up page. Then click Create.
1.6 Click the Confirmation link in your email. You should receive a pop-up notice confirming that your account has been created (see next step).

10 Shark SD100 (Barracuda) User’s Manual
Back to TOC
1.7 Once your Account is confirmed, click Close
1.8 Return to the Portal Login screen and Login with your Username and Password. This will take you the Software Registration and download page.
This completes Section 1 – Create a Next Wave Portal Account
Create a Next Wave Portal Account (cont.)

1105/2020
Back to TOC
Section 2 – Install Ready2Control-Basic
2.1 in the My Software window, click the + Software button to start the download and install process for Ready2Control-Basic software.
2.2 Next, select Ready2Control-Basic from the dropdown menu.Enter the License Pair codes from the card that came with your machine.
2.3 Press Register.
The software will now attempt an automatic download. This may take a minute or two.

12 Shark SD100 (Barracuda) User’s Manual
Back to TOC
2.4 If a Save window appears, click Save File, then pick a folder and save the file. If the Save window doesn’t appear, check your download folder, it may be there. If it’s not there, do a Search on your computer for Ready2Control to locate the file. If you find it, then skip to step 2.7 on the next page.
If the file failed to download, go to Step 2.5 (below) for another way to download the program.
2.5 Ready2Control-Basic will now appear in the My Software window. Click on the software name to access the Software information window.
2.6 In the Software Information window, click the Download button to download Ready2Control-Basic.
What happens after you press the Download button will vary depending on computer setup. It may ask you to save it to a folder or it may save the file directly to your Downloads folder. If you don’t see where it downloaded, do a Search on your computer for Ready2Control to locate the file.
Install Ready2Control-Basic (cont.)

1305/2020
Back to TOC
NOTE: You may need to grant permission to your computer if it does not recognize the Ready2Control-Basic program.
2.7 Locate the file on your computer and click on it to start the install process.
2.8 If you get this message, select More Info.
2.9 Then click Run anyway.
Install Ready2Control-Basic (cont.)

14 Shark SD100 (Barracuda) User’s Manual
Back to TOC
2.10 Check the I Agree… box and then click the Install button.
2.12 Press LaunchThis will open Ready2Register window (see next step).
2.11 If you receive this message click Yes.
Install Ready2Control-Basic (cont.)

1505/2020
Back to TOC
2.13 If the Sign-In window appears, sign in using your Portal account name and password. Also check the box for Keep me signed in. This will simplify the current install process and future updates.
2.15 This message will appear next. Click CONFIRM.
2.14 After you’ve signed in, you will see Ready2Control-Basic in the list. Click on USE SEAT. This process will assign a copy of the software to the computer you are currently using.
Install Ready2Control-Basic (cont.)

16 Shark SD100 (Barracuda) User’s Manual
Back to TOC
2.16 Next check your email for the Unlock Code/Software Key.
2.17 Click on the Link in your email to access your Software Key.
Install Ready2Control-Basic (cont.)

1705/2020
Back to TOC
2.18 The software Key window will appear next. Click Copy Key. The software will attempt to automatically paste the Key into your copy of Ready2Contorl-Basic. If successful, Ready2Control-Basic will automatically open – See step 2.20 on the next page.
If it fails to auto-paste, you will be given the options to manually paste the Key into the software registration window – step 2.19 below.
2.19 If this window appears, paste the KEY into the space at the bottom and click Unlock. This will unlock and launch Ready2Control-Basic – see next page.
Install Ready2Control-Basic (cont.)
18 Shark SD100 (Barracuda) User’s Manual
Back to TOC
Install Ready2Control-Basic (cont.)
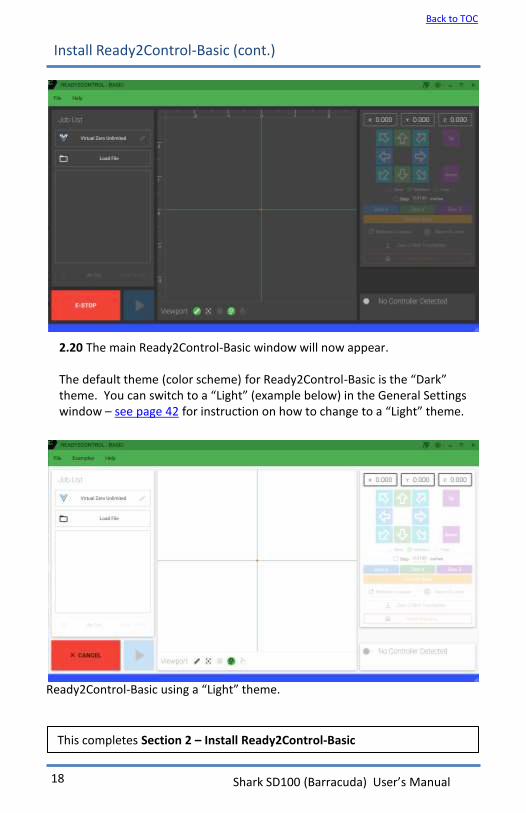
2.20 The main Ready2Control-Basic window will now appear.
The default theme (color scheme) for Ready2Control-Basic is the “Dark” theme. You can switch to a “Light” (example below) in the General Settings window – see page 42 for instruction on how to change to a “Light” theme.
This completes Section 2 – Install Ready2Control-Basic
Ready2Control-Basic using a “Light” theme.

Contain dust and sound with a CNC machine encloser from Next Wave CNC.
Available from your local Next Wave CNC distributor or online at www.NextWaveCNC.com
The CNC machine enclosure is designed to help control dust, add safety and reduce machining noise. Made with an aluminum frame, acrylic panels and steel connectors. Hinged access door with magnetic catch allows for easy material removal or bit changes. Pre-drilled 3” hole for cords allows for the case to be placed on any flat surface. Ships flat, assembly required.
CNC machine enclosure
20 Shark SD100 (Barracuda) User’s Manual
Back to TOC
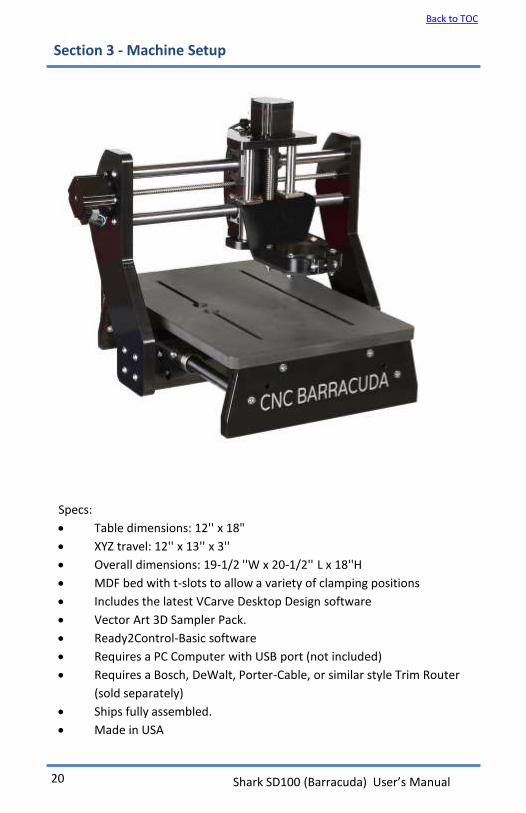
Section 3 - Machine Setup
Specs:
• Table dimensions: 12'' x 18"
• XYZ travel: 12'' x 13'' x 3''
• Overall dimensions: 19-1/2 ''W x 20-1/2'' L x 18''H
• MDF bed with t-slots to allow a variety of clamping positions
• Includes the latest VCarve Desktop Design software
• Vector Art 3D Sampler Pack.
• Ready2Control-Basic software
• Requires a PC Computer with USB port (not included)
• Requires a Bosch, DeWalt, Porter-Cable, or similar style Trim Router
(sold separately)
• Ships fully assembled.
• Made in USA
2105/2020
Back to TOC
Machine Setup (cont.)
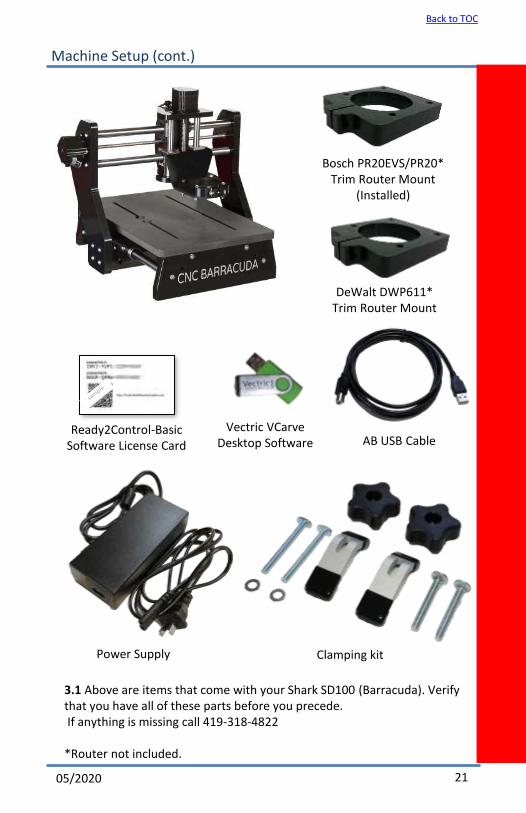
3.1 Above are items that come with your Shark SD100 (Barracuda). Verify that you have all of these parts before you precede. If anything is missing call 419-318-4822
*Router not included.
Ready2Control-BasicSoftware License Card
Vectric VCarve Desktop Software AB USB Cable
Power Supply Clamping kit
DeWalt DWP611* Trim Router Mount
Bosch PR20EVS/PR20* Trim Router Mount
(Installed)

22 Shark SD100 (Barracuda) User’s Manual
Back to TOC
3.2 Control Box OverviewA – Y Axis motor connectionB – 1/8” port (connects to optional Touchplate accessory - see page 58)C – On/Off power switchD – Z axis motor connectionE – Diagnostic lights (will flash intermittently during normal operation)F – USB port (connects to your computer with the AB USB cable)G – 15 pin connection (connects to optional Pendant accessory)H – Power cord connectionI – 20 pin connection (connects to optional Mini 4th axis (page 55) and Laser Module accessory (page 47)J – X axis motor connection
A B
H I
C
FE G
D
J
3.3 Connect the power supply (included) to the control box ( port H) and to a 120V outlet.
3.4 Turn ON the power switch (C)
3.6 Open Ready2Connect-Basic on your computer.
3.5 Connect the USB AB cable (included) to the USB port on the control box (F) and the USB port on your computer.
Machine Setup (cont.)

2305/2020
Back to TOC
Machine Setup (cont.)
NOTE: If you get this message, please follow the Firmware Update instructions on Page 52 and then return to step 3.6 below.
3.6 This message appears the first time you connect Shark SD100 (Barracuda) to Ready2Control-Basic. Clicking YES will register your machine to your Portal Account. If you’re not log-in, it will also prompt you to log-in to your portal account.
3.7 Click OKAY

24 Shark SD100 (Barracuda) User’s Manual
Back to TOC
3.8 Your machine is now connected to Ready2Control-Basic. The name of your machine appears in the lower right.
Machine Setup (cont.)
Step 3.9 Install your trim router in the mounting bracket so the bottom of the collet is about 1 inch from the deck when the Z axis at its lowest position. This will provide enough reach for most router bits. If needed, you can reposition the router up or down in the future.
This completes the Machine Setup. Your machine is now ready to use.
See the next section for an overview of the workflow when using Ready2Control-Basic and your Shark SD100 (Barracuda).
About 1-in. clearance

Explore and expand your creativity with these accessories from Next Wave CNC.
Available from your local Next Wave CNC distributor or online at www.NextWaveCNC.com
Starter sets General purpose sets
1/8 dia. tapered ball nose
1/4 dia. 60 deg. V-bit
1/4 dia. Spiral Upcut
Router bits – Find the right bit for your project. Available in a variety of sizes and shapes and as singles or sets. V-Bits, straight bits, upcut spirals, carving bits, small diameter bits and coated long lasting bits.
1/2 dia. 90 deg. V-bit

26 Shark SD100 (Barracuda) User’s Manual
Back to TOC
This section provides an overview of the basic workflow of Ready2Control-Basic when connected to your Shark SD100 (Barracuda) machine.
4.2 Connect your computer to the control box with the USB AB cable and turn ON the power switch on the control box.
Section 4 – Ready2Control-Basic Workflow
4.1 Open the Ready2Control-Basicsoftware.
Connect
4.3 Install the appropriate bit in the router and secure your project material to the table of your machine using the provided clamps and carriage bolts. Note: The T bolts that came with the clamps are not used with the Shark SD100 (Barracuda) deck.
For detailed information about specific functions in Ready2Control-Basic see pages 33-51

2705/2020
Back to TOC
4.4 Use the Arrow buttons to move the X and Y Axes (router bit) to the XY Zero (datum point) for your project.
4.5 Zero the X and Y axes using the Zero X and Zero Y buttons. The X and Y position fields at the top of the window will zero-out and display 0.000
4.6 Use the purple Z Up and Down buttons to position the tip of the router bit to the Z Zero location you set up in your VCarve file. When the bit is positioned, press the purple Zero Z button. The Z position field at the top of the window will zero-out and display 0.000. Next, use the purple Up button to move the Z axis up so the router bit is safely above the material.
X Position Y Position Z Position
Ready2Control-Basic Workflow (cont.)
OR If you have a Touchplate, use the process described on pages 59

28 Shark SD100 (Barracuda) User’s Manual
Back to TOC
4.7 Click on Load File.
4.8 Select your .tap cutting file.
4.9a Start the router.
4.9b Then press the blue Run button to start the file. The CNC will not start moving and cutting the design.
The .tap cutting file appears in the Job List panel.
A preview of the toolpath appears in the Viewport.
Ready2Control-Basic Workflow (cont.)

2905/2020
Back to TOC
Pressing the CANCEL button will stop the machine movement. To restart the file press the Blue Run button. The file will restart at the beginning – not where it left off.
Use this slider to decrease the feed speed while the file is cutting. NOTE: it may take a few lines of code before it takes effect.
The information below describes some of the basic functions that are useful when running a file.
Ready2Control-Basic Workflow (cont.)
This completes the Workflow Overview. If you would like to practice the workflow, check out the next section for some sample projects that require no design work and are Ready 2 Cut.
Pressing the blue Pause bar button will pause the cutting. Press it again to restart the file at the same place you paused it.
A progress bar appears behind the file name as the file cuts.
The percent completed appears in the lower right. A progress bar appears behind the time information.
When the file is complete, the actual total run time / estimate run time appears in the lower right.
To cut a new file click on Load File
To rerun the same file, click on the blue Run button.

30 Shark SD100 (Barracuda) User’s Manual
Back to TOC
Section 5 – Ready2Cut Projects
5.2 Start by downloading the Instruction from the Examples menu. The instructions contain detailed information on how to setup your Shark SD100 (Barracuda) to run these projects.
5.1 There are Ready2Cut projects available under the Examples menu. These projects are predesigned and load directly into Job List Panel in Ready2Control-Basic. They are a good way to get a quick understanding of how to operate your new Shark SD100 (Barracuda).
Welcome sign.tap
US flag.tap
Trivet.tap
Gone fishing.tap
Project Instructions

3105/2020
Back to TOC
Section 1 – Install Vectric VCarve Desktop software
A thumb drive (color may vary) containing the Vectric VCarve Desktop software is included with your Shark SD100 (Barracuda). Insert the thumb drive into your computer and follow the prompts for installation.
VCarve Desktop is used to design projects and create the cutting files that are used to make your Shark SD100 (Barracuda) move. Vectric provides a variety of training materials at their website – see page 63 for more information about Vectric and other resources to help you get the most from your new tool.
Explore and expand your CNC creativity with the book the shows you how.
Available from your local Next Wave CNC distributor or online at www.NextWaveCNC.com
CNC Router EssentialsGet started right with the book that shows you how.

Explore and expand your creativity with these Free Projects
Online at NextWaveCNC.com/cncprojectplans

3305/2020
Back to TOC
Ready2Control-Basic Main Panel overview
Main Control Main PanelThe R2Control -Basic main window contains six main sections:1. Menu Bar (see page 34)2. Update icons (see page 35)3. Job List, Virtual Zero and Run functions (see page 36)4. Viewport window and commands (see page 38)5. Machine controls (see page 39)6. General Settings (see page 42)
More Settings menu (see page 49)• Controller settings• Software Shortcuts• Registration window• About window.
1.
3.
4.
2. 6.
5.

34 Shark SD100 (Barracuda) User’s Manual
Back to TOC
File menuLoad File – Loads a .tap cutting file to Job List window.
Settings - Opens General Settings window. See Page 42 for more information.
Exit - Closes Ready2Control-Basic program. Ctrl+Q – keyboard shortcut to Exit program.
Help menuAbout– Opens the About window that contains Current Version information and Change Log history
Shortcuts - Opens the Ready2Control-Basic keyboard shortcuts window.
View manual – A link to most recent version of the Shark SD100 (Barracuda) User’s manual appears here when the software is connected to the internet.
Menu Bar
Examples menuContains cutting files and instructions for Ready2Cut projects. See Page 30
Available project may vary from those shown here.
Shark- Manual
Welcome sign.tap
US flag.tap
Trivet.tap
Gone fishing.tap
Project Instructions

3505/2020
Back to TOC
Update Icons
Software Update IconWhen this icon is glowing yellow it means a Ready2Control-Basic software update is available. Clicking on the icon starts the update process. Ready2Control-Basic automatically closes during the update process. Follow the screen prompts to update the software. Step-by-step information on updating the software is also found on page 56.
Firmware Update IconWhen icon on the right is glowing yellow it means a machine firmware update is available. Clicking on the icon starts the update process. See page 52 for instruction on how to update the firmware for your machine’s control box. If a red exclamation mark is showing, it means an update is available, but you need to log into your portal account.

36 Shark SD100 (Barracuda) User’s Manual
Back to TOC
Job List panel
Virtual Zero Unlimited is not available in this version of Ready2Control-Basic. To purchase Virtual Zero Unlimited visit nextwaveautomation.com/shop or call the Next Wave Sales team at 419-318-4822
Press Load File to load a .tap cutting file.
The currently “loaded” file appears here.
Press Air Cut to test cut the loaded .tap file.
Set Offset to thickness of the material plus a clearance amount. For example for .75” material thickness add .25” clearance for an Offset amount of 1.00”. This will keep the router bit at least .25” inches above your material during the Air Cut.
Press this button to RUN/PAUSE/RESUME the cutting file.
Press the CANCEL to stop the machine movement and cancel the cutting file. After pressing CANCEL the cutting file must be restarted from the beginning. For a temporary stop, use the blue Pause button

3705/2020
Back to TOC
Holding the cursor over the .tap file name reveals the Pencil icon and the Trash icon.
Use the Trash icon to delete the .tap file from the list.
Click on the Pencil icon to view the G-code for this file and to access the feed speed override slider (see below).
Feed speed override slider
G-code file. G-code can be viewed, but not edited. G-code editing will be available in a future “Pro” version of Ready2Control.
Job List panel (cont.)

38 Shark SD100 (Barracuda) User’s Manual
Back to TOC
Viewport window
Toggles ruler visibility on and off
Centers the entire job in the middle of the viewport.
Visualize Height - When enabled toolpath lines that are deep appear dark, shallow cuts appear light.
The crosshairs shows the current location of the tool (router bit center) relative to the XY zero location.
Horizontal and vertical lines represent the X Y zero locations
Click to Move – When enabled, clicking on the Viewport will move the tool (router/spindle) to that XY location on your machine.
Not functional with the SharkSD100 (Barracuda).

3905/2020
Back to TOC
Axis Position fields- Show the current location of
each axis.- Clicking on one of these fields will
open the Keypad control for that axis – see bottom of this page.
Arrow buttons – press arrows to move axis in that direction. To change arrow buttons can also be changed to the “classic” pendant style layout - see page 45.
Axis Keypad (pop-up view)Position fields- They show the current
location of each axis.- Clicking on a position field will
activate the keypad for that axis and the keys will change color to match.
- The location fields can be edited and used in conjunction with the Move to Position and Set Position buttons.
- The keypad also functions as a simple calculator.
Machine control panel
The Keypad ENABLED view provides quick access to the axis keypad. You can activate the keypad by clicking on one of the axis position fields. This will open the keypad control for that axis as shown at the bottom of this page. See page 44 on how to enable and disable the Keypad
See pages 40 and 41 for information on these buttons and functions
Keypad ENABLED view

40 Shark SD100 (Barracuda) User’s Manual
Back to TOC
Axis Position fields- Show the current location of
each axis.- When the Keypad is disabled,
values can be entered directly into these fields and used in conjunction with the Move to Position and Set Position buttons below.
Jog speed setting (to change default speeds see page 43)
Step – check this box to jog by the entered amount. (To set the default Step amount see page 43)
Zero X, Y, Z, All Axes buttonsClicking these button will set the Position field(s) to zero.
Machine control panel (cont.)
The Keypad DISABLED view prevents access to the keypad. Instead axis location can be entered directly in the axis position fields. See page 44 on how to enable and disable the Keypad.
See page 41 for information on these buttons and functions
Keypad DISABLED view

4105/2020
Back to TOC
Refresh Location button -Click this button if Position fields fail to update or if the machine stalls. The need to refresh can sometimes be caused by an underpowered computer, too many programs open or a program problem in Ready2Control-Basic. If you frequently need to use the Refresh Location button, contact [email protected] call 419-318-4822.
Move to Zero – Click this button to move one or all axis to its zero location.
Move to Position – Press this button after entering an amount in one or all the Axis Position fields
Set Position – Press this button after entering an amount in one or all the Axis Positions fields.
Zero with Touchplate (optional accessory)See page 59 for a step-by-step guide to using a touchplate.
Home Machine – Only available on Piranha XL and Shark HD tools that use a Pendant.
Safe Z – Enter the amount that you want the bit to raise above Z zero between cuts. Set to a height that keeps the bit from colliding with clamps or other objects. This amount can also be set in the Control settings window, see page 50.
Controller Toggle – Switches control between Ready2Control-Basic and the Pendant (The pendant is an optional accessory).
Job Progress – Shows the runtime and progress of the active job.
Feed Speed Slider – Adjusts the Feed Rate during operation.
(Cont.) Keypad DISABLED view
Job Progress
Feed Speed slider
Controller toggle and Connected Tool name
Machine control panel (cont.)

42 Shark SD100 (Barracuda) User’s Manual
Back to TOC
General Settings
More settings menuOpens a menu with access to additional settings and information windows. See page 49 for details.
General Settings windowSee the pages listed below for detailed information.
More options Opens access to the HardReset option, which resets all program functions to original default settings.
See page 43
See page 49
See page 46See page 44
See page 47
See page 48
Settings iconClick the Setting Icon to open the General Settings window (below) Additional setting and options can be access by clicking on the More Settings and More Option icons.

4305/2020
Back to TOC
The Light theme setting uses a light background color
Speeds settings
Use this area to adjust the default jogging speeds for the three jog speed buttons in the main control window.
Default Speed – Sets the default jog speed option in main Control window. (See page 39)
Slow, Medium, Fast - Set the default speed for each of these settings.
Step Distance - Sets the default step distance when using the “Step” option in the main Control window. (See page 40 )
The Dark theme setting uses a dark background color
The System Default theme setting uses your computer’s theme setting (light or dark or other)
Theme Settings
General Settings (cont.)
44 Shark SD100 (Barracuda) User’s Manual
Back to TOC
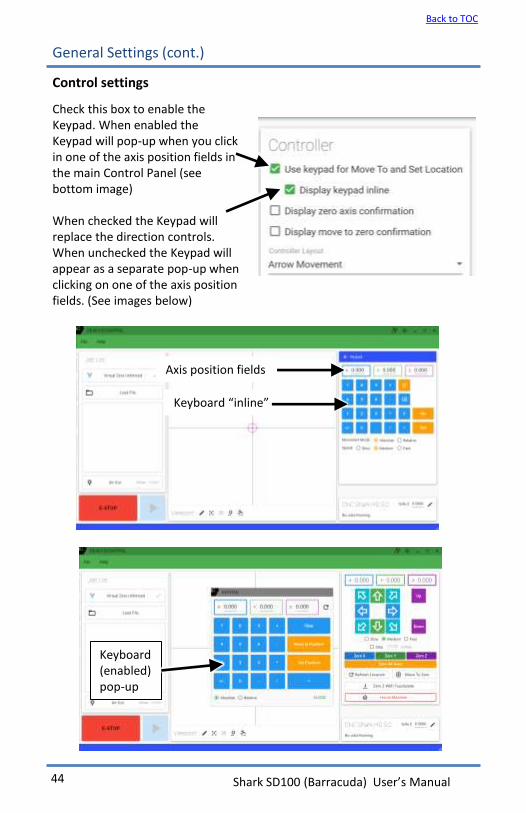
Check this box to enable the Keypad. When enabled the Keypad will pop-up when you click in one of the axis position fields in the main Control Panel (see bottom image)
When checked the Keypad will replace the direction controls.When unchecked the Keypad will appear as a separate pop-up when clicking on one of the axis position fields. (See images below)
Control settings
Keyboard “inline”
Keyboard (enabled) pop-up
Axis position fields
General Settings (cont.)

4505/2020
Back to TOC
Checking the box makes the Zero Axis confirmation message pop-up by default in the main control window.
Checking the box makes the Move to Zero confirmation message pop-up by default in the main control window.
Click on the name dropdown menu to toggle between the Arrow Movement layout and the Classic CNC Controlsbuttons. The Classic layout is similar to the Pendant control button layout.
Control settings (cont.)
General Settings (cont.)
IMPORTANT NOTE: When this box is UNCHECKED, the machine will move to XYZ zero when the Move to Zero button is clicked in the control panel.

46 Shark SD100 (Barracuda) User’s Manual
Back to TOC
Display Rulers – Check this box to make ruler visibility the default setting in the main Viewport window. (See page 38)
Visualize G-Code Height – Check this box to turn on this option as the default in the main Viewport window. (See page 38)
( Z-Label as seen in the main Viewport window)
(dropdown menu)Z-Label Behavior
• The Z label becomes visible for a few seconds each time the machine moves to a new X or Y or Z location.
• The Z label is always visible
• The Z label is always hidden
Viewport settings
General Settings (cont.)

Explore and expand your creativity with these accessories from Next Wave CNC.
Available from your local Next Wave CNC distributor or online at www.NextWaveCNC.com
Virtual Zero Unlimited – Carve your designs into a curved or uneven surface such as a chairback, gun stock or rough sawn board. (A larger Shark HD machine is required for large projects such as the Chair back shown above).
®
Laser Module (available with 2- or 7-watt power)* Engraves in a variety of soft materials such as wood, paper, and leather. Also cuts thin materials**. * Using the 7-watt with your Shark SD100 (Barracuda) requires a special mounting bracket.** Cutting thin materials requires the 7-watt model.

48 Shark SD100 (Barracuda) User’s Manual
Back to TOC
Report an issue
Current Instance checkbox- Check this box to automatically attach a log file (history) of your current
usage of Ready2Control-Basic. The log file is helpful to the programmers because it provides information about the problem you encountered and things that may have contributed to the problem .
- Leave the box unchecked if you wish to submit a comment or suggestion not directly related to your current instance of Ready2Control-Basic, or submit a older log file from an earlier session.
Click the button to open the Report An Issue window. Use this window to report issues (software problems) related to Ready2Control-Basic software. The reported issue is forwarded to the software support team.
You can also use this window to submit “Wish List” items for features you’d like to see added to Ready2Control-Basic.
Current log file and .tap file automatically attach to the report.
Drop-down menu access to past log files.
General Settings (cont.)

4905/2020
Back to TOC
The More Settings Menu icon is in the top left corner of the Settings window
See page 42
See page 50
See page 50
See page 51
See page 51
Click on the name in the menu to go to that window. See the pages listed above for detailed information on each window.
More Settings Menu

50 Shark SD100 (Barracuda) User’s Manual
Back to TOC
You can enter a custom name for your tool in this field. It shows up in the bottom right corner of the main control window.
Controller Settings (Applies to the Connected Controller)
Keyboard Shortcuts
Changes the color of the Crosshairs in the Viewport window
More Settings Menu (cont.)
Information for the controller that is currently connected.
Change Safe Z and Touchplate settings
5105/2020
Back to TOC
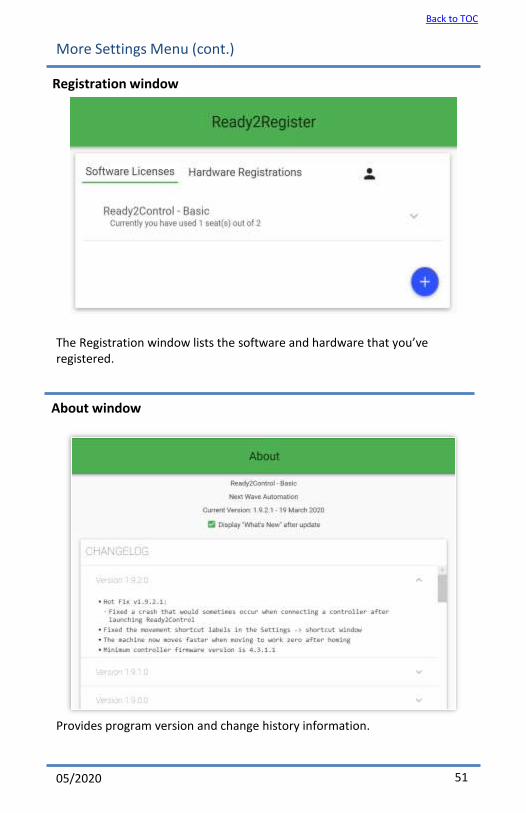
The Registration window lists the software and hardware that you’ve registered.
Provides program version and change history information.
Registration window
About window
More Settings Menu (cont.)

52 Shark SD100 (Barracuda) User’s Manual
Back to TOC
4.2a You will know the firmware in your machine’s control box needs updating because you will either get a pop-up message (shown above) or the Ready2Update icon in the upper right corner will glow yellow.
4.2b If you get the pop-up message, click on the green button and proceed to Step 4.3 on the next page.
4.2c If you see the yellow icon, click on the icon and proceed to Step 4.5 on the next page. NOTE
4.1 Before you attempt to update the firmware on your machine’s control box, make sure your computer is connected to the machine with the USB cable and the machine is turned on.
Connect with USB cable
Turn ON machineOpen Ready2Control-Basic
NOTE: Launching Ready2Update will close Ready2Control-Basic.
How to Update the Machine Firmware

5305/2020
Back to TOC
4.4 Ready2Update-Firmware program will launch
4.5 Click on the Download Controller button. When it’s yellow it means a new version of the firmware is available.
4.3a Check the I agree checkbox and the Install button. This will installs a firmware updating program on your computer. It also helps automate the process in the future.
4.3b Click Launch when the Installation Successful window appear.
How to Update the Machine Firmware (cont.)

54 Shark SD100 (Barracuda) User’s Manual
Back to TOC
4.7 Click on the X in the upper right to close the Ready2Update window.This completes the Firmware update process.
4.6 Click DONE when the update is complete.
You can now re-open Ready2Control-Basic and start using it again.
How to Update the Machine Firmware (cont.)

Explore and expand your creativity with these accessories from Next Wave CNC.
Available from your local Next Wave CNC distributoror online at www.NextWaveCNC.com
Mini Rotary 4th Axis – Works like a wood lathe but can also carve intricate patterns and designs in your CNC project. Excels at turning pens and tool handles.
56 Shark SD100 (Barracuda) User’s Manual
Back to TOC
How to Update the Ready2Control-Basic Software
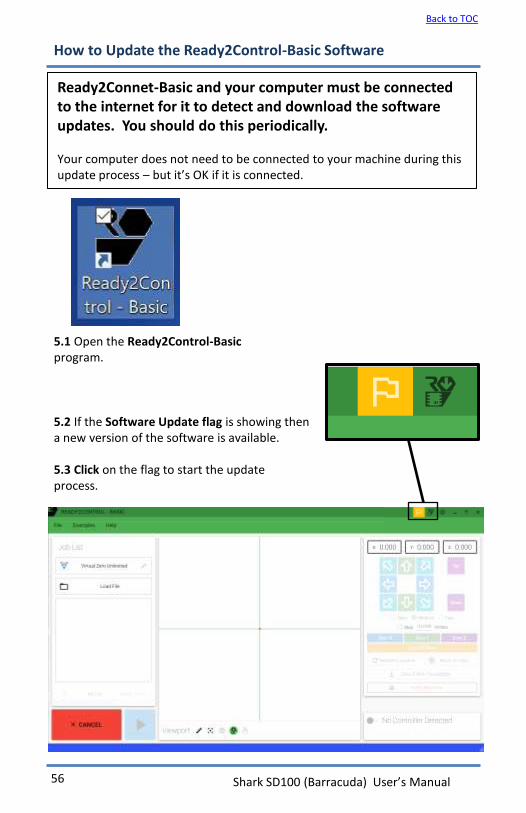
5.1 Open the Ready2Control-Basicprogram.
5.2 If the Software Update flag is showing then a new version of the software is available.
5.3 Click on the flag to start the update process.
Ready2Connet-Basic and your computer must be connected to the internet for it to detect and download the software updates. You should do this periodically.
Your computer does not need to be connected to your machine during this update process – but it’s OK if it is connected.
5705/2020
Back to TOC
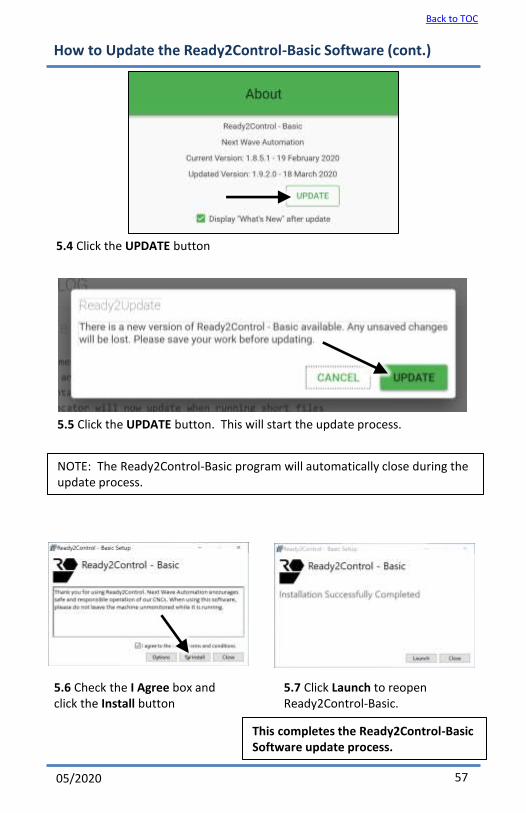
5.4 Click the UPDATE button
5.5 Click the UPDATE button. This will start the update process.
NOTE: The Ready2Control-Basic program will automatically close during the update process.
5.6 Check the I Agree box and click the Install button
5.7 Click Launch to reopen Ready2Control-Basic.
How to Update the Ready2Control-Basic Software (cont.)
This completes the Ready2Control-Basic Software update process.
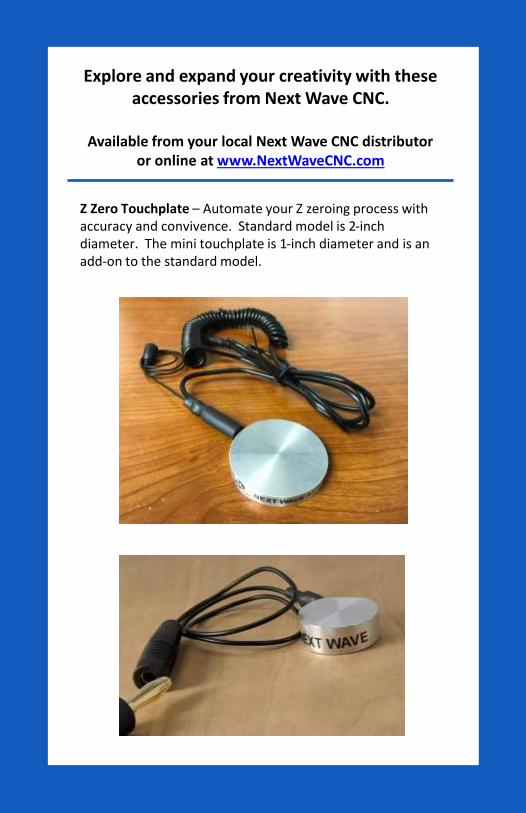
Explore and expand your creativity with these accessories from Next Wave CNC.
Available from your local Next Wave CNC distributor or online at www.NextWaveCNC.com
Z Zero Touchplate – Automate your Z zeroing process with accuracy and convivence. Standard model is 2-inch diameter. The mini touchplate is 1-inch diameter and is an add-on to the standard model.

5905/2020
Back to TOC
Step 1 - Plug Touchplate cable into controller- Place touchplate under bit - Attached magnet to collet or bit
Step 2Start the routine by clicking on the Zero Z With Touchplate button.
How to Use a Touchplate to Zero the Z axis

60 Shark SD100 (Barracuda) User’s Manual
Back to TOC
The Touchplate Thickness can be edited in this pop-up or in the Control Settings window (see page 50). Editing the Touchplate Thickness is useful if the plate is slightly over or undersize or if you want the routine to set the Z Zero slightly deeper or shallower. The Touchplate Thickness setting can also be used to accommodate the thickness of a custom-made plate.
How to Use a Touchplate to Zero the Z axis (cont.)
Step 3 Prepare the touchplate per the instruction in the pop-up window
Step 4 After the Confirmation notice appears, click NEXT.

6105/2020
Back to TOC
Step 5 The Z axis will move down until the tip of the router bit touches the touchplate. It will then retract up to the Safe Z Height that was set in the control panel (page 41).
Step 6 Remove the magnet and touchplate from the machine before proceeding.
How to Use a Touchplate to Zero the Z axis (cont.)
This completes the Z Zero process using the Touchplate accessory.

62 Shark SD100 (Barracuda) User’s Manual
Back to TOC
Daily• Check for damaged wires or components. Repair or replace as needed.• Check for loose parts. Tighten or adjust as needed. • Vacuum or dust-off machine and components including Controller and
router.• Wipe down the bars with a soft cloth.• Clean the leadscrews with a soft brush or vacuum.
Monthly or every 40 hours of use. • Apply a light coat of dry lubricant to to bars and leadscrews. Wipe off
excess with a soft rag.
Dupont Silicon Teflon spray works well as a dry lubricate and is available at your local Next Wave CNC retailer or online at: nextwaveautomation.com/shop
Similar products are available at hardware stores. Make sure it is the dry type, so it doesn't attract dust and cause buildup.
Maintenance

6305/2020
Back to TOC
Next Wave Automationwww.nextwaveautomation.comManufacturer of the SharkSD100 (Barracuda), Shark HD series, CNCPiranha series, Moray Laser and CNC accessories. The website has software and documentation downloads as well as information about the full line of Next Wave CNC products.
Next Wave CNC Technical SupportFor questions about your Shark SD100 (Barracuda) or Ready2Contorl-Basics software or other Next Wave CNC products, please contact our support team at [email protected]
NWA Owners Only Forumhttps://forums.nextwaveautomation.com/An online group of the CNC users geared around Next Wave CNC machine owners. The website has projects, ideas, showcase, and valuable support from users of all levels.
CNC Shark Talk User Forumwww.cncsharktalk.comCNC forum open to all CNC users.
Vectricwww.vectric.comProducers of the VCarve and Aspire software package. The Vectric website has product information, FAQs, on-line tutorials, and an excellent user forum. Keep in mind that Vectric only supports Vectric software. They are a separate company. They do not provide technical support for Next Wave products.
Resources

Shark SD100 (Barracuda) Owner's Manual
04/2020
80004