sharpener - cdn.ymaws.com · 38 american woodturner ctober 212 the nuts and bolts of fixtures and...
TRANSCRIPT

Following are excerpts of articles recently published in the “American Woodturner” journal, the premier publication of the American Association of Woodturners, serving more than 15,000 members worldwide.
We hope they pique your interest ... and you stop back and join the organization, with memberships starting at only $43 annually.
Other benefits of membership? Well ...• Automatic participation in periodic drawings for prizes• Access to all past issues of “American Woodturner,” going
back to 1986. • Access to machine-readable “American Woodturner” issues
for those members who are visually impaired and utilize screen-reading software - contact the AAW if this applies to you.
• Marketing opportunities on the AAW website for artists, collectors, galleries, and museums.
• Group rates for individual and chapter insurance.• Savings up to 50% on AAW merchandise, including project
books, DVDs, logo apparel, and more.• Eligibility to apply for AAW Educational Opportunity Grants.• AAW Forum and member-only access to articles and
resources on our website. • Eligibility to vote in AAW board elections if a member before
the end of August in that year.• Eligibility to apply for membership in the Professional
Outreach Program (POP) and its fellowship grants.• Access to Turners Without Borders, an initiative of taking
woodturning to the far corners of the world.
• Access to Woodturning Beyond Barriers, serving the needs of physically and sight-challenged turners.
• Access to Youth Turning programs, engaging a new generation of turners.
• Eligibility to attend all sessions and events the annual international symposium.
• Exhibit opportunities - AAW members may enter work for the juried member exhibit featured at the annual Symposium, the Gallery of Wood Art in St. Paul, and other venues.
• Annual International AAW Woodturning symposium.• Demonstration opportunities at AAW symposiums.• AAW “Resource Directory” that contains a complete listing
of contact information for members, local chapters, demonstrators, and other woodturning resources. Updated listings are available to members through the AAW website.
• More than 350 AAW local chapters worldwide that offer workshops, camaraderie, opportunities to share ideas and techniques, and access to lending libraries, discounts, and volume purchases.
• And more ...
woodturner.org

27woodturner.org
F e a t u r e
One of the major differences between an expert turner and most beginners is how sharp each turner keeps his tools. Sharp tools are also are why one beginner becomes proficient much faster than another, and dull tools probably discourage some beginners who just give up. Our turning tools really are consumable items just like sandpaper. They need to be sharp-ened much more frequently than many beginners imagine, and yes,
repeated sharpening does use them up although it may take years.
When I teach I always advise begin-ning and intermediate turners to spend time learning how to properly sharpen their tools. A key advantage of belonging to the AAW and becom-ing active in your local chapter is that our clubs offer many opportunities to learn how to sharpen properly. My local chapter conducts sharpening workshops and we also have a mentor-ing program to help our new members get their tools properly sharpened so they have one less barrier to learning.
This article provides an overview of the various sharpening systems currently available: dry grinders, wet grinders, belt systems, and the new rotary see-through grinders that have come to market in recent years. I will explain the primary features, ben-efits, disadvantages, and costs of each system. Because many turners also have other woodworking interests, we will also look at other possible uses. Everyone has a different budget and workshop setup, so there is no single perfect solution, system, or method for sharpening.
For everyday sharpening, many woodturners rely on a slow-speed grinder with two 8" × 1" white aluminum oxide wheels. On Jim Echter’s machine, the left wheel has a TruGrind jig for sharpening gouges, skews, and parting tools. The right has a Veritas adjustable-angle platform for sharpening scrapers.
Here’s why: with sharp tools, you can turn cleanly and skip directly to your finest sandpaper grit.
Sharpener Alternatives
{The joy of sharp tools} Jim Echter

38 American Woodturner October 2012
The Nuts and Bolts of Fixtures and JigsAdventures in Woodturning
John Kelsey
J igs guide tools and fixtures hold workpieces; they are aids to effi-cient and/or repeatable woodturn-
ing, but sometimes they only substi-tute for a skill you might be better off learning. I touched all of those bases when my wife wanted a folding base to support a 36"- (90 cm-) round brass tray. It needed 36" walnut cross-spin-dles with pommels and tenons, and even as 1¼" (3 cm) squares they flexed while on the lathe. So I made a fixture to steady the workpiece.
There are two principles about jigs and fixtures that an apprentice or student would learn, but a self-taught amateur might not. First, you need a basic vocabulary of universal elements that are accurate, cheap, and quick to make. For the lathe, flat sleds with hardwood runners that lock on to the ways offer support to attach fences and mount vises, steady rests, router motors,
or whatever. Second, you will not get it right the first time and maybe not the second time either. Plan to make your useful gizmos twice, maybe even three times. The first pass—quick and crude—proves the concept and dimen-sions. Try to nail it on the second pass and be neat. Then if the gizmo really is a winner, go to town for Mark III, chamfer all edges, and wax or varnish.
A jig sledTo make jig sleds I started with 2' × 4' (60 cm × 120 cm) panels of ½" (13 mm) and ¾" (19 mm) MDF because they are flat, smooth, and inexpensive at the home center, plus runners sawn from hardwood scraps. Photo 1 includes a few feet of sled made by gluing and screw-ing a ¼"- (6 mm-) thick walnut runner onto the MDF base. Then, as if you were slicing bologna, you can just saw off whatever size sled the next project needs.
To hold a sled onto the lathe ways I like wooden nuts and bolts, more key ele-ments in my shopmade gizmo vocabu-lary. They work, they use up shop scrap, and best of all, I can tailor the parts to the job. People can’t resist fiddling with wooden nuts and bolts—they can really dress up a project. Photo 1 also shows the ½" × 8 tpi threadbox with matching tap that I got many years ago from AAW stalwart Ernie Conover, and you can buy similar sets online for about $60.
A few discoveries• For a threaded rod, turn a hard-
wood dowel 15⁄32" (12 mm) dia. so it just spins freely in a ½" (13 mm) hole (Photos 2, 3).
• For wingnuts and bolt heads, drill 7⁄16" (11.1 mm) for a loose thread, 13⁄32" (10.3 mm) for a tight one—your mileage may vary, so you do have to experiment.
Photo 1. A lathe sled is bolted to the ways (l), thanks to the scrap-wood parts and
threading tools arrayed on the lathe bed. The sled in the middle has just been sliced
from the long MDF blank (r). The walnut ripping, ¼" thick, is glued to the MDF and makes a sliding fit between the lathe ways.

42 American Woodturner October 2012
Sphere-Cutting JigShopbuilt
Eugene Lee
I ’ve been turning for a few years and have honed my skills so that I can turn a sphere-shaped object,
either as a solid or hollow form. They are always sphere-shaped rather than near perfect because when I rotated them in my hands, I felt some bulges and depressions—they were not as spherical as I wanted.
When turning a spherical object without the use of a jig, I am mindful that at any time I can cut too much and go inside the target radius. When that happens, I either recut the sphere to a smaller radius or leave it alone as a sphere-shaped
object. I wanted to spend more time exploring surface enhancements rather than turning the sphere itself, so I decided to build a sphere-cut-ting jig.
The jig’s cutter has to be mounted at the lathe’s center height, on an arm that pivots around a point directly under the intersection of the lathe axis and the equator of the sphere-to-be. Swinging the arm through a semicircle sweeps the cutter across the surface of the sphere. There are a number of metal sphere-cutting jigs on the market (see page 46), but I have no experience with machining, so I
designed a jig that can be built with hardwood, phenolic-faced plywood, and metal hardware.
Make the jigThere are two parts to this jig (Photo 1): a platform mounted on the lathe ways, and a pivoting turret that
(Above, l to r) Juniper spherical hollow form with a tilted band, 4¾" (12 cm)—band produced by
multiaxis turning. Walnut, 4¼" (11 cm); Avocado, with John Jordan-inspired carving, 4½". Spheres
were turned with the jig described.

47woodturner.org
F e a t u r e
Joshua Friend
1Several crossgrain box lids are rough turned for drying.
Crossgrain Jewelry
Boxes
C rossgrainJewelry
Boxes
I like it when a customer chal-lenges me to expand my turning repertoire. Recently, a woman
asked if I would make her a jewelry box. I had turned plenty of endgrain boxes, but never one large enough to be regarded as a proper jewelry box, with dividers and a soft, welcom-ing interior. I began to consider how those standards could be applied to a turned jewelry box. Ultimately, the inquiry led me to explore turning lidded crossgrain boxes (also called lidded bowls).
Benefits and considerations Unlike traditional endgrain boxes where the grain runs parallel to the ways of the lathe, crossgrain boxes are turned in a perpendicular, or faceplate-grain, orientation. This orientation allows for larger diameter
boxes—expanses across the width of boards are usually larger than expanses across endgrain where the pith may be unavoidable. Wider diameters afford excellent opportuni-ties to use the lid to showcase grain patterns, feature unusual figure, or add embellishments, such as chip carving. Also, the lid and body of the box can be made from different pieces of wood, which opens up possibili-ties for using contrasting species, like maple and walnut.
For endgrain boxes, the lid and body are usually made from the same piece of wood, with the grain con-tinuing from the body to the lid. This means that when the wood expands and contracts with changes in mois-ture content, the body and lid are likely to move proportionately with one another and the original good
fit is main-tained. The lid and body of a crossgrain box, however, may behave differently with seasonal movement, especially if varying species are used
together. For this reason, I do not try to achieve a tight or suction fit of the lid, which would be more likely to fail over time. Instead, I employ a tight fit only during the turning process and then intentionally loosen it for the final fit. Lifting a lid off a jewelry box should not require two hands.
Another consideration is the dryness of the wood. With most lidded boxes, endgrain or crossgrain, it is wise to start with wood that is thoroughly dried to minimize the effects of wood movement as a result of changes in moisture content. This especially holds true for crossgrain boxes. Professional turner Mike Mahoney noted about his crossgrain cookie jar, pictured on page 52, “I carefully dried the pieces: I brought the rough-turned pieces into the house for a few months to give them a natural environment.” Photo 1 shows several lids for jewelry boxes, which I rough turned both inside and out. The general shape is defined, and I left the lids slightly thick. Rough turning allows the wood to do most (and hopefully all) of its moving prior to final turning.
Noted demonstrator and teacher Richard Raffan said, “The lidded bowl is still my favored project
Joshua Friend, untitled, 2011, Sipo mahogany, figured maple, 4" × 8" (10 cm × 20 cm)
62 American Woodturner October 2012
GGALLERY
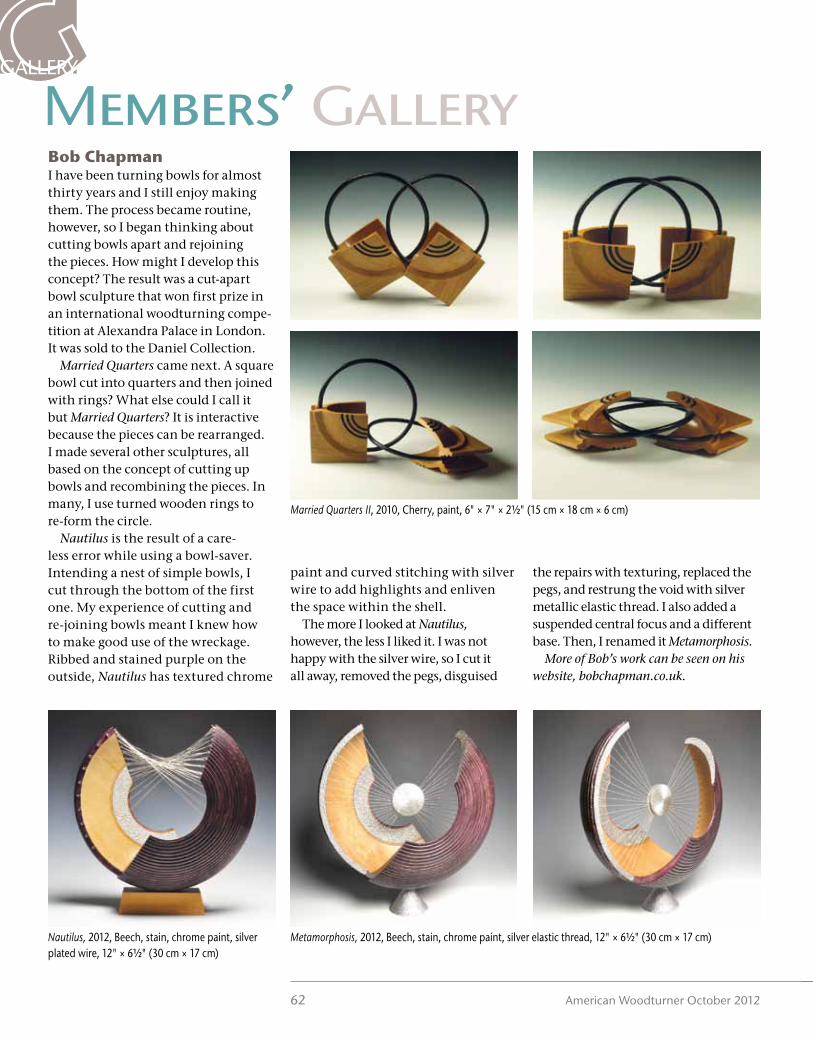
I have been turning bowls for almost thirty years and I still enjoy making them. The process became routine, however, so I began thinking about cutting bowls apart and rejoining the pieces. How might I develop this concept? The result was a cut-apart bowl sculpture that won first prize in an international woodturning compe-tition at Alexandra Palace in London. It was sold to the Daniel Collection.
Married Quarters came next. A square bowl cut into quarters and then joined with rings? What else could I call it but Married Quarters? It is interactive because the pieces can be rearranged. I made several other sculptures, all based on the concept of cutting up bowls and recombining the pieces. In many, I use turned wooden rings to re-form the circle.
Nautilus is the result of a care-less error while using a bowl-saver. Intending a nest of simple bowls, I cut through the bottom of the first one. My experience of cutting and re-joining bowls meant I knew how to make good use of the wreckage. Ribbed and stained purple on the outside, Nautilus has textured chrome
paint and curved stitching with silver wire to add highlights and enliven the space within the shell.
The more I looked at Nautilus, however, the less I liked it. I was not happy with the silver wire, so I cut it all away, removed the pegs, disguised
the repairs with texturing, replaced the pegs, and restrung the void with silver metallic elastic thread. I also added a suspended central focus and a different base. Then, I renamed it Metamorphosis.
More of Bob’s work can be seen on his website, bobchapman.co.uk.
Members’ GalleryBob Chapman
Nautilus, 2012, Beech, stain, chrome paint, silver plated wire, 12" × 6½" (30 cm × 17 cm)
Metamorphosis, 2012, Beech, stain, chrome paint, silver elastic thread, 12" × 6½" (30 cm × 17 cm)
Married Quarters II, 2010, Cherry, paint, 6" × 7" × 2½" (15 cm × 18 cm × 6 cm)

8 American Woodturner October 2013
A s s o c i A t i o n n e w sANNEWS
Prize Drawing for AAW Members
• Provide sufficient information so EOG committee members can clearly understand what you are requesting and how you intend to use the funds. Please be as concise as possible to make your points direct and clear.
• Include details of how you will use the funds. Specific needs should be itemized. Funds will not be granted for miscellaneous, incidental, or unspecified expenses.
• Explain your educational goal or experience you wish to obtain. Keep in mind that these grants are for educational purposes. In particular, please explain how others will benefit as well.
Grants are limited to $1,000 for indi-viduals and students and $1,500 for local chapters, schools, and nonprofit organizations. Your budget may exceed
AAW’s Educational Opportunity Grant (EOG) fund continues to be strong, thanks to the wonderful gen-erosity of donors and buyers at our annual symposium auction. Funds are available for worthy proposals. To be eligible, applications must be received by December 31, 2013. All AAW members are eligible to apply (except for recent recipients). You can complete the application form and review the guidelines at woodturner.org/resources/eog/.
The committee will not consider applications that are incomplete or vague. Please take care when applying. The following tips will help you with your application:
• Complete the application online at woodturner.org/resources/eog/. Only online applications will be accepted.
Apply for an AAW Educational Opportunity Grant these limits; however, your grant request should not exceed EOG limits. For special situations, at the discretion of the EOG committee and the AAW Board, grants are available in larger amounts. In addition to EOGs, the committee will award ten certificates for registration to AAW’s international symposium.
If you have questions, contact the EOG committee chair or the AAW office. The AAW Board encourages you to take advantage of this mem-bership benefit.
Kurt Hertzog, EOG committee chair [email protected]
Call for DemonstratorsAAW Symposium 2014Deadline: October 15, 2013The AAW’s 28th annual international symposium will be held in Phoenix, Arizona, June 13-15. Visit the AAW website at woodturner.org/calendar for instructions on how to submit an application for demonstrating. For additional information,
call the AAW office in Saint Paul, 651-484-9094, or email, [email protected].
One of the many benefits of membership in the AAW is our monthly prize and year-end grand prize drawings. Thank you to the vendors who donated this year’s prizes, which include tuition scholarships, $100 certificates, sanding supplies, DVDs, chucks, grinding jigs, symposium registration, and lathes! Contact Linda Ferber if you would like to contribute a prize, [email protected].
When you patronize our vendors, please thank them for their support of the AAW. Visit our website at woodturner.org/org/mbrship/drawings_winners.htm to see each month’s prizes and winners.
At the end of 2013, we will draw another name from our membership roster to give away a Powermatic 3520B lathe. That winner will name a local chapter to win either a JET 1642 or five JET mini-lathes. The Powermatic and JET lathes are donated by Walter Meier Powermatic/JET. Included is free shipping in the continental USA, or up to a $500 allow-ance for international winners.
2013 Donors (Others may be added during the year.)
Anderson Ranch Arts Center, andersonranch.org
Arrowmont School of Arts and Crafts, arrowmont.org
Craft Supplies, woodturnerscatalog.com
David Ellsworth, ellsworthstudios.com
Easy Wood Tools, easywoodtools.com
Hunter Tool Systems, hunterwoodturningtool.com
John C. Campbell Folk School, folkschool.org
Mike Mahoney, bowlmakerinc.com
North Woods - Figured Woods, nwfiguredwoods.com
Oneway Manufacturing, oneway.ca
Tennessee Association of Woodturners symposium registration
Thompson Lathe Tools, thompsonlathetools.com
Totally Turning/Showcase Symposium, totallyturning.com
Trent Bosch, trentbosch.com
Walter Meier Powermatic/JET, powermatic.com and jettools.com
Woodturning Design magazine, woodturningdesign.com

18 American Woodturner October 2013
Think Inside the BoxA dust-free finish booth that also works as a drying box
for green wood and a stage for photographyJohn Franklin
Daylight-balanced fluorescent lights
Thermostat
Thermometer
Heater
Kraft paper
Intake filter
Exhaust filter
Exhaust fan and vent
Outlet and timer
I f you are like me, you work in a small, unheated shop. When you want to finish a piece, you have
to put all other projects on hold to avoid getting dust in the wet finish. You sometimes try to heat the shop to make finishes cure faster. When you think you have everything right, you may still get complaints about finish odors that make their way to living quarters. To solve those problems in my shop, I built a multipurpose booth.
This large, enclosed box serves mainly as a dust-free finish-drying booth. It is vented to the outdoors, so heat, humid-ity, and fumes from finishes exit the building. When closed, the booth is energy-efficient. I can regulate the inte-rior temperature and humidity, so I can work in cold weather without heating the entire shop. What’s more, the finish and the wood start at the same tem-perature, for optimum results. Best of all, because the booth has a door and a
filtered air intake, I don’t have to stop sanding or turning while the finish dries. The booth also makes an out-standing place to store and dry green or partially turned pieces. And, it serves as a photography booth.
How it is madeI spent about a year building the booth, making numerous modifications along the way. At the outset, I had a bench top made from an 80" × 30" (203cm
A simple box with many features: ultrafine intake and exhaust filters, an exhaust fan, and multiple electrical outlets make for a versatile booth.

21woodturner.org
F e a t u r e
From a Tube KiTJoshua Friend
This simple project is sure to please during the holidays: ornaments from a tube kit. There are many
projects that make use of brass tubes for centering and driving the wood on the lathe, such as pens, whistles, letter openers, and perfume atomizers. If you have not yet ventured into the world of tube kits, this project is a good place to start. It’s simple, quick, and fun!
There are several resources for pur-chasing ornament kits. I bought mine from Craft Supplies USA. When you pur-chase an ornament kit, it comes with a brass tube, a decorative tip (in the shape
of a droplet, icicle, or spiral), and an eye cap for hanging the ornament (Photo 1). You will also need a pen mandrel, which is used for holding and driving the piece on the lathe, and two bushings, which make it easy to achieve a smooth transi-tion from the wood to the metal parts (Photo 2). When ordering, make sure to purchase the 7 mm (.335") bushings, the appropriate size for this kit. You will also need a 7 mm drill bit.
Wood preparationThis project does not require much wood, so it is ideal for using up small
scraps or pieces of exotic wood or burl. The brass tube provided in the kit determines the length of the blank: The wood should be cut about ¼" (6mm) longer than the brass tube. Place the brass tube on the wood and make a cut mark so that about ⅛" (3mm) overhangs each end (Photo 3). It is not essential to cut the wood square because the blank will be squared up later using a barrel trimmer. The width of the blank depends on your design.
Drill a hole all the way through the blank using a 7-mm drill bit. Center the hole, but precision is not
1 2Ornament kits can be purchased in three styles, top to bottom: droplet, icicle, spiral.
A typical pen mandrel can be used to turn many different tube-type kits. The bushings go on both sides of the wood and provide a target diameter for a smooth wood-to-kit transition when the kit is assembled.
Ornaments

36 American Woodturner October 2013
HARMONYBarbara Dill
Harmony, 2013, Spalted wood, 5" × 4½" × 4½" (13cm × 11cm × 11cm)
1 2 3
Last year, the Professional Outreach Program (POP) committee invited me to be in their “Harmony” exhibit at the
Tampa symposium, but I was not convinced I should take this on—I had never before intentionally turned a conceptual piece. I thought for a few days, talked to some peo-ple who encouraged me, and then accepted the invitation.
My first thought was of a note to represent music, so I tried to turn multiaxis musical-note forms based on the shaped note tradi-tion (do, re, mi) that was a huge part of the southern church of my youth. Harmonic waves made while using multiple axes came next, obviously concrete thinking, but I had to try. The results were horrible.
After I gave up on those ideas, I started think-ing conceptually about harmony with ideas like balance and equality. I looked around my shop and saw a multiaxis spindle I had made in 2005, before I became totally obsessed with figuring out a way to think about multiaxis turning (Photo 1). I had turned this successful form by luck, using the random-experimen-tation method. I also had made many candle-holders and bottle stoppers using these random multiaxis cuts, but these pieces drew little attention, so I moved on (Photos 2, 3).
Harmony emergesWith balance and equality in mind, I started experimenting. The red lines on the piece in Photo 4 are the two axes used to turn this piece. They are parallel to each other but not to the center axis of the wood, if it had been used.
It took me about four weeks to solve the many problems inherent in turning the piece I envisioned. One requirement of the POP exhibits is that the piece must fit into a 6" (15cm) cube, which meant I had to use this concept on a shorter, fatter piece of wood.
(Left) I keep samples of successful ideas to remember how I made them. I clearly mark the axes on each end to avoid spending time trying to figure out how I turned the piece. Cherry, 11" × 3" (28cm × 8cm)
(Middle) Candleholder, Cherry, 13" × 3" (33cm × 8cm)
(Right) Bottle Stopper, Cherry, 5" × 3" (13cm × 8cm)
38 American Woodturner October 2013
Out of a Limb: Natural-EdgE Bowls
Emmett Manley
T urning a natural-edge bowl can be daunting for some beginners. Even experienced turners may
dread the process of splitting a log, locating the bark-side center, mount-ing the piece between centers, and removing a lot of wood to establish the outside shape and a tenon.
There is, however, a simple tech-nique for making small, natural-edge bowls from green wood. It proceeds quickly with immediate and pleasing
results, so new turners are not intimi-dated. Compared with the traditional method of making a natural-edge bowl, less wood has to be removed. A few cuts begin to reveal the bowl’s emerging shape.
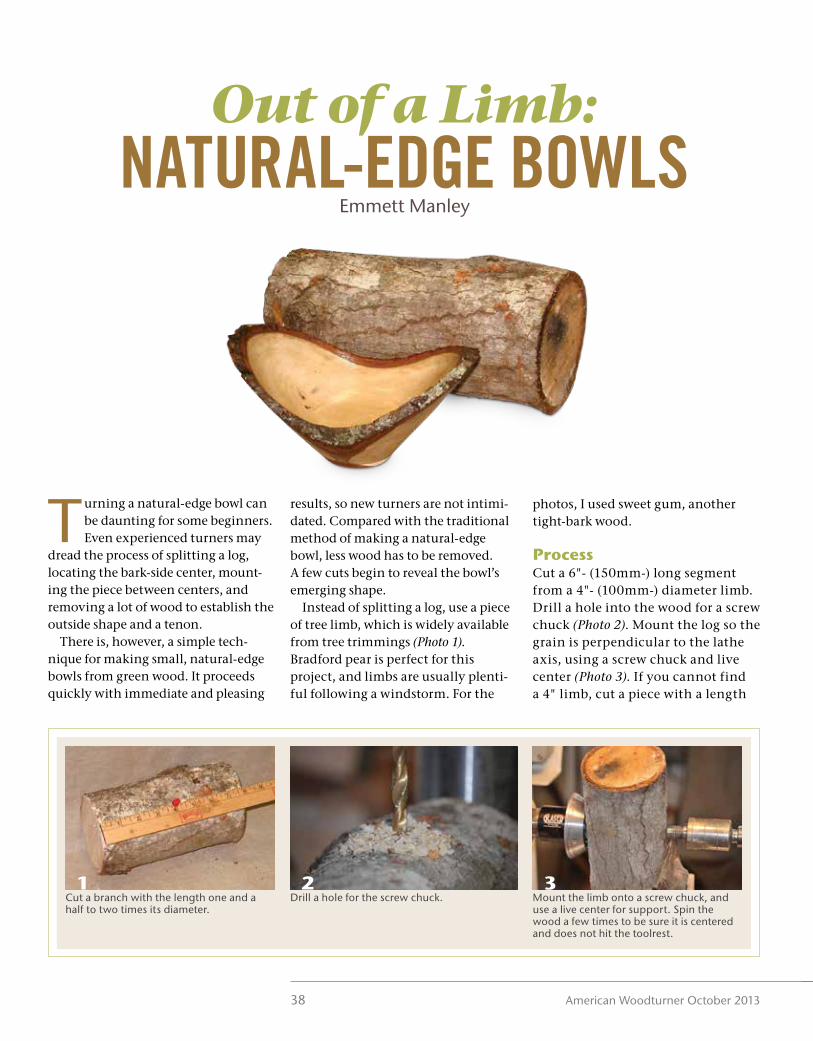
Instead of splitting a log, use a piece of tree limb, which is widely available from tree trimmings (Photo 1). Bradford pear is perfect for this project, and limbs are usually plenti-ful following a windstorm. For the
photos, I used sweet gum, another tight-bark wood.
ProcessCut a 6"- (150mm-) long segment from a 4"- (100mm-) diameter limb. Drill a hole into the wood for a screw chuck (Photo 2). Mount the log so the grain is perpendicular to the lathe axis, using a screw chuck and live center (Photo 3). If you cannot find a 4" limb, cut a piece with a length
1 2 3Cut a branch with the length one and a half to two times its diameter.
Drill a hole for the screw chuck. Mount the limb onto a screw chuck, and use a live center for support. Spin the wood a few times to be sure it is centered and does not hit the toolrest.