shelterpoint™ data-entry workflows 1. shelterpoint 2
TRANSCRIPT

ShelterPoint™
Data-Entry Workflows
1

ShelterPoint
2

What is ShelterPoint?
The ShelterPoint module is a centralized unit management system and information resource for shelters. It provides the ability to document client check in and checkout, view unit availability, refer a client, reserve a unit, and can function as a client roster.
3

Learning Objectives
After reviewing this presentation, you will understand how to:
• Login to ServicePoint®• Navigate to ShelterPoint• View Shelter Inventory• Enter an Individual into a Unit• Enter a Household into Units• Exit a Client and Household• Use Express Check In• Check in Reservations• Check in Referrals• Use Confirmation List & Check Out List• Additional Features
4

ShelterPoint
Begin by logging into ServicePoint® using your assigned Username & Password.
Contact your Agency or System Administrator if you need assistance in gaining access to ServicePoint®.
5
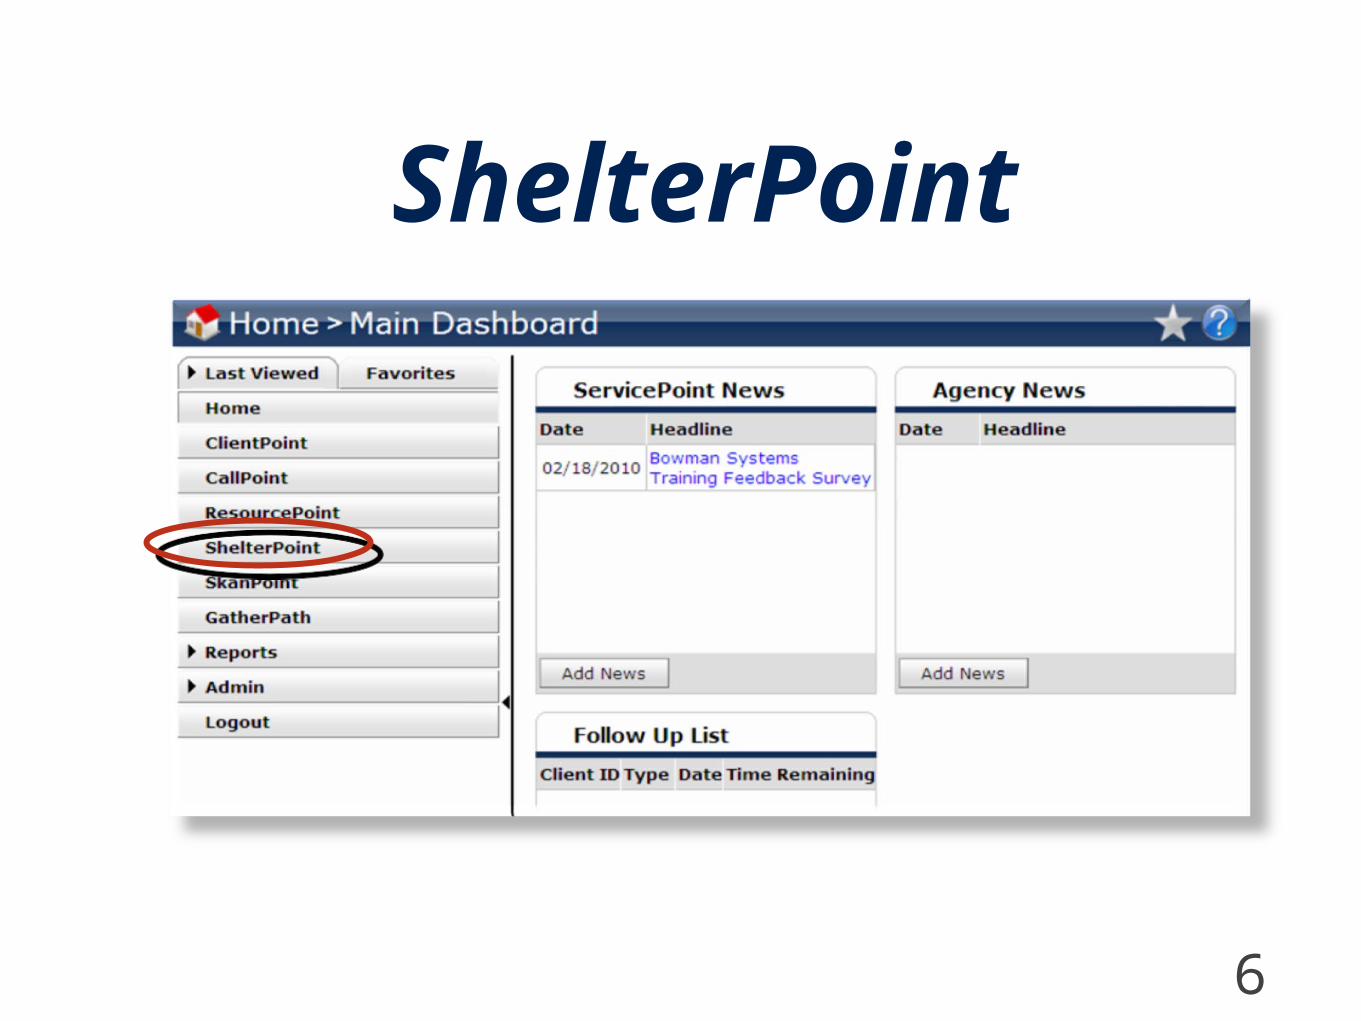
ShelterPoint
6

ShelterPoint Main Menu
To access the ShelterPoint Dashboard, a Provider must first be selected followed by selecting a Unit List for that provider. After both fields have been selected, click on the “Submit” button.
7

ShelterPoint Main Menu
NOTE: This is a complete Dashboard list of the dashlets. Depending on how the Admin Providers is configured, not all options will be available.
8

View Shelter Inventory
9

Select a Provider from the drop down list. NOTE: Only Providers with a unit list created will appear.
Once the provider is selected, you can “Check Unit Availability” to see a quick preview of all Units used, available, overflow units, and what percentage of capacity is being used. .
10

To view detailed information on a specific Unit, select the unit from the drop down list and click on “Submit”
After you click on the submit button to view information, click on “View All”
11
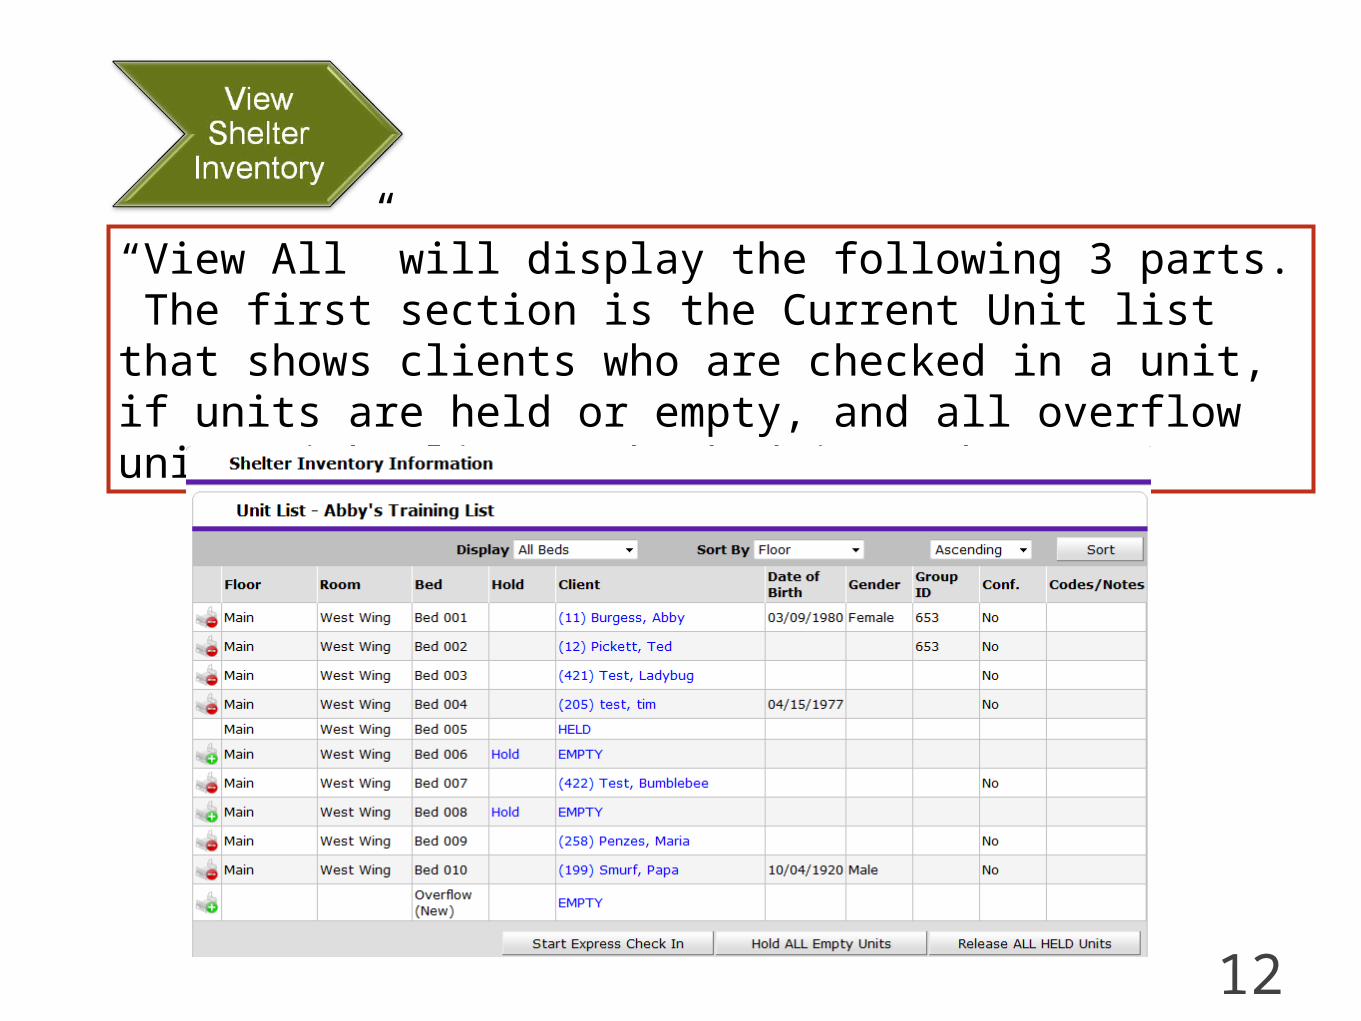
“View All” will display the following 3 parts. The first section is the Current Unit list that shows clients who are checked in a unit, if units are held or empty, and all overflow units with clients checked into them.
12
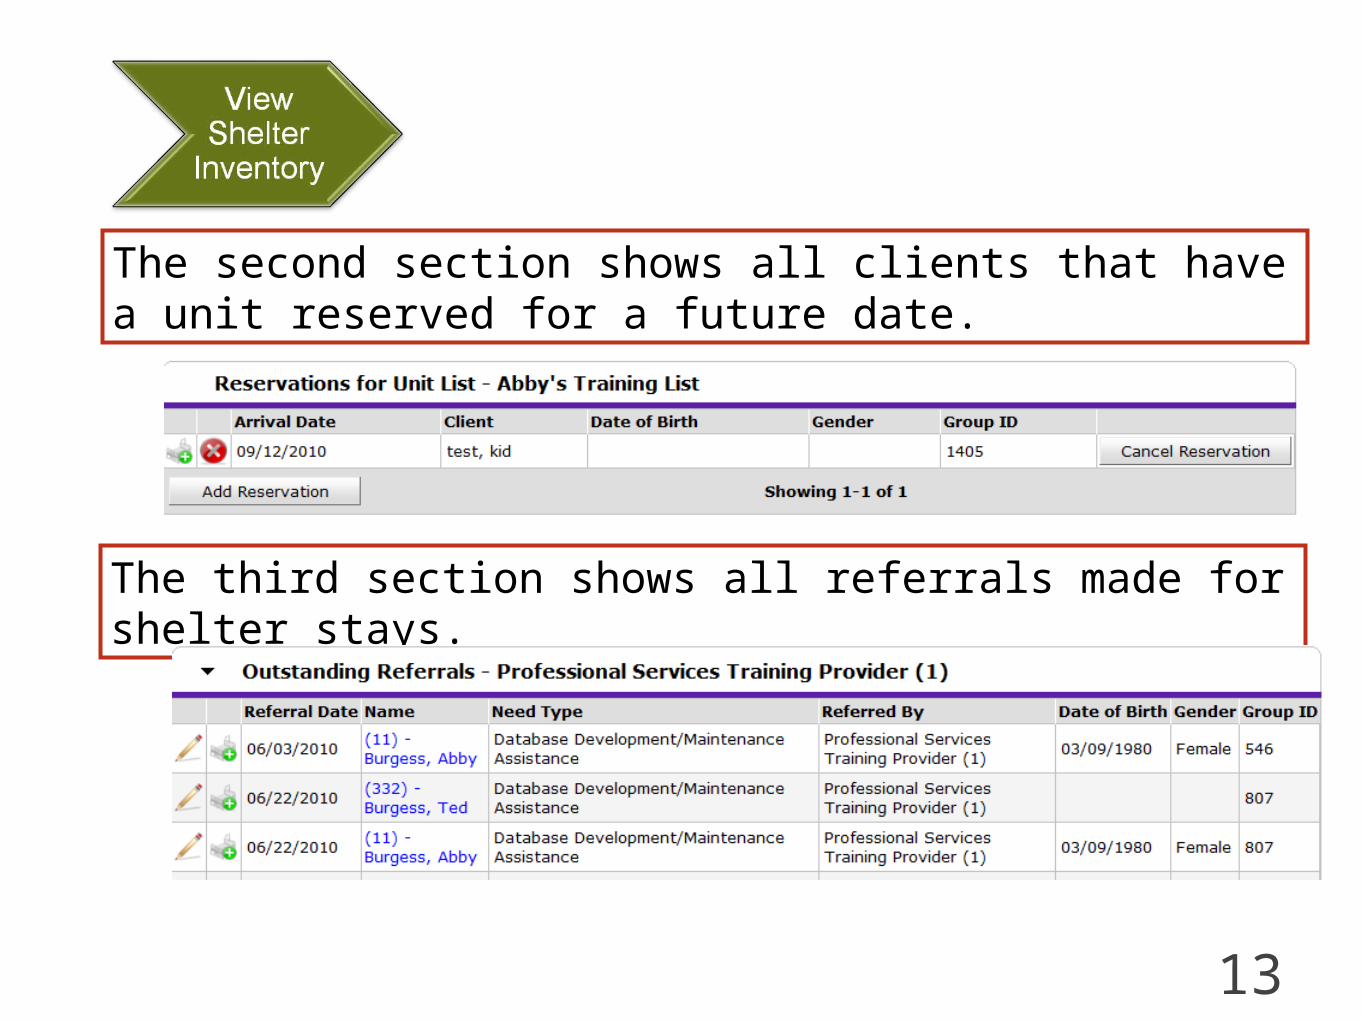
The second section shows all clients that have a unit reserved for a future date.
The third section shows all referrals made for shelter stays.
13

Enter an Individual into a Unit
14

Select the Provider and Unit List you want to work with, then click on “Check Client In.”
15

Once the “Check Client In” is selected, the following unit list displays. From here, click on the Check In icon or “Empty” unit.
16

You will perform a Client Search and select the client from the Client Result area. Client ID number can also be used.
17

The Client Results section will appear after a client has been searched for. Note: Client Results will not display if Client ID Number is used. Client ID Number will take the user to the “Unit Entry Data” screen.
Verify the Client Name and Social Security. If provided, verify Date of Birth, and Gender. If the client is a match, click on the green plus icon to check the client in.
18
For Your InformationThe Client Search procedures outlined in slides 16-18 are used
throughout this presentation and are not duplicated for each section. Please review the Check In process now if you have questions.
!
19

Once a client is selected, you will be able to change the time of Check In or select Midnight Check In (11:59 PM) as well as make additional notes.
20

Verify that there are no incidents prohibiting the client entering the shelter.
21

Once you have entered all relevant information, save your information at the bottom of the Unit Entry Data screen.
22

After clicking Save and Exit, you will be exited to the ShelterPoint Dashboard. Verify that the correct Provider and Unit list are still selected. To verify client(s) were checked select “View All.”
23

Enter a Household into a Unit
24

Select the Provider and Unit List you want to work with, then click on “Check Client In”
25

Once the “Check Client In” is selected the following unit list displays. From here, click on the Check In icon or “Empty” unit.
26

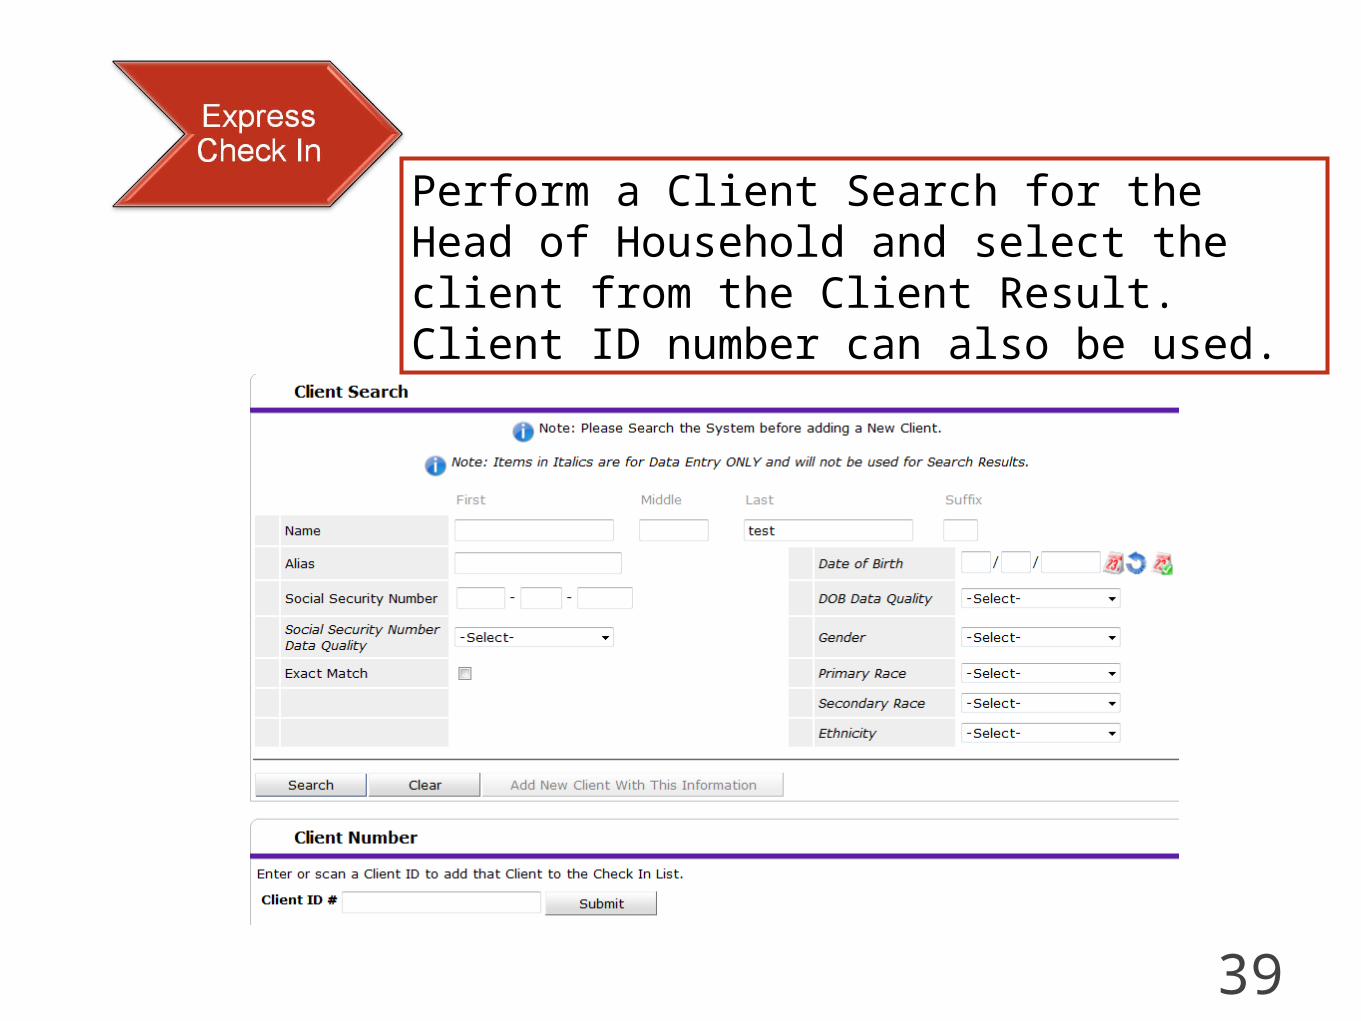
Perform a Client Search for the Head of Household and select the client from the Client Result area. Client ID number can also be used.
27

Verify that there are no incidents prohibiting the client entering the shelter.
Once a client is selected, you will be able to change the time of Check In or select Midnight Check In (11:59 PM) as well as make additional notes.
28

The next step is to verify the Household Information. From here you can make any adjustments (i.e. add and delete members) following the same procedure learned in ClientPoint.
NOTE: The “Manage Households in the Check In process” must be set to use in your Admin Providers for this feature to be enabled!
29

Once the Household information is updated, assign each Household member to a Unit by clicking on the “Assign Unit” button.
From the pop up screen, select a Unit from the drop down list or select Overflow.
30
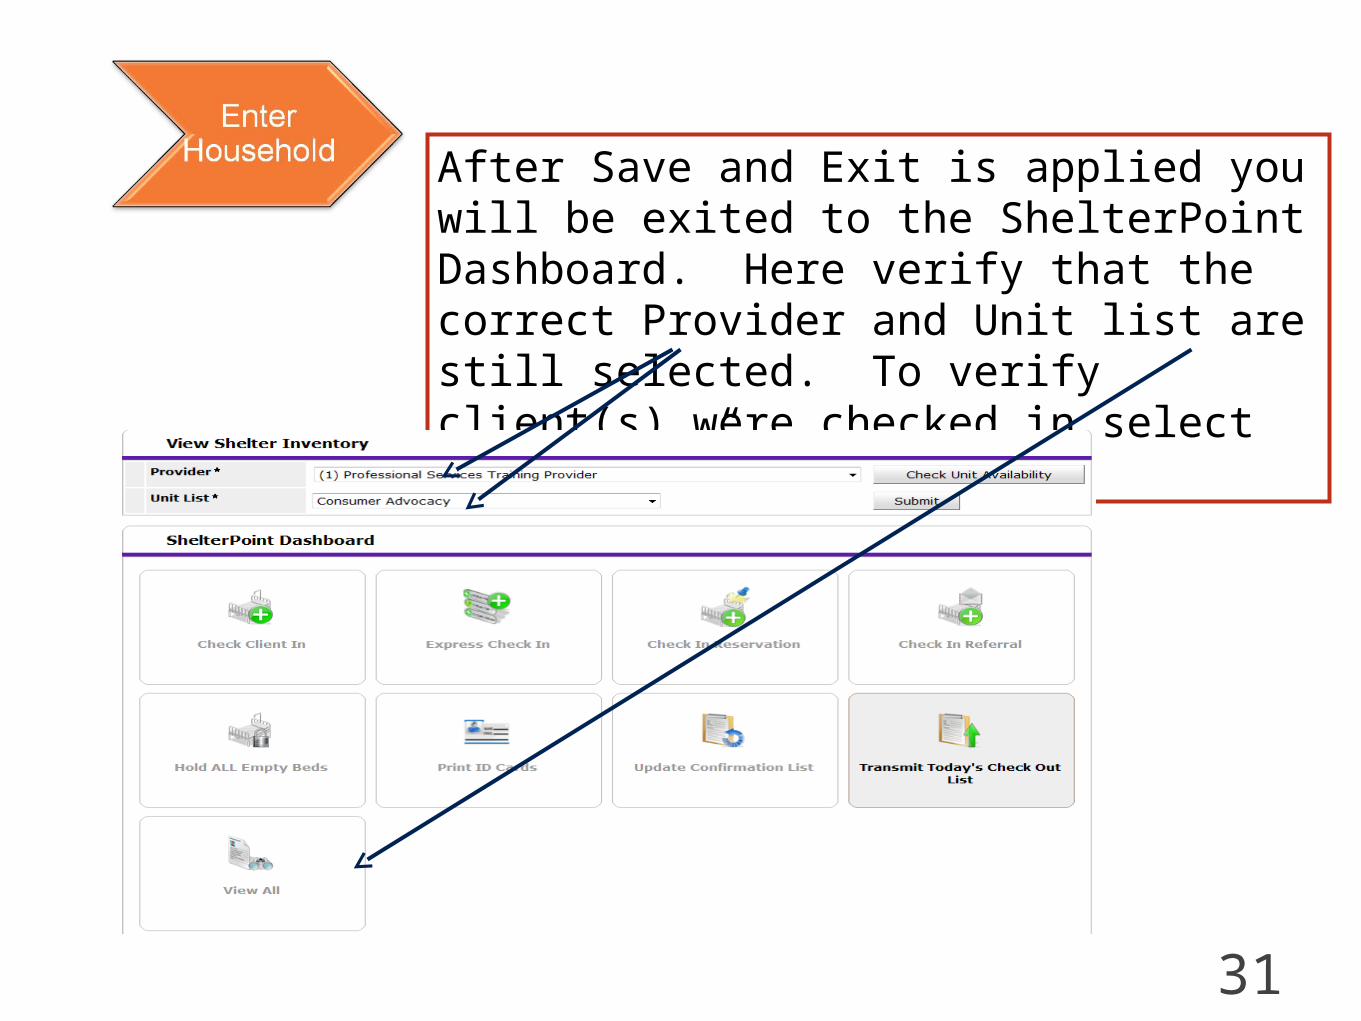
After Save and Exit is applied you will be exited to the ShelterPoint Dashboard. Here verify that the correct Provider and Unit list are still selected. To verify client(s) were checked in select “View All.”
31

Exit Client and Household
32
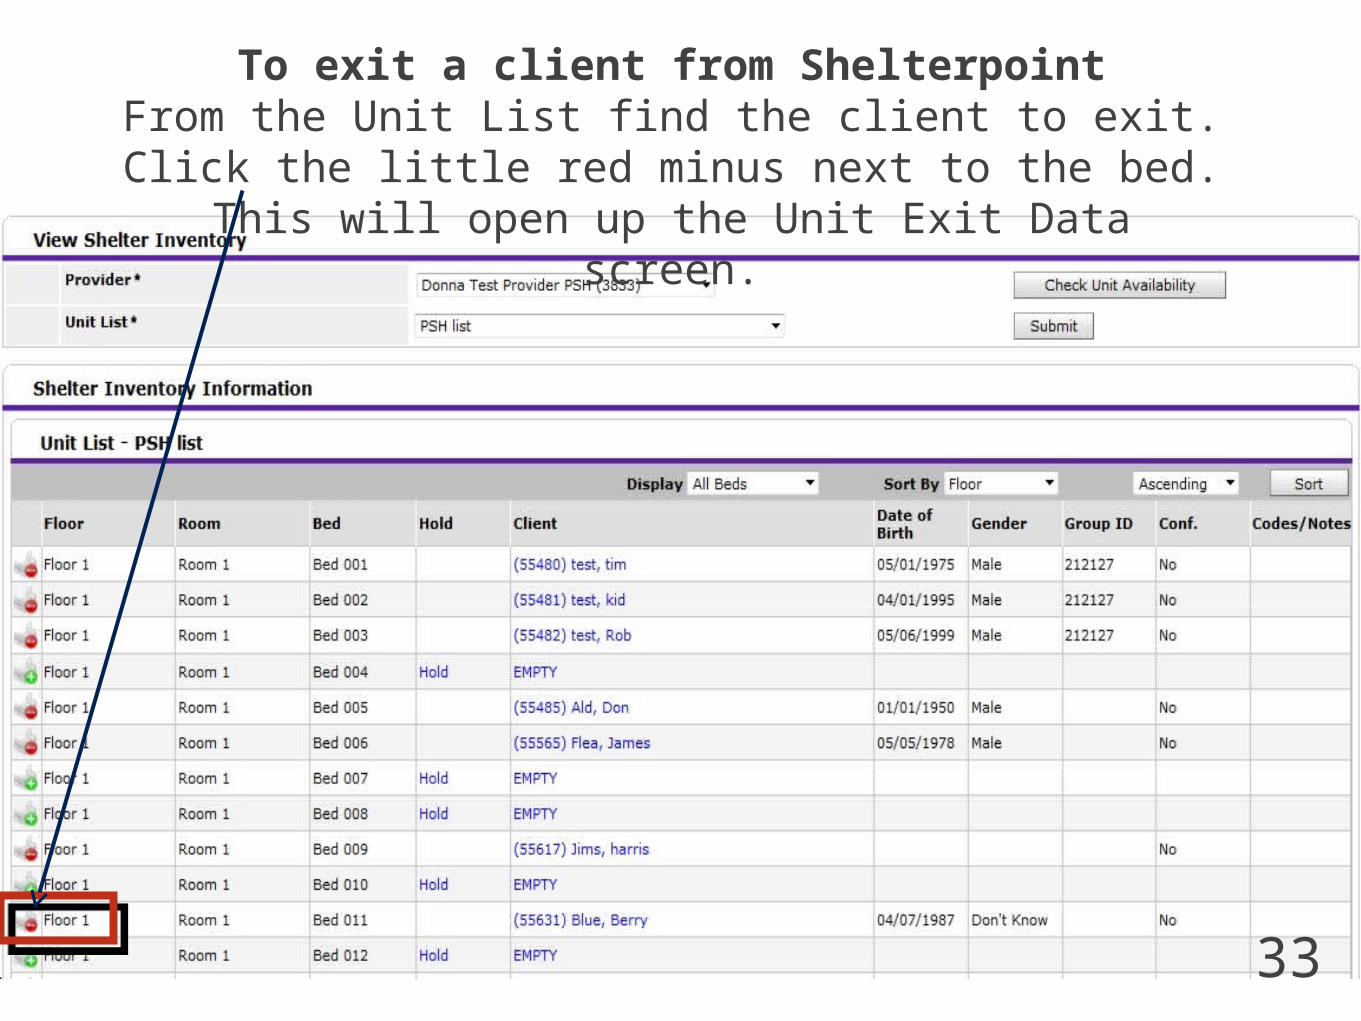
To exit a client from ShelterpointFrom the Unit List find the client to exit. Click the little red minus next to the bed. This will open up the Unit Exit Data
screen.
33

To exit a client, fill out the following:Date Out: The Date that client is leaving the programUnit Name/Number: The Bed name that the client is being exited fromSupplies Returned: Check whether the supplies given to the client at program entry were given back to the program. Once you have completed all these fields. Click “Save & Exit.” The window closes and the clients will no longer appear in the bedlist
34

To exit a Household, fill out the following: Date Out: The Date that client is leaving the program
Unit Name/Number: The Bed name that the client is being exited fromSupplies Returned: Check whether the supplies given at program entry were given back to the program. Click on the box beside each name under “Household Members.” Click “Save & Exit”.
35

NOTE: Express Check In must be set to “Yes” in the Admin Providers Section.
Express Check In is a feature that allows a group of clients to be quickly checked in at once.
Information that is filled in here will apply to all clients that are checked in using this feature.
Express Check In
36

Select the Provider and Unit List you wish to work with then click on “Express Check In”
37

Fill in the Date in and determine the time of check in or select Midnight Check icon. Client will be assigned to the first available unit rather then Case Managers selecting which unit to put them in. Fill in the Supplies Given and Codes/Notes section, if appropriate.
38
Perform a Client Search for the Head of Household and select the client from the Client Result. Client ID number can also be used.
39

If Client Search feature is used a pop up window will appear with the search results. Select the appropriate client by clicking on the green Add icon. From this screen you can perform searches for additional clients. When finished select “Exit” at the bottom of the pop up screen
40

If Client ID number is entered, the client will display on the Express Check In List. You can add multiple clients if the Client ID number is known. Note: The incident box in this case lets you view and/or add to the last client added only.
41

Final Express Check In features:• Remove Last Entry – removes the last client added • Clear List – clears the entire list• Submit List – submits the list and assign all clients to a unit and exit to the ShelterPoint Dashboard• Exit – exits to the ShelterPoint Dashboard without assigning units.
42

Check in Reservation
NOTE: Check In Reservation is a feature that must be turned on in the Admin Providers section.
43

Reservations allow a Unit to be reserved for a client that will be showing up in the future. First click on Check in Reservation.
NOTE: Check In Reservation is a feature that must be turned on in the Admin Providers section.
44

Reservations will show up under the Unit list. To add a reservation, click on “Add Reservation.”
45
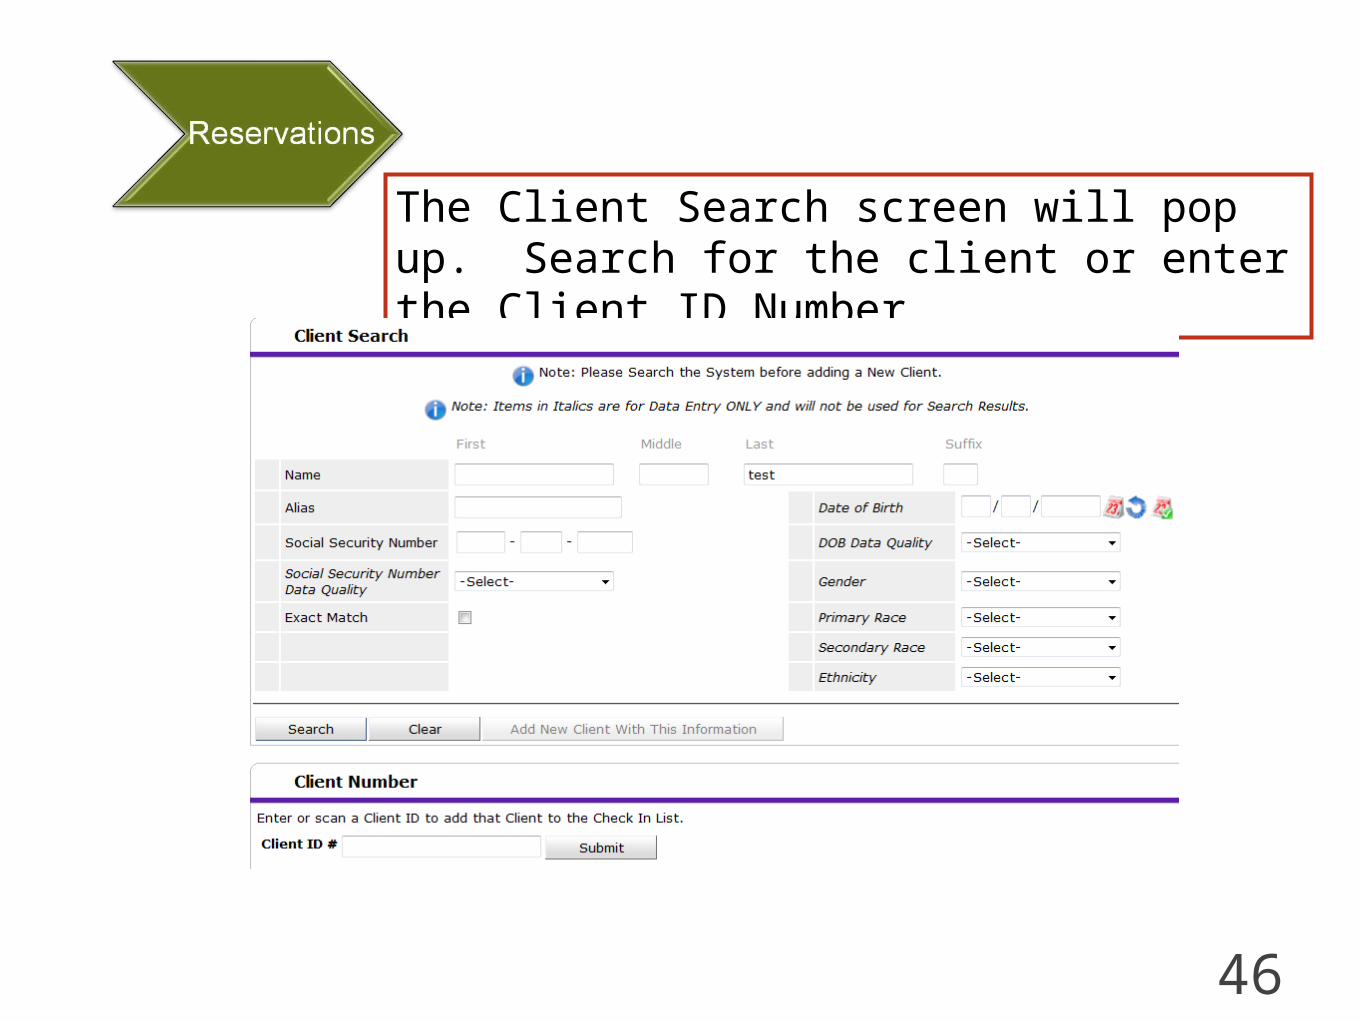
The Client Search screen will pop up. Search for the client or enter the Client ID Number.
46

First Enter the Reservation Date and enter the appropriate date.
If needed, select additional Household members.
Incidents can also be reviewed on the client.
47

Now the reservation has been made. From here case managers can:1.Delete the reservation if is was made in error2.Check client(s) in if it is the arrival date3.Cancel Reservation
48

If Check In is selected, case managers will need to assign the appropriate unit for the client and household members if any are attached. If a unit is not assigned, the client will be checked into an overflow unit. Save the changes once the units have been assigned and a Release of Information is entered, if needed.
49

If cancel reservation is selected, the case manager will need to select the appropriate reason for the cancellation.
50

Check in Referrals
51

Check in Referral allows case managers to check in referrals made by other providers.
52

Once Check In Referral button is clicked, scroll to the bottom of the Unit Inventory Screen. Outstanding Referrals will show up here. Options that are available are:• Edit Referral• Check In Referral• Transfer to clients ClientPoint Profile by clicking on
the client name
53

Edit Referral will allow case managers edit Referral Data.
54
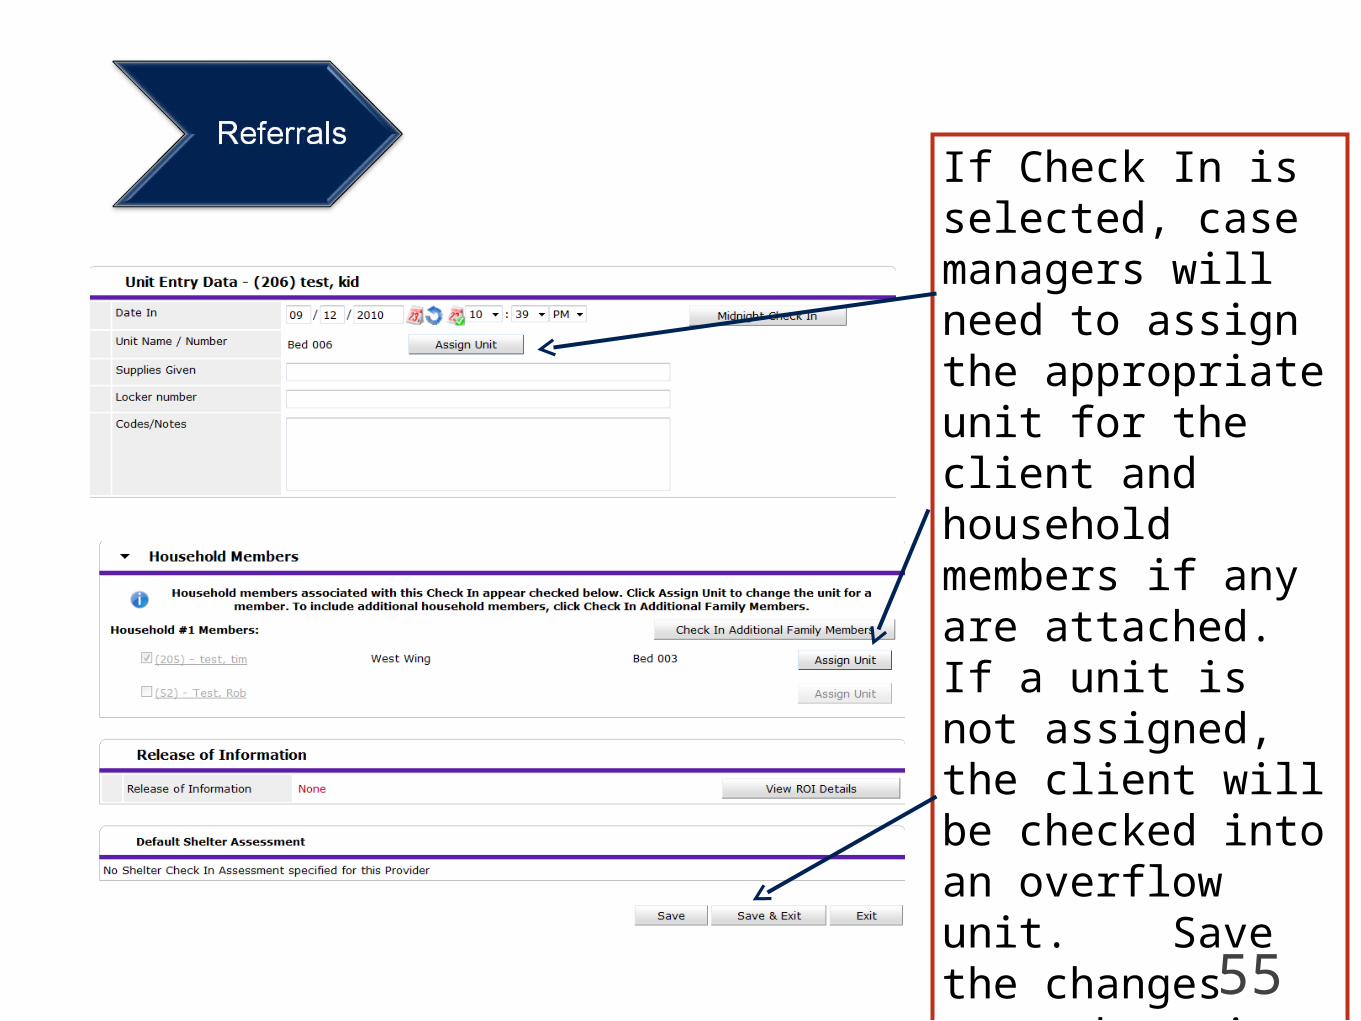
If Check In is selected, case managers will need to assign the appropriate unit for the client and household members if any are attached. If a unit is not assigned, the client will be checked into an overflow unit. Save the changes once the units have been assigned and a Release of Information is entered, if needed.
55

Update Confirmation Lists &
Transmit Today’s Check Out List
56

Update Confirmation Lists allows Shelters to confirm clients who will be stay in the shelter from one night to the next.
57

To use Confirmations, click in the checkbox in the Confirm column for all clients that will be staying the next night and click Confirm.
58

Transmit Today’s Check Out List allows shelters to check all clients that have not confirmed an additional night of stay.
59

To transmit Today’s Check Out List, click “Check All” then click ”Check Out.” Make sure to verify the Check Out Date.
60
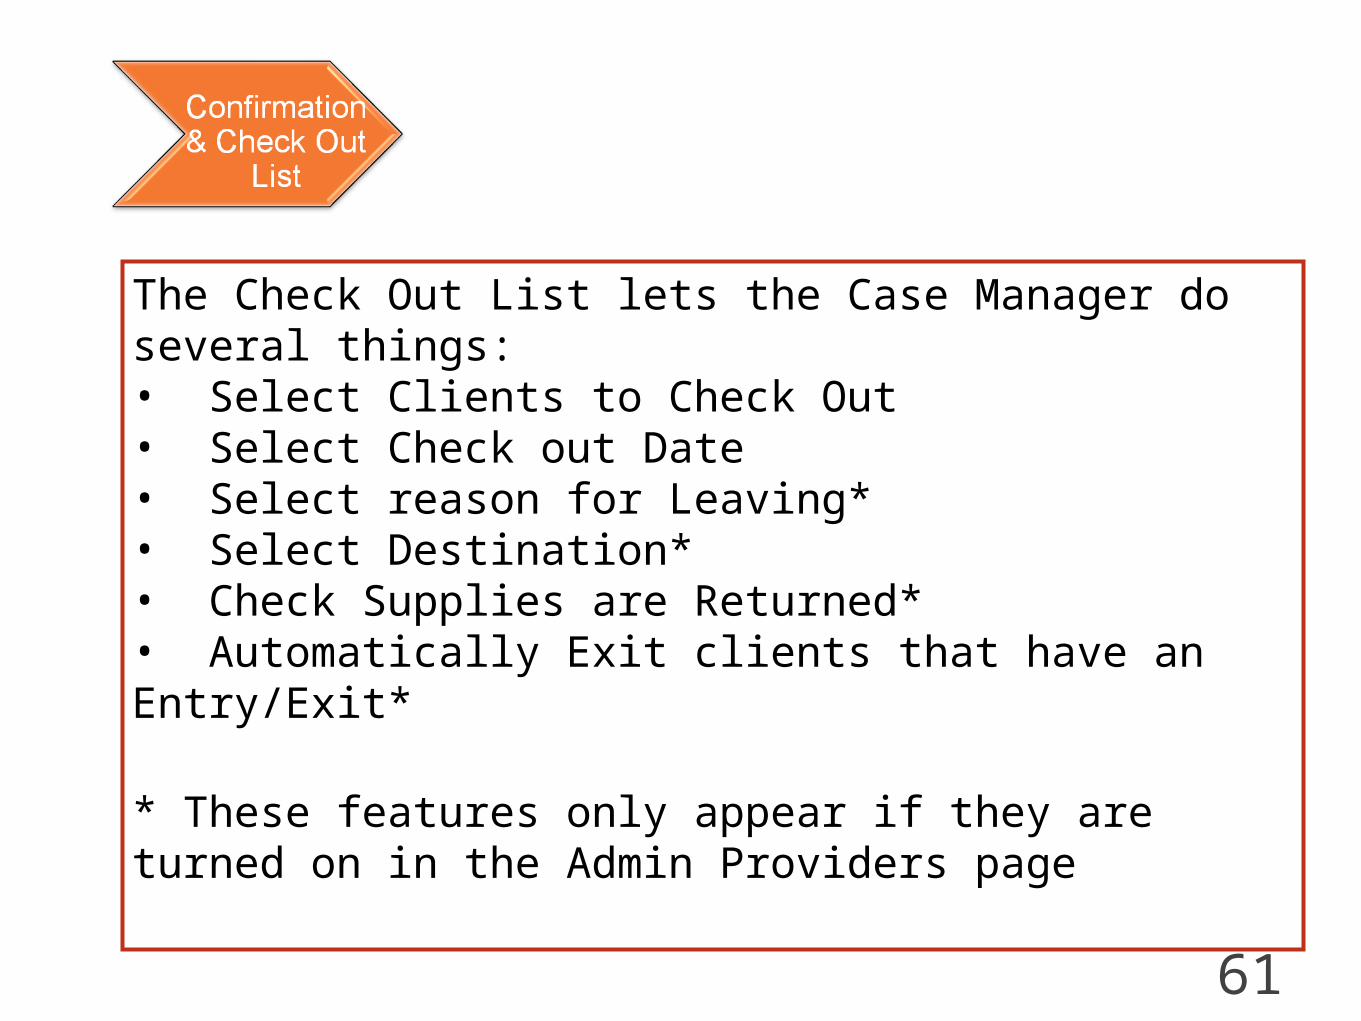
The Check Out List lets the Case Manager do several things:• Select Clients to Check Out• Select Check out Date• Select reason for Leaving*• Select Destination*• Check Supplies are Returned*• Automatically Exit clients that have an Entry/Exit*
* These features only appear if they are turned on in the Admin Providers page
61

First select clients to check out and then select check out date for the those respective clients.
62

If appropriate, select the Reason for Leaving (top drop down list), Destination (bottom drop down list), and if Supplies were Returned.
63

Click on “Check Out” to finish the process.
64

ShelterPoint has the following additional features that may be utilized by case managers:• Incidents• Hold All Empty Units• Entry/Exit at check in• Default Assessment• Multiple Services at check in • Print ID Cards
Additional Features
65
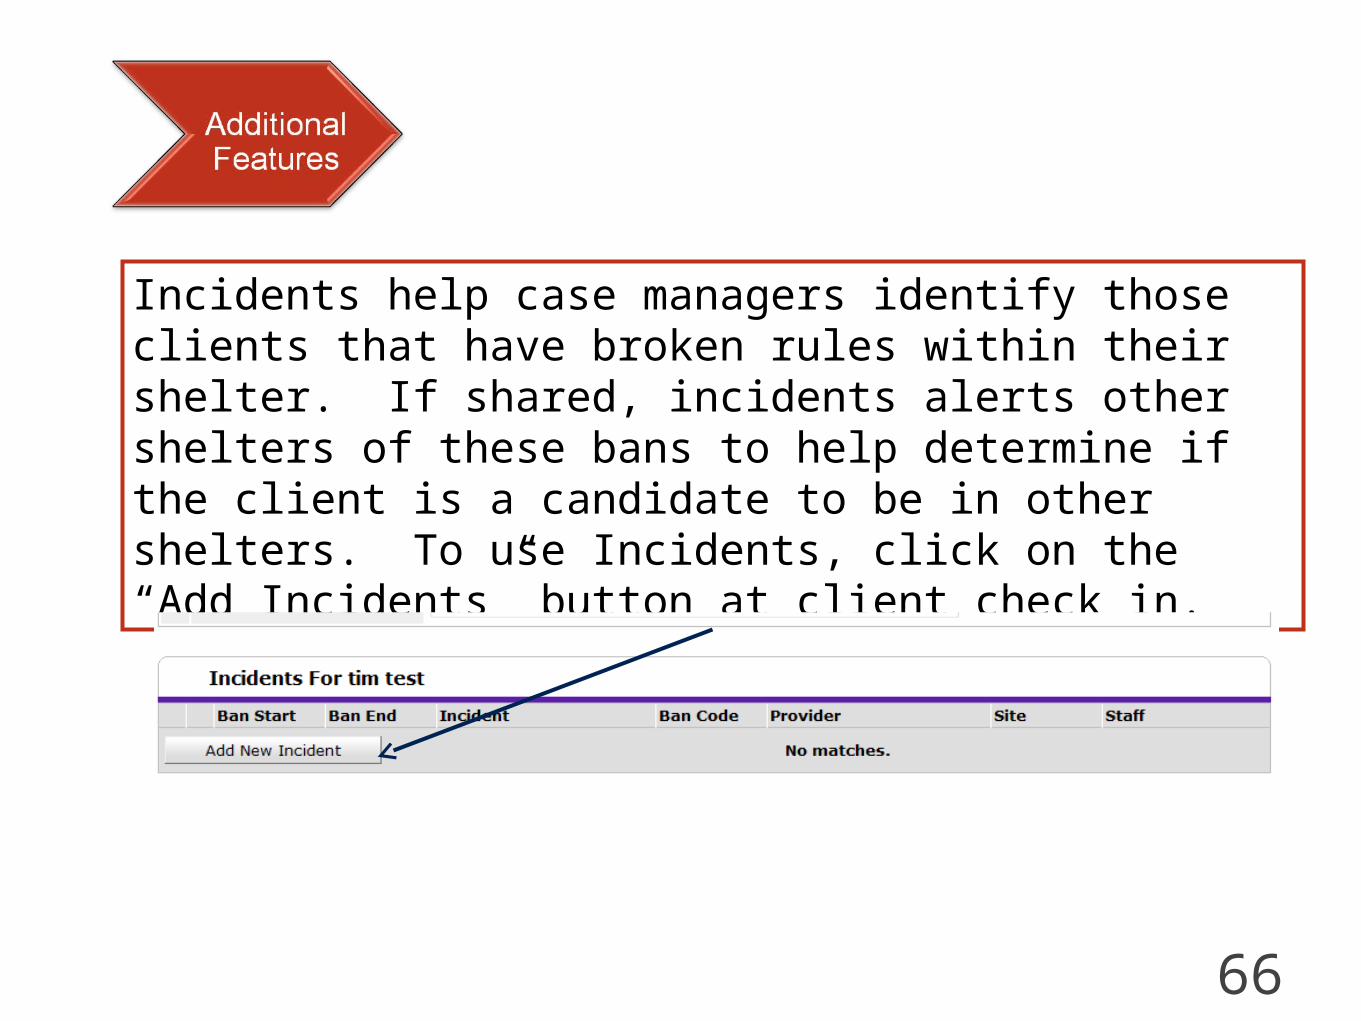
Incidents help case managers identify those clients that have broken rules within their shelter. If shared, incidents alerts other shelters of these bans to help determine if the client is a candidate to be in other shelters. To use Incidents, click on the “Add Incidents” button at client check in.
66
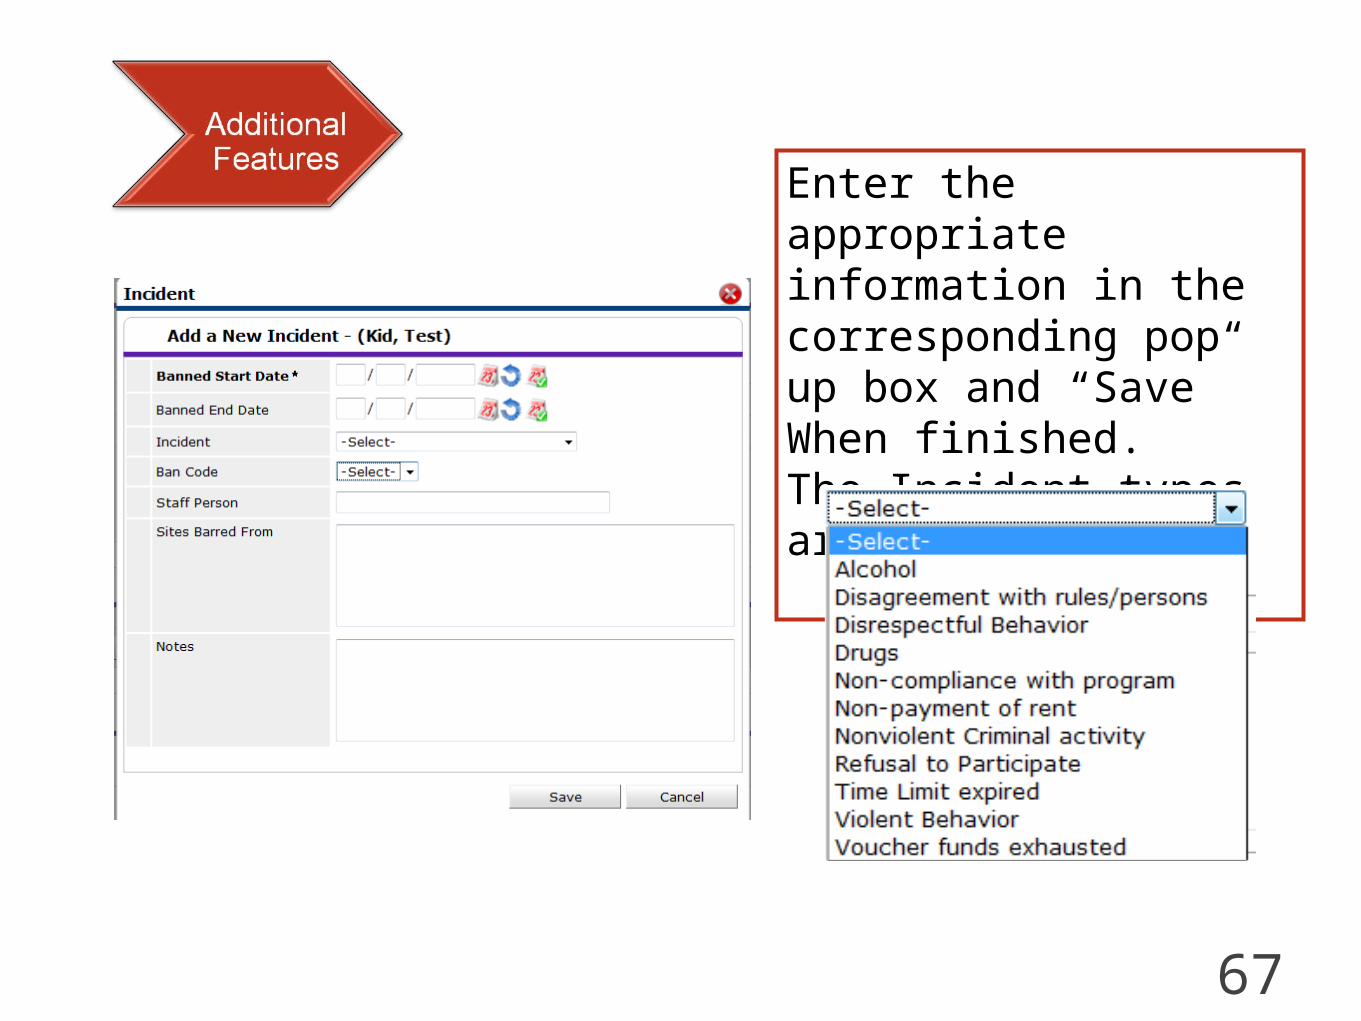
Enter the appropriate information in the corresponding pop up box and “Save” When finished. The Incident types are listed below.
67

To Hold All Empty Units, click on the corresponding button on the ShelterPoint Dashboard.
68
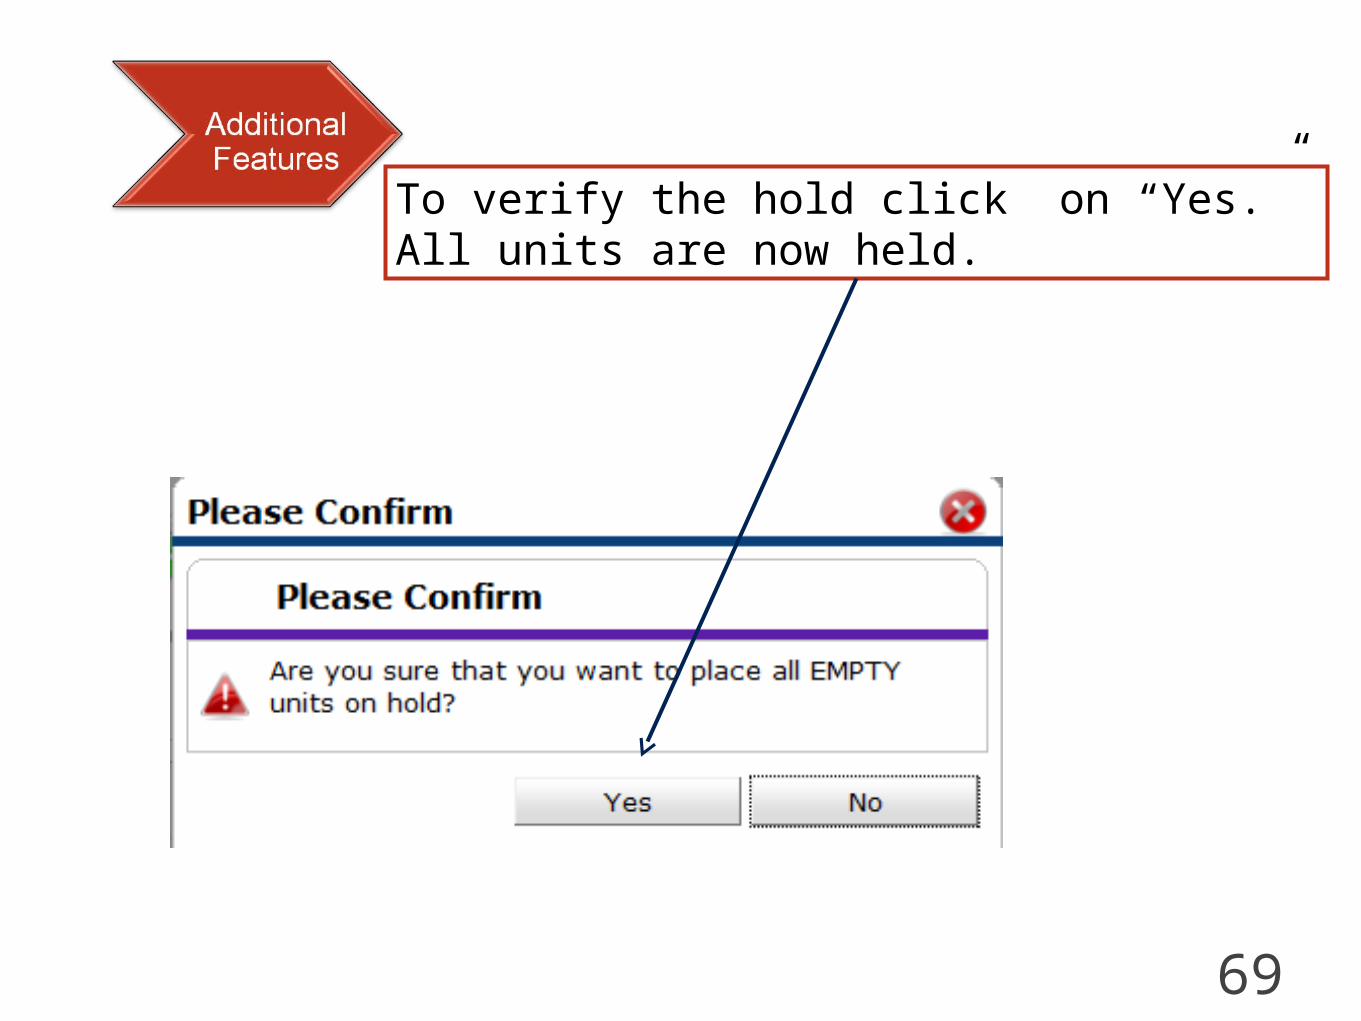
To verify the hold click on “Yes.” All units are now held.
69

After clicking Yes, case managers will be taken to the Shelter Inventory Information Screen. Notice all units are held that are not assigned to a client. To remove a hold, click on “HELD” or the “Release All HELD Units” button.
70

If permission is given in the Admin Provider page, Case Managers can attach an Entry/Exit to a client at check in. The following section will appear in the Unit Stay Entry Data. The type of Entry/Exit can be pre-filled in the Admin Provider page. If needed, case managers can select a different provider.
71

A Default Assessment can be determined on the Admin Provider Page. If shelters wish to have case managers enter some basic information at client check in the assessment will appear in a section on the Unit Stay Entry Data screen (example below).
72

Agency Administrators can also add the Multiple Services feature at Check In on the Admin Providers page. This puts the Multiple Services entry directly into the Unit Stay Entry Data Screen as a section. Case Managers can then add Services directly at Check In.
73
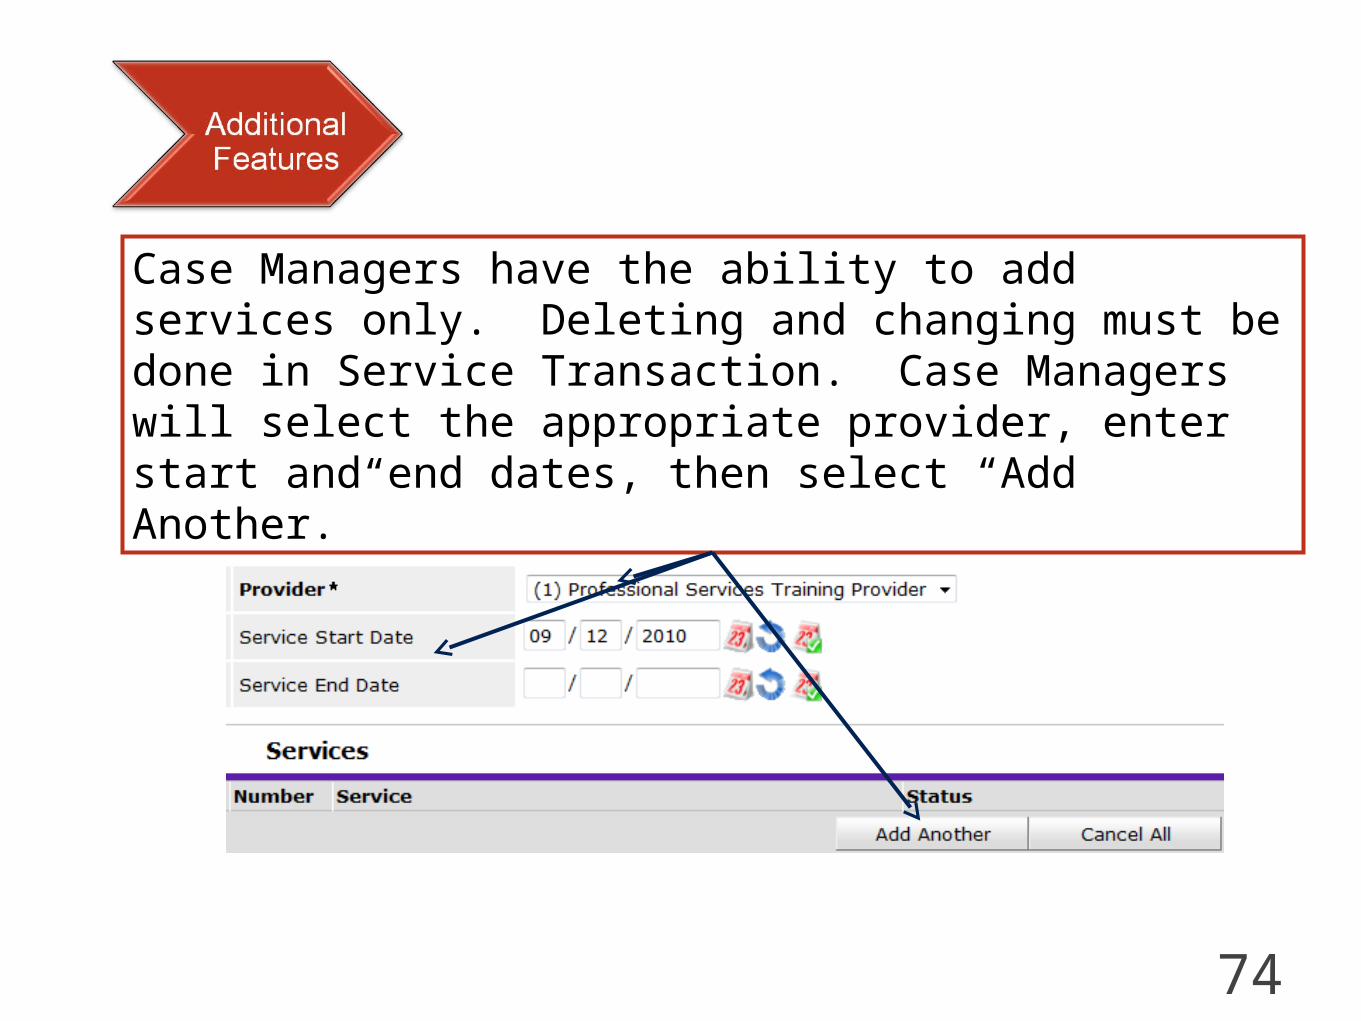
Case Managers have the ability to add services only. Deleting and changing must be done in Service Transaction. Case Managers will select the appropriate provider, enter start and end dates, then select “Add Another.”
74

The Case Managers will then select from the number of service instances provided, what the service is, and the status of that service.
Case Managers may delete the service or cancel all services in this window. Once saved, all adjustments must be made in Service Transactions.
75

Case Managers have the ability to Print ID Cards for clients that are checked into the shelter. To use this feature press the “Print ID Cards” icon.
76

The following Screen will display. Select the client(s) that an ID card needs to be printed for and click “Print Client ID Cards.”
77

SkanPoint can be used to add Shelter stays for individuals or all members in a household at once. To use this feature, click on SkanPoint on the left hand menu.
78

Enter a “Start Date” for the shelter and select if clients will be assigned to the next available Unit or to Overflow Units. When finished click on the “Start Skan” button.
When in SkanPoint select the “Add Shelter Stay” Tab. From here, select the Shelter Provider and the appropriate Unit List for that provider.
79

Once the “Start Skan” button is pressed the “Client Search Screen” will appear. Search for clients by using all or any combination of First Name, Last Name, and/or Social Security Number. The client ID number may also be typed in or scanned at this time.
80

The search results will display. Once the client being searched for has been verified, click on the green “Select” icon. NOTE: Client cannot be added, clients will need to be entered into the system prior to using SkanPoint.
81

If the selected client has additional Household members, the Household Overview screen will appear. Household maintenance can be performed here as well as selecting the appropriate Household members the Shelter Stay is for.
82
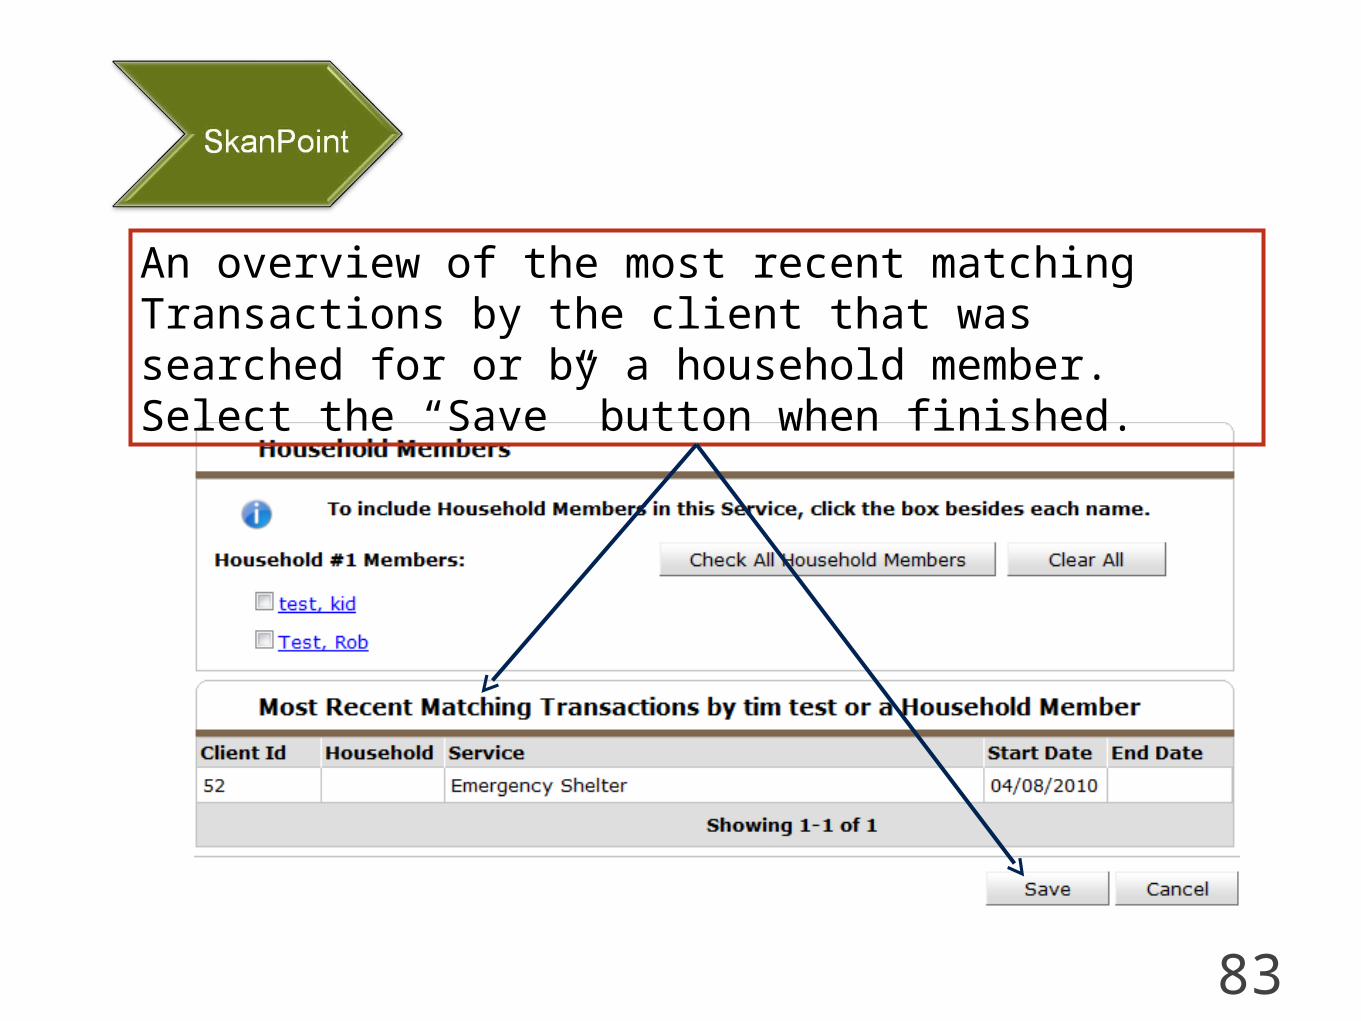
An overview of the most recent matching Transactions by the client that was searched for or by a household member. Select the “Save” button when finished.
83

When all clients have been added to the list, select the “Enter Service for Clients” or “Enter Service & Create New Session” to update a different Unit List or Provider.
An overview of the Clients Entered will show. Repeat the Search or Skan for additional clients to check in. If a client was entered in error, click the “Remove Last Entry” button or use the red remove icon.
84

85
PC Hardware Password Protection
PC Hardware Secure Physical Location
PC Screen not Viewable by Casual Bystanders
NO Stored Passwords
Security
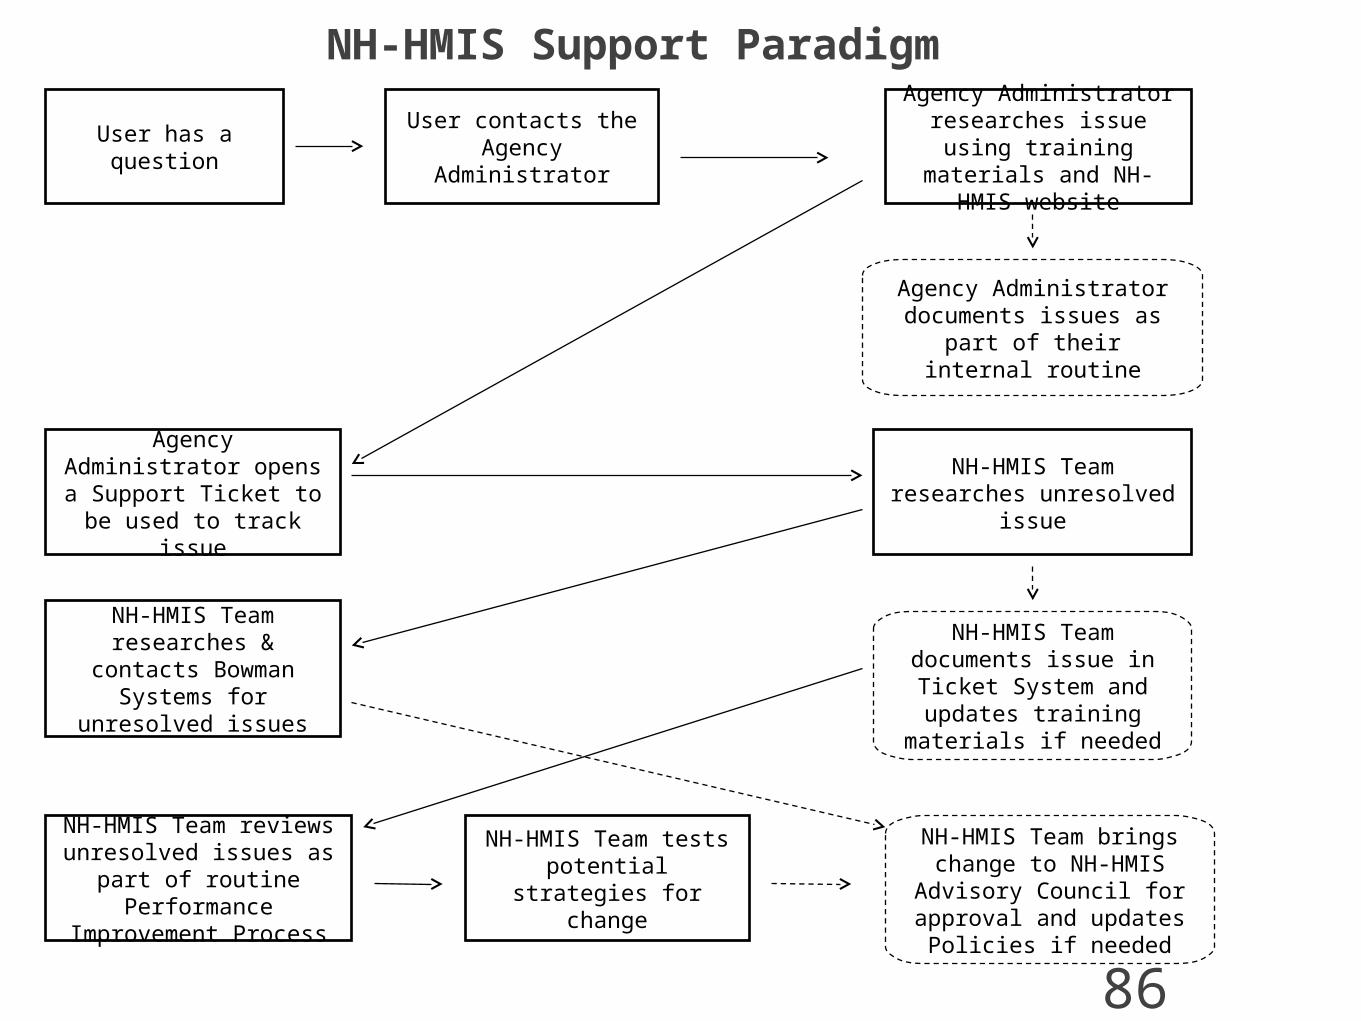
User has a question
User contacts the Agency
Administrator
Agency Administrator researches issue using training materials and
NH-HMIS website
NH-HMIS Team researches unresolved
issue
Agency Administrator opens a Support Ticket
to be used to track issue
NH-HMIS Team researches & contacts Bowman Systems for
unresolved issues
NH-HMIS Team tests potential strategies
for change
NH-HMIS Team reviews unresolved issues as
part of routine Performance
Improvement Process
Agency Administrator documents issues as part of their internal
routine
NH-HMIS Team documents issue in Ticket System and updates training
materials if needed
NH-HMIS Team brings change to NH-HMIS Advisory Council for
approval and updates Policies if needed
NH-HMIS Support Paradigm
86
87
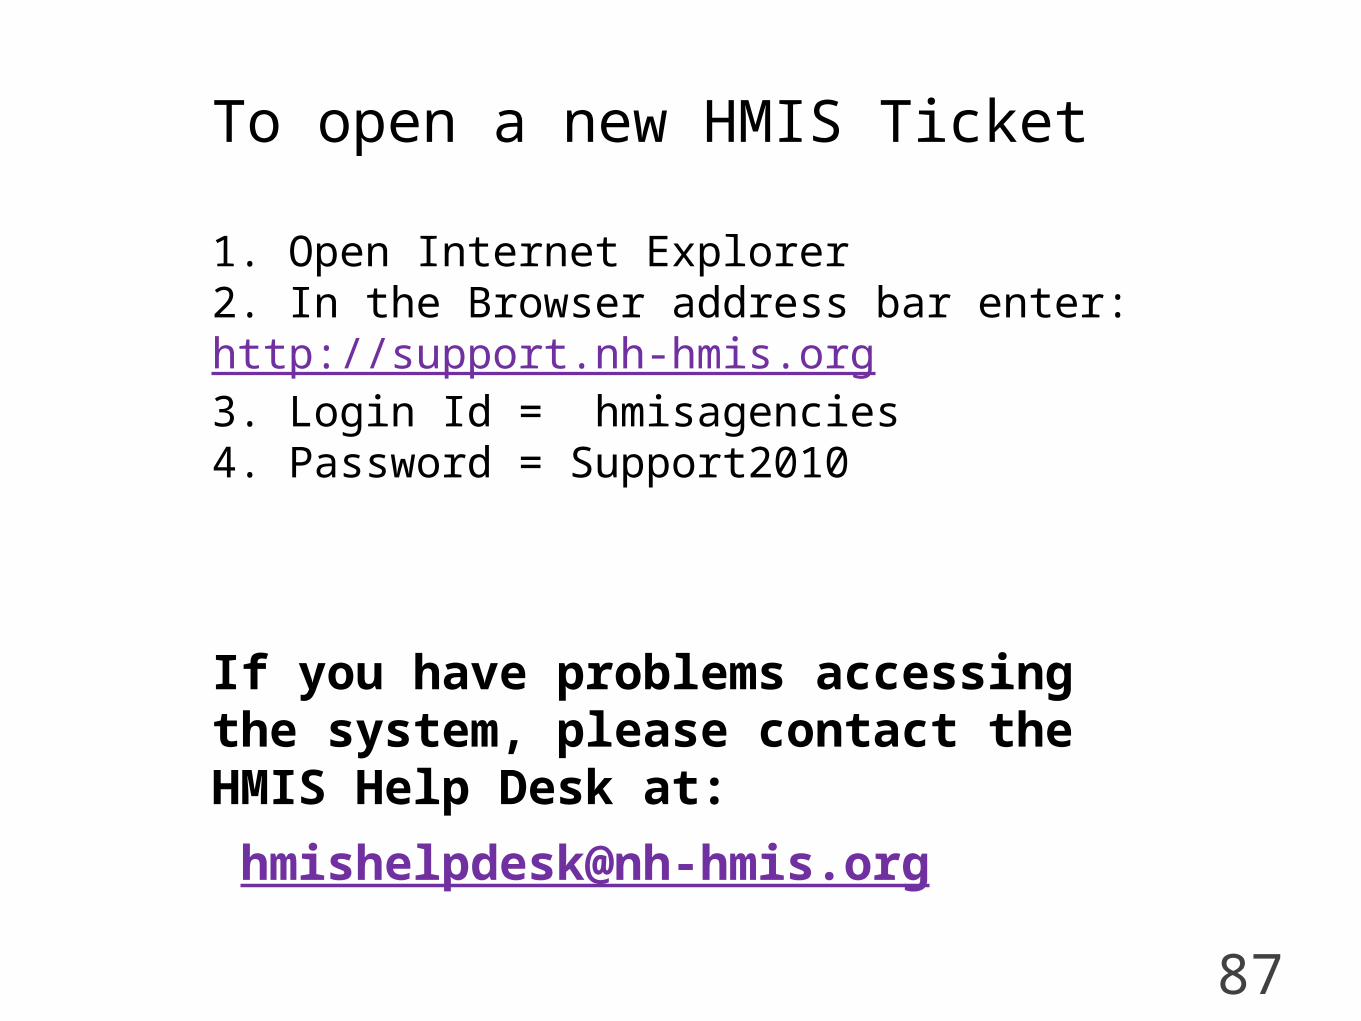
To open a new HMIS Ticket
1. Open Internet Explorer2. In the Browser address bar enter: http://support.nh-hmis.org3. Login Id = hmisagencies4. Password = Support2010
If you have problems accessing the system, please contact the HMIS Help Desk at: