shop-built cleanup center
TRANSCRIPT

SHOP-BUILTCLEANUPCENTER
© 2017 Cruz Bay Publishing, Inc.
1 WoodsmithPlans.com SN09230 ©2017 Cruz Bay Publishing, Inc. All Rights Reserved.
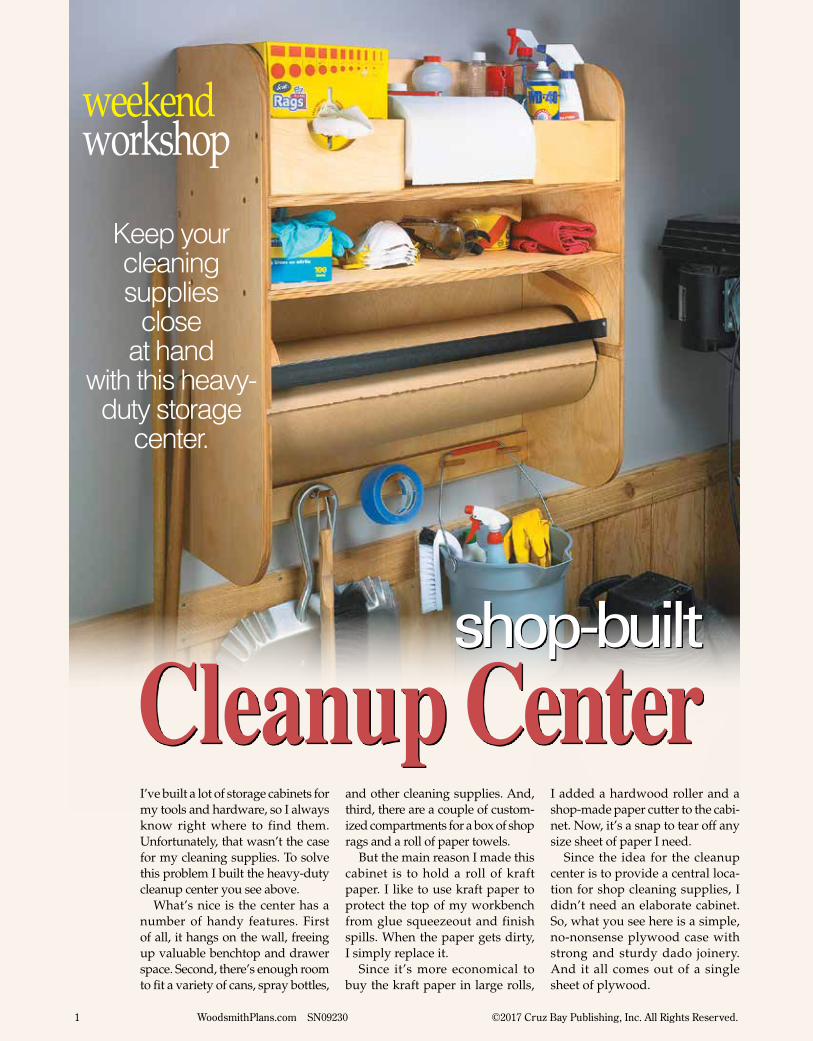
Keep your cleaning supplies
close at hand
with this heavy-duty storage
center.
weekendworkshop
shop-built
Cleanup CenterI’ve built a lot of storage cabinets for my tools and hardware, so I always know right where to find them. Unfortunately, that wasn’t the case for my cleaning supplies. To solve this problem I built the heavy-duty cleanup center you see above.
What’s nice is the center has a number of handy features. First of all, it hangs on the wall, freeing up valuable benchtop and drawer space. Second, there’s enough room to fit a variety of cans, spray bottles,
and other cleaning supplies. And, third, there are a couple of custom-ized compartments for a box of shop rags and a roll of paper towels.
But the main reason I made this cabinet is to hold a roll of kraft paper. I like to use kraft paper to protect the top of my workbench from glue squeezeout and finish spills. When the paper gets dirty, I simply replace it.
Since it’s more economical to buy the kraft paper in large rolls,
I added a hardwood roller and a shop-made paper cutter to the cabi-net. Now, it’s a snap to tear off any size sheet of paper I need.
Since the idea for the cleanup center is to provide a central loca-tion for shop cleaning supplies, I didn’t need an elaborate cabinet. So, what you see here is a simple, no-nonsense plywood case with strong and sturdy dado joinery. And it all comes out of a single sheet of plywood.
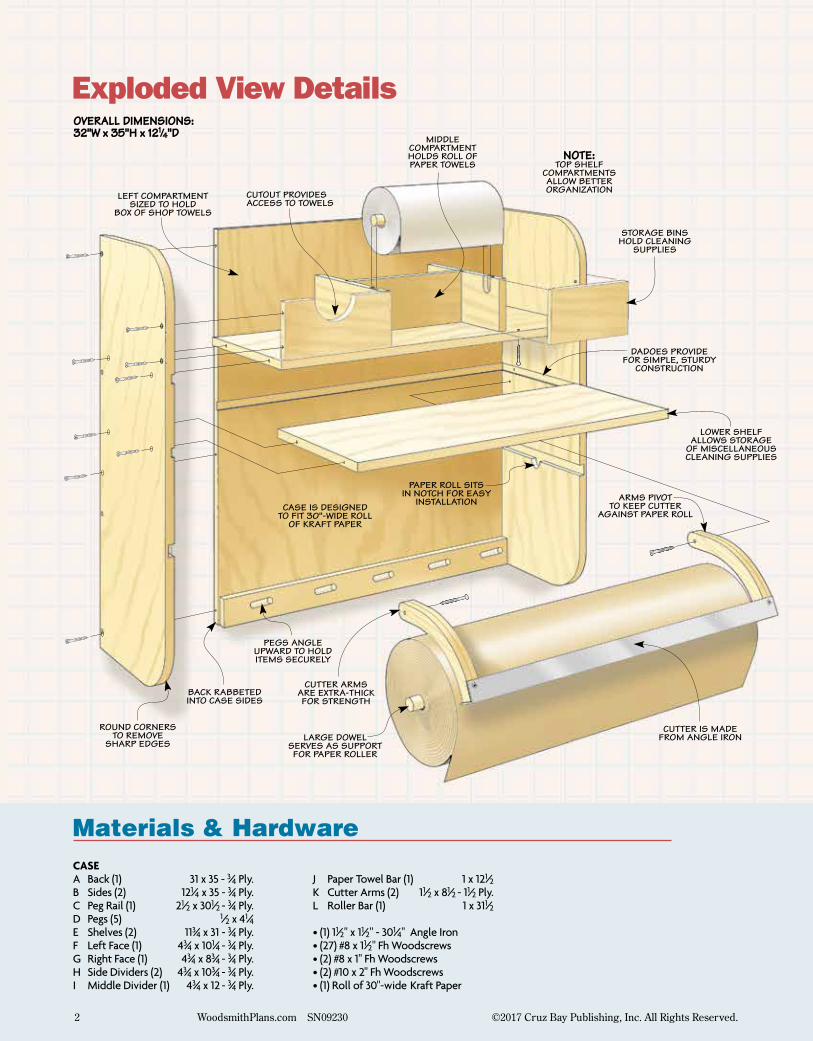
CASEA Back (1) 31 x 35 - 3/4 Ply.B Sides (2) 121/4 x 35 - 3/4 Ply.C Peg Rail (1) 21/2 x 301/2 - 3/4 Ply.D Pegs (5) 1/2 x 41/4E Shelves (2) 113/4 x 31 - 3/4 Ply.F Left Face (1) 43/4 x 101/4 - 3/4 Ply.G Right Face (1) 43/4 x 83/4 - 3/4 Ply.H Side Dividers (2) 43/4 x 103/4 - 3/4 Ply.I Middle Divider (1) 43/4 x 12 - 3/4 Ply.
J Paper Towel Bar (1) 1 x 121/2K Cutter Arms (2) 11/2 x 81/2 - 11/2 Ply.L Roller Bar (1) 1 x 311/2
• (1) 11/2" x 11/2" - 301/4" Angle Iron• (27) #8 x 11/2" Fh Woodscrews• (2) #8 x 1" Fh Woodscrews• (2) #10 x 2" Fh Woodscrews• (1) Roll of 30"-wide Kraft Paper
Materials & Hardware
Exploded View DetailsOVERALL DIMENSIONS:32"W x 35"H x 121⁄4"D
2 WoodsmithPlans.com SN09230 ©2017 Cruz Bay Publishing, Inc. All Rights Reserved.

The cleanup center is an open case with heavy-duty sides and back that are tied together with shelves and dado joinery. The cabinet is sized to fit a 30"-wide roll of kraft paper (see Sources on page 6).
THE CASEBuilding the case out of 3⁄4" plywood gives the cabinet lots of strength. To make it sturdier, the back fits into rabbets cut in the back edges of the sides. Plus, the shelves are anchored in dadoes cut in the sides and the back (Figure 1).
After you cut the dadoes for the shelves, you’ll need to make a third dado for the paper roller. But this one is a little different.
Kraft Paper Roller. Because of the weight of the roll of kraft paper, it’s best to use a 1" wood dowel to support it and to act as a roller. To prevent the roller from pulling out when you’re tearing off a sheet,
Storage Compartments. To fit and install these compartments eas-ily, go ahead and assemble the sides, back, and top shelf. You don’t want to put the lower shelf in just yet, because it’ll interfere with installing the compartments. You can slide it into place later.
Inside Out. Figure 2 shows how the compartments fit together. The easiest way to put them together is to build from the inside out in a step-by-step process. As I said
building the
Center
2 FIGURE
1 FIGURE
the dowel rests in notches in the sides. So, the first step is to locate the notches for the dowel (Figure 1c). I used a Forstner bit and drilled the notches 1⁄2" deep to provide solid support for the roller.
Roller Dado. The next step, as Figure 1c also shows, is to cut a 1"-wide dado that aligns with the top of the notches. This allows you to slide the roller into the cabinet and drop it into place. Since most dado blades will not cut that wide, you may have to make two passes, sneaking up on the final width.
With the dadoes complete, you can cut the rabbets in the sides
for the back (Figure 1a). Then, you can tackle the storage compartments.
c.
a.
b.
a. b.
3 WoodsmithPlans.com SN09230 ©2017 Cruz Bay Publishing, Inc. All Rights Reserved.
4 WoodsmithPlans.com SN09230 ©2017 Cruz Bay Publishing, Inc. All Rights Reserved.
earlier, a couple of the compart-ments are custom-sized to store specific items. So, the first step is to size the left compartment to fit a box of your favorite shop rags, then you can size the middle compartment to fit a roll of paper towels.
Once the compartments are assembled on the top shelf, you can adjust the size of the right face to complete the last compartment. Finally, you can glue and screw the lower shelf into place.
Peg Rail. Next, I turned my atten-tion to the peg rail. To keep items on the pegs, they’re set at a 20° angle (Figure 1c, page 3). I made the holes using my drill press with a Forstner bit and tilting the table.
To give the pegs more strength, they’re supported by the back of the case. To do this, first attach the rail to the back. Then, using the holes in the rail as a guide, drill through the back with the same Forstner bit and at the same angle. Glue will hold the pegs firmly in the holes.
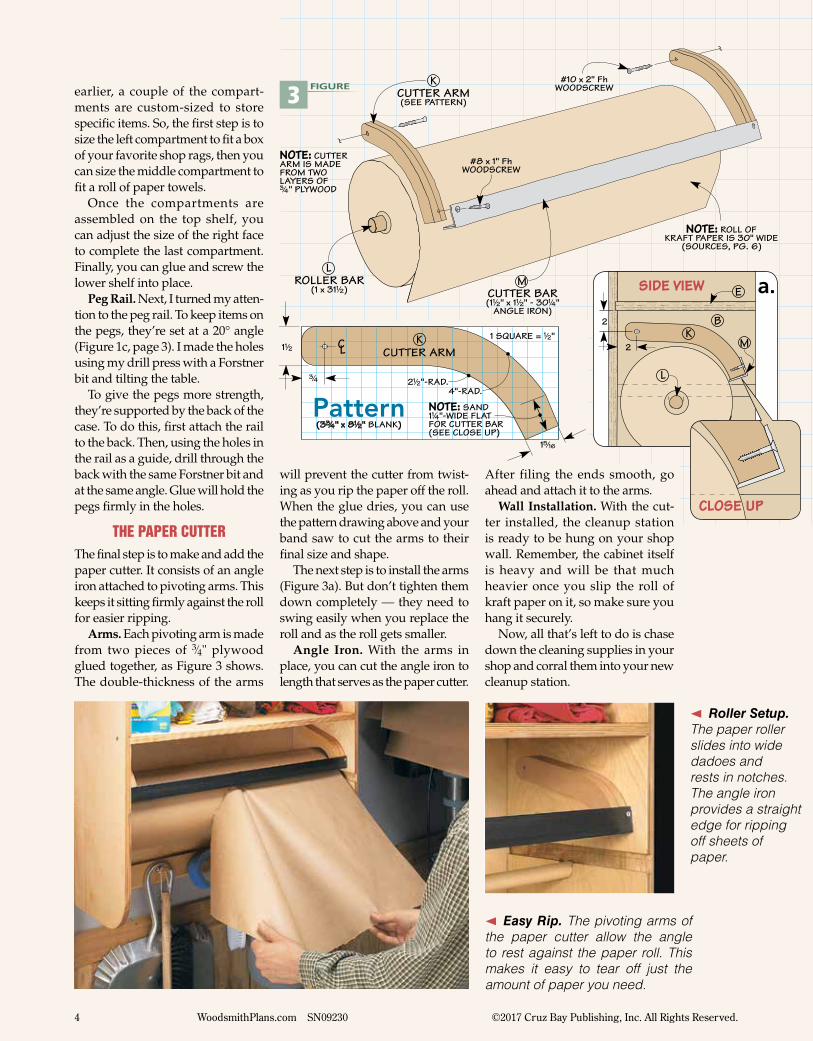
THE PAPER CUTTERThe final step is to make and add the paper cutter. It consists of an angle iron attached to pivoting arms. This keeps it sitting firmly against the roll for easier ripping.
Arms. Each pivoting arm is made from two pieces of 3⁄4" plywood glued together, as Figure 3 shows. The double-thickness of the arms
will prevent the cutter from twist-ing as you rip the paper off the roll. When the glue dries, you can use the pattern drawing above and your band saw to cut the arms to their final size and shape.
The next step is to install the arms (Figure 3a). But don’t tighten them down completely — they need to swing easily when you replace the roll and as the roll gets smaller.
Angle Iron. With the arms in place, you can cut the angle iron to length that serves as the paper cutter.
After filing the ends smooth, go ahead and attach it to the arms.
Wall Installation. With the cut-ter installed, the cleanup station is ready to be hung on your shop wall. Remember, the cabinet itself is heavy and will be that much heavier once you slip the roll of kraft paper on it, so make sure you hang it securely.
Now, all that’s left to do is chase down the cleaning supplies in your shop and corral them into your new cleanup station.
3 FIGURE
a.
< Easy Rip. The pivoting arms of the paper cutter allow the angle to rest against the paper roll. This makes it easy to tear off just the amount of paper you need.
< Roller Setup. The paper roller slides into wide dadoes and rests in notches. The angle iron provides a straight edge for ripping off sheets of paper.

5 WoodsmithPlans.com SN09230 ©2017 Cruz Bay Publishing, Inc. All Rights Reserved.
Cutting Diagram
Materials
shop-built Cleanup Center
CASEA Back (1) 31 x 35 - 3/4 Ply.B Sides (2) 121/4 x 35 - 3/4 Ply.C Peg Rail (1) 21/2 x 301/2 - 3/4 Ply.D Pegs (5) 1/2 x 41/4
E Shelves (2) 113/4 x 31 - 3/4 Ply.F Left Face (1) 43/4 x 101/4 - 3/4 Ply.G Right Face (1) 43/4 x 83/4 - 3/4 Ply.H Side Dividers (2) 43/4 x 103/4 - 3/4 Ply.I Middle Divider (1) 43/4 x 12 - 3/4 Ply.
J Paper Towel Bar (1) 1 x 121/2
K Cutter Arms (2) 11/2 x 81/2 - 11/2 Ply.L Roller Bar (1) 1 x 311/2
• (1) 11/2" x 11/2" - 301/4" Angle Iron
• (27) #8 x 11/2" Fh Woodscrews
• (2) #8 x 1" Fh Woodscrews
• (2) #10 x 2" Fh Woodscrews
• (1) Roll of 30"-wide Kraft Paper
ALSO NEEDED: (1) 1/2" x 24" Dowel for Pegs
(1) 1" x 48" Dowel for Paper Towel Bar and Roller Bar
McMaster-Carr630-600-3600mcmaster.com
Office Depot800-463-3768
officedepot.com
MAIL ORDER
SOURCES
Project SourcesAll the hardware for the cleanup center is pretty common. The only challenge may be finding the 30# kraft paper roll used to protect your benchtops and worksurfaces.
You can find the 30"-wide roll from a number of sources, includ-ing Office Depot and McMaster-Carr listed in the margin at left.
Manufacturers and retailers will periodically redesign or discon-tinue some of their items. So you’ll want to gather all the hardware, supplies, and tools you need before you get started. It’s easy to adjust dimensions or drill different-sized holes to suit your hardware.
6 WoodsmithPlans.com SN09230 ©2017 Cruz Bay Publishing, Inc. All Rights Reserved.