siebel email marketing stand-alone installation guide - oracle
TRANSCRIPT
SIEBEL EMAIL MARKETING STAND-ALONE
INSTALLATION GUIDE
VERSION 7.5.3, REVISION A
MARCH 2004

Siebel Systems, Inc., 2207 Bridgepointe Parkway, San Mateo, CA 94404Copyright © 2004 Siebel Systems, Inc. All rights reserved.Printed in the United States of America
No part of this publication may be stored in a retrieval system, transmitted, or reproduced in any way, including but not limited to photocopy, photographic, magnetic, or other record, without the prior agreement and written permission of Siebel Systems, Inc.
Siebel, the Siebel logo, TrickleSync, TSQ, Universal Agent, and other Siebel product names referenced herein are trademarks of Siebel Systems, Inc., and may be registered in certain jurisdictions.
Other product names, designations, logos, and symbols may be trademarks or registered trademarks of their respective owners.
U.S. GOVERNMENT RESTRICTED RIGHTS. Programs, Ancillary Programs and Documentation, delivered subject to the Department of Defense Federal Acquisition Regulation Supplement, are “commercial computer software” as set forth in DFARS 227.7202, Commercial Computer Software and Commercial Computer Software Documentation, and as such, any use, duplication and disclosure of the Programs, Ancillary Programs and Documentation shall be subject to the restrictions contained in the applicable Siebel license agreement. All other use, duplication and disclosure of the Programs, Ancillary Programs and Documentation by the U.S. Government shall be subject to the applicable Siebel license agreement and the restrictions contained in subsection (c) of FAR 52.227-19, Commercial Computer Software - Restricted Rights (June 1987), or FAR 52.227-14, Rights in Data—General, including Alternate III (June 1987), as applicable. Contractor/licensor is Siebel Systems, Inc., 2207 Bridgepointe Parkway, San Mateo, CA 94404.
Proprietary InformationSiebel Systems, Inc. considers information included in this documentation and in Siebel eBusiness Applications Online Help to be Confidential Information. Your access to and use of this Confidential Information are subject to the terms and conditions of: (1) the applicable Siebel Systems software license agreement, which has been executed and with which you agree to comply; and (2) the proprietary and restricted rights notices included in this documentation.

Contents
Siebel Email Marketing Stand-Alone Installation Guide 1
IntroductionHow This Guide Is Organized . . . . . . . . . . . . . . . . . . . . . . . . . . . . . . . . 6
Additional Documentation . . . . . . . . . . . . . . . . . . . . . . . . . . . . . . . . . . 7
Revision History . . . . . . . . . . . . . . . . . . . . . . . . . . . . . . . . . . . . . . . . . . 8
Chapter 1. Siebel Email Marketing Stand-Alone Architecture Overview
About Siebel Email Marketing Stand-Alone . . . . . . . . . . . . . . . . . . . . . . 11
Siebel Email Marketing Stand-Alone Architecture Overview . . . . . . . . . . 12
Architecture . . . . . . . . . . . . . . . . . . . . . . . . . . . . . . . . . . . . . . . . . . . . . . . 12
Chapter 2. Setting Up Siebel Email Marketing Stand-Alone
Process for Installing Siebel Email Marketing Stand-Alone . . . . . . . . . . . 15
Confirming Installation Requirements . . . . . . . . . . . . . . . . . . . . . . . . . . 16
Prerequisites of Installing Siebel Email Marketing Stand-Alone . . . . . . . . 17
Installing a terminal window emulator . . . . . . . . . . . . . . . . . . . . . . . . . 18
Installing JDBC Drivers . . . . . . . . . . . . . . . . . . . . . . . . . . . . . . . . . . . . 18
Downloading the Java Virtual Machine . . . . . . . . . . . . . . . . . . . . . . . . . 18
Setting Up the Database for Siebel Email Marketing Stand-Alone in MSSQL .19
Creating a Login in MSSQL . . . . . . . . . . . . . . . . . . . . . . . . . . . . . . . . . . . . 19
Creating a Database in MSSQL . . . . . . . . . . . . . . . . . . . . . . . . . . . . . . . . . 19
Version 7.5.3, Revision A Siebel Email Marketing Stand-Alone Installation Guide 3

Contents
Creating Database Server Login in MSSQL . . . . . . . . . . . . . . . . . . . . . . . . . 22
Creating a User in MSSQL . . . . . . . . . . . . . . . . . . . . . . . . . . . . . . . . . . . . . 23
Setting Up the Database for Siebel Email Marketing Stand-Alone in Oracle 24
Creating the User in Oracle . . . . . . . . . . . . . . . . . . . . . . . . . . . . . . . . . . . . 24
Setting Ports for Siebel Email Marketing Stand-Alone . . . . . . . . . . . . . . 26
Testing Ports . . . . . . . . . . . . . . . . . . . . . . . . . . . . . . . . . . . . . . . . . . . 27
Checking DNS, A, and MX records . . . . . . . . . . . . . . . . . . . . . . . . . . . 28
To install Siebel Email Marketing Stand-Alone . . . . . . . . . . . . . . . . . . . 29
Starting the Siebel Email Marketing Stand-Alone Service . . . . . . . . . . . . . 31
Chapter 3. Configuring Siebel Email Marketing Stand-Alone
Logging In to Siebel Email Marketing Stand-Alone . . . . . . . . . . . . . . . . 33
Logging In to Siebel Email Marketing Stand-Alone . . . . . . . . . . . . . . . . . . . 34
Receiving a License for Siebel Email Marketing Stand-Alone . . . . . . . . . . . . 35
Implementing Siebel Email Marketing Stand-Alone . . . . . . . . . . . . . . . . 37
Verify Implementation of Siebel Email Marketing Stand-Alone . . . . . . . . . . 38
Configuring Siebel Email Marketing Stand-Alone . . . . . . . . . . . . . . . . . 39
Default List Settings for Siebel Email Marketing Stand-Alone . . . . . . . . . . . 40
Creating a List . . . . . . . . . . . . . . . . . . . . . . . . . . . . . . . . . . . . . . . . . . . . . 41
Bounce Handling . . . . . . . . . . . . . . . . . . . . . . . . . . . . . . . . . . . . . . . . . . . 42
Stored Procedures . . . . . . . . . . . . . . . . . . . . . . . . . . . . . . . . . . . . . . . . . . . 44
Chapter 4. Upgrading Siebel Email Marketing Stand-Alone
Upgrading the Express Server from Version 3.1.x or 3.2.x to 7.5.3 (Windows 2000) . . . . . . . . . . . . . . . . . . . . . . . . . . . . . . . . . . . . . . . . . . . . . . . . 46
Upgrading the Express Server from Version 3.1.x or 3.2.x to 7.5.3 (Solaris) . 47
Common Steps After Logging in to Siebel EMSA, Version 7.5.3 . . . . . . . . 47
4 Siebel Email Marketing Stand-Alone Installation Guide Version 7.5.3, Revision A

Introduction
This guide provides information necessary to install, implement, configure, and upgrade Siebel Email Marketing Stand-Alone.
NOTE: This document may contain references to BoldFish. Products formerly labeled as BoldFish are now known as Siebel Email Marketing Stand-Alone.
This book will be useful primarily to people whose title or job description matches one of the following:
Technical users of this guide should possess skills in application development or server configuration. Expertise in email delivery would be a useful asset.
Siebel Application Administrators
Administrators who plan, set up, and maintain Siebel applications.
Siebel Application Developers
Developers who plan, implement, and configure Siebel applications, possibly adding new functionality.
Siebel System Administrators
Administrators responsible for the whole system, including installing, maintaining, and upgrading Siebel applications.
Version 7.5.3, Revision A Siebel Email Marketing Stand-Alone Installation Guide 5

Introduction
How This Guide Is Organized
How This Guide Is OrganizedThis guide includes sections that provide:
■ “Siebel Email Marketing Stand-Alone Architecture Overview.” These sections include background on the end users’ experiences, server architecture and processes, and client components.
■ “Setting Up Siebel Email Marketing Stand-Alone.” These sections include material on installing and configuring the Siebel Email Marketing Stand-Alone (EMSA) Server and instructions for setting up Siebel Email Marketing Stand-Alone.
■ “Configuring Siebel Email Marketing Stand-Alone.” These sections include instructions about configuring Siebel Email Marketing Stand-Alone and about server administration and the optimization of its operation.
■ “Upgrading Siebel Email Marketing Stand-Alone.” These sections include information on how to upgrade Siebel Email Marketing Stand-Alone from 3.1.x or 3.2.x.
6 Siebel Email Marketing Stand-Alone Installation Guide Version 7.5.3, Revision A

Introduction
Additional Documentation
Additional Documentation You may also want to consult the other documentation for Siebel Email Marketing Stand-Alone, for example: Siebel Email Marketing Stand-Alone Administration Guide, Siebel Email Marketing Stand-Alone API Guide, and Siebel Email Marketing Stand-One User Guide on SupportWeb.
Version 7.5.3, Revision A Siebel Email Marketing Stand-Alone Installation Guide 7

Introduction
Revision History
Revision HistorySiebel Email Marketing Stand-Alone Installation Guide
Version 7.5.3, Rev. ATable 1. Changes Made in Version 7.5.3, Rev. A
Topic Revision
Performance Characteristic Deleted this chapter.
Information about Performance characteristics, advanced reporting modules, SMTP queue considerations, and so on can be found in Siebel Email Marketing Stand-Alone Administration Guide.
Log Files Deleted this chapter.
Information about how to work with log files can be found in Siebel Email Marketing Stand-Alone Administration Guide.
See “About Siebel Email Marketing Stand-Alone” on page 11
Added new introduction section.
Server and Domain names, see “To install Siebel Email Marketing Stand-Alone” on page 29
Added new note about Server and Domain name.
See “Process for Installing Siebel Email Marketing Stand-Alone” on page 15
New section outlining process steps for installing Siebel Email Marketing Stand-Alone.
“Installing a terminal window emulator” on page 18
Updated section as an optional step.
“Installing JDBC Drivers” on page 18
New JDBC Drivers section.
“Downloading the Java Virtual Machine” on page 18
New Java Virtual Machine section.
See “Setting Up the Database for Siebel Email Marketing Stand-Alone in MSSQL” on page 19
Updated table depending on whether you are using MSSQL or Oracle.
8 Siebel Email Marketing Stand-Alone Installation Guide Version 7.5.3, Revision A

Introduction
Revision History
Additional ChangesChanged the template and format for the entire book.
“Creating a Database in MSSQL” on page 19
New section on creating a database, setting data files, and the translation log in MSSQL.
“Creating Database Server Login in MSSQL” on page 22
New section on how to create a database server login.
“Setting Up the Database for Siebel Email Marketing Stand-Alone in Oracle” on page 24
New section on how to set up an Oracle database user.
See “Setting Ports for Siebel Email Marketing Stand-Alone” on page 26
Updated ports in this section.
“Checking DNS, A, and MX records” on page 28
New section about DNS, M, and MX records.
See “Logging In to Siebel Email Marketing Stand-Alone” on page 34
Updated section about logging in to Siebel Email Marketing Stand-Alone for the first time.
See “Receiving a License for Siebel Email Marketing Stand-Alone” on page 35
Updated entire section and added procedure.
“Stored Procedures” on page 44 New section about stored procedures.
See “Upgrading the Express Server from Version 3.1.x or 3.2.x to 7.5.3 (Windows 2000)” on page 46
Updated Siebel Email Marketing Stand-Alone install directory.
Table 1. Changes Made in Version 7.5.3, Rev. A
Topic Revision
Version 7.5.3, Revision A Siebel Email Marketing Stand-Alone Installation Guide 9

Introduction
Revision History
10 Siebel Email Marketing Stand-Alone Installation Guide Version 7.5.3, Revision A

Siebel Email Marketing Stand-AloneArchitecture Overview 1
This chapter provides conceptual and procedural information about the architecture and processes used by Siebel Email Marketing Stand-Alone.
This chapter covers the following topics:
■ “About Siebel Email Marketing Stand-Alone” on page 11
■ “About Siebel Email Marketing Stand-Alone” on page 11
■ “Siebel Email Marketing Stand-Alone Architecture Overview” on page 12
About Siebel Email Marketing Stand-AloneA marketing professional, whether it be an executive, manager, or campaign agent can use Siebel Email Marketing Stand-Alone for creating programs, campaigns, screen campaign lists, execute campaigns, and so on.
Siebel Email Marketing Stand-Alone is a permission-based email marketing solution with the follow characteristics:
■ Uses a dedicated machine (Windows 2000 or Solaris)
■ Core engine is Java-based
■ Web-based user interface, where users access the application through a browser
■ Processes bounces and click-through
■ Two-way communication with existing database
■ Organizes mailings and sends them to an MTA (Mail Transfer Agent). An MTA performs the following functions:
■ Dedicated machine that primarily sends outbound mail
Version 7.5.3, Revision A Siebel Email Marketing Stand-Alone Administration Guide 11

Siebel Email Marketing Stand-Alone Architecture Overview
Siebel Email Marketing Stand-Alone Architecture Overview
■ Tuned specifically for outbound sending
■ May be more than one MTA to send in parallel and increase performance
Siebel Email Marketing Stand-Alone Architecture Overview
Siebel Email Marketing Stand-Alone (EMSA) allows you to send high volumes of personalized email messages, provides automatic handling of bounced messages, and allows you to track a variety of campaign results.
ArchitectureThe component architectures describe how the parts of Siebel EMSA interact from both an inbound and outbound perspective.
Siebel EMSA architecture is as follows (separated into outbound and inbound (see Figure 1 and Figure 2).
Figure 1. Siebel Email Marketing Stand-Alone Outbound Overview
The component outbound architecture is described as follows:
■ Email Source databases must have a JDBC driver.
■ File uploads of email addresses and personalization data are also supported.
12 Siebel Email Marketing Stand-Alone Administration Guide Version 7.5.3, Revision A

Siebel Email Marketing Stand-Alone Architecture Overview
Siebel Email Marketing Stand-Alone Architecture Overview
■ Report databases.
■ External Services are Java programs that can be written and are triggered by the EMSA for events such as:
■ Server start up and server shut down
■ Unsubscriptions
■ Bounces (Hard and Soft)
■ Java API (aka NetAPI) permits programmatic access to the Siebel EMSA through port 2000, by default.
■ Siebel EMSA listens on port 8000 by default for browser requests.
■ Siebel EMSA round-robins among all defined MTAs for load balancing.
Figure 2. Siebel Email Marketing Stand-Alone Inbound Overview
The component inbound architecture is described as follows:
■ Email Source databases must have JDBC driver. If the email source database does not support stored procedures, a PS engagement is required to implement the functionality. The infrastructure is in place, however.
■ Report databases.
■ Advanced Reporting Module (ARM)
Version 7.5.3, Revision A Siebel Email Marketing Stand-Alone Administration Guide 13

Siebel Email Marketing Stand-Alone Architecture Overview
Siebel Email Marketing Stand-Alone Architecture Overview
■ External Services are generic Java programs that can be written and they may exist for events such as the following:
■ Server start up
■ Server shut down
■ Unsubscriptions
■ Bounces
■ Track Message Opens (TMO)
■ Click-throughs, unsubscribes, and TMOs are recorded in the Report Database. Unsubscribes are also processed back into the email source database through a stored procedure.
■ Bounces are processed into both the email source database via stored procedures and are recorded back into the Report Database.
■ Email based unsubscribes are also supported.
■ Ports 25, 80, and 8000 must be open on the Siebel EMSA.
14 Siebel Email Marketing Stand-Alone Administration Guide Version 7.5.3, Revision A

Setting Up Siebel Email MarketingStand-Alone 2
Getting Siebel Email Marketing Stand-Alone (EMSA) up and running involves:
■ Installing the JDBC driver
■ Installing the database
■ Downloading and installing the proper version of the JVM (Java Virtual Machine)
■ Installing Siebel Email Marketing Stand-Alone
■ Starting Siebel Email Marketing Stand-Alone service
■ Logging in to Siebel Email Marketing Stand-Alone
The following sections will cover each of these procedures with step-by-step instructions.
Process for Installing Siebel Email Marketing Stand-Alone
This section provides instructions for installing the Siebel Email Marketing Stand-Alone product for both Windows and UNIX operating systems.
For information about installation requirements and other platforms supported by Siebel Email Marketing Stand-Alone, see Siebel System Requirements and Supported Platforms on SupportWeb.
You must perform the following tasks to install the Siebel Email Marketing Stand-Alone product:
1 “Confirming Installation Requirements” on page 16
Version 7.5.3, Revision A Siebel Email Marketing Stand-Alone Installation Guide 15

Setting Up Siebel Email Marketing Stand-Alone
Confirming Installation Requirements
2 “Prerequisites of Installing Siebel Email Marketing Stand-Alone” on page 17
3 “To install Siebel Email Marketing Stand-Alone” on page 29
4 “Starting the Siebel Email Marketing Stand-Alone Service” on page 31
Confirming Installation RequirementsThe following installations and licensing must be completed before installing Siebel Email Marketing Stand-Alone (EMSA).
NOTE: For the most up to date installation requirements, see Siebel System Requirements and Supported Platforms on SupportWeb.
■ Operating Systems: Windows 2000 Server or Solaris 8
■ Database Support:
■ MS SQL Server 2000 with Server Pack 2
❏ Code pages - UCS 2, 1252
■ Oracle
❏ Enterprise Server - 8.1.7.4
❏ Enterprise Server - 9.0.1.3
❏ Code pages - UTF 8
NOTE: Siebel EMSA supports accessing external databases. Access to external databases is accomplished using JDBC drivers.
■ Siebel EMSA contains the following third-party software:
■ Tomcat
■ Oro Expression Library
■ PC Requirements:
16 Siebel Email Marketing Stand-Alone Installation Guide Version 7.5.3, Revision A
Setting Up Siebel Email Marketing Stand-Alone
Prerequisites of Installing Siebel Email Marketing Stand-Alone
■ Windows 2000 SP4
■ 733 MHz P-III
■ 1 GB RAM
■ 512 MB available virtual memory
■ 10 GB hard disk
■ Sun Systems Requirements
■ Sun Solaris 2.8 (apply the appropriate J2SE Cluster Patched documented in the Java installation notes)
■ 450 MHz UltraSPARC II
■ 512 MB RAM
■ 512 MB available virtual memory
■ 10 GB Hard disk space
Prerequisites of Installing Siebel Email Marketing Stand-Alone
The following must be installed before installing Siebel Email Marketing Stand-Alone (EMSA):
■ “Installing a terminal window emulator” on page 18
■ “Installing JDBC Drivers” on page 18
■ “Downloading the Java Virtual Machine” on page 18
■ Setting up the Database.
■ For MSSQL, see “Setting Up the Database for Siebel Email Marketing Stand-Alone in MSSQL” on page 19
■ For Oracle, see: “Setting Up the Database for Siebel Email Marketing Stand-Alone in Oracle” on page 24
Version 7.5.3, Revision A Siebel Email Marketing Stand-Alone Installation Guide 17

Setting Up Siebel Email Marketing Stand-Alone
Installing a terminal window emulator
■ “Setting Ports for Siebel Email Marketing Stand-Alone” on page 26
■ “Testing Ports” on page 27
Installing a terminal window emulator[Optional] This step is only an issue for non-UNIX environments. Before installing Siebel Email Marketing Stand-Alone, you might need to install a terminal window emulator, such as Cygwin or ListXP. Terminal windows assist you in reading large files using UNIX commands in a Microsoft Windows environment.
Installing JDBC DriversThe Siebel Email Marketing Stand-Alone database requires JDBC drivers, which are not bundled with the product. Therefore, you need to get and install the appropriate JDBC drivers that supports the database that you are using, save them on the appropriate machine, and then refer to them during installation.
Downloading the Java Virtual MachineJava Virtual Machine (JVM) is the source code that allows Java to run applications. You need to locate, download, and install the proper JVM for Siebel EMSA.
It is important to download the correct version to stay compatible with Siebel EMSA.
It is also important, in a Windows environment, to add a path. For example, in the Edit System Variable dialog box, in the Variable name text field, add Path and in the Variable value text field, add C:\j2sdk1.4.1_02\jre\bin\;C:\Program Files.
18 Siebel Email Marketing Stand-Alone Installation Guide Version 7.5.3, Revision A

Setting Up Siebel Email Marketing Stand-Alone
Setting Up the Database for Siebel Email Marketing Stand-Alone in MSSQL
Setting Up the Database for Siebel Email Marketing Stand-Alone in MSSQL
Siebel Email Marketing Stand-Alone is database intensive and the database must be created before installation. Users must have proper permissions as database owner before installation begins, as well.
The following is the process for setting up the database in MSSQL:
1 “Creating a Login in MSSQL” on page 19
2 “Creating a Database in MSSQL” on page 19
3 “Creating Database Server Login in MSSQL” on page 22
4 “Creating a User in MSSQL” on page 23
Creating a Login in MSSQLBefore installing Siebel Email Marketing Stand-Alone (EMSA) you must first create a login for your Siebel database administrator.
To create a login in MSSQL
1 Navigate to Microsoft SQL Servers > Your Machine >Security.
2 Right-click Logins > New Login.
3 Choose SQL Server authentication and give the Siebel user name and password.
You should now see the new user in the Name screen.
4 In the SQL Server Login Properties - New Login dialog box, select the following check boxes:
■ Setup Administrators
■ Database Creators
Creating a Database in MSSQLNext, you need to create Advanced Reporting Module (ARM) or reporting database.
Version 7.5.3, Revision A Siebel Email Marketing Stand-Alone Installation Guide 19

Setting Up Siebel Email Marketing Stand-Alone
Setting Up the Database for Siebel Email Marketing Stand-Alone in MSSQL
Before installing Siebel Email Marketing Stand-Alone you must first create a database. This example, assumes you are using Microsoft SQL Server Enterprise Manager.
The following is the process for creating the database in MSSQL:
■ “Setting the Data Files in MSSQL” on page 20
■ “Setting the Transaction Log in MSSQL” on page 21
NOTE: These steps are continued from the “Creating a Login in MSSQL” on page 19 steps in the preceding example.
To create a database
1 Navigate to Your computer > Databases.
2 Right-click Database > New Database.
The Database Properties dialog box appears.
3 In the Name field, enter the name of your database.
4 Allow the collation name to remain the server default.
Setting the Data Files in MSSQLNext, you need to set the data files.
Before installing Siebel Email Marketing Stand-Alone you must first set the data files. This example, assumes you are using Microsoft SQL Server Enterprise Manager.
NOTE: These steps are continued from the “Creating a Database in MSSQL” on page 19 steps in the preceding example.
To set the data file
1 In MSSQL, click the Data Files tab.
20 Siebel Email Marketing Stand-Alone Installation Guide Version 7.5.3, Revision A
Setting Up Siebel Email Marketing Stand-Alone
Setting Up the Database for Siebel Email Marketing Stand-Alone in MSSQL
2 Enter a size for the data file.
The size is based on several factors:
Assume 400 bytes of data will be saved per email sent, as a rough rule of thumb. This will vary based on features used, such as click-through tracking, messages opened, and on how many bounces are received for the mailings.
Assume 300 bytes of index will be consumed per email sent, as a rough rule of thumb.
3 Determine the shelf life of the data, after which it may be purged.
4 Set a purge interval.
If purges are done once a month and two years of data should be available, then 25 months worth of mailings must be kept. If the expected average number of emails per month is 100,000, then the size of the data file should be:
700 * 25 * 100,000 = 1,750,000,000 bytes
5 File Properties and file group membership settings depend on local standards and environments.
Setting the Transaction Log in MSSQLNext, you need to set the transaction log.
Before installing Siebel Email Marketing Stand-Alone you must first set the transaction log in MSSQL. This example assumes you are using Microsoft SQL Server Enterprise Manager.
NOTE: These steps are continued from the “Setting the Data Files in MSSQL” on page 20 steps in the preceding example.
To set the transaction log
1 In MSSQL, click the Transaction Log tab.
2 Enter a size for the transaction log file.
The size is based on several factors:
Version 7.5.3, Revision A Siebel Email Marketing Stand-Alone Installation Guide 21
Setting Up Siebel Email Marketing Stand-Alone
Setting Up the Database for Siebel Email Marketing Stand-Alone in MSSQL
■ The amount of data accumulated in a purge interval or the size of the largest mailing, whichever is larger.
■ The frequency with which the transaction log is backed up.
3 If, in the preceding example, the monthly purge and a 100 K mailing could happen on the same day before the nightly backup, then the transaction log must be at least 140 M (70 M for the monthly purge and 70 M for the 100 K mailing). Doubling this value and rounding up to 300 M would not be extreme considering the cost of disk and the ill effects of a full transaction log.
4 File Properties and file group membership settings depend on local standards and environments.
5 Click OK to set the translation log and create the database.
Creating Database Server Login in MSSQLNext, you need to create a database server login.
Before installing Siebel Email Marketing Stand-Alone you must first set the database server login in MSSQL. This example, assumes you are using Microsoft SQL Server Enterprise Manager.
NOTE: These steps are continued from the “Setting the Transaction Log in MSSQL” on page 21 steps in the preceding example.
To create a database server login
1 Under the Security directory is the Logins item. Right-click the directory to bring up the menu and choose New Login.
2 Provide a name for the server login.
3 Choose SQL Server Authentication and enter a password.
4 Set the default database to the one created for the Siebel EMSA Server.
The login does not require any server roles for the Siebel EMSA Server.
22 Siebel Email Marketing Stand-Alone Installation Guide Version 7.5.3, Revision A

Setting Up Siebel Email Marketing Stand-Alone
Setting Up the Database for Siebel Email Marketing Stand-Alone in MSSQL
5 Click the Database Access Tab and specify the databases the login may access. Be sure to include, at a minimum, the Siebel EMSA Server database.
6 Specify the public role for this login.
The login may be made an owner, which will simplify the creation of the user, but this may not be an acceptable security practice.
7 Click OK and confirm the password specified earlier.
8 Click OK to create the server login.
The new login appears on the right-hand side. The default database should be the Siebel EMSA Server database.
Creating a User in MSSQLNext, you need to create a user. The creation of the server login automatically creates a user in the database with the same name. This user must have appropriate permissions set.
These steps are continued from the “Creating a Login in MSSQL” on page 19 and “Creating a Database in MSSQL” on page 19 steps in the preceding examples.
Before installing Siebel Email Marketing Stand-Alone you must first create a user. This example assumes you are using Microsoft SQL Server Enterprise Manager.
To create a user
1 Right-click the database for this user and select Properties.
2 Click the Permissions tab and then check the Create Table and Create View boxes.
Note that create index and trigger privileges are implicit in the create table privilege in MSSQL Server.
3 Click OK to grant the permissions.
Version 7.5.3, Revision A Siebel Email Marketing Stand-Alone Installation Guide 23

Setting Up Siebel Email Marketing Stand-Alone
Setting Up the Database for Siebel Email Marketing Stand-Alone in Oracle
Setting Up the Database for Siebel Email Marketing Stand-Alone in Oracle
Siebel Email Marketing Stand-Alone is database-intensive and the database must be created before installation. Users must have proper permissions as database owner before installation begins, as well.
The following is the process for setting up the database:
1 Create a user whose associated schema has sufficient room for growth.
2 Use Oracle Enterprise Manager.
3 Log in as SYSTEM or other adequately privileged account.
NOTE: It is assumed the Oracle server is already installed with properly configured tablespaces, rollback segments, redo logs, and so on.
Creating the User in OracleFirst you must create a user.
To create a user
1 Open the Security submenu and highlight Users.
2 Click the Object drop-down list and select Create.
3 Scroll down in the popup and the User item is highlighted.
4 Click the Create button.
5 Under the General tab, enter the following:
Field Description
Name Enter the user name.
Authentication Enter “Password” (no quotes).
24 Siebel Email Marketing Stand-Alone Installation Guide Version 7.5.3, Revision A

Setting Up Siebel Email Marketing Stand-Alone
Setting Up the Database for Siebel Email Marketing Stand-Alone in Oracle
6 Click the Show SQL button to present the underlying SQL being constructed.
7 Click the System tab and select:
■ Create Table
■ Create Trigger
■ Create View
8 Click the Quota tab and enter a quota for the default tablespace for this user. The size is based on several factors:
■ Assume 400 bytes of data will be saved per email sent, as a rough rule of thumb. This will vary based on features used, such as click-through tracking, messages opened, and so on and on how many bounces are received for the mailings.
■ Assume 300 bytes of index will be consumed per email sent, as a rough rule of thumb.
■ Determine the shelf life of the data, after which it may be purged.
■ Set a purge interval.
Profile Select a profile as appropriate in the local environment.
Enter Password Enter password.
Confirm Password Enter password again. Do not expire the password.
Default Tablespace Select this option if different from users.
Temporary Tablespace Select this option as appropriate in the local environment.
Status Select unlocked.
Field Description
Version 7.5.3, Revision A Siebel Email Marketing Stand-Alone Installation Guide 25

Setting Up Siebel Email Marketing Stand-Alone
Setting Ports for Siebel Email Marketing Stand-Alone
■ If purges are done once a month and two years of data should be available, then 25 months worth of mailings must be kept. If the expected average number of emails per month is 100,000, then the size of the data file should be:
700 * 25 * 100,000 = 1,750,000,000 bytes
9 The user is created, click OK.
Setting Ports for Siebel Email Marketing Stand-AloneIt is necessary to ensure that the ports required by the Siebel Email Marketing Stand-Alone (EMSA) Server are accessible outside of your firewall on the machine the Siebel EMSA Server will be installed on.
26 Siebel Email Marketing Stand-Alone Installation Guide Version 7.5.3, Revision A
Setting Up Siebel Email Marketing Stand-Alone
Testing Ports
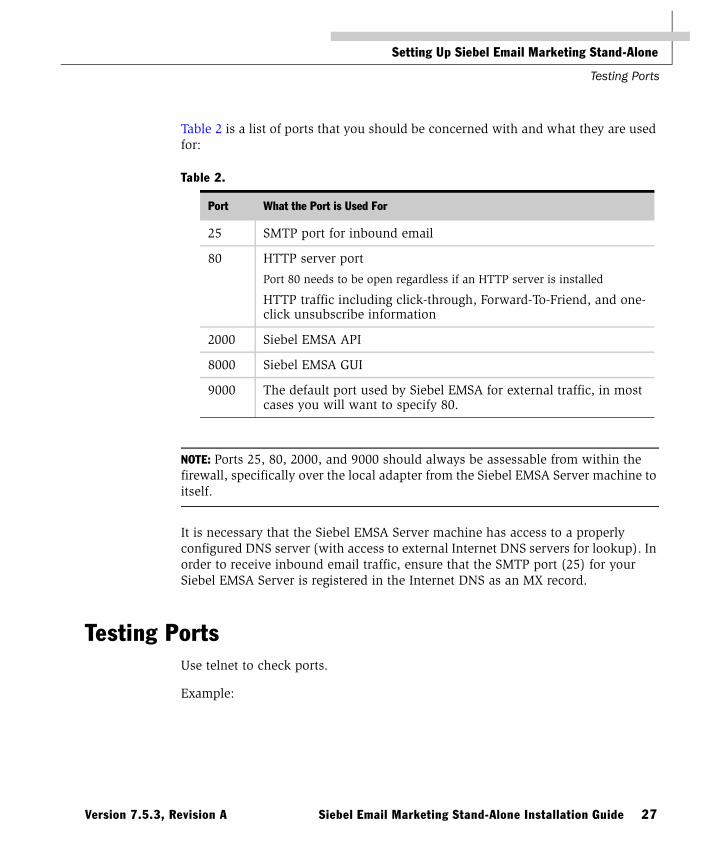
Table 2 is a list of ports that you should be concerned with and what they are used for:
NOTE: Ports 25, 80, 2000, and 9000 should always be assessable from within the firewall, specifically over the local adapter from the Siebel EMSA Server machine to itself.
It is necessary that the Siebel EMSA Server machine has access to a properly configured DNS server (with access to external Internet DNS servers for lookup). In order to receive inbound email traffic, ensure that the SMTP port (25) for your Siebel EMSA Server is registered in the Internet DNS as an MX record.
Testing PortsUse telnet to check ports.
Example:
Table 2.
Port What the Port is Used For
25 SMTP port for inbound email
80 HTTP server port
Port 80 needs to be open regardless if an HTTP server is installed
HTTP traffic including click-through, Forward-To-Friend, and one-click unsubscribe information
2000 Siebel EMSA API
8000 Siebel EMSA GUI
9000 The default port used by Siebel EMSA for external traffic, in most cases you will want to specify 80.
Version 7.5.3, Revision A Siebel Email Marketing Stand-Alone Installation Guide 27

Setting Up Siebel Email Marketing Stand-Alone
Checking DNS, A, and MX records
C:\>telnet dbserver.mycompany.com 25
NOTE: Perform this test outside the firewall as well.
Checking DNS, A, and MX recordsMake sure that the public hostname associated with your Siebel EMSA Server machine is registered in DNS with a good A and MX record.
DNS stands for Domain Name System (or Service). Domain names are the people-friendly representations of computers. DNS is an Internet service for translating domain names into Internet addresses. There is a many to one mapping of domain names to IP addresses. DNS entries can be tested using nslookup, dig, and host commands, whatever you are most familiar with.
DNS records are the entries which map domain names or mail exchanges to IP addresses and are composed of multiple types of records. Of these, A records and MX records are relevant for routing email. ‘A’ records are authority records and are the records necessary to route email through the Internet. No two A records refer to the same IP address. A domain name with a valid ‘A’ record will have mail routed directly to it.
MX stands for Mail Exchange and MX records are mail exchange records. This is the record necessary to route email through the Internet. The MX record creates a mail route for a domain. A domain name may have several mail routes, each assigned a priority. The lowest numbered mail route identifies the server responsible for the domain. Other mail routes are used as backups. MX records allow a domain or sub domain to redirect mail to specific mail handling servers. Set up of an MX record should be done at least 24 hours before testing. The MX record should be created for the Inbound MTA or the Siebel EMSA Server.
Test the validity of the ‘A’ or MX record by using nslookup with set q=mx or set q=a option.
28 Siebel Email Marketing Stand-Alone Installation Guide Version 7.5.3, Revision A

Setting Up Siebel Email Marketing Stand-Alone
To install Siebel Email Marketing Stand-Alone
To install Siebel Email Marketing Stand-AloneThe following is the process for installing Siebel Email Marketing Stand-Alone.
1 Get installation files
2 Install files
3 Enter Database information
4 Confirm host and domain name
5 Supply correct Ports
To install Siebel Email Marketing Stand-Alone
1 Execute the zip file to begin installation.
The download file will look something like the following: sem-install.exe (Windows) and sem-install.bin (UNIX).
The Introduction dialog box appears.
2 Click Next.
The Choose Install Folder dialog box appears.
3 Choose where you would like to install and click Next.
The Choose Location of JDBC Drivers appears.
NOTE: The appropriate JDBC driver must be installed before starting the installation process. For more information about the exact type and versions of drivers required, see Siebel System Requirements and Supported Platforms.
4 Choose the folder that contains all the JDBC drivers that you plan on using, and then click Next.
The Pre-Installation Summary dialog box appears.
5 Verify the installation summary. If everything is satisfactory, click Install.
The Install Complete dialog box appears.
Version 7.5.3, Revision A Siebel Email Marketing Stand-Alone Installation Guide 29

Setting Up Siebel Email Marketing Stand-Alone
To install Siebel Email Marketing Stand-Alone
6 Click Next to configure your server.
7 The Configuration: database platform dialog box appears.
8 Select the platform you will use to host Siebel Email Marketing Stand-Alone, and click Next.
The Database Connection parameters dialog box appears.
9 Enter the database connection parameters and then click Next.
The fields are summarized in the following table if you are using MSSQL.
The fields are summarized in the following table if you are using Oracle.
Field Description Example
Host and Port Enter your hostname and port numbers here.
dbserver.mycompany.com
1433
Database and Server Name
Server Name is ignored.
Database is the database name in the SQL Server instance.
Credentials Enter your username and password here.
semuser
sempassword
Field Description Example
Host and Port Enter your hostname and port numbers here.
dbserver.mycompany.com
1521
Database and Server Name
The Server Name should be the SID.
The Database is ignored.
Credentials Enter your username and password here.
semuser
sempassword
30 Siebel Email Marketing Stand-Alone Installation Guide Version 7.5.3, Revision A

Setting Up Siebel Email Marketing Stand-Alone
Starting the Siebel Email Marketing Stand-Alone Service
10 In the Configuration: Express Server Ports dialog box, complete the fields, and click Done.
The fields are summarized in the following table.
You have finished installing Siebel Email Marketing. Next,6ttc you need to start the Siebel Email Marketing Stand-Alone service; see “Starting the Siebel Email Marketing Stand-Alone Service” on page 31.
NOTE: The Server name and Domain name fields should not be left blank during the installation process. These fields are required and if left blank they should be modified in the appropriate configuration file.
Starting the Siebel Email Marketing Stand-Alone ServiceBefore starting the Siebel Email Marketing Stand-Alone (EMSA) service in either Windows or Solaris, you need to install Siebel EMSA.
To start the Siebel EMSA service for Windows
1 Navigate to your Control Panel > Services.
2 In the Services dialog box, right-click SEM Service and select Start.
To start the Siebel EMSA service for Solaris
■ Start the Siebel EMSA Server with the following command from the installation directory:
Field Value Example
API Port Enter your API Port. 2000
Admin Web port Enter your Admin Web port. 8000
Public Web port Enter your Public Web port. 80
hostname Enter your hostname. semserver
domainname Enter your domain name. mycompany.com
Version 7.5.3, Revision A Siebel Email Marketing Stand-Alone Installation Guide 31

Setting Up Siebel Email Marketing Stand-Alone
Starting the Siebel Email Marketing Stand-Alone Service
nohup ./boldfish -S &
32 Siebel Email Marketing Stand-Alone Installation Guide Version 7.5.3, Revision A
Configuring Siebel Email MarketingStand-Alone 3
After you have installed Siebel Email Marketing Stand-Alone, you will need to configure it.
The process of configuring Siebel Email Marketing Stand-Alone is as follows:
■ Log in as root
■ Request a license
■ Supply outgoing MTA information
■ Test a mailing
Logging In to Siebel Email Marketing Stand-AloneIf you have forgotten which port your server is running on, you can find this information from the global_config file on the machine where Siebel Email Marketing Stand-Alone is installed.
To locate Siebel Email Marketing Stand-Alone global_config (Windows)
1 Choose Start > Run.
2 In the Run dialog box, enter cmd and click OK.
A command-line dialog box appears.
3 Change directories to the Run directory of the Siebel Email Marketing Stand-Alone installation directory.
By default, this would be:
Version 7.5.3, Revision A Siebel Email Marketing Stand-Alone Installation Guide 33

Configuring Siebel Email Marketing Stand-Alone
Logging In to Siebel Email Marketing Stand-Alone
cd c:\Program Files\SEM\
You should now be at the Exchange Server directory, as evidenced by the prompt in the command window:
C:\Program Files\SEM\
4 Send the global_config file to a text editor (such as Notepad) by executing the following command:
notepad global_config
The global_config file appears.
5 Search for serverPort.
The number following LWD.HTTP.serverPort will be the administrative server port number.
To locate Siebel Email Marketing Stand-Alone global-config (Solaris)
From the directory where Siebel Email Marketing Stand-Alone is installed, search the global_config file for serverPort. Use the grep command.
For example:
grep serverPort global_config
The result should look like:
LWD.HTTP.serverPort=8000zomrak_boldfish_com_8082.LWD.HTTP.serverPort=8082zomrak_boldfish_com_80.LWD.HTTP.serverPort=80paymaster_boldfish_com_80.LWD.HTTP.serverPort=80In this case, the administrative server is on port 8000, there is a server on port 8082, and there are two virtual servers on port 80.
Logging In to Siebel Email Marketing Stand-AloneThe default email and password is root/admin.
To log in to Siebel Email Marketing Stand-Alone
1 Open a browser and point it to the Administration URL.
34 Siebel Email Marketing Stand-Alone Installation Guide Version 7.5.3, Revision A

Configuring Siebel Email Marketing Stand-Alone
Logging In to Siebel Email Marketing Stand-Alone
2 From the Log In screen, enter the default email address (root) and password (admin).
3 Click Log In.
The Licensing screen appears and you are logged in to Siebel Email Marketing Stand-Alone.
Receiving a License for Siebel Email Marketing Stand-AloneThe licensing screen is where you fill in basic configuration information about the email flow and request a license from Siebel Systems. The first part of the screen tells you what licensing is all about.
When logging in for the first time, you will automatically be brought to the license screen and will not be allowed to perform any other tasks until a valid license is entered into the system.
At this time, it is also recommended that you complete the Minimum Setup Information form.
Before proceeding with these steps, you should first review the flow of email in Siebel Email Marketing Stand-Alone system. For more information, see Siebel Email Marketing Stand-Alone Administrator Guide.
To receive a license, you will need to complete the following steps.
1 Request a license from Technical Support.
2 Install the license through the EMSA interface.
To request a license
■ Contact Technical Support for a license.
Install the license through the EMSA interface
1 After you have contacted Technical Support, they will send you an email with the license in it.
2 From the Site Manager screen, click the Licensing hyperlink.
3 Scroll down to the Input License section.
Version 7.5.3, Revision A Siebel Email Marketing Stand-Alone Installation Guide 35

Configuring Siebel Email Marketing Stand-Alone
Logging In to Siebel Email Marketing Stand-Alone
4 Copy and paste the license you received from Technical Support into the Input License list box.
5 Click Add License.
To complete the Minimum Setup Information form
1 Scroll down until Minimum Setup Information is at the top of your screen.
2 Modify the Email Server Domain setting.
The Email Server Domain specifies the domain of your email server. For example, semsvr3.siebel.com specifies the domain name for an email server.
3 Enter the name of your outbound email servers in the outbound SMTP Servers field.
If you have multiple outbound email addresses, enter all of them on the same line each separated by “,”.
For servers listening on different port numbers, enter servername:port.
For example:
localhost,mail:3000, gateway,br
4 You can assign as many Site Managers as you need to in this entry field. Make sure that these are all valid email addresses. Enter one email address per line.
After you have completed entering the preceding information, scroll down until you see the three buttons (Update Server, Test Email Setup, and Request License).
5 Every time you make a change, click the Update Server button. This will write the information to your local global configuration file, and make the changes known to the system.
36 Siebel Email Marketing Stand-Alone Installation Guide Version 7.5.3, Revision A

Configuring Siebel Email Marketing Stand-Alone
Implementing Siebel Email Marketing Stand-Alone
6 After you have entered all the information correctly, you should test that everything works by clicking the Test Email Setup button. If everything works, every Site Manager will receive two email messages; one to test outgoing, and one to test incoming. If you do not receive these messages, check your SMTP.log.
If you receive an error message, you should request a license from Technical Support. For more information about requesting a license, see “Receiving a License for Siebel Email Marketing Stand-Alone” on page 35.
NOTE: The SMTP.log file is only activated if logging is set to DEBUG#3Level in the log4j-congfig.properties file located in the <Siebel EMSA Home>\j2ee\....
Implementing Siebel Email Marketing Stand-AloneAfter you have installed Siebel Email Marketing Stand-Alone and logged in for the first time, you will need to enter some basic information in order for Siebel Email Marketing Stand-Alone to operate properly.
You need to enter the following information:
1 Email Server Domain setting
2 SMTP Server setting
3 Identity of the Site Manager
You will also verify that Siebel Email Marketing Stand-Alone is functioning properly by conducting a round-trip email test, requesting a license, and setting up the Site Manager and default list settings. Finally, you will set up a new list.
After you have logged in, you will automatically be directed to the Licensing screen.
From here you can enter some basic information:
1 Modify the Email Server Domain setting.
The Email Server Domain specifies the domain of your email server. For example, semsvr3.siebel.com specifies the domain name for an email server.
Version 7.5.3, Revision A Siebel Email Marketing Stand-Alone Installation Guide 37

Configuring Siebel Email Marketing Stand-Alone
Implementing Siebel Email Marketing Stand-Alone
2 Modify the SMTP Server setting.
Siebel Email Marketing Stand-Alone needs to communicate with at least one SMTP Server in order to transmit email. If you specify more than one server, Siebel Email Marketing Stand-Alone will cycle round-robin style through all the servers. Each server can also contain a port number. Multiple servers should be comma-separated with no intervening white spaces.
For example:
eagle.yourcompany.com:2000,eagle.yourcompany.com:2001,eagle.yourcompany.com,mailhub.yourcompany.com
3 Add one or more Site Managers.
Enter the valid email address of person(s) you wish to be Site Managers. If you are adding someone who is not currently in the system, an account will be created and they will be notified, through email, of their new status—including their default system password.
4 When finished, click Update Server.
By clicking Update Server, your local global configuration file will be updated.
Verify Implementation of Siebel Email Marketing Stand-AloneIn order to verify that Siebel Email Marketing Stand-Alone has been properly implemented, you need to conduct a test of Siebel Email Marketing Stand-Alone functionality.
1 Scroll down to approximately the middle of the screen and click Test Email Setup.
After a short period of time, the designated Site Managers will receive an email message stating LICENSE TEST=OK and System Test Succeeded.
38 Siebel Email Marketing Stand-Alone Installation Guide Version 7.5.3, Revision A

Configuring Siebel Email Marketing Stand-Alone
Configuring Siebel Email Marketing Stand-Alone
2 If for some reason the Site Managers do not receive the email, check the SMTP.log file.
NOTE: The SMTP.log file is only activated if logging is set to DEBUG#3Level in the log4j-congfig.properties file located in the <Siebel EMSA Home>\j2ee\....
Configuring Siebel Email Marketing Stand-AloneYou will need to modify some of the Site Manager settings with your company’s specific information.
If this is the first time you have logged in or if you have not changed your password, you will be sent to the Update User Options screen.
To change the default password for the Site Manager
1 When you first log in to Siebel EMSA, you will be sent to the Update User Options screen.
2 Complete the form as desired, making sure to change your password, and click Update Information.
NOTE: For each configuration change feedback appears on the top of each screen indicating if the change was accepted or if there was an error.
To set the Site Manager settings
1 From the Site Manager screen, click Server.
The Server Configuration screen appears.
2 Modify the Your Organization Name setting according to your specifications.
Your Organization Name appears in several places on the Web interface. The main screen, for example, displays the organization name.
Version 7.5.3, Revision A Siebel Email Marketing Stand-Alone Installation Guide 39

Configuring Siebel Email Marketing Stand-Alone
Configuring Siebel Email Marketing Stand-Alone
3 Scroll down to the Inbound SMTP Configuration section and make sure the Start Inbound SMTP Server setting is set to Yes. By setting the value to Yes you are specifying that incoming email goes directly to this server.
4 Click Submit.
Default List Settings for Siebel Email Marketing Stand-AloneAfter you have set up the Site Manager settings, you will need to make a few adjustments to the Default List settings.
From here you can specify the default settings, options, and rules configurations for a list.
To access the Default List
■ From the Site Manager screen, click Default List.
The Configuring List: Default List screen appears.
To configure Default List: Posting
1 Click Site Manager > Default List > Posting.
The Posting screen appears.
2 Enter the appropriate fields, and then click Submit or Submit & Go.
To configure Default List: Errors
1 Click List Owner > Errors.
The Errors screen appears.
2 Select Send Unresolved Bounces to Error Handlers.
3 Select Remove Subscriber Immediately on Hard Bounces.
4 Select Remove Subscriber When Too Many Soft Bounces Occur Within Grace Period.
5 When selecting the preceding item, you must provide values for the following two fields:
■ Enter 1 in the Hour text entry field under Grace Period for Soft Bounces.
40 Siebel Email Marketing Stand-Alone Installation Guide Version 7.5.3, Revision A

Configuring Siebel Email Marketing Stand-Alone
Configuring Siebel Email Marketing Stand-Alone
■ Enter 1 under Max Number of Soft Bounces Within Grace Period Before User Removed.
6 Click Submit or Submit & Go.
To configure Default List: Appearance
1 Click List Owner > Appearance.
The Appearance screen appears.
2 Under From: Header Line, specify User Specified Value.
Enter the value in the following format:
(user-specified name)<owner-listname@machinename>
3 Under Reply-to: Header Line, specify User-specified Value.
Enter the value in the following format:
(user-specified name)<[email protected]>
NOTE: Domain is the DNS name for the machine.
4 Click Submit or Submit & Go.
Creating a ListWhen creating lists, keep in mind that the owner-specific name for a given list may be viewable to recipients, depending on the mail client or browser. Furthermore, make sure the Siebel Server name is included in the email address list.
To create a list
1 Click Site Manager and then click the List Creation hyperlink.
The Minimum List Creation Information screen appears.
2 Complete the Minimum List Creation Information form as desired:
■ List Name. Specify a distinctive and readily-identifiable name for the list.
Version 7.5.3, Revision A Siebel Email Marketing Stand-Alone Installation Guide 41

Configuring Siebel Email Marketing Stand-Alone
Configuring Siebel Email Marketing Stand-Alone
■ List Email. Specify an email address for the list.
NOTE: The machine name of Siebel EMSA Server must be included in the List Email address for bounce handling to work properly.
■ List Owner. Specify the email address of the Owner of the list. The Owner will be able to administer the list and delegate responsibilities for various features of the list.
■ List Template. Siebel Email Marketing Stand-Alone will use the specified list as a template in creating new lists in the system. The template feature can be used as a shortcut in creating large amounts of lists with the same characteristics. However, several list options are not copied over from the template list to the new list. These include the POP3 password, the From: and Reply-To: headers, and the default subscriber options.
■ Database. Specify a database for the list.
3 Click Submit.
Bounce HandlingYou should set up procedures for handling bounces to complete the configuration of a list.
When mailing to a list, you can expect 5-15% of the email addresses to return to the sender, or bounce, due to some sort of delivery failure. That means that if you send 100,000 messages, you will receive from 5,000 to 15,000 bounces. Managing these bounces manually can waste an enormous amount of your time and effort because you need to read each message to decide what action should take place.
The following are the three types of incoming messages that the Bounce Handler can detect:
■ Hard bounces. These result from a permanent delivery failure, such as an Invalid Email Account message, that indicates no possibility of delivering the email to the recipient. Hard bounces usually result in the removal of that particular email address from the mailing list.
42 Siebel Email Marketing Stand-Alone Installation Guide Version 7.5.3, Revision A

Configuring Siebel Email Marketing Stand-Alone
Configuring Siebel Email Marketing Stand-Alone
■ Soft bounces. Soft bounces indicate a temporary delivery failure, such as a full mailbox or a mail server temporarily not working. In this case, the usual action is to resend the message or to institute a temporary suspension of sending to that address.
■ Replies to the original message. When a person replies to the original email message, the Bounce Handler detects that the message is not a bounce and the message can be routed to a user-defined mailbox for a personal response. Replies are also automatically handled for subscribe and unsubscribe, as well as confirmations. Unidentified responses are sent to the error handler (if configured that way), which also gets all kind of other errors.
To configure a List for Bounce Handling
1 Click List Owner.
The List Owner Options screen appears. From here you can see a list of all available lists.
2 Click the configure hyperlink for the list you want to configure.
The Configuring List: (list) screen for the selected list appears.
3 Click the Errors hyperlink.
The Errors section of the Configuring List: (list) screen appears.
4 From here you can configure your list for bounce handling
5 Select Send Unresolved Bounces to Error Handlers.
6 Select Remove Subscriber Immediately on Hard Bounces.
7 Select Remove Subscriber When Too Many Soft Bounces Occur Within Grace Period.
When selecting the above item, you must provide values for the following two fields.
8 Enter 1 in the Hour text entry field under Grace Period for Soft Bounces.
9 Enter 1 under Max Number of Soft Bounces Within Grace Period Before User Removed.
Version 7.5.3, Revision A Siebel Email Marketing Stand-Alone Installation Guide 43

Configuring Siebel Email Marketing Stand-Alone
Configuring Siebel Email Marketing Stand-Alone
10 When finished, click Submit or Submit & Go.
Stored ProceduresSiebel EMSA records bounce and unsubscribe information with the use of stored procedures that are edited according to your schema.
To access the stored procedure stubs
1 Go to ddl/sql/install under the installation directory.
NOTE: The files may also be extracted from the dmutl.jar file using Winzip or the jar utility.
2 Locate the *.targetdb.sql file for your particular type of database.
3 Edit the stubs according to your schema making sure not to change the signature of the stored procedure.
44 Siebel Email Marketing Stand-Alone Installation Guide Version 7.5.3, Revision A

Upgrading Siebel Email MarketingStand-Alone 4
This chapter describes how to upgrade Siebel Email Marketing Stand-Alone (EMSA) from Version 3.1.x or 3.2.x to Version 7.5.3. For more information about upgrading on Windows, see “Upgrading the Express Server from Version 3.1.x or 3.2.x to 7.5.3 (Windows 2000)” on page 46. For more information about upgrading on Solaris, see “Upgrading the Express Server from Version 3.1.x or 3.2.x to 7.5.3 (Solaris)” on page 47.
If you are on a previous version (that is, Version 2.4.x or 3.0.x) you will need to first upgrade to 3.1.x. For more information about upgrading from Version 2.4.x or 3.0.x, contact Technical Support.
NOTE: It is recommended that you save your server information and back up your database before proceeding with your upgrade.
Version 7.5.3, Revision A Siebel Email Marketing Stand-Alone Installation Guide 45

Upgrading Siebel Email Marketing Stand-Alone
Upgrading the Express Server from Version 3.1.x or 3.2.x to 7.5.3 (Windows 2000)
Upgrading the Express Server from Version 3.1.x or 3.2.x to 7.5.3 (Windows 2000)
There is a series of steps you need to follow to upgrade the Express Server from Windows 2000.
CAUTION: Do not delete the Express Server directory tree (which is by default C:\Program Files\Boldfish\Express Server\).
1 Stop Express Server services.
2 Remove Express Server.
To stop the Express Server
1 From the Start menu, choose Run.
The Run dialog box appears.
2 In the Open field, type cmd to launch the command-line dialog box.
3 Type: net stop express server.
4 Click OK.
To Remove the Express Server
1 From the Add/Remove Programs control panel, remove Express Server.
CAUTION: Do not delete the Express Server directory tree (which is by default C:\Program Files\Boldfish\Express Server\).
2 Restart Windows.
3 Install Siebel Email Marketing Stand-Alone 7.5.3.
For more information about installing Siebel Email Marketing Stand-Alone, see “Process for Installing Siebel Email Marketing Stand-Alone” on page 15.
46 Siebel Email Marketing Stand-Alone Installation Guide Version 7.5.3, Revision A

Upgrading Siebel Email Marketing Stand-Alone
Upgrading the Express Server from Version 3.1.x or 3.2.x to 7.5.3 (Solaris)
Upgrading the Express Server from Version 3.1.x or 3.2.x to 7.5.3 (Solaris)
First, you must stop the Express Server then remove it.
It is important not to delete the bes directory tree.
To stop the Express Server
■ Stop the Express Server:
./boldfish -K
To download and install Siebel Email Marketing Stand-Alone
1 Download and install Siebel Email Marketing Stand-Alone 7.5.3 (start installer ./bes-753_100-XXXXX.bin).
For more information about installing Siebel Email Marketing Stand-Alone, see “Process for Installing Siebel Email Marketing Stand-Alone” on page 15.
2 When prompted for the install location use whatever directory the older version of the Express Server is installed in.
Common Steps After Logging in to Siebel EMSA, Version 7.5.3
Currently, this process overwrites the global_config file, so at the very least the following parameters must be re-entered: Email Server Domain.
Version 7.5.3, Revision A Siebel Email Marketing Stand-Alone Installation Guide 47

Upgrading Siebel Email Marketing Stand-Alone
Common Steps After Logging in to Siebel EMSA, Version 7.5.3
48 Siebel Email Marketing Stand-Alone Installation Guide Version 7.5.3, Revision A