sigidp ms access demo - topaz systems acformbar, acrecordsmenu, acsaverecord, , acmenuver70...
TRANSCRIPT

Copyright © Topaz Systems Inc. All rights reserved. For Topaz Systems, Inc. trademarks and patents, visit www.topazsystems.com/legal.
How-To Guide
SigIDp (With Microsoft Access) Demo

2 www.topazsystems.com Back to Top
SigIDp Demo with MS Access
Table of Contents
Overview ................................................................................................................................... 3
The Code ................................................................................................................................ 10
3 www.topazsystems.com Back to Top
SigIDp Demo with MS Access
Overview
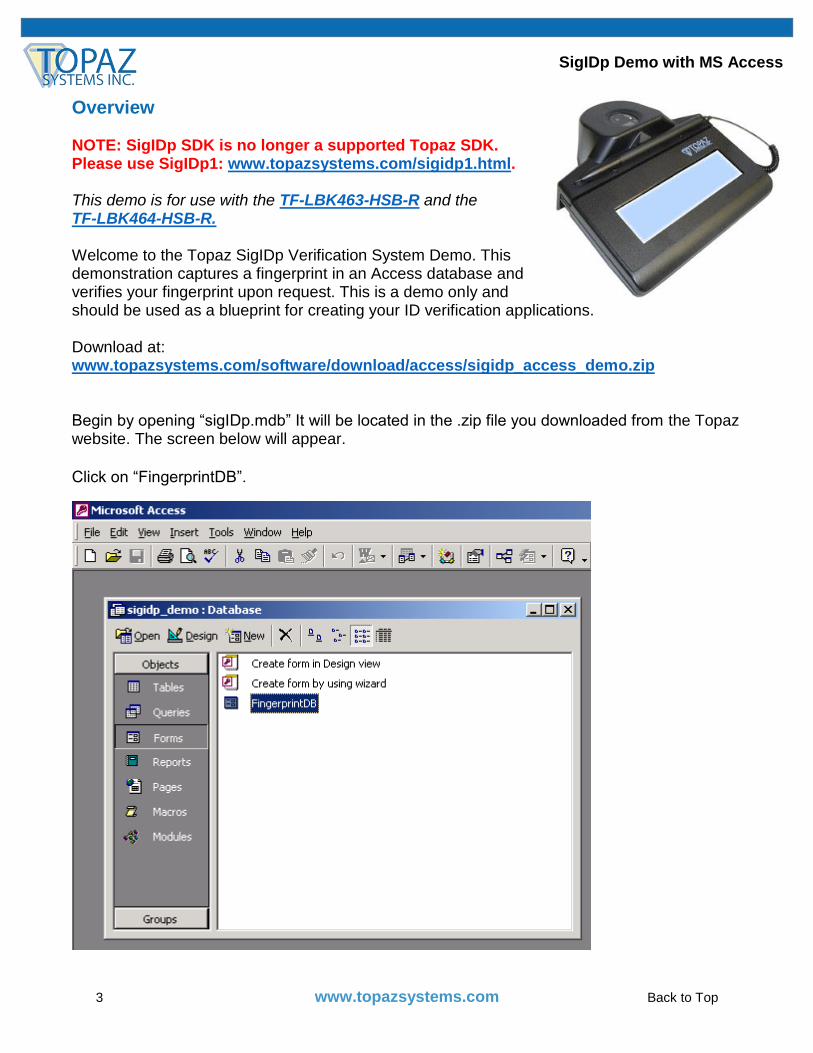
NOTE: SigIDp SDK is no longer a supported Topaz SDK. Please use SigIDp1: www.topazsystems.com/sigidp1.html. This demo is for use with the TF-LBK463-HSB-R and the TF-LBK464-HSB-R. Welcome to the Topaz SigIDp Verification System Demo. This demonstration captures a fingerprint in an Access database and verifies your fingerprint upon request. This is a demo only and should be used as a blueprint for creating your ID verification applications. Download at: www.topazsystems.com/software/download/access/sigidp_access_demo.zip Begin by opening “sigIDp.mdb” It will be located in the .zip file you downloaded from the Topaz website. The screen below will appear.
Click on “FingerprintDB”.

4 www.topazsystems.com Back to Top
SigIDp Demo with MS Access
After clicking on “FingerprintDB”, the fingerprint database will open.
To add a new user, click the icon shown below.
You will be prompted to verify that you want to create a new record as shown below. Click
“Yes”.
5 www.topazsystems.com Back to Top
SigIDp Demo with MS Access
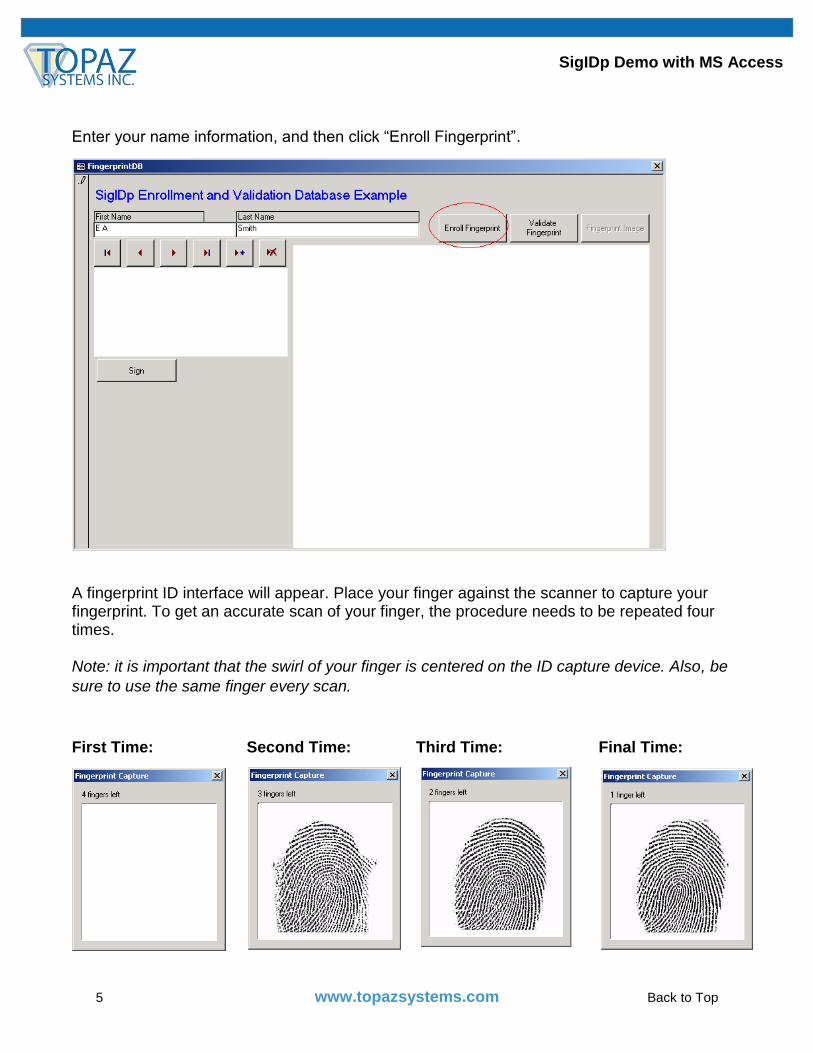
Enter your name information, and then click “Enroll Fingerprint”.
A fingerprint ID interface will appear. Place your finger against the scanner to capture your fingerprint. To get an accurate scan of your finger, the procedure needs to be repeated four times. Note: it is important that the swirl of your finger is centered on the ID capture device. Also, be
sure to use the same finger every scan.
First Time: Second Time: Third Time: Final Time:
6 www.topazsystems.com Back to Top
SigIDp Demo with MS Access
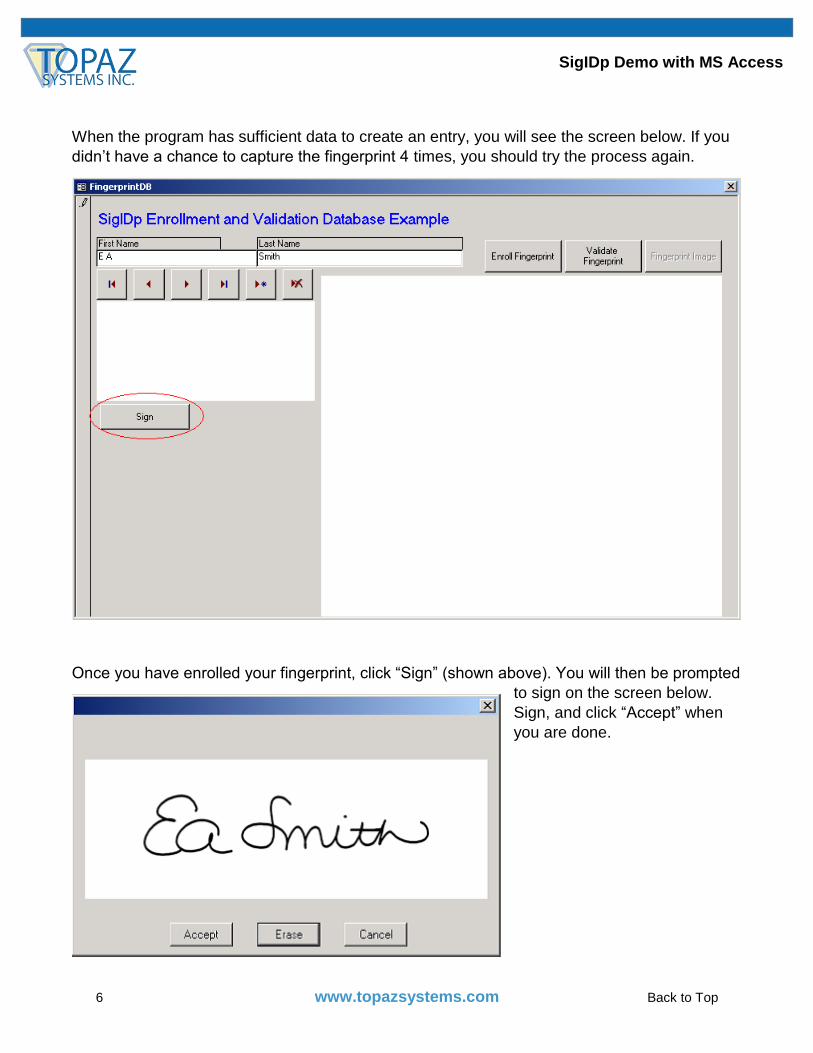
When the program has sufficient data to create an entry, you will see the screen below. If you
didn’t have a chance to capture the fingerprint 4 times, you should try the process again.
Once you have enrolled your fingerprint, click “Sign” (shown above). You will then be prompted
to sign on the screen below.
Sign, and click “Accept” when
you are done.
7 www.topazsystems.com Back to Top
SigIDp Demo with MS Access
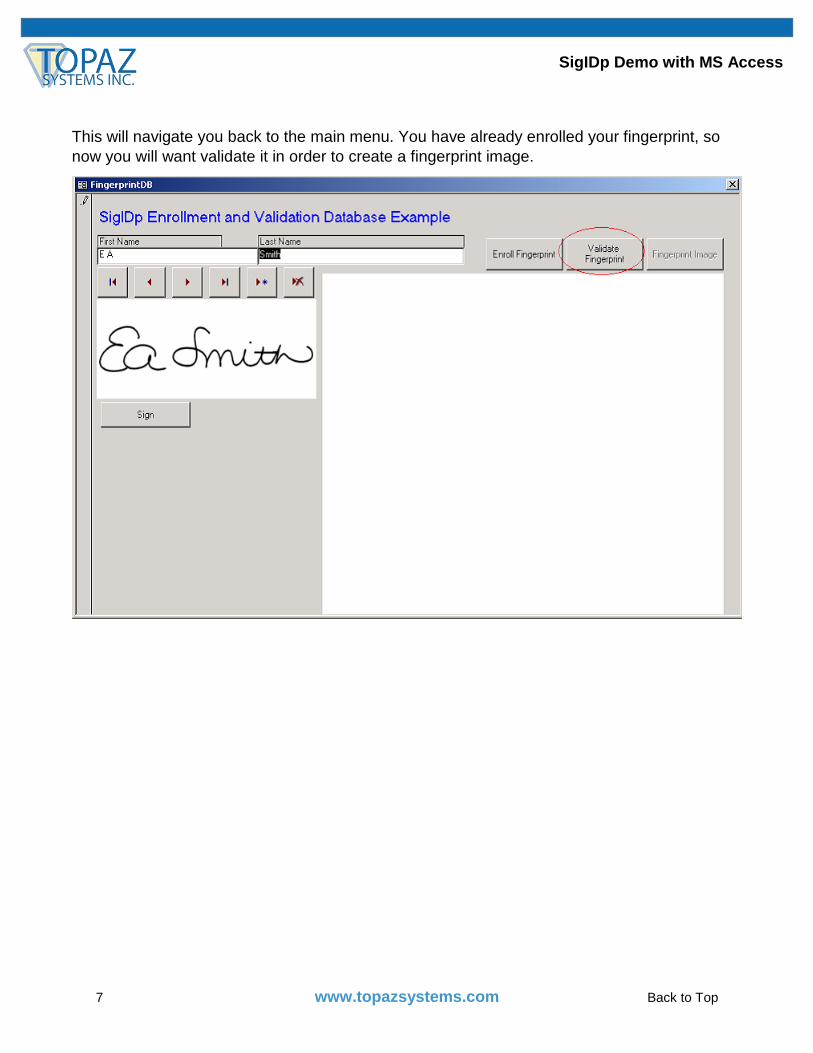
This will navigate you back to the main menu. You have already enrolled your fingerprint, so
now you will want validate it in order to create a fingerprint image.
8 www.topazsystems.com Back to Top
SigIDp Demo with MS Access
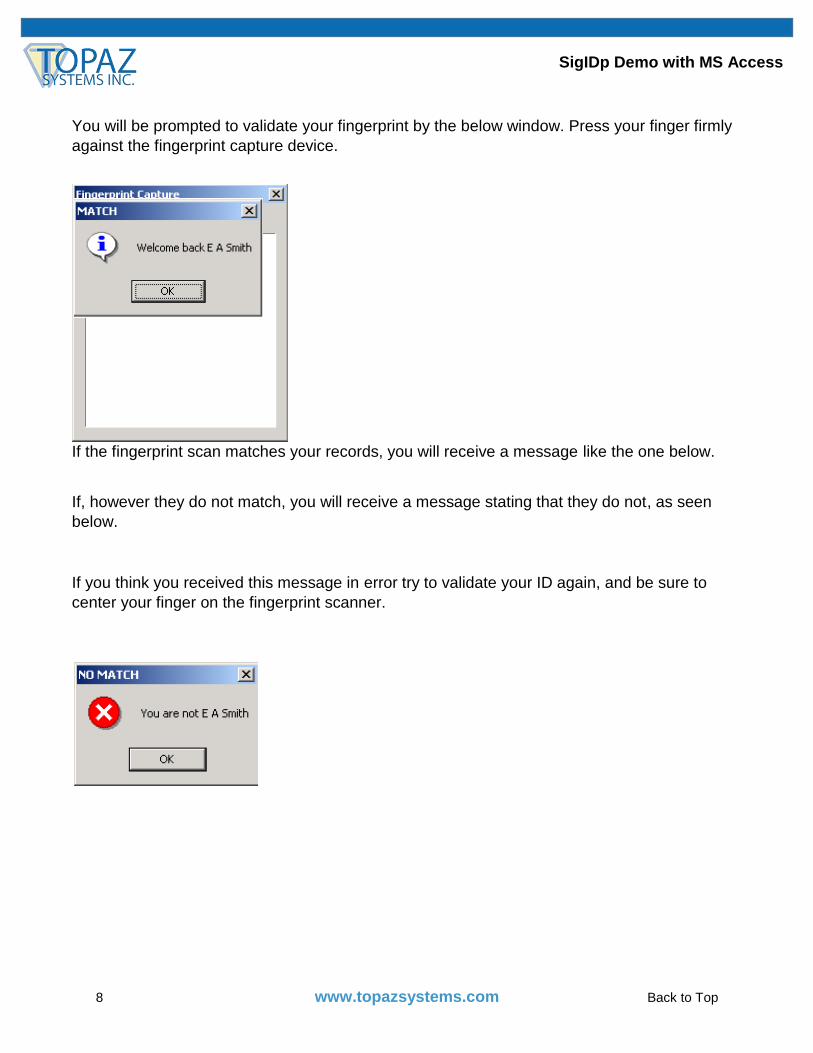
You will be prompted to validate your fingerprint by the below window. Press your finger firmly
against the fingerprint capture device.
If the fingerprint scan matches your records, you will receive a message like the one below.
If, however they do not match, you will receive a message stating that they do not, as seen
below.
If you think you received this message in error try to validate your ID again, and be sure to
center your finger on the fingerprint scanner.
9 www.topazsystems.com Back to Top
SigIDp Demo with MS Access
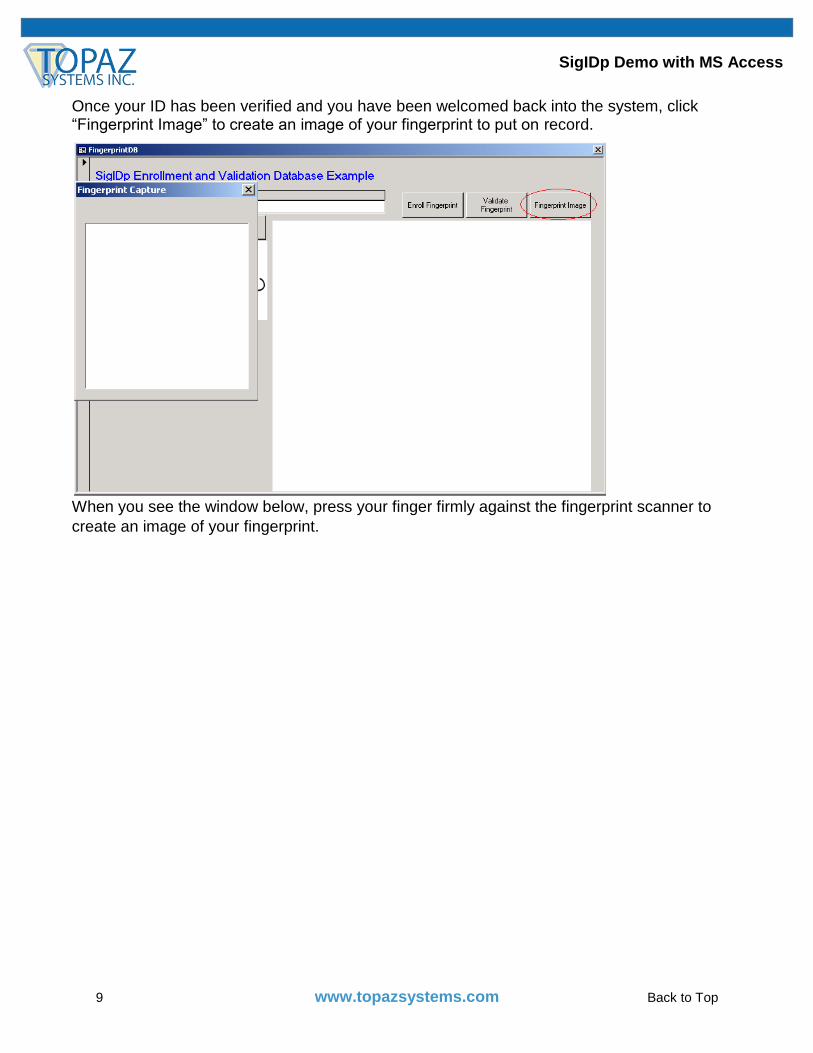
Once your ID has been verified and you have been welcomed back into the system, click “Fingerprint Image” to create an image of your fingerprint to put on record.
When you see the window below, press your finger firmly against the fingerprint scanner to
create an image of your fingerprint.
10 www.topazsystems.com Back to Top
SigIDp Demo with MS Access
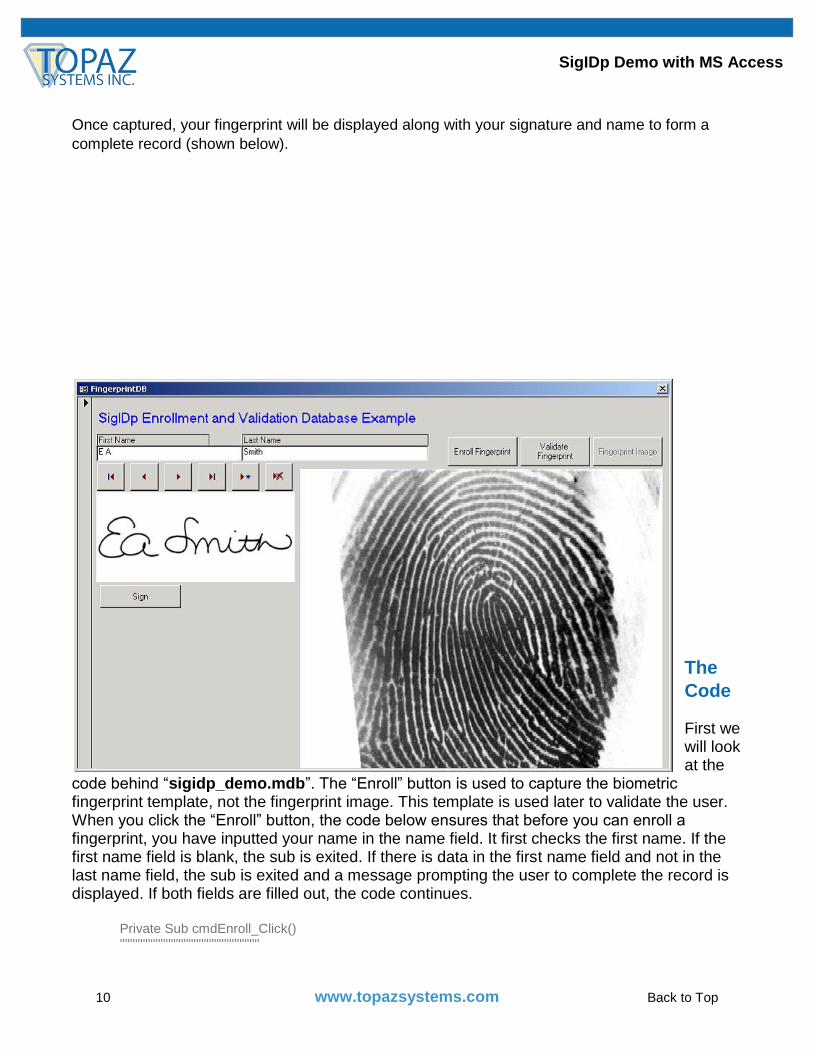
Once captured, your fingerprint will be displayed along with your signature and name to form a
complete record (shown below).
The
Code
First we will look at the
code behind “sigidp_demo.mdb”. The “Enroll” button is used to capture the biometric fingerprint template, not the fingerprint image. This template is used later to validate the user. When you click the “Enroll” button, the code below ensures that before you can enroll a fingerprint, you have inputted your name in the name field. It first checks the first name. If the first name field is blank, the sub is exited. If there is data in the first name field and not in the last name field, the sub is exited and a message prompting the user to complete the record is displayed. If both fields are filled out, the code continues.
Private Sub cmdEnroll_Click() '''''''''''''''''''''''''''''''''''''''''''''''''''''''
11 www.topazsystems.com Back to Top
SigIDp Demo with MS Access
'Create a SigIDpString (ASCII hex string) of fingerprint ''''''''''''''''''''''''''''''''''''''''''''''''''''''' First_Name.SetFocus If First_Name.Text = "" Then
MsgBox "Please enter a First and Last name before continuing", vbOKOnly + vbExclamation, "Complete Record"
Exit Sub End If Last_Name.SetFocus If Last_Name.Text = "" Then
MsgBox "Please enter a First and Last name before continuing", vbOKOnly + vbExclamation, "Complete Record"
Exit Sub End If
Below is the section of Sub cmdEnroll() that you reach after it has checked to ensure that the name fields are not blank. A string variable called strHoldReturn is created to hold the return from the GetFingerprintString method. This method brings up the fingerprint capture dialog and returns once the capture is complete or the user closes the window. If a 3 is returned, then the user cancelled capture; if a 4 is returned, then the user tried to enroll with different fingers. Enrollment should always be done with a single finger. Otherwise, the capture was successful. If successful, the fingerprint template string is placed in the fingerprint text box, which in turn is bound to a field in the database.
Dim strHoldReturn As String strHoldReturn = SigIDp1.GetFingerprintString If strHoldReturn = "3" Then
'user canceled capture MsgBox "Fingerprint string capture canceled", vbOKOnly + VBExclamaton, "Canceled"
ElseIf strHoldReturn = "4" Then 'user mixing fingers during capture MsgBox "Please use only one finger to enroll", vbOKOnly + VBExclamaton, "Multiple
Fingers Placed" Else
'capture successful!! fingerprint.Value = strHoldReturn cmdFingImg.Enabled = False
End If End Sub
The Sub cmdFingImg() shown below creates the fingerprint image to place on the form, as opposed to the biometric fingerprint. A byte array is created, and the BitmapBufferBytes() method is called. This will bring up the fingerprint capture dialogue, which will return an array holding the bitmap fingerprint image if successful.
Private Sub cmdFingImg_Click() On Error GoTo EH Dim ByteValue() As Byte Dim intVal As Integer ByteValue = SigIDp1.BmpBufferBytes '''''SIGPLUS.OCX ALSO HAS A GET BITMAP BUFFER BYTES METHOD...THE CODE WOULD BE SOMETHING LIKE

12 www.topazsystems.com Back to Top
SigIDp Demo with MS Access
'Dim Size As Long 'Dim ByteValue() As Byte 'SigPlus1.BitMapBufferWrite 'Size = SigPlus1.BitMapBufferSize 'use this SIZE value to 'ReDim ByteValue(Size) 'ByteValue = SigPlus1.GetBitmapBufferBytes '''USE THIS IN PLACE OF ByteValue = SigIDp1.BmpBufferBytes 'Close #1 'SigPlus1.BitMapBufferClose '''''''''''''''''''''''''''''''''''''''''''''''''''''''''''''''''''''''''''''''''''''''''''''
Next, the image is placed temporarily into the picture clip control, then the background of a SigPlus object for display. The fingerprint image byte array is then placed into the database using the AppendChunk() method.
PictureClip0.Picture = PictureFromBits(ByteValue) 'get image into PicClip object SigPlus2.DisplayWindowRes = True SigPlus2.SetBackgroundHandle PictureClip0.Picture.Handle, 0 'display image in SigPlus object Dim db As Object Dim rst As Object Set db = CurrentDb Set rst = db.OpenRecordset("FingerprintDB") txtRec.SetFocus txtRec.Text = Me.CurrentRecord rst.Move txtRec.Text – 1 rst.Edit rst("fingerprintimg").AppendChunk ByteValue() 'dump bmp byte array into database rst.Update rst.Close Set db = Nothing Set rst = Nothing cmdFingImg.Enabled = False Exit Sub EH: If Err.Number = 13 Then
MsgBox "Be sure to press firmly on the fingerprint device", vbOKOnly + vbInformation, "Image Capture Unsuccessful" Exit Sub
End If MsgBox Err.Number & " " & Err.Description 'cmdFingImg_Click End Sub
This event moves the record set to the first record, displaying the correct signature and fingerprint image, provided they have already been saved into the database.
Private Sub cmdGoFirst_Click() On Error GoTo Err_cmdGoFirst_Click
13 www.topazsystems.com Back to Top
SigIDp Demo with MS Access
DoCmd.GoToRecord , , acFirst SigPlus1.ClearTablet SigPlus2.SetBackground "", 0 If Signature.Value <> "" Then
SigPlus1.SigString = Signature.Value End If Dim byt() As Byte txtRec.SetFocus txtRec.Text = Me.CurrentRecord Dim db As Object Dim rst As Object Set db = CurrentDb Set rst = db.OpenRecordset("FingerprintDB") rst.Move txtRec.Text - 1 'rst.Edit Dim getoutbytes Dim cmem As Long getoutbytes = rst("fingerprintimg") cmem = UBound(getoutbytes) + 1 byt() = rst("fingerprintimg").GetChunk(0, cmem) 'rst.Update rst.Close Set db = Nothing Set rst = Nothing PictureClip0.Picture = PictureFromBits(byt) SigPlus2.DisplayWindowRes = True SigPlus2.SetBackgroundHandle PictureClip0.Picture.Handle, 0 cmdFingImg.Enabled = False Exit_cmdGoFirst_Click:
Exit Sub Err_cmdGoFirst_Click:
MsgBox Err.Description Resume Exit_cmdGoFirst_Click
End Sub
This event moves the record set to the previous record, displaying the correct signature and fingerprint image, provided they have already been saved into the database.
Private Sub cmdGoPrevious_Click() On Error GoTo Err_cmdGoPrevious_Click
DoCmd.GoToRecord , , acPrevious SigPlus1.ClearTablet SigPlus2.SetBackground "", 0 If Signature.Value <> "" Then
SigPlus1.SigString = Signature.Value End If
14 www.topazsystems.com Back to Top
SigIDp Demo with MS Access
Dim byt() As Byte txtRec.SetFocus txtRec.Text = Me.CurrentRecord Dim db As Object Dim rst As Object Set db = CurrentDb Set rst = db.OpenRecordset("FingerprintDB") rst.Move txtRec.Text - 1 'rst.Edit Dim getoutbytes Dim cmem As Long getoutbytes = rst("fingerprintimg") cmem = UBound(getoutbytes) + 1 byt() = rst("fingerprintimg").GetChunk(0, cmem) 'rst.Update rst.Close Set db = Nothing Set rst = Nothing PictureClip0.Picture = PictureFromBits(byt) SigPlus2.DisplayWindowRes = True SigPlus2.SetBackgroundHandle PictureClip0.Picture.Handle, 0 cmdFingImg.Enabled = False Exit_cmdGoPrevious_Click:
Exit Sub Err_cmdGoPrevious_Click:
'MsgBox Err.Description Resume Exit_cmdGoPrevious_Click
End Sub
This event moves the record set to the next record, displaying the correct signature and fingerprint image, provided they have already been saved into the database.
Private Sub cmdGoNext_Click() On Error GoTo Err_cmdGoNext_Click DoCmd.GoToRecord , , acNext txtRec.SetFocus txtRec.Text = Me.CurrentRecord SigPlus1.ClearTablet SigPlus2.SetBackground "", 0 If Signature.Value <> "" Then
SigPlus1.SigString = Signature.Value
15 www.topazsystems.com Back to Top
SigIDp Demo with MS Access
End If Dim byt() As Byte Dim db As Object Dim rst As Object Set db = CurrentDb Set rst = db.OpenRecordset("FingerprintDB") rst.Move txtRec.Text - 1 Dim getoutbytes Dim cmem As Long getoutbytes = rst("fingerprintimg") cmem = UBound(getoutbytes) + 1 byt() = rst("fingerprintimg").GetChunk(0, cmem) 'rst.Update rst.Close Set db = Nothing Set rst = Nothing PictureClip0.Picture = PictureFromBits(byt) SigPlus2.DisplayWindowRes = True SigPlus2.SetBackgroundHandle PictureClip0.Picture.Handle, 0 cmdFingImg.Enabled = False Exit_cmdGoNext_Click:
Exit Sub Err_cmdGoNext_Click:
'MsgBox Err.Description & " "& Err.Number If Err.Number = 3021 And rst.EOF = True Then Dim retval As Integer
retval = MsgBox("You are adding a new record. Continue?", vbYesNo + vbQuestion, "Add Record") If retval = vbYes Then ' Else
rst.Close Set db = Nothing Set rst = Nothing cmdGoLast_Click
End If End If Resume Exit_cmdGoNext_Click
End Sub
This event moves the record set to the last record, displaying the correct signature and fingerprint image, provided they have already been saved into the database.
Private Sub cmdGoLast_Click() On Error GoTo Err_cmdGoLast_Click
DoCmd.GoToRecord , , acLast txtRec.SetFocus txtRec.Text = Me.CurrentRecord SigPlus1.ClearTablet SigPlus2.SetBackground "", 0 If Signature.Value <> "" Then
SigPlus1.SigString = Signature.Value End If
16 www.topazsystems.com Back to Top
SigIDp Demo with MS Access
Dim byt() As Byte Dim db As Object Dim rst As Object Set db = CurrentDb Set rst = db.OpenRecordset("FingerprintDB") rst.Move txtRec.Text - 1 'rst.Edit Dim getoutbytes Dim cmem As Long getoutbytes = rst("fingerprintimg") cmem = UBound(getoutbytes) + 1 byt() = rst("fingerprintimg").GetChunk(0, cmem) 'rst.Update rst.Close Set db = Nothing Set rst = Nothing PictureClip0.Picture = PictureFromBits(byt) SigPlus2.DisplayWindowRes = True SigPlus2.SetBackgroundHandle PictureClip0.Picture.Handle, 0 cmdFingImg.Enabled = False Exit_cmdGoLast_Click:
Exit Sub Err_cmdGoLast_Click:
'MsgBox Err.Description Resume Exit_cmdGoLast_Click
End Sub
This event adds a new record to the record set.
Private Sub cmdAddNew_Click() On Error GoTo Err_cmdAddNew_Click
DoCmd.GoToRecord , , acNewRec txtRec.SetFocus
txtRec.Text = Me.CurrentRecord
SigPlus1.ClearTablet SigPlus2.SetBackground "", 0 DoCmd.DoMenuItem acFormBar, acRecordsMenu, acSaveRecord, , acMenuVer70 DoCmd.GoToRecord , , acPrevious
17 www.topazsystems.com Back to Top
SigIDp Demo with MS Access
DoCmd.GoToRecord , , acLast cmdFingImg.Enabled = False Exit_cmdAddNew_Click:
Exit Sub Err_cmdAddNew_Click:
MsgBox Err.Description Resume Exit_cmdAddNew_Click
End Sub
CmdDelete() deletes the current record from the record set, then moves back one record.
Private Sub cmdDelete_Click() On Error GoTo Err_cmdDelete_Click
DoCmd.DoMenuItem acFormBar, acEditMenu, 8, , acMenuVer70 DoCmd.DoMenuItem acFormBar, acEditMenu, 6, , acMenuVer70
SigPlus1.ClearTablet SigPlus2.SetBackground "", 0 DoCmd.GoToRecord , , acLast If Signature.Value <> "" Then
SigPlus1.SigString = Signature.Value End If txtRec.SetFocus txtRec.Text = Me.CurrentRecord Dim byt() As Byte Dim db As Object Dim rst As Object Set db = CurrentDb Set rst = db.OpenRecordset("FingerprintDB") rst.Move txtRec.Text - 1 Dim getoutbytes Dim cmem As Long getoutbytes = rst("fingerprintimg") cmem = UBound(getoutbytes) + 1 byt() = rst("fingerprintimg").GetChunk(0, cmem) 'rst.Update rst.Close Set db = Nothing Set rst = Nothing PictureClip0.Picture = PictureFromBits(byt) SigPlus2.DisplayWindowRes = True SigPlus2.SetBackgroundHandle PictureClip0.Picture.Handle, 0 cmdFingImg.Enabled = False Exit_cmdDelete_Click:
Exit Sub
Err_cmdDelete_Click: MsgBox Err.Description Resume
18 www.topazsystems.com Back to Top
SigIDp Demo with MS Access
Exit_cmdDelete_Click
End Sub
When you click the “Sign” button, the code below ensures that before you can sign your name, you have input your name in the name field. It first checks the first name. If the first name field is blank, the sub is exited. Also, if there is data in the first name field and not in the last name field, the sub is exited and a message prompting the user to complete the record is displayed. If both fields are filled out, the code continues.
Private Sub cmdSign_Click() First_Name.SetFocus If First_Name.Text = "" Then
MsgBox "Please enter a First and Last name before continuing", vbOKOnly + vbExclamation, "Complete Record"
Exit Sub End If Last_Name.SetFocus If Last_Name.Text = "" Then
MsgBox "Please enter a First and Last name before continuing", vbOKOnly + vbExclamation, "Complete Record"
Exit Sub End If
Below is the cmdSign() continued. Using the GetSignature function of SigSign, the signature is saved as SigSign1.SigString. That data is then transferred to SigPlus.SigString, and SigSign.SigString is cleared. If there were no tablet points collected, the user is notified that no signature was captured.
If SigSign1.GetSignature = True Then SigPlus5.SigString = SigSign1.SigString
If SigPlus5.NumberOfTabletPoints > 0 Then SigPlus5.ClearTablet SigPlus1.SigCompressionMode = 0 'SigPlus1.SigString = SigSign1.SigString SigPlus1.ClearTablet SigPlus1.SigString = SigSign1.SigString SigPlus1.SigCompressionMode = 2 Signature.Value = SigPlus1.SigString
Else SigPlus5.ClearTablet MsgBox "You must sign to continue...", vbOKOnly + vbExclamation, "No Signature Captured"
Exit Sub End If
End If cmdFingImg.Enabled = False End Sub
19 www.topazsystems.com Back to Top
SigIDp Demo with MS Access
CmdValidate runs to validate your identity by comparing the fingerprint on record to that taken for validation purposes. If a validation print was captured, “SigIDp1.ValidateFingerprintString” is assigned to intAns. If intAns returns 1, then the validating fingerprint and the one in the database did not match. 3 denotes that the user cancelled the operation, and anything else means that the user is not enrolled. However, if it returned a 0, that means that the fingerprint was validated. The screen then refreshes to ensure accuracy of data.
Private Sub cmdValidate_Click() '''''''''''''''''''''''''''''''''''''''''''''''''''''''''''''''''' 'Validate a captured SigIDpString (ASCII hex string) of fingerprint '''''''''''''''''''''''''''''''''''''''''''''''''''''''''''''''''' If fingerprint.Value <> "" Then
Dim intAns As Integer intAns = SigIDp1.ValidateFingerprintString(fingerprint.Value) 'this example validates a new fingerprint against the 'current fingerprint string in the Text box
If intAns = 1 Then MsgBox "You are not " & Me.First_Name & " " & Me.Last_Name, vbOKOnly +
vbCritical, "NO MATCH" ElseIf intAns = 0 Then
MsgBox "Welcome back " & Me.First_Name & " " & Me.Last_Name, vbOKOnly + vbInformation, "MATCH"
SigPlus1.Visible = False SigPlus2.Visible = False pic1.Visible = True pic2.Visible = True
If Me.CurrentRecord <> 1 Then cmdGoPrevious_Click cmdGoNext_Click
Else cmdGoFirst_Click
End If cmdFingImg.Enabled = True SigPlus1.Visible = True SigPlus2.Visible = True pic1.Visible = False pic2.Visible = False ElseIf intAns = 3 Then
MsgBox "User has cancelled operation", vbOKOnly + vbInformation, "User Canceled" End If Else
MsgBox "You must enroll a fingerprint before validating", vbOKOnly + vbExclamation, "Enrollment Required"
Exit Sub End If End Sub
The below code loads upon start-up of the application. The device is initialized and formatted, and the tablet is cleared. Also, the database is loaded, and the picture object containing the fingerprint samples is made visible, provided the fingerprint and/or signature has already been captured for record 1.
20 www.topazsystems.com Back to Top
SigIDp Demo with MS Access
Private Sub Form_Load() On Error GoTo EH: sizechunk = 21814 'sizechunk represents the size of the Dim intAns As Integer intAns = SigIDp1.InitDevice If intAns = 0 Then
'MsgBox "Initialization successful!" ElseIf intAns = 1 Then
MsgBox "Error initializing fingerprint device!" ElseIf intAns = 2 Then
MsgBox "Device already initialized" End If SigPlus1.JustifyMode = 5 SigPlus1.SigCompressionMode = 2 SigPlus1.ClearTablet If Signature.Value <> "" Then
SigPlus1.SigString = Signature.Value End If txtRec.SetFocus txtRec.Text = Me.CurrentRecord Dim byt() As Byte Dim db As Object Dim rst As Object Set db = CurrentDb Set rst = db.OpenRecordset("FingerprintDB") Dim getoutbytes Dim cmem As Long getoutbytes = rst("fingerprintimg") cmem = UBound(getoutbytes) + 1 byt() = rst("fingerprintimg").GetChunk(0, cmem) 'rst.Update rst.Close Set db = Nothing Set rst = Nothing PictureClip0.Picture = PictureFromBits(byt) SigPlus2.DisplayWindowRes = True SigPlus2.SetBackgroundHandle PictureClip0.Picture.Handle, 0 cmdFingImg.Enabled = False pic1.Height = SigPlus1.Height pic1.Width = SigPlus1.Width pic1.Left = SigPlus1.Left pic1.Top = SigPlus1.Top pic2.Height = SigPlus2.Height pic2.Width = SigPlus2.Width pic2.Left = SigPlus2.Left pic2.Top = SigPlus2.Top txtRec.Width = 1 txtRec.Height = 1 pic1.Visible = False pic2.Visible = False Exit Sub EH: MsgBox Err.Number & " " & Err.Description End Sub
21 www.topazsystems.com Back to Top
SigIDp Demo with MS Access
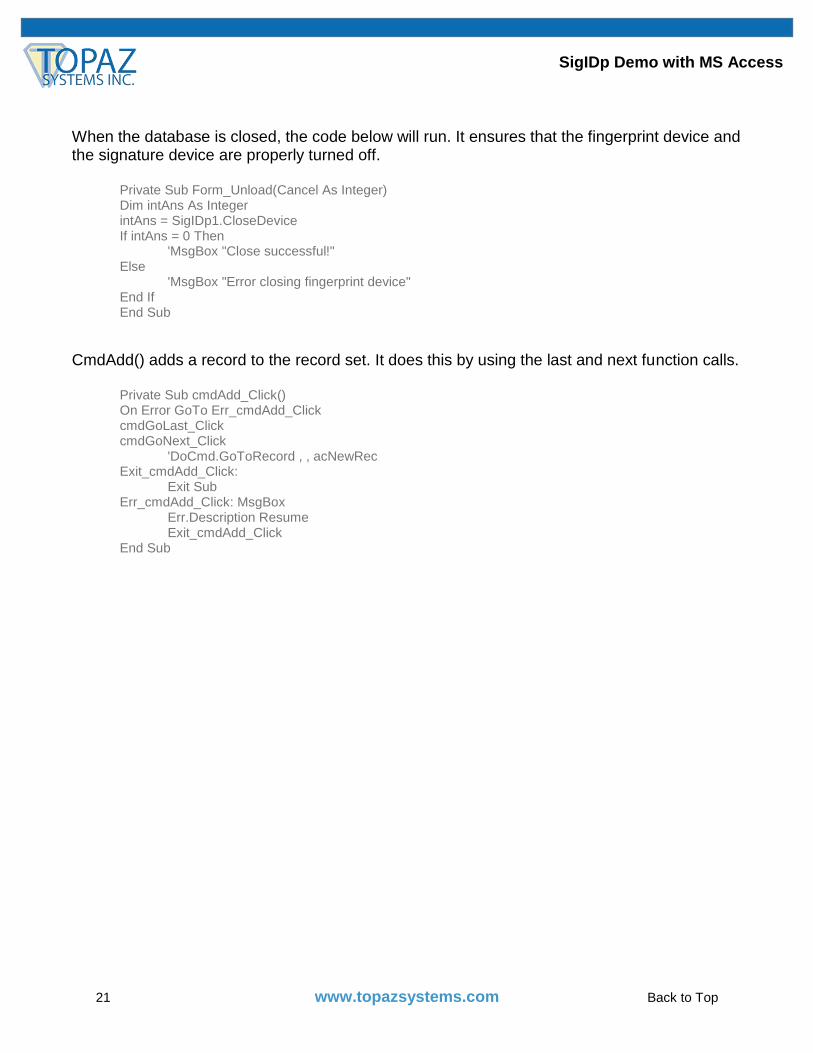
When the database is closed, the code below will run. It ensures that the fingerprint device and the signature device are properly turned off.
Private Sub Form_Unload(Cancel As Integer) Dim intAns As Integer intAns = SigIDp1.CloseDevice If intAns = 0 Then
'MsgBox "Close successful!" Else
'MsgBox "Error closing fingerprint device" End If End Sub
CmdAdd() adds a record to the record set. It does this by using the last and next function calls.
Private Sub cmdAdd_Click() On Error GoTo Err_cmdAdd_Click cmdGoLast_Click cmdGoNext_Click
'DoCmd.GoToRecord , , acNewRec Exit_cmdAdd_Click:
Exit Sub Err_cmdAdd_Click: MsgBox
Err.Description Resume Exit_cmdAdd_Click
End Sub