single signon using hats & websphere portal
TRANSCRIPT

Single SignOn Using HATS & WebSphere Portal
Introduction:
This lab will demonstrate how to implement the Single SignOn Functionality on WebSphere PortalServer with the help of HATS Web Express Logon Portal Plug-in and Portal Credential Mapper.
Remove Projects from Server
1. As projects are tested in the WebSpherev6.1 Server they are added to the list of Configuredprojects in the server. When the server starts it will load every project in the list, causing theserver to take much longer than necessary to start the project you are testing. To speed uploading of the server remove one or more project from the server.Click the Servers tab in the lower window pane.
2. Right-click on WebSpherev6.0 Server @ localhost and then click Add and removeprojects…
3. On the Add and Remove Projects panel click the << Remove All button to remove allConfigured projects, and then click Finish

3. Select File New HATS ProjectBuild a new project

4. On Create a Project – HATS Project panel, type SSOPortlet as Name: andSSOPortlet_EAR as Enterprise application project: select WebSphere Application Serverv6.1 as Target server: (From drop down). Click Next

5. On Create a Project – SSOPortlet Connection Settings panel, typezserveros.dfw.ibm.com for Host name: and 23 as Port: select 3270 as Type, 037 United Statesas Code page: and 24 x 80 as Screen size (From drop down). Click Next

6. On Create a Project – SSOPortlet Project Theme panel, accept the default values, Nochange, Click Next
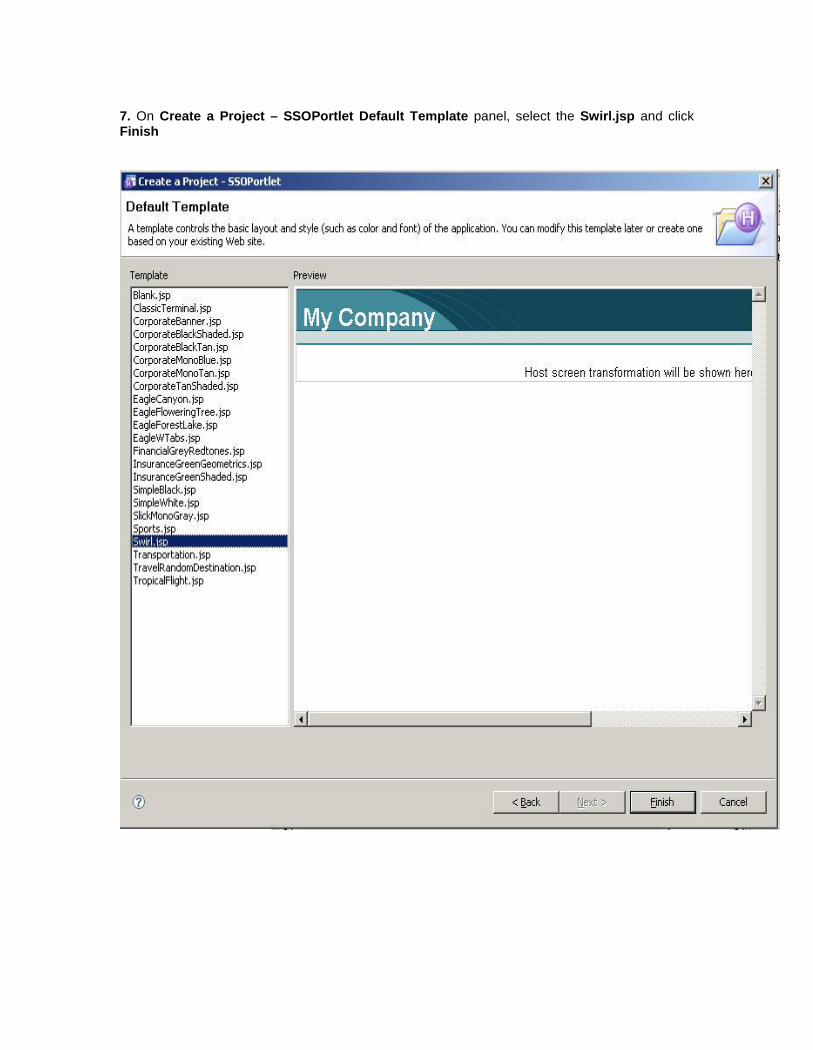
7. On Create a Project – SSOPortlet Default Template panel, select the Swirl.jsp and clickFinish

8. Right click on SSOPortlet project and select Generate Portlet Project as shown below

9. On the Convert to Portlet wizard, accept all the settings as default and click Finish.
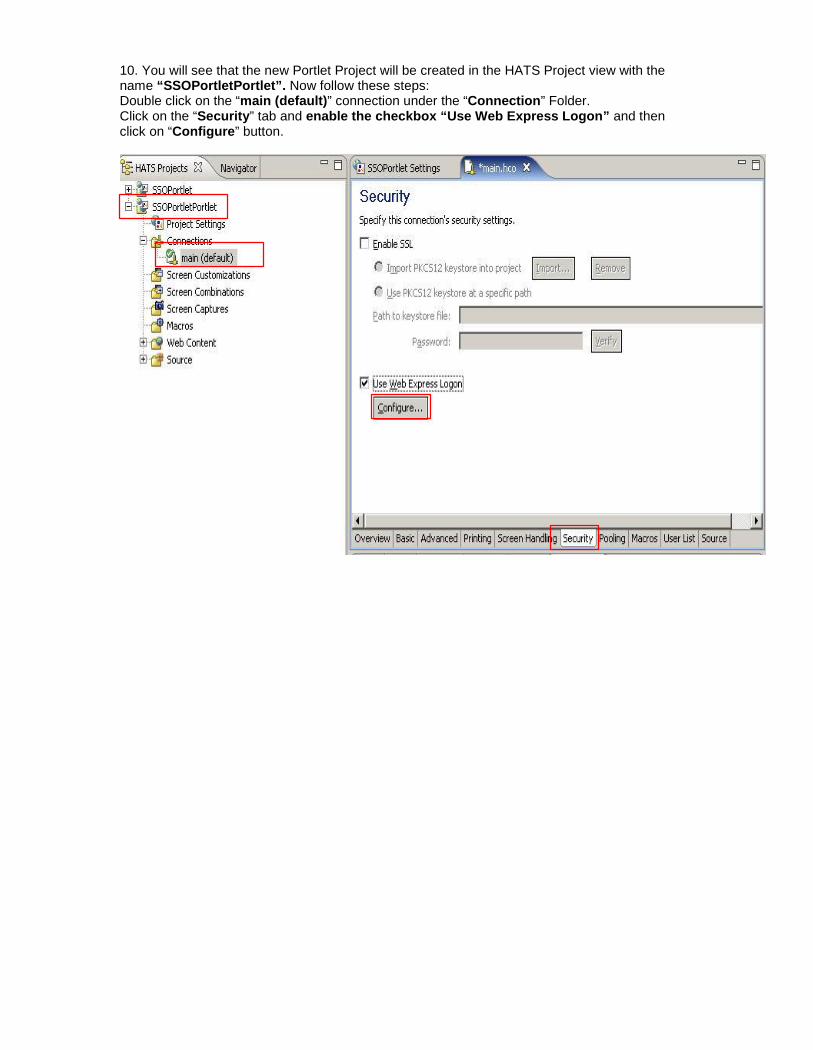
10. You will see that the new Portlet Project will be created in the HATS Project view with thename “SSOPortletPortlet”. Now follow these steps:Double click on the “main (default)” connection under the “Connection” Folder.Click on the “Security” tab and enable the checkbox “Use Web Express Logon” and thenclick on “Configure” button.

11 On the “Web Express Logon” wizard click on the “Network Security Plugin” tab at thebottom. Select “WebSphere Portal Network Security” from the “Plugin type”.NOTE: This Plugin appears in the “Add Network Security Plugin” window only for a Portletproject.

12 Now click on the “Credential Mapper Plugin” at the bottom, and click on the “Add” button.
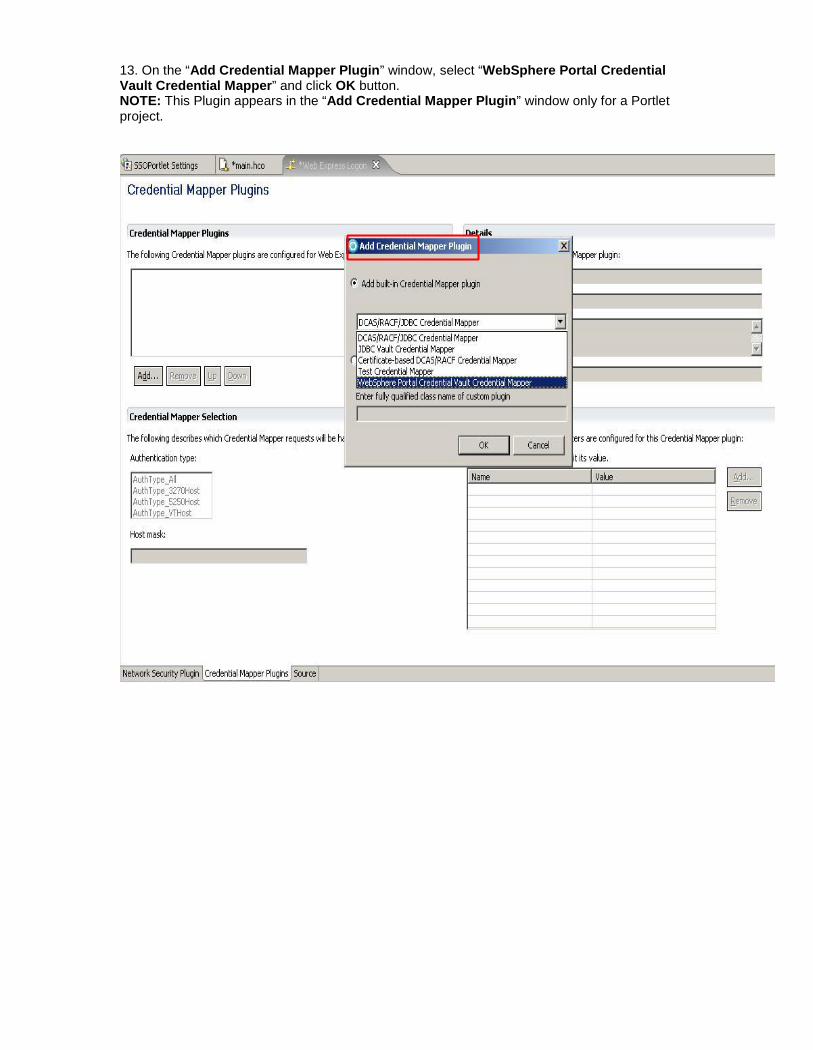
13. On the “Add Credential Mapper Plugin” window, select “WebSphere Portal CredentialVault Credential Mapper” and click OK button.NOTE: This Plugin appears in the “Add Credential Mapper Plugin” window only for a Portletproject.
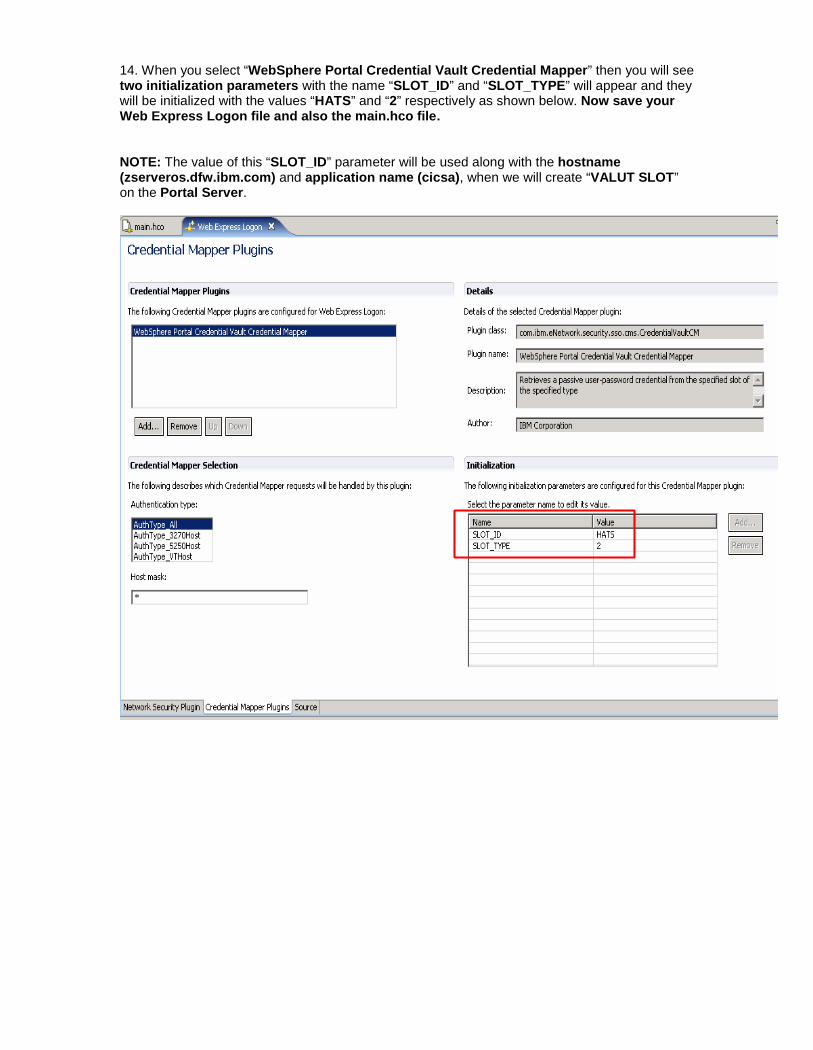
14. When you select “WebSphere Portal Credential Vault Credential Mapper” then you will seetwo initialization parameters with the name “SLOT_ID” and “SLOT_TYPE” will appear and theywill be initialized with the values “HATS” and “2” respectively as shown below. Now save yourWeb Express Logon file and also the main.hco file.
NOTE: The value of this “SLOT_ID” parameter will be used along with the hostname(zserveros.dfw.ibm.com) and application name (cicsa), when we will create “VALUT SLOT”on the Portal Server.

15. Now right click on the “SSOPortletPortlet” project and select “main” from “Open HATS HostTerminal” to open the host terminal.

16. On the Host Terminal Welcome to IBM screen, click on the “Record a New macro” button tostart a Signon Macro.

17. On the “Record Macro” panel, type “SignOn” in the Name field and click Finish.

18. On the “Screen Recognition Criteria” window, select the three line text in the white fontcolor starting with “Welcome to IBM” as screen recognition criteria. Select “At a SpecifiedPosition” radio button on the right hand side and click Finish button.

19. Now your macro is in the recording state as shown on the Title bar. Type “cicsa” in theselection field and hit “ENTER” key.

20. On the “Signon to CICS” screen, your cursor is in the “Userid” field.Click “Add Prompt Action” button from the toolbar.

21. Select “Signon to CICS” text as the “Screen Recognition Criteria” and select “At aSpecified Position” radio button from the right hand side.
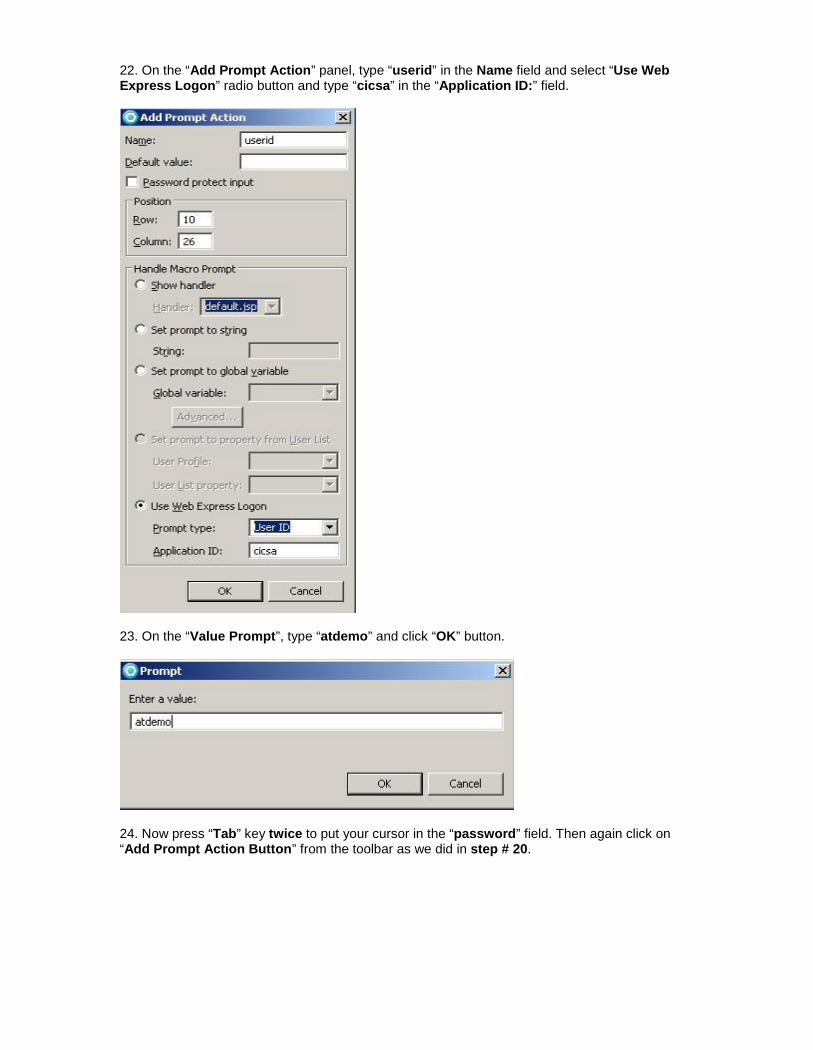
22. On the “Add Prompt Action” panel, type “userid” in the Name field and select “Use WebExpress Logon” radio button and type “cicsa” in the “Application ID:” field.
23. On the “Value Prompt”, type “atdemo” and click “OK” button.
24. Now press “Tab” key twice to put your cursor in the “password” field. Then again click on“Add Prompt Action Button” from the toolbar as we did in step # 20.

25 On the “Add Prompt Action” panel, type “password” in the Name field and select “Use WebExpress Logon” radio button and type “cicsa” in the “Application ID:” field.
26. On the “Value Prompt”, type “demo4you” and click “OK” button
27. Now press “ENTER” to navigate on to the next screen.

28. On the next screen, Click on the “Stop Macro” button.

29. On the “Screen Recognition Criteria” screen, select “DFHCE3549 Sign-on is complete(Language ENU)” as screen recognition criteria. Uncheck “Total number of fields”, “Number ofInput fields”, “Cursor Position” check boxes. Select “At a specified Position” radio button andclick Finish.
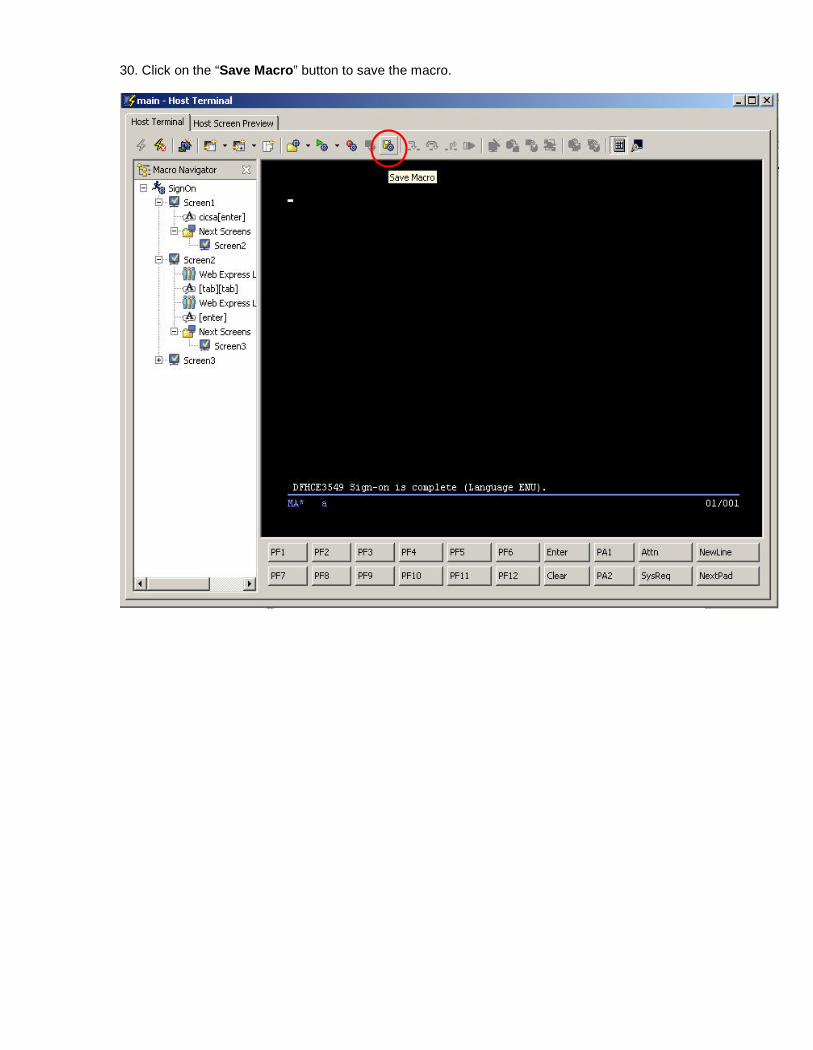
30. Click on the “Save Macro” button to save the macro.

31. Type “cesf logoff” and hit ENTER to go back on the Welcome screen to test the Signonmacro.
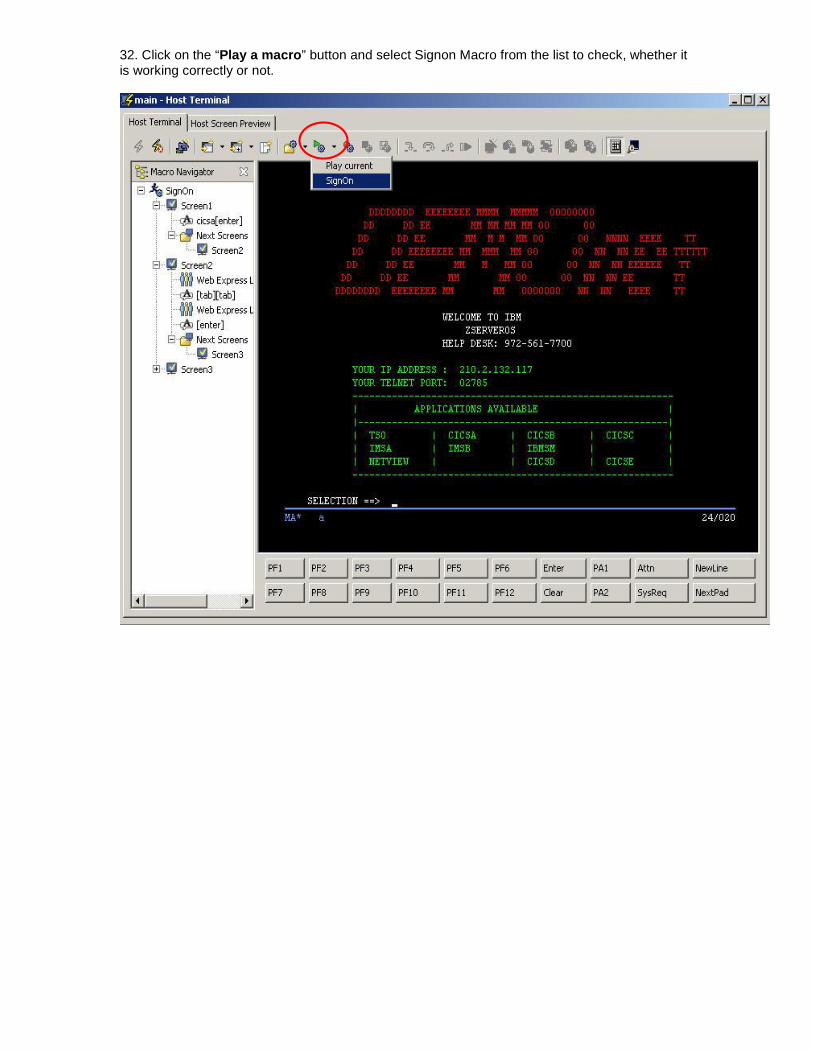
32. Click on the “Play a macro” button and select Signon Macro from the list to check, whether itis working correctly or not.

33. Now double click on the “main” under the “Connection” folder and select the “Macros” tab.select the “SignOn” macro as a “Connect macro” from the dropdown and save the file.

34. Right Click on the “SSOPortletPortlet” project and select “Export Project” to create the .warfile of the project.

35. On the “Export” panel, click on the “Browse” button and give the path where you want tocreate your “war file”.

36. Your “Export” window should look like this. Click “Finish” button.
37. Now open the command prompt and start your WebSphere Portal Server in the followingway:

38. After starting WebSphere Portal Server, Open the browser and type the following URL.http://localhost:10038/wps/myportal
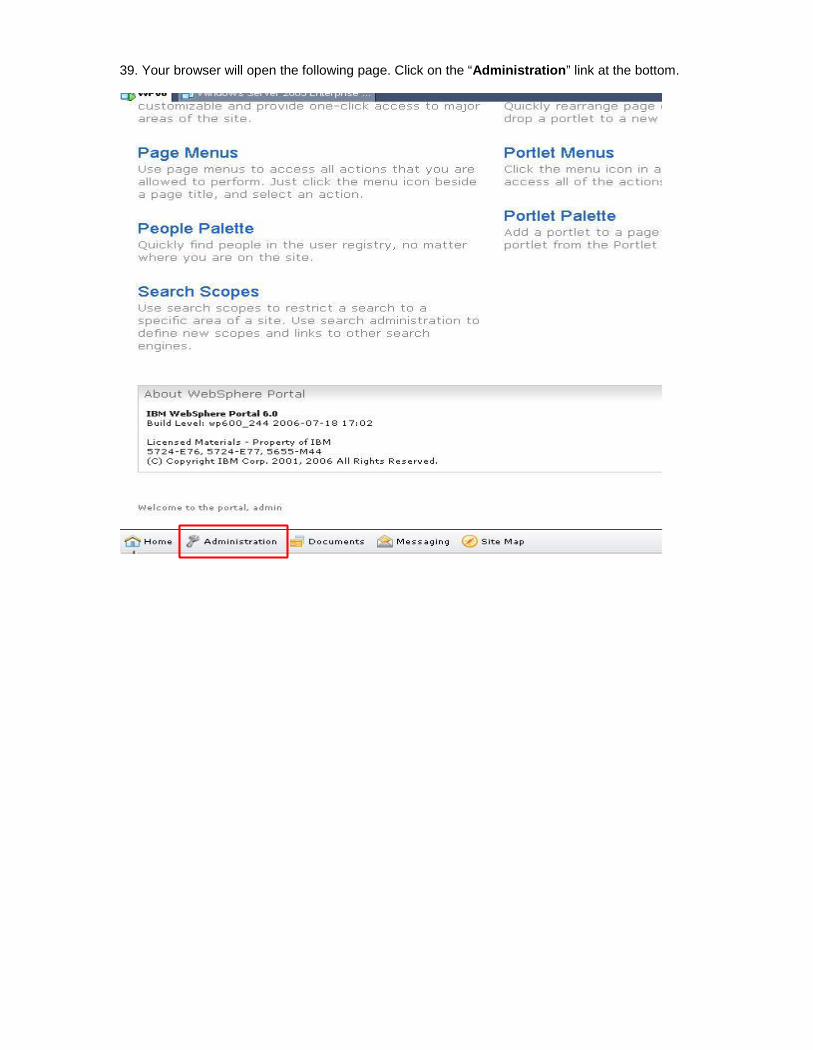
39. Your browser will open the following page. Click on the “Administration” link at the bottom.
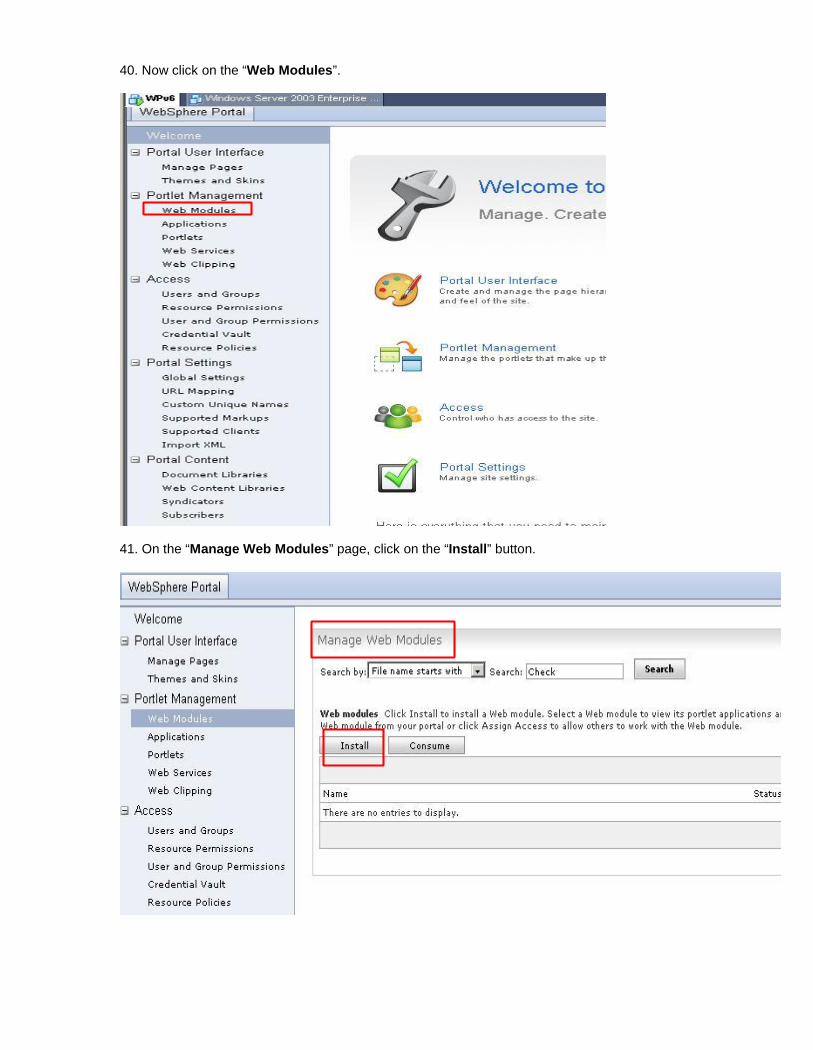
40. Now click on the “Web Modules”.
41. On the “Manage Web Modules” page, click on the “Install” button.
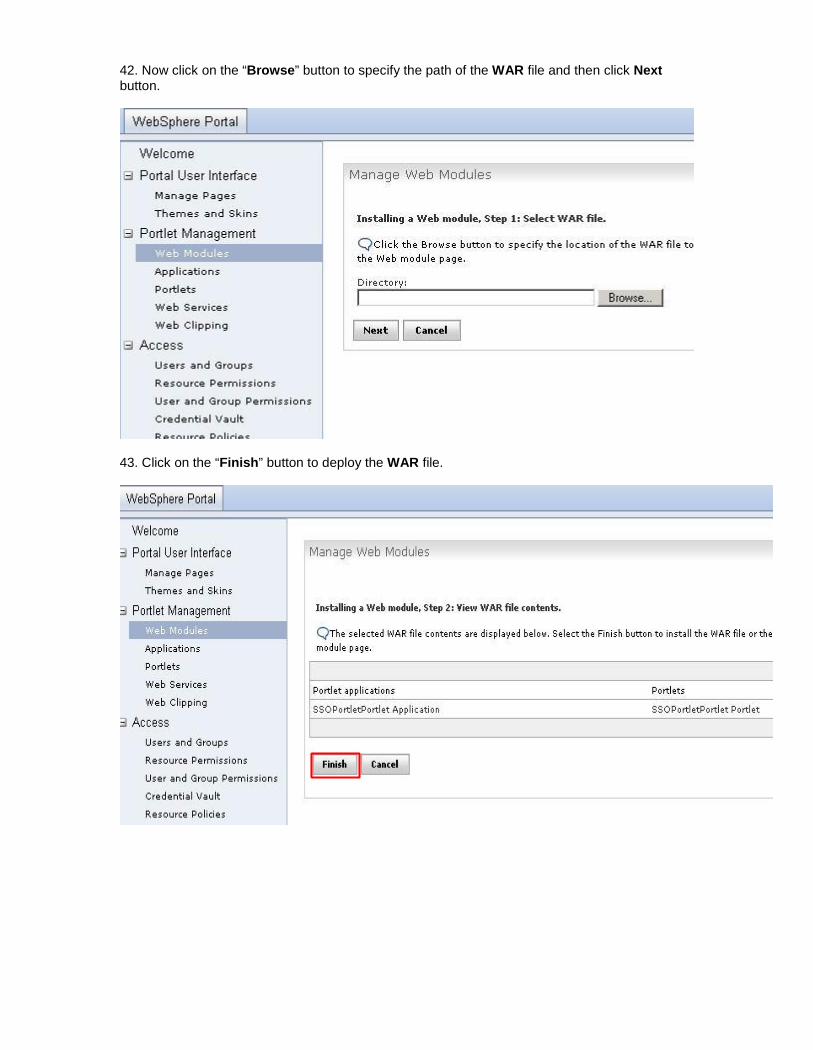
42. Now click on the “Browse” button to specify the path of the WAR file and then click Nextbutton.
43. Click on the “Finish” button to deploy the WAR file.

44. When your application WAR file will be installed, it will give the message of successfulinstallation as shown below:

45. Now click on the “Manage Pages” link from the left navigation and then click on “ContentRoot” link.
46. Then click on the “Home” link.
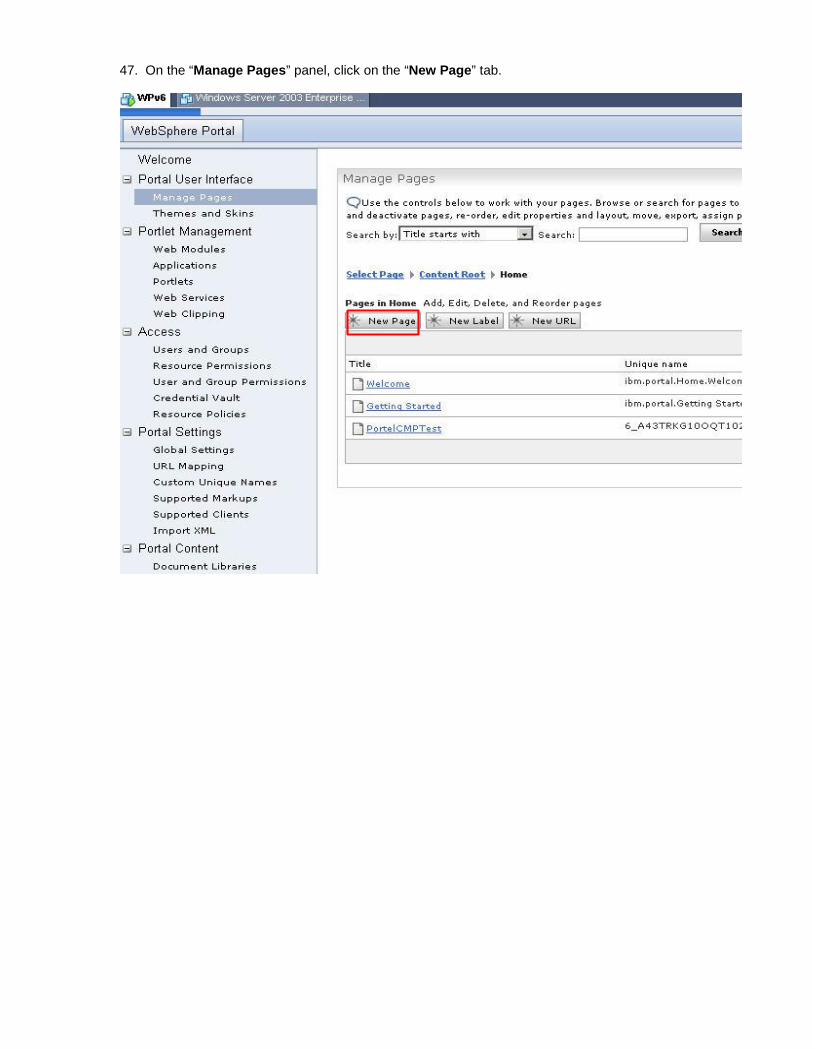
47. On the “Manage Pages” panel, click on the “New Page” tab.

48. On the “Page Properties” page, type the name “PortletTest” in the “Title” field.Expand the “Type of Page” and select the first radio button for the Portlet to display as shownbelow and click on OK button.
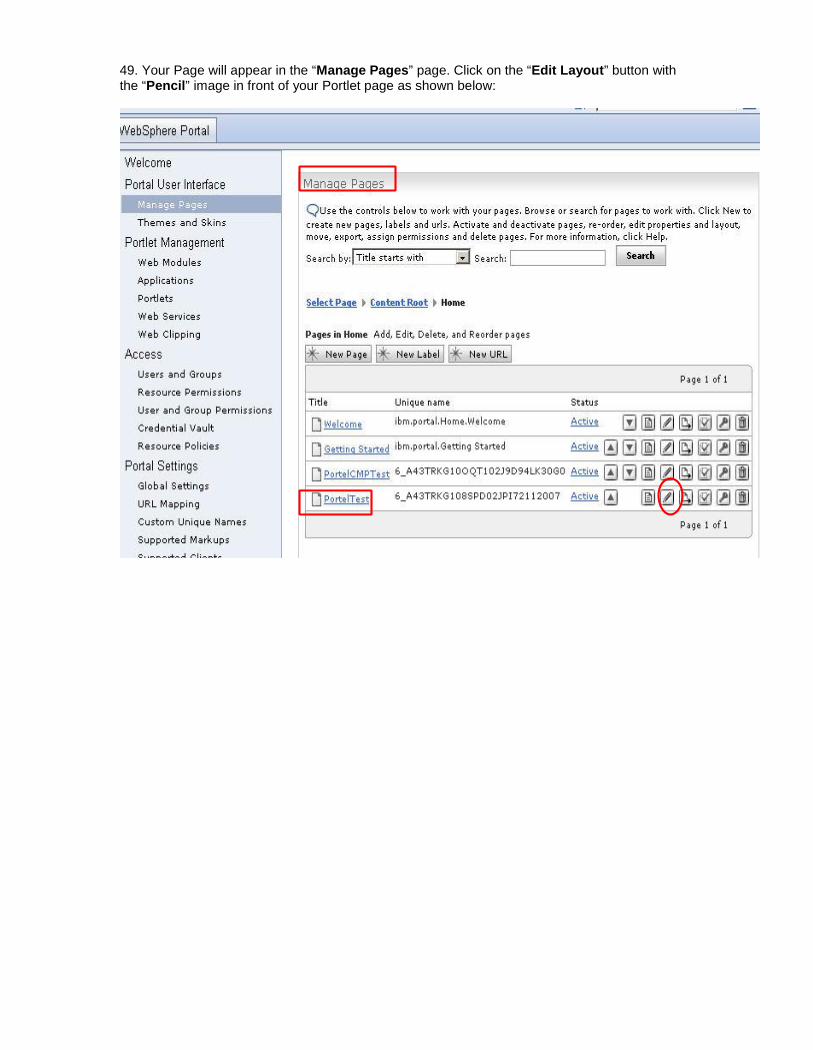
49. Your Page will appear in the “Manage Pages” page. Click on the “Edit Layout” button withthe “Pencil” image in front of your Portlet page as shown below:

50. On the “Edit Layout” panel, click on the “Add portlets” button
51. On the next window, type initial letters of your WAR file for e.g. SSO in the Search input fieldand click on Search button. It will bring up your WAR file and then select your WAR file and clickon the “OK” button.

52. Click on the DONE button.
53. Now click on the “Credential Vault” link from the left navigation. You will see the following 4options on the page under the Credential Vault heading.Click on the “Add a vault slot” option.

54. On the “Credential Vault” panel, type “HATS zserveros.dfw.ibm.com cicsa” in the “Name”field.HATS is the name of SLOT ID which we saw in Step # 14.zserveros.dfw.ibm.com is the hostname.cicsa is the Application ID.
Enable checkbox “Vault slot is shared” and type “atdemo” in userid field and “demo4you” inshared password and confirm password fields.
Select the new radio button and type HATS in the field

55. Now click on the “Home” link at the bottom.
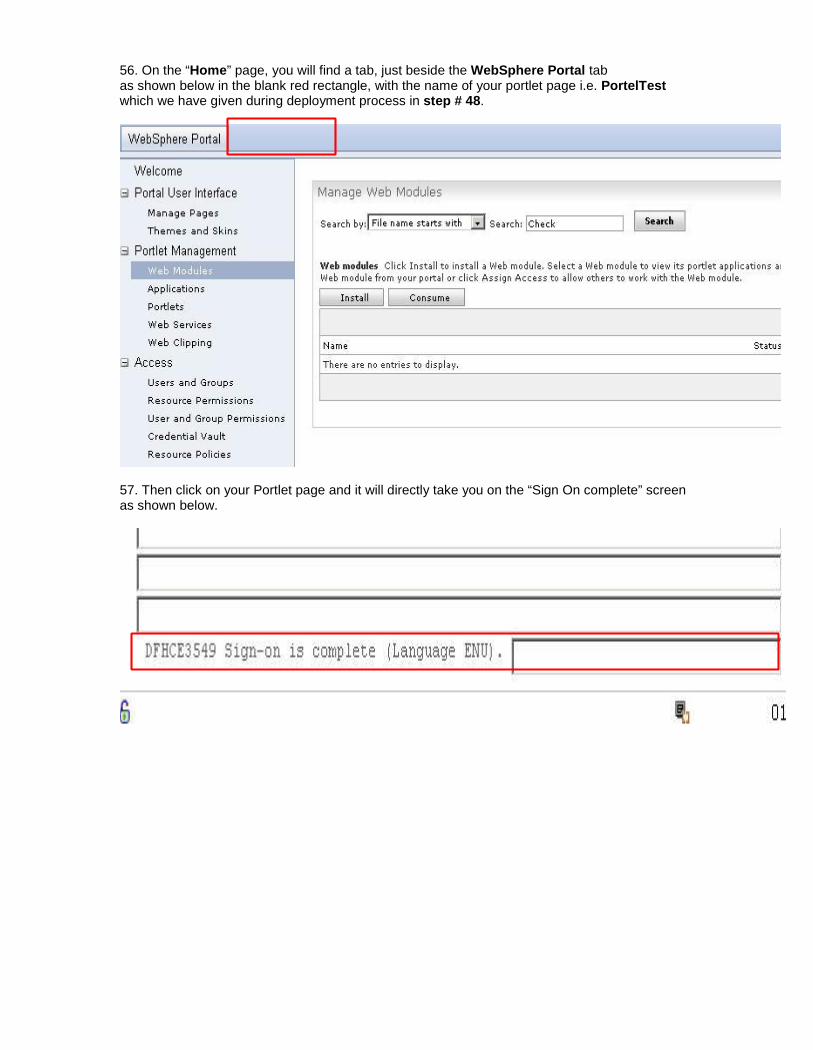
56. On the “Home” page, you will find a tab, just beside the WebSphere Portal tabas shown below in the blank red rectangle, with the name of your portlet page i.e. PortelTestwhich we have given during deployment process in step # 48.
57. Then click on your Portlet page and it will directly take you on the “Sign On complete” screenas shown below.

© Copyright IBM Corporation 2010 IBM Global Services Route 100 Somers, NY 10589 U.S.A. Produced in the United States of America 08-10 All Rights Reserved IBM, the IBM logo, ibm.com, Lotus®, Rational®, Tivoli®, DB2® and WebSphere® are trademarks or registered trademarks of International Business Machines Corporation in the United States, other countries, or both. If these and other IBM trademarked terms are marked on their first occurrence in this information with a trademark symbol (® or ™), these symbols indicate U.S. registered or common law trademarks owned by IBM at the time this information was published. Such trademarks may also be registered or common law trademarks in other countries. A current list of IBM trademarks is available on the Web at “Copyright and trademark information” at ibm.com/legal/copytrade.shtml Other company, product and service names may be trademarks or service marks of others. The information contained in this documentation is provided for informational purposes only. While efforts were made to verify the completeness and accuracy of the information contained in this documentation, it is provided “as is” without warranty of any kind, express or implied. In addition, this information is based on IBM’s current product plans and strategy, which are subject to change by IBM without notice. IBM shall not be responsible for any damages arising out of the use of, or otherwise related to, this documentation or any other documentation. Nothing contained in this documentation is intended to, nor shall have the effect of, creating any warranties or representations from IBM (or its suppliers or licensors), or altering the terms and conditions of the applicable license agreement governing the use of IBM software. This document illustrates how one organization uses IBM products. Many factors have contributed to the results and benefits described; IBM does not guarantee comparable results elsewhere.