single time constant measurement dr. len trombetta 1 ece 2100
TRANSCRIPT

Single Time Constant Measurement
Dr. Len Trombetta
1
ECE 2100

Capacitors
2
There are many different types of capacitors. Your lab kit has ceramic and electrolytic capacitors.
ceramic electrolytic
http://en.wikipedia.org/wiki/Capacitor
These can have large capacitance values and support large voltages. The dielectric is an electrolyte (ionic fluid). The polarity must be positive at the longer lead (not shown in figure).
These can have small values, and the value is more stable over large voltage and frequency ranges. Polarity is not important. The dielectric is a ceramic.

Capacitor Types
3
Why so many capacitor types? The various capacitors types trade off performance :
• Capacitance• Usable voltage range• Variation in capacitance with
temperature or frequency• Leakage current (how long it will hold a
charge)
Capacitor Values
4
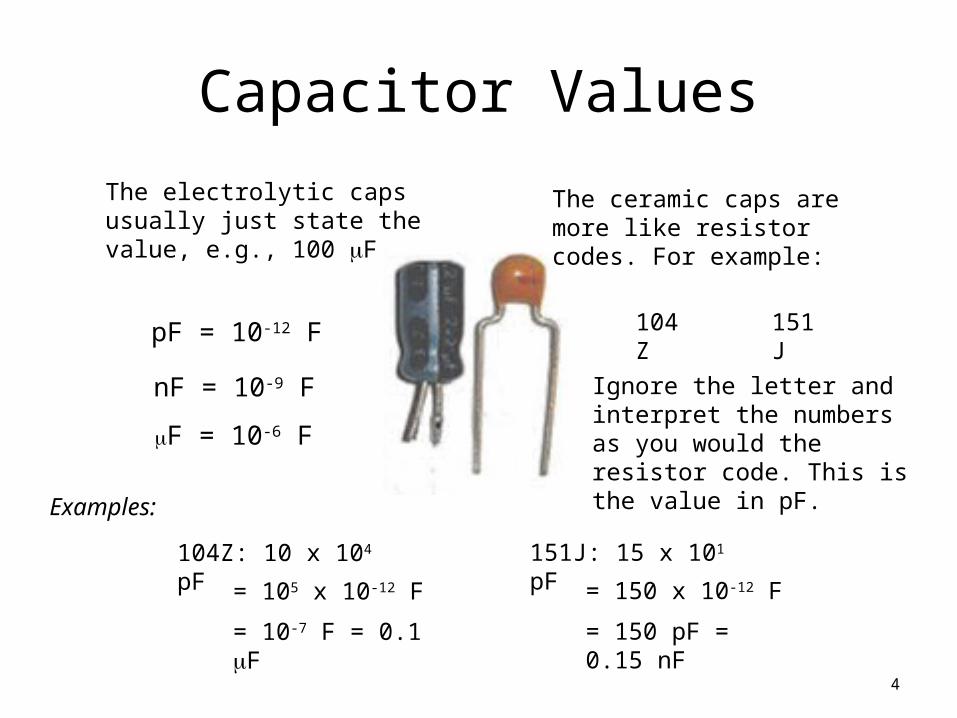
The electrolytic caps usually just state the value, e.g., 100 mF
The ceramic caps are more like resistor codes. For example:
104Z 151J
Ignore the letter and interpret the numbers as you would the resistor code. This is the value in pF.
104Z: 10 x 104 pF
= 105 x 10-12 F
= 10-7 F = 0.1 mF
151J: 15 x 101 pF
= 150 x 10-12 F
= 150 pF = 0.15 nF
pF = 10-12 F
nF = 10-9 F
mF = 10-6 F
Examples:

Capacitor Tolerance
5
Most capacitor codes will not state a tolerance, but it is usually around 20%. If you need an accurate value, use the meters in S385 near the TA bench.

Pre-Lab
6
We will do the Pre-Lab in class. Write answers to the Activities in your Lab Notebook.
This is the same RC as in the first part of your lab, except that the output is across C, whereas in the lab handout it is across R.

The Analysis Part I: Charging
7
Assuming the switch was at b) for a long time and moved to a) at t = 0, find the voltage vc(t) for t ³ 0. This is the step response.

The Plot Part I
8
)
Activity 1: Plot the function vc(t) vs. t in your lab notebook. See below for details. Use your calculator to find actual points on the graph– don’t just sketch by “eyeball”. Use these parameters:
Vs = 5 [V] R = 47 [kW] C = 0.022 [mF]
Choose a horizontal scale factor so that you have at least 10 time constants (10 t = 10 RC) across the paper (see below).
Paper in landscape position
Put your first plot in this side
We will plot something else here later
Answer:
vc(t)
tt~5t t~10t

What’s the 10t thing?
9
)
When t = 5t in the equation above, the voltage vC(t) has (almost) completely stopped changing – we are in “steady state”. So to be sure we are plotting for a long enough time to see the whole charging function, we need to plot from 0 to at least 5t.
For the second function (coming up next) we need to plot for another 5t to see the complete discharge function.
Paper in landscape position
Put your first plot in this side
vc(t)
tt~5t t~10t

The Analysis Part II: Discharging
10
Now assume that the switch stayed in position a) until time t1, which was a long time. If it then moves to position b), find the voltage vc(t) for t ³ t1. This is the natural response.
t = t1
vc(t)
tt~10t
The Plot Part II
11
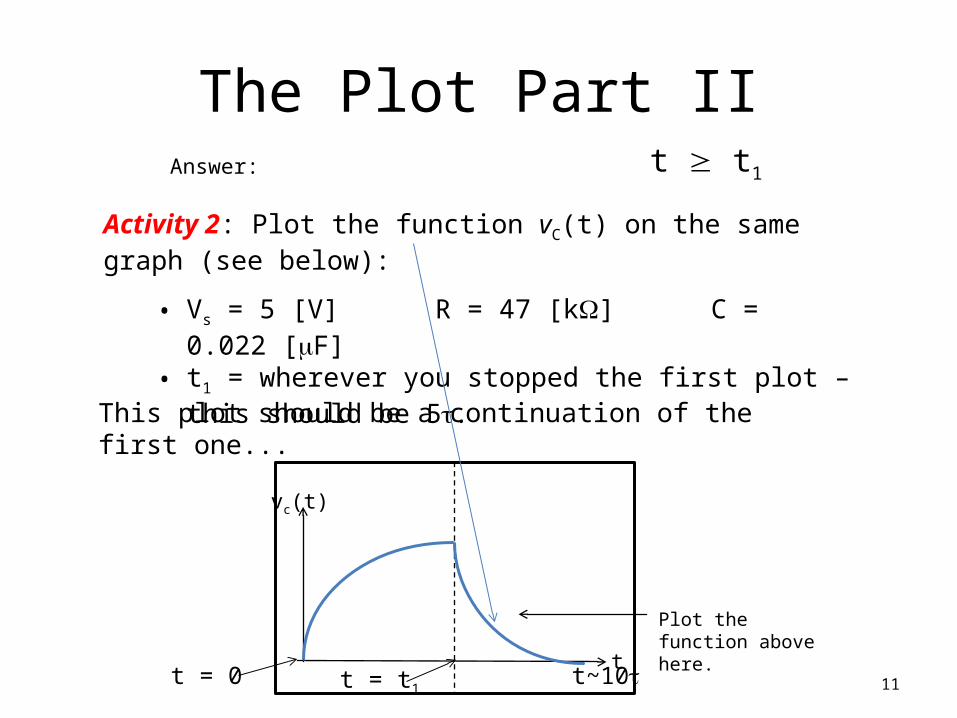
Activity 2: Plot the function vC(t) on the same graph (see below):
• Vs = 5 [V] R = 47 [kW] C = 0.022 [mF]
• t1 = wherever you stopped the first plot – this should be 5t.
This plot should be a continuation of the first one...
Plot the function above here.
Answer: t ³ t1
t = t1t = 0

Graphical Analysis
12
Look at your second graph (the “discharge” curve), which is described by
Activity 3:i) Substitute t – t1 = tc into this equation. Then
• What value does e-1 have? Compare this with 3/8.• What is the value of vc(t) at this time?
ii) Find this point on your graph and label it.
iii) Find the corresponding point on the first graph (the “charging” curve) by substituting t = tc into the charging equation.

The Experiment
13
Now imagine the switch moving back and forth from a to b, over and over, staying in each position long enough to arrive at “steady state” – in other words, for 5 time constants in each position. We can accomplish this be applying a square wave to the circuit input.
Activity 4: Apply a square wave going from 0 to 5 [V] to the input of the circuit. Connect the output to the scope. Use the “T” connector on the lab bench to view the input and the output on the scope. Compare what you see on the scope to the plot in your lab notebook - they should be the same!
Scope
Function Generator

dc Offset
14
To have a square wave that goes from 0 to 5[V] instead of -2.5[V] to +2.5[V], you will need to use the dc offset.
Remember that the dc offset you actually get on the scope will be twice what is stated on the function generator. Verify that you have 0 to 5[V] by examining the scope screen and looking at the vertical sensitivity.

The Measurement…
15
The screen has 8 divisions vertically, so if we could get the discharge curve to cover the entire screen, like this…
…we could simply locate the point where the curve crosses the value 3/8. The corresponding time would then by t = tc.
𝑡 ≅𝜏𝑐
Oscilloscope Screen

The Technique
16
But how do we get the curve to be exactly 8 divisions tall?
The vertical scale has a feature called “fine”…
Select CH1 (or CH 2)Select or de-select “Fine”
Get close to full-screen and then adjust using “Fine”.

Let’s Do It!
17
Activity 5: Using the response on the oscilloscope that you got in Activity 4, isolate the discharge curve, and measure the time constant.
1. Use the fine vertical scale adjustment to get the curve to cover the entire 8 divisions on the screen.
2. Make sure your square wave period is at least 10 time constants so that you have a full charge or discharge cycle.
3. What would the corresponding point on the charging curve be?

An Alternative
18
We don’t have to do it that way. We have an equation, which is “plotted” on the screen. If we measure any value of vc(t0) and the corresponding time t0, we can solve for the time constant.
=
𝑣𝑐 (𝑡 0 )𝑡 0

And Another Thing…
19
You may find it convenient to use the external triggering (EXT TRIG) feature of the scope for this lab (or any one, for that matter). You can review the “ECE2100_FnGen_Scope” presentation posted on the class web site.

Things You Should Know
• How to set amplitude, offset, and period using the function generator.
• How to read amplitude, offset, and period directly from the scope factors (not using the “measurement” function).
• How to use “coupling” (ac, dc).• How to use the trigger menu.• How to use the “fine” adjust to get a full-screen
waveform.20