site analysis, worked examples, formula sheet, etc
TRANSCRIPT

CHEAT SHEET FOR CALCUATING SQUARE FOOTAGE (AREA)
Break an area into manageable pieces and calculate the square footage of each piece. Then add up the pieces.
Field Notes and Materials
Watershed Wise Landscape Professional Training 191

MINI WATERSHED SITE EVALUATION:
DATA CRUNCH AND CONCLUSIONS
1) Determine Water Budget How much annual water in gallons does turf grass need to stay healthy in this area? ETo x 80% x .62 = Cool season turf grass ETo x 60% x .62 = Warm season turf grass How much annual water does the EXISTING landscape need (in gallons)? Sq. ft. x ETo x (PLANT FACTOR %) x .62 gallons/inch =
2) Determine Actual Water Use Total GPM x Minutes/zone x Days /week x 52 weeks/year =
3) Determine Rain Retention – First Flush is 3/4” – 1” of rain a. First Flush formula is:
Sq. ft. of roof surface x 1” x .62 gallons/inch =
b. Total annual rainfall to be retained by your garden is: Sq. ft. of roof surface x Inches of rainfall per year x .62 gal./inch =
Field Notes and Materials
Watershed Wise Landscape Professional Training 192

G3, the Green Gardens Group: Watershed Site Assessment HOW Page 2
c. Is there a rainy season in your area? i. Are there gaps between rainstorms in which water can absorb? ii. What is a really large storm event?
iii. Where in the landscape would you hold the water? How large is
the area in Square Feet?
4) Determine Where To Place The Rain
a. Determine the Volume of First Flush: First Flush Gallons ÷ 7.48 = Cubic Feet of Water
b. Determine the Volume of Total Rainfall: Total Annual Rainfall ÷ 7.48 = Cubic Feet of Water
c. Determine Depth of The Sponge Garden: i. Remember the square footage of the area to put the water? ii. Be aware of any setbacks from buildings (9’ – 15’ minimum) and
from neighbors’ properties (10’ minimum) and from sidewalks (3’ minimum)
iii. Are there other setback requirements or impediments like tree roots?
Cubic Feet of Water ÷ Square Ft. of Storage Space = Depth of Garden Feet (To convert to Inches, multiply by 12 Inches/Ft.)
Watershed Wise Landscape Plan of Action: Conservation - Our target for water use is a 50% reduction from the amount currently needed by the garden. How do we best achieve this reduction?
Field Notes and Materials
Watershed Wise Landscape Professional Training 193

G3, the Green Gardens Group: Watershed Site Assessment HOW Page 3
1) Does changing irrigation reduce water consumption? 2) Should we remove any turf? 3) Could we select plants that get us to this reduction? Which plants? Permeability – Is the garden a brick or a sponge? 1) What kind of soil do we have? How do we plan on bringing oxygen, water and life
into this soil? 2) Where is the hardscape in this garden? Do we want more or less? 3) Which areas need radical amendment and which can be amended with less
intensive intervention? Retention - Do we have any runoff (dry or wet weather)? What can we do about that? 1) Where can we re-direct the downspouts? What would we have to do to capture
that rainwater? 2) How much water can we realistically capture on this property – where does it all
go? Do we have the space?
Field Notes and Materials
Watershed Wise Landscape Professional Training 194

1
1. Make a site planStart by measuring your property. Measure your house and other buildings.Draw it out on graph paper or use a computer. Make several copies.
Think about how you and your family want to use the space, and how the sun and rain affect your garden.
INCLUDE THESE ITEMS ON YOUR SITE PLAN:• Dimensions of the site (round up to the nearest foot or 6 inches)• Orientation — North arrow (or mark East and West)• Buildings (house, garage, neighbor's houses if nearby)• Other structures (carport, porch, arbor, shed)• Large landscape features (ponds, streams, swimming pools, driveways, patios)• Large trees or shrubs
Walk around your garden with a copy of your site plan, and mark any of these that are relevant:• Hillsides, slopes, or other major grade changes• Areas of erosion or obvious soil compaction• Low areas that are commonly wet• Exposed rock• Shallow soils• Areas where the soil abruptly changes texture or structure
Later, you can note your soil type and places where you conduct your soiland compaction tests. You also will be making notes for irrigation.
site your home on your property: BingMaps (bing.com/maps) gives you a good birdseye view of your roof for calculating square footage.
LOOK at Google Maps (maps.google.com) for help placing buildings and trees on your property. Just type in your address, zoom in, and use the Satellite view.
PLAN YOUR GARDEN PROJECT
Excerpted from The Drought Tolerant Garden: Los Angeles County Handbook, © 2012, Los Angeles County
Field Notes and Materials
Watershed Wise Landscape Professional Training 195

2
It's important to know where water flows into your garden, how it moves around, where it stays, and how it leaves your garden. Walk around your garden with another copy of your site plan, and note this information:
INCLUDE THESE ITEMS ON YOUR SITE PLAN:• If you don't have roof gutters and
downspout, then mark the edges of your roof where water sheets down to the landscape.
• Mark your roof gutter downspout,if you have them, and follow the path ofthe water in them out to the street.
• Identify which part of the roof drains into each downspout, and estimate the
dimensions of that portion of roof.• Draw arrows to indicate the direction
water moves through your garden.• Note areas where water pools when
it rains.• Locate where rainwater runoff
is concentrated and eventually leaves your garden (i.e. driveways, drainage pipes, storm gutters etc).
• Mark which areas are impervious surfaces, where water can't get into the ground (i.e. driveways, solid patios,areas covered by a roof, etc).
pho
tos:
Pam
ela
Ber
stle
r
before after
PLAN YOUR GARDEN PROJECT
2. Water in your garden
Excerpted from The Drought Tolerant Garden: Los Angeles County Handbook, © 2012, Los Angeles County
Field Notes and Materials
Watershed Wise Landscape Professional Training 196

3
3. Plants and sunlightOn a copy of your site plan, locate large trees, shrubs, lawn and othersignificant vegetation. Outline the canopy area of each plant and notewith the name, general size and health of the plant. If you don't knowwhat the plant (or tree) is, take pictures (or samples) of its leaves, fruitand bark to your local nursery for help with identification.
Every garden has areas where plants will grow well and others will die. Structures, walls, fences, and other plants all can affectthe amount of sun and shade in a garden. And every garden is com-pletely different. There will be hills and hollows in your garden that maycollect cold air or, because your property is sloped, you don't get frostwhen neighbors do. These climate factors that are particular to your gar-den are called microclimate, and they may differ significantly from thegeneral climate of an area. Note on your site map any microclimate you think your garden might have.
Outline the sun and shade patterns of the site. Mark areas thatreceive sun all day and areas that are shaded all day. Also note whichareas receive only partial sun, maybe just a few hours of direct sun in themorning, mid-day or in late afternoon. When you choose your plantsmake sure to select those that are appropriate to the sunlight pattern inyour garden. Plants marked as “full sun” will not be happy in full shade.
Look closely at the plants you have, and note which are dry climateappropriate and which aren't. Many plants can be dry climate appropri-ate if they're well established, with deep healthy roots (old rose bushes,for example). Decide which plants will work well in your new garden andwhich you should plan to remove.
There are four characteristics shared by many dry climate appropriate plants that willallow you to find them in a crowded nursery.Sometimes you will find plants with three or four of these adaptations at one time - they're really drought tolerant!
STIFF, LEATHERY LEAVES These leaves hold on to water, and represent many of our evergreennative plants.
SILVERY OR HAIRY LEAVES Light colored leaves reflect sunlight, cooling the plant. Hairyback sides of leaves hold moisture longerwhich cools the leaf.
TINY LITTLE LEAVES Like the solar panels theymimic, it is easier to keep small surfaces coolthan it is to cool down one large hot surface.
SOLAR TRACKING LEAVES In the middle of the day these leaves will appear to be standing atattention, straight up and down. As the day progresses, or if you see the same plant in theearly morning, you will find that the leaves are more horizontally oriented. This plant is moving its solar panels throughout the day to minimize exposure during the hottest part of theday (smart, huh?). Many of the native manzanitas utilize this adaptation.
dry climate appropriate characteristics of plants
PLAN YOUR GARDEN PROJECT
Excerpted from The Drought Tolerant Garden: Los Angeles County Handbook, © 2012, Los Angeles County
Field Notes and Materials
Watershed Wise Landscape Professional Training 197

4. Check your irrigationIf you have an irrigation system installed, chances arethat it is a spray emitter system with an automatic irrigation controller. Locate all of the sprinkler headson your property and mark their location on a copy ofyour site plan. Note the location of your controller,where the water comes on to your property from thestreet (the main line), and the location of every valvethat controls the various irrigation zones.
RUN YOUR IRRIGATION SYSTEM & OBSERVE WHAT'S HAPPENING — TEST ONEVALVE AT A TIME • Does water spray on the hard surfaces surroundingthe garden?• How quickly does water run off the landscape? • Are there any broken or missing heads?• Make notes of all of the things you observe whenyou turn on your irrigation.
CHECK YOUR CONTROLLER• How many days does each zone run each week?• How many minutes per run for each zone?
4
PLAN YOUR GARDEN PROJECT
Fill in chart: Range is based on Pressure in Pounds Per Square Inch (PSI) at Hose Bib: Low = 15 PSI, High = 30 PSI; Values are for spray heads spaced 12’ apart unless otherwise noted.
Calculate Spray Heads Annual Water Use For The Zone = TOTAL GPM x Minutes/Zone x Days/Week x 52 Weeks/Year =
Calculate Drip Emitters Annual Water Use For The Zone = TOTAL GPH ÷ 60 x Minutes/Zone x Days/Week x 52 Weeks/Year =
sprinkler data chart
Excerpted from The Drought Tolerant Garden: Los Angeles County Handbook, © 2012, Los Angeles County
Field Notes and Materials
Watershed Wise Landscape Professional Training 198

5. Group plants into hydrozonesOnce you’ve reviewed your irrigation, make a note of which sprinklerheads go on at the same time. Color code the groupings of sprinklerson your site plan.
Now compare the colored zones with your microclimates (see p.3).Are sun and shade areas combined on the same valve? Are lawn andplanter beds combined on the same valve? If so, the irrigation zoneswill have to be altered to correlate with plants that need similar things.Groupings of plants by water need are called hydrozones.
Remember that you want plants that require the same amount of irri-gation to be grouped together; otherwise, your garden will not thriveand thirsty plants will dehydrate or dry plants will drown. The colorson our site plan indicate different hydrozones.
5
PLAN YOUR GARDEN PROJECT
sprinkler testIngredients:CUPS, BOWLS OR JARS, STOPWATCH, RULER, PEN AND PAPER
1
Collect your containers (they all need to be the same size).
2
Spread them around so they are spaced about 5' apart.
3
Get your stopwatch ready and start it as you turn on yoursprinklers.
4
At 2 minutes, turn the sprinklers off. Hold ruler upright and note how deep the water is in inches.
5
Get ready and start again, for 3 more minutes this time, and record your results.
6
One more time, this time for 5 more minutes. Note: Measure at 5, 10, and 15 minutes for drip systems.• Different depths of water in different containers means yoursprinklers are not watering evenly. Get new heads that emit thesame amount of water at once (matched flow rate). Note thateach head has a different spray pattern; full circle, half, quarter or adjustable. • See how much water your section emits at 2 minutes, 5 minutes (2+3), 8 minutes (5+3), and 10 minutes (5+5) for drip then at 5, 10, 15, 30 and 45 minutes. • Next, look at www.bewaterwise.com and determine how manyinches of water your garden needs each week or month.• Now you can give your plants just the water they need.
Excerpted from The Drought Tolerant Garden: Los Angeles County Handbook, © 2012, Los Angeles County
Field Notes and Materials
Watershed Wise Landscape Professional Training 199

1
Ingredients:• YOUR SITE PLAN • SHOVELS & RAKES• COMPOST, WORM CASTINGS • LIVING WOODCHIP MULCH• HOSE WITH SPRAY NOZZLE• SWALE PLANTS (see #7 below)
Call DIG ALERT (811) at least two days before digging to locateunderground utilities!
1
Get to know your rain. Make yoursite plan and note where rain falls, andhow it flows. Look for an open, mostlyflat low spot to direct water towards inthe front yard, or anywhere with thecenter at least 10' away from the foundation of the house and 3' awayfrom the sidewalk. Calculate the bestsize of your rain garden (see p. 2).
2
Lay out your rain garden. Spread outa garden hose to outline the shape. Thearea must be basically flat or slightly bowl-like, and not sloping backtoward the house. Be careful aroundtrees. Don't put your rain garden undera mature tree or disturb any big roots.Remove all plants (including grass) from the area and start digging.
3
Test how fast your soil drains. If you have compaction, try to break
through it with a shovel or a pitchfork.
4
Dig a basin that is between 6” and12” deep at the center. Slope the sidesgently to make a sloping bowl, not acylinder. Mound extra soil around thebowl to increase capacity. Put down atleast an inch of compost or worm castings to activate your soil.
5
Direct downspouts into the basinarea, moving the rainwater throughgravel lined ditches or above-grounddrainage pipes. Also, make an overflowpath so extra water has a direct channel to the street and not backtowards your house.
6
Plant swale plants in compost on the bottom. On the mounded sides,choose plants that like their feet drier.When it rains, the basin will fill up, creating a temporary pond until thewater soaks into your soil. All the watershould be gone in 24 hours. Make sureto mulch (2-3” deep) around yourplants.
7
SWALE plants are special. They can be completely submerged in rainwater and still survive our hot dry summers without extra water. They'resort of plant Super Heroes that way!
how
to
mak
e a
rain
gar
den
simple rain garden recipeYour soil says “It's Swale!”
G3L
A L
LC.
© 2
012
Excerpted from The Drought Tolerant Garden: Los Angeles County Handbook, © 2012, Los Angeles County
References and Resources
Watershed Wise Landscape Professional Training 200

2
how
to
cap
ture
the
rai
n
pho
to:
Pam
ela
Ber
stle
r
rainwater capture basic mathIf you want to figure out how large your rain garden should be, use this basic calculation.
Gallons of Water ÷ 7.48 = Square Feet of Rain Garden (at 12” deep)For example, to capture 620 Gallons, how big should you dig?
620 Gallons ÷ 7.48 = 83 Sq. Ft. area (at 12” deep)620 Gallons ÷ 7.48 = 166 Sq. Ft. area (at 6” deep)
If your rain garden (aka swale) is 10' wide and 8-1/2' long, its area (10’ x 8.5’) is 85 squarefeet. So at 12” deep, it will hold about 620 gallons of rainwater. If you dig it down just 6”deep, your rain garden will hold only half of that, or just 310 gallons of water. With shallower swales, you may want more, or wider rain gardens. If you make your swaledeeper, you can capture more water in a smaller footprint.
HOW MUCH WATER RUNS OFF THE ROOF?The shape of your roof doesn't matter. A pitchedroof and a flat roof have the same footprint and thesame amount of rain falls on the area no matter itsshape. Just measure the outside edges and calcu-late the area.
Area = length of side a x length of side bFor complicated roofs, divide into squares thenadd up the area of each square.
Rainfall (in inches) x Square Feet x .62 =Gallons of Rain Water
If your roof is 1,000 square feet here's how muchwater runs off it:
1” (rainfall) x 1,000 (sq. ft.) x .62 = 620 gallons 5” (a big storm) x 1,000 x .62 = 3,100 gallons 15” (one year's total rainfall) x 1,000 x .62 =
9,300 gallonsIt adds up quickly, even in dry areas. Try to saveas much as you can in your garden!
HOW MUCH WATER COMES OUT OF ONEDOWNSPOUT?Imagine the water from your roof splits into twodownspouts.
Your Roof Area is 20' x 40' = 800 sq. ft.If half of the water goes into each downspout,then the roof size for one downspout is:
800 sq. ft. ÷ 2 = 400 sq. ft.Now calculate how much water that is in gallons.
400 sq. ft. x 1” x .62 = 248 gallons(of water, per inch of rain, from each
downspout). You can use these calculations to determine how much water comes off of any hard surface (patio, driveway, roof, sidewalk, etc.).
Excerpted from The Drought Tolerant Garden: Los Angeles County Handbook, © 2012, Los Angeles County
References and Resources
Watershed Wise Landscape Professional Training 201
3
how
to
tes
t yo
ur s
oil
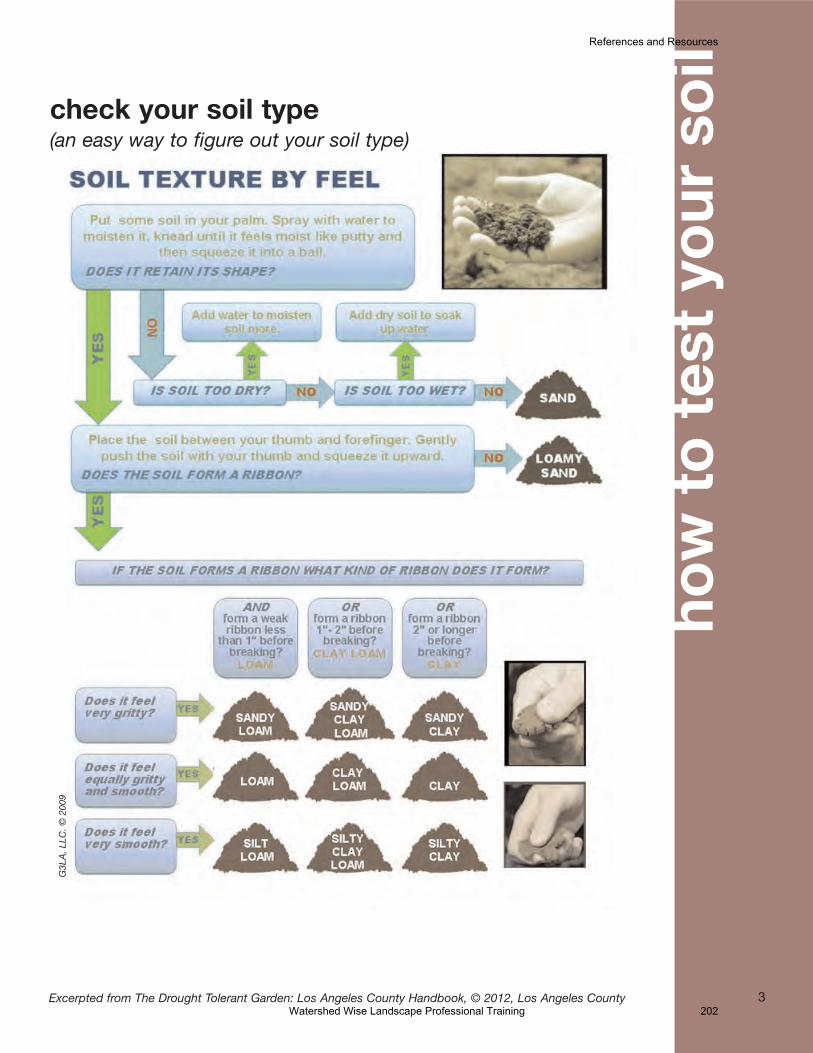
check your soil type(an easy way to figure out your soil type)
G3L
A, L
LC. ©
200
9
Excerpted from The Drought Tolerant Garden: Los Angeles County Handbook, © 2012, Los Angeles County
References and Resources
Watershed Wise Landscape Professional Training 202

4
how
to
bui
ld h
ealt
hy s
oilmaking the sponge
So how do I change a BRICK into a SPONGE? Living soil remediation is theanswer. It's not fertilizer, but it is food for the soil. When that food is digested bythe organisms, it becomes food for the plants!
LIVING SOIL REMEDIATION
1
ADD OXYGEN by opening up the soil. Once the spongy soil structure has beencreated, you will not want to break up the soil again. But to get things started, you must beak a few eggs --- or break a little soil. You can rototill it, auger it, or dig it up with a shovel (or jackhammer!). Sometimes all it takes is apitchfork plunged into the ground and pulled back and forth.
2
ADD WATER and LIFE. You can add good compost, worm castings, and/orcompost tea. All of these are full of the living microbes that will do the hard workof bringing your soil back to life. Spread them on, give them some water, andthen…
3
FEED YOUR SOIL ORGANISMS (not your plants)! They like to eat organic mat-ter, so give them a nice thick blanket of mulch (3” at least). Add water as needed,and your soil will be healthy and happy in no time, ready for your plants!
join the soil party! Living soil is alive. A teaspoon of good garden soil contains billions of invisible bacteria, several yards of equally invisiblefungal hyphae, several thousand protozoa and a few dozen beneficial nematodes.
G3L
A L
LC.
© 2
012
Excerpted from The Drought Tolerant Garden: Los Angeles County Handbook, © 2012, Los Angeles County
References and Resources
Watershed Wise Landscape Professional Training 203

how
to
bui
ld h
ealt
hy s
oil
5
“soil lasagna” recipe(aka Sheet Mulching to Remove Turf)Ingdients: • SHOVELS & RAKES• BINS FOR REMOVED GRASS
AND SOIL (WARM SEASON TURF GRASS ONLY)
• LANDSCAPE FLAGS• COMPOST OR WORM CASTINGS• MULCH
(FRESHLY SHREDDED TREE TRIMMINGS WITHLEAVES ARE BEST)• PAINTERS PAPER OR BIG SHEETS OF CARDBOARD
(IT SHOULD BE CLEAN)• HOSE WITH SPRAY NOZZLE• WATER (LOTS!)
1
Deal with the turf grass you have. If it's cool season turf grass (stays green allyear), say goodbye, give it a good soaking of water and go to Step 3.
2
If it's the other kind of turfgrass (any mixture that turns brownish in the winter) remove and dispose of soil at least 8” deep, but preferably 10” or more tobe sure it’s all gone. If you can’t hand remove, rent a sod cutter.
3
Dig back 12” - 24” from any hard surfaces and building foundations toa depth of 8” - 10.”
4
Flag all your sprinkler heads so you can find and adjust or remove them later.
5
Add LIFE! Spread out a 1” deep blanket of compost or worm castings.
6
Water the soil so the paper will stick to it.
7
Roll out paper or cardboard. Be sure to overlap all edges by at least 6” - don't leave any bare soil! If necessary, to prevent tearing and gaps, use two layers of paper.
8
Water well - really soak the paper/cardboard.
9
While the paper/cardboard is wet, gently rake out a thick blanket of mulch (4” to 6”) over everything. Keep watering while you do this - you want the mulchto be really wet at first.
s
Admire your work.
That's it! Now the LIFE you added will get to work, turning it all into delicious,healthy living soil. When you're ready to plant, just dig a hole right into it, cuttingthrough the paper/cardboard (if it's still there) and plant right into the yummy soil.
Excerpted from The Drought Tolerant Garden: Los Angeles County Handbook, © 2012, Los Angeles County
References and Resources
Watershed Wise Landscape Professional Training 204

6
successful plantingrecipeIngredients:• TOOLS: shovel, hand trowel, hose• PLANTS • COMPOST • MULCHFeeling Adventurous? Try the more advanced planting approach in5
and add these to your list: MYCORRHIZAE (not for grasses) FISH EMULSIONor WATER SOLUBLE HUMATES
1
Dig a hole! Don't dig it any deeper than therootball of the plant. Do dig at least a little bitwider than the plant to loosen the surroundingsoil. If you accidentally dig too deep, be sure toput the soil back in and tamp it down firmlybefore moving on, to give your plant a solid base.
2
Throw in some compost or worm castingsno more than 1” deep - along the bottom of thehole. Never put mulch in a hole!
3
Fill the hole with water TWICE, and allow it todrain completely each time. This will take a longtime, unless your soil is really sandy. Start dig-ging the next hole, or take a break.
4
Submerge the rootball in a bucket of water untilair bubbles stop bubbling up. It's probably easier
to keep the plant in its container but ok if you takeit out - just be careful with the delicate roots. 5
Add fish emulsion or soluble humate to thewater (follow label directions). Dust the rootballwith a mycorrhizae inoculant (only if the plantsare woody, so don't bother with the grasses).
6
Place plant in hole, make sure the root collar(that's where the roots join the stem or trunk) isa bit (1/2” - 1”) higher than the surroundingsoil/existing grade. This is super importantbecause we don't want the plant to get chokedby the surrounding soil.
7
Fill the hole with water one more time (thistime with the plant in it) and let it drain completely.
8
Now fill the hole with the soil you dug out(not with fancy potting soil!), making sure thesoil slopes away from the root collar. Tamp thesoil down (use your feet, but be gentle) so theplant doesn't move around.
9
Don't create a bowl around the plant. Really!Your plant doesn't need it and it might make amoat that would drown your drought tolerant plant.
s
Water the soil all around the plant one moretime, and deeply. And have a drink yourself!
NOW THAT YOUR SOIL IS HAPPY you are ready to plant! It's almost as easy as digging a hole, but a little extra love will help. By following these simple steps, you will get your plants' roots growing properly, quickly spreading into the living soil and making friends with the other drought tolerant plants. Strong rootsmake strong plants, and this is especially important in dry environments.
What's with all the water at planting time? There are three reasons:DRAINAGE If the water does not drain within an houror so, it's probably not a good place to plant a droughttolerant plant until you fix the compaction.
SOIL PARTY By watering so thoroughly, you are waking up any microbes that might be in the surrounding soil.
PLANT SHOCK The major reason plants suffer fromplanting shock is that the dry soil around the new plants wicks water away from their rootball, sending the plant
into shock from which they never recover. By watering thesurrounding soil, you reduce the probability of plant shock.
“Hey, where's the fertilizer?” you may ask. Dry climategardens don't want nutrient rich (i.e. fertilized) soil. Itcould make them grow too fast, use too much water, orjust make them weak and sickly. By following our livingsoil remediation instructions you've made healthy, livingsoil for your plants - just add rainwater and that's allthese plant need! Really. Let the soil microbes do all thework to keep your plants strong, healthy, and continu-ously drought tolerant.
right plant right place
Excerpted from The Drought Tolerant Garden: Los Angeles County Handbook, © 2012, Los Angeles County
References and Resources
Watershed Wise Landscape Professional Training 205

IRRIGATION QUICK GUIDE
Following the Flow…. A properly designed system distributes water to the plants as directly and effectively as possible. It takes into consideration the site’s water pressure and water flow, and sizes the materials so that the velocity stays within safe limits. Delivery Methods: Overhead via sprinklers: used for groundcover, grasses and turf. Measures water in gallons per minute Drip – at surface or subsurface: typically used for groundcover, shrubs, trees. Measures water in gallons per hour Typical Irrigation Equipment Set Up (there are many variables that can affect a system – these are the more common components) Water Main – at the street Service Line Water Meter Main Line Shut Off Valve Wye Strainer Backflow Prevention Device(s) – prevents reverse flow and back siphoning. See manufacturer’s specifications and local plumbing codes for proper installation. Pressure Vacuum Breaker - must be 12” above highest head (or per code)
Reduced Pressure Backflow Preventer – can be placed anywhere on site
Double Check Valves - not that common – often installed in vaults Pressure Regulator Shut Off Valve Quick Coupler Flow Meter (new) Main Line Controller – Manual (obsolete) or Weather Based Historic data Live data
References and Resources
Watershed Wise Landscape Professional Training 206
Satellite On Site Rain Sensors (optional) Up to this point, the set up is essentially identical for both sprinklers and drip. Sprinklers: Control Valves, either remote control or manual Globe Valves / Angle Valves – below grade Remote Control Valve – above ground (anti-siphon valve). must be at least 6” above highest head (or per code) ** Shut Off Valve Lateral Lines Distribution Method – Sprinklers Spray (pop up or fixed) Rotary Nozzles (aka rotators) Rotors ** If anti-siphon valves will work on the site, there is no need for a master backflow prevention system. Drip: Control Valves, either remote control or manual Low Flow Globe Valves / Angle Valves – located below grade Low Flow Remote Control Valve – above ground (aka anti-siphon valve). Installed at least 6” above highest head (or per code) Filter Pressure Regulator Shut Off Valve Lateral Lines Distribution Method – Drip ½” In-line (emitters built in) ½”On-line (emitters punched in) 3/8” EZ Drip Pipe (6” o.c.) Tattle Tale – one per zone Flush Valve – min. one per zone ** If anti-siphon valves will work on the site, there is no need for a master backflow prevention system. At the hose bib – new code requires a Hose Connection Vacuum Breaker – mini backflow prevention.
References and Resources
Watershed Wise Landscape Professional Training 207

Some Irrigation Terms / Definitions: Anti-Siphon Valve – This valve is a manual or automatic control valve with a built-in atmospheric vacuum breaker. It must be installed a minimum of 6 inches higher than the highest sprinkler head or drip emitter outlet. (or per code). One valve is needed for each zone. Backflow Prevention – This is a must! A device that prevents contaminated water from being sucked back into the water source should a reverse flow situation occur. All preventers except the anti-siphon valves must be inspected once per year (or per code). Back siphoning / back pressure - When water pressure in a potable water main line is lost for any reason, the fluids in all of the potable and non-potable service lines connected to the main line will be effectively pulled or back-siphoned out of those lines and back into the main line, unless effective backflow preventive measures have been taken on those lines. Back-pressure backflow occurs whenever the water pressure in a service line is higher than that of the main line. The fluid in the service line will be forced back, or back-pressured, back into the line. Control Valves - generally used to deliver pressurized water to either sprinklers or drip throughout the system. These can be automatic (regulated by the controller) or they can be controlled manually. Flow – Flow rate is defined as the volume of water per unit of time flowing past a point in the system. Commonly used units for flow rate are gallons per minute (gal/min or gpm), gallons per hour (gal/hr) and acre-inches per hour (ac-in/hr). Can be checked with either a flow meter or turning on a faucet and measuring how quickly a 5 gallon bucket gets filled. Container size in gallons / Seconds to fill container X 60 = GPM Example: Using a 5 gallon container it takes 20 seconds to fill the container. 5 / 20 X 60 = 15 GPM. (5 divided by 20, then multiplied 60, equals 15 GPM.) This is the total water available per zone per minute. In a properly designed system, the total gallons per minute required per zone cannot exceed the safe flow available to the system (75% of flow). Globe Valve / Angle Valve – Remote control valves that can be installed below grade. Requires a master backflow prevention system.
References and Resources
Watershed Wise Landscape Professional Training 208

Head to Head Coverage - each sprinkler throws water ALL the way to the next sprinkler in each direction. Lateral Line – PVC pipe from control valves out to distribution system (sprinklers or drip) Main Line – line from Meter to point of connection (POC) or from POC to control valves. Manifold – a group of valves Pressure – describes the flow strength of water through plumbing pipes, measured in pounds per square inch (psi). Dynamic – water is moving in the pipes Static – water is not moving in the pipes As water moves thru an irrigation system it will either lose or gain pressure. Potential sources of pressure changes: elevation, equipment and irrigation lines. Need to make sure that the pressure at the final distribution point is within the correct range for system to function properly. Test at source and at last head (or drip line) on the most distant circuit with the highest pressure requirement, using a pitot tube and pressure gauge. Too much pressure can cause misting, or even damage to the system. Too little pressure can result in sprinklers not operating at optimal capacity.
Pressure Vacuum Breaker - An option for a master backflow prevention system. It must be installed above ground and it must be 6 inches higher than the highest sprinkler head or drip emitter controlled by any of the valves. (or per local code)
Reduced Pressure Backflow Preventer – An option for a master backflow prevention system. The reduced pressure backflow preventer is the king of the backflow preventers, made for high-hazard uses. It is the standard for commercial irrigation installations. The Unit must be installed 12 inches above ground, but it does not have to be higher than any of the sprinklers. Service Line – Water line from street to water meter Shut Off Valves – Shut off valves are used to temporarily turn off water throughout the entire sprinkler system or sections of the sprinkler system. Can be either ball valves or gate valves.
References and Resources
Watershed Wise Landscape Professional Training 209

Velocity - The velocity of flow is a calculation of the speed of water moving in a closed pipe system. More than 5 feet per second (FPS) in PVC can cause water hammer and damage irrigation systems. Needs to be considered when sizing pipe. Water Meter - an instrument for recording the quantity of water passing through a particular outlet. Typically measure in gallons or cubic feet: 7.48 gallons = 1cf. HCF – Hundred Cubic Feet or 748 gallons
References and Resources
Watershed Wise Landscape Professional Training 210

Some Irrigation Rules of Thumb / Tips Proper Drip Installation Recommendations and Tips
• Place emitters uphill of plants. • If using in-line, follow contours of slope. • If using more than one emitter per plant, place emitters on either side
of plants. • Compression fittings vs. external barbed fittings - For 1⁄2” tubing,
compression fittings are preferred over barbed fittings. Barbed fittings fit inside the tubing and on a hot day the connection can blow apart due to the fact that the tubing gets soft in the heat. Compression fittings where the tubing fits inside the fitting solve this problem.
• No more than 200 linear feet of tubing and a maximum of 240 gallons per hour.
• In-line can be used either on the surface or subsurface. On-line or point source should be used only on the surface.
• Staples – Use ‘U’ shaped every 4 – 6’ to hold tubing in place. • Install tattle tale for each zone. • Stay away from spaghetti tubing.
Do not exceed a 10% psi drop from pressure read at the meter Do not exceed 75% of maximum flow on any one zone Great resources for additional information: www.Irrigationtutorials.com http://www.smgov.net/Departments/OSE/Categories/Landscape/Landscape_Plans.aspx
References and Resources
Watershed Wise Landscape Professional Training 211

Rev
iew
Of B
asic
Pla
nt D
ata
Water Needs (E
T):
High
Med
ium
Mod
erate
Low
Very Low
No Supp
lemen
tal W
ater
Hab
it: Evergreen
Deciduo
us (B
y season
) Par1ally Deciduo
us
Form
: Tree (M
ost w
ood, harde
r the longer it lives)
Shrub (Som
e woo
d, lives years)
Perenn
ial (Lives more than 2 yrs)
Succulen
ts
Bulbs
Bi-‐Ann
ual (Finished
cycle in 2 years)
Ann
ual (Finished
cycle in 1 yr)
Expo
sure:
Sun
Part-‐Sun
or Part Shade
Shade
All
Growth:
Max Height
Max Spread-‐Width
References and Resources
Watershed Wise Landscape Professional Training 212

REGULATIONS, CODES & RESOURCES OSHA – Occupational Safety and Health Administration Purpose: To help employers and employees reduce on the job injuries, illnesses and deaths:
• Maintain conditions and/or adopt practices necessary and appropriate to protect workers on the job.
• Be familiar with and comply with standards applicable to their establishments.
• Ensure that employees have and use personal protective equipment when required for safety and health.
OSHA Standards for landscape and horticultural services encompass a wide range of services. Included in this category are companies engaged in landscape design and architecture; soil preparation and grading; irrigation systems; tree, shrub and lawn planting; hardscape construction including: retaining walls, pathways and patios; lawn care and landscape maintenance; arborist services including tree trimming and line clearance. Landscaping and horticulture hazards are addressed in specific standards for the general industry if work is considered maintenance activity and the construction industry if work is considered building activity. The OSHA website includes, among other things, OSHA regulations, enforcement procedures and how to get OSHA training: https://www.osha.gov/SLTC/landscaping/ Electrical & Plumbing Codes The purpose of building codes are to provide minimum standards for safety, health, and general welfare including structural integrity, mechanical integrity (including sanitation, water supply, light, and ventilation), means of egress, fire prevention and control, and energy conservation In the USA the main codes are the International Commercial or Residential Code [ICC/IRC], electrical codes and plumbing, mechanical codes. Fifty
References and Resources
Watershed Wise Landscape Professional Training 213

states and the District of Columbia have adopted the I-Codes at the state or jurisdictional level. Not every location is the same – each has their ‘sense of place’ that affect building codes (including landscaping). States and even local municipalities may decide to create more stringent requirements. State Codes: Title 24 – Title 24 of the California Code of Regulations, known as the California Building Standards Code or just "Title 24," contains the regulations that govern the construction of buildings in California. There are 12 parts; Electrical (part 3), Plumbing (part 5) and Green Building (part 11) which can pertain to irrigation. http://www.bsc.ca.gov/Home/Current2013Codes.aspx Local Codes: Most municipalities will follow the State regulations as a minimum. Some will exceed requirements. When beginning a project, be sure to check with: • Local Building and Safety Departments • Review municipal codes for the site • Check on local implementation of AB 1881, Model Water Efficient
Landscape Ordinance Recent Innovations and Technological Developments, Research and development are on-going for irrigation and better water efficiency products. Sometimes they are successful and move into the marketplace. Sometimes they are a dud. Where to go for the best information? Check with Trade Associations to stay current on legislation and technology relating to irrigation: Irrigation Association http://www.irrigation.org/ California Landscape Contractors Association http://www.clca.org/ Association of Professional Landscape Designers http://www.apld.com/ American Society of Landscape Architects http://www.asla.org/default.aspx
References and Resources
Watershed Wise Landscape Professional Training 214

WaterSense WaterSense is a partnership program sponsored by EPA that is designed to protect the future of our nation’s water supply by promoting and enhancing the market for water-efficient products, new homes, and professional certification programs (hereafter referred to as “programs”). WaterSense aims to help consumers and businesses use water resources more efficiently to preserve them for future generations and to reduce water and wastewater infrastructure costs by decreasing unnecessary water consumption. Through this program, EPA provides reliable information on water-efficient, high-performing products, homes, and practices; raises awareness about the importance of water efficiency; ensures water-efficient product performance; helps consumers and businesses identify products and services that use less water; promotes innovation in product development; and supports state and local water efficiency efforts. WaterSense labeled products are backed by independent, third–party testing and certification, and meet EPA’s specifications for water efficiency and performance. Currently these include weather based irrigation controllers. In the pipeline are irrigation sprinklers, soil moisture-based control technologies. Check the WaterSense site to learn more about their role and for the most up to date approved products: http://www.epa.gov/WaterSense/products/ http://www.epa.gov/watersense/docs/programguidelines.pdf
References and Resources
Watershed Wise Landscape Professional Training 215

©2013. G3, The Green Gardens Group. All Rights Reserved. Written Permission Required For Use of Presentation Materials
Core Concepts Workshop
Completed Exercises
Completed Exercises
Watershed Wise Landscape Professional Training 217

Exercise #1 Cal cu l at e “Drive - By ” Lands cape Water
Requirements The lawn in your client’s Escondido home covers 1,000 sq. ft. QUESTIONS: How many inches of water are needed for this lawn in the month of July? SF x ETo x PF = Inches of Water Required 1,000 sq. ft. x 7.34” x 100% = 7,340 Inches How Big is the landscape area? 1,000 Sq. Ft. Where Are We (hint: place and time of year)? Escondido in July = July ETo = 7.34” What’s There in the landscape and what would be the Plant Factor we’d apply?
Lawn – the simplest “drive by” Plant Factor would be 100%, but you could apply 80% or 90% if you’re into the math. How many gallons of water are needed for this lawn in the month of July?
SF x ETo x PF x .62 = Gallons 1,000 sq. ft. x 7.34” x 100% x .62 = 4,551 Gallons How many gallons of water are needed for this lawn annually? Escondido Annual ETo = 56.96” SF x ETo x PF x .62 = 1,000 sq. ft. x 56.96” x 100% x .62 = 35,315 gallons of water annually are Required for maintaining the health and aesthetics of a 1,000 sq. ft. lawn in Escondido.
Completed Exercises
Watershed Wise Landscape Professional Training 218

© 2
010.
G3,
The
Gre
en G
arde
ns G
roup
. All
Rig
hts
Res
erve
d.
PL
AN
T F
AC
TO
R W
OR
KS
HE
ET
U
sing
the
WU
CO
LS I
V 2
014
refe
renc
e in
form
atio
n at
tach
ed t
o th
is w
orks
heet
, de
term
ine
the
Plan
t Fa
ctor
and
Pl
ant
Wat
er R
equi
rem
ent
by r
egio
n fo
r th
e th
ree
plan
ts li
sted
bel
ow:
San
ta
Mon
ica
An
nu
al
ETo=
4
4.2
2”
Bor
reg
o S
pri
ng
s A
nn
ual
ET
o=
75
.39
”
Pic
ture
B
otan
ical
N
ame
Com
mon
N
ame
San
ta
Mon
ica
WU
CO
LS
Wat
er
Nee
d
% P
F (K
c)
San
ta
Mon
ica
PW
R
Bor
reg
o S
pri
ng
s W
UC
OLS
W
ater
N
eed
%P
F (K
c)
Bor
reg
o S
pri
ng
s P
WR
Just
icia
ca
rnea
Bra
zilia
n pl
ume
flow
er
Hig
h 80
%
44.2
2” x
.8
0 =
35
.37”
pe
r ye
ar
Hig
h 80
%
75.3
9” x
.8
0 =
60
.31”
pe
r ye
ar
Kni
phof
ia
uvar
ia
Red
hot
po
ker
Low
20
%
44.2
2” x
.2
0 =
8.
84”
per
year
Med
ium
50
%
75.3
9” x
.5
0 =
37
.70”
pe
r ye
ar
Laur
us
nobi
lis
Sw
eet
bay
Low
–
may
be
adju
st
beca
use
a tr
ee for
m?
20%
-
30%
44
.33”
x
.30
=
13.2
7”
per
year
Med
ium
–
adju
st
beca
use
it’s
a tr
ee?
60%
75
.39”
x
.60
=
45.2
3”
per
year
If P
lant
Fac
tor
is li
sted
as
unkn
own
(?)
then
use
dat
a fr
om g
row
ers
of t
he p
lant
Completed Exercises
Watershed Wise Landscape Professional Training 219

Exercise #3 Annual Water Requirement for TURF-Centric Landscape
Where are we? = California
Annual ETo for Region = 50”
Annual Rainfall for Region = <12”
Plant Factor–Cool Season Turf (PF) = 1.0
Back Yard Turf SF:
Front Yard Turf SF:
Total Landscape Area (TLA):
Annual Water Requirement in Inches = TLA x Eto x Plant Factor
Annual Water Requirement in Gallons = TLA x Eto x Plant Factor x 0.62
Plant Factor Inches per SF: (ETo x PF)
Plant Factor Gallons per SF: (ETo x PF x 0.62)
Total Gallons Per Year: (TLA x ETo x PF x 0.62) What does this number mean?
DR
IVEW
AY
GARAGE
HOUSE
2,970 SF TURF
1,144 SF TURF
___________
___________
___________
__________________________
__________________________
__________________________
_________________________________
_________________________________
2,970
1,144
4,144
50 x 1.0 = 50”
50 x 1.0 x 0.62 = 31 gal
4,144 x 50 x 1.0 x 0.62 = 127,534
This turf-centric landscape requires 127,534
gal. per year in California to remain healthy.
Completed Exercises
Watershed Wise Landscape Professional Training 220

Exercise #4 Annual Water Requirement for NATIVE -Centric Landscape
Where are we? = California
Annual ETo for Region = 50”
Annual Rainfall for Region = <12”
Plant Factor–Cool Season Turf (PF) = 0.20
Back Yard Turf SF:
Front Yard Turf SF:
Total Landscape Area (TLA):
Annual Water Requirement in Inches = TLA x Eto x Plant Factor
Annual Water Requirement in Gallons = TLA x Eto x Plant Factor x 0.62
Plant Factor Inches per SF: (ETo x PF)
Plant Factor Gallons per SF: (ETo x PF x 0.62)
Total Gallons Per Year: (TLA x ETo x PF x 0.62) What does this number mean?
DR
IVEW
AY
GARAGE
HOUSE
2,970 SF NATIVES
___________
___________
___________
__________________________
__________________________
__________________________
_________________________________
_________________________________
1,144 SF NATIVES
2,970
1,144
4,144
50 x 0.2 = 10”
50 x 0.2 x 0.62 = 6.2 gal
4,144 x 50 x 0.2 x 0.62 = 25,507
This Native centric landscape requires 25,507
gal. per year in California to remain healthy.
Completed Exercises
Watershed Wise Landscape Professional Training 221
Exercise #5 Calculating Annual Designed Landscape Water
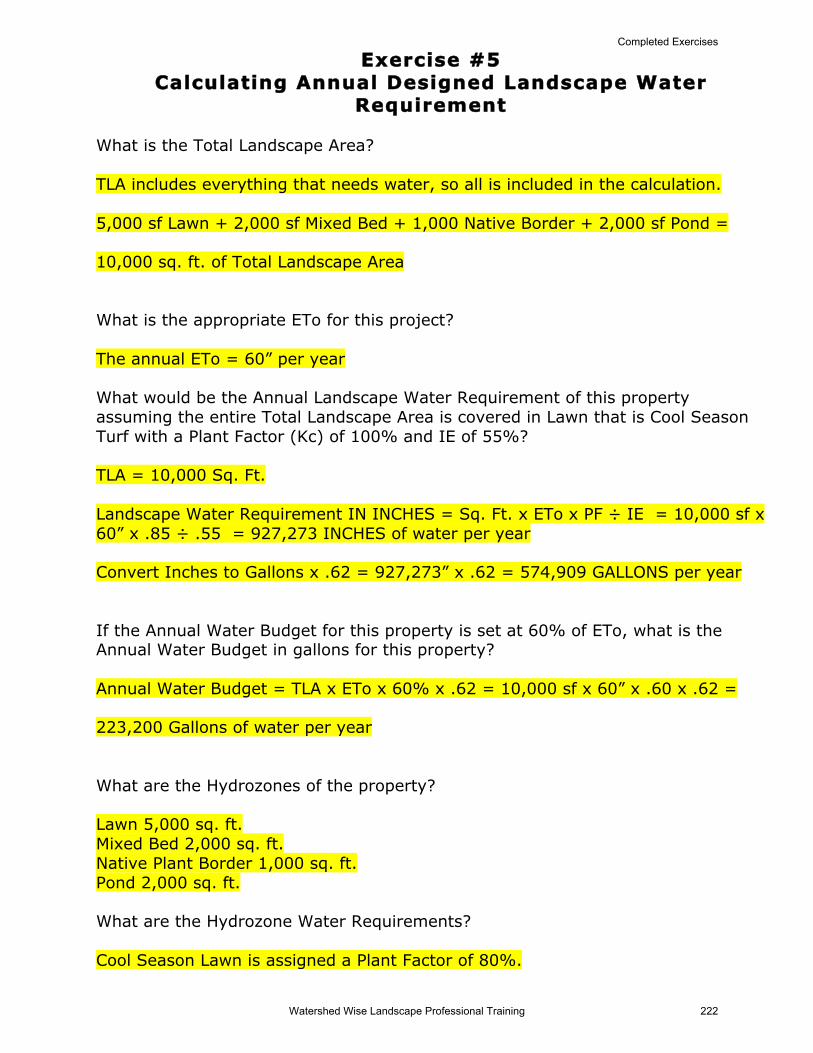
Requirement What is the Total Landscape Area? TLA includes everything that needs water, so all is included in the calculation. 5,000 sf Lawn + 2,000 sf Mixed Bed + 1,000 Native Border + 2,000 sf Pond = 10,000 sq. ft. of Total Landscape Area What is the appropriate ETo for this project? The annual ETo = 60” per year What would be the Annual Landscape Water Requirement of this property assuming the entire Total Landscape Area is covered in Lawn that is Cool Season Turf with a Plant Factor (Kc) of 100% and IE of 55%? TLA = 10,000 Sq. Ft. Landscape Water Requirement IN INCHES = Sq. Ft. x ETo x PF ÷ IE = 10,000 sf x 60” x .85 ÷ .55 = 927,273 INCHES of water per year Convert Inches to Gallons x .62 = 927,273” x .62 = 574,909 GALLONS per year If the Annual Water Budget for this property is set at 60% of ETo, what is the Annual Water Budget in gallons for this property? Annual Water Budget = TLA x ETo x 60% x .62 = 10,000 sf x 60” x .60 x .62 = 223,200 Gallons of water per year What are the Hydrozones of the property? Lawn 5,000 sq. ft. Mixed Bed 2,000 sq. ft. Native Plant Border 1,000 sq. ft. Pond 2,000 sq. ft. What are the Hydrozone Water Requirements? Cool Season Lawn is assigned a Plant Factor of 80%.
Completed Exercises
Watershed Wise Landscape Professional Training 222

Designed Landscape Water Requirement Page 2 The Mixed Border is the trickiest Hydrozone with Low and Medium plants. The higher Plant Factor must be selected, so use Medium or 50% Plant Factor for that hydrozone. The Native Plant Border is Low and therefore 10% - 30%. We used 20%. The Pond evaporates at 100%, so it has an Adjustment Factor of 100%. What is the Designed Water Plan or Designed Landscape Water Requirement for this property? From the chart, we find the Designed Water Plan is 394,545 gallons per year. How does the Water Budget compare to the Designed Water Plan? Water Budget = 223,200 Gallons Designed Water Plan = 394,545 Gallons Water Budget < Designed Water Plan Our Plan would be rejected and needs to be re-designed to be less than the Water Budget.
Completed Exercises
Watershed Wise Landscape Professional Training 223
Exercise #6 Calculate Precipitation Rate and Lower-Quarter
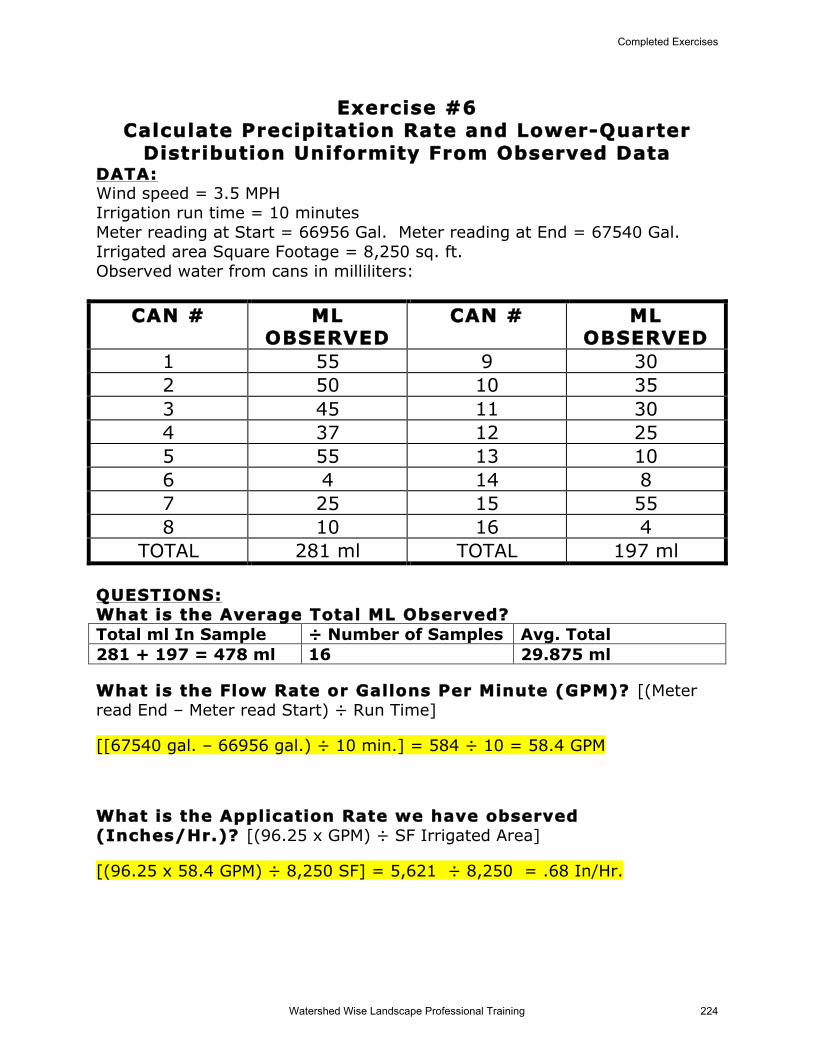
Distribution Uniformity From Observed Data DATA: Wind speed = 3.5 MPH Irrigation run time = 10 minutes Meter reading at Start = 66956 Gal. Meter reading at End = 67540 Gal. Irrigated area Square Footage = 8,250 sq. ft. Observed water from cans in milliliters:
CAN # ML OBSERVED
CAN # ML OBSERVED
1 55 9 30 2 50 10 35 3 45 11 30 4 37 12 25 5 55 13 10 6 4 14 8 7 25 15 55 8 10 16 4
TOTAL 281 ml TOTAL 197 ml QUESTIONS: What is the Average Total ML Observed? Total ml In Sample ÷ Number of Samples Avg. Total 281 + 197 = 478 ml 16 29.875 ml
What is the Flow Rate or Gallons Per Minute (GPM)? [(Meter read End – Meter read Start) ÷ Run Time]
[[67540 gal. – 66956 gal.) ÷ 10 min.] = 584 ÷ 10 = 58.4 GPM
What is the Application Rate we have observed (Inches/Hr.)? [(96.25 x GPM) ÷ SF Irrigated Area]
[(96.25 x 58.4 GPM) ÷ 8,250 SF] = 5,621 ÷ 8,250 = .68 In/Hr.
Completed Exercises
Watershed Wise Landscape Professional Training 224

Arrange the results in ascending order of magnitude in this chart:
DATA # ML OBSERVED
1 4 2 4 3 8 4 10 5 10 6 25 7 25 8 30 9 30 10 35 11 37 12 45 13 50 14 55 15 55 16 55
TOTAL 478 ml
What is the Average of the Lower Quarter? (hint: #1-4) Total ml In Lower Qtr. ÷ Number of Samples Avg. Lower Quarter 10+8+4+4 = 26 ml 4 6.5 ml
What is the Average of the Lower Half? (hint: #1-8)
Total ml In Lower Half ÷ Number of Samples Avg. Lower Half 30+25+25+10+26= 116 ml
8 14.5 ml
Completed Exercises
Watershed Wise Landscape Professional Training 225

What is the Distribution Uniformity of the Lower Quarter if DULQ = (Average of Lower Quarter ÷ Average of Total)?
DULQ = (6.5 ml ÷ 29.875 ml) = .22
What is the Distribution Uniformity of the Lower Half if DULH = (Average of Lower Half ÷ Average of Total)?
DULH = (14.5 ml ÷ 29.875 ml) = .49
In order to correctly evaluate our irrigation system, what other information should we gather when we are on site?
Slope pattern of layout
________________ ________________
head-to-head coverage root zone depth
________________ ________________
nozzle/emitter types broken sprinklers
________________ ________________
Completed Exercises
Watershed Wise Landscape Professional Training 226

Exercise #7 Calculate Plant Available Water (PAW) For This
Landscape Scenario DATA: Plant = 24” Koelreuteria paniculata Landscape Maturity = Planted 1 year ago Root Depth = 24” Soil Type = Sandy Loam QUESTIONS: What form does this plant take in the garden? How will you determine this? Looking on the WUCOLS sheet, we see that it is a Tree form. How do you determine the Root Depth of the plant, if it were not provided? Soil probe on site or look up grower literature. What is the Soil Available Water Holding Capacity (AWHC)? Soil type is Sandy Loam, the chart indicates that there is a range 1.25 – 1.75”/Foot of Soil. We chose the middle 1.50”/Ft. This equals .125”/” of soil. Using the Root Depth above to complete this question, what is the Plant Available Water (PAW)? PAW = Root Depth” x AWHC “/” = 24” x .125”/” = 3” of Water/24” of Soil
Completed Exercises
Watershed Wise Landscape Professional Training 227

Exercise #8 Calculate Allowable Depletion and Irrigation Intervals
For This Landscape Scenario DATA: Neverywhere Annual ETo = 50” Square Footage of Area = 500 Sq. Ft. Plant Type = Medium Low Shrub Type Root Depth = 20” Soil Type = Clay Loam MAD = 50% Distribution Uniformity = 70% QUESTIONS: What is the Plant Water Requirement (PWR)? PWR = ETo” x PF = 50” x .40 (because it is MEDIUM LOW) = 20” Annually This is the tricky part. For use in AD calculations you have to determine the PWR DAILY so: Annual 20” ÷ 365 Days/year = .055”/Day Note: It would be preferable to use a monthly ETo for determining Daily PWR, if it is available; but if not, make sure you use what data you are given. What is the Soil Available Water Holding Capacity (AWHC)? AWHC Clay Loam soil is 1.90”/Ft. of soil or .158”/” (to get this, divide 1.90”/ft. by 12”/ft.) What is the Plant Available Water (PAW)? PAW = Root Depth” x AWHC”/” = 20” x .158”/” = 3.16” of water in 20” of Root Depth What is the Allowable Depletion? AD = MAD% x PAW = .50 x 3.16” = 1.58” How many days between irrigation events (irrigation Interval)? Irrigation Interval = AD ÷ Daily PWR = 1.58” ÷ .055” = 28.72 Days or 29 Days
Completed Exercises
Watershed Wise Landscape Professional Training 228
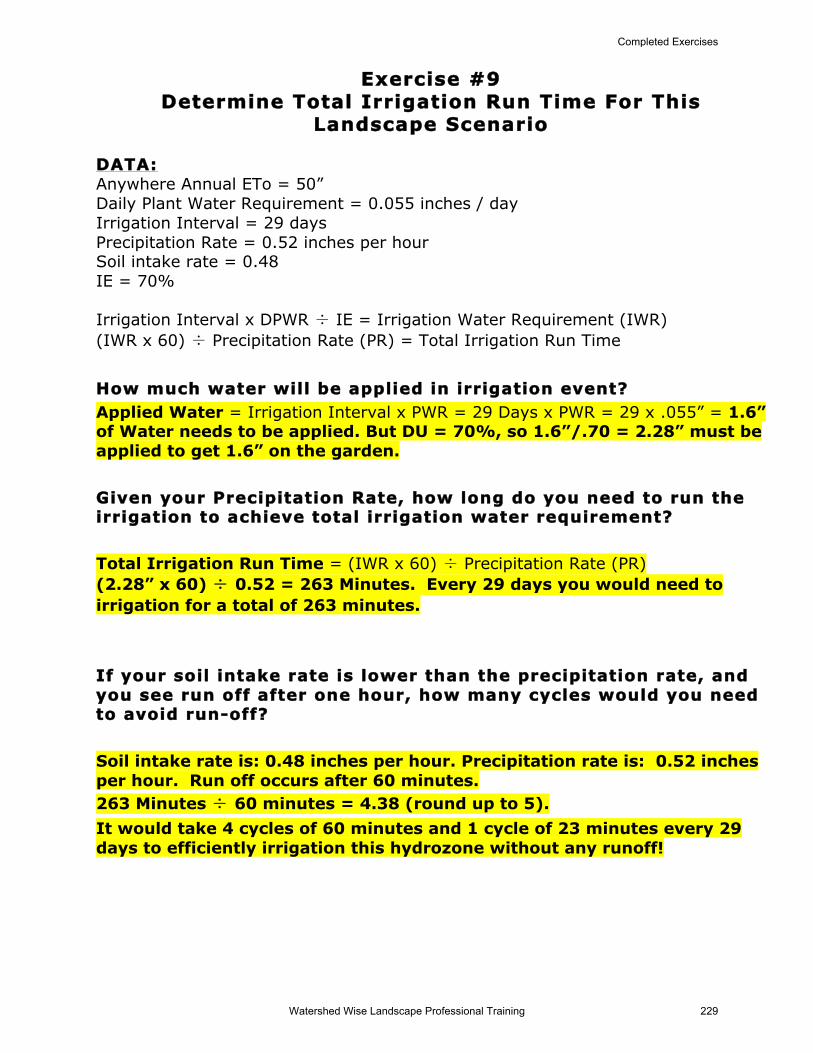
Exercise #9 Determine Total Irrigation Run Time For This
Landscape Scenario DATA: Anywhere Annual ETo = 50” Daily Plant Water Requirement = 0.055 inches / day Irrigation Interval = 29 days Precipitation Rate = 0.52 inches per hour Soil intake rate = 0.48 IE = 70% Irrigation Interval x DPWR ÷ IE = Irrigation Water Requirement (IWR) (IWR x 60) ÷ Precipitation Rate (PR) = Total Irrigation Run Time How much water will be applied in irrigation event? Applied Water = Irrigation Interval x PWR = 29 Days x PWR = 29 x .055” = 1.6” of Water needs to be applied. But DU = 70%, so 1.6”/.70 = 2.28” must be applied to get 1.6” on the garden. Given your Precipitation Rate, how long do you need to run the irrigation to achieve total irrigation water requirement? Total Irrigation Run Time = (IWR x 60) ÷ Precipitation Rate (PR) (2.28” x 60) ÷ 0.52 = 263 Minutes. Every 29 days you would need to irrigation for a total of 263 minutes. If your soil intake rate is lower than the precipitation rate, and you see run off after one hour, how many cycles would you need to avoid run-off? Soil intake rate is: 0.48 inches per hour. Precipitation rate is: 0.52 inches per hour. Run off occurs after 60 minutes. 263 Minutes ÷ 60 minutes = 4.38 (round up to 5). It would take 4 cycles of 60 minutes and 1 cycle of 23 minutes every 29 days to efficiently irrigation this hydrozone without any runoff!
Completed Exercises
Watershed Wise Landscape Professional Training 229

Exercise #10
Calculate Am
ount of R
ainfall From Each Im
perm
eable Surface
Catchm
ent A
rea
Sq.
Ft.
x First
Flush “ x Ru
noff
Coeffi
cien
t x .62
= First
Flush
Gallons
x An
nual
Rainfall “
= To
tal
Annu
al
Gallons
Flat Com
posite
Roof
3,200
1 .85
.62
1,686.40
10
16,864
Flat Steel Roo
f 800
1 .95
.62
471.20
10
4,712
Side
walk
500
1 .95
.62
294.50
10
2,945
TOTA L
2,452
TOTA
L 24,521
Completed Exercises
Watershed Wise Landscape Professional Training 230

Exercise #11 Calculate Runoff Available To Be Harvested From
Each Hard Surface In This Landscape Scenario And Size BMPs For Capture
INSTRUCTIONS & DATA: Use the Sq. Footage and Surface information on the first page Image for calculating the runoff that will be generated by each surface. Assume all runoff generated is harvestable. First Flush = 1” 100 Year Storm Event = 4” Average Annual Rainfall = 10” Capture constraints: 15’ setback from buildings; 3’ setback from sidewalks, 10’ setback from neighbors’ properties and no runoff on to neighbors’ property. QUESTIONS: Calculate Square Footage of each Impermeable Surface.
Flat Composite Roof = 40’ x 80’ = 3,200 SF
Flat Steel Roof = 40’ x 20’ = 800 SF
Sidewalk = 5’ x 100’ = 500 SF
Calculate First Flush Runoff in Gallons from each Impermeable Surface. What are the Runoff Coefficients For Each Surface?
Flat Composite Roof = .85
Flat Steel Roof = .95
Sidewalk = .95
From Chart: 2,452 Gallons Total From 1” First Flush
Calculate Total 100 Year Storm Event in Gallons.
100 Year Storm Event = 4”
2,452 Gallons Total From 1” x 4 = 9,808 Gallons
Completed Exercises
Watershed Wise Landscape Professional Training 231

Calculate Total Annual Avg. Runoff in Gallons.
Avg. Annual Rainfall = 10’
2,452 Gallons Total From 1” x 10 = 24,521 Gallons
What is the Maximum Length and Maximum Width (and how much square footage) available for capture given the constraints outlined above. What is the Total SF for BMPs? Hardscape Setback 15’ from building + 3’ from sidewalk = 18’ Total Setback 50’ Width of Landscaped Area – 18’ Setback = 32’ W Total Available Neighbor Setback 10’ Total 85’ Length of Landscaped Area – 10’ Setback = 75’ L Total Available 32’W x 75’L = 2,400 SF available for capture. What is the Minimum Depth required of the BMP to capture First Flush if the entire BMP square footage is available for use? First Flush Total Gallons = 2,452 Gallons Convert Gallons to Cubic Feet = Gallons ÷ 7.48 Gal/Cu. Ft. = 2,452 Gallons ÷ 7.48 Gal/Cu. Ft. = 328 Cu. Ft. 2,400 Sq. Ft. available. 328 Cu. Ft. ÷ 2,400 SF = .136’ Depth x 12”/’ = 1.6 Inches
Completed Exercises
Watershed Wise Landscape Professional Training 232

What is the Minimum Depth required of the BMP to capture A 100 Year Storm Event if the entire BMP square footage is available for use? 100 Year Storm Event Total Gallons = 9,808 Gallons Convert Gallons to Cubic Feet = Gallons ÷ 7.48 Gal/Cu. Ft. = 9,808 Gallons ÷ 7.48 Gal/Cu. Ft. = 1,311 Cu. Ft. 2,400 Sq. Ft. available. 1,311 Cu. Ft. ÷ 2,400 SF = .55’ Depth x 12”/’ = 6.5 or 7 Inches What is the Minimum Depth required of the BMP to capture First Flush if only 100 sq. ft. is available for use? 328 Cu. Ft. ÷ 100 SF = 3.28’ Depth x 12”/” = 39 Inches What is the Minimum Depth required of the BMP to capture Annual Average Precipitation if only 100 sq. ft. is available for use? 1,311 Cu. Ft. ÷ 100 SF = 13’ Depth
Completed Exercises
Watershed Wise Landscape Professional Training 233

© 2014. G3, The Green Gardens Group. All Rights Reserved.
G3 FORMULA & CONVERSION SHEET 2014 TLA = Total Landscaped Area (Distribution Uniformity is an approximation for Irrigation Efficiency, therefore IE = DU)) Plant Water Requirement = PWR = ETo x PF or ETo x Kc (PF = Kc) Annual Landscape Water Requirement In Inches = SF x ETo x Plant Factor ÷ IE Annual Landscape Water Requirement In Gallons = SF x ETo x Plant Factor ÷ IE x .62 Annual Designed Water Use Plan = SUM: [(Hydrozone1 SF x ETo x (PF ÷ IE) x .62) +
(Hydrozone2 SF x ETo x (PF ÷ IE) x .62)…] Annual Water Budget in Gallons (MAWA) = TLA x ETo x Budget Adjustment Factor x .62 Annual EPPTA Gallons = TLA x Avg. Annual Rainfall x .25 x .62 Annual G3 Water Budget = MAWA – EPPTA Plant Available Water = PAW = AWHC by Soil Type x Root Depth Inches Managed Allowed Depletion = 50% in most cases, but adjusted for site conditions Allowable Depletion = AD = MAD x PAW Irrigation Interval = AD ÷ Daily PWR Irrigation Water Requirement = IWR = (Irrigation Interval Days x Daily PWR) ÷ IE Alternative IWR Estimate = AD ÷ IE Total Irrigation Run Time = TIRT = (IWR x 60) ÷ PR First Flush Gallons = Catchment Area SF x .75 Inches x Runoff Coefficient x .62 Annual Total Runoff Gallons = Catchment Area SF x Total Inches of Rainfall x Runoff Coefficient x .62 Application Rate = Precipitation Rate = PR Inches/Hour PRDGRID = (231.1 x Emitter Flow Rate) ÷ (Emitter Spacing Inches x Row Spacing Inches) PRDRANDOM = (96.25 x Total Zone GPM) ÷ Total Zone Area SF PRSPRAY/BUBBLER = (96.25 x Total Zone GPM) ÷ Total Zone Area SF GPM = (Start Meter Reading – End Meter Reading) ÷ Minutes Test Run Lower Quarter Distribution Uniformity = DULQ = Avg. Lower Quarter Catch Observed ÷ Avg. Total Catch Observed Convert Inches of Water to Gallons of Water = Inches x .62 Convert Gallons to Cubic Feet = Gallons ÷ 7.48 Convert Cubic Feet to Cubic Yards = Cu. Ft. ÷ 27
Plant Type % of ETo (Kc) Irrigation Type Irrigation Efficiency Warm Season Turf 70 Classic Spray .55
CA Native Shrubs/VERY LOW/LOW 20 PGP/Rot Nozzle .70 MEDIUM 50 Micro-spray .70
HIGH (Water Feature or Edibles @ 100) 80 – 100 Drip Irrigation .90