site operational procedures for teom fdms analysers
TRANSCRIPT

TEOM FDMS EQUIPMENT AEAT/ENV/R/2750
SITE OPERATIONAL PROCEDURES FOR TEOM FDMS ANALYSERS
1. Introduction
A major factor in ensuring high quality from the Automatic Urban and Rural
Monitoring Network will be the regular visits to each monitoring site carried out
by locally based personnel.
This section sets out procedures to be followed by Local Site Operators in
carrying out the tasks necessary to support the operation of the Thermo TEOM
1400AB / 8500 FDMS (Filter Dynamic Measurement System) equipment used to
undertake gravimetric monitoring of airborne particulate concentrations of PM10
and, where relevant PM2.5, at sites in the UK. It outlines procedures required for
the changing of sensor unit and purge filters, together with the routine
maintenance of the equipment necessary for continued optimal performance.
Together with these routine functions, there may be instances when non-routine
site visits will be necessary, in the event of instrument or system malfunction.
Local site operators have been trained in all aspects of normal equipment
operation by the QA/QC unit. Operators must retain copies of instrument
manuals at each site, and are required to familiarise themselves with normal
operating principles and characteristics of the instrumentation.
The following sections of this manual describe step-by-step procedures that
must be followed during site visits. It is essential that the procedures be
followed as written, for routine and non-routine site visits, to ensure that
reliable and accurate air quality measurements are made.
2. Operational procedures
The FDMS unit provides particulate matter (PM) measurement that closely
correlates with gravimetric PM mass concentration, as measured with the EU
Reference Sampler. The FDMS system accounts for volatile PM that may not be
detected by earlier TEOM models. The device provides high-resolution PM mass
concentration readings for both short-term averages (one hour) as well as 24-
hour averages. The system’s basic output consists of a 1-hour average mass
concentration (in µg/m3) of PM updated every six minutes.
AEA January 2008
1

TEOM FDMS EQUIPMENT AEAT/ENV/R/2750
The FDMS unit automatically measures mass concentrations (ug/m3) that
include both non-volatile and volatile PM components.
The FDMS instrument calculates PM mass concentration average based upon
independent measurements of “base” and “reference” mass concentrations (see
3 and 4 below). The analyser constantly samples ambient air, using a switch
valve to change the path of the main flow every six minutes. The sampling
process consists of alternate sample and reference (filtered) air streams passing
through the exchangeable filter in the TEOM mass sensor.
Figure 1 gives a schematic of the process, which is described below.
1. The analyser draws air through the PM10 head in the same way as a basic
TEOM and then splits the excess flow through the Auxiliary Mass Flow
Controller.
2. The main flow then passes through a new module – a permeation dryer -
which removes water from the airstream. The air then reaches a switching
valve.
3. For six minutes, the air passes directly into the sensor unit, where PM is
collected on the filter and weighed. This is identical to the method used in
the TEOM 1400AB, except that the air is dried and the FDMS operates at
30°C, rather than 50°C. The flow of air for this part of the cycle is marked
in green in Figure 1. The average concentration over this 6 minutes is the
“base” measurement of the 12-minute cycle.
4. The switching valve then diverts the air through to a purge filter, marked in
blue in Figure 1. The main flow air passes through the drier as before, but
then passes into a cooled chamber, which is held at 4°C. The air then
passes through a filter, which retains all the PM in the airstream, but allows
any gases to pass through. This scrubbed, zero air is then returned to the
sensor unit, where it is sampled normally, to provide a baseline
measurement. The average concentration over this 6 minutes is the
“reference” measurement of the 12-minute cycle.
5. During the reference cycle, any volatile particulates that were collected during the base measurement cycle can evaporate from the sensor filter. This means that the reference cycle average is usually a small negative value, as material has been lost from the filter. The reference cycle measurement can also, on occasion be slightly positive, if gases are absorbed by PM on the filter cartridge. The FDMS uses the average base and reference concentrations to calculate an overall mass concentration for
AEA January 2008
2

TEOM FDMS EQUIPMENT AEAT/ENV/R/2750
the 12 minute cycle, according to the following example equation: Mass Concentration = Base Concentration - Reference Concentration. (example: Base=25µg/m3, Reference=-2.6µg/m3) Mass Concentration = 25 - (-2.6) = 27.6µg/m3
The exchangeable purge filter can provide a time-integrated particulate matter
sample that can be used for subsequent chemical analysis.
Figure 1 – Analyser Schematic, showing 1st generation FDMS unit (B type
drier)
AEA January 2008
3

TEOM FDMS EQUIPMENT AEAT/ENV/R/2750
3. TEOM FDMS Pre-calibration Checks
The R & P TEOM FDMS instrument has a 4 line display screen, as shown in
Figure 2. The top line displays, from left to right, current status code, current
operating mode, percentage of filter lifetime used, current RS-232 mode and
current time. This top line is fixed, whilst the other 3 lines of the display can be
used to scroll through a list of information lines displaying various parameters.
Use the cursor keys on the keypad to scroll up and down.
Figure 2 – TEOM front panel display
Two lights marked "POWER" and "STATUS" are also visible on the front panel.
Record the following checks on the precalibration checklist.
1. In normal operation, the "POWER" switch will be on and the
"STATUS" light off. Check these and record on the precalibration
checklist.
2. Check that the power supply to the FDMS unit (8500 module) is
intact by confirming that the cooler is working properly by
placing a hand close to the fins on the side (1st generation
AEA January 2008
4

TEOM FDMS EQUIPMENT AEAT/ENV/R/2750
FDMS) or rear (2nd generation FDMS) of the module. A steady air
stream should be felt.
3. Open the front door of the FDMS module and check that the filter
holder and sample tube are connected securely (1st generation
only – access to the connections is not possible on the 2nd
generation modules).
4. Record current status code, current operating mode, percentage
of filter lifetime used, current RS-232 mode and current time
from the top line.
5. Record the first three information lines in the appropriate space
on the precalibration checklist.
6. Press ↓ to scroll through all information lines and record the
information.
7. Press ↑ to return to the top of the information lines.
8. Record the pump vacuum measurement. This must be between
–20 and –30 in Hg. MU must be informed if the result is outside
these limits
4. TEOM FDMS Routine Maintenance
Two filters need to be changed routinely on the TEOM FDMS unit:
• Sensor Unit filter (normal TEOM filter in the sensor unit)
• Purge filter located in the FDMS main enclosure
The TEOM sensor unit filter and the purge filter in the FDMS main enclosure
must be changed together when the "percentage of filter lifetime used", as
shown on the top line of the instrument display is 90% or greater. The filters
supplied for the TEOM purge filters must only be used for this purpose. The
sample inlet filters supplied for the other analysers must NOT be used. It is
recommended that the filter boxes are stored in the sensor unit of the TEOM
analyser so they are pre-conditioned before they are changed with existing
filters.
AEA January 2008
5

TEOM FDMS EQUIPMENT AEAT/ENV/R/2750
Whenever the filters are changed, the PM10 head must be cleaned as detailed
below. Since the analyser requires at least one hour to stabilise after filter
cartridge changing, it is recommended that this operation be undertaken before
the calibration of the gas analysers.
4.1 Cleaning the PM10 Head
The PM10 head is located on the sample inlet tube above the roof of the
monitoring station. Use the ladder, with due regard to personal safety, to gain
access to the cabinet roof. Extra care should be taken if raining as the roof of
the cabinet may be slippery when wet. Ingress of rain into the sample inlet
must be avoided, and consideration should be given to postponing cleaning the
head if this is likely.
The PM10 inlet needs to be cleaned each time the TEOM FDMS filters are
changed to ensure optimal performance. The cleaning materials required are a
small brush, lint free tissues, cotton buds, Decon 90 (1% in H2O), silicon
grease, and distilled water. All components are to be cleaned by soaking Decon
90 on lint-free tissues or cotton buds. The component should then be rinsed
with distilled water to remove any Decon 90 and wiped dry with a lint-free
tissue.
4.2 Removing the PM10 Head
1. Switch the TEOM FDMS "out of service" switch to ON. For sites without
out of service switches, press the <Data Stop> button on the instrument
front panel. This will flag any subsequent data as invalid.
2. Carefully lift the complete PM10 head assembly from the TEOM inlet tube.
3. Protect the inlet tube so that rain or snow cannot enter at any time
whilst the head is removed, and take the head inside the monitoring
cabinet.
3. Separate the upper and lower inlet halves by unscrewing the acceleration
assembly from the collector assembly as shown in Figure 3.
AEA January 2008
6

TEOM FDMS EQUIPMENT AEAT/ENV/R/2750
Figure 3 – PM10 inlet assembly
4.3 Cleaning the Acceleration Assembly
1. Mark the upper and lower plates of the assembly with a pencil so that
the unit can be correctly aligned on reassembly.
2. Unscrew the four Philips screws from the top plate and remove the top
plate and four spacers.
3. Clean the top plate, deflector cone, insect screen, internal walls and the
underside plate.
4. Inspect the large diameter o-ring for wear and replace if necessary.
Wipe any grease off with a tissue, and apply a thin coating of fresh
silicon grease to the o-ring and the aluminium threads.
5. Careful reassemble, using the pencil marks to align the top and bottom
plates.
AEA January 2008
7

TEOM FDMS EQUIPMENT AEAT/ENV/R/2750
4.4 Cleaning the Collector Assembly
1. Clean the walls, the three vent tubes and the base of the assembly with
a lint-free cloth soaked in Decon 90. Rinse with distilled water.
2. Use cotton buds and Decon 90 to clean the three vent tubes, base of the
assembly and weep hole in the collector plate where the moisture runs
out to the moisture trap. Rinse with distilled water.
3. Disconnect rain jar assembly from lower collector plate assembly. Clean
inside brass tube with cotton buds and Decon 90. Rinse with distilled
water.
4. Remove the rain jar and clean. For units with a cork sealing ring inside
the cap of the jar, put a thin coating of silicon grease on the gasket and
install the jar. If the sealing gasket is neoprene, no silicon grease is
required.
5. Reconnect rain jar assembly to lower collector assembly. Ensure rain jar
is sitting vertically.
6. Inspect the two inlet tube o-rings for wear and replace if necessary.
Wipe off any grease present, and apply a thin coating of fresh silicon
grease to the o-rings.
7. Clean the internal threads of the assembly with Decon 90 on a lint-free
tissue.
4.5 Replacing the Head
1. Screw the Acceleration and Collector assemblies together until the
threads are hand tight. DO NOT OVER-TIGHTEN
2. Place the complete assembly back onto the TEOM FDMS inlet tube.
4.6 TEOM Sensor Unit Filter Exchange Procedure
1. Refer to Figures 4 and 5 when following the instructions for filter
exchange. It is recommended that the TEOM sensor unit filter box is
stored in the sensor unit of the TEOM analyser so they are pre-
conditioned before changing.
AEA January 2008
8

TEOM FDMS EQUIPMENT AEAT/ENV/R/2750
2. Check that the TEOM 'out of service' switch is ON. For sites without out
of service switches, press the <Data Stop> button on the instrument
front panel. This will flag any subsequent data as invalid.
3. Open the door of the TEOM sensor unit.
4. Carefully lift the clip on the front of the mass transducer to allow the
transducer to open into its filter changing position and expose the filter.
5. Carefully insert the filter exchange tool under the used filter cartridge so
that the filter disk is between the fork and the upper plate of the tool
(with the hub of the filter between the tines of the lower form). Gently
lift the filter from the tapered element with a straight pull - DO NOT
TWIST OR PULL SIDEWAYS.
6. Check with Management Unit whether the filter cartridge is to be sent off
for analysis. If so place in storage, otherwise discard the exposed
cartridge and wipe clean the exchange tool with a tissue.
7. There are two storage locations in the transducer unit that hold fresh
filter cartridges. Use the exchange tool to remove one of these - DO NOT
TOUCH THE FILTER SURFACE WITH YOUR FINGERS.
8. Hold the new filter in line with the tapered element and lightly insert the
hub of the filter onto the tip of the tapered element. Apply a downward
pressure to set the filter firmly in place and then carefully retract the
exchange tool. Problems with excessive response noise may be
experienced if the filter is not seated correctly and firmly on the tip of the
tapered element. The filter should, therefore, be positioned with
particular care. Using the exchange tool, take a new filter cartridge from
the box and place it in the empty storage location in the transducer unit.
9. Return the mass transducer to the closed position and reseat the clip to
secure it in position.
10. Close the door of the TEOM sensor unit.
11. After 5 minutes, open the sensor unit and mass transducer again and
push down on the filter with the base of the exchange tool. This is to
ensure that no movement of the cartridge has occurred during heating of
the transducer.
AEA January 2008
9
TEOM FDMS EQUIPMENT AEAT/ENV/R/2750
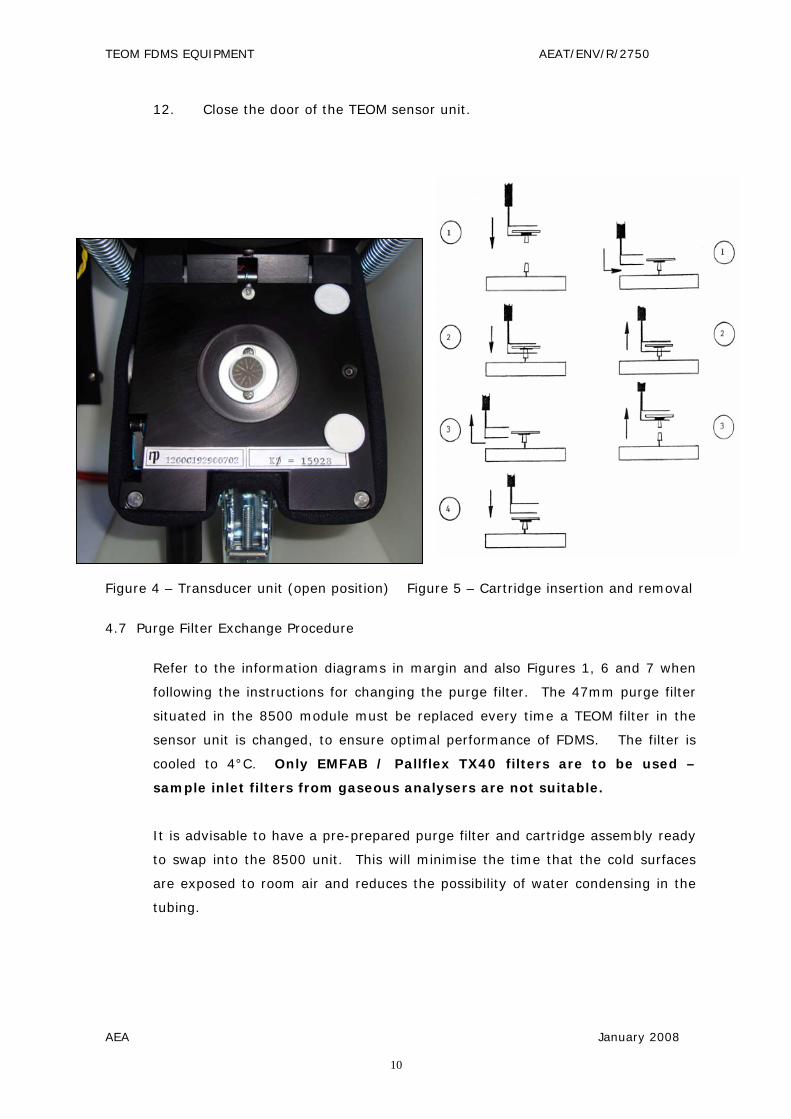
12. Close the door of the TEOM sensor unit.
Figure 4 – Transducer unit (open position) Figure 5 – Cartridge insertion and removal
4.7 Purge Filter Exchange Procedure
Refer to the information diagrams in margin and also Figures 1, 6 and 7 when
following the instructions for changing the purge filter. The 47mm purge filter
situated in the 8500 module must be replaced every time a TEOM filter in the
sensor unit is changed, to ensure optimal performance of FDMS. The filter is
cooled to 4°C. Only EMFAB / Pallflex TX40 filters are to be used –
sample inlet filters from gaseous analysers are not suitable.
It is advisable to have a pre-prepared purge filter and cartridge assembly ready
to swap into the 8500 unit. This will minimise the time that the cold surfaces
are exposed to room air and reduces the possibility of water condensing in the
tubing.
AEA January 2008
10

TEOM FDMS EQUIPMENT AEAT/ENV/R/2750
1. Check that the TEOM 'out of service' switch is ON. Press 14 and
then Enter on the TEOM control unit keyboard. This will bring up
a special display showing the current operating mode of the
FDMS. The unit MUST be in BASE mode before proceeding,
if not, either: wait until it changes from REF mode to BASE
mode (up to 6 minutes), or: press F8 on the keypad to force the
valve to change operating position.
2. Switch the power to the FDMS module OFF to lock the system in
BASE mode. The power can be switched off on the rear panel
using the switch above the power cord.
3. Open small door located on the FDMS module
4. (1st generation modules only) Disconnect the quick connect
fitting, from the filter holder on the left side of the compartment.
5. Unscrew the filter holder from the chiller and locate the blue
filter cassette with 47mm filter
6. Remove the blue filter cartridge and replace with a new pre-
prepared one. Make sure to install the 47mm filter into the
cassette so that the woven side of the filter paper is face down
on the foil. Place the cartridge into the holder with the foil back
against the inner chamber and the filter facing upwards.
7. Check with Management Unit whether 47mm filter is to be sent
off for analysis. If so place in refrigerated storage, otherwise
discard. r 8. Using a tissue, carefully wipe away any moisture that might be
C type driepresent in and around the filter chamber making sure no loose
fibres or tissue are left behind. Check the condition of the ‘V’ seal
and if damaged either replace it or report it to CMCU.
9. Install filter holder back into chiller and connect the quick-
connect fitting onto the filter holder (1st generation modules
only). Shut door.
10. Turn on the FDMS unit again. Press <F1> on the TEOM control
unit and allow one hour for system to reset.
11. Switch the TEOM 'out of service' switch to 'off'.
12. After one hour check that TEOM mass concentration returns to
ambient levels. Scroll down to view the frequency value and
examine how stable the response is. If very high or negative
concentrations are displayed, or if the frequency value is not r
B type driestable (ie if it changes by more than 0.001Hz in a 2 minute
AEA January 2008
11

TEOM FDMS EQUIPMENT AEAT/ENV/R/2750
period), reseat the tapered element filter cartridge (see section
4.6) and press <F1> again, waiting for a further hour for the
analyser to return to normal operation. If the instrument still
does not return to normal operation, contact MU.
Figure 6 – C type FDMS unit Figure 7 – C type Purge filter
4.8 Cleaning the PM2.5 Sharp Cut Cyclone (SCC) (where fitted)
PM2.5 analysers have an additional module placed in the sample stream to
remove particulate matter larger than 2.5 microns. This unit is called a sharp
cut cyclone (SCC), shown in Figure 8. In addition to the routine cleaning of the
PM10 sample inlet, it will be necessary for local site operators to clean the SCC
used on FDMS units measuring PM2.5
Holding the SCC unit upright in the position which it has been removed from its
‘plug-in’ position, pull the 180o size separation unit from the side of the main
accelerator chamber.
The separation unit can be cleaned simply by blowing into the orifice at the top
of the unit.
AEA January 2008
12

TEOM FDMS EQUIPMENT AEAT/ENV/R/2750
Unscrew the knurled plug on the side of the SCC and clean the walls of the main
accelerator chamber with a lint free cloth soaked in Decon 90. Wipe clean with a
dry lint-free tissue.
Once cleaned, refit the knurled plug, push the separation unit back into position
on the accelerator chamber and re-locate the SCC unit into its plug-in position.
Figure 8 Sharp Cut Cyclone - PM2.5 shown in stand alone profile and in
conjunction with a PM10 sampling head.
AEA January 2008
13