sitepad reference guide - florida department of ... sitepad users...trns•port sitemanager®...
TRANSCRIPT

SitePad Reference Guide
Release 1.0
November 2001
Trns•port SiteManager® Credit SitePad Reference Guide
ii November 2001
Credit Prepared for AASHTO by
5700 SW 34th Street Suite 1235
Gainesville, Florida 32608-5371 Phone (352) 375-7624
Fax (352) 373-9586 E-mail [email protected]
Internet www.infotechfl.com
Trns•port, Trns•port BAMS/DSS, Trns•port CES, Trns•port Estimator, and Trns•port Expedite are trademarks of the American Association of State Highway Transportation Officials (AASHTO) and represent one or more proprietary products of AASHTO.
Trns•port SiteManager PES, LAS and CAS are registered trademarks of the American Association of State Highway and Transportation Officials (AASHTO) and represent one or more proprietary products of AASHTO.
DS/Shell, DS/RTF, Estimator, and Expedite are trademarks of Info Tech, Inc., and represent the proprietary products of Info Tech.
Microsoft, Microsoft Forms, Forms95, Microsoft SQL Server, Microsoft LAN Manager, and MS-DOS are trademarks of Microsoft Corporation.
SAS, SAS/ACCESS, SAS/AF, SAS/ASSIST, SAS/CONNECT, SAS/FSP, SAS/GRAPH, SAS/STAT, SAS/SHARE, and MVA are registered trademarks of SAS Institute, Inc., Cary, North Carolina, and represent the proprietary products of SAS Institute.
IBM, OS/2, SQL/DS, ISPF, ISPF/PDF, MVS, TSO, VM, CMS, CICS/MVS, CICS/ESA, DB2, and Database Manager are trademarks of International Business Machines Corporation (IBM).
Rdb/VMS, VAX, VMS, FMS, and RMS are trademarks of Digital Equipment Corporation (DEC).
3Com, Palm Computing, Graffiti, and HotSync are registered trademarks and PalmPilot, Palm III, Palm OS, and Palm are trademarks of Palm Computing, 3Com Corporation or its subsidiaries.
Parts Copyright 1985-2001, AASHTO. All Rights Reserved.
Copyright 1985-2001, Info Tech, Inc. All Rights Reserved.

Trns•port SiteManager® SitePad Reference Guide Table of Contents
November 2001 iii
Table of Contents 1. Introduction ............................................................................................................................ 1-1
1.1 Document Structure ........................................................................................................ 1-2 1.2 Overview......................................................................................................................... 1-3 1.3 The Palm OS Environment ............................................................................................. 1-4
1.3.1 Data Entry................................................................................................................ 1-5 2. Getting Started....................................................................................................................... 2-1
2.1 SitePad Overview ........................................................................................................... 2-2 2.1.1 Field Data Collection................................................................................................ 2-2 2.1.2 SiteManager to SitePad Data Synchronization......................................................... 2-2
2.2 Starting and Exiting SitePad ........................................................................................... 2-2 2.2.1 Starting SitePad....................................................................................................... 2-2 2.2.2 Exiting SitePad ........................................................................................................ 2-4
2.3 Navigating in SitePad...................................................................................................... 2-5 2.3.1 The Menu Bar .......................................................................................................... 2-5
3. General Concepts .................................................................................................................. 3-1 3.1 Menus............................................................................................................................. 3-2
3.1.1 General Guidelines .................................................................................................. 3-2 3.1.2 Forms Menu ............................................................................................................ 3-2 3.1.3 Edit Menu ................................................................................................................ 3-3 3.1.4 Actions Menu........................................................................................................... 3-4
3.2 The Current Contract Form............................................................................................. 3-4 3.3 Using the Find Function .................................................................................................. 3-6 3.4 Remarks ......................................................................................................................... 3-8 3.5 Special Function Buttons ................................................................................................ 3-9
3.5.1 Set Button................................................................................................................ 3-9 3.5.2 ⊕ Button .................................................................................................................. 3-9
4. Check Out.............................................................................................................................. 4-1 4.1 Overview......................................................................................................................... 4-2 4.2 Check Out — Downloading Data from the Server ........................................................... 4-3 4.3 Check Out — Zipping Files for the Inspector................................................................... 4-5 4.4 Using the SitePad Desktop Utility - ................................................................................. 4-6
4.4.1 Using Make XML ..................................................................................................... 4-6 4.5 Synchronizing Data......................................................................................................... 4-7
5. Recording Daily Work Report Data ........................................................................................ 5-1 5.1 Overview......................................................................................................................... 5-2 5.2 Creating a Daily Work Report ......................................................................................... 5-2
5.2.1 Selecting a Contract................................................................................................. 5-3 5.2.2 Copying an Existing Daily Work Report.................................................................... 5-5
5.3 Recording Daily Staff ...................................................................................................... 5-6 5.4 Recording Contractor Information ................................................................................... 5-8
5.4.1 Supervisors.............................................................................................................. 5-9 5.4.2 Personnel .............................................................................................................. 5-10 5.4.3 Equipment ............................................................................................................. 5-12
5.5 Recording Work Items .................................................................................................. 5-14 5.6 Recording Weather and Weather Conditions ................................................................ 5-23
6. Check In ................................................................................................................................ 6-1 6.1 Checking In Daily Work Reports ..................................................................................... 6-2

Trns•port SiteManager® Table of Contents SitePad Reference Guide
iv November 2001
6.2 Synchronizing Data......................................................................................................... 6-2 6.3 Use Make Zip ................................................................................................................. 6-3 6.4 Check In — Loading Zip Files......................................................................................... 6-4 6.5 Check In — Uploading Data to the Server ...................................................................... 6-5 6.6 Deleting a Contract Database......................................................................................... 6-5
7. Index......................................................................................................................................... 7

November 2001 1-1
1. Introduction
November 2001

Trns•port SiteManager® Introduction Document Structure
1-2 November 2001
1.1 Document Structure The SitePad Reference Guide is a reference document for users of the AASHTO SitePad application. The user should refer to this manual only when a question cannot be answered by SitePad’s on-line help system. This manual describes all of the SitePad components, including their purpose, functions, and how to use them. The manual’s main sections are described below. Section 1 Introduction
The Introduction describes the structure and objective of this manual. Refer to this section for an overview of the manual’s topics or to find out how this manual is intended to be used. This section also includes a brief introduction to the SitePad application, as well as a short orientation to Palm-compatible devices. Section 2 Getting Started
The Getting Started section includes information to help the user get started with SitePad. This includes information about starting and exiting SitePad and basic navigation within the application. Section 3 General Concepts The General Concepts section includes descriptions of the menus and functions that are common throughout the application. It also includes procedures for using the on-line help system. Section 4 Check Out The Check Out section describes the procedures for the exchange of data from SiteManager to SitePad. Section 5 Recording DWR Data The Recording DWR Data section includes information on entering information into SitePad. Section 6 Check In The Check In section describes the procedures for the exchange of data from SitePad back to SiteManager. Section 7 Index A topical index assists the user in finding topic-specific information or instructions.

Trns•port SiteManager® Overview Introduction
November 2001 1-3
1.2 Overview AASHTO Trns•port SitePad is a Palm OS-based field data collection application intended for use as a component of the SiteManager Construction Management System. SitePad has been designed to run on hand-held devices that utilize the Palm operating system platform. SitePad supports the collection of an inspector’s field data in Daily Work Reports, and provides a conduit program for exchanging required data with SiteManager. The type of data collected in the SitePad application is based upon SiteManager’s Daily Work Report (DWR) function. The following two functionalities are featured in SitePad:
• A Palm OS-based, hand-held application for collecting data in the field • A conduit program for transferring SiteManager specific data from SiteManager to SitePad
and vice versa. The conduit program is responsible for transferring data to and from the handheld device and converting the data to the appropriate format for the data's final destination. The conduit program is initiated whenever the user places the handheld device in the hardware cradle and presses the synch button on the cradle. Pressing the synch button starts the Palm Conduit Manager, which controls the synchronization process. SitePad presents a series of forms to the user. Each form either serves as a place to enter or view data or by offering selections from which to choose, provides the ability to navigate between data entry forms. The following forms make up SitePad:
• The SitePad logon form.
• The DWR Info form, which contains date and time information for the DWR
• The DWR Weather form, which contains weather information for the DWR
• The Staff form, which allows the user to select or add a staff person to the DWR
• The Staff Details form, which contains information about a staff person
• The DWR Remarks form, which allows the user to view or enter one or more remarks to the DWR.
• The Contractors form, which allows the user to select a contract
• The Supervisors form, which allows the user to select a supervisor to view or to add to the DWR
• The Supervisor Details form, which contains information about a supervisor
• The Supervisor Remarks form, which allows the user to view or enter remarks about a supervisor
• The Personnel form, which allows to user to select a personnel category to view or to add to the DWR
• The Personnel Details form, which contains information about a Personnel category
• The Personnel Remarks form, which allows the user to view or enter remarks about personnel
• The Equipment form, which allows the user to select an equipment category to view or to add to the DWR

Trns•port SiteManager® Introduction The Palm OS Environment
1-4 November 2001
• The Equipment Details form, which contains information about an Equipment category
• The Equipment Remarks form, which allows the user to view or enter remarks about equipment
• The Item List form, which lists all items for selection
• The Item Locations form which allows the user to select and item placement location to add or to view
• The Stationing form, which contains information about an item placement
• Three Item Info forms that contain information about an item
• Two Item Stockpile forms that contain information about an item stockpile
• The Item Remarks form, which allows the user to view or enter remarks about an item placement
• The Contracts form, which allows the user to select a contract
• The DWRs form, which allows the user to select a DWR
• Various support dialogs and forms
1.3 The Palm OS Environment
A Palm-Compatible Hand-Held Device
Figure 1-1

Trns•port SiteManager® The Palm OS Environment Introduction
November 2001 1-5
There are many companies that manufacture and distribute Palm-compatible devices. Figure 1-1 above is a generic representation of a Palm-compatible device. The items identified in Figure 1-1 are described in the table below.
ITEM DESCRIPTION SitePad icon Opens the SitePad application. Applications icon Displays the application launcher. Menu icon Displays the menu bar options for an application. Power On/Off Turns power on or off. In some models, this button also operates
a screen back light for use in dim lighting conditions. Programmable application buttons
Although these buttons come pre-programmed to launch various pre-installed applications, they may be reconfigured to launch other applications, such as SitePad. See your device’s user guide for more details on this feature.
Scroll button On some devices, this may be two buttons instead of one. Find icon Launches the Find application, allowing the user to find files
quickly. Calculator icon Launches the calculator application. Graffiti writing area This area is for the entry of data using the stylus.
The Palm Environment Table 1-1
1.3.1 Data Entry There are two methods of entering alphabetic and numeric characters into applications in the Palm environment: by using the Graffiti writing area or by using the alphabetic and numeric tappads. The Graffiti handwriting recognition software resident in the Palm OS allows the user to enter alphanumeric data simply by writing. The alphabetic and numeric tappads allow data to be entered by tapping the desired characters with the stylus. Both are described briefly in the following sections. For more extensive information on this topic, please consult your device’s user guide.
1.3.1.1 The Graffiti Writing Area Entry of alpha and numeric data may be performed by the user in the Graffiti writing area. The exact location of this area may be seen in Figure 1-1.
The Graffiti Writing Area
Figure 1-2
Trns•port SiteManager® Introduction The Palm OS Environment
1-6 November 2001
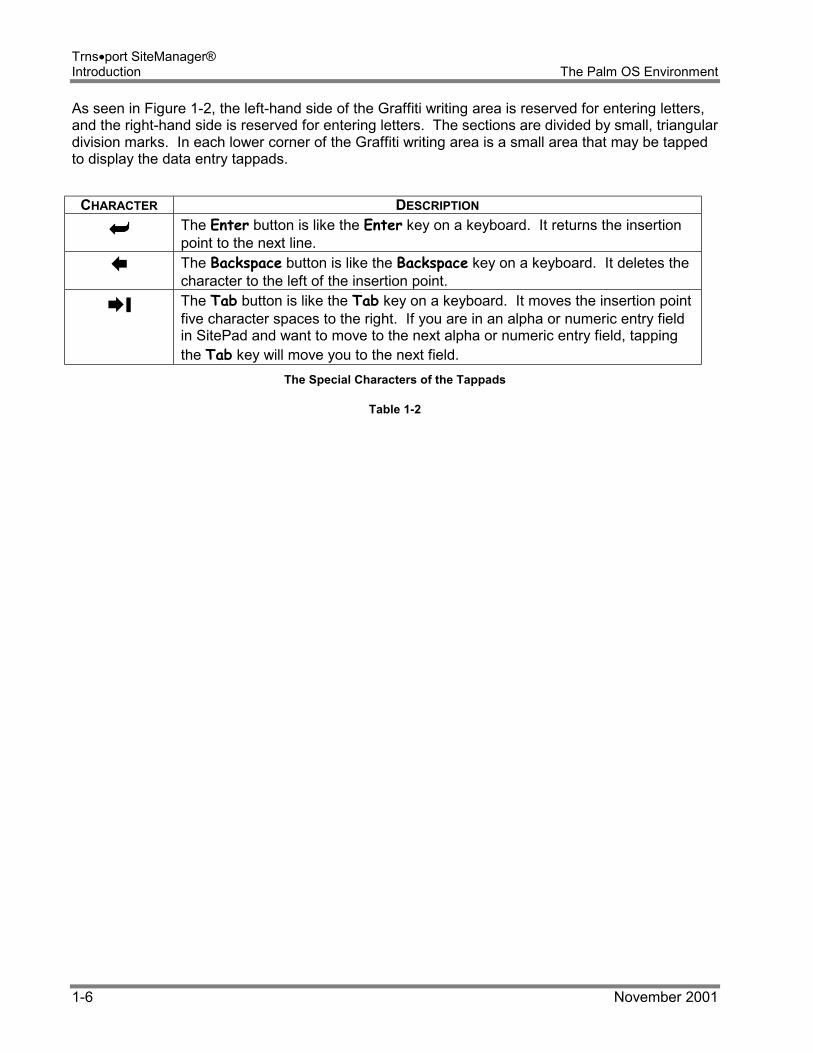
As seen in Figure 1-2, the left-hand side of the Graffiti writing area is reserved for entering letters, and the right-hand side is reserved for entering letters. The sections are divided by small, triangular division marks. In each lower corner of the Graffiti writing area is a small area that may be tapped to display the data entry tappads.
CHARACTER DESCRIPTION
The Enter button is like the Enter key on a keyboard. It returns the insertion point to the next line.
The Backspace button is like the Backspace key on a keyboard. It deletes the character to the left of the insertion point.
❙ The Tab button is like the Tab key on a keyboard. It moves the insertion point five character spaces to the right. If you are in an alpha or numeric entry field in SitePad and want to move to the next alpha or numeric entry field, tapping the Tab key will move you to the next field.
The Special Characters of the Tappads
Table 1-2

Trns•port SiteManager® The Palm OS Environment Introduction
November 2001 1-7
1.3.1.2 Using Graffiti The quickest method for entering data in the Palm environment is Graffiti. Using the stylus, the user simply writes the data in the appropriate section of the Graffiti writing area. Graffiti is similar to regular printing, but has some unique differences in strokes used to form the characters. The table below illustrates how each alphanumeric character should be formed. The heavy dot on each shape indicates the beginning of the stroke.
GRAFFITI LETTER GRAFFITI LETTER GRAFFITI NUMBER A A N N 0 0 B B O O 1 1 C C P P 2 2 D D Q Q 3 3 E E R R 4 4 F F S S 5 5 G G T T 6 6 H H U U 7 7 I I V V 8 8 J J W W 9 9 K K X X L L Y Y M M Z Z
Graffiti Letters and Numbers Table 1-3
GRAFFITI PUNCTUATION GRAFFITI OPERATOR GRAFFITI FUNCTION
. Punctuation Shift
= = , Enter
. Period / / - Space
¸ Comma + + Backspace
( Open Parenthesis
_ - Tab
) Close Parenthesis
* *
Graffiti Punctuation, Operators, and Functions
Table 1-4
Note: Graffiti includes any character you can type on a standard computer keyboard. For more details on how to form additional symbols and text, please refer to your device’s user guide.

Trns•port SiteManager® Introduction The Palm OS Environment
1-8 November 2001
Tip: Some Palm-compatible devices include a game that allows users to practice writing Graffiti characters. See individual device user guides for more information.
1.3.1.3 Using Tappads On-screen tappads may also be used to enter data. There are two separate tappads - an alphabetic tappad and a numeric tappad. To display a tappad, tap the stylus in the appropriate corner of the Graffiti writing area (see Figure 1-2). When you are finished, tap the Done button.
The Alphabetic Tappad
Figure 1-3
The Numeric Tappad Figure 1-4
To enter alphabetic and numeric characters using the tappads:
1. Tap the alphabetic icon in the left corner of the Graffiti writing area; or the numeric icon in the right corner of the Graffiti writing area.
2. Tap the desired letters or numbers on the tappad.
3. To switch between the alphabetic and numeric tappads, tap either the abc button or the 123 button.
4. When finished, tap the Done button.
For more information on how to use the alpha and numeric keypads, please refer to your device’s user guide.

November 2001 2-1
2. Getting Started
November 2001

Trns•port SiteManager® Getting Started SitePad Overview
2-2 November 2001
2.1 SitePad Overview
2.1.1 Field Data Collection SitePad is intended for use by inspectors in the field. Data that may be collected and recorded consists of the following:
• Weather conditions • Work suspend/resume times • Remarks • Contractor information • Daily Staff information • Contractor Supervisor details • Contractor Equipment details (including remarks) • Installed work item information
Other information that may be displayed on SitePad forms includes the DWR authorization indicator and DWR authorization date. Contractor and Daily Staff information may be copied from an existing DWR to a new DWR, including any associated remarks. The data that may be collected when recording Installed Work consists of plan page number, additional stationing information, measured indicator, and selection of a subcontractor for a particular work item. Remarks may be entered for each item installed. Access to unit pricing may also be displayed, depending upon the assigned security attributes for individual users. SitePad’s field data collection application is not intended to replace the Daily Work Report function of SiteManager. SitePad currently does not support such DWR functions as force accounts, OLE documents, DWR templates, or Plug-Ins. Although information such as Contractors and Installed Work can be recorded in SitePad, these previously mentioned functions must be carried out utilizing SiteManager’s more complete Daily Work Report functionalities.
2.1.2 SiteManager to SitePad Data Synchronization The Palm OS environment terms the program responsible for transferring data to and from the handheld device a conduit. When data is to be transferred to the Palm, the conduit is responsible for creating data records in a specific format used by the Palm database facility. The conduit program is initiated whenever the user places the handheld device in the hardware cradle and presses the synch button on the cradle. The conduit will only download active equipment, supervisors, personnel and items for a contract. DWRs created by other inspectors will be downloaded as read-only and will be available for review or for copying.
2.2 Starting and Exiting SitePad
2.2.1 Starting SitePad SitePad has been designed to run on hand-held devices that utilize the Palm operating system. You will start SitePad the same way you would any application on your Palm-compatible hand-held device. The SitePad application is located with its own icon (a bulldozer) displayed in the Application Launcher, as illustrated in Figure 2-1.

Trns•port SiteManager® Starting and Exiting SitePad Getting Started
November 2001 2-3
Application Launcher Screen
Figure 2-1
To start the SitePad application:
1. Tap the Application button on the data entry area of the handheld’s screen. The Application Launcher will appear.
2. Tap the SitePad icon. The SitePad Logon form will appear.
3. Tap the Password field.
4. In the Graffiti entry area, enter your password.
5. Tap the Logon button.
SitePad Logon Form
Figure 2-2

Trns•port SiteManager® Getting Started Starting and Exiting SitePad
2-4 November 2001
The Logon Form's User ID field is not editable in SitePad. The User ID is specified at the time data is downloaded to the handheld device. The password will display when entered by the user, since Graffiti is more error-prone than a traditional keyboard. Passwords may not be changed in SitePad. To change a password, the change must be made in SiteManager, and the new password will be passed to SitePad at the next synchronization.
2.2.2 Exiting SitePad The Action menu’s Exit SitePad choice allows you to end your SitePad work session and exit the application. It is not always necessary to exit SitePad when turning off the handheld device. When the device is turned off, the same form appears when the device is turned back on.
Actions Menu on Menu Bar Figure 2-3
To exit the SitePad application:
1. Tap the Menu button on the data entry area of the handheld’s form. The menu bar will appear.
2. Tap the Actions choice on the menu bar, then tap the Exit SitePad menu choice.
3. Tap the Yes button.
SitePad Logout Form
Figure 2-4

Trns•port SiteManager® Navigating in SitePad Getting Started
November 2001 2-5
2.3 Navigating in SitePad
2.3.1 The Menu Bar The Menu bar is used to navigate through the various functions of the SitePad application. Each item on the menu bar has an associated drop-down menu that lists the functions associated with that item.
The Menu Bar
Figure 2-5
To display the Menu bar:
1. Tap the Menu button on the data entry area of the hand-held device.
Trns•port SiteManager® Getting Started Navigating in SitePad
2-6 November 2001
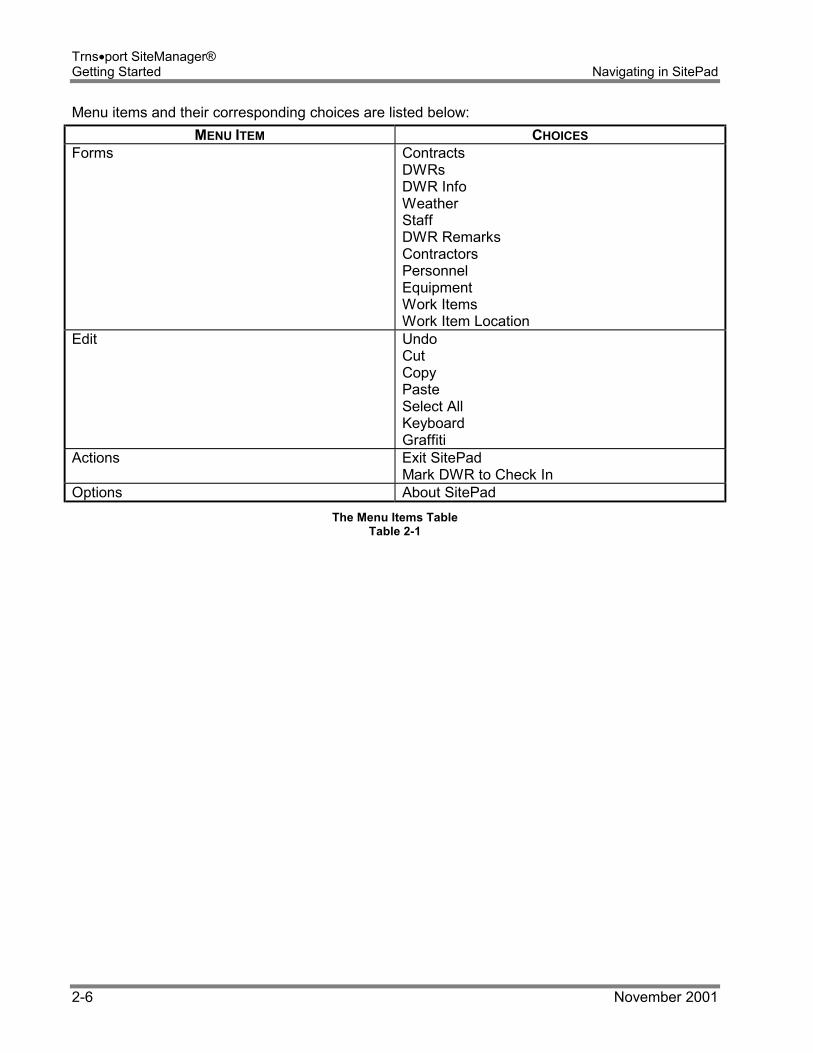
Menu items and their corresponding choices are listed below: MENU ITEM CHOICES
Forms Contracts DWRs DWR Info Weather Staff DWR Remarks Contractors Personnel Equipment Work Items Work Item Location
Edit Undo Cut Copy Paste Select All Keyboard Graffiti
Actions Exit SitePad Mark DWR to Check In
Options About SitePad The Menu Items Table
Table 2-1

November 2001 3-1
3. General Concepts
November 2001

Trns•port SiteManager® General Concepts Menus
3-2 November 2001
3.1 Menus
An Example of SitePad Menus
Figure 3-1
3.1.1 General Guidelines The following guidelines apply to the use and structure of SitePad.
• All of SitePad’s data entry functions are located in the Forms Menu. • Tapping the bulldozer in the upper right of all SitePad forms will display the currently
selected contract information. • Remarks are available on several forms - general DWR remarks, Staff, Equipment, Work
Items, and Supervisors. • Functions available on the Contractors List form can also be accessed through the Forms
menu. • All Daily Work Report information may be recorded in SitePad except Force Accounts, DWR
Templates, External Documents, and Plug-Ins. • Tapping the Back button on any form where it is available will navigate back to the previous
form.
3.1.2 Forms Menu
The Forms Menu
Figure 3-1

Trns•port SiteManager® Menus General Concepts
November 2001 3-3
The Forms menu allows the user to navigate to SitePad’s functional areas. The following table documents the choices associated with the Forms menu item:
MENU CHOICE DESCRIPTION Contracts Displays a list of all contracts currently loaded into the hand-held device.
The user must have more than one contract loaded into the device to use this form.
DWRst Displays a list of all Daily Work Reports associated with a particular contract that is currently loaded into the hand-held device.
DWR Info The main Daily Work Report information form.
Weather Allows the user to enter Weather-related data for a particular Daily Work Report.
Staff Displays the Staff Member master list for the current contract.
DWR Remarks Displays the DWR Remarks form, where general remarks may be entered.
Contractors Lists the contractors and subcontractors available for the contract selected.
Personnel Displays the Personnel master list for the current contract.
Equipment Displays the Equipment master list for the current contract.
Work Items Displays the list of work items available for the selected contract.
Work Item Location Displays the Location list for the current contract
Forms Menu Choices Table 3-2
3.1.3 Edit Menu
The Edit Menu Figure 3-2
The Edit menu contains those commands which are common to most Palm OS applications. The following table documents the choices associated with the Edit menu item:
MENU CHOICE DESCRIPTION Undo Reverses the action of the last edit command.

Trns•port SiteManager® General Concepts The Current Contract Form
3-4 November 2001
Cut Removes highlighted text and makes it available to paste elsewhere.
Copy Copies highlighted text and makes it available to paste elsewhere.
Paste Inserts text that was either cut or copied at a selected point.
Select All Selects all text on the current record or form for the purpose of cutting or copying.
Keyboard Opens the on-form keyboard for data entry
Graffiti Opens the help topic for Graffiti character strokes.
Edit Menu Choices Table 3-3
3.1.4 Actions Menu
The Actions Menu
Figure 3-3
The Actions menu allows the user to log out of SitePad, save a Daily Work Report, mark a DWR for check in, and list messages. The following table documents the choice associated with the Actions menu item:
MENU CHOICE DESCRIPTION Exit SitePad Allows the user to exit the SitePad application.
Mark DWR to Check In Flags the DWR as ready to check in to the SiteManager database and locks it against further changes.
Action Menu Choices Table 3-4
3.2 The Current Contract Form The use of a handheld device differs from using a desktop computer in several ways. One of the differences is that the handheld device must hibernate more often in order to conserve battery power. Also, handheld devices are often closed and reopened without exiting the application. These factors necessitate the ability for the user to be able to quickly identify where he or she left off using the device.

Trns•port SiteManager® The Current Contract Form General Concepts
November 2001 3-5
Due to the limited size of Palm OS forms, it is not always possible to display the contract and current user ID information on the current form. To allow the user to view which contract information is currently being viewed, edited, or entered, the Current Contract form is available on every form in SitePad. This read-only information is displayed when the SitePad icon (a bulldozer) is tapped.
The Current Contract Form
Figure 3-4
This box displays data for the most currently selected values for the User ID that created the selected DWR as well as the selected Contract, Project, DWR, Contractor, Item, and Location. If any of these values have not yet been selected, the field will be blank. When the user taps OK, the form will close and display the previous form.

Trns•port SiteManager® General Concepts Using the Find Function
3-6 November 2001
FIELD DESCRIPTION Userid The user ID of the person currently logged into the handheld device.
Contract The transportation agency-defined contract ID of the currently selected contract.
Fed/St Prj Nbr The Federal or State Project Number
DWR The date of the DWR.
Contractor The prime contractor for the currently selected contract.
Item The most currently selected item.
Location The last location against which an item was recorded.
Current Contract Form Fields Table 3-5
To display the Current Contract form:
1. Tap the SitePad icon.
2. When finished viewing the information, tap OK.
3.3 Using the Find Function To make data entry and retrieval easier, SitePad provides a Find capability throughout the application. The Find function provides users with the ability to limit the data retrieved from a list by specifying criteria using the first few characters of an entry, or by filtering criteria applied against a specific field or fields. A list with the capability of using the Find function will have the Find button displayed on the form. Tapping the Find button will display a form where criteria may be entered. Depending upon the list context, one of two Find forms is available to the user. The Simple Find form appears on all list-type forms except the Item List form, and only allows the user to search on one criteria. The more complex extended Find capability on the Item List form allows the user to Find, Filter, or Sort on a series of differing criteria.

Trns•port SiteManager® Using the Find Function General Concepts
November 2001 3-7
The Simple Find Form
The Extended Find Form
To Find a list entry (simple Find):
1. Tap the Find button.
2. Tap the Find Starting With field and input the desired text.
3. Tap OK.
To Find, Filter, or Sort the Item List (extended Find):
1. Tap the Find button.
2. Tap the Find Item Description starting with field and input the desired text.
OR Tap the Find Item Code starting with field and input the desired text. OR
Tap the down arrow to the left of the Filter Fields label and tap the desired field. Tap
the for field and input the desired text.
3. Tap OK.

Trns•port SiteManager® General Concepts Remarks
3-8 November 2001
3.4 Remarks
The DWR Remarks Form
Figure 3-5
Remarks are available on several SitePad functions. Remarks may be entered for Staff, Supervisors, Equipment, Work Items, and general DWR remarks. General DWR remarks have a drop down list of remark types that may be entered individually. When remarks are existing, the remark type will have a small square indicator to the left of it. When entering remarks of any kind, it is helpful to keep in mind that the maximum size of any remarks field is 32 KB. To enter a DWR remark:
1. On the DWR Info form, tap the Remarks button.
2. In the Type droplist, click the expand arrow to the left of the list label and tap the desired Remark type.
3. Tap the first line of Remark entry area and enter the desired text.

Trns•port SiteManager® Special Function Buttons General Concepts
November 2001 3-9
3.5 Special Function Buttons
3.5.1 Set Button The set button activates a form which, depending upon the type of field is being entered, displays either a time setting function or a calendar function. The data being entered can be selected on either of these displays and will automatically be transferred to the field.
The Set Date Form
Figure 3-6
The Set Time Form
Figure 3-7
To set a date using the Set feature:
1. Tap the Set button. The Set Date form will appear.
2. To set the year, tap either the or buttons to scroll to the desired year. 3. Tap the desired month, and tap the desired date.
Tip: To select today's date, tap the Today button. The default value for date fields in SitePad is the current date. To set a time using the Set feature:
1. Tap the Set button. The Set Time form will appear.
2. To set the time, tap the up or down arrow keys to the right of the time field.
3. Tap the AM or PM button, and tap OK.
Tip: The current time is the default value for time fields. The time format is defined by system settings.
3.5.2 ⊕⊕⊕⊕ Button When a user taps the ⊕ button next to a field, a list of the last 10 entries of the same type entered by the user on this handheld, regardless of contract or DWR, will display for selection. For example, when the user taps the ⊕ button next to the Work Code field, a list of the last 10 work codes entered will display. The user may then select a work code from the list to be entered into the field. This option is available on various fields throughout SitePad.

Trns•port SiteManager® General Concepts Special Function Buttons
3-10 November 2001
This page intentionally left blank.

November 2001 4-1
4. Check Out
November 2001

Trns•port SiteManager® Check Out Overview
4-2 November 2001
4.1 Overview Just as Pipeline & Zip is used to transfer data to and from a laptop so that an Inspector or Project Manager can work in Standalone mode, Pipeline & Zip is also used to transfer data to and from SitePad. To create convert data from the Pipeline & Zip process into SitePad compatible data, two SitePad utilities will be used:
• Make XML • Make Zip
Additionally, the Palm desktop application must also be used to synchronize the data.
WARNING! You must complete a Palm synchronization as well as run MakeZip prior to installation new contract data on the Palm. Failure to do so may result in loss of data. The following table shows how the Project Manager and Inspector use the Pipeline and Zip panels to transfer data.
Process
Pipeline and Zip Panel
Other component
Step 1 The Project Manager/Inspector selects and downloads:
Contracts DWR’s User ID’s
The Project Manager/Inspector copies the SZP file to a secure location.
Server to PM Pipeline panel
--
Step 2 The Project Manager/Inspector zips:
Contracts DWR’s
PM to Inspector Zip panel
(standalone connection)
--
Step 3 The Project Manager/Inspector converts to an XML format:
Contracts DWR’s Reference data
-- SitePad Make XML Utility
Step 4 The Project Manager/Inspector synchronizes the checked out data with the handheld
Palm Desktop
Step 5 The Project Manager/Inspector uses the data on the handheld to record data
-- --
Step 6 The Project Manager/Inspector checks the DWR for Check In
-- SitePad
Trns•port SiteManager® Check Out — Downloading Data from the Server Check Out
November 2001 4-3
Process
Pipeline and Zip Panel
Other component
Step 7 The Project Manager/Inspector synchronizes the data with the workstation
-- Palm Desktop
Step 8 The Project Manager/Inspector converts the XML data into a Zip format
-- SitePad Make Zip Utility
Step 9 The Project Manager/Inspector loads the zip files into the standalone workstation’s database.
PM/Inspector’s Load panel
(standalone connection)
--
Step 10 The Project Manager/Inspector selects and uploads activity data from the standalone workstation to the server.
PM to Server Pipeline panel
--
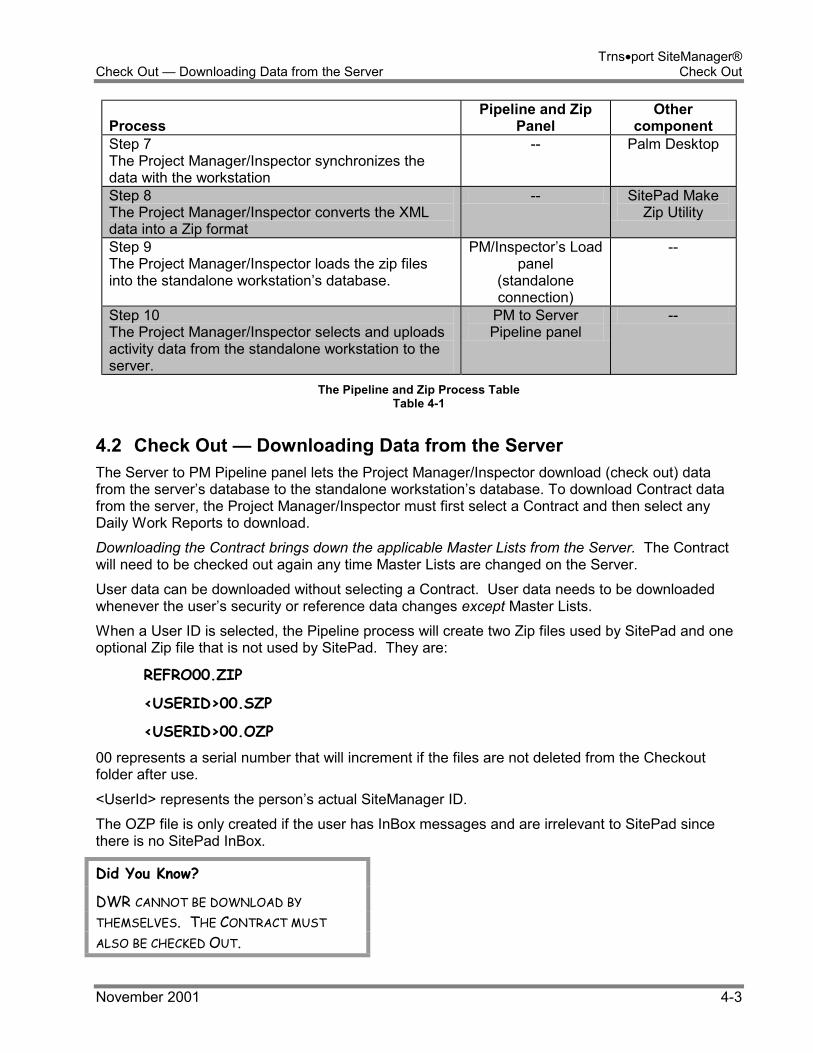
The Pipeline and Zip Process Table Table 4-1
4.2 Check Out — Downloading Data from the Server The Server to PM Pipeline panel lets the Project Manager/Inspector download (check out) data from the server’s database to the standalone workstation’s database. To download Contract data from the server, the Project Manager/Inspector must first select a Contract and then select any Daily Work Reports to download. Downloading the Contract brings down the applicable Master Lists from the Server. The Contract will need to be checked out again any time Master Lists are changed on the Server. User data can be downloaded without selecting a Contract. User data needs to be downloaded whenever the user’s security or reference data changes except Master Lists. When a User ID is selected, the Pipeline process will create two Zip files used by SitePad and one optional Zip file that is not used by SitePad. They are:
REFRO00.ZIP
<USERID>00.SZP
<USERID>00.OZP
00 represents a serial number that will increment if the files are not deleted from the Checkout folder after use. <UserId> represents the person’s actual SiteManager ID. The OZP file is only created if the user has InBox messages and are irrelevant to SitePad since there is no SitePad InBox.
Did You Know?
DWR CANNOT BE DOWNLOAD BY THEMSELVES. THE CONTRACT MUST ALSO BE CHECKED OUT.

Trns•port SiteManager® Check Out Check Out — Downloading Data from the Server
4-4 November 2001
The Server to PM Pipeline Summary Folder Tab
Figure 4-1
To download data from the server that is applicable to SitePad:
1. When logging on to SiteManager, connect to the Server.
2. On the SiteManager main panel, double-click the Pipeline and Zip icon.
3. On the Pipeline and Zip panel, double-click the Server to PM Pipeline icon. The Pipeline Summary folder tab is displayed.
4. To select a Contract, click the Open button.
5. In the Contract ID list box, scroll to and double-click the Contract.
6. To download Basic Contract Data, click the Basic Contract Data check box (ON).
7. In the DWR list box, shift-click each Daily Work Report to be downloaded.
8. Click the Add button. The selected Daily Work Reports are added to the Selected DWRs list.
9. In the Users list box, shift-click each User ID to be downloaded.
10. Click the Add button. The selected User IDs are added to the Selected Users list.
11. Click the Pipeline Summary folder tab. The panel displays the total number of Change Orders, Force Accounts, Diaries, Daily Work Reports, and users selected.
The Basic Contract Data includes all Contract data usable by SitePad.
Materials data cannot be downloaded to SitePad.
The Pipeline Status field shows the activity and complete status of the pipeline process.
Trns•port SiteManager® Check Out — Zipping Files for the Inspector Check Out
November 2001 4-5
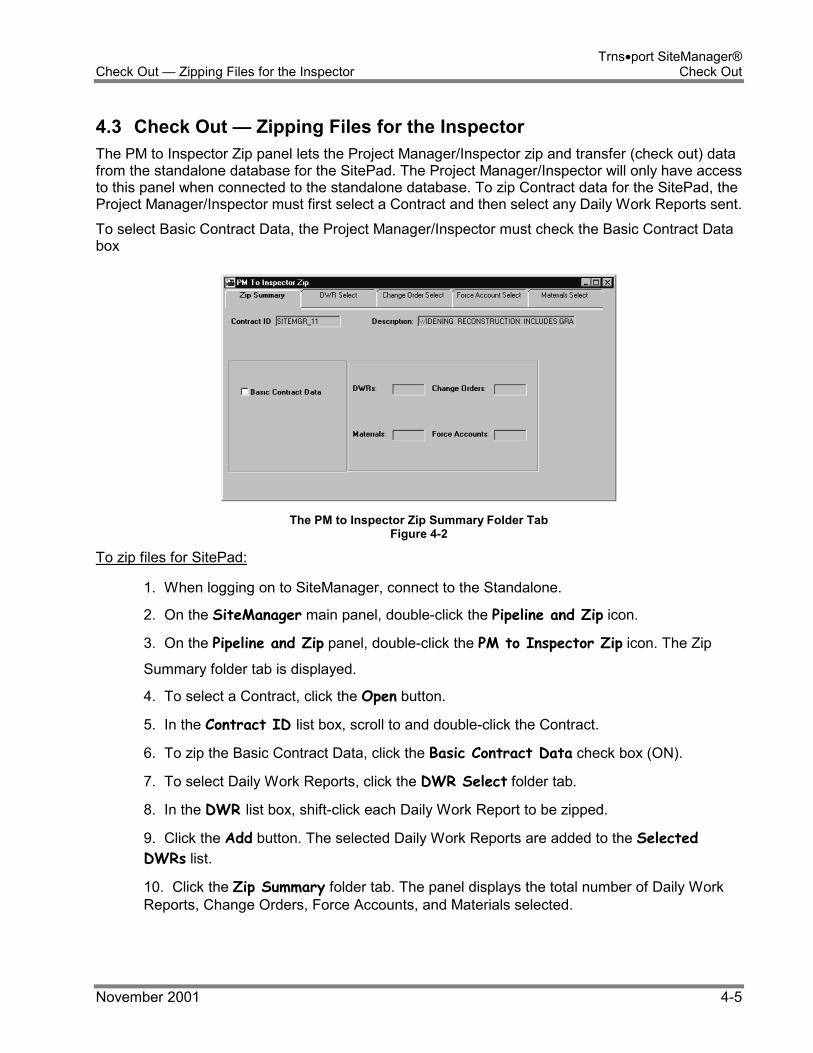
4.3 Check Out — Zipping Files for the Inspector The PM to Inspector Zip panel lets the Project Manager/Inspector zip and transfer (check out) data from the standalone database for the SitePad. The Project Manager/Inspector will only have access to this panel when connected to the standalone database. To zip Contract data for the SitePad, the Project Manager/Inspector must first select a Contract and then select any Daily Work Reports sent. To select Basic Contract Data, the Project Manager/Inspector must check the Basic Contract Data box
The PM to Inspector Zip Summary Folder Tab
Figure 4-2
To zip files for SitePad:
1. When logging on to SiteManager, connect to the Standalone.
2. On the SiteManager main panel, double-click the Pipeline and Zip icon.
3. On the Pipeline and Zip panel, double-click the PM to Inspector Zip icon. The Zip
Summary folder tab is displayed.
4. To select a Contract, click the Open button.
5. In the Contract ID list box, scroll to and double-click the Contract.
6. To zip the Basic Contract Data, click the Basic Contract Data check box (ON).
7. To select Daily Work Reports, click the DWR Select folder tab.
8. In the DWR list box, shift-click each Daily Work Report to be zipped.
9. Click the Add button. The selected Daily Work Reports are added to the Selected DWRs list.
10. Click the Zip Summary folder tab. The panel displays the total number of Daily Work Reports, Change Orders, Force Accounts, and Materials selected.

Trns•port SiteManager® Check Out Using the SitePad Desktop Utility -
4-6 November 2001
11. To zip the selected data, click the Services menu and click the Create Zip Files choice. The selected data is extracted from the Project Manager's workstation. The zip files are created in the C:\smapp\checkout subdirectory.
Make XML Conversion Program
Figure 4-3
4.4 Using the SitePad Desktop Utility -
4.4.1 Using Make XML In order for SiteManager zip files to be downloaded into SitePad, the zip files must first be chosen by the user and converted to the appropriate SitePad file structure.
The program that converts SiteManager zip files to SitePad data is called Make XML. It allows the user to select zip files containing data to be transferred from SiteManager to SitePad. Once the zip files have been converted, the user is prompted to begin the conversion process again. The process may be repeated as many times as necessary. When the conversion process is complete, the user clicks the Done button to exit the program.
4.4.1.1 Input The Make XML program will initial look to the Checkout directory of the default installed SiteManager directory (usually SMAPP) for its input files.
4.4.1.2 Output The Make XML program requires that the Palm Desktop application be installed first. Make XML will put its output in the correct location for Palm synchronization.
Trns•port SiteManager® Synchronizing Data Check Out
November 2001 4-7
To convert SiteManager data to SitePad data:
1. Click the Start menu, click the Programs choice, click the SitePad 1.0a choice, and click the Make XML choice.
2. Click the Browse button and select the desired contract zip file.
3. Click the OK button.
4. If no DWR files are to be converted, click the None button.
Or
5. Click the Browse button and select the desired DWR zip file.
6. Click the OK button.
7. If no reference files are to be converted, click the None button.
Or
8. Click the Browse button and select the desired reference zip file.
9. Click the OK button.
10. In the Available User list, click the user ID(s) of one or more recipients of the converted data.
11. Click the Add button.
12. To remove users from the Selected Users box, click the appropriate user ID and click the Remove button.
13. Click the Export button.
14. When complete, click the Done button.
4.5 Synchronizing Data Converted files are placed in the Palm upload directory for upload onto the handheld device at the next synchronization session. TIP: For best results, Palm, Inc. recommends using Palm Desktop version 4.0 (available for download at http://www.palm.com) when using any Palm-manufactured device.
To upload SiteManager data to SitePad: 1. Place the handheld device in the synchronization cradle.
2. Press the synch button on the cradle.
4.6 After Synchronization To avoid the situation of having a Daily Work Report locked on the server while being used for reference purposes on SitePad, the following procedure must be followed.

Trns•port SiteManager® Check Out After Synchronization
4-8 November 2001
After the DWR zip file has been used in the creation of the Palm database, the DWR zip file should be returned to the SiteManager standalone database using the PM/Inspector Load function. From the SiteManager standalone database, the DWR may then be pipelined to the server, unlocking the DWR and allowing it to be included in diaries and estimate, even though a "ghost" copy still resides in the Palm database.
November 2001 5-1
5. Recording Daily Work Report Data
November 2001

Trns•port SiteManager® Recording Daily Work Report Data Overview
5-2 November 2001
5.1 Overview Before any information may be recorded about a contract in SitePad, the basic contract data must be loaded into the SitePad database. More concerning this procedure is detailed in Section 4: The SitePad Conduit.
5.2 Creating a Daily Work Report Once data has been downloaded from SiteManager to the SitePad application, the user may begin to record Daily Work Report data in SitePad. The DWR Info form will be the first form displayed upon logon. If multiple contracts are loaded into the handheld device, the form will display blanks, with the date set to the current date. If a DWR already exists for the current date, then the data for that DWR is displayed. The Contract field is a drop down list which contains the same list of contracts shown on the Contracts form. The field initially displays the currently selected contract. If a user selects a different contract from the list, then the DWR for the selected contract for the same date is displayed. If there is no DWR for this date for the newly-selected contract, one is created. If data has already been added to the DWR, the appropriate button will have chevrons (<< >>) surrounding the button label.
The DWR Info Form Figure 5-1

Trns•port SiteManager® Creating a Daily Work Report Recording Daily Work Report Data
November 2001 5-3
FIELD DESCRIPTION Contract Displays the currently selected contract ID. When the down arrow to the left of
the contract ID is tapped, a drop down list of contract IDs appears and may be selected from.
Date The date for which Daily Work Report information is recorded.
Authorized On If the Daily Work Report has been Authorized, this field displays the date of on which the Daily Work Report was authorized in a Diary. This field is read-only.
Suspend Time The time construction activity stopped. Must be before the resume time. This may be left blank if no suspension of work occurred on this day.
Resume Time The time construction activity resumed. Must be after the suspend time. This may be left blank if no suspension of work occurred on this day.
DWR Info Fields Table 5-1
5.2.1 Selecting a Contract
The Contract Drop Down List
Figure 5-2
Before Daily Work Report information can be successfully recorded on the handheld device, the contract must be selected. This may be done in either of two methods - through a drop down list on the DWR Info form or through the Contract List option on the Forms menu.

Trns•port SiteManager® Recording Daily Work Report Data Creating a Daily Work Report
5-4 November 2001
To select a contract to create a new or copy an existing DWR:
1. In the Contract droplist, click the expand arrow ( ) to the left of the current selection and click the desired choice.
2. Tap the ID of the desired contract. OR
1. Tap the Menu icon and tap the Contract List choice in the Forms menu.
2. Tap the ID of the desired contract.
3. Tap the DWR button.
Tip: Only those contracts whose basic contract data has been downloaded into the hand-held device will be available in the Contract List form.
The Contract List Form
Figure 5-3
The Contract List form also enables the user to select the contract for which information is to be recorded. The Details functionality also allows the user to view read-only data such as the Contract ID, Vendor, Fed/State Project number, Status, County, Office, and Description. Functions associated with the Contract List form are detailed in the table below.
FUNCTION DESCRIPTION DWR After a contract ID has been selected, tapping on this button opens the DWR
status form, allowing Daily Work Report data to be entered.
Details Displays a read-only form that details the Contract ID, Vendor, Project, Status, County, Office, and Description of the Contract.
Find Similar to SiteManager's Find function, this option allows the user to find a particular contract, or specify filter criteria for a single field.
Contract List Form Functions Table 5-2

Trns•port SiteManager® Creating a Daily Work Report Recording Daily Work Report Data
November 2001 5-5
5.2.1.1 Viewing Contract Details The Details function on the Contract List form allows users to view information concerning the chosen contract. To view Contract Details:
1. Tap the Menu icon and tap the Contract List choice in the Forms menu.
2. Tap the desired contract ID.
3. Tap the Details button.
The Contract Details Form
Figure 5-4
FIELD DESCRIPTION Contract ID Transportation agency-defined ID for the contract.
Vendor The prime contractor for the contract.
Project The primary project number of the contract.
Status Indicates the current status of the contract (i.e. Pending, Active, Complete, or Archived).
County The contract's primary county. The county in which most of the work will be performed.
Office Office number of the district office responsible for administering the contract.
Description A brief textual description of the contract.
Contract Details Fields Table 5-3
5.2.2 Copying an Existing Daily Work Report Contractor and Daily Staff information may be copied from an existing DWR to a new DWR, including any associated remarks. To copy an existing Daily Work Report:

Trns•port SiteManager® Recording Daily Work Report Data Recording Daily Staff
5-6 November 2001
1. Tap the Menu icon and tap the Contract List choice in the Forms menu.
2. Tap the desired Contract ID.
3. Tap the Menu icon and tap the DWR List choice in the Forms menu.
4. Tap the desired DWR date. The DWR opens.
5. Tap the Copy button.
6. Tap the Date field and input the new date.
5.3 Recording Daily Staff
The Daily Staff Form Figure 5-5
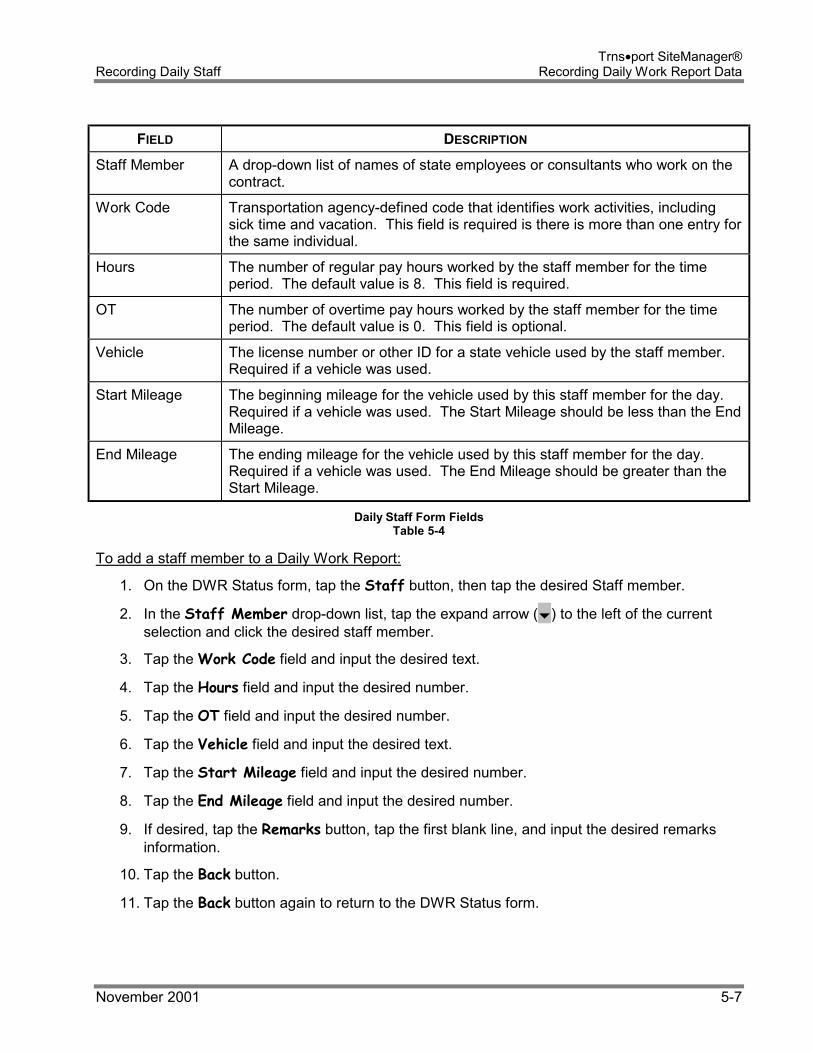
The Daily Staff form lets the user enter daily information for state employees and consultants. A staff member can be entered more than once per DWR with a different work code. Each entry shows how many hours the staff member worked, the type of work performed, and if a state vehicle was used. If a state vehicle was used, its identification number must be recorded along with its starting and ending miles. The user selects staff members from the drop-down list in the Staff Member field. The user may also enter remarks for each Staff Member recorded. If the Staff Member already has remarks recorded on the current DWR, the Remarks button will have a small square indicator to the left of the button label.
Trns•port SiteManager® Recording Daily Staff Recording Daily Work Report Data
November 2001 5-7
FIELD DESCRIPTION Staff Member A drop-down list of names of state employees or consultants who work on the
contract.
Work Code Transportation agency-defined code that identifies work activities, including sick time and vacation. This field is required is there is more than one entry for the same individual.
Hours The number of regular pay hours worked by the staff member for the time period. The default value is 8. This field is required.
OT The number of overtime pay hours worked by the staff member for the time period. The default value is 0. This field is optional.
Vehicle The license number or other ID for a state vehicle used by the staff member. Required if a vehicle was used.
Start Mileage The beginning mileage for the vehicle used by this staff member for the day. Required if a vehicle was used. The Start Mileage should be less than the End Mileage.
End Mileage The ending mileage for the vehicle used by this staff member for the day. Required if a vehicle was used. The End Mileage should be greater than the Start Mileage.
Daily Staff Form Fields Table 5-4
To add a staff member to a Daily Work Report:
1. On the DWR Status form, tap the Staff button, then tap the desired Staff member.
2. In the Staff Member drop-down list, tap the expand arrow ( ) to the left of the current selection and click the desired staff member.
3. Tap the Work Code field and input the desired text.
4. Tap the Hours field and input the desired number.
5. Tap the OT field and input the desired number.
6. Tap the Vehicle field and input the desired text.
7. Tap the Start Mileage field and input the desired number.
8. Tap the End Mileage field and input the desired number.
9. If desired, tap the Remarks button, tap the first blank line, and input the desired remarks information.
10. Tap the Back button.
11. Tap the Back button again to return to the DWR Status form.
Trns•port SiteManager® Recording Daily Work Report Data Recording Contractor Information
5-8 November 2001
5.4 Recording Contractor Information
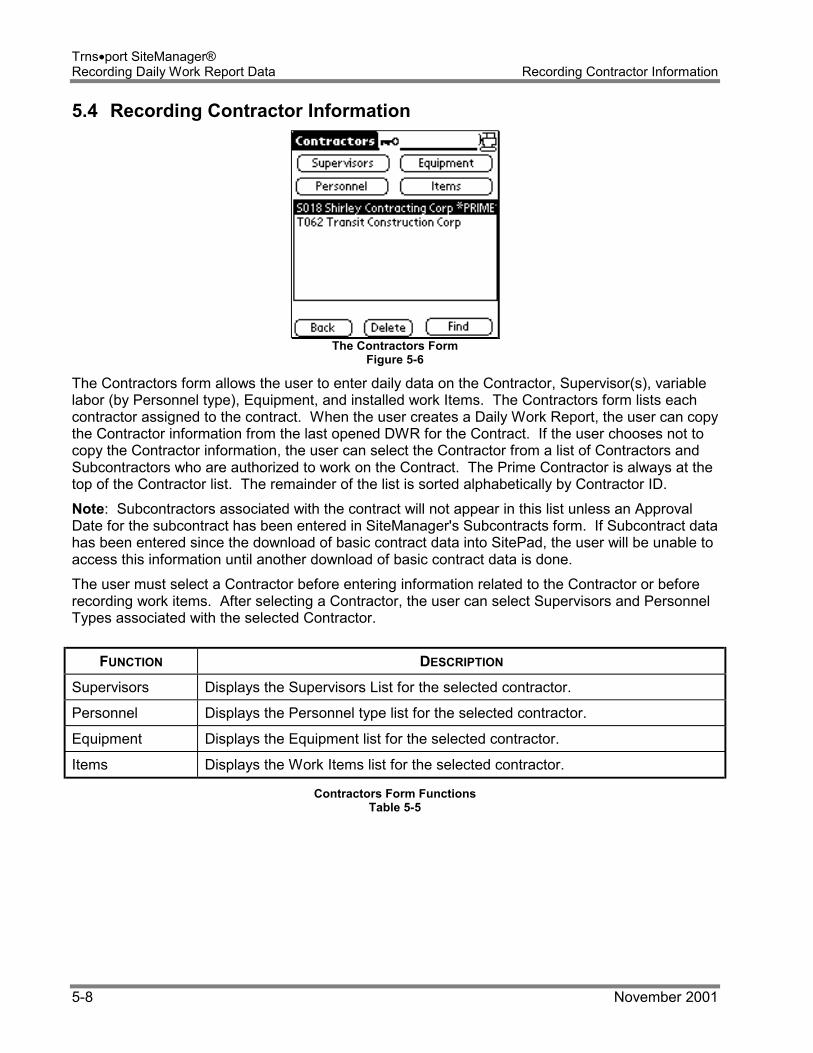
The Contractors Form
Figure 5-6
The Contractors form allows the user to enter daily data on the Contractor, Supervisor(s), variable labor (by Personnel type), Equipment, and installed work Items. The Contractors form lists each contractor assigned to the contract. When the user creates a Daily Work Report, the user can copy the Contractor information from the last opened DWR for the Contract. If the user chooses not to copy the Contractor information, the user can select the Contractor from a list of Contractors and Subcontractors who are authorized to work on the Contract. The Prime Contractor is always at the top of the Contractor list. The remainder of the list is sorted alphabetically by Contractor ID. Note: Subcontractors associated with the contract will not appear in this list unless an Approval Date for the subcontract has been entered in SiteManager's Subcontracts form. If Subcontract data has been entered since the download of basic contract data into SitePad, the user will be unable to access this information until another download of basic contract data is done. The user must select a Contractor before entering information related to the Contractor or before recording work items. After selecting a Contractor, the user can select Supervisors and Personnel Types associated with the selected Contractor.
FUNCTION DESCRIPTION Supervisors Displays the Supervisors List for the selected contractor.
Personnel Displays the Personnel type list for the selected contractor.
Equipment Displays the Equipment list for the selected contractor.
Items Displays the Work Items list for the selected contractor.
Contractors Form Functions Table 5-5

Trns•port SiteManager® Recording Contractor Information Recording Daily Work Report Data
November 2001 5-9
5.4.1 Supervisors
The Supervisors List Form
Figure 5-7
The Supervisors list displays all of the supervisors who work for the selected Contractor. After selecting a supervisor, the user can record the number of hours worked by the supervisor. The user may also enter remarks for each supervisor. The Supervisor Details form displays information for the selected supervisor for the currently selected DWR. If the DWR is not locked, the data displayed on the form may be changed by the user. If there is a remark recorded for the current supervisor, the remarks button will indicate this with a small black square. To record Supervisor information:
1. On the Contractor form, tap the desired contractor, then tap the Supervisor button.
2. Tap the desired Supervisor. The Supervisor Details form appears.
3. In the Supervisor drop-down list, click the expand arrow ( ) to the left of the field label and click the desired Supervisor.
4. Tap the Hours field and input the number of hours worked.
5. Tap OK.
6. If desired, tap the Remarks button, tap the first blank line, and input the desired remarks information.
7. Tap the Back button.
8. When finished entering Supervisor data, tap the Back button to navigate back to the Contractor form.

Trns•port SiteManager® Recording Daily Work Report Data Recording Contractor Information
5-10 November 2001
The Supervisor Details Form
Figure 5-8
FIELD DESCRIPTION Select Supervisor A drop-down list of all supervisors for this contractor.
Hours The number of hours worked for this supervisor.
Supervisor Details Form Fields Table 5-6
5.4.2 Personnel
The Personnel Form
Figure 5-9
The Personnel type list displays all of the non-supervisory personnel types who work for the currently selected contractor. This list is also referred to as the variable labor list. The user can record the number of workers present for each personnel type. For example, the user can record the number of painters present for the Prime Contractor. The user may also enter remarks for each personnel type used. The Personnel Details form displays the information for the selected personnel class for the current DWR. If a remark is recorded for the current personnel class, the remarks button will have a small indicator to the left of the remarks button label. To record Personnel type information:

Trns•port SiteManager® Recording Contractor Information Recording Daily Work Report Data
November 2001 5-11
1. On the Contractor form, tap the name of the desired contractor, then tap the Personnel button.
2. Tap the desired Personnel type. The Personnel Details form appears.
3. In the Select Personnel drop-down list, tap the expand arrow ( ) to the left of the field name and click the desired personnel type.
4. Tap the Hours field and input the number of hours worked.
5. Tap the Number field and input the number of personnel of that type.
6. Tap OK.
7. If desired, tap the Remarks button, tap the first blank line, and input the desired remarks information.
8. Tap the Back button to return to the Personnel form.
9. When finished entering Personnel data, tap the Back button to navigate back to the Contractor form.
The Personnel Details Form
Figure 5-10

Trns•port SiteManager® Recording Daily Work Report Data Recording Contractor Information
5-12 November 2001
FIELD DESCRIPTION Select Personnel A drop-down list of all personnel types associated with the current contract and
the current contractor.
Hours The number of hours worked by this personnel type. Hours cannot be recorded until the number of persons is greater than zero.
Number The number of persons of the selected personnel type who worked on this date for the selected contractor. The number of persons must be greater than zero.
Personnel Details Fields Table 5-7
5.4.3 Equipment
The Equipment Form
Figure 5-11
The Equipment form allows the user to document the presence and use of equipment on the job site for the selected Contractor. The user enters the number of pieces of each equipment type on the site on this date, the number of pieces used, and the number of hours each equipment type was used. The user may also enter remarks for each piece of equipment used. The user must select a Contractor before entering equipment information for the Contractor. After the user selects a Contractor, the user can select equipment from the list on the Equipment form. To record Equipment information:
1. On the Contractor form, tap the desired contractor, then tap the Equipment button.
2. Tap the desired equipment description. The Equipment Details form appears.
3. In the Select Equipment drop-down list, tap the expand arrow ( ) to the left of the field name and tap the desired equipment description.
4. Tap the Number field and input the number of equipment pieces on-site.
5. Tap the Number Used field and input the number of equipment pieces that were actually used.

Trns•port SiteManager® Recording Contractor Information Recording Daily Work Report Data
November 2001 5-13
6. Tap the Hours field and input the number of hours the equipment was used.
7. Tap OK.
8. If desired, tap the Remarks button, tap the first blank line, and input the desired remarks information.
9. Tap the Back button to return to the Equipment form.
10. When finished entering Equipment data, tap the Back button to navigate back to the Contractor form.
The Equipment Details Form
Figure 5-12
FIELD DESCRIPTION Select Equipment A drop-down list of all equipment associated with the current contract and the
current contractor.
Number This field is used to record the quantity of an equipment type. The equipment quantity must be greater than zero before the number used can be recorded.
Number Used Identifies how many pieces of the equipment type were used that day. The Number Used cannot be greater than the Number.
Hours Number of hours the vehicle or equipment was used on that day. The equipment quantity used must be greater than zero before equipment hours can be recorded.
Equipment Details Fields Table 5-8

Trns•port SiteManager® Recording Daily Work Report Data Recording Work Items
5-14 November 2001
5.5 Recording Work Items
The Items Form
Figure 5-13
The Item List form allows the user to view and add daily installed Work Items. Before entering Work Item data, the Contractor responsible for the Work Item must be selected on the Contractors form. When the user first selects the Work Items folder tab, the Work Item list for the selected contractor is displayed. To enter installed work data for an item, the user taps the Work Item desired. This displays the Item Locations form on which the User can select the location in which the item was installed. Selecting the desired location displays the Item Location form where the user can view and add daily installed work data.
The Item Location List Form
Figure 5-14
To record a Work Item:
1. On the Contractor form, tap the desired contractor, then tap the Work Items button.
2. Tap the desired item description.
3. Tap the down arrow (d) to the left of the Project field and tap the desired selection.
4. Tap the down arrow (d) to the left of the Category field and tap the desired selection.
5. Tap the down arrow (d) to the left of the Line field and tap the desired selection.
6. Tap the Record button.
7. Tap the New button.

Trns•port SiteManager® Recording Work Items Recording Daily Work Report Data
November 2001 5-15
8. Tap the Quantity field and enter the quantity installed.
9. Tap the Plan Page Number field and enter the desired information.
10. Tap the Seq/Location field and enter the Location of the installed work.
The Item Location Form
Figure 5-15
FIELD DESCRIPTION
Item Code The transportation agency-defined code that identifies a particular item.
Quantity Quantity of the work item installed on this date. This is a required field.
Plan Page No Plan page number on which the Work Item is included. Measured If checked, indicates that the installation location of this Work Item was
measured. Location Location where the Work Item was installed. An Item can be installed at
multiple locations. (This description does not have to be unique for each entry.) This is a required field.
Item Location Fields Table 5-9

Trns•port SiteManager® Recording Daily Work Report Data Recording Work Items
5-16 November 2001
5.5.1.1 Entering Stationing Information
The Stationing Form
Figure 5-16
If stationing information about an installed work item is to be recorded, it must be entered on the Stationing form. The Stationing form is reached through tapping the Stationing button on the Item Location form.
FIELD DESCRIPTION From Station ID that identifies where the installation of this Work Item starts. (From) Offset Offset from the Station ID that identifies where the installation of this Work
Item starts. (From) Distance Distance of the offset from the Station ID that identifies where the
installation of this Work Item starts. To Station ID that identifies where the installation of this Work Item ends. (To) Offset Offset from the Station ID that identifies where the installation of this Work
Item ends. (To) Distance Distance of the offset from the Station ID that identifies where the
installation of this Work Item ends.
Stationing Form Fields Table 5-10
To enter Stationing Information:
1. From the Work Item Location form, tap the Stationing button.
2. Tap the From field and input the Station ID that identifies where the installation of this Work Item starts.
3. Tap the Offset field and input the offset from the Station ID that identifies where the installation of this work item starts.
4. Tap the Distance Field and input offset distance from the Station ID that identifies where the installation of this Work Item starts.

Trns•port SiteManager® Recording Work Items Recording Daily Work Report Data
November 2001 5-17
5. Tap the To field and input the Station ID that identifies where the installation of this Work Item ends.
6. Tap the Offset field and input the offset from the Station ID that identifies where the installation of this work item ends.
7. Tap the Distance Field and input offset distance from the Station ID that identifies where the installation of this Work Item ends.
8. When finished entering stationing data, tap the Back button to return to the Item Location form.
5.5.1.2 Viewing Item and Stockpile Information When recording Work Item information, it is sometimes necessary to view additional item data, including information about stockpiles and quantities previously installed. This information is read-only in SitePad, and what data is viewable may depend upon the individual user's security setup. For more information on the topic of SitePad Security, please refer to the SitePad System Manager's Guide or the SiteManager Reference Manual.
The Item Info 1 Form
Figure 5-17
To view Item Information:
1. On the Work Items form, tap the Item Info button. The Item Info 1 form displays.
2. To view additional Item Information, tap the More button. The Item Info 2 form displays.
3. To return to the Item Info 1 form, tap the More button.
4. To return to the Item Location form, tap the Back button.

Trns•port SiteManager® Recording Daily Work Report Data Recording Work Items
5-18 November 2001
FIELD DESCRIPTION Item Code The transportation agency-defined code that identifies a particular item.
Description A short textual description of the item.
Project The transportation agency-defined ID for the project.
Line Item # The Contract Line Item Number that identifies each Item as it appears on the Contract.
Category # A grouping of items assigned during pre-construction. Items can be grouped within categories for various reasons, primarily for funding.
Unit Price The unit price of the Item; identified on the invoice and Contract documents. This field may or may not be visible
Status Identifies the current status of the Contract Item (i.e., Active, Audit, Final, Complete, Pending, None).
Item Info 1 Form Fields Table 5-11
The Item Info 2 Form
Figure 5-18
Trns•port SiteManager® Recording Work Items Recording Daily Work Report Data
November 2001 5-19
FIELD DESCRIPTION
Item Code The transportation agency-defined code that identifies a particular item.
Qty Installed The quantity of the material installed to date. This value is calculated by SiteManager's estimate generation process.
Bid Quantity This is the original quantity of the line Item, as indicated on the proposal or Contract. Must be greater than zero. Must be equal to one, if the Item’s unit of measure is Lump Sum.
Qty Paid to Date The total number units that have been paid to date for the Line Item.
Current Contract Qty
Bid contract plus approved quantities. This field is display only.
Unit Type The unit of measure for this item.
Item Info 2 Form Fields Table 5-12
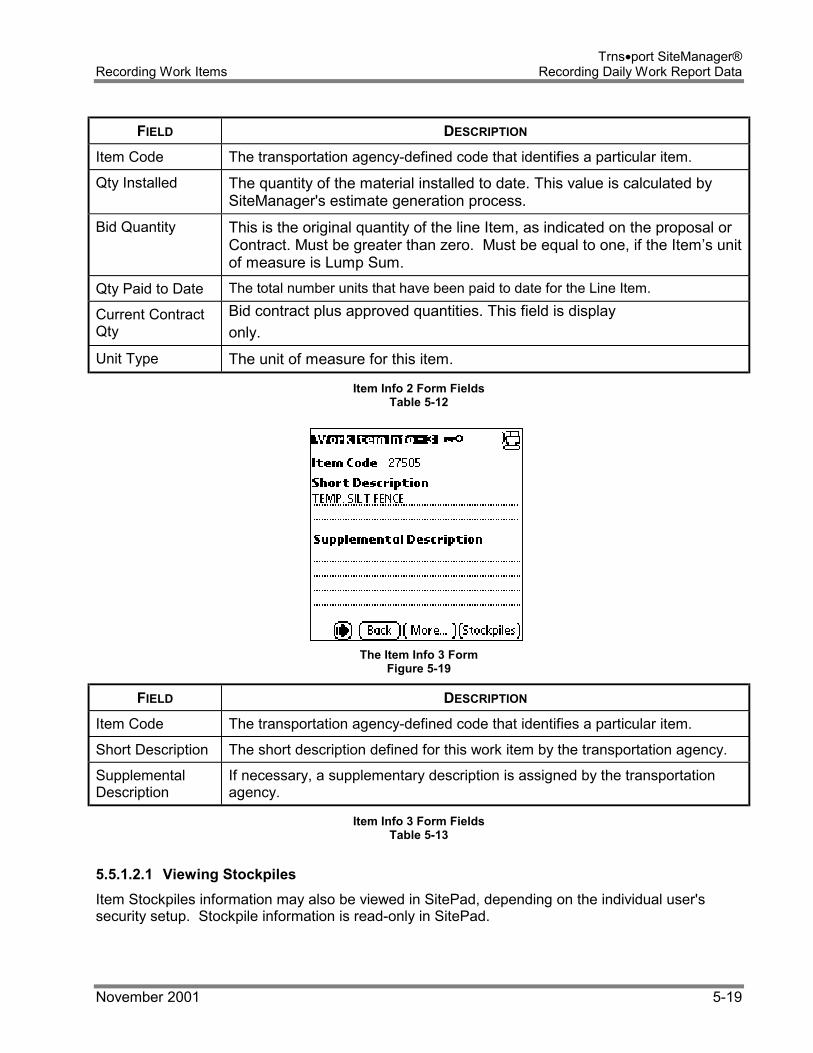
The Item Info 3 Form Figure 5-19
FIELD DESCRIPTION Item Code The transportation agency-defined code that identifies a particular item.
Short Description The short description defined for this work item by the transportation agency.
Supplemental Description
If necessary, a supplementary description is assigned by the transportation agency.
Item Info 3 Form Fields Table 5-13
5.5.1.2.1 Viewing Stockpiles Item Stockpiles information may also be viewed in SitePad, depending on the individual user's security setup. Stockpile information is read-only in SitePad.

Trns•port SiteManager® Recording Daily Work Report Data Recording Work Items
5-20 November 2001
The Item Stockpiles 1 Form
Figure 5-20

Trns•port SiteManager® Recording Work Items Recording Daily Work Report Data
November 2001 5-21
FIELD DESCRIPTION Matl Code The transportation agency-defined ID for the material.
Description A short textual description of the material
Status The status of a stockpiled material is either Open, Active, or Closed. New materials are given Open status. Materials included on an estimate are given Active status. When a balance is closed out, the material is given Closed status.
Invoice Date The date of the invoice.
Invoice # Identifies the invoice with which the material was received.
Quantity Number of units received.
Units Description of the unit of measure for the material.
Item Stockpiles 1 Form Fields Table 5-14
To view Item Stockpiles information:
1. From the Item Info form, tap the Stockpiles button. The Item Stockpiles 1 form displays.
2. To view additional Item Stockpile information, tap the More button. The Item Stockpiles 2 form displays.
3. To return to the Item Stockpiles 1 form, tap the More button.
4. To return to the Item Info 1 form, tap the Back button.
The Item Stockpiles 2 Form
Figure 5-21
FIELD DESCRIPTION Unit Price The unit price of the material, as identified on the invoice. The contents of this
field will be visible only if the SitePad user has been assigned security access to view Unit Pricing.
Conv Factor The conversion factor is derived from the Contract Line Item information. It is

Trns•port SiteManager® Recording Daily Work Report Data Recording Work Items
5-22 November 2001
the number of units of the material used in one unit of the line item.
Invoice Amt The system-calculated product of the Material Quantity and the Unit Price.
Initial Invoice Pmt The initial payment to be applied to the invoice upon generation of the first estimate for the stockpiled material. This value cannot be more than the Invoice Amt.
Matl# The stockpiled material sequence number. Each time a stockpiled material is entered, it will receive a material sequence number. The first stockpiled material record will be assigned the number one (1) for the material sequence number, and subsequent material sequence numbers (for each newly-created stockpile record) will increase by increments of one (1).
Repl# The replenishment sequence number. Each time a stockpile is replenished, SiteManager copies the existing stockpile information to a new stockpile record. The first replenished stockpile will be assigned the number zero (0) for the replenishment sequence number, and subsequent replenishment sequence numbers will increase by increments of one (1).
Remaining Qty The quantity of material that remains. Calculated as the difference between quantity and installed quantity to date. May be zero if the project is closed or the contract is ended.
Installed Qty The quantity of the material installed to date. This value is calculated by SiteManager's estimate generation process.
Paid to Date The amount that has been paid for the stockpiled material to date. This value is calculated by SiteManager's estimate generation process.
Item Stockpiles 2 Form Fields Table 5-15
Trns•port SiteManager® Recording Weather and Weather Conditions Recording Daily Work Report Data
November 2001 5-23
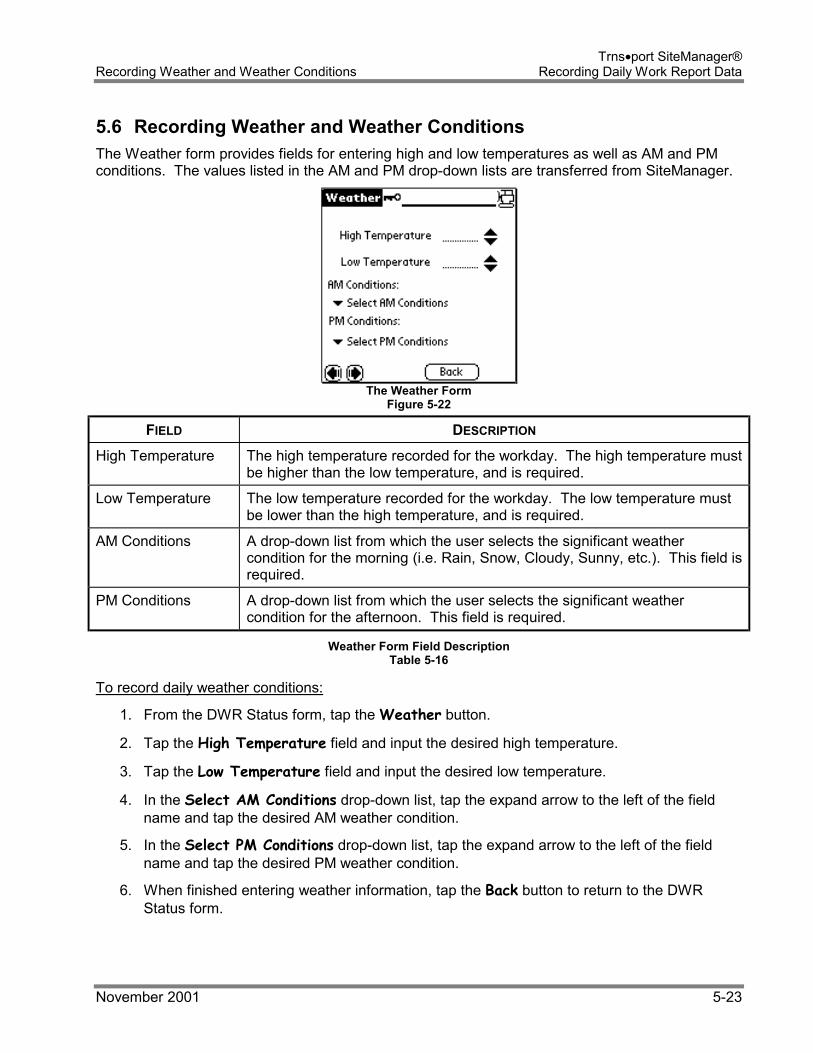
5.6 Recording Weather and Weather Conditions The Weather form provides fields for entering high and low temperatures as well as AM and PM conditions. The values listed in the AM and PM drop-down lists are transferred from SiteManager.
The Weather Form
Figure 5-22
FIELD DESCRIPTION High Temperature The high temperature recorded for the workday. The high temperature must
be higher than the low temperature, and is required.
Low Temperature The low temperature recorded for the workday. The low temperature must be lower than the high temperature, and is required.
AM Conditions A drop-down list from which the user selects the significant weather condition for the morning (i.e. Rain, Snow, Cloudy, Sunny, etc.). This field is required.
PM Conditions A drop-down list from which the user selects the significant weather condition for the afternoon. This field is required.
Weather Form Field Description Table 5-16
To record daily weather conditions:
1. From the DWR Status form, tap the Weather button.
2. Tap the High Temperature field and input the desired high temperature.
3. Tap the Low Temperature field and input the desired low temperature.
4. In the Select AM Conditions drop-down list, tap the expand arrow to the left of the field name and tap the desired AM weather condition.
5. In the Select PM Conditions drop-down list, tap the expand arrow to the left of the field name and tap the desired PM weather condition.
6. When finished entering weather information, tap the Back button to return to the DWR Status form.
Trns•port SiteManager® Recording Daily Work Report Data Recording Weather and Weather Conditions
5-24 November 2001
This page intentionally left blank.

November 2001 6-1
6. Check In
November 2001

Trns•port SiteManager® Check In Checking In Daily Work Reports
6-2 November 2001
The Actions Menu Figure 6-1
6.1 Checking In Daily Work Reports Before Daily Work Report information can be sent from the handheld device to the SiteManager database, the individual Daily Work Report must be marked for checking in. Once a DWR has been marked for Check-In, it cannot be changed and is locked on the handheld device. When a DWR is marked for Check-In, it is locked against further changes, and will be checked in upon the next synchronization with SiteManager. If the current DWR has been edited or created but not yet saved, marking it for Check-In will automatically cause it to be saved.
To mark the current Daily Work Report for check in: 1. Open the Daily Work Report.
2. Tap the Menus icon, tap the Actions menu and tap the Mark DWR to check in choice.
6.2 Synchronizing Data Files from the handheld device must be uploaded to the PC via the synchronization program. Files are placed in the Palm download directory, where they may be accessed for conversion from XML to ZIP format.
To download SitePad data to the PC for conversion: 3. Place the handheld device in the synchronization cradle.
4. Press the synch button on the cradle.
Trns•port SiteManager® Use Make Zip Check In
November 2001 6-3
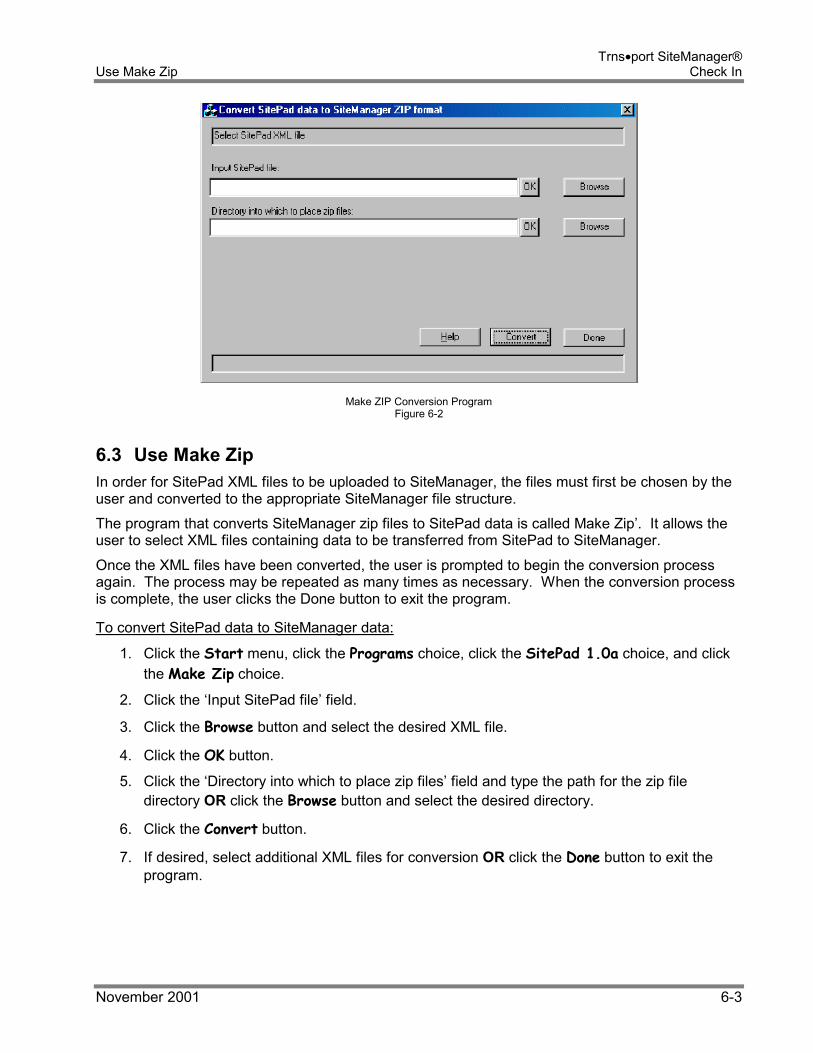
Make ZIP Conversion Program
Figure 6-2
6.3 Use Make Zip In order for SitePad XML files to be uploaded to SiteManager, the files must first be chosen by the user and converted to the appropriate SiteManager file structure. The program that converts SiteManager zip files to SitePad data is called Make Zip’. It allows the user to select XML files containing data to be transferred from SitePad to SiteManager. Once the XML files have been converted, the user is prompted to begin the conversion process again. The process may be repeated as many times as necessary. When the conversion process is complete, the user clicks the Done button to exit the program.
To convert SitePad data to SiteManager data:
1. Click the Start menu, click the Programs choice, click the SitePad 1.0a choice, and click the Make Zip choice.
2. Click the ‘Input SitePad file’ field.
3. Click the Browse button and select the desired XML file.
4. Click the OK button.
5. Click the ‘Directory into which to place zip files’ field and type the path for the zip file directory OR click the Browse button and select the desired directory.
6. Click the Convert button.
7. If desired, select additional XML files for conversion OR click the Done button to exit the program.

Trns•port SiteManager® Check In Check In — Loading Zip Files
6-4 November 2001
The PM/Inspector’s Load Panel
Figure 6-3
6.4 Check In — Loading Zip Files The PM/Inspector’s Load panel lets the user unzip and load files from SitePad into the database. The PM/Inspector’s Load panel loads the following file types to the standalone database from SitePad:
DWR files DLWR00.ZIP
The PM/Inspector’s Load panel opens with a default drive and directory, which the user can change. The List of Files box displays all files with the .zip extension for the selected drive and directory. After the user selects the files, the Services menu Load Files option loads these files into the database.
To load DWR and Sample and Test zip files into the standalone database:
1. When logging on to SiteManager, connect to the standalone database.
2. On the Pipeline and Zip panel, double-click the PM/Inspector’s Load icon.
3. In the Drive drop-down list, select the directory in which the zip files are located.
4. In the Directories list box, scroll to and click the directory in which the zip files are located. The filenames in the selected directory are displayed in the List of Files
5. In the List of Files list box, scroll to and click the filename(s). 6. Click the Add button. The files selected in the List of Files are added
to the Selected Files list. 7. Click the Services menu and click the Load Files choice. The
selected files are unzipped and loaded into the standalone database.
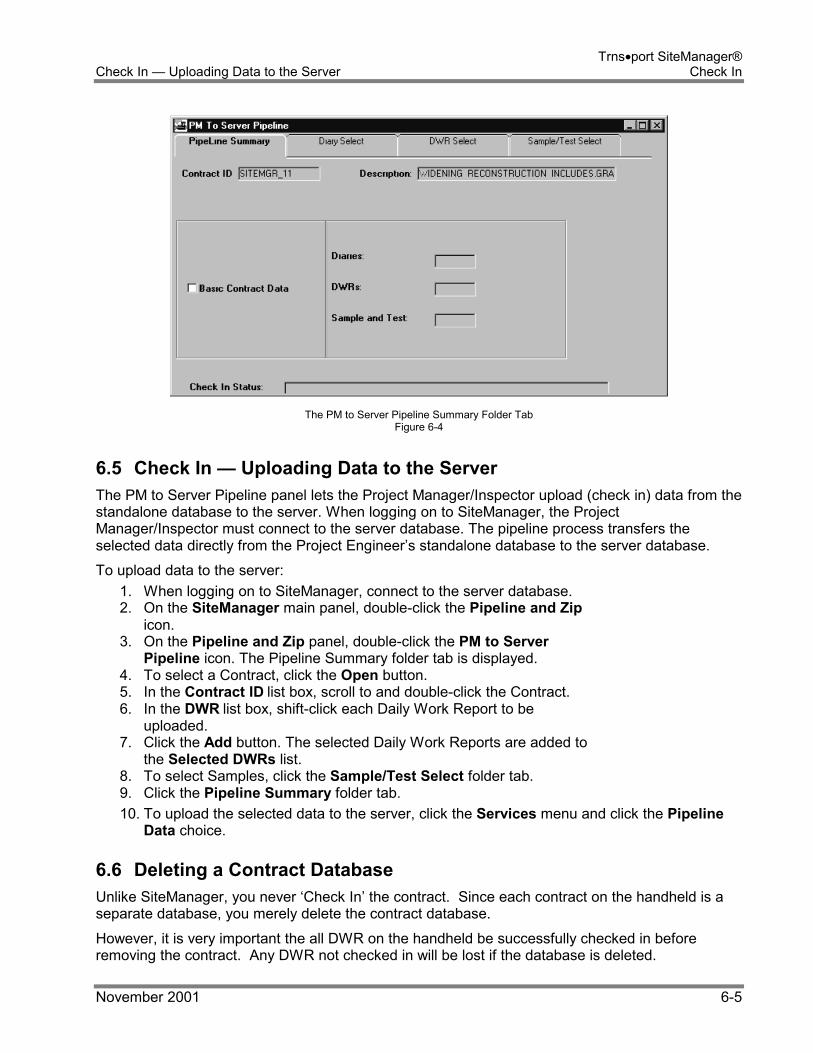
Trns•port SiteManager® Check In — Uploading Data to the Server Check In
November 2001 6-5
The PM to Server Pipeline Summary Folder Tab
Figure 6-4
6.5 Check In — Uploading Data to the Server The PM to Server Pipeline panel lets the Project Manager/Inspector upload (check in) data from the standalone database to the server. When logging on to SiteManager, the Project Manager/Inspector must connect to the server database. The pipeline process transfers the selected data directly from the Project Engineer’s standalone database to the server database. To upload data to the server:
1. When logging on to SiteManager, connect to the server database. 2. On the SiteManager main panel, double-click the Pipeline and Zip
icon. 3. On the Pipeline and Zip panel, double-click the PM to Server
Pipeline icon. The Pipeline Summary folder tab is displayed. 4. To select a Contract, click the Open button. 5. In the Contract ID list box, scroll to and double-click the Contract. 6. In the DWR list box, shift-click each Daily Work Report to be
uploaded. 7. Click the Add button. The selected Daily Work Reports are added to
the Selected DWRs list. 8. To select Samples, click the Sample/Test Select folder tab. 9. Click the Pipeline Summary folder tab. 10. To upload the selected data to the server, click the Services menu and click the Pipeline
Data choice.
6.6 Deleting a Contract Database Unlike SiteManager, you never ‘Check In’ the contract. Since each contract on the handheld is a separate database, you merely delete the contract database. However, it is very important the all DWR on the handheld be successfully checked in before removing the contract. Any DWR not checked in will be lost if the database is deleted.

Trns•port SiteManager® Check In Deleting a Contract Database
6-6 November 2001
To delete a contract database:
1. At the main Palm screen, tap the Menus icon, tap the App menu and tap the Blah choice.
2. Tap the contract database to be deleted.
3. Tap the Delete button.
4. Tap the Yes button to confirm deletion

November 2001 7
7. Index
November 2001

Trns•port SiteManager® Index Deleting a Contract Database
8 November 2001
Index ⊕ Button ....................................................3-9 Actions Menu.............................. 2-4, 2-6, 3-4 AM Conditions .........................................5-23 Authorized On............................................5-3 Back Button ...............................................3-2 Bid Quantity .............................................5-19 Calendar ....................................................3-9 Category..................................................5-18 Conduit ......................................................2-2 Conduit Manager .......................................1-3 Conduit Program......................... See Conduit Contract ..............................................3-6, 5-3
Selecting a .............................................5-3 Contract field .............................................5-2 Contract ID ................................................5-5 Contract List Form .... See Form, Contract List Contractor..................................................3-6 Conv Factor .............................................5-22 County .......................................................5-5 Current Contract Qty................................5-19 Data Entry..................................................1-5
Graffiti ....................................................1-5 Stylus .....................................................1-5 Tappads.................................................1-5
Date...........................................................5-3 Description...............................5-5, 5-18, 5-21 Details .......................................................5-4 Distance ..................................................5-16 DWR..........................................................5-4
Authorization Date..................................2-2 Authorization Indicator............................2-2 Copying a...............................................5-6 Create ....................................................5-4
DWR Templates ........................................2-2 Edit
Copy ......................................................3-4 Cut .........................................................3-4 Graffiti ....................................................3-4 Keyboard................................................3-4 Paste......................................................3-4 Select All ................................................3-4 Undo ......................................................3-4
Edit Menu ...........................................2-6, 3-4 End Mileage...............................................5-7 Exit SitePad ........................................2-4, 3-4 Field Data Collection..................................2-2 Filtering......................................................3-6
Find.................................................... 3-6, 5-4 Extended ............................................... 3-6 Simple ................................................... 3-6
Force Accounts ......................................... 2-2 Form
Contract Details ..................................... 5-5 Contractors..................................... 3-3, 5-8 Contracts ............................................... 3-3 Current Contract .................................... 3-5 Daily Staff .............................................. 5-6 DWR Info........................................ 3-3, 5-2 DWR Remarks....................................... 3-3 DWRs.................................................... 3-3 Equipment .................................... 3-3, 5-12 Item Info .............................................. 5-17 Item List............................................... 5-14 Item Locations ..................................... 5-14 Logon .................................................... 2-3 Personnel .............................................. 3-3 Personnel Details ................................ 5-11 Personnel Type List............................. 5-10 Staff....................................................... 3-3 Stationing ............................................ 5-16 Supervisor Details ................................. 5-9 Supervisor List....................................... 5-9 Weather................................................. 3-3 Work Item Location................................ 3-3 Work Items ............................................ 3-3
Forms Menu....................................... 2-6, 3-3 From ....................................................... 5-16 Functionalities ........................................... 1-3 Graffiti ....................................................... 1-5 Graffiti ....................................................... 1-7 Graffiti Writing Area................................... 1-5 High Temperature ................................... 5-23 Hours ............................. 5-7, 5-10, 5-12, 5-13 Initial Invoice Pmt.................................... 5-22 Installed Qty............................................ 5-22 Installed Work ........................................... 2-2 Invoice # ................................................. 5-21 Invoice Amt ............................................. 5-22 Invoice Date ............................................ 5-21 Item........................................................... 3-6 Item Code ............................. 5-15, 5-18, 5-19 Line Item ................................................. 5-18 Location ........................................... 3-6, 5-15 Logon........................................................ 2-4 Logon Form......................... See Form: Logon

Trns•port SiteManager® Deleting a Contract Database Index
November 2001 9
Low Temperature.................................... 5-23 Mark DWR for Check In ............................ 3-4 Matl Code ............................................... 5-21 Matl#....................................................... 5-22 Measured................................................ 5-15 Menu
Actions .................................................. 2-4 Menu Bar .................................................. 2-5 Navigation................................................. 2-5 Number.......................................... 5-12, 5-13 Number Used.......................................... 5-13 Office ........................................................ 5-5 Offset ...................................................... 5-16 OLE Documents........................................ 2-2 OT............................................................. 5-7 Paid to Date ............................................ 5-22 Passwords ................................................ 2-4 Plan Page No.......................................... 5-15 Plug-Ins..................................................... 2-2 PM Conditions......................................... 5-23 Prime Contractor....................................... 5-8 Project ............................................. 5-5, 5-18 Qty Installed to Date ............................... 5-19 Qty Paid to Date...................................... 5-19 Quantity ......................................... 5-15, 5-21 Remaining Qty ........................................ 5-22 Remark Types........................................... 3-8 Remarks ................................................... 3-8
Maximum Size of ................................... 3-8 Repl# ...................................................... 5-22 Resume Time ........................................... 5-3
Security ..................................................... 2-2 Select Equipment .................................... 5-13 Select Personnel ..................................... 5-12 Select Supervisor .................................... 5-10 Set Button ................................................. 3-9 SiteManager.............................................. 1-3 SitePad Icon.............................................. 3-5 Staff Member............................................. 5-7
Adding a ................................................ 5-7 Start Mileage ............................................. 5-7 Status......................................5-5, 5-18, 5-21 Stockpile Information............................... 5-17 Stockpiles................................................ 5-20 Stylus ..........................................1-5, 1-7, 1-8 Subcontractors .......................................... 5-8 Suspend Time ........................................... 5-3 Synchronization......................................... 2-2 Tappads ............................................. 1-5, 1-8
Using ..................................................... 1-8 Time.......................................................... 3-9 To............................................................ 5-16 Unit Price........................................ 5-18, 5-22 unit pricing................................................. 2-2 Unit Type................................................. 5-19 Units........................................................ 5-21 User ID...................................................... 2-4 Userid........................................................ 3-6 Variable Labor List .................................. 5-10 Vehicle ...................................................... 5-7 Vendor ...................................................... 5-5 Work Code ................................................ 5-7

Trns•port SiteManager® Index Deleting a Contract Database
10 November 2001