skills badge - scouts · 3 scout survival skills: building a fire scouts.org.uk/victorinox...
TRANSCRIPT

BUILDING A FIRESCOUTS SURVIVAL SKILLS BADGE

CONTENTS
Page 3Introduction Safety
Page 4Where to build your fire
Page 5Tinder, Kindling and Fuel
Page 6Firelighting
Page 7-8Firelighting tips & tricks
Page 9How to light a fire
Page 10-12Types of fire
Page 13Burning properties of woods
Page 14Activity sheet
THANKS TO Austin LillTerry Longhurst22nd Hampstead Sea Scout Group15th Chingford Scout Groupfor their contributions to this resource.
© April 2015 The Scout Association. Registered charity numbers: 306101 (England and Wales) and SCO38437 (Scotland)
2
The Scout Association recognises that bladed and sharply pointed hand-tools are important for working on survival skills. We promote the safe use of knives used as a tool reiterating UK Law. Knives with a fixed non-folding blade, a folding knife with a blade over 3 inches in length or a folding knife which locks in place require the person carrying such a knife in public (whatever age) to have good reason for carrying the tool. It is illegal to sell such a tool to a person under 18.
The Scout Association holds no responsibility from injuries that have occurred as a result of using this resource. Whenever a knife is to be used, or any other activity a risk assessment must be made and suitable controls put in place.
SCOUTS AND VICTORINOX DISCLAIMER

3
Scout Survival Skills: Building A Fire @victorinox /VictorinoxUK @victorinoxscouts.org.uk/victorinox
INTRODUCTION
Firelighting is a fundamental skill in Scouting and is vital for survival. A fire provides warmth, a place to cook or boil water as well as a focal point for the camp. Knowing how to light a fire as well as extinguish and clear away afterwards will ensure Scouts are prepared for a survival situation and leave no harmful impact on the area they camp in.
SAFETYIf it is not watched or properly controlled, your campfire can be dangerous both to people and the natural surroundings. Fire can spread quickly especially in dry conditions and a stray ember can be enough to start a forest fire. Follow the safety measures on where to build your fire to ensure your campfire is a safe and happy one.
Wildfires
Uncontrolled or accidental fires can cause damage to wildlife and habitats as well as people and property. Take care with matches not only during dry summers but at all times of the year. Sometimes vegetation is burned on purpose as a way of managing the woodland usually between October and early April, so check that a fire isn’t being supervised before calling 999.
Other safety factors to consider
• never leave a fire unattended• check if there is anything you need to know about
the area you are camping in, for example, is it prone to bush fires in dry summers and are there protected species of trees or plants nearby
• don’t build a fire bigger than you need• check the direction and strength of the wind which
can make a fire flare up and blow sparks out of the fireplace that could set light to other areas
• do not build your fire too close to your shelter as sparks or exploding embers could burn it
• never use methylated spirits, paraffin, petrol or any other chemicals to start or rekindle a fire, as chemicals are volatile and even vapour from these can catch light
• don’t use riverbed rocks or flint to edge your fireplace as they can sometimes explode when they get hot
• hot ashes or coals: do not bury hot ashes or coals as you may set light to roots and cause a fire to spread both under and over ground
• keep loose clothing tucked in and long hair tied back around a fire
Make sure you familiarise yourself with the First Aid treatment for burns before you build a fire. Ensure a First Aid Kit and water is nearby for treating small or minor burns. More serious burns will require professional medical treatment at a hospital.
FIRST AID
4
Scout Survival Skills: Building A Fire @victorinox /VictorinoxUK @victorinoxscouts.org.uk/victorinox
WHERE TO BUILD YOUR FIRE
CAMPFIRES PREPARING THE GROUND FOR A FIRE AND EXTINGUISHING A FIRE
Use a spade to cut through the turf and outline a square where you will build your fire.
Divide it into smaller squares and slide your spade under the squares and lift them off.
Store the squares away from the fire grassy side down and water them frequently to avoid them drying out as you will be replacing them when you leave the camp.
Edge or bank the cleared area using large stones, logs, bricks or mounds of soil. This keeps the fire and its ashes in place and protects it from the wind. The edging material should be spaced out a little to allow air to flow into the base of the fire.
Extinguishing a campfire
Stop adding fuel and wait for the fire to burn down and turn to ash. Break down large logs by knocking them with a long stick so they will burn quicker. Once it has turned to ash, pour water on all parts of the fire and stir the ashes with the stick to make sure that all the embers are put out. Check no stray embers have escaped. Pour water over it again and carefully check that the ashes are cold to the touch.
Clearing away a fireplace
Scouts should leave no trace of their time at a campsite. If you leave the campsite completely you must clear away the fireplace. If you are camping in the wilderness pile any remaining embers up to burn them off then dig over the fireplace so there are no ashes left on the surface. Check that the fire is fully out and any remaining small pieces of wood can be scattered into the surrounding foliage. Scatter fresh soil over the area then smooth it down and water it well. If a fire has been alight for a long time then make holes in the ground to allow water in to cool the ground below the surface. If you cut out turf when you arrived, replace it now and fill in any gaps with soil, grass and leaves to look as natural as possible.
1
2
3
4
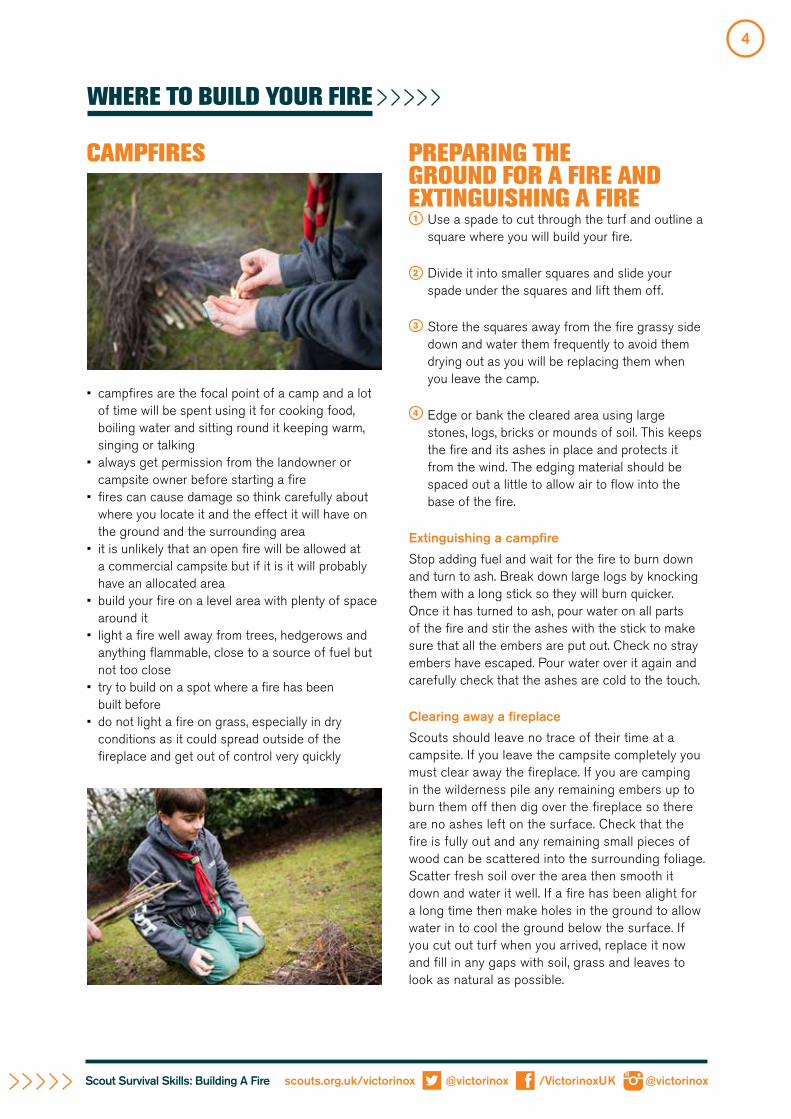
• campfires are the focal point of a camp and a lot of time will be spent using it for cooking food, boiling water and sitting round it keeping warm, singing or talking
• always get permission from the landowner or campsite owner before starting a fire
• fires can cause damage so think carefully about where you locate it and the effect it will have on the ground and the surrounding area
• it is unlikely that an open fire will be allowed at a commercial campsite but if it is it will probably have an allocated area
• build your fire on a level area with plenty of space around it
• light a fire well away from trees, hedgerows and anything flammable, close to a source of fuel but not too close
• try to build on a spot where a fire has been built before
• do not light a fire on grass, especially in dry conditions as it could spread outside of the fireplace and get out of control very quickly

5
Scout Survival Skills: Building A Fire @victorinox /VictorinoxUK @victorinoxscouts.org.uk/victorinox
WHAT IS KINDLING? It keeps the fire going once you have a spark and a flame.
What does it look like?
Consists of small sticks and splinters from the size of a match up to a pencil. It’s bigger than tinder but not as big as logs or large pieces of wood.
What else do I need to know?
Kindling needs to be bone dry to catch light more easily. Be careful not to put too much kindling on your fire, or too large pieces too soon as you may smother the fire.
WHAT IS FUEL? Builds up your fire and keeps it burning.
What does it look like?
For most campfires, medium-sized sticks and logs (up to the maximum thickness of your arm) are fine for fuel.
What else do I need to know?
Wood should ideally be dry, seasoned wood (although ash can be burnt green), this is because fresh wood has more moisture which affects the burning quality and generates smoke. Logs and sticks should be laid on the kindling carefully, or built as part of the construction of your fire. Be careful not to put the fire out as you add fuel.
Tinder, kindling and fuel are three essential ingredients for firelighting. You should collect plenty of materials before starting to light your fire as you do not want to leave it unattended to gather more fuel. Lay out the materials in order of thickness so you can feed the fire slowly and gradually, which should give the best results.
WHAT IS TINDER?Small, dry, highly flammable material used primarily to catch a flame.
What does it look like?
Examples include wood shavings, crumbled rotten wood (also called punk), dried grass, birch bark, leaves, string and even fungus such as crampballs (also called King Alfred’s cakes as they resemble burnt buns).
What else do I need to know?
Different type of tinder are used depending on how you are lighting the fire. If you have a lighter then birch bark is a good choice.
TINDER, KINDLING AND FUEL

6
Scout Survival Skills: Building A Fire @victorinox /VictorinoxUK @victorinoxscouts.org.uk/victorinox
Firelighting takes practise and good-quality equipment and materials to get the quickest and best results. Preparing your firelighting kit in advance will pay off on a cold, wet night when you need your fire the most.
FERRO ROD
A ferro rod and striker is a reliable firelighter and will stand you in good stead for many camping trips. It can be used to light a range of tinder and will guarantee a spark in the wettest of conditions.
FLINT AND STEELA flint and steel set can be struck together to create a spark. It is not as hot or reliable as a ferro rod and can only ignite high quality natural tinder or prepared tinder such as charcloth.
LIGHTERSThere are many different kinds of lighter available. A cheap disposable lighter will be fine in fair weather conditions, but will prove less reliable in strong wind and rain. In bad weather or for effective results a storm-proof lighter is recommended. These use butane and have a better delivery mechanism.
WATERPROOF MATCHES
Waterproof matches were originally developed for the Ministry of Defence. The flame cannot be blown out and the matches light up even when they are wet. They’re available from good outdoor equipment retailers.
Store your firelighters in a metal tin.
SAFETY
FIRELIGHTING

7
Scout Survival Skills: Building A Fire @victorinox /VictorinoxUK @victorinoxscouts.org.uk/victorinox
FIRELIGHTING TIPS AND TRICKS
Feather Stick
Feathersticks are better than wood shavings as you can move them about in a bundle to catch a flame. They allow oxygen in and, unlike shavings, can prevent moisture getting into the wood from the ground.
Find a dry stick approximately 2-3cm in diameter. Use your Swiss Army Knife to slice thin strips down the sides, making sure they stay attached at the bottom. These thin strips make it easier to light the stick. Create a few feathersticks and put them in amongst your larger fuel items to help start your fire.
Making fire out of water (this can only be done on a sunny day)
Press a sheet of cling film into a mug with plenty of the film hanging over the sides.
Half fill the mug with water.
Carefully lift the cling film and turn it so it wraps around the water to form a water ball, take it out of the mug.
Under bright sunlight hold the water ball over your tinder, move it up and down like a lens until a bright dot of light is beamed on to the tinder.
The tinder should eventually light up.
Wear sunglasses to protect your eyes.
Use a magnifying glass to light a fire (this can only be done on a sunny day)
If your Swiss Army Knife has a magnifying glass, angle the magnifier towards the sun until a bright dot of light is beamed on to the tinder. The tinder should start to smoke and then catch light.
Wood shavings
Use a Swiss Army Knife to slice thin wood shavings from a stick, which are easier to catch light than thicker sticks. Take a pencil sharpener to produce shavings from pencil-thick sticks.
1
2
3
4
5

8
Scout Survival Skills: Building A Fire @victorinox /VictorinoxUK @victorinoxscouts.org.uk/victorinox
King Alfred’s Cakes
A good natural firelighter is a fungus found on dead wood, especially ash, called Daldinia Concentrica, also known as crampballs. It looks like a lump of coal but has been most associated with the cakes King Alfred (849-899) was said to have burnt when hiding out in the country. The black variety are best for firelighting, and must be completely dry as fresh ones will not work. A spark is enough to ignite it and it will burn for a long time.
Baskerville Burner
The Baskerville Burner is a firelighter that can be made with natural materials. It was ‘invented’ in 1989 when instructors at Tolmers Scout Camp kept burning their fingers whilst trying to light pine cones.
Find a pine cone, some birch bark and three twigs, making sure they are all dry.
Tear the bark into strips, fold them and stuff them into the scales of the pine cone until all the scales are stuffed with birch bark.
Push the twigs into the pine cone so the burner can stand up like a tripod.
Place kindling around the burner and light the bottom of the burner.
1
2
3
4
Fungus should not be picked unless you are with a bush craft expert who can identify whether it is the correct type. Always wash your hands after touching fungus or wear gloves.
SAFETY

9
Scout Survival Skills: Building A Fire @victorinox /VictorinoxUK @victorinoxscouts.org.uk/victorinox
If you are using matches or a lighter, strike it up and take the flame to the tinder. If you are using a ferro rod and striker or flint and steel, place the rod or flint next to the tinder and strike to create a spark.
Blow gently on the flame or spark to provide more oxygen to grow the flame.
Arrange your kindling and tinder
HOW TO LIGHT A FIREThe three elements needed to light a fire are oxygen, heat and fuel, known as the fire triangle. If you take away one of these elements, the fire will not light or will go out.
Collect your kindling and fuel.
Choose a site and build your fire (see Types of fire for information on different fires and how to build them).
Kneel by the fire with your back facing the wind which shields your fire from gusts that may make it difficult to light it. Place your knees and feet firmly together to eliminate any draughts.
1
2
3
4
5
6
7
OX
YGE
N
FUEL
HEAT
Gradually add more kindling to grow the flame and establish the fire.

10
Scout Survival Skills: Building A Fire @victorinox /VictorinoxUK @victorinoxscouts.org.uk/victorinox
TYPES OF FIRE
The size and type of fire you build should depend on the materials available and the purpose of the fire. The following fire types are all common and reasonably easy to build, light and maintain.
GROUND FIRE WITH TOWERA good choice if the ground must not be scorched, dug or disturbed. One of the simplest to make is a single or double-layered platform using similar-sized logs. Then create a top level made of smaller sticks. Ensuring the whole contraption is sturdy, cover it with soil to prevent the altar itself catching alight. Then make your fire on top.
How to build a ground fire with a tower
Find and prepare a suitable area for building your fire.
Lay seasoned/dry logs approximately 50cm in length side by side on the cleared area.
On top of this hearth begin to build a tower by laying smaller sticks approximately 2cm wide, across each other in a log cabin structure. The tower should be approx 40cm square and built up to 10cm high.
Fill the squared off space with tinder and kindling such as feather sticks, small twigs, cotton wool paper, wood shavings.
Continue to build the tower up to approximately 40cm using sticks that reduce in size.
Light the fire and leave it to burn down to embers before cooking.
1
2
4
5
6
3

11
Scout Survival Skills: Building A Fire @victorinox /VictorinoxUK @victorinoxscouts.org.uk/victorinox
STAR FIREThis fire is easy to build and can be used to hang a kettle over or provide a stable base for resting a pot on. Make a conical shape from kindling and small sticks, then push in the ends of six slender logs around the fire to create a star shape. These logs will help the fire to burn for a long time. As it burns down the logs can be pushed in towards the centre of the fire.
How to build a star fire
Find and prepare a suitable area for building your fire.
You will need six seasoned or dry logs of approximately 7cm thick and a collection of smaller dry sticks of different sizes. Gather your firewood before you begin to build your fire and sort them by size.
Take your six large logs and arrange them in a star shape that meets in the centre.
Use three smaller sticks and build a tripod over the centre of the logs. Add more twigs about finger width around the tripod to make a wigwam shape.
Leave one side open and place your tinder and kindling in the space. Keep adding more twigs of different sizes around the outside leaving a gap to light the tinder.
Light the fire and leave it to burn down to embers before cooking.
The logs can be pushed further into the centre as they burn down. Keep extra logs ready in case you need to refuel.
1
5
6
7
2
3
4
12
Scout Survival Skills: Building A Fire @victorinox /VictorinoxUK @victorinoxscouts.org.uk/victorinox
OTHER TYPES OF FIRE
Wigwam fire
This takes the form of a wigwam or tepee shape and is a classic campfire. First find a large stick and drive it into the ground, then place a couple of handfuls of small kindling around it. Lean a number of smaller sticks against the central stick all the way around then do the same thing with larger sticks to create another layer. Make sure you leave some space for air to circulate. Light the fire in the centre then blow into it until it catches.
Trench fire
A fire that is particularly effective in windy conditions. Dig a rectangular hole in the ground measuring approximately a metre long by 30cm wide and 30cm deep. Create a slope of approximately 20° into the hole. The back of the fire should face into the wind to supply it with air. Lay a grate across the top for cooking.
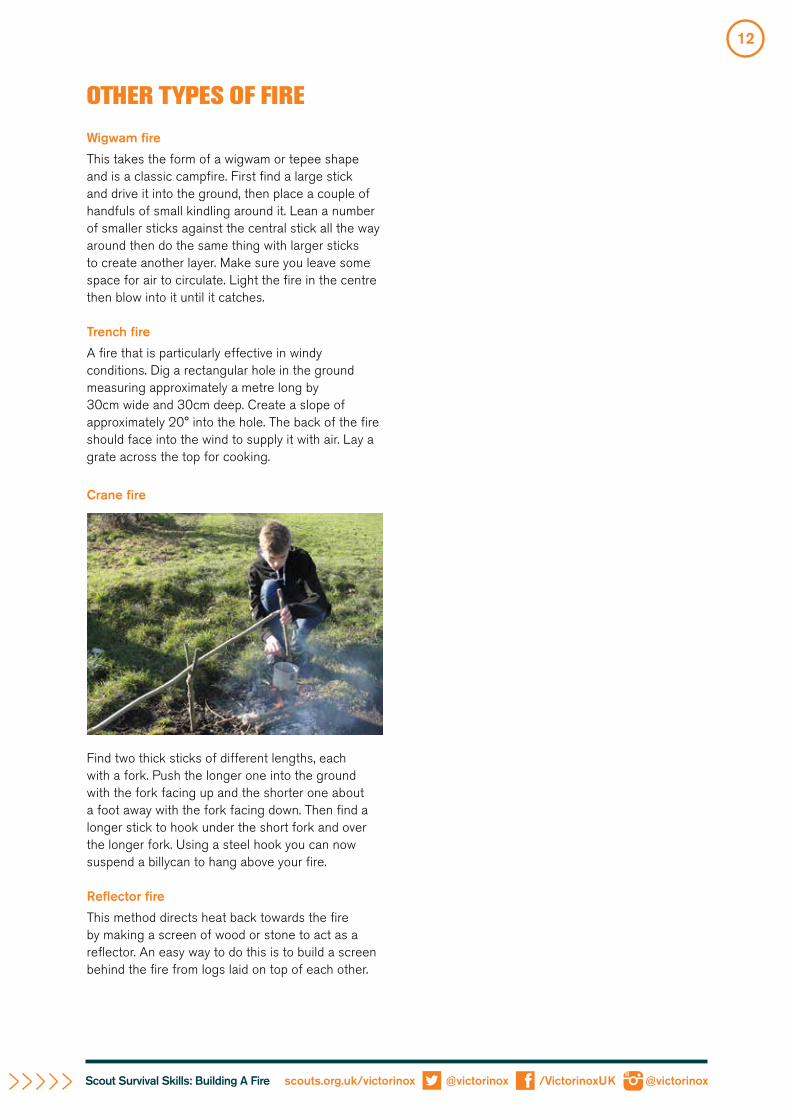
Crane fire
Find two thick sticks of different lengths, each with a fork. Push the longer one into the ground with the fork facing up and the shorter one about a foot away with the fork facing down. Then find a longer stick to hook under the short fork and over the longer fork. Using a steel hook you can now suspend a billycan to hang above your fire.
Reflector fire
This method directs heat back towards the fire by making a screen of wood or stone to act as a reflector. An easy way to do this is to build a screen behind the fire from logs laid on top of each other.

13
Scout Survival Skills: Building A Fire @victorinox /VictorinoxUK @victorinoxscouts.org.uk/victorinox
BURNING PROPERTIES OF WOODS
The burning properties of woods in the table below are for dry, seasoned wood. All wood burns better when seasoned and some burn better when they are split rather than as whole logs. In wet weather look for dry kindling in the nearest hedge. Dry dead wood can usually be found in the thickest part of the hedge but take care not to damage the hedge itself.
EXCELLENTASH: The best wood for burning as it provides both flame and heat and will burn when green if unable to find any seasoned wood
BEECH: Almost as good as ash but green wood is not as good as ash
BLACKTHORN: One of the best as it burns slowly with good heat and little smoke
HAWTHORN: Similar to blackthorn
OAK: Sparse flame and the smoke is acrid but very old dry seasoned oak is excellent for heat, burning slowly and steadily and producing little ash
YEW: One of the best. Burns slowly with a fierce heat and the scent is pleasant
GOODAPPLE: Very good as it burns slowly and steadily, creating little flame but a good heat and smells nice
BIRCH: Good heat but burns away quickly and also smells nice
CEDAR: Snaps and crackles, gives off a good heat but little flame, smells nice but needs to be fully dried out before burning
CHERRY: Slow burner produces good heat and nice smell
HAZEL: Good
HORNBEAM: Almost as good as beech
MAPLE: Good
PEAR: A good heat and a good scent
PLUM: Good heat and scent
SYCAMORE: Burns with a good flame and moderate heat
FAIRELM: Unpredictable since dutch elm disease. Can smoke violently. One large log put on before bed will keep the fire burning until morning
HOLLY: Good only when seasoned
LAUREL: Has brilliant flame
PINE: Burns with a splendid flame, but is apt to spit. The resinous Weymouth pine has a lovely scent and a cheerful blue flame
PLANE: Burns pleasantly but can throw sparks if very dry
RHODODENDRON: The thick old stems, being very tough, burn well
WALNUT: Good with a pleasant scent
POORALDER: Poor in heat and doesn’t last
DOUGLAS FIR: Little flame or heat
ELDER: Average, quick burner creates and lot of smoke but not much heat
HORSE CHESTNUT: Good flame and heating power but spits a lot
LARCH: Crackly, scented and fairly good for heat
LIME: Burns with a dull flame
POPLAR: Poor to fair
SWEET CHESTNUT: Burns when seasoned but spits excessively making it unsuitable for campfires
SPRUCE: Burns too quickly and with too many sparks
WILLOW: Burns slowly with little flame even when seasoned, and is apt to spark

14
Scout Survival Skills: Building A Fire @victorinox /VictorinoxUK @victorinoxscouts.org.uk/victorinox
ACTIVITY SHEET
FIRELIGHTINGList three different fire lighting techniques and when they might be used.
Type of technique When might you use it?
Identify the type of firelighter or kindling
Name and draw three types of fire
Name three types of wood that are the best for:
A big flame
A good heat
A nice smell
A slow burning fire
Less smoke
1
2
3