slide preparation summary - richardwheeler.net · slide preparation summary the sample production...
TRANSCRIPT

Slide preparation summary The sample production protocol is similar to normal DAPI staining with an additional RNAse
treatment. A typical protocol would be:
1. 3× PBS wash
2. Settle on slides
3. Fix with 1% PFA (10 min)
4. Permeabilise in -20°C MeOH (30 min)
5. Rehydrate with 1× PBS wash
6. Add RNAse A (50 μg/ml) (1 hr, room temp)
7. Add DAPI (1 μg/ml) and SYBR green (1:10000) or PI (40 μg/ml), 2 min
8. 3× PBS wash
9. Mount in DABCO
For more information about sample preparation see http://users.ox.ac.uk/~path0493/
The sample preparation should be relatively insensitive to fixing conditions and precise fluorescent
stain concentration etc.
Cells should be seeded at a suitable slide density and prepared with care – these analysis tools are
much less “clever” than a person - fluorescence background (both from poor RNAse digestion and
sample contamination) will interfere with colour deconvolution and debris on the slide, very high cell
density and out of focus cells will confuse the DAPI counter.
Image capture summary Phase contrast, DAPI and PI/SYBR green images are required, DIC is not suitable. Images are best
captured at 40-60× magnification. Many images will be needed (typically 10 or more) so tiled arrays
of images are advisable. Key points to remember are:
Colour deconvolution requires quantitative capture of the fluorescence images:
o Do not pre-expose cells as this will result in photobleaching
o Do not over-expose (saturate) the fluorescence image.
o Make sure the fluorescence field stop is correctly adjusted so as not to overexpose
regions around the field you are currently capturing.
Fluorescence channels:
o DAPI – blue
o SYBR green – green (FITC/GFP)
o Propidium iodide – near or mid red (TRITC, RFP)
For more information about image capture see http://users.ox.ac.uk/~path0493/

Image analysis The image analysis tools are for use in ImageJ. ImageJ is free and open source software and is
available for Windows, Linux and Mac operating systems. For more information and downloads visit
http://rsbweb.nih.gov/ij/
Installing the tool set
Open ImageJ and go to “Plugins>Macros>Install”, navigate to the location of the text file containing
the analysis macros and click “Open”.
You can download the macro tool set from http://users.ox.ac.uk/~path0493/
Once installed the analysis tools appear as 7 icons on the right side of the toolbar. These are the
tools for image setup, measurement of chromatic aberration, correction of chromatic aberration,
measurement of K/N signal, colour deconvolution, K/N counting and summarising the K/N count
results.
The 7 tools should be used in order left to right. To use each tool simply click on their icon.
For each tool default values for various settings are already in place. These should work for many
analyses however they may also need optimising for you microscope setup or cell type. Tips for
optimising some of the values are given at the end of the instructions.
Each tool takes some time to run. Once the image preparation/analysis is complete a message box
will pop up; interacting with the images before this has happened can disrupt the
preparation/analysis step.
Preparing for the analysis All images you want to analyse should be open in ImageJ. Make sure that any images you do not
want analysed are closed.
All images have to be in the form of 16-bit image stacks with each channel (phase, DAPI and PI/SYBR
green) in a different slice. The order of the channels must be the same in all images.
Merged images (e.g. an RGB jpeg) with all the image channels combined into a single image are not
suitable.
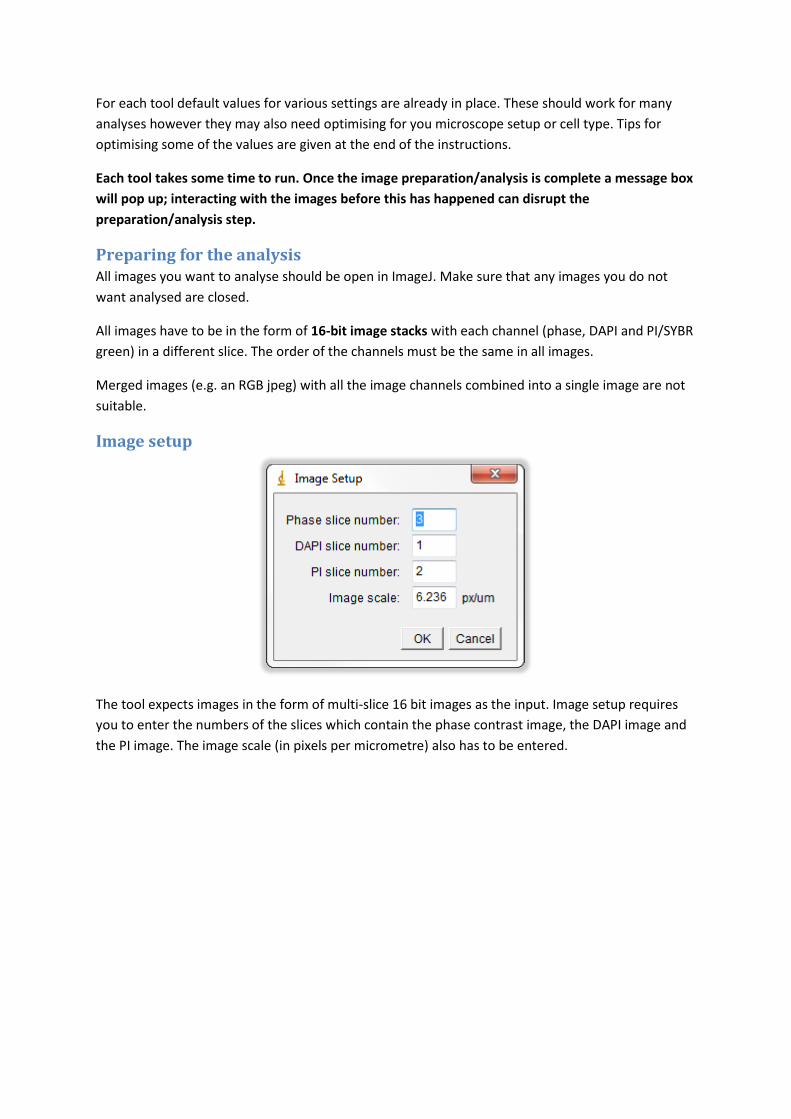
Image setup
The tool expects images in the form of multi-slice 16 bit images as the input. Image setup requires
you to enter the numbers of the slices which contain the phase contrast image, the DAPI image and
the PI image. The image scale (in pixels per micrometre) also has to be entered.
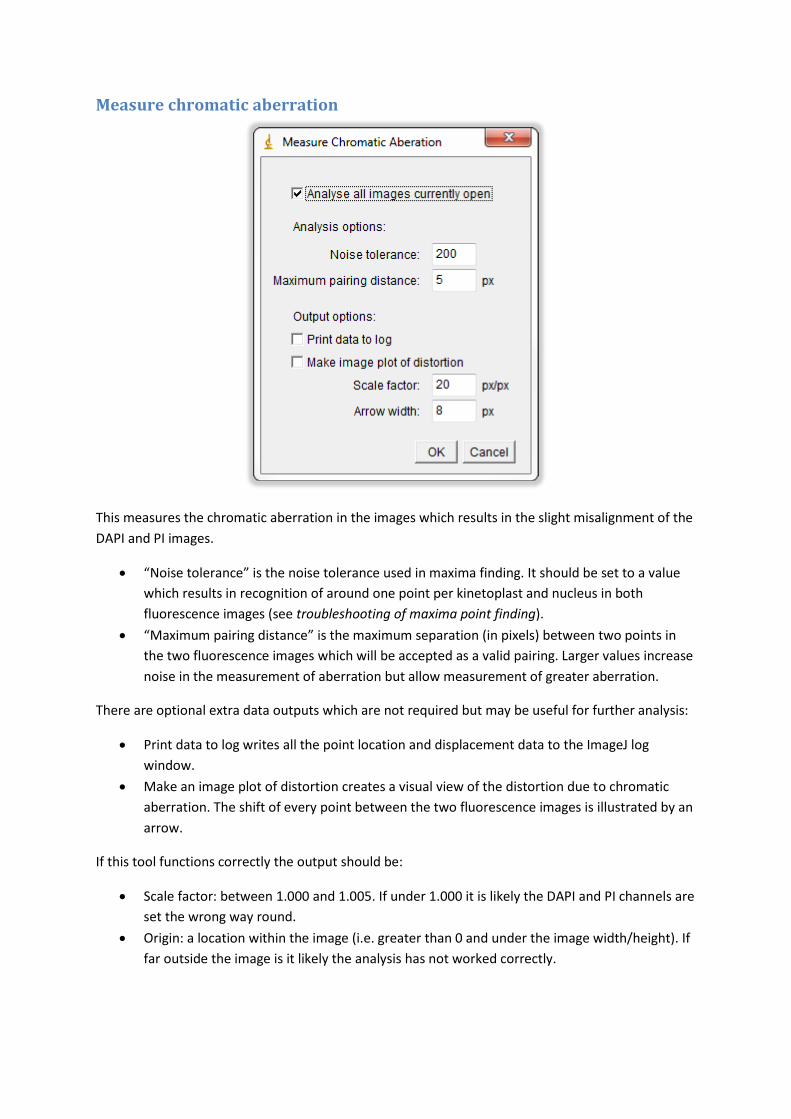
Measure chromatic aberration
This measures the chromatic aberration in the images which results in the slight misalignment of the
DAPI and PI images.
“Noise tolerance” is the noise tolerance used in maxima finding. It should be set to a value
which results in recognition of around one point per kinetoplast and nucleus in both
fluorescence images (see troubleshooting of maxima point finding).
“Maximum pairing distance” is the maximum separation (in pixels) between two points in
the two fluorescence images which will be accepted as a valid pairing. Larger values increase
noise in the measurement of aberration but allow measurement of greater aberration.
There are optional extra data outputs which are not required but may be useful for further analysis:
Print data to log writes all the point location and displacement data to the ImageJ log
window.
Make an image plot of distortion creates a visual view of the distortion due to chromatic
aberration. The shift of every point between the two fluorescence images is illustrated by an
arrow.
If this tool functions correctly the output should be:
Scale factor: between 1.000 and 1.005. If under 1.000 it is likely the DAPI and PI channels are
set the wrong way round.
Origin: a location within the image (i.e. greater than 0 and under the image width/height). If
far outside the image is it likely the analysis has not worked correctly.

Correct chromatic aberration
This distorts the PI image to correct for chromatic aberration. The scale factor and origin are
remembered from the measurement of chromatic aberration. Alternatively they can be manually
entered.
Measure K/N signal
This measures the typical intensity in the DAPI and PI channels of bright points in the image and uses
them to calculate the reference intensity values of kinetoplasts and nuclei for colour deconvolution.
“Noise tolerance” is the noise tolerance used in maxima finding. It should be set to a value
which results in recognition of around one point per kinetoplast and nucleus in both
fluorescence images (see troubleshooting of maxima point finding).
“Exclude outliers” is an exclusion filter used when analysing the points and clustering them
into the kinetoplasts and nuclei groups. Any points which lie more than this number of
standard deviations from the mean are excluded from the analysis. Lower numbers exclude
more points and can help with samples which have fluorescent debris or similar
contamination.
There is an optional extra data output which is not required but may be useful for further analysis:
“Print data to log” writes all the point intensity data to the ImageJ log window.
If this tool functions correctly the output will be the nucleus, kinetoplast and background vectors;
which indicate the brightness of kinetoplasts, nuclei and the background in the DAPI and PI channels.
There are two “quality control” measures.
Points in each cluster: These two numbers should be similar indicating a roughly equal
number of kinetoplasts and nuclei have been detected. (200, 350) would be a good result
while (20, 530) would indicate either kinetoplasts or nuclei have not been recognised or the
clustering has been unsuccessful.
Ratio ratio: The further from 1 this is the better. A value of 0.1 indicates a large difference in
the colour of kinetoplasts and nuclei, a value of 1 indicates no difference. If close to 1 then
colour deconvolution will not be possible. A typical good value is 0.3.
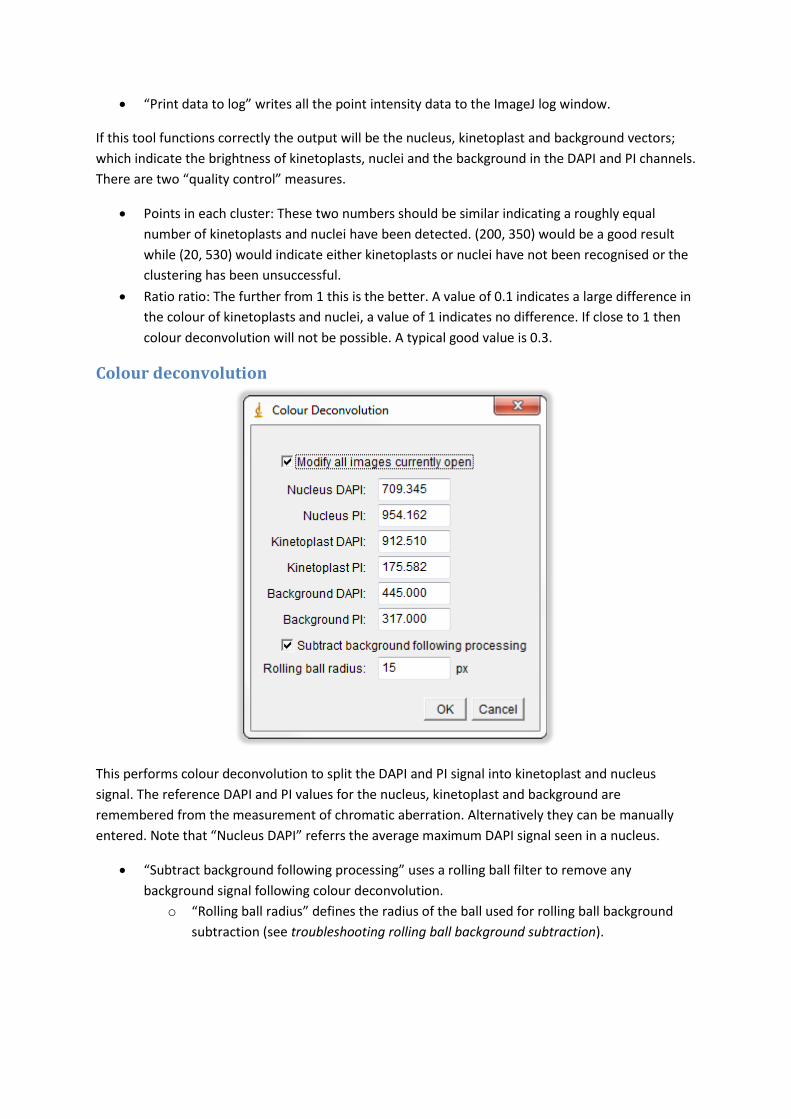
Colour deconvolution
This performs colour deconvolution to split the DAPI and PI signal into kinetoplast and nucleus
signal. The reference DAPI and PI values for the nucleus, kinetoplast and background are
remembered from the measurement of chromatic aberration. Alternatively they can be manually
entered. Note that “Nucleus DAPI” referrs the average maximum DAPI signal seen in a nucleus.
“Subtract background following processing” uses a rolling ball filter to remove any
background signal following colour deconvolution.
o “Rolling ball radius” defines the radius of the ball used for rolling ball background
subtraction (see troubleshooting rolling ball background subtraction).

K/N count
This performs the DAPI count on the deconvolved images currently open. The data collected is all
written to the ImageJ results table.
Note that this step is by far the slowest and will take at least 10 sec per image.
“Give a visual display of results” provides an image output illustrating the masks used for
detecting the cells and measuring K/N number, intensity and area.
Cell thresholding is a two-step process:
o “Rolling ball radius” defines the radius of the ball used for rolling ball background
subtraction (see troubleshooting rolling ball background subtraction).
o “Minimum cell area” defines the minimum particle area accepted as a cell. Anything
under this area is ignored.
Cell detection uses a skeletonisation step to generate the cell shape skeletons for use in
excluding cells which are actually multiple cells lying in contact.
o “Trim short skeleton branches” trims off short branches in the skeleton which are
likely to form due to irregularities in cell shape.
o “Minimum branch length” is the minimum branch length allowed to remain
following trimming of short branches.
Nuclei and kinetoplasts are detected by thresholding.

o “Thresholding type” defines whether manually set thresholds are used or if
automatic thresholding is used.
“Manual nucleus threshold value” is the thresholding value used for
detecting nuclei if manual thresholding is selected (see troubleshooting
thresholding).
“Manual kinetoplast threshold value” is the thresholding value used for
detecting kinetoplasts if manual thresholding is selected (see
troubleshooting thresholding).
“Automatic threshold type” is the thresholding method used of automatic
thresholding is selected (see troubleshooting thresholding).
o “Minimum nucleus area” defines the minimum particle area accepted as a nucleus.
Anything under this area is ignored.
o “Minimum kinetoplast area” defines the minimum particle area accepted as a
kinetoplast. Anything under this area is ignored.
Results table The data from the automated analysis is placed into the results table. Each row represents a cell (or
potential cell) and each column is corresponds to a piece of data collected. All data about every cell
is recorded in the table; absolutely nothing is filtered out.
Properties relating to the whole cell:
Cell area (um2)
o The cell area in square microns
Total kinetoplast/nuclear DNA
o The total kinetoplast/nuclear DNA within the cell outline, in arbitrary units
The DNA content of a nucleus can be compared to another nucleus
accurately
The DNA content of a kinetoplast can be compared to another kinetoplast
accurately
The DNA content of a kinetoplast cannot be directly compared to that of a
nucleus, and vice versa.
Touching edge
o A Boolean (1=true, 0=false) indicating whether any part of the cell outline touches
an edge of the image
Kinetoplast/nucleus number
o The number of kinetoplasts/nuclei detected in the cell
Cell OX/Y
o The location of the topmost pixel in the leftmost column of pixels in the cell outline
Cell X/Y
o The location of the top left corner of the cell outline’s bounding box
Cell W/H
o The width and height of the cell outline’s bounding box
Properties relating to the analysis of cell shape:

Skeleton length
o The number of pixels in the skeleton
Gives a measure of total cell length where every branch in the skeleton is
added up and taken as a contribution to overall cell length
Skeleton termini/branches
Two statistics used in detecting branched skeletons
Termini are the branch ends. An unbranched skeleton should have
two
Branches are the branch points in a skeleton. An unbranched
skeleton should have zero
Cell length
o Skeleton length converted to microns
Cell width
o Maximum cell width, as inferred from the skeleton, in microns
Image and analysis identifiers:
Image no
o The unique number of the image as assigned by the analysis
Year/month/day/hour/minute/second
o The date and time of the analysis
Kinetoplast and nuclei properties:
Each of the following column names is preceded by kinetoplast or nucleus (indicating whether they
are a statistic of the kinetoplast or nucleus) and the number of the kinetoplast or nucleus. i.e. for a
2K1N cell there will be data for “Kinetoplast 1”, “Kinetoplast 2” and “Nucleus 1”.
Area (um2)
o The area in square microns of the organelle
Sum Intensity
o The total DNA content of the organelle in arbitrary units
This measurement is comparable to the the total kinetoplast/nucleus
(respectively) DNA content of the cell
Centroid X/Y
o The location of the “centre of mass” of the organelle based on its signal
Terminus distance (um)
o The distance of the organelle from a cell skeleton terminus, this corresponds to the
distance of the organelle from one end of the cell
minimumOf(terminusDistance, cellLength-terminusDistance) gives the
distance from the organelle to the nearest end of the cell
Skeleton distance (um)
o The distance of the organelle from the cell skeleton, this corresponds to the distance
of the organelle from the centre-line of the cell
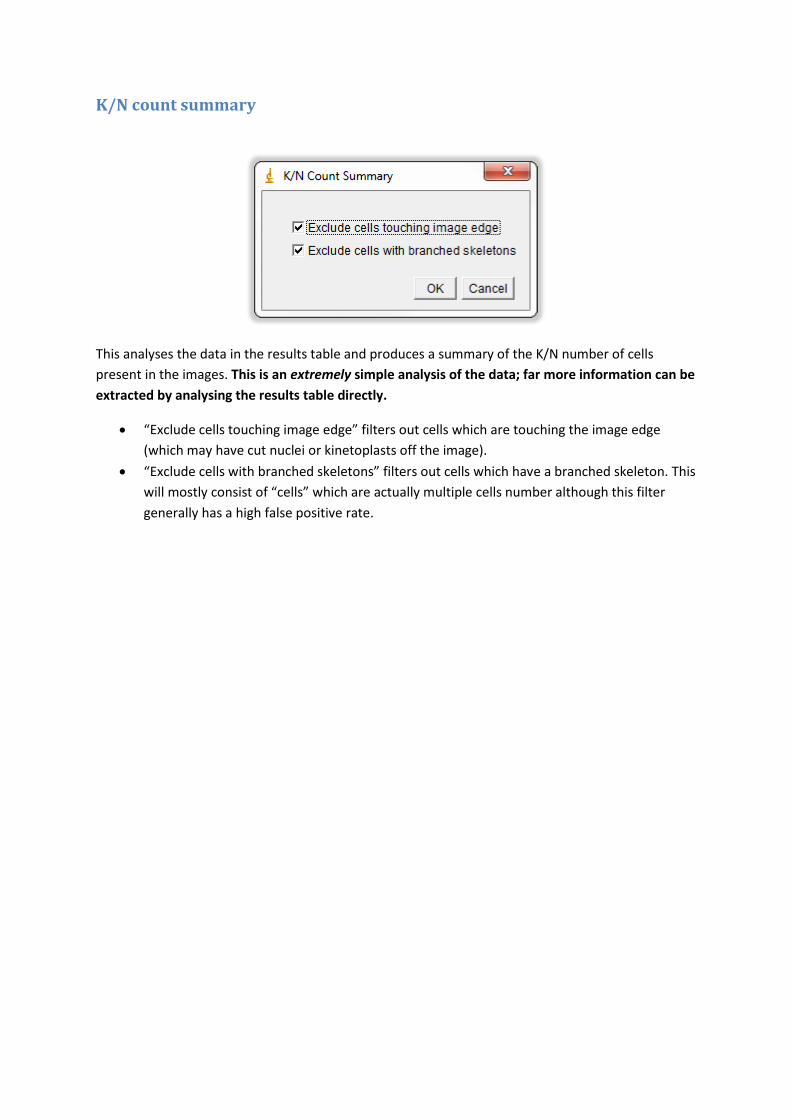
K/N count summary
This analyses the data in the results table and produces a summary of the K/N number of cells
present in the images. This is an extremely simple analysis of the data; far more information can be
extracted by analysing the results table directly.
“Exclude cells touching image edge” filters out cells which are touching the image edge
(which may have cut nuclei or kinetoplasts off the image).
“Exclude cells with branched skeletons” filters out cells which have a branched skeleton. This
will mostly consist of “cells” which are actually multiple cells number although this filter
generally has a high false positive rate.

Troubleshooting
Maxima point finding Maxima point finding uses the built-in ImageJ maxima finding tool. If there seem to be problems
with measurement of chromatic aberration or K/N signals it is worth manually optimising the noise
tolerance.
The noise tolerance should be adjusted so that there is approximately one point recognised per
kinetoplast and nucleus. The points recognised can be seen using the “Preview point selection”
option.
It does not matter if more than one point per kinetoplast and/or nucleus is identified so long as the
number of points found in kinetoplasts and nuclei respectively is similar.

Rolling ball background subtraction Background subtraction is performed by the built-in ImageJ background subtraction tool. If there are
problems with background subtraction following colour deconvolution or detecting cells from the
phase image then it is worth manually optimising the rolling ball radius.
The rolling ball radius should be adjusted so that it subtracts the background effectively without
removing too much detail on the details of interest (e.g. faint kinetoplasts or small cells).
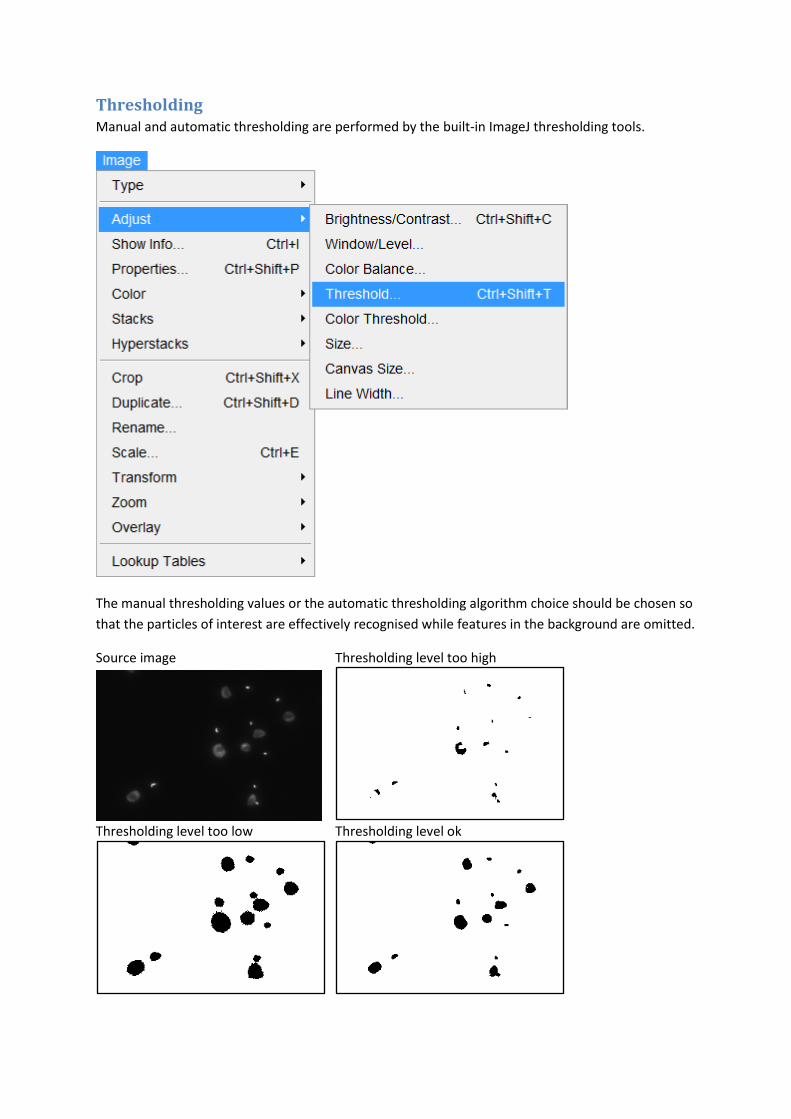
Thresholding Manual and automatic thresholding are performed by the built-in ImageJ thresholding tools.
The manual thresholding values or the automatic thresholding algorithm choice should be chosen so
that the particles of interest are effectively recognised while features in the background are omitted.
Source image Thresholding level too high
Thresholding level too low Thresholding level ok