sm dvsuper10 user operation manual manual post.pdf · introduction ... round icon on the screen...
TRANSCRIPT

SMDVSUPER10
USER OPERATION MANUAL

CONTENT INTRODUCTION ..................................................................................................................1
-PRECAUTIONS / FEATURES
SPECIFICATIONS .................................................................................. 2
REMOTE CONTROL OPERATION............................................................. 3
MOUSE OPERATION .............................................................................. 4
ICON INDICATORS ………………………………………..……………………………..4
OPERATION …………………………………………………………..... ................. 5-9
- ON/OFF 5
- SUB-MENU 5
- MAIN MENU 5
- BASIC 5
- LIVE 6
- RECORD 6
- USER 7
- BACKUP 7
- TOOLS 7
- RECORDED FILE DELETION 7
REMOTE VIEWING .…………………………………………..……………………… 8-13
- STATIC & NON-STATIC IP 8
- HOW TO GET YOUR LOCAL IP ADDRESS 9
- DDNS SETUP 10
- INTERNET EXPLORER REMOTE VIEWING 11
- REMOTE SURVEILLANCE DVR CLIENT SOFTWARE 12
- NO-IP ACCOUNT CREATION 13
FAQ (Frequently Asked Questions) ………………..………….……………… 14-15
PACKAGE CONTENTS …………………………………………………….……………... 16

INTRODUCTION Who would think this is possible, this 4 channel H.264 compression system w/4 cameras that we are offering you with reliable function for such an affordable pricing, ‘cause we’d developed from old technology to a better concept.
Now a day all the DVR camera are calling for “CCD” “SONY” “RATIO” lens that we think is great, and pricy. But most of the CCD lens isn’t delivering what we expect it will, our upgraded CMOS displays better picture than most of CCD lens, see for it yourself, compare them, there you have it!! Come to compact design; we all know the smaller the better, Right? This unit and these cameras all small enough to conceal, and the system is so simple to operate, the VGA/RCA connector allows you to display on your TV or a LCD monitor, you can also do remote access with the built-in network connector.
PRECAUTIONS
For your safety, while using the DVR and to prolong device life, please pay attention to the following details: o When installing device, please comply with all the electric product safety criteria. o Power and ground: o Do not touch the power and DVR with a wet hand o Do not spill liquid on DVR o Do not put any object on DVR o Please use soft dry cloth to clean DVR; do not use harmful chemicals. o Please unplug power line from power source if the Device is not intended to be used for a long
period of time.
FEATURES
4 Day/Night High Resolution water proof Digital Cameras H.264 compression Two USB interface, USB2.0 for data backup, USB1.1 for mouse operation. 320GB SATA HDD built-in, it could replace up to 1TB storage Password sensitive secure operation Auto Data Rollover Recording VGA and RCA output for TV and/or LCD display Optimized four channel simultaneously playback Support remote live view, parameter setting and copy playback video via network. Cell phone remote viewing Data backup via USB port Motion detection Remote control USB mouse
1

SPECIFICATIONS DVR Specifications
Item Device Parameter Specification Language Multi language to choose from
System GUI Graphic menu (OSD Menu)
Video in 4ch composite video input 1.0Vp-p,impedance75Ω,BNC
Video out 1 VGA port,1 RCA connector
Video display 4ch:1/4channel switch Video
Video standard NTSC or PAL
Picture compression H.264
Picture resolution CIF
Streaming style ISO14496-10 Video code rate(4CH) CIF: 384~768 Kbps(normal)
Picture proceeding and store
Data storage 320GB SATA HDD storage
Connector Network interface RJ45,10M/100M
Software upgrade Support USB firmware upgrade Voltage input AC:110~240V Voltage output DC: 12V/3A( optional )
Power Consumption 6W without HDD Others
Working temperature -10----50
Voltage input 12V DC 12V Voltage output for camera 12V(+/-0.2) 4channel :12V@500ma
Video impedance input 75Ω 75Ω each channel
Video output 1Vp-p 1Vp-p CVBS signal
Working temperature -10----50 Under normal conditions Camera Specification
Model SM-801
CCD Type KOREA PC1030
Pixels NTSC 640H x 480v
Minimum Illumination 0LUX/F1.2
Lens 3.6mm
IR View Distance 10-15m
Power Supply DC12V±5%
2

REMOTE CONTROL OPERATION
S/N Function Remarks
Video recording
symbol
Start/stop video recording. The green round icon on the screen indicates manual recording state.
Power Press to turn DVR ON/OFF
0,1,2… Numerical key/character
Input numbers or characters; switch recording screen, press “0” to change characters.
Playing symbol Play/stop the recording. It turns green while playing recording.
Next frame symbol
Indicates two functions: pause or move to the next frame. It will appear in the image while it pause or is in frame step playing.
FR symbol Indicates fast rewind. Followed such as x4, indicate the fast reward speed
FF symbol Indicates fast forward, followed such as x2, indicate the fast forward speed
Last track While back play the recording, it will enter last recording file quickly.
First track While back play the recording, it will enter first recording file quickly.
Recorded clip
Press to go to the beginning of the clip that is currently playing.
Press to go to the last recorded clip. (-) Backspace Press to delete inputted data (+) ESC Press to exit out of the current menu
Direction key Press this key to move cursor left
Direction key Press this key to move cursor right
Direction key Press this key to move cursor up
Direction key Press this key to move cursor down
Menu Menu/Confirm Enter into device menu and confirm setting
Timing Timing Enable or cancel timing recording
Search Search Enter search interface
Info Info Check the device information list
Display Display in HD Storage while on 4 screen monitoring or recording
Backspace/
single Display the video in single screen while
monitoring or recording; Backspace while input number or characters.
VGA Input select Press to select video output from VGA or RCA
Not Enabled
3

MOUSE OPERATION
The mouse is the primary input device for navigating system menus. NOTE: Unless otherwise noted, all system functions described in this manual are achieved using the
mouse.
To use a mouse with the system: 1) Connect the included USB mouse to the USB MOUSE port on back of the system. NOTE: The top USB port on the front panel is designed for data backup to a USB flash drive ONLY.
Do not connect a USB flash drive to the bottom USB port on the rear panel.
Connect a USB mouse to the bottom USB port on the rear panel
2) Use the mouse buttons to perform the following: • Left-Button (1): Click to select a menu option; during live viewing in split-screen, double-click on a channel to view the selected channel in full-screen. Double-click the channel again to return to split-screen view • Right-Button (2): Click to open the Sub-Menu and/or to go back to the previous screen. • Wheel: No function.
Icon Indicators The different symbols displayed on the screen, indicating different information. Some have no icon, some have icon. Please find the indicating meaning as below:
Video recording symbol The green round icon indicates manual recording state
Video recording symbol The yellow round icon indicates timing recording state.
Playing symbol Indicates the recording is being played
FF symbol Indicates fast forward, followed such as x2, indicate the fast forward speed
FR symbol Indicates fast rewind. Followed such as x4, indicate the fast reward speed
Timing symbol Indicates the video recorder is in timing state
USB Symbol Indicates the USB interface is connected
HDD Indicate HDD connect
Single frame symbol Indicates pause in single frame playing state.
**/**/** Time display Playing time or recording time.
4

OPERATION Turning the unit on/off - Plug the included AC adapter to the back of DVR and plug the other end to a wall outlet, the unit will
power on and boot up automatically, to turn the DVR off unplug the power on the back of the unit.
Note: Once the system has booted up, the display will show quad screen view of all the cameras hooked up to the DVR.
Sub Menu - Using the mouse, right-click anywhere on the screen to bring up the sub-menu. - The screen will now display the following:
- SETTING: This will display the main menu - FILE LIST: This will display the recorded file list - SYSTEM INFO: This will play current system info (time/date, IP address, HDD capacity, etc…) - TIMER: This enables the scheduled record time to activate. - TIMER STOP: This disables scheduled record time. - RECORD: This enables manual recording. (Timer must be disabled) - RECORD STOP: This disables manual recording - PLAY FILES: This will play the recorded files starting from the oldest.
Note: These functions can also be found on the remote control. (see page 3)
SUB-Menu Main Menu - Select and click on “SETTING”, and key in the default password “88888888”. - You can also press “ENTER” on the remote to bring up the main menu. - The Main Menu will now show up and display the following:
BASIC/LIVE/RECORD/NETWORK/USER/BACKUP/TOOL/EXIT
Main Menu Password Input Window Time Adjust Screen
BASIC
- Video Format: Click to select from NTSC or PAL. - Language: Click to select from English/Spanish/Chinese - DVR ID: You can set a specific numeric ID for up to 8 characters. - Enable System Log: This will log all the events - Time Adjust: Click to enter time adjust screen.
- To change the time and date settings: Simply click on the value that you want to change, and use the onscreen keypad to enter the desired value and click “X” on the onscreen keypad to close the keypad.
- Repeat steps for the Year/Month/Day/Hour/Minutes/Seconds. - Click “Time Adjust” when finish to return to the “BASIC” main screen, click “OK” to exit to the “Main
Menu”, and click “EXIT” to exit out of the main menu. Click “Yes” to save and exit the setup.
5

OPERATION continued
Live Lets you customize camera names and setup Motion Detection.
- To change camera name: Select which channel you want to change, click on “01” to bring up the number pad click again to bring up the alpha-numeric pad and key in your desired name for channel 1 or click on select and pick from a list.
- To Enable Motion Detection: Click on the box next to “Motion Detection”. - To change sensitivity: Click on the box next to sensitivity and select from the following:
Lowest/Lower/Normal/High/Highest. - Area: Click on “Area” to specify which areas you want to have the motion detection on.
The selected areas will turn red (section A in image). Trees, Flags and other constant moving objects should be grayed out to save hard drive space. Right click to exit.
- You can copy the same settings to 1 or all the channels by the selecting the desired option under “Copy To” then click “Copy” to copy to the desired channel(s).
- Motion Post-record time: This feature determines how long the unit will record once it detects motion. You can select from 1-second to 99-minutes. Repeat steps above for all other channels.
- Once done with all the changes: Click “OK” to confirm, then click “Exit” and select “Yes” to save all changes and to close main menu window.
Record This will allow you to change the recording video quality and the recording schedule for each channel.
- To change the recording video quality: Select the desired channel to be changed, Under “Video Quality” select from Normal/Medium/Superior/Best/Custom.
- To customize the quality of the recording click on “Customize Quality” and key-in the desired quality specified by MB/Hr (megabytes per hour).
Schedule Record - To Setup Scheduled Recording: Click on “Setup” next to “Schedule Record” the date and time setup
screen. - Under Date: Click to select day. (Mon-Fri, Sat-Sun, Mon-Sun, Mon, Tues, Wed, Thur, Fri, Sat, Sun) - Under From/To: Click to enter start and end time. - Repeat for each section until the desired schedule is setup. Click “OK” to exit the schedule setup, click
“OK” again to exit record screen and click “Exit” to exit to the main menu, click “Yes” to confirm save. Note: The higher the video quality the more hard drive space it will take up.
6

OPERATION continued
USER
This will allow you to change the default password (88888888) to your desired password. - To change password click on USER from the main menu - Enter the current password under “Current PWD” - Under “New PWD” enter your new password and enter again in “Confirm New PWD” - Check “Authorization Check” if you want the password to be prompted every time you want to
access the system “Setting”.
Note: Password can be up to 8 digits. Make sure you write your password in a safe place. If password is forgotten see FAQ page 15.
BACKUP This will allow you to backup recorded events on the DVR to a USB flash drive or and external HDD connected to the top USB port.
- To start backup enter the correct time and date you want to backup (From/To) - Select the file size “Full” or “Original” - Backup Channel: Select which channel you want to backup (1-4) and press OK - Play Back Screen Mode will allow you to select how many and which channel(s) you want the
playback to show on. Select from 1 Chan, 2 Chan, or 4 Chan, once selected, press “Playback” to view the recorded event. (Unit will not play the record event).
- You can also click on “List and Search” to view and select from list of recorded events on the selected time frame.
- Right-click anywhere on the screen to bring up the playback controls (PLAY, STOP, FB, FF, PREV, NEXT, CHAN).
- Once confirmed, press “STOP” to go back to the Backup menu and click on “BACKUP” and select the drive you want to backup to and click “OK”.
Note: Time of backup will vary depending on the size of the file(s).
TOOLS This will give you access to the following:
- Load Default: This will reset the DVR to the factory settings. - Update Firmware: Use to update the firmware of the system. - HDD Mng: Use to format or do data recovery. Data Recovery is ONLY used if the hard drive has
some bad sectors. The system will try to recover any file in the bad sector. Note: Once hard drive is formatted all data will be lost.
- System Log: Will list all of the system logs. (System Log must be enable in the “Basic” menu). Simply enter the dates (From-To) you want to view the logs from and click “Log list”
- System Information: Shows all of the system configurations. - System Mng: You can reboot the system in this section.
RECORDED FILE DELETION This type of DVR does not allow deletion of individual recordings. To be able to delete individual files you’ll
need a PC based surveillance system which will cost $1,000.00 more than what you paid for.
The unit will automatically delete the oldest recordings when the hard drive gets full.
The other option to delete files is to format the hard drive, which will delete all the recording.
- To format hard drive, simply go to “Settings”-“Tools”-“HDD Mng” and click on the hard drive
from the list, click “Format”, then click “Exec”. The hard drive will now be formatted.
Note: You must stop all current recordings before you can format the hard drive.
7
Remote Viewing Setup for Static and Non-Static IP
This will allow you to setup the network for remote viewing. (Internet Explorer 6.0 or higher required) Make sure to have an Ethernet cable coming from your router plugged in to the Ethernet port of the DVR. Static or Non-Static Internet IP address: How to check what you have
- If you’re not paying hundreds of dollars for your internet, then more than likely you do not have a
Static internet IP address.
- You can check your router’s “SETUP” page, under internet setup to see if you have static or non-
static internet IP address. Your router will state “Static IP” on this page if you have a Static IP
address, if it doesn’t display “Static IP”, then you have a non-static internet IP address.
Note: Before calling Sumas Media for assistance, please have your IP address ready. (Read below)
Different brands and models of routers will have different ways on how to check you internet IP address. Please check your routers user manual or call you internet provider for assistance.
If you cannot see the setup page or the internet IP is not shown or you’re not sure, please contact your internet service provider for assistance.
Before you start you will need to setup to local wired network or to your router.
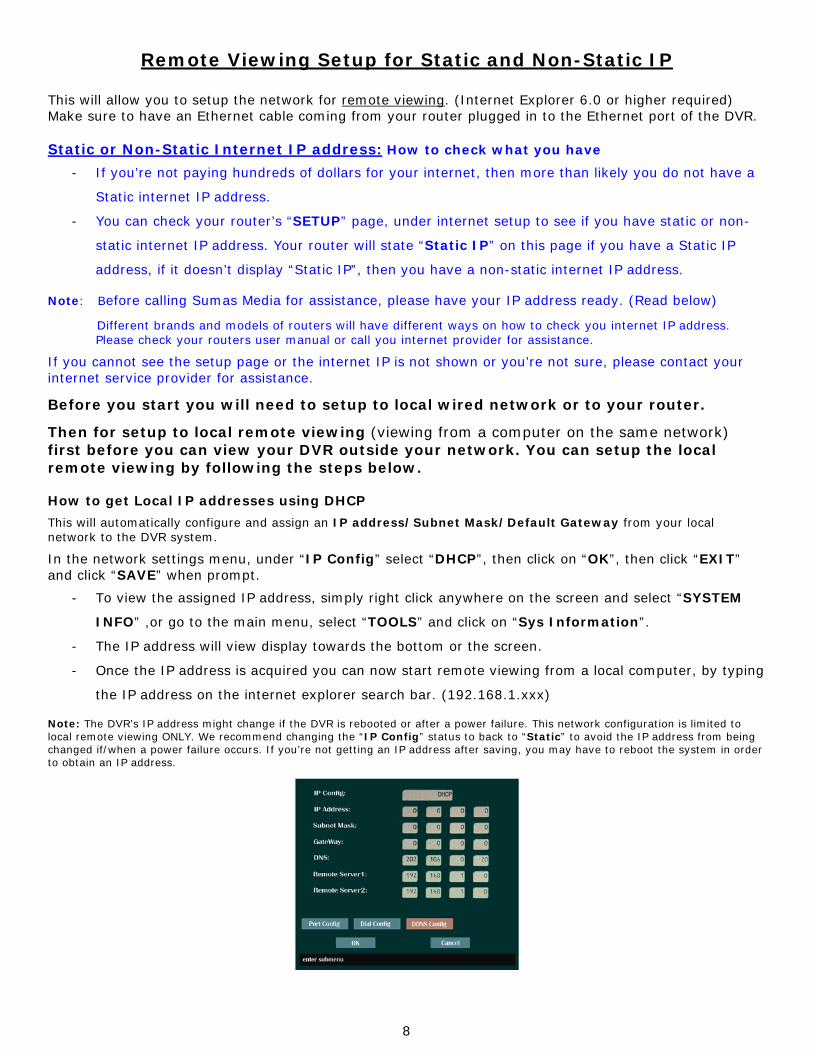
Then for setup to local remote viewing (viewing from a computer on the same network) first before you can view your DVR outside your network. You can setup the local remote viewing by following the steps below. How to get Local IP addresses using DHCP
This will automatically configure and assign an IP address/Subnet Mask/Default Gateway from your local network to the DVR system.
In the network settings menu, under “IP Config” select “DHCP”, then click on “OK”, then click “EXIT” and click “SAVE” when prompt.
- To view the assigned IP address, simply right click anywhere on the screen and select “SYSTEM
INFO” ,or go to the main menu, select “TOOLS” and click on “Sys Information”.
- The IP address will view display towards the bottom or the screen.
- Once the IP address is acquired you can now start remote viewing from a local computer, by typing
the IP address on the internet explorer search bar. (192.168.1.xxx)
Note: The DVR’s IP address might change if the DVR is rebooted or after a power failure. This network configuration is limited to local remote viewing ONLY. We recommend changing the “IP Config” status to back to “Static” to avoid the IP address from being changed if/when a power failure occurs. If you’re not getting an IP address after saving, you may have to reboot the system in order to obtain an IP address.
8

How to get your Local IP address from your PC:
- From a PC running Windows XP click on start and then click on run and type in “CMD” and press
“Enter” to bring up the command prompt screen. On Windows Vista or 7, click start and type “CMD”
on the search bar and press “Enter”.
- Once the command prompt screen shows up, type in “IPCONFIG” and press enter. This will bring out
the computers IP Address, Subnet Mask and Default Gateway.
- Depending on how many computers you have in the network, you will need to change the last set of
numbers on the IP Address before inputting the IP Address on your DVR. For example: If your
Computer’s IP Address is 192.168.1.101 and you have only 1 computer you will use 192.168.1.102,
192.168.1.103, etc…, as the IP Address for your DVR. Subnet Mask and Default Gateway must be
copied exactly the same to the network settings of the DVR.
Note: Using the same IP Address as your computer will not work.
Windows XP Windows Vista/7 Command prompt screen
Static IP Setup (Required for local remote viewing from your PC and from outside home/business network)
- To input the IP configuration, click on “IP Config:” and select “Static IP”
- Fill out all appropriate fields IP Address, Subnet Mask, Gateway.
- Click on “Port Config” and verify that all fields are filled out. (Control/Video Stream/Talkback
Stream/HTTP port).
- Once done, click on “OK” then “Exit” and confirm save to save the changes.
Note: When using a router, make sure all of these ports are properly forwarded to be able to view outside the local network. (Check router manual for port forwarding options). (Forward the following Ports: 3356, 3356, 3360 and 80)
IP Configuration Screen Port Configuration screen
9

DDNS Setup
(Use for static and non-static IP address for remote viewing outside your home/business network)
Note: Local static IP must be configured before continuing to this step (see above steps).
- Click on “DDNS Config” under Network settings to configure DNS settings.
- If you don’t have a registered domain name, please visit www.no-ip.com to setup a free domain
name and follow the free account setup. (make sure to select “.no-ip.org” see detailed
instructions below, page 13)
- Once an account has been setup, click on “DDNS”.
- Click on the server and select “no-ip”
- Under “Account” and “Password”, input your account user name and password from
www.no-ip.com
- Under “Hostname” enter the domain name you have created from www.no-ip.com (no need
include “.no-ip.org”).
- Click on “Activate” and then click on “OK”
- Click “OK” again to exit to the main menu, then click “EXIT” and confirm the “save and exit”
Network Setup DDNS Config. Screen
Router Setup: - You must enable port forwarding for the following ports (3356, 3357, 3360, and HTTP port 80).
- Once all the settings are inputted correctly make sure you save and reboot your router.
- Once the router has rebooted; open internet explorer browser on your computer and type the
domain name you have registered with www.no-ip.com [(example http://sumastest.no-ip.org) (see
below)].
Note: Different brands of routers will have different ways on how to enable port forwarding. Please check with your routers user manual to properly setup port forwarding, or call your internet service provider for assistance. Sumas Media DOES NOT provide technical support on routers.
10

INTERNET EXPLORER REMOTE VIEWING Remote viewing requires Internet Explorer (IE) 6.0 or higher running on Window XP or higher.
To start remote viewing: Make sure that network configuration is properly setup. - Open IE and type in the IP address for (xxx.xxx.xxx.xxx) on the address bar. (Fig. 1) - For non static IP type-in the domain name you have registered from www.no-ip.com. - Active X attention bar should pop-up. Click on the Active X attention bar and select run/install. Active X
controller must be installed in able to run remote viewing. If Active X bar does not pop-up and log-in screen does not come up, you must enable Active X in IE internet options. (Fig.2)
- Enter the password when prompt and click OK. Default password is “88888888” - Once logged in, quad view should automatically start showing all the active camera views. (Fig.3)
Fig. 1 Fig. 2 Fig. 3
Control configurations for remote viewing.
Logout: Click to log off remote viewing. View: Click to view cameras. Playback: Click to playback recorded events. Log: Click to view system logs. DVR configuration: Click to enter DVR configuration. (Basic info, Channel config, and Network config). Local setting: Click to specify local storage/capture/save paths. Camera channels: Double-click to enable/disable camera channel Viewing pane: Live and Playback viewing window. Full screen view: Click to view selected channel in full screen mode. Quad screen view: Click to switch from full screen view to quad view. Stop: Click to stop viewing or playback. Capture: Click take screen shot of selected camera channel. (screenshot is save on the local hard drive) Record: Click to start recording what’s currently on the screen to your local hard drive. Brightness, Hue, Contrast, Sharpness: Adjust up/down to get the desired video settings. Brightness, Hue, Contrast, and Sharpness Reset: Resets all video setting to default.
Cell Phone Viewing This DVR also supports remote viewing via cell phone. Supported smart phones are iPhone, Nokia, Motorola, Samsung,
HP, etc… Please refer to the included CD or our website at www.sumasmedia.com for instructions and cell phone software.
11

Using “Remote Surveillance DVR Client” Software The Remote Surveillance DVR Client software can be found in the included CD or at www.sumasmedia.com. - Once the program have installed, open the program, and input the default password “88888888”. - Once logged in, click on “Device Management”. - Once DVR management window show up, right click under group management and select “Add”
Login Device Management DVR management window - Fill in the box under group name with the desired name and check “Auto Connection” - Once the group is added, right-click under DVR Management and select “Add” - Fill in the name, IP address, Password (DVR password) for local remote viewing. - Fill in the name, and click on “Domain” and fill in the domain name created from no-ip (sumastest.no-
ip.org), password for remote viewing outside your local network. - Check “Auto Connection” and click “Add” when finished.
Add Group Add DVR DVR info input - Close “DVR Management” once done adding the group and DVR. Group name will now show up under “DVR List” - Double-click on the blue house icon to show DVR. - Double-click on the blue monitor icon to show all the channels of you DVR. - Once the channels show-up, double-click each channel to view your cameras.
DVR Group DVR List DVR Channels Note: This program can be use with multiple DVR’s, Repeat steps above to add DVR to existing groups or to create multiple groups.
12

No-IP Account Creation
1. Visit www.no-ip.com and click on “Create Account” on the right side of the screen. (Fig 1) 2. On the next page click on “Free DNS”. (Fig. 2) 3. Fill-in all the required information. (Make sure your user name does not exceed 14
characters). Then agree to the terms and click on “I accept, Create my Account”. (Fig. 3)
Fig. 1 Fig. 2 Fig. 3
4. After clicking on “I accept, Create my Account”, a confirmation email will be sent to you. You’ll need to go to your email and click on the link to confirm your email and activate your account. (Fig. 4)
5. Once you’ve confirmed your email, you will now be able to login to your no-ip account, by clicking on “login”.(Fig 5)
Fig. 4 Fig. 5
6. After logging in click on “Your No-IP” on the top-right of the screen next to account. On
the “Your No-IP” screen click on “Add a Host”. 7. Type-in your desire host name (less than 14 characters) in the box, for example
“sumastest”. Click on the drop-down menu and select “no-ip.org” 8. Host Type: “DNS Host (A)”. 9. IP Address will automatically populate. (Make sure you’re on the same network as the
DVR to get the correct web IP address). 10.Leave everything else the same and click on “Create Host” at the bottom of the screen.
Note: Make sure to write down your login, password and hostname information, you will need to
input all these information into the DVR under “DDNS”. (See instructions above)
13

FAQ (Frequently Asked Questions)
If your problem is not listed below, please call our toll-free number for more support.
1. Question: DVR will not power up? Answer:
Check the adaptor input to the DVR. Check the power supply line connection going to the wall outlet. Test another device on the wall socket to make sure there is power.
2. Question: DVR is rebooting automatically or stopped after starting the DVR for several
minutes? Answer:
Instability or low input voltage. Bad sector on the hard drive or the hard drive has gone bad. Power supply output is not enough or wrong voltage power supply. Over heating, dusty, or high humidity environment to operate.
3. Question: No output of signal channel, multi channel or all channel video, blue screen?
Answer: Please check camera’s AC adaptor connection. Please check the camera’s BNC connection on the back of the DVR and to the camera.
Make sure they are both locked in place. Try swapping the camera connections to determine if there is camera defective. Live view settings is set to closed. (remote view only)
4. Question: DVR cannot record after startup.
Answer: Make sure the power adaptor is DC 12V. Confirm the HDD is formatted. To format HDD go to “Tools” then “HDD Mng” The HDD has gone bad. Go to the system info to check if the unit is recognizing the HDD. Scheduled Recording is enabled. Disable Scheduled Recording.
5. Question: Video is flickering, lines across the screen on each channel, and/or display is
distorted? Answer:
Check and make sure the LCD monitor and the VGA cable are in good working condition. Make sure the system is set to NTSC not PAL. The recommended monitor display screen resolution is at least 800 x 600. Reset the system (see page 8).
6. Question: System time is not correct?
Answer: A system Reset was done. Redo time setup. (see page 5) Wrong setting or user did not click "Time Adjust" to confirm. (see page 5)
7. Question: Why the “Record Stop” by clicking the right mouse button does not work,
how to stop recording? Answer:
The “Record Stop” by right mouse button will only work with Manual recording. This cannot stop recording when the DVR is on “scheduled recording” mode.
You must click on “Timer Stop” first to stop recording. If the recording does not stop, click on “Record Stop” to stop the recording.
14

FAQ (Frequently Asks Questions) cont.
8. Question: Motion detection is not working properly? Answer:
Motion detection is not enabled. (see page 6) The setting of motion detection area is not correct. (see page 6 for setup) Sensitivity is too low.
9. Question: USB backup error Answer:
The data exceeds the capacity of backup device The backup device is incompatible or not formatted properly (FAT/FAT32). The backup device is damaged. USB device plugged into the wrong port. (see page 4)
10. Question: Remote control cannot work? Answer:
The distance of remote control is too far or the angle is bad Remote control battery run out, replace batteries.
11. Question: WEB cannot login? Answer:
Please check the network to see if it is connected. Ping xxx.xxx.xxx.xxx (DVR IP) to check if the Internet is linked properly. Recommended to use Internet Explorer browser v6.0 or higher running on Windows XP or
higher operating system. ActiveX control has been blocked or disabled. Enable or unable the Active X control in the
options menu in internet explorer.
12. Question: There is no picture or picture is not clear when you preview the recording or playback the recording via IE. Answer:
Restart browser and log back in to the DVR. Restart the DVR by going to “Tools” in the main menu then click on “System Mng” and click
on “Restart DVR”
13. Question: The mouse is not detected or not working properly. Answer:
Mouse is defective or broken. Mouse is plugged in the wrong port. Make sure the mouse is plugged in the USB mouse port.
(see page 4)
14. Question: No picture on selected channels, Camera not displaying picture, when there’s no light the color of the picture looks weird.
Answer: Camera cable are loose or disconnected, Camera power cable not connected or defective. Night vision color on a CCD camera is different than a normal camera.
15. Question: A humming sound and vibration coming from the system. Answer:
This is normal, the humming and vibration is coming from hard drive while it’s spinning.
16. Question: Cannot login system when trying to remote view, IE browser stuck at loading or error message on the screen. Answer:
Check and make sure all the network settings on the DVR including the DDNS setting if you are using non-static IP. Also check you domain registration to make sure it’s not expired.
17. Question: I forgot my password, is there a default password? Answer:
Unfortunately there is no default password. You will need to email 2 screenshots to [email protected]. Take a screenshot of the main screen where all the cameras are showing, and system info (right-click on the main screen and select system info).
Once we have the screenshots we’ll email you with the unlock codes within 72hours.
15

PACKAGE CONTENT
DVR 4x Camera Mouse
4 X Power & Video Cable
1 x Power supply for cameras DVR DC Power supply
1 X 4-way Camera
Power Splitter User Manual Quick start guide
4 X Camera Mounting Kit
Remote Control Software CD
16