smart banding machine - lbm-italia.comlbm-italia.com/downloads/mabas_sm-90_series_manual.pdf ·...
TRANSCRIPT
LBM-Italia SpA
SEDE OPERATIVAC.so Principe Oddone, 3710044 TORINO (Italia)
t +39 011 4731316f +39 011 [email protected]
SEDE LEGALEC.so Galileo Ferraris, 14610129 TORINO (Italia)[email protected]
C.F.-P.IVA 10766770019REA TO 1160249cap.soc.120.000 € i.v.
1
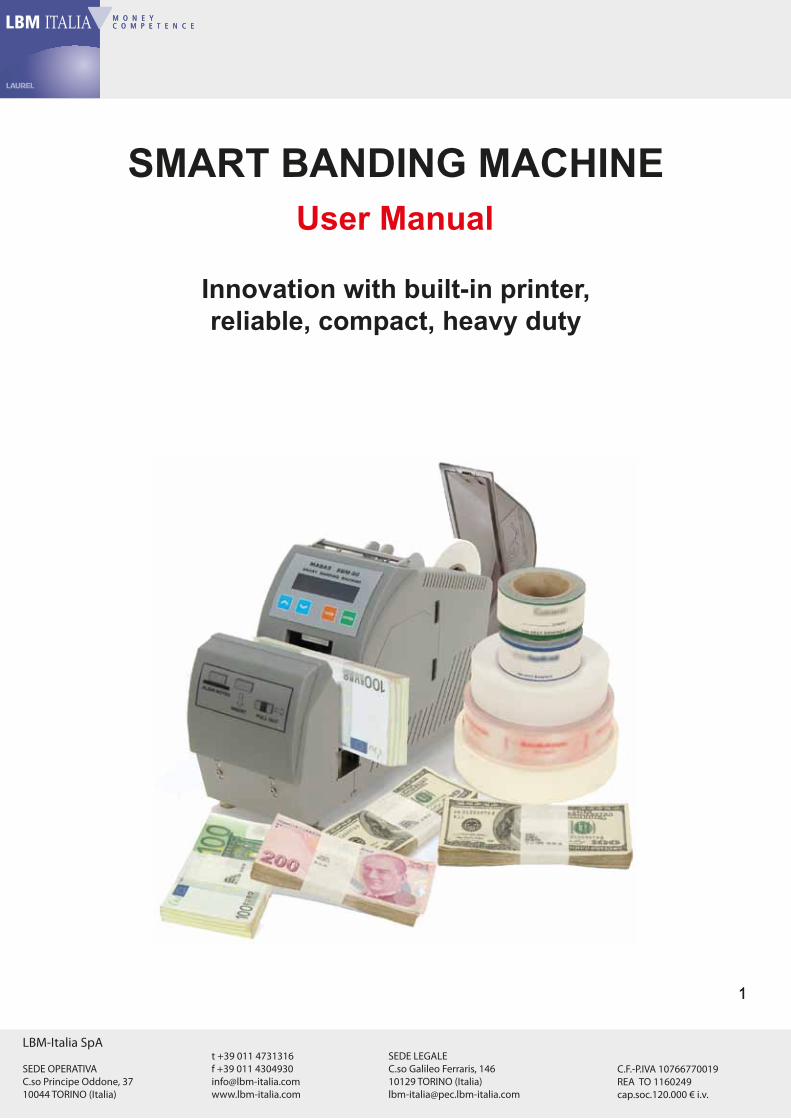
SMART BANDING MACHINEUser Manual
Innovation with built-in printer,reliable, compact, heavy duty
LBM-Italia SpA
SEDE OPERATIVAC.so Principe Oddone, 3710044 TORINO (Italia)
t +39 011 4731316f +39 011 [email protected]
SEDE LEGALEC.so Galileo Ferraris, 14610129 TORINO (Italia)[email protected]
C.F.-P.IVA 10766770019REA TO 1160249cap.soc.120.000 € i.v.
1

MODELS FEATURES
SM-90 P 40 mm band, with printer, 4 lines x 20 characters
SM-90 B 40 mm band, without printer
SM-90 S 30 mm band, without printer
SM-90 SP 30 mm band, with printer, 4 lines x 13 characters
SM-90 Models
LBM-Italia SpA
SEDE OPERATIVAC.so Principe Oddone, 3710044 TORINO (Italia)
t +39 011 4731316f +39 011 [email protected]
SEDE LEGALEC.so Galileo Ferraris, 14610129 TORINO (Italia)[email protected]
C.F.-P.IVA 10766770019REA TO 1160249cap.soc.120.000 € i.v.
2

CHAPTER PAGE
4
5
6
7
8
9
10
11
12
13
14
15
16
17
18
Product Introduction
Technical Specifications
Packing List
Installation
Preparation for operation
Band - reel replacing
Operation
Banding cycle failures
Printer ink-cartridge replacing
Printer data transfer from PC
Data transfer utility screen
Setup system parameters
Setup printer data lines
Error codes
Operator maintenance
Contents
PLEASE READTHIS USER MANUAL CAREFULLYBEFORE USING THE MACHINE !
LBM-Italia SpA
SEDE OPERATIVAC.so Principe Oddone, 3710044 TORINO (Italia)
t +39 011 4731316f +39 011 [email protected]
SEDE LEGALEC.so Galileo Ferraris, 14610129 TORINO (Italia)[email protected]
C.F.-P.IVA 10766770019REA TO 1160249cap.soc.120.000 € i.v.
3

Thank you for using the SM - 90 - new generation banknote banding machine.The SM - 90 will support you with a lot of new features and advantages.
• The SM - 90 is constructed as a reliable, compact, heavy duty working banknote banding machine.
• With its compact size (40 x 11.2 x 24.5 cm) and less weight (8 kg), the working place of the machine can be changed easily. The small width allows to place the SM - 90 close by your banknote counting/sorting machines.
• The machine is operating with only DC 24V; there is no high voltage (AC 100 - 240V ) within the machine that means much more security for the user. A power - adapter which supplies the machine with 24V is included in the delivery.
• The band feeding is very easy & comfortable with the removable feeding module.
• It is possible to use all kind of banding paper quality since the machine can be adjusted by software parameters to reach the best banding result. It is not necessary (and not possible for operator) to make any mechanical adjustments or changes for different banding paper quality and banding result.
A significant innovative feature of the SM - 90 is the built - in printer function.
• After finishing of a banding cycle, the machine prints 4 lines of data on the band during pull- out movement of the strap.
• The printed 4 lines can contain fix & variable data with 20 characters each line.
• Data for each of 3 lines can be chosen by the operator from 8 transferred options (e.g. 8 operators).
• Date & Time will always be printed at bottom line and can be changed only by service or supervisor by making the data transfer.
Product Introduction
For example:
ABCD BANKTAKSIM SB. ISTANBUL ALI SAGLAM – OP2123.05.2011 16:43:22
ABCD BANKZURICH BRANCH
RITA MULLER – OP323.05.2011 16:43:22
LBM-Italia SpA
SEDE OPERATIVAC.so Principe Oddone, 3710044 TORINO (Italia)
t +39 011 4731316f +39 011 [email protected]
SEDE LEGALEC.so Galileo Ferraris, 14610129 TORINO (Italia)[email protected]
C.F.-P.IVA 10766770019REA TO 1160249cap.soc.120.000 € i.v.
4
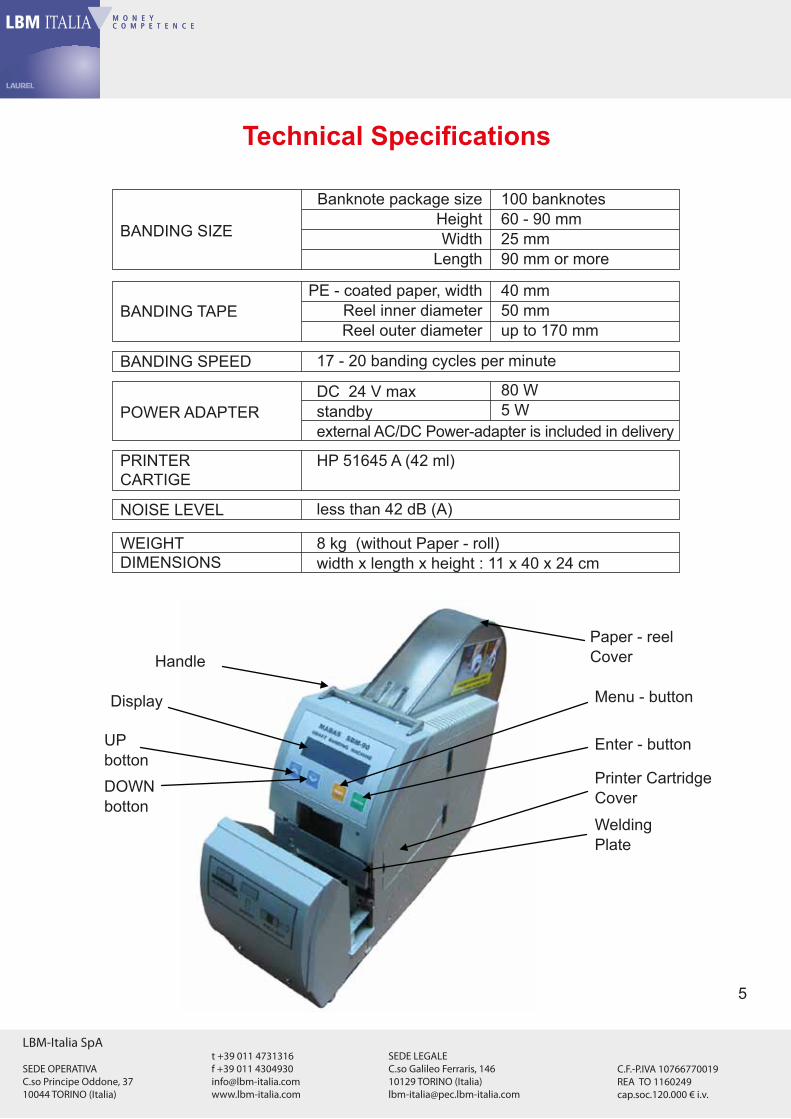
BANDING SIZE
Banknote package sizeHeightWidth
Length
100 banknotes60 - 90 mm25 mm90 mm or more
BANDING TAPEPE - coated paper, width
Reel inner diameterReel outer diameter
40 mm50 mmup to 170 mm
POWER ADAPTERDC 24 V maxstandbyexternal AC/DC Power-adapter is included in delivery
80 W5 W
WEIGHTDIMENSIONS
8 kg (without Paper - roll)width x length x height : 11 x 40 x 24 cm
BANDING SPEED 17 - 20 banding cycles per minute
NOISE LEVEL less than 42 dB (A)
PRINTER CARTIGE
HP 51645 A (42 ml)
Handle
Display
UPbottonDOWNbotton
Paper - reelCover
Menu - button
Printer CartridgeCover
WeldingPlate
Enter - button
Technical Specifications
LBM-Italia SpA
SEDE OPERATIVAC.so Principe Oddone, 3710044 TORINO (Italia)
t +39 011 4731316f +39 011 [email protected]
SEDE LEGALEC.so Galileo Ferraris, 14610129 TORINO (Italia)[email protected]
C.F.-P.IVA 10766770019REA TO 1160249cap.soc.120.000 € i.v.
5

Packing List
1
2 3
4
5
6
7
8
PACKING LIST12345678
The SM-90Power - adapterData cable - RS 232Paper - roll adapterPrinter Ink - cartridge, HP 51645A (42 ml)Paper - roll (white for test)User - manualSoftware CD
LBM-Italia SpA
SEDE OPERATIVAC.so Principe Oddone, 3710044 TORINO (Italia)
t +39 011 4731316f +39 011 [email protected]
SEDE LEGALEC.so Galileo Ferraris, 14610129 TORINO (Italia)[email protected]
C.F.-P.IVA 10766770019REA TO 1160249cap.soc.120.000 € i.v.
6

1
2
3
4
5
6
7
8
9
10
11
12
Open the box.
Remove the machine and the accessories.
Keep safe the empty box for future usage.
Put the SM - 90 machine and the Power - adapter on the table
Never leave Power - adapter on the floor, put it always on the table
Connect DC - connector to the SM - 90 socket at the rear side
Connect AC - plug of the Power - adapter to AC INPUT: 100 - 240V socket
Switch - on the SM - 90 by the power switch at the rear side
The display starts to indicate that the machine is warming-up
Wait till operating temperature is reached (takes around 2 minutes)
When the temperature is reached, the machine is ready for operation
If there is no Paper - reel installed in the machine, follow the instructions of
“Band - reel Replacing”.
Installation
LBM-Italia SpA
SEDE OPERATIVAC.so Principe Oddone, 3710044 TORINO (Italia)
t +39 011 4731316f +39 011 [email protected]
SEDE LEGALEC.so Galileo Ferraris, 14610129 TORINO (Italia)[email protected]
C.F.-P.IVA 10766770019REA TO 1160249cap.soc.120.000 € i.v.
7

Preparation For Operation• Connect the Power-adapter to AC-INPUT: 100 - 240V.
• Switch-on the machine with the switch located at the rear side.
• Wait untill the operating temperature is reached (it takes around 2 minutes).
• Check the Band-reel if it is already advanced; if necessary replace the band-reel and
feed correctly band (follow instruction replacing the Band-reel).
• When operating temperature is reached, the machine is ready to band.
CAUTION !Anytime you intend to enter with your fingers into the banding area of the machine (in order to take off band parts or clean this area), be sure you have blocked (disabled) the machine or Switch-off the power.
You can block (disable) the machine by pressing ENTER-button for 2 seconds; also the display will indicate “SAFETY PAUS”If the machine is disabled, no action (no movement of motors) will occur.
You can enable the machine again by pressing ENTER-buttonFor safety reason unplug the Power-adapter from AC-INPUT if you do not use the machine for long period or overnight.
CAUTION !In error cases the welding plate rarely could be heated up by the heater.To prevent touching hot parts, please be careful when entering with your fingers into the banding area or Switch-off the machine and wait for cooling.
LBM-Italia SpA
SEDE OPERATIVAC.so Principe Oddone, 3710044 TORINO (Italia)
t +39 011 4731316f +39 011 [email protected]
SEDE LEGALEC.so Galileo Ferraris, 14610129 TORINO (Italia)[email protected]
C.F.-P.IVA 10766770019REA TO 1160249cap.soc.120.000 € i.v.
8

Sostituzione del rotolo della fascetta
• Press ENTER-button for 2 sec. to get the machine into “SAFETY PAUSE” mode.
• Open the band cove.
• Remove used band-reel. If necessary move the band end by pressing UP-button.
• Take it off the band-reel - holder out of the used band-reel.
• Install the reel-holder into the new band-reel.
• Put the new band-reel with holder in right direction into the machine – see how to do it on
the pictures located at the band cover.
• Feed the band end into the machine till the transport roller is reached.
• Press DOWN-button to feed the band end till it can be held by operator fingers.
• Close the band-reel cover.
• Pull the band end powerful and quickly till it is cut by the machine’s knife.
• Press ENTER-button so that the gripper fingers catch the band end and the machine is in
“READY” status.
1
2
3 Put in new
band-reel
Feed band intothe machine
Cut the band
Band - reel Replacing
LBM-Italia SpA
SEDE OPERATIVAC.so Principe Oddone, 3710044 TORINO (Italia)
t +39 011 4731316f +39 011 [email protected]
SEDE LEGALEC.so Galileo Ferraris, 14610129 TORINO (Italia)[email protected]
C.F.-P.IVA 10766770019REA TO 1160249cap.soc.120.000 € i.v.
9

Operation
• The machine has to be in “READY” status.
• Align the banknotes to be banded and put them into the machine stack as shown in the
Pictures 1,2.
• After the banknotes are placed completely into the machine, the banding cycle will start
automatically when the banknotes are pressed down a little bit.
• After banding cycle starts, do no longer hold the banknotes with fingers.
• When the banding cycle is finished you will hear a short signal tone and also light comes up.
• Pull-out the banded strap horizontally to right side with a regular speed possible.
• During Pull - out the strap, the built - in printer will write 4 lines of data on the band.
• Please Pull - out the banded strap carefully out of the machine to the right in order to
archieve best print result on the band.
• As soon as the strap is pulled - out, the machine immediately starts the preparations to get
into “READY” status again.
1
5
4
3
2
Alignbanknotes Insert into
machinefrom top todown
Do nottouchduringbanding
Pull outstrap to right
OK
LBM-Italia SpA
SEDE OPERATIVAC.so Principe Oddone, 3710044 TORINO (Italia)
t +39 011 4731316f +39 011 [email protected]
SEDE LEGALEC.so Galileo Ferraris, 14610129 TORINO (Italia)[email protected]
C.F.-P.IVA 10766770019REA TO 1160249cap.soc.120.000 € i.v.
10

Banding Cycle Failures
• Disable (block) the machine by pressing ENTER-button for 2 seconds.
• “SAFETY PAUSE–RELOAD BAND” will be displayed.
In this mode you can enter with your fingers into the banding area without danger.
Please be careful the welding plate can be very hot.
• Remove all banknotes out of the stack.
• Remove also band or band parts out of the banding area.
• If the band is not cut correctly, pull the band manually to be cut, if necessary make band
advance with DOWN-button and cut again.
• When the banding area of the machine is empty, enable the machine by pressing
ENTER-button again.
• The band-control-fingers will catch the leading edge of the band automatically and band
advance will follow.
• Machine gets into “READY” status – see also display.
• Start normal banding procedure again.
If the banding-cycle fails and parts of the band remains in the machine, Please follow the instructions below:
LBM-Italia SpA
SEDE OPERATIVAC.so Principe Oddone, 3710044 TORINO (Italia)
t +39 011 4731316f +39 011 [email protected]
SEDE LEGALEC.so Galileo Ferraris, 14610129 TORINO (Italia)[email protected]
C.F.-P.IVA 10766770019REA TO 1160249cap.soc.120.000 € i.v.
11
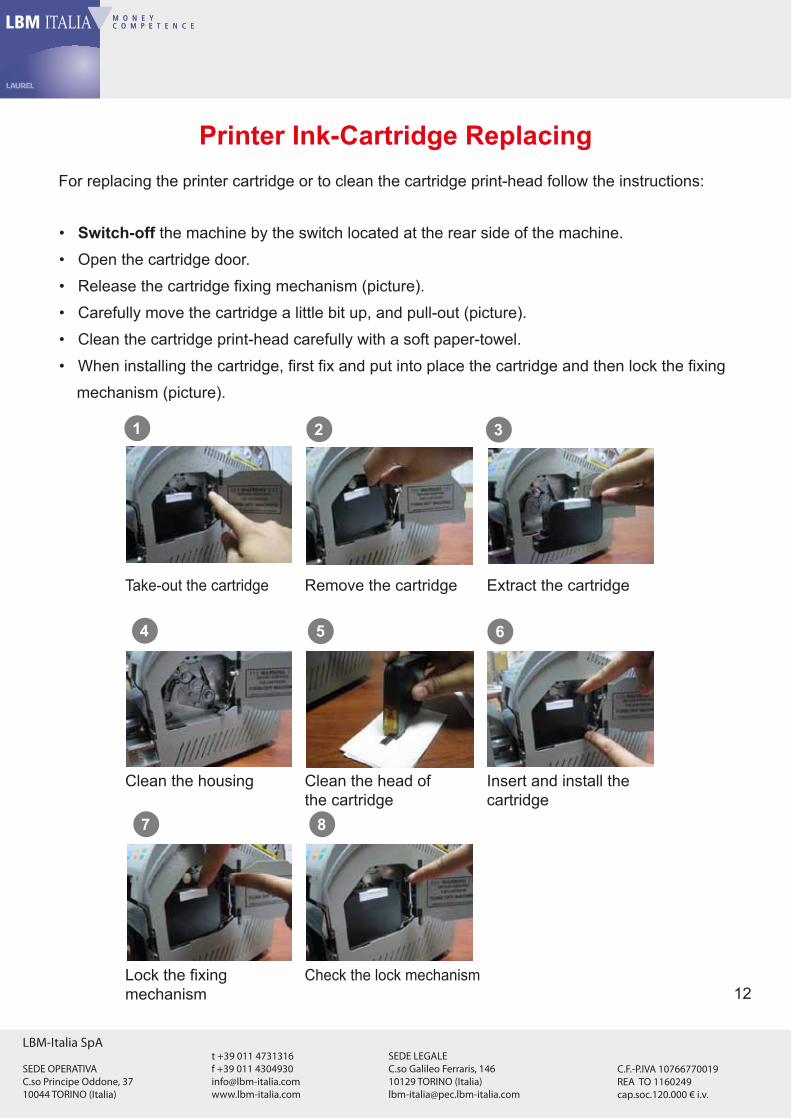
Printer Ink-Cartridge ReplacingFor replacing the printer cartridge or to clean the cartridge print-head follow the instructions:
• Switch-off the machine by the switch located at the rear side of the machine.
• Open the cartridge door.
• Release the cartridge fixing mechanism (picture).
• Carefully move the cartridge a little bit up, and pull-out (picture).
• Clean the cartridge print-head carefully with a soft paper-towel.
• When installing the cartridge, first fix and put into place the cartridge and then lock the fixing
mechanism (picture).
1 2 3
4 5 6
7 8
Take-out the cartridge Remove the cartridge Extract the cartridge
Clean the housing Clean the head of the cartridge
Insert and install thecartridge
Lock the fixing mechanism
Check the lock mechanism
LBM-Italia SpA
SEDE OPERATIVAC.so Principe Oddone, 3710044 TORINO (Italia)
t +39 011 4731316f +39 011 [email protected]
SEDE LEGALEC.so Galileo Ferraris, 14610129 TORINO (Italia)[email protected]
C.F.-P.IVA 10766770019REA TO 1160249cap.soc.120.000 € i.v.
12
Printer Data Transfer From PCFor the models the SM-90P and the SM-90SP with built-in printer:• The printer data for Lines 1, 2 and 3 have to be transferred once from PC to the SM-90.• Line-4 always prints Date & Time, during a data transfer process actual Date & Time of PC-system is automatically transferred to the SM-90.• The data list for Lines 1, 2 and 3 can be edited new, or re-called from pre-stored fileor partly changed and then transferred to the SM-90. • Connect PC and the SM-90 with special RS232 interface cable. • Start the - DATA - TRANSFER - PROGRAM on PC. (first check the Windows operating system recommended for PC !) • Create the data list for Line 1, 2 and 3 by: - Recalling an existing file; - Change some lines of existing list; - Edit new list • Switch-off and then Switch-on the SM-90. • Transfer the created data list. • If data transfer is successful, disconnect serial-cable from the SM-90. • New transferred data and Date & Time is now available on the SM-90.If the data transfer program does not open the screen with the lists (mostly PORT error appears) follow the instruction on PC: • Connect interface cable to RS232/USB of PC. • Enter Control Panel. System Hardware Device Manager Ports (COM...) USB Serial Port Port Settings Advanced COM Port number Choose and click the lowest COM-number which is not used OK
OK• Restart Data Transfer Program; now the screen should be opened.• Switch-off and Switch-on the SM-90.• Data modification and transfer will be available.
Configuration
Bits per secondData Bit
ParityStop Bit
Flow control
96008None1None
LBM-Italia SpA
SEDE OPERATIVAC.so Principe Oddone, 3710044 TORINO (Italia)
t +39 011 4731316f +39 011 [email protected]
SEDE LEGALEC.so Galileo Ferraris, 14610129 TORINO (Italia)[email protected]
C.F.-P.IVA 10766770019REA TO 1160249cap.soc.120.000 € i.v.
13

Data Transfer Utility Screen
Clear Screen To edit all new.
Load Last Transferred Last transferred data list appears on the screen.
Load Load data list from the existing files.
Save As Save screen data to a file.
Print Screen Screen data will be printed as one column.
Advanced Use For online usage; PC always connected to the SMB-90.
Transfer Data Screen data will be transferred to the SMB-90.
Save Data and EXIT Screen data will be saved and program exit.
LBM-Italia SpA
SEDE OPERATIVAC.so Principe Oddone, 3710044 TORINO (Italia)
t +39 011 4731316f +39 011 [email protected]
SEDE LEGALEC.so Galileo Ferraris, 14610129 TORINO (Italia)[email protected]
C.F.-P.IVA 10766770019REA TO 1160249cap.soc.120.000 € i.v.
14

Setup System ParametersIf you want to change the band tightness (looser or stronger) or the temperature and if you change your band supplier who delivers different quality, you can easily adjust your machine for best banding result by just changing software-parameters; there is no need and possibility to make mechanical adjustments.
Press MENU-button till the display enters into the parameter list menu. Every time you pressMENU-button, the display changes to the next parameter which can be set for the values 1 to 8.
1 - PRINTER LINE 12 - PRINTER LINE 23 - PRINTER LINE 3 Only for the SM-90P and the SM-90SP - See Setup Printer Data.
4 - TENSION ADJUSTMENT Increasing the value results higher band tension / tightness.
5 - TEMPERATURE ADJUSTMENT Increasing the value results higher temperature (200 to 270°C).
6 - WELDING TIME To get better welding results for different band quality.
7 - BAND ADVANCE Value too small: may be gripper fingers cannot catch band. Value too big: band advance may be too much.
8 - BAND CATCHING ANGLE Value too small: may be difficult to catch band by gripper fingers. Value too big: banding cycle cannot be succeeded.
9 - MOVEMENT SPEED Value too small: machine too slow-may be not successful to catch band and finish cycle. Value too big: makes high noise.
10 - OVERLAPPING AREA Value too small: tries to increase tension. Value too big: a part of band end may be not be welded.
11 - TENSION LEVEL+ CUTTING POSITION Value too small: tries to extreme tension-may be cycle not successful.
12 - MANual / AUTOmatic Banding process starts automatically after entering the banknotes or will be started by ENTER-button.
13 - DEFAULT SETTINGS “YES” and ENTER loads default factory settings for the parameters.
LBM-Italia SpA
SEDE OPERATIVAC.so Principe Oddone, 3710044 TORINO (Italia)
t +39 011 4731316f +39 011 [email protected]
SEDE LEGALEC.so Galileo Ferraris, 14610129 TORINO (Italia)[email protected]
C.F.-P.IVA 10766770019REA TO 1160249cap.soc.120.000 € i.v.
15
Linee dati del setup della stampante
The built-in printer of the SM-90 prints 4 Lines of information on the band.
The 4th Line contents always Date & Time and cannot be changed by the operato.
The pre-stored data of line 1, 2 and 3 (for each 8 options) can be chosen by the operator.
for example; operator name change:
If the operator name list (8 names) are downloaded before for line 3, follow the instruction:
• Enter parameter by pressing MENU-button.
• Change display till PRINTER LINE 3 DATA.
• Chose new operator number (1 to 8) by using the ARROW-buttons UP/DOWN.
• Press ENTER-button.
• New operator name will be printed on line 3 at the next cycle.
Setup Printer Data Lines
LBM-Italia SpA
SEDE OPERATIVAC.so Principe Oddone, 3710044 TORINO (Italia)
t +39 011 4731316f +39 011 [email protected]
SEDE LEGALEC.so Galileo Ferraris, 14610129 TORINO (Italia)[email protected]
C.F.-P.IVA 10766770019REA TO 1160249cap.soc.120.000 € i.v.
16

Error Codes
ERROR
Banding not successful
No data print on band
Band too loose / strong
No band advance
Jam in the machine
WHAT TO DO
• Disable the machine by pressing ENTER-button for 2 seconds, “SAFETY PAUSE” will be displayed.• Pull-out all the banknotes and the band out of the machine; if band is not cut, pull it manually to cut.• Enable the machine by pressing ENTER-button to get into READY-status.
• Try a second banding cycle, if there is no print at all, Switch-off and then Switch-on the machine; if the print is not complete, try several banding cycles to clean the printer head by itself.• You can clean the printer head with a soft paper- towel; if not successful the printer head has to be cleaned manually (follow the instruction “Printer Ink- Cartridge Replacing”).
• Adjust tension with parameter; see also “Setup System Parameters”.
• Press the band advance button (Down-arrow) and check whether band is moved; check the band-reel is empty, if necessary replace new reel; if there is a blockage in the band feeding area, easily pull-out the feeding module, clean it and replace again.
• If band advance is possible, disable the machine by pressing ENTER-button for 2 seconds, and pull the band till it is cut, press again ENTER-button, the machine gets in to “READY” status.
• Remove band feeding module. • Clean it.• Replace band feeding module.• Feed band.
CAUTION !In error cases the welding plate rarely could be heated up by the heater. To prevent touching hot parts, please be careful when entering with your fingers into the banding area – or Switch-off the power and wait for cooling.
LBM-Italia SpA
SEDE OPERATIVAC.so Principe Oddone, 3710044 TORINO (Italia)
t +39 011 4731316f +39 011 [email protected]
SEDE LEGALEC.so Galileo Ferraris, 14610129 TORINO (Italia)[email protected]
C.F.-P.IVA 10766770019REA TO 1160249cap.soc.120.000 € i.v.
17

Operator Maintenance• Before starting any maintenance work, be sure that the machine is Switch-off by using the switch located at the rear side.
• Clean the banding area; remove the band parts and dust.
• Clean the photo detectors in the banding area.
• Clean the ink-cartridge print-head with a soft paper-towel (for replacing the printer ink-cartridge see instruction “Printer Ink-Cartridge Replacing”).
Print nozzles ofthe ink-cartridge
Clean with apaper towel
40 mmwide Bandingand Print-out
30mm wide Bandingand Print-out
LBM-Italia SpA
SEDE OPERATIVAC.so Principe Oddone, 3710044 TORINO (Italia)
t +39 011 4731316f +39 011 [email protected]
SEDE LEGALEC.so Galileo Ferraris, 14610129 TORINO (Italia)[email protected]
C.F.-P.IVA 10766770019REA TO 1160249cap.soc.120.000 € i.v.
18