smart submit 3.12 user guide · smart submit release 9.0 user guide document version 1.0...
TRANSCRIPT
SMART Submit Release 9.0
User Guide Document Version 1.0
StudyDirect Site Submission has been updated to be part of Bioclinica’s SMART Services Suite and is now known as SMART Submit. As a result, there have been changes to the look and feel but no change in functionality.

SMART SUBMIT 9.0 User Guide
Page 2 of 19
Table of Contents TABLE OF CONTENTS ................................................................................................................................................ 2
GETTING STARTED .................................................................................................................................................... 3 LOGIN ................................................................................................................................................................................... 3 SELECT STUDY ........................................................................................................................................................................ 5 LOGOUT ................................................................................................................................................................................ 5
UPLOADING IMAGES AND DATA ............................................................................................................................... 6 UPLOAD METHODS: ASPERA CONNECT VS. “CLASSIC SFTP” .......................................................................................................... 6 DOWNLOAD ASPERA CONNECT BROWSER PUG-IN ........................................................................................................................ 7
Further Information: ....................................................................................................................................................... 8 Additional Help: .............................................................................................................................................................. 8
SEARCH CRITERIA FOR FILES ...................................................................................................................................................... 9 File Upload History ......................................................................................................................................................... 9
UPLOADING FILES.................................................................................................................................................................... 9 Submit and Upload ....................................................................................................................................................... 11
RESUBMIT IMAGES ................................................................................................................................................................ 14
SUBMITTING STUDY FORMS..................................................................................................................................... 15 SUBMIT NEW STUDY FORM .................................................................................................................................................... 15 SEARCH AND EDIT A STUDY FORM ............................................................................................................................................ 17
VIEWING STUDY PORTAL ......................................................................................................................................... 18 VIEW SITE PORTAL/STUDY DOCUMENTS AS A SITE USER ............................................................................................................. 18
SMART SUBMIT 9.0 User Guide
Page 3 of 19
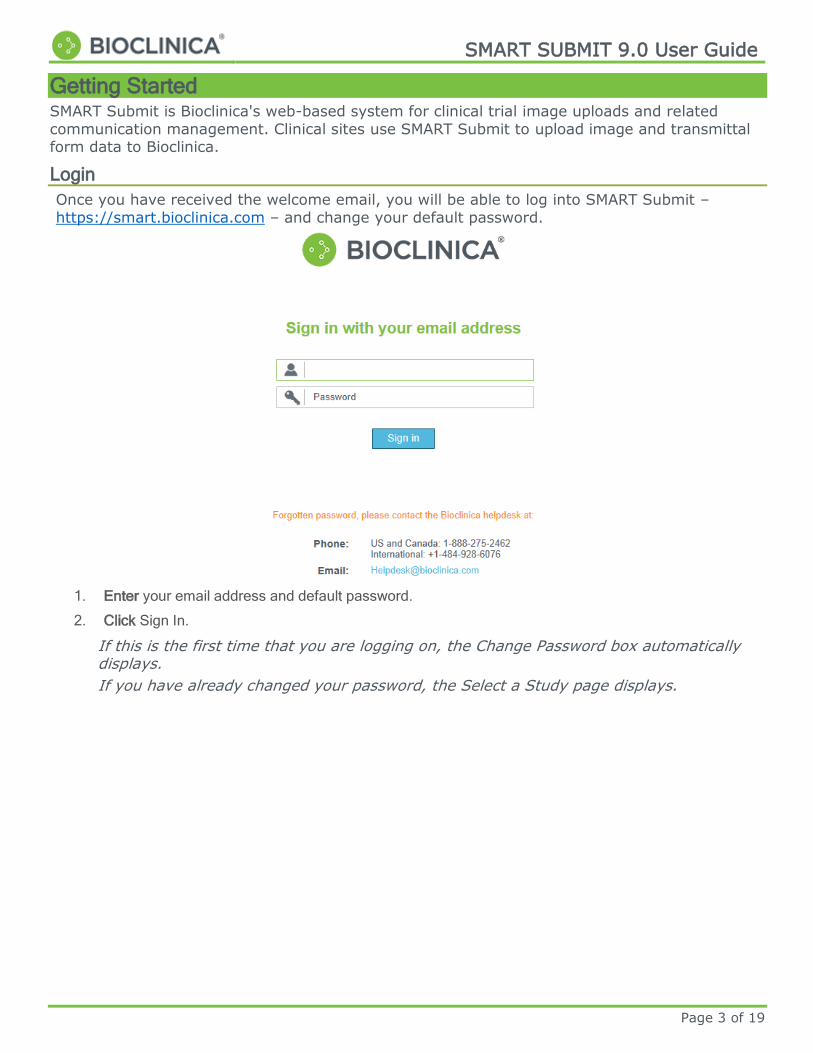
Getting Started SMART Submit is Bioclinica's web-based system for clinical trial image uploads and related
communication management. Clinical sites use SMART Submit to upload image and transmittal form data to Bioclinica.
Login
Once you have received the welcome email, you will be able to log into SMART Submit –
https://smart.bioclinica.com – and change your default password.
1. Enter your email address and default password.
2. Click Sign In.
If this is the first time that you are logging on, the Change Password box automatically displays.
If you have already changed your password, the Select a Study page displays.
SMART SUBMIT 9.0 User Guide
Page 4 of 19
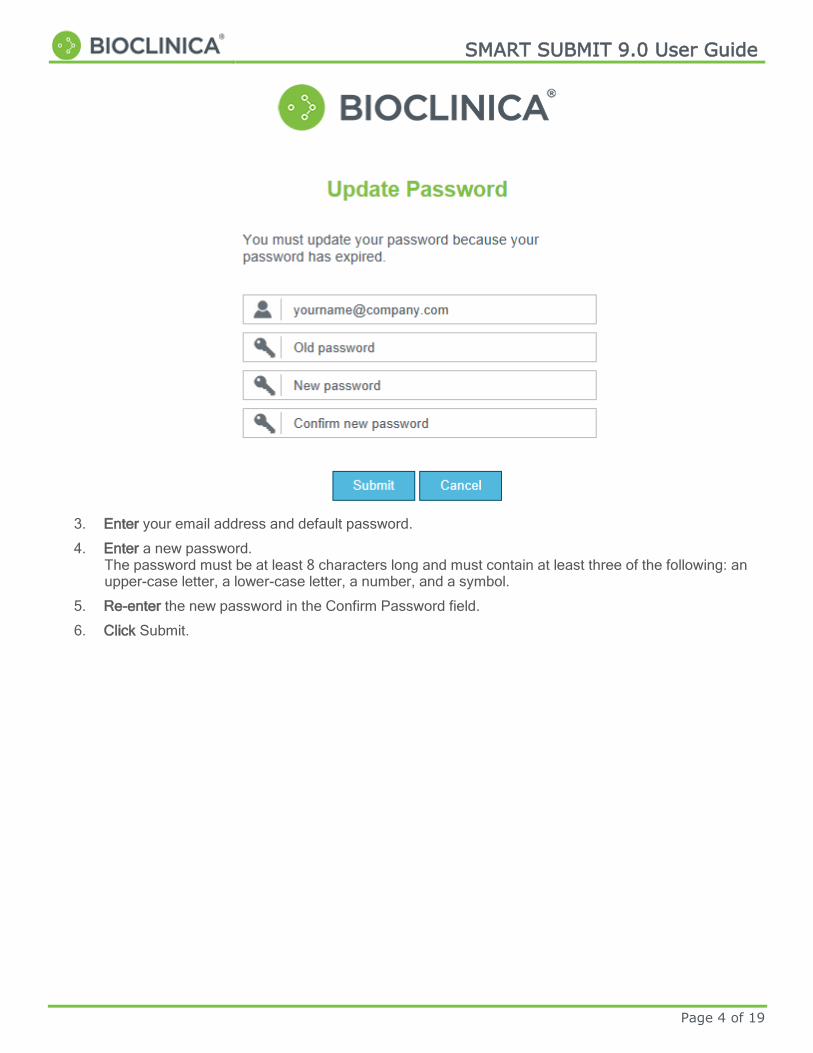
3. Enter your email address and default password.
4. Enter a new password. The password must be at least 8 characters long and must contain at least three of the following: an upper-case letter, a lower-case letter, a number, and a symbol.
5. Re-enter the new password in the Confirm Password field.
6. Click Submit.

SMART SUBMIT 9.0 User Guide
Page 5 of 19
Select Study
If you have access to more than one study, or multiple sites within a study, the System displays a study selection dialog after login:
1. Click the study or form you wish to work with from the list.
If you select an item beginning with Image Submissions– the Site Submission Home page displays.
If you select an item beginning with Forms – the Study Forms page display.
If you select an item beginning with Site Portal– the Study Portal page display.
Logout
To logout of SynarcConnect, click Logout in the upper right corner of the screen. The system confirms that you have successfully logged out.

SMART SUBMIT 9.0 User Guide
Page 6 of 19
UPLOADING IMAGES AND DATA After you have selected the project the File Upload Activities Summary page displays. The upper right corner of the page displays your Login ID. You can always return to this page by clicking Site Submission Home in the upper right of the page.
The center section highlighted below only displays if you don’t already have the Aspera Connect Browser Plug-in installed.
Note: You must download and install the Aspera Connect Browser Plug-in before you can upload any files. Please see Aspera Connect Browser Pug-in for more information.
Upload Methods: Aspera Connect vs. “Classic SFTP”
SMART Submit supports two methods for uploading files. “Classic SFTP” is a fallback method available to sites where the Aspera Connect plug-in cannot be installed, or network restrictions at a site prevent its use. This uses Unlimitech’s web-based file transfer client. It is handy as a back-up solution, but it is slow compared to using Aspera Connect.
You can switch between the Aspera and SFTP methods. On the electronic Transmittal Form data entry page that you are presented with prior to uploading the data (after selecting Upload or Test), there is a link at the bottom of the web page if you are using Classic SFTP:
Currently using Classic SFTP to upload files. Use Aspera (recommended)
Clicking on the “Use Aspera (recommended)” link switches your session to use the Aspera Connect method. When Aspera is selected, you will see this at the bottom of the electronic TF data entry page:
Currently using 'Aspera' to upload files (no deIdentification). Use Classic SFTP
If you have not installed the Aspera Connect file transfer software, or if you have it installed for a single user rather than for all users, a warning displays at the top of the electronic Transmittal Form data entry page.
SMART SUBMIT 9.0 User Guide
Page 7 of 19
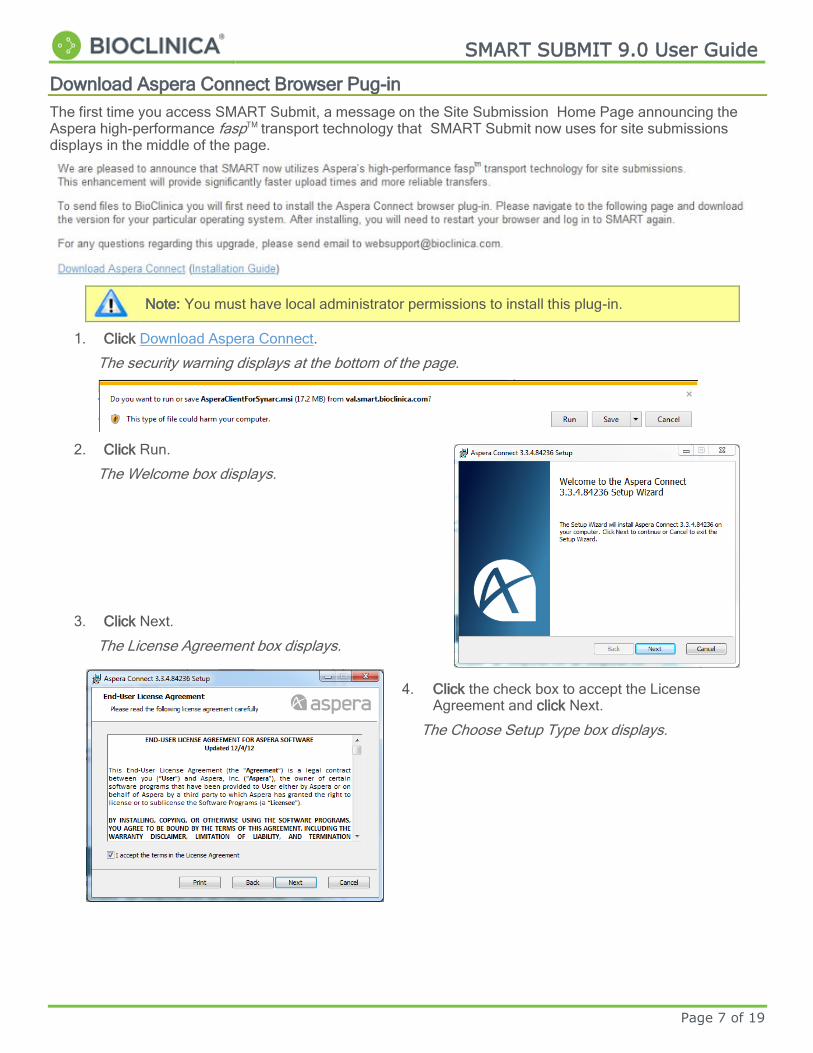
Download Aspera Connect Browser Pug-in
The first time you access SMART Submit, a message on the Site Submission Home Page announcing the Aspera high-performance faspTM transport technology that SMART Submit now uses for site submissions displays in the middle of the page.
Note: You must have local administrator permissions to install this plug-in.
1. Click Download Aspera Connect.
The security warning displays at the bottom of the page.
2. Click Run.
The Welcome box displays.
3. Click Next.
The License Agreement box displays.
4. Click the check box to accept the License Agreement and click Next.
The Choose Setup Type box displays.

SMART SUBMIT 9.0 User Guide
Page 8 of 19
5. Click Custom.
The Installation Scope box displays.
6. Click the radio button next to Install for all users on this machine and click Next.
The Ready to install box displays.
7. Click Install.
After the installation is complete the Complete box displays.
8. Click Finish.
Further Information:
Sometimes the Aspera Connect software is not able to communicate with the SynarcConnect web site from a location where the networking security is blocking its access. Aspera Connect uses two “port numbers” in its communications with Synarc. These must be allowed for in your network firewall configuration. If you have trouble after installing the software, be sure your network infrastructure personnel allow for communications on the following two network port numbers:
TCP/7600 UDP/33001
Additional Help:
For additional assistance, contact the Help Desk:
Toll Free from the US and Canada: 1-888-ASK-BIO2 (1-888-275-2462)
International: +1-484-928-6076
Email: [email protected]
SMART SUBMIT 9.0 User Guide
Page 9 of 19
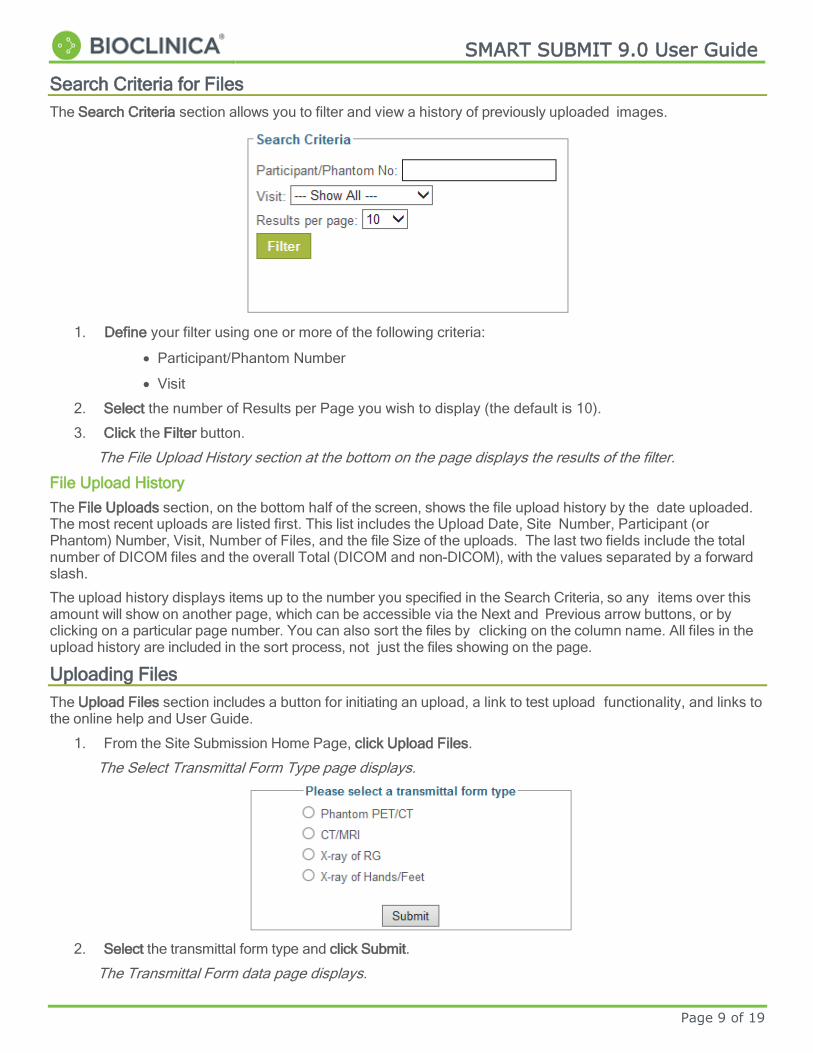
Search Criteria for Files
The Search Criteria section allows you to filter and view a history of previously uploaded images.
1. Define your filter using one or more of the following criteria:
Participant/Phantom Number
Visit
2. Select the number of Results per Page you wish to display (the default is 10).
3. Click the Filter button.
The File Upload History section at the bottom on the page displays the results of the filter.
File Upload History
The File Uploads section, on the bottom half of the screen, shows the file upload history by the date uploaded. The most recent uploads are listed first. This list includes the Upload Date, Site Number, Participant (or Phantom) Number, Visit, Number of Files, and the file Size of the uploads. The last two fields include the total number of DICOM files and the overall Total (DICOM and non-DICOM), with the values separated by a forward slash.
The upload history displays items up to the number you specified in the Search Criteria, so any items over this amount will show on another page, which can be accessible via the Next and Previous arrow buttons, or by clicking on a particular page number. You can also sort the files by clicking on the column name. All files in the upload history are included in the sort process, not just the files showing on the page.
Uploading Files
The Upload Files section includes a button for initiating an upload, a link to test upload functionality, and links to the online help and User Guide.
1. From the Site Submission Home Page, click Upload Files.
The Select Transmittal Form Type page displays.
2. Select the transmittal form type and click Submit.
The Transmittal Form data page displays.

SMART SUBMIT 9.0 User Guide
Page 10 of 19
3. Enter the Site, Patient, and Visit Information fields.
4. If the form is being submitted as a Repeat Request or Resubmission Request, check the appropriate box.
5. Check the Exam Site(s), enter Exam Date, Tech Initials, and any applicable Comments for each modality identified on the transmittal form.
6. Click Submit and Upload.
Your transmittal form data is saved.

SMART SUBMIT 9.0 User Guide
Page 11 of 19
Submit and Upload
After the image upload program connects, you will see the File Uploads page. This page shows two panels: a Current Upload Status panel, and an Upload Files panel.
The Current Upload Status panel always displays the status of the current file upload session, and have values such as “Ready”, “Completed”, etc.
At first the Upload Files panel has two enabled buttons:
Add Files – is used to add individual files to your upload list.
Add Folders – is used to add all the contents of a folder or folders to your upload list
After you select files, the other three buttons are enabled:
Upload Files/Folders – is used to upload the files or folders with the status of “Ready to Upload.”
Remove Selected Files – is used to remove files that have been placed on the upload list in error but not yet uploaded. Click the check the box to the left of the files and click this button to remove the selected files from the list.
Remove All Unsent – is used to remove all the files in the upload list that have a status of “Ready for Upload”. Files already uploaded cannot be removed from the list.

SMART SUBMIT 9.0 User Guide
Page 12 of 19
Upload Files/Folders
1. Click either Add Files or Add Folders.
A pop up a window displays showing your local file system on your computer.
2. Navigate to the directory where your file(s) are located using the buttons inside the local system view, select the file(s). – Use SHIFT + Click / CTRL + Click to highlight multiple files -- and click Open.
The File Uploads page displays with the selected files/folders in the upload list.
3. Click Upload Files/Folders.
An additional popup window alerting you that an attempt is being made to initiate a transfer with the Bioclinica server may display.
4. Click Allow to permit the image upload to proceed.
When the file is uploading, the Current Upload Status panel displays the percent and status of upload. In addition, a popup Transfer Manager window displays the status of the transfer.

SMART SUBMIT 9.0 User Guide
Page 13 of 19
The first time you attempt to upload files to Bioclinica, you may see a Windows Security Alert regarding the ascp Application. If you do, click Unblock to continue with the upload.
When the upload is complete, the Upload Files panel displays the status of each uploaded file.
Note: When all the files have been uploaded, you must sign the session to complete the process.
5. Enter your password in the signature box below and click Sign and Complete.
If you attempt to sign before the upload is complete, the system prompts you to wait.
After you sign the upload session, a confirmation of your upload is sent. An image verification is run on your uploaded files to check for valid DICOM images. If there was an error with the files, then the system asks if you want to re-upload the files.
If there were no errors encountered by the verification process, then a confirmation displays.

SMART SUBMIT 9.0 User Guide
Page 14 of 19
You will also receive a confirmation email with a summary of the uploaded files, including the study, site, participant, and visit the upload was associated to. The email also lists any files that failed the DICOM verification check.
Note: The system continues uploading a file for up to 24 hours. After 24 hours, the system stops loading the file and times out. It is suggested that you segment very large files so they load in the time allowed.
Resubmit Images
If there is an issue with an image, a query may be initiated asking for the image to be resubmitted. In DCF Resolution, a “Resubmit” button displays under Query Status. After uploading the new image, click “Resubmit” to go to Image Submission.

SMART SUBMIT 9.0 User Guide
Page 15 of 19
Submitting Study Forms Study Forms refers to any study specific non-image data other than the Transmittal Form, configured for electronic submission. Study Forms are be enabled if your studies have been set up to include one or more of them.
If the Study Form has been enabled for your studies, they display on the SMART Portal page in the format:
Forms - Study/Protocol Number – Site Number
Submit New Study Form
1. From the SMART Portal page, click the item beginning with Forms for the Study and Site you wish to use.
The Study Form Selection page displays.
2. Select the type of form you wish to submit from dropdown list under Form Type.
3. Click New.
The selected form displays.

SMART SUBMIT 9.0 User Guide
Page 16 of 19
4. Enter the study form information. Fields marked with an asterisk (*) are required.
5. If you don’t have all the information needed to complete the form, or simply need to finish it later, enter your electronic signature (by default, located in the lower right of the form) and click Finish Later.
This saves the information you have entered, but does not submit the form.
6. If you have finished the form, click (Mark this form complete), then enter your electronic signature and click Save.
The form is saved as Complete.
Note: If the form was submitted from a site, you receive a confirmation email. (Study forms submitted by internal Bioclinica personnel do not generate a confirmation email.)

SMART SUBMIT 9.0 User Guide
Page 17 of 19
Search and Edit a Study Form
You can search for previously saved study forms and edit them using the Site Submission interface.
1. From the SMART Portal page, click the item beginning with Forms for the Study and Site you wish to use.
The Study Form Selection page displays.
2. Select the form type and any of the Optional Search Criteria, as applicable.
3. Click Search.
Any submitted forms matching the form type and search criteria display on the bottom half of the page.
4. Use the arrow keys to navigate through multiple pages of results, if necessary. You can also sort the results by clicking on the header of each column.
5. Click a form ID (the leftmost column) to open the saved form.
6. Edit the data in the selected form as required.
7. You can Save and re-submit the edited form, or Cancel.

SMART SUBMIT 9.0 User Guide
Page 18 of 19
Viewing Study Portal Depending on the permissions granted to you and the study setup, you may be able to view study-specific documents and other information uploaded by BioClinica. These documents are available through the SMART Portal.
Note: Not all studies utilize this functionality.
If the Site Portal has been enabled for your studies, they display on the SMART Portal page in the format:
Site Portal - Study/Protocol Number – Site Number
View Site Portal/Study Documents as a Site User
1. From the SMART Portal page, click the Site Portal link.
The Site Portal Selection page displays.

SMART SUBMIT 9.0 User Guide
Page 19 of 19
The options display on the Quick View Menu to the right of the screen.
2. Click on Site Documents to list documents for site users within your browser.
The list of Site Documents displays.
3. Click the link for the document you wish to view.
A warning similar to the one below displays.
4. Click Open or Save to view or save the file.