smile documentation - read the docs · smile documentation, ... > python -m pip install...
TRANSCRIPT

SMILE DocumentationRelease 0.1.0
Per B. Sederberg
February 27, 2017

Contents
1 What does a SMILE experiment look like? 3
2 Whats Next? 5
3 Funding Sources 69
i

ii
SMILE Documentation, Release 0.1.0
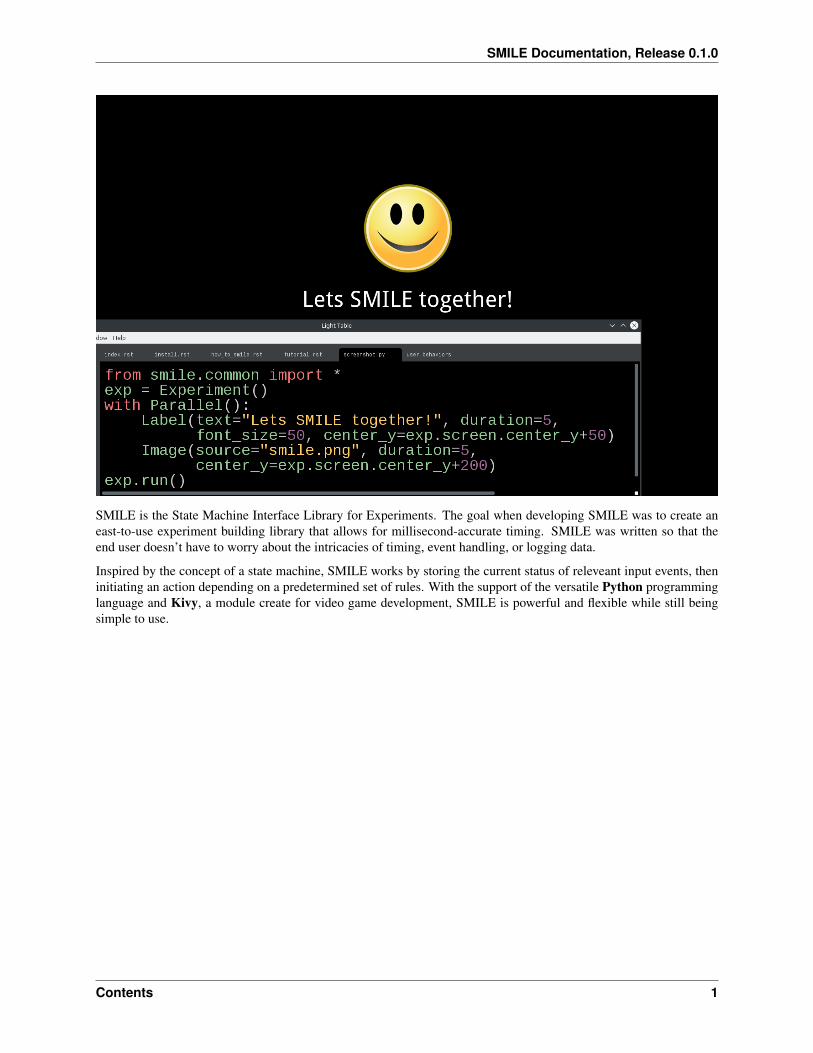
SMILE is the State Machine Interface Library for Experiments. The goal when developing SMILE was to create aneast-to-use experiment building library that allows for millisecond-accurate timing. SMILE was written so that theend user doesn’t have to worry about the intricacies of timing, event handling, or logging data.
Inspired by the concept of a state machine, SMILE works by storing the current status of releveant input events, theninitiating an action depending on a predetermined set of rules. With the support of the versatile Python programminglanguage and Kivy, a module create for video game development, SMILE is powerful and flexible while still beingsimple to use.
Contents 1

SMILE Documentation, Release 0.1.0
2 Contents
CHAPTER 1
What does a SMILE experiment look like?
Below is hello.py, an example of what the simplest SMILE experiment looks like:
from smile.common import *
exp = Experiment()
Label(text="Hello, World!", duration=5)
exp.run()
In order to run this experiment from a computer that has SMILE installed, you would use your favorite OS’s commandprompt and run the following line:
>> python hello.py -s SubjectID
This program creates a full-screen window with a black background and the words Hello, World! in white text in thecenter–just like that, we are SMILEing!
Now let us go through our SMILE experiment line by line and see what each of them does.
First is the line exp = Experiment(). This line is the initialization line for SMILE. This tells SMILE that it shouldprepare to see states being declared.
Second is the line Label(text=”Hello, World!”, duration=5). Label is a SMILE visual state that displays text onto thescreen. Certain SMILE states take a duration, and we are setting this state’s duration to 5. This means the state willremain active on the screen for 5 seconds.
Third is the line exp.run(). This line signals to SMILE that you have finished building your experiment and that it isready to run. SMILE will then run your experiment from start to finish and exit the experiment window when it hasfinished.
3
SMILE Documentation, Release 0.1.0
4 Chapter 1. What does a SMILE experiment look like?
CHAPTER 2
Whats Next?
To help you get ready to SMILE, the first section of this documentation is the SMILE installation and the installation ofits dependencies. After that is a section that delves deeper into SMILE and how to write more complicated experiments.
Installation of SMILE!
Getting ready to SMILE? Then you are in the right place. This guide will tell you how to install SMILE and the packagethat SMILE is dependent upon, Kivy! Scroll down to the appropriate operating system and follow the directionsprovided to install Kivy, SMILE, and any extra needed packages.
Installing SMILE on Windows
Before installing anything, make sure that you have python installed and that you can run python through your com-mand prompt.
Also, it is important to have pip installed to your python. Without pip you will not be able to run the commands neededto install SMILE. To install pip, click the link below and follow the instructions.
-Get pip
The next thing you need to install after pip is kivy. Kivy is the display backend for SMILE. Note that you do not needto know anything about how to use kivy to figure out how to use SMILE.
To install kivy on your windows machine, run the following line in your command prompt.
> python -m pip install docutils pygments pypiwin32 kivy.deps.sdl2 kivy.deps.glew> python -m pip install kivy.deps.gstreamer --extra-index-url https://kivy.org/downloads/packages/simple/
Then run this line in your command prompt.
> python -m pip install kivy
Note: If you run into any trouble installing kivy onto your windows machine, please check the kivy website for moredetailed instructions.
After running the last command, it is now time to download SMILE. Download SMILE from the github link providedand then extract it.
-SMILE Download
5
SMILE Documentation, Release 0.1.0
Now, in your command prompt, navigate to the newly extracted smile download folder that contains setup.py and runthe following line.
> python -m pip install .
The final thing you need to install to gain access to all of SMILE’s functionality is PYO. PYO is used to play and recordsound with SMILE. Download and install the windows version of PYO from their website. The link is provided below.
-PYO Download
Note: When PYO asks for a directory to install to, choose C:Python27. If that folder doesn’t already exist, create itand then attempt to install PYO into that folder
With that, you are finished installing SMILE. Congrats! Head over to The SMILE Tutorial to start SMILING. Thiswill cover a more advance look into how SMILE works.
Sync Pulsing on Windows
To use sync pulsing on windows via the parallel port, you must install Inpout32, or include inpout32.dll in the samefolder as your experiment.
Windows Troubleshooting
If you are trying to replace an older version of SMILE, or if you just need to upgrade your current version, you mustrun the following command while the Anaconda command prompt is in the SMILE download folder.
> pip install . --upgrade
If you would like to use any of the audio options of SMILE, pyo is required. If you find that you can’t install pyo, itis because you are not using the 32 bit version of Python. You can install SMILE on 64 versions of Python, but youwill lose the ability to play sound files. Your ability to play sound while presenting a video file, however, will not beinhibited.
If you are trying to install SMILE to an Anaconda distribution of python, you must use 64 bit. We have found that the32 bit version of GStreamer that Anaconda provides will not work well with Kivy, and will error out. Please use the64 bit version of Anaconda if you choose to install SMILE to it.
If you are installing SMILE to a Python separate from Anaconda, but still have Anaconda installed on that machine,you may encounter a weird pathing error. We are still looking into what causes it, and it doesn’t happen to everyone,but we would still like you to be aware that you may run into some problems.
Installing SMILE on Mac
The first step is to download and install Kivy. The following link will take you to the Mac-Kivy install guide.
-Mac-Kivy Install Guide
After you install Kivy, you must download and install SMILE. The following is a link to the SMILE download page,where you will download the zip, and extract it to an easy to find place.
-SMILE Download
Now, all you have to do is open the terminal and navigate to the newly extracted smile download folder. This foldershould contain setup.py. Run the following line to install SMILE to your special Kivy distribution of python.
6 Chapter 2. Whats Next?

SMILE Documentation, Release 0.1.0
$ kivy -m pip install .
Easy. SMILE should have installed without any issue.
The final thing you need to install to gain access to all of SMILE’s functionality is PYO. Download and install theMac version of PYO from their website. The link is provided below.
-PYO Download
With that, you are finished installing SMILE. Congrats! Head over to The SMILE Tutorial to start SMILING. Thiswill cover a more advance look into how SMILE works.
Mac Troubleshooting
If you are trying to replace an older version of SMILE, or if you just need to upgrade your current version, you mustrun the following command while the Anaconda command prompt is in the SMILE download folder.
$ kivy -m pip install . --upgrade
If you require any additional packages to run your experiment, you must use kivy to install them. Like above, you usethe kivy -m pip install line to install any additional packages to the python that is linked to kivy.
Installing SMILE with Linux
SMILE requires Kivy to run properly, but if you would like to use the smile.sound functionality, you need to downloadand install PYO as well. Run the following in your command line to install both Kivy and PYO at the same time.
$ sudo aptitude install python-pyo python-kivy
If you are running something besides a Debian based linux system, the above line will look different. It depends onyour prefered package manager.
Then, download SMILE from github and extract it to a place you can find later. The download link is the following:
-SMILE Download
Next, navigate to the newly extracted smile folder that contains setup.py, and run the following line in your terminalwindow.
$ python -m pip install .
This will add SMILE to your python distribution.
With that, you are finished installing SMILE. Congrats! Head over to The SMILE Tutorial to start SMILING. Thiswill cover a more advance look into how SMILE works.
Sync pulsing on Linux
To use sync pulsing on linux over a parallel port, you must install PyParallel. Install it via pip or your favorite packagemanager.
Linux Troubleshooting
To be added when problems are found.
2.1. Installation of SMILE! 7
SMILE Documentation, Release 0.1.0
SMILE Tutorial Basics!
Hello SMILErs! This tutorial is for people just starting out in the world of SMILE. Further in this documentation,there is a more advanced tutorial. If you are brand new to SMILE and want to learn the basics line by line, you are inthe right place.
Running a SMILE Experiment
After installing SMILE, there is only one thing needed to run a SMILE experiment, and that is a fully coded experimentfile. SMILE uses python to run its experiments, so to run SMILE you must run the .py file with python.
If you followed our instructions for installing SMILE, Linux and Windows users would use the following line in acommand prompt to run their SMILE experiments:
>> python filename.py -s SubjectID
If you are an OSX user, you just replace the python in the previous line with kivy:
$ kivy filename.py -s SubjectID
Notice the -s in the commands above. This is a command line argument for SMILE. SMILE has 3 command linearguments.
• -s : Subject ID, whatever identifier you would like to use for a particular run of the experiment. The nextargument passed -s will be the subject ID for the purposes of where to save data on your system.
• -f : Fullscreen, if -f is present in the command line, SMILE will run in windowed mode.
• -c : CSV, if -c is present, SMILE will save out all of its .slog data files as .csv data files as well. Not Recom-mended
Before you learn how to code SMILE experiments, it is important to understand a few things about how SMILE works.The next section goes over how SMILE first builds then runs experiments.
Build Time V.S. Run Time
The difference between Build Time and Run Time is the most important concept to understand when learning touse SMILE. There are 2 lines of code that designate the start of BT and then the start of RT. Those lines are exp =Experiment() and exp.run() respectively.
exp = Experiment() initializes the instance of an Experiment. All calls to a state must take place after this line!Once this line is run, BT starts. BT, or Experimental Build Time, is the section of the code that sets up how theexperiment will run.
During Experimental Build Time, all calls to the different states of SMILE define how your experiment will run toSMILE. SMILE sees each of those states and uses them to setup the rules of how your state machine will flow fromone state to another. When SMILE see the with Parallel(): state, it will know that all of the states that are definedwithin should run at the same time. When SMILE sees one Label following another Label, SMILE will know thatthe second Label should not show up on the screen until the first one has finished running.
During Experimental Run Time, all of the timing and intricacies of SMILE’s backend are run. Once exp.run() is called,SMILE will start whatever the first state you defined in the experiment is and continue with the rest of your experimentafterwards.
8 Chapter 2. Whats Next?
SMILE Documentation, Release 0.1.0
Note: During RT, SMILE will not run any non-SMILE code. SMILE will only run the prebuilt state-machine. If youneed to run any kind of python during your experiment, use the Func state.
Another thing to look out for when programming the experiment how variables are set and used in BT. A local variablein between exp = Experiment() and exp.run() cannot be set and expected to actually set during RT. In order to set andget local variables during RT, set and get must be used through the local Experiment variable. To set this kind ofvariable, exp.variable_name must be added to the beginning of the variable name. Doing this creates a Set state inSMILE that will run during RT. An example is as follows.
exp.variableName = lbl.appear_time['time']
For more information about setting in RT see the Setting a Variable in RT section of Advanced SMILEing
What are References?
Since SMILE will build the experiment before it runs it, we needed to think of a way to reference variables beforethe variables were created. That is why we developed the Ref. The Ref, very basically, is a delayed function call.Using Ref**s, SMILE is able to hold onto a reference to data that hasn’t been created yet in your experiment.**Ref**s are powerful in that they are recursive. That means that if you apply a basic operation to a **Ref (i.e.+, -, , or /) it will create a new **Ref* that contains both sides of the operation, and the operation function itself.
from smile.ref import Refa = Ref.object(5)b = Ref.object(6)c = a + bprint c.eval()
In the above example, a and b are refs that are created to contain only an object. Ref.object() will return a Ref thatwill, when being evaluated later, check to see what the value of the object is at that moment and return that value. Theabove example creates 2 integer references. The third line c = a + b is an example of creating a recursive reference.When c tries to evaluate itself, it will attempt to evaluate a and b, then add them together and return the result. Theabove example will print out the number 11 when it finishes running.
Note: You should not have to ever call .eval() for a reference. This was just an example to demonstrate how we usereferences in SMILE’s backend. SMILE calls .eval() automatically.
References can also create a Reference object that contains a conditional expression to be evaluated later. These areimportant when building SMILE If states. Say for instance the experimenter would like to present “CONGRATS” onscreen if the participant responded in less than three seconds, and “FAILURE” if the participant took longer than threeseconds to respond. The experimenter would need to rely on a Referenced conditional statement, where Ref.cond(cond,true_val, false_val) can return any kind of object if true or false. Say you want to display “jubba” if a participant presses“J” and “bubba” if the participant presses “K”. SMILE allows you to use cond to do this in 1 line rather than use an Ifstate. For the above example, please see the Ref docstring.
A Done state is a unique state that will wait until the value of a reference is made available. A reference is madeavailable the first time something calls .eval()
Warning: This state is not for regular use. It should only be used when encountering the NotAvailableError.Misuse of the Done state, the experiment will have hang-ups in the framerate or running of the experiment.
For more information about Ref and Func please see Preforming Functions and Operations in RT
2.2. SMILE Tutorial Basics! 9
SMILE Documentation, Release 0.1.0
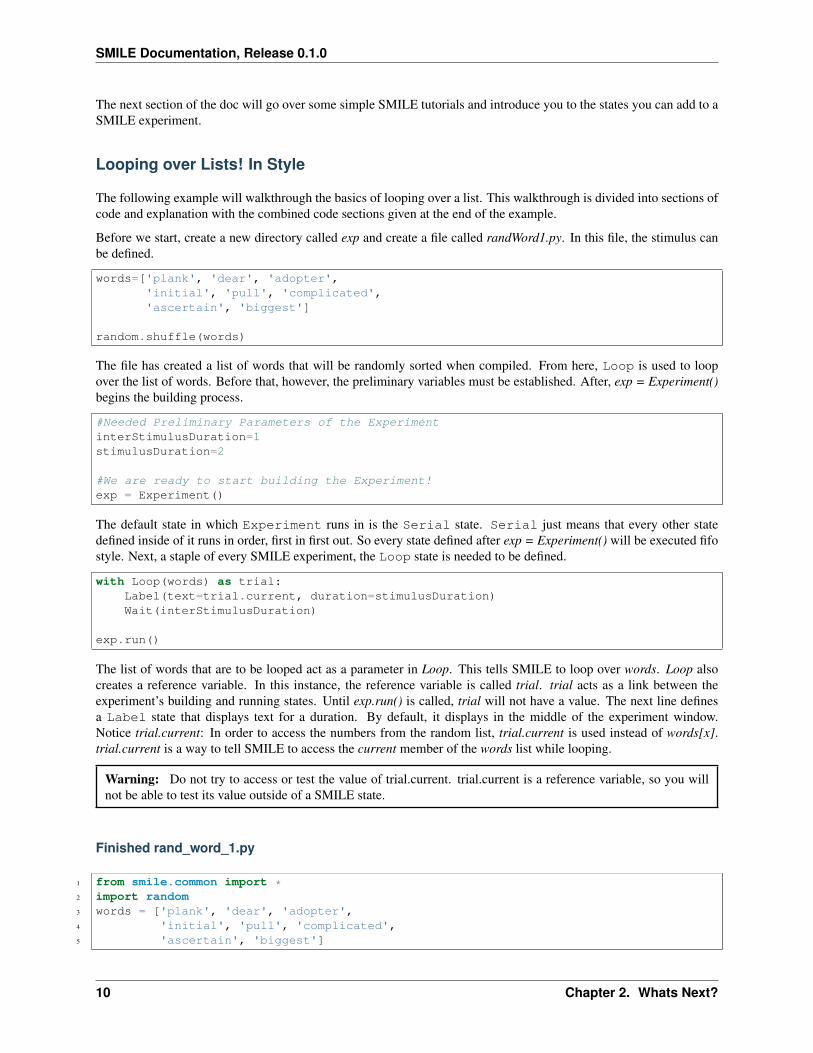
The next section of the doc will go over some simple SMILE tutorials and introduce you to the states you can add to aSMILE experiment.
Looping over Lists! In Style
The following example will walkthrough the basics of looping over a list. This walkthrough is divided into sections ofcode and explanation with the combined code sections given at the end of the example.
Before we start, create a new directory called exp and create a file called randWord1.py. In this file, the stimulus canbe defined.
words=['plank', 'dear', 'adopter','initial', 'pull', 'complicated','ascertain', 'biggest']
random.shuffle(words)
The file has created a list of words that will be randomly sorted when compiled. From here, Loop is used to loopover the list of words. Before that, however, the preliminary variables must be established. After, exp = Experiment()begins the building process.
#Needed Preliminary Parameters of the ExperimentinterStimulusDuration=1stimulusDuration=2
#We are ready to start building the Experiment!exp = Experiment()
The default state in which Experiment runs in is the Serial state. Serial just means that every other statedefined inside of it runs in order, first in first out. So every state defined after exp = Experiment() will be executed fifostyle. Next, a staple of every SMILE experiment, the Loop state is needed to be defined.
with Loop(words) as trial:Label(text=trial.current, duration=stimulusDuration)Wait(interStimulusDuration)
exp.run()
The list of words that are to be looped act as a parameter in Loop. This tells SMILE to loop over words. Loop alsocreates a reference variable. In this instance, the reference variable is called trial. trial acts as a link between theexperiment’s building and running states. Until exp.run() is called, trial will not have a value. The next line definesa Label state that displays text for a duration. By default, it displays in the middle of the experiment window.Notice trial.current: In order to access the numbers from the random list, trial.current is used instead of words[x].trial.current is a way to tell SMILE to access the current member of the words list while looping.
Warning: Do not try to access or test the value of trial.current. trial.current is a reference variable, so you willnot be able to test its value outside of a SMILE state.
Finished rand_word_1.py
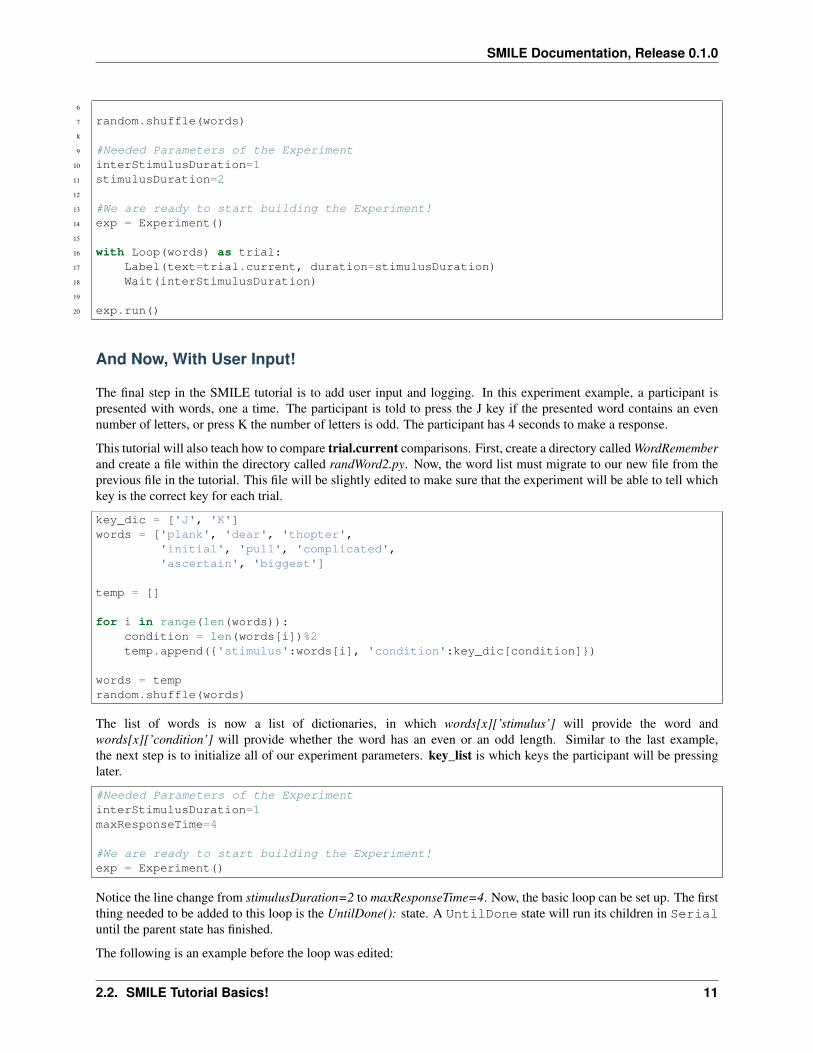
1 from smile.common import *2 import random3 words = ['plank', 'dear', 'adopter',4 'initial', 'pull', 'complicated',5 'ascertain', 'biggest']
10 Chapter 2. Whats Next?
SMILE Documentation, Release 0.1.0
6
7 random.shuffle(words)8
9 #Needed Parameters of the Experiment10 interStimulusDuration=111 stimulusDuration=212
13 #We are ready to start building the Experiment!14 exp = Experiment()15
16 with Loop(words) as trial:17 Label(text=trial.current, duration=stimulusDuration)18 Wait(interStimulusDuration)19
20 exp.run()
And Now, With User Input!
The final step in the SMILE tutorial is to add user input and logging. In this experiment example, a participant ispresented with words, one a time. The participant is told to press the J key if the presented word contains an evennumber of letters, or press K the number of letters is odd. The participant has 4 seconds to make a response.
This tutorial will also teach how to compare trial.current comparisons. First, create a directory called WordRememberand create a file within the directory called randWord2.py. Now, the word list must migrate to our new file from theprevious file in the tutorial. This file will be slightly edited to make sure that the experiment will be able to tell whichkey is the correct key for each trial.
key_dic = ['J', 'K']words = ['plank', 'dear', 'thopter',
'initial', 'pull', 'complicated','ascertain', 'biggest']
temp = []
for i in range(len(words)):condition = len(words[i])%2temp.append({'stimulus':words[i], 'condition':key_dic[condition]})
words = temprandom.shuffle(words)
The list of words is now a list of dictionaries, in which words[x][’stimulus’] will provide the word andwords[x][’condition’] will provide whether the word has an even or an odd length. Similar to the last example,the next step is to initialize all of our experiment parameters. key_list is which keys the participant will be pressinglater.
#Needed Parameters of the ExperimentinterStimulusDuration=1maxResponseTime=4
#We are ready to start building the Experiment!exp = Experiment()
Notice the line change from stimulusDuration=2 to maxResponseTime=4. Now, the basic loop can be set up. The firstthing needed to be added to this loop is the UntilDone(): state. A UntilDone state will run its children in Serialuntil the parent state has finished.
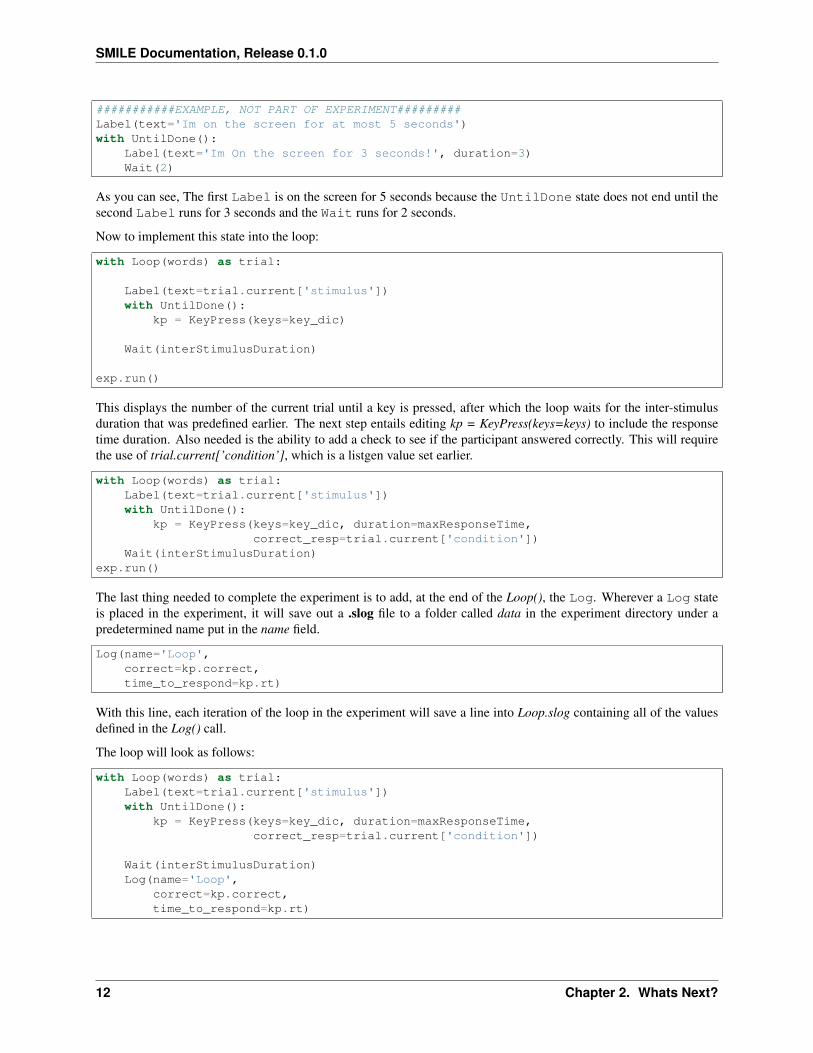
The following is an example before the loop was edited:
2.2. SMILE Tutorial Basics! 11
SMILE Documentation, Release 0.1.0
###########EXAMPLE, NOT PART OF EXPERIMENT#########Label(text='Im on the screen for at most 5 seconds')with UntilDone():
Label(text='Im On the screen for 3 seconds!', duration=3)Wait(2)
As you can see, The first Label is on the screen for 5 seconds because the UntilDone state does not end until thesecond Label runs for 3 seconds and the Wait runs for 2 seconds.
Now to implement this state into the loop:
with Loop(words) as trial:
Label(text=trial.current['stimulus'])with UntilDone():
kp = KeyPress(keys=key_dic)
Wait(interStimulusDuration)
exp.run()
This displays the number of the current trial until a key is pressed, after which the loop waits for the inter-stimulusduration that was predefined earlier. The next step entails editing kp = KeyPress(keys=keys) to include the responsetime duration. Also needed is the ability to add a check to see if the participant answered correctly. This will requirethe use of trial.current[’condition’], which is a listgen value set earlier.
with Loop(words) as trial:Label(text=trial.current['stimulus'])with UntilDone():
kp = KeyPress(keys=key_dic, duration=maxResponseTime,correct_resp=trial.current['condition'])
Wait(interStimulusDuration)exp.run()
The last thing needed to complete the experiment is to add, at the end of the Loop(), the Log. Wherever a Log stateis placed in the experiment, it will save out a .slog file to a folder called data in the experiment directory under apredetermined name put in the name field.
Log(name='Loop',correct=kp.correct,time_to_respond=kp.rt)
With this line, each iteration of the loop in the experiment will save a line into Loop.slog containing all of the valuesdefined in the Log() call.
The loop will look as follows:
with Loop(words) as trial:Label(text=trial.current['stimulus'])with UntilDone():
kp = KeyPress(keys=key_dic, duration=maxResponseTime,correct_resp=trial.current['condition'])
Wait(interStimulusDuration)Log(name='Loop',
correct=kp.correct,time_to_respond=kp.rt)
12 Chapter 2. Whats Next?

SMILE Documentation, Release 0.1.0
Finished rand_word_2.py
1 from smile.common import *2 import random3
4 words = ['plank', 'dear', 'thopter',5 'initial', 'pull', 'complicated',6 'ascertain', 'biggest']7
8 temp = []9
10 for i in range(len(words)):11 condition = len(words[i])%212 temp.append({'stimulus':words[i], 'condition':key_dic[condition]})13
14 words = temp15 random.shuffle(words)16
17 #Needed Parameters of the Experiment18 interStimulusDuration=119 maxResponseTime = 420 key_dic = ['J', 'K']21
22 #We are ready to start building the Experiment!23 exp = Experiment()24
25 with Loop(words) as trial:26 Label(text=trial.current['stimulus'])27 with UntilDone():28 kp = KeyPress(keys=key_dic, duration=maxResponseTime,29 correct_resp=trial.current['condition'])30 Wait(interStimulusDuration)31 Log(name='Loop',32 correct=kp.correct,33 time_to_respond=kp.rt)34
35 exp.run()
Now you are ready to get SMILEing! The next section of this documentation goes over every state that SMILE has tooffer!
SMILE States
The States of SMILE
Below is the list of most of the SMILE states you will ever need when running an experiment. Each state has arudimentary tutorial on how to use them. If you need more information about what a specific state does, then checkouteach state’s docstring.
The Flow States of SMILE
One of the basic types of SMILE states are the Flow states. Flow states are states that control the flow of the experi-ment.
2.3. SMILE States 13
SMILE Documentation, Release 0.1.0
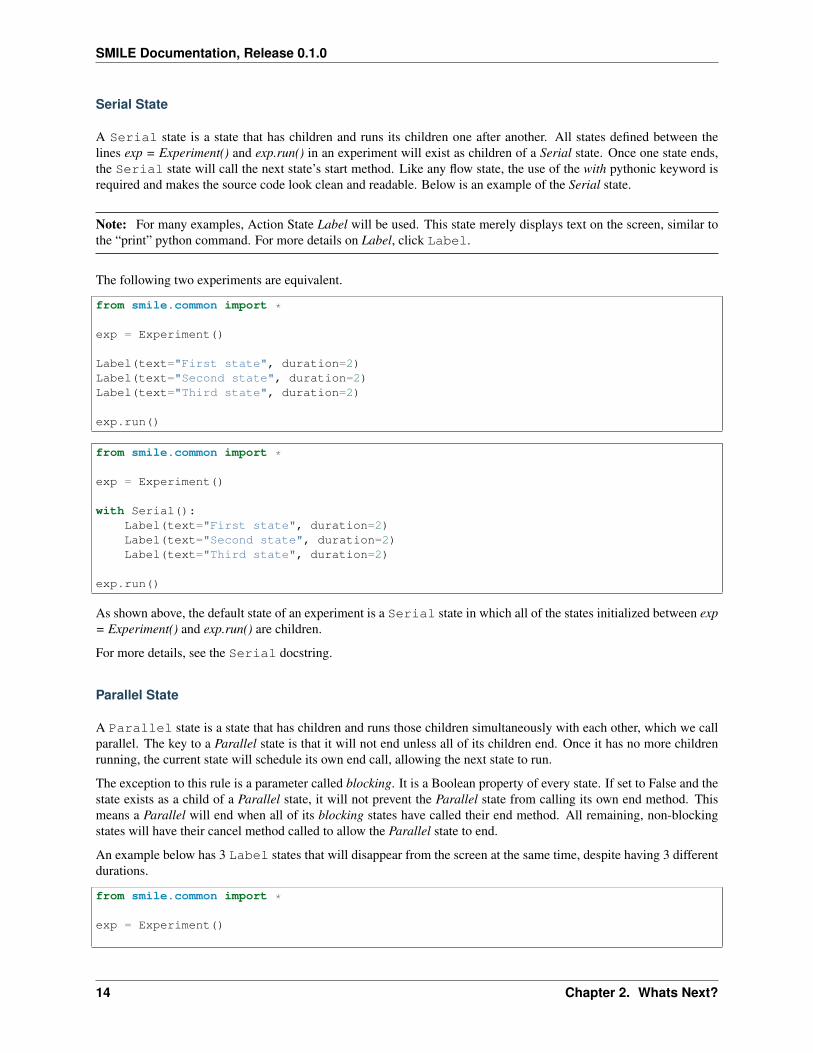
Serial State
A Serial state is a state that has children and runs its children one after another. All states defined between thelines exp = Experiment() and exp.run() in an experiment will exist as children of a Serial state. Once one state ends,the Serial state will call the next state’s start method. Like any flow state, the use of the with pythonic keyword isrequired and makes the source code look clean and readable. Below is an example of the Serial state.
Note: For many examples, Action State Label will be used. This state merely displays text on the screen, similar tothe “print” python command. For more details on Label, click Label.
The following two experiments are equivalent.
from smile.common import *
exp = Experiment()
Label(text="First state", duration=2)Label(text="Second state", duration=2)Label(text="Third state", duration=2)
exp.run()
from smile.common import *
exp = Experiment()
with Serial():Label(text="First state", duration=2)Label(text="Second state", duration=2)Label(text="Third state", duration=2)
exp.run()
As shown above, the default state of an experiment is a Serial state in which all of the states initialized between exp= Experiment() and exp.run() are children.
For more details, see the Serial docstring.
Parallel State
A Parallel state is a state that has children and runs those children simultaneously with each other, which we callparallel. The key to a Parallel state is that it will not end unless all of its children end. Once it has no more childrenrunning, the current state will schedule its own end call, allowing the next state to run.
The exception to this rule is a parameter called blocking. It is a Boolean property of every state. If set to False and thestate exists as a child of a Parallel state, it will not prevent the Parallel state from calling its own end method. Thismeans a Parallel will end when all of its blocking states have called their end method. All remaining, non-blockingstates will have their cancel method called to allow the Parallel state to end.
An example below has 3 Label states that will disappear from the screen at the same time, despite having 3 differentdurations.
from smile.common import *
exp = Experiment()
14 Chapter 2. Whats Next?

SMILE Documentation, Release 0.1.0
with Parallel():Label(text='This one is in the middle', duration=3)Label(text='This is on top', duration=5, blocking=False,
center_y=exp.screen.center_y+100)Label(text='This is on the bottom', duration=10, blocking=False,
center_y=exp.screen.center_y-100)
exp.run()
Because the second and third Label in the above example are non-blocking, the Parallel state will end after the firstLabel‘s duration of 3 seconds instead of the third Label‘s duration which was 10 seconds.
For more details, see the Parallel docstring.
Meanwhile State
A Meanwhile state is one of two parallel with previous states. A Meanwhile will run all of its children in a Serialstate and then run that in Parallel with the previous state in the stack. A Meanwhile state will end when either allof its children have left, or if the previous state has left. In simpler terms, a Meanwhile state runs while the previousstate is still running. If the previous state ends before the Meanwhile has ended, then the Meanwhile will cancel all ofits remaining children.
If a Meanwhile is created and there is no previous state, then all of the children of the Meanwhile will run until theyend or until the experiment is over. An example of this would be if Meanwhile were inserted right after the line exp =Experiment().
The following example shows how to use a Meanwhile to create an instructions screen that waits for a keypress tocontinue.
from smile.common import *
exp = Experiment()
KeyPress()with Meanwhile():
Label(text="THESE ARE YOUR INSTRUCTIONS, PRESS ENTER")
exp.run()
As soon as the KeyPress state ends, the Label will disappear off the screen because the Meanwhile will havecanceled it.
For more details, see the Meanwhile docstring.
UntilDone State
An UntilDone state is one of two parallel with previous states. An UntilDone state will run all of its children in aSerial state and then run them in a Parallel with the previous state. An UntilDone state will end when all of itschildren are finished. Once the UntilDone ends, it will cancel the previous state if still running.
If an UntilDone is created and there is no previous state (right after the exp = Experiment() line), all of the children ofthe UntilDone will run until they end. The experiment will then end.
The following example shows how to use an UntilDone to create an instructions screen that waits for a keypress tocontinue.
2.3. SMILE States 15
SMILE Documentation, Release 0.1.0
from smile.common import *
exp = Experiment()
Label(text="THESE ARE YOUR INSTRUCTIONS, PRESS ENTER")with UntilDone():
KeyPress()
exp.run()
For more details, see the UntilDone docstring.
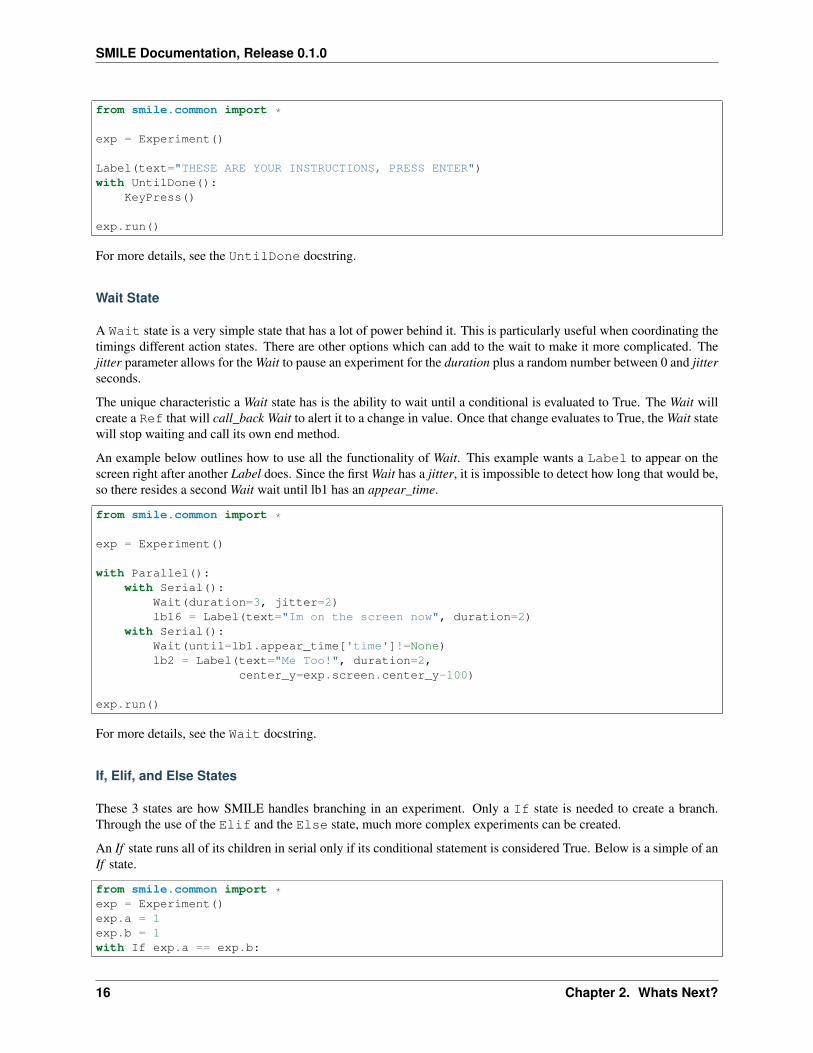
Wait State
A Wait state is a very simple state that has a lot of power behind it. This is particularly useful when coordinating thetimings different action states. There are other options which can add to the wait to make it more complicated. Thejitter parameter allows for the Wait to pause an experiment for the duration plus a random number between 0 and jitterseconds.
The unique characteristic a Wait state has is the ability to wait until a conditional is evaluated to True. The Wait willcreate a Ref that will call_back Wait to alert it to a change in value. Once that change evaluates to True, the Wait statewill stop waiting and call its own end method.
An example below outlines how to use all the functionality of Wait. This example wants a Label to appear on thescreen right after another Label does. Since the first Wait has a jitter, it is impossible to detect how long that would be,so there resides a second Wait wait until lb1 has an appear_time.
from smile.common import *
exp = Experiment()
with Parallel():with Serial():
Wait(duration=3, jitter=2)lb16 = Label(text="Im on the screen now", duration=2)
with Serial():Wait(until=lb1.appear_time['time']!=None)lb2 = Label(text="Me Too!", duration=2,
center_y=exp.screen.center_y-100)
exp.run()
For more details, see the Wait docstring.
If, Elif, and Else States
These 3 states are how SMILE handles branching in an experiment. Only a If state is needed to create a branch.Through the use of the Elif and the Else state, much more complex experiments can be created.
An If state runs all of its children in serial only if its conditional statement is considered True. Below is a simple of anIf state.
from smile.common import *exp = Experiment()exp.a = 1exp.b = 1with If exp.a == exp.b:
16 Chapter 2. Whats Next?

SMILE Documentation, Release 0.1.0
Label(text="CORRECT")exp.run()
Here, exp.a == exp.b is the conditional statement. This If state expresses that if the conditional exp.a == exp.b isTrue, then the experiment will display the Label “CORRECT”. In this case, if the conditional was False (say exp.b =2 instead of 1), then the experiment will not display the Label.
An Elif statement, short for “Else if”, is another conditional statement. It functions the same as the pythonic “elif”.An Else statement is identical to the pythonic “else”. The following is a 4 option if test.
from smile.common import *
exp = Experiment()
Label(text='PRESS A KEY')with UntilDone():
kp = KeyPress()
with If(kp.pressed == "SPACEBAR"):Label(text="YOU PRESSED SPACE", duration=3)
with Elif(kp.pressed == "J"):Label(text="YOU PRESSED THE J KEY", duration=3)
with Elif(kp.pressed == "F"):Label(text="YOU PRESSED THE K KEY", duration=3)
with Else():Label(text="I DONT KNOW WHAT YOU PRESSED", duration=3)
exp.run()
For more details, see the:py:class:~smile.state.If, Elif, or Else docstrings.
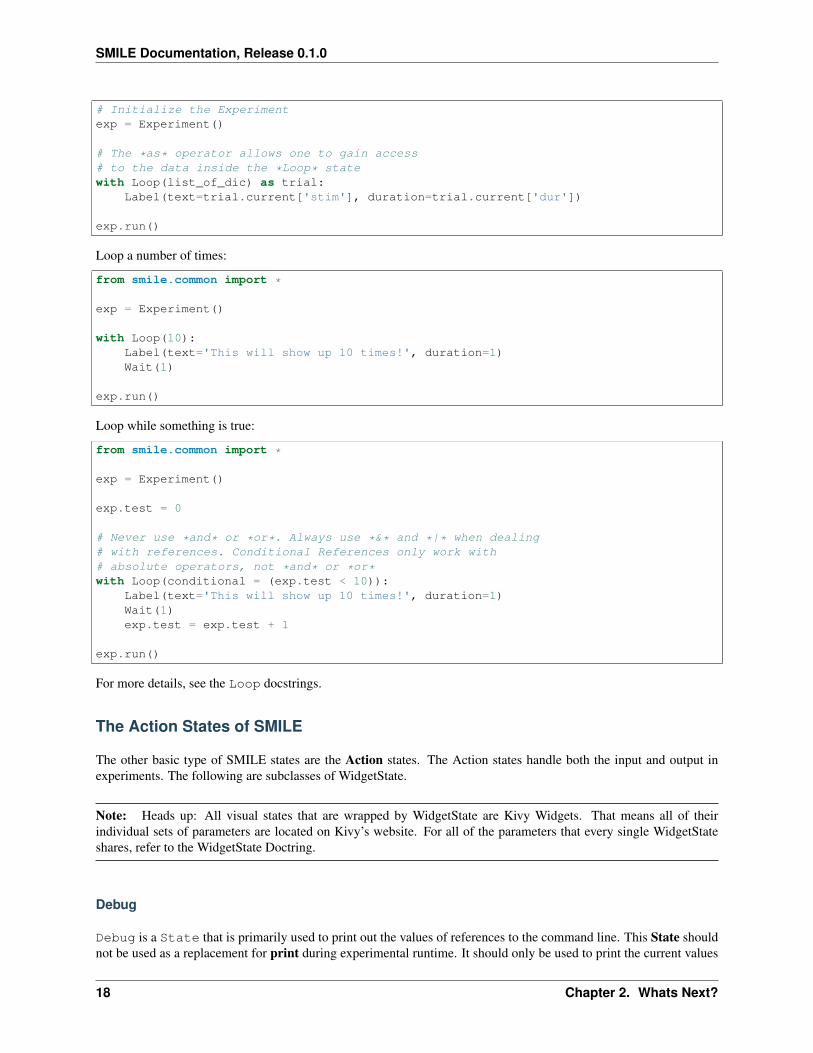
Loop State
A Loop state can handle any kind of looping needed. The main use for a Loop state is to loop over a list of dictionariesthat contain stimuli. Loops can also be created by passing in a conditional parameter. Lastly, instead of looping overa list of dictionaries, Loop states can be used to loop an exact number of times by passing in a number as a parameter.
A Loop state requires a variable to be defined to access all of the information about the loop. This can be performedby utilizing the pythonic as keyword. with Loop(list_of_dic) as trial: is the line that defines the loop. If access to thecurrent iteration of a loop is needed, ‘trial.current’ can be utilized.
Refer to the :py:class:‘~smile.state.Loop‘* docstring for information on how to access the different properties of aLoop.
Below is an example of all 3 loops.
List of Dictionaries
from smile.common import *
#List Genlist_of_dic = [{'stim':"STIM 1", 'dur':3},
{'stim':"STIM 2", 'dur':2},{'stim':"STIM 3", 'dur':5},{'stim':"STIM 4", 'dur':1}]
2.3. SMILE States 17
SMILE Documentation, Release 0.1.0
# Initialize the Experimentexp = Experiment()
# The *as* operator allows one to gain access# to the data inside the *Loop* statewith Loop(list_of_dic) as trial:
Label(text=trial.current['stim'], duration=trial.current['dur'])
exp.run()
Loop a number of times:
from smile.common import *
exp = Experiment()
with Loop(10):Label(text='This will show up 10 times!', duration=1)Wait(1)
exp.run()
Loop while something is true:
from smile.common import *
exp = Experiment()
exp.test = 0
# Never use *and* or *or*. Always use *&* and *|* when dealing# with references. Conditional References only work with# absolute operators, not *and* or *or*with Loop(conditional = (exp.test < 10)):
Label(text='This will show up 10 times!', duration=1)Wait(1)exp.test = exp.test + 1
exp.run()
For more details, see the Loop docstrings.
The Action States of SMILE
The other basic type of SMILE states are the Action states. The Action states handle both the input and output inexperiments. The following are subclasses of WidgetState.
Note: Heads up: All visual states that are wrapped by WidgetState are Kivy Widgets. That means all of theirindividual sets of parameters are located on Kivy’s website. For all of the parameters that every single WidgetStateshares, refer to the WidgetState Doctring.
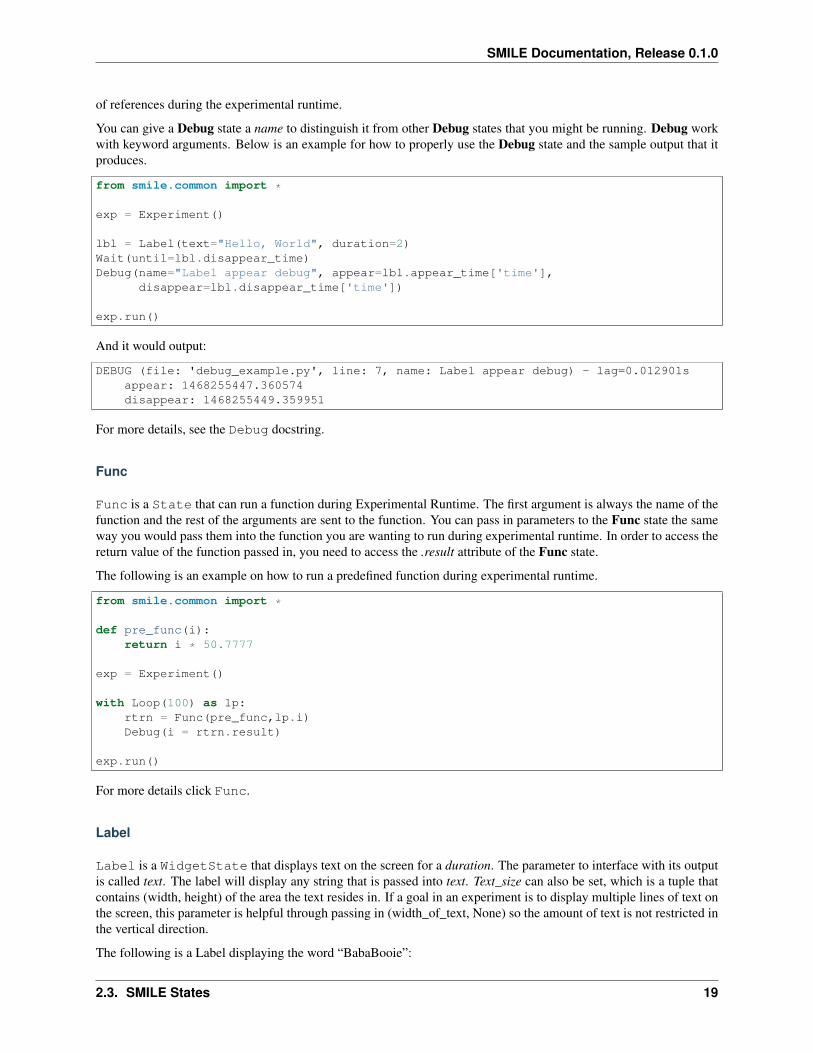
Debug
Debug is a State that is primarily used to print out the values of references to the command line. This State shouldnot be used as a replacement for print during experimental runtime. It should only be used to print the current values
18 Chapter 2. Whats Next?
SMILE Documentation, Release 0.1.0
of references during the experimental runtime.
You can give a Debug state a name to distinguish it from other Debug states that you might be running. Debug workwith keyword arguments. Below is an example for how to properly use the Debug state and the sample output that itproduces.
from smile.common import *
exp = Experiment()
lbl = Label(text="Hello, World", duration=2)Wait(until=lbl.disappear_time)Debug(name="Label appear debug", appear=lbl.appear_time['time'],
disappear=lbl.disappear_time['time'])
exp.run()
And it would output:
DEBUG (file: 'debug_example.py', line: 7, name: Label appear debug) - lag=0.012901sappear: 1468255447.360574disappear: 1468255449.359951
For more details, see the Debug docstring.
Func
Func is a State that can run a function during Experimental Runtime. The first argument is always the name of thefunction and the rest of the arguments are sent to the function. You can pass in parameters to the Func state the sameway you would pass them into the function you are wanting to run during experimental runtime. In order to access thereturn value of the function passed in, you need to access the .result attribute of the Func state.
The following is an example on how to run a predefined function during experimental runtime.
from smile.common import *
def pre_func(i):return i * 50.7777
exp = Experiment()
with Loop(100) as lp:rtrn = Func(pre_func,lp.i)Debug(i = rtrn.result)
exp.run()
For more details click Func.
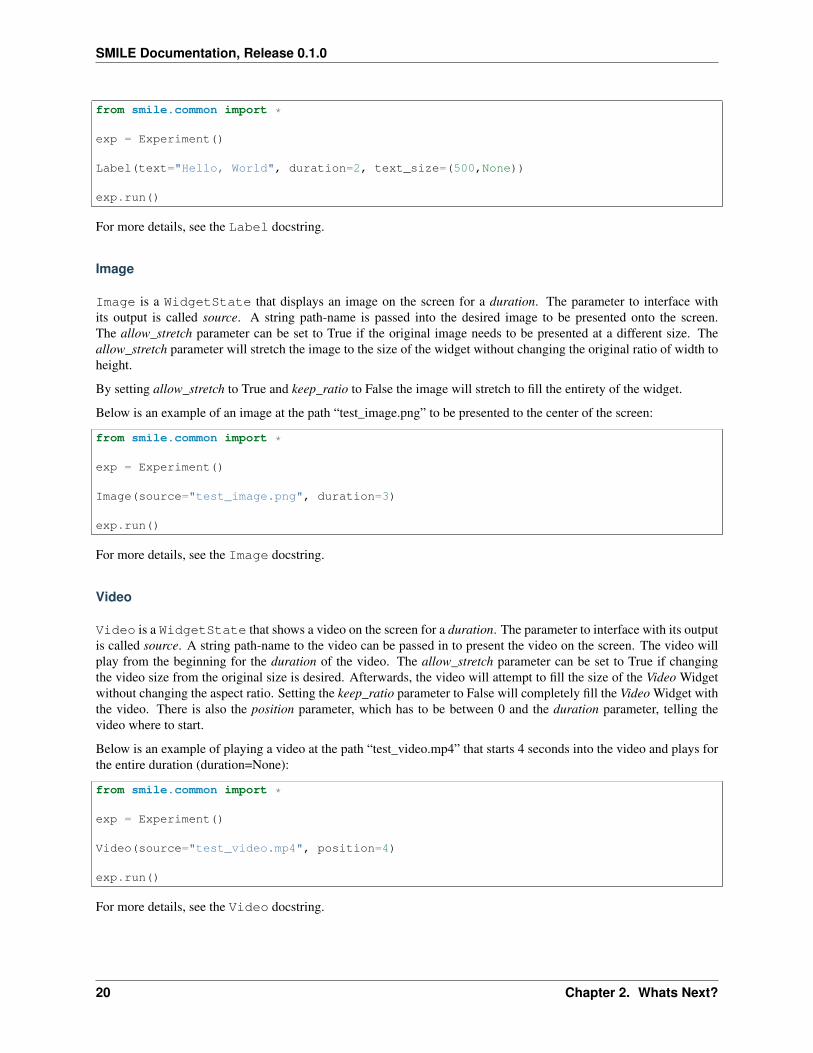
Label
Label is a WidgetState that displays text on the screen for a duration. The parameter to interface with its outputis called text. The label will display any string that is passed into text. Text_size can also be set, which is a tuple thatcontains (width, height) of the area the text resides in. If a goal in an experiment is to display multiple lines of text onthe screen, this parameter is helpful through passing in (width_of_text, None) so the amount of text is not restricted inthe vertical direction.
The following is a Label displaying the word “BabaBooie”:
2.3. SMILE States 19
SMILE Documentation, Release 0.1.0
from smile.common import *
exp = Experiment()
Label(text="Hello, World", duration=2, text_size=(500,None))
exp.run()
For more details, see the Label docstring.
Image
Image is a WidgetState that displays an image on the screen for a duration. The parameter to interface withits output is called source. A string path-name is passed into the desired image to be presented onto the screen.The allow_stretch parameter can be set to True if the original image needs to be presented at a different size. Theallow_stretch parameter will stretch the image to the size of the widget without changing the original ratio of width toheight.
By setting allow_stretch to True and keep_ratio to False the image will stretch to fill the entirety of the widget.
Below is an example of an image at the path “test_image.png” to be presented to the center of the screen:
from smile.common import *
exp = Experiment()
Image(source="test_image.png", duration=3)
exp.run()
For more details, see the Image docstring.
Video
Video is a WidgetState that shows a video on the screen for a duration. The parameter to interface with its outputis called source. A string path-name to the video can be passed in to present the video on the screen. The video willplay from the beginning for the duration of the video. The allow_stretch parameter can be set to True if changingthe video size from the original size is desired. Afterwards, the video will attempt to fill the size of the Video Widgetwithout changing the aspect ratio. Setting the keep_ratio parameter to False will completely fill the Video Widget withthe video. There is also the position parameter, which has to be between 0 and the duration parameter, telling thevideo where to start.
Below is an example of playing a video at the path “test_video.mp4” that starts 4 seconds into the video and plays forthe entire duration (duration=None):
from smile.common import *
exp = Experiment()
Video(source="test_video.mp4", position=4)
exp.run()
For more details, see the Video docstring.
20 Chapter 2. Whats Next?

SMILE Documentation, Release 0.1.0
Vertex Instructions
Each Vertex Instruction outlined in video.py displays a predefined shape on the screen for a duration. The followingare all of the basic Vertex Instructions that SMILE implements:
• Bezier
• Mesh
• Point
• Triangle
• Quad
• Rectangle
• BorderImage
• Ellipse
The parameters for each of these vary, but just like any other SMILE state, they take the same parameters as thedefault State class. They are Kivy widgets wrapped in our WidgetState class. Kivy documentation can be referred tofor understanding how to use them or what parameters they take.
Beep
Beep is a state that plays a beep noise at a set frequency and volume for a duration. The four parameters needed toset the output of this Beep are freq, volume, fadein, and fadeout. freq and volume are used to set the frequency and thevolume of the Beep. freq defaults to 400 Hz and volume defaults to .5 the max system volume. fadein and fadeout arein seconds, and they represent the time it takes to get from 0 to volume and volume to 0 respectively.
Below is an example of a beep at 555hz for 2 seconds with no fade in or out while at 50% volume:
from smile.common import *
exp = Experiment()
Beep(freq=555, volume=0.5, duration=2)
exp.run()
For more details, see the Beep docstring.
SoundFile
SoundFile is a state that plays a sound file - such as an mp3 - for a duration that defaults to the duration of the file.The parameter used to interface with the output of this state is filename. filename is the path name to the sound filesaved on the computer. volume is a float from 1 to 0 where 1 is the max system volume.
The start parameter allows for sound files to begin at the desired point in the audio file. By using the start parameter,the audio will begin however many seconds into the audio file as desired.
The end parameter allows for sound files to end before the original end of the audio. The end parameter must be set tohowever many seconds from the beginning of the sound file it is desired to end at. The parameter must be greater thanthe value of start.
If the loop parameter is set to True, the sound file will run on a loop for the duration of the State.
Below is an example of playing a sound file at path “test_sound.mp3” at 50% volume for the full duration of the soundfile:
2.3. SMILE States 21
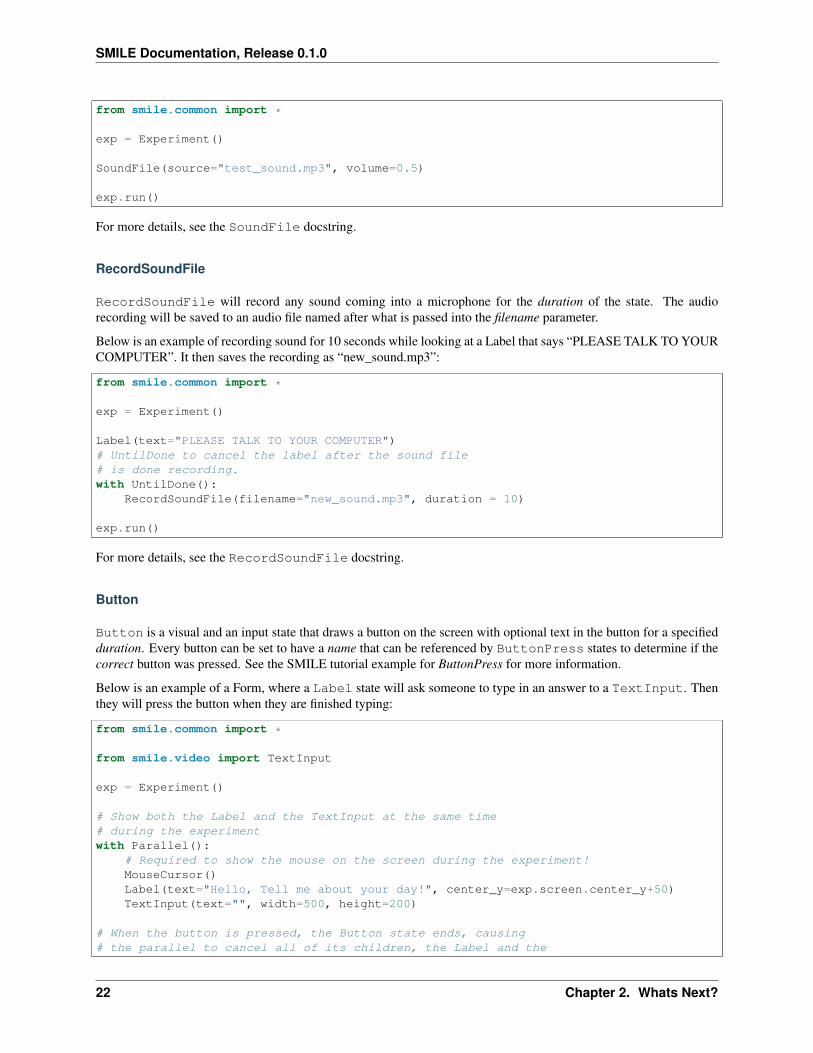
SMILE Documentation, Release 0.1.0
from smile.common import *
exp = Experiment()
SoundFile(source="test_sound.mp3", volume=0.5)
exp.run()
For more details, see the SoundFile docstring.
RecordSoundFile
RecordSoundFile will record any sound coming into a microphone for the duration of the state. The audiorecording will be saved to an audio file named after what is passed into the filename parameter.
Below is an example of recording sound for 10 seconds while looking at a Label that says “PLEASE TALK TO YOURCOMPUTER”. It then saves the recording as “new_sound.mp3”:
from smile.common import *
exp = Experiment()
Label(text="PLEASE TALK TO YOUR COMPUTER")# UntilDone to cancel the label after the sound file# is done recording.with UntilDone():
RecordSoundFile(filename="new_sound.mp3", duration = 10)
exp.run()
For more details, see the RecordSoundFile docstring.
Button
Button is a visual and an input state that draws a button on the screen with optional text in the button for a specifiedduration. Every button can be set to have a name that can be referenced by ButtonPress states to determine if thecorrect button was pressed. See the SMILE tutorial example for ButtonPress for more information.
Below is an example of a Form, where a Label state will ask someone to type in an answer to a TextInput. Thenthey will press the button when they are finished typing:
from smile.common import *
from smile.video import TextInput
exp = Experiment()
# Show both the Label and the TextInput at the same time# during the experimentwith Parallel():
# Required to show the mouse on the screen during the experiment!MouseCursor()Label(text="Hello, Tell me about your day!", center_y=exp.screen.center_y+50)TextInput(text="", width=500, height=200)
# When the button is pressed, the Button state ends, causing# the parallel to cancel all of its children, the Label and the
22 Chapter 2. Whats Next?

SMILE Documentation, Release 0.1.0
# TextInputwith UntilDone():
# A ButtonPress will end whenever one of its child buttons# is pressed.with ButtonPress():
Button(text="Enter")
exp.run()
For more details, see the Button docstring.
ButtonPress
ButtonPress is a parent state, much like Parallel, that will run until a button inside of it is pressed. Whendefining a ButtonPress state, The name of a button inside of the parent state can be designated as the correct buttonto press by passing the string name of the correct Button or Buttons into the correct_resp parameter. Refer to theButtonPress example in the SMILE tutorial document.
The following is an example of choosing between 3 buttons where only one of the buttons is the correct button to click:
from smile.common import *
exp = Experiment()
# A ButtonPress will end whenever one of its child buttons# is pressed.with ButtonPress(correct_resp=['First_Choice']) as bp:
# Required to do anything with buttons.MouseCursor()Label(text="Choose WISELY")# Define both buttons, giving both unique namesButton(name="First_Choice",text="LEFT CHOICE", center_x=exp.screen.center_x-200)Button(name="Second_Choice",text="RIGHT CHOICE", center_x=exp.screen.center_x+200)
Label(text=bp.pressed, duration=2)
exp.run()
For more details, see the ButtonPress docstring.
KeyPress
KeyPress is an input state that waits for a keyboard press during its duration. A list of strings can be passed in asparameters that are acceptable keyboard buttons into keys. A correct key can be selected by passing in its string nameas a parameter to correct_resp.
Access to the information about the KeyPress state by can be achieved by using the following attributes:
-pressed : a string that is the name of the key that was pressed. -press_time : a float value of the timewhen the key was pressed. -correct : a boolean that is whether or not they pressed the correct_resp -rt : afloat that is the reaction time of the keypress. It is press_time - base_time.
The following is a keypress example that will identify what keys were pressed.
from smile.common import *
exp = Experiment()
2.3. SMILE States 23
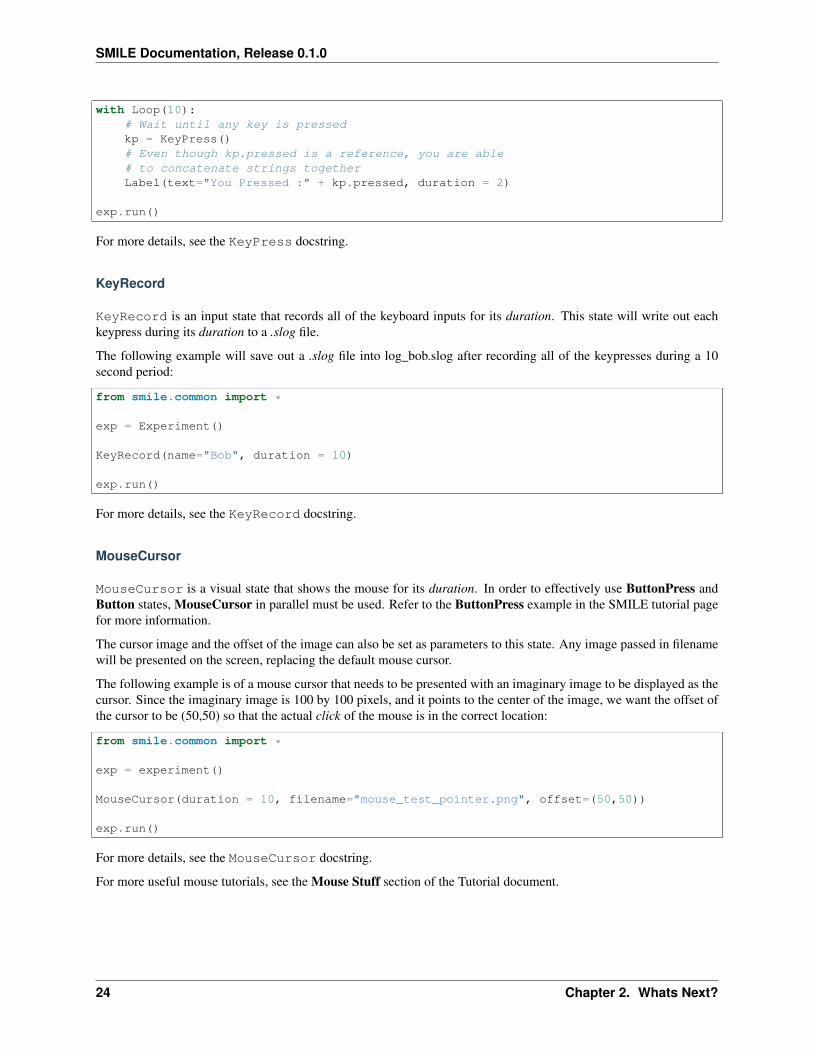
SMILE Documentation, Release 0.1.0
with Loop(10):# Wait until any key is pressedkp = KeyPress()# Even though kp.pressed is a reference, you are able# to concatenate strings togetherLabel(text="You Pressed :" + kp.pressed, duration = 2)
exp.run()
For more details, see the KeyPress docstring.
KeyRecord
KeyRecord is an input state that records all of the keyboard inputs for its duration. This state will write out eachkeypress during its duration to a .slog file.
The following example will save out a .slog file into log_bob.slog after recording all of the keypresses during a 10second period:
from smile.common import *
exp = Experiment()
KeyRecord(name="Bob", duration = 10)
exp.run()
For more details, see the KeyRecord docstring.
MouseCursor
MouseCursor is a visual state that shows the mouse for its duration. In order to effectively use ButtonPress andButton states, MouseCursor in parallel must be used. Refer to the ButtonPress example in the SMILE tutorial pagefor more information.
The cursor image and the offset of the image can also be set as parameters to this state. Any image passed in filenamewill be presented on the screen, replacing the default mouse cursor.
The following example is of a mouse cursor that needs to be presented with an imaginary image to be displayed as thecursor. Since the imaginary image is 100 by 100 pixels, and it points to the center of the image, we want the offset ofthe cursor to be (50,50) so that the actual click of the mouse is in the correct location:
from smile.common import *
exp = experiment()
MouseCursor(duration = 10, filename="mouse_test_pointer.png", offset=(50,50))
exp.run()
For more details, see the MouseCursor docstring.
For more useful mouse tutorials, see the Mouse Stuff section of the Tutorial document.
24 Chapter 2. Whats Next?
SMILE Documentation, Release 0.1.0
Special Examples
This section is designed to develop techniques on how to use more advanced states and advanced interactions withother states in SMILE. For more detailed real life examples of experiments, reference Full Experiments page!
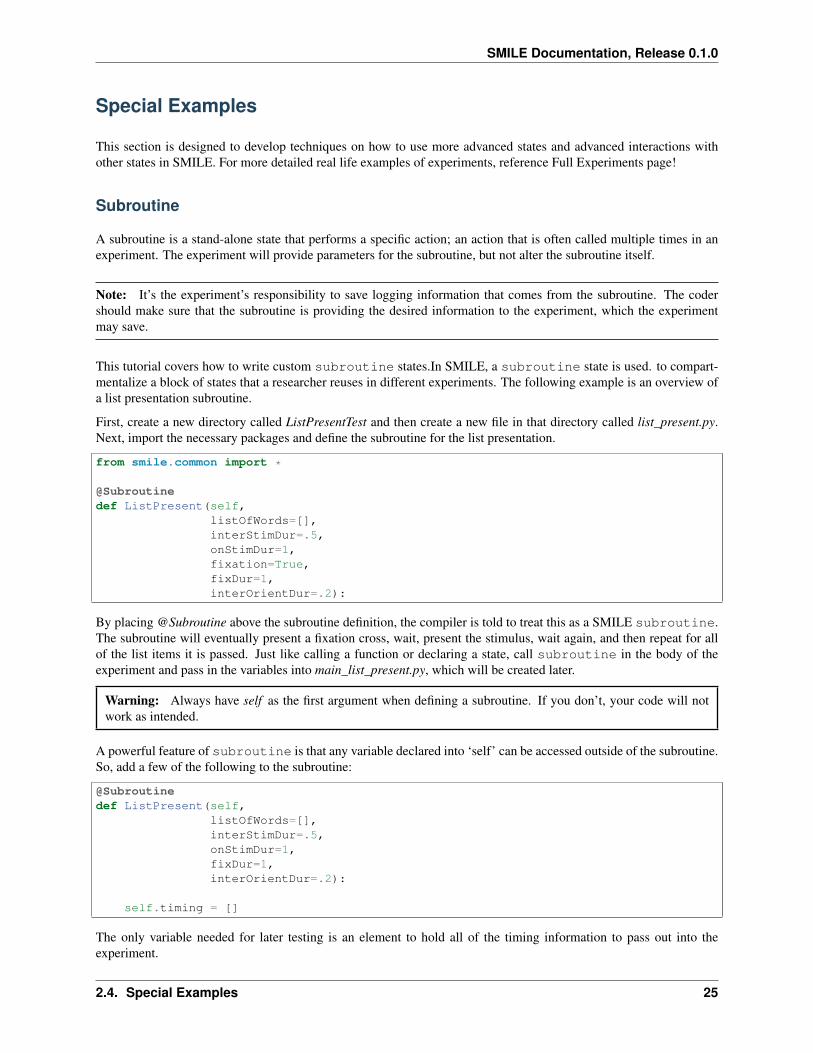
Subroutine
A subroutine is a stand-alone state that performs a specific action; an action that is often called multiple times in anexperiment. The experiment will provide parameters for the subroutine, but not alter the subroutine itself.
Note: It’s the experiment’s responsibility to save logging information that comes from the subroutine. The codershould make sure that the subroutine is providing the desired information to the experiment, which the experimentmay save.
This tutorial covers how to write custom subroutine states.In SMILE, a subroutine state is used. to compart-mentalize a block of states that a researcher reuses in different experiments. The following example is an overview ofa list presentation subroutine.
First, create a new directory called ListPresentTest and then create a new file in that directory called list_present.py.Next, import the necessary packages and define the subroutine for the list presentation.
from smile.common import *
@Subroutinedef ListPresent(self,
listOfWords=[],interStimDur=.5,onStimDur=1,fixation=True,fixDur=1,interOrientDur=.2):
By placing @Subroutine above the subroutine definition, the compiler is told to treat this as a SMILE subroutine.The subroutine will eventually present a fixation cross, wait, present the stimulus, wait again, and then repeat for allof the list items it is passed. Just like calling a function or declaring a state, call subroutine in the body of theexperiment and pass in the variables into main_list_present.py, which will be created later.
Warning: Always have self as the first argument when defining a subroutine. If you don’t, your code will notwork as intended.
A powerful feature of subroutine is that any variable declared into ‘self’ can be accessed outside of the subroutine.So, add a few of the following to the subroutine:
@Subroutinedef ListPresent(self,
listOfWords=[],interStimDur=.5,onStimDur=1,fixDur=1,interOrientDur=.2):
self.timing = []
The only variable needed for later testing is an element to hold all of the timing information to pass out into theexperiment.
2.4. Special Examples 25
SMILE Documentation, Release 0.1.0
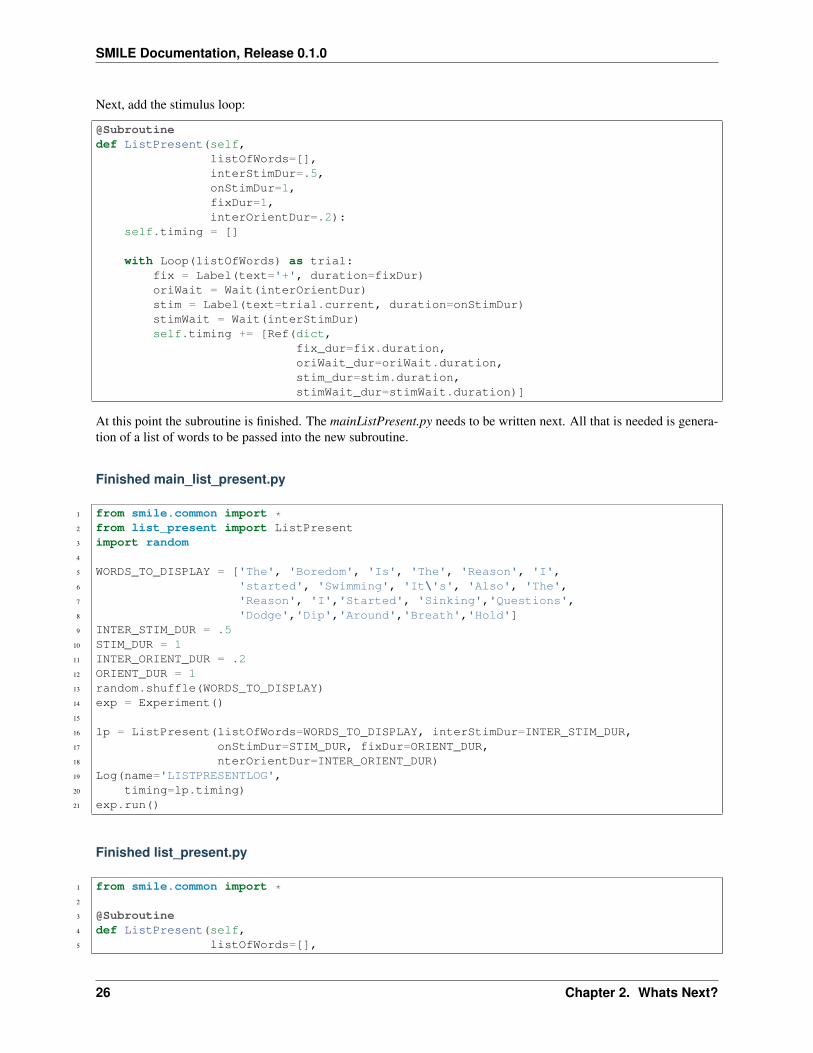
Next, add the stimulus loop:
@Subroutinedef ListPresent(self,
listOfWords=[],interStimDur=.5,onStimDur=1,fixDur=1,interOrientDur=.2):
self.timing = []
with Loop(listOfWords) as trial:fix = Label(text='+', duration=fixDur)oriWait = Wait(interOrientDur)stim = Label(text=trial.current, duration=onStimDur)stimWait = Wait(interStimDur)self.timing += [Ref(dict,
fix_dur=fix.duration,oriWait_dur=oriWait.duration,stim_dur=stim.duration,stimWait_dur=stimWait.duration)]
At this point the subroutine is finished. The mainListPresent.py needs to be written next. All that is needed is genera-tion of a list of words to be passed into the new subroutine.
Finished main_list_present.py
1 from smile.common import *2 from list_present import ListPresent3 import random4
5 WORDS_TO_DISPLAY = ['The', 'Boredom', 'Is', 'The', 'Reason', 'I',6 'started', 'Swimming', 'It\'s', 'Also', 'The',7 'Reason', 'I','Started', 'Sinking','Questions',8 'Dodge','Dip','Around','Breath','Hold']9 INTER_STIM_DUR = .5
10 STIM_DUR = 111 INTER_ORIENT_DUR = .212 ORIENT_DUR = 113 random.shuffle(WORDS_TO_DISPLAY)14 exp = Experiment()15
16 lp = ListPresent(listOfWords=WORDS_TO_DISPLAY, interStimDur=INTER_STIM_DUR,17 onStimDur=STIM_DUR, fixDur=ORIENT_DUR,18 nterOrientDur=INTER_ORIENT_DUR)19 Log(name='LISTPRESENTLOG',20 timing=lp.timing)21 exp.run()
Finished list_present.py
1 from smile.common import *2
3 @Subroutine4 def ListPresent(self,5 listOfWords=[],
26 Chapter 2. Whats Next?
SMILE Documentation, Release 0.1.0
6 interStimDur=.5,7 onStimDur=1,8 fixDur=1,9 interOrientDur=.2):
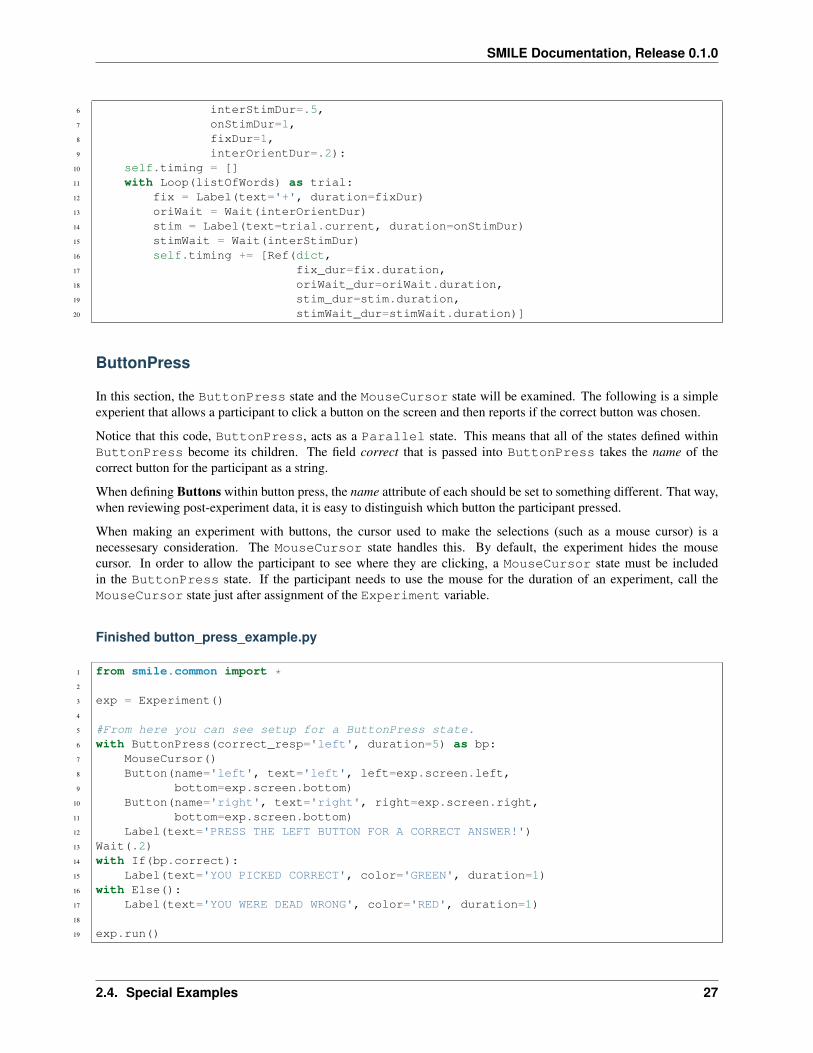
10 self.timing = []11 with Loop(listOfWords) as trial:12 fix = Label(text='+', duration=fixDur)13 oriWait = Wait(interOrientDur)14 stim = Label(text=trial.current, duration=onStimDur)15 stimWait = Wait(interStimDur)16 self.timing += [Ref(dict,17 fix_dur=fix.duration,18 oriWait_dur=oriWait.duration,19 stim_dur=stim.duration,20 stimWait_dur=stimWait.duration)]
ButtonPress
In this section, the ButtonPress state and the MouseCursor state will be examined. The following is a simpleexperient that allows a participant to click a button on the screen and then reports if the correct button was chosen.
Notice that this code, ButtonPress, acts as a Parallel state. This means that all of the states defined withinButtonPress become its children. The field correct that is passed into ButtonPress takes the name of thecorrect button for the participant as a string.
When defining Buttons within button press, the name attribute of each should be set to something different. That way,when reviewing post-experiment data, it is easy to distinguish which button the participant pressed.
When making an experiment with buttons, the cursor used to make the selections (such as a mouse cursor) is anecessesary consideration. The MouseCursor state handles this. By default, the experiment hides the mousecursor. In order to allow the participant to see where they are clicking, a MouseCursor state must be includedin the ButtonPress state. If the participant needs to use the mouse for the duration of an experiment, call theMouseCursor state just after assignment of the Experiment variable.
Finished button_press_example.py
1 from smile.common import *2
3 exp = Experiment()4
5 #From here you can see setup for a ButtonPress state.6 with ButtonPress(correct_resp='left', duration=5) as bp:7 MouseCursor()8 Button(name='left', text='left', left=exp.screen.left,9 bottom=exp.screen.bottom)
10 Button(name='right', text='right', right=exp.screen.right,11 bottom=exp.screen.bottom)12 Label(text='PRESS THE LEFT BUTTON FOR A CORRECT ANSWER!')13 Wait(.2)14 with If(bp.correct):15 Label(text='YOU PICKED CORRECT', color='GREEN', duration=1)16 with Else():17 Label(text='YOU WERE DEAD WRONG', color='RED', duration=1)18
19 exp.run()
2.4. Special Examples 27
SMILE Documentation, Release 0.1.0
Full Experiments
Below are a few links to full, recognizable experiments that were coded up in SMILE. They include the idea behindthe experiment, an explanation of the code, and they include a mini-analysis of the data collected. These real worldexamples will provide a better understanding into exactly how to code a SMILE experiment in real world conditions,rather than in bite-sized samples of code.
Experiments
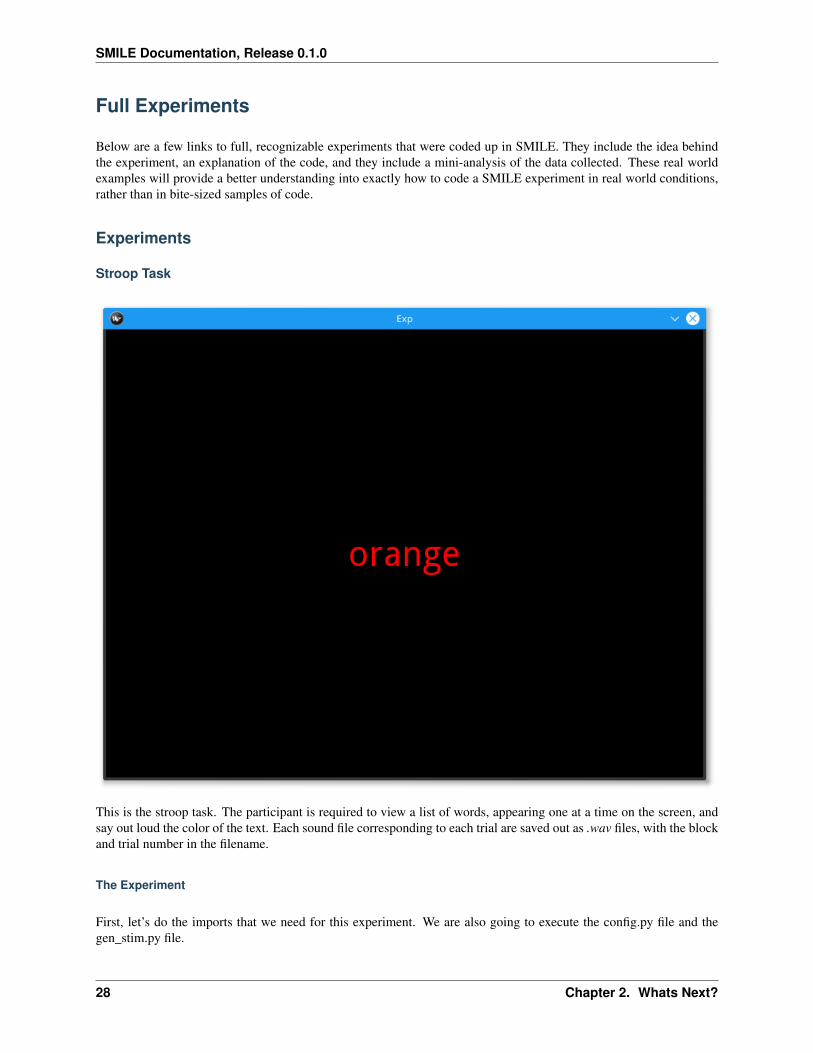
Stroop Task
This is the stroop task. The participant is required to view a list of words, appearing one at a time on the screen, andsay out loud the color of the text. Each sound file corresponding to each trial are saved out as .wav files, with the blockand trial number in the filename.
The Experiment
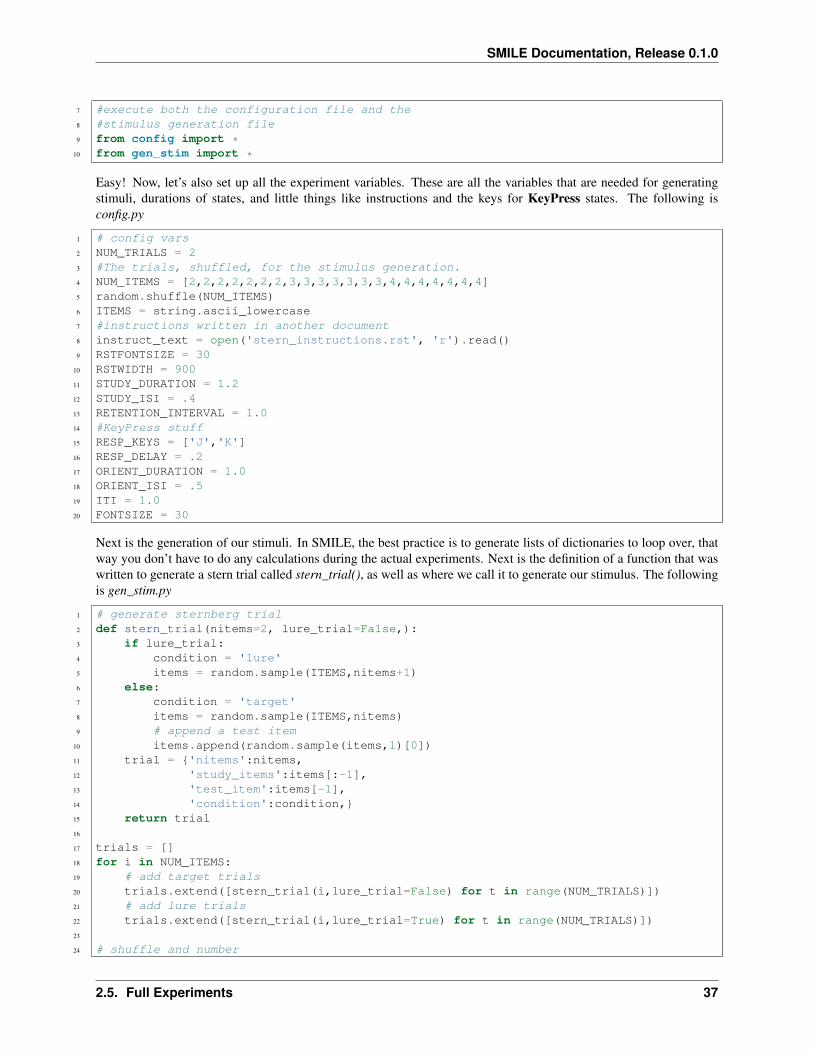
First, let’s do the imports that we need for this experiment. We are also going to execute the config.py file and thegen_stim.py file.
28 Chapter 2. Whats Next?
SMILE Documentation, Release 0.1.0
from smile.common import *from smile.audio import RecordSoundFile
#execute both the configuration file and the#stimulus generation filefrom config import *from gen_stim import *
For this experiment we defined two functions that would generate our list of lists of dictionaries full of the informationwe need to run each trial of our experiment. The first is called gen_lists(). The following is gen_stim.py.
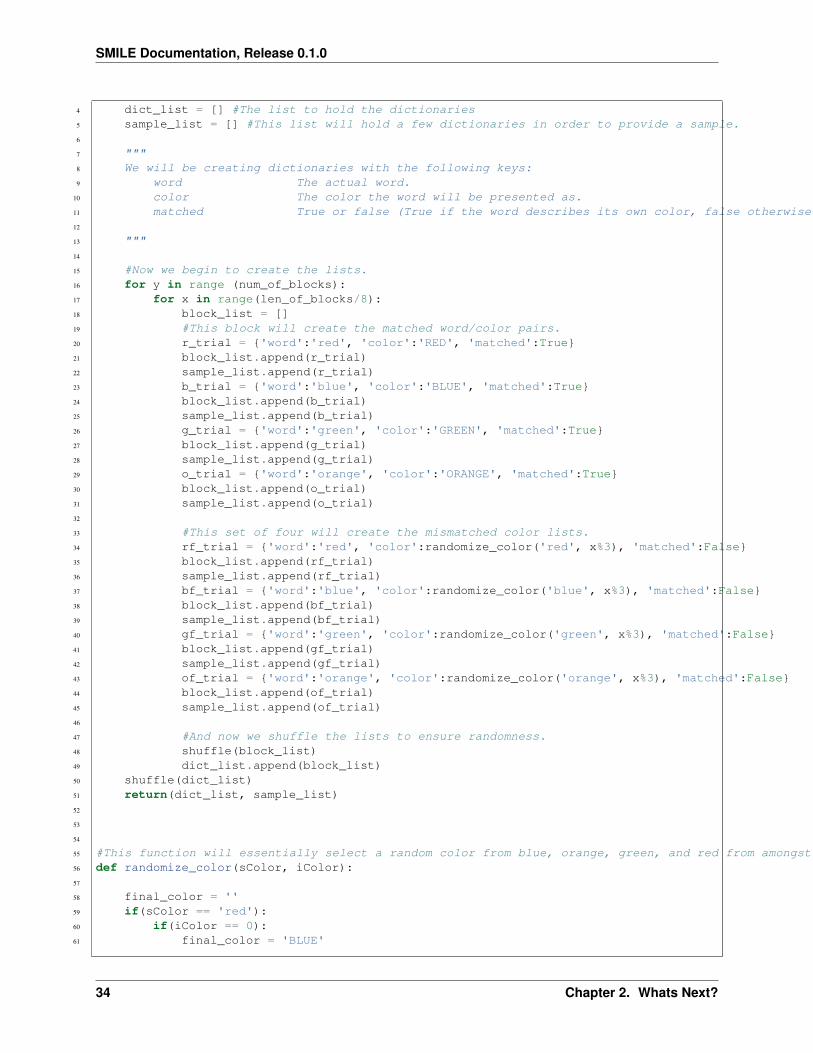
1 def gen_lists():2 #First, let's define some variables.3 num_of_blocks = 4 #This is an arbitrary number of blocks.4 len_of_blocks = 24 #Once again, an arbitrary number of words in the block.5 total_words = num_of_blocks * len_of_blocks #The total number of words.6 dict_list = [] #The list to hold the dictionaries7 sample_list = [] #This list will hold a few dictionaries in order to provide a sample.8
9 """10 We will be creating dictionaries with the following keys:11 word The actual word.12 color The color the word will be presented as.13 matched True or false (True if the word describes its own color, false otherwise.)14
15 """16
17 #So, now we begin to create the lists.18 for y in range (num_of_blocks):19 for x in range(len_of_blocks/8):20 block_list = []21 #This block will create the matched word/color pairs.22 r_trial = {'word':'red', 'color':'RED', 'matched':True}23 block_list.append(r_trial)24 sample_list.append(r_trial)25 b_trial = {'word':'blue', 'color':'BLUE', 'matched':True}26 block_list.append(b_trial)27 sample_list.append(b_trial)28 g_trial = {'word':'green', 'color':'GREEN', 'matched':True}29 block_list.append(g_trial)30 sample_list.append(g_trial)31 o_trial = {'word':'orange', 'color':'ORANGE', 'matched':True}32 block_list.append(o_trial)33 sample_list.append(o_trial)34
35 #This set of four will create the mismatched color lists.36 rf_trial = {'word':'red', 'color':randomize_color('red', x%3), 'matched':False}37 block_list.append(rf_trial)38 sample_list.append(rf_trial)39 bf_trial = {'word':'blue', 'color':randomize_color('blue', x%3), 'matched':False}40 block_list.append(bf_trial)41 sample_list.append(bf_trial)42 gf_trial = {'word':'green', 'color':randomize_color('green', x%3), 'matched':False}43 block_list.append(gf_trial)44 sample_list.append(gf_trial)45 of_trial = {'word':'orange', 'color':randomize_color('orange', x%3), 'matched':False}46 block_list.append(of_trial)47 sample_list.append(of_trial)
2.5. Full Experiments 29
SMILE Documentation, Release 0.1.0
48
49 #And now we shuffle the lists to ensure randomness.50 shuffle(block_list)51 dict_list.append(block_list)52 shuffle(dict_list)53 return(dict_list, sample_list)
Inside this function we call another function that we used to give us the color of the mismatched trials. This functionis called randomize_color(). This function will return a string representative of the color that that text of this trial willbe. The following is the rest of gen_stim.py.
:lineno-start: 54
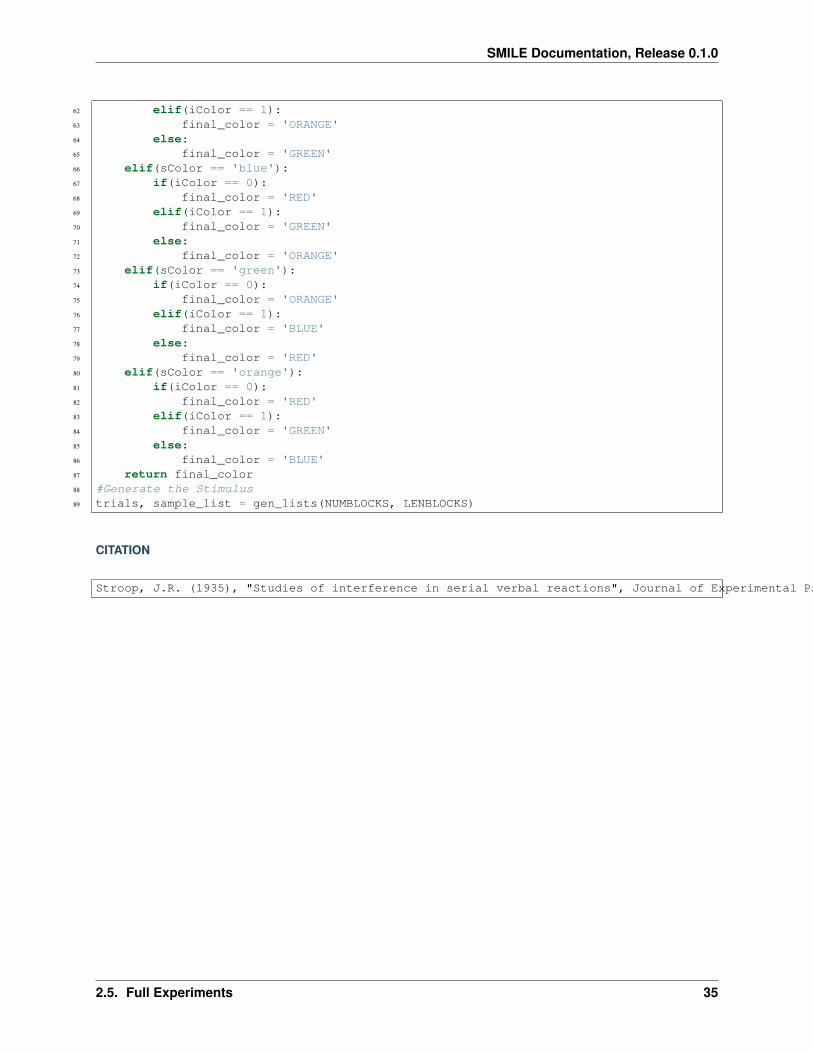
#This function will essentially select a random color from blue, orange, green, and red from amongst the colors that the inputted word is not.def randomize_color(sColor, iColor):
final_color = ''if(sColor == 'red'):
if(iColor == 0):final_color = 'BLUE'
elif(iColor == 1):final_color = 'ORANGE'
else:final_color = 'GREEN'
elif(sColor == 'blue'):if(iColor == 0):
final_color = 'RED'elif(iColor == 1):
final_color = 'GREEN'else:
final_color = 'ORANGE'elif(sColor == 'green'):
if(iColor == 0):final_color = 'ORANGE'
elif(iColor == 1):final_color = 'BLUE'
else:final_color = 'RED'
elif(sColor == 'orange'):if(iColor == 0):
final_color = 'RED'elif(iColor == 1):
final_color = 'GREEN'else:
final_color = 'BLUE'return final_color
#Generate the Stimulustrials, sample_list = gen_lists(NUMBLOCKS, LENBLOCKS)
Now that we have our list gen setup, let’s run our list gen and setup our experiment variables. The following isconfig.py.
1 #Read in the instructions2 instruct_text = open('stroop_instructions.rst', 'r').read()3 RSTFONTSIZE = 304 RSTWIDTH = 9005 NUMBLOCKS = 46 LENBLOCKS = 247 recDuration = 2
30 Chapter 2. Whats Next?
SMILE Documentation, Release 0.1.0
8 interBlockDur = 29 interStimulusInterval = 2
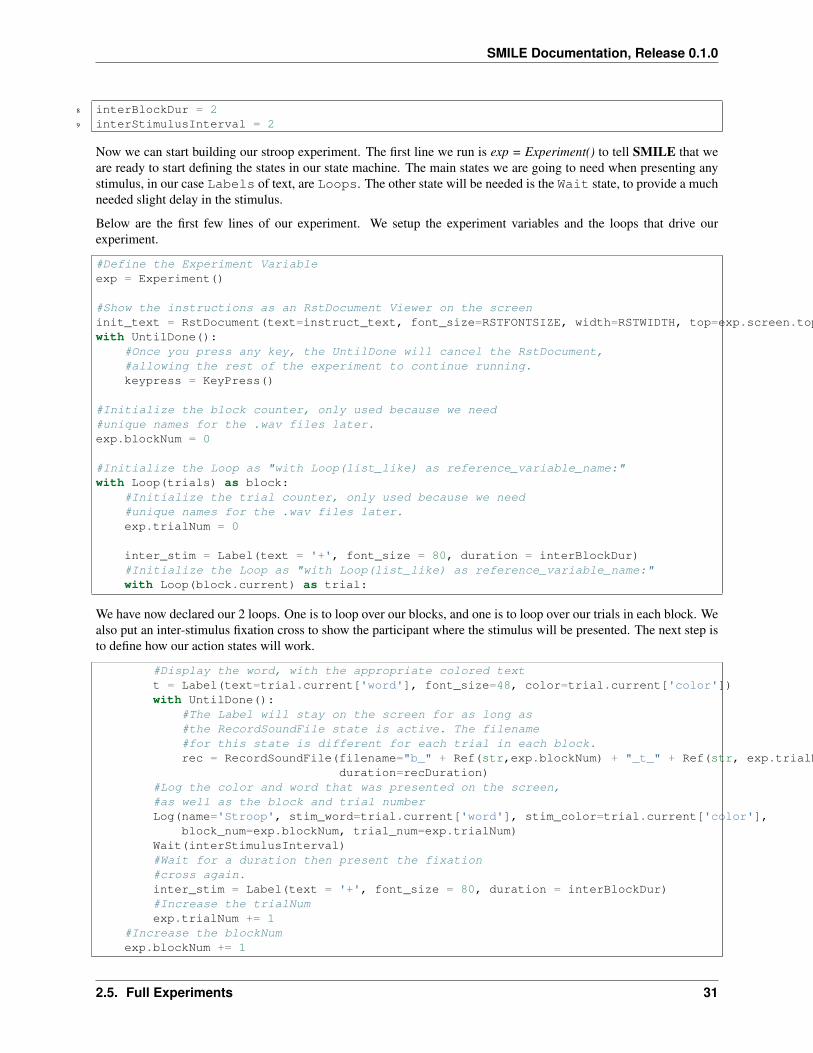
Now we can start building our stroop experiment. The first line we run is exp = Experiment() to tell SMILE that weare ready to start defining the states in our state machine. The main states we are going to need when presenting anystimulus, in our case Labels of text, are Loops. The other state will be needed is the Wait state, to provide a muchneeded slight delay in the stimulus.
Below are the first few lines of our experiment. We setup the experiment variables and the loops that drive ourexperiment.
#Define the Experiment Variableexp = Experiment()
#Show the instructions as an RstDocument Viewer on the screeninit_text = RstDocument(text=instruct_text, font_size=RSTFONTSIZE, width=RSTWIDTH, top=exp.screen.top, height=exp.screen.height)with UntilDone():
#Once you press any key, the UntilDone will cancel the RstDocument,#allowing the rest of the experiment to continue running.keypress = KeyPress()
#Initialize the block counter, only used because we need#unique names for the .wav files later.exp.blockNum = 0
#Initialize the Loop as "with Loop(list_like) as reference_variable_name:"with Loop(trials) as block:
#Initialize the trial counter, only used because we need#unique names for the .wav files later.exp.trialNum = 0
inter_stim = Label(text = '+', font_size = 80, duration = interBlockDur)#Initialize the Loop as "with Loop(list_like) as reference_variable_name:"with Loop(block.current) as trial:
We have now declared our 2 loops. One is to loop over our blocks, and one is to loop over our trials in each block. Wealso put an inter-stimulus fixation cross to show the participant where the stimulus will be presented. The next step isto define how our action states will work.
#Display the word, with the appropriate colored textt = Label(text=trial.current['word'], font_size=48, color=trial.current['color'])with UntilDone():
#The Label will stay on the screen for as long as#the RecordSoundFile state is active. The filename#for this state is different for each trial in each block.rec = RecordSoundFile(filename="b_" + Ref(str,exp.blockNum) + "_t_" + Ref(str, exp.trialNum),
duration=recDuration)#Log the color and word that was presented on the screen,#as well as the block and trial numberLog(name='Stroop', stim_word=trial.current['word'], stim_color=trial.current['color'],
block_num=exp.blockNum, trial_num=exp.trialNum)Wait(interStimulusInterval)#Wait for a duration then present the fixation#cross again.inter_stim = Label(text = '+', font_size = 80, duration = interBlockDur)#Increase the trialNumexp.trialNum += 1
#Increase the blockNumexp.blockNum += 1
2.5. Full Experiments 31
SMILE Documentation, Release 0.1.0
#Run the experiment!exp.run()
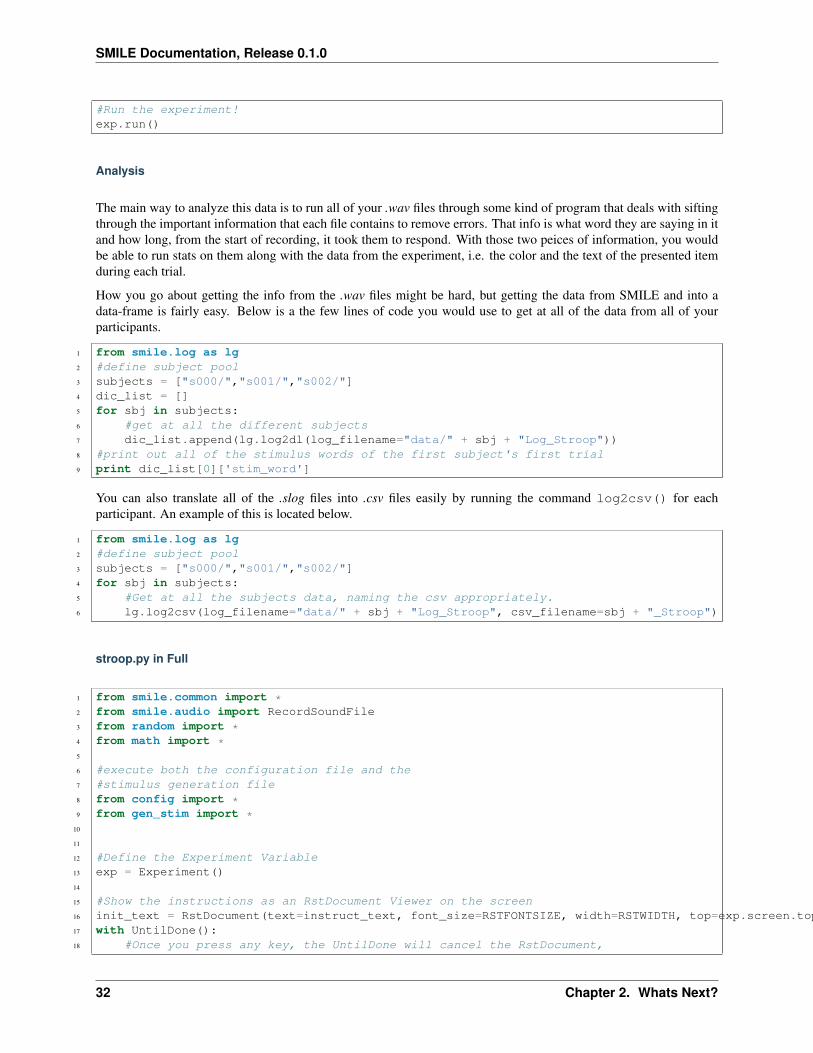
Analysis
The main way to analyze this data is to run all of your .wav files through some kind of program that deals with siftingthrough the important information that each file contains to remove errors. That info is what word they are saying in itand how long, from the start of recording, it took them to respond. With those two peices of information, you wouldbe able to run stats on them along with the data from the experiment, i.e. the color and the text of the presented itemduring each trial.
How you go about getting the info from the .wav files might be hard, but getting the data from SMILE and into adata-frame is fairly easy. Below is a the few lines of code you would use to get at all of the data from all of yourparticipants.
1 from smile.log as lg2 #define subject pool3 subjects = ["s000/","s001/","s002/"]4 dic_list = []5 for sbj in subjects:6 #get at all the different subjects7 dic_list.append(lg.log2dl(log_filename="data/" + sbj + "Log_Stroop"))8 #print out all of the stimulus words of the first subject's first trial9 print dic_list[0]['stim_word']
You can also translate all of the .slog files into .csv files easily by running the command log2csv() for eachparticipant. An example of this is located below.
1 from smile.log as lg2 #define subject pool3 subjects = ["s000/","s001/","s002/"]4 for sbj in subjects:5 #Get at all the subjects data, naming the csv appropriately.6 lg.log2csv(log_filename="data/" + sbj + "Log_Stroop", csv_filename=sbj + "_Stroop")
stroop.py in Full
1 from smile.common import *2 from smile.audio import RecordSoundFile3 from random import *4 from math import *5
6 #execute both the configuration file and the7 #stimulus generation file8 from config import *9 from gen_stim import *
10
11
12 #Define the Experiment Variable13 exp = Experiment()14
15 #Show the instructions as an RstDocument Viewer on the screen16 init_text = RstDocument(text=instruct_text, font_size=RSTFONTSIZE, width=RSTWIDTH, top=exp.screen.top, height=exp.screen.height)17 with UntilDone():18 #Once you press any key, the UntilDone will cancel the RstDocument,
32 Chapter 2. Whats Next?
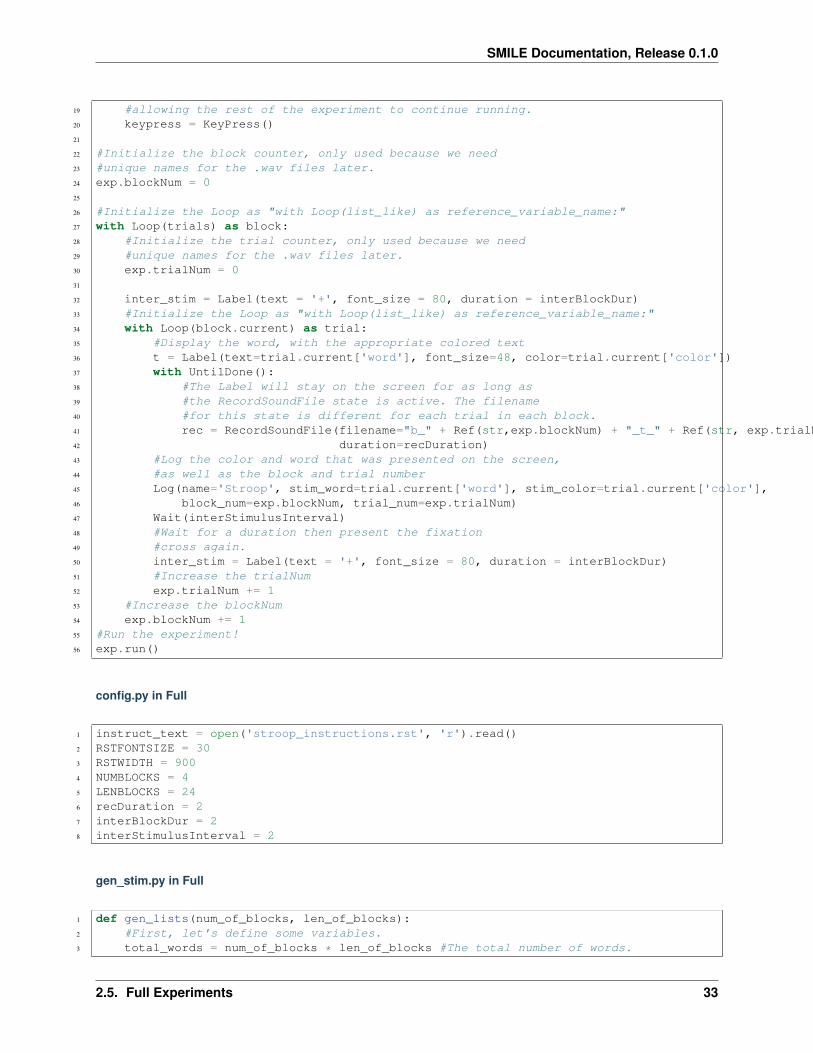
SMILE Documentation, Release 0.1.0
19 #allowing the rest of the experiment to continue running.20 keypress = KeyPress()21
22 #Initialize the block counter, only used because we need23 #unique names for the .wav files later.24 exp.blockNum = 025
26 #Initialize the Loop as "with Loop(list_like) as reference_variable_name:"27 with Loop(trials) as block:28 #Initialize the trial counter, only used because we need29 #unique names for the .wav files later.30 exp.trialNum = 031
32 inter_stim = Label(text = '+', font_size = 80, duration = interBlockDur)33 #Initialize the Loop as "with Loop(list_like) as reference_variable_name:"34 with Loop(block.current) as trial:35 #Display the word, with the appropriate colored text36 t = Label(text=trial.current['word'], font_size=48, color=trial.current['color'])37 with UntilDone():38 #The Label will stay on the screen for as long as39 #the RecordSoundFile state is active. The filename40 #for this state is different for each trial in each block.41 rec = RecordSoundFile(filename="b_" + Ref(str,exp.blockNum) + "_t_" + Ref(str, exp.trialNum),42 duration=recDuration)43 #Log the color and word that was presented on the screen,44 #as well as the block and trial number45 Log(name='Stroop', stim_word=trial.current['word'], stim_color=trial.current['color'],46 block_num=exp.blockNum, trial_num=exp.trialNum)47 Wait(interStimulusInterval)48 #Wait for a duration then present the fixation49 #cross again.50 inter_stim = Label(text = '+', font_size = 80, duration = interBlockDur)51 #Increase the trialNum52 exp.trialNum += 153 #Increase the blockNum54 exp.blockNum += 155 #Run the experiment!56 exp.run()
config.py in Full
1 instruct_text = open('stroop_instructions.rst', 'r').read()2 RSTFONTSIZE = 303 RSTWIDTH = 9004 NUMBLOCKS = 45 LENBLOCKS = 246 recDuration = 27 interBlockDur = 28 interStimulusInterval = 2
gen_stim.py in Full
1 def gen_lists(num_of_blocks, len_of_blocks):2 #First, let's define some variables.3 total_words = num_of_blocks * len_of_blocks #The total number of words.
2.5. Full Experiments 33
SMILE Documentation, Release 0.1.0
4 dict_list = [] #The list to hold the dictionaries5 sample_list = [] #This list will hold a few dictionaries in order to provide a sample.6
7 """8 We will be creating dictionaries with the following keys:9 word The actual word.
10 color The color the word will be presented as.11 matched True or false (True if the word describes its own color, false otherwise.)12
13 """14
15 #Now we begin to create the lists.16 for y in range (num_of_blocks):17 for x in range(len_of_blocks/8):18 block_list = []19 #This block will create the matched word/color pairs.20 r_trial = {'word':'red', 'color':'RED', 'matched':True}21 block_list.append(r_trial)22 sample_list.append(r_trial)23 b_trial = {'word':'blue', 'color':'BLUE', 'matched':True}24 block_list.append(b_trial)25 sample_list.append(b_trial)26 g_trial = {'word':'green', 'color':'GREEN', 'matched':True}27 block_list.append(g_trial)28 sample_list.append(g_trial)29 o_trial = {'word':'orange', 'color':'ORANGE', 'matched':True}30 block_list.append(o_trial)31 sample_list.append(o_trial)32
33 #This set of four will create the mismatched color lists.34 rf_trial = {'word':'red', 'color':randomize_color('red', x%3), 'matched':False}35 block_list.append(rf_trial)36 sample_list.append(rf_trial)37 bf_trial = {'word':'blue', 'color':randomize_color('blue', x%3), 'matched':False}38 block_list.append(bf_trial)39 sample_list.append(bf_trial)40 gf_trial = {'word':'green', 'color':randomize_color('green', x%3), 'matched':False}41 block_list.append(gf_trial)42 sample_list.append(gf_trial)43 of_trial = {'word':'orange', 'color':randomize_color('orange', x%3), 'matched':False}44 block_list.append(of_trial)45 sample_list.append(of_trial)46
47 #And now we shuffle the lists to ensure randomness.48 shuffle(block_list)49 dict_list.append(block_list)50 shuffle(dict_list)51 return(dict_list, sample_list)52
53
54
55 #This function will essentially select a random color from blue, orange, green, and red from amongst the colors that the inputted word is not.56 def randomize_color(sColor, iColor):57
58 final_color = ''59 if(sColor == 'red'):60 if(iColor == 0):61 final_color = 'BLUE'
34 Chapter 2. Whats Next?
SMILE Documentation, Release 0.1.0
62 elif(iColor == 1):63 final_color = 'ORANGE'64 else:65 final_color = 'GREEN'66 elif(sColor == 'blue'):67 if(iColor == 0):68 final_color = 'RED'69 elif(iColor == 1):70 final_color = 'GREEN'71 else:72 final_color = 'ORANGE'73 elif(sColor == 'green'):74 if(iColor == 0):75 final_color = 'ORANGE'76 elif(iColor == 1):77 final_color = 'BLUE'78 else:79 final_color = 'RED'80 elif(sColor == 'orange'):81 if(iColor == 0):82 final_color = 'RED'83 elif(iColor == 1):84 final_color = 'GREEN'85 else:86 final_color = 'BLUE'87 return final_color88 #Generate the Stimulus89 trials, sample_list = gen_lists(NUMBLOCKS, LENBLOCKS)
CITATION
Stroop, J.R. (1935), "Studies of interference in serial verbal reactions", Journal of Experimental Psychology 18 (6): 643-662
2.5. Full Experiments 35

SMILE Documentation, Release 0.1.0
Sternberg Task
This is the Sternberg task. Developed by Saul Sternberg in the 1960’s, this task is designed to test a participantsworking memory by asking them to view a list of several stimuli, usually words, numbers, or letters, and then showingthem a stimuli that may or may not have been in that list. They are then required to make a judgement on whether ornot that word was in the list. Below is the SMILE version of that classic task. We use Action states like KeyPressand Label in this experiment, as well as Flow states like UntilDone and Loop.
Each participant of this experiment will have a different log that will contain all of the information about each block,as well as all of the information that would be needed to run analysis of this experiment, i.e. reaction times.
The Experiment
First, let’s do the imports of the experiment. Below is the start of stern.py. We will also execute the configuration fileand the stimulus generation file.
1 # global imports2 import random3 import string4 # load all the states5 from smile.common import *6
36 Chapter 2. Whats Next?
SMILE Documentation, Release 0.1.0
7 #execute both the configuration file and the8 #stimulus generation file9 from config import *
10 from gen_stim import *
Easy! Now, let’s also set up all the experiment variables. These are all the variables that are needed for generatingstimuli, durations of states, and little things like instructions and the keys for KeyPress states. The following isconfig.py
1 # config vars2 NUM_TRIALS = 23 #The trials, shuffled, for the stimulus generation.4 NUM_ITEMS = [2,2,2,2,2,2,2,3,3,3,3,3,3,3,4,4,4,4,4,4,4]5 random.shuffle(NUM_ITEMS)6 ITEMS = string.ascii_lowercase7 #instructions written in another document8 instruct_text = open('stern_instructions.rst', 'r').read()9 RSTFONTSIZE = 30
10 RSTWIDTH = 90011 STUDY_DURATION = 1.212 STUDY_ISI = .413 RETENTION_INTERVAL = 1.014 #KeyPress stuff15 RESP_KEYS = ['J','K']16 RESP_DELAY = .217 ORIENT_DURATION = 1.018 ORIENT_ISI = .519 ITI = 1.020 FONTSIZE = 30
Next is the generation of our stimuli. In SMILE, the best practice is to generate lists of dictionaries to loop over, thatway you don’t have to do any calculations during the actual experiments. Next is the definition of a function that waswritten to generate a stern trial called stern_trial(), as well as where we call it to generate our stimulus. The followingis gen_stim.py
1 # generate sternberg trial2 def stern_trial(nitems=2, lure_trial=False,):3 if lure_trial:4 condition = 'lure'5 items = random.sample(ITEMS,nitems+1)6 else:7 condition = 'target'8 items = random.sample(ITEMS,nitems)9 # append a test item
10 items.append(random.sample(items,1)[0])11 trial = {'nitems':nitems,12 'study_items':items[:-1],13 'test_item':items[-1],14 'condition':condition,}15 return trial16
17 trials = []18 for i in NUM_ITEMS:19 # add target trials20 trials.extend([stern_trial(i,lure_trial=False) for t in range(NUM_TRIALS)])21 # add lure trials22 trials.extend([stern_trial(i,lure_trial=True) for t in range(NUM_TRIALS)])23
24 # shuffle and number
2.5. Full Experiments 37
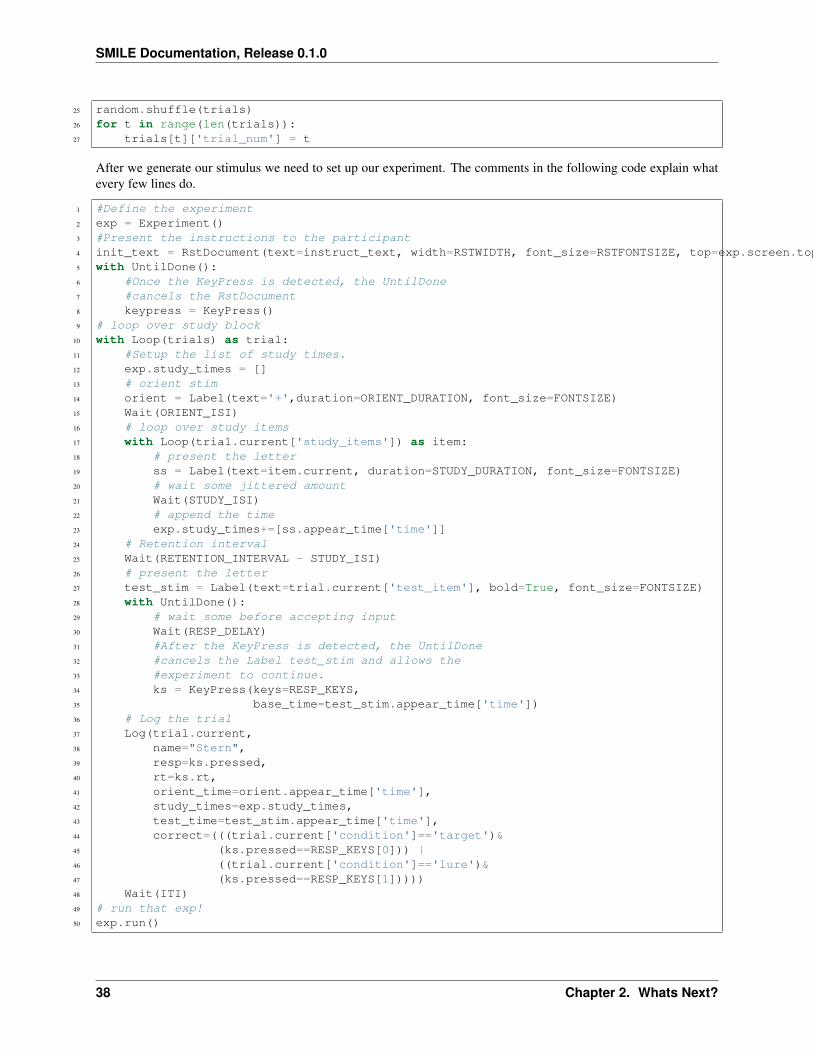
SMILE Documentation, Release 0.1.0
25 random.shuffle(trials)26 for t in range(len(trials)):27 trials[t]['trial_num'] = t
After we generate our stimulus we need to set up our experiment. The comments in the following code explain whatevery few lines do.
1 #Define the experiment2 exp = Experiment()3 #Present the instructions to the participant4 init_text = RstDocument(text=instruct_text, width=RSTWIDTH, font_size=RSTFONTSIZE, top=exp.screen.top, height=exp.screen.height)5 with UntilDone():6 #Once the KeyPress is detected, the UntilDone7 #cancels the RstDocument8 keypress = KeyPress()9 # loop over study block
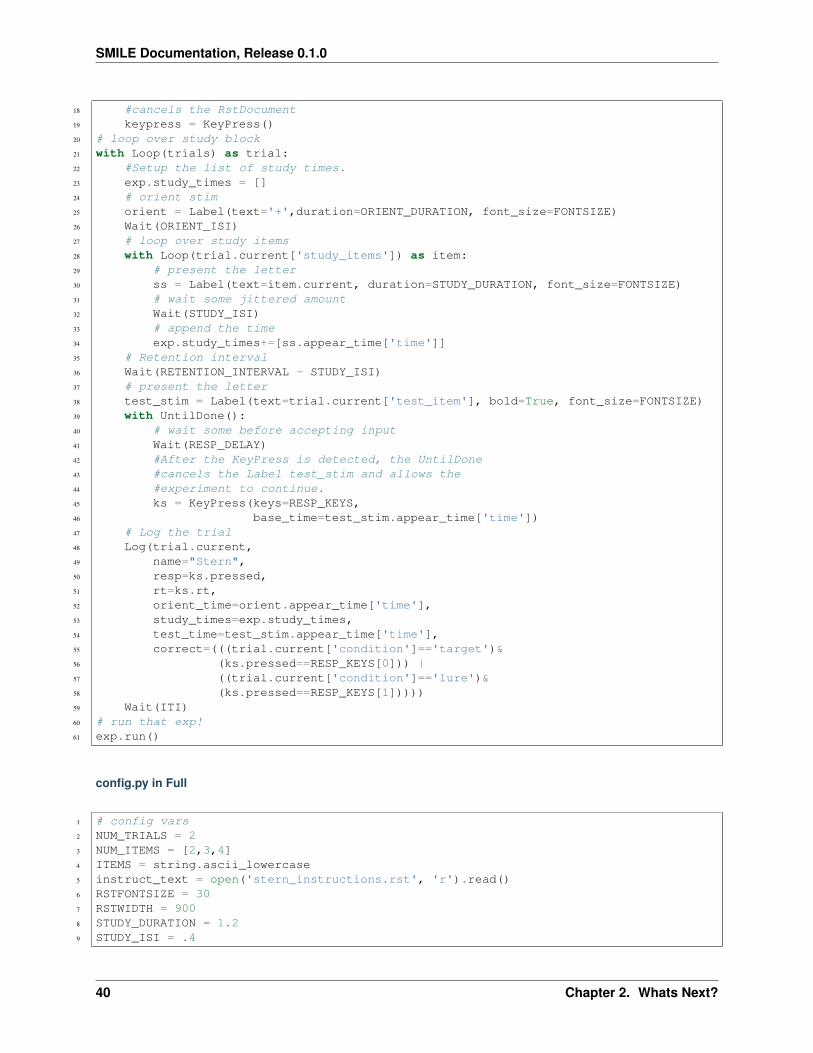
10 with Loop(trials) as trial:11 #Setup the list of study times.12 exp.study_times = []13 # orient stim14 orient = Label(text='+',duration=ORIENT_DURATION, font_size=FONTSIZE)15 Wait(ORIENT_ISI)16 # loop over study items17 with Loop(trial.current['study_items']) as item:18 # present the letter19 ss = Label(text=item.current, duration=STUDY_DURATION, font_size=FONTSIZE)20 # wait some jittered amount21 Wait(STUDY_ISI)22 # append the time23 exp.study_times+=[ss.appear_time['time']]24 # Retention interval25 Wait(RETENTION_INTERVAL - STUDY_ISI)26 # present the letter27 test_stim = Label(text=trial.current['test_item'], bold=True, font_size=FONTSIZE)28 with UntilDone():29 # wait some before accepting input30 Wait(RESP_DELAY)31 #After the KeyPress is detected, the UntilDone32 #cancels the Label test_stim and allows the33 #experiment to continue.34 ks = KeyPress(keys=RESP_KEYS,35 base_time=test_stim.appear_time['time'])36 # Log the trial37 Log(trial.current,38 name="Stern",39 resp=ks.pressed,40 rt=ks.rt,41 orient_time=orient.appear_time['time'],42 study_times=exp.study_times,43 test_time=test_stim.appear_time['time'],44 correct=(((trial.current['condition']=='target')&45 (ks.pressed==RESP_KEYS[0])) |46 ((trial.current['condition']=='lure')&47 (ks.pressed==RESP_KEYS[1]))))48 Wait(ITI)49 # run that exp!50 exp.run()
38 Chapter 2. Whats Next?
SMILE Documentation, Release 0.1.0
Analysis
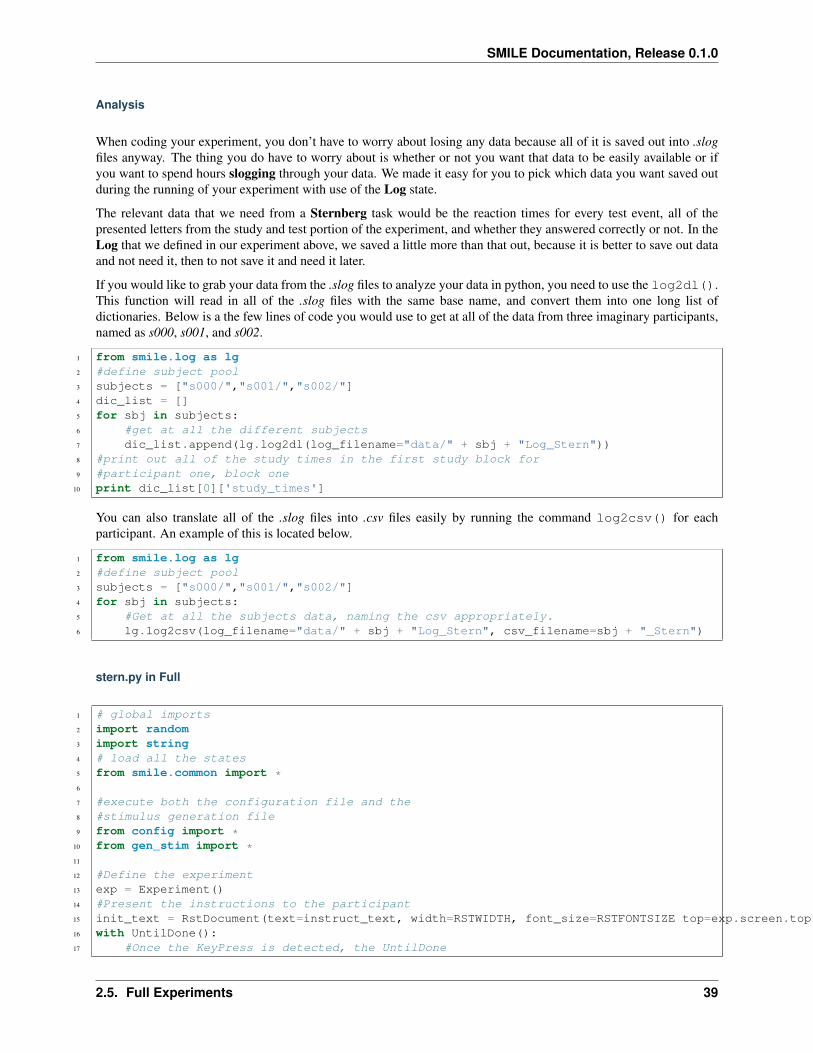
When coding your experiment, you don’t have to worry about losing any data because all of it is saved out into .slogfiles anyway. The thing you do have to worry about is whether or not you want that data to be easily available or ifyou want to spend hours slogging through your data. We made it easy for you to pick which data you want saved outduring the running of your experiment with use of the Log state.
The relevant data that we need from a Sternberg task would be the reaction times for every test event, all of thepresented letters from the study and test portion of the experiment, and whether they answered correctly or not. In theLog that we defined in our experiment above, we saved a little more than that out, because it is better to save out dataand not need it, then to not save it and need it later.
If you would like to grab your data from the .slog files to analyze your data in python, you need to use the log2dl().This function will read in all of the .slog files with the same base name, and convert them into one long list ofdictionaries. Below is a the few lines of code you would use to get at all of the data from three imaginary participants,named as s000, s001, and s002.
1 from smile.log as lg2 #define subject pool3 subjects = ["s000/","s001/","s002/"]4 dic_list = []5 for sbj in subjects:6 #get at all the different subjects7 dic_list.append(lg.log2dl(log_filename="data/" + sbj + "Log_Stern"))8 #print out all of the study times in the first study block for9 #participant one, block one
10 print dic_list[0]['study_times']
You can also translate all of the .slog files into .csv files easily by running the command log2csv() for eachparticipant. An example of this is located below.
1 from smile.log as lg2 #define subject pool3 subjects = ["s000/","s001/","s002/"]4 for sbj in subjects:5 #Get at all the subjects data, naming the csv appropriately.6 lg.log2csv(log_filename="data/" + sbj + "Log_Stern", csv_filename=sbj + "_Stern")
stern.py in Full
1 # global imports2 import random3 import string4 # load all the states5 from smile.common import *6
7 #execute both the configuration file and the8 #stimulus generation file9 from config import *
10 from gen_stim import *11
12 #Define the experiment13 exp = Experiment()14 #Present the instructions to the participant15 init_text = RstDocument(text=instruct_text, width=RSTWIDTH, font_size=RSTFONTSIZE top=exp.screen.top, height=exp.screen.height)16 with UntilDone():17 #Once the KeyPress is detected, the UntilDone
2.5. Full Experiments 39
SMILE Documentation, Release 0.1.0
18 #cancels the RstDocument19 keypress = KeyPress()20 # loop over study block21 with Loop(trials) as trial:22 #Setup the list of study times.23 exp.study_times = []24 # orient stim25 orient = Label(text='+',duration=ORIENT_DURATION, font_size=FONTSIZE)26 Wait(ORIENT_ISI)27 # loop over study items28 with Loop(trial.current['study_items']) as item:29 # present the letter30 ss = Label(text=item.current, duration=STUDY_DURATION, font_size=FONTSIZE)31 # wait some jittered amount32 Wait(STUDY_ISI)33 # append the time34 exp.study_times+=[ss.appear_time['time']]35 # Retention interval36 Wait(RETENTION_INTERVAL - STUDY_ISI)37 # present the letter38 test_stim = Label(text=trial.current['test_item'], bold=True, font_size=FONTSIZE)39 with UntilDone():40 # wait some before accepting input41 Wait(RESP_DELAY)42 #After the KeyPress is detected, the UntilDone43 #cancels the Label test_stim and allows the44 #experiment to continue.45 ks = KeyPress(keys=RESP_KEYS,46 base_time=test_stim.appear_time['time'])47 # Log the trial48 Log(trial.current,49 name="Stern",50 resp=ks.pressed,51 rt=ks.rt,52 orient_time=orient.appear_time['time'],53 study_times=exp.study_times,54 test_time=test_stim.appear_time['time'],55 correct=(((trial.current['condition']=='target')&56 (ks.pressed==RESP_KEYS[0])) |57 ((trial.current['condition']=='lure')&58 (ks.pressed==RESP_KEYS[1]))))59 Wait(ITI)60 # run that exp!61 exp.run()
config.py in Full
1 # config vars2 NUM_TRIALS = 23 NUM_ITEMS = [2,3,4]4 ITEMS = string.ascii_lowercase5 instruct_text = open('stern_instructions.rst', 'r').read()6 RSTFONTSIZE = 307 RSTWIDTH = 9008 STUDY_DURATION = 1.29 STUDY_ISI = .4
40 Chapter 2. Whats Next?

SMILE Documentation, Release 0.1.0
10 RETENTION_INTERVAL = 1.011 RESP_KEYS = ['J','K']12 RESP_DELAY = .213 ORIENT_DURATION = 1.014 ORIENT_ISI = .515 ITI = 1.016 FONTSIZE = 30
gen_stim.py in Full
1 # generate Sternberg trial2 def stern_trial(nitems=2, lure_trial=False,):3 if lure_trial:4 condition = 'lure'5 items = random.sample(ITEMS,nitems+1)6 else:7 condition = 'target'8 items = random.sample(ITEMS,nitems)9 # append a test item
10 items.append(random.sample(items,1)[0])11 trial = {'nitems':nitems,12 'study_items':items[:-1],13 'test_item':items[-1],14 'condition':condition,}15 return trial16
17 trials = []18 for i in NUM_ITEMS:19 # add target trials20 trials.extend([stern_trial(i,lure_trial=False) for t in range(NUM_TRIALS)])21 # add lure trials22 trials.extend([stern_trial(i,lure_trial=True) for t in range(NUM_TRIALS)])23
24 # shuffle and number25 random.shuffle(trials)26 for t in range(len(trials)):27 trials[t]['trial_num'] = t
CITATION
Sternberg, S. (1966), "High-speed scanning in human memory", Science 153 (3736), 652-654
2.5. Full Experiments 41
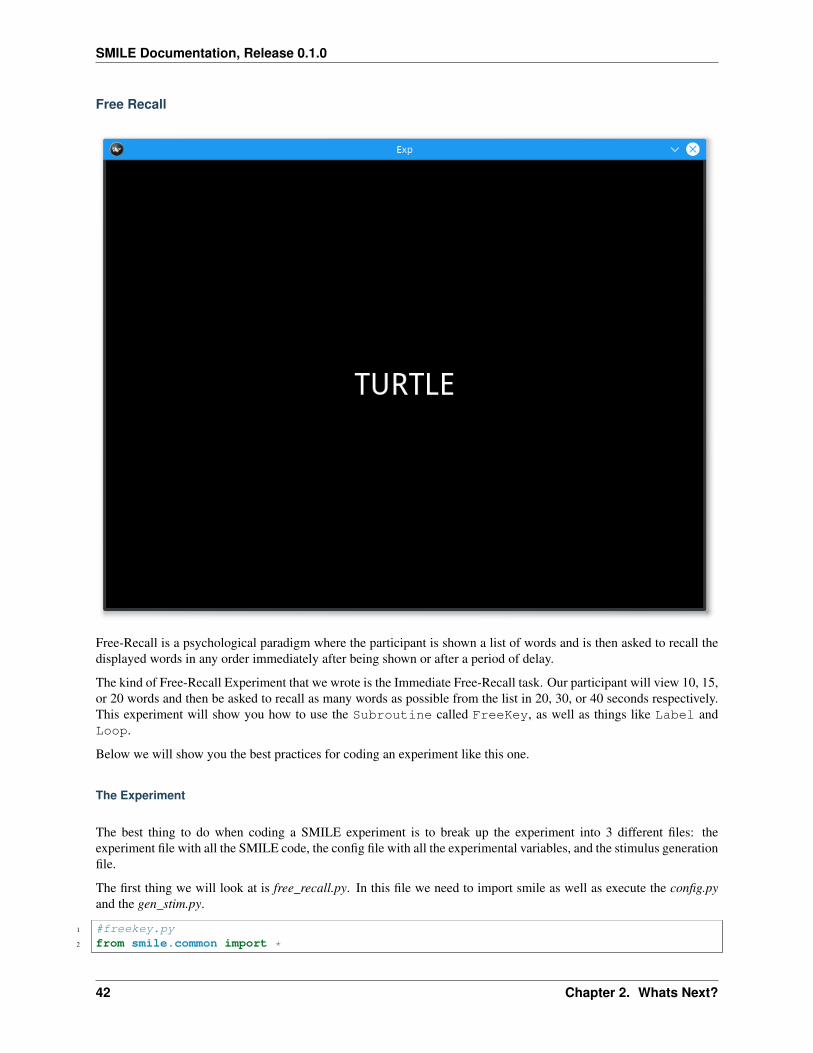
SMILE Documentation, Release 0.1.0
Free Recall
Free-Recall is a psychological paradigm where the participant is shown a list of words and is then asked to recall thedisplayed words in any order immediately after being shown or after a period of delay.
The kind of Free-Recall Experiment that we wrote is the Immediate Free-Recall task. Our participant will view 10, 15,or 20 words and then be asked to recall as many words as possible from the list in 20, 30, or 40 seconds respectively.This experiment will show you how to use the Subroutine called FreeKey, as well as things like Label andLoop.
Below we will show you the best practices for coding an experiment like this one.
The Experiment
The best thing to do when coding a SMILE experiment is to break up the experiment into 3 different files: theexperiment file with all the SMILE code, the config file with all the experimental variables, and the stimulus generationfile.
The first thing we will look at is free_recall.py. In this file we need to import smile as well as execute the config.pyand the gen_stim.py.
1 #freekey.py2 from smile.common import *
42 Chapter 2. Whats Next?

SMILE Documentation, Release 0.1.0
3 from smile.freekey import FreeKey4
5 #execute both the configuration file and the6 #stimulus generation file7 from config import *8 from gen_stim import *
Inside config.py we setup any variables that will need to be used during the experiment as well as open any files thatwe might need for list generation or instructions for the participant.
1 #Names of the stimulus files2 filenameL = "pools/living.txt"3 filenameN = "pools/nonliving.txt"4
5 #Open the files and combine them6 L = open(filenameL)7 N = open(filenameN)8 stimList = L.read().split('\n')9 stimList.append(N.read().split('\n'))
10
11 #Open the instructions file12 instruct_text = open('freekey_instructions.rst', 'r').read()13
14 #Define the Experimental Variables15 ISI = 216 IBI = 217 STIMDUR = 218 PFI = 419 FONTSIZE = 4020 RSTFONTSIZE = 3021 RSTWIDTH = 90022
23 MINFKDUR = 2024
25 NUMBLOCKS = 626 NUMPERBLOCK = [10,15,20]
Next we can take a look into our list gen. Simply, we generate a list of dictionaries where study points to a list ofwords and duration points to the duration that the participants have to freely recall the words.
1 import random2
3 #Shuffle the stimulus4 random.shuffle(stimList)5
6 blocks = []7 #Loop NUMBLOCKS times8 for i in range(NUMBLOCKS):9 tempList = []
10 #For each block, loop either 10, 15, or 20 times11 #Counter balanced to have equal numbers of each12 for x in range(NUMPERBLOCK[i%len(NUMPERBLOCK)]):13 tempList.append(stimList.pop())14 #Create tempBlock15 tempBlock = {"study":tempList,16 "duration":(MINFKDUR + 10*i%len(NUMPERBLOCK))}17 blocks.append(tempBlock)18 #Shuffle the newly created list of blocks19 random.shuffle(blocks)
2.5. Full Experiments 43
SMILE Documentation, Release 0.1.0
Finally we can get to the fun stuff! We now can start programming our SMILE experiment. The comments in thefollowing section of code explain why we do each part of the experiment.
#Initialize the Experimentexp = Experiment()
#Show the instructions to the participantRstDocument(text=instruct_text, base_font_size=RSTFONTSIZE, width=RSTWIDTH, height=exp.screen.height)with UntilDone():
#When a KeyPress is detected, the UntilDone#will cancel the RstDocument stateKeyPress()
#Start the experiment Loopwith Loop(blocks) as block:
Wait(IBI)with Loop(block.current['study']) as study:
#Present the Fixation CrossLabel(text="+", duration=ISI, font_size=FONTSIZE)#Present the study itemLabel(text=study.current, duration=STIMDUR, font_size=FONTSIZE)
Wait(PFI)#Start FreeKeyfk = FreeKey(Label(text="XXXXXXX", font_size=FONTSIZE), max_duration=block.current['duration'])#Log everything!Log(block,
name="FreeKey",responses = fk.responses)
#Run the experimentexp.run()
Analysis
When coding your experiment, you don’t have to worry about losing any data because all of it is saved out into .slogfiles anyway. The thing you do have to worry about is whether or not you want that data to be easily available or ifyou want to spend hours slogging through your data. We made it easy for you to pick which data you want saved outduring the running of your experiment with use of the Log state.
Relevant data from the Free-Recall task would be the responses from each FreeKey state. In the Log that we used inthe experiment above, we log everything in each block of the experiment, i.e. the stimulus and the duration that theyare allowed to respond in, and the responses from FreeKey.
If you would like to grab your data from the .slog files to analyze your data in python, you need to use the log2dl().This function will read in all of the .slog files with the same base name, and convert them into one long list ofdictionaries. Below is a the few lines of code you would use to get at all of the data from three imaginary participants,named as s000, s001, and s002.
1 from smile.log as lg2 #define subject pool3 subjects = ["s000/","s001/","s002/"]4 dic_list = []5 for sbj in subjects:6 #get at all the different subjects7 dic_list.append(lg.log2dl(log_filename="data/" + sbj + "Log_FreeKey"))8 #print out all of the study times in the first study block for9 #participant one, block one
10 print dic_list[0]['study_times']
44 Chapter 2. Whats Next?
SMILE Documentation, Release 0.1.0
You can also translate all of the .slog files into .csv files easily by running the command log2csv() for eachparticipant. An example of this is located below.
1 from smile.log as lg2 #define subject pool3 subjects = ["s000/","s001/","s002/"]4 for sbj in subjects:5 #Get at all the subjects data, naming the csv appropriately.6 lg.log2csv(log_filename="data/" + sbj + "Log_FreeKey", csv_filename=sbj + "_FreeKey")
free_recall.py in Full
1 #freekey.py2 from smile.common import *3 from smile.freekey import FreeKey4
5 #execute both the configuration file and the6 #stimulus generation file7 from config import *8 from gen_stim import *9
10 #Initialize the Experiment11 exp = Experiment()12
13 #Show the instructions to the participant14 RstDocument(text=instruct_text, base_font_size=RSTFONTSIZE, width=RSTWIDTH, height=exp.screen.height)15 with UntilDone():16 #When a KeyPress is detected, the UntilDone17 #will cancel the RstDocument state18 KeyPress()19 #Start the experiment Loop20 with Loop(blocks) as block:21 Wait(IBI)22 with Loop(block.current['study']) as study:23 #Present the Fixation Cross24 Label(text="+", duration=ISI, font_size=FONTSIZE)25 #Present the study item26 Label(text=study.current, duration=STIMDUR, font_size=FONTSIZE)27 Wait(PFI)28 #Start FreeKey29 fk = FreeKey(Label(text="XXXXXXX", font_size=FONTSIZE), max_duration=block.current['duration'])30 #Log everything!31 Log(block,32 name="FreeKey",33 responses = fk.responses)34 #Run the experiment35 exp.run()
config.py in Full
1 #Names of the stimulus files2 filenameL = "pools/living.txt"3 filenameN = "pools/nonliving.txt"4
5 #Open the files and combine them
2.5. Full Experiments 45
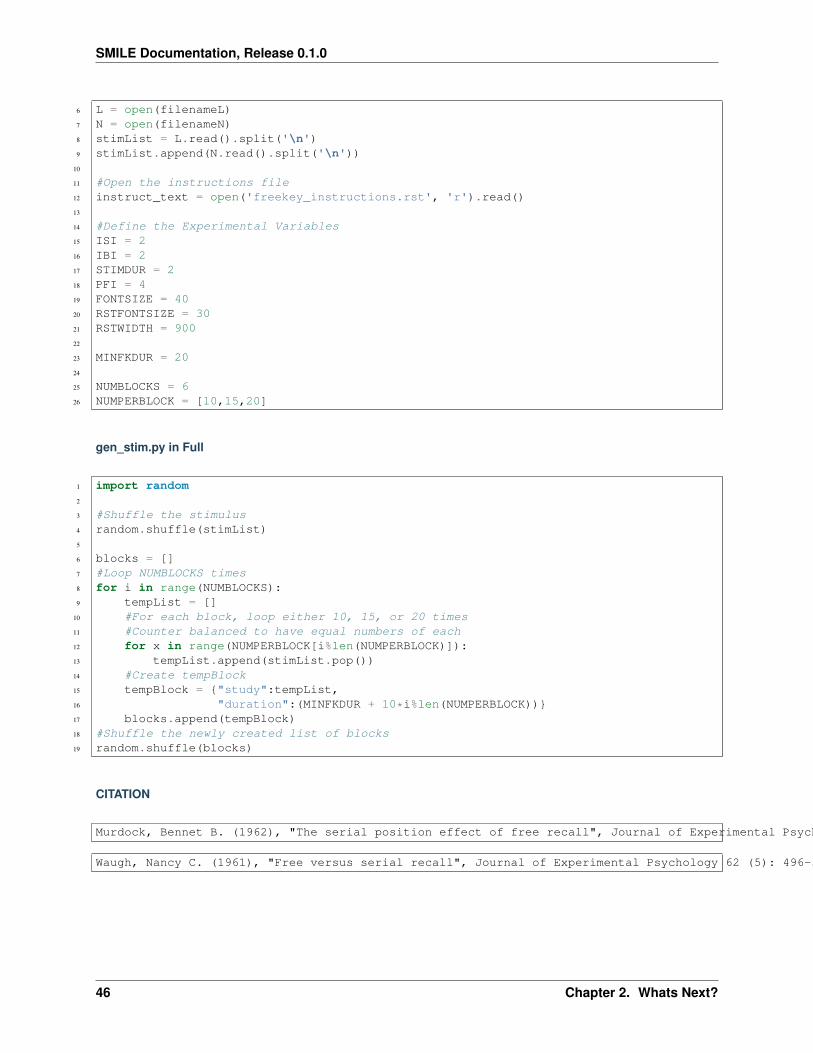
SMILE Documentation, Release 0.1.0
6 L = open(filenameL)7 N = open(filenameN)8 stimList = L.read().split('\n')9 stimList.append(N.read().split('\n'))
10
11 #Open the instructions file12 instruct_text = open('freekey_instructions.rst', 'r').read()13
14 #Define the Experimental Variables15 ISI = 216 IBI = 217 STIMDUR = 218 PFI = 419 FONTSIZE = 4020 RSTFONTSIZE = 3021 RSTWIDTH = 90022
23 MINFKDUR = 2024
25 NUMBLOCKS = 626 NUMPERBLOCK = [10,15,20]
gen_stim.py in Full
1 import random2
3 #Shuffle the stimulus4 random.shuffle(stimList)5
6 blocks = []7 #Loop NUMBLOCKS times8 for i in range(NUMBLOCKS):9 tempList = []
10 #For each block, loop either 10, 15, or 20 times11 #Counter balanced to have equal numbers of each12 for x in range(NUMPERBLOCK[i%len(NUMPERBLOCK)]):13 tempList.append(stimList.pop())14 #Create tempBlock15 tempBlock = {"study":tempList,16 "duration":(MINFKDUR + 10*i%len(NUMPERBLOCK))}17 blocks.append(tempBlock)18 #Shuffle the newly created list of blocks19 random.shuffle(blocks)
CITATION
Murdock, Bennet B. (1962), "The serial position effect of free recall", Journal of Experimental Psychology 64 (5): 482-488
Waugh, Nancy C. (1961), "Free versus serial recall", Journal of Experimental Psychology 62 (5): 496-502
46 Chapter 2. Whats Next?
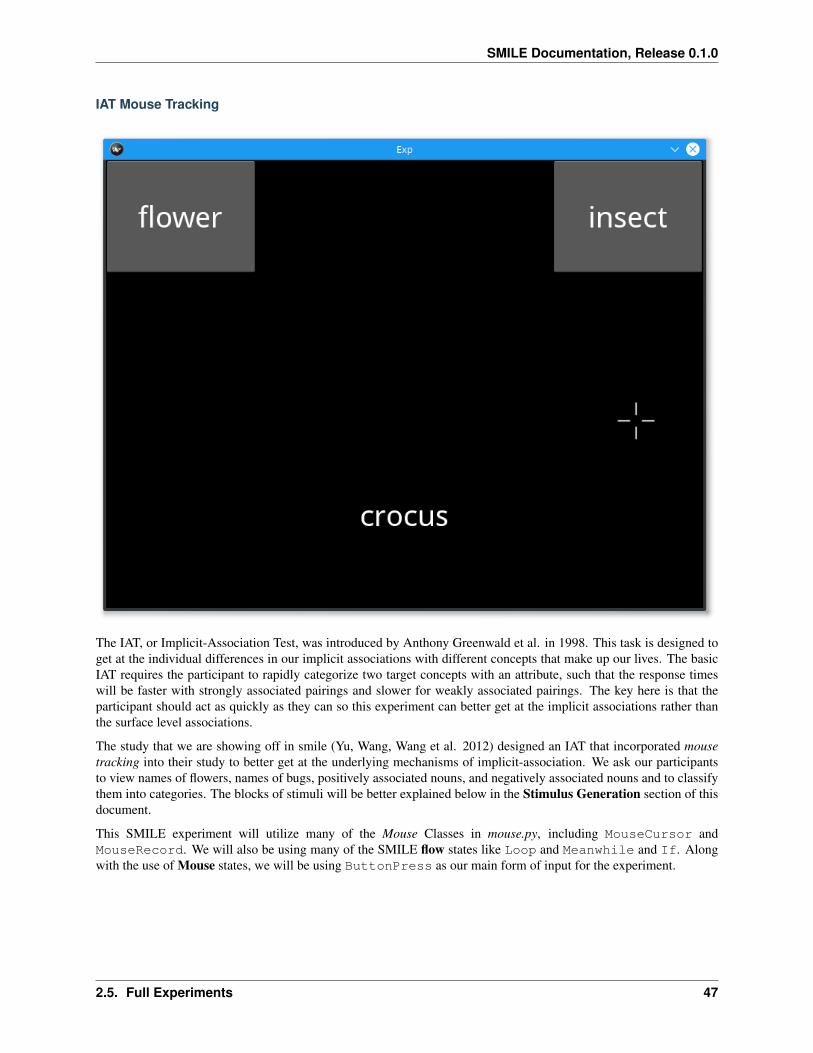
SMILE Documentation, Release 0.1.0
IAT Mouse Tracking
The IAT, or Implicit-Association Test, was introduced by Anthony Greenwald et al. in 1998. This task is designed toget at the individual differences in our implicit associations with different concepts that make up our lives. The basicIAT requires the participant to rapidly categorize two target concepts with an attribute, such that the response timeswill be faster with strongly associated pairings and slower for weakly associated pairings. The key here is that theparticipant should act as quickly as they can so this experiment can better get at the implicit associations rather thanthe surface level associations.
The study that we are showing off in smile (Yu, Wang, Wang et al. 2012) designed an IAT that incorporated mousetracking into their study to better get at the underlying mechanisms of implicit-association. We ask our participantsto view names of flowers, names of bugs, positively associated nouns, and negatively associated nouns and to classifythem into categories. The blocks of stimuli will be better explained below in the Stimulus Generation section of thisdocument.
This SMILE experiment will utilize many of the Mouse Classes in mouse.py, including MouseCursor andMouseRecord. We will also be using many of the SMILE flow states like Loop and Meanwhile and If. Alongwith the use of Mouse states, we will be using ButtonPress as our main form of input for the experiment.
2.5. Full Experiments 47
SMILE Documentation, Release 0.1.0
The Experiment
When writing any experiment in smile, it is usually best to split it over multiple files so that you can better organize yourexperiment. In this example, we split our experiment into 3 different files, gen_stim.py, config.py, and iat_mouse.py.
In iat_mouse.py we have the imports that we need for the experiment. Below are those imports.
1 from smile.common import *2 from config import *3 from gen_stim import *
Our experiment first imports smile.commmon, where all of the most used states are imported from, as well as configand gen_stim. Let’s take a look into config, where we set and define our global variables for the experiment.
1 #RST VARIABLES2 RSTFONTSIZE = 503 RSTWIDTH = 6004 instruct1 = open('iat_mouse_instructions1.rst', 'r').read()5 instruct2 = open('iat_mouse_instructions2.rst', 'r').read()6 instruct3 = open('iat_mouse_instructions3.rst', 'r').read()7 instruct4 = open('iat_mouse_instructions4.rst', 'r').read()8 instruct5 = open('iat_mouse_instructions5.rst', 'r').read()9 instruct6 = open('iat_mouse_instructions6.rst', 'r').read()
10 instruct7 = open('iat_mouse_instructions7.rst', 'r').read()11
12 #MOUSE MOVING VARIABLES13 WARNINGDURATION = 2.014 MOUSEMOVERADIUS = 10015 MOUSEMOVEINTERVAL = 0.40016
17 #BUTTON VARIABLES18 BUTTONHEIGHT = 15019 BUTTONWIDTH = 20020
21 #GENERAL VARIABLES22 FONTSIZE = 4023 INTERTRIALINTERVAL = 0.750
After defining our global variables, we should define our stimulus generator. In gen_stim.py we define a function thatgenerates lists of dictionaries that represent out blocks of trials. The following is our gen_stim.py, where we first setup our lists of stimuli to be pulled from.
1 import random as rm2 from config import instruct1,instruct2,instruct3,instruct4,instruct5,instruct6,instruct73
4 # WORDLISTS FROM Greenwald et al. 19985 filenameI = "pools/insects.txt"6 filenameF = "pools/flowers.txt"7 filenameP = "pools/positives.txt"8 filenameN = "pools/negatives.txt"9
10 I = open(filenameI)11 F = open(filenameF)12 P = open(filenameP)13 N = open(filenameN)14
15 stimListI = I.read().split('\n')16 stimListF = F.read().split('\n')17 stimListP = P.read().split('\n')
48 Chapter 2. Whats Next?
SMILE Documentation, Release 0.1.0
18 stimListN = N.read().split('\n')19
20 #pop off the trailing line21 stimListI.pop(len(stimListI)-1)22 stimListF.pop(len(stimListF)-1)23 stimListP.pop(len(stimListP)-1)24 stimListN.pop(len(stimListN)-1)
Next we define our gen_blocks() function. At the bottom of gen_stim.py we also call gen_blocks() so our iat_mouse.pydoesn’t have to.
1 def gen_blocks(type):2
3 sampI = rm.sample(stimListI, 10)4 sampF = rm.sample(stimListF, 10)5 sampP = rm.sample(stimListP, 10)6 sampN = rm.sample(stimListN, 10)7
8 #Generate the blocks9 list1 = {"left_word":"flower", "right_word":"insect", "instruct":instruct1,
10 "words":([{"correct":"right", "center_word":I} for I in sampI] +11 [{"correct":"left", "center_word":F} for F in sampF])}12
13 list2 = {"left_word":"positive", "right_word":"negative", "instruct":instruct2,14 "words":([{"correct":"left", "center_word":P} for P in sampP] +15 [{"correct":"right", "center_word":N} for N in sampN])}16
17 list3 = {"left_word":"flower positive", "right_word":"insect negative", "instruct":instruct3,18 "words":([{"correct":"right", "center_word":I} for I in rm.sample(sampI[:], 5)] +19 [{"correct":"left", "center_word":F} for F in rm.sample(sampF[:], 5)] +20 [{"correct":"left", "center_word":P} for P in rm.sample(sampP[:], 5)] +21 [{"correct":"right", "center_word":N} for N in rm.sample(sampN[:], 5)])}22
23 list4 = {"left_word":"flower positive", "right_word":"insect negative", "instruct":instruct4,24 "words":([{"correct":"right", "center_word":I} for I in sampI] +25 [{"correct":"left", "center_word":F} for F in sampF] +26 [{"correct":"left", "center_word":P} for P in sampP] +27 [{"correct":"right", "center_word":N} for N in sampN])}28
29 list5 = {"left_word":"insect", "right_word":"flower", "instruct":instruct5,30 "words":[{"correct":"left", "center_word":I} for I in sampI] + [{"correct":"right", "center_word":F} for F in sampF]}31
32 list6 = {"left_word":"insect positive", "right_word":"flower negative", "instruct":instruct6,33 "words":([{"correct":"left", "center_word":I} for I in rm.sample(sampI[:], 5)] +34 [{"correct":"right", "center_word":F} for F in rm.sample(sampF[:], 5)] +35 [{"correct":"left", "center_word":P} for P in rm.sample(sampP[:], 5)] +36 [{"correct":"right", "center_word":N} for N in rm.sample(sampN[:], 5)])}37
38 list7 = {"left_word":"insect positive", "right_word":"flower negative", "instruct":instruct7,39 "words":([{"correct":"left", "center_word":I} for I in sampI] +40 [{"correct":"right", "center_word":F} for F in sampF] +41 [{"correct":"left", "center_word":P} for P in sampP] +42 [{"correct":"right", "center_word":N} for N in sampN])}43 rm.shuffle(list1['words'])44 rm.shuffle(list2['words'])45 rm.shuffle(list3['words'])46 rm.shuffle(list4['words'])47 rm.shuffle(list5['words'])
2.5. Full Experiments 49

SMILE Documentation, Release 0.1.0
48 rm.shuffle(list6['words'])49 rm.shuffle(list7['words'])50
51 #If type 1, then do critical compatible lists52 if type == 1:53 return [list1, list2, list3, list4, list5, list6, list7]54 #if type 2, then do critical incompatible lists55 else:56 return [list5, list2, list6, list7, list1, list3, list4]57 #GenBlocks58 BLOCKS = gen_blocks(1)
Now we can look at the rest of iat_mouse.py. The following is the setup of the block loop and the setup of the trial loop.At the beginning of each loop, you will see a new instructions page and will not be able to go on with the experimentuntil you press a key. The block loop will loop over the BLOCKS that were defined in gen_stim.py, whereas the trialloop will loop over the words key that is attached to each block’s dictionary.
#Set up the Block loop, where *block* is a#Reference to the variable you are looping overwith Loop(BLOCKS) as block:
#Show the instructions to the participantRstDocument(text=block.current['instruct'], base_font_size=RSTFONTSIZE, width=RSTWIDTH, height=exp.screen.height)with UntilDone():
#When a KeyPress is detected, the UntilDone#will cancel the RstDocument stateKeyPress()
#Setup a loop over each Trial in a Block. *block.current* references the#current iteration of the loop, which is a dictionary that contains the list#words. *trial* will be our reference to the current word in our loop.with Loop(block.current['words']) as trial:
The core of this experiment is the trial level loop. Below is the code that defines the states that run each and every trialfor the participant. This is the section of code that defines the button press, the things that happen while the buttonsare waiting to be pressed, and the Log the logs out the information from each trial. It also sets up the MouseRecordthat tracks the mouse positions that need to be analyzed for this experiment.
#initialize our testing variable in Experiment Runtime#exp.something = something will create a Set stateexp.mouse_test = False#The following is a ButtonPress state. This state works like KeyPress,#but instead waits for any of the buttons that are its children to be#pressed.with ButtonPress(correct_resp=trial.current['correct']) as bp:
#block.current is a dictionary that has all of the information we#would need during each individual block, including the text that is#in these buttons, which differs from block to blockButton(text=block.current['left_word'], name="left", left=0,
top=exp.screen.top, width = BUTTONWIDTH, height=BUTTONHEIGHT, text_size = (170, None),font_size=FONTSIZE, halign='center')
Button(text=block.current['right_word'], name="right",right=exp.screen.right, top=exp.screen.top,width = BUTTONWIDTH, height = BUTTONHEIGHT, text_size = (170, None),font_size=FONTSIZE, halign='center')
#Required to see the mouse on the screen!MouseCursor()
#while those buttons are waiting to be pressed, go ahead and do the#children of this next state, the Meanwhilewith Meanwhile():
50 Chapter 2. Whats Next?
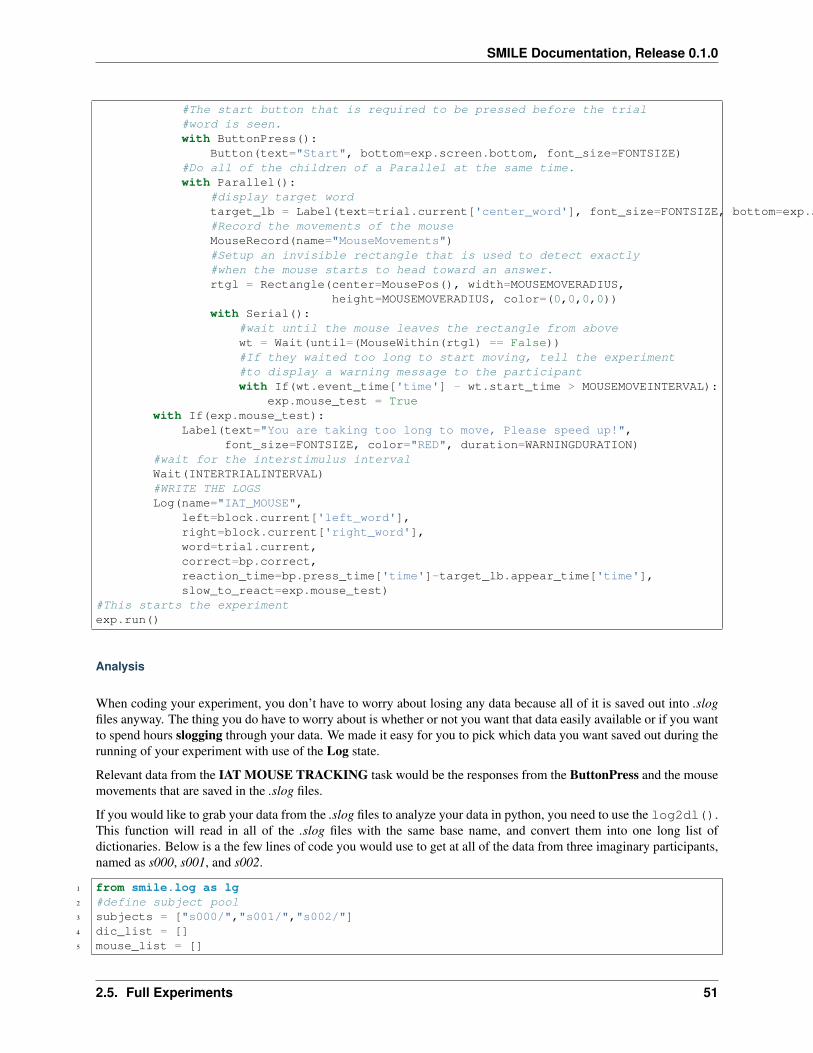
SMILE Documentation, Release 0.1.0
#The start button that is required to be pressed before the trial#word is seen.with ButtonPress():
Button(text="Start", bottom=exp.screen.bottom, font_size=FONTSIZE)#Do all of the children of a Parallel at the same time.with Parallel():
#display target wordtarget_lb = Label(text=trial.current['center_word'], font_size=FONTSIZE, bottom=exp.screen.bottom+100)#Record the movements of the mouseMouseRecord(name="MouseMovements")#Setup an invisible rectangle that is used to detect exactly#when the mouse starts to head toward an answer.rtgl = Rectangle(center=MousePos(), width=MOUSEMOVERADIUS,
height=MOUSEMOVERADIUS, color=(0,0,0,0))with Serial():
#wait until the mouse leaves the rectangle from abovewt = Wait(until=(MouseWithin(rtgl) == False))#If they waited too long to start moving, tell the experiment#to display a warning message to the participantwith If(wt.event_time['time'] - wt.start_time > MOUSEMOVEINTERVAL):
exp.mouse_test = Truewith If(exp.mouse_test):
Label(text="You are taking too long to move, Please speed up!",font_size=FONTSIZE, color="RED", duration=WARNINGDURATION)
#wait for the interstimulus intervalWait(INTERTRIALINTERVAL)#WRITE THE LOGSLog(name="IAT_MOUSE",
left=block.current['left_word'],right=block.current['right_word'],word=trial.current,correct=bp.correct,reaction_time=bp.press_time['time']-target_lb.appear_time['time'],slow_to_react=exp.mouse_test)
#This starts the experimentexp.run()
Analysis
When coding your experiment, you don’t have to worry about losing any data because all of it is saved out into .slogfiles anyway. The thing you do have to worry about is whether or not you want that data easily available or if you wantto spend hours slogging through your data. We made it easy for you to pick which data you want saved out during therunning of your experiment with use of the Log state.
Relevant data from the IAT MOUSE TRACKING task would be the responses from the ButtonPress and the mousemovements that are saved in the .slog files.
If you would like to grab your data from the .slog files to analyze your data in python, you need to use the log2dl().This function will read in all of the .slog files with the same base name, and convert them into one long list ofdictionaries. Below is a the few lines of code you would use to get at all of the data from three imaginary participants,named as s000, s001, and s002.
1 from smile.log as lg2 #define subject pool3 subjects = ["s000/","s001/","s002/"]4 dic_list = []5 mouse_list = []
2.5. Full Experiments 51
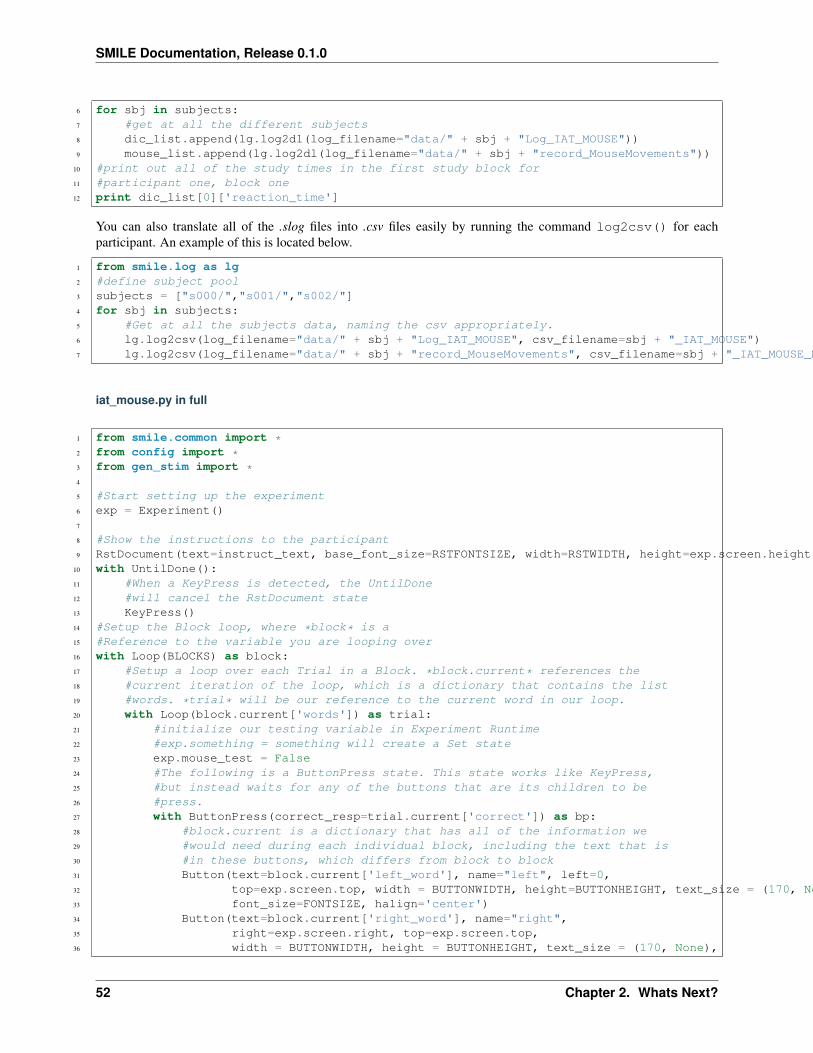
SMILE Documentation, Release 0.1.0
6 for sbj in subjects:7 #get at all the different subjects8 dic_list.append(lg.log2dl(log_filename="data/" + sbj + "Log_IAT_MOUSE"))9 mouse_list.append(lg.log2dl(log_filename="data/" + sbj + "record_MouseMovements"))
10 #print out all of the study times in the first study block for11 #participant one, block one12 print dic_list[0]['reaction_time']
You can also translate all of the .slog files into .csv files easily by running the command log2csv() for eachparticipant. An example of this is located below.
1 from smile.log as lg2 #define subject pool3 subjects = ["s000/","s001/","s002/"]4 for sbj in subjects:5 #Get at all the subjects data, naming the csv appropriately.6 lg.log2csv(log_filename="data/" + sbj + "Log_IAT_MOUSE", csv_filename=sbj + "_IAT_MOUSE")7 lg.log2csv(log_filename="data/" + sbj + "record_MouseMovements", csv_filename=sbj + "_IAT_MOUSE_MOVEMENTS")
iat_mouse.py in full
1 from smile.common import *2 from config import *3 from gen_stim import *4
5 #Start setting up the experiment6 exp = Experiment()7
8 #Show the instructions to the participant9 RstDocument(text=instruct_text, base_font_size=RSTFONTSIZE, width=RSTWIDTH, height=exp.screen.height)
10 with UntilDone():11 #When a KeyPress is detected, the UntilDone12 #will cancel the RstDocument state13 KeyPress()14 #Setup the Block loop, where *block* is a15 #Reference to the variable you are looping over16 with Loop(BLOCKS) as block:17 #Setup a loop over each Trial in a Block. *block.current* references the18 #current iteration of the loop, which is a dictionary that contains the list19 #words. *trial* will be our reference to the current word in our loop.20 with Loop(block.current['words']) as trial:21 #initialize our testing variable in Experiment Runtime22 #exp.something = something will create a Set state23 exp.mouse_test = False24 #The following is a ButtonPress state. This state works like KeyPress,25 #but instead waits for any of the buttons that are its children to be26 #press.27 with ButtonPress(correct_resp=trial.current['correct']) as bp:28 #block.current is a dictionary that has all of the information we29 #would need during each individual block, including the text that is30 #in these buttons, which differs from block to block31 Button(text=block.current['left_word'], name="left", left=0,32 top=exp.screen.top, width = BUTTONWIDTH, height=BUTTONHEIGHT, text_size = (170, None),33 font_size=FONTSIZE, halign='center')34 Button(text=block.current['right_word'], name="right",35 right=exp.screen.right, top=exp.screen.top,36 width = BUTTONWIDTH, height = BUTTONHEIGHT, text_size = (170, None),
52 Chapter 2. Whats Next?
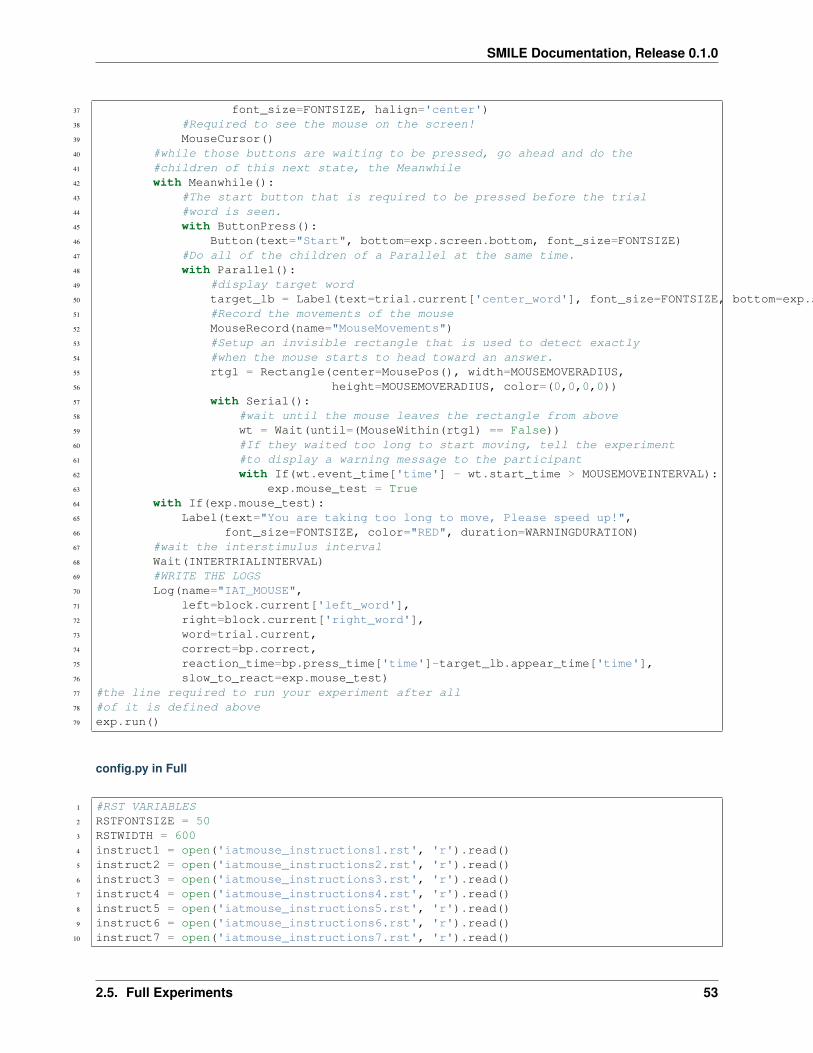
SMILE Documentation, Release 0.1.0
37 font_size=FONTSIZE, halign='center')38 #Required to see the mouse on the screen!39 MouseCursor()40 #while those buttons are waiting to be pressed, go ahead and do the41 #children of this next state, the Meanwhile42 with Meanwhile():43 #The start button that is required to be pressed before the trial44 #word is seen.45 with ButtonPress():46 Button(text="Start", bottom=exp.screen.bottom, font_size=FONTSIZE)47 #Do all of the children of a Parallel at the same time.48 with Parallel():49 #display target word50 target_lb = Label(text=trial.current['center_word'], font_size=FONTSIZE, bottom=exp.screen.bottom+100)51 #Record the movements of the mouse52 MouseRecord(name="MouseMovements")53 #Setup an invisible rectangle that is used to detect exactly54 #when the mouse starts to head toward an answer.55 rtgl = Rectangle(center=MousePos(), width=MOUSEMOVERADIUS,56 height=MOUSEMOVERADIUS, color=(0,0,0,0))57 with Serial():58 #wait until the mouse leaves the rectangle from above59 wt = Wait(until=(MouseWithin(rtgl) == False))60 #If they waited too long to start moving, tell the experiment61 #to display a warning message to the participant62 with If(wt.event_time['time'] - wt.start_time > MOUSEMOVEINTERVAL):63 exp.mouse_test = True64 with If(exp.mouse_test):65 Label(text="You are taking too long to move, Please speed up!",66 font_size=FONTSIZE, color="RED", duration=WARNINGDURATION)67 #wait the interstimulus interval68 Wait(INTERTRIALINTERVAL)69 #WRITE THE LOGS70 Log(name="IAT_MOUSE",71 left=block.current['left_word'],72 right=block.current['right_word'],73 word=trial.current,74 correct=bp.correct,75 reaction_time=bp.press_time['time']-target_lb.appear_time['time'],76 slow_to_react=exp.mouse_test)77 #the line required to run your experiment after all78 #of it is defined above79 exp.run()
config.py in Full
1 #RST VARIABLES2 RSTFONTSIZE = 503 RSTWIDTH = 6004 instruct1 = open('iatmouse_instructions1.rst', 'r').read()5 instruct2 = open('iatmouse_instructions2.rst', 'r').read()6 instruct3 = open('iatmouse_instructions3.rst', 'r').read()7 instruct4 = open('iatmouse_instructions4.rst', 'r').read()8 instruct5 = open('iatmouse_instructions5.rst', 'r').read()9 instruct6 = open('iatmouse_instructions6.rst', 'r').read()
10 instruct7 = open('iatmouse_instructions7.rst', 'r').read()
2.5. Full Experiments 53
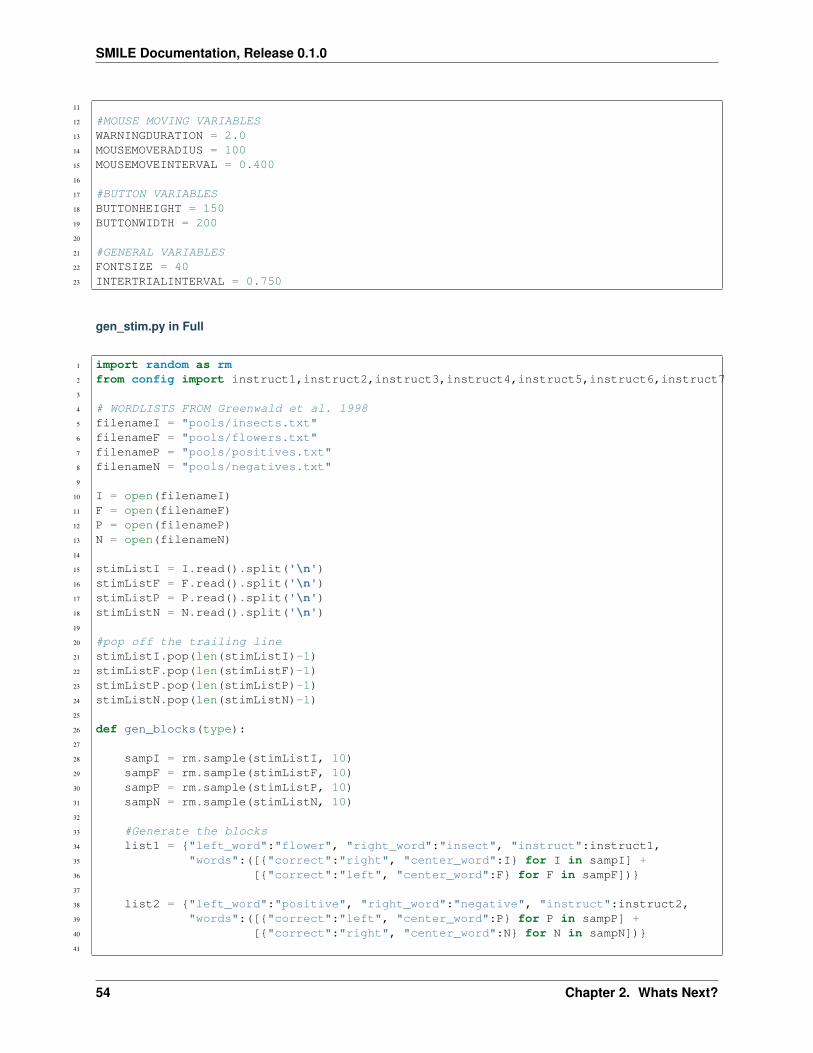
SMILE Documentation, Release 0.1.0
11
12 #MOUSE MOVING VARIABLES13 WARNINGDURATION = 2.014 MOUSEMOVERADIUS = 10015 MOUSEMOVEINTERVAL = 0.40016
17 #BUTTON VARIABLES18 BUTTONHEIGHT = 15019 BUTTONWIDTH = 20020
21 #GENERAL VARIABLES22 FONTSIZE = 4023 INTERTRIALINTERVAL = 0.750
gen_stim.py in Full
1 import random as rm2 from config import instruct1,instruct2,instruct3,instruct4,instruct5,instruct6,instruct73
4 # WORDLISTS FROM Greenwald et al. 19985 filenameI = "pools/insects.txt"6 filenameF = "pools/flowers.txt"7 filenameP = "pools/positives.txt"8 filenameN = "pools/negatives.txt"9
10 I = open(filenameI)11 F = open(filenameF)12 P = open(filenameP)13 N = open(filenameN)14
15 stimListI = I.read().split('\n')16 stimListF = F.read().split('\n')17 stimListP = P.read().split('\n')18 stimListN = N.read().split('\n')19
20 #pop off the trailing line21 stimListI.pop(len(stimListI)-1)22 stimListF.pop(len(stimListF)-1)23 stimListP.pop(len(stimListP)-1)24 stimListN.pop(len(stimListN)-1)25
26 def gen_blocks(type):27
28 sampI = rm.sample(stimListI, 10)29 sampF = rm.sample(stimListF, 10)30 sampP = rm.sample(stimListP, 10)31 sampN = rm.sample(stimListN, 10)32
33 #Generate the blocks34 list1 = {"left_word":"flower", "right_word":"insect", "instruct":instruct1,35 "words":([{"correct":"right", "center_word":I} for I in sampI] +36 [{"correct":"left", "center_word":F} for F in sampF])}37
38 list2 = {"left_word":"positive", "right_word":"negative", "instruct":instruct2,39 "words":([{"correct":"left", "center_word":P} for P in sampP] +40 [{"correct":"right", "center_word":N} for N in sampN])}41
54 Chapter 2. Whats Next?
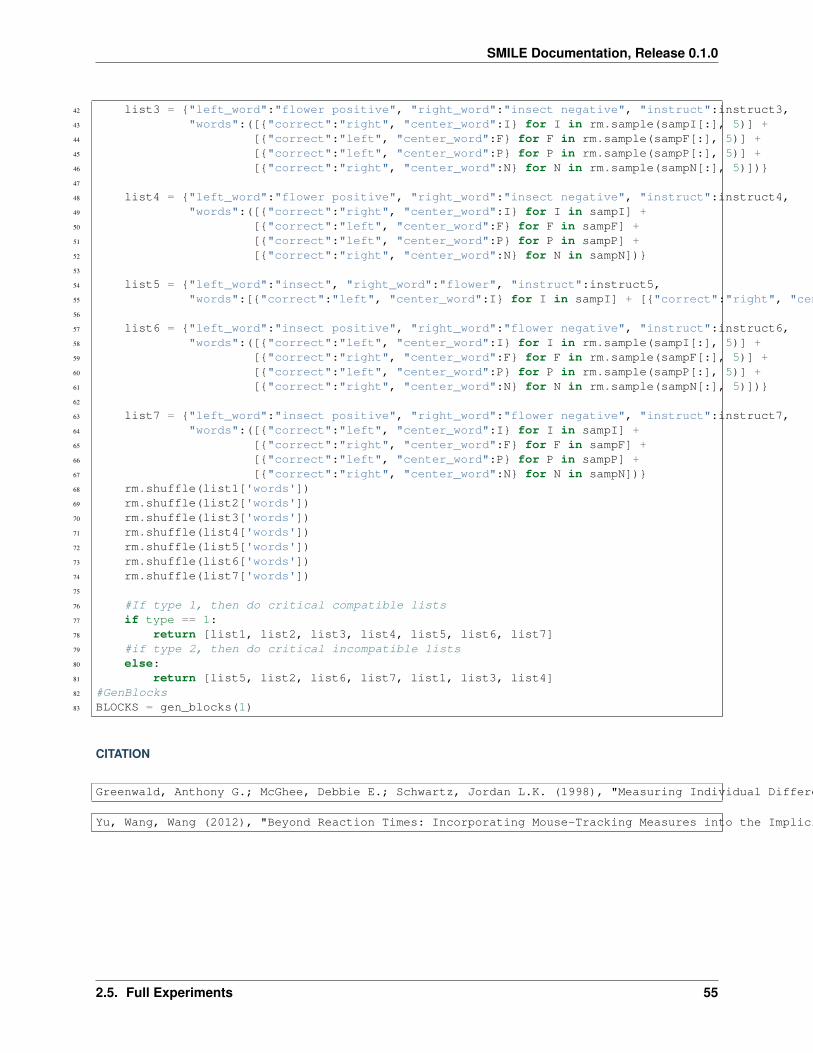
SMILE Documentation, Release 0.1.0
42 list3 = {"left_word":"flower positive", "right_word":"insect negative", "instruct":instruct3,43 "words":([{"correct":"right", "center_word":I} for I in rm.sample(sampI[:], 5)] +44 [{"correct":"left", "center_word":F} for F in rm.sample(sampF[:], 5)] +45 [{"correct":"left", "center_word":P} for P in rm.sample(sampP[:], 5)] +46 [{"correct":"right", "center_word":N} for N in rm.sample(sampN[:], 5)])}47
48 list4 = {"left_word":"flower positive", "right_word":"insect negative", "instruct":instruct4,49 "words":([{"correct":"right", "center_word":I} for I in sampI] +50 [{"correct":"left", "center_word":F} for F in sampF] +51 [{"correct":"left", "center_word":P} for P in sampP] +52 [{"correct":"right", "center_word":N} for N in sampN])}53
54 list5 = {"left_word":"insect", "right_word":"flower", "instruct":instruct5,55 "words":[{"correct":"left", "center_word":I} for I in sampI] + [{"correct":"right", "center_word":F} for F in sampF]}56
57 list6 = {"left_word":"insect positive", "right_word":"flower negative", "instruct":instruct6,58 "words":([{"correct":"left", "center_word":I} for I in rm.sample(sampI[:], 5)] +59 [{"correct":"right", "center_word":F} for F in rm.sample(sampF[:], 5)] +60 [{"correct":"left", "center_word":P} for P in rm.sample(sampP[:], 5)] +61 [{"correct":"right", "center_word":N} for N in rm.sample(sampN[:], 5)])}62
63 list7 = {"left_word":"insect positive", "right_word":"flower negative", "instruct":instruct7,64 "words":([{"correct":"left", "center_word":I} for I in sampI] +65 [{"correct":"right", "center_word":F} for F in sampF] +66 [{"correct":"left", "center_word":P} for P in sampP] +67 [{"correct":"right", "center_word":N} for N in sampN])}68 rm.shuffle(list1['words'])69 rm.shuffle(list2['words'])70 rm.shuffle(list3['words'])71 rm.shuffle(list4['words'])72 rm.shuffle(list5['words'])73 rm.shuffle(list6['words'])74 rm.shuffle(list7['words'])75
76 #If type 1, then do critical compatible lists77 if type == 1:78 return [list1, list2, list3, list4, list5, list6, list7]79 #if type 2, then do critical incompatible lists80 else:81 return [list5, list2, list6, list7, list1, list3, list4]82 #GenBlocks83 BLOCKS = gen_blocks(1)
CITATION
Greenwald, Anthony G.; McGhee, Debbie E.; Schwartz, Jordan L.K. (1998), "Measuring Individual Differences in Implicit Cognition: The Implicit Association Test", Journal of Personality and Social Psychology 74 (6): 1464-1480
Yu, Wang, Wang (2012), "Beyond Reaction Times: Incorporating Mouse-Tracking Measures into the Implicit Association Test to Examine its Underlying Process", Social Cognition 30 (3): 289-306
2.5. Full Experiments 55

SMILE Documentation, Release 0.1.0
Data accessing and Processing
Saving your Data into SLOG Files
In SMILE, each state will produce what is called a .slog file by default. This file is a specially compressed filecomposed of all the important data associated with the state. It not only logs every parameter, but also all of thevariables listed in the Logged Attributes section of the docstrings. In most cases, every state will save out 2 rows ofdata to the .slog file. The first row is the field names, and the second row will be the data for each of those fields.
The kind of state that write multiple lines out to its associated .slog file is the Log state. Wherever the class is insertedinto the experiment, the class will log the values of all of the keywords/argument pairs it is passed. If the Log existswithin a loop, it will write out the values of the keyword/argument pairs during each iteration of the loop duringexperimental runtime. In this case, the .slog file will have the first row be the keywords, and the subsequent rows beall of the data for each Log during each iteration of the loop.
Note: Every instance of the Log state in the experiment will save to a separate file.
Below is an example of a Log state.
with Loop(10) as trial:lb = Label(text=trial.i, duration=2)Log(trial.current,
name="looping_log",label_appear_time=lb.appear_time['time'])
This example will save 11 rows into a .slog file. If trial.current is the first argument for Log, then it will save out allof the information about the looping variable out in different columns.
A Record state will record all of the references given. It will write a line to the .slog file every time one of the referenceschanges. It will also log the time at which the given reference changed.
Reading your SLOG files in python
In order to slog through data, one of two things are first needed to be completed. The first is to pull the data intopython by using the Log method called log2dl(). This method converts the .slog file to a list of dictionaries sothat you can perform any pythonic functions on it in order to analyze the data. log2dl has one required parameter,log_filename, which should be a string that starts out log_ and ends with a user chosen name parameter of the Log inthe user’s experiment.
If there are multiple files with the same name, they have trailing _# in the filename. log2dl will pull all of the files withthe same base name, and concatenate them into a single list of dictionaries.
The other way data can be access is by converting all of the .slog files to .csv files. This can be accomplished by runningthe Log2csv() method. This method will take two parameters, log_filename and csv_filename. log_filename worksthe same way as in log2dl, where a string that is log_ plus the name which was provided in the name parameter of theLog is passed. If no csv_filename is given, then it will be saved as the same name as the log_filename plus .csv. Fromthere, one can use their preferred method of data analysis.
56 Chapter 2. Whats Next?

SMILE Documentation, Release 0.1.0
Advanced SMILEing
Screen Placement of Visual States
In SMILE, any state that displays something to the screen is known as a VisualState. These states share the abilityto set their size, position, and relative position to each other. Every visual state has the following basic attributes, andall of the following attributes can be passed into the initialization of the visual states in your code:
• width
• height
• x
• y
Now, imagine a scenario where one would want to place a Label 400 pixels above a TextInput, which is 200 pixelsto the left of the bottom right hand corner of the screen. Hard calculations of those numbers by hand or relativisticpositioning attributes could be employed to yield the answer.
By utilizing the relative position attributes, the VisualStates can be initialized to the left or right, above or below, ofeach other. An example of this is as follows:
1 from smile.common import *2
2.7. Advanced SMILEing 57
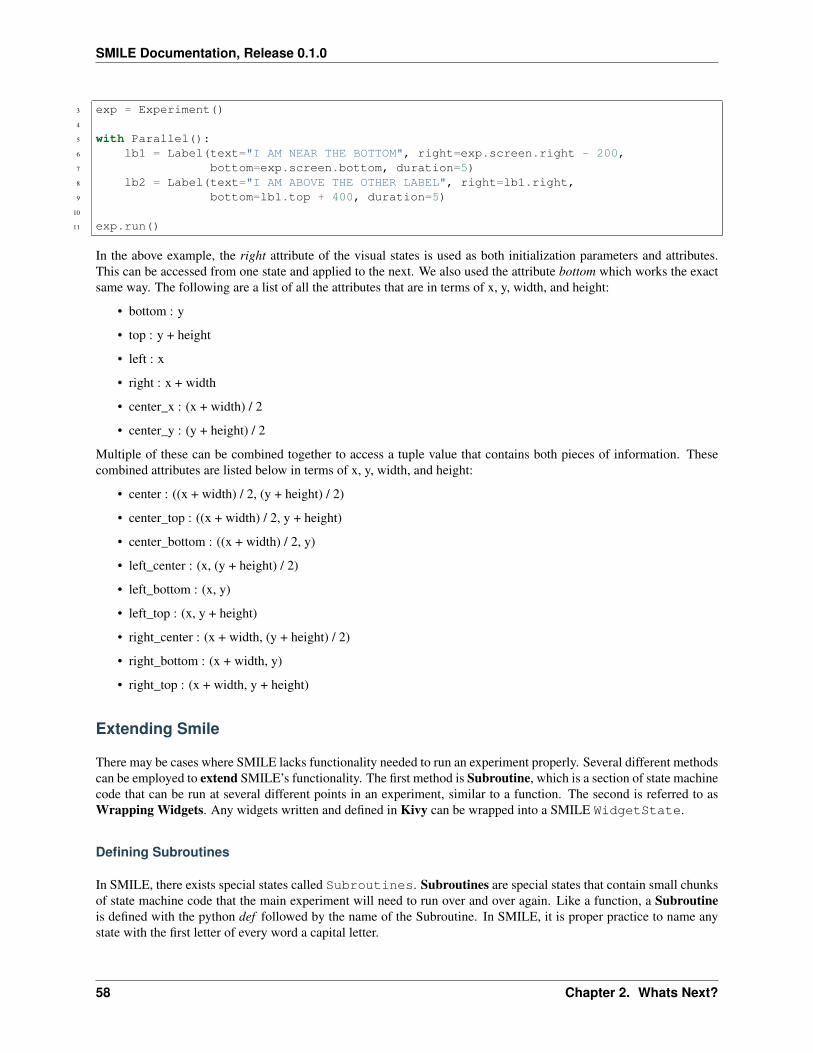
SMILE Documentation, Release 0.1.0
3 exp = Experiment()4
5 with Parallel():6 lb1 = Label(text="I AM NEAR THE BOTTOM", right=exp.screen.right - 200,7 bottom=exp.screen.bottom, duration=5)8 lb2 = Label(text="I AM ABOVE THE OTHER LABEL", right=lb1.right,9 bottom=lb1.top + 400, duration=5)
10
11 exp.run()
In the above example, the right attribute of the visual states is used as both initialization parameters and attributes.This can be accessed from one state and applied to the next. We also used the attribute bottom which works the exactsame way. The following are a list of all the attributes that are in terms of x, y, width, and height:
• bottom : y
• top : y + height
• left : x
• right : x + width
• center_x : (x + width) / 2
• center_y : (y + height) / 2
Multiple of these can be combined together to access a tuple value that contains both pieces of information. Thesecombined attributes are listed below in terms of x, y, width, and height:
• center : ((x + width) / 2, (y + height) / 2)
• center_top : ((x + width) / 2, y + height)
• center_bottom : ((x + width) / 2, y)
• left_center : (x, (y + height) / 2)
• left_bottom : (x, y)
• left_top : (x, y + height)
• right_center : (x + width, (y + height) / 2)
• right_bottom : (x + width, y)
• right_top : (x + width, y + height)
Extending Smile
There may be cases where SMILE lacks functionality needed to run an experiment properly. Several different methodscan be employed to extend SMILE’s functionality. The first method is Subroutine, which is a section of state machinecode that can be run at several different points in an experiment, similar to a function. The second is referred to asWrapping Widgets. Any widgets written and defined in Kivy can be wrapped into a SMILE WidgetState.
Defining Subroutines
In SMILE, there exists special states called Subroutines. Subroutines are special states that contain small chunksof state machine code that the main experiment will need to run over and over again. Like a function, a Subroutineis defined with the python def followed by the name of the Subroutine. In SMILE, it is proper practice to name anystate with the first letter of every word a capital letter.
58 Chapter 2. Whats Next?
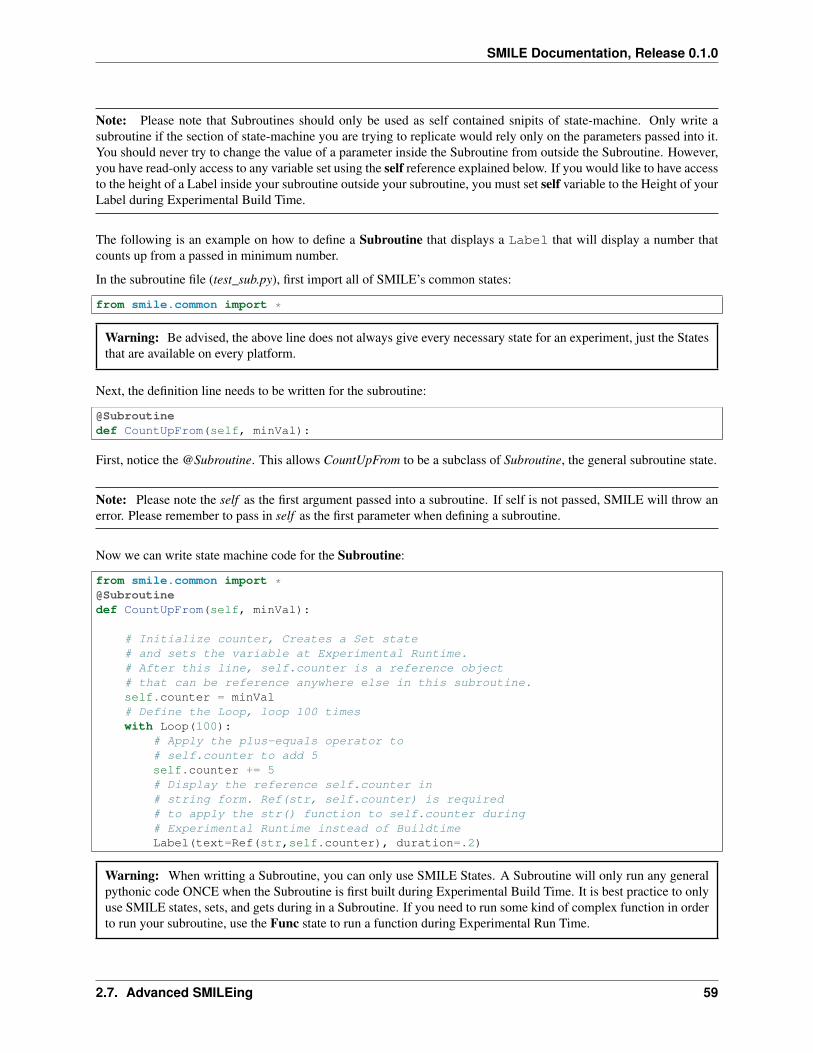
SMILE Documentation, Release 0.1.0
Note: Please note that Subroutines should only be used as self contained snipits of state-machine. Only write asubroutine if the section of state-machine you are trying to replicate would rely only on the parameters passed into it.You should never try to change the value of a parameter inside the Subroutine from outside the Subroutine. However,you have read-only access to any variable set using the self reference explained below. If you would like to have accessto the height of a Label inside your subroutine outside your subroutine, you must set self variable to the Height of yourLabel during Experimental Build Time.
The following is an example on how to define a Subroutine that displays a Label that will display a number thatcounts up from a passed in minimum number.
In the subroutine file (test_sub.py), first import all of SMILE’s common states:
from smile.common import *
Warning: Be advised, the above line does not always give every necessary state for an experiment, just the Statesthat are available on every platform.
Next, the definition line needs to be written for the subroutine:
@Subroutinedef CountUpFrom(self, minVal):
First, notice the @Subroutine. This allows CountUpFrom to be a subclass of Subroutine, the general subroutine state.
Note: Please note the self as the first argument passed into a subroutine. If self is not passed, SMILE will throw anerror. Please remember to pass in self as the first parameter when defining a subroutine.
Now we can write state machine code for the Subroutine:
from smile.common import *@Subroutinedef CountUpFrom(self, minVal):
# Initialize counter, Creates a Set state# and sets the variable at Experimental Runtime.# After this line, self.counter is a reference object# that can be reference anywhere else in this subroutine.self.counter = minVal# Define the Loop, loop 100 timeswith Loop(100):
# Apply the plus-equals operator to# self.counter to add 5self.counter += 5# Display the reference self.counter in# string form. Ref(str, self.counter) is required# to apply the str() function to self.counter during# Experimental Runtime instead of BuildtimeLabel(text=Ref(str,self.counter), duration=.2)
Warning: When writting a Subroutine, you can only use SMILE States. A Subroutine will only run any generalpythonic code ONCE when the Subroutine is first built during Experimental Build Time. It is best practice to onlyuse SMILE states, sets, and gets during in a Subroutine. If you need to run some kind of complex function in orderto run your subroutine, use the Func state to run a function during Experimental Run Time.
2.7. Advanced SMILEing 59
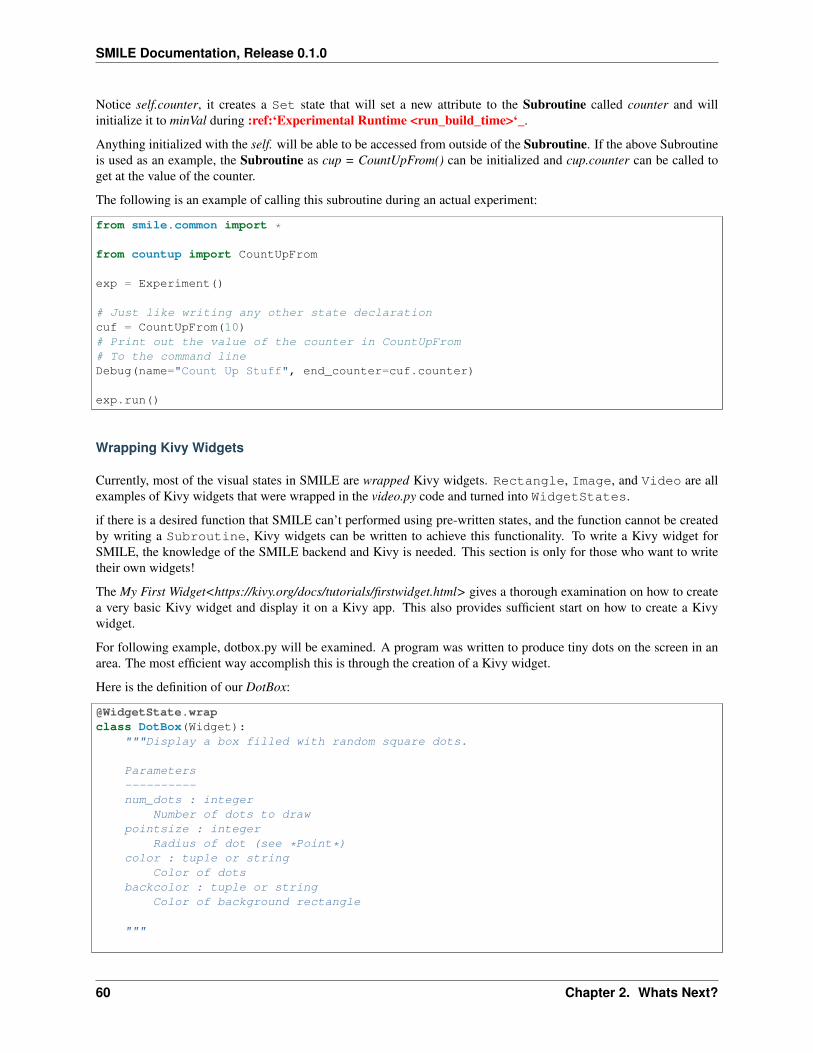
SMILE Documentation, Release 0.1.0
Notice self.counter, it creates a Set state that will set a new attribute to the Subroutine called counter and willinitialize it to minVal during :ref:‘Experimental Runtime <run_build_time>‘_.
Anything initialized with the self. will be able to be accessed from outside of the Subroutine. If the above Subroutineis used as an example, the Subroutine as cup = CountUpFrom() can be initialized and cup.counter can be called toget at the value of the counter.
The following is an example of calling this subroutine during an actual experiment:
from smile.common import *
from countup import CountUpFrom
exp = Experiment()
# Just like writing any other state declarationcuf = CountUpFrom(10)# Print out the value of the counter in CountUpFrom# To the command lineDebug(name="Count Up Stuff", end_counter=cuf.counter)
exp.run()
Wrapping Kivy Widgets
Currently, most of the visual states in SMILE are wrapped Kivy widgets. Rectangle, Image, and Video are allexamples of Kivy widgets that were wrapped in the video.py code and turned into WidgetStates.
if there is a desired function that SMILE can’t performed using pre-written states, and the function cannot be createdby writing a Subroutine, Kivy widgets can be written to achieve this functionality. To write a Kivy widget forSMILE, the knowledge of the SMILE backend and Kivy is needed. This section is only for those who want to writetheir own widgets!
The My First Widget<https://kivy.org/docs/tutorials/firstwidget.html> gives a thorough examination on how to createa very basic Kivy widget and display it on a Kivy app. This also provides sufficient start on how to create a Kivywidget.
For following example, dotbox.py will be examined. A program was written to produce tiny dots on the screen in anarea. The most efficient way accomplish this is through the creation of a Kivy widget.
Here is the definition of our DotBox:
@WidgetState.wrapclass DotBox(Widget):
"""Display a box filled with random square dots.
Parameters----------num_dots : integer
Number of dots to drawpointsize : integer
Radius of dot (see *Point*)color : tuple or string
Color of dotsbackcolor : tuple or string
Color of background rectangle
"""
60 Chapter 2. Whats Next?
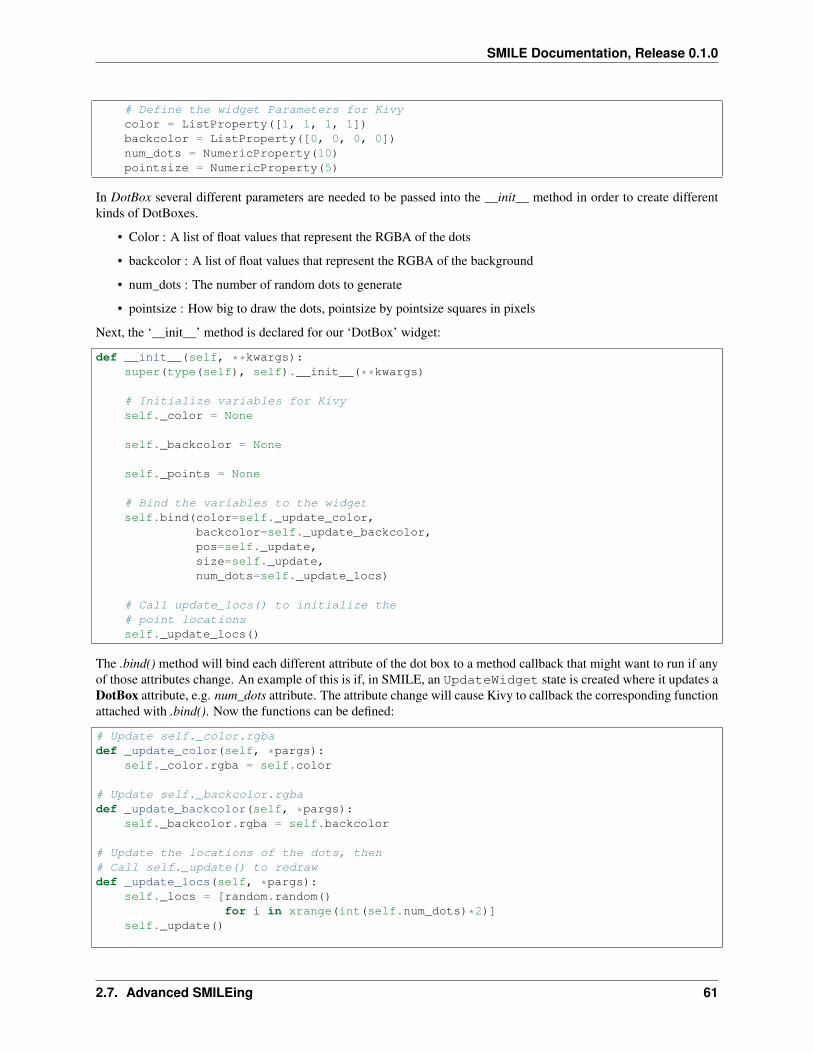
SMILE Documentation, Release 0.1.0
# Define the widget Parameters for Kivycolor = ListProperty([1, 1, 1, 1])backcolor = ListProperty([0, 0, 0, 0])num_dots = NumericProperty(10)pointsize = NumericProperty(5)
In DotBox several different parameters are needed to be passed into the __init__ method in order to create differentkinds of DotBoxes.
• Color : A list of float values that represent the RGBA of the dots
• backcolor : A list of float values that represent the RGBA of the background
• num_dots : The number of random dots to generate
• pointsize : How big to draw the dots, pointsize by pointsize squares in pixels
Next, the ‘__init__’ method is declared for our ‘DotBox’ widget:
def __init__(self, **kwargs):super(type(self), self).__init__(**kwargs)
# Initialize variables for Kivyself._color = None
self._backcolor = None
self._points = None
# Bind the variables to the widgetself.bind(color=self._update_color,
backcolor=self._update_backcolor,pos=self._update,size=self._update,num_dots=self._update_locs)
# Call update_locs() to initialize the# point locationsself._update_locs()
The .bind() method will bind each different attribute of the dot box to a method callback that might want to run if anyof those attributes change. An example of this is if, in SMILE, an UpdateWidget state is created where it updates aDotBox attribute, e.g. num_dots attribute. The attribute change will cause Kivy to callback the corresponding functionattached with .bind(). Now the functions can be defined:
# Update self._color.rgbadef _update_color(self, *pargs):
self._color.rgba = self.color
# Update self._backcolor.rgbadef _update_backcolor(self, *pargs):
self._backcolor.rgba = self.backcolor
# Update the locations of the dots, then# Call self._update() to redrawdef _update_locs(self, *pargs):
self._locs = [random.random()for i in xrange(int(self.num_dots)*2)]
self._update()
2.7. Advanced SMILEing 61
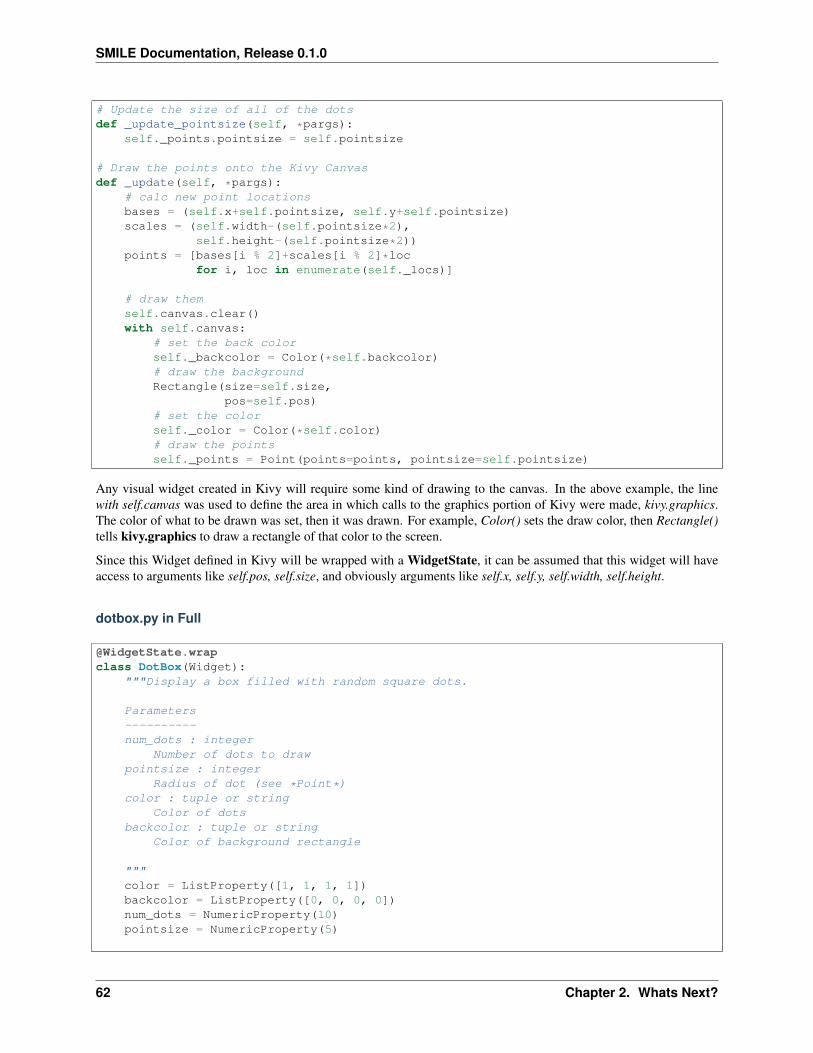
SMILE Documentation, Release 0.1.0
# Update the size of all of the dotsdef _update_pointsize(self, *pargs):
self._points.pointsize = self.pointsize
# Draw the points onto the Kivy Canvasdef _update(self, *pargs):
# calc new point locationsbases = (self.x+self.pointsize, self.y+self.pointsize)scales = (self.width-(self.pointsize*2),
self.height-(self.pointsize*2))points = [bases[i % 2]+scales[i % 2]*loc
for i, loc in enumerate(self._locs)]
# draw themself.canvas.clear()with self.canvas:
# set the back colorself._backcolor = Color(*self.backcolor)# draw the backgroundRectangle(size=self.size,
pos=self.pos)# set the colorself._color = Color(*self.color)# draw the pointsself._points = Point(points=points, pointsize=self.pointsize)
Any visual widget created in Kivy will require some kind of drawing to the canvas. In the above example, the linewith self.canvas was used to define the area in which calls to the graphics portion of Kivy were made, kivy.graphics.The color of what to be drawn was set, then it was drawn. For example, Color() sets the draw color, then Rectangle()tells kivy.graphics to draw a rectangle of that color to the screen.
Since this Widget defined in Kivy will be wrapped with a WidgetState, it can be assumed that this widget will haveaccess to arguments like self.pos, self.size, and obviously arguments like self.x, self.y, self.width, self.height.
dotbox.py in Full
@WidgetState.wrapclass DotBox(Widget):
"""Display a box filled with random square dots.
Parameters----------num_dots : integer
Number of dots to drawpointsize : integer
Radius of dot (see *Point*)color : tuple or string
Color of dotsbackcolor : tuple or string
Color of background rectangle
"""color = ListProperty([1, 1, 1, 1])backcolor = ListProperty([0, 0, 0, 0])num_dots = NumericProperty(10)pointsize = NumericProperty(5)
62 Chapter 2. Whats Next?
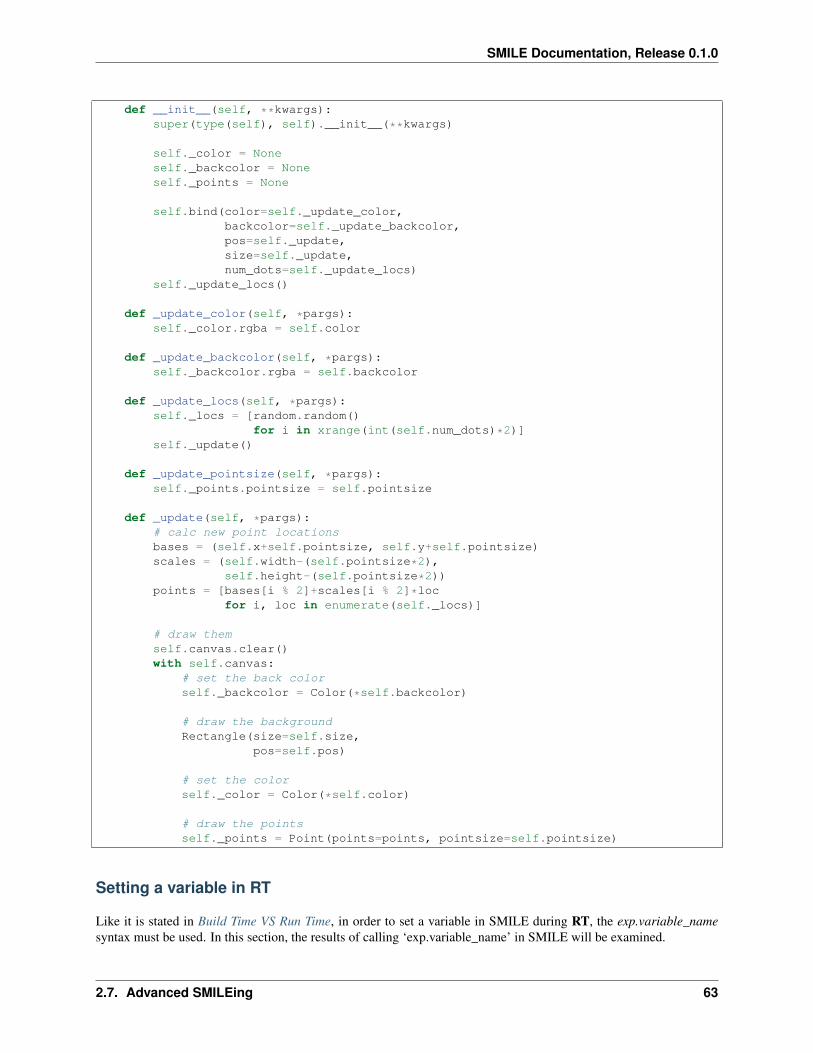
SMILE Documentation, Release 0.1.0
def __init__(self, **kwargs):super(type(self), self).__init__(**kwargs)
self._color = Noneself._backcolor = Noneself._points = None
self.bind(color=self._update_color,backcolor=self._update_backcolor,pos=self._update,size=self._update,num_dots=self._update_locs)
self._update_locs()
def _update_color(self, *pargs):self._color.rgba = self.color
def _update_backcolor(self, *pargs):self._backcolor.rgba = self.backcolor
def _update_locs(self, *pargs):self._locs = [random.random()
for i in xrange(int(self.num_dots)*2)]self._update()
def _update_pointsize(self, *pargs):self._points.pointsize = self.pointsize
def _update(self, *pargs):# calc new point locationsbases = (self.x+self.pointsize, self.y+self.pointsize)scales = (self.width-(self.pointsize*2),
self.height-(self.pointsize*2))points = [bases[i % 2]+scales[i % 2]*loc
for i, loc in enumerate(self._locs)]
# draw themself.canvas.clear()with self.canvas:
# set the back colorself._backcolor = Color(*self.backcolor)
# draw the backgroundRectangle(size=self.size,
pos=self.pos)
# set the colorself._color = Color(*self.color)
# draw the pointsself._points = Point(points=points, pointsize=self.pointsize)
Setting a variable in RT
Like it is stated in Build Time VS Run Time, in order to set a variable in SMILE during RT, the exp.variable_namesyntax must be used. In this section, the results of calling ‘exp.variable_name’ in SMILE will be examined.
2.7. Advanced SMILEing 63
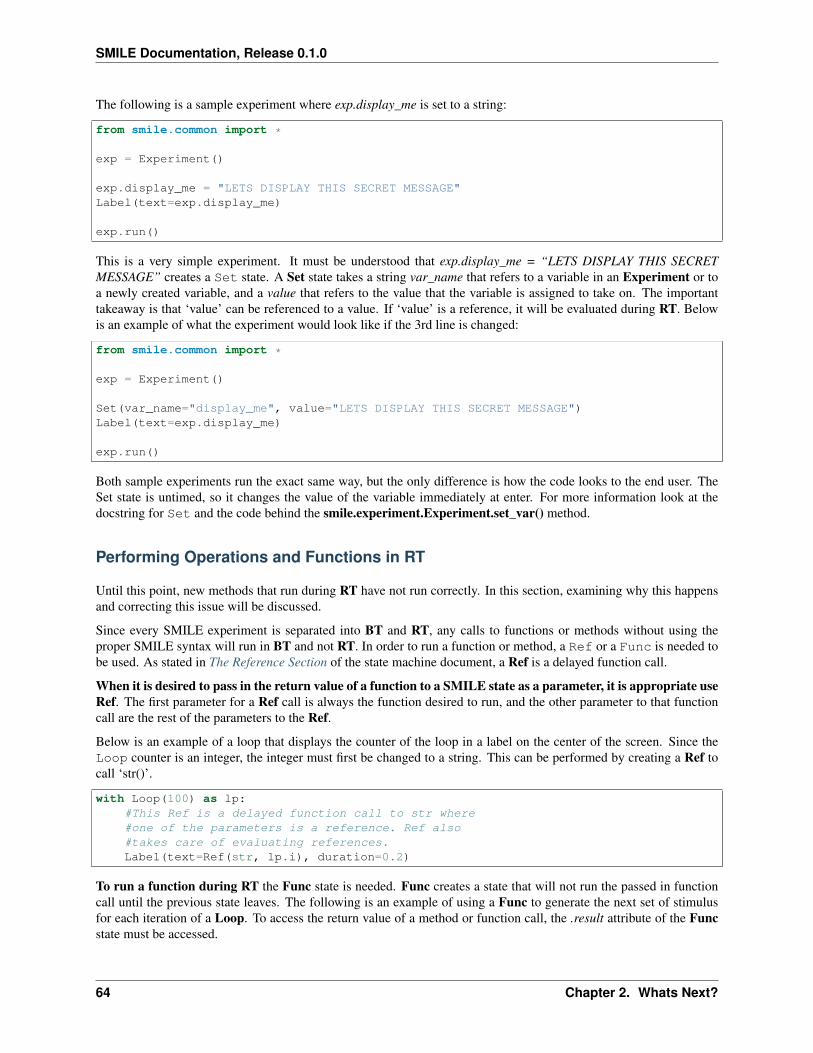
SMILE Documentation, Release 0.1.0
The following is a sample experiment where exp.display_me is set to a string:
from smile.common import *
exp = Experiment()
exp.display_me = "LETS DISPLAY THIS SECRET MESSAGE"Label(text=exp.display_me)
exp.run()
This is a very simple experiment. It must be understood that exp.display_me = “LETS DISPLAY THIS SECRETMESSAGE” creates a Set state. A Set state takes a string var_name that refers to a variable in an Experiment or toa newly created variable, and a value that refers to the value that the variable is assigned to take on. The importanttakeaway is that ‘value’ can be referenced to a value. If ‘value’ is a reference, it will be evaluated during RT. Belowis an example of what the experiment would look like if the 3rd line is changed:
from smile.common import *
exp = Experiment()
Set(var_name="display_me", value="LETS DISPLAY THIS SECRET MESSAGE")Label(text=exp.display_me)
exp.run()
Both sample experiments run the exact same way, but the only difference is how the code looks to the end user. TheSet state is untimed, so it changes the value of the variable immediately at enter. For more information look at thedocstring for Set and the code behind the smile.experiment.Experiment.set_var() method.
Performing Operations and Functions in RT
Until this point, new methods that run during RT have not run correctly. In this section, examining why this happensand correcting this issue will be discussed.
Since every SMILE experiment is separated into BT and RT, any calls to functions or methods without using theproper SMILE syntax will run in BT and not RT. In order to run a function or method, a Ref or a Func is needed tobe used. As stated in The Reference Section of the state machine document, a Ref is a delayed function call.
When it is desired to pass in the return value of a function to a SMILE state as a parameter, it is appropriate useRef. The first parameter for a Ref call is always the function desired to run, and the other parameter to that functioncall are the rest of the parameters to the Ref.
Below is an example of a loop that displays the counter of the loop in a label on the center of the screen. Since theLoop counter is an integer, the integer must first be changed to a string. This can be performed by creating a Ref tocall ‘str()’.
with Loop(100) as lp:#This Ref is a delayed function call to str where#one of the parameters is a reference. Ref also#takes care of evaluating references.Label(text=Ref(str, lp.i), duration=0.2)
To run a function during RT the Func state is needed. Func creates a state that will not run the passed in functioncall until the previous state leaves. The following is an example of using a Func to generate the next set of stimulusfor each iteration of a Loop. To access the return value of a method or function call, the .result attribute of the Funcstate must be accessed.
64 Chapter 2. Whats Next?
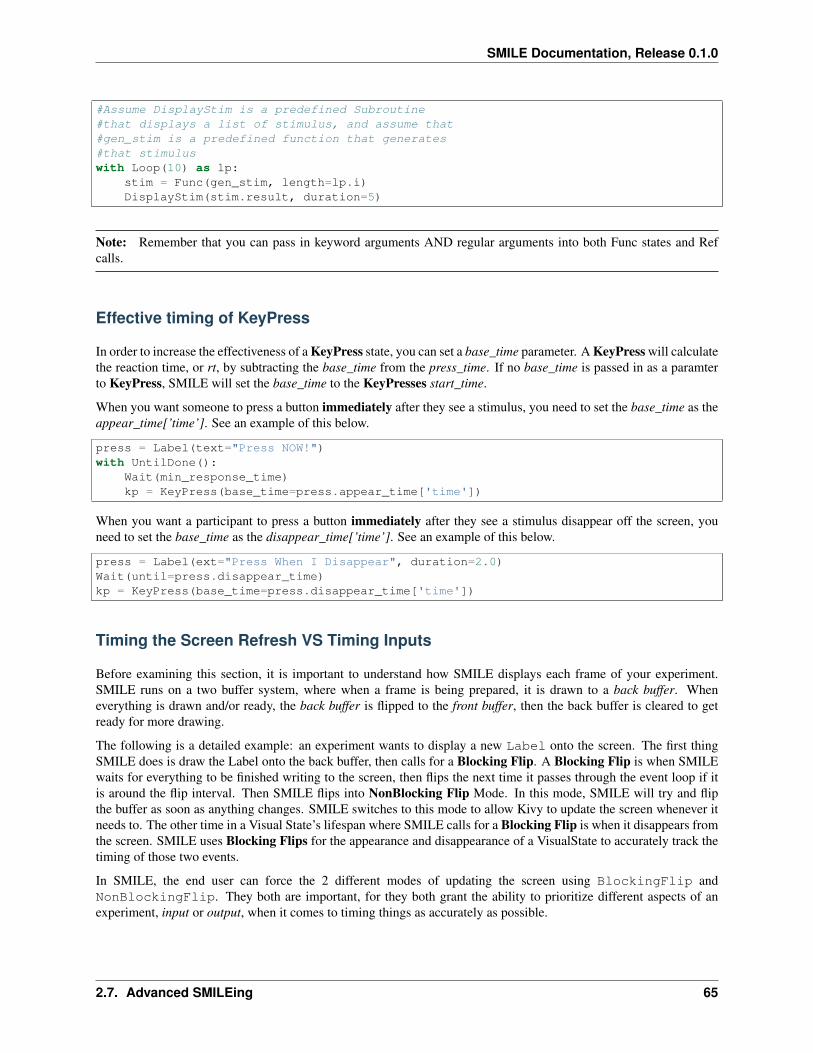
SMILE Documentation, Release 0.1.0
#Assume DisplayStim is a predefined Subroutine#that displays a list of stimulus, and assume that#gen_stim is a predefined function that generates#that stimuluswith Loop(10) as lp:
stim = Func(gen_stim, length=lp.i)DisplayStim(stim.result, duration=5)
Note: Remember that you can pass in keyword arguments AND regular arguments into both Func states and Refcalls.
Effective timing of KeyPress
In order to increase the effectiveness of a KeyPress state, you can set a base_time parameter. A KeyPress will calculatethe reaction time, or rt, by subtracting the base_time from the press_time. If no base_time is passed in as a paramterto KeyPress, SMILE will set the base_time to the KeyPresses start_time.
When you want someone to press a button immediately after they see a stimulus, you need to set the base_time as theappear_time[’time’]. See an example of this below.
press = Label(text="Press NOW!")with UntilDone():
Wait(min_response_time)kp = KeyPress(base_time=press.appear_time['time'])
When you want a participant to press a button immediately after they see a stimulus disappear off the screen, youneed to set the base_time as the disappear_time[’time’]. See an example of this below.
press = Label(ext="Press When I Disappear", duration=2.0)Wait(until=press.disappear_time)kp = KeyPress(base_time=press.disappear_time['time'])
Timing the Screen Refresh VS Timing Inputs
Before examining this section, it is important to understand how SMILE displays each frame of your experiment.SMILE runs on a two buffer system, where when a frame is being prepared, it is drawn to a back buffer. Wheneverything is drawn and/or ready, the back buffer is flipped to the front buffer, then the back buffer is cleared to getready for more drawing.
The following is a detailed example: an experiment wants to display a new Label onto the screen. The first thingSMILE does is draw the Label onto the back buffer, then calls for a Blocking Flip. A Blocking Flip is when SMILEwaits for everything to be finished writing to the screen, then flips the next time it passes through the event loop if itis around the flip interval. Then SMILE flips into NonBlocking Flip Mode. In this mode, SMILE will try and flipthe buffer as soon as anything changes. SMILE switches to this mode to allow Kivy to update the screen whenever itneeds to. The other time in a Visual State’s lifespan where SMILE calls for a Blocking Flip is when it disappears fromthe screen. SMILE uses Blocking Flips for the appearance and disappearance of a VisualState to accurately track thetiming of those two events.
In SMILE, the end user can force the 2 different modes of updating the screen using BlockingFlip andNonBlockingFlip. They both are important, for they both grant the ability to prioritize different aspects of anexperiment, input or output, when it comes to timing things as accurately as possible.
2.7. Advanced SMILEing 65
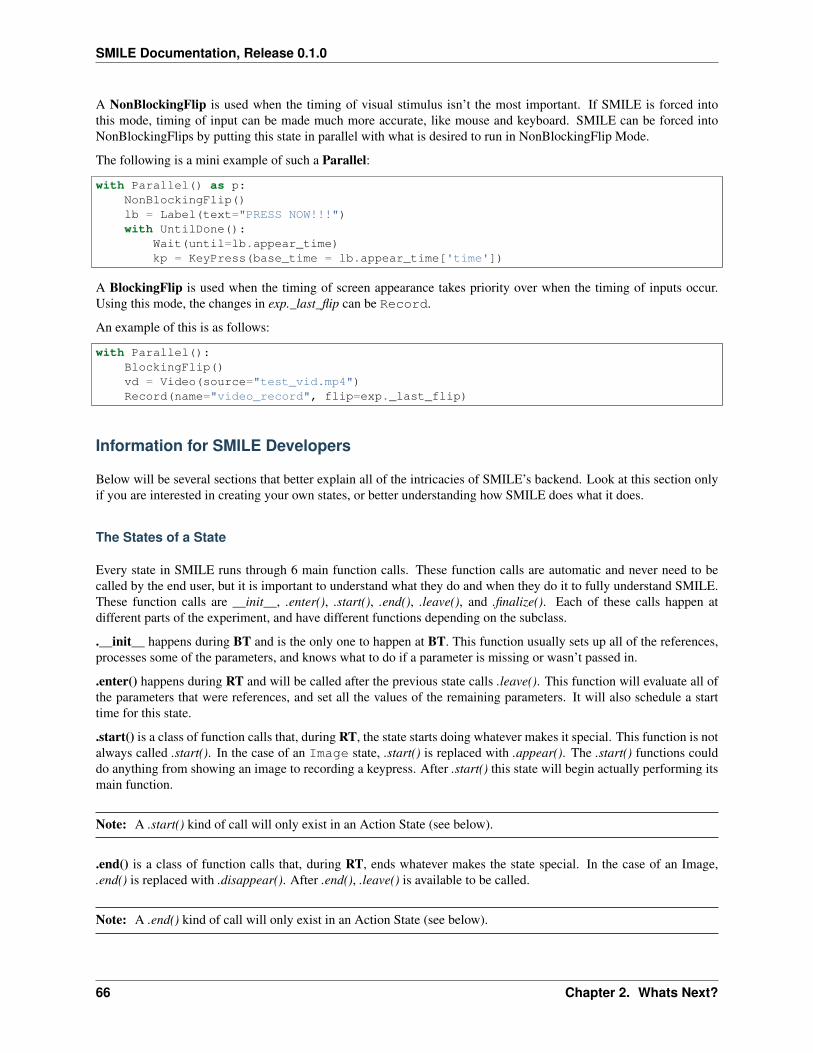
SMILE Documentation, Release 0.1.0
A NonBlockingFlip is used when the timing of visual stimulus isn’t the most important. If SMILE is forced intothis mode, timing of input can be made much more accurate, like mouse and keyboard. SMILE can be forced intoNonBlockingFlips by putting this state in parallel with what is desired to run in NonBlockingFlip Mode.
The following is a mini example of such a Parallel:
with Parallel() as p:NonBlockingFlip()lb = Label(text="PRESS NOW!!!")with UntilDone():
Wait(until=lb.appear_time)kp = KeyPress(base_time = lb.appear_time['time'])
A BlockingFlip is used when the timing of screen appearance takes priority over when the timing of inputs occur.Using this mode, the changes in exp._last_flip can be Record.
An example of this is as follows:
with Parallel():BlockingFlip()vd = Video(source="test_vid.mp4")Record(name="video_record", flip=exp._last_flip)
Information for SMILE Developers
Below will be several sections that better explain all of the intricacies of SMILE’s backend. Look at this section onlyif you are interested in creating your own states, or better understanding how SMILE does what it does.
The States of a State
Every state in SMILE runs through 6 main function calls. These function calls are automatic and never need to becalled by the end user, but it is important to understand what they do and when they do it to fully understand SMILE.These function calls are __init__, .enter(), .start(), .end(), .leave(), and .finalize(). Each of these calls happen atdifferent parts of the experiment, and have different functions depending on the subclass.
.__init__ happens during BT and is the only one to happen at BT. This function usually sets up all of the references,processes some of the parameters, and knows what to do if a parameter is missing or wasn’t passed in.
.enter() happens during RT and will be called after the previous state calls .leave(). This function will evaluate all ofthe parameters that were references, and set all the values of the remaining parameters. It will also schedule a starttime for this state.
.start() is a class of function calls that, during RT, the state starts doing whatever makes it special. This function is notalways called .start(). In the case of an Image state, .start() is replaced with .appear(). The .start() functions coulddo anything from showing an image to recording a keypress. After .start() this state will begin actually performing itsmain function.
Note: A .start() kind of call will only exist in an Action State (see below).
.end() is a class of function calls that, during RT, ends whatever makes the state special. In the case of an Image,
.end() is replaced with .disappear(). After .end(), .leave() is available to be called.
Note: A .end() kind of call will only exist in an Action State (see below).
66 Chapter 2. Whats Next?
SMILE Documentation, Release 0.1.0
.leave() happens during RT and will be called whenever the duration of a state is over, or whenever the rules of a statesays it should end. A special case for this is the .cancel() call. If a state should need to be ended early for whateverreason, the Experiment will call the state’s .cancel() method and that method will setup an immediate call to both.leave() and .finalize().
.finalize() happens during RT but not until after a state has left. This call usually happens whenever the clock hasextra time, i.e. during a Wait state. This call will save out the logs, setup callbacks to the ParentState to tell itthat this state has finished, and set self.active to false. This call is used to clean up the state sometime after the statehas run .leave().
The SMILE timing Algorithm
Write up coming soon.
Want to Contribute to SMILE?
SMILE has a GitHub page that, if you find an issue and fix it or want to add functionality to SMILE, you may makea pullrequest to. At GitWash you can find documents to better understand how to make use Git and how to makechanges and update SMILE.
Seeking Help?
SMILE has a Google group where you can discuss SMILE with other people who are trying to learn how to use it, aswell as see if anyone is having the same problems that you are. This group is located at smile-users.
SMILE also has a GitHub page where you can report any issues that you have.
2.8. Seeking Help? 67
SMILE Documentation, Release 0.1.0
SMILE package
smile.audio module
smile.clock module
smile.dag module
smile.experiment module
smile.freekey module
smile.keyboard module
smile.kivy_overrides module
smile.log module
smile.mouse module
smile.pulse module
smile.ref module
smile.state module
smile.utils module
smile.video module
Module contents
68 Chapter 2. Whats Next?
69

SMILE Documentation, Release 0.1.0
CHAPTER 3
Funding Sources
Development of SMILE made possible by grants from:
70 Chapter 3. Funding Sources