smoker plans
TRANSCRIPT

1
Arms of Mercy
When trails are your portion and your night is ever long,
When heartbreak steals your laughter and your soul has lost it's song.
When little comforts leave you,
and you're left with stinging tears. When loneliness envelops
and you're bound by doubts and fears.
Cry out for tender mercies, let the Lord's sweet love embrace.
Cast that heavy load upon him and look full into his face.
Rest your eyes and heart upon him, let him sooth your weary brow. Let him wipe your tears of sorrow as you linger with him there.
Nestling in God's arms of mercy brings assurance, Hope and Peace.
You can know that in your struggles God's embrace brings sweet release.
( The old hillbilly )
© 2009

2
Disclaimer
http://www.compuvices.com, does not now, nor will in the
future, be held liable or responsible for the information
contained within any or all of it's Web Pages. Nor the use or
misuse to which individuals intend to apply said information.
Any and all individuals that undertake the projects, plans or
ideas that are offered, do so of their own free will and accept
responsibility for their own actions, abilities and inability's.
It should be stressed that any and all companies that are listed
or implied within CompuVices Web Pages are held blameless
and assume no liabilities for the understanding or
misunderstanding of information relating to themselves or any
third parties associated with them.
In laymen's terms; this is a free web site, that you can either
view or disregard. A reasonable effort has been, and will be,
put forth to offer information in a clear manner.

3
Redistribution Rights to this eBook
By simply being in possession of this Document (.PDF file) you own a
license to
Print or give away (Free of Charge). You also agree to the terms and
conditions
Represented here.
• Your license gives you the right to give away or reprint this
eBook.
• Your redistribution rights allow you to offer this eBook as a Free
Download from your web site.
• This eBook is provided in PDF format only and may not be
transferred to .exe format or any other formats.
• Modification of the eBook is prohibited. You may not change any
of the contents therein.
• You may NOT promote this eBook by sending unsolicited
commercial emails (SPAM). Any form of SPAM is prohibited!
• Modification of this eBook is prohibited. DO NOT change the
Contents herein.
• You MAY NOT sell this eBook.
WARNING!
Cutting Old Propane Tanks
Can Be Life Threatening.
Accidents Can and Do Happen!
Proceed At Your Own Risk.

4
Courtesy of http://www.compuvices.com Owner and Operator: Garell York
Email Address: [email protected]
Always looking for ways to provide free forms of Knowledge, Fun,
Enjoyment and Help; Here at:
http://www.compuvices.com
If these plans are of use to you and you feel like
making a donation to keep this site running.
Our Address is:
CompuVices
1342 Hwy 319
Franklin La. 70538

5
SMOKER PLANS A guide to the novice for building a smoker
Read all instructions before attempting any work on this project………. Remember that a propane tank is still very dangerous after you drain the propane out.
Do not use galvanized metal at all on this cooker. First thing to do is contacting your local propane dealer and arrange to buy a couple of their old
tanks that no longer pass their inspections. You will need two tanks, one for the cooker {main tank} and one for the smoke box. I usually try to get the main tank around six and a half feet to
seven and a half feet long, and for the smoke box I use one of the stand up bottles that are almost
chest high {25 gallon tank or AKA; 100 lb bottle}. You will need to find a professional welder to
cut the tanks open for you.
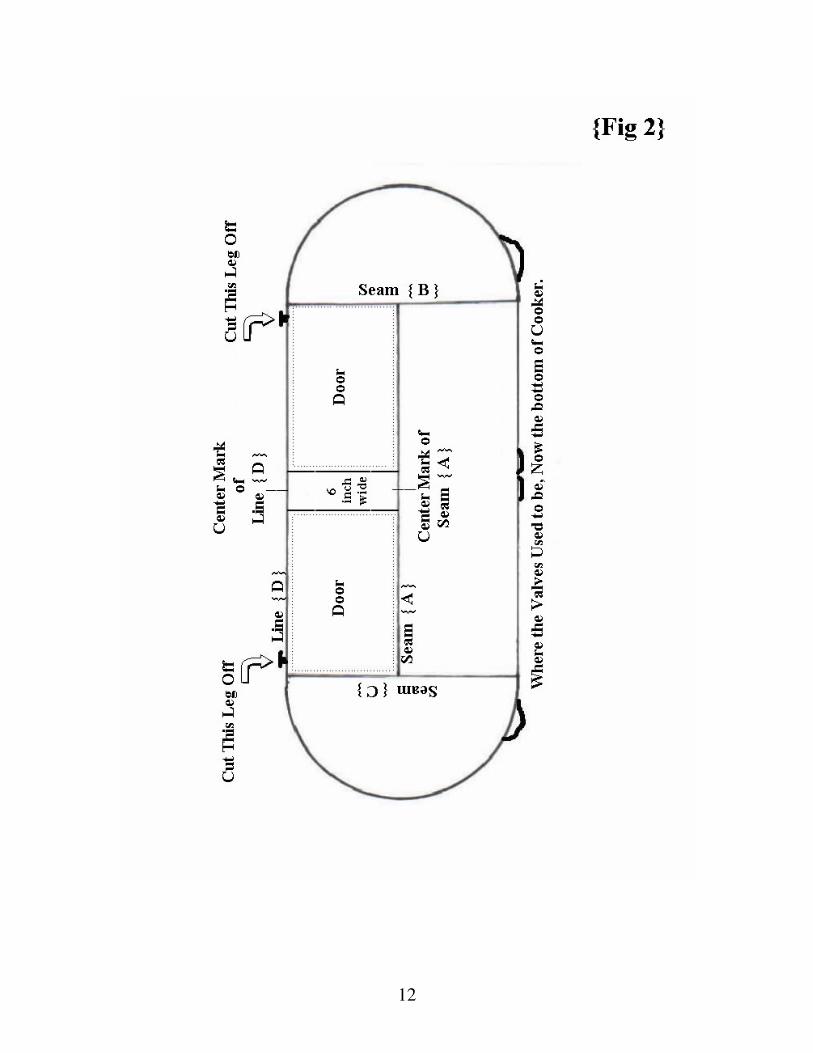
{Fig .2} Now you’re going to measure the tank and mark out for the doors. (Remember to have
a professional welder cut open the tank first) From the factory welded seam that runs from one
end of the tank to the other. Seam {A} {horizontal}, measure from the horizontal line; around the tank to find the circumference {be sure and pull the tape tight for accuracy}. Now take the total
circumference and divide by four {4}, this will give you one-fourth the circumference of the tank.
This will be the vertical length of the doors on the big tank. Roll the tank so that the holes for the valves are facing down, that will now be the bottom of the cooker. From seam {A} measure up
one-fourth the circumference of the tank along the inside edge of seam {B factory weld} and
mark. Do the same from seam {A} up one fourth the circumference of the tank along the inside edge of seam{C factory weld}, and mark, this is where the top of the door will be. Draw line
between the marks this will be line {D}. Now measure out and mark the center of seam {A} and
the center of line {D}. From each mark measure out three inches in each direction and then
connect the corresponding marks vertically down the tank, this will make a six inch divider between the two doors. Now you’re doors are marked out and ready to cut. {Make sure you mark
the doors so you can put them back in the right place later}. This is a good time to plug the holes
that the valve and gauge was in. There are two doors on this cooker; because of the weight of the ¼ inch steel used in the tank.
{Fig .3} Now you’re going to cut another hole in the big tank, this one is where the smoke box
is attached. This time you measure the circumference and divide by three {3}. This will give you
one third of the circumference of the tank. Measure from line {D} down and away from the doors along the inside edge of seam {B} and make a mark, now measure from line {D} down and away
from the doors along the inside edge of seam {C} and make a mark. With a straight edge connect
the two marks this will be line {E}. Now you want to find the center of line {E} and make a mark, from the center mark on line {E} measure out in each direction seventeen and one half
inches {17 ½} and mark. Make another line across the tank just like line {E} only six inches {6}
down the tank, this is line {F}. Find the center of line {F} and mark it. Measure out in each direction seventeen and one half inches {17 ½} and mark, connect the marks between Line {E}
and line {F} and cut out the 35 x 6 inch piece. Use grinder to clean up edges.
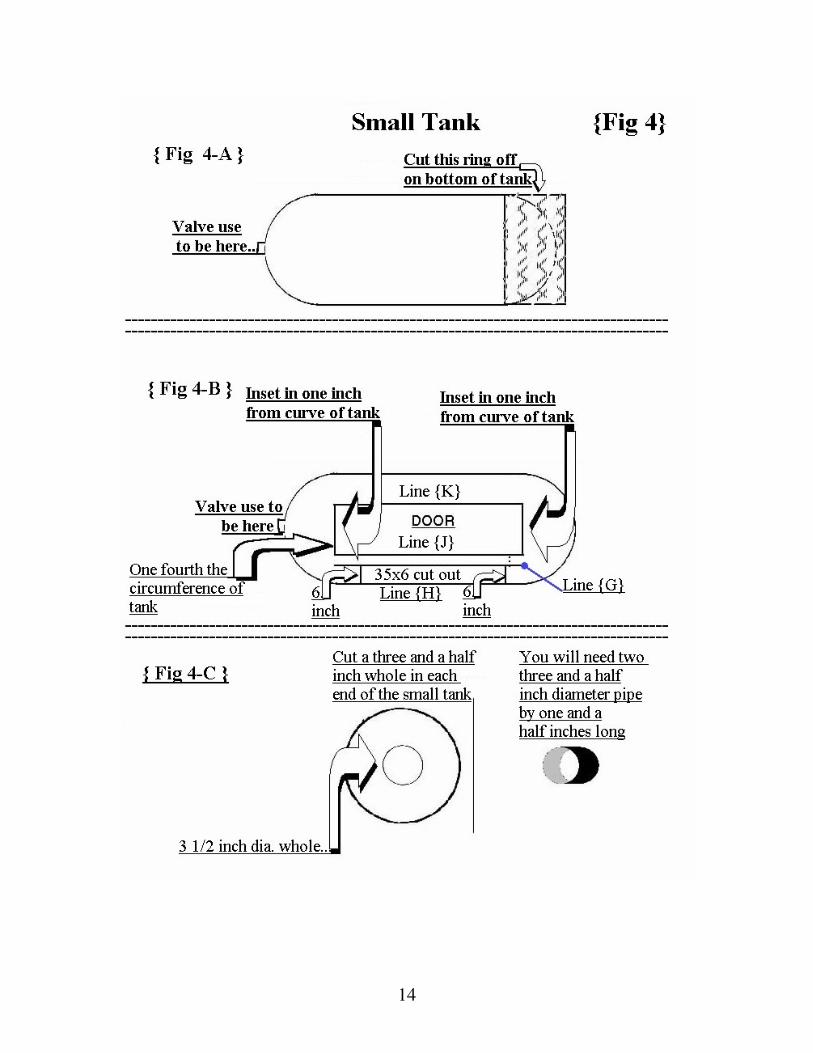
{Fig .4} Now you’re going to start on the small tank, make sure all the water is drained out.
{Fig .4-A}; On the end of the tank opposite of the valves you’ll see a ring; it has been welded on
the tank to make a platform to keep the tank out of the dirt, this needs to be cut off… {Fig .4-B}
6
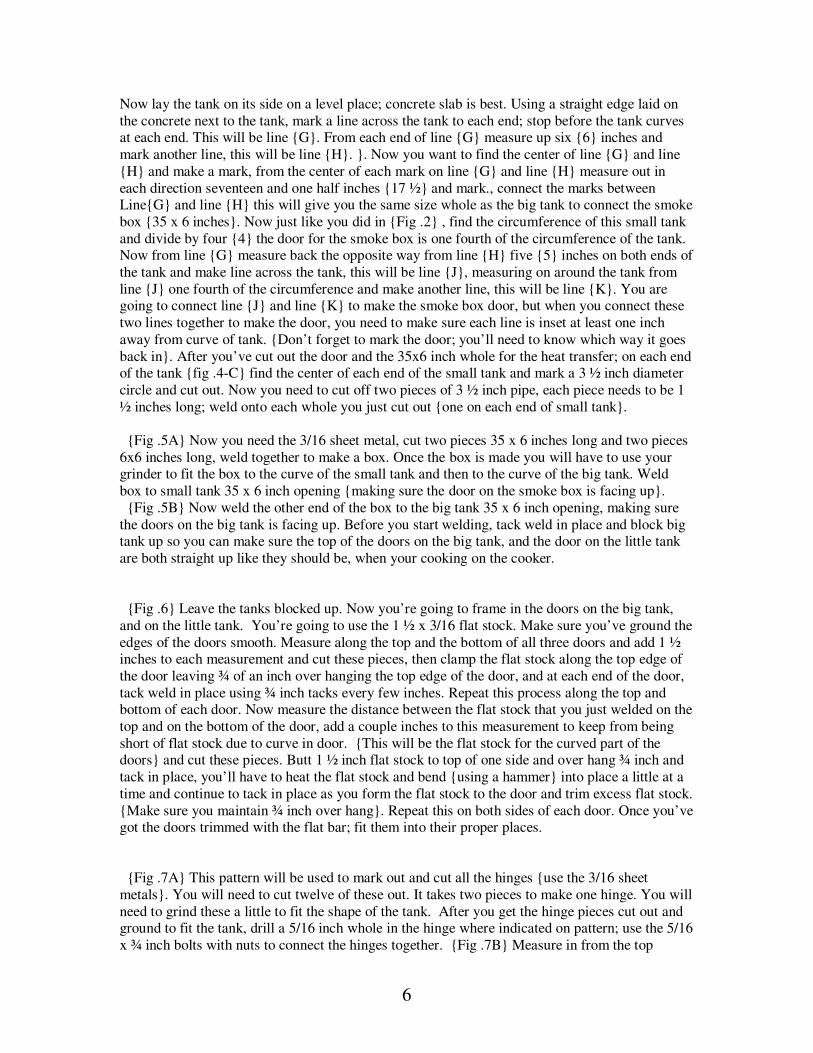
Now lay the tank on its side on a level place; concrete slab is best. Using a straight edge laid on
the concrete next to the tank, mark a line across the tank to each end; stop before the tank curves at each end. This will be line {G}. From each end of line {G} measure up six {6} inches and
mark another line, this will be line {H}. }. Now you want to find the center of line {G} and line
{H} and make a mark, from the center of each mark on line {G} and line {H} measure out in
each direction seventeen and one half inches {17 ½} and mark., connect the marks between Line{G} and line {H} this will give you the same size whole as the big tank to connect the smoke
box {35 x 6 inches}. Now just like you did in {Fig .2} , find the circumference of this small tank
and divide by four {4} the door for the smoke box is one fourth of the circumference of the tank. Now from line {G} measure back the opposite way from line {H} five {5} inches on both ends of
the tank and make line across the tank, this will be line {J}, measuring on around the tank from
line {J} one fourth of the circumference and make another line, this will be line {K}. You are going to connect line {J} and line {K} to make the smoke box door, but when you connect these
two lines together to make the door, you need to make sure each line is inset at least one inch
away from curve of tank. {Don’t forget to mark the door; you’ll need to know which way it goes
back in}. After you’ve cut out the door and the 35x6 inch whole for the heat transfer; on each end of the tank {fig .4-C} find the center of each end of the small tank and mark a 3 ½ inch diameter
circle and cut out. Now you need to cut off two pieces of 3 ½ inch pipe, each piece needs to be 1
½ inches long; weld onto each whole you just cut out {one on each end of small tank}.
{Fig .5A} Now you need the 3/16 sheet metal, cut two pieces 35 x 6 inches long and two pieces
6x6 inches long, weld together to make a box. Once the box is made you will have to use your grinder to fit the box to the curve of the small tank and then to the curve of the big tank. Weld
box to small tank 35 x 6 inch opening {making sure the door on the smoke box is facing up}.
{Fig .5B} Now weld the other end of the box to the big tank 35 x 6 inch opening, making sure
the doors on the big tank is facing up. Before you start welding, tack weld in place and block big tank up so you can make sure the top of the doors on the big tank, and the door on the little tank
are both straight up like they should be, when your cooking on the cooker.
{Fig .6} Leave the tanks blocked up. Now you’re going to frame in the doors on the big tank,
and on the little tank. You’re going to use the 1 ½ x 3/16 flat stock. Make sure you’ve ground the
edges of the doors smooth. Measure along the top and the bottom of all three doors and add 1 ½ inches to each measurement and cut these pieces, then clamp the flat stock along the top edge of
the door leaving ¾ of an inch over hanging the top edge of the door, and at each end of the door,
tack weld in place using ¾ inch tacks every few inches. Repeat this process along the top and bottom of each door. Now measure the distance between the flat stock that you just welded on the
top and on the bottom of the door, add a couple inches to this measurement to keep from being
short of flat stock due to curve in door. {This will be the flat stock for the curved part of the doors} and cut these pieces. Butt 1 ½ inch flat stock to top of one side and over hang ¾ inch and
tack in place, you’ll have to heat the flat stock and bend {using a hammer} into place a little at a
time and continue to tack in place as you form the flat stock to the door and trim excess flat stock.
{Make sure you maintain ¾ inch over hang}. Repeat this on both sides of each door. Once you’ve got the doors trimmed with the flat bar; fit them into their proper places.
{Fig .7A} This pattern will be used to mark out and cut all the hinges {use the 3/16 sheet
metals}. You will need to cut twelve of these out. It takes two pieces to make one hinge. You will
need to grind these a little to fit the shape of the tank. After you get the hinge pieces cut out and ground to fit the tank, drill a 5/16 inch whole in the hinge where indicated on pattern; use the 5/16
x ¾ inch bolts with nuts to connect the hinges together. {Fig .7B} Measure in from the top

7
corner approximately 4 inches from each end on the top of the door; this is where the hinge goes.
Use your torch to wash an opening through the flat stock {use care not to wash into the door}. Place the hinge on the door where you washed through; with the bolthole in the hinge hanging
over the tank approximately ¼ inch and weld in place {make sure you do this the same way on
each hinge, on all three doors}.
{Fig .8} Time to make the trailer. You will need two pieces of “C” channel 8 feet by 3 inches
by 3/16 inch {these are used for the trailer sides}. You will also need 5 pieces of angle iron, 4 feet by 2inch by 2 inch by 3/16 inch {these are for the cross braces}. And you will need one piece of
black iron pipe, 3 inch by 75 inches {this is for the trailer tongue}. You need to find somewhere
to purchase one trailer axle with spindles, springs and spring hangers {look in the phone book under axles, or you can also get good deals from the J C Whitney catalog, or a old boat trailer
axle will work}. {Fig .8A} Take two pieces of the 2-inch angle iron and measure out and find the
middle, and make a mark. From the middle mark measure out in each direction 1 ½ inches and
mark, using the end of the 3 inch pipe set between the outer two marks you just made on the angle iron half way in from the edge and draw the half shape of the pipe, do this on both pieces of
the angle iron and cut out. {Fig .8B} Now lay the two pieces of 8 foot “C” channel 4 foot apart,
find the center on each piece and mark, this is where you will tack the first piece of angle iron, remember to use your square {do not use the two pieces of angle iron that you cut the half shapes
out of here}. Now measure up the “C ” channel 16 inches from center and mark, this is where the
next piece goes, use one of the two pieces that you cut the half circle out of here. Move to the end of the “C” channel and tack the other piece that you cut the half circle out of here, make sure and
face the half circles down {these two half circles are where the trailer tongue goes through}. The
back half of the trailer is done the same way as the front half, using the remaining angle iron.
Now that the basic frame is welded together, roll frame on its back with the half circles facing up. {Fig .8C} Lay the black iron pipe in the half circles and push it back till it hits the center piece of
angle iron and weld tongue to all three frames. Weld front spring hanger onto bottom of “C “
channel directly under center angle iron on trailer and then weld rear hanger on frame. You can buy the trailer coupler from the auto parts store or Wal-mart and weld on end of tongue {I use 1
7/8 inch ball hitch; you can use this or any other size you wish to}. Weld 4’x 8’ No #9 expanded
metal to deck of trailer.
{Fig .9} Block the trailer up so the axle is off the ground and perfectly level, now you can set
the cooker on the trailer and place it where you want it, you will have to use wooden blocks to get
the cooker level on the trailer.. Use angle iron to connect cooker to trailer. From the left side door bottom outside corner measure straight down 2 ½ inches and then straight across 7 ½ inches place
angle iron here, grind to fit tank. Run angle iron down to corner of trailer and weld.
Repeat process on right side door. Smoke box should be welded to cross frames of trailer.
{Fig .10} Keep the trailer blocked up and level for this part. Now you’re going to make the heat
deflector door on the heat transfer flu {this door goes on the inside of the cooker over the 35 x 6
inch opening}. Cut out a 42 x 12-inch piece of 3/16-inch steel. Position door so it is centered over heat transfer hole. Level door and then drop the outside edge of door approximately 1 ½ inches
and weld in place. {This would be the edge opposite from wall of cooker}.
{Fig .11} The trailer needs to be kept level for this part. This step will make the frame for the grate that you will cook on. You will use the 1 x 1 x 1/8 inch angle iron and face the 1 inch width
of the angle iron up and the other 1 inch width down and against the wall of the cooker. On the
edge just inside the doors weld the first piece of angle iron the whole length of the tank and stop where the tank starts to curve this is part {A}. Now on the back inside of the tank weld another
piece of angle straight across from the front piece, make sure and use your level to keep it right

8
with the front one, this is part {B}. Now measure and cut 6 pieces of angle iron to fit between
parts {A} and part {B}... Weld one of the 6 pieces you just cut, call it part {C} on left end of part {A} and on left end of part {B} Weld part {H} on the other end of part {A} and part {B}. Now
measure the distance from part {H} to part {C} and find the middle on part {A} and part {B}.
This is where part {E} and part {H} butt together, weld in place. Now measure from part {E} to
part {C} and find the middle, this is where part {D} welds to. And finally measure from part {F} to part {H} and find the middle, this is where part {G} welds to… Part {I} is next; measure from
the middle of part {C} to the deepest part of the curve of your cooker, this is the length of your
next cut of {1 x 1 x 1/8} angle iron, weld in place from middle of part {C} to deepest part of curve in tank {make sure and use your level}…Part {J} is to be done the same as part {I}; only
on other end of tank…
{Fig .12} To make the grates for the cooker you will need the 3/8 inch rod for the grate, and the No# 9 expanded metal for the grate, you can use heavier size expanded metal if you chose to.
The grates will be made in four pieces so they are easier to handle and clean. You need to make a
template a ¼ of the curve in the tank; to do this I use a piece of cardboard that is easy to cut with
scissors.{fig .12A} Measure out from the back side of part {B} across part {C} half way to where the middle of part {I} joins, and then measure off the half way point of part {C} across
part {I} to the wall of the tank. Using these measurements you can make a basically square piece
of cardboard that is the length of part {I} and half the length of part {C}. Now you can start trial fitting, and trimming the corner of the cardboard that faces the curved part of the tank until it fits
the curved part of the tank. Now you have a template of the curved part of your tank.
{Fig .12B} Now measure out from the back of the tank across part {E} half way, this will be the width of the grate. From this point on part {E} measure down the center of the tank to the point
that part {I} welds into the tank, this is the length of the grate, now reduce length by ¾ inch and
width by ¾ inch. Use template to cut curve in grate. Make a total of four grates like this. Using
3/8” inch rod, start at one corner and but rod to edge of grate and tack every 5 to 6 inches using as little heat as possible. Heat 3/8-inch rod to form curve on grate and allow cooling completely
before tacking to grate. Grate should be completely lined on all edges. Note: {excessive heat
while welding will warp grate}. {Fig .13A} For this part you will need two levels, and two pieces of 3 ½ inch black iron pipe,
each about 30 inches long… In {fig .13A} you will place the first level {level A} across the top
of the tank and make sure you have it level {don’t place level on doorframe; between the doors is
the best place to get this measurement}. Now from the contact point of level {A}, and where the tank starts to curve measure out 3 ½ inches along level {A}, this is where level {B} intersects
down to the tank. Measure this length; it’s the line that is red in {Fig .13A}. This will be the
measurement that you use to mark out your smoke stack. Now mark on the smoke stack the measurement you got from the red line in {fig .13A}. Now on the same end of the stack that
you’ve made the mark on, directly opposite of this mark at the end of the stack draw a circle
around the pipe. {Fig .13B} The circle will be from nothing on one side to the mark on the other side all the way around the stack. Both pipes should be marked out like the pipe on the top half
of the page of {fig 13B}. Cut both pipes. You can use the pipe for a pattern to mark out the holes
in the tank {make sure to cut on the inside of the marks that you make on the tank, so the holes
wont be to big}. You will have grind and cut a little to make the stacks fit right. We usually set the stacks just inside each outside hinge and back from the doors far enough so when the doors
are open and leaning on the stacks they wont fall forward. Use your own judgment as to where
the stacks look best.
{Fig .14} Using 3/16 inch sheet metal cut out four 3 ½ inch diameter circles, and using one inch
flat stock cut out four pieces one inch long, you will end up with four 1”x 1” inch pieces.

9
Then cut four one inch long pieces of one-inch angle iron. {Fig .14A} Now place the 3-½ inch
diameter circle and the 1”x 1” Inch Square together and weld in place {choke plate}, and then repeat this to make the other three choke plates.
Now weld two of the four 1” inch angle iron pieces, one on top of each smoke stack {make sure
its exactly level with the top of the stack. {Fig .14B} Now weld the remaining two 1” inch angle
iron pieces one to each choke hole in the smoke box {make sure you weld them to the top side of the choke and keep them level with end of pipe}… Each pipe gets a choke plate bolted on to it,
position the choke plates in their places and drill a 5/16 inch hole in the center of each 1”x 1” inch
flat stock and the 1” inch angle iron, now using 5/16 x ¾ inch bolts put chokes together {tighten bolts so the chokes are stiff to move}.
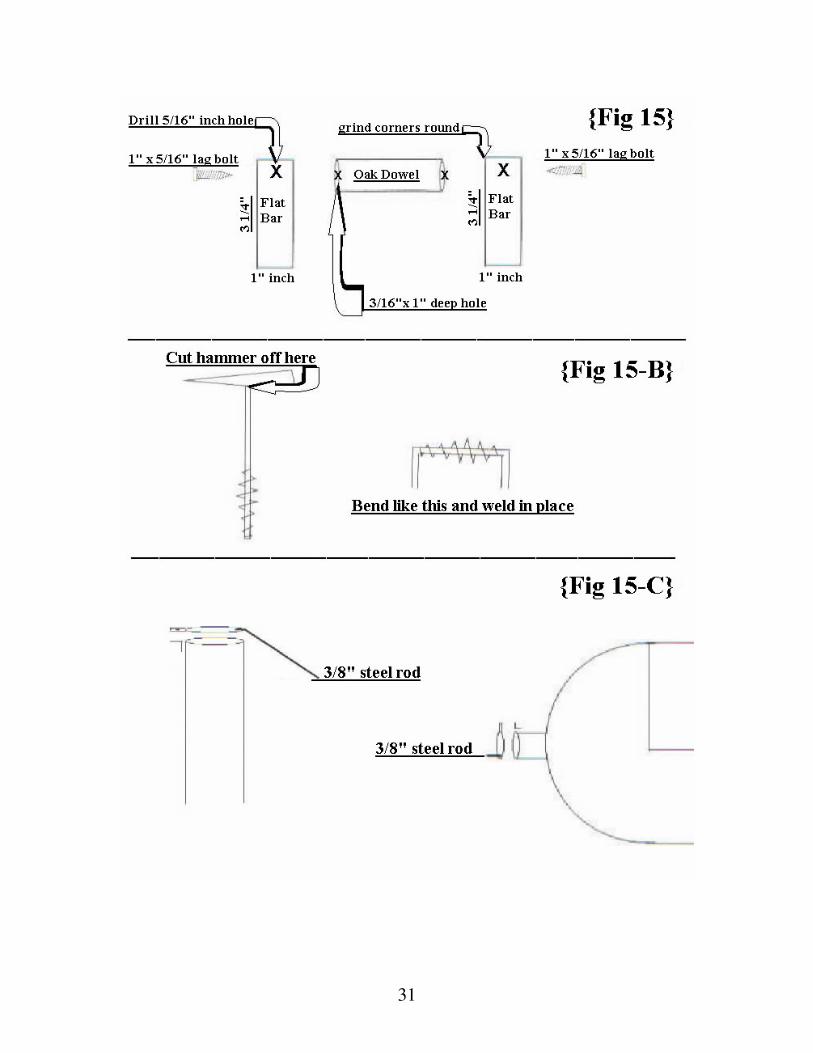
{Fig .15A} Time to make the handles. For the two cooker doors you will need 4 pieces of 1 inch flat stock 3 ¼ inches long, 1/8 -inch thick, and one 1 ¼ inch thick oak wood dowel.
4 lag bolts. 5/16 wide. and 1” long. On one end of the 4 pieces of 1-inch flat stock use grinder to
round the corners down and then ½” inch in from the end, drill a 5/16” inch hole in the middle of
the flat stock. Now cut two pieces of the 1 ¼ inch thick oak wood dowel 5” inches long and drill
a 3/16”x 1” inch hole in each end of the two pieces. Use the lag bolts to fasten the rounded ends of the flat stock to the oak dowels. Now you have a handle for each cooker door, now just
measure out across the bottom of each door and find the middle, center the handles and weld in
place. Note: {cover wooden dowel to protect from welding slag}. {Fig .15B} Now to make the smoke box handle use a chipping hammer, one with the spring like
grip on it. Cut the hammer end off and grind the tack weld off of the spring so that it spins around the handle. Center the spring on the handle and bend each end leaving the spring lose so it can
spin. Make sure each end that you bend is the same length and weld in place…
{Fig .15C} Make the handle for the smoke stacks out of the 3/8” inch steel rod. Cut a 5” inch piece for each stack and weld 1” inch on choke and bend the other end at a 45-degree angle
towards the top of the cooker. Now weld a 3” inch piece one on each end of the choke for the
smoke box at the bottom of the choke. Take the 3 ½” inch temperature gauge that you bought for the grill to the hardware store and purchase a steel threaded fitting that threads onto the gauge,
most gauges are standard pipe thread. {No galvanized fittings}. Use your torch to burn a hole and
place the fitting in the center between the two doors of the cooker and weld. Note: {protect
threads in fitting from welding slag}.

10
Time to have the completed cooker sand blasted. Take the temperature gauge and the two oak
handles off until the sand blasting and painting is done. Paint the grill with 1000 degree or higher grill or stove paint.
Important note; the chemicals used in propane are dangerous, and should be removed before
cooking on your propane tank smoker. We use dawn dish soap to wash the inside of smoker. After washing inside of smoker we like building fire in firebox and bringing temperature up to
500 degrees for approximately 2 hours and then apply Vegetable Oil, on entire surface of cooking
chamber for another hour. HAPPY SMOKING.
If you have any questions or need any help please contact us:
Web Manager:
Communications Director:
You can look at photographs of a cooker step by step being built; just go to CompuVices.com and
click on the link that says http://www.compuvices.com/smoker.html

11
PARTS LIST_____________
1~ large propane tank {6 ½ to 7 ½ feet long}
1~ small propane tank {25 gal /AKA 100 lb bottle}
2~ 4’ x 8’ foot sheets No # 9 expanded metal
1~ 4’x 4’x 3/16” sheet metal
2~ 8’x 3”x 3/16” C channel steel
1~ 3”x 75” black iron pipe {trailer tongue}
1~ 3 ½”x 72” black iron pipe {smoke stacks}
10~ 5/16” x ¾” inch bolts with nuts {door hinges and choke flaps}
4~ 5/16”x1” lag bolts {oak handles}
1~ 1 ¼” inch oak dowel {cooker handles}
1~ chipping hammer with spring handle
1~ 17” inch piece of 1”x3/16 inch flat stock
5 ~ quarts of black 1000 degree grill or stove paint
1~ 3 ½ inch temperature gauge for smoking and grilling
1~ fitting for temperature gauge threads
1~ trailer tongue for 1 7/8 inch ball
1~ axle with spindles, springs, U bolts, and spring hangers
2 tires with rims and lug nuts that fit on axle
1~ adjustable trailer tongue jack
Approximately 30’ feet of 1”x 1” x 1/8” inch angle iron
Approximately 25’ feet of 2’x2’ x 1/8’ inch angle iron
Approximately 26 feet of 1 ½” inch flat stock
Approximately 45 feet of 3/8” inch steel rod
12

13
14

15

16

17

18

19

20

21

22

23

24

25

26

27

28

29
30
31