smooth wall express 3 installation guide v2
TRANSCRIPT

8/6/2019 Smooth Wall Express 3 Installation Guide V2
http://slidepdf.com/reader/full/smooth-wall-express-3-installation-guide-v2 1/40
V e r s
i o n
1SmoothWall
Express
Installation Guide

8/6/2019 Smooth Wall Express 3 Installation Guide V2
http://slidepdf.com/reader/full/smooth-wall-express-3-installation-guide-v2 2/40
V e r s
i o n
1
SmoothWall Express, Installation Guide, SmoothWall Limited, July 2007
Trademark and Copyright NoticesSmoothWall is a registered trademark of SmoothWall Limited. This manual is the copyright of SmoothWall
Limited and is not currently distributed under an open source style licence. Any portions of this or other manualsand documentation that were not written by SmoothWall Limited will be acknowledged to the original author byway of a copyright/licensing statement within the text.
You may not modify the manual nor use any part of within any other document, publication, web page orcomputer software without the express permission of SmoothWall Limited. These restrictions are necessary toprotect the legitimate commercial interests of SmoothWall Limited.
Unless specifically stated otherwise, all program code within SmoothWall Express is the copyright of the originalauthor, i.e. the person who wrote the code.
Linux is a registered trademark of Linus Torvalds. Snort is a registered trademark of Sourcefire INC.DansGuardian is a registered trademark of Daniel Barron. Microsoft, Internet Explorer, Window 95, Windows 98,Windows NT, Windows 2000 and Windows XP are either registered trademarks or trademarks of MicrosoftCorporation in the United States and/or other countries. Netscape is a registered trademark of NetscapeCommunications Corporation in the United States and other countries. Apple and Mac are registered trademarksof Apple Computer Inc. Intel is a registered trademark of Intel Corporation. Core is a trademark of IntelCorporation.
All other products, services, companies, events and publications mentioned in this document, associateddocuments and in SmoothWall Limited software may be trademarks, registered trademarks or servicemarks of their respective owners in the US or other countries.
This document was created and published in the United Kingdom on behalf of the SmoothWall open sourceproject by SmoothWall Limited.
AcknowledgementsWe acknowledge the work, effort and talent of all those who have contributed to the SmoothWall open sourceproject.
For the latest team list, visit http://www.smoothwall.org/ but we would particularly like to thank: Lawrence Manningand Gordon Allan, William Anderson, Jan Erik Askildt, Daniel Barron, Emma Bickley, Imran Chaudhry, AlexCollins, Dan Cuthbert, Bob Dunlop, Moira Dunne, Nigel Fenton, Mathew Frank, Dan Goscomb, Pete Guyan,Nick Haddock, Alan Hourihane, Martin Houston, Steve Hughes, Eric S. Johansson, Stephen L. Jones, ToniKuokkanen, Luc Larochelle, Osmar Lioi, Richard Morrell, Piere-Yves Paulus, John Payne, Martin Pot, StanfordT. Prescott, Ralf Quint, Guy Reynolds, Kieran Reynolds, Paul Richards, Chris Ross, Scott Sanders, EmilSchweickerdt, Paul Tansom, Darren Taylor, Hilton Travis, Jez Tucker, Bill Ward, Rebecca Ward, Lucien Wells,Adam Wilkinson, Simon Wood, Nick Woodruffe, Marc Wormgoor.
8/6/2019 Smooth Wall Express 3 Installation Guide V2
http://slidepdf.com/reader/full/smooth-wall-express-3-installation-guide-v2 3/40
i
V e r s
i o n
1
ContentsChapter 1 Welcome to SmoothWall Express . . . . . . . . . . . . . 1
Welcome . . . . . . . . . . . . . . . . . . . . . . . . . . . . . . . . . . . . . . . . . . . . 1Who should read this guide? . . . . . . . . . . . . . . . . . . . . . . . . . . . . . . . . . . . . . . 2Other Documentation and User Information . . . . . . . . . . . . . . . . . . . . . . . . . . 2System and Hardware Specifications . . . . . . . . . . . . . . . . . . . . . . 2About Registration. . . . . . . . . . . . . . . . . . . . . . . . . . . . . . . . . . . . . 3GPL and Open Source Software. . . . . . . . . . . . . . . . . . . . . . . . . . 4Need some help?. . . . . . . . . . . . . . . . . . . . . . . . . . . . . . . . . . . . . . 4
Chapter 2 Installing SmoothWall Express. . . . . . . . . . . . . . . . 5Warning! . . . . . . . . . . . . . . . . . . . . . . . . . . . . . . . . . . . . . . . . . . . . 5Messages and Conventions . . . . . . . . . . . . . . . . . . . . . . . . . . . . . 5Installing SmoothWall Express . . . . . . . . . . . . . . . . . . . . . . . . . . . 6
Chapter 3 Upgrading to SmoothWall Express. . . . . . . . . . . . 17Prerequisites . . . . . . . . . . . . . . . . . . . . . . . . . . . . . . . . . . . . . . . . 17Upgrading to the Latest Version . . . . . . . . . . . . . . . . . . . . . . . . . 17
Chapter 4 Configuring Advanced Options. . . . . . . . . . . . . . . 19Configuring Web Proxy Settings . . . . . . . . . . . . . . . . . . . . . . . . . 19Enabling ISDN. . . . . . . . . . . . . . . . . . . . . . . . . . . . . . . . . . . . . . . 20Enabling ADSL . . . . . . . . . . . . . . . . . . . . . . . . . . . . . . . . . . . . . . 22Enabling DHCP . . . . . . . . . . . . . . . . . . . . . . . . . . . . . . . . . . . . . . 24
Chapter 5 Accessing SmoothWall Express. . . . . . . . . . . . . . 27Accessing SmoothWall Express for the First Time . . . . . . . . . . . 27Connecting Using a Modem/ISDN Card . . . . . . . . . . . . . . . . . . . 29Installing Updates . . . . . . . . . . . . . . . . . . . . . . . . . . . . . . . . . . . . 33Where to go next? . . . . . . . . . . . . . . . . . . . . . . . . . . . . . . . . . . . . 33

8/6/2019 Smooth Wall Express 3 Installation Guide V2
http://slidepdf.com/reader/full/smooth-wall-express-3-installation-guide-v2 4/40
ii
V e r s
i o n
1
8/6/2019 Smooth Wall Express 3 Installation Guide V2
http://slidepdf.com/reader/full/smooth-wall-express-3-installation-guide-v2 5/40
1
V e r s
i o n
1
Chapter 1
Welcome to SmoothWall ExpressIn this chapter:
• An overview of SmoothWall Express
• About this documentation and who should read it
• System and hardware information
• GPL, registration and support information.
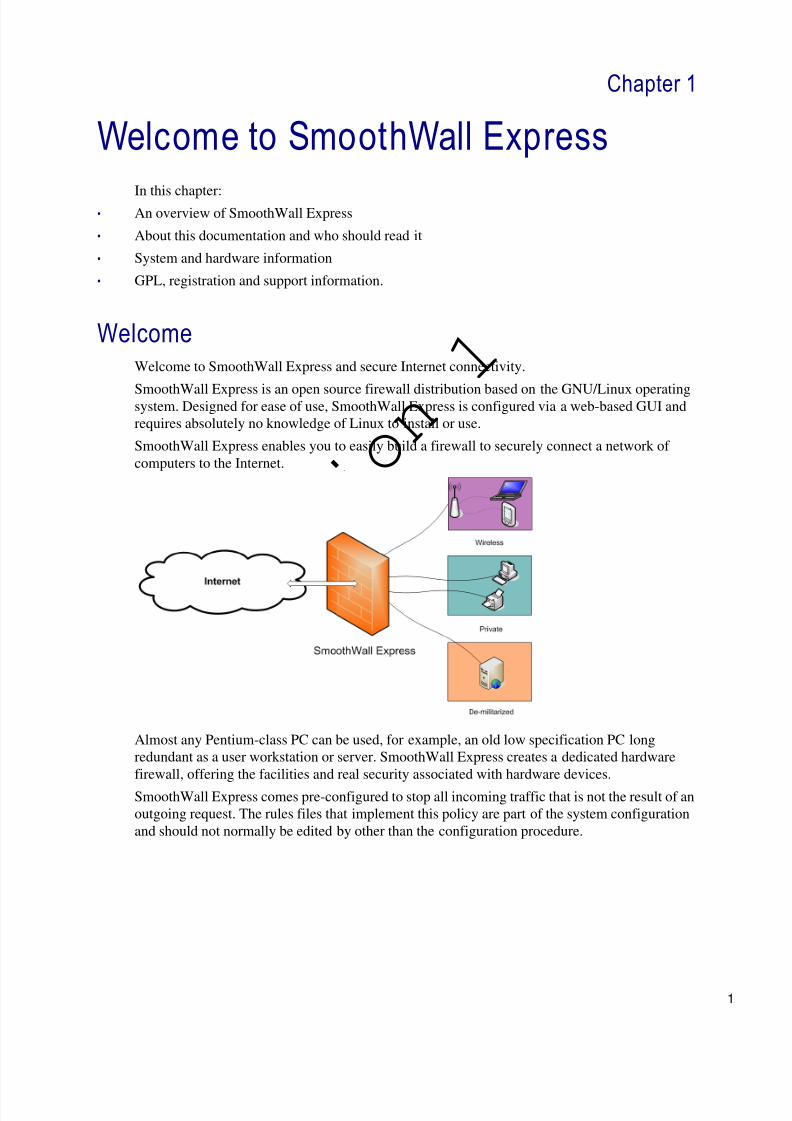
WelcomeWelcome to SmoothWall Express and secure Internet connectivity.
SmoothWall Express is an open source firewall distribution based on the GNU/Linux operatingsystem. Designed for ease of use, SmoothWall Express is configured via a web-based GUI andrequires absolutely no knowledge of Linux to install or use.
SmoothWall Express enables you to easily build a firewall to securely connect a network of computers to the Internet.
Almost any Pentium-class PC can be used, for example, an old low specification PC longredundant as a user workstation or server. SmoothWall Express creates a dedicated hardwarefirewall, offering the facilities and real security associated with hardware devices.
SmoothWall Express comes pre-configured to stop all incoming traffic that is not the result of anoutgoing request. The rules files that implement this policy are part of the system configurationand should not normally be edited by other than the configuration procedure.
8/6/2019 Smooth Wall Express 3 Installation Guide V2
http://slidepdf.com/reader/full/smooth-wall-express-3-installation-guide-v2 6/40
Welcome to SmoothWall ExpressSystem and Hardware Specifications
2
V e r s
i o n
1
Note: If any of the Linux system or configuration files are changed by other than the SmoothWallExpress configuration and installation procedures, there is a risk of compromising security, forwhich the SmoothWall Express Project Team cannot be held responsible.
However, we do not discourage people from experimenting with and further developing theirSmoothWall Express – it is just that we must point out that ill-conceived or badly executedchanges might compromise the security of the SmoothWall Express system.
Who should read this guide?Anyone installing and maintaining SmoothWall Express should read this guide.
Other Documentation and User Informationhttps://my.smoothwall.org/ – here you can create a my.SmoothWall profile, access more documentationand sign up for newsletters and more information.
http://www.smoothwall.org/ – this is the home of the SmoothWall Express community, containing thecollective wisdom of hundreds of SmoothWall Express experts in forums, FAQs and IRCchannels.
System and Hardware SpecificationsNote: Requirements may vary depending on traffic throughput and processing requirements, which
themselves vary according to the number and size of protected networks.
The following specifications are the minimum hardware specifications and recommendations for
SmoothWall Express:
System/hardware Requirement/recommendations
Processor Intel Pentium 200 or compatible processors.
Memory 128 megabytes of RAM. More RAM is required for additional services.
Storage 2 gigabytes hard disk – IDE and SCSI devices supported.
Network interface cards A minimum of one supported network interface card (NIC).
If the connection to the Internet is via a broadband device such as acable modem, ethernet-presented ADSL, or another ethernet-presentedconnection, you will need a second NIC.
Keyboard If the system BIOS supports boot without keyboard, this is onlyrequired for the initial installation.
Video card Only required when installing SmoothWall Express.
Monitor Only required when installing SmoothWall Express.
CD-ROM Only required when installing SmoothWall Express.
8/6/2019 Smooth Wall Express 3 Installation Guide V2
http://slidepdf.com/reader/full/smooth-wall-express-3-installation-guide-v2 7/40
3
SmoothWall ExpressInstallation Guide
V e r s
i o n
1 About RegistrationThe first time you connect to the Internet from your newly installed SmoothWall Express, aregistration script runs once only.
In a manner similar to the way in which a web site cookie records a small amount of informationfor future viewing of that particular site, the registration script sends a few key pieces of information about your installation back to SmoothWall Limited. This data enables thedevelopment team to gauge the type of platforms on which SmoothWall Express is beingdeployed and to better judge what features it would be helpful to add to future releases.
Note: Please note that none of this information is sensitive and that all the information is stored securelyin our database according to BS5750 and the Data Protection Act requirements.
SmoothWall Limited does not capture any other user information or any other data secretly or
covertly – all information recorded is impersonal.We appreciate your concerns about security anddata integrity.If you would like to voluntarily provide any further information to assist the future developmentof products there is a registration form on the web site that can be used for this purpose.
The following system information is recorded:
• The date of installation
• The processor type and speed
• Interface configuration
• SmoothWall Express Version
• The size of hard drive present• The amount of memory (RAM) present
• A list of PCI and USB devices installed.
Floppy drive Recommended for upgrading from previous versions.
Internet connec tion type In ternet a suitable NIC is required.
ADSL a supported PCI or USB modem is required.
ISDN a supported ISDN card or external RS232 or USBconnected adapter is required.
Modem a modem, a supported RS232, ISA or PCI modem isrequired.
System/hardware Requirement/recommendations
8/6/2019 Smooth Wall Express 3 Installation Guide V2
http://slidepdf.com/reader/full/smooth-wall-express-3-installation-guide-v2 8/40
Welcome to SmoothWall ExpressGPL and Open Source Software
4
V e r s
i o n
1
GPL and Open Source SoftwareSmoothWall Express is licensed under the General Public Licence (GPL); see http://www.gnu.org/ andhttp://www.copyleft.org/ for the full terms and conditions of the licence.
All program code written specifically for SmoothWall Express is licensed under the GPL, the
copyright to which remains with the original author.All code contributed to SmoothWall Express by SmoothWall Limited, even if previously releasedas part of their commercial products, is licensed under the GPL, the copyright of the coderemaining with SmoothWall Limited.
The CD image file (.iso) by which SmoothWall Express is distributed also contains a large amountof Linux operating system and general purpose code, libraries etc. that was not written specificallyfor SmoothWall Express. Indeed, it is the use of this pre-existing code base that makes the opensource concept so powerful and enabled the rapid development of the initial SmoothWall Expressfirewall.
The licensing and copyright of all this non SmoothWall Express specific code is the responsibilityof the original author, i.e. the person who wrote the code. In general this code is licensed underthe GPL or the Lesser GPL (LGPL).
In adherence with the terms of the GPL, any changes that have been made to other people’s GPLor LGPL licensed code in the creation of SmoothWall Express are published by the SmoothWallExpress open source project team via the http://www.smoothwall.org/ web site. All program codespecifically written for SmoothWall Express is also available from the web site. You canreproduce, modify or distribute any of this code without payment of any royalty or fees – but youare expected to publish any changes that you make so that other may benefit, especially if youdistribute your changed code to other people.
Open source is not shareware and vice versa. Shareware may be available ‘free of charge’, withoutroyalties or fees but the whole source code of the software is not usually made freely available toyou, unlike open source. The confusion is a result of the English language having two meaningsfor the word free, as in free of charge and free as in liberty (free to do what you want).
Your use and installation of SmoothWall Express acknowledges your acceptance of the terms of the GPL.
You are encouraged to participate in and support the open source movement. The Free SoftwareFoundation (FSF) is generally seen as the champion of the open source movement and you areencouraged to support their efforts to promote and defend open source.
Need some help?Support for SmoothWall Express is provided by way of mailing lists and forums accessible byvisiting: http://community.smoothwall.org/
This support is provided on an entirely voluntary basis by members of the SmoothWall Expressopen source community. Nobody is paid to provide support for SmoothWall Express. Thus, theSmoothWall Express open source project team cannot be held responsible for the quality,accuracy or timeliness of the information provided by the volunteers who are kind enough to offertheir time and knowledge to the benefit of others.
For those users, particularly commercial users, who want professional support, we recommend theuse of SmoothWall Limited’s commercial products which are fully supported by bothSmoothWall Limited and its world-wide network of resellers. For further details see SmoothWallLimited’s web site at: http://www.smoothwall.net/
8/6/2019 Smooth Wall Express 3 Installation Guide V2
http://slidepdf.com/reader/full/smooth-wall-express-3-installation-guide-v2 9/40
5
V e r s
i o n
1
Chapter 2
Installing SmoothWall ExpressIn this chapter:
• Warning!
• Program messages and conventions
• How to install SmoothWall Express.
Warning!Do not install SmoothWall Express on your main or only workstation – all data on theworkstation’s hard disk will be lost.
Installing SmoothWall Express ERASES ALL DATAfrom the workstation’s hard disk. Before you startthe installation, ensure that all valuable data is safely backed up.
SmoothWall Limited cannot be held responsible for any loss of data.
Messages and ConventionsSmoothWall Express’s installation and initial setup programs use a text-based interface that iscompatible with all types of graphic card.
The following keyboard controls are used to interact with the programs:
The following on-screen buttons are used throughout the installation and setup process:
Key Explanation
Arrows Move the cursor/focus/highlight between options.
Tab Advances the focus to the next screen object.
Space Clicks a button if it has the focus.
Enter or Return Clicks a button if it has the focus.
Clicks Ok if the focus is not currently on a button.
Button Explanation
Cancel Exits the current section of the installation or setup process without saving oractivating any changes.
If the Setup program is being run as part of the first-time setup process, the Cancelbutton will exit the setup program and require the installation process to be restarted.
Done Indicates that configuration of the current feature is complete. Changes will be savedand activated and control will return to the menu or installation procedure.
8/6/2019 Smooth Wall Express 3 Installation Guide V2
http://slidepdf.com/reader/full/smooth-wall-express-3-installation-guide-v2 10/40
Installing SmoothWall ExpressInstalling SmoothWall Express
6
V e r s
i o n
1
Installing SmoothWall ExpressSmoothWall Express’s install is designed to run on a workstation with a bootable CD-ROM drive.It automatically checks the workstation and hardware components and installs SmoothWallExpress accordingly.
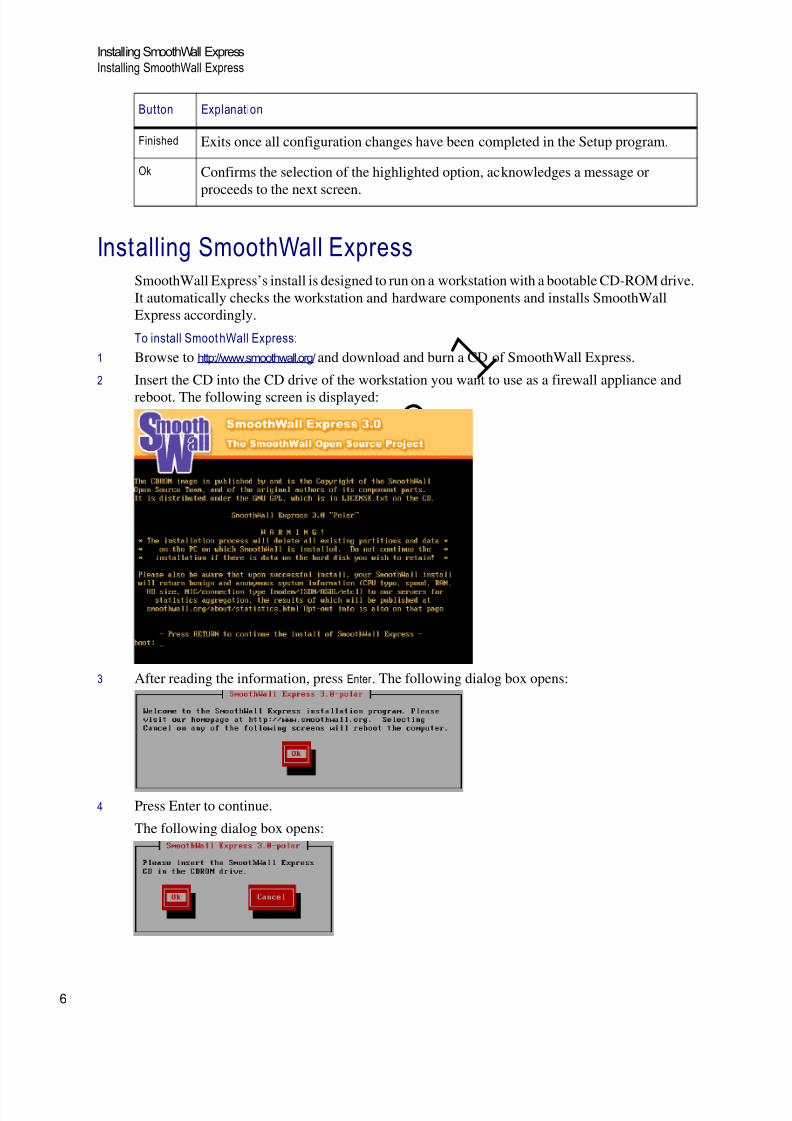
To install Smoot hWall Express:1 Browse to http://www.smoothwall.org/ and download and burn a CD of SmoothWall Express.
2 Insert the CD into the CD drive of the workstation you want to use as a firewall appliance andreboot. The following screen is displayed:
3 After reading the information, press Enter . The following dialog box opens:
4 Press Enter to continue.
The following dialog box opens:
Finished Exits once all configuration changes have been completed in the Setup program.
Ok Confirms the selection of the highlighted option, acknowledges a message or
proceeds to the next screen.
Button Explanation
8/6/2019 Smooth Wall Express 3 Installation Guide V2
http://slidepdf.com/reader/full/smooth-wall-express-3-installation-guide-v2 11/40
7
SmoothWall ExpressInstallation Guide
V e r s
i o n
1
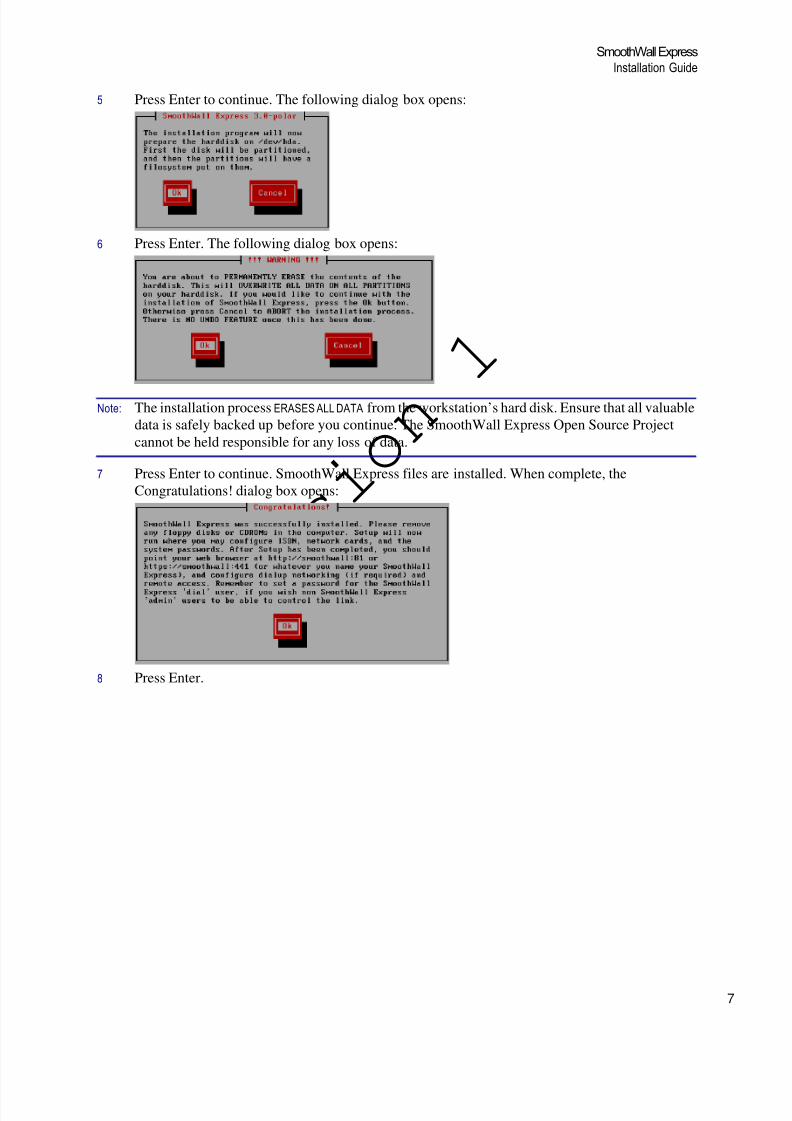
5 Press Enter to continue. The following dialog box opens:
6 Press Enter. The following dialog box opens:
Note: The installation process ERASES ALL DATAfrom the workstation’s hard disk. Ensure that all valuabledata is safely backed up before you continue. The SmoothWall Express Open Source Projectcannot be held responsible for any loss of data.
7 Press Enter to continue. SmoothWall Express files are installed. When complete, theCongratulations! dialog box opens:
8 Press Enter.

8/6/2019 Smooth Wall Express 3 Installation Guide V2
http://slidepdf.com/reader/full/smooth-wall-express-3-installation-guide-v2 12/40
Installing SmoothWall ExpressInstalling SmoothWall Express
8
V e r s
i o n
1
The following dialog box opens:
Note: If you select Yes here, you access upgrade and restore options for existing SmoothWall Expresssystems. For information on upgrading SmoothWall Express, see Chapter 3, Upgrading toSmoothWall Express on page 17 .
9 Select No and press Enter to start configuring your new installation of SmoothWall Express. TheKeyboard mapping dialog box opens:
10 Select your keyboard type and press Enter to continue. The Hostname dialog box opens:
Here you can specify a hostname for SmoothWall Express.
Note: We recommend that you only use lowercase characters in the hostname.
• You can use hyphens ‘-’ and dots ‘.’.
• You cannot use numbers, spaces, underscores ‘_’ or any other wildcard or punctuation charactersexcept ‘.’.
The default hostname is smoothwall . If you have multiple SmoothWall Express systems, useunique hostnames.
11 If you want to use a different hostname, enter it. Select Ok and press Enter to continue.
8/6/2019 Smooth Wall Express 3 Installation Guide V2
http://slidepdf.com/reader/full/smooth-wall-express-3-installation-guide-v2 13/40
9
SmoothWall ExpressInstallation Guide
V e r s
i o n
1
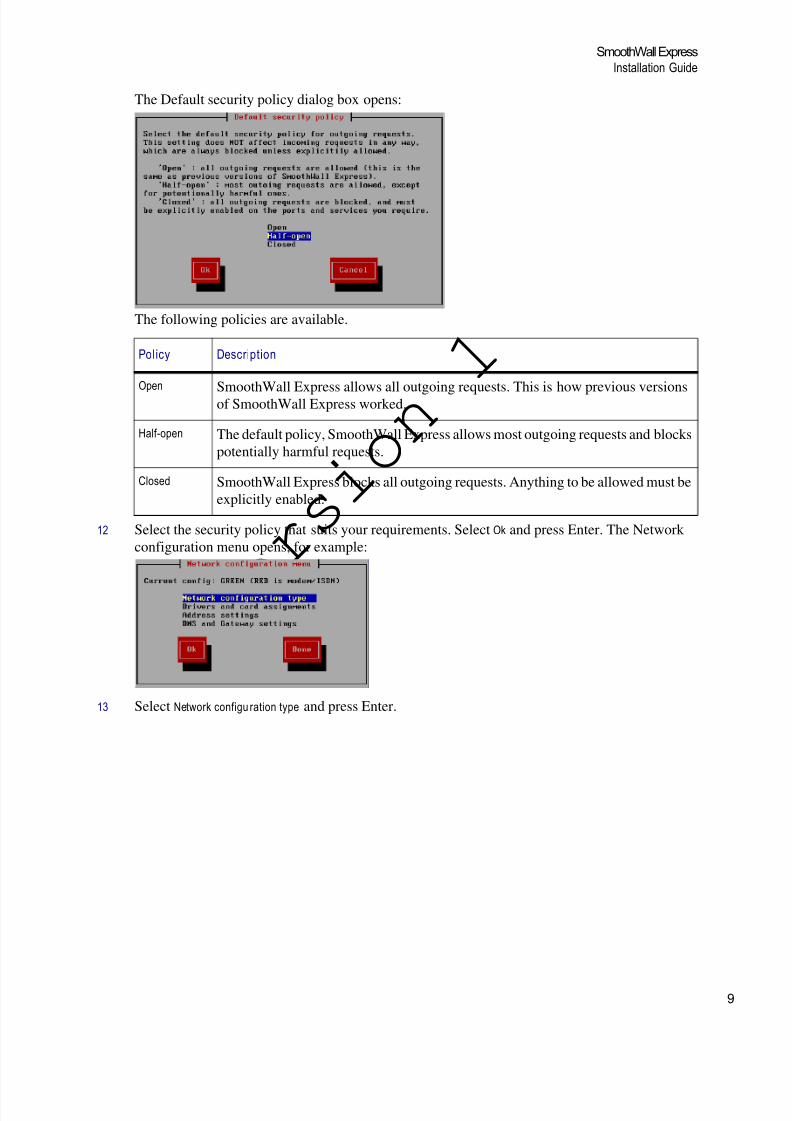
The Default security policy dialog box opens:
The following policies are available.
12 Select the security policy that suits your requirements. Select Ok and press Enter. The Network configuration menu opens, for example:
13 Select Network configu ration typeand press Enter.
Policy Description
OpenSmoothWall Express allows all outgoing requests. This is how previous versionsof SmoothWall Express worked.
Half-open The default policy, SmoothWall Express allows most outgoing requests and blockspotentially harmful requests.
Closed SmoothWall Express blocks all outgoing requests. Anything to be allowed must beexplicitly enabled.
8/6/2019 Smooth Wall Express 3 Installation Guide V2
http://slidepdf.com/reader/full/smooth-wall-express-3-installation-guide-v2 14/40
Installing SmoothWall ExpressInstalling SmoothWall Express
10
V e r s
i o n
1
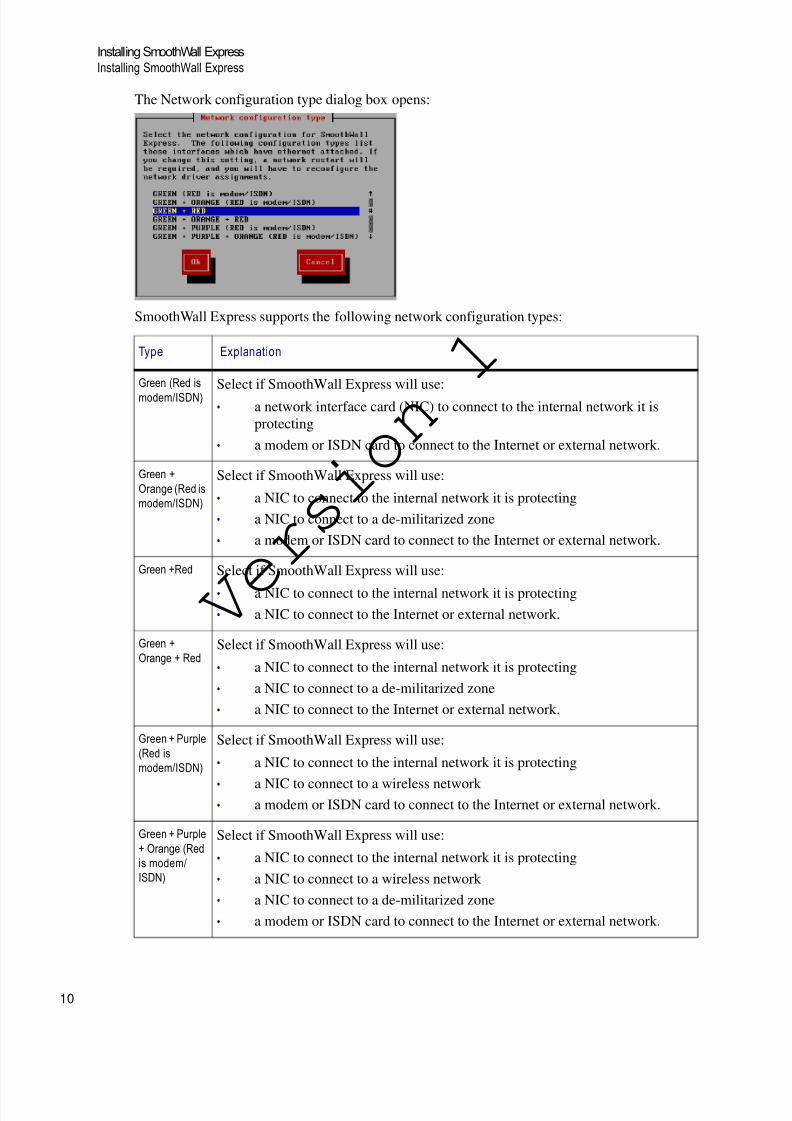
The Network configuration type dialog box opens:
SmoothWall Express supports the following network configuration types:
Type Explanation
Green (Red ismodem/ISDN)
Select if SmoothWall Express will use:
• a network interface card (NIC) to connect to the internal network it isprotecting
• a modem or ISDN card to connect to the Internet or external network.
Green +Orange (Red ismodem/ISDN)
Select if SmoothWall Express will use:
• a NIC to connect to the internal network it is protecting• a NIC to connect to a de-militarized zone• a modem or ISDN card to connect to the Internet or external network.
Green +Red Select if SmoothWall Express will use:
• a NIC to connect to the internal network it is protecting• a NIC to connect to the Internet or external network.
Green +Orange + Red
Select if SmoothWall Express will use:
• a NIC to connect to the internal network it is protecting• a NIC to connect to a de-militarized zone• a NIC to connect to the Internet or external network.
Green + Purple(Red ismodem/ISDN)
Select if SmoothWall Express will use:
• a NIC to connect to the internal network it is protecting
• a NIC to connect to a wireless network • a modem or ISDN card to connect to the Internet or external network.
Green + Purple+ Orange (Redis modem/ISDN)
Select if SmoothWall Express will use:
• a NIC to connect to the internal network it is protecting• a NIC to connect to a wireless network • a NIC to connect to a de-militarized zone• a modem or ISDN card to connect to the Internet or external network.
8/6/2019 Smooth Wall Express 3 Installation Guide V2
http://slidepdf.com/reader/full/smooth-wall-express-3-installation-guide-v2 15/40
11
SmoothWall ExpressInstallation Guide
V e r s
i o n
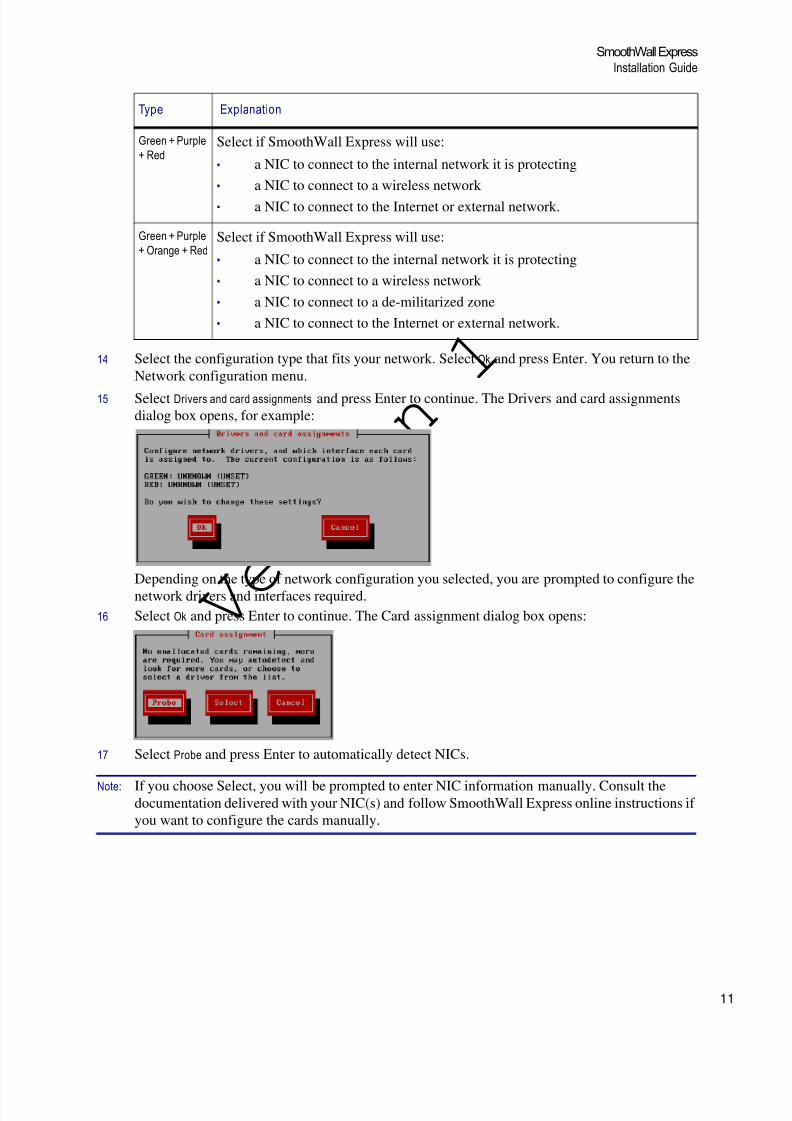
114 Select the configuration type that fits your network. Select Ok and press Enter. You return to theNetwork configuration menu.
15 Select Drivers and card assignments and press Enter to continue. The Drivers and card assignmentsdialog box opens, for example:
Depending on the type of network configuration you selected, you are prompted to configure thenetwork drivers and interfaces required.
16 Select Ok and press Enter to continue. The Card assignment dialog box opens:
17 Select Probe and press Enter to automatically detect NICs.
Note: If you choose Select, you will be prompted to enter NIC information manually. Consult thedocumentation delivered with your NIC(s) and follow SmoothWall Express online instructions if you want to configure the cards manually.
Green + Purple+ Red
Select if SmoothWall Express will use:
• a NIC to connect to the internal network it is protecting• a NIC to connect to a wireless network • a NIC to connect to the Internet or external network.
Green + Purple+ Orange + Red
Select if SmoothWall Express will use:
• a NIC to connect to the internal network it is protecting• a NIC to connect to a wireless network • a NIC to connect to a de-militarized zone• a NIC to connect to the Internet or external network.
Type Explanation
8/6/2019 Smooth Wall Express 3 Installation Guide V2
http://slidepdf.com/reader/full/smooth-wall-express-3-installation-guide-v2 16/40
Installing SmoothWall ExpressInstalling SmoothWall Express
12
V e r s
i o n
1
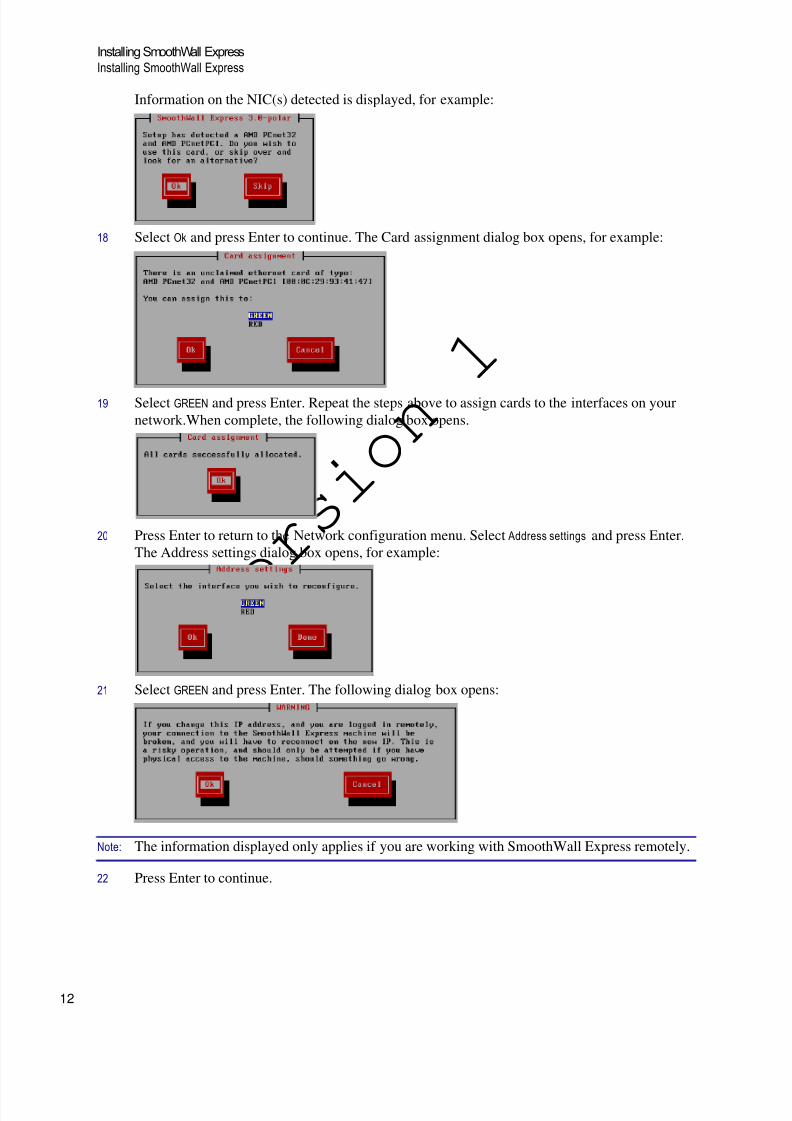
Information on the NIC(s) detected is displayed, for example:
18 Select Ok and press Enter to continue. The Card assignment dialog box opens, for example:
19 Select GREENand press Enter. Repeat the steps above to assign cards to the interfaces on yournetwork.When complete, the following dialog box opens.
20 Press Enter to return to the Network configuration menu. Select Address settings and press Enter.The Address settings dialog box opens, for example:
21 Select GREENand press Enter. The following dialog box opens:
Note: The information displayed only applies if you are working with SmoothWall Express remotely.
22 Press Enter to continue.
8/6/2019 Smooth Wall Express 3 Installation Guide V2
http://slidepdf.com/reader/full/smooth-wall-express-3-installation-guide-v2 17/40
13
SmoothWall ExpressInstallation Guide
V e r s
i o n
1
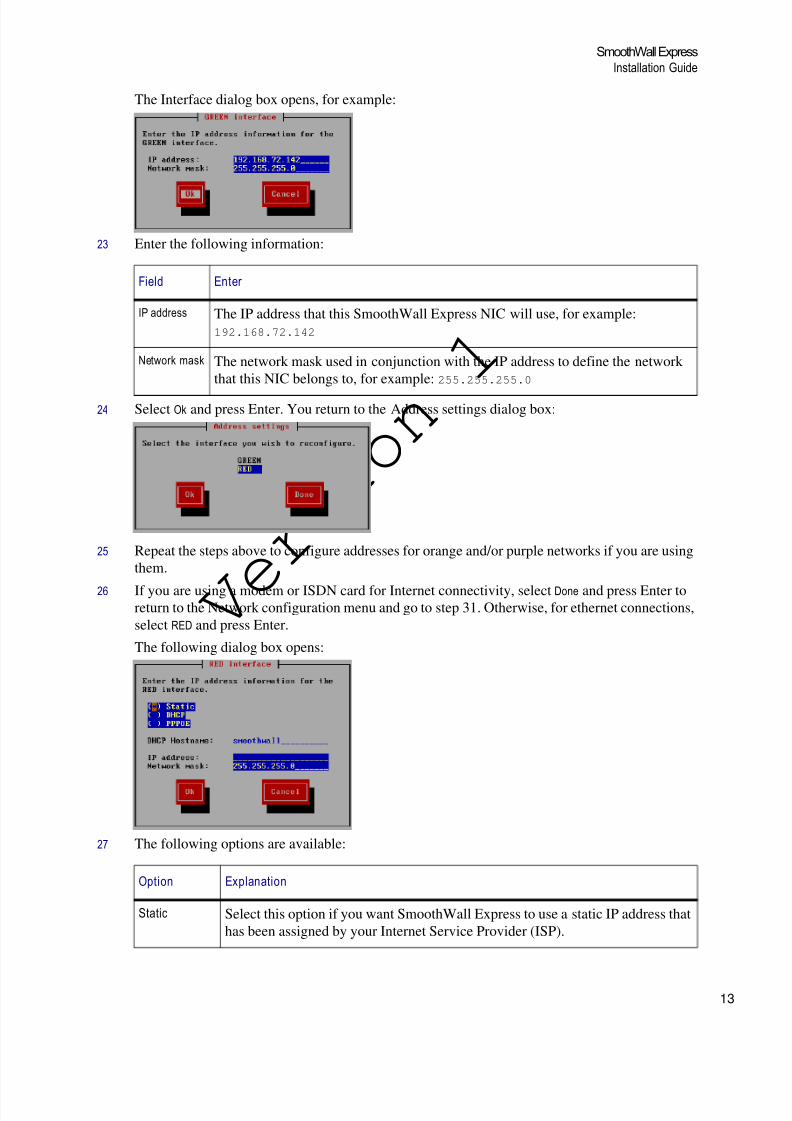
The Interface dialog box opens, for example:
23 Enter the following information:
24 Select Ok and press Enter. You return to the Address settings dialog box:
25 Repeat the steps above to configure addresses for orange and/or purple networks if you are usingthem.
26 If you are using a modem or ISDN card for Internet connectivity, select Done and press Enter toreturn to the Network configuration menu and go to step 31 . Otherwise, for ethernet connections,select RED and press Enter.
The following dialog box opens:
27 The following options are available:
Field Enter
IP address The IP address that this SmoothWall Express NIC will use, for example:192.168.72.142
Network mask The network mask used in conjunction with the IP address to define the network that this NIC belongs to, for example: 255.255.255.0
Option Explanation
Static Select this option if you want SmoothWall Express to use a static IP address thathas been assigned by your Internet Service Provider (ISP).
8/6/2019 Smooth Wall Express 3 Installation Guide V2
http://slidepdf.com/reader/full/smooth-wall-express-3-installation-guide-v2 18/40
Installing SmoothWall ExpressInstalling SmoothWall Express
14
V e r s
i o n
128 When complete, select Ok and press Enter. In the Address settings dialog box, select Done and pressEnter.
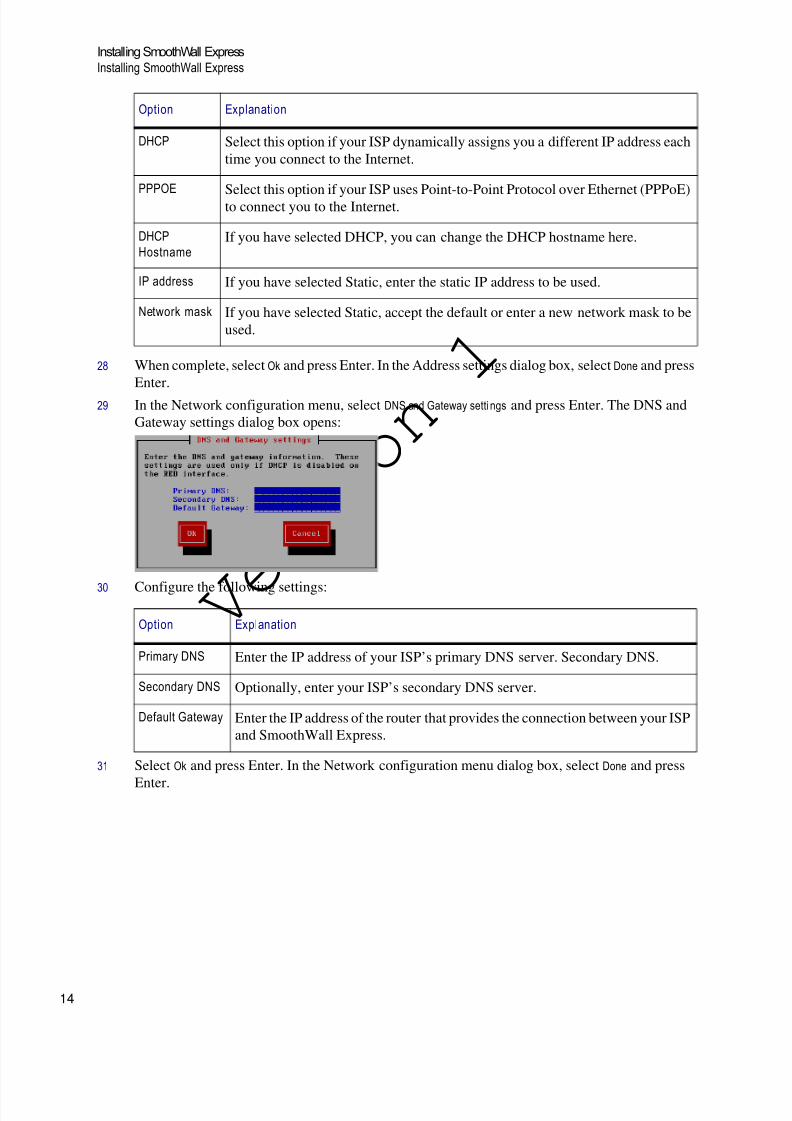
29 In the Network configuration menu, select DNS and Gateway settingsand press Enter. The DNS andGateway settings dialog box opens:
30 Configure the following settings:
31 Select Ok and press Enter. In the Network configuration menu dialog box, select Done and press
Enter.
DHCP Select this option if your ISP dynamically assigns you a different IP address eachtime you connect to the Internet.
PPPOESelect this option if your ISP uses Point-to-Point Protocol over Ethernet (PPPoE)to connect you to the Internet.
DHCPHostname
If you have selected DHCP, you can change the DHCP hostname here.
IP address If you have selected Static, enter the static IP address to be used.
Network mask If you have selected Static, accept the default or enter a new network mask to beused.
Option Explanation
Primary DNS Enter the IP address of your ISP’s primary DNS server. Secondary DNS.
Secondary DNS Optionally, enter your ISP’s secondary DNS server.
Default Gateway Enter the IP address of the router that provides the connection between your ISPand SmoothWall Express.
Option Explanation
8/6/2019 Smooth Wall Express 3 Installation Guide V2
http://slidepdf.com/reader/full/smooth-wall-express-3-installation-guide-v2 19/40
15
SmoothWall ExpressInstallation Guide
V e r s
i o n
1
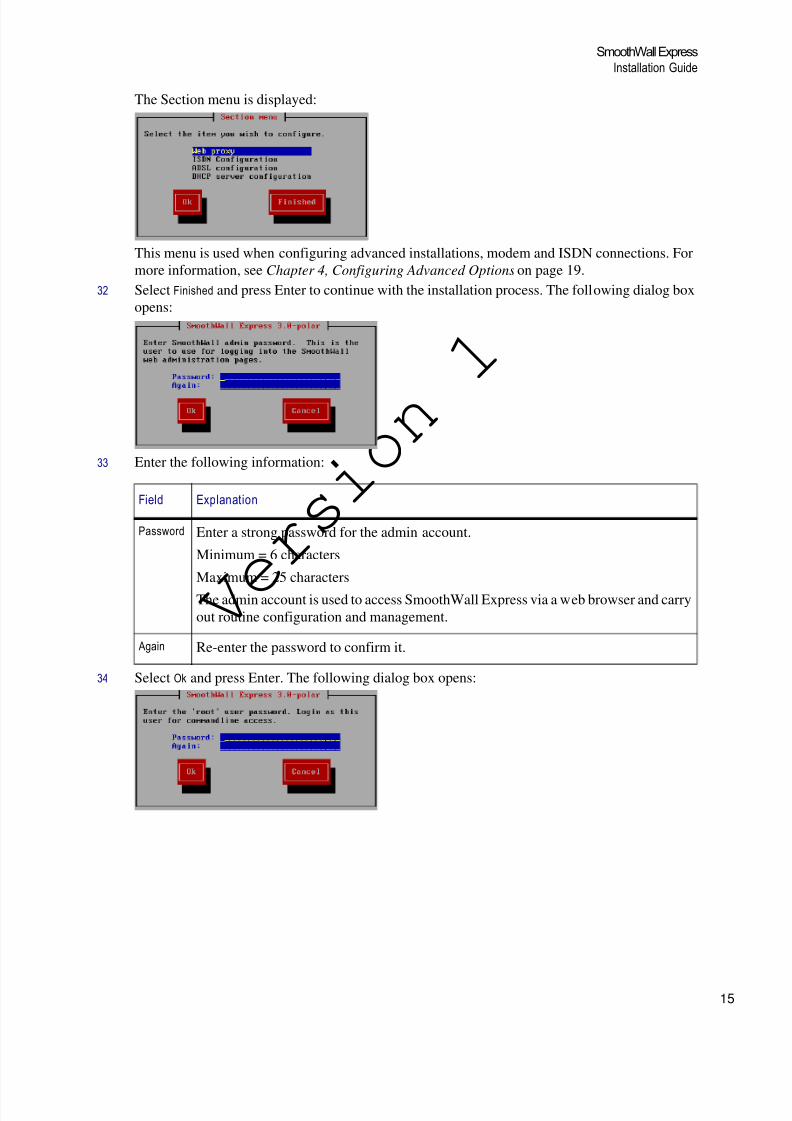
The Section menu is displayed:
This menu is used when configuring advanced installations, modem and ISDN connections. Formore information, see Chapter 4, Configuring Advanced Options on page 19 .
32 Select Finished and press Enter to continue with the installation process. The following dialog boxopens:
33 Enter the following information:
34 Select Ok and press Enter. The following dialog box opens:
Field Explanation
Password Enter a strong password for the admin account.
Minimum = 6 characters
Maximum = 25 characters
The admin account is used to access SmoothWall Express via a web browser and carryout routine configuration and management.
Again Re-enter the password to confirm it.
8/6/2019 Smooth Wall Express 3 Installation Guide V2
http://slidepdf.com/reader/full/smooth-wall-express-3-installation-guide-v2 20/40
Installing SmoothWall ExpressInstalling SmoothWall Express
16
V e r s
i o n
1
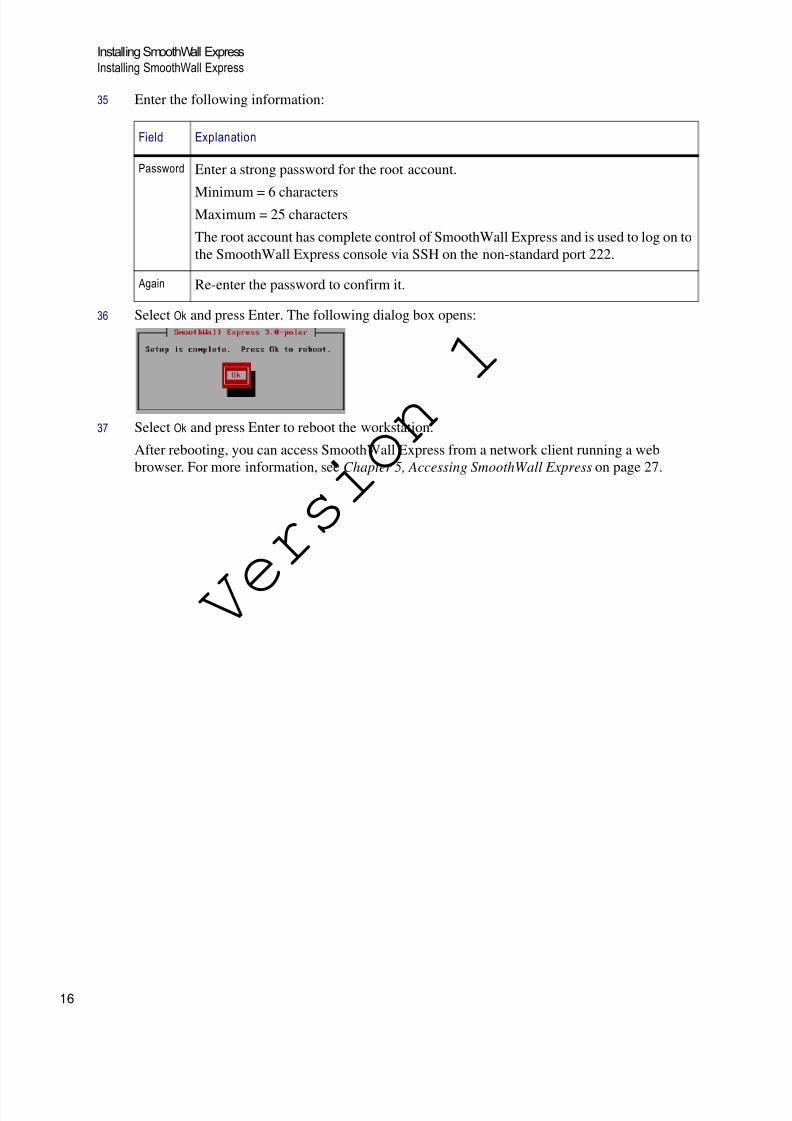
35 Enter the following information:
36 Select Ok and press Enter. The following dialog box opens:
37 Select Ok and press Enter to reboot the workstation.
After rebooting, you can access SmoothWall Express from a network client running a webbrowser. For more information, see Chapter 5, Accessing SmoothWall Express on page 27 .
Field Explanation
Password Enter a strong password for the root account.
Minimum = 6 charactersMaximum = 25 characters
The root account has complete control of SmoothWall Express and is used to log on tothe SmoothWall Express console via SSH on the non-standard port 222.
Again Re-enter the password to confirm it.
8/6/2019 Smooth Wall Express 3 Installation Guide V2
http://slidepdf.com/reader/full/smooth-wall-express-3-installation-guide-v2 21/40
17
V e r s
i o n
1
Chapter 3
Upgrading to SmoothWall ExpressIn this chapter:
• How to upgrade from an earlier version of SmoothWall Express by installing the latest versionand re-using the settings from your current SmoothWall Express.
PrerequisitesIn order to upgrade from an earlier version of a SmoothWall system, you must have:
• An archive containing the settings you want to use in the new version, see the Administrator’sGuide delivered with your current SmoothWall system for information on how to archive settingsfor upgrades
• Carried out the initial SmoothWall Express installation, see Chapter 2, Installing SmoothWall Express on page 5 for more information.
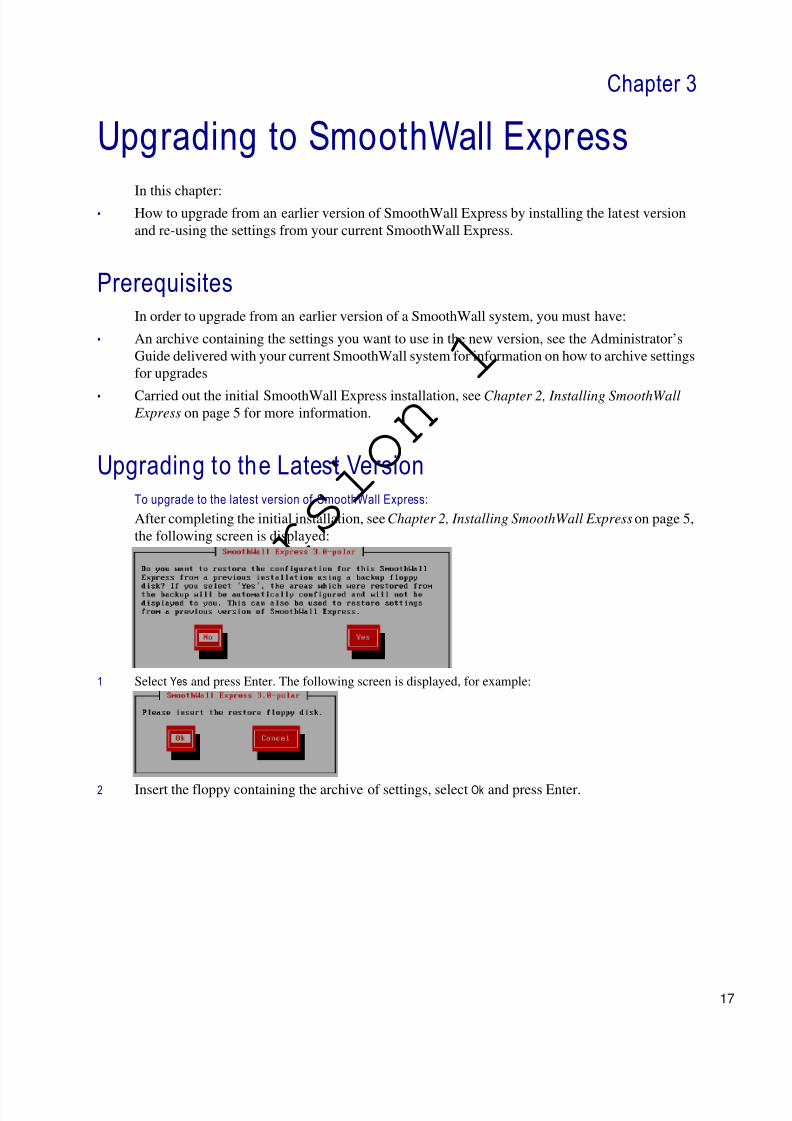
Upgrading to the Latest VersionTo upgrade to the latest version of SmoothWall Express:After completing the initial installation, see Chapter 2, Installing SmoothWall Express on page 5,the following screen is displayed:
1 Select Yes and press Enter. The following screen is displayed, for example:
2 Insert the floppy containing the archive of settings, select Ok and press Enter.

8/6/2019 Smooth Wall Express 3 Installation Guide V2
http://slidepdf.com/reader/full/smooth-wall-express-3-installation-guide-v2 22/40
Upgrading to SmoothWall ExpressUpgrading to the Latest Version
18
V e r s
i o n
1
The Select backup screen is displayed, for example:
3 Select Ok and press Enter. The following screen is displayed:
4 Select Ok, remove the floppy and press Enter. The installation program deploys your existingsettings to the latest version of SmoothWall Express and displays the Keyboard mapping screen:
5 See Chapter 2, Installing SmoothWall Express on page 5 for information on how to completeupgrading SmoothWall Express.
8/6/2019 Smooth Wall Express 3 Installation Guide V2
http://slidepdf.com/reader/full/smooth-wall-express-3-installation-guide-v2 23/40
19
V e r s
i o n
1
Chapter 4
Configuring Advanced OptionsIn this chapter:
• Configuring web proxy settings if required by your ISP
• Configuring ISDN, ADSL and DHCP settings.
Configuring Web Proxy SettingsNote: As the majority of Internet Service Providers (ISPs) do not use web proxy servers, it is unlikely
that you will need to make changes on this screen. If your ISP does use a proxy server, you shouldalready be aware of the configuration details. If you do not, consult your ISP.
Some ISPs require you to connect to the Internet via a web proxy server. The Setup program’sWeb proxy option enables you to configure SmoothWall Express to use such a proxy server. Thisensures that SmoothWall Express will be able to connect to the Internet, register itself anddownload any updates available from SmoothWall Limited.
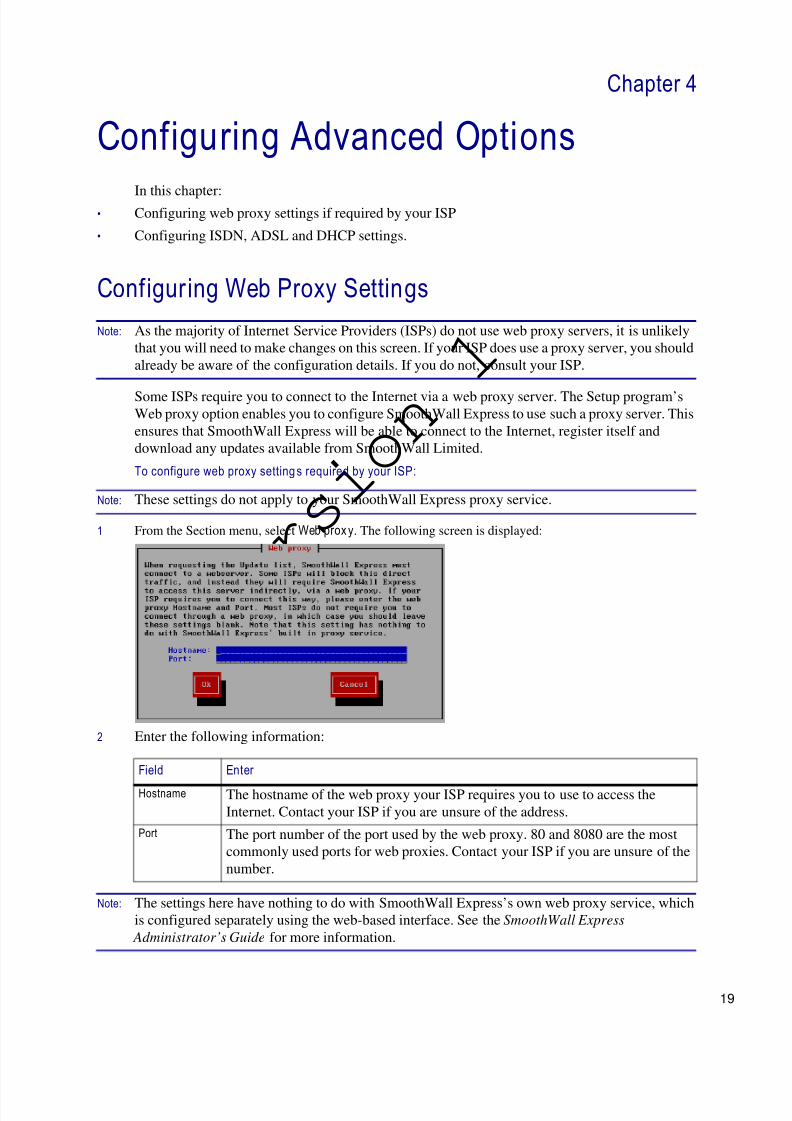
To configure web proxy setting s required by your ISP:
Note: These settings do not apply to your SmoothWall Express proxy service.
1 From the Section menu, select Web prox y. The following screen is displayed:
2 Enter the following information:
Note: The settings here have nothing to do with SmoothWall Express’s own web proxy service, whichis configured separately using the web-based interface. See the SmoothWall Express
Administrator’s Guide for more information.
Field Enter
Hostname The hostname of the web proxy your ISP requires you to use to access theInternet. Contact your ISP if you are unsure of the address.
Port The port number of the port used by the web proxy. 80 and 8080 are the mostcommonly used ports for web proxies. Contact your ISP if you are unsure of thenumber.
8/6/2019 Smooth Wall Express 3 Installation Guide V2
http://slidepdf.com/reader/full/smooth-wall-express-3-installation-guide-v2 24/40
Configuring Advanced OptionsEnabling ISDN
20
V e r s
i o n
1
3 Select Ok to return to the Section menu. To continue with the Setup program, select anotherSection menu option and press Enter. To end the Setup program, select Finishedand press Enter.
If you have finished with the Setup program, the next step is to set administration accountpasswords. For more information, see Chapter 2, Installing SmoothWall Express on page 5 .
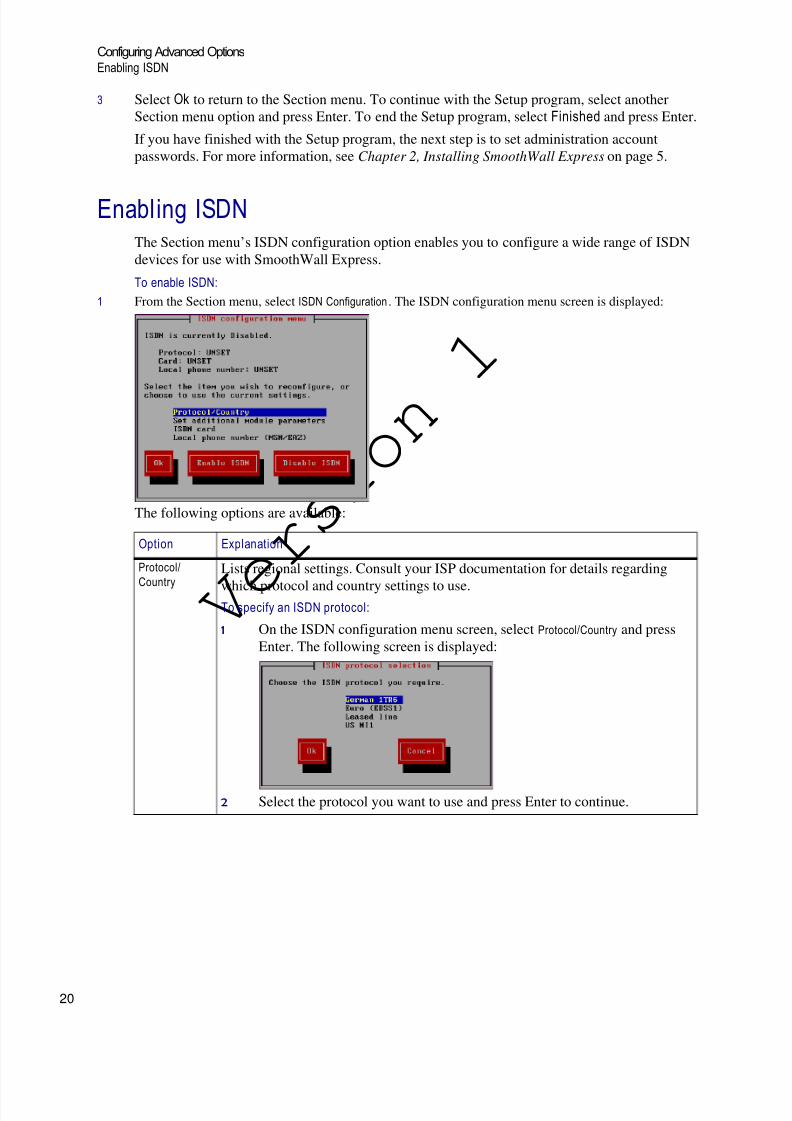
Enabling ISDNThe Section menu’s ISDN configuration option enables you to configure a wide range of ISDNdevices for use with SmoothWall Express.
To enable ISDN:1 From the Section menu, select ISDN Configuration. The ISDN configuration menu screen is displayed:
The following options are available:
Option Explanation
Protocol/Country
Lists regional settings. Consult your ISP documentation for details regarding
which protocol and country settings to use.To specify an ISDN protocol:
1 On the ISDN configuration menu screen, select Protocol/Countryand pressEnter. The following screen is displayed:
2 Select the protocol you want to use and press Enter to continue.
8/6/2019 Smooth Wall Express 3 Installation Guide V2
http://slidepdf.com/reader/full/smooth-wall-express-3-installation-guide-v2 25/40
21
SmoothWall ExpressInstallation Guide
V e r s
i o n
1
Set additionalmoduleparameters
Sets additional address information for legacy ISDN devices. Refer to your ISDNdevice to determine if additional parameters need to be set.To set additio nal parameters:
1 On the ISDN configuration menu screen, select Set additional module parameters and press Enter. The following screen is displayed:
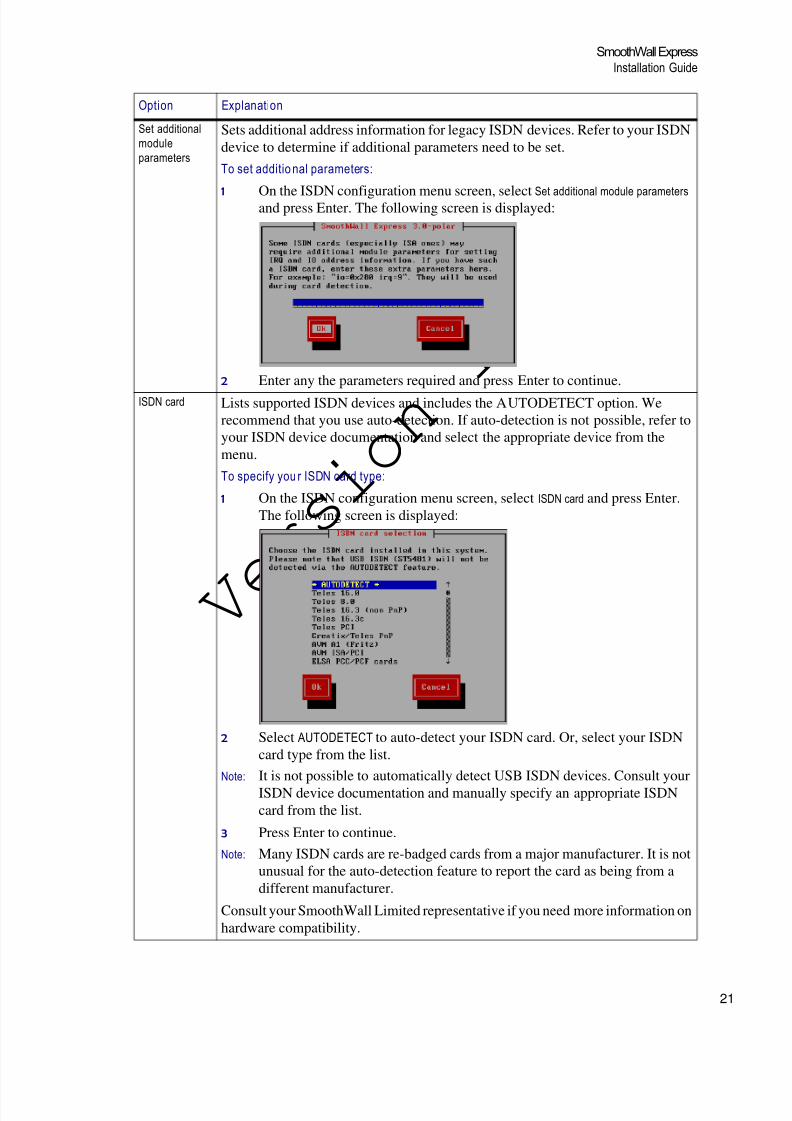
2 Enter any the parameters required and press Enter to continue.ISDN card Lists supported ISDN devices and includes the AUTODETECT option. We
recommend that you use auto-detection. If auto-detection is not possible, refer toyour ISDN device documentation and select the appropriate device from themenu.To specify you r ISDN card type:
1 On the ISDN configuration menu screen, select ISDN cardand press Enter.The following screen is displayed:
2 Select AUTODETECTto auto-detect your ISDN card. Or, select your ISDNcard type from the list.
Note: It is not possible to automatically detect USB ISDN devices. Consult yourISDN device documentation and manually specify an appropriate ISDNcard from the list.
3 Press Enter to continue.Note: Many ISDN cards are re-badged cards from a major manufacturer. It is not
unusual for the auto-detection feature to report the card as being from adifferent manufacturer.
Consult your SmoothWall Limited representative if you need more information onhardware compatibility.
Option Explanation
8/6/2019 Smooth Wall Express 3 Installation Guide V2
http://slidepdf.com/reader/full/smooth-wall-express-3-installation-guide-v2 26/40
Configuring Advanced OptionsEnabling ADSL
22
V e r s
i o n
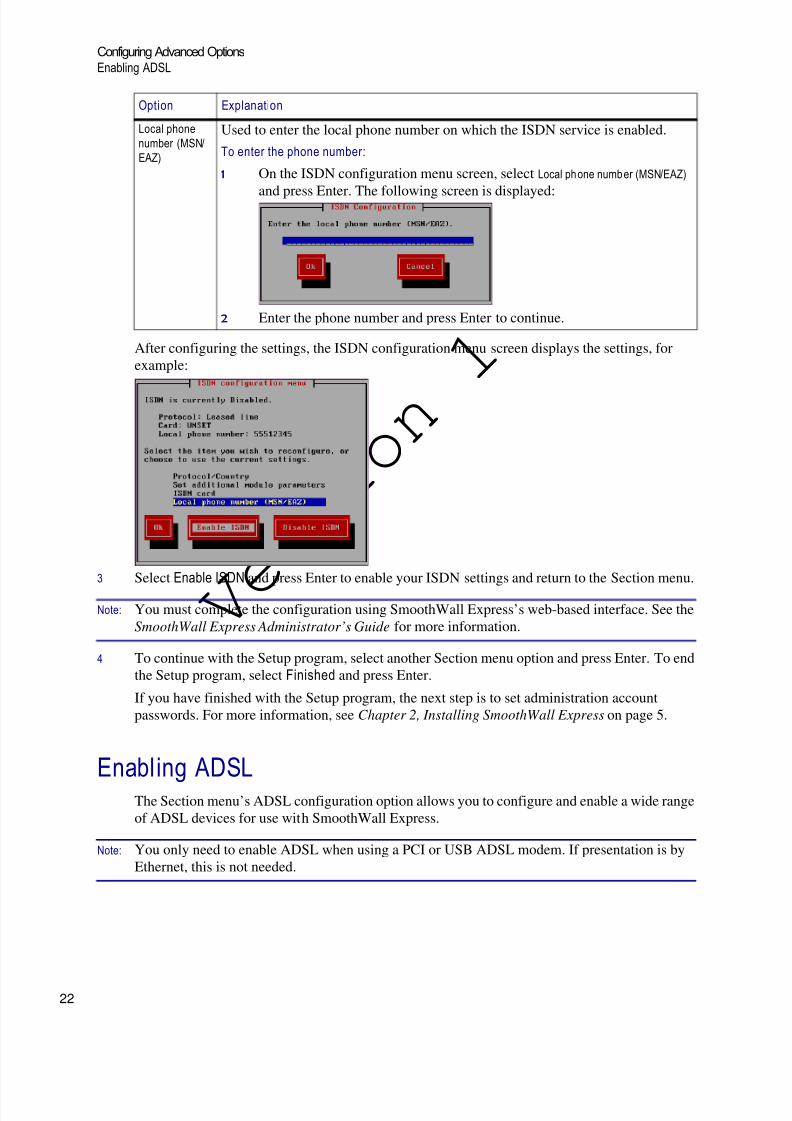
1After configuring the settings, the ISDN configuration menu screen displays the settings, forexample:
3 Select Enable ISDNand press Enter to enable your ISDN settings and return to the Section menu.
Note: You must complete the configuration using SmoothWall Express’s web-based interface. See theSmoothWall Express Administrator’s Guide for more information.
4 To continue with the Setup program, select another Section menu option and press Enter. To endthe Setup program, select Finishedand press Enter.
If you have finished with the Setup program, the next step is to set administration accountpasswords. For more information, see Chapter 2, Installing SmoothWall Express on page 5 .
Enabling ADSLThe Section menu’s ADSL configuration option allows you to configure and enable a wide rangeof ADSL devices for use with SmoothWall Express.
Note: You only need to enable ADSL when using a PCI or USB ADSL modem. If presentation is byEthernet, this is not needed.
Local phonenumber (MSN/EAZ)
Used to enter the local phone number on which the ISDN service is enabled.To enter the phone number:
1 On the ISDN configuration menu screen, select Local phone number (MSN/EAZ)
and press Enter. The following screen is displayed:
2 Enter the phone number and press Enter to continue.
Option Explanation
8/6/2019 Smooth Wall Express 3 Installation Guide V2
http://slidepdf.com/reader/full/smooth-wall-express-3-installation-guide-v2 27/40
23
SmoothWall ExpressInstallation Guide
V e r s
i o n
1
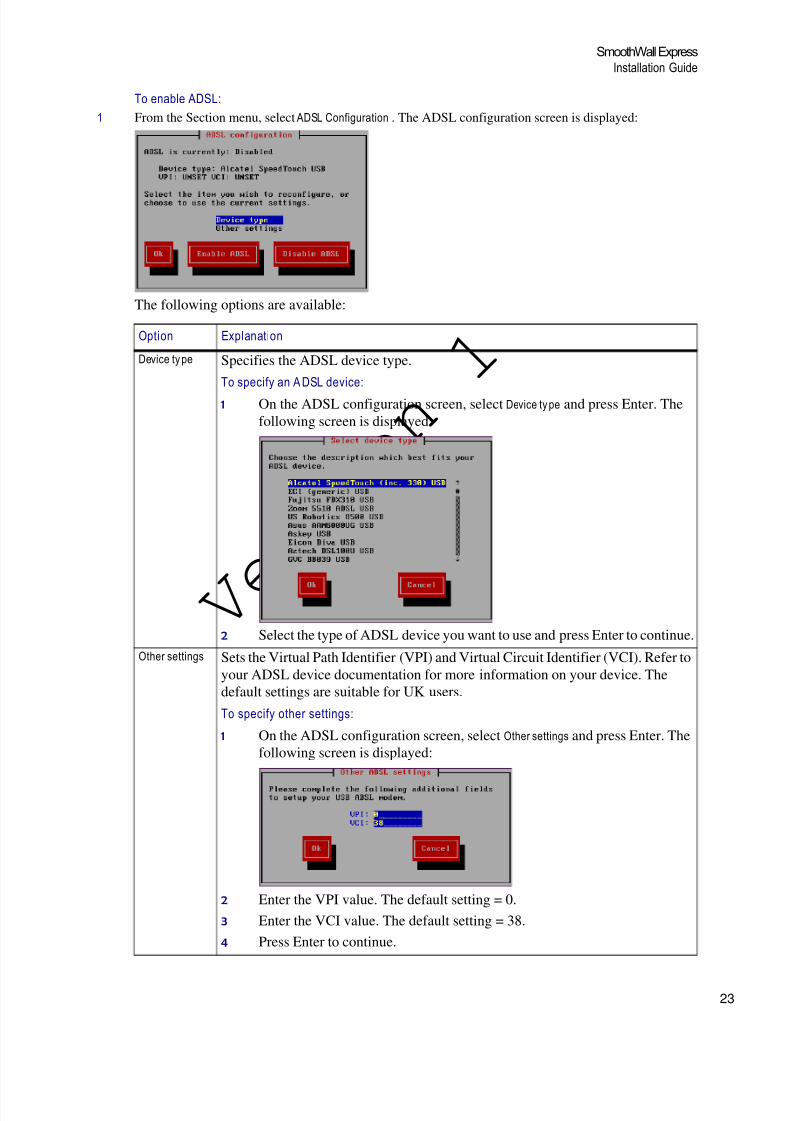
To enable ADSL:1 From the Section menu, select ADSL Configuration. The ADSL configuration screen is displayed:
The following options are available:
Option Explanation
Device type Specifies the ADSL device type.To specify an A DSL device:
1 On the ADSL configuration screen, select Device typeand press Enter. Thefollowing screen is displayed:
2 Select the type of ADSL device you want to use and press Enter to continue.Other settings Sets the Virtual Path Identifier (VPI) and Virtual Circuit Identifier (VCI). Refer to
your ADSL device documentation for more information on your device. Thedefault settings are suitable for UK users.To specify other settings:
1 On the ADSL configuration screen, select Other settings and press Enter. Thefollowing screen is displayed:
2 Enter the VPI value. The default setting = 0.3 Enter the VCI value. The default setting = 38.4 Press Enter to continue.
8/6/2019 Smooth Wall Express 3 Installation Guide V2
http://slidepdf.com/reader/full/smooth-wall-express-3-installation-guide-v2 28/40
Configuring Advanced OptionsEnabling DHCP
24
V e r s
i o n
1
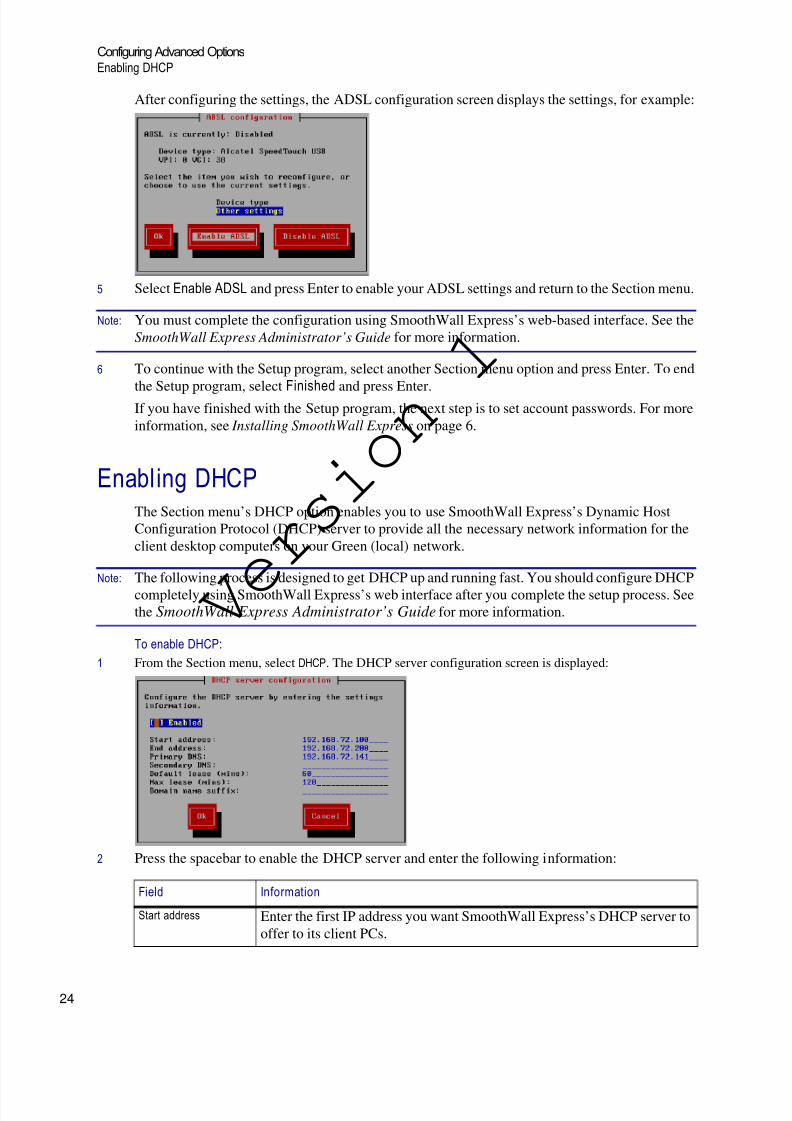
After configuring the settings, the ADSL configuration screen displays the settings, for example:
5 Select Enable ADSLand press Enter to enable your ADSL settings and return to the Section menu.
Note: You must complete the configuration using SmoothWall Express’s web-based interface. See theSmoothWall Express Administrator’s Guide for more information.
6 To continue with the Setup program, select another Section menu option and press Enter. To end
the Setup program, select Finishedand press Enter.If you have finished with the Setup program, the next step is to set account passwords. For moreinformation, see Installing SmoothWall Express on page 6 .
Enabling DHCPThe Section menu’s DHCP option enables you to use SmoothWall Express’s Dynamic HostConfiguration Protocol (DHCP) server to provide all the necessary network information for theclient desktop computers on your Green (local) network.
Note: The following process is designed to get DHCP up and running fast. You should configure DHCPcompletely using SmoothWall Express’s web interface after you complete the setup process. Seethe SmoothWall Express Administrator’s Guide for more information.
To enable DHCP:1 From the Section menu, select DHCP. The DHCP server configuration screen is displayed:
2 Press the spacebar to enable the DHCP server and enter the following information:
Field Information
Start address Enter the first IP address you want SmoothWall Express’s DHCP server tooffer to its client PCs.
8/6/2019 Smooth Wall Express 3 Installation Guide V2
http://slidepdf.com/reader/full/smooth-wall-express-3-installation-guide-v2 29/40
25
SmoothWall ExpressInstallation Guide
V e r s
i o n
1
3 After reviewing the information you have entered, select Ok and press Enter to return to theSection menu.
4 To continue with the Setup program, select another Section menu option and press Enter. To end
the Setup program, select Finishedand press Enter.
End address Enter the highest IP address that SmoothWall Express’s DHCP server willallocate.
Primary DNS SmoothWall Express also runs a DNS proxy server and can provide a DNSservice to all network clients that connect through it.
By default, the primary DNS is set to the IP address of the internal network connection you configured earlier.
You can accept this DNS or enter another DNS server, such as your ISP’s.Secondary DNS Optionally, enter the IP address of a second DNS server to use if the
primary DNS becomes unavailable.Default lease (mins) Enter the default lease time, in minutes, that a client PC can retain an IP
address provided by the DHCP server. Upon expiry of the lease, the clientPC has to re-request a new IP address. For most users, this field should beleft at its default value.
Max lease (mins)Enter the maximum lease time, in minutes, to specify the maximum lengthof time that a client PC can retain an IP address provided by the DHCPserver. Upon expiry of the lease, the client PC has to re-request a new IPaddress. For most users, this field should be left at its default value.
Domain name suffix Entering a domain name suffix entry allows you to define the domain namethat will be given to systems requesting an IP address.
For many small networks this field should be left blank.
Field Information

8/6/2019 Smooth Wall Express 3 Installation Guide V2
http://slidepdf.com/reader/full/smooth-wall-express-3-installation-guide-v2 30/40
Configuring Advanced OptionsEnabling DHCP
26
V e r s
i o n
1

8/6/2019 Smooth Wall Express 3 Installation Guide V2
http://slidepdf.com/reader/full/smooth-wall-express-3-installation-guide-v2 31/40
27
V e r s
i o n
1
Chapter 5
Accessing SmoothWall ExpressIn this chapter:
• How to access SmoothWall Express for the first time
• Connecting to the Internet if you are using a modem
• Checking for updates
• More resources.
Accessing SmoothWall Express for the First TimeNote: The examples in the following sections are illustrated using Mozilla Firefox. You can access and
administer SmoothWall Express using a browser of your choice.
To access SmoothWall Express for th e first time:1 In the browser of your choice, enter the address of your SmoothWall Express, for example: https://
192.168.72.142:441
Note: The example address uses HTTPS to ensure secure communication with SmoothWall Express.You can use HTTP on port 81 if you are satisfied with less security.
2 Accept SmoothWall Express’s certificate.
3 When prompted by your browser, enter the following information:
4 Click OK. The Control > home page opens. What is displayed on the Control > home page dependson how you have configured SmoothWall Express during installation.
Field Information
Username Enter admin. This is the name of the default SmoothWall Express administratoraccount.
Password Enter the password you specified for the admin account when installingSmoothWall Express.
8/6/2019 Smooth Wall Express 3 Installation Guide V2
http://slidepdf.com/reader/full/smooth-wall-express-3-installation-guide-v2 32/40
Accessing SmoothWall Express Accessing SmoothWall Express for the First Time
28
V e r s
i o n
1
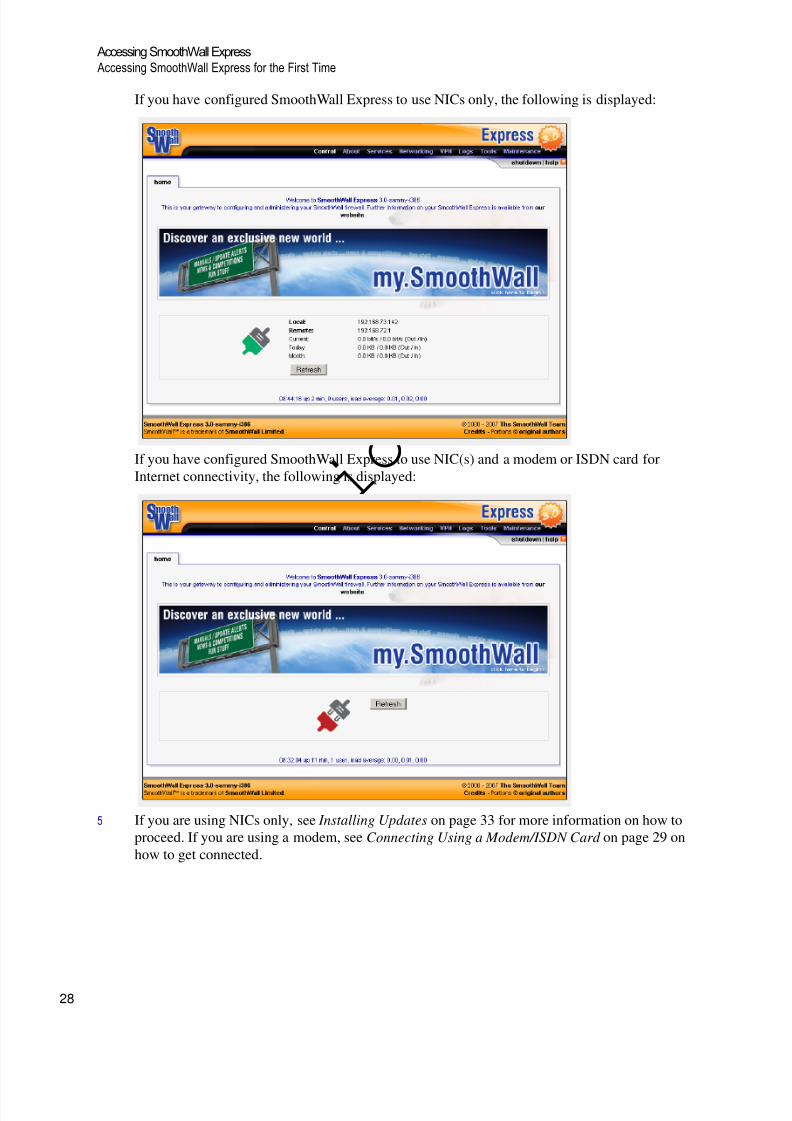
If you have configured SmoothWall Express to use NICs only, the following is displayed:
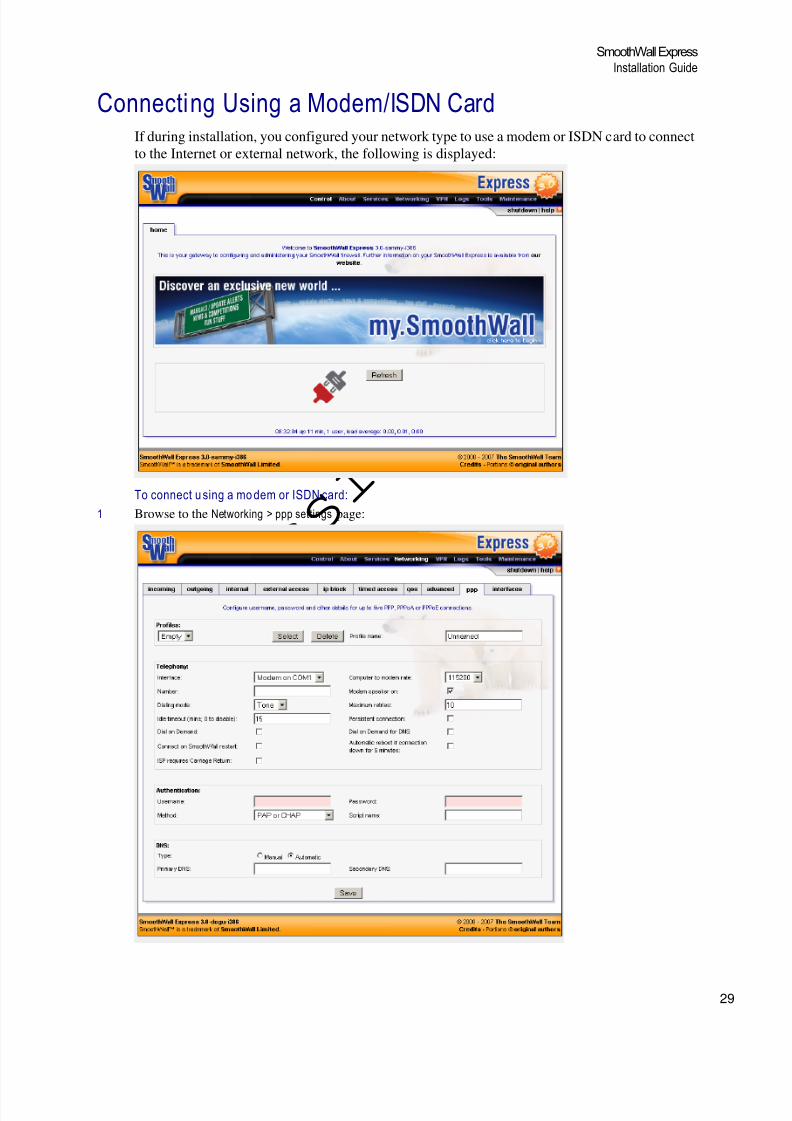
If you have configured SmoothWall Express to use NIC(s) and a modem or ISDN card forInternet connectivity, the following is displayed:
5 If you are using NICs only, see Installing Updates on page 33 for more information on how toproceed. If you are using a modem, see Connecting Using a Modem/ISDN Card on page 29 onhow to get connected.
8/6/2019 Smooth Wall Express 3 Installation Guide V2
http://slidepdf.com/reader/full/smooth-wall-express-3-installation-guide-v2 33/40
29
SmoothWall ExpressInstallation Guide
V e r s
i o n
1
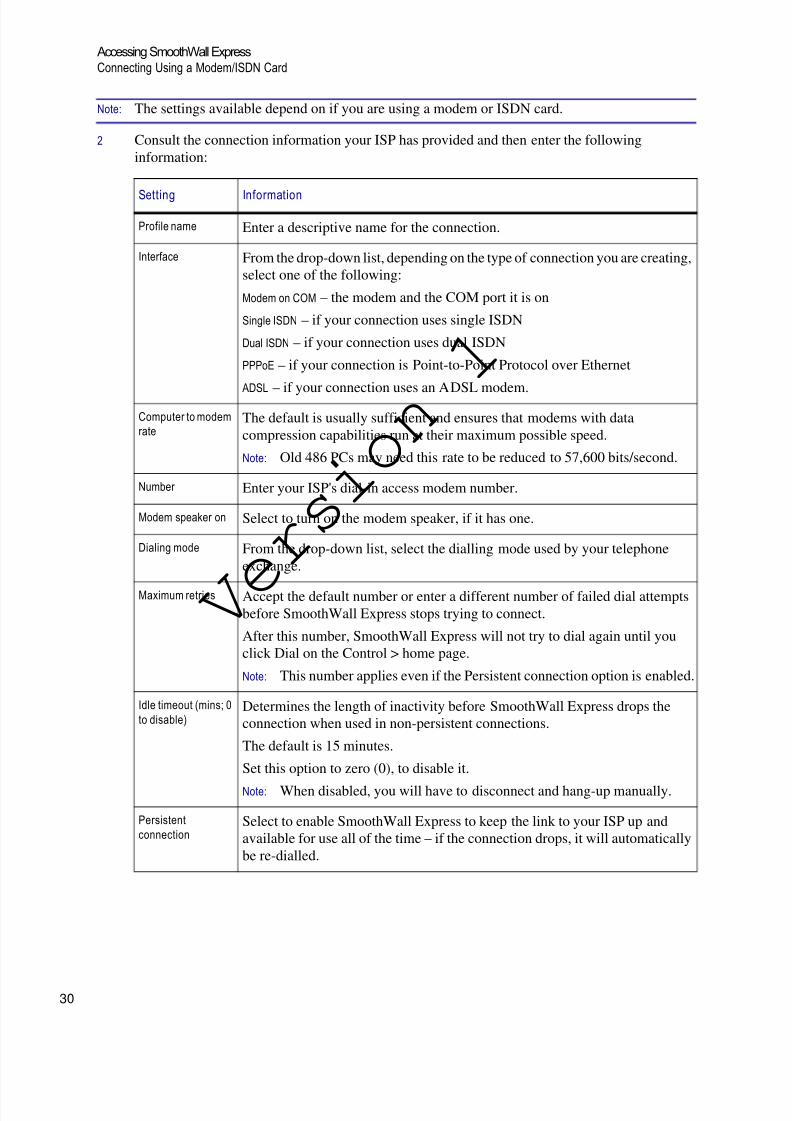
Connecting Using a Modem/ISDN CardIf during installation, you configured your network type to use a modem or ISDN card to connectto the Internet or external network, the following is displayed:
To connect u sing a mo dem or ISDN card:1 Browse to the Networking > ppp settingspage:
8/6/2019 Smooth Wall Express 3 Installation Guide V2
http://slidepdf.com/reader/full/smooth-wall-express-3-installation-guide-v2 34/40
Accessing SmoothWall ExpressConnecting Using a Modem/ISDN Card
30
V e r s
i o n
1
Note: The settings available depend on if you are using a modem or ISDN card.
2 Consult the connection information your ISP has provided and then enter the followinginformation:
Setting Information
Profile name Enter a descriptive name for the connection.
Interface From the drop-down list, depending on the type of connection you are creating,select one of the following:
Modem on COM– the modem and the COM port it is on
Single ISDN– if your connection uses single ISDN
Dual ISDN– if your connection uses dual ISDN
PPPoE – if your connection is Point-to-Point Protocol over Ethernet
ADSL– if your connection uses an ADSL modem.Computer to modemrate
The default is usually sufficient and ensures that modems with datacompression capabilities run at their maximum possible speed.
Note: Old 486 PCs may need this rate to be reduced to 57,600 bits/second.
Number Enter your ISP's dial-in access modem number.
Modem speaker on Select to turn on the modem speaker, if it has one.
Dialing mode From the drop-down list, select the dialling mode used by your telephoneexchange.
Maximum retries Accept the default number or enter a different number of failed dial attemptsbefore SmoothWall Express stops trying to connect.
After this number, SmoothWall Express will not try to dial again until youclick Dial on the Control > home page.
Note: This number applies even if the Persistent connection option is enabled.
Idle timeout (mins; 0to disable)
Determines the length of inactivity before SmoothWall Express drops theconnection when used in non-persistent connections.
The default is 15 minutes.
Set this option to zero (0), to disable it.
Note: When disabled, you will have to disconnect and hang-up manually.
Persistentconnection
Select to enable SmoothWall Express to keep the link to your ISP up andavailable for use all of the time – if the connection drops, it will automaticallybe re-dialled.
8/6/2019 Smooth Wall Express 3 Installation Guide V2
http://slidepdf.com/reader/full/smooth-wall-express-3-installation-guide-v2 35/40
31
SmoothWall ExpressInstallation Guide
V e r s
i o n
1
Dial on Demand Select to configure SmoothWall Express to automatically connect to the ISPdetailed in the current profile whenever a user on the network initiates aconnection to the Internet.
Note: If dial on demand is enabled and your Internet connection is charged ona per minute basis, you may get an unpleasant surprise when the nexttelephone bill arrives!
Note: You still have to click Connect on the Control > home page to startSmoothWall Express.
Dial on Demand for DNS
Select to configure SmoothWall Express to dial up to the Internet each time aDNS request is made by any machine on the local network – this can happena lot when reading e-mail with embedded HTML, for example.
Note: If not selected, SmoothWall Express will not dialup to the Internet eachtime a DNS request is made, but only when a specific connection isrequested. This is one simple way to help reduce telephone chargeswhen the ISP connection is one that is paid for on a per minute basis.
Connect onSmoothWall restart
Select to configure SmoothWall Express to automatically connect to the ISPafter being rebooted.
Automatic reboot if connection down for 5 minutes
Select to configure SmoothWall Express to automatically reboot if the Redinterface is detected as being down for 5 minutes.
This option is primarily intended for users of Alcatel USB ADSL modemswhich appear not to automatically reconnect in some circumstances.
Note: This option cannot be used in conjunction with Dial on Demand.
ISP requiresCarriage Return
Select this option if your ISP requires that the modem send a carriage return tosignal it has finished sending.
Service name For PPPoE connections, enter the name of the PPPoE service.
Concentrator name For PPPoE connections, enter the name of the PPPoE concentrator.
Keep secondchannel up
For ISDN connections, select this option to control the action of the seconddata channel for high-speed, 128Kbit access.
If the data throughput keeps changing, this may cause the ISDN channel to goup and down. Selecting this option will force the second channel to remain up,
instead of automatically closing once the data-rate decreases below a thresholdwhere the second channel is of no benefit.
Minimum time tokeep secondchannel up (sec)
For ISDN connections, select this option to stop the second channel repeatedlygoing up and down due to the threshold being exceeded for short periods of time.
You can enter a higher value to force the second channel to stay up for longer,so a momentary lull in the data traffic will not cause the second channel to godown.
Username Enter the username supplied by your ISP.
Setting Information

8/6/2019 Smooth Wall Express 3 Installation Guide V2
http://slidepdf.com/reader/full/smooth-wall-express-3-installation-guide-v2 36/40
Accessing SmoothWall ExpressConnecting Using a Modem/ISDN Card
32
V e r s
i o n
1
3 Click Save and browse to the Control > homepage:
4 Click Connect to connect SmoothWall Express to the Internet.
Password Enter the password supplied by your ISP.
Method Select one of the following authentication methods:
PAP or CHAP– this is the most common method used by ISPsStandard login scr ipt– uses a standard text-based login script
Demon login sc ript– uses the UK Demon Internet ISP’s modified version of thestandard login script to connect to Demon’s authentication servers
Other login script– enables you to use a custom login script if none of the othermethods are suitable.
Note: If you need this, you will need to login to SmoothWall Express as theroot user and create the file in /etc/ppp
Script name If you have selected the Other login script method, enter the script’s name.
Type Here you determine DNS details. Select form the following:Manual – enter the IP addresses of your ISP’s DNS server
Automatic– select if your ISP supports automatic DNS server configuration.
Primary DNS If you select Manual as the DNS type, enter the primary DNS server IPaddress.
Secondary DNS Optionally, if you select Manual as the DNS type, enter the secondary DNSserver IP address.
Setting Information
8/6/2019 Smooth Wall Express 3 Installation Guide V2
http://slidepdf.com/reader/full/smooth-wall-express-3-installation-guide-v2 37/40
33
SmoothWall ExpressInstallation Guide
V e r s
i o n
1
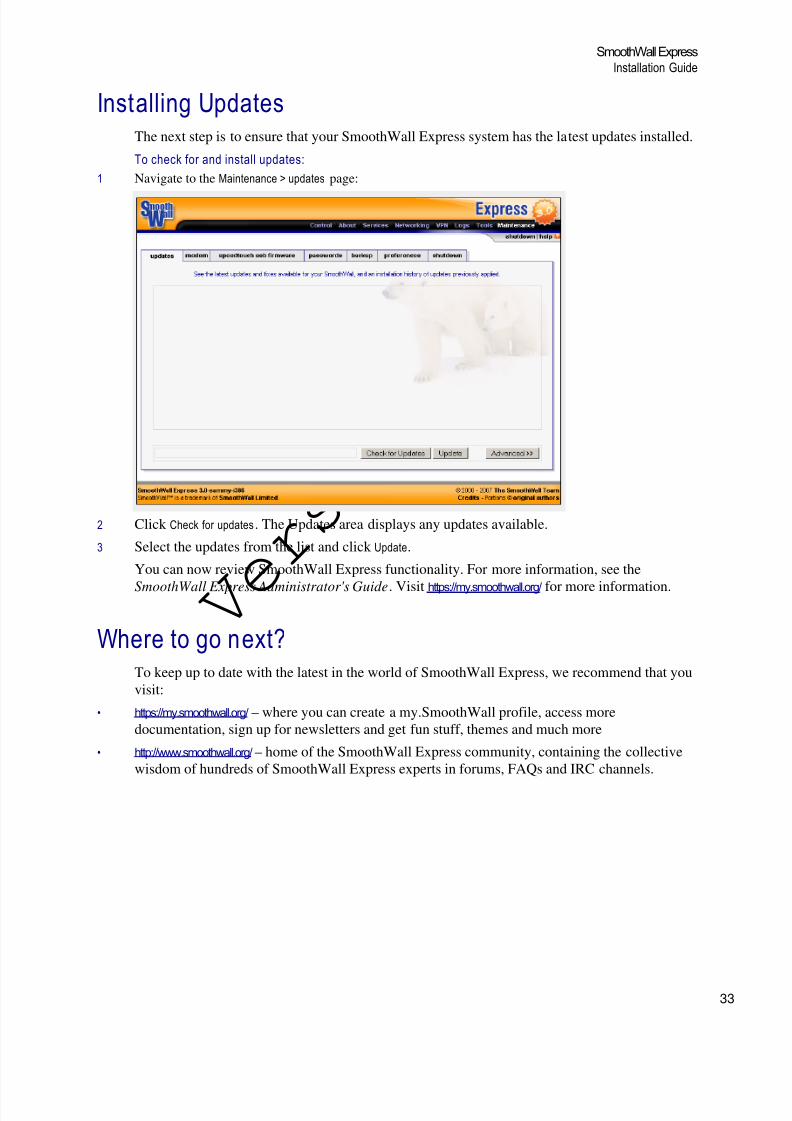
Installing UpdatesThe next step is to ensure that your SmoothWall Express system has the latest updates installed.
To check for and install updates:1 Navigate to the Maintenance > updates page:
2 Click Check for updates. The Updates area displays any updates available.
3 Select the updates from the list and click Update.
You can now review SmoothWall Express functionality. For more information, see the
SmoothWall Express Administrator's Guide . Visit https://my.smoothwall.org/ for more information.
Where to go next?To keep up to date with the latest in the world of SmoothWall Express, we recommend that youvisit:
• https://my.smoothwall.org/ – where you can create a my.SmoothWall profile, access moredocumentation, sign up for newsletters and get fun stuff, themes and much more
• http://www.smoothwall.org/ – home of the SmoothWall Express community, containing the collectivewisdom of hundreds of SmoothWall Express experts in forums, FAQs and IRC channels.

8/6/2019 Smooth Wall Express 3 Installation Guide V2
http://slidepdf.com/reader/full/smooth-wall-express-3-installation-guide-v2 38/40
Accessing SmoothWall ExpressWhere to go next?
34
V e r s
i o n
1

8/6/2019 Smooth Wall Express 3 Installation Guide V2
http://slidepdf.com/reader/full/smooth-wall-express-3-installation-guide-v2 39/40
V e r s
i o n
1

8/6/2019 Smooth Wall Express 3 Installation Guide V2
http://slidepdf.com/reader/full/smooth-wall-express-3-installation-guide-v2 40/40
V e r s
i o n
1