snf general ledger best practices
TRANSCRIPT

©2018 Shelby Systems, Inc. Other brand and product names are trademarks or registered trademarks of the respective holders.
ShelbyNext | Financials: General Ledger Best Practices
(Course #F213)
Presented by: Dave Heston Shelby Consultant
OBJECTIVE This session is meant to give a general understanding of the core functions to help you maximize your General Ledger. The following topics are presented in this session:
• Navigate within the General Ledger Application o Top Navigation: Drop-down lists o Current Financial settings: Check often
• Setting up Company Information o How many companies do you have? Are they on the same year? o Calendar vs. Fiscal year: What is best for you? o When do you need to use the “Audit” period? o When do you “Close” a period? o Closing a Fiscal year: When, who, and how often can you close your Fiscal year?
• How to manage your Chart of Accounts o Account Structure: Funds, Cost Centers, and Departments – How are you using
them? Are you Multi-campus? o Sub-Accounts vs. Projects: Which to use? o Account Groups: Headers and Totals o How to inactivate Account Levels or Accounts o How to renumber/move Funds, Cost Center, Departments, Accounts, Company
• What Financial Applications are you using? o Are they “linked” correctly to your General ledger? o What are the core General Ledger accounts needed?
• How to work with Journal entries: Add, Manage, and Finalize o Journal Types o Who finalizes your Journal entries? o Do you post directly to the General Ledger? o Manual Journal entries: Be careful and DOCUMENT! o How to View Posted journals and Source Documents, and how to Drill Down o Copy/Reverse journals o Recurring Journals
• Budgets o Who enters your budget o Do you use the Export/Import feature
• Account Rights Roles – limit users to specific Funds, Departments, or Accounts • Common Monthly financial reports
o Statement of Financial Position o Statement of Activities o Financial Spreadsheet
3
Navigate within the GL Application
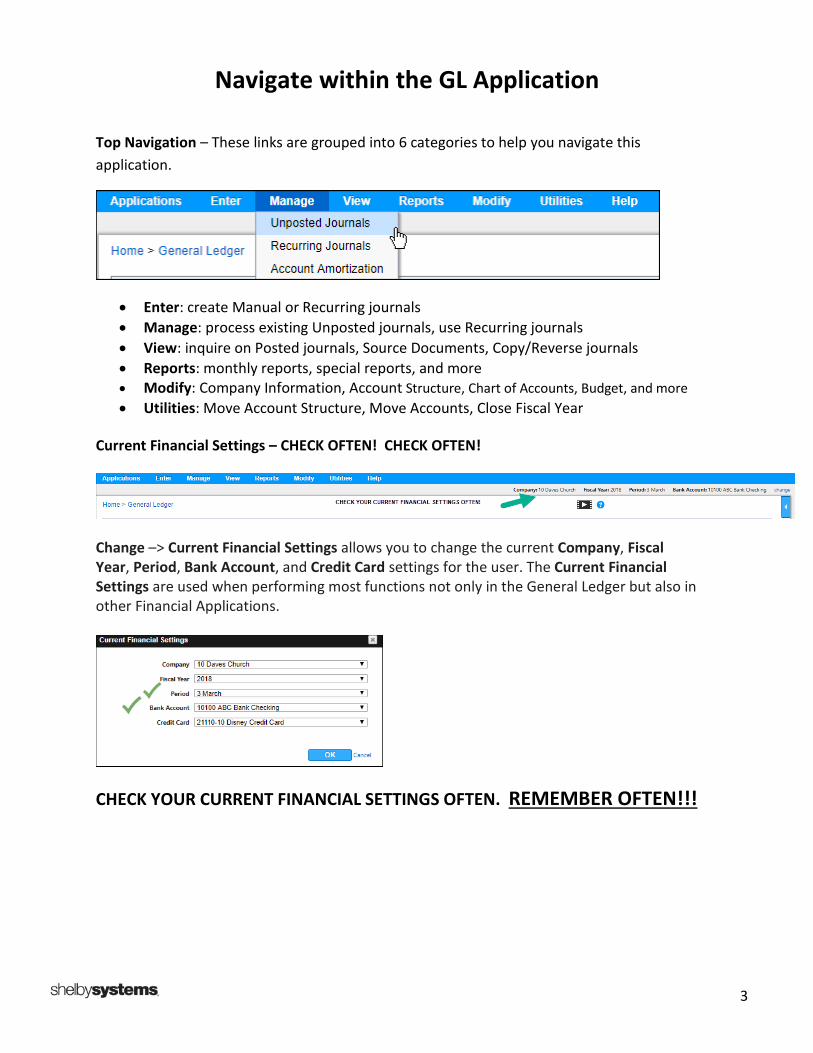
Top Navigation – These links are grouped into 6 categories to help you navigate this application.
• Enter: create Manual or Recurring journals • Manage: process existing Unposted journals, use Recurring journals • View: inquire on Posted journals, Source Documents, Copy/Reverse journals • Reports: monthly reports, special reports, and more • Modify: Company Information, Account Structure, Chart of Accounts, Budget, and more • Utilities: Move Account Structure, Move Accounts, Close Fiscal Year
Current Financial Settings – CHECK OFTEN! CHECK OFTEN!
Change –> Current Financial Settings allows you to change the current Company, Fiscal Year, Period, Bank Account, and Credit Card settings for the user. The Current Financial Settings are used when performing most functions not only in the General Ledger but also in other Financial Applications.
CHECK YOUR CURRENT FINANCIAL SETTINGS OFTEN. REMEMBER OFTEN!!!
4
Setting up Company Information
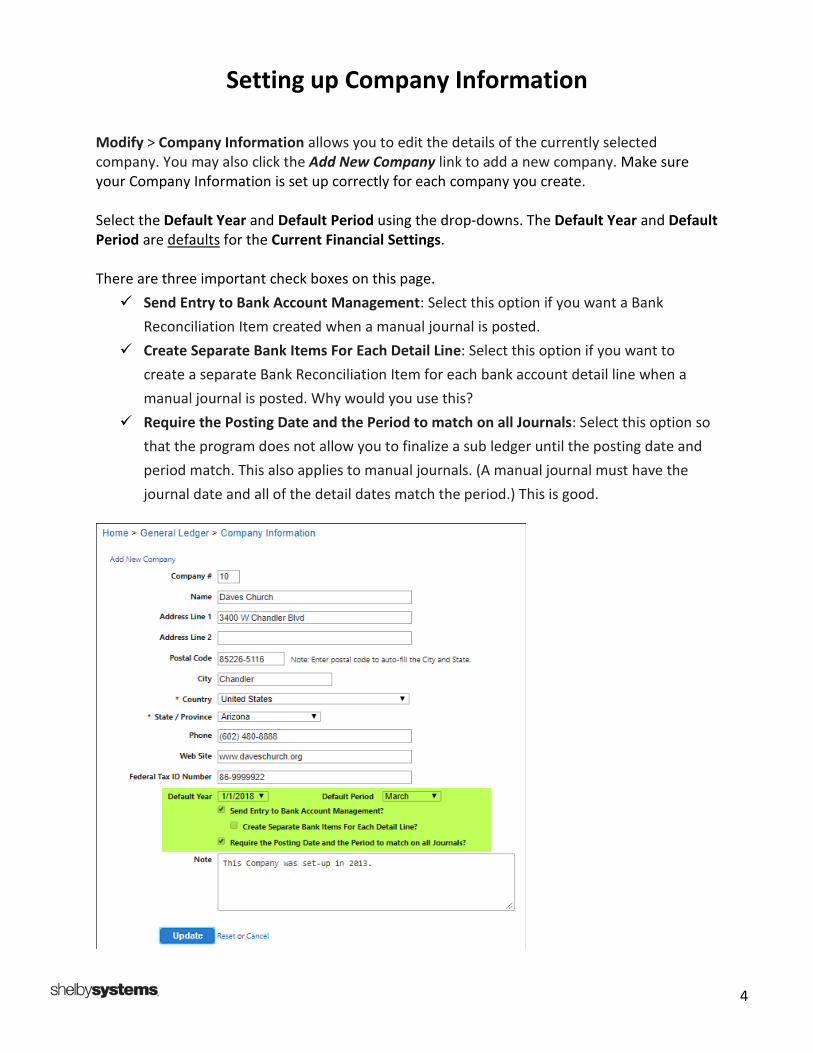
Modify > Company Information allows you to edit the details of the currently selected company. You may also click the Add New Company link to add a new company. Make sure your Company Information is set up correctly for each company you create. Select the Default Year and Default Period using the drop-downs. The Default Year and Default Period are defaults for the Current Financial Settings. There are three important check boxes on this page. Send Entry to Bank Account Management: Select this option if you want a Bank
Reconciliation Item created when a manual journal is posted. Create Separate Bank Items For Each Detail Line: Select this option if you want to
create a separate Bank Reconciliation Item for each bank account detail line when a manual journal is posted. Why would you use this?
Require the Posting Date and the Period to match on all Journals: Select this option so that the program does not allow you to finalize a sub ledger until the posting date and period match. This also applies to manual journals. (A manual journal must have the journal date and all of the detail dates match the period.) This is good.
5
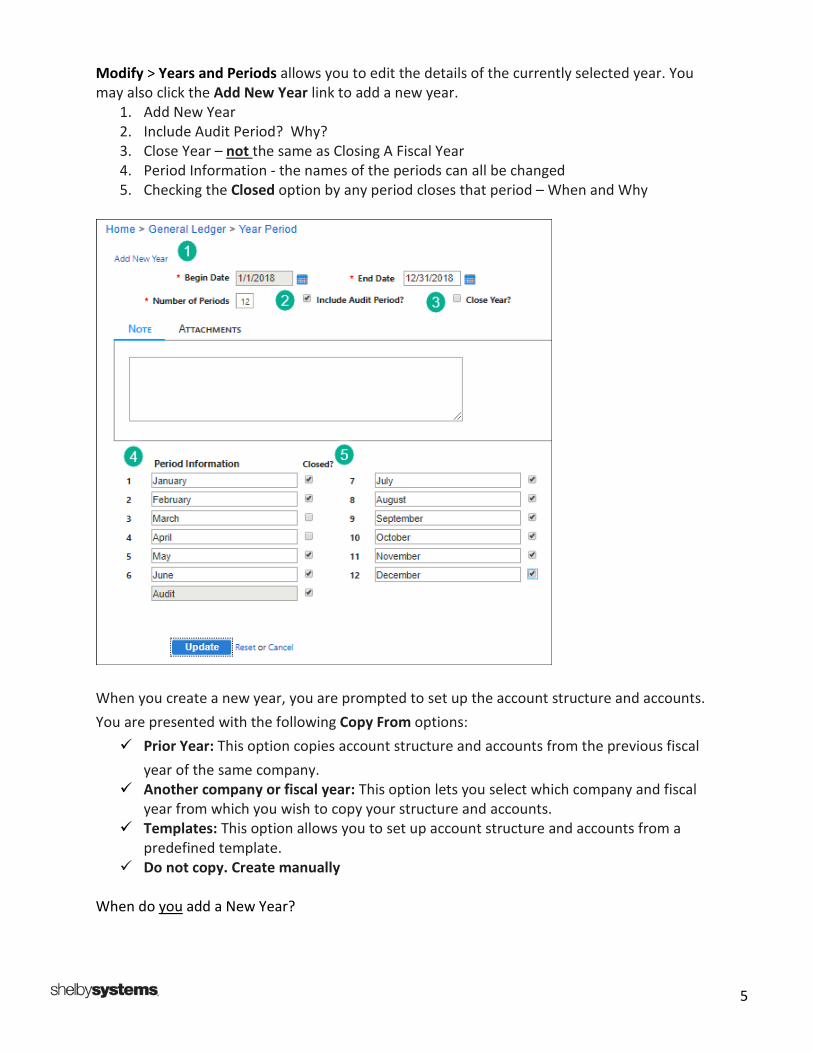
Modify > Years and Periods allows you to edit the details of the currently selected year. You may also click the Add New Year link to add a new year.
1. Add New Year 2. Include Audit Period? Why? 3. Close Year – not the same as Closing A Fiscal Year 4. Period Information - the names of the periods can all be changed 5. Checking the Closed option by any period closes that period – When and Why
When you create a new year, you are prompted to set up the account structure and accounts. You are presented with the following Copy From options: Prior Year: This option copies account structure and accounts from the previous fiscal
year of the same company. Another company or fiscal year: This option lets you select which company and fiscal
year from which you wish to copy your structure and accounts. Templates: This option allows you to set up account structure and accounts from a
predefined template. Do not copy. Create manually
When do you add a New Year?
6
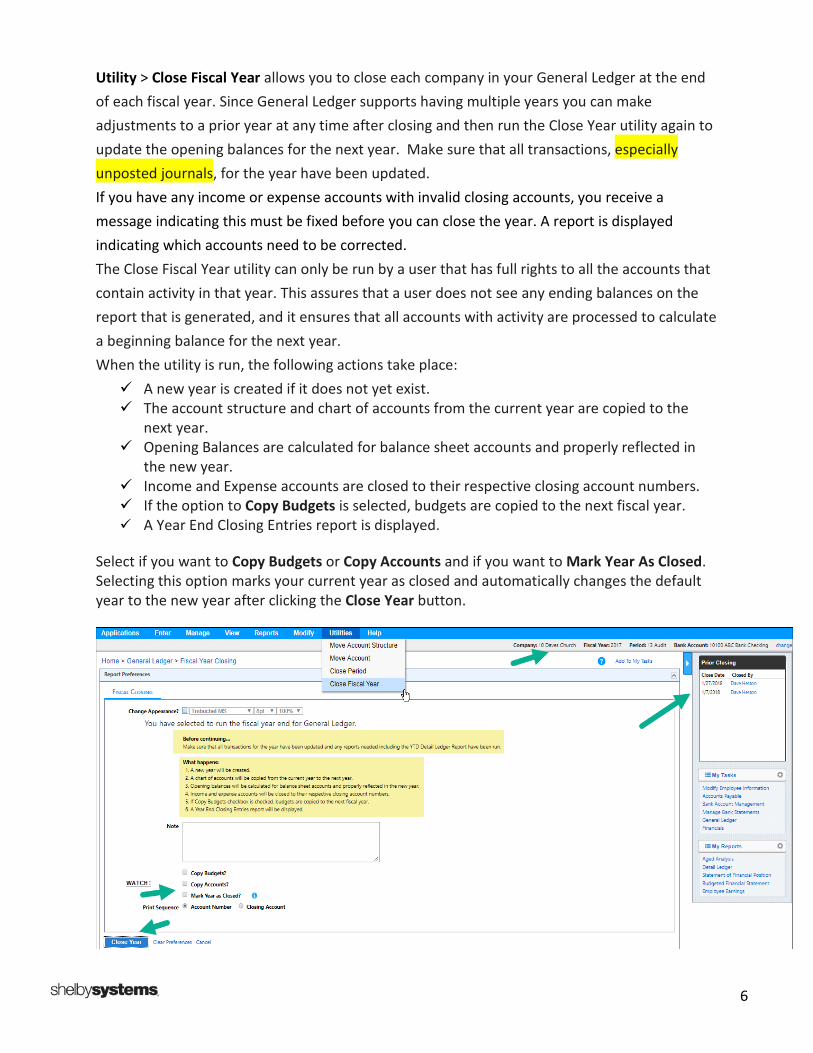
Utility > Close Fiscal Year allows you to close each company in your General Ledger at the end of each fiscal year. Since General Ledger supports having multiple years you can make adjustments to a prior year at any time after closing and then run the Close Year utility again to update the opening balances for the next year. Make sure that all transactions, especially unposted journals, for the year have been updated. If you have any income or expense accounts with invalid closing accounts, you receive a message indicating this must be fixed before you can close the year. A report is displayed indicating which accounts need to be corrected. The Close Fiscal Year utility can only be run by a user that has full rights to all the accounts that contain activity in that year. This assures that a user does not see any ending balances on the report that is generated, and it ensures that all accounts with activity are processed to calculate a beginning balance for the next year. When the utility is run, the following actions take place: A new year is created if it does not yet exist. The account structure and chart of accounts from the current year are copied to the
next year. Opening Balances are calculated for balance sheet accounts and properly reflected in
the new year. Income and Expense accounts are closed to their respective closing account numbers. If the option to Copy Budgets is selected, budgets are copied to the next fiscal year. A Year End Closing Entries report is displayed.
Select if you want to Copy Budgets or Copy Accounts and if you want to Mark Year As Closed. Selecting this option marks your current year as closed and automatically changes the default year to the new year after clicking the Close Year button.
7
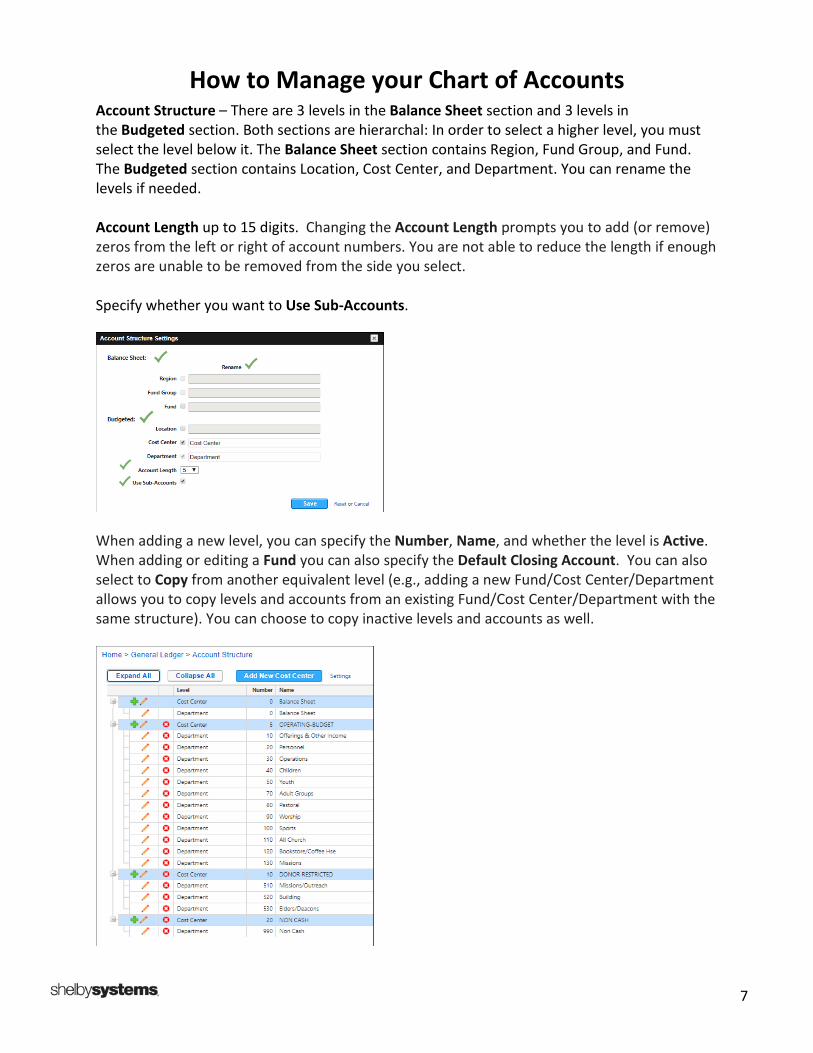
How to Manage your Chart of Accounts Account Structure – There are 3 levels in the Balance Sheet section and 3 levels in the Budgeted section. Both sections are hierarchal: In order to select a higher level, you must select the level below it. The Balance Sheet section contains Region, Fund Group, and Fund. The Budgeted section contains Location, Cost Center, and Department. You can rename the levels if needed. Account Length up to 15 digits. Changing the Account Length prompts you to add (or remove) zeros from the left or right of account numbers. You are not able to reduce the length if enough zeros are unable to be removed from the side you select. Specify whether you want to Use Sub-Accounts.
When adding a new level, you can specify the Number, Name, and whether the level is Active. When adding or editing a Fund you can also specify the Default Closing Account. You can also select to Copy from another equivalent level (e.g., adding a new Fund/Cost Center/Department allows you to copy levels and accounts from an existing Fund/Cost Center/Department with the same structure). You can choose to copy inactive levels and accounts as well.
8
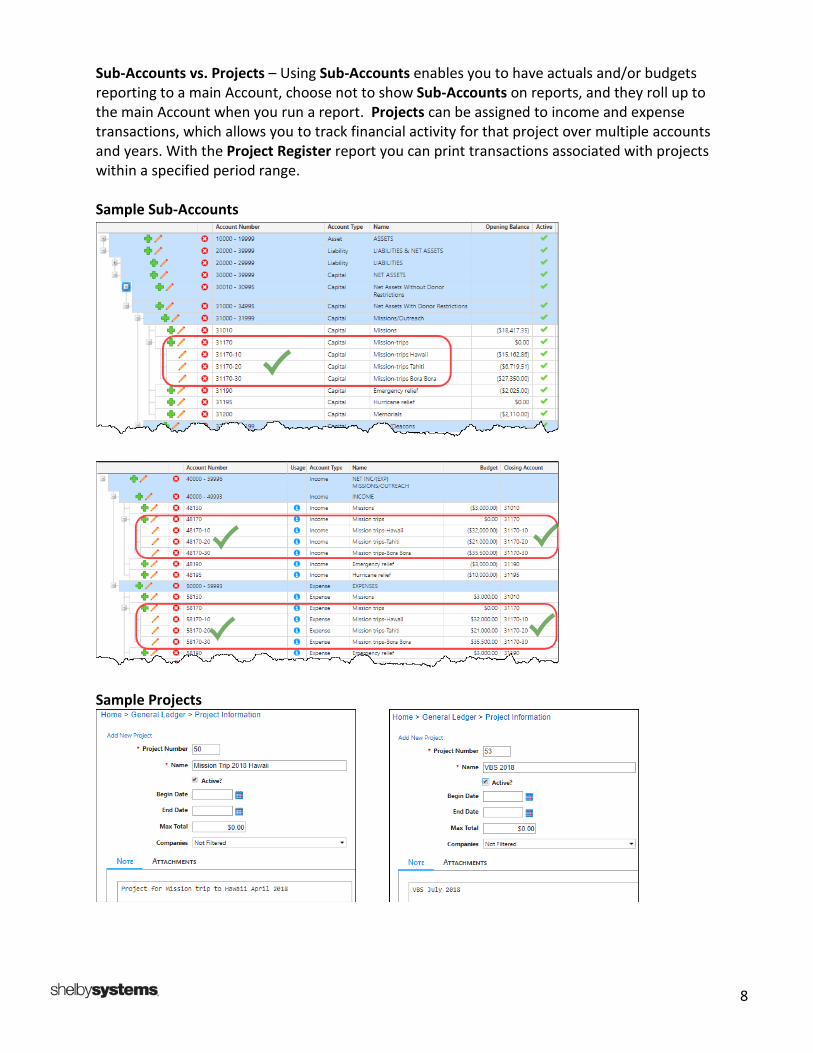
Sub-Accounts vs. Projects – Using Sub-Accounts enables you to have actuals and/or budgets reporting to a main Account, choose not to show Sub-Accounts on reports, and they roll up to the main Account when you run a report. Projects can be assigned to income and expense transactions, which allows you to track financial activity for that project over multiple accounts and years. With the Project Register report you can print transactions associated with projects within a specified period range. Sample Sub-Accounts
Sample Projects
9
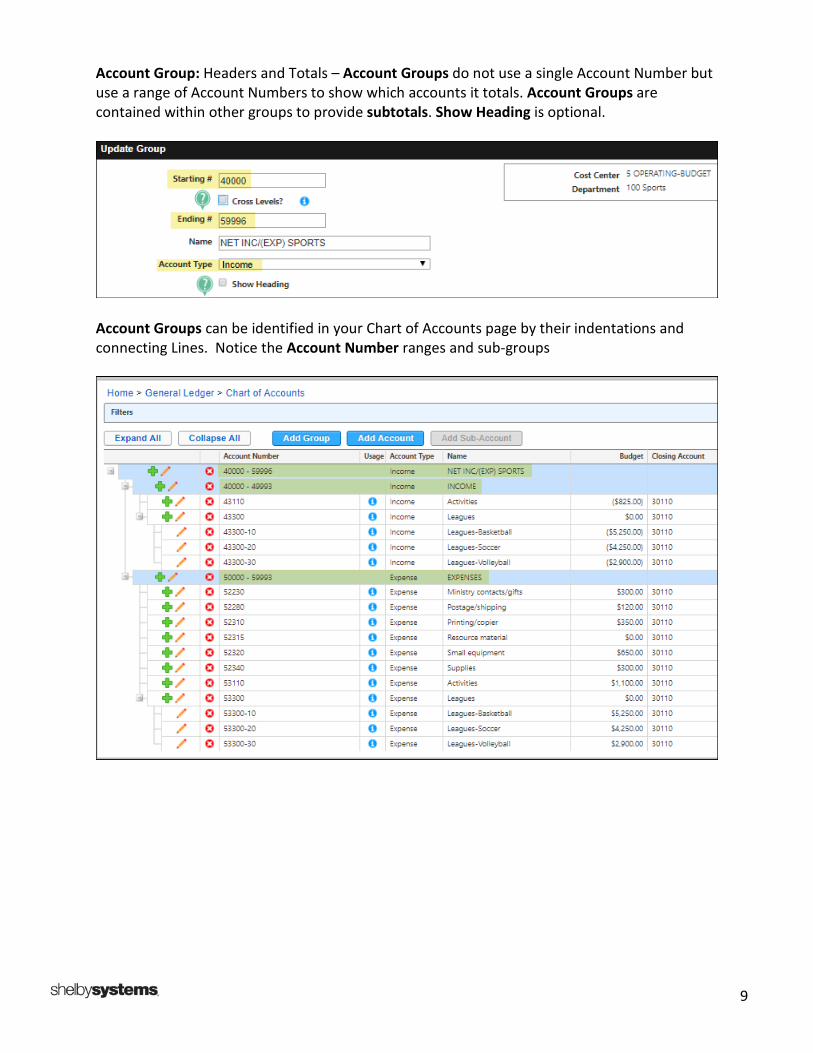
Account Group: Headers and Totals – Account Groups do not use a single Account Number but use a range of Account Numbers to show which accounts it totals. Account Groups are contained within other groups to provide subtotals. Show Heading is optional.
Account Groups can be identified in your Chart of Accounts page by their indentations and connecting Lines. Notice the Account Number ranges and sub-groups
10
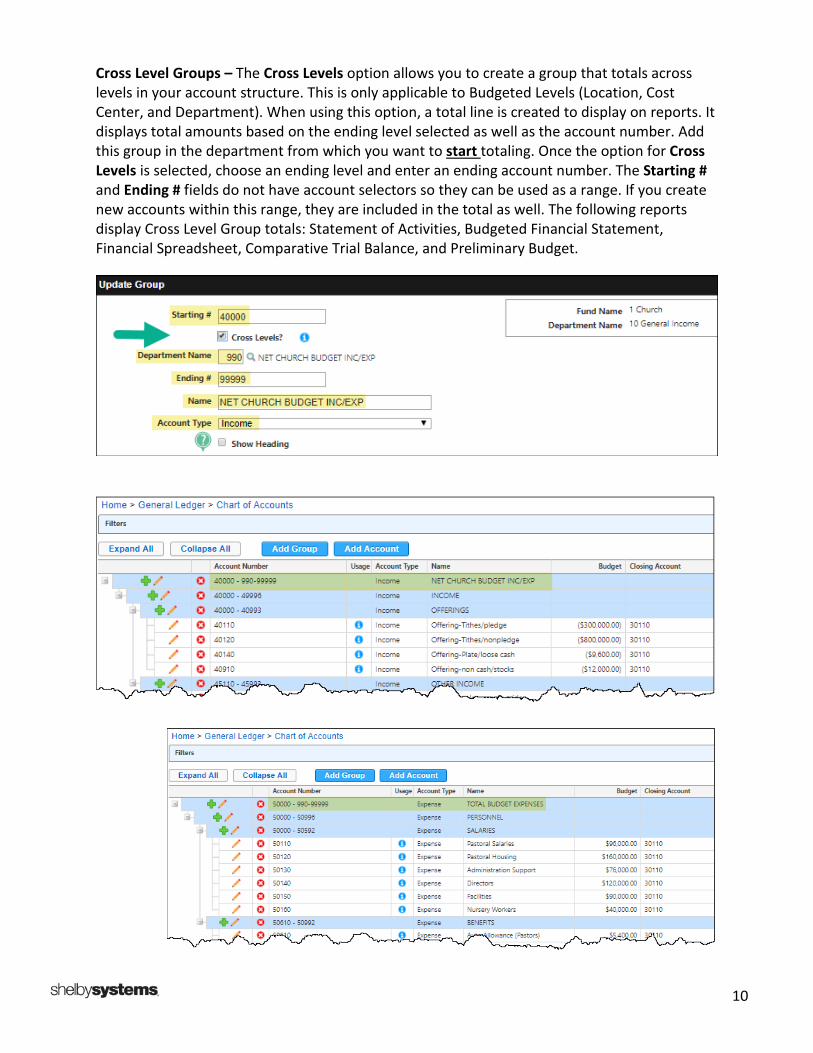
Cross Level Groups – The Cross Levels option allows you to create a group that totals across levels in your account structure. This is only applicable to Budgeted Levels (Location, Cost Center, and Department). When using this option, a total line is created to display on reports. It displays total amounts based on the ending level selected as well as the account number. Add this group in the department from which you want to start totaling. Once the option for Cross Levels is selected, choose an ending level and enter an ending account number. The Starting # and Ending # fields do not have account selectors so they can be used as a range. If you create new accounts within this range, they are included in the total as well. The following reports display Cross Level Group totals: Statement of Activities, Budgeted Financial Statement, Financial Spreadsheet, Comparative Trial Balance, and Preliminary Budget.
11
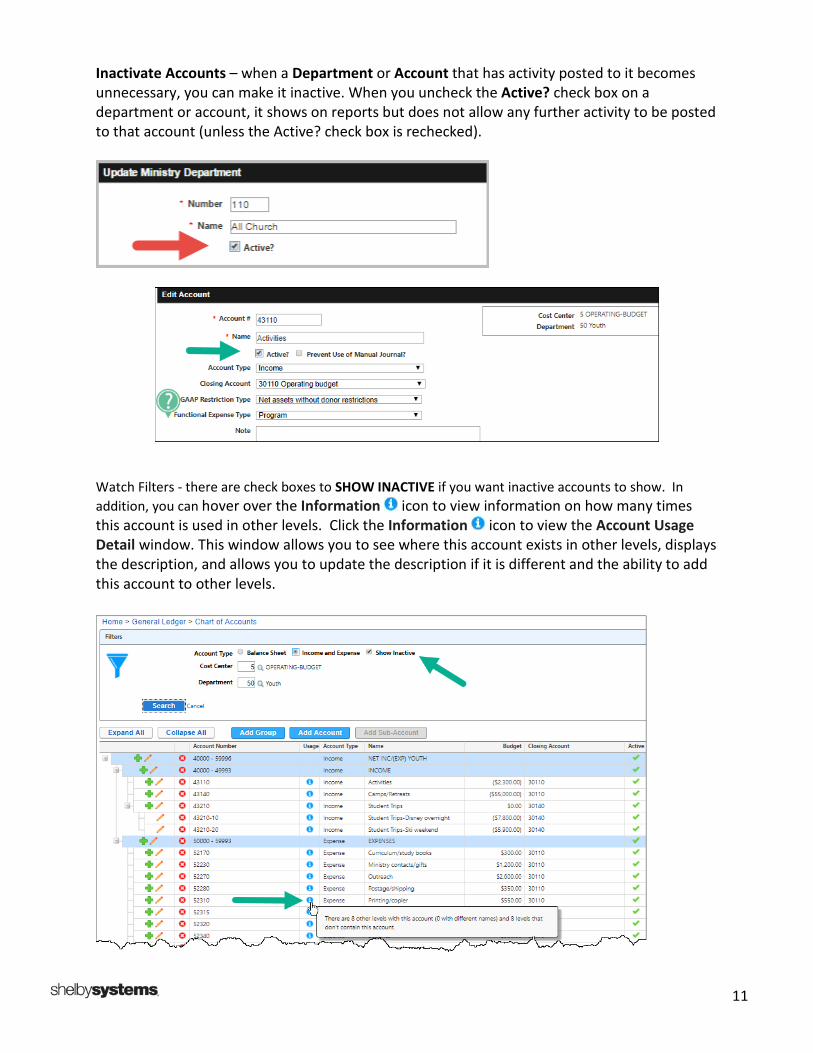
Inactivate Accounts – when a Department or Account that has activity posted to it becomes unnecessary, you can make it inactive. When you uncheck the Active? check box on a department or account, it shows on reports but does not allow any further activity to be posted to that account (unless the Active? check box is rechecked).
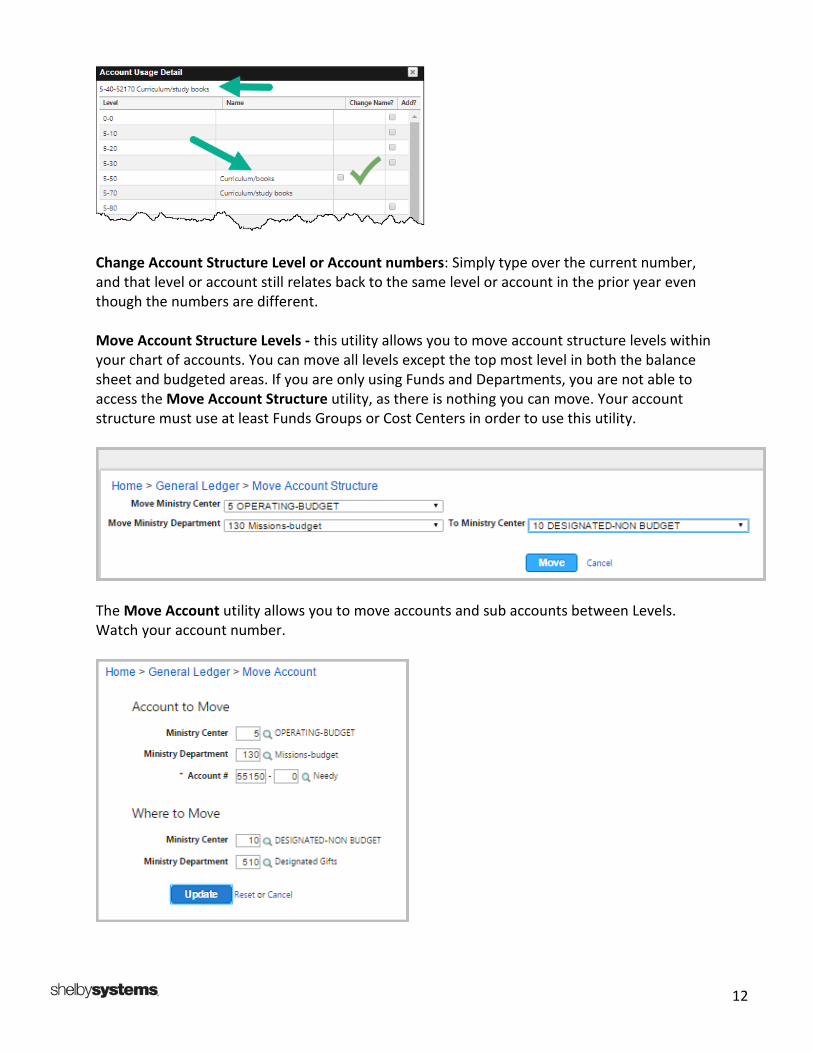
Watch Filters - there are check boxes to SHOW INACTIVE if you want inactive accounts to show. In addition, you can hover over the Information icon to view information on how many times this account is used in other levels. Click the Information icon to view the Account Usage Detail window. This window allows you to see where this account exists in other levels, displays the description, and allows you to update the description if it is different and the ability to add this account to other levels.
12
Change Account Structure Level or Account numbers: Simply type over the current number, and that level or account still relates back to the same level or account in the prior year even though the numbers are different. Move Account Structure Levels - this utility allows you to move account structure levels within your chart of accounts. You can move all levels except the top most level in both the balance sheet and budgeted areas. If you are only using Funds and Departments, you are not able to access the Move Account Structure utility, as there is nothing you can move. Your account structure must use at least Funds Groups or Cost Centers in order to use this utility.
The Move Account utility allows you to move accounts and sub accounts between Levels. Watch your account number.
13
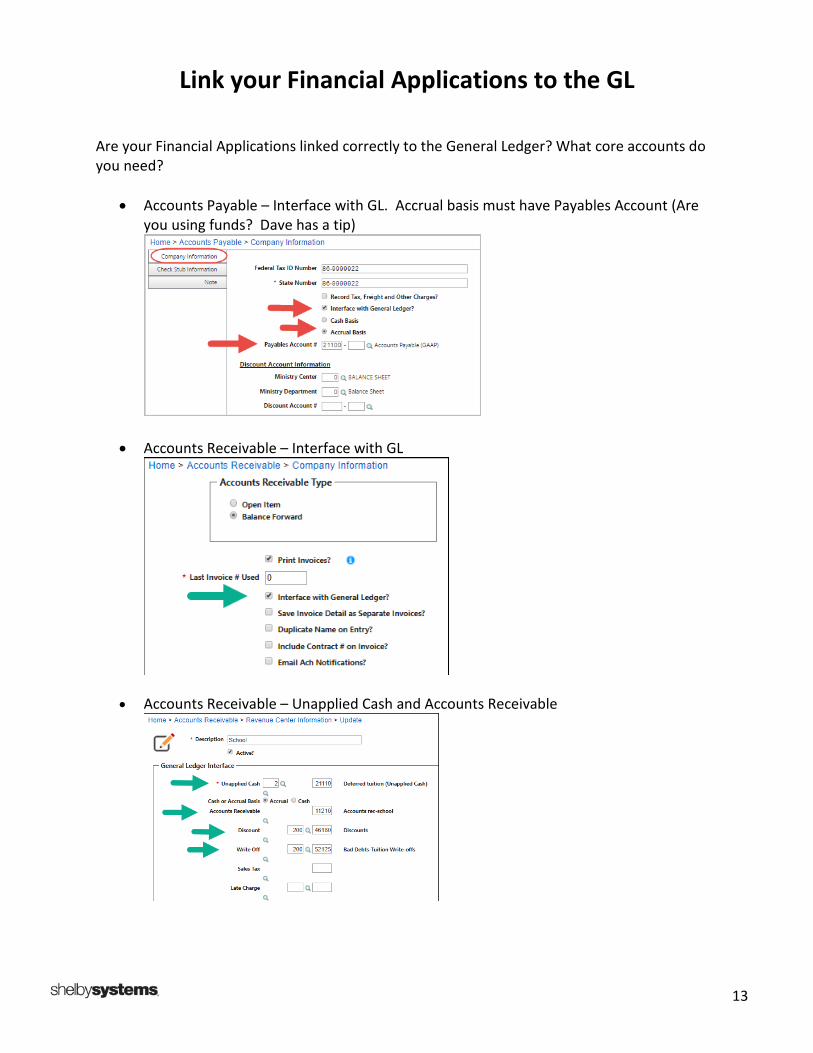
Link your Financial Applications to the GL
Are your Financial Applications linked correctly to the General Ledger? What core accounts do you need?
• Accounts Payable – Interface with GL. Accrual basis must have Payables Account (Are you using funds? Dave has a tip)
• Accounts Receivable – Interface with GL
• Accounts Receivable – Unapplied Cash and Accounts Receivable
14
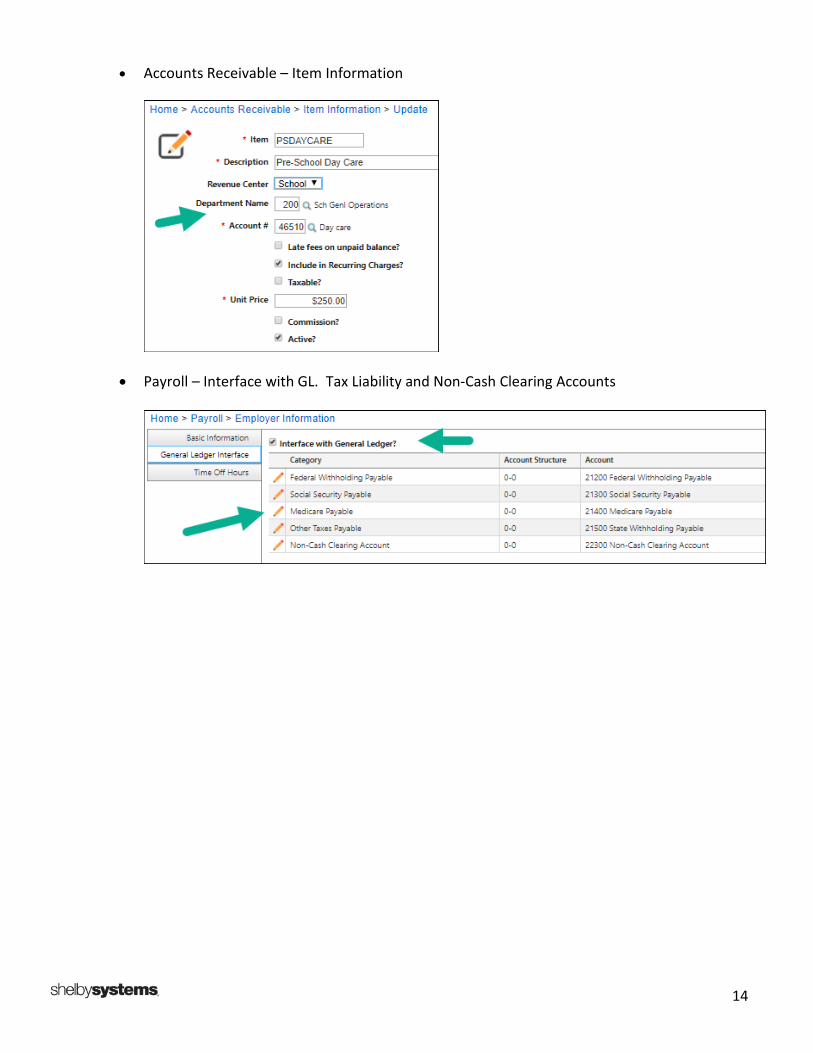
• Accounts Receivable – Item Information
• Payroll – Interface with GL. Tax Liability and Non-Cash Clearing Accounts
15
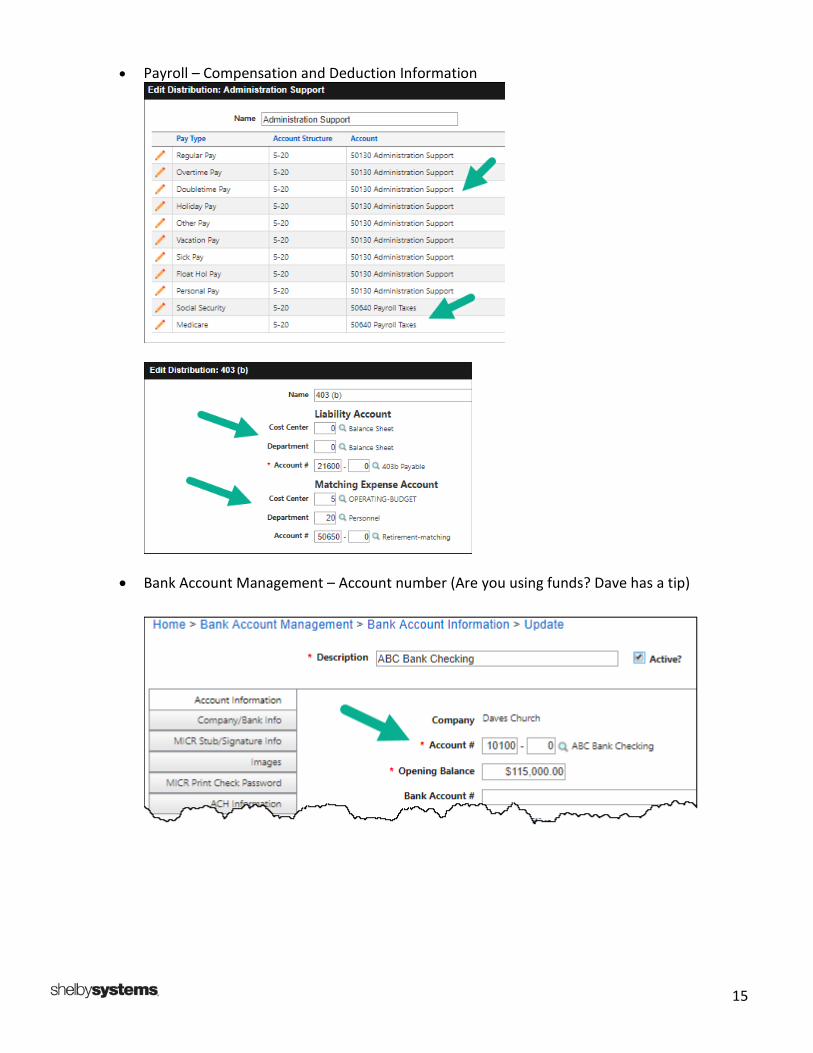
• Payroll – Compensation and Deduction Information
• Bank Account Management – Account number (Are you using funds? Dave has a tip)
16
JOURNAL ENTRIES Journal Types The following Journal Types are generated by the system and cannot be edited.
• AJ Adjustment • AM Expense Amortization • AP Accounts Payable Entries • AR Accounts Receivable • BR Bank Account Management • CD Check Disbursements • CR Cash Receipts • FA Fixed Assets • JE Miscellaneous Journal Entry • PR Payroll • RG Registrations • TR Transfer
Suggested other Journal Types for Manual journal entries: (Let’s talk about this.)
• CN Contribution Entry • OB Opening Balances • RE Recurring Journal Entry
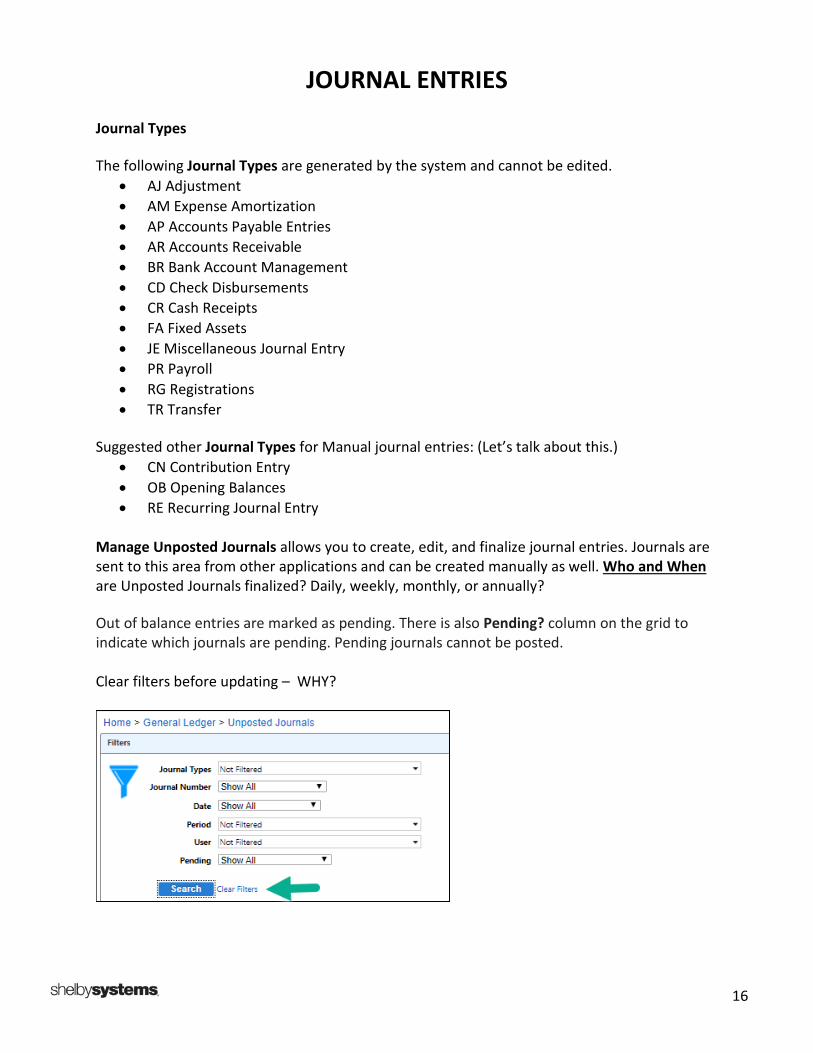
Manage Unposted Journals allows you to create, edit, and finalize journal entries. Journals are sent to this area from other applications and can be created manually as well. Who and When are Unposted Journals finalized? Daily, weekly, monthly, or annually? Out of balance entries are marked as pending. There is also Pending? column on the grid to indicate which journals are pending. Pending journals cannot be posted. Clear filters before updating – WHY?
17
Before you post journals, LOOK THEM OVER. Make sure the dates fall within the same Period.
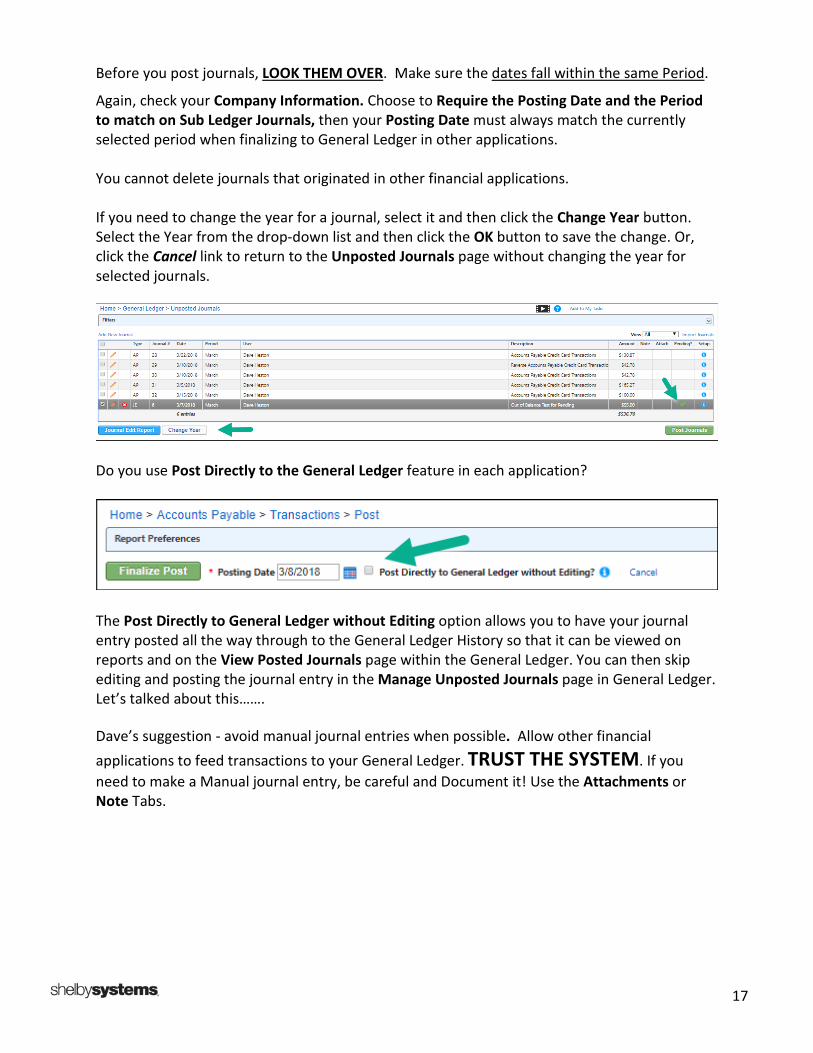
Again, check your Company Information. Choose to Require the Posting Date and the Period to match on Sub Ledger Journals, then your Posting Date must always match the currently selected period when finalizing to General Ledger in other applications. You cannot delete journals that originated in other financial applications. If you need to change the year for a journal, select it and then click the Change Year button. Select the Year from the drop-down list and then click the OK button to save the change. Or, click the Cancel link to return to the Unposted Journals page without changing the year for selected journals.
Do you use Post Directly to the General Ledger feature in each application?
The Post Directly to General Ledger without Editing option allows you to have your journal entry posted all the way through to the General Ledger History so that it can be viewed on reports and on the View Posted Journals page within the General Ledger. You can then skip editing and posting the journal entry in the Manage Unposted Journals page in General Ledger. Let’s talked about this……. Dave’s suggestion - avoid manual journal entries when possible. Allow other financial applications to feed transactions to your General Ledger. TRUST THE SYSTEM. If you need to make a Manual journal entry, be careful and Document it! Use the Attachments or Note Tabs.
18
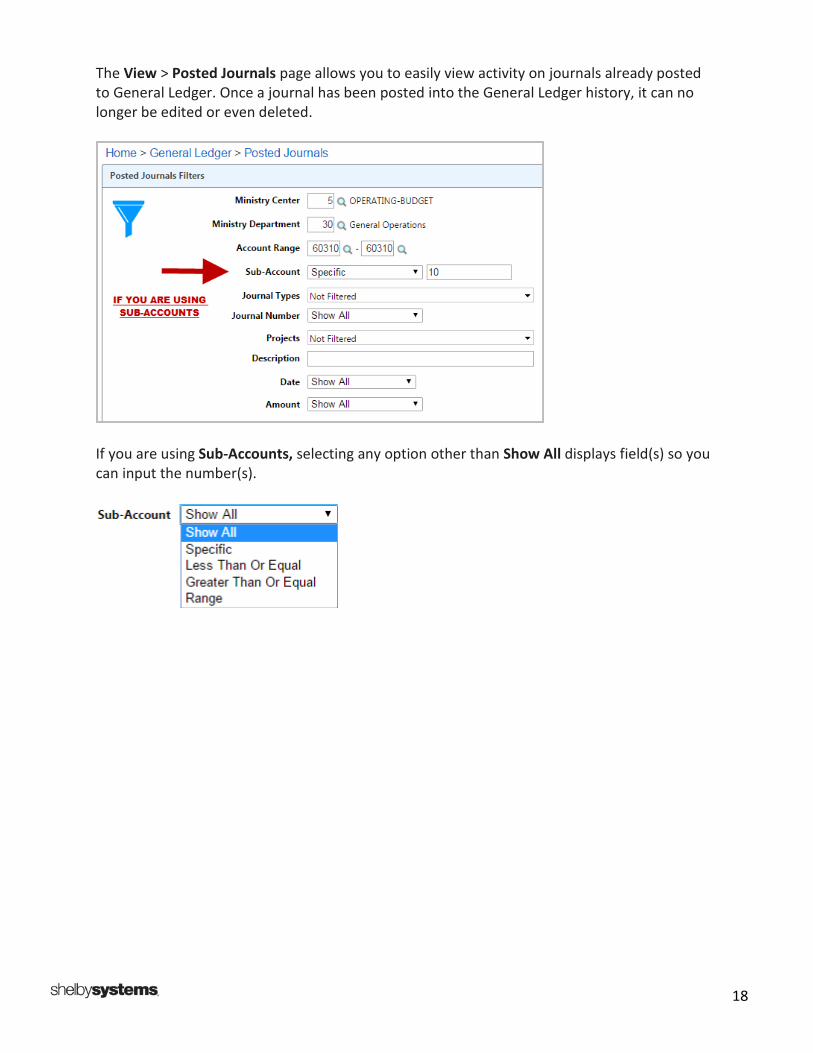
The View > Posted Journals page allows you to easily view activity on journals already posted to General Ledger. Once a journal has been posted into the General Ledger history, it can no longer be edited or even deleted.
If you are using Sub-Accounts, selecting any option other than Show All displays field(s) so you can input the number(s).
19
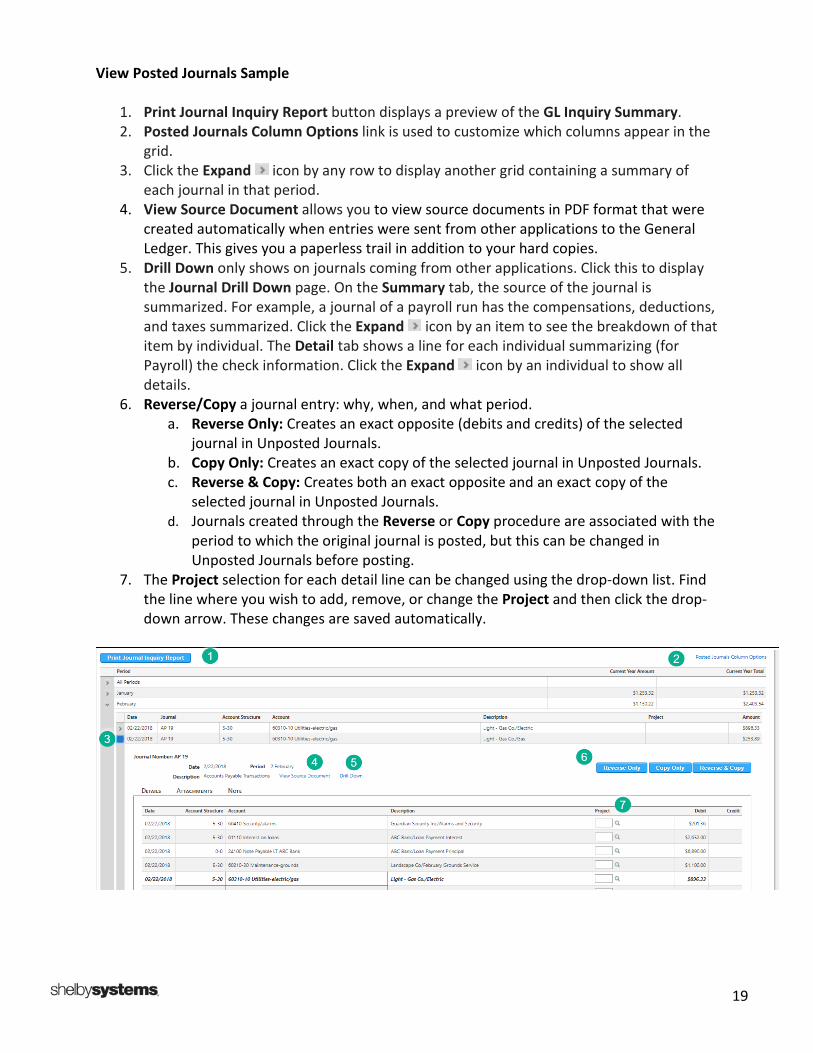
View Posted Journals Sample
1. Print Journal Inquiry Report button displays a preview of the GL Inquiry Summary. 2. Posted Journals Column Options link is used to customize which columns appear in the
grid. 3. Click the Expand icon by any row to display another grid containing a summary of
each journal in that period. 4. View Source Document allows you to view source documents in PDF format that were
created automatically when entries were sent from other applications to the General Ledger. This gives you a paperless trail in addition to your hard copies.
5. Drill Down only shows on journals coming from other applications. Click this to display the Journal Drill Down page. On the Summary tab, the source of the journal is summarized. For example, a journal of a payroll run has the compensations, deductions, and taxes summarized. Click the Expand icon by an item to see the breakdown of that item by individual. The Detail tab shows a line for each individual summarizing (for Payroll) the check information. Click the Expand icon by an individual to show all details.
6. Reverse/Copy a journal entry: why, when, and what period. a. Reverse Only: Creates an exact opposite (debits and credits) of the selected
journal in Unposted Journals. b. Copy Only: Creates an exact copy of the selected journal in Unposted Journals. c. Reverse & Copy: Creates both an exact opposite and an exact copy of the
selected journal in Unposted Journals. d. Journals created through the Reverse or Copy procedure are associated with the
period to which the original journal is posted, but this can be changed in Unposted Journals before posting.
7. The Project selection for each detail line can be changed using the drop-down list. Find the line where you wish to add, remove, or change the Project and then click the drop-down arrow. These changes are saved automatically.
20
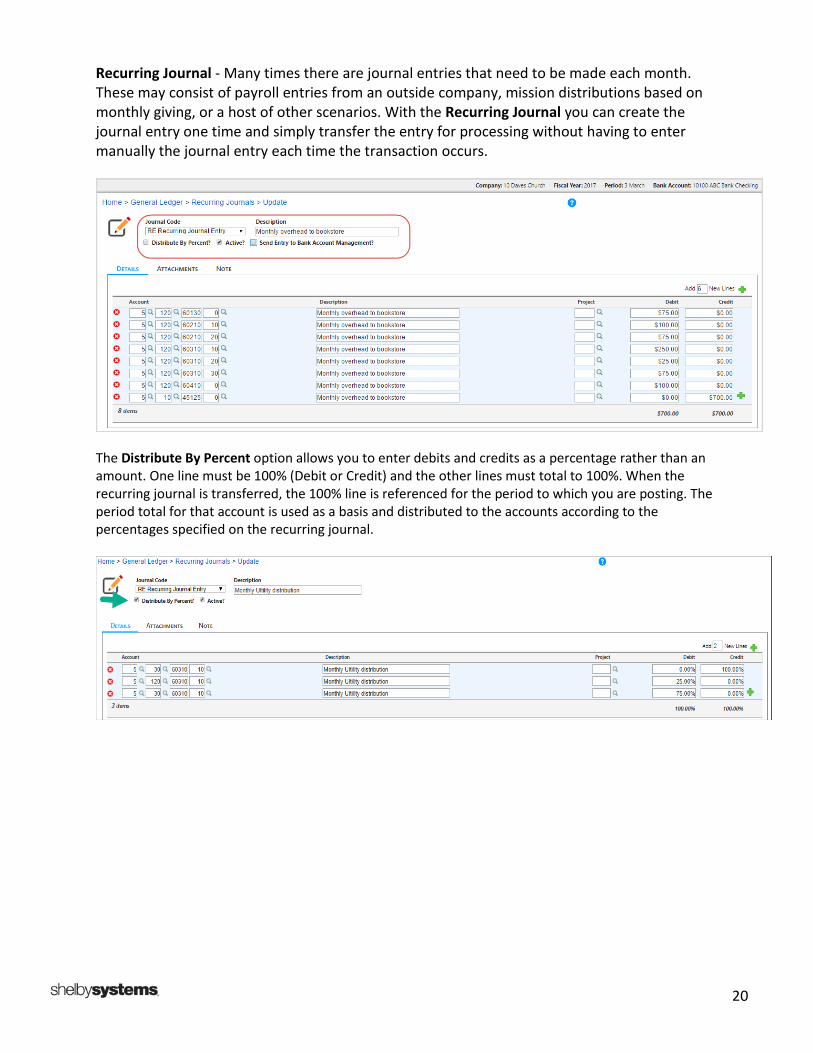
Recurring Journal - Many times there are journal entries that need to be made each month. These may consist of payroll entries from an outside company, mission distributions based on monthly giving, or a host of other scenarios. With the Recurring Journal you can create the journal entry one time and simply transfer the entry for processing without having to enter manually the journal entry each time the transaction occurs.
The Distribute By Percent option allows you to enter debits and credits as a percentage rather than an amount. One line must be 100% (Debit or Credit) and the other lines must total to 100%. When the recurring journal is transferred, the 100% line is referenced for the period to which you are posting. The period total for that account is used as a basis and distributed to the accounts according to the percentages specified on the recurring journal.
21
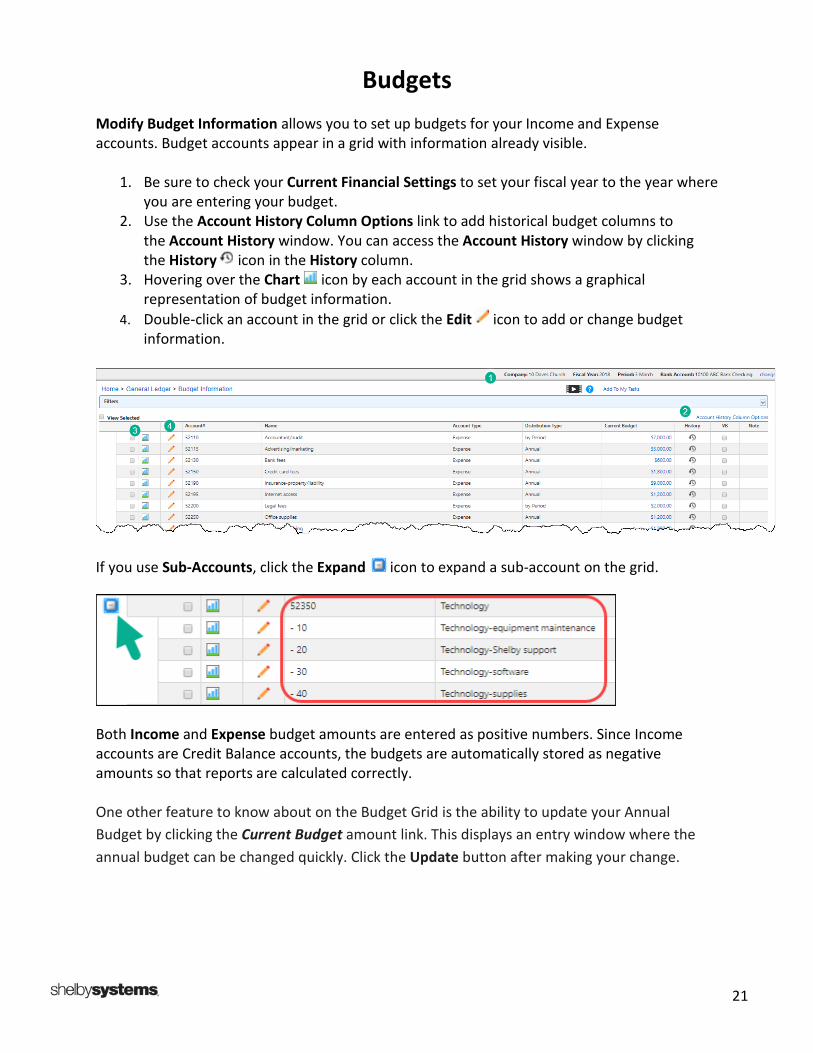
Budgets Modify Budget Information allows you to set up budgets for your Income and Expense accounts. Budget accounts appear in a grid with information already visible.
1. Be sure to check your Current Financial Settings to set your fiscal year to the year where you are entering your budget.
2. Use the Account History Column Options link to add historical budget columns to the Account History window. You can access the Account History window by clicking the History icon in the History column.
3. Hovering over the Chart icon by each account in the grid shows a graphical representation of budget information.
4. Double-click an account in the grid or click the Edit icon to add or change budget information.
If you use Sub-Accounts, click the Expand icon to expand a sub-account on the grid.
Both Income and Expense budget amounts are entered as positive numbers. Since Income accounts are Credit Balance accounts, the budgets are automatically stored as negative amounts so that reports are calculated correctly. One other feature to know about on the Budget Grid is the ability to update your Annual Budget by clicking the Current Budget amount link. This displays an entry window where the annual budget can be changed quickly. Click the Update button after making your change.
22
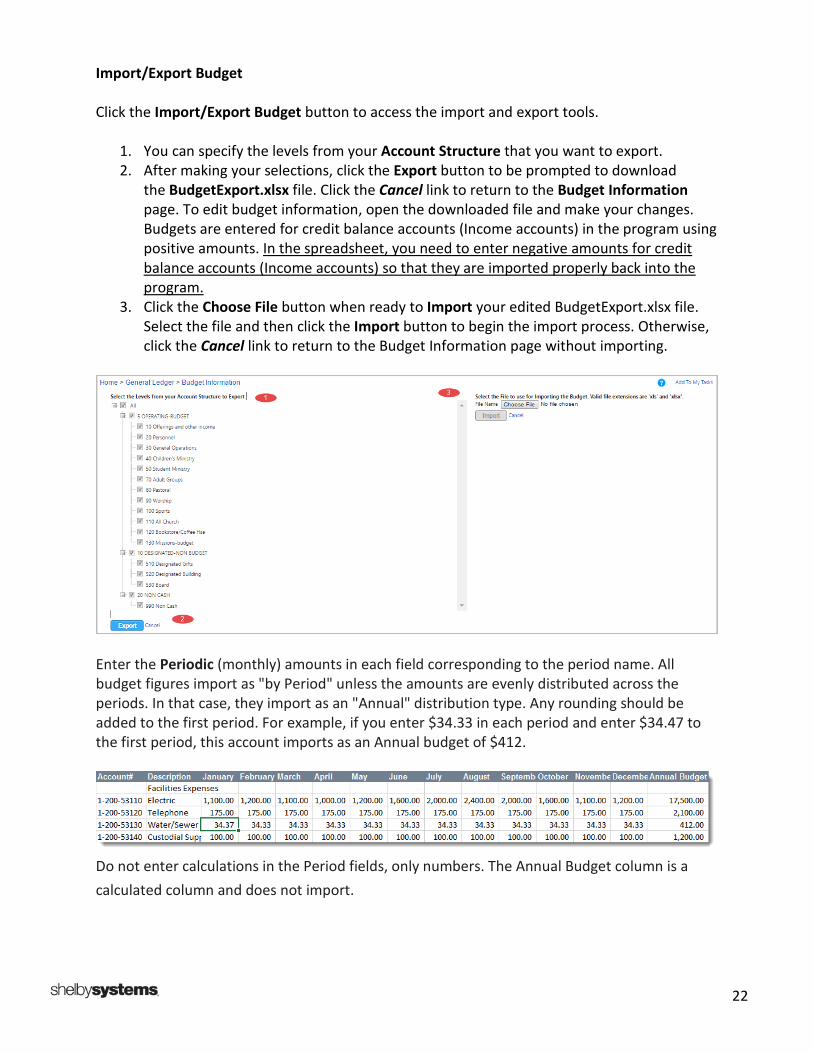
Import/Export Budget Click the Import/Export Budget button to access the import and export tools.
1. You can specify the levels from your Account Structure that you want to export. 2. After making your selections, click the Export button to be prompted to download
the BudgetExport.xlsx file. Click the Cancel link to return to the Budget Information page. To edit budget information, open the downloaded file and make your changes. Budgets are entered for credit balance accounts (Income accounts) in the program using positive amounts. In the spreadsheet, you need to enter negative amounts for credit balance accounts (Income accounts) so that they are imported properly back into the program.
3. Click the Choose File button when ready to Import your edited BudgetExport.xlsx file. Select the file and then click the Import button to begin the import process. Otherwise, click the Cancel link to return to the Budget Information page without importing.
Enter the Periodic (monthly) amounts in each field corresponding to the period name. All budget figures import as "by Period" unless the amounts are evenly distributed across the periods. In that case, they import as an "Annual" distribution type. Any rounding should be added to the first period. For example, if you enter $34.33 in each period and enter $34.47 to the first period, this account imports as an Annual budget of $412.
Do not enter calculations in the Period fields, only numbers. The Annual Budget column is a calculated column and does not import.
23
Account Rights Roles
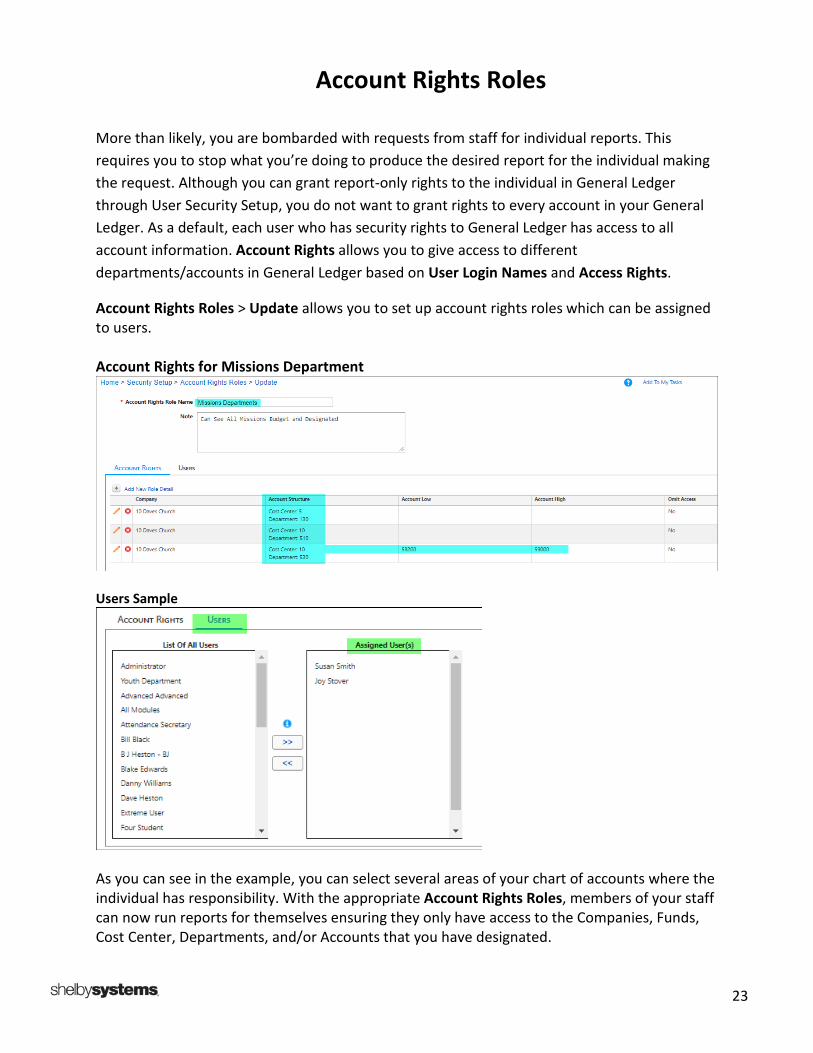
More than likely, you are bombarded with requests from staff for individual reports. This requires you to stop what you’re doing to produce the desired report for the individual making the request. Although you can grant report-only rights to the individual in General Ledger through User Security Setup, you do not want to grant rights to every account in your General Ledger. As a default, each user who has security rights to General Ledger has access to all account information. Account Rights allows you to give access to different departments/accounts in General Ledger based on User Login Names and Access Rights.
Account Rights Roles > Update allows you to set up account rights roles which can be assigned to users. Account Rights for Missions Department
Users Sample
As you can see in the example, you can select several areas of your chart of accounts where the individual has responsibility. With the appropriate Account Rights Roles, members of your staff can now run reports for themselves ensuring they only have access to the Companies, Funds, Cost Center, Departments, and/or Accounts that you have designated.
24
Financial Reports
Some of the most common financial reports include the Detail Ledger Report, Statement of Financial Position, Budgeted Financial Statement, and the Financial Spreadsheet.
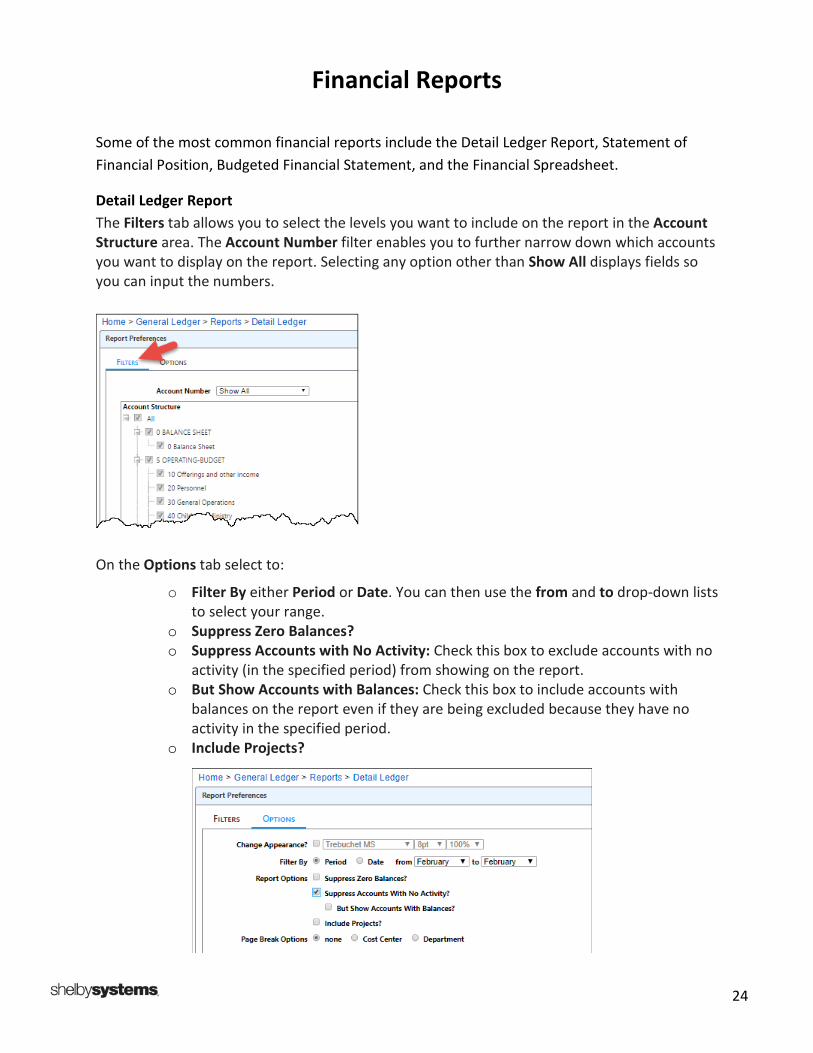
Detail Ledger Report The Filters tab allows you to select the levels you want to include on the report in the Account Structure area. The Account Number filter enables you to further narrow down which accounts you want to display on the report. Selecting any option other than Show All displays fields so you can input the numbers.
On the Options tab select to:
o Filter By either Period or Date. You can then use the from and to drop-down lists to select your range.
o Suppress Zero Balances? o Suppress Accounts with No Activity: Check this box to exclude accounts with no
activity (in the specified period) from showing on the report. o But Show Accounts with Balances: Check this box to include accounts with
balances on the report even if they are being excluded because they have no activity in the specified period.
o Include Projects?
25
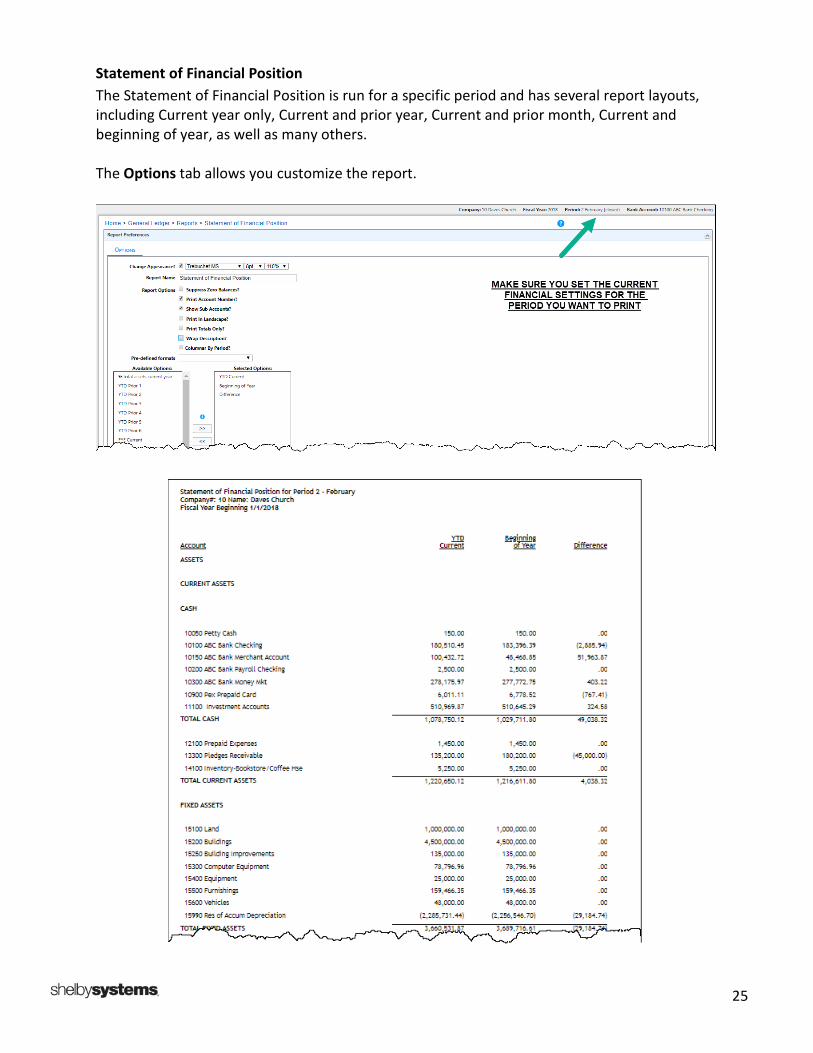
Statement of Financial Position The Statement of Financial Position is run for a specific period and has several report layouts, including Current year only, Current and prior year, Current and prior month, Current and beginning of year, as well as many others. The Options tab allows you customize the report.
26
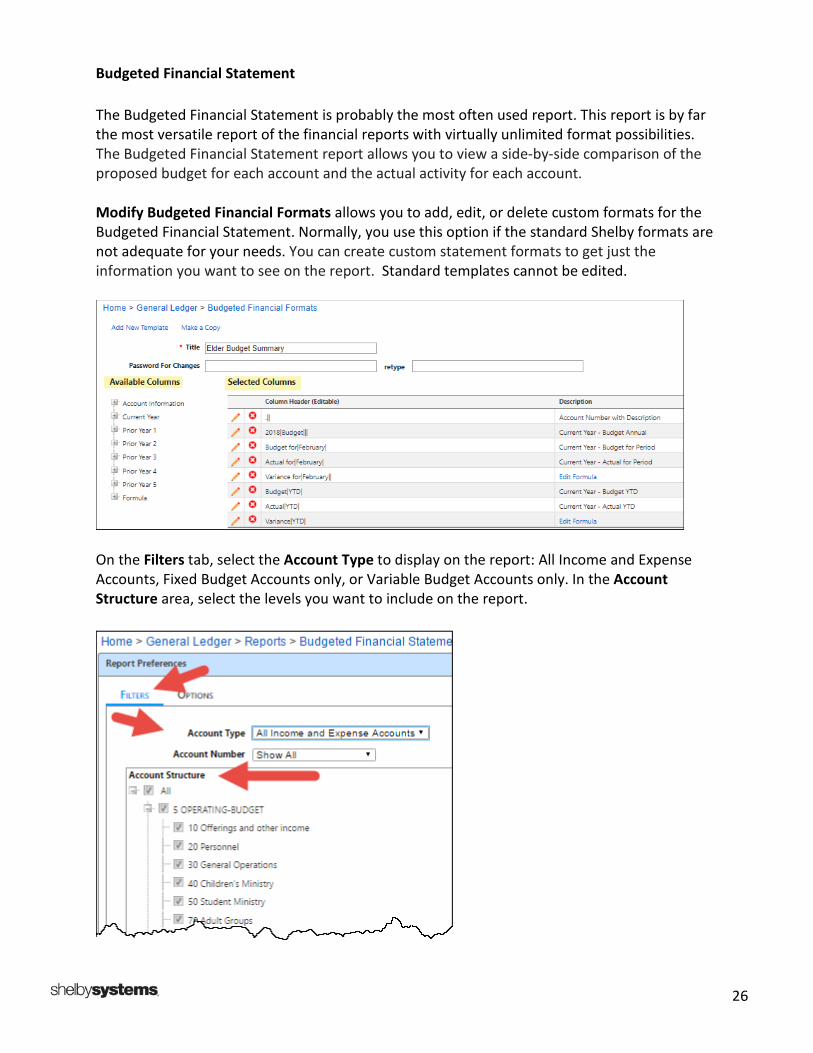
Budgeted Financial Statement The Budgeted Financial Statement is probably the most often used report. This report is by far the most versatile report of the financial reports with virtually unlimited format possibilities. The Budgeted Financial Statement report allows you to view a side-by-side comparison of the proposed budget for each account and the actual activity for each account. Modify Budgeted Financial Formats allows you to add, edit, or delete custom formats for the Budgeted Financial Statement. Normally, you use this option if the standard Shelby formats are not adequate for your needs. You can create custom statement formats to get just the information you want to see on the report. Standard templates cannot be edited.
On the Filters tab, select the Account Type to display on the report: All Income and Expense Accounts, Fixed Budget Accounts only, or Variable Budget Accounts only. In the Account Structure area, select the levels you want to include on the report.
27
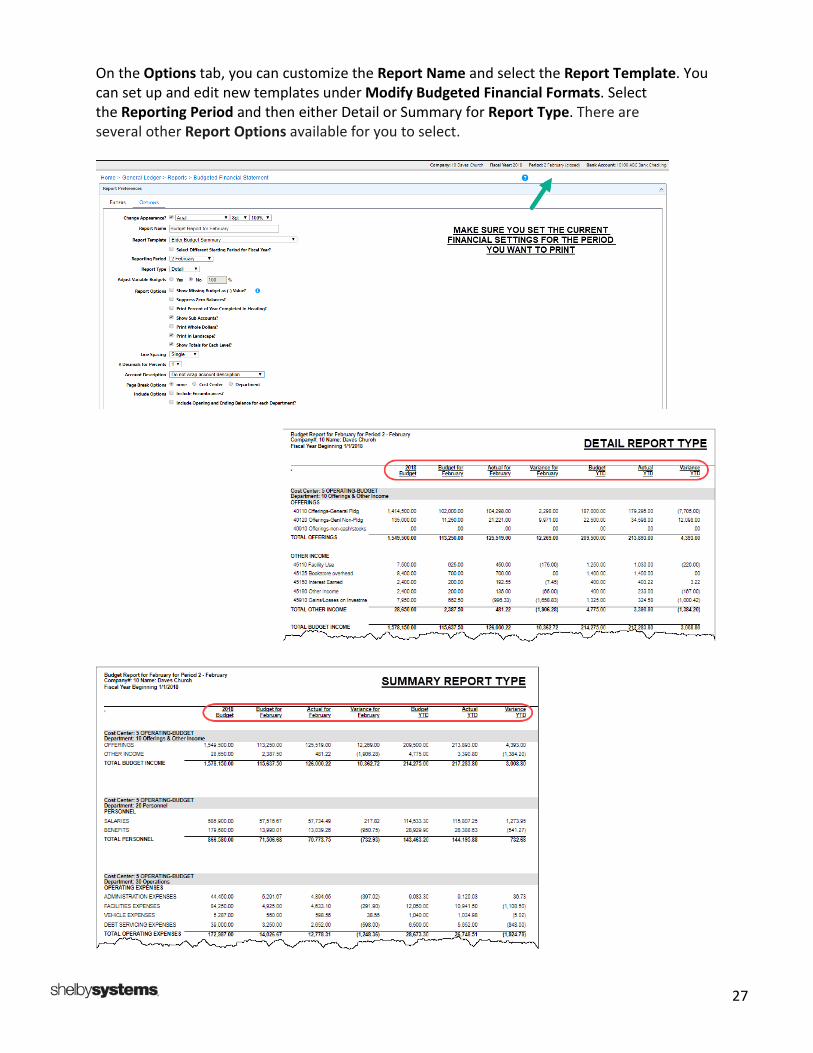
On the Options tab, you can customize the Report Name and select the Report Template. You can set up and edit new templates under Modify Budgeted Financial Formats. Select the Reporting Period and then either Detail or Summary for Report Type. There are several other Report Options available for you to select.
28
Financial Spreadsheet
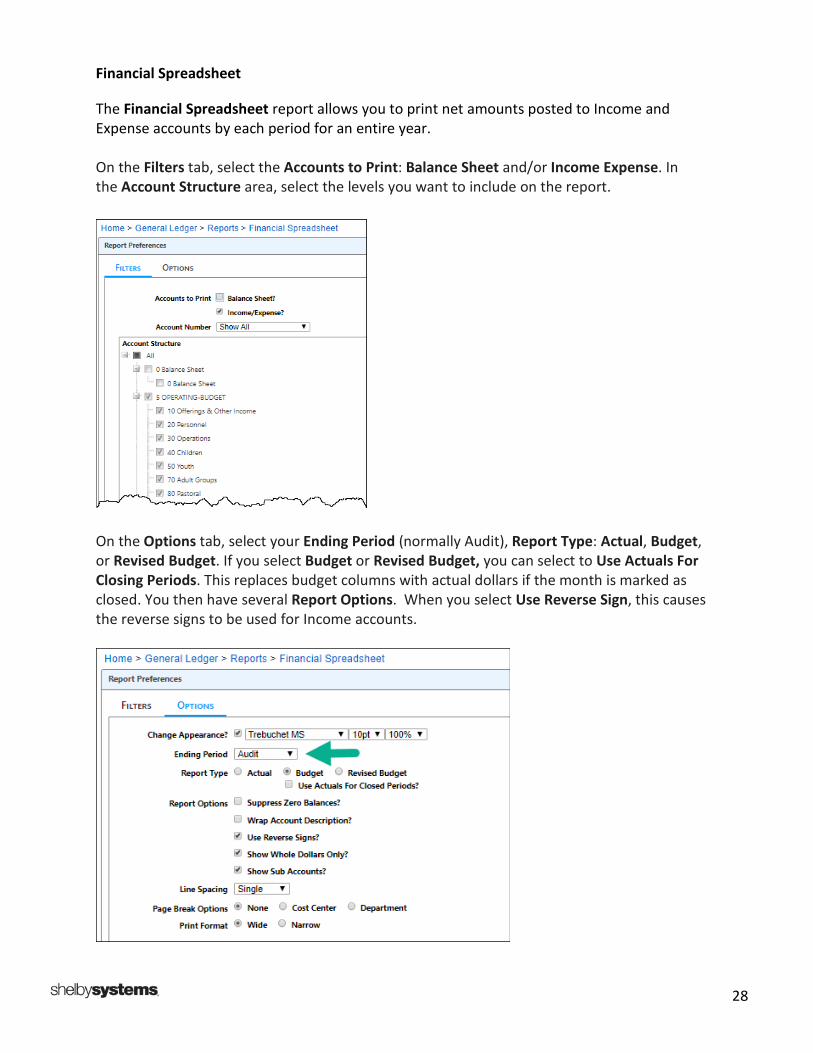
The Financial Spreadsheet report allows you to print net amounts posted to Income and Expense accounts by each period for an entire year. On the Filters tab, select the Accounts to Print: Balance Sheet and/or Income Expense. In the Account Structure area, select the levels you want to include on the report.
On the Options tab, select your Ending Period (normally Audit), Report Type: Actual, Budget, or Revised Budget. If you select Budget or Revised Budget, you can select to Use Actuals For Closing Periods. This replaces budget columns with actual dollars if the month is marked as closed. You then have several Report Options. When you select Use Reverse Sign, this causes the reverse signs to be used for Income accounts.
29
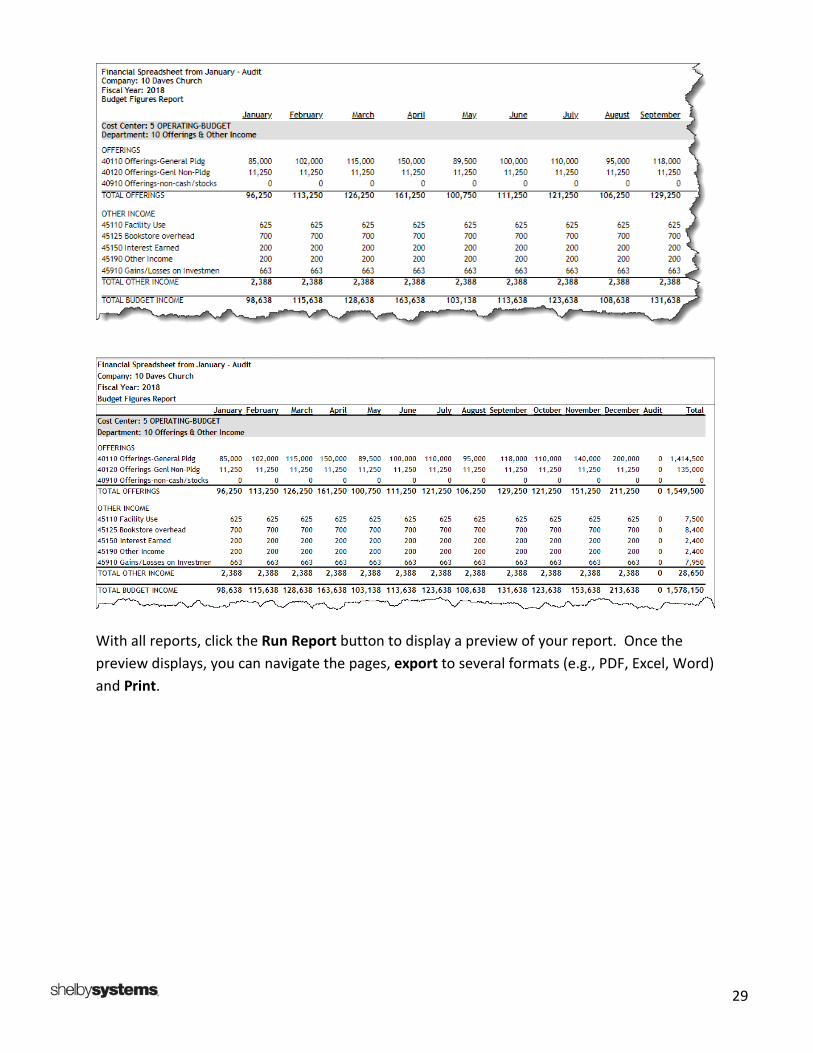
With all reports, click the Run Report button to display a preview of your report. Once the preview displays, you can navigate the pages, export to several formats (e.g., PDF, Excel, Word) and Print.

30
Q&A
Class Discussion

Dave served as an accountant for a Phoenix-based CPA firm before he joined the staff of his church in 1977. Over the last 40 years, Dave has served as an administrator at three churches in the Phoenix metro area. Dave recently retired as the Director of Finance for Phoenix Seminary in AZ. Dave has been a Shelby user since 1985 and trains as a Shelby Consultant training on Shelby v.5 and ShelbyNext | Financials.
Dave Heston Shelby Consultant