soccer chelsea u8 program guide · 2017-07-12 · soccer chelsea u8 program guide ......
TRANSCRIPT

Soccer Chelsea
U8 PROGRAM GUIDE
VERSION 1.0

ii
ABOUT THIS MANUAL
ACKNOWLEDGEMENT
This guide is intended for the U7-U8 Program of Soccer Chelsea and helps the coaches and their assistants run the program. The content is derived from the listed sources and has been edited to fit the needs of the U7-U8 Program. A special thank you goes to David and Kay Huddleston of SoccerHelp who gave us the kind permission to print and distribute up to 15 pages of information from their site and the candid spirit of Gavin J. Spooner and Daniel Frankl who gave full access to the material on their sites.
SOURCES
Jacques Michaud, Soccer Chelsea U8 Coordinator 2004 Season.
Soccer Chelsea Program for 7/8 Year-old, by Sylvie Béliveau, 2003 Season
David and Kay Huddleston from SoccerHelp www.soccerhelp.com/index.shtml
Article written by Jeff Pill, NHSA Director of Coaching. Special thanks to Dr. Thomas Fleck and the National Youth Coaching Staff, Bill Buren, Dr. David Carr, Dr. Ronald Quinn, Virgil Stringfield taken directly from the New
Hampshire Soccer Association website
Coaching Manual for 6 and U8 Soccer Coaches by Gavin J. Spooner, http://www.decatursports.com/drills/soc/u6_u8manual.htm
Daniel Frankl www.kidsfirstsoccer.com

iii
TABLE OF CONTENTS
FIELDS ............................................................................................................ 1 Practice Fields .......................................................................................... 2 Game Fields .............................................................................................. 3
U8 PROGRAM DESCRIPTION ....................................................................... 4 Program Objectives .................................................................................. 4 Program Description ................................................................................. 4 Equipment Requirements ......................................................................... 5 Parent Involvement ................................................................................... 6
U8 PRACTICE GUIDE .................................................................................... 7 Practice Breakdown .................................................................................. 7 Warm-Up Exercises .................................................................................. 8
DRILL DESCRIPTIONS .................................................................................. 9 Team Building (TB) ................................................................................... 9 Passing (PS) ........................................................................................... 16 Ball Control (BC) ..................................................................................... 18 Shooting/Kicking (SK) ............................................................................. 27 Throwing/Heading (TH) ........................................................................... 29 Mini-Game (MG) ..................................................................................... 32

1
FIELDS
Since the practice and game field requirements are different, the field layout for games and practices must also be different. This section describes the game field location and layout, and describes the practice field location, station layout and drill rotation for each week. This section also includes all practice and game schedules.
There are four soccer fields as shown in the following diagram. Your teams will use fields 1, 3 and 4 for all games and practices.
2
PRACTICE FIELDS
This section describes the practice field layout, start positions and the drill rotation schedule.
Practice Field Layout
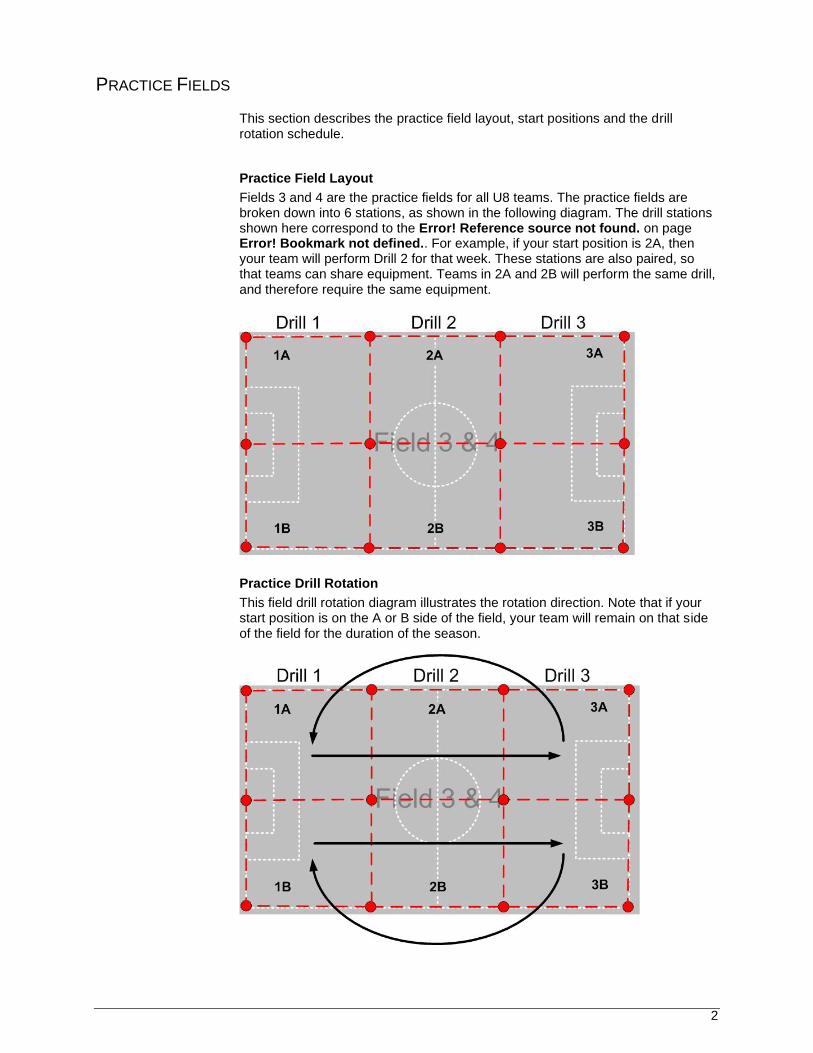
Fields 3 and 4 are the practice fields for all U8 teams. The practice fields are broken down into 6 stations, as shown in the following diagram. The drill stations shown here correspond to the Error! Reference source not found. on page Error! Bookmark not defined.. For example, if your start position is 2A, then your team will perform Drill 2 for that week. These stations are also paired, so that teams can share equipment. Teams in 2A and 2B will perform the same drill, and therefore require the same equipment.
Practice Drill Rotation
This field drill rotation diagram illustrates the rotation direction. Note that if your start position is on the A or B side of the field, your team will remain on that side of the field for the duration of the season.

3

4
GAME FIELDS
This section describes the game field layout and location for each game.
Game Field Layout
All U8 games are played on fields 1, 3 and 4. Field 3 and 4 are sub-divided into fields A and B. Refer to the girls and boys game schedules for specific game locations.

5
U8 PROGRAM DESCRIPTION
PROGRAM OBJECTIVES
The U7-U8 program is for children who will turn 7 or 8 this year. The program objectives are:
Develop sportsmanship and to have fun.
Understanding the basic rules of soccer.
Build friendships with peers in the community.
Develop basic soccer motor skills including coordination, balance, body and ball control
Develop basic soccer skills including ball control, passing, goal keeping, throwing, kicking and heading.
PROGRAM DESCRIPTION
At Chelsea Soccer, the U7-U8 Program is an extension of the U5-U6 program with more emphasis on soccer skills, development and game situations. It will consist of a mix of skill development sessions, games and special events composed of the initial team rating round robin tournament, the mid-season soccer rodeo and the end season rodeo.
Team Size and Selection
Depending on the number of kids registered in the program, the team roster size will be between eight to twelve players. The program practices will usually run on Saturday mornings and games will be played on weekdays.
Game/Practice Format.
The training sessions will last 90 min. and consist of a 10 min. warm-up followed by three 15-min skill-development drills. The remaining time (approx. 20 min.) is used to play an inter-squad soccer game where coaches will act as referees.
League games will consist of four 12-min. quarters in mini-soccer format opposing a maximum of six players aside including the goalkeeper.
The U7/U8 players will be introduced to all field positions with players designated as defender, forwards and goalie. Before the beginning of the season we try to balance the teams according to ability in order to provide motivation and challenge to all players.
Basic soccer rules will apply with some minor adjustment to the rulebook and without the offside rule. Neutral referees will be provided for all regular league games. Referees will verbally call minor infractions but play will resume, allowing maximum participation. Notwithstanding, dangerous play will result in play stoppage and the player at fault will be asked to report to the coach for counselling.

6
Soccer Skills Introduced/Developed.
The following skills will be introduced or developed further:
Dribbling
Striking with head & feet
Passing & Receiving
Ball & Body control
Shooting
Goalkeeping
Juggling
Creating space & support play
EQUIPMENT REQUIREMENTS
Soccer Chelsea team jerseys/shorts and socks will be handed out at the beginning of the season. Each player must wear appropriate soccer shin pads covered by knee-length socks and have suitable soccer shoes.
Shin Guards
Players should wear shin guards to every practice and every game. Hard surfaces of shin guards must be covered with socks. Encourage parents to buy properly sized shin guards that have a hard surface, either plastic or fibreglass and padding to cover the anklebone.
Cleats
Players should wear shoes with rubber cleats. No shoes with front cleats may be worn, i.e., no baseball or football shoes if they have a front cleat, unless it is cut off. Metal cleats are not allowed.
Clothing
Jewellery, metal devices, or hazardous equipment should be taken off before the game. Casts can be allowed if they are padded and the referee approves them before the game.
Goalkeepers should wear a special goalkeeper jersey, or a mesh-training vest (pinnie) or a T-shirt. The goalkeeper‟s shirt colour must distinguish them from the other players and from the referees.
Water Bottle
Bring a plastic water bottle to games and practices. Coaches should allow adequate water breaks during practice and bring extra water as some players will always forget to bring water.
Ball
Bring a stitched soccer ball, as opposed to a hard seamless ball, of size 4 clearly identified with his/her name. The ball size is shown on the ball. Ideally it should have a stamp that says either "official size and weight" or "FIFA Approved". Even if a ball is the official weight, some balls are heavier and harder than others. Don't get a ball that is too heavy or hard like some seamless balls that are painful to kick. If you have a choice, a shiny, waterproof surface is best because it won't

7
absorb water and will last longer. Test the ball to see if it's round and will fly straight by tossing it into the air with a lot of spin on it to see if it wobbles.
PARENT INVOLVEMENT
The U7/U8 Program is totally run by volunteers. Involvement of the parents as volunteers for coaching or helping with different activities is critical to the success of the program.
Coach Volunteers
No specific skills are required. You will get the support needed. Soccer Chelsea offers training sessions and technical support throughout the season to all coaches. A program manual will be handed out at the beginning of the season.
Assistant Coach Volunteers
Every team needs an assistant coach to help with on–the-field activities and to share the administrative responsibilities.
Other Requirement for Support
To ensure the success of the program, we also require:
Referee Coordinator
Special Event Coordinator
Field and Equipment Coordinator
Statistician

8
U8 PRACTICE GUIDE
PRACTICE BREAKDOWN
Practices will focus on skill-development stations followed by an inter-squad game. The 90 minute training session will be broken down as follows:
Warm-up (10 mins)
A 10 min. warm-up is appropriate in order to get the players thinking about soccer and to prepare them physically for the time ahead. This should involve individual body activities that may or may not involve the ball as explained in the next section.
Drills (4 x 15 mins)
All teams will rotate through three 15-min. sessions focusing on a specific skill. As the season progresses, each session serves as a building block to build a specific soccer skill and to understand the basic concept of soccer including team building, ball control, passing, kicking (shooting), goal keeping, throwing and heading.
Mini Game (25 mins)
The training session will finish with a 20 min. inter-squad soccer game across the short side of the field. The game will be played according to U7-U8 rules but without a fixed goaltender. This format allows players to learn to defend aggressively and to achieve the maximum number of ball contacts during a short period of time. The mini game will heighten the intensity of the players, who are now tired of the drills. It will also create some good competition within the team. If the conditions permit, the team can be divided into two squads playing against another two squads from a different team.
Warm-down and Snack (5 mins)
Finish the session with a short warm-down and give the players some more stretches to do with the ball. Give them some homework for the week so that they practice on their own. Think of some ball trick that they can practice on their own (such as bouncing the ball off their head, then kicking it high and catching it.)
It is important to finish on time. This is especially essential if the players are really into it. Stop at this point and you will get an enthusiastic return. Have fun while kids share a snack brought by a parent.

9
WARM-UP EXERCISES
The Importance Of Warming-Up
In general, warming up and stretching before playing soccer is very important. For the U7-U8 program, the priority is to teach them the proper way to warm up and to make warm up a routine for future years when their muscles will have much less elasticity.
Many coaches skip the "warm up" and go straight to stretching. This is a mistake. A light warm up is important because it "warms up" the muscles, which makes them stretch easier and less likely to tear. If you think about it, this makes sense. Many experts even promote post-game stretching because it will improve flexibility and reduce muscle soreness.
Warm Up
Warm up the muscles with light activities such as jogging or slowly dribbling a ball around the field. Warming up with a ball is the ideal way if it is practical to do so. Once players are warmed up, they can stretch. Many of the tem building (TB) exercises make ideal warm-up exercises.
Stretch the muscles
Static stretching is appropriate, but stretching with a ball is best.
Have players stretch the following muscles:
Front of the thigh
Back of thigh (hamstring)
Inside of thigh
Calf
Note Most soccer injuries occur to the hamstring and inside of thigh muscles.
Stretching should not be painful; so be sure the players do not over-stretch. Stretching should be fun and carried out at a relatively slow pace to allow for proper preparation of the muscles.
Use the following best-practices for each stretch:
Apply the stretch slowly
Hold for 10-15 seconds
Repeat 2-4 times

10
DRILL DESCRIPTIONS
This section describes the following drill categories that your team will perform at each practice:
Team Building
Passing
Ball Control
Shooting/Kicking
Throwing/Heading
Mini-Game
The goal of each drill is to develop a specific skill, to build team spirit and cohesiveness, to keep all players moving at all times, and to be fun.
You may have to modify these drills to accommodate for the field conditions, weather, or the number of players at the practice. If necessary, select an entirely new drill. Some of them may not be filling the 15-minute drill time period. It is therefore important to prepare yourself ahead of time and to go through the entire training program in your mind.
TEAM BUILDING (TB)
This section describes the team building drills that you will perform with your team at each practice. Many of these exercises can be used during warm-up.
TB01. Who’s Who
Each player has a ball. Call out the name of a player. Have the players run to the player that you just named and touch him. Begin this drill with players carrying their balls, and as players improve progress to dribbling.

11
TB02. Circle the wagon
Tell players to sit on the ground forming a large circle. Assign each player a number.
Call out one of the numbers that you have assigned. When a player‟s number is called, the player moves around the circle. Have players move in the following ways: running forward, running backward, hopping on one leg, running sideways, skipping on two legs, or doing the crab-walk.
TB03. Hoops Relay
Line up hoops 1 m apart. Divide players into three teams, and have each team form a line. On the whistle, the first player from each team completes the first task, as described below. Once the first player completes the task, they hand the ball to the second player on their team. The second player also performs the first task and hands the ball off to the next player. The circuit is complete when all players on the team have completed each task once.
This relay should include several tasks.
Task 1:Hop on left leg through the hoops, around the cone and come back in the same manner
Task 2: Hop on the right leg; through the hoops, around the cone and come back in the same manner.
Task 3: Move side ways between all hoops, around the cone and come back in the same manner.
Task 4: Run in a zigzag between all hoops, around the cone and come back in the same manner;
Task 5: Two foot hop through the hoops, around the cone and come back in the same manner.
Task 6: Run in a straight line touching the inside of each hoop and using one step between each hoop, around the cone and come back in the same manner;
Task 7: Run in a straight line backward touching the inside of each hoop, around the cone and come back in the same manner.
12
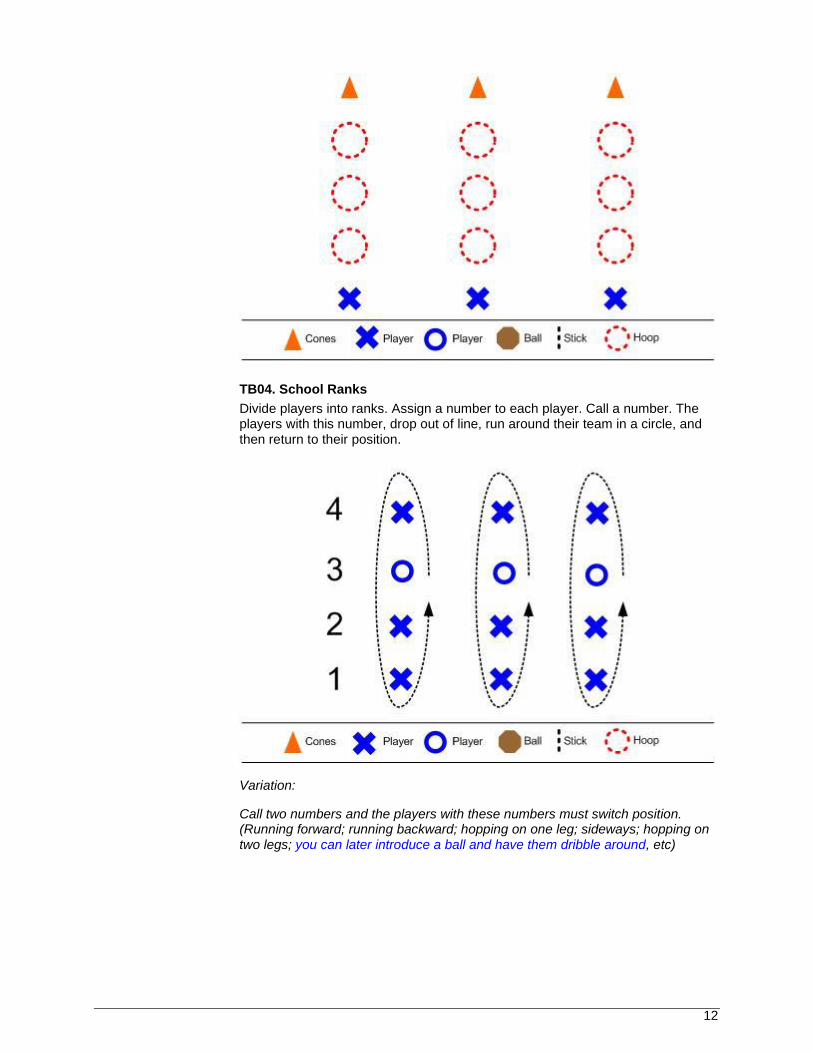
TB04. School Ranks
Divide players into ranks. Assign a number to each player. Call a number. The players with this number, drop out of line, run around their team in a circle, and then return to their position.
Variation:
Call two numbers and the players with these numbers must switch position. (Running forward; running backward; hopping on one leg; sideways; hopping on two legs; you can later introduce a ball and have them dribble around, etc)

13
TB05. Duo
Divide players into teams of two players. Have the teams stand back-to-back. Give each team one ball. At the whistle, players hand the ball to each other, passing the ball around their bodies ten times.
Variation: Have players pass the ball in a figure-eight pattern, passing the ball between their bodies.
TB06. Merry go round
Divide players into teams of about 4 players. Have each team form a line. The first player passes the ball to the second player by reaching back over their head. The second player takes the ball and passes it back to the third player by passing the ball through their legs. Players continue going over and under until the ball reached the last player. The last player runs to the front of the line and continues the circuit. The circuit is completed when players are back in initial position and sitting down.
14
Variation: Have players pass the ball in a figure-eight pattern, passing the ball between their bodies.
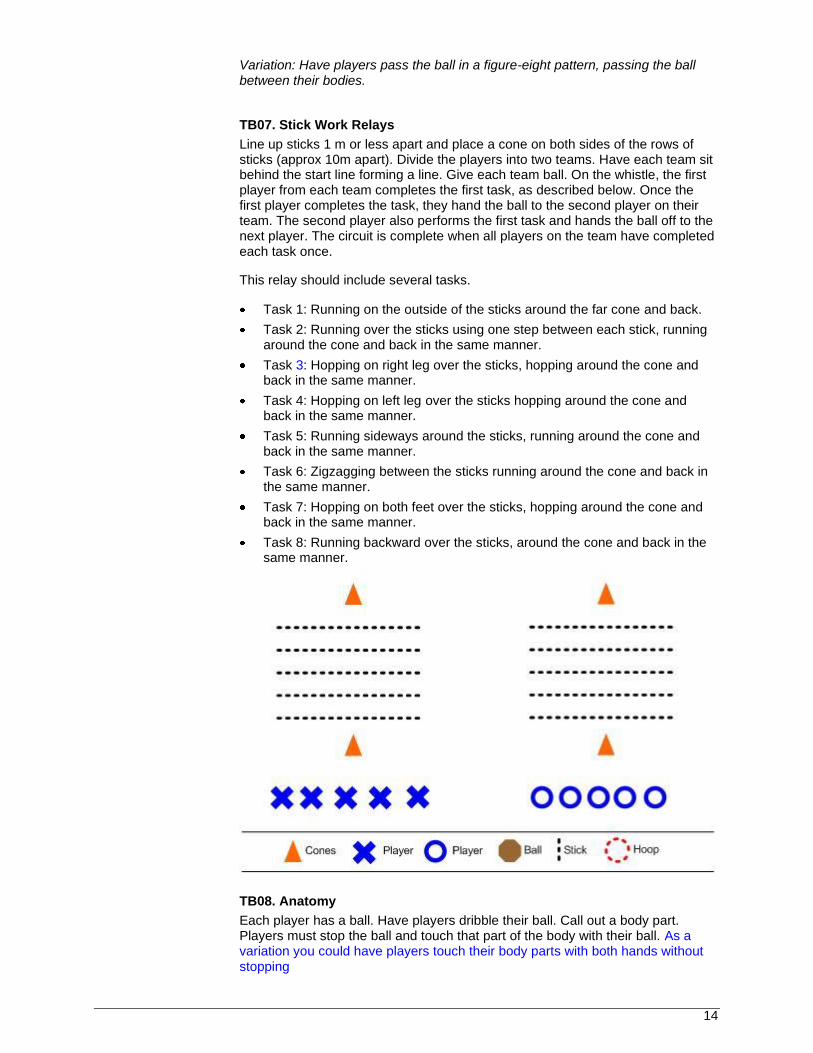
TB07. Stick Work Relays
Line up sticks 1 m or less apart and place a cone on both sides of the rows of sticks (approx 10m apart). Divide the players into two teams. Have each team sit behind the start line forming a line. Give each team ball. On the whistle, the first player from each team completes the first task, as described below. Once the first player completes the task, they hand the ball to the second player on their team. The second player also performs the first task and hands the ball off to the next player. The circuit is complete when all players on the team have completed each task once.
This relay should include several tasks.
Task 1: Running on the outside of the sticks around the far cone and back.
Task 2: Running over the sticks using one step between each stick, running around the cone and back in the same manner.
Task 3: Hopping on right leg over the sticks, hopping around the cone and back in the same manner.
Task 4: Hopping on left leg over the sticks hopping around the cone and back in the same manner.
Task 5: Running sideways around the sticks, running around the cone and back in the same manner.
Task 6: Zigzagging between the sticks running around the cone and back in the same manner.
Task 7: Hopping on both feet over the sticks, hopping around the cone and back in the same manner.
Task 8: Running backward over the sticks, around the cone and back in the same manner.
TB08. Anatomy
Each player has a ball. Have players dribble their ball. Call out a body part. Players must stop the ball and touch that part of the body with their ball. As a variation you could have players touch their body parts with both hands without stopping

15
TB09. Tap Tap
Each player has a ball. Players begin each drill by holding the ball in their hands. Have players toss the ball and perform each of the following drills:
Kick the ball high (using left and right foot) and then try to catch the ball.
Kick the ball high, let it bounce and then kick it high again.
Kick the ball about chest high and catch the ball. Repeat. As players improve, have them perform this drill without catching the ball between kicks. This drill is also known as “keep-up”.
TB10. Tag Team
Divide players into teams of two players. Make half of the teams “defenders” and the other half “attackers”. (If there is an odd number of teams, the extra team should be an attacker team).Pair each attacker team with a defender team, and give a ball to the attackers. Have the "defenders" hold hands and try to tag the ball-handling "attacker" with their hands. The attacker can avoid being tagged by passing the ball to his or her team-mate. Defenders must be holding hands or a tag does not count. Defenders cannot tag the same attacker twice consecutively. Play for 2 minutes and then switch.
TB11. Team Keep Away
Place cones to outline a field about 20m x 20m (adjust the size according to your team ability and the number of players). Divide the players into 2 teams. Give each team one ball for every 2 1/2 to 4 players (for example, 5 - 7 players per side should get 2 balls, and 8 - 9 players per side should get 4 balls). If there are 4 players per side, you can let one team start with 2 balls and the other team with one ball. Each team must try to keep their balls and steal the other team‟s balls. If a ball goes "out of bounds", play it in with feet or throw in. After each 4-minute game, balance the teams so they are competitive.

16
Tips:
Players with the ball should work in pairs or groups of three.
If a player has a ball but no "support", he should call someone by name to come to support him.
Encourage clear communication with team-mates, such as calling team-mates by name and being specific (e.g., "John, support!" or "John, man on").

17
PASSING (PS)
This section describes the passing drills that you will perform with your team at each practice.
PS12. Passing Square
Divide players into groups of two players. Have players practice passing to their partner using the following options:
Option A Passer remains stationary and passes the ball to his partner who is moving to an open space. Players keep moving around the square.
Option B Passer passes the the ball to his partner and then moves after the pass to an open space. Players keep moving around the square.
PS13. Pass to Me
The purpose of this drill is to practice moving into the open after a pass. Place cones to outline a field about 20m x 20m (adjust the size according to your team ability and the number of players). Give a ball to half of the players plus one. On the word “Go”, players dribble with the ball but cannot keep it for more than x seconds or touches. They must pass to a free player. The free player should call for the pass by positive pointing or calling for the ball from the passer. Call “stop” randomly.
Note You can increase the difficulty of this drill by reducing the possession time, the number of touches and or by disallowing a return pass to the player who passed the ball.

18
PS14. Precision Pass Game
Divide players into groups of two players. Position cones as gates for each pair in the middle of the field in a neutral zone. Have the group members face each other on opposite sides of a gate. Give each group a ball. On “Go”, players must pass the ball between the gates.
PS15. Dribble Around Cone and Pass Relay Race
Set up rows of cones, placing the cones about 6 meters apart. Divide players in to teams. Have players dribble the ball around the cones. When the player rounds the final cone, he must pass the ball back to his team-mate.

19
BALL CONTROL (BC)
This section describes the ball control drills that you will perform with your team at each practice.
BC16. Traffic Jam
Divide players into groups of four players. Have each group form a square. Give each player a ball. Assign each player within each group a number from 1 to 4. When you call a number, players with that number must put the ball on the ground and dribble the ball clockwise or counter-clockwise (as per your instructions) around the other three players. The other players must remain stationary, acting as pylons.
Variation:
Players select the direction themselves. Players must keep their head up while dribbling.
BC17. Wolf Pack
Give each player a ball. Assign two players to be "It”. These players are the only players to start with a ball on the ground. All other players start with the ball in their hand. On „Go‟, players who are “it” must dribble and kick the ball, attempting to hit the other players below the waist. The other players should try to avoid being hit by the ball. Once hit, players put their ball on the ground and join players 'who are “it”. The game is over when all of the players have been hit. The last two players to be hit start the next round of the game. Encourage quick movements and sudden changes of direction to catch players off guard.

20
BC18. My Ball
Place cones to outline a field about 20m. Give half of the players a ball. Have all players run around within the field. The players with the ball must pass the ball to a free player. Encourage communication and the use of open space.
BC19. Stay Away From Me
This drill practices protecting the ball and creating space. Place cones to outline a field about 20m. Give each player a ball. Have players dribble their ball. When you call “Stop”, players must stop the ball with their foot.
Variation: Have players to try to kick the ball away from another player.

21
BC20. Thief
Place cones to outline a field about 20m. Give half of the players a ball. Have players dribble their ball, while the other players attempt to steal it. When a player loses control of their ball, they must try to steal from a ball from another player.
BC21. Tic-Toc
This drill practices fast foot movement and ball control using inside of the foot.
Give each player a ball. Have the players start with the ball between their feet, with knees bent. On the word "Go", each player taps the ball back and forth between his feet until they reach 20 taps. When they manage this well on a small scale, have them move forward – first slowly then faster always tapping the ball back and forth between their feet.

22
BC22. Stop and Go
Place two sets of cones at both ends of the field to create a start and finish line. Give each player a ball. Players line up on the start line with their balls. You stand at the finish line with you back to the players. When you call "Green Light", players dribble their ball forward as much as they can. When you call "Red Light" and turn around, players must stop their ball with their foot and remain in that position. Send any player that are still moving or without a ball back to the starting line. The first player to reach the finish line wins.
BC23. Squirrel
Place cones into small squares (nests). Position these squares so that they are spread out and form the corners of a larger square. Divide players (squirrels) into four teams. Have players stand in their square and place their balls (precious nuts) in the middle. When you give the signal, one “squirrel” per “nest” runs out to get a “nut” from another “nest” and must bring it back to his team‟s “nest”. To perform this task, players must dribble the ball and then stop it when they return to their nest. As soon as a “squirrel” is back in his “nest”, another “squirrel” can leave. No “squirrel” can stop another “squirrel” from taking a” nut”. Stop the game after 4 minutes. Count the “nuts” in each “nest”. The “nest” with the most “nuts” wins.

23
Variation:
Give each player a ball. Have the players run with the ball inside their respective house. When you give the signal, players must change house according to your instructions: clockwise, counter clockwise or switch house with another team.
BC24. Driving School
Place cones to outline a field about 20m. Give each player a ball. Players must dribble the ball within the marked field. Give players visual cues which forces the players to look up so they what they should be doing. Players must dribble and follow your cues. Before you begin the drill demonstrate each of these moves to the players.
Go Start dribbling. “Keep the ball near your feet & look up while you dribble so you don't run into someone".
Stop Players put their foot on top of the ball to stop it.
Slow Slow dribble.
Speed Up Dribble faster but keep looking up and don't wreck.
Turn right Use the outside of the right foot to push the ball to the right and then dribble in that direction. This teaches them to stop & turn the ball using the outside of the foot. Be sure they know which is the right foot.
Turn left Use the outside of the left foot to push the ball to the left and then dribble in that direction.
Reverse Use the bottom of foot to pull the ball back, i.e., flick it backward, turn around and go the other way.

24
BC25. Square Dance
This drill is a great game that teaches dribbling and how to use the bottom and outside of the foot to stop the ball and turn.
Use 4 disk cones to make a square about 10 or 12 meters wide, (smaller or larger depending on number of players). Give each player a ball. Have players spread out around the perimeter of the square, facing inward. Players must successfully pass the ball through the square.

25
BC26. Hawk/Chicken
Place cones to outline a field about 20m. Give each play a ball, except for one player. All player with a ball are “chickens”, the player without a ball is the “hawk”. The “chickens” must run across the field with the ball while the “hawk” attempts to tag them. Tagged “chickens” put their ball on the side of the field and help the “hawk” until no “chickens” are left.
Variation:
Have the “chickens” dribble the ball, while the ”hawk(s)” attempt to tackle them and take the ball away from the “chicken(s)”.
BC27. Dribble Around Cone & Back Relay Race
Divide players into teams of two to four players. Set up a relay course for each team, spacing them about 8 meters apart. Give each team a ball. On "Go", the first player dribbles the ball around the cone, back to the starting line and gives the ball to his team mate who then dribbles around the cone and back, etc. Teach the players to "pop the ball" for a fast start by kicking the ball forward about 5 steps and then running to it. This trick can also be used after making the turn. Everyone must go around the same side of the cone. Change the side for each set so everyone goes around the cone on the designated side so they are either turning the ball with the inside of the outer foot or the outside of the inner

26
foot.
Variations:
Players go past the cone (rather than around it) and turn by using a pullback.
Players circle the cone once entirely and then continue back.
Same as variations above but players can only use the top or outside of their foot to dribble the ball.
27
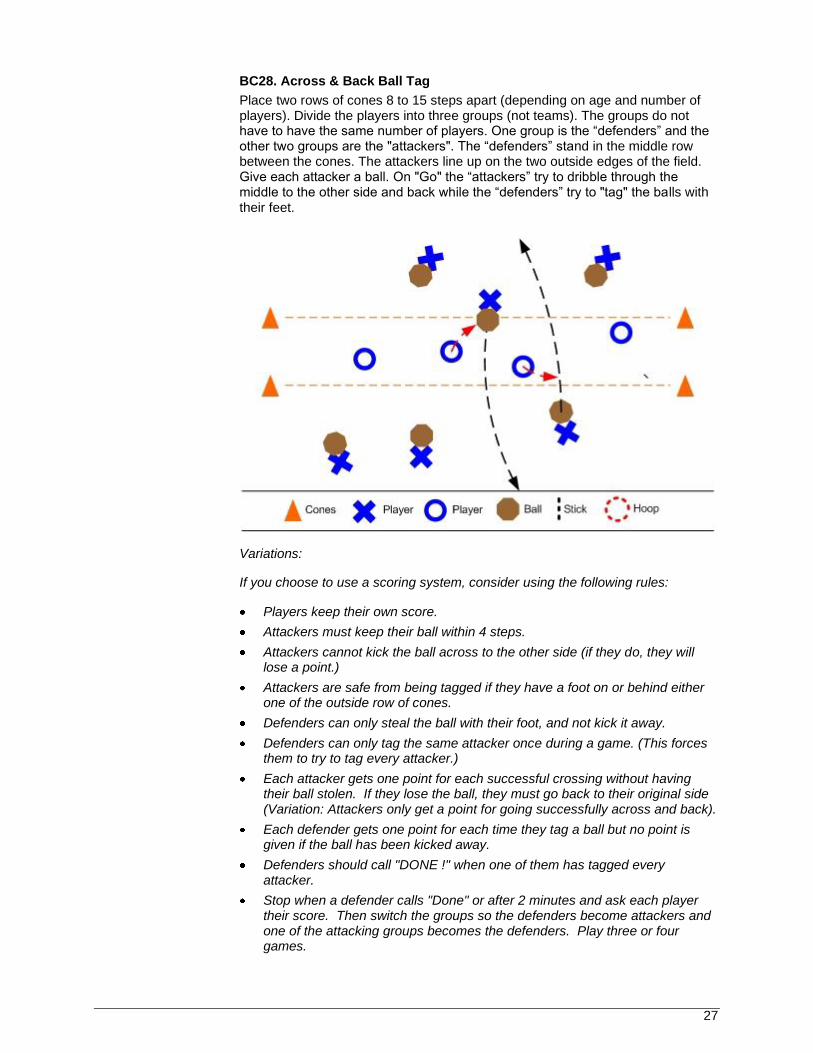
BC28. Across & Back Ball Tag
Place two rows of cones 8 to 15 steps apart (depending on age and number of players). Divide the players into three groups (not teams). The groups do not have to have the same number of players. One group is the “defenders” and the other two groups are the "attackers". The “defenders” stand in the middle row between the cones. The attackers line up on the two outside edges of the field. Give each attacker a ball. On "Go" the “attackers” try to dribble through the middle to the other side and back while the “defenders” try to "tag" the balls with their feet.
Variations:
If you choose to use a scoring system, consider using the following rules:
Players keep their own score.
Attackers must keep their ball within 4 steps.
Attackers cannot kick the ball across to the other side (if they do, they will lose a point.)
Attackers are safe from being tagged if they have a foot on or behind either one of the outside row of cones.
Defenders can only steal the ball with their foot, and not kick it away.
Defenders can only tag the same attacker once during a game. (This forces them to try to tag every attacker.)
Each attacker gets one point for each successful crossing without having their ball stolen. If they lose the ball, they must go back to their original side (Variation: Attackers only get a point for going successfully across and back).
Each defender gets one point for each time they tag a ball but no point is given if the ball has been kicked away.
Defenders should call "DONE !" when one of them has tagged every attacker.
Stop when a defender calls "Done" or after 2 minutes and ask each player their score. Then switch the groups so the defenders become attackers and one of the attacking groups becomes the defenders. Play three or four games.
28
SHOOTING/KICKING (SK)
This section describes the shooting/kicking drills that you will perform with your team at each practice.
SK29. Beat the Keeper
Divide the player into groups of two. Have players stand about 40 steps apart. Position two cones in the middle of the field mid-way between the two players and about 8 steps apart. Have players kick the ball to each other keeping the ball between the cones.
Variation:
Position a third player in the gate. These players must attempt to stop the ball. All players rotate as a goalkeeper. Players must keep the ball on the ground.
SK30. Kick Practice
Divide the players into groups of two and have them face one another about 8 feet apart. Position the players so that one line of partners is parallel to the other, about 5 meters apart. Have each pair attempt the following drills:
Kick the ball with the laces of each shoe.
Touch the ball with the laces of each shoe.
Point their toe down and lock the ankle.
Step next to the ball and kick the centre of the ball.
Kick the ball back and forth.
Encourage players to practice kicking with both feet rather than just using their dominant foot.
SK31. Dribble, Turn & Shoot Race
Divide the players into three teams (it is okay to have more players on one team than on another). Give each player a ball. Use cones to make one goal per team where each goal is 2 meters wide. Put a "Turning Cone" out 10 meters away from each goal. Line each team up beside the goal they will be shooting on, starting on the right side, so all the teams are turning in the same direction. After each game, have the players start beside the other side of the goal, so that they turn to the left in one game and to the right in the next game. On "Go", the first player in each line dribbles to the "Turning Cone", turns around it and dribbles back to the Goal and shoots. The player may shoot as soon as he/she thinks he/she can make the shot. The next player in each line can go as soon as the prior player takes a shot. Players who shoot must run to pick up their own ball and go to the back of the team's line to be ready when it is their turn again. One point is given for each goal and the first team to reach 10 wins. Play three games and, if necessary, re-balance the teams after each game.
SK32. Dribbling Race
This drill practices the use of the inside and outside of same foot. Players race simultaneously around two cones in a "Figure 8" pattern using only the inside and outside of one foot. They turn around one cone using the outside of the foot and around the other cone using the inside of the same foot. Good players can control the ball using the inside and outside of the same foot; this is very useful in dribbling and shielding the ball. Split your players into two groups and let one group play while the other watches. The first to complete five trips around the

29
cones and back to the start is the winner. Allow players to use the bottom of the foot to stop the ball. Then, play again with everyone using only the other foot. Let the players all practice for a minute while you watch to be sure they understand what to do. Tell them to use their preferred foot to dribble in the first game. This is so they are all competing using their strongest foot in the first game and their weaker foot in the second game so each player is as competitive as possible. Play four games, (two with each foot). Use disk cones to make two rows putting the cones opposite each other, four steps apart, and place the cones in each row also four steps apart so that players have enough room to turn around the cones without running into each other. Tell players to yell "DONE" when they have made five trips across and back. The first to make five trips across and back is the winner. Then, play another game requiring each player to use the opposite foot.
SK33. Scoring Zone Game
Use disk cones to outline the field that is 40 to 50 steps long and 25-40 steps wide, depending on the age group. Use two cones to make a goal at each end that is four steps wide. Put one cone in the middle to mark the halfway line. Put a red cone 7-10 steps in front of each goal to mark the "Scoring Zone".
Divide the players into two balanced teams (with a parent or coach playing if necessary). Use vests or some method to identify the teams. Do not use a goalie. The benefits of this game are that all players learn to play tough defence and to block shots, rather than relying on a goalie, and that players must „work‟ the ball close to the goal to score and rather than taking long shots. Encourage control, dribbling, passing, and movement with or without the ball in the attacking zone.
Start each game by having each team start from inside its Scoring Zone. This forces them to control the ball and prevents kick-offs. Goals only count if shot from within the scoring zone, which is identified by a red cone.
Variation:
Eliminate the goals
Increase goal size but the players must run with the ball past the line and stop the ball with the sole of one foot in order to score a goal.
SK34. Kick/Goal Rally
Place a cone 14 steps in front of the goal. The goal can be a regular net or one marked by cones or flags. The goal should be six steps wide. Adjust the distance from the goal and the width of the goal so that attackers and defenders have reasonable success. Give each player a ball. Line up the players with their ball behind the cone. Create more than one line-up so that the activity level is maintained. The ideal number is five players per goal rally. Have one player start in the goal.
The first player runs with the ball and takes a shot on goal before passing the cone. The successful shooter replaces the goalkeeper. The unsuccessful shooter goes to the back of the line. The goalkeeper must stay inside the 2 cones. The attacker should continue forward after the kick for any rebounds.
30
THROWING/HEADING (TH)
This section describes the throwing/heading drills that you will perform with your team at each practice.
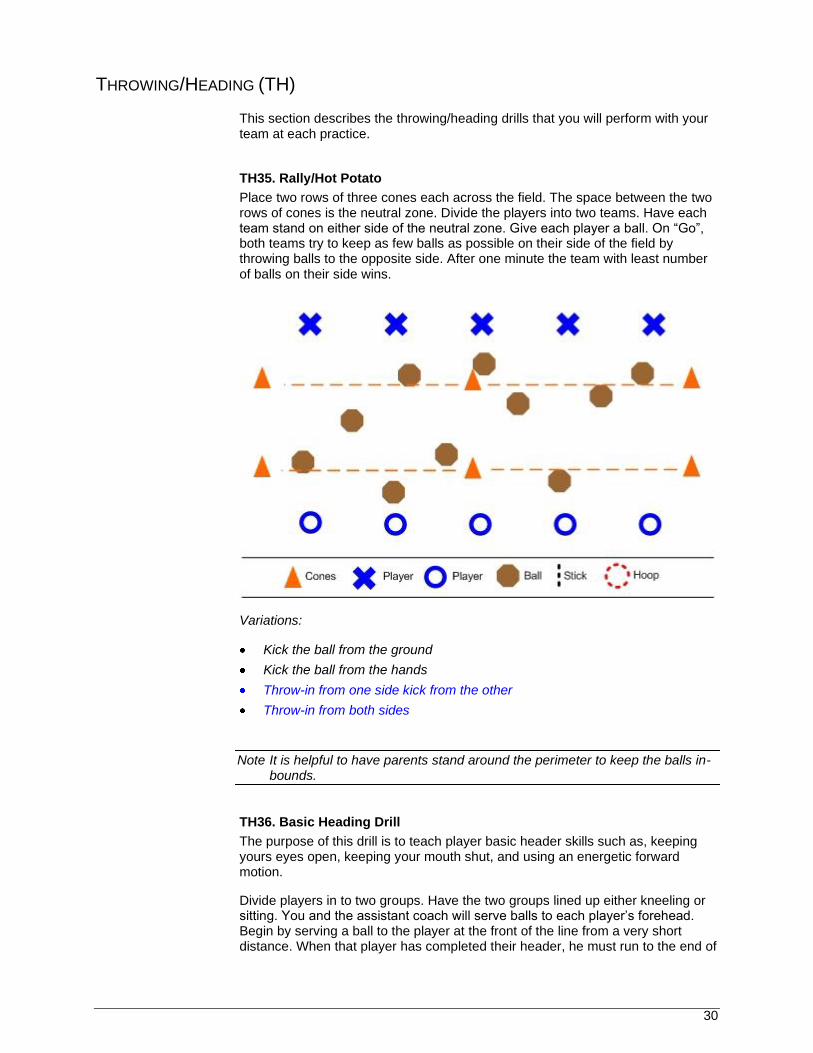
TH35. Rally/Hot Potato
Place two rows of three cones each across the field. The space between the two rows of cones is the neutral zone. Divide the players into two teams. Have each team stand on either side of the neutral zone. Give each player a ball. On “Go”, both teams try to keep as few balls as possible on their side of the field by throwing balls to the opposite side. After one minute the team with least number of balls on their side wins.
Variations:
Kick the ball from the ground
Kick the ball from the hands
Throw-in from one side kick from the other
Throw-in from both sides
Note It is helpful to have parents stand around the perimeter to keep the balls in-bounds.
TH36. Basic Heading Drill
The purpose of this drill is to teach player basic header skills such as, keeping yours eyes open, keeping your mouth shut, and using an energetic forward motion.
Divide players in to two groups. Have the two groups lined up either kneeling or sitting. You and the assistant coach will serve balls to each player‟s forehead. Begin by serving a ball to the player at the front of the line from a very short distance. When that player has completed their header, he must run to the end of

31
the line again. Keep the line-up and header distance short to keep the activity level high.
Variation:
Have players perform this drill while lying, sitting, kneeling, standing, etc.
32
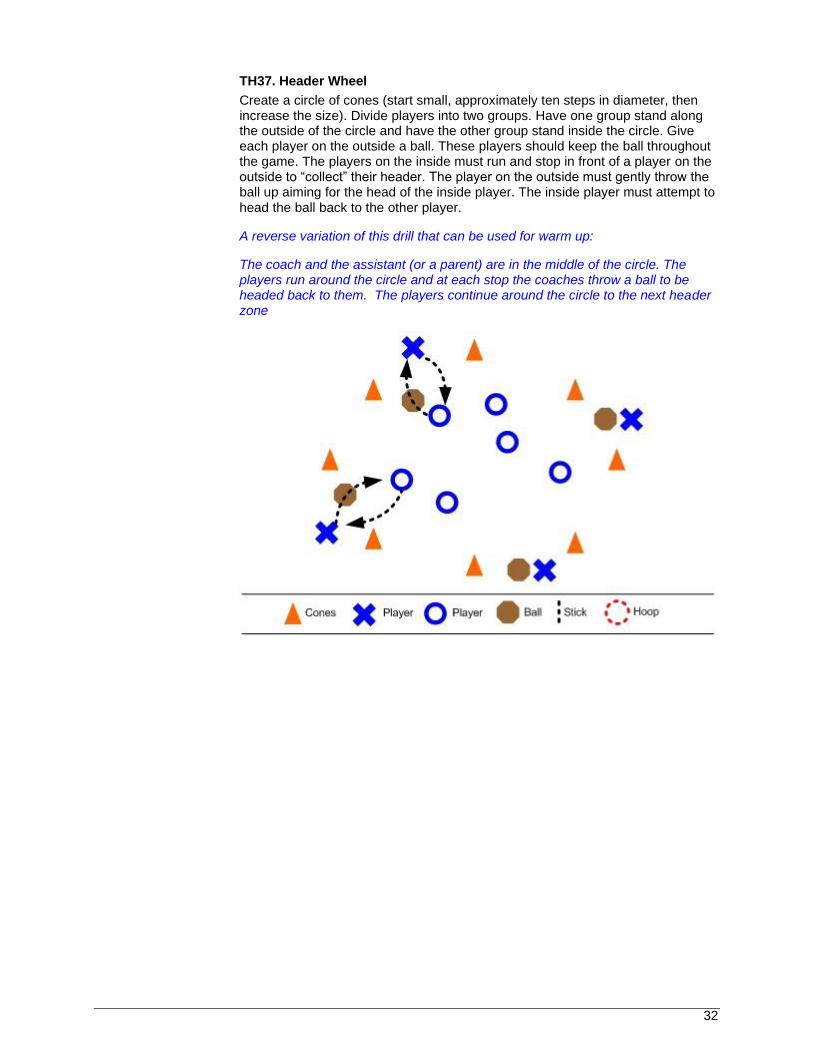
TH37. Header Wheel
Create a circle of cones (start small, approximately ten steps in diameter, then increase the size). Divide players into two groups. Have one group stand along the outside of the circle and have the other group stand inside the circle. Give each player on the outside a ball. These players should keep the ball throughout the game. The players on the inside must run and stop in front of a player on the outside to “collect” their header. The player on the outside must gently throw the ball up aiming for the head of the inside player. The inside player must attempt to head the ball back to the other player.
A reverse variation of this drill that can be used for warm up:
The coach and the assistant (or a parent) are in the middle of the circle. The players run around the circle and at each stop the coaches throw a ball to be headed back to them. The players continue around the circle to the next header zone

33
MINI-GAME (MG)
MG38. Small Sided Scrimmage Without A Goalie
The best way to scrimmage during practices is to play with small team sizes and no goalie. Have your players scrimmage Keep in mind that most recreational teams should only scrimmage for 15-20 minutes per practice.
Small-sided scrimmages on a small field are good because:
Everyone gets to play.
Players get to touch the ball.
There are many transitions from offence to defence.
You can evaluate your players' skills, natural abilities, and where they prefer to play.
Players must defend and block shots with their feet and body.
It encourages passing, crosses, and centering the ball in the "Attacking Third".
Note You can impose conditions on a game to emphasize a particular skill set (such as requiring that a ball is dribbled across the goal line in order to get a point.) Cones are often used instead of real goals. Keep all players involved. Have more than one game going on at a time if necessary. Switch teams often to give everyone a chance to win. The size of the field should be adjusted to allow a lot of touches allowing every player to shoot on the goal more often.