software commands - university of...
TRANSCRIPT

AH501C 4-Channel Bipolar Picoammeter
with Bias Voltage Source
User’s Manual
All Rights Reserved © CAENels d.o.o.
Rev. 1.0 – April 2011

This product is licensed by Sincrotrone Trieste S.C.p.A.
CAENels d.o.o. Kraška ulica, 2
6210 Sežana - Slovenija
Mail: [email protected]
Web: www.caenels.com

Table Of Contents
1. INTRODUCTION ................................................................................................ 8
1.1 THE AH501C PICOAMMETER ......................................................................... 8
1.2 THE AH501C AT A GLANCE ........................................................................... 9 1.3 FEATURES ....................................................................................................... 9 1.4 ANALOG VOLTAGE MONITORS ..................................................................... 10 1.5 BIAS VOLTAGE SOURCE ................................................................................ 11 1.6 DATA FORMAT .............................................................................................. 11
1.7 SAMPLING FREQUENCY ................................................................................. 12 1.8 OFFSET CALIBRATION ................................................................................... 14
2. SOFTWARE COMMANDS ............................................................................. 15
2.1 COMMAND SYNTAX ...................................................................................... 15 2.2 LIST OF COMMANDS...................................................................................... 17
2.2.1 “ACQ” Command .................................................................................... 17 2.2.2 “BDR” Command .................................................................................... 20
2.2.3 “BIN” Command ..................................................................................... 21 2.2.4 “CHN” Command ................................................................................... 22
2.2.5 “DEC” Command .................................................................................... 23 2.2.6 “GET” and “G” Commands ................................................................... 24
2.2.7 “HVS” Command .................................................................................... 25 2.2.8 “NAQ” Commands .................................................................................. 26 2.2.9 “RES” Command ..................................................................................... 27
2.2.10 “RNG” Command ................................................................................ 28 2.2.11 “SYN” Command ................................................................................. 29
2.2.12 “TRG” Command ................................................................................ 30
2.2.11 “VER” Command ................................................................................ 31
2.2.12 “?” Command ...................................................................................... 31 2.2.13 Command Table Summary ................................................................... 32
3. ETHERNET COMMUNICATION ................................................................. 34
3.1 COMMUNICATION MODULE .......................................................................... 34 3.1.1 IP Address Assignement ........................................................................... 34
3.1.2 Ethernet Module Software Configuration ................................................ 37
4. I/O CONNECTORS ........................................................................................... 41
4.1 POWER CONNECTOR ..................................................................................... 41 4.2 I/O CONNECTORS .......................................................................................... 41
4.2.1 The TRIGGER OUT Signal ...................................................................... 41
4.2.2 The TRIGGER/GATE Input Signal .......................................................... 42
5. TECHNICAL SPECIFICATIONS .................................................................. 43

Document Revision Date Comment
0.1 April 10th
2011 Draft Release
1.0 April 19th
2011 First Release

Safety information
Read the instruction manual carefully prior to using the instrument.
The following precautions should be strictly followed before using the AH501:
WARNING Do not use this product in any manner not
specified by the manufacturer. The protective
features of this product may be impaired if it is
used in a manner not specified in this manual.
Do not use the device if it is damaged. Inspect
carefully the outer case for possible cracks or
breaks before each use.
Do not operate the device if explosive gases,
vapors or excessive dust is present.
Always use the device with its original cables.
Power off the device before establishing any
connection to/from it.
Do not operate the device for any reason with
side covers removed or loosened.
Do not install substitute parts or perform any
unauthorized modification to the product.
Return the product to the manufacturer for
service and repair to ensure that safety features
are maintained
CAUTION This instrument is designed for indoor use and in
area with low condensation.


AH501C User‟s Manual Introduction
The table below reports the general environmental requirements for the
instrument:
Environmental Conditions Requirements
Operating Temperature 0°C to 55°C
Operating Humidity 20% to 85% RH (non-condensing)
Storage Temperature -20°C to 70°C
Storage Humidity 5% to 90% RH (non-condensing)

Introduction AH501C User‟s Manual
8
1. Introduction
This chapter describes the general characteristics and main features of the
AH501C picoammeter.
1.1 The AH501C Picoammeter
CAENels AH501C is a 4-channel, 24-bit resolution, wide-bandwidth, ultra-
wide input dynamic range picoammeter with an integrated bias voltage source. It is
composed of a specially designed transimpedance input stage for current sensing
combined with analog signal conditioning and filtering stages making use of state-of-
the-art electronics. This device can perform bipolar current measurements from ±2.5
nA (with a resolution of about 300 aA) up to ±2.5 mA (resolution of 300 pA) with
sampling frequencies up to 26 kHz (for 1 channel and a 16-bit resolution) and 6.5 kHz
(4 channels, 16 bit/sample). Low temperature drifts, good linearity and very low noise
levels enable users to perform very high-precision current measurements. This new
version has also buffered voltage monitors that are proportional to the measured input
current.
The AH501C is housed in a light, robust and extremely compact metallic box
that can be placed as close as possible to the current source (detector), in order to
reduce cable lengths and minimize possible noise pick-up. It is specially suited for
applications where multi-channel simultaneous acquisitions are required, a typical
application being the currents readout from 4-quadrant photodiodes used to monitor
X-ray beam displacements.
The AH501C communication is guaranteed by a standard Ethernet (TCP/IP
and UDP).

AH501C User‟s Manual Introduction
1.2 The AH501C at a Glance
The AH501C and its I/Os are represented in Fig. 1:
Fig. 1 - The AH501C I/O Connections
1.3 Features
The AH501C input stage is based on a multi-path inverting transimpedance
amplifier (I/V converter) cascaded with signal conditioning stages.
Three measuring ranges are available as reported in the following table:
The corresponding gain values for these three input ranges are:
Full Scale
RNG 0 ±2.5 mA RNG 1 ±2.5 µA RNG 2 ±2.5 nA
Power Connector
LED
Activity Monitors
Ethernet
Module
Bias
Voltage
Voltage Monitors
Trigger In
Trigger Out

Introduction AH501C User‟s Manual
10
The maximum and minimum currents that can be measured with the AH501C are
reported, along with the LSB resolution for each range, in the following table:
Full Scale
Resolution @16 bit
Resolution @24 bit
RNG0 ±2.5 mA 76 nA 298 nA RNG1 ±2.5 µA 76 pA 298 fA RNG2 ±2.5 nA 76 fA 298 aA
A host PC is necessary in order to operate the AH501C and properly set/check
the desired parameters (i.e. range and resolution bits) and to acquire the converted
data. Please refer to the “Software Commands” chapter for a complete description of
available commands, their purposes and their syntax.
1.4 Analog Voltage Monitors
Each input channel of the AH501C picoammeter has its corresponding analog
voltage monitor signal available on a SMA connector.
These four signals are true analog buffered independent inverting stages and
are directly proportional to the input current value with a full-scale range of ±5V.
These voltage monitors, being inverting themselves, automatically compensate for the
input stages inversion so that positive output voltage values correspond to input
current sources (positive currents) and negative output values to input current sinks
(negative currents).
Gain values for the three input ranges (in V/A) are presented in the following
table:
For example, if a tester/oscilloscope connected to a channel voltage monitor
measures a value of -1.500V and the AH501C is set on RNG 1, the corresponding
input current for that channel is of -0.75 µA = -750 nA.
Gain (V/A)
RNG 0 -103 RNG 1 -106 RNG 2 -109
GAIN [VOUT / IIN]
GRNG 0 2 · 103 GRNG 1 2 · 106 GRNG 2 2 · 109

AH501C User‟s Manual Introduction
1.5 Bias Voltage Source
A low-noise voltage source is also available on a BNC connector placed on a
module side panel. This voltage source is ground-referred, can be set remotely, and
has a maximum output value of 30V. It is also possible to disable this source by a
specific command and so set the output to a high-impedance state. The red LED on
the side panel acts as a status indicator for this voltage source: it turns on when output
is enabled and turns off as soon as the output is disabled. Typical values of RMS
(Root Mean Square) noise are of 0.003% at rated output voltage value. The short-
circuit current value for this output is 3mA and the minimum time constant is 100 ms
(it increases along with the load capacitive part).
1.6 Data Format
Since the AH501C has three different input gain values and two possible
resolution modes (16- and 24-bit), output values depend on the selected configuration.
For this reason it is important to properly set the gain value in order to avoid input
stage saturation and corresponding data clipping of the output values (to 8388608 or
to 8388607 in 24-bit resolution mode and to 32768 or to 32767 in 16-bit resolution
mode).
Moreover it is very important to perform an offset calibration procedure before
using the picoammeter. In the following table the correspondence between the read
value and the full scale range is reported (note that the input stage is inverting):
Data value in 16-bit resolution mode
Data value in 24-bit resolution mode
Data Value Hex Value Input Signal
32768 0x8000 +Full Scale 32769 0x8001 +Full Scale - LSB … … …
65535 0xFFFF LSB 0 0x0000 0 1 0x0001 -LSB … … …
32766 0x7FFE -Full Scale + LSB 32767 0x7FFF -Full Scale
Data Value Hex Value Input Signal
8388608 0x800000 +Full Scale 0 0x000000 0
8388607 0x7FFFFF -Full Scale

Introduction AH501C User‟s Manual
12
The data read from the AH501C are the raw values of the A/D converter, thus
the data conversion from the read values to the corresponding current values must be
performed by the user applying the following formula for the 16-bit resolution mode:
32768 if6553512
32767 if1212
5.2
16
1515
ValueOffsetValueFSR
ValueOffsetValueFSR
OffsetValueG
IX
X
RNGIN
X
and the following one when working in 24-bit resolution mode:
8388608 if1677721512
8388607 if12
24
23
ValueOffsetValueFSR
ValueOffsetValueFSR
IX
X
IN
where:
- IIN: the calculated input current;
- GRNGx: the selected range gain;
- FSRX: the selected Full Scale Range;
- Value: the raw data value from the AH501C;
- Offset: the raw data offset. For a proper estimation of this offset
a calibration procedure must be performed (please refer
to the “AH501C Offset Calibration” paragraph).
1.7 Sampling Frequency
The AH501C sampling frequency depends either on resolution, data stream
format and number of channels (please refer to “List of Commands” chapter to see
how to set these values). When receiving a non-formatted binary data stream, the
sampling periods for each channel are represented in the following table:
Sampling period when receiving raw binary data
corresponding to the following sampling frequencies:
Sampling frequencies when receiving raw binary data
16-bit Resolution 24-bit Resolution
1 Channel 38.4 µs 38.4 µs 2 Channels 76.8 µs 153.6 µs 4 Channels 153.6 µs 307.2 µs
16-bit Resolution 24-bit Resolution
1 Channel 26.042 kHz 13.021 kHz 2 Channels 13.021 kHz 6.510 kHz 4 Channels 6.510 kHz 3.255 kHz

AH501C User‟s Manual Introduction
The sampling periods dilate when working with ASCII data values (that
require computational time to be formatted) reaching the values here listed:
Sampling frequencies when receiving ASCII-formatted data
The corresponding sampling frequencies for each channel in this mode are
then:
Sampling frequencies when receiving ASCII-formatted data
Adding the offset binary two’s complement correction (“DEC ON” command,
see section 2.2.5 for additional information), the sampling periods become:
Sampling periods when receiving ASCII-formatted data with offset binary 2’s complement
correction
and the sampling frequencies the following ones:
Sampling frequencies when receiving ASCII-formatted data with offset binary 2’s complement
correction
16-bit Resolution 24-bit Resolution
1 Channel 384 µs 499.2 µs 2 Channels 806.4 µs 998.4 µs 4 Channels 1.6128 ms 1.9968 ms
16-bit Resolution 24-bit Resolution
1 Channel 2.604 kHz 2.003 kHz 2 Channels 1.240 kHz 1.002 kHz 4 Channels 620.0 Hz 500.8 Hz
16-bit Resolution 24-bit Resolution
1 Channel 422.4 µs 537.6 µs 2 Channels 844.8 µs 1.0752 ms 4 Channels 1.6896 ms 2.1504 ms
16-bit Resolution 24-bit Resolution
1 Channel 2.367 kHz 1.860 kHz 2 Channels 1.184 kHz 930.1 Hz 4 Channels 591.9 Hz 465.0 Hz

Introduction AH501C User‟s Manual
14
1.8 Offset Calibration
Due to the internal bias and offset voltages of its electronic components, an
offset calibration (to eliminate the equivalent input offset current) must be performed
on each AH501C module. If a precise estimation of this offset is necessary, the
following procedure must be performed:
- Install on each input connector (SMA or BNC) a shielding cap in
order to avoid noise pick-up (be aware that the central input pin must
be left open and shielded but not grounded otherwise the read values
are meaningless);
- Switch on the AH501C;
- Let it warm-up for about half an hour;
- Acquire a set of data (for example 10000 pts.) from each input
channel and calculate the mean value;
- Repeat the previous step for each gain range (RNG 0, RNG 1 and
RNG 2).
The calculated mean values are the new Data Offsets that must be taken into
account in the current evaluation formula that must be applied for each channel. It
may be preferable to calculate this offset as the median of collected data to avoid
errors caused by unwanted rectified impulsive noise.

AH501C User‟s Manual Introduction
2. Software Commands
This chapter describes the software commands used for tuning and readout of
the AH501 picoammeter.
2.1 Command Syntax
The command syntax used by the AH501 protocol is described in the following
paragraphs.
Commands must be sent in ASCII format and are composed by two fields, the
“command field” and the “parameter field”, separated by a space („\s‟ or 0x20 in
hexadecimal notation). Instructions are not case sensitive and therefore the command
string can freely use either uppercase or lowercase characters. Each instruction is
terminated with a “carriage return” character („\r‟ or 0x0D), e.g.:
BIN\sON\r
Command field Space Parameter field Termination character
There are two types of software commands: “configuration commands” and
“query commands”. The “query commands” usually have the same “command field”
as the “configuration commands” and a “?” in the “parameter field”.
The AH501C, after each received command, replies with a string whose content
depends on the type of command sent and its correctness.
There are three possible scenarios (with some exceptions, as described in the
corresponding command paragraph):
1) the command syntax is incorrect: the AH501C will always answer with the
string “NAK” terminated with “carriage return/line feed” characters („\r\n‟ or
0x0A0x0D in hexadecimal notation), e.g.:
BIX\sON\r
NAK\r\n

Introduction AH501C User‟s Manual
16
example 2:
BIN\sOOG\r
NAK\r\n
2) the command syntax is correct and it is a “configuration command”: the
AH501C will answer with the string “ACK” terminated with “carriage return/line
feed” („\r\n‟) characters, e.g.:
BIN\sON\r
ACK\r\n
example 2:
RES\s24\r
ACK\r\n
3) the command syntax is correct and it is a “query command”: the AH501C
will answer with the echo of the “command field” and the value of the requested
parameter separated with a space and terminated with “carriage return/line feed”
(„\r\n‟) characters, e.g.:
BIN\s?\r
BIN\sON\r\n
example 2:
RES\s?\r
RES\s24\r\n
AH501C User‟s Manual Introduction
2.2 List of Commands
Please find hereafter the command list used by the AH501C and the
corresponding syntax, the description of each command purpose and any special
requirements relating to specific commands.
2.2.1 “ACQ” Command
The purpose of the ACQ command is to start/stop the acquisition from the
AH501. The instrument starts to acquire data as soon as the command is received and
immediately sends the generated digital data stream to the host PC.
At power-up the instrument boots with the acquisition stopped (default), the
user is required to start the data acquisition sending the “ACQ ON” command.
The type of transmitted data depends on the setting of the “binary mode” and
can be changed using the “BIN” command (see “BIN Command” paragraph). With
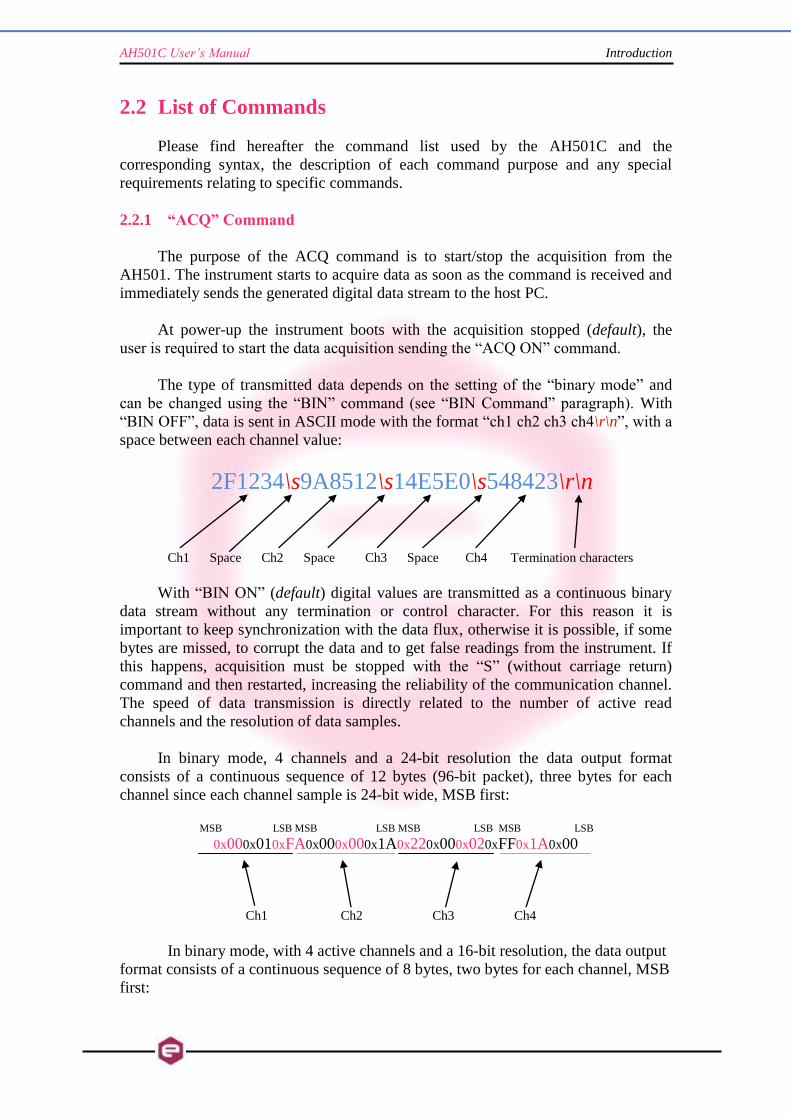
“BIN OFF”, data is sent in ASCII mode with the format “ch1 ch2 ch3 ch4\r\n”, with a
space between each channel value:
2F1234\s9A8512\s14E5E0\s548423\r\n
Ch1 Space Ch2 Space Ch3 Space Ch4 Termination characters
With “BIN ON” (default) digital values are transmitted as a continuous binary
data stream without any termination or control character. For this reason it is
important to keep synchronization with the data flux, otherwise it is possible, if some
bytes are missed, to corrupt the data and to get false readings from the instrument. If
this happens, acquisition must be stopped with the “S” (without carriage return)
command and then restarted, increasing the reliability of the communication channel.
The speed of data transmission is directly related to the number of active read
channels and the resolution of data samples.
In binary mode, 4 channels and a 24-bit resolution the data output format
consists of a continuous sequence of 12 bytes (96-bit packet), three bytes for each
channel since each channel sample is 24-bit wide, MSB first:
MSB LSB MSB LSB MSB LSB MSB LSB
0x000x010xFA0x000x000x1A0x220x000x020xFF0x1A0x00
Ch1 Ch2 Ch3 Ch4
In binary mode, with 4 active channels and a 16-bit resolution, the data output
format consists of a continuous sequence of 8 bytes, two bytes for each channel, MSB
first:

Introduction AH501C User‟s Manual
18
MSB LSB MSB LSB MSB LSB MSB LSB
0x200x010xFA0x320x0A0x1A0x220x51
Ch1 Ch2 Ch3 Ch4
In binary mode, with only 1 active channel and a 24-bit resolution, the data
output format consists of a continuous sequence of 6 bytes (48-bit packet):
MSB LSB MSB LSB
0x200x010xFA0x32
Ch1 Ch2
Please note that no acknowledgement string is sent back to the host after an
“ACQ ON” command while an “ACK” command is returned after the acquisition is
stopped (with “S” command).
Data-packet sizes, which also define the maximum data rates, are listed in the
following table:
Examples
ACQ ON example with ASCII data:
ACQ\sON\r
FF3524\s12E001\s126A52\s03FE41\r\n
1C3133\s141991\s1BB342\s 542720\r\n
…\r\n
ACQ ON example with BINARY data:
ACQ\sON\r
0x000x020xFA0x590x000x020xFA0x590x000x020xFA0x590x000x020xFA0x59...
16-bit Resolution 24-bit Resolution
1 Channel 2 bytes 3 bytes 2 Channels 4 bytes 6 bytes 4 Channels 8 bytes 12 bytes

AH501C User‟s Manual Introduction
S example with ASCII data:
…\r\n
1F3321\s42E203\s321B22\s03BE43\r\n
13312A\s132951\s1BB342\s112721\r\n
S
S example with BINARY data:
...0x000x020xFA0x590x000x020xFA0x590x000x020xFA0x590x000x020xFA0x59
S
ACQ ? example:
ACQ\s?\r
ACQ\sOFF\r\n

Introduction AH501C User‟s Manual
20
2.2.2 “BDR” Command
The purpose of the BDR command is to set the baudrate between the AH501C
and the communication module. The following table shows the allowed baudrates:
Command Baudrate
BDR 921600 921600
BDR 460800 460800
BDR 230400 230400
BDR 115200 115200
BDR 57600 57600
BDR 38400 38400
BDR 19200 19200
BDR 9600 9600
Since the instrument changes the baudrate right after the BDR command is
accepted and the acknowledgement string (ACK) is sent back to the host. The user
can verify successful execution of the command sending another command after
changing the host baudrate (e.g.: “BDR ?”).
The baudrate change procedure strictly depends on the communication interface
module used. Please refer to the “Communication Module Interfaces” chapter for
more information.
By default the instrument boots with a 921600 baudrate setting.
Examples
BDR example with incorrect parameter:
BDR\s960000\r
NAK\r\n
BDR example with correct parameter:
BDR\s9600\r
ACK\r\n
Acknowledgement from the AH501 before the change of baudrate.
BDR ? example:
BDR\s?\r
BDR\s921600\r\n

AH501C User‟s Manual Introduction
2.2.3 “BIN” Command
The purpose of the BIN command is to change the format of the digital data
stream generated by the AH501C picoammeter. At power-up “binary mode” is
enabled (“BIN ON” - default) and data is sent as a continuous binary data stream.
With the “BIN OFF” command the ASCII format is enabled and the output values are
sent as strings. The binary format helps to improve the data rate transmission, as it
avoids the overhead due to the ASCII format conversion.
In binary mode the data output format is a continuous sequence of bytes, (see
“ACQ Command” paragraph for details).
Examples
BIN ON example:
BIN\sON\r
ACK\r\n
BIN ? example:
BIN\s?\r
BIN\sOFF\r\n

Introduction AH501C User‟s Manual
22
2.2.4 “CHN” Command
The purpose of the CHN command is to set the number of active input channels
to be sampled; the AH501C provides the capability to simultaneously sample 1, 2 or 4
channels.
Channels on which sampling is performed are indicated in the following table
(default power-up value is CHN 4):
The overall sampling frequency of the system is determined by the value set
with this command.
Examples
CHN example:
CHN\s2\r
ACK\r\n
CHN example with incorrect parameter:
CHN\s5\r
NAK\r\n
CHN ? example:
CHN\s?\r
CHN\s4\r\n
Sampled Channels
CHN\s1\r Ch.1 CHN\s2\r Ch.1, Ch.2 CHN\s4\r Ch.1, Ch.2, Ch.3, Ch.4

AH501C User‟s Manual Introduction
2.2.5 “DEC” Command
The DEC command can only be used when working in BIN OFF mode, i.e. data
is transmitted as ASCII characters, and is a function that, if enabled, performs the
two’s complement offset correction directly on the AH501C processor.
If this offset correction is enabled, data values are sent in the usual “ch1 ch2 ch3
ch4\r\n” format with a hexadecimal representation:
003234\sF18512\s51EC07\s66A60A\r\n when working in 24-bit resolution mode (data width is 6-byte/sample)
0032\sF185\s51EC\s66A6\r\n when working in 16-bit resolution mode (data width is 4-byte/sample)
This feature is disabled (“DEC OFF”) at device power-up.
Examples
DEC example:
DEC\sON\r
ACK\r\n
DEC ? example:
DEC\s?\r
DEC\sON\r\n

Introduction AH501C User‟s Manual
24
2.2.6 “GET” and “G” Commands
The purpose of the GET command is to read back a single snapshot of the
values for the active channels. The “G” command is a useful shortcut fully equivalent
to the “GET ?” command and it is implemented to further reduce delays caused by
data transmission and handling. The format of the returned values depends on the
“binary mode” setting (refer to “BIN Command” paragraph), the resolution settings
and the active channels settings.
Examples
GET ? example with ASCII data:
GET\s?\r
448231\s4A3567\s9EE803\s711996\r\n
G example with ASCII data:
G\r
448231\s4A3567\s9EE803\s711996\r\n
GET ? example with binary data:
GET\s?\r
0x000x020xFA0x590x000x020xFA0x590x000x020xFA0x590x000x020xFA0x59
? example with binary data:
G\r
0x000x020xFA0x590x000x020xFA0x590x000x020xFA0x590x000x020xFA0x59

AH501C User‟s Manual Introduction
2.2.7 “HVS” Command
The HVS command let the users set and read the Bias Voltage output
status/value. It is necessary to enable the bias voltage circuitry first in order to set a
voltage value, i.e. send the command “HVS ON”. The red LED on the AH501C side
panel should turn on. The command “HVS OFF” disables the bias voltage output,
putting it in an high impedance state.
The voltage value (up to 30V) can be set by sending a “HVS xx.xx” command
to the AH501C, where xx.xx is the desired voltage value in Volts. It is also possible to
check the bias voltage circuitry status by sending a “HVS ?” command.
Examples
HVS ? example:
HVS\s?\r
HVS OFF\r\n
HVS ON example:
HVS\sON\r
ACK\r\n
HVS “value” example:
HVS\s19.22\r
ACK\r\n
HVS ? example:
HVS\s?\r
HVS 19.22\r\n

Introduction AH501C User‟s Manual
26
2.2.8 “NAQ” Commands
The purpose of the NAQ command is to read a fixed number of samples,
ranging from 1 to 2000000000, without having to manually stop the acquisition (i.e.
with the “S” command) when the desired number of samples has been read. The
format of the returned values depends on the “binary mode” setting (refer to “BIN
Command” paragraph), the resolution settings and the active channels settings.
Examples
NAQ example with ASCII data:
NAQ\s12\r
448231\s4A3567\s9EE222\s714596\r\n
448234\s4A3976\s9EE323\s711912\r\n
448566\s4A3433\s9E1A10\s714955\r\n
448243\s4A3567\s9EE803\s71A116\r\n
441332\s4A3555\s9E4543\s711888\r\n
448231\s4A3B65\s9E5802\s710990\r\n
448231\s4A35F4\s9E2AC5\s711946\r\n
448431\s4A1111\s9EE661\s71C750\r\n
448230\s4A3421\s9EBD13\s713216\r\n
448001\s4CC569\s9EE663\s71432C\r\n
448234\s4AB451\s9E124A\s71B0B0\r\n
448324\s4A6564\s9EAA03\s732436\r\n
ACK\r\n

AH501C User‟s Manual Introduction
2.2.9 “RES” Command
The purpose of the RES command is to select whether to use 16 bits or 24 bits
to represent sampled values obtained from the on-board delta-sigma modulator ADCs.
The use of this feature determines the maximum data transfer rate of the
AH501C when running in continuous mode, i.e. “ACQ ON” and “BIN ON”.
The default value at power-up is set to 16 bits.
Examples
RES example:
RES\s24\r
ACK\r\n
RES ? example:
RES\s?\r
RES\s16\r\n

Introduction AH501C User‟s Manual
28
2.2.10 “RNG” Command
The purpose of the RNG command is to set the gain and therefore the full scale
range of the AH501C. The parameter field is a number representing the selected gain
range as reported in the following table:
The parameter value can be set from 0 to 2; at power-up the AH501C range is
set to its lowest gain value (0, default) in order to avoid possible damages to the
device in case some of its inputs are connected to a high current source/sink at start-
up.
Examples
RNG example for a ±2.5nA Full Scale Range:
RNG\s2\r
ACK\r\n
RNG example for a ±2.5mA Full Scale Range:
RNG\s0\r
ACK\r\n
RNG ? example:
RNG\s?\r
RNG\s0\r\n
Full Scale
Resolution (@ 24-bit)
RNG 0 ±2.5 mA 298 nA RNG 1 ±2.5 µA 298 fA RNG 2 ±2.5 nA 298 aA

AH501C User‟s Manual Introduction
2.2.11 “SYN” Command
The purpose of the SYN command is to synchronize the four on-board analog to
digital converters. The task performed by this command is automatically executed at
device power-up and shall not be performed again when using the AH501C device.
This is a command to be used only for debugging purposes.

Introduction AH501C User‟s Manual
30
2.2.12 “TRG” Command
The purpose of the TRG command is to enable/disable the “trigger/gate input”
of the AH501C. This feature, when enabled (TRG ON), is useful when the
picoammeter data acquisition must be synchronized to an external event (for instance
laser pulses).
The “trigger mode” operation is described hereafter. As soon as the TRG ON
command is received the AH501C stops the acquisition and waits to receive, on the
corresponding TRIGGER/GATE pin (see “I/O Connectors” chapter), a trailing edge
signal transition. As soon as this is detected, the AH501C starts to acquire data and to
continuously send them to the host; data are sent to the host as long as the
TRIGGER/GATE signal is kept in high state. As soon as a falling edge signal
transition (i.e. signal goes to low level state) is encountered, the acquisition stops and
no more data are sent to the host. This behavior continues whether until the “trigger
mode” is disabled with the “TRG OFF” (default) command (see “TRIGGER/GATE
Signal” paragraph in the “I/O Connectors” chapter) or the driving signal is kept at low
level.
Please note that an acknowledgement string is sent back to the host after a
“TRG ON” or “TRG OFF” command. The format of the data sent depends on the
“BIN”, “CHN”, “RES” and “DEC” settings previously configured for the
picoammeter. Activating the “trigger mode” (“TRG ON”) while the trigger/gate input
pin on the I/O connector is not driven has no effects.
Examples
TRG example with ASCII data:
TRG ON\r
ACK\r\n
TRIGGER/GATE pin signal
3124 1F01 1222 0AAC\r\n
3133 1F04 1552 0BA6\r\n
…\r\n
TRIGGER/GATE pin signal
(pause)
TRIGGER/GATE pin signal
3134 1E21 1332 0ABB\r\n
3128 1EB8 1221 0A95\r\n
…\r\n
TRG OFF\r
ACK\r\n
TRG ? example:
TRG ?\r
TRG ON\r\n

AH501C User‟s Manual Introduction
2.2.11 “VER” Command
The purpose of the VER command is to report the firmware version currently
flashed into the AH501C on-board processor.
Examples
VER ? example:
VER\s?\r
VER\sAH501\sv.1.0\r\n
2.2.12 “?” Command
The “?” command generates a reply that contains the device on-line help: the
purpose is to give users important information about the AH501C features, data
formats and some data stream examples. The use of this command is very useful
when using the picoammeter in a text Winsock-based application (such as
HyperTerminal) without being able to access the device user’s manual.

Introduction AH501C User‟s Manual
32
2.2.13 Command Table Summary
Command Purposes Parameters Power-Up
default value
ACQ Start continuous acquisition ON
Query acquisition status ?
BDR Set baudrate 921600 default
Set baudrate 460800
Set baudrate 230400
Set baudrate 115200
Set baudrate 57600
Set baudrate 38400
Set baudrate 19200
Set baudrate 9600
Query baudrate setting ?
BIN Select binary mode ON default
Select ASCII mode OFF
Query “binary mode” status ?
CHN
Set readings to only 1 channel 1
Set readings to 2 channels 2
Set readings to 4 channels 4 default
Query channel settings ?
DEC Select offset correction ON
De-select offset correction OFF default
Query offset correction status ?
GET Read a single snapshot ?
G\r Read a single snapshot
HVS Set Bias Voltage On ON
Set Bias Voltage Off OFF default
Set Bias Voltage to “value" value
Query Bias Voltage Status ?
NAQ Read a fixed number of samples 1 ... 2000000000
RES Set resolution to 16 bits 16 default
Set resolution to 24 bits 24
Query resolution setting ?
RNG Set Full Scale Range to ±11mA 0 default
Set Full Scale Range to ±6.4µA 1
Set Full Scale Range to ±2.5nA 2
S Stops continuous acquisition default
SYN\r Synchronize internal ADCs
TRG Enable trigger/gate input ON
Disable trigger/gate input OFF default
Query “trigger mode” status ?
VER Query firmware version ?
?\r Generates on-line Help text

AH501C User‟s Manual Introduction

Ethernet Communication AH501C User‟s Manual
34
3
3. Ethernet Communication
This chapter describes available communication module for the AH501C and
gives hints on how to configure it.
3.1 Communication Module
The communication module is based on the Lantronix Xport® embedded
Ethernet device server. To properly configure the Xport® device the user must
configure the IP address, the communication protocol and all other network
parameters needed by the AH501C. Please refer to the Xport® documentation and
configuration software available at the Lantronix site www.lantronix.com for a
complete description.
3.1.1 IP Address Assignement
The module is shipped with a default IP address as indicated on the label on the
module itself. Factory settings are:
- IP address: 192.168.0.10;
- port: 10001.
Before assigning a new IP address it is required to install, on the host PC, the
“DeviceInstaller” software that can be downloaded from the Lantronix website
www.lantronix.com.
Even if the AH501C can be connected to the global LAN, a point-to-point
Ethernet connection is strongly recommended in order to obtain minimum delay,
maximum speed performance and to avoid possible communication problems. This
implies that the host PC and the AH501C should reside on the same Ethernet subnet,
i.e.:
Host PC address: 192.168.10.100 → AH501C address: 192.168.10.200
Please note that for a point-to-point direct connection a twisted Ethernet cable
must be used.
AH501C User‟s Manual Ethernet Communication
3
The next few steps must be followed in order to assign a new IP address to the
module:
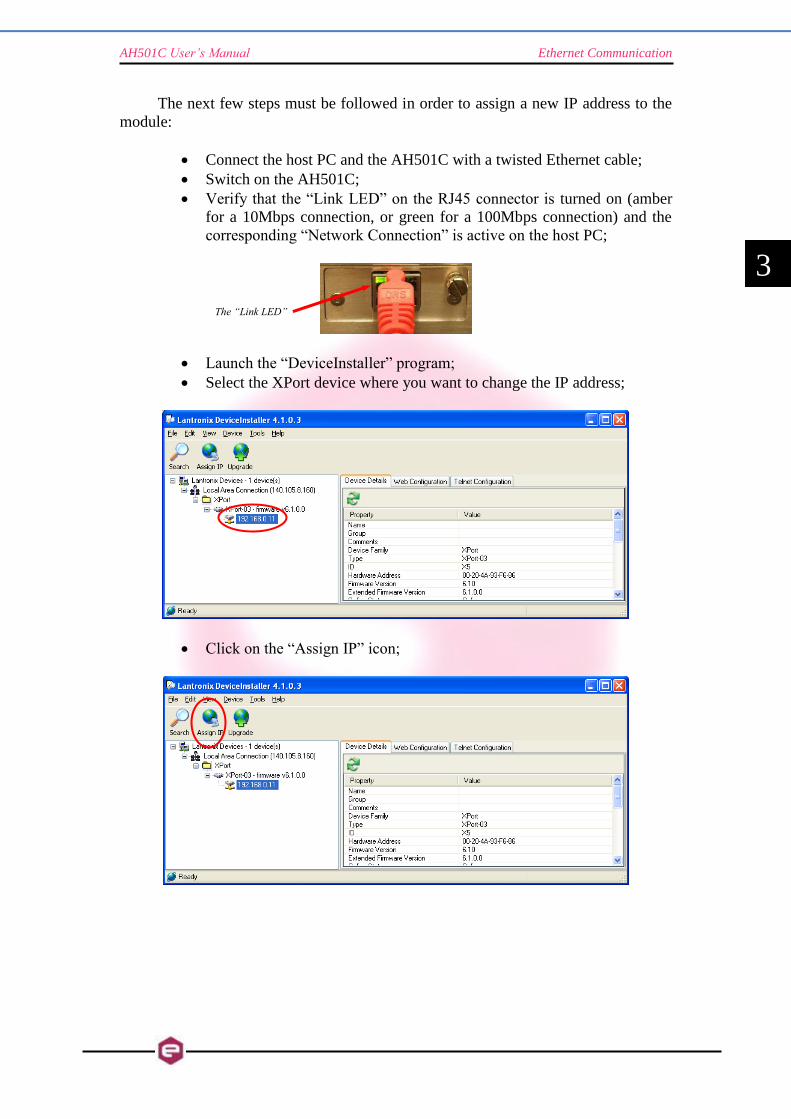
Connect the host PC and the AH501C with a twisted Ethernet cable;
Switch on the AH501C;
Verify that the “Link LED” on the RJ45 connector is turned on (amber
for a 10Mbps connection, or green for a 100Mbps connection) and the
corresponding “Network Connection” is active on the host PC;
Launch the “DeviceInstaller” program;
Select the XPort device where you want to change the IP address;
Click on the “Assign IP” icon;
The “Link LED”

Ethernet Communication AH501C User‟s Manual
36
3
Select “Assign a specific IP address” and then click “Next”;
Set the “IP address”. Click “Next”;
Click the “Assign” button;
Wait for the assignment procedure to end, then click “Finish”
The new module IP address should now be already assigned and the success of
the operation can be verified on the “DeviceInstaller” window.

AH501C User‟s Manual Ethernet Communication
3
3.1.2 Ethernet Module Software Configuration
After assigning the IP address, the user must configure some other parameters
on the XPort® device. There are two possible ways to configure such parameters:
the web server interface;
a telnet connection.
In this manual only the web interface procedure is described, if you need to
configure the module using a telnet connection please refer to the XPort® user guide.
Follow the next instructions to properly setup your AH501C communication
module:
Select the “Web Configuration” tab and then click on the “Go” button.
Be sure to disable the “proxy server” option in your “Internet Options”
application. To do so, go to the “Control Panel” folder, open the
“Internet Options”, then click on the “Connections” tab, go to the “LAN
settings” and then deselect the “Use a proxy server for your LAN”
option;
A dialog window asking for user name and password will appear, simply
click on the “OK” button;
Ethernet Communication AH501C User‟s Manual
38
3
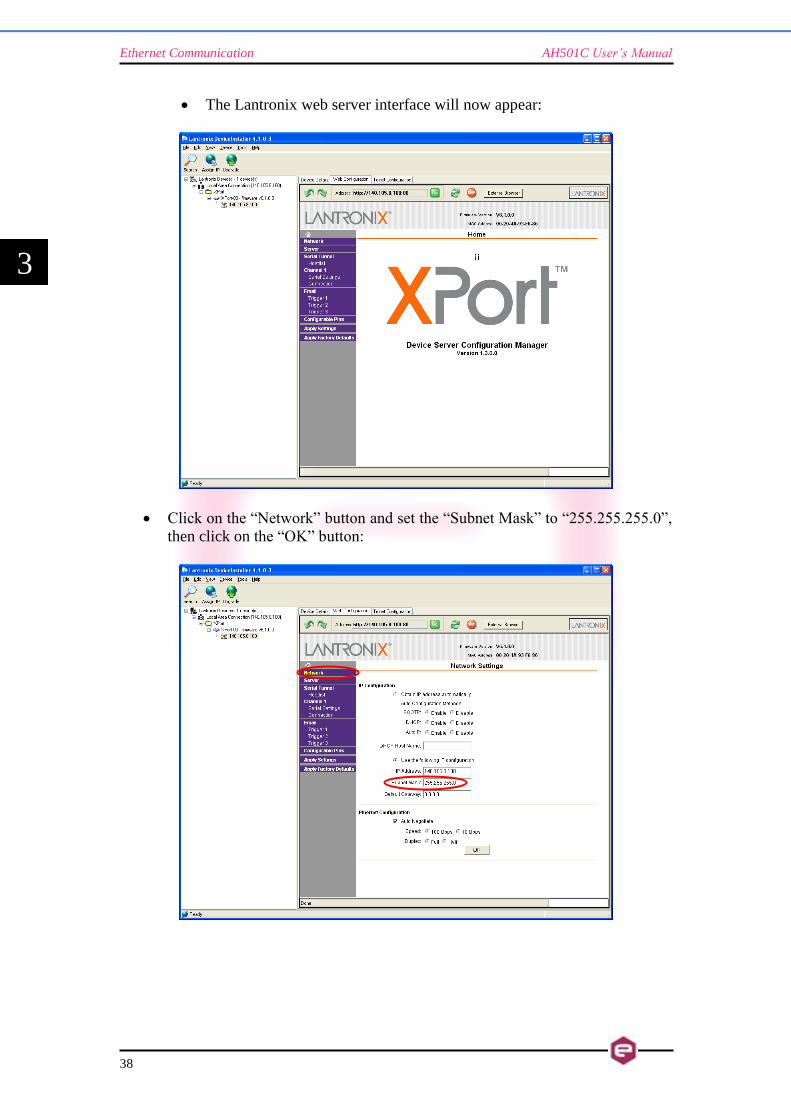
The Lantronix web server interface will now appear:
Click on the “Network” button and set the “Subnet Mask” to “255.255.255.0”,
then click on the “OK” button:

AH501C User‟s Manual Ethernet Communication
3
Click on the “Server” button. Set the “CPU Performance Mode” to “High” and
then click on the “OK” button:
Click on the “Serial Settings” button. Set the “Baud Rate” to “921600” and the
“Flow Control” to “None”. Click on the “OK” button:

Ethernet Communication AH501C User‟s Manual
40
3
Click on the “Connection” button. Set the “Protocol” to “TCP” and the “Local
Port” to “10001”, this value can be changed as needed. Click the “OK” button;
Click the “Apply Settings” button.
The XPort® Ethernet device should now be correctly configured to work with
the AH501C picoammeter. If you need to change any other XPort parameter, please
refer to the XPort® user’s guide.

AH501C User‟s Manual I/O Connectors
4
4. I/O Connectors
This chapter describes the I/O connectors, their corresponding pinout and the
each signal functionality.
4.1 Power Connector
The input Power Connector and the corresponding pinout are shown in Fig.4.
The input voltage range goes from ±6V up to ±9V with a rated maximum input
current of 410mA (depending on the communication module).
The connector type is a LEMO – “EPG.0B.303” series. The corresponding
matching connector plug is a LEMO – “FGG.0B.303” series.
Fig. 2 - Power Connector
4.2 I/O Connectors
The I/O interface signals (gate/trigger) are available on SMA-type connectors.
The signal levels are 5V TTL and CMOS compatible. The maximum output current is
25mA (or a 200Ω load).
4.2.1 The TRIGGER OUT Signal
The TRIGGER OUT signal is a 5V TTL-, CMOS-compatible signal toggling at
every ADC conversion cycle and it can be used as a synchronization signal for
external devices or just to monitor the module internal conversion timing.
This pin is driven by an output buffer that is capable of driving loads down to
150Ω (VOH = 0.25V, VOL = 4.2V).
Pin Signal 1 GND 2 - VCC 3 +VCC
1
2 3

I/O Connectors AH501C User‟s Manual
42
4
4.2.2 The TRIGGER/GATE Input Signal
The presence of the TRIGGER/GATE input signal leaves to the user a chance
to synchronize the acquisition of the AH501C with an external event (e.g. laser
pulses). A leading edge signal on the TRIGGER/GATE causes the acquisition of the
picoammeter to start and the trailing edge of the same signal causes it to stop. The
acquisition process continues as long as the signal is kept at the high voltage level
(VIH = 3.8V); as soon as the TRIGGER/GATE signal crosses the logic low level
threshold (VIL = 1.2V) the acquisition stops and no data is being sent to the host. This
feature allows the user to receive only data related to a hardware-determined time
window.
The input voltage high level is 5V TTL and CMOS compatible.

AH501C User‟s Manual Technical Specifications
5
5. Technical Specifications
Input Channels 4
Current Measuring Range from ±2.5 nA to ±2.5 mA
Voltage Monitors Yes
Current Polarity bipolar
Data rate up to 26 ksamples/s
Resolution Bits 16 or 24
RMS Noise (@RNG2, CIN = 5pF) < 200 fA
Bias Voltage RMS Noise 0.003%
Communication Ethernet TCP/IP and UDP
I/O Signal TRIGGER/GATE input, TRIGGER OUT
Supply Voltage from ±6 V to ±15 V
Bias Voltage Output 0 to 30V
Voltage Monitors Yes (±5 V)
Dimensions 160 × 108 × 45 mm
Weight 500 g
Input Connectors BNC
Voltage Monitor Connectors SMA
Communication Interface Ethernet 10/100 TCP-IP or UDP