solar car drawing - · pdf filesolidworks drawing solar car page 11-1 solar car drawing a....
TRANSCRIPT

SolidWorks Drawing SOLAR CAR Page 11-1
Solar Car Drawing A. Insert Top and Side Views.Step 1. Click File Menu > New, click Drawing and OK.
Step 2. Click Browse in the Property Manager.
Step 3. Select your solar car assembly fi le and click Open.
Step 4. In the Property Manager under Orientation:
Click Right
Step 4. In the Property Manager under
Check Previewunder Scale
Click Use custom scale and set scale to 1:1, Fig. 1.
Step 5. Move the cursor into the graphic area and click to place the right side view as shown in Fig. 2. Aline the left edge of the preview with the left border line and aline the bottom edge with the top of the title block.
Step 6. Move the cursor straight up and click to place the top view as shown in Fig. 3. Center the preview between the side view you just placed and the top border line.
Step 7. Click OK in the Property Manager.
B. Save as "SOLAR CAR".Step 1. Click File Menu > Save As and Yes to
Rebuild Now.
Step 2. Key-in SOLAR CAR for the fi lename and press ENTER.
C. Insert Isometric View.
Step 1. Click Drawings on the Command Manager toolbar and Model View on the Drawings toolbar.
Chapter 11
Fig. 2
Fig. 3
Solar Car Drawing
Aline
Aline
Fig. 1
Brookside Middle School Tech Edhttp://www.sarasota.k12.fl.us/brookside/cudacountry email:[email protected]
SolidWorks Drawing SOLAR CAR Page 11-2
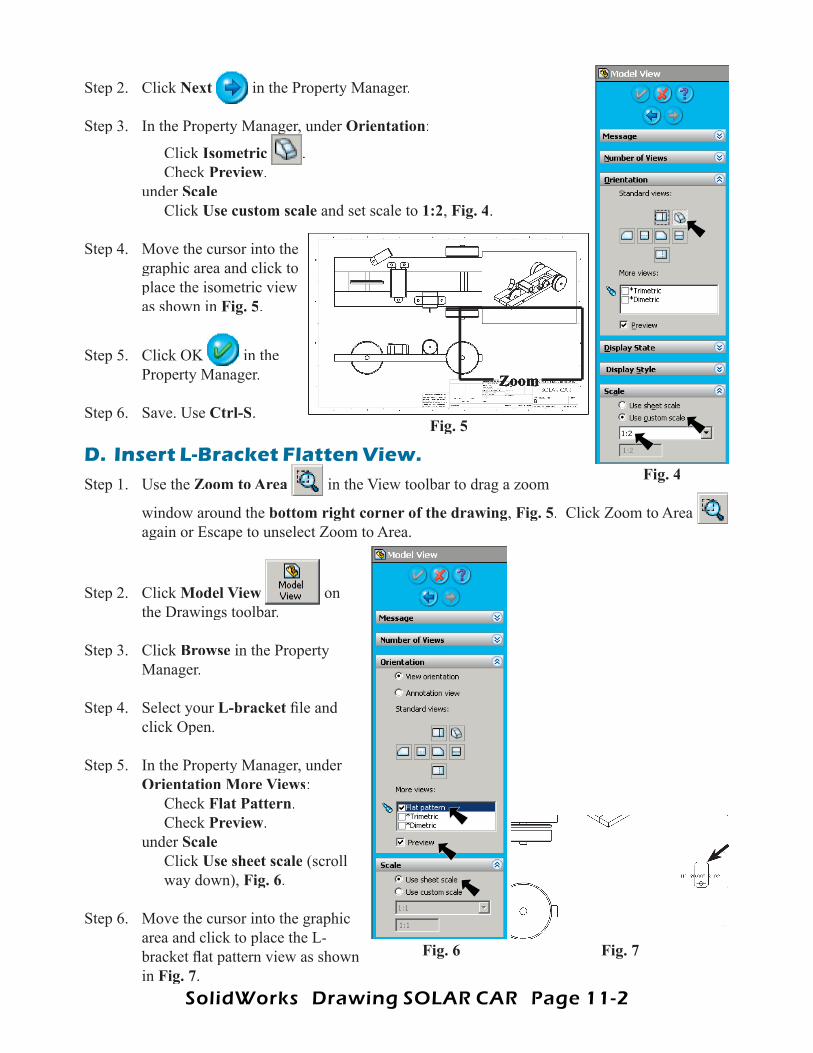
Step 2. Click Next in the Property Manager.
Step 3. In the Property Manager, under Orientation:
Click Isometric
Step 3. In the Property Manager, under
. Check Preview.under Scale
Click Use custom scale and set scale to 1:2, Fig. 4.
Step 4. Move the cursor into the graphic area and click to place the isometric view as shown in Fig. 5.
Step 5. Click OK in the Property Manager.
Step 6. Save. Use Ctrl-S.
D. Insert L-Bracket Flatten View.Step 1. Use the Zoom to Area in the View toolbar to drag a zoom
window around the bottom right corner of the drawing, Fig. 5. Click Zoom to Area again or Escape to unselect Zoom to Area.
Step 2. Click Model View on the Drawings toolbar.
Step 3. Click Browse in the Property Manager.
Step 4. Select your L-bracket fi le and click Open.
Step 5. In the Property Manager, under Orientation More Views: Check Flat Pattern. Check Preview.under Scale
Click Use sheet scale (scroll way down), Fig. 6.
Step 6. Move the cursor into the graphic area and click to place the L-bracket fl at pattern view as shown in Fig. 7.
Fig. 5
Zoom
Fig. 4
Fig. 6 Fig. 7
SolidWorks Drawing SOLAR CAR Page 11-3
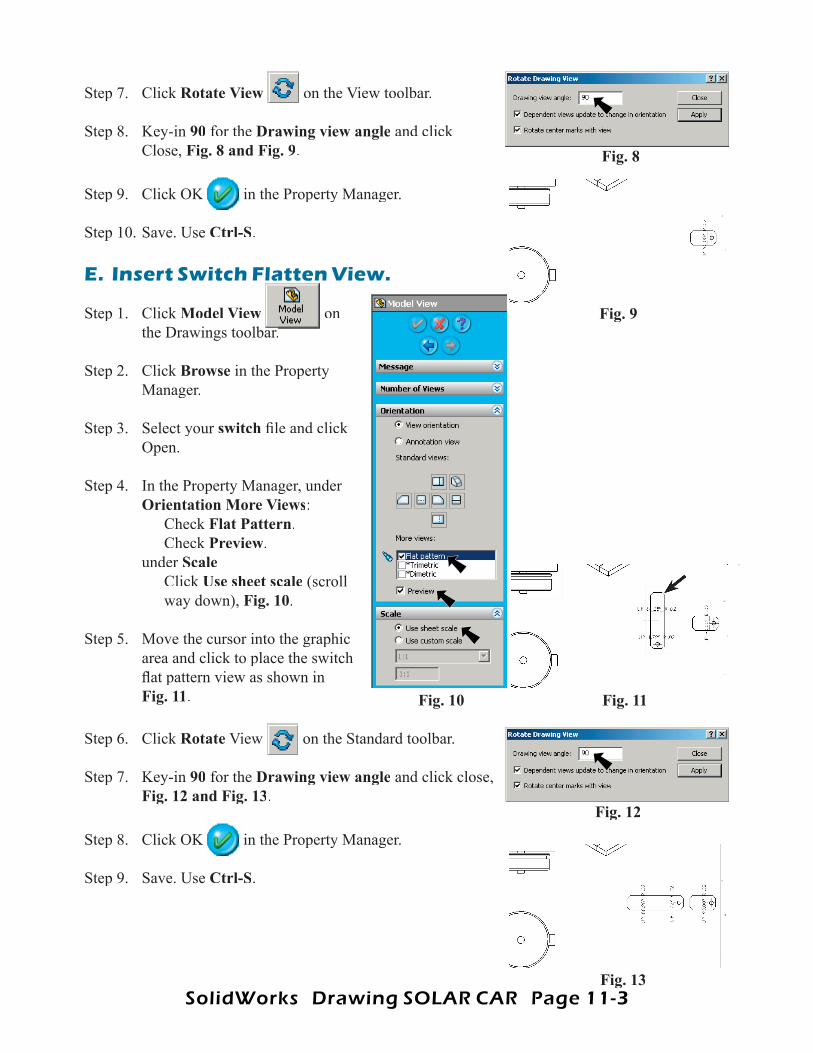
Step 7. Click Rotate View on the View toolbar.
Step 8. Key-in 90 for the Drawing view angle and click Close, Fig. 8 and Fig. 9.
Step 9. Click OK in the Property Manager.
Step 10. Save. Use Ctrl-S.
E. Insert Switch Flatten View.
Step 1. Click Model View on the Drawings toolbar.the Drawings toolbar.
Step 2. Click Browse in the Property Manager.
Step 3. Select your switch fi le and click Open.
Step 4. In the Property Manager, under Orientation More Views: Check Flat Pattern. Check Preview.under Scale
Click Use sheet scale (scroll way down), Fig. 10.
Step 5. Move the cursor into the graphic area and click to place the switch fl at pattern view as shown in Fig. 11.
Step 6. Click Rotate View on the Standard toolbar.
Step 7. Key-in 90 for the Drawing view angle and click close, Fig. 12 and Fig. 13.
Step 8. Click OK in the Property Manager.
Step 9. Save. Use Ctrl-S.
Fig. 8
Fig. 10
Fig. 12
Fig. 9
Fig. 11
Fig. 13
SolidWorks Drawing SOLAR CAR Page 11-4
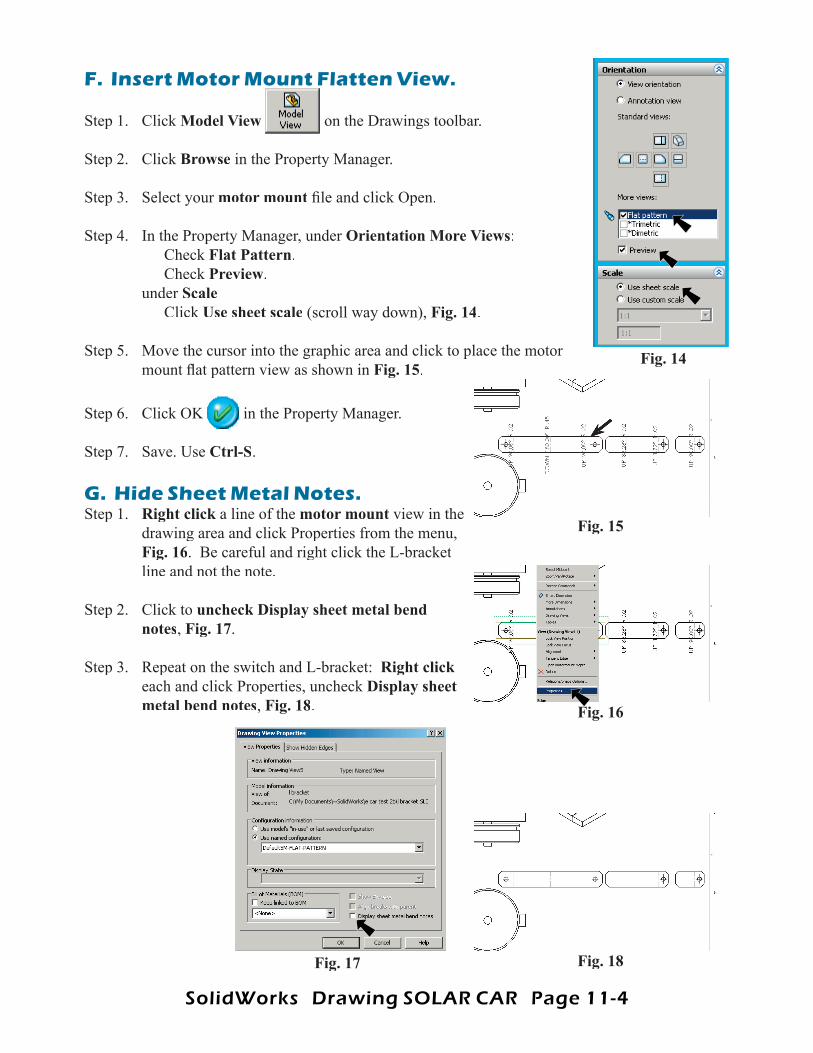
F. Insert Motor Mount Flatten View.
Step 1. Click Model View on the Drawings toolbar.
Step 2. Click Browse in the Property Manager.
Step 3. Select your motor mount fi le and click Open.
Step 4. In the Property Manager, under Orientation More Views: Check Flat Pattern. Check Preview.under Scale
Click Use sheet scale (scroll way down), Fig. 14.
Step 5. Move the cursor into the graphic area and click to place the motor mount fl at pattern view as shown in Fig. 15.
Step 6. Click OK in the Property Manager.
Step 7. Save. Use Ctrl-S.
G. Hide Sheet Metal Notes.Step 1. Right click a line of the Right click a line of the Right click motor mount view in the
drawing area and click Properties from the menu, Fig. 16. Be careful and right click the L-bracket line and not the note.
Step 2. Click to uncheck Display sheet metal bend notes, Fig. 17.
Step 3. Repeat on the switch and L-bracket: Right clickeach and click Properties, uncheck Display sheet metal bend notes, Fig. 18.
Fig. 14
Fig. 17
Fig. 15
Fig. 16
Fig. 18
SolidWorks Drawing SOLAR CAR Page 11-5
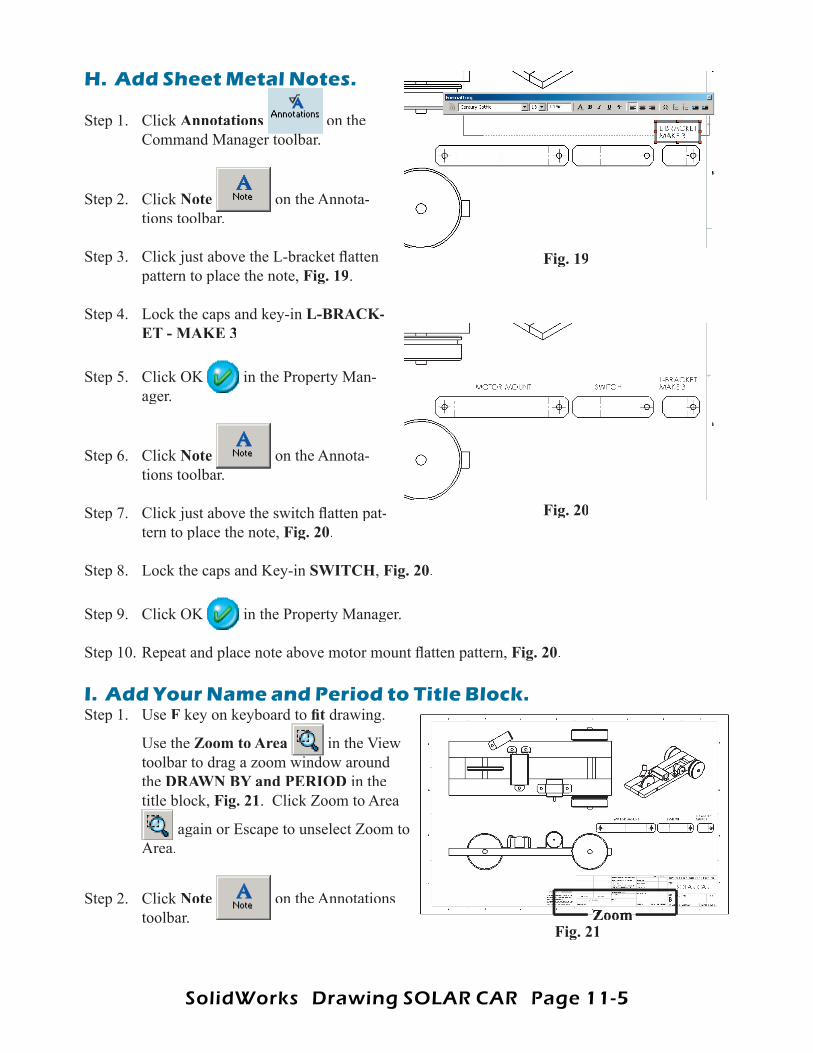
H. Add Sheet Metal Notes.
Step 1. Click Annotations on the Command Manager toolbar.
Step 2. Click Note on the Annota-tions toolbar.
Step 3. Click just above the L-bracket fl atten pattern to place the note, Fig. 19.
Step 4. Lock the caps and key-in L-BRACK-ET - MAKE 3
Step 5. Click OK in the Property Man-ager.
Step 6. Click Note on the Annota-tions toolbar.
Step 7. Click just above the switch fl atten pat-tern to place the note, Fig. 20.
Step 8. Lock the caps and Key-in SWITCH, Fig. 20.
Step 9. Click OK in the Property Manager.
Step 10. Repeat and place note above motor mount fl atten pattern, Fig. 20.
I. Add Your Name and Period to Title Block.Step 1. Use F key on keyboard to fi t drawing.
Use the Zoom to Area
key on keyboard to
in the View toolbar to drag a zoom window around the DRAWN BY and PERIOD in the title block, Fig. 21. Click Zoom to Area
again or Escape to unselect Zoom to Area.
Step 2. Click Note on the Annotations toolbar.
Fig. 19
Fig. 20
Fig. 21ZoomZoom
SolidWorks Drawing SOLAR CAR Page 11-6
Step 3. Click just to the right of DRAWN BY:, Fig. 22.
Step 4. Lock the Caps and key-in your fi rst and last names, Fig. 22.
Step 5. Click OK in the Property Manager.
Step 6. Click Note on the Anno-tations toolbar.
Step 7. Click just to the right of PERIOD:, click and key-in your Period number, Fig. 23.
Step 8. Click OK in the Property Manager.
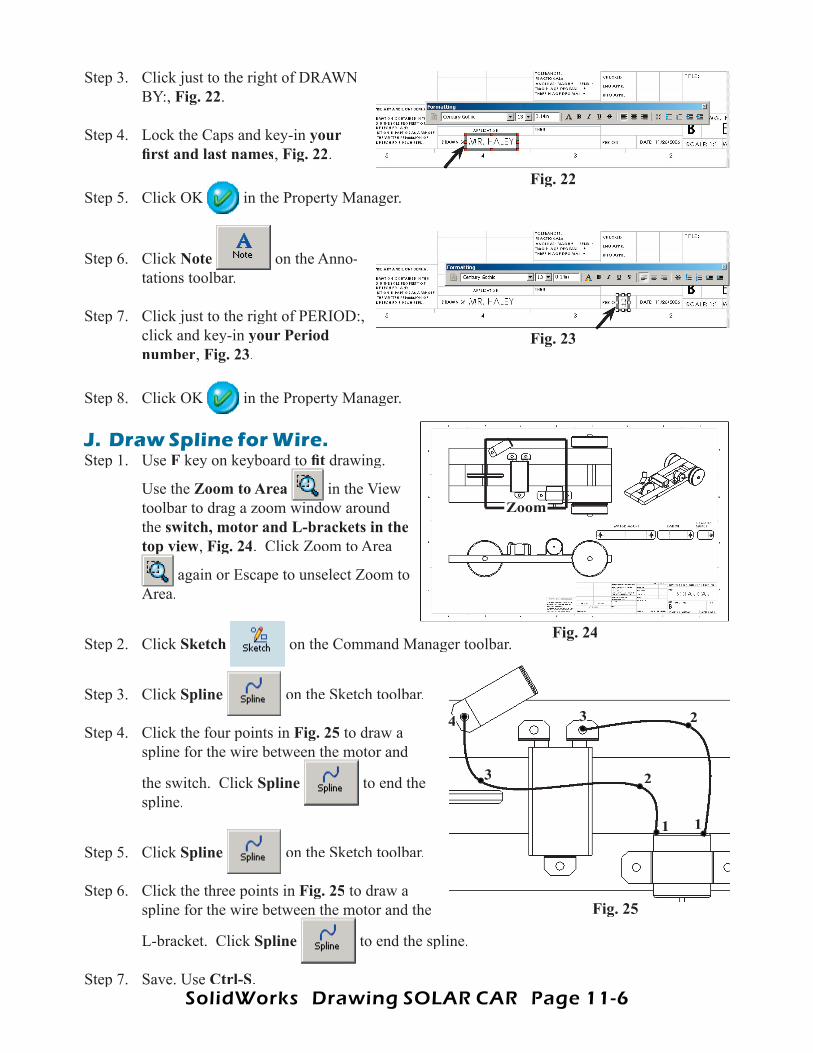
J. Draw Spline for Wire.Step 1. Use F key on keyboard to fi t drawing.
Use the Zoom to Area
key on keyboard to
in the View toolbar to drag a zoom window around the switch, motor and L-brackets in the top view, Fig. 24. Click Zoom to Area top view
again or Escape to unselect Zoom to Area.
Step 2. Click Sketch on the Command Manager toolbar.
Step 3. Click Spline on the Sketch toolbar.
Step 4. Click the four points in Fig. 25 to draw a spline for the wire between the motor and
the switch. Click Spline
spline for the wire between the motor and
to end the spline.
Step 5. Click Spline on the Sketch toolbar.
Step 6. Click the three points in Fig. 25 to draw a spline for the wire between the motor and the
L-bracket. Click Spline
spline for the wire between the motor and the
to end the spline.
Step 7. Save. Use Ctrl-S.
Fig. 22
Fig. 23
Fig. 24
ZoomZoom
Fig. 25
1
233
1
2334