solar led egglite kit, lse2-w kit solaire À del egglite ... · screw. 2) frame mounting: the solar...
TRANSCRIPT

1
SOLAR LED EGGLITE KIT, LSE2-W
KIT SOLAIRE À DEL EGGLITE LSE2-W
JUEGO EGGLITE DE LED SOLAR LSE2-W
EN INTRODUCTIONThis instruction sheet provides you with the information required to safely own and operate your product. Retain these instructions for future reference.
The product you have purchased is of the highest quality workmanship and material, and has been engineered to give you long and reliable service. This product has been carefully tested, inspected, and packaged to ensure safe delivery and operation. Please examine your item(s) carefully to ensure that no damage occurred during shipment. If damage has occurred, please contact the place of purchase. They will assist you in replacement or repair, if required.
READ THESE INSTRUCTIONS CAREFULLY BEFORE ATTEMPTING TO INSTALL, OPERATE, OR SERVICE YOUR PRODUCT. KNOW THE PRODUCT’S APPLICATION, LIMITATIONS, AND POTENTIAL HAZARDS. PROTECT YOURSELF AND OTHERS BY OBSERVING ALL SAFETY INFORMATION. FAILURE TO COMPLY WITH THESE INSTRUCTIONS COULD RESULT IN PERSONAL INJURY AND/OR PROPERTY DAMAGE!
SAFETY GUIDELINES
WARNING
WARNING: Risk of explosion. Do not incinerate.
WARNING: Replace battery with authorized part only. Use of another battery may present a risk of fire or explosion.
Dispose of used battery promptly. Keep away from children. Do not disassemble and do not dispose of in fire.
This product has not been investigated for swimming pool or spa use.
ASSEMBLYYour Solar LED EggLite kit comes fully assembled with the following items:
• Solar panel with 6-inch cord
• Two white LED EggLites
• 10-foot extension cord with three-way connector
• Stake extension
• Spare o-ring
If you purchased the above items separately, follow the instructions below to ensure your unit is correctly assembled. (Skip to step 5 if you purchased these items as a kit.)
1. To ensure a waterproof connection, place an o-ring onto each light plug (Figure 1).
2. Insert each of the two light plugs into a three-way connector receptacle (Figure 2), then tighten the connectors.
IMPORTANT: Align the flat sides on the plugs and the receptacles for proper polarization. If the plugs are not inserted correctly the lights will not illuminate.
3. Connect additional lights (sold separately) to the third receptacle on the three-way connector (Figure 3). NOTE: Regardless of how many lights are added (if any), the last three-way connector will have an unused receptacle. This receptacle must be covered with the black cap provided in your kit.
4. Connect one end of the extension cord to the short cord of the solar panel. Connect the opposite end to the three-way connector (Figure 3). NOTE: Ensure that the flats are aligned as previously described.
5. Attach extension to ground stake.
6. Slide the MODE switch to the RUN position (Figure 4). This will automatically turn the lights off during the day so that the battery can recharge. It will also turn the lights on during the night to illuminate your landscape. NOTE: For the automatic on/off switching to work properly, ensure the photocell (Figure 5) is not covered and is always exposed to ambient light.
7. Your LED EggLites should now be fully functional. The lights should turn on with the solar panel in a mostly dark room, and turn off when the room is well lit.
Franklin Electric Co., Inc.Oklahoma City, OK 73127
IMPORTANT! Align flat sides
Three-way connector receptacle
Light plugLight plugFiche d’éclairageEnchufe de luz
Three-way connector receptacleEmbase à trois voies
Receptáculo conector de tres vías
IMPORTANT• IMPORTANT ! • IMPORTANTE! Alignflatsides•Alignezlescôtésplats•Alineelosladosplanos
O-ring
Light plug
Connector
O-ringJoint toriqueJunta tórica
Light plugFiche d'éclairageEnchufe de luz
ConnectorConnecteurConector
Figure 1 • Figure 1 • Figura 1
Figure 2 • Figure 2 • Figura 2 Figure 3 • Figure 3 • Figura 3
COMPLETE SOLAR LED EGGLITE KITKIT COMPLET DE LAMPES SOLAIRES EGGLITE
JUEGO EGGLITE SOLAR COMPLETO Solar Panel, Two LED EggLites and 10' Low-Voltage
Power CordPanneau solaire, deux lampes à DEL EggLites et
cordon d’alimentation basse tension de 10 piPanel solar, dos EggLites de LED y cable de
alimentación de bajo voltaje de 10’
EXTRA LED EGGLITES (up to 6 total)
LAMPES À DEL EGGLITES SUPPLÉMENTAIRES
(jusqu’à 6 au total)EGGLITES DE LED
ADICIONALES (hasta 6 en total)
Install black cap on unused receptacle
Placez le capuchon noir sur l’embase
non-utilisée
Coloque la tapa negra sobre el receptáculo sin
utilizar
10' Low-Voltage Power CordCordon d’alimentation basse tension de 10 piCable de alimentación de bajo voltaje de 10’
16" Pliable Cord
Cordon flexible de 10 pi
Cable flexible de 16’
Three-way connectorConnecteur à trois voies
Conector de tres vías
2
INSTALLATION AND OPERATION 1. Consider the following to determine the best location for your solar
LED EggLites:
• The lights can be used dry or submerged in your water feature. The solar panel should not be submerged, but can withstand rainy, outdoor environments.
• Each light comes with a 16-inch pliable cord that can be formed to stand on its own or coiled around foliage and fountain heads in the landscape.
• Choose a location for the solar panel that maximizes its exposure to the sun. Locate the solar panel so that its surface is mostly perpendicular to the sun’s rays throughout the day.
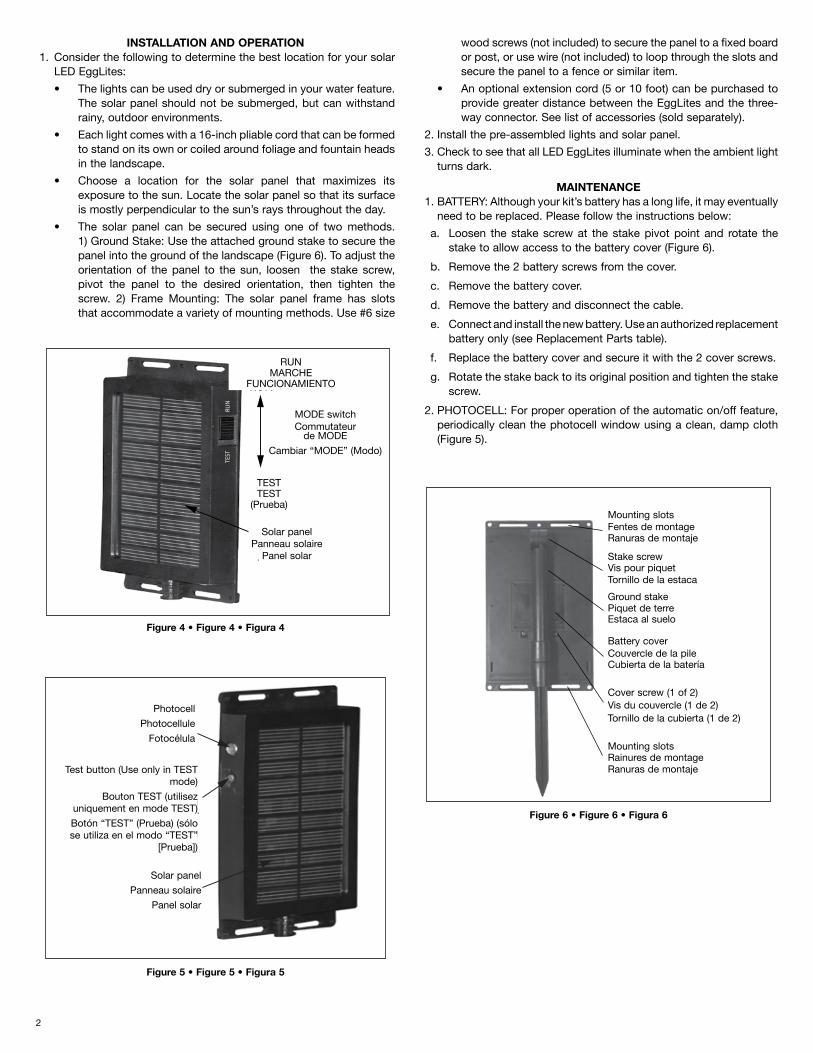
• The solar panel can be secured using one of two methods. 1) Ground Stake: Use the attached ground stake to secure the panel into the ground of the landscape (Figure 6). To adjust the orientation of the panel to the sun, loosen the stake screw, pivot the panel to the desired orientation, then tighten the screw. 2) Frame Mounting: The solar panel frame has slots that accommodate a variety of mounting methods. Use #6 size
wood screws (not included) to secure the panel to a fixed board or post, or use wire (not included) to loop through the slots and secure the panel to a fence or similar item.
• An optional extension cord (5 or 10 foot) can be purchased to provide greater distance between the EggLites and the three-way connector. See list of accessories (sold separately).
2. Install the pre-assembled lights and solar panel.
3. Check to see that all LED EggLites illuminate when the ambient light turns dark.
MAINTENANCE 1. BATTERY: Although your kit’s battery has a long life, it may eventually
need to be replaced. Please follow the instructions below:
a. Loosen the stake screw at the stake pivot point and rotate the stake to allow access to the battery cover (Figure 6).
b. Remove the 2 battery screws from the cover.
c. Remove the battery cover.
d. Remove the battery and disconnect the cable.
e. Connect and install the new battery. Use an authorized replacement battery only (see Replacement Parts table).
f. Replace the battery cover and secure it with the 2 cover screws.
g. Rotate the stake back to its original position and tighten the stake screw.
2. PhOTOCELL: For proper operation of the automatic on/off feature, periodically clean the photocell window using a clean, damp cloth (Figure 5).
MODE switch
RUN
TEST
RUN
TEST
Solar panel
RUNMARChE
FUNCIONAMIENTO
MODE switchCommutateur
de MODE
Cambiar “MODE” (Modo)
TESTTEST
(Prueba)
Solar panel Panneau solaire
Panel solar
Figure 4 • Figure 4 • Figura 4
Photocell
TEST button(Use only in TEST
mode)
Solar panel
Photocell
Photocellule
Fotocélula
Test button (Use only in TEST mode)
Bouton TEST (utilisez uniquement en mode TEST)
Botón “TEST” (Prueba) (sólo se utiliza en el modo “TEST”
[Prueba])
Solar panel
Panneau solaire
Panel solar
Figure 5 • Figure 5 • Figura 5
Fentes de montage
Vis pour piquet
Piquet de terre
Vis du couvercle (1 de 2)
Rainures de montage
Couvercle de la pile
Ranuras de montaje
Tornillo de la estaca
Estaca al suelo
Tornillo de la cubierta (1 de 2)
Ranuras de montaje
Cubierta de la batería
Mounting slots
Stake screw
Ground stake
Cover screw (1 of 2)
Mounting slots
Battery cover
Figure 6 • Figure 6 • Figura 6

3
F INTRODUCTIONCette fiche d'instructions vous fournit les informations nécessaires pour entretenir et faire fonctionner votre produit. Conservez ces instructions pour référence future.Le produit que vous avez acheté a bénéficié d'une fabrication et de matériels de première qualité, et a été conçu pour vous offrir un service fiable et durable. Ce produit a été soigneusement testé, vérifié et emballé pour garantir une livraison et un fonctionnement sûrs. Veuillez examiner votre (vos) article(s) soigneusement pour vérifier qu'aucun dommage n'est survenu pendant le transport. En cas de dommages, veuillez contacter le revendeur. Il vous aidera à remplacer ou réparer le produit si nécessaire.LISEZ ATTENTIVEMENT CES INSTRUCTIONS AVANT D'INSTALLER, FAIRE FONCTIONNER OU RÉPARER VOTRE PRODUIT. INFORMEZ-VOUS SUR L'APPLICATION, LES LIMITES ET LES DANGERS RELATIFS À CE PRODUIT. PROTÉGEZ-VOUS ET LES AUTRES EN RESPECTANT TOUTES LES INFORMATIONS DE SÉCURITÉ. LE NON-RESPECT DE CES INSTRUCTIONS POURRAIT PROVOQUER DES BLESSURES ET / OU DOMMAGES MATÉRIELS !
DIRECTIVES DE SÉCURITÉ
WARNINGAVERTISSEMENT
AVERTISSEMENT
AVERTISSEMENT: Risque d'explosion. N'incinérez pas.AVERTISSEMENT: Remplacez la pile uniquement par une pile autorisée. L'utilisation d'une autre pile peut présenter un risque d'incendie ou d'explosion.Jetez immédiatement les piles usagées. Tenez à l'écart des enfants. Ne démontez pas et ne jetez pas au feu.Ce produit n'a pas été approuvé pour une utilisation en piscine ou en station thermale.
MONTAGEVotre kit de lampes solaires à DEL EggLite est livré entièrement assemblé avec les éléments suivants :• Panneau solaire avec cordon de 6 pouces• Deux lampes à DEL EggLite blanches• Rallonge de 10 pieds avec connecteur à trois voies• Rallonge de piquet• Joint torique de rechangeSi vous avez acheté les articles ci-dessus séparément, suivez les instructions ci-dessous pour vous assurer que votre appareil est correctement assemblé. (Passez à l'étape 5 si vous avez acheté ces articles sous forme de kit.)1. Pour assurer un raccordement étanche, posez un joint torique sur
chaque fiche d'éclairage (Figure 1).2. Insérez chacune des deux fiches d'éclairage dans une embase à
trois voies (Figure 2), puis serrez les connecteurs.
IMPORTANT: Alignez les côtés plats des fiches et des embasespour une polarisation correcte. Si les fiches ne sont pas insérées correctement les lampes ne s'allumeront pas.
3. Connectez les lampes supplémentaires (vendues séparément) à la troisième embase sur le connecteur à trois voies (Figure 3). REMARQUE: Peu importe combien de lampes sont ajoutées (le cas échéant), le dernier connecteur à trois voies aura une embase non-utilisée. Cette embase doit être couverte avec le bouchon noir fourni dans votre trousse.
4. Branchez une extrémité de la rallonge au cordon court du panneau solaire. Branchez l'autre extrémité au connecteur à trois voies (Figure3).REMARQUE:Veillezàcequelescôtésplatssoientalignéscomme décrit précédemment.
5. Fixez la rallonge au piquet de terre.6. Faites glisser le commutateur de MODE sur la position RUN
(MARChE). Cela éteint automatiquement les lampes pendant la journée afin que la pile puisse se recharger, et les allume pendant
la nuit pour illuminer votre paysage. REMARQUE: Pour que la commutation marche / arrêt automatique fonctionne correctement, veillez à ce que la photocellule (figure 5) ne soit pas couverte et qu'elle soit toujours exposée à la lumière ambiante.
7. Vos lampes à DEL EggLites doivent désormais être totalement opérationnelles. Les lampes devraient s'allumer avec le panneau solaire dans une pièce sombre, et s'éteindre lorsque la pièce est bien éclairée.
INSTALLATION ET FONCTIONNEMENT1. Considérez ce qui suit pour déterminer le meilleur emplacement
pour vos lampes solaires à DEL EggLites :• Les lampes peuvent être utilisées à sec ou immergées dans
votre décor d’eau. Le panneau solaire ne doit pas être immergé, mais il résiste à la pluie et à l’environnement extérieur.
• Chaque lampe est livrée avec un cordon flexible de 16 pouces qui peut être manipulé pour se tenir debout ou s’enrouler autour du feuillage et des têtes de fontaine dans le paysage.
• Choisissez un emplacement pour le panneau solaire qui maximise son exposition au soleil. Installez le panneau solaire de sorte que sa surface soit principalement perpendiculaire aux rayons du soleil tout au long de la journée.
• Le panneau solaire peut être sécurisé de deux façons. 1) Piquet de terre : Utilisez le piquet de terre joint pour fixer le panneau dans le sol du paysage (Figure 6). Pour régler l’orientation du panneau par rapport au soleil, desserrez la vis du piquet, faites pivoter le panneau vers l’orientation désirée, puis serrez la vis. 2) Montage du cadre : Le cadre du panneau solaire présente des fentes pour différentes méthodes de montage. Utilisez des vis à bois n° 6 (non comprises) pour fixer le panneau sur un panneau ou un poteau fixe, ou utilisez un câble (non compris) pour faire une boucle à travers les fentes et fixer le panneau sur uneclôtureouunélémentsimilaire.
• Vous pouvez acheter une rallonge optionnelle (de 5 ou 10 pieds) pour augmenter la distance entre les lampes EggLites et le connecteur à trois voies. Voir la liste des accessoires (vendus séparément).
2. Installez les lampes pré-assemblées et le panneau solaire.3. Vérifiez que toutes les lampes à DEL EggLites s’allument lorsque la
luminosité ambiante s’assombrit.
ENTRETIEN1. PILE: Bien que la pile de votre kit ait une longue durée de vie,
il vous faudra peut être la remplacer éventuellement. Veuillez vous conformer aux instructions ci-dessous.a. Desserrez la vis du piquet au point de pivotement du piquet
et faites tourner le piquet pour accéder au couvercle de la pile (Figure 6).
b. Retirez les 2 vis du couvercle de la pile.
c. Retirez le couvercle du compartiment à piles.
d. Retirez la pile et débranchez le câble.
e. Branchez et insérez la nouvelle pile. Utilisez une pile de rechange agréée (voir le tableau des pièces de rechange).
f. Remettez le couvercle de la pile et fixez-le à l’aide des 2 vis du couvercle.
g. Faites à nouveau tourner le piquet pour le ramener à sa position originale et serrez la vis
2. PhOTOCELLULE: Pour un bon fonctionnement de la fonction marche / arrêt automatique, nettoyez régulièrement la fenêtre de la photocellule en utilisant un chiffon propre et humide (Figure 5).

4
E INTRODUCCION
Este instructivo proporciona la información necesaria para utilizar y almacenar el producto de forma segura. Conserve estas instrucciones para referencia futura.El producto adquirido cuenta con mano de obra y material de la más alta calidad y se diseñó para brindarle un servicio confiable y duradero. Este producto se probó, inspeccionó y embaló cuidadosamente para asegurar una entrega y un funcionamiento seguros. Examine los artículos cuidadosamente para asegurarse de que no se hayan dañado durante el envío. Si se produjeron daños, póngase en contacto con el lugar de compra. Ellos lo ayudarán con el reemplazo o la reparación, de ser necesario.LEA ESTAS INSTRUCCIONES ANTENTAMENTE ANTES DE INSTALAR, OPERAR O REPARAR EL PRODUCTO. CONOZCA ACERCA DE LA APLICACIÓN, LAS LIMITACIONES Y LOS PELIGROS POTENCIALES DEL PRODUCTO. PROTÉJASE Y PROTEJA A LOS DEMAS RESPETANDO TODA LA INFORMACIÓN DE SEGURIDAD. ¡LA FALTA DE CUMPLIMIENTO DE ESTAS INSTRUCCIONES PODRÍA CAUSAR LESIONES PERSONALES Y/O DAÑOS MATERIALES!
ORIENTACIONES DE SEGURIDAD
WARNINGAVERTISSEMENT
AVERTISSEMENT
ADVERTENCIA: Riesgo de explosión. No incinerar. ADVERTENCIA: Reemplace la batería con piezas autorizadas únicamente. Utilizar otra batería puede presentar riesgos de incendio o explosión.Deseche la batería utilizada inmediatamente. Manténgala alejada de los niños. No desmonte la batería ni la arroje al fuego.No se probó el uso de este producto en piscinas o spa.
MONTAJEEl juego EggLite de LED solar se presenta montado por completo e incluye los siguientes artículos:• Panel solar con un cable de 6 pulgadas• Dos EggLites de LED blancas• Cable de extensión de 10 pies con un conector de tres vías• Extensión de estaca• Junta tórica de repuestoSi adquirió los artículos anteriores por separado, siga las instrucciones a continuación para asegurarse de que la unidad esté montada correctamente. (Pase al paso 5 si adquirió estos artículos en un juego).1. Para asegurar una conexión a prueba de agua, coloque una junta
tórica en cada enchufe de luz (Figura 1).2. Inserte cada uno de los dos enchufes de luz en un receptáculo de
conector de tres vías (Figura 2) y, a continuación, ajuste los conectores.
IMPORTANTE: Alinee los lados planos en los enchufes y los receptáculos para obtener una polarización adecuada. Si los enchufes no se insertan correctamente, las luces no se encenderán.
3. Conecte las luces adicionales (se venden por separado) al tercer receptáculo en el conector de tres vías (Figura 3). NOTA: Independientemente de la cantidad de luces que se agreguen (de agregarse alguna), en el último conector de tres vías quedará un receptáculo sin utilizar. Este receptáculo debe cubrirse con la tapa negra incluida en el juego.
4. Conecte un extremo del cable de extensión al cable corto en el panel solar. Conecte el extremo opuesto en el conector de tres vías (Figura 3). NOTA: Asegúrese de que los lados planos estén alineados tal como se describió anteriormente.
5. Coloque la extensión en la estaca al suelo.
6. Deslice el interruptor “MODE” (Modo) hacia la posición “RUN” (Funcionamiento) (Figura 4). Esto apagará las luces de forma automática durante el día para que la batería pueda recargarse. También encenderá las luces durante la noche para que iluminen el paisaje. NOTA: Para que la conmutación de encendido/apagado funcione adecuadamente, asegúrese de que la fotocélula (Figura 5) esté descubierta y siempre expuesta a luz ambiental.
7. Las EggLites de LED deberían funcionar por completo. Las luces deberían encenderse si el panel solar se encuentra en una habitación mayormente oscura y apagarse si la habitación está bien iluminada.
INSTALACIÓN Y FUNCIONAMIENTO1. Considere los siguientes puntos para determinar la mejor ubicación
para las EggLites de LED solares:• Las luces pueden utilizarse en zonas secas o áreas sumergidas
del sistema de agua. El panel solar no debe sumergirse pero puede soportar ambientes exteriores y lluviosos.
• Cada luz incluye un cable flexible de 16 pulgadas que puede colocarse de forma independiente o enrollarse entre el follaje y los cabezales de la fuente en el paisaje.
• Elija una ubicación para el panel solar que maximice su exposición al sol. Ubique el panel solar de modo tal que la superficie se encuentre en su mayor parte de forma perpendicular a los rayos solares durante el día.
• El panel solar puede sujetarse utilizando uno de dos métodos. 1) Estaca al suelo: Utilice la estaca al suelo acoplada para fijar el panel en el suelo del paisaje (Figura 6). Para ajustar la orientación del panel hacia el sol, afloje el tornillo de la estaca, gire el panel hacia la orientación deseada y, luego, ajuste el tornillo. 2) Montaje en estructura: La estructura del panel solar cuenta con ranuras que pueden adaptarse a una variedad de métodos de montaje. Utilice tornillos de madera número 6 (no incluidos) para fijar el panel en un poste o una placa fija o utilice alambre (no incluido) a través de las ranuras para fijar el panel a un cerco o estructura similar.
• Se puede adquirir un cable de extensión opcional (de 5 ó 10 pies) para proporcionar mayor distancia entre las EggLites y el conector de tres vías. Consulte la lista de accesorios (se venden por separado).
2. Instale las luces previamente montadas y el panel solar.3. Verifique que todas las EggLites de LED se enciendan cuando se
oscurezca el ambiente.
MANTENIMIENTO1. BATERÍA: A pesar de que la batería incluida en el juego es de larga
duración, es posible que con el tiempo necesite reemplazarla. Siga las instrucciones a continuación:a. Afloje el tornillo de la estaca en el punto giratorio de la estaca y
rótela para poder acceder a la cubierta de la batería (Figura 6).
b. Extraiga los 2 tornillos de la cubierta de la batería.
c. Extraiga la cubierta de la batería.
d. Extraiga la batería y desconecte el cable.
e. Conecte e instale la nueva batería. Utilice únicamente una batería de reemplazo autorizada (consulte la tabla de Repuestos).
f. Vuelva a colocar la cubierta de la batería y asegúrela con los 2 tornillos correspondientes.
g. Coloque la estaca nuevamente en su posición original y ajuste el tornillo de la estaca.
2. FOTOCÉLULA: Para un funcionamiento adecuado de la función de encendido/apagado automático, limpie regularmente la ventana de la fotocélula utilizando un paño limpio y húmedo (Figura 5).

5
TROUBLESHOOTING • DÉPANNAGE • SOLUCIÓN DE PROBLEMASSymptom • Symptôme • Síntoma Cause • Cause • Causa Remedy • Solution • Solución
LEDLitesdonotilluminate•Leslampes à DEL Lites ne s’allument pas •LaslucesdeLEDnoseencienden
ModeswitchisnotinRUNposition(Figure4)•Lecommutateur de mode n’est pas en position RUN (MARCHE)•Elinterruptor“MODE”(Modo)noseencuentraen la posición “RUN” (Funcionamiento) (Figura 4)
ChangeswitchpositiontoRUN•MettezlecommutateurenpositionRUN(MARCHE)•Cambie la posición del interruptor a “RUN” (Funcionamiento)
AmbientlightispreventingLEDsfromilluminating•LalumièreambianteempêchelesDELdes’allumer•Laluzambiental evita que las luces de LED se enciendan
Reduce ambient light or move LED lites to a darkerlocation.•Réduisezlalumièreambianteoudéplacez les lampes à DEL Lites dans un endroit plussombre•Reduzcalaluzambientalocoloquelas luces de LED en un sector más oscuro
Connectorflatsarenotproperlyaligned(Figure2)•Lescôtésplatsdesconnecteursnesontpascorrectementalignés(Figure2)•Losladosplanosdelconectornoestáncorrectamente alineados (Figura 2)
Re-connectwithproperalignmentofflats•Rebranchezenalignantcorrectementlescôtésplats•Vuelvaaconectaralineandolosladosplanos de forma adecuada
Batteryisnotfullycharged•Lapilen’estpasentièrementchargée•Labateríanosecargóporcompleto
Expose solar panel to sun for a day, then retry thelites•Exposezlepanneausolaireausoleilpendant une journée, puis réessayez les lampes Lite•Expongaelpanelsolaralsolporundíay,luego, vuelva a intentarlo
Batteryneedsreplaced•Lapiledoitêtreremplacée•Sedebe reemplazar la batería
Replacebattery•Remplacezlapile•Reemplacela batería
Photocellisdamaged•Laphotocelluleestendommagée•Se dañó la fotocélula
Replacesolarpanel•Remplacezlepanneausolaire•Reemplaceelpanelsolar
LEDLitesarealwaysilluminated•Leslampes à DEL Lites sont constamment allumées•LaslucesLEDsiempre están encendidas
Ambientlighttophotocellisblocked•Lalumièreambianteverslaphotocelluleestobstruée•Laluzambientalnopenetra en la fotocélula
Clean transparent cover to photocell to allow ambientlighttopenetrate•Nettoyezlecouvercletransparent de la photocellule pour permettre à la lumièreambiantedepénétrer•Limpielacubiertatransparente de la fotocélula para que penetre la luz ambiental
Photocellisdamaged•Laphotocelluleestendommagée•Se dañó la fotocélula
Replacesolarpanel•Remplacezlepanneausolaire•Reemplaceelpanelsolar
REPLACEMENT PARTS • PIÈCES DE RECHANGE • Repuestos
Part No. • Num. de pièce • N.º de pieza
Description • Description • Descripción
566430 LSPRsolarpanel•PanneausolaireLSPR•Panel solar LSPR
566432 Replacementbatterykit•Kitdepilederechange•Juegodebateríaderepuesto
566440 ExtraMiniEggLite,white•ExtraMiniEggLite,blanche•LuzMiniEggLiteblancaadicional
566431 Replacementstakekit•Kitdepiquetderechange•Juegodeestacaderepuesto

6
LIMITED WARRANTY*THIS WARRANTY SETS FORTH THE COMPANY’S SOLE OBLIGATION AND PURCHASER’S EXCLUSIVE REMEDY FOR DEFECTIVE PRODUCT.
Franklin Electric Company, Inc. and its subsidiaries (hereafter “the Company”) warrants that the products accompanied by this warranty are free from defects in material or workmanship of the Company.
The Company has the right to inspect any product returned under warranty to confirm that the product contains a defect in material or workmanship. The Company shall have the sole right to choose whether to repair or replace defective equipment, parts, or components.
The buyer should return the product to the place of purchase for warranty consideration. Subject to the terms and conditions listed below, the Company will repair or replace to the buyer any portion of this product which proves defective due to materials or workmanship of the Company.
The company will consider products for warranty for 12 months (1-year) from the date of installation or for 24 month (2-years) from the date of manufacture,whicheveroccursfirst.Thislimitedwarrantyextendsonlytothe products purchased directly from Franklin Electric and is not assignable or transferable to any subsequent purchaser or user.
TheCompanyshallINNOEVENTberesponsibleorliableforthecostoffieldlabor or other charges incurred by any customerinremovingand/oraffixingany product, part or component thereof.
The Company reserves the right to change or improve its products or any portions thereof without being obligated to provide such change or improvement to previously sold products.
ThIS WARRANTY DOES NOT APPLY TO products damaged by acts of God, including lightning, normal wear and tear, normal maintenance services and the parts used in connection with such service, or any other conditions beyond the control of the Company.
ThIS WARRANTY WILL IMMEDIATELY VOID if any of the following conditions are found:
1. Product is used for purposes other than those for which it was designed and manufactured;
2. Product was not installed in accordance with applicable codes, ordinances and good trade practices;
3. ProductwasnotinstalledbyaFranklinCertifiedContractororFranklinKey Dealer; or
4. Product was damaged as a result of negligence, abuse, accident, misapplication, tampering, alteration, improper installation, operation, maintenance or storage, nor to an excess of recommended maximums as set forth in the product instructions.
NEIThER SELLER NOR ThE COMPANY ShALL BE LIABLE FOR ANY INJURY, LOSS OR DAMAGE, DIRECT, INCIDENTAL OR CONSEQUENTIAL (INCLUDING, BUT NOT LIMITED TO, INCIDENTAL OR CONSEQUENTIAL DAMAGES FOR LOST PROFITS, LOST SALES, INJURY TO PERSON OR PROPERTY, OR ANY OThER INCIDENTAL OR CONSEQUENTIAL LOSS), ARISING OUT OF ThE USE OR ThE INABILITY TO USE ThE PRODUCT, AND ThE BUYER AGREES ThAT NO OThER REMEDY ShALL BE AVAILABLE TO IT.
ThE WARRANTY AND REMEDY DESCRIBED IN ThIS LIMITED WARRANTY IS AN EXCLUSIVE WARRANTY AND REMEDY AND IS IN LIEU OF ANY OThER WARRANTY OR REMEDY, EXPRESS OR IMPLIED, WhICh OThER WARRANTIES AND REMEDIES ARE hEREBY EXPRESSLY EXCLUDED, INCLUDING BUT NOT LIMITED TO ANY IMPLIED WARRANTY OF MERChANTABILITY OR FITNESS FOR A PARTICULAR PURPOSE, TO ThE EXTENT EIThER APPLIES TO A PRODUCT ShALL BE LIMITED IN DURATION TO ThE PERIODS OF ThE EXPRESSED WARRANTIES GIVEN ABOVE.
DISCLAIMER: Any oral statements about the product made by the seller, the Company, the representatives or any other parties, do not constitute warranties, shall not be relied upon by the buyer, and are not part of the contract for sale. Seller’s and the Company’s only obligation, and buyer’s only remedy, shall be the replacement and/or repair by the Company of the product as described above. Before using, the user shall determine the suitability of the product for his intended use, and user assumes all risk and liability whatsoever in connection therewith.
Some states and countries do not allow the exclusion or limitations on how long an implied warranty lasts or the exclusion or limitation of incidental or consequential damages, so the above exclusion or limitations may not apply toyou.Thiswarrantygivesyouspecificlegalrights,andyoumayalsohaveother rights which vary from state to state and country to country.
*Contact Franklin Electric Co., Inc. Export Division for International Warranty.
GARANTIE LIMITÉE*LA PRÉSENTE GARANTIE ÉTABLIT LA SEULE OBLIGATION DE LA SOCIÉTÉ ET LE RECOURS EXCLUSIF DE L’ACHETEUR EN CE QUI A TRAIT À UN PRODUIT DÉFECTUEUX.
Franklin Electric Company, Inc. et ses filiales (ci-après « la Société »)garantissent que les produits accompagnés de la présente garantie sont exempts de défauts de matériel et de main-d’œuvre liés à la Société.
La Société a le droit d’inspecter tout produit renvoyé sous garantie pour confirmer que ledit produit contient un défaut de matériel ou de main-d’œuvre. La Société aura le droit exclusif de choisir de réparer ou de remplacer les équipements, pièces ou composants défectueux.
L’acheteur devra renvoyer le produit au point d’achat pour qu’il soit pris en compte par la garantie. Sous réserve des conditions et modalités énumérées ci-dessous, la Société réparera ou remplacera toute partie de ce produit qui s’avère défectueuse pour des raisons de matériel ou de main-d’œuvre liés à la Société.
La compagnie garantie ces produits pour une période de 12 mois (1 an) de la date d’installation ou 24 mois (2 ans) de la date de fabrication selon la première éventualité. Cette garantie s’applique uniquement aux produits qui sont achetés directement de Franklin Electric. Cette garantie est ni cessible, ni transférable.
EN AUCUN CAS la Société ne sera responsable du coût de la main-d’œuvre extérieureoud’autresdépensesencouruespartoutclientafind’enleveret/ou d’installer tout produit, partie ou composant de ce dernier.
LaSociété se réserve ledroit demodifieroud’améliorer sesproduitsoutoute partie de ceux-ci sans que cela n’entraîne l’obligation d’apporter ces modificationsouaméliorationsàdesproduitspréalablementvendus.
LA PRÉSENTE GARANTIE NE S’APPLIQUE PAS À des produits endommagés par des catastrophes naturelles, dont la foudre, l’usure normale, le service d’entretien normal et les pièces utilisées en relation avec ledit service, ou touteautrecirconstanceéchappantaucontrôledelaSociété.
LA PRÉSENTE GARANTIE SERA ANNULÉE IMMÉDIATEMENT si l’une ou l’autre des conditions suivantes est présente :
1. Le produit est utilisé à des fins autres que celles pour lesquelles il a été conçu et fabriqué;
2. Le produit n’a pas été installé conformément aux codes et arrêtés applicables et aux bonnes pratiques commerciales;
3. Le produit n’a pas été installé par un Entrepreneur Certifié de Franklin ou Programme pour installateurs clés ; ou
4. Le produit a été endommagé pour cause de négligence, d’abus, d’accident, de mauvaise application, d’altération, de procédures d’installation, d’opération, d’entretien ou d’entreposage non conformes, ou pour cause d’utilisation excédant les maximums recommandés tel que stipulé dans les instructions concernant le produit.
NI LE VENDEUR NI LA SOCIÉTÉ N’ASSUMERONT DE RESPONSABILITÉ POUR TOUTE BLESSURE, TOUTE PERTE OU TOUT DOMMAGE, DIRECT, ACCESSOIRE OU CONSÉCUTIF (Y COMPRIS, MAIS SANS S’Y LIMITER, LES DOMMAGES ACCESSOIRES OU CONSÉCUTIFS POUR PERTE DE BÉNÉFICES, PERTE DE VENTES, BLESSURES À LA PERSONNE OU DÉGÂTS AUX BIENS, OU TOUTE AUTRE PERTE ACCESSOIRE OU CONSÉCUTIVE), DÉCOULANT DE L’UTILISATION OU DE L’INCAPACITÉ D’UTILISER LE PRODUIT, ET L’AChETEUR ADMET QU’AUCUN AUTRE RECOURS NE SERA DISPONIBLE À CET EFFET.
LA GARANTIE ET LE RECOURS DÉCRITS DANS LA PRÉSENTE GARANTIE LIMITÉE SONT UNE GARANTIE ET UN RECOURS EXCLUSIFS, EN LIEU ET PLACE DE TOUT AUTRE GARANTIE OU RECOURS, EXPLICITE OU IMPLICITE, CELA EXCLUANT EXPRESSÉMENT PAR LES PRÉSENTES D’AUTRES GARANTIES ET RECOURS, Y COMPRIS, MAIS SANS S’Y LIMITER, TOUTE GARANTIE IMPLICITE DE MARChANDISAGE OU D’ADÉQUATION À UNE FIN PARTICULIÈRE, DANS LA MESURE OÙ L’UNE OU L’AUTRE S’APPLIQUE À UN PRODUIT ET SA DURÉE SERA LIMITÉE AUX PÉRIODES DES GARANTIES EXPRESSES INDIQUÉES PLUS hAUT.
CLAUSE DE NON-GARANTIE : Toute déclaration orale au sujet du produit faite par le vendeur, la Société, les représentants ou toute autre partie, ne constitue pas une garantie, ne sera pas prise comme référence par l’acheteur et ne fait pas partie du contrat de vente. La seule obligation du vendeur et de la Société ainsi que le recours exclusif de l’acheteur porteront sur le remplacement et/ou la réparation par la Société du produit tel que décrit plus haut. Avant d’utiliser le produit, l’utilisateur devra déterminer l’adéquation dudit produit à l’usage prévu, et l’utilisateur assumera tous les risques et responsabilités afférents, quels qu’ils soient.

7
Certains États et pays n’autorisent pas l’exclusion ou la restriction de la durée d’une garantie implicite ou l’exclusion ou la restriction des dommages accessoires ou consécutifs. Par conséquent, les exclusions ou restrictions susmentionnées pourraient ne pas s’appliquer dans votre cas. La présente garantievousaccordedesdroitslégauxspécifiquesetilsepeutquevouspuissiezbénéficierd’autresdroitsquivarientd’unÉtatàl’autreetd’unpaysà l’autre.
*Communiquez avec le service de l’exportation de Franklin Electric Co., Inc.
pour obtenir des informations concernant la garantie internationale.
GARANTÍA LIMITADA*ESTA GARANTÍA ESTABLECE LAS OBLIGACIONES QUE LE CORRESPONDEN A LA COMPAÑÍA Y EL RESARCIMIENTO QUE LE CORRESPONDE EXCLUSIVAMENTE AL COMPRADOR EN CASO DE QUE EL PRODUCTO SEA DEFECTUOSO.
Franklin Electric Company, Inc. y sus subsidiarias (en adelante “la Compañía”) garantiza que los productos que cubre esta garantía carecen de defectos en cuanto al material o la mano de obra de la Compañía.
La Compañía tiene derecho a inspeccionar todo producto devuelto en garantíaparaconfirmarsicontienedefectosenelmaterialolamanodeobra.La Compañía tendrá el derecho exclusivo de elegir si reparará o reemplazará el equipo, las piezas o los componentes defectuosos.
El comprador deberá enviar el producto al lugar de compra para hacer uso de la garantía. Con sujeción a los términos y las condiciones que se enumeran a continuación, la Compañía reparará o reemplazará para el comprador cualquier parte de este producto que resulte ser defectuosa a causa de los materiales o la mano de obra de la Compañía.
La compañía considerará dentro de garantía un producto durante 12 meses (1 año) a partir de su fecha de instalación, o bien 24 meses (2 años) a partir de su fecha de fabricación; cualquiera que ocurra primero. Esta garantía limitada se extiende únicamente a productos comprados directamente a Franklin Electric y no es asignable o transferible a ningún comprador o usuario subsecuente.
La Compañía no se responsabilizará EN NINGÚN CASO ni estará obligada a responder por el costo del trabajo de campo u otros cargos en los que incurra un cliente al retirar y/o instalar un producto, una pieza o un componente de este.
La Compañía se reserva el derecho de cambiar o mejorar sus productos, o parte de ellos, sin tener la obligación de proveer dicho cambio o mejora a los productos que ya se han vendido.
ESTA GARANTÍA NO SE APLICA A los productos dañados por sucesos de fuerza mayor, incluyendo descargas eléctricas, el desgaste normal del producto, los servicios habituales de mantenimiento y las piezas que se utilicen en relación con dichos servicios, o por cualquier otra condición que escape al control de la Compañía.
ESTA GARANTÍA SE ANULARÁ DE INMEDIATO si se presenta cualquiera de las siguientes condiciones:
1. El producto se utiliza para otros propósitos distintos de aquellos para los que fue diseñado y fabricado;
2. El producto no se instaló de conformidad con los códigos, los reglamentos y las buenas prácticas comerciales vigentes;
3. El producto no fue instalado por un contratista certificado por Franklin o Franklin Key Dealer; o
4. El producto resultó dañado por negligencia, abuso, accidente, aplicación indebida, modificación, alteración, instalación inadecuada, operación, mantenimiento o almacenamiento o como resultado del abuso de los límites recomendados y establecidos en las instrucciones del producto.
NI EL VENDEDOR NI LA COMPAÑÍA SERÁN RESPONSABLES FRENTE A UNA LESIÓN, PÉRDIDA O DAÑO DIRECTO, INCIDENTAL O EMERGENTE (INCLUIDOS, A TÍTULO ENUNCIATIVO, MAS NO LIMITATIVO, LOS DAÑOS INCIDENTALES Y EMERGENTES POR LUCRO CESANTE, LAS VENTAS NO REALIZADAS, LAS LESIONES A LAS PERSONAS O LA PROPIEDAD, O CUALQUIER OTRA PÉRDIDA INCIDENTAL O EMERGENTE) QUE SURJAN DEL USO O LA IMPOSIBILIDAD DE USO DEL PRODUCTO, Y EL COMPRADOR CONVIENE EN QUE NO PODRÁ EXIGIR NINGÚN OTRO RESARCIMIENTO.
LA GARANTÍA Y EL RESARCIMIENTO DESCRITOS EN ESTA GARANTÍA LIMITADA SON EXCLUSIVOS Y REEMPLAZAN A CUALQUIER OTRA GARANTÍA O RESARCIMIENTO, EXPRESO O IMPLÍCITO, Y POR EL PRESENTE SE EXCLUYEN OTRAS GARANTÍAS Y RESARCIMIENTOS INCLUYENDO, A TÍTULO ENUNCIATIVO, MAS NO LIMITATIVO, TODA GARANTÍA IMPLÍCITA DE COMERCIABILIDAD O IDONEIDAD PARA UN PROPÓSITO DETERMINADO, Y EN LA MEDIDA EN QUE ALGUNO DE LOS DOS SE APLIQUE A UN PRODUCTO, ESTARÁ LIMITADO A LA DURACIÓN DE LOS PERIODOS DE LAS GARANTÍAS EXPRESAS MENCIONADOS ANTERIORMENTE.
DESCARGO DE RESPONSABILIDAD: las declaraciones verbales que el vendedor, la Compañía, los representantes o cualquier otra parte, hagan respecto del producto, no constituirán garantías, ni formarán partedelcontratodeventa,nielcompradorsefiarádeellas.Laúnicaobligación del Vendedor y la Compañía, y el único resarcimiento a disposición del comprador, será el reemplazo y/o la reparación del producto por parte de la Compañía, de la forma descrita anteriormente. Antes de usar el producto, el usuario determinará la idoneidad de este para su uso previsto, y el usuario asumirá los riesgos y la responsabilidad que deriven de esta acción.
En algunos estados y países no se permite la exclusión o la limitación respecto de cuánto tiempo durará una garantía implícita, ni tampoco la exclusión o la limitación respecto de los daños incidentales o emergentes, de manera que es posible que la exclusión o las limitaciones mencionadas anteriormente en su caso no se apliquen. Esta garantía le concede derechos legales específicos, y tambiénpuede tener otros derechos que varían según el estado y el país.
*Comuníquese con la División de Exportaciones para Garantías Internacionales de Franklin Electric Co., Inc.

For technical assistance, please contact ............................................ 1-888-956-0000
Pour l’aide technique, entrez s’il vous plaît en contact ....................... 1-888-956-0000
Para la ayuda técnica, por favor póngase en contacto ....................... 1-888-956-0000
Form 998675 - 05/2013 REV. 001