solaris advanced user's guide - oracle · unix is a registered ... s guide • may 2002 ....
TRANSCRIPT

Solaris Advanced User’s Guide
Sun Microsystems, Inc.4150 Network CircleSanta Clara, CA 95054U.S.A.
Part No: 806–7612–10May 2002
Copyright 2002 Sun Microsystems, Inc. 4150 Network Circle, Santa Clara, CA 95054 U.S.A. All rights reserved.
This product or document is protected by copyright and distributed under licenses restricting its use, copying, distribution, and decompilation. Nopart of this product or document may be reproduced in any form by any means without prior written authorization of Sun and its licensors, if any.Third-party software, including font technology, is copyrighted and licensed from Sun suppliers.
Parts of the product may be derived from Berkeley BSD systems, licensed from the University of California. UNIX is a registered trademark in the U.S.and other countries, exclusively licensed through X/Open Company, Ltd.
Sun, Sun Microsystems, the Sun logo, docs.sun.com, AnswerBook, AnswerBook2, SunOS, and Solaris are trademarks, registered trademarks, orservice marks of Sun Microsystems, Inc. in the U.S. and other countries. All SPARC trademarks are used under license and are trademarks orregistered trademarks of SPARC International, Inc. in the U.S. and other countries. Products bearing SPARC trademarks are based upon anarchitecture developed by Sun Microsystems, Inc.
The OPEN LOOK and Sun™ Graphical User Interface was developed by Sun Microsystems, Inc. for its users and licensees. Sun acknowledges thepioneering efforts of Xerox in researching and developing the concept of visual or graphical user interfaces for the computer industry. Sun holds anon-exclusive license from Xerox to the Xerox Graphical User Interface, which license also covers Sun’s licensees who implement OPEN LOOK GUIsand otherwise comply with Sun’s written license agreements.
Federal Acquisitions: Commercial Software–Government Users Subject to Standard License Terms and Conditions.
DOCUMENTATION IS PROVIDED “AS IS” AND ALL EXPRESS OR IMPLIED CONDITIONS, REPRESENTATIONS AND WARRANTIES,INCLUDING ANY IMPLIED WARRANTY OF MERCHANTABILITY, FITNESS FOR A PARTICULAR PURPOSE OR NON-INFRINGEMENT, AREDISCLAIMED, EXCEPT TO THE EXTENT THAT SUCH DISCLAIMERS ARE HELD TO BE LEGALLY INVALID.
Copyright 2002 Sun Microsystems, Inc. 4150 Network Circle, Santa Clara, CA 95054 U.S.A. Tous droits réservés
Ce produit ou document est protégé par un copyright et distribué avec des licences qui en restreignent l’utilisation, la copie, la distribution, et ladécompilation. Aucune partie de ce produit ou document ne peut être reproduite sous aucune forme, par quelque moyen que ce soit, sansl’autorisation préalable et écrite de Sun et de ses bailleurs de licence, s’il y en a. Le logiciel détenu par des tiers, et qui comprend la technologie relativeaux polices de caractères, est protégé par un copyright et licencié par des fournisseurs de Sun.
Des parties de ce produit pourront être dérivées du système Berkeley BSD licenciés par l’Université de Californie. UNIX est une marque déposée auxEtats-Unis et dans d’autres pays et licenciée exclusivement par X/Open Company, Ltd.
Sun, Sun Microsystems, le logo Sun, docs.sun.com, AnswerBook, AnswerBook2, SunOS, et Solaris sont des marques de fabrique ou des marquesdéposées, ou marques de service, de Sun Microsystems, Inc. aux Etats-Unis et dans d’autres pays. Toutes les marques SPARC sont utilisées souslicence et sont des marques de fabrique ou des marques déposées de SPARC International, Inc. aux Etats-Unis et dans d’autres pays. Les produitsportant les marques SPARC sont basés sur une architecture développée par Sun Microsystems, Inc.
L’interface d’utilisation graphique OPEN LOOK et Sun™ a été développée par Sun Microsystems, Inc. pour ses utilisateurs et licenciés. Sun reconnaîtles efforts de pionniers de Xerox pour la recherche et le développement du concept des interfaces d’utilisation visuelle ou graphique pour l’industriede l’informatique. Sun détient une licence non exclusive de Xerox sur l’interface d’utilisation graphique Xerox, cette licence couvrant également leslicenciés de Sun qui mettent en place l’interface d’utilisation graphique OPEN LOOK et qui en outre se conforment aux licences écrites de Sun.
CETTE PUBLICATION EST FOURNIE “EN L’ETAT” ET AUCUNE GARANTIE, EXPRESSE OU IMPLICITE, N’EST ACCORDEE, Y COMPRIS DESGARANTIES CONCERNANT LA VALEUR MARCHANDE, L’APTITUDE DE LA PUBLICATION A REPONDRE A UNE UTILISATIONPARTICULIERE, OU LE FAIT QU’ELLE NE SOIT PAS CONTREFAISANTE DE PRODUIT DE TIERS. CE DENI DE GARANTIE NES’APPLIQUERAIT PAS, DANS LA MESURE OU IL SERAIT TENU JURIDIQUEMENT NUL ET NON AVENU.
020115@3062
Contents
Preface 9
1 Differences Between Command Line Interface and Graphical User Interface 13
Command Line Interface 13Graphical User Interfaces 13
Common Desktop Environment 14GNOME Desktop 14
2 Logging In and Using Basic SunOS Commands 15
Logging In 15Your Login Shell 16Logging Out 17Keyboard Equivalents 17Command Prompt 18Typing Commands 19
Correcting Typing Mistakes 19Typing Multiple Commands and Long Commands 19Repeating Previous Commands 20Adding Command Options 22Redirecting and Piping Command Output 22Running Commands in the Background 23
Using a Password 24Changing Your Password 25Password Aging 25
Getting Help With OS Commands 26
3
Displaying Manual Pages With man 26
Displaying a One-line Summary With whatis 26
Keyword Lookup With apropos 27
3 Working With Files and Directories 29
File Concepts 29
Using File Commands 30
Before You Begin 30
Creating a Test File 30
Listing Files (ls) 31
Copying Files (cp) 31
Moving and Renaming Files (mv) 31
Deleting Files (rm) 32
Displaying File Contents (more, cat) 32
Displaying File Type (file) 32
Directories and Hierarchy 33
Directory Hierarchy 33
Printing the Working Directory (pwd) 34
Your Home Directory 34
Changing the Working Directory (cd) 34
Creating a Directory (mkdir) 35
Relative Path Names 36
Moving and Renaming Directories 36
Copying Directories 37
Removing Directories (rmdir) 37
Viewing Differences Between Files (diff) 37
Comparing Three Different Files (diff3) 39
Using bdiff on Large Files 39
Searching for Files (find) 39
File and Directory Security 41
Displaying Permissions and Status (ls -l) 42
Listing Hidden Files (ls -a) 43
Changing Permissions (chmod) 43
Setting Absolute Permissions 45
4 Searching Files 49
Searching for Patterns With grep 49
4 Solaris Advanced User’s Guide • May 2002
grep as a Filter 50
grep With Multiword Strings 51
Searching for Lines Without a Certain String 51
Using Regular Expressions With grep 51
Searching for Metacharacters 52
Single or Double Quotes on Command Lines 53
5 Managing Processes and Disk Usage 55
Processes and PIDs 55
What Commands Are Running Now (ps) 55
Terminating Processes (pkill) 56
Managing Disk Storage 57
Displaying Disk Usage (df -k) 57
Displaying Directory Usage (du) 57
6 Using the vi Editor 59
Starting vi 59
Creating a File 60
Status Line 60
Two Modes of vi 61
Entry Mode 61
Command Mode 62
Ending a Session 62
Saving Changes and Quitting vi 63
Printing a File 64
Basic vi Commands 64
Moving Around in a File 64
Inserting Text 67
Changing Text 68
Undoing Changes 68
Deleting Text 69
Copying and Moving Text — Yank, Delete, and Put 69
Using a Count to Repeat Commands 70
Using ex Commands 71
Turning Line Numbers On and Off 71
Copying Lines 72
Moving Lines 72
Contents 5
Deleting Lines 73Searching and Replacing With vi 73
Finding a Character String 73Refining the Search 74Replacing a Character String 75Going to a Specific Line 75
Inserting One File Into Another 76Editing Multiple Files 76Summary of Basic vi Commands 76
7 Using Mail 83
mailx Basics 83Starting mailx 84Sending Yourself a Sample Message 84Reading Your Sample Message 85Quitting mailx 86
Reading Messages 86Deleting (and Undeleting) Messages 87Printing Messages 88Sending Messages 89
Undeliverable Messages 90Canceling an Unsent Message 90Adding Carbon and Blind Carbon Copies 90Inserting a Copy of a Message or File 91Replying to a Message 92
Saving and Retrieving Messages 93Saving and Copying Messages in Files 93Saving and Copying Messages in Folders 93Reading Messages in Files and Folders 95
Using vi With mailx 96Mail Aliases 96
Setting Up Mail Aliases in .mailrc 97Setting Up Mail Aliases in /etc/aliases 98
Tilde Commands 100Getting Help: Other mailx Commands 102
6 Solaris Advanced User’s Guide • May 2002
8 Using Printers 103
Submitting Print Requests 103
Submitting Print Requests to the Default Printer 103
Submitting Print Requests Using a Printer Name 104
Requesting Notification When Printing Is Complete 105
Printing Multiple Copies 105
Summary Table of lp Options 105
Determining Printer Status 106
Checking on the Status of Your Print Requests 106
Checking Available Printers 107
Displaying All Status Information 107
Displaying Status for Printers 108
Summary Table of lpstat Options 108
Canceling a Print Request 109
Canceling a Print Request by ID Number 109
Canceling a Print Request by Printer Name 110
9 Using the Network 111
Networking Concepts 111
Logging In Remotely (rlogin) 112
rlogin Without a Home Directory 112
rlogin as Someone Else 113
rlogin to an Unknown Machine 113
Aborting an rlogin Connection 114
Suspending an rlogin Connection 114
Verifying Your Location (who am i) 115
Copying Files Remotely (rcp) 115
Copying Files From a Remote Machine 115
Copying Files From Your Machine to Another 116
Executing Commands Remotely (rsh) 116
Viewing User Information (rusers) 117
Running Networked Applications 118
Using rlogin to Run a Networked Application 118
More About Security 119
10 Customizing Your Working Environment 127
Modifying Initialization Files 127
Contents 7
Setting Environment Variables 128
User Profile 129
Setting the PATH Variable 130
Command Aliases 131
Changing Your Command Prompt 132
Other Useful Variables 133
Setting Default File Permissions 134
A Modifying the Keyboard 137
Disabling and Enabling the Compose Key 137
SPARC: Left-Handed Key Remapping 138
SPARC: Using the Remapping Script 138
SPARC: Undoing the Keyboard Remapping 140
IA: Function Key and Control Key Remapping 141
IA: Using the Remapping Script 141
IA: Undoing the Keyboard Remapping 142
Index 147
8 Solaris Advanced User’s Guide • May 2002
Preface
This book describes how to use the command line interface (CLI) of the Solaris™operating environment to perform various system tasks.
Note – The Solaris operating environment runs on two platforms, SPARC™ and IA.The information in this document pertains to both platforms unless otherwisespecified in a special chapter, section, note, bulleted item, figure, table, or example.
Who Should Read This BookThis book is for users of the Solaris 9 operating environment who want learn how touse the command line interface.
Before You Read This BookYour system should be installed and ready for use. If the Solaris operatingenvironment is not installed on your system, see the installation manual specific toyour system before you read this book.
9
How This Book Is OrganizedThe Solaris Advanced User’s Guide describes the following topics.
� Chapter 1 briefly describes the command line interface and the two graphical userinterfaces supported by the Solaris operating environment, the Common DesktopEnvironment and GNOME.
� Chapter 2 describes how to log in and out of your system and how to use basiccommands to perform system tasks.
To view license terms, attribution, and copyright statements for bash, tcsh, andzsh, the default path is /usr/share/src. If the Solaris operating environmenthas been installed anywhere other than the default, modify the given path to accessthe file at the installed location.
� Chapter 3 describes how to create, copy, move, and delete files and directories. Thischapter also describes how to search for files, compare differences between files,and how to set permissions on files and directories.
� Chapter 4 describes how to use the grep command to search through files forspecific character strings.
� Chapter 5 describes how to monitor and manage your system’s processes and diskusage.
� Chapter 6 describes how to use the vi text editor to create, edit, save, and printtext files.
� Chapter 7 describes how to use the mailx tool to read, create, send, and printemail.
� Chapter 8 describes how to print files and manage printer status.� Chapter 9 describes how to perform system tasks from a remote machine.� Chapter 10 describes how to customize your working environment by modifying
your system initialization files and environment variables.� Appendix A describes how to customize the key mapping on your keyboard.
Related BooksThe Solaris operating environment documentation set provides access to a number ofbooks about the Solaris software. These books are organized into the following relatedsets:
� Solaris 9 System Administrator Collection
10 Solaris Advanced User’s Guide • May 2002
This set offers detailed installation and system administration information for avariety of system configurations, including larger networks of Sun workstations.
� Solaris 9 Software Developer Collection
This set gives software developers the information they need to write, debug, andmaintain programs on the system.
� Solaris 9 Reference Manual Collection
This set contains a description of every SunOS command. This collection, oftenreferred to as man pages, can optionally be installed as online documentation.
� Solaris 9 User Collection
This set offers a detailed description of various aspects of the Solaris operatingenvironment. These aspects include:
� How to use SunOS™ commands� How to work with window environments� How to customize your work environment� How to write shell scripts� How to use email� How to work on the network
Accessing Sun Documentation OnlineThe docs.sun.comSM Web site enables you to access Sun technical documentationonline. You can browse the docs.sun.com archive or search for a specific book title orsubject. The URL is http://docs.sun.com.
Typographic ConventionsThe following table describes the typographic changes used in this book.
Preface 11
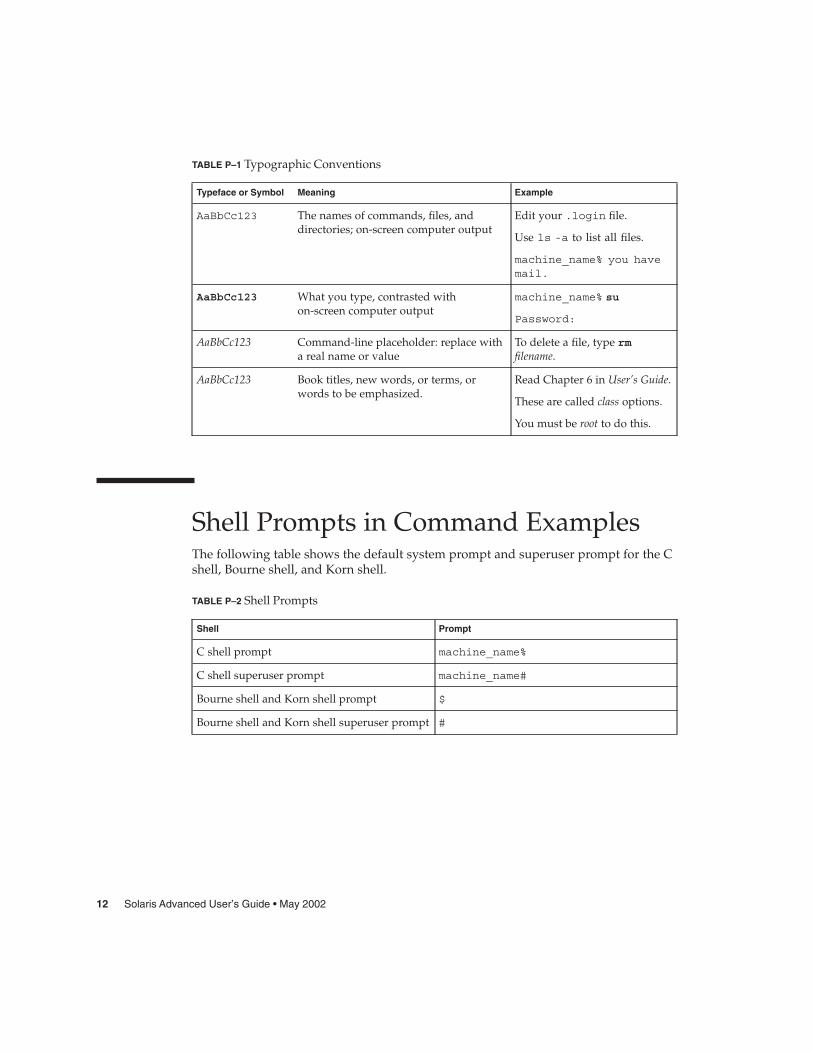
TABLE P–1 Typographic Conventions
Typeface or Symbol Meaning Example
AaBbCc123 The names of commands, files, anddirectories; on-screen computer output
Edit your .login file.
Use ls -a to list all files.
machine_name% you havemail.
AaBbCc123 What you type, contrasted withon-screen computer output
machine_name% su
Password:
AaBbCc123 Command-line placeholder: replace witha real name or value
To delete a file, type rmfilename.
AaBbCc123 Book titles, new words, or terms, orwords to be emphasized.
Read Chapter 6 in User’s Guide.
These are called class options.
You must be root to do this.
Shell Prompts in Command ExamplesThe following table shows the default system prompt and superuser prompt for the Cshell, Bourne shell, and Korn shell.
TABLE P–2 Shell Prompts
Shell Prompt
C shell prompt machine_name%
C shell superuser prompt machine_name#
Bourne shell and Korn shell prompt $
Bourne shell and Korn shell superuser prompt #
12 Solaris Advanced User’s Guide • May 2002
CHAPTER 1
Differences Between Command LineInterface and Graphical User Interface
Desktop software should already be installed on your hard disk or on an accessibleserver in your network. If you are unsure that you have access to the desktopsoftware, see your system administrator, or refer to the installation manual for yourspecific platform.
This chapter briefly describes the differences between the command line interface andthe desktop environment.
Command Line InterfaceA command line interface (CLI) enables users to type commands in a terminal orconsole window to interact with an operating system. Users respond to a visualprompt by typing a command on a specified line, and receive a response back fromthe system. Users type a command or series of commands for each task they want toperform.
This book describes how to use the command line interface to perform various systemtasks.
Graphical User InterfacesA graphical user interface (GUI) uses graphics, along with a keyboard and a mouse, toprovide an easy-to-use interface to a program. A GUI provides windows, pull-downmenus, buttons, scrollbars, iconic images, wizards, other icons, and the mouse toenable users to interact with the operating system or application.
13
The Solaris 9 operating environment supports two GUIs, the Common DesktopEnvironment (CDE) and the GNOME desktop.
Common Desktop EnvironmentThe Common Desktop Environment (CDE) provides windows, workspaces, controls,menus, and the Front Panel to help you organize and manage your work. You can usethe CDE GUI to organize your files and directories, read, compose and send email,access files, and manage your system.
For more information, see Solaris Common Desktop Environment: User’s Guide.
GNOME DesktopGNOME (GNU Network Object Model Environment) is a GUI and set of computerdesktop applications. You can use the GNOME desktop, panel, applications, and toolset to customize your working environment and manage your system tasks. GNOMEalso provides an application set, including a word processor, a spreadsheet program, adatabase manager, a presentation tool, a Web browser, and an email program.
14 Solaris Advanced User’s Guide • May 2002
CHAPTER 2
Logging In and Using Basic SunOSCommands
This chapter describes the following topics.
� “Logging In” on page 15� “Logging Out” on page 17� “Typing Commands” on page 19� “Correcting Typing Mistakes” on page 19� “Typing Multiple Commands and Long Commands” on page 19� “Adding Command Options” on page 22� “Using a Password” on page 24� “Getting Help With OS Commands” on page 26
To enter commands, use a terminal or window. Use your desktop environmentdocumentation if you need information on starting a terminal or window.
Logging InA standard work session is the interval between the time you log in to the system andthe time you log out. The SunOS multiuser environment requires that you identifyyourself each time you want to use the system. Your login name (also known as a username or an account) serves as your identity to the system and to other users on thesystem. Your password restricts use of your account to you. If you don’t already have alogin name and password, ask your system administrator to set up an account for you.After you have this information, you are ready to log in.
Before you log in to the system, your screen should look similar to the following:
hostname console login:
Type the login name given to you by the system administrator and press the Returnkey. For example, if your login name is spanky, type:
15
hostname console login: spanky
and press Return. Next, the system requests your password as follows:
hostname console login: spanky
Password:
Type your password at the prompt and press Return. If your account does not have apassword assigned to it, the system logs you in without asking you for a password.Note that the system does not display (echo) your password on the screen as you typeit. The failure to display your password helps to prevent others from discovering yourpassword.
Your Login ShellIn the chapters that follow, you enter SunOS commands. When you issue a commandto the system, you are actually providing information to a command interpretationprogram, called a shell. The shell program then reads the information you haveprovided and causes the proper action to occur within the system.
The default shell for SunOS system software is the Bourne shell. The Solaris operatingenvironment also supports the following shells.
� GNU Bourne Again shell (bash)� C shell (csh)� Korn shell (ksh)� TC shell (tcsh)� Z shell (zsh)
Each of these shells has its own unique differences.
Note – You can get specific information about any SunOS command, including each ofthe available shells, by viewing its man (manual reference) page. For more informationon man pages, see “Displaying Manual Pages With man” on page 26.
When you initially log in to the system (or open a new terminal or window) and yousee your command prompt, it indicates that a shell program has been started for youautomatically. This shell is called your login shell. If your login shell is not the SunOSdefault (the Bourne shell), it is because a different shell has been specified for you byyour system administrator.
Some commands or procedures available when using one shell might not be availablewhen using another shell. Unless stated otherwise, all commands and proceduresdescribed in this manual are available in the Bourne shell.
16 Solaris Advanced User’s Guide • May 2002
Logging OutWhen you have finished your work session and are ready to exit the operating system,log out by typing the following:
$ exit
After a moment, the system once again displays the login prompt:
$ exit
hostname console login:
When you see the login prompt, it indicates that you have successfully logged out.The system is now ready for you or another user to log in.
Note – In the SunOS operating system, turning off your workstation or terminal doesnot necessarily log you out. Unless you log out explicitly, you might remain logged into the system.
Keyboard EquivalentsYou can often speed up operations by using a sequence of keystrokes, called keyboardaccelerators, that duplicate the operations of the mouse and menus, and of thepreconfigured keyboard keys.
The following table lists several command operations and the keyboard equivalentsfor both SPARC™ and IA machines.
Note – The Meta key is the <> key on SPARC keyboards and is obtained on IAkeyboards by pressing Ctrl-Alt.
To use a keyboard accelerator, press and hold the first key (Meta or Ctrl-Alt together)and type the second key. For example, to cut selected text, press and hold the Metakey and press X on a SPARC system. On an IA system, press and hold Ctrl and Alttogether and press X simultaneously.
Chapter 2 • Logging In and Using Basic SunOS Commands 17
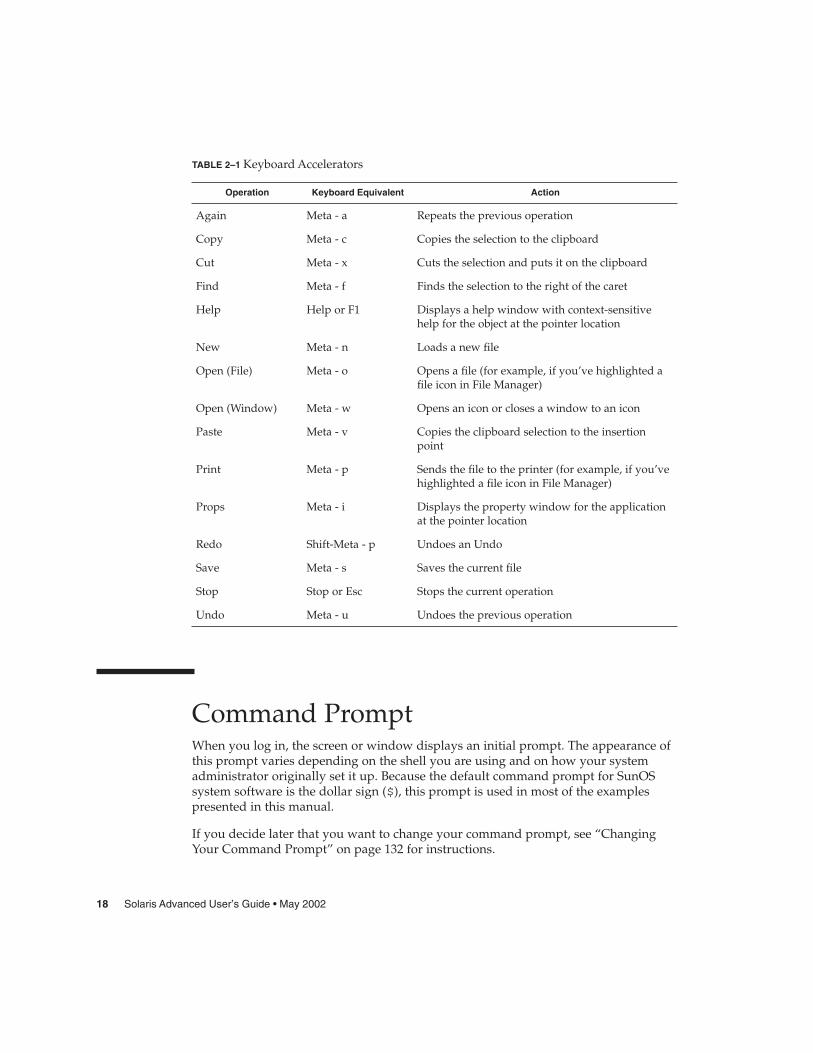
TABLE 2–1 Keyboard Accelerators
Operation Keyboard Equivalent Action
Again Meta - a Repeats the previous operation
Copy Meta - c Copies the selection to the clipboard
Cut Meta - x Cuts the selection and puts it on the clipboard
Find Meta - f Finds the selection to the right of the caret
Help Help or F1 Displays a help window with context-sensitivehelp for the object at the pointer location
New Meta - n Loads a new file
Open (File) Meta - o Opens a file (for example, if you’ve highlighted afile icon in File Manager)
Open (Window) Meta - w Opens an icon or closes a window to an icon
Paste Meta - v Copies the clipboard selection to the insertionpoint
Print Meta - p Sends the file to the printer (for example, if you’vehighlighted a file icon in File Manager)
Props Meta - i Displays the property window for the applicationat the pointer location
Redo Shift-Meta - p Undoes an Undo
Save Meta - s Saves the current file
Stop Stop or Esc Stops the current operation
Undo Meta - u Undoes the previous operation
Command PromptWhen you log in, the screen or window displays an initial prompt. The appearance ofthis prompt varies depending on the shell you are using and on how your systemadministrator originally set it up. Because the default command prompt for SunOSsystem software is the dollar sign ($), this prompt is used in most of the examplespresented in this manual.
If you decide later that you want to change your command prompt, see “ChangingYour Command Prompt” on page 132 for instructions.
18 Solaris Advanced User’s Guide • May 2002
Typing CommandsWhen you see the command prompt, the system is waiting for you to type acommand. Try typing the command date at the prompt, as shown in this example(type date and press the Return key):
$ dateMon Sep 17 10:12:51 PST 2001
$
This command displays the current date and time. When you type the samecommand, but capitalized, you receive the following message.
$ DateDate: Command not found.
$
The Solaris operating environment interprets an uppercase D differently than alowercase d, and the Date command fails. Most commands in the Solaris operatingenvironment are lowercase.
Correcting Typing MistakesThe commands you type are not sent to the system until you press Return. If youtype a command incorrectly, but do not press Return, you can correct your mistake inthe following ways.
� Press the Delete or Back Space key to move back a space to the error; or� Type Ctrl-U to erase the entire line and start over. Hold down the Control key
and press u.
Try both of these methods and see how they work. The Delete/Back Space key varieson some systems. Ctrl-U should work on most systems.
Typing Multiple Commands and Long CommandsYou can type more than one command on a single line. Simply place a semicolon (;)between the commands, as shown here with the date command and the lognamecommand:
$ date; lognameTue Oct 31 15:16:00 MST 2000
spooky
Chapter 2 • Logging In and Using Basic SunOS Commands 19
This command entry displays the current date and time (from the date command)and the login name of the user currently logged in to the system (from the lognamecommand).
If you are typing a long command, you can use the backslash character (\) to continuetyping on a second line. For example:
$ date; \lognameTue Oct 31 15:17:30 MST 2000
spooky
Although the date and logname commands are not long commands, theydemonstrate the concept of continuing a set of commands on the next line. Later, whenthe commands you want to use are longer than the width of your screen, you will seehow useful the backslash character can be.
Note – If you use a desktop window, you might not need to use the backslashcharacter to continue typing commands on the next line. When you reach the end of aline, the commands you type wrap to the next line automatically, and the systemexecutes all commands when you press Return.
Repeating Previous CommandsThe Korn, Bourne Again, C, TC, and Z shells enable your system to keep a history ofcommands you type and are able to repeat previous commands.
Note – The Bourne shell (sh) does not support the history command.
Repeating Commands in the Bourne Again, C, TC, or ZShellIf you use the Bourne Again, C, TC, or Z shell, type !! and press Return to repeat thelast command you typed.
example%!!dateTue Oct 31 15:18:38 MST 2000
example%
You can also repeat any previously typed command by typing !x, where x is thedesired command’s corresponding number on the history list. To see the history list,type the history command and press Return. The following is an example of whatyou might see.
20 Solaris Advanced User’s Guide • May 2002
example% history1 pwd2 clear3 ls -l4 cd $HOME5 logname6 date
7 history
Note – The Z shell does not display the history command in the history list.
Another method for repeating characters from the history list is to follow the ! with anegative number. For example, to repeat the second from the last command on thehistory list, type the following command.
example% !-2dateTue Oct 31 15:20:41 MST 2000
example%
Note – If you use this command repetition method immediately after the historycommand in the Z shell, increase the negative number after the ! by one (!-3).
Using the previous example history list, the date command is repeated.
You can also type the ! character, followed by the first few characters of a previouscommand to repeat that command. For example, if you had previously typed theclear command to clear your screen, you could type !cl to clear your screen again.With this method for repeating commands, however, you must use enough charactersfor the desired command to be unique in the history list. If you use only one letterafter the !, the system repeats the most recent command that begins with that letter.
Repeating Commands in the Korn ShellIf you use the Korn shell, type the following command to repeat the previouscommand.
$ fc -s -dateTue Oct 31 15:18:38 MST 2000
$
You can also repeat any previously typed command by typing fc -s x, where x is thedesired command’s corresponding number on the history list. To see the history list,type the fc -l command and press Return. The following example is a samplehistory list.
Chapter 2 • Logging In and Using Basic SunOS Commands 21
$ fc -l344 pwd345 clear346 ls -l347 cd $HOME348 logname349 date350 history
$
You can also repeat commands from the history list by following the fc -s commandwith a negative number. For example, to repeat the second from the last command onthe history list, type the following command.
$ fc -s -2dateTue Oct 31 15:20:41 MST 2000
$
Using the previous example history list, the date command repeats.
You can also use the fc -s command with the first few characters of a previouscommand. For example, if you had previously typed the date command to displaythe current date, you could type fc -s da to display the date again. However, youmust use enough characters for the desired command to be unique in the history list.If you use only one letter after the fc -s command, the system repeats the mostrecent command that begins with that letter.
Adding Command OptionsMany commands have options that invoke special features of the command. Forexample, the date command has the option -u, which expresses the date inGreenwich Mean Time instead of local time:
$ date -uTue Oct 31 22:33:16 GMT 2000
$
Most options are expressed as a single character preceded by a dash (-). Not allcommands have options. Some commands have more than one option. If you usemore than one option for a command, you can either type the options separately (-a-b) or together (-ab).
Redirecting and Piping Command OutputUnless you indicate otherwise, commands normally display their results on the screen.Some special symbols allow you to redirect the output of a command. For example,you might want to save the output to a file rather than display it on the screen. Thefollowing example illustrates the use of the redirect symbol (>).
22 Solaris Advanced User’s Guide • May 2002
$ date > sample.file
$
In this example, the output from the date command is redirected to a new file calledsample.file. You can display the contents of sample.file by typing the morecommand.
$ more sample.fileTue Oct 31 15:34:45 MST 2000
$
As you can see, the contents of sample.file now contain the output from the datecommand. See Chapter 3 for information on the more command.
Sometimes you might want to redirect the output of one command as input to anothercommand. A set of commands strung together in this way is called a pipeline. Thesymbol for this type of redirection is a vertical bar (|) called a pipe.
For example, instead of saving the output of a command to a file, you might want todirect it as input to the command for printing (lp) by using the pipe symbol (|). Tosend the output from the date command directly to the printer, type the following:
$ date | lprequest id is jetprint-46 (1 file)
$
This pipeline would print the results of the date command. See “Submitting PrintRequests to the Default Printer” on page 103 for information on using the lpcommand to print files.
The command redirection examples shown here are simple, but when you learn moreadvanced commands, you will find many uses for piping and redirection.
Running Commands in the BackgroundWhen you type a command and press the Return key, your system runs the command,waits for the command to complete a task, and then prompts you for anothercommand. However, some commands can take a long time to finish, and you mightprefer to type other commands in the meantime. If you want to run additionalcommands while a previous command runs, you can run a command in thebackground.
If you know you want to run a command in the background, type an ampersand (&)after the command as shown in the following example.
$ bigjob &[1] 7493
$
Chapter 2 • Logging In and Using Basic SunOS Commands 23
The number that follows is the process id. The command bigjob will now run in thebackground, and you can continue to type other commands. After the job completes,you will see a message similar to the following the next time you type anothercommand, such as date in the following example.
$ dateTue Oct 31 15:44:59 MST 2000[1] Done bigjob
$
If you plan to log off before a background job completes, use the nohup (no hangup)command to enable the job to complete, as shown in the following example. If you donot use the nohup command , the background job terminates when you log off.
$ nohup bigjob &[3] 7495
$
Using a PasswordTo ensure your system’s security, the Solaris operating environment requires you use apassword to access your system. Changing your password several times a year helpsto ensure that you are the only user with easy access to your account.
Note – If you believe someone has used your account without your permission,change your password immediately.
When you choose a password, follow these guidelines.
� Choose a password that you can remember without writing it down. A passwordthat you cannot remember is worse than one that is too easily guessed.
� Choose a password that is at least six characters long and contains at least onenumber.
� Don’t use your own name or initials or the name or initials of your spouse.� Don’t use the names of pets or objects common to your interests.� Don’t use all capital letters.� If you have more than one account, don’t use the same password for every
account.� Avoid using the characters Ctrl-C, Ctrl-Z, Ctrl-U, Ctrl-S, Esc, Tab, #, and @ in your
password. The terminal might interpret these characters as signals rather than textcharacters, and this interpretation would preclude you from properly typing inyour password.
24 Solaris Advanced User’s Guide • May 2002
Changing Your PasswordTo change your personal password, type the passwd command:
$ passwdpasswd: Changing password for user2Enter login password:New password:Re-enter new password:passwd (SYSTEM): passwd successfully changed for user2
$
1. When the system prompts you for Enter login password:, type your currentpassword.
If no password is currently assigned to your account, the system skips the OldPassword: prompt.
The system does not echo (display) your password on the screen and thereby preventsother users from discovering your password.
2. When the system prompts you for New Password:, type your new password.
Again, the password you type does not echo on the screen.
3. At the final prompt, Re-enter new password:, type your new password a secondtime.
Your system verifies that you typed the password you intended to type.
If you do not type your password precisely the way you did at the previous prompt,the system refuses to change your password and responds with the followingmessage:
passwd: They don’t match; try again.
If you receive this message repeatedly, contact your system administrator to get a newpassword.
Note – Passwords containing fewer than six characters are not allowed. Also, a newpassword must differ from the old password by at least three characters.
Password AgingIf your system uses password aging (implemented with options to the passwdcommand), your password can have either a maximum, or a maximum and minimumlifespan. The lifespan of your password is set by your system administrator.
When your password reaches the maturity date, your system prompts you to changeyour password when you log in. The following message displays.
Your password has expired. Choose a new one.
Chapter 2 • Logging In and Using Basic SunOS Commands 25
The system then automatically runs the passwd program and prompts you for a newpassword.
If, for example, the minimum age of your password has been set for two weeks, andyou try to change your password before the minimum life span has elapsed, thefollowing message displays.
Sorry, less than 2 weeks since the last change.
For more information on passwd(1) and password aging, refer to the man Pages(1):User Commands.
Getting Help With OS CommandsThis section describes various online help features. These features enable you to viewreference information from your workstation or terminal.
Displaying Manual Pages With manIf you know the name of a command, but you are not sure what it does, the mancommand can be helpful. Type the following to find out more about this command:
$ man man
This command displays the first part of a SunOS manual reference page in thewindow display area. Press the space bar to see the next screen, or press the Q key toquit and return to the command prompt. Use the man command to see all the availableoptions and to show the proper command syntax. Manual reference pages oftenprovide examples that illustrate various uses of the command.
Displaying a One-line Summary With whatisIf you want just a one-line summary of the command’s function, use the whatiscommand, as shown here:
$ whatis datedate (1) -display or set the date
$
The number in parentheses after the command name in the previous exampleindicates the Reference Manual section to which this command belongs. Commandsare grouped into various categories according to function. Most user commands are in
26 Solaris Advanced User’s Guide • May 2002

section 1. By common convention, the section number is displayed in parentheses afterthe name of the command. You can find the printed manual reference page for acommand in alphabetical order within its group.
Note – The whatis command is only available if your system administrator has setup a special database of command descriptions.
Keyword Lookup With aproposIf you know what you want to do, but you do not know which command to use, usethe apropos command to locate commands by keyword lookup. The aproposcommand lists all commands that have one-line summaries that contain any keywordsyou supply. The output of the apropos can be lengthy, as some keywords mightappear in many places.
Note – The apropos command is only available if your system administrator has setup a special database of command descriptions.
To view examples of apropos output, type one or more of the following commands.
� apropos who� apropos execute� apropos apropos
If you do type a keyword that generates an unreasonably lengthy display, press Ctrl-Cto interrupt the display and return you to the command prompt. Hold down theControl key and press “c.”
Chapter 2 • Logging In and Using Basic SunOS Commands 27

28 Solaris Advanced User’s Guide • May 2002
CHAPTER 3
Working With Files and Directories
You can use the SunOS command line to work with, organize, and manage files anddirectories. You type the file and directory names with SunOS commands to completespecific operations. The command line operates differently than a desktop FileManager. In a File Manager, you can display files as icons that you can click on andmove, and you can select commands from menus.
This chapter describes the following topics.
� “File Concepts” on page 29� “Using File Commands” on page 30� “Directories and Hierarchy” on page 33� “Viewing Differences Between Files (diff)” on page 37� “Searching for Files (find)” on page 39� “File and Directory Security” on page 41
File ConceptsA file is the basic unit in the SunOS operating system. Almost everything is treated as afile, including the following items.
� Documents – These items include text files, such as letters or reports, computersource code, or any other document that you write and want to save.
� Commands – Most commands are executable file. That is, they are files you canexecute to run a particular program. For example, the date command in theprevious chapter, which executes a program that provides the current date, is anexecutable file.
� Devices – Your terminal, printer, and disk drive(s) are all treated as files.� Directories – A directory is simply a file that contains other files.
29
The following section explains the commands for creating, listing, copying, moving,and deleting files. This section also includes information on how to list the contents ofa file and how to determine the nature of a file.
Using File CommandsEach of the command descriptions in this section includes an example of how to usethe command. Try the examples as you read the text.
Before You BeginBefore you experiment with files, make sure that you are in your home directory. Yoursystem administrator established this directory for you at your account creation. Toavoid changes to parts of your system that other users expect to remain unchanged,perform the following tasks in your home directory.
To make certain that you are in your home directory, type the cd (change directory)command. This command moves you to your home (default) directory. Then type thepwd (print working directory) command to display your current location within thefile system. The directory displayed is your home directory:
$ cd$ pwd
/export/home/username
In this example, the user’s home directory is /export/home/username, whereusername is the name of the user who owns the home directory.
Creating a Test FileUse the touch command to create an empty file.
$ touch tempfile
$
If a file by the name you specify does not exist, the touch command creates an emptyfile.
Note – If the file already exists, touch updates the last file access time.
30 Solaris Advanced User’s Guide • May 2002
Listing Files (ls)Now list the file with the ls command to verify that you’ve created it:
$ ls tempfile
tempfile
When you type the ls command by itself, it lists all the files in your current location.If you type the ls command with a specific file name, it lists only that file, if the fileexists.
For more information on listing files, see the man page ls(1).
Copying Files (cp)Use the cp command to copy tempfile to a file called copyfile:
$ cp tempfile copyfile
$
Now list both files. Notice that both names end with the characters “file.” You can usethe wildcard character, asterisk (*), to match any character or sequence of characters.The command ls *file lists both tempfile and copyfile, and any other file inthis directory with a name that ends with file.
$ ls *file
copyfile tempfile
Notice that copyfile is listed first. Files are listed in alphabetical order. Capitalletters and numbers precede lowercase letters.
For detailed information on copying files, see the man page cp(1).
Moving and Renaming Files (mv)You can move and rename files by using the same command, mv (move). In thisexample, use the mv command to rename tempfile to emptyfile:
$ mv tempfile emptyfile
$
Then list both files again to verify the change.
$ ls *file
copyfile emptyfile
tempfile is replaced by emptyfile.
For more information on moving and renaming files, see the man page mv(1).
Chapter 3 • Working With Files and Directories 31
Deleting Files (rm)Use the rm (remove) command to delete copyfile, and verify the result with the lscommand:
$ rm copyfile$ ls *file
emptyfile
Caution – Be careful when you use the rm command, and be particularly careful whenyou use rm with the wildcard character (*). You cannot recover files that you haveremoved with rm.
For more information on the rm(1) command, refer to the man Pages(1): UserCommands.
Displaying File Contents (more, cat)Use the more command to display the contents of a file. Type more and follow it withthe name of the file to be displayed. The contents of the file scroll down the screen. Ifthe file is longer than one screen, this message appears:
--More--(nn%)
where nn is the percentage of the file already displayed.
You can also use the cat command to display the contents of a file, but it displays thefile contents rapidly without pausing. The cat (concatenate) command is more oftenused to join two or more files into one large file, as in this example:
$ cat file1 file2 file3 > bigfile$ ls *filebigfilefile1file2file3
$
For further information on the more(1) or cat(1) commands, refer to the man Pages(1):User Commands.
Displaying File Type (file)Some files, such as binary files and executable files, are not printable and cannot bedisplayed on the screen. Use the file command to show the file type.
32 Solaris Advanced User’s Guide • May 2002
$ file *myscript: executable shell scriptprint.ps: PostScript document
save.txt: ascii text
Directories and HierarchyThis section describes the directory hierarchy that the Solaris operating environmentuses to manage and organize files.
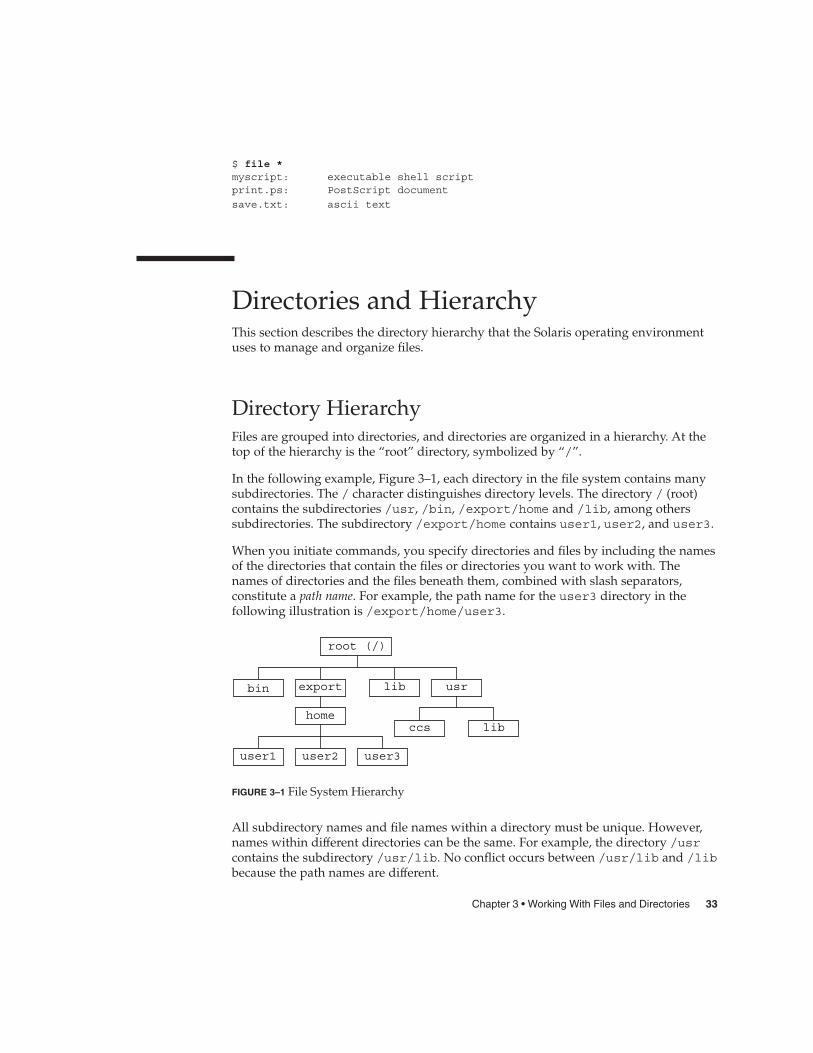
Directory HierarchyFiles are grouped into directories, and directories are organized in a hierarchy. At thetop of the hierarchy is the “root” directory, symbolized by “/”.
In the following example, Figure 3–1, each directory in the file system contains manysubdirectories. The / character distinguishes directory levels. The directory / (root)contains the subdirectories /usr, /bin, /export/home and /lib, among otherssubdirectories. The subdirectory /export/home contains user1, user2, and user3.
When you initiate commands, you specify directories and files by including the namesof the directories that contain the files or directories you want to work with. Thenames of directories and the files beneath them, combined with slash separators,constitute a path name. For example, the path name for the user3 directory in thefollowing illustration is /export/home/user3.
root (/)
export lib usr
homeccs lib
user2user1 user3
bin
FIGURE 3–1 File System Hierarchy
All subdirectory names and file names within a directory must be unique. However,names within different directories can be the same. For example, the directory /usrcontains the subdirectory /usr/lib. No conflict occurs between /usr/lib and /libbecause the path names are different.
Chapter 3 • Working With Files and Directories 33
Path names for files work exactly like path names for directories. The path name of afile describes that file’s place within the file-system hierarchy. For example, if the/export/home/user2 directory contains a file called report5, the path name forthis file is /export/home/user2/report5. This example shows that the filereport5 is within the directory user2, which is within the directory home, which iswithin the root (/) directory.
Printing the Working Directory (pwd)The pwd command (print working directory) displays where you are in the file systemhierarchy.
$ pwd
/home/user1
Your output might be different from the example, as your directory structure isdifferent. Your working directory is your current location within the file-systemhierarchy.
Your Home DirectoryEvery user has a home directory. When you first open a terminal or a window, yourinitial location is your home directory. Your system administrator creates your homedirectory for you at your account creation.
Changing the Working Directory (cd)The cd (change directory) command enables you to move around within thefile-system hierarchy.
$ cd /usr/lib$ pwd
/usr/lib
When you type the cd command by itself, you return to your home directory. Forexample, if your home directory was /export/home/user1:
$ cd$ pwd
/home/user1
Although your home directory is /export/home/user1, the cd command returnsyou to the/home/user1 because home directories are mounted on the /homedirectory by the automounter.
In the Bourne Again, C, Korn, TC, and Z shells, the tilde (~) is used as a shortcut forspecifying your home directory. For example, you would type the following to changeto the subdirectory music within your home directory:
34 Solaris Advanced User’s Guide • May 2002
example% cd ~/music
You can also use this shortcut to specify another user’s home directory. For example:
example% cd ~username
where username is another user’s login name, you would change to that user’s homedirectory.
Note – The Bourne shell does not support the ~ shortcut.
If you use the Bourne shell, your system administrator might have configured thesystem so that you can type $home to specify your home directory. With thisconfiguration, you type the following command to change your working directory tothe subdirectory music in your home directory.
$ cd $home/music
The directory immediately “above” a subdirectory is called the parent directory. In thepreceding example, /home is the parent directory of /home/user1. The symbol ..(“dot-dot”) represents the parent directory. The command cd .. changes the workingdirectory to the parent directory, as in this example:
$ pwd/home/user1$ cd ..$ pwd
/home
If your current working directory is /home/user1 and you want to work with somefiles in /home/user2, type the following command.
$ pwd/home/user1$ cd ../user2$ pwd
/home/user2
../user2 tells the system to look in the parent directory for user2. As you can see,this command is much easier than typing the entire path name /home/user2.
Creating a Directory (mkdir)To create a new directory, type the mkdir command and follow it with the name ofthe new directory.
$ mkdir veggies$ cd veggies$ mkdir broccoli
Chapter 3 • Working With Files and Directories 35
$ cd broccoli$ pwd
/home/user2/veggies/broccoli
Relative Path NamesThe full path name of a directory or a file begins with a slash (/) and describes theentire directory structure between that file (or directory) and the root directory.However, you can often use a shorter name that defines the file or directory relative tothe current working directory.
When you are in a parent directory, you can move to a subdirectory by using only thedirectory name and not the full path name. In the previous example, the command cdveggies uses the relative path name of the directory veggies. If the current workingdirectory is /home/user2, the full path name of this directory is/home/user2/veggies.
Create several different subdirectories, and then move around within this directorystructure. Use both full path names and relative path names, and confirm yourlocation with the pwd command.
Moving and Renaming DirectoriesYou rename a directory by moving it to a different name. Use the mv command torename directories.
$ pwd/home/user2/veggies$ lsbroccoli$ mv broccoli carrots$ ls
carrots
You can also use mv to move a directory to a location within another directory.
$ pwd/home/user2/veggies$ lscarrots$ mv carrots ../veggies2$ ls ../veggies2
carrots
In this example, the directory carrots is moved from veggies to veggies2 withthe mv command.
36 Solaris Advanced User’s Guide • May 2002
Copying DirectoriesUse the cp -r command to copy directories and the files they contain:
$ cp -r veggies veggies3
$
The command in the previous example copies all files and subdirectories within thedirectory veggies to a new directory veggies3. This is a recursive copy, asdesignated by the -r option. If you attempt to copy a directory without using thisoption, the system displays an error message.
Removing Directories (rmdir)To remove an empty directory, use the rmdir command as follows:
$ rmdir veggies3
$
If the directory still contains files or subdirectories, the rmdir command does notremove the directory.
To remove a directory and all its contents, including any subdirectories and files, usethe rm command with the recursive option, -r.
$ rm -r veggies3
$
Caution – Directories that are removed with the rmdir command cannot berecovered, nor can directories and their contents removed with the rm -r command.
Viewing Differences Between Files(diff)Use the diff command to view differences between similar files. The followingcommand scans each line in leftfile and rightfile to check for differences.
$ diff leftfile rightfile
Chapter 3 • Working With Files and Directories 37
When the diff utility finds a line or lines that differ, diff determines if the differenceis the result of an addition, a deletion, or a change to the line, and how many lines areaffected. diff tells you the respective line number or numbers in each file, followedby the relevant text from each file.
If the difference is the result of an addition, diff displays a line with the followingformat.
l[,l] a r[,r]
In the previous example, l is a line number in leftfile and r is a line number inrightfile.
If the difference is the result of a deletion, diff uses a d in place of a. If the differenceis the result of a change on the line, diff uses a c.
The relevant text from both files immediately follow the line number information. Textfrom leftfile is preceded by a left angle bracket (<). Text from rightfile ispreceded by a right angle bracket (>).
This example shows two sample files, followed by their diff output.
$ cat sched.7.15Week of 7/15
Day: Time: Action Item: Details:
T 10:00 Hardware mtg. every other weekW 1:30 Software mtg.T 3:00 Docs. mtg.F 1:00 Interview$ cat sched.7.22Week of 7/22
Day: Time: Action Item: Details:
M 8:30 Staff mtg. all dayT 10:00 Hardware mtg. every other weekW 1:30 Software mtg.T 3:00 Docs. mtg.$ diff sched.7.15 sched.7.221c1< Week of 7/15---> Week of 7/224a5> M 8:30 Staff mtg. all day8d8
< F 1:00 Interview
If the two files to be compared are identical, diff does not display output.
For more information on the diff(1) command, refer to the man Pages(1): UserCommands.
38 Solaris Advanced User’s Guide • May 2002
Comparing Three Different Files (diff3)To compare three different versions of a file, use the diff3 command.
$ diff3 file1 file2 file3
diff3 compares three versions of a file and publishes the differing ranges of text thatare flagged with these codes:
==== all three files differ
====1 file1 is different
====2 file2 is different
====3 file3 is different
Using bdiff on Large FilesIf you are comparing large files, use bdiff instead of diff. Use the diff commandsyntax with bdiff.
$ bdiff leftfile rightfile
Use bdiff instead of diff for files longer than 3500 lines.
Searching for Files (find)The find command searches for files that meet conditions you specify, starting from adirectory you name. For example, you might search for file names that match a certainpattern or that have been modified within a specified time frame.
Unlike most commands, find options are several characters long. You must specifythe starting directory before your desired options.
$ find directory options
In the previous example, directory is the name of the starting directory and optionsrepresents the options for the find command.
Each option describes a criterion for selecting a file. A file must meet all criteria to beselected. The more options you apply, the narrower the field becomes. The -printoption indicates that you want the system to display the results.
Chapter 3 • Working With Files and Directories 39
The -name filename option tells find to select files that match filename. Here filename istaken to be the rightmost component of a file’s full path name. For example, therightmost component of the file /usr/bin/calendar is calendar. This portion of afile’s name is often called the base name.
For example, to see which files within the current directory and its subdirectories endin s, type the following command.
$ find . -name ’*s’ -print./programs./programs/graphics./programs/graphics/gks./src/gks
$
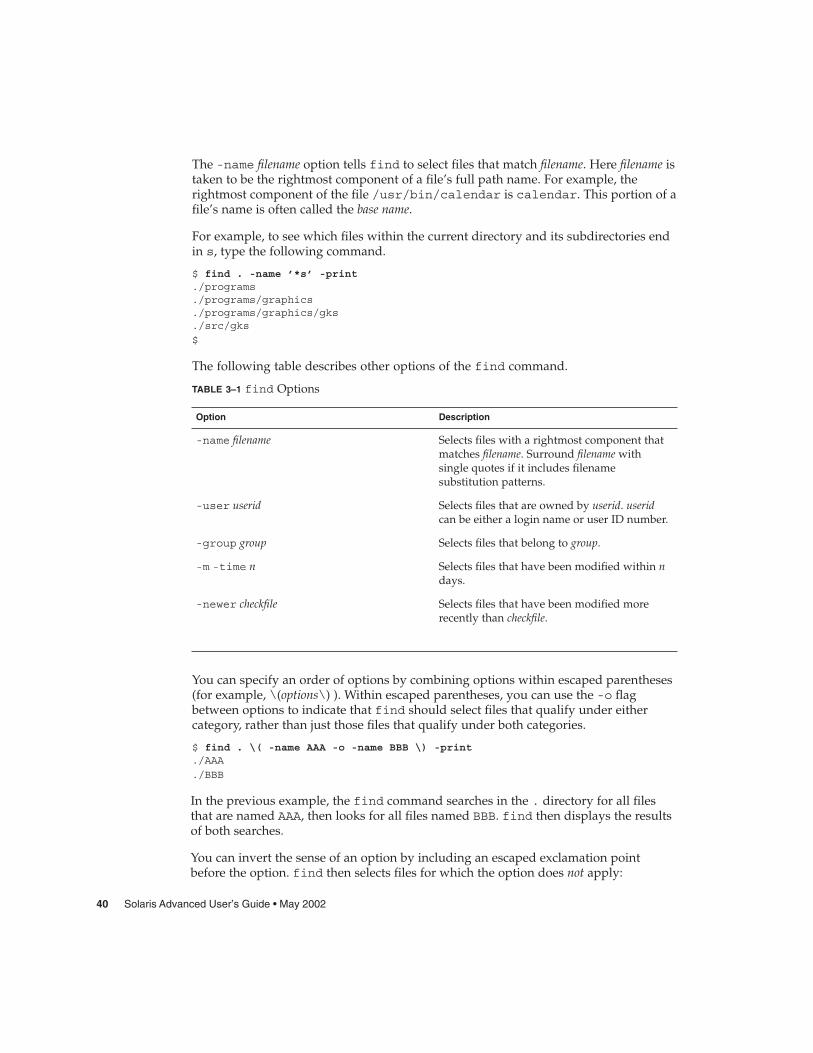
The following table describes other options of the find command.
TABLE 3–1 find Options
Option Description
-name filename Selects files with a rightmost component thatmatches filename. Surround filename withsingle quotes if it includes filenamesubstitution patterns.
-user userid Selects files that are owned by userid. useridcan be either a login name or user ID number.
-group group Selects files that belong to group.
-m -time n Selects files that have been modified within ndays.
-newer checkfile Selects files that have been modified morerecently than checkfile.
You can specify an order of options by combining options within escaped parentheses(for example, \(options\) ). Within escaped parentheses, you can use the -o flagbetween options to indicate that find should select files that qualify under eithercategory, rather than just those files that qualify under both categories.
$ find . \( -name AAA -o -name BBB \) -print./AAA
./BBB
In the previous example, the find command searches in the . directory for all filesthat are named AAA, then looks for all files named BBB. find then displays the resultsof both searches.
You can invert the sense of an option by including an escaped exclamation pointbefore the option. find then selects files for which the option does not apply:
40 Solaris Advanced User’s Guide • May 2002
$ find . \!-name BBB -print
./AAA
You can also use find to apply commands to the files it selects with the followingoptions.
-exec command ’{}’ \;
You terminate this option with an escaped semicolon (\;). The quoted braces arereplaced with the file names that find selects.
You can use find to automatically remove temporary work files. If you name yourtemporary files consistently, you can use find to search for and remove these files. Forexample, if you name your temporary files junk or dummy, this command finds andremoves the files.
$ find . \( -name junk -o -name dummy \) -exec rm ’{}’ \;
For more information on searching for files, see the man page find(1).
File and Directory SecurityFile permissions help to protect files and directories from unauthorized reading andwriting. Often you will have files you want to allow others to read but not change. Inother situations, you might want to share executable files or programs. Filepermissions enable you to control access to your files.
The following list describes the three basic file and directory permission types.
� r – read permission. A file must be readable in order for you to examine or copy it.A directory must be readable in order for you to list its contents.
� w – write permission. A file must be writable in order for you to modify it, removeit, or rename it. A directory must be writable in order for you to add or delete filesin it.
� x – execute permission. A file with executable permissions is one you can run, suchas a program. A directory must be executable in order for you to gain access to anyof its subdirectories.
You can set permissions for three categories of users.
� User – The file owner
� Group – Other users within the same group as the user, such as all staff membersof a particular division. The system administrator establishes and maintainsgroups.
� Others – All users.
Chapter 3 • Working With Files and Directories 41

Displaying Permissions and Status (ls -l)Use the -l with the ls command to display a long listing of files and directories inalphabetical order.
$ pwd/home/hostname/user2$ ls -ltotal 8drwxr-xr-x 2 user2 users 1024 Feb 9 14:22 directory1-rw-r--r-- 1 user2 users 0 Feb 10 10:20 emptyfile-rw-r--r-- 1 user2 users 104357 Feb 5 08:20 large-filedrwxr-xr-x 3 user2 users 1024 Feb 10 11:13 veggies2
Permissions Links Owner Group Size Date Time File ordirectory name
FIGURE 3–2 Displaying Permissions and Status
The first character on the line indicates the file type. A dash (-) indicates an ordinaryfile, a d indicates a directory, and other characters can indicate other special file types.
The next nine characters indicate the permissions for the file or directory. The ninecharacters consist of three groups of three, showing the permissions for the owner, theowner’s group, and the world, respectively. The permissions for emptyfile arerw-r--r--, indicating that the owner can read and write this file, everyone can readit, and no one can execute it. The permissions for the directory veggies2 arerwxr-xr-x, indicating that everyone has read and execute permissions, but only theowner can write to it.
In addition to file permissions, the display shows the following information:
� Number of links to this file or directory� Name of the owner (user2 in this case)� Name of the group owner (users in this case)� Number of bytes (characters) in the file� Date and time the file or directory was last updated� Name of the file or directory
Use the cd command to move to your home directory, and try the ls -lcommand.
Now type the following command, where dirname is the name of an actualdirectory in your file system.
$ ls -l dirname
42 Solaris Advanced User’s Guide • May 2002
When you give the name of a directory, the ls -l command prints information on allthe files and directories in that directory.
Listing Hidden Files (ls -a)Some files are not listed by the ls command. These files have names that begin withthe character . (called “dot”), such as .cshrc, .login and .profile. Use the ls -acommand to list these dot files:
$ ls -a....cshrc.login.profile
emptyfile
Notice that the files beginning with . are listed before the other files. The file . is thereference for the current directory, and the file .. is the reference for the parentdirectory.
In general, system utilities use files that begin with . and the user cannot modify thesefiles. Some exceptions to this rule do exist.
Changing Permissions (chmod)Use the chmod command to change permissions for a file or directory. You must be theowner of a file or directory, or have root access, to change its permissions. The generalform of the chmod command is:
chmod permissions name
In this example, permissions indicates the permissions to be changed and name is thename of the affected file or directory.
You can specify the permissions in several ways. Here is one of the forms that is easyto use:
1. Use one or more letters to indicate the type of users.
� u (for the user)� g (for group)� o (for others)� a (for all three of the previous categories.))
2. Indicate whether the permissions are to be added (+) or removed (-).
3. Use one or more letters to indicate the permissions.
� r (for read)
Chapter 3 • Working With Files and Directories 43
� w (for write)
� x (for execute)
In the following example, write permission is added to the directory carrots forusers who belong to the same group (thus, permissions is g+w and name is carrots).
$ cd veggies2$ ls -ldrwxr-xr-x 2 user2 users 512 Nov 1 09:11 carrots$ chmod g+w carrots$ ls -ldrwxrwxr-x 2 user2 users 512 Nov 1 09:11 carrots
$
The chmod g+w carrots command in the previous example gives the group writepermission on the file carrots. The hyphen (-) in the set of permissions for group ischanged to a w.
To make this same directory unreadable and unexecutable by other users outside yourgroup type the following commands.
$ ls -ldrwxrwxr-x 2 user2 users 512 Nov 1 09:11 carrots$ chmod o-rx carrots$ ls -ldrwxrwx--- 2 user2 users 512 Nov 1 09:11 carrots
$
Now, the r (for read) and the x (for execute) in the set of permissions for other usersare both changed to hyphens (-).
When you create a new file, the system automatically assigns the followingpermissions.
-rw-r--r--
When you create a new directory, the system automatically assigns the followingpermissions.
drwxr-xr-x
For example, to make a new file turnip executable by its owner (user2), type thefollowing command.
$ ls -l turnip-rw-r--r-- 1 user2 users 124 Nov 1 09:14 turnip$ chmod u+x turnip$ ls -l turnip-rwxr--r-- 1 user2 users 124 Nov 1 09:14 turnip
$
44 Solaris Advanced User’s Guide • May 2002
If you want to change permissions for all categories of users, use the -a option of thels command. To make a new file garlic executable by everyone, type the followingcommand.
$ ls -l garlic-rw-r--r-- 1 user2 users 704 Nov 1 09:16 garlic$ chmod a+x garlic$ ls -l garlic-rwxr-xr-x 1 user2 users 704 Nov 1 09:16 garlic
$
The x in the output of the ls -l command indicates garlic is executable byeveryone.
You can also use the * wildcard character to change permissions for groups of filesand directories. For example, to change the permissions for all the files in the currentdirectory veggies so that the files can be written by you alone, type the followingcommand.
$ pwd/home/user2/veggies$ ls -l-rwxrwxrwx 1 user2 users 5618 Nov 1 09:18 beets-rwxrwxrwx 1 user2 users 1777 Nov 1 09:18 corn-rwxrwxrwx 1 user2 users 3424 Nov 1 09:18 garlic-rwxrwxrwx 1 user2 users 65536 Nov 1 09:18 onions$ chmod go-w *$ ls -ltotal 152-rwxr-xr-x 1 user2 users 5618 Nov 1 09:18 beets-rwxr-xr-x 1 user2 users 1777 Nov 1 09:18 corn-rwxr-xr-x 1 user2 users 3424 Nov 1 09:18 garlic-rwxr-xr-x 1 user2 users 65536 Nov 1 09:18 onions
$
Note – Perform this chmod operation on the current directory only.
Setting Absolute PermissionsIn the previous section, you used the chmod command to change file permissionsrelative to their current settings. You can also set the permissions for a file or directoryabsolutely by using numeric codes with the chmod command.
The syntax for this usage of the chmod command is:
chmod numcode name
In this example, numcode is the numeric code and name is the name of the file ordirectory for which you are changing permissions.
Chapter 3 • Working With Files and Directories 45
The complete numeric code consists of three numbers. One number is used for each ofthe three categories: user, group, and others. For example, the following command setsabsolute read, write, and execute permissions for the user and the group, and executepermissions only for others.
$ chmod 771 garlic
Table 3–2 illustrates how the the code 771 describes the permissions for garlic.
TABLE 3–2 Permissions for garlic
Permission User Group Others
Read 4 4 0
Write 2 2 0
Execute 1 1 1
Total 7 7 1
Each of the columns in Table 3–2 represents one of the categories: user, group, andothers. To set read permissions, add 4 to the appropriate column. To set writepermissions, add 2. To add execute permissions, add 1. The total in all three columnsin the last row of the table is the complete numeric code.
The following is another example of using numeric codes to set absolute permissions,with the inclusion of the ls -l command to demonstrate the results.
$ ls -l onions-rwxr-xr-x 1 user2 users 65536 Nov 1 09:18 onions$ chmod 755 onions$ ls -l onions-rwxr-xr-x 1 user2 users 65536 Nov 1 09:18 onions
$
The chmod 755 onions command sets the permissions for the file onions so thatthe user can read, write, and execute, group members can read and execute, and otherscan read and execute. Table 3–3 describes the numeric code that is used to set thepermissions for onions.
TABLE 3–3 Permissions for onions
Permission User Group Others
Read 4 4 4
Write 2 0 0
Execute 1 1 1
Total 7 5 5
46 Solaris Advanced User’s Guide • May 2002
To provide read, write, and execute permissions for the file cabbage to yourself, yourgroup, and all other users, type the following command.
$ ls -l cabbage-rw-r--r-- 1 user2 users 75 Nov 1 09:28 cabbage$ chmod 777 cabbage$ ls -l cabbage-rwxrwxrwx 1 user2 users 75 Nov 1 09:28 cabbage
$
Table 3–4 describes the numeric code that is used to set permissions in the previousexample.
TABLE 3–4 Permissions for cabbage
Permission User Group Others
Read 4 4 4
Write 2 2 2
Execute 1 1 1
Total 7 7 7
The numeric code 777 represents the maximum level of permissions you can provide.
Similar to changing relative permissions, you can also use the wildcard character * toset absolute permissions for all in the files in the current directory. For example,suppose you want to set absolute permissions for all files in the current directory asfollows:
� Owner – Read, write, and execute permissions� Group – Read and write permissions� Others – Execute permissions
To set these permissions, type the following commands.
$ pwd/home/user2/veggies$ ls -l-rwxrwxrwx 1 user2 users 5618 Nov 1 09:18 beets-rwxrwxrwx 1 user2 users 1777 Nov 1 09:18 corn-rwxrwxrwx 1 user2 users 3424 Nov 1 09:18 garlic-rwxrwxrwx 1 user2 users 65536 Nov 1 09:18 onions$ chmod 751 *$ ls -l-rwxr-x--x 1 user2 users 5618 Nov 1 09:18 beets-rwxr-x--x 1 user2 users 1777 Nov 1 09:18 corn-rwxr-x--x 1 user2 users 3424 Nov 1 09:18 garlic-rwxr-x--x 1 user2 users 65536 Nov 1 09:18 onions
$
Chapter 3 • Working With Files and Directories 47
The pwd command is included in this example to illustrate that the directory on whichyou perform this operation must be the current directory. The ls -l command isshown only to illustrate the changes in permissions. When setting absolutepermissions, you do not need to know what the permissions are currently.
For more information on the chmod(1) command, refer to the man Pages(1): UserCommands.
48 Solaris Advanced User’s Guide • May 2002
CHAPTER 4
Searching Files
This chapter describes how to search directories and files for keywords and strings byusing the grep command.
Searching for Patterns With grepTo search for a particular character string in a file, use the grep command. The basicsyntax of the grep command is:
$ grep string file
In this example, string is the word or phrase you want to find, and file is the file to besearched.
Note – A string is one or more characters. A single letter is a string, as is a word or asentence. Strings can include blank spaces, punctuation, and invisible (control)characters.
For example, to find Edgar Allan Poe’s telephone extension, type grep, all or part ofhis name, and the file containing the information:
$ grep Poe extensionsEdgar Allan Poe x72836
$
Note that more than one line might match the pattern you give.
$ grep Allan extensionsDavid Allan x76438Edgar Allan Poe x72836
49
$ grep Al extensionsLouisa May Alcott x74236David Allan x76438Edgar Allan Poe x72836
$
grep is case sensitive; that is, you must match the pattern with respect to uppercaseand lowercase letters:
$ grep allan extensions$ grep Allan extensionsDavid Allan x76438Edgar Allan Poe x72836
$
Note that grep failed in the first try because none of the entries began with alowercase a.
grep as a FilterYou can use the grep command as a filter with other commands, enabling you to filterout unnecessary information from the command output. To use grep as a filter, youmust pipe the output of the command through grep. The symbol for pipe is “|”.
The following example displays files that end in “.ps” and were created in the monthof September.
$ ls -l *.ps | grep Sep
The first part of this command line produces a list of files ending in .ps.
$ ls -l *.ps-rw-r--r-- 1 user2 users 833233 Jun 29 16:22 buttons.ps-rw-r--r-- 1 user2 users 39245 Sep 27 09:38 changes.ps-rw-r--r-- 1 user2 users 608368 Mar 2 2000 clock.ps-rw-r--r-- 1 user2 users 827114 Sep 13 16:49 commands.ps
$
The second part of the command line pipes that list through grep, looking for thepattern Sep.
| grep Sep
The search provides the following results.
$ ls -l *.ps | grep Sep-rw-r--r-- 1 user2 users 39245 Sep 27 09:38 changes.ps-rw-r--r-- 1 user2 users 827114 Sep 13 16:49 commands.ps
$
50 Solaris Advanced User’s Guide • May 2002
grep With Multiword StringsTo find a pattern that is more than one word long, enclose the string with single ordouble quotation marks.
$ grep “Louisa May” extensionsLouisa May Alcott x74236
$
The grep command can search for a string in groups of files. When it finds a patternthat matches in more than one file, it prints the name of the file, followed by a colon,then the line matching the pattern.
$ grep ar *actors:Humphrey Bogartalaska:Alaska is the largest state in the United States.wilde:book. Books are well written or badly written.
$
Searching for Lines Without a Certain StringTo search for all the lines of a file that do not contain a certain string, use the -v optionto grep. The following example shows how to search through all the files in thecurrent directory for lines that do not contain the letter e.
$ lsactors alaska hinterland tutors wilde$ grep -v e *actors:Mon Mar 14 10:00 PST 1936wilde:That is all.
$
Using Regular Expressions With grepYou can also use the grep command to search for targets that are defined as patternsby using regular expressions. Regular expressions consist of letters and numbers, inaddition to characters with special meaning to grep. These special characters, calledmetacharacters, also have special meaning to the system. When you use regularexpressions with the grep command, you need to tell your system to ignore the specialmeaning of these metacharacters by escaping them. When you use a grep regularexpression at the command prompt, surround the regular expression with quotes.Escape metacharacters (such as & ! . * $ ? and \) with a backslash (\). See“Searching for Metacharacters” on page 52 for more information on escapingmetacharacters.
� A caret (^) metacharacter indicates the beginning of the line. The followingcommand finds any line in the file list that starts with the letter b.
$ grep ’^b’ list
Chapter 4 • Searching Files 51

� A dollar-sign ($) metacharacter indicates the end of the line. The followingcommand displays any line in which b is the last character on the line.
$ grep ’b$’ list
The following command displays any line in the file list where b is the onlycharacter on the line.
$ grep ’^b$’ list
� Within a regular expression, dot (.) finds any single character. The followingcommand matches any three-character string with “an” as the first two characters,including “any,” “and,” “management,” and “plan” (because spaces count, too).
$ grep ’an.’ list
� When an asterisk (*) follows a character, grep interprets the asterisk as “zero ormore instances of that character.” When the asterisk follows a regular expression,grep interprets the asterisk as “zero or more instances of characters matching thepattern.”
Because it includes zero occurrences, the asterisk can create a confusing commandoutput. If you want to find all words with the letters “qu” in them, type thefollowing command.
$ grep ’qu*’ list
However, if you want to find all words containing the letter “n,” type the followingcommand.
$ grep ’nn*’ list
If you want to find all words containing the pattern “nn,” type the followingcommand.
$ grep ’nnn*’ list
� To match zero or more occurrences of any character in list, type the followingcommand.
$ grep .* list
Searching for MetacharactersTo use the grep command to search for metacharacters such as & ! . * ? and \,precede the metacharacter with a backslash (\). The backslash tells grep to ignore(escape) the metacharacter.
For example, the following expression matches lines that start with a period, and isuseful when searching for nroff or troff formatting requests (which begin with aperiod).
$ grep ^\.
52 Solaris Advanced User’s Guide • May 2002
Table 4–1 lists common search pattern elements you can use with grep.
TABLE 4–1 grep Search Pattern Elements
Character Matches
^ The beginning of a text line
$ The end of a text line
. Any single character
[...] Any single character in the bracketed list orrange
[^...] Any character not in the list or range
* Zero or more occurrences of the precedingcharacter or regular expression
.* Zero or more occurrences of any singlecharacter
\ The escape of special meaning of nextcharacter
Note that you can also use these search characters in vi text editor searches.
Single or Double Quotes on Command LinesAs shown earlier, you use quotation marks to surround text that you want to beinterpreted as one word. For example, type the following to use grep to search allfiles for the phrase “dang it, boys”:
$ grep "dang it, boys" *
You can also use single quotation marks (’) to group multiword phrases into singleunits. Single quotation marks also make sure that certain that the system interpretsmetacharacters, such as $, literally.
Note – The history metacharacter ! is always interpreted as a metacharacter, eveninside quotation marks, unless you escape it with a backslash.
Escape characters such as & ! $ ? . ; and \ when you want grep to interpret thesecharacters as ordinary typographical characters.
For example, if you type the following command, the system displays all the lines inthe file list.
Chapter 4 • Searching Files 53
$ grep $ list
However, if you type the following command, the system displays only those linesthat contain the “$” character.
$ grep ’\$’ list
For more information on the grep(1) command, refer to the man Pages(1): UserCommands.
54 Solaris Advanced User’s Guide • May 2002

CHAPTER 5
Managing Processes and Disk Usage
This chapter describes the following topics..
� “Processes and PIDs” on page 55� “Terminating Processes (pkill)” on page 56� “Managing Disk Storage” on page 57
Processes and PIDsAfter your system interprets each command, the system creates an independent processwith a unique process identification number (PID) to perform the command. Thesystem uses the PID to track the current status of each process.
What Commands Are Running Now (ps)Use the ps command to see what processes are currently running.The ps commandshows the process identification number (listed under PID) for each process you own,which is created after you type a command. This command also shows you theterminal from which it was started (TTY), the cpu time it has used so far (TIME), and thecommand it is performing (COMMAND).
If you add the -l option to the ps command, the system displays other processinformation, including the state of each running process (listed under S). Thefollowing list defines the codes used to describe processes.
� O – Process is running on a processor
� S – Sleeping: Process is waiting for an event to complete
� R - Runnable: Process is on run queue
55
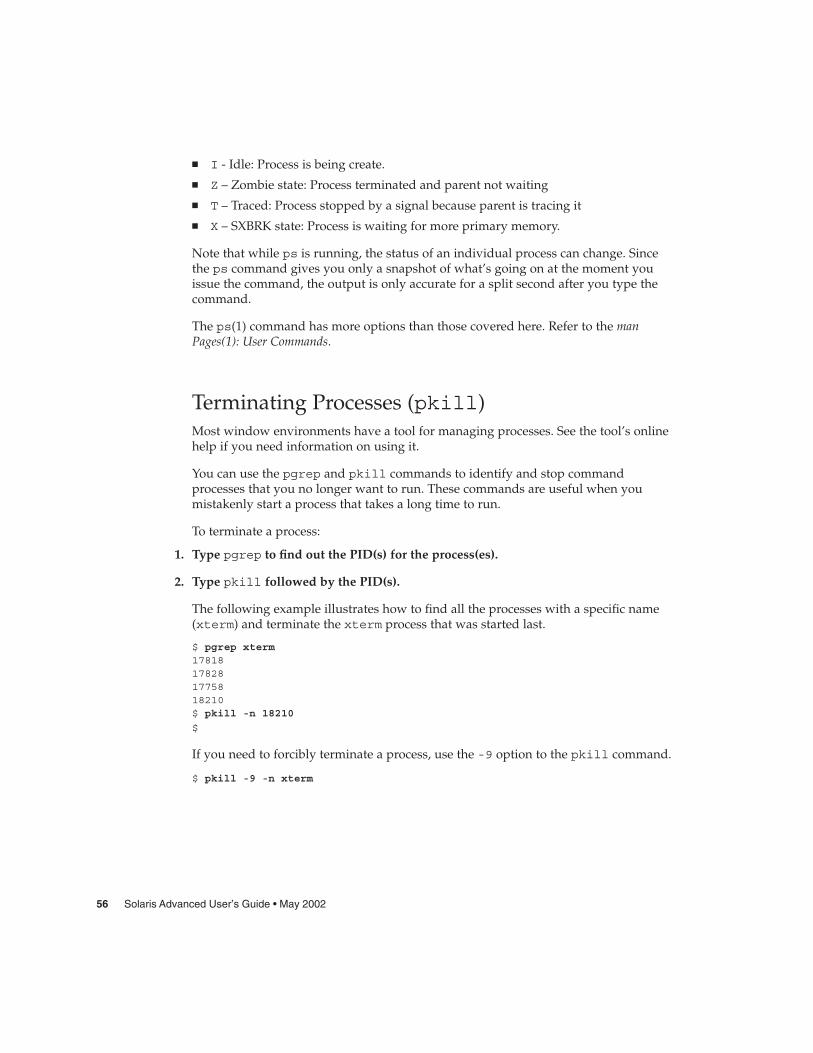
� I - Idle: Process is being create.
� Z – Zombie state: Process terminated and parent not waiting
� T – Traced: Process stopped by a signal because parent is tracing it
� X – SXBRK state: Process is waiting for more primary memory.
Note that while ps is running, the status of an individual process can change. Sincethe ps command gives you only a snapshot of what’s going on at the moment youissue the command, the output is only accurate for a split second after you type thecommand.
The ps(1) command has more options than those covered here. Refer to the manPages(1): User Commands.
Terminating Processes (pkill)Most window environments have a tool for managing processes. See the tool’s onlinehelp if you need information on using it.
You can use the pgrep and pkill commands to identify and stop commandprocesses that you no longer want to run. These commands are useful when youmistakenly start a process that takes a long time to run.
To terminate a process:
1. Type pgrep to find out the PID(s) for the process(es).
2. Type pkill followed by the PID(s).
The following example illustrates how to find all the processes with a specific name(xterm) and terminate the xterm process that was started last.
$ pgrep xterm17818178281775818210$ pkill -n 18210
$
If you need to forcibly terminate a process, use the -9 option to the pkill command.
$ pkill -9 -n xterm
56 Solaris Advanced User’s Guide • May 2002
Managing Disk StorageBecause space on the disk is a limited resource, make sure that you know the amountof space currently in use.
Displaying Disk Usage (df -k)The df -k command displays the amount of space currently in use on each diskmounted (directly accessible) to your system. For the capacity of each disk mountedon your system, the amount of space available, and the percentage of space in use, usethe df -k command.
$ df -k
If the output of the df -k command indicates your file systems are at or above 90percent capacity, clear unnecessary files. Clear the files by moving them to a disk ortape, using cp to copy files and mv to move them, or removing files with the rmcommand. Perform these kinds of “housekeeping” chores only on files that you own.
Displaying Directory Usage (du)You can use du to display the usage of a directory and all its subdirectories in units of512 bytes or characters.
du shows you the disk usage in each subdirectory. For a list of subdirectories in a filesystem, change the directory to the path name that is associated with that file system.Then run the following pipeline:
$ du | sort -r -n
This pipeline, which uses the reverse (-r) and numeric (-n) options of the sortcommand, identifies large directories. Use ls -l to examine the size (in bytes) andmodification times of files within each directory. Old files and text files larger 100KBytes might warrant storage offline.
Chapter 5 • Managing Processes and Disk Usage 57

58 Solaris Advanced User’s Guide • May 2002
CHAPTER 6
Using the vi Editor
vi (pronounced “vee-eye,” short for visual display editor) is the standard SunOS texteditor. vi is not window based and can be used on any kind of terminal to edit a widerange of file types.
You can type and edit text with vi, but it is not a word processor. vi does not processformatted text in the familiar manner of a commercial word processor. To produceformatted printouts, vi relies on a typesetting emulation program, such as nroff,troff, or ditroff. These programs enable you to format vi text by inserting codesthat are then interpreted by the emulator.
vi uses a variety of commands, many of which have functions that overlap. Thischapter provides an overview of the most essential vi commands. As you begin to usevi, you will find that it is an extremely powerful text editor, and proficiency happenswith practice.
Note – The view utility is a read-only version of vi. When you open a file with view,you can use vi commands, but you cannot accidentally change the file by saving yourchanges.
Starting viThe following sections describe how to start vi, type text in a file, save (write) the file,and quit vi.
59
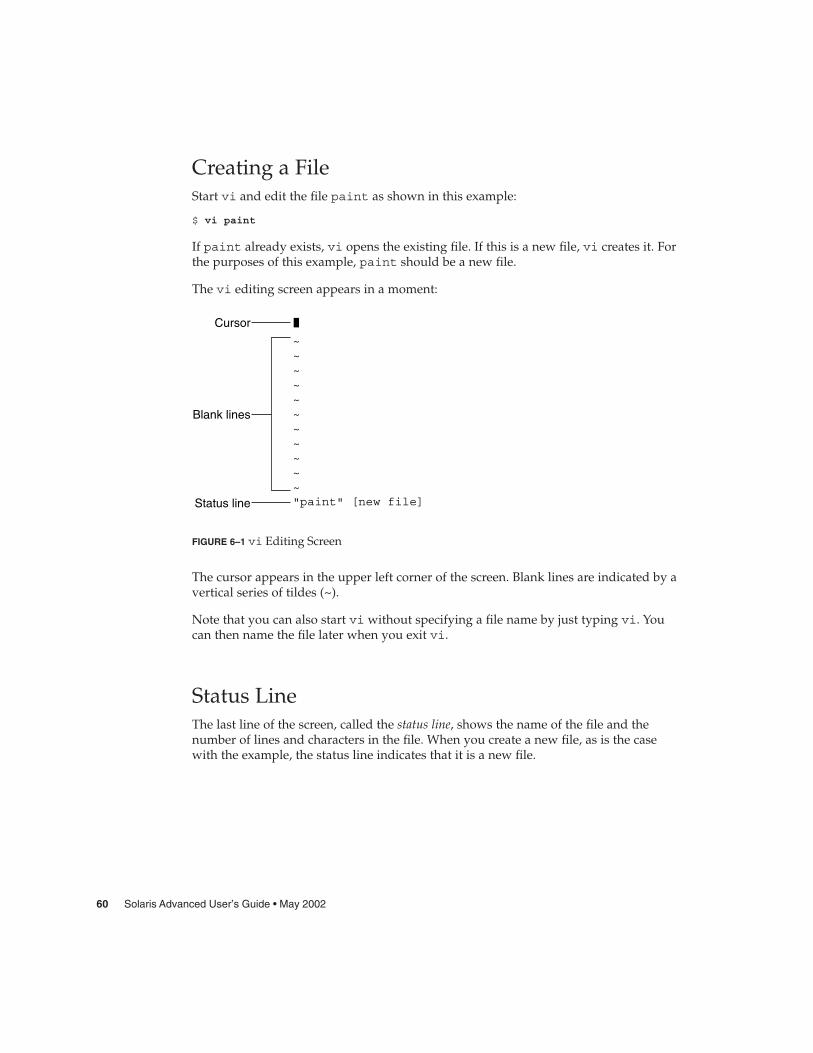
Creating a FileStart vi and edit the file paint as shown in this example:
$ vi paint
If paint already exists, vi opens the existing file. If this is a new file, vi creates it. Forthe purposes of this example, paint should be a new file.
The vi editing screen appears in a moment:
~~~~~~~~~~~"paint" [new file]
Cursor
Status line
Blank lines
FIGURE 6–1 vi Editing Screen
The cursor appears in the upper left corner of the screen. Blank lines are indicated by avertical series of tildes (~).
Note that you can also start vi without specifying a file name by just typing vi. Youcan then name the file later when you exit vi.
Status LineThe last line of the screen, called the status line, shows the name of the file and thenumber of lines and characters in the file. When you create a new file, as is the casewith the example, the status line indicates that it is a new file.
60 Solaris Advanced User’s Guide • May 2002
Two Modes of viTwo modes of operation in vi are entry mode and command mode. You use entrymode to type text into a file, while command mode is used to type commands thatperform specific vi functions. Command mode is the default mode for vi.
Because vi doesn’t indicate which mode you’re currently in, distinguishing betweencommand mode and entry mode is probably the single greatest cause of confusionamong new vi users. However, if you remember just a few basic concepts from thebeginning, you should be able to avoid most of the usual “vi stress.”
When you first open a vi file, it’s always in command mode. Before you can type textin the file, you must type one of the vi entry commands, such as i (“insert”), to inserttext at the current cursor location, or a (“append”), to insert text after the currentcursor location. These and other vi entry commands are covered in greater detail laterin this chapter.
Whenever you want to return vi to command mode, press Esc. If you’re not surewhich mode vi is presently in, simply press Esc to make sure it’s in command modeand continue from there. If you press Esc while vi is already in command mode, thesystem beeps and the screen flashes, but no harm is done.
Entry ModeTo type text in the sample file paint, type the vi “insert” command i. This commandremoves vi from command mode and puts it into entry mode.
Now type a few short lines of text, ending every line with a Return. Characters youtype appear to the left of the cursor and push any existing characters to the right. Forthe moment, you can correct your mistakes by backspacing and retyping a line beforeyou press Return. For information on editing text in vi, see “Changing Text”on page 68.
When you finish typing text in paint, press Esc to return to command mode. Thecursor moves back onto the last character you typed. Now you can type more vicommands.
If vi seems to act unpredictably, make sure that you are not in “Caps Lock” mode,which would cause your entries to be all capital letters. On some systems, the F1 key(usually next to the Esc key) acts as the Caps Lock. Pressing this key instead of Esc is acommon error.
Chapter 6 • Using the vi Editor 61
Note – Occasionally you might need to instruct vi to clear or redraw the screen toeliminate, for example, extraneous system messages. To redraw the screen, entercommand mode and press Ctrl-L.
Command ModeWhen you open a file with vi, you are in command mode. In this mode, you can typecommands to implement a wide range of functions. Most vi commands consist of oneor two letters and an optional number. Usually, uppercase and lowercase versions ofcommands perform related but different functions. As an example, typing a appendsthe file to the right of the cursor, while typing A appends the file at the end of the line.
Most vi commands do not require that you press Return to execute them. Commandsbeginning with a colon (:), however, do require that you press Return after thecommand. Some discussions of the vi editor refer to commands that are precededwith a colon as a third, and uniquely separate mode of vi, last-line mode. This mode isso named because when you type the colon while in command mode, the colon andthe remainder of what is typed appear on the bottom line of the screen. For thepurpose of this discussion, however, all vi commands are initiated from commandmode.
Commands that are preceded with a colon are actually ex commands. vi and ex aretwo separate interfaces to the same text-editing program. While vi is a screen-orientedinterface, ex is a line-oriented interface. The full set of ex commands is available fromwithin vi. When you press the colon, you are actually switching to the line-oriented,ex interface. This switch enables you to perform many file manipulation commandswithout ever leaving vi. See “Using ex Commands” on page 71, in this chapter, forfurther information.
Ending a SessionWhen you edit a file in vi, your changes are not made directly to the file. Instead, theyare applied to a copy of the file that vi creates in a temporary memory space that iscalled the buffer. The permanent disk copy of the file is modified only when you write(save) the contents of the buffer.
This arrangement is both positive and negative. A positive feature is that you can quita file and discard all the changes that you have made during an editing session,leaving the disk copy intact. The negative feature is that you could lose the (unsaved)contents of the work buffer if the system crashes. People on remote terminals that areconnected by phone lines are especially vulnerable to unplanned interruptions.
62 Solaris Advanced User’s Guide • May 2002
The best policy is to save your work frequently, especially when you are makingsubstantive changes.
Caution – Although it’s possible to run multiple, simultaneous vi sessions on one file,it is not a good idea. Great confusion could result when you try to determine whichchanges have been written to the file and which changes have been overwritten from asimultaneous session.
Saving Changes and Quitting vivi is rich in substantively synonymous commands that control the save of the buffercontents to a file and the exit from vi. These commands give you the option of saving,saving-and-quitting, or quitting-without-saving.
SavingSave the contents of the buffer (write the buffer to the file on disk) by typing:
:w
Press Return.
Saving and QuittingSave and quit by typing:
:wq
Press Return. Alternatively, type ZZ.
Note that the command ZZ is neither preceded by a colon nor followed by Return.
Quitting Without SavingWhen you’ve made no changes to a file and want to quit, type:
:q
Press Return. If you have made changes, vi does not let you quit with :q. Instead, itdisplays the following message.
No write since last change (:quit! overrides)
If you do not want to save your changes, type:
Chapter 6 • Using the vi Editor 63
:q!
Press Return.
Printing a FileAfter you quit a vi file, you can print the file with the following command:
$ lp filename
In this example, filename is the name of the vi file to be printed. This command printsthe file to your default printer. The file is printed without any formatting, line for line,just as it appears on the screen. See Chapter 8 for more information on printercommands.
Basic vi CommandsThe following sections explain the following categories of vi commands.
� Moving around in a file� Inserting text� Changing and substituting text� Undoing changes to text� Deleting text� Checking your spelling� Formatting your file output� Repeating commands
Moving Around in a FileIn the previous sections you learned how to create, save, print, and exit a vi file. Nowthat you have created a file, you’ll need to understand the concepts that are requiredto navigate within it. Open your practice file now, and try each of the commands thatare discussed in this section.
64 Solaris Advanced User’s Guide • May 2002
Moving the CursorWhen you start vi, the cursor is in the upper left corner of the vi screen. In commandmode, you can move the cursor with a number of keyboard commands. Certain letterkeys, the arrow keys, and the Return key, Back Space (or Delete) key, and the SpaceBar can all be used to move the cursor when you’re in command mode.
Note – Most vi commands are case sensitive. The same command typed in lowercaseand uppercase characters might have different effects.
Moving With Arrow Keys
If your machine is equipped with arrow keys, try these now. You should be able tomove the cursor freely about the screen by using combinations of the up, down, right,and left arrow keys. Notice that you can only move the cursor across already existingtext or input spaces.
If you’re using vi from a remote terminal, the arrow keys might not work correctly.The arrow key behavior depends on your terminal emulator. If the arrow keys don’twork for you, you can use the following substitutes:
� To move left, press h.� To move right, press l.� To move down, press j.� To move up, press k.
Moving One Word
Press w (“word”) to move the cursor to the right one word at a time.
Press b (“back”) to move the cursor to the left one word at a time.
Press W or B to move the cursor past the adjacent punctuation to the next or previousblank space.
Press e (“end”) to move the cursor to the last character of the current word.
Moving to Start or End of Line
Press ^ to move the cursor to the start of the current line.
Press $ to move the cursor to the end of the current line.
Moving Down One Line
Press the Return key to move the cursor to the beginning of the next line down.
Chapter 6 • Using the vi Editor 65
Moving Left
Press the Back Space key to move the cursor one character to the left.
Moving Right
Press the Space Bar to move the cursor one character to the right.
Moving to the Top
Press H (“high”) to move the cursor to the top of the screen.
Moving to the Middle
Press M (“middle”) to move the cursor to the middle of the screen.
Moving to the Bottom
Press L (“low”) to move the cursor to the bottom of the screen.
Paging and ScrollingIf you move down when the cursor is at the bottom of the screen, or move up whenthe cursor is at the top of the screen, you will see the text scroll up or down. Thisscrolling can be an effective way to display more text in a short file, but it can betedious to move this way through a long file.
You can page or scroll backward or forward through a file, a screen or a half-screen ata time. To try out these commands on paint, you might want to add text so you havea longer file to work with.
Note that paging and scrolling are fundamentally different. Scrolling actually scrollsthe cursor up or down through the text a line at a time, as though it were on a paperscroll. Paging moves the cursor up or down through the text a screenful at a time. On afast system, you might not notice the difference. However, if you’re working from aremote terminal or in any other situation where your system is running slower thanusual, this difference can become painfully apparent.
Page Forward One Screen
To scroll forward (move down) one screenful, press Ctrl-F. (Hold down the Controlkey and press the F key.) The cursor moves to the upper left corner of the new screen.
Scroll Forward One-Half Screen
To scroll forward one half of a screen, press Ctrl-D.
66 Solaris Advanced User’s Guide • May 2002
Page Backward One Screen
To scroll backward (that is., move up) one screenful, press Ctrl-B.
Scroll Backward One-Half Screen
To scroll backward one half of a screen, press Ctrl-U.
Inserting Textvi provides many commands for inserting text. This section introduces you to themost useful of these commands. Note that each of these commands places vi in entrymode. To use any of these commands, you must first be in command mode.Remember to press Esc to make sure you are in command mode.
AppendType a (append) to insert text to the right of the cursor. Experiment by moving thecursor anywhere on a line and typing a, followed by the text you want to add. PressEsc when you’re finished.
Type A to add text to the end of a line. To see how this command works, position thecursor anywhere on a text line and type A. The cursor moves to the end of the line,where you can type your additions. Press Esc when you are finished.
InsertInsert text to the left of the cursor by typing i from command mode.
Type I to insert text at the beginning of a line. The command moves the cursor fromany position on that line. Press Esc to return to command mode after you type thedesired text.
Open LineUse these commands to open new lines, either above or below the current cursorposition.
Type o to open a line below the current cursor position. To experiment, type o followedby a bit of text. You can type several lines of text if you like. Press Esc when you arefinished.
Type O to open a line above the current cursor position.
Chapter 6 • Using the vi Editor 67
Changing TextChanging text involves the substitution of one section of text for another. vi hasseveral ways to do this, depending on circumstances.
Changing a WordTo replace a word, position the cursor at the beginning of the word to be replaced.Type cw, followed by the new word. To finish, press Esc.
To change part of a word, place the cursor on the word, to the right of the portion to besaved. Type cw, type the correction, and press Esc.
Changing a LineTo replace a line, position the cursor anywhere on the line and type cc. The linedisappears, leaving a blank line for your new text (which can be of any length). PressEsc to finish.
Substituting Character(s)To substitute one or more characters for the character under the cursor, type s,followed by the new text. Press Esc to return to command mode.
Replacing One CharacterUse this command to replace the character highlighted by the cursor with anothercharacter. Position the cursor over the character and type r, followed by just onereplacement character. After the substitution, vi automatically returns to commandmode (you do not need to press Esc).
Undoing ChangesWhen you edit text and make changes to a vi file, you might occasionally wish thatyou had not changed something. vi’s undo commands enable you to back up oneoperation and continue on from there.
Undoing the Previous CommandIf you make a mistake in vi or if you just change your mind after an operation iscompleted, you can undo your last command by pressing u immediately after thecommand. You do not need to press Esc after you type u. By pressing u a second timeyou undo the undo.
68 Solaris Advanced User’s Guide • May 2002
Undoing Changes to a LineType U to undo all changes you’ve made to a line. This command works only if youhaven’t moved the cursor off the line. You do not need to press Esc after you type U.
Deleting TextThese vi commands delete the character, word, or line you indicate. vi stays incommand mode, so any subsequent text insertions must be preceded by additionalcommands to enter entry mode.
Deleting One CharacterTo delete one character, position the cursor over the character to be deleted and type x.
The x command also deletes the space the character occupied—when a letter isremoved from the middle of a word, the remaining letters will close up, leaving nogap. You can also delete blank spaces in a line with the x command.
To delete one character before (to the left of) the cursor, type X (uppercase).
Deleting a Word or Part of a WordTo delete a word, position the cursor at the beginning of the word and type dw. Theword and the space it occupied are removed.
To delete part of a word, position the cursor on the word to the right of the part to besaved. Type dw to delete the rest of the word.
Deleting a LineTo delete a line, position the cursor anywhere on the line and type dd. The line and thespace it occupied are removed.
Copying and Moving Text — Yank, Delete, and PutMany word processors allow you to “copy and paste” and “cut and paste” lines oftext. The vi editor also includes these features. The vi command-mode equivalent of“copy and paste” is yank and put. The equivalent of “cut and paste” is delete and put.
The methods for copying or moving small blocks of text in vi involves the use of acombination of the yank, delete, and put commands.
Chapter 6 • Using the vi Editor 69
Copying LinesCopying a line requires two commands: yy or Y (“yank”) and either p (“put below”)or P (“put above”). Note that Y does the same thing as yy.
To yank one line, follow these steps.
1. Position the cursor anywhere on the line you want to yank.
2. Type yy.
3. Move the cursor to the line above where you want to put (copy) the yanked line.
4. Type p.
A copy of the yanked line appears in a new line below the cursor.
To place the yanked line in a new line above the cursor, type P.
The yy command works well with a count: to yank 11 lines, for example, type 11yy.Eleven lines, counting down from the cursor, are yanked, and vi indicates this with amessage at the bottom of the screen: 11 lines yanked.
You can also use the P or p commands immediately after any of the deletioncommands discussed earlier. This action puts the text you deleted above or below thecursor, respectively.
Caution – Use only cursor-moving commands between yanking or deleting andputting. If you delete or yank any other text before putting the new text in place, thelines you yanked or deleted are lost.
Moving LinesMoving lines also requires two commands: dd (“delete”) and either p or P.
To move one line, position the cursor anywhere on the line and type dd. For example,to delete 5 lines, type 5dd.
Next, move the cursor to the line above where you want the deleted line reinsertedand type p. This inserts the text on a new line below the cursor.
Alternatively, you can put the deleted line above the cursor by typing P.
Using a Count to Repeat CommandsMany vi commands can be preceded by a repeat factor (called a count)—a numberthat precedes the command and tells it how many times to repeat the operation.
70 Solaris Advanced User’s Guide • May 2002
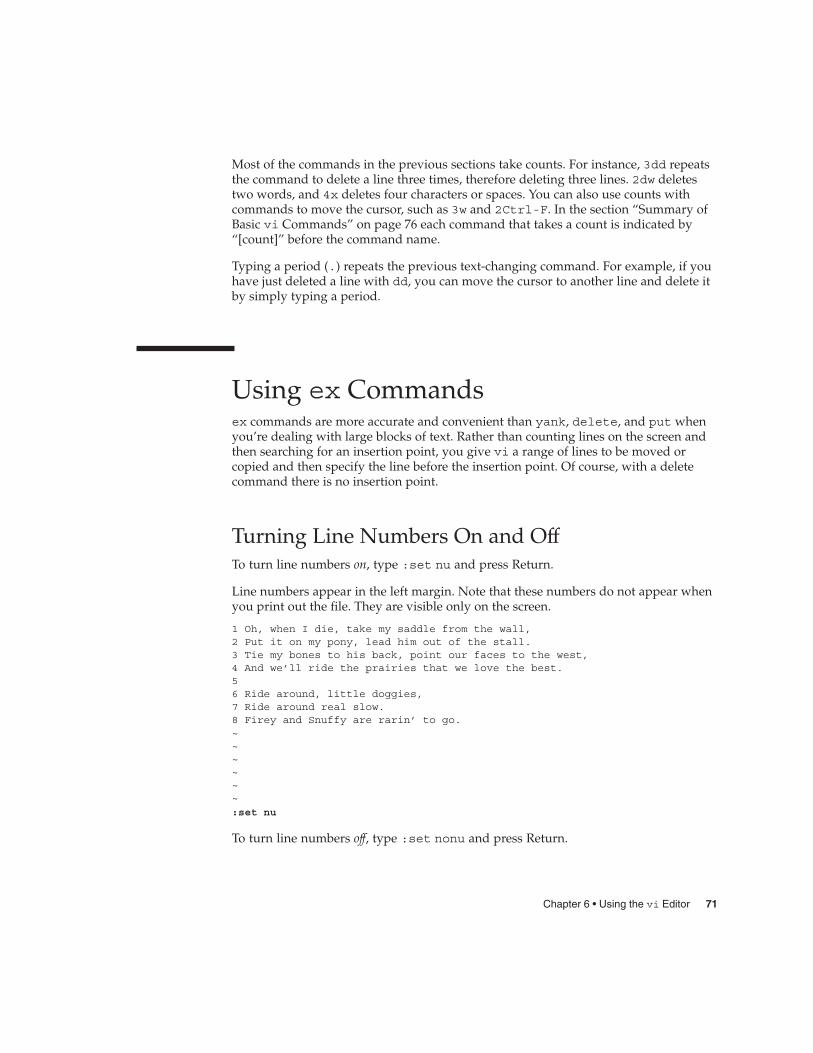
Most of the commands in the previous sections take counts. For instance, 3dd repeatsthe command to delete a line three times, therefore deleting three lines. 2dw deletestwo words, and 4x deletes four characters or spaces. You can also use counts withcommands to move the cursor, such as 3w and 2Ctrl-F. In the section “Summary ofBasic vi Commands” on page 76 each command that takes a count is indicated by“[count]” before the command name.
Typing a period (.) repeats the previous text-changing command. For example, if youhave just deleted a line with dd, you can move the cursor to another line and delete itby simply typing a period.
Using ex Commandsex commands are more accurate and convenient than yank, delete, and put whenyou’re dealing with large blocks of text. Rather than counting lines on the screen andthen searching for an insertion point, you give vi a range of lines to be moved orcopied and then specify the line before the insertion point. Of course, with a deletecommand there is no insertion point.
Turning Line Numbers On and OffTo turn line numbers on, type :set nu and press Return.
Line numbers appear in the left margin. Note that these numbers do not appear whenyou print out the file. They are visible only on the screen.
1 Oh, when I die, take my saddle from the wall,2 Put it on my pony, lead him out of the stall.3 Tie my bones to his back, point our faces to the west,4 And we’ll ride the prairies that we love the best.56 Ride around, little doggies,7 Ride around real slow.8 Firey and Snuffy are rarin’ to go.~~~~~~
:set nu
To turn line numbers off, type :set nonu and press Return.
Chapter 6 • Using the vi Editor 71
Copying LinesThe basic form of the ex copy command is:
:line#,line# co line#
The first two numbers (separated by a comma) specify the range of lines to be copied.The third number is the line before the insertion point.
For example, to copy lines 1 through 5 of paint and place the copy after line 12, youwould type the following:
:1,5 co 12
Then press Return.
When you specify line ranges, use the abbreviations:
� Period (.) to denote “from the current line.”� Dollar sign ($) to denote “to end of file.”
Thus, to copy the range “from the current line through line 5” and insert this blockafter line 12, you would type:
:.,5 co 12
To copy the range “from line 6 through the end of the file” and insert this block afterline 2, you would type:
:6,$ co 2
Moving LinesThe basic form of the ex move command is similar to the copy command that isdiscussed in the previous section.
:line#,line# m line#
Line ranges and insertion points are specified in the same ways, including use of theabbreviations . and $. The difference in function is simply that “move” removes ablock from one location and reinserts it elsewhere.
For example, to move lines 1 through 5 to the line following 12, you would type:
:1,5 m 12
Then press Return.
72 Solaris Advanced User’s Guide • May 2002
Deleting LinesTo delete a range of lines, use the command form:
:line#,line# d
For example, to delete lines 1 through 5, you would type:
:1,5 d
Searching and Replacing With vivi provides several ways to find your place in a file by locating a specified string ofcharacters. vi also has a powerful global replacement function.
Finding a Character StringA character string is one or more characters in succession. A string might includeletters, numbers, punctuation, special characters, blank spaces, tabs, or carriagereturns. A string can be a grammatical word or it can be part of a word.
To find a character string, type / followed by the string you want to search for, andthen press Return. vi positions the cursor at the next occurrence of the string. Forexample, to find the string “meta,” type /meta followed by Return.
Type n to go to the next occurrence of the string. Type N to go to the previousoccurrence.
To search backward in a file, you can use ? instead of /. In this situation, the directionsof n and N are reversed.
Searches normally are case sensitive: a search for “china” will not find “China.” If youwant vi to ignore case during a search, type :set ic. To change it back to thedefault, case-sensitive mode, type :set noic.
If vi finds the requested string, the cursor stops at its first occurrence. If the string isnot found, vi displays Pattern not found on the last line of the screen.
Certain special characters ( / & ! . ^ * $ \ ?) have special significance to thesearch process and must be “escaped” when they are used in a search. To escape aspecial character, precede it with a backslash (\). For example, to search for the string“anything?” type /anything\? and press Return.
Chapter 6 • Using the vi Editor 73
You can use these special characters as commands to the search function. If you wantto search for a string that includes one or more of these characters, you must precedethe special character with a backslash. To escape a backslash itself, type \\.
Refining the SearchYou can make searches more precise by tagging the string with indicators for thefollowing characteristics:
� Beginning of line� End of line� Beginning of word� End of word� Wildcard characters
To match the beginning of a line, start the search string with a caret (^). For example,to find the next line beginning with “Search”, type:
/^Search
To match the end of a line, end the search string with a dollar sign ($). For example, tofind the next line ending with “search.”, type:
/search\.$
Note that the period is escaped with a backslash.
To match the beginning of a word, type \< at the beginning of the string; to match theend of a word, type \> at the end of the string. Thus, to match a word, rather than astring, combine the end-of-word and beginning-of-word tags in the search pattern. Forexample, to find the next occurrence of the word—as opposed to the string—“search”,type:
/\<search\>
To match any character, type a period (.) in the string at the location to be matched.For example, to find the next occurrence of “disinformation” or “misinformation,”type:
/.isinformation
Because this is a search for a string and not a word, this search pattern might also findsuch constructions as “misinformationalist” and “disinformationism.”
To search for alternative characters in a string, enclose the alternatives in brackets. Thesearch pattern /[md]stringfinds strings that begin with either “m” or “d.” Conversely,/[d-m]string finds strings that begin with any letter from “d” through “m.”
74 Solaris Advanced User’s Guide • May 2002
To match zero or more occurrences of the last character, type an asterisk (*) in thestring. You can effectively combine brackets and the asterisk to look for well-definedalternatives. For example, to find all strings beginning with a through z and endingwith “isinformation” and to find all occurrences of the string “isinformation”, type:
/[a-z]*isinformation
Replacing a Character StringThe procedure for replacing a text string is based on the search procedures that arediscussed previously. You can use all the special matching characters for searches insearch-and-replace.
The basic command form is:
:g/search-string/s//replace-string/g
Then press the Return key.
Therefore, to replace every occurrence of the string “disinformation” with“newspeak,” type:
:g/disinformation/s//newspeak/g
Then and press Return.
You can modify this command to halt the search and make vi query whether youwant to make the replacement in each instance. The following command uses gc(adding c for “consult”) to make vi stop at every occurrence of “disinformation” andask whether you want to make the substitution. Respond with y for yes or n for no.
:g/disinformation/s//newspeak/gc
Note – You can cancel a “consulted” search-and-replace function by pressing Ctrl-C.
Going to a Specific LineTo go to the last line of an open file, type G. To return to the first line of the file, type1G.
You can go to any other line by typing its number followed by G.
For example, suppose that you quit the file paint while editing line 51. You canaccess that line by opening the file and typing 51G.
Chapter 6 • Using the vi Editor 75
Inserting One File Into Anothervi makes it convenient to “read” (insert) a file into the file you are editing. Thegeneral form of the command is:
: line# r filename
If you do not specify a line number, vi inserts the file at the current cursor position.
For example, if you wanted to insert the file orwell at line 84 of the file paint, youwould type:
:84 r orwell
Or you could position the cursor on line 84 and type:
:r orwell
Editing Multiple Filesvi enables you to edit multiple files. For example, to edit the file orwell while youare editing paint:
1. First, save your current work in paint. Type :w and press Return.
2. To edit orwell, type :n orwell and press Return.
3. Make editing changes to orwell and save your work.
4. When you are finished working with orwell and have saved your work, you havethree choices:
� Exit vi. Type :q and press Return.� Return to paint. Type :n # and press Return.� Swap back and forth between two files with the command :n #.
Summary of Basic vi CommandsThe following table describes basic vi commands.
76 Solaris Advanced User’s Guide • May 2002
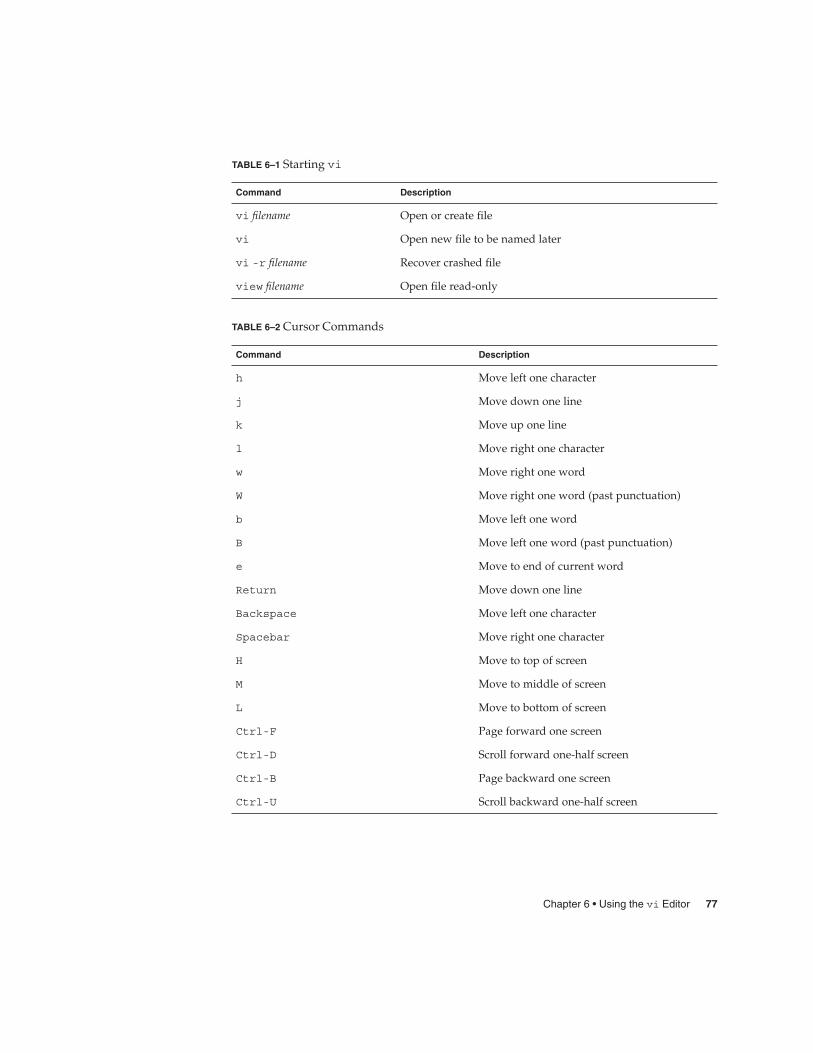
TABLE 6–1 Starting vi
Command Description
vi filename Open or create file
vi Open new file to be named later
vi -r filename Recover crashed file
view filename Open file read-only
TABLE 6–2 Cursor Commands
Command Description
h Move left one character
j Move down one line
k Move up one line
l Move right one character
w Move right one word
W Move right one word (past punctuation)
b Move left one word
B Move left one word (past punctuation)
e Move to end of current word
Return Move down one line
Backspace Move left one character
Spacebar Move right one character
H Move to top of screen
M Move to middle of screen
L Move to bottom of screen
Ctrl-F Page forward one screen
Ctrl-D Scroll forward one-half screen
Ctrl-B Page backward one screen
Ctrl-U Scroll backward one-half screen
Chapter 6 • Using the vi Editor 77
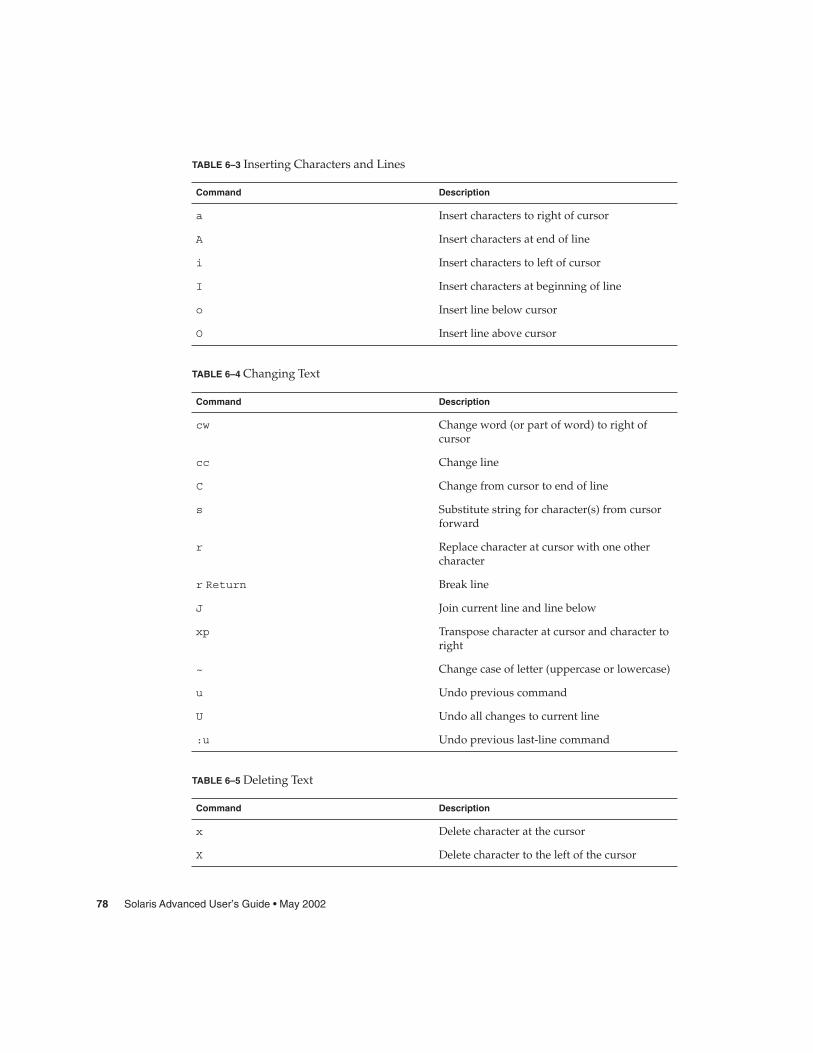
TABLE 6–3 Inserting Characters and Lines
Command Description
a Insert characters to right of cursor
A Insert characters at end of line
i Insert characters to left of cursor
I Insert characters at beginning of line
o Insert line below cursor
O Insert line above cursor
TABLE 6–4 Changing Text
Command Description
cw Change word (or part of word) to right ofcursor
cc Change line
C Change from cursor to end of line
s Substitute string for character(s) from cursorforward
r Replace character at cursor with one othercharacter
r Return Break line
J Join current line and line below
xp Transpose character at cursor and character toright
~ Change case of letter (uppercase or lowercase)
u Undo previous command
U Undo all changes to current line
:u Undo previous last-line command
TABLE 6–5 Deleting Text
Command Description
x Delete character at the cursor
X Delete character to the left of the cursor
78 Solaris Advanced User’s Guide • May 2002
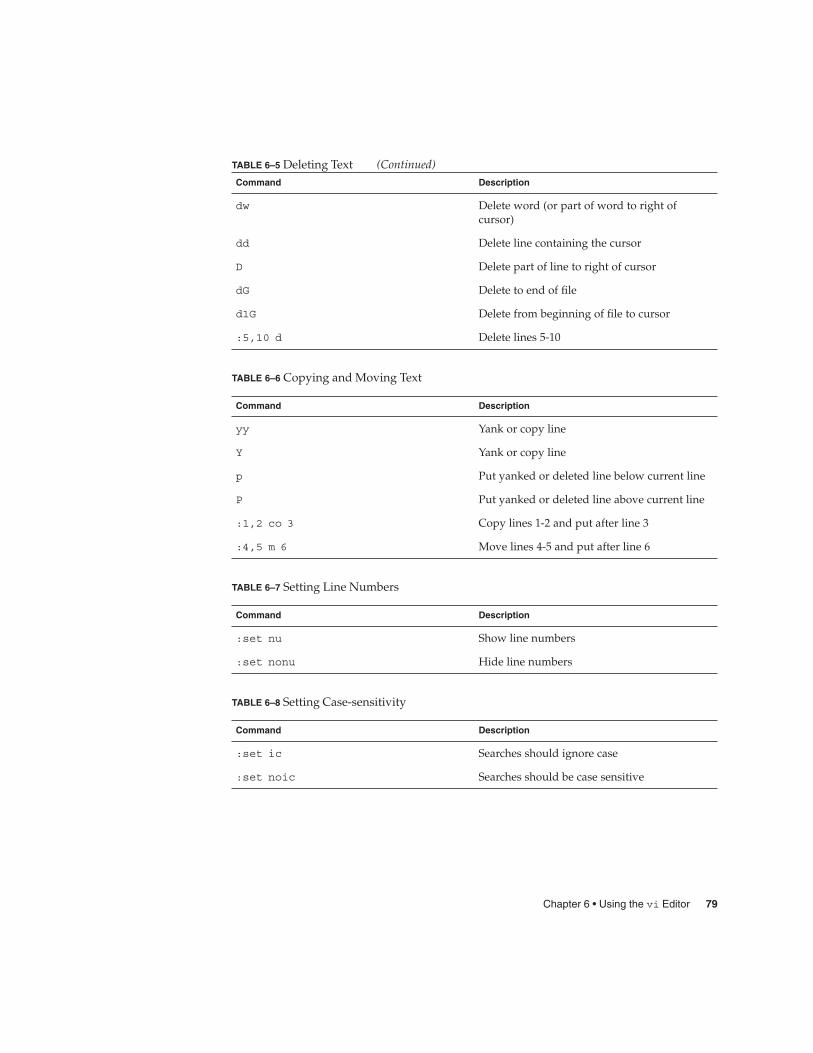
TABLE 6–5 Deleting Text (Continued)Command Description
dw Delete word (or part of word to right ofcursor)
dd Delete line containing the cursor
D Delete part of line to right of cursor
dG Delete to end of file
d1G Delete from beginning of file to cursor
:5,10 d Delete lines 5-10
TABLE 6–6 Copying and Moving Text
Command Description
yy Yank or copy line
Y Yank or copy line
p Put yanked or deleted line below current line
P Put yanked or deleted line above current line
:1,2 co 3 Copy lines 1-2 and put after line 3
:4,5 m 6 Move lines 4-5 and put after line 6
TABLE 6–7 Setting Line Numbers
Command Description
:set nu Show line numbers
:set nonu Hide line numbers
TABLE 6–8 Setting Case-sensitivity
Command Description
:set ic Searches should ignore case
:set noic Searches should be case sensitive
Chapter 6 • Using the vi Editor 79
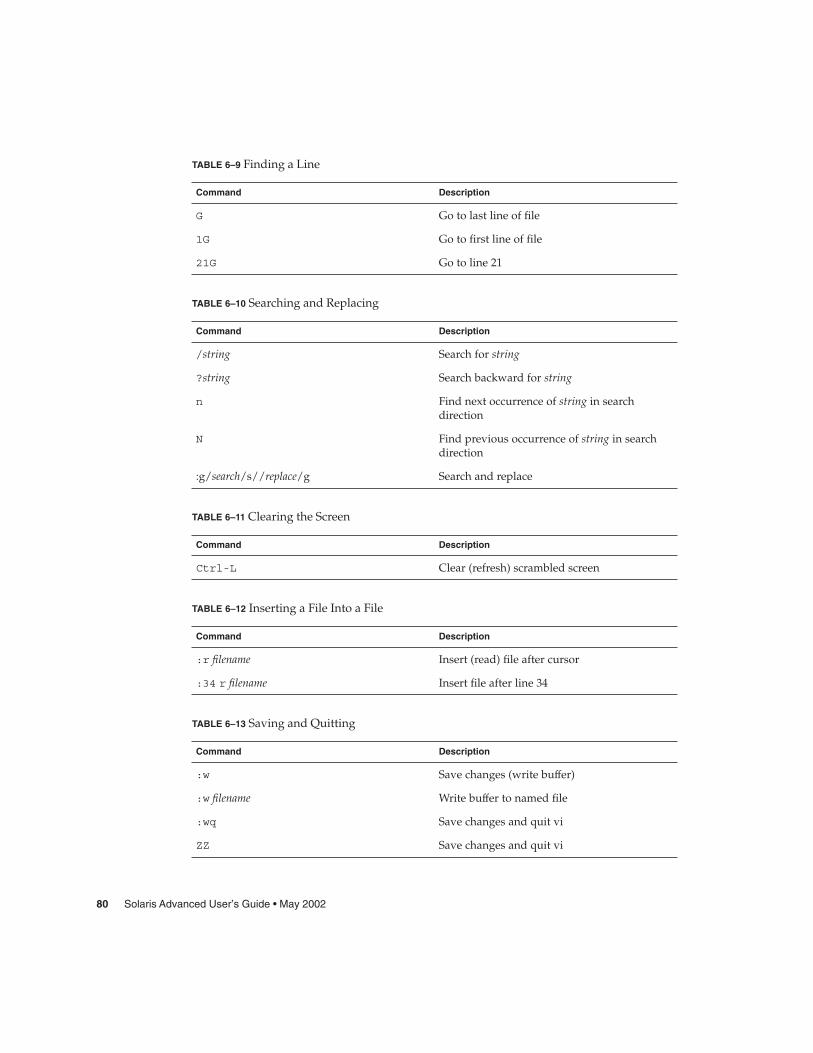
TABLE 6–9 Finding a Line
Command Description
G Go to last line of file
1G Go to first line of file
21G Go to line 21
TABLE 6–10 Searching and Replacing
Command Description
/string Search for string
?string Search backward for string
n Find next occurrence of string in searchdirection
N Find previous occurrence of string in searchdirection
:g/search/s//replace/g Search and replace
TABLE 6–11 Clearing the Screen
Command Description
Ctrl-L Clear (refresh) scrambled screen
TABLE 6–12 Inserting a File Into a File
Command Description
:r filename Insert (read) file after cursor
:34 r filename Insert file after line 34
TABLE 6–13 Saving and Quitting
Command Description
:w Save changes (write buffer)
:w filename Write buffer to named file
:wq Save changes and quit vi
ZZ Save changes and quit vi
80 Solaris Advanced User’s Guide • May 2002
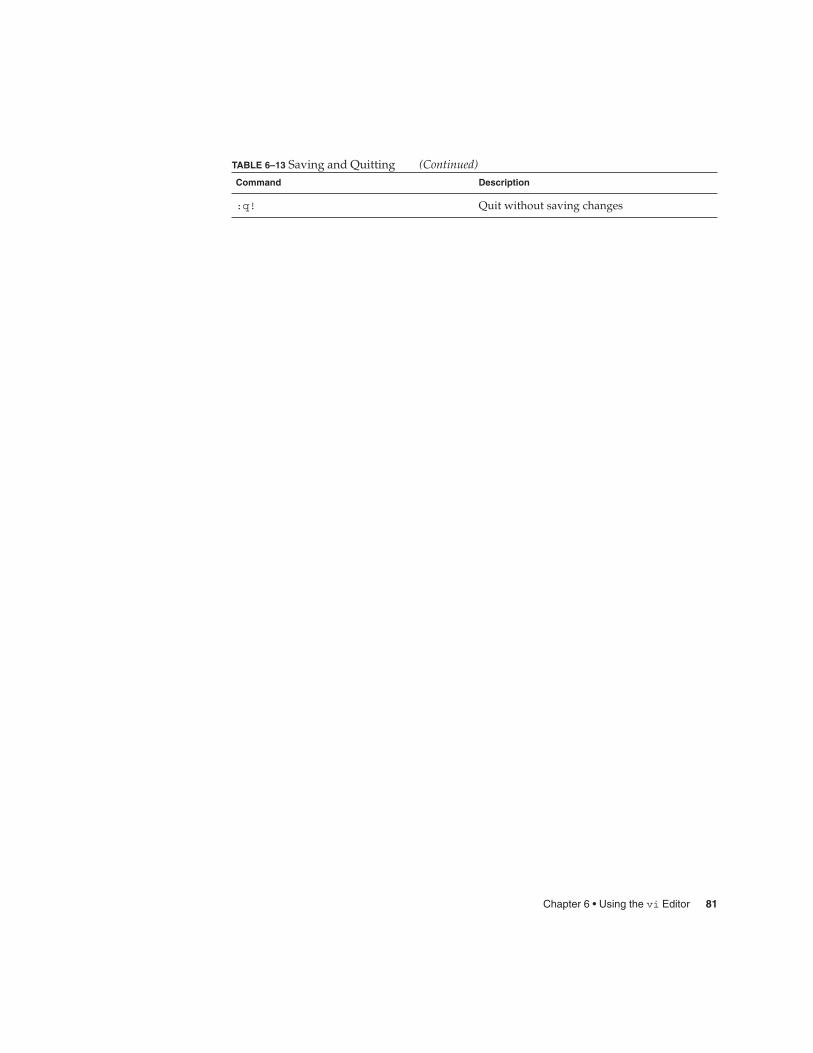
TABLE 6–13 Saving and Quitting (Continued)Command Description
:q! Quit without saving changes
Chapter 6 • Using the vi Editor 81

82 Solaris Advanced User’s Guide • May 2002
CHAPTER 7
Using Mail
SunOS provides a program called mailx for sending and receiving electronic mail(email). mailx provides features for reading, writing, sending, receiving, saving, anddeleting messages. The mailx program is not window based, and can therefore be runon any terminal. Although you might prefer to use the window-based mail, you mightfind that the mailx program is handy when you are dashing off a quick note. Also, ifyou want to set up your own mail aliases, you can read about it here.
Note – If you are in a window environment and the Mail Tool icon appears on yourscreen, quit from the Mail Tool before trying the examples in this chapter. Otherwise,you will have two mail processes active, and these concurrent processes mightgenerate error and warning messages. You can safely send mail messages in aCommand Tool or Shell Tool window, but if you read your mail and save or deletemessages, this affects your “in tray,” thus confusing Mail Tool.
mailx BasicsThis section describes how to perform basic tasks in mailx. Later sections describefeatures and functions that can enhance your ability to use this program.
An intended recipient’s login name and machine name serve as a unique address forthe mailx program. If the intended recipient is on the same machine as the sender, thelogin name is all that is required. Each user has a mailbox in which to receive mail. Thismailbox is generally located in the /var/mail/username directory, where username isyour login name.
The mailx program notifies you when you receive mail and places the mail in yourmailbox. After you read your mail, mailx automatically places these messages in astorage file called mbox, which is also located in your home directory.
83
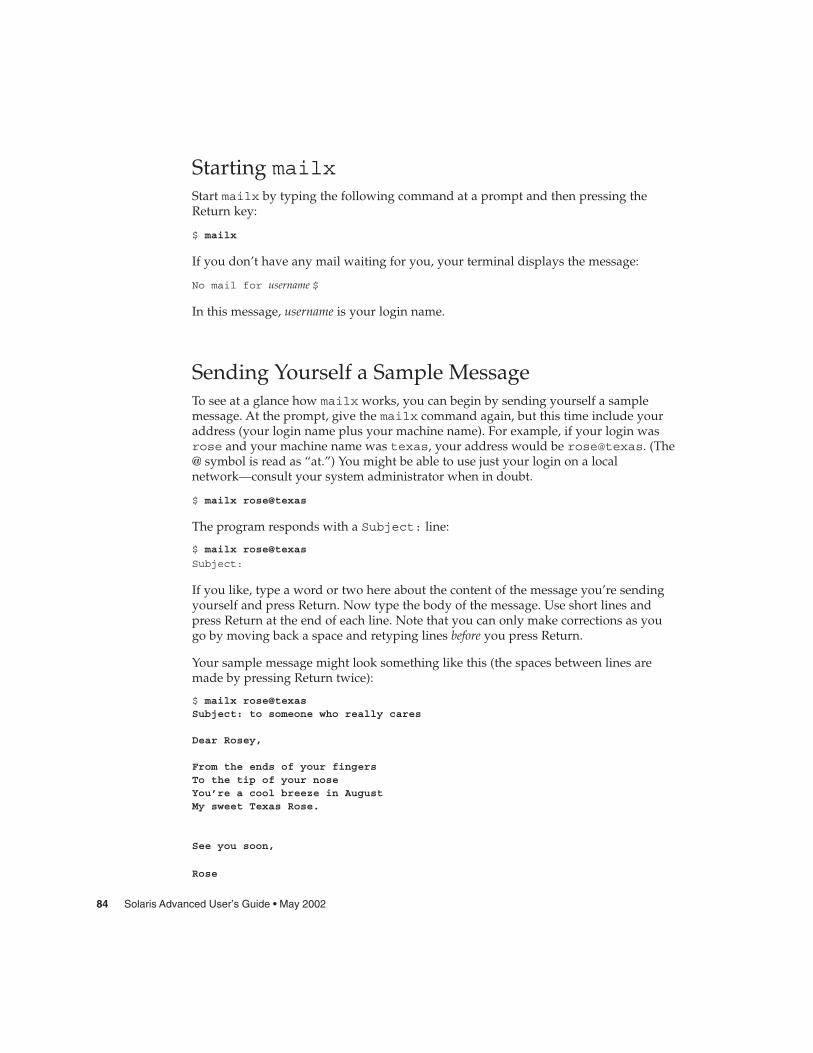
Starting mailxStart mailx by typing the following command at a prompt and then pressing theReturn key:
$ mailx
If you don’t have any mail waiting for you, your terminal displays the message:
No mail for username $
In this message, username is your login name.
Sending Yourself a Sample MessageTo see at a glance how mailx works, you can begin by sending yourself a samplemessage. At the prompt, give the mailx command again, but this time include youraddress (your login name plus your machine name). For example, if your login wasrose and your machine name was texas, your address would be rose@texas. (The@ symbol is read as “at.”) You might be able to use just your login on a localnetwork—consult your system administrator when in doubt.
$ mailx rose@texas
The program responds with a Subject: line:
$ mailx rose@texas
Subject:
If you like, type a word or two here about the content of the message you’re sendingyourself and press Return. Now type the body of the message. Use short lines andpress Return at the end of each line. Note that you can only make corrections as yougo by moving back a space and retyping lines before you press Return.
Your sample message might look something like this (the spaces between lines aremade by pressing Return twice):
$ mailx rose@texasSubject: to someone who really cares
Dear Rosey,
From the ends of your fingersTo the tip of your noseYou’re a cool breeze in AugustMy sweet Texas Rose.
See you soon,
Rose
84 Solaris Advanced User’s Guide • May 2002
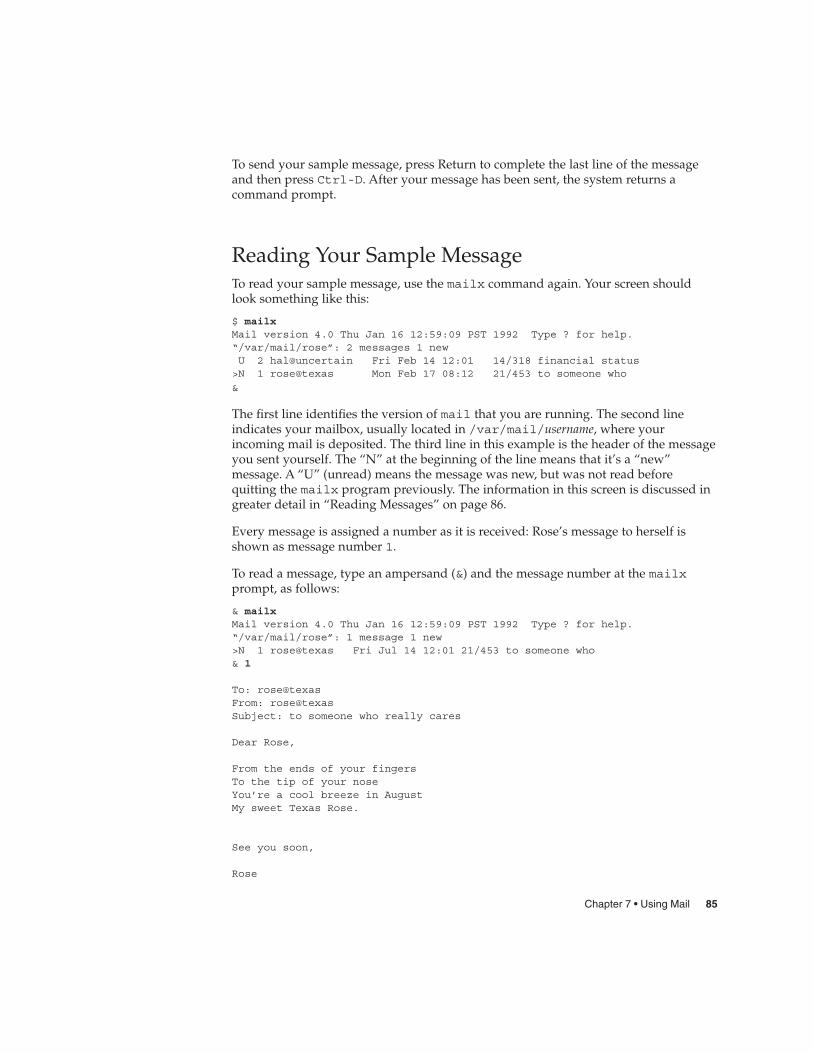
To send your sample message, press Return to complete the last line of the messageand then press Ctrl-D. After your message has been sent, the system returns acommand prompt.
Reading Your Sample MessageTo read your sample message, use the mailx command again. Your screen shouldlook something like this:
$ mailxMail version 4.0 Thu Jan 16 12:59:09 PST 1992 Type ? for help.“/var/mail/rose”: 2 messages 1 newU 2 hal@uncertain Fri Feb 14 12:01 14/318 financial status>N 1 rose@texas Mon Feb 17 08:12 21/453 to someone who
&
The first line identifies the version of mail that you are running. The second lineindicates your mailbox, usually located in /var/mail/username, where yourincoming mail is deposited. The third line in this example is the header of the messageyou sent yourself. The “N” at the beginning of the line means that it’s a “new”message. A “U” (unread) means the message was new, but was not read beforequitting the mailx program previously. The information in this screen is discussed ingreater detail in “Reading Messages” on page 86.
Every message is assigned a number as it is received: Rose’s message to herself isshown as message number 1.
To read a message, type an ampersand (&) and the message number at the mailxprompt, as follows:
& mailxMail version 4.0 Thu Jan 16 12:59:09 PST 1992 Type ? for help.“/var/mail/rose”: 1 message 1 new>N 1 rose@texas Fri Jul 14 12:01 21/453 to someone who& 1
To: rose@texasFrom: rose@texasSubject: to someone who really cares
Dear Rose,
From the ends of your fingersTo the tip of your noseYou’re a cool breeze in AugustMy sweet Texas Rose.
See you soon,
Rose
Chapter 7 • Using Mail 85
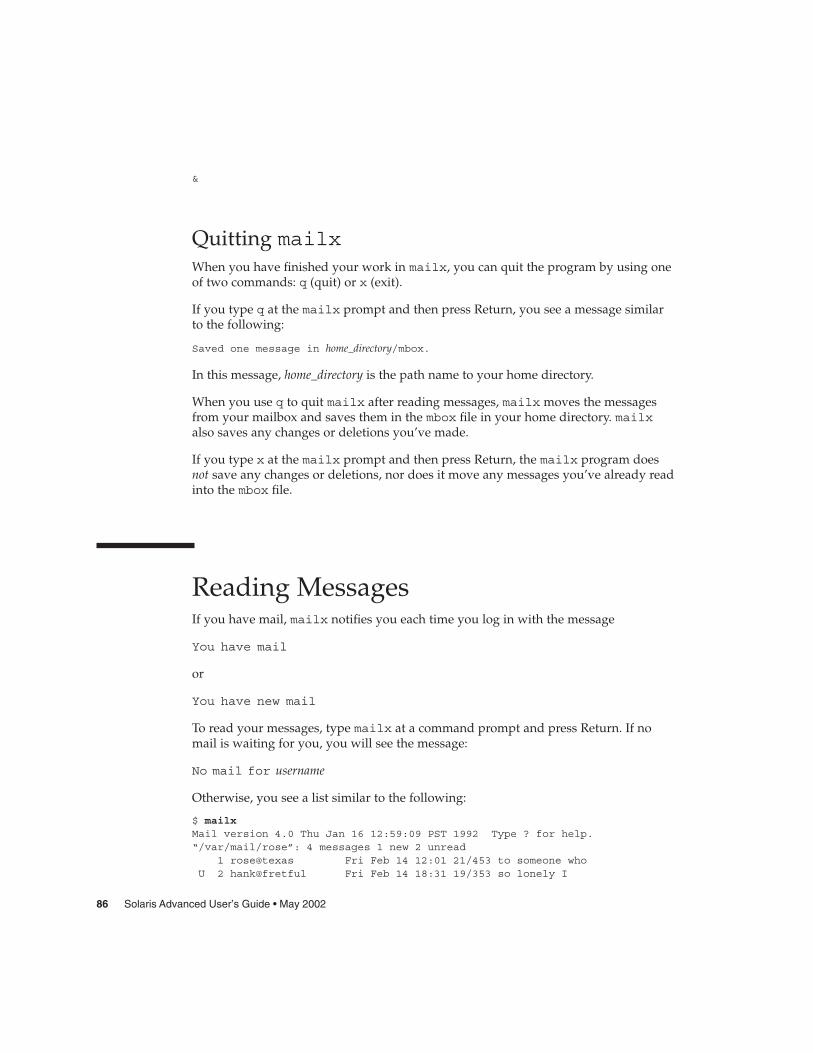
&
Quitting mailxWhen you have finished your work in mailx, you can quit the program by using oneof two commands: q (quit) or x (exit).
If you type q at the mailx prompt and then press Return, you see a message similarto the following:
Saved one message in home_directory/mbox.
In this message, home_directory is the path name to your home directory.
When you use q to quit mailx after reading messages, mailx moves the messagesfrom your mailbox and saves them in the mbox file in your home directory. mailxalso saves any changes or deletions you’ve made.
If you type x at the mailx prompt and then press Return, the mailx program doesnot save any changes or deletions, nor does it move any messages you’ve already readinto the mbox file.
Reading MessagesIf you have mail, mailx notifies you each time you log in with the message
You have mail
or
You have new mail
To read your messages, type mailx at a command prompt and press Return. If nomail is waiting for you, you will see the message:
No mail for username
Otherwise, you see a list similar to the following:
$ mailxMail version 4.0 Thu Jan 16 12:59:09 PST 1992 Type ? for help.“/var/mail/rose”: 4 messages 1 new 2 unread
1 rose@texas Fri Feb 14 12:01 21/453 to someone whoU 2 hank@fretful Fri Feb 14 18:31 19/353 so lonely I
86 Solaris Advanced User’s Guide • May 2002
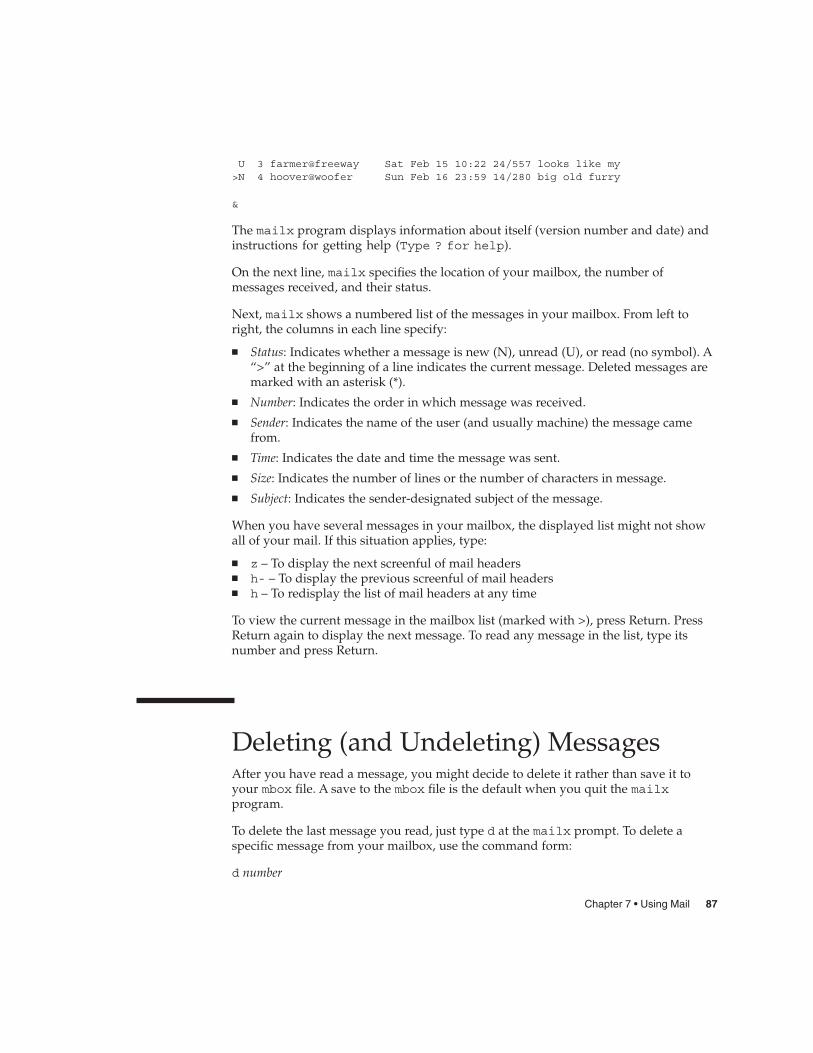
U 3 farmer@freeway Sat Feb 15 10:22 24/557 looks like my>N 4 hoover@woofer Sun Feb 16 23:59 14/280 big old furry
&
The mailx program displays information about itself (version number and date) andinstructions for getting help (Type ? for help).
On the next line, mailx specifies the location of your mailbox, the number ofmessages received, and their status.
Next, mailx shows a numbered list of the messages in your mailbox. From left toright, the columns in each line specify:
� Status: Indicates whether a message is new (N), unread (U), or read (no symbol). A“>” at the beginning of a line indicates the current message. Deleted messages aremarked with an asterisk (*).
� Number: Indicates the order in which message was received.� Sender: Indicates the name of the user (and usually machine) the message came
from.� Time: Indicates the date and time the message was sent.� Size: Indicates the number of lines or the number of characters in message.� Subject: Indicates the sender-designated subject of the message.
When you have several messages in your mailbox, the displayed list might not showall of your mail. If this situation applies, type:
� z – To display the next screenful of mail headers� h- – To display the previous screenful of mail headers� h – To redisplay the list of mail headers at any time
To view the current message in the mailbox list (marked with >), press Return. PressReturn again to display the next message. To read any message in the list, type itsnumber and press Return.
Deleting (and Undeleting) MessagesAfter you have read a message, you might decide to delete it rather than save it toyour mbox file. A save to the mbox file is the default when you quit the mailxprogram.
To delete the last message you read, just type d at the mailx prompt. To delete aspecific message from your mailbox, use the command form:
d number
Chapter 7 • Using Mail 87

For example, to delete the second message, use this command from within mailx:
& d 2
You can also delete several messages at a time. To delete messages 1 and 3, use thecommand:
& d 1 3
To delete a range of messages, for example 1 through 3, use the command:
& d 1-3
Before you quit mailx, you can undelete messages you’ve removed from yourmailbox. Use the command form:
u number
followed by Return. For example, to undelete the second message, use this command:
& u 2
To undo your last deletion, just type u at the mailx prompt immediately after thedeletion. For example, if your last deletion command was d 2-5, type u to undeletemessages 2, 3, 4, and 5.
Note that all deletions are made permanent when you quit mailx with the qcommand. That is, you can no longer undelete messages that have been deleted. Youcan, however, quit mailx with the x command and leave your mailbox intact. Asmentioned previously, if you quit with x you leave read messages marked with a U,deleted messages undeleted, and so forth.
Printing MessagesYou can print a hard copy of a message by piping a message to a printer command. Todo so, use the following command form at a mailx prompt:
|number lp
The | symbol is called a pipe. For example, to print a copy of message 2, type:
& |2 lp
Then press Return. If a message number is not specified, mailx pipes the currentmessage to the printer. For more information on piping, see “Redirecting and PipingCommand Output” on page 22.
88 Solaris Advanced User’s Guide • May 2002
Sending MessagesTo send mail with the mailx program, you need to know the login name(s) of theintended recipient(s) of your message. If an intended recipient is on a differentmachine, you also need to know that user’s machine name. To determine thisinformation, you can use the who, finger, or rusers commands.
Type the who command to list all the users who are currently logged in to the fileserver you are on. The displayed list contains users’ login names, their terminal types,and the date and time they logged in. For example:
$ whoelmer tty15 Feb 20 10:22susan tty04 Feb 20 10:37stormy tty07 Feb 20 11:49
hankw tty06 Feb 20 12:02
Type the finger command to display the same type of information as who with moredetail. The information that appears depends on how your system administrator hasset up this command. As an example, you might see something like the following:
$ fingerLogin Name TTY Idle Whenelmer Elmer Brown tty15 43 Thu 10:22susan Susan Lake tty04 Thu 10:37stormy Stormy Ball tty07 12 Thu 11:49
hankw Hank Wilson tty06 22 Thu 12:02
The rusers command provides information on the users who are currently logged into your local network. Refer to Chapter 9 for instructions on the use of the ruserscommand.
When you have determined the necessary user information, complete the followingsteps to send a message.
1. Type the mailx command, followed by a user’s address:
$ mailx user@machine
In this command, user is the intended recipient’s login name and machine is the nameof the intended recipient’s machine.
� If you’ve already started mailx, you can just type m at the mailx prompt,followed by the intended recipient’s login and machine name:
& m user@machine
� To send the same message to multiple recipients, separate each address with aspace or a comma, for example:
$ mailx hank@fretful sally@dakota tex@twister
Chapter 7 • Using Mail 89
or
$ mailx hank@fretful,sally@dakota,tex@twister
2. When you press Return, the mailx program prompts you for a subject. Type asubject for your message and press Return again.
3. Type the body of your message. To create a new line, press Return.
A sentence that wraps on your screen is not considered a new line until you pressReturn.
Note – Each line of text within your message can be up to 256 characters long. Whenyou exceed this limitation, your screen freezes. If this situation occurs, press Ctrl-C toabort your message.
4. When you have completed your message, press Return to move the cursor to a newline. Then press Ctrl-D to send your message.
Undeliverable MessagesIf you specify an incorrect user address when you send a message, the systemresponds with the message
[email protected] unknown
The message is then returned to your mailbox. The next time you type the mailxcommand, the header states that you have returned mail, similar to the followingexample:
N 1 Mailer-Daemon Fri Jan 3 11:13 8/49 Returned mail: User unknown
When a message cannot be delivered, the file is also copied to a file in your homedirectory named dead.letter.
Canceling an Unsent MessageYou can cancel a message at any time before it is sent by pressing Ctrl-C twice.
Adding Carbon and Blind Carbon CopiesBefore sending a message, you can specify that “carbon copies” be sent to other thanthe main addressees. You can also send “blind carbons.” This specification ensuresthat recipients of your message can read the addresses for the carbon copies, but notthe addresses for the blind carbons.
90 Solaris Advanced User’s Guide • May 2002
Many people send themselves carbons or blind carbons in order to retain a copy fortheir own record.
You can use three methods for sending carbon copies with a message:
� Use a text editor to edit your .mailrc file (in your home directory) and insert thefollowing line:
set askcc
The mailx program now displays the carbon copy prompt (Cc:) after the subjectprompt. Type the addresses of the users you want to receive carbon copies.Separate multiple addresses with spaces.
� When you have typed the body of your message, but before you press Ctrl-D, pressReturn to move to a new line and use the command form:
~c address(es)
To use this method to send carbon copies to multiple recipients, separate theaddresses with spaces. For example:
~c hank@fretful george@lonesome stormy@snoozer
� You can also create a Cc: line with the ~h command, which displays the entireheader of the message. ~h prompts you with To:, Subject:, Cc:, and Bcc:(blind carbon copy) lines, one line at a time. You can fill in blank lines. You can alsoretype filled lines. As with other tilde commands, always use the ~h command on anew line.
Note – ~c, ~h, and other tilde commands are described in “Tilde Commands”on page 100.
Inserting a Copy of a Message or FileYou can insert a copy of any message in your mailbox into the message you’re writing.Likewise, you can insert a copy of any text file.
Inserting a MessageUse the following command form to insert a message.
~m number
In this example, number is the number of the message to be inserted. For example, tosend to another user a message that includes a copy of message number 3 from yourmailbox list, complete the following steps.
1. On a new line, type the command ~m 3, and then press Return.
Chapter 7 • Using Mail 91
mailx displays the following message.
Interpolating: 3 (continue)
2. You do not see the text of message 3, but the recipient will. You can continue tocompose your message after (continue), or you can send it as is.
3. To see the complete message, interpolation included, type the command ~p.
Inserting a FileYou can also insert a copy of any text file into a message. As you are writing amessage, use the following command form.
~r filename
For example, to insert the file outline in the current message, type the followingcommand.
& ~r outline
Replying to a MessageReply to mail at a mailx prompt by typing the following command.
r number
If you omit the message number, mailx replies to the current message.
For example, to reply to the sender of message 2, type the following command.
& r 2
mailx automatically addresses your message and supplies an Re: Subject: linethat echoes the original Subject: line. Send your reply as you would with any othermessage.
R is a variant of the reply command that sends your reply to all recipients of theoriginal message as well as to its sender. Use this command only when absolutelynecessary, to avoid generating “junk mail.”
Note – You can insert a message into your reply as shown in the previous section. Toinsert a copy of the message to which you are replying, type the command ~m withouta message number.
92 Solaris Advanced User’s Guide • May 2002
Saving and Retrieving MessagesIn addition to sending and receiving messages, you might also save and retrieve themfor later use. In mailx you can save messages by appending them to regular text files.You can also append messages to special files called folders. Both methods arediscussed subsequently.
mailx makes a distinction between saving messages and copying them. Savingremoves a message from the mailbox and appends it to a file or folder. Copying leavesa message in the mailbox and appends a copy to a file or folder.
Saving and Copying Messages in FilesTo save a message into a file, use the following command form at the mailx prompt.
s number filename
where number is the number of the message to be saved and filename is the file whereyou want to save the message. For example, to save message 3 into a file called~/notes/finance, you would type:
& s 3 ~/notes/finance
Remember that in a path name, the ~ represents your home directory.
You can also save several messages at once to the same file. For example, to savemessages 3, 5, 6, 7, and 8 to ~/notes/finance, type the following command.
& s 3 5-8 ~/notes/finance
If the file you specify does not exist, mailx creates it. If the file does exist, mailxappends the message you are saving to the end of the file.
Saving a file removes it from your mailbox. mailx displays an asterisk (*) next to theheader of any message than has been saved.
To leave the message in your mailbox while appending it to another file, use the copycommand, as follows:
& c 3 ~/notes/finance
Saving and Copying Messages in FoldersYou can avoid typing full path names to files if you save or copy messages to mailfolders. Folders are special files that are stored in a folder directory.
Chapter 7 • Using Mail 93
The advantage of saving or copying messages to folders is that your messages areautomatically stored in the same directory, where they are easily accessible withouttyping long path names.
Setting the Folder DirectoryTo use folders, you must first set up a folder directory. Follow these steps to set up afolder directory.
1. Create a directory by using the mkdir command.
For example, if you wanted your folder directory to be called Messages, youwould first create the directory:
$ mkdir Messages
2. Edit the .mailrc file in your home directory (which contains mailx options) toset the folder directory path.
Edit the folder variable to include the full path name of your newly createdfolder directory. For example:
set folder=/home/austin/rose/Messages
Or use the C shell shortcut ~ to specify your home directory.
set folder=~/Messages
Now your folder directory is set to receive messages that are saved in folders. Thechange to the .mailrc file becomes effective the next time you start mailx.
Designating FoldersYou use the same commands to save or copy messages into folders as into files, exceptthat the folder name is preceded by a plus sign (+) instead of a path name. The + tellsmailx that the folder is to be kept in the folder directory (Messages).
For example, to save message 3 to a folder called projects, type:
& s 3 +projects
mailx interprets this command as “save message 3 into ~/Messages/projects.” Ifthe folder doesn’t already exist, mailx creates it.
Copy the message into a folder by typing:
& c 3 +projects
94 Solaris Advanced User’s Guide • May 2002

Sending a Message Directly to a File or FolderYou can send copies of your messages directly to one of your files or folders. To send acopy to a folder, simply type the folder name in either the Cc: or the Bcc: field. Sendinga copy to a file is similar, but you must include the full path name.
Reading Messages in Files and FoldersTo read messages that are saved in a file, use the command form:
mailx -f filename
In the previous example, you would read the file ~/memos/finance by typing:
$ mailx -f ~/memos/finance
You can read messages that are saved in a folder with a similar command—just usethe + instead of a path name. For example, to read the messages in the folderprojects, you would type:
$ mailx -f +projects
This command starts mailx in the file or folder that you have designated. Onlyheaders for the messages in the file or folder are displayed. Select a message to read bytyping its number at the mailx prompt, and then press Return.
You can also work on mail folders within the mailx program. To see a list of yourfolders, type this command at a mailx prompt:
& folders
To switch from your mailbox to a folder, use the command form:
& folder +foldername
To return to your mailbox, type this command at a mailx prompt:
& %
To return to the previous folder, type:
& #
Chapter 7 • Using Mail 95
Using vi With mailxYou can use the vi text editor to compose messages while you run mailx. vi enablesyou to correct mistakes and add and delete text before you send your messages. If youare not already familiar with using vi, refer to Chapter 6 for instructions.
In the mailx program, you can use the standard vi commands for inserting, deleting,and changing text.
To write a message with vi:
1. Type the mailx command with an address at either the mailx prompt (&) or thecommand prompt ($).
2. Type the subject at the Subject: line. Press Return.
3. Start vi by typing the command ~v on a new line.
The vi screen appears, representing an empty file in your /tmp directory.
4. Use vi commands to type and edit the body of your message.
5. When you are finished, quit vi with the command :wq or ZZ.
After you quit vi, mailx displays the (continue): message. You can either add tothe message (outside vi) or send the message by pressing Ctrl-D.
Mail AliasesA mail alias is a selection of user names that are grouped under a single name.
Use mail aliases when you want to send messages to the same group of people overand over. For example, if you occassionally send mail to hank@fretful,george@lonesome, and sally@dakota, you could create a mail alias calledamigos. Then, each time you sent mail to amigos, all three people would receive it.
Two locations where you can set up mail aliases are:
� Your .mailrc file� The /etc/aliases file
Mail aliases that are set up in .mailrc behave differently from mail aliases set up in/etc/aliases. These differences are summarized in Table 7-1 at the end of thissection.
96 Solaris Advanced User’s Guide • May 2002
Setting Up Mail Aliases in .mailrcNote the following about setting up mail aliases in .mailrc:
� Mail aliases in .mailrc are private. That is, only you can use them. For example, ifyou set up a mail alias called amigos in .mailrc and another user tries to sendmail to amigos, he receives an unknown user error message.
� When the mail is sent, .mailrc aliases are automatically expanded to showeveryone on the mail alias. For example, if you send mail to amigos, your mailarrives as though you had typed everyone’s names as recipients. The recipients donot know that you used a mail alias to send the mail.
.mailrc is located in your home directory. This file contains several settings thatcontrol the behavior of mailx and Mail Tool.
To add a mail alias to .mailrc, type:
$ vi ~/.mailrc
Note – You can use any text editor to edit the .mailrc file. The previous exampleshows the method for using the vi editor to edit the file. If you are not alreadyfamiliar with vi, refer to Chapter 6 for instructions.
Each mail alias is contained on one line of the file. That is, the line can visually “wraparound” to another line, but it cannot contain carriage returns. Each mail alias shouldcontain the following, separated by spaces:
� The word “alias”� The name of the mail alias (must be one word)� The recipients (logins and machine names) in the mail alias, separated by spaces
The following example shows two mail aliases. The first alias (amigos) contains threepeople. The second alias (softball) contains eight. Notice in softball how thenames are visually wrapped around on the screen. This is fine, as long as no carriagereturns are used.
alias amigos hank@fretful george@lonesome sally@dakotaalias softball earl@woofer tex@twister elmer@farmhouse
jane@freeway hank@fretful jj@walker sally@dakota steve@hardway
To send mail to people on a .mailrc alias, address the mail to the mail alias name.Do not include your machine name. Suppose that you sent the following message:
$ mail amigosSubject: Let’s eat
Hey Compadres. How aboutgetting together for lunch on Friday?
Anyone interested?
Chapter 7 • Using Mail 97
The recipients would see the following (note the expanded To: line):
To: hank@fretful george@lonesome sally@dakotaSubject: Let’s eat
Hey Compadres. How about getting together for lunch on Friday?
Anyone interested?
Setting Up Mail Aliases in /etc/aliasesNote the following about setting up mail aliases in /etc/aliases:
� Mail aliases in /etc/aliases are public. This means that if you set up a mail aliascalled softball, anyone can send to softball@your-machinename and make useof the mail alias.
� When the mail is sent, /etc/aliases mail aliases are not expanded. For example,if you send mail to softball@machinename, that’s how the mail reads when it isreceived. The recipients know what the mail alias is, but not necessarily who else ison it.
The format of mail aliases that are created in /etc/aliases is somewhat differentfrom those in .mailrc. Each /etc/aliases alias should use the following format:
� The name of the mail alias, followed by a colon (:)� The recipients (logins and machine names), separated by commas. Note that the
mail alias does not have to be on a single line.
To modify your /etc/aliases file, you must first become root. If root is passwordprotected, you’ll need to know the root password.
Type the following to become the root user on the system:
$ suPassword:
#
Notice that the command prompt changes when you become root.
The following example shows how the alias softball@texas is added to the default/etc/aliases file.
# vi /etc/aliases###Aliases can have any mix of upper and lower case on the left-#hand side,#but the right-hand side should be proper case (usually lower)## >>>>>>>>>>The program “newaliases” will need to be run after# >> NOTE >>this file is updated for any changes to# >>>>>>>>>>show through to sendmail.#
98 Solaris Advanced User’s Guide • May 2002
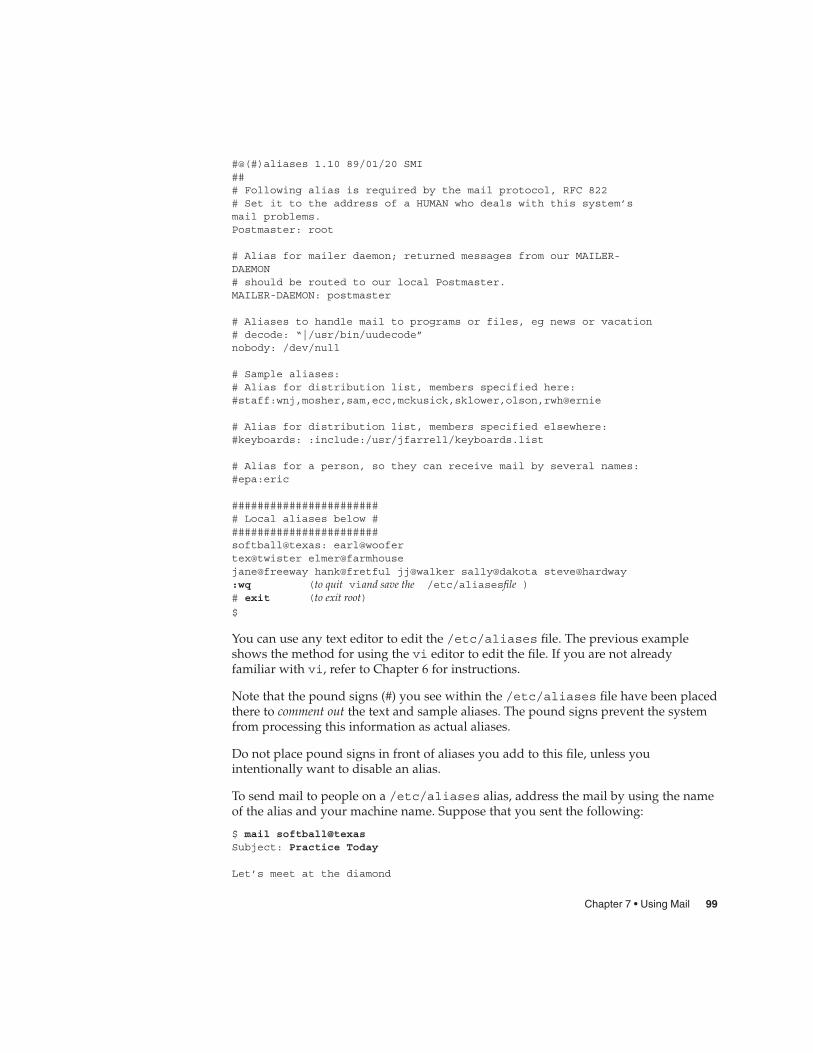
#@(#)aliases 1.10 89/01/20 SMI### Following alias is required by the mail protocol, RFC 822# Set it to the address of a HUMAN who deals with this system’smail problems.Postmaster: root
# Alias for mailer daemon; returned messages from our MAILER-DAEMON# should be routed to our local Postmaster.MAILER-DAEMON: postmaster
# Aliases to handle mail to programs or files, eg news or vacation# decode: “|/usr/bin/uudecode”nobody: /dev/null
# Sample aliases:# Alias for distribution list, members specified here:#staff:wnj,mosher,sam,ecc,mckusick,sklower,olson,rwh@ernie
# Alias for distribution list, members specified elsewhere:#keyboards: :include:/usr/jfarrell/keyboards.list
# Alias for a person, so they can receive mail by several names:#epa:eric
######################## Local aliases below ########################softball@texas: earl@woofertex@twister elmer@farmhousejane@freeway hank@fretful jj@walker sally@dakota steve@hardway:wq (to quit viand save the /etc/aliasesfile )# exit (to exit root)$
You can use any text editor to edit the /etc/aliases file. The previous exampleshows the method for using the vi editor to edit the file. If you are not alreadyfamiliar with vi, refer to Chapter 6 for instructions.
Note that the pound signs (#) you see within the /etc/aliases file have been placedthere to comment out the text and sample aliases. The pound signs prevent the systemfrom processing this information as actual aliases.
Do not place pound signs in front of aliases you add to this file, unless youintentionally want to disable an alias.
To send mail to people on a /etc/aliases alias, address the mail by using the nameof the alias and your machine name. Suppose that you sent the following:
$ mail softball@texasSubject: Practice Today
Let’s meet at the diamond
Chapter 7 • Using Mail 99
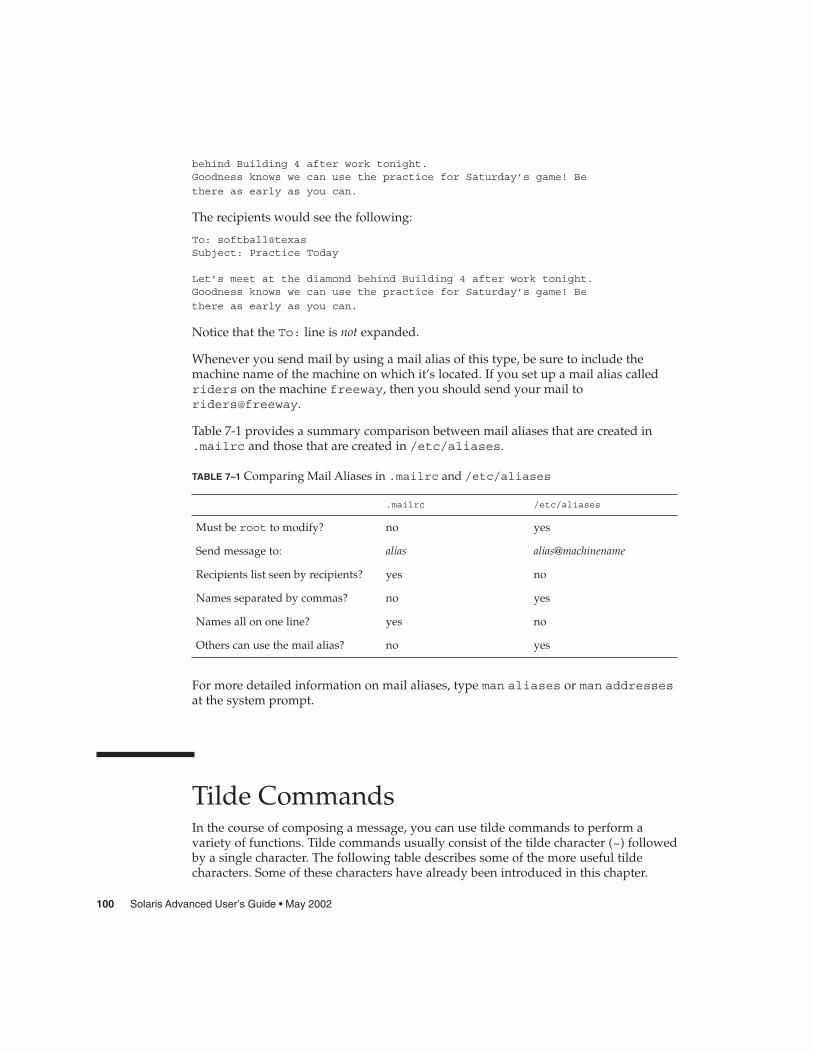
behind Building 4 after work tonight.Goodness knows we can use the practice for Saturday’s game! Be
there as early as you can.
The recipients would see the following:
To: softball@texasSubject: Practice Today
Let’s meet at the diamond behind Building 4 after work tonight.Goodness knows we can use the practice for Saturday’s game! Be
there as early as you can.
Notice that the To: line is not expanded.
Whenever you send mail by using a mail alias of this type, be sure to include themachine name of the machine on which it’s located. If you set up a mail alias calledriders on the machine freeway, then you should send your mail toriders@freeway.
Table 7-1 provides a summary comparison between mail aliases that are created in.mailrc and those that are created in /etc/aliases.
TABLE 7–1 Comparing Mail Aliases in .mailrc and /etc/aliases
.mailrc /etc/aliases
Must be root to modify? no yes
Send message to: alias alias@machinename
Recipients list seen by recipients? yes no
Names separated by commas? no yes
Names all on one line? yes no
Others can use the mail alias? no yes
For more detailed information on mail aliases, type man aliases or man addressesat the system prompt.
Tilde CommandsIn the course of composing a message, you can use tilde commands to perform avariety of functions. Tilde commands usually consist of the tilde character (~) followedby a single character. The following table describes some of the more useful tildecharacters. Some of these characters have already been introduced in this chapter.
100 Solaris Advanced User’s Guide • May 2002
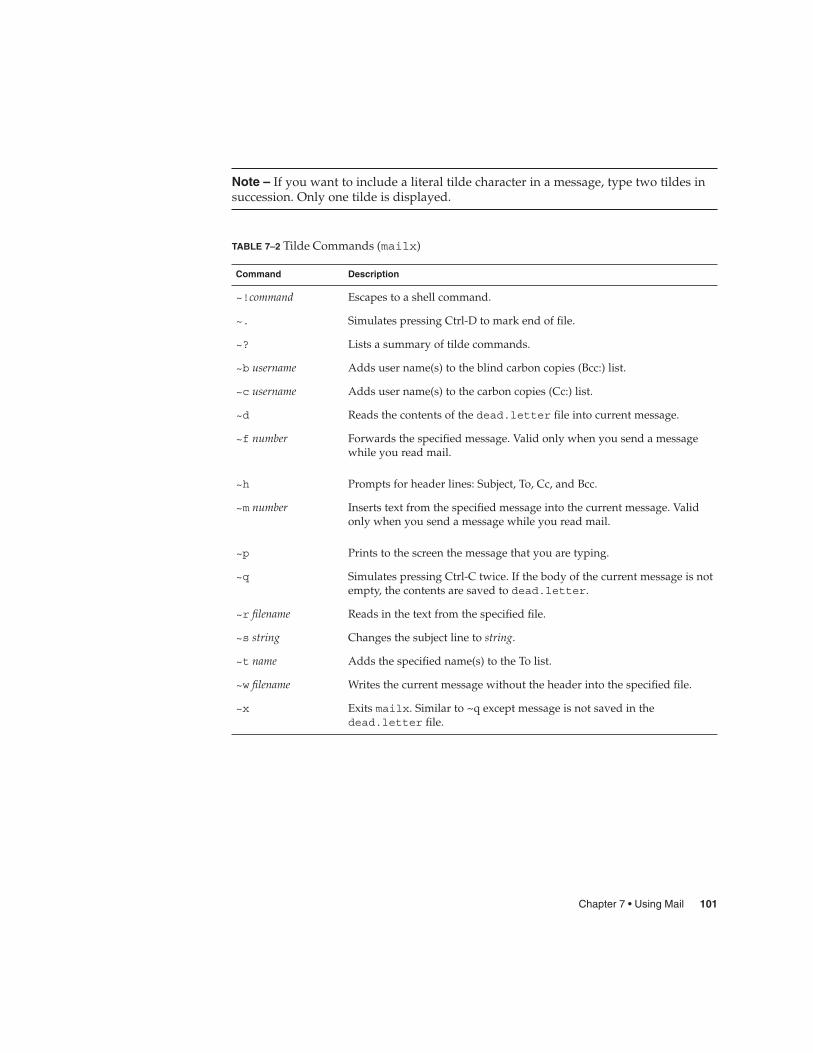
Note – If you want to include a literal tilde character in a message, type two tildes insuccession. Only one tilde is displayed.
TABLE 7–2 Tilde Commands (mailx)
Command Description
~!command Escapes to a shell command.
~. Simulates pressing Ctrl-D to mark end of file.
~? Lists a summary of tilde commands.
~b username Adds user name(s) to the blind carbon copies (Bcc:) list.
~c username Adds user name(s) to the carbon copies (Cc:) list.
~d Reads the contents of the dead.letter file into current message.
~f number Forwards the specified message. Valid only when you send a messagewhile you read mail.
~h Prompts for header lines: Subject, To, Cc, and Bcc.
~m number Inserts text from the specified message into the current message. Validonly when you send a message while you read mail.
~p Prints to the screen the message that you are typing.
~q Simulates pressing Ctrl-C twice. If the body of the current message is notempty, the contents are saved to dead.letter.
~r filename Reads in the text from the specified file.
~s string Changes the subject line to string.
~t name Adds the specified name(s) to the To list.
~w filename Writes the current message without the header into the specified file.
~x Exits mailx. Similar to ~q except message is not saved in thedead.letter file.
Chapter 7 • Using Mail 101

Getting Help: Other mailx Commandsmailx has two help commands that display lists of commands and functions. Whenin command mode, you can type ? at the mailx prompt (&) to see a list of commandsused in that mode. Similarly, when in input mode (for example, when writing amessage), you can use the equivalent command, ~? to view a list of tilde commands(also called “tilde escapes”).
The man pages contain extensive information on mailx in more technical form. To seethis entry, type the command:
$ man mailx
For more information, refer to the man Pages(1): User Commands.
102 Solaris Advanced User’s Guide • May 2002
CHAPTER 8
Using Printers
The line printer subsystem (LP) print service provides the printing tools that are usedin the Solaris operating environment. LP provides a wide variety of functions, many ofwhich are not within the scope of this manual. This chapter provides the proceduresnecessary for you to perform the following basic printing tasks with the LP printservice:
� “Submitting Print Requests” on page 103� “Determining Printer Status” on page 106� “Canceling a Print Request” on page 109
See System Administration Guide: Advanced Administration for a complete description ofthe LP print service.
Submitting Print RequestsTo print a file from the command prompt, use the lp command to send a request tothe printer to print that file. When a request is made, the LP print service places it inthe queue for the printer, displays the request ID number, and then redisplays the shellprompt.
Submitting Print Requests to the Default PrinterWhen your system administrator sets up the LP print service with a default printer,you can submit print requests without typing the name of the printer by typing thefollowing command.
$ lp filename
In the previous example, filename is the name of the file you want to print.
103
The specified file is placed in the print queue of the default printer, and the request id isdisplayed.
For example, to print the /etc/profile file, type the following command.
$ lp /etc/profilerequest id is jetprint-1 (1 file)
$
See System Administration Guide: Advanced Administration for information on how tospecify a default printer.
Submitting Print Requests Using a Printer NameWhether or not a default printer has been designated for your system, you can submitprint requests to any printer that is configured for your system. To submit a printrequest to a specific printer, type the following command.
$ lp -d printername filename
In the previous example, printername is the name of the specific printer and filename isthe name of the file you want to print.
The specified file is placed in the print queue of the destination printer, and therequest id is displayed.
For example, to print the /etc/profile file on the printer fastprint, type thefollowing command.
$ lp -d fastprint /etc/profilerequest id is fastprint-1 (1 file(s))
$
If you submit a request to a printer that is not configured on your system, aninformation message is displayed, as shown in the following example.
$ lp -d newprint /etc/profilenewprint: unknown printer
$
See System Administration Guide: Advanced Administration for information onconfiguring printers. See “Determining Printer Status” on page 106 for informationabout how to find out which printers are available on your system.
104 Solaris Advanced User’s Guide • May 2002
Requesting Notification When Printing IsCompleteWhen you submit a large file for printing, you might want the LP print service tonotify you when printing is complete. You can request that the LP print service notifyyou in two ways:
� Send an email message� Write a message to your console window
To request email notification, use the -m option when you submit the print request.
$ lp -m filename
To request a message be written to your console window, use the -w option when yousubmit the print request.
$ lp -w filename
In the previous example, filename is the name of the file you want to print.
Printing Multiple CopiesYou can use the -n option to the lp command to print more than one copy of a file.
Use the following command syntax to request multiple printed copies.
$ lp -n number filename
In the previous example, number is the desired number of copies and filename is thename of the file you are printing. The print request is considered as one print job, andonly one header page is printed.
For example, to print four copies of the /etc/profile file, type the followingcommand.
$ lp -n4 /etc/profilerequest id is jetprint-5 (1 file)
$
Summary Table of lp OptionsYou can use options to the lp command to customize your print request. Table 8–1summarizes the frequently used options for the lp command. You can use theseoptions individually or combine them in any order on the command line. When youcombine options, use a space between each option and repeat the dash (-).
For example, to specify a destination printer, request email notification, and print sixcopies of a file, type the following command.
Chapter 8 • Using Printers 105
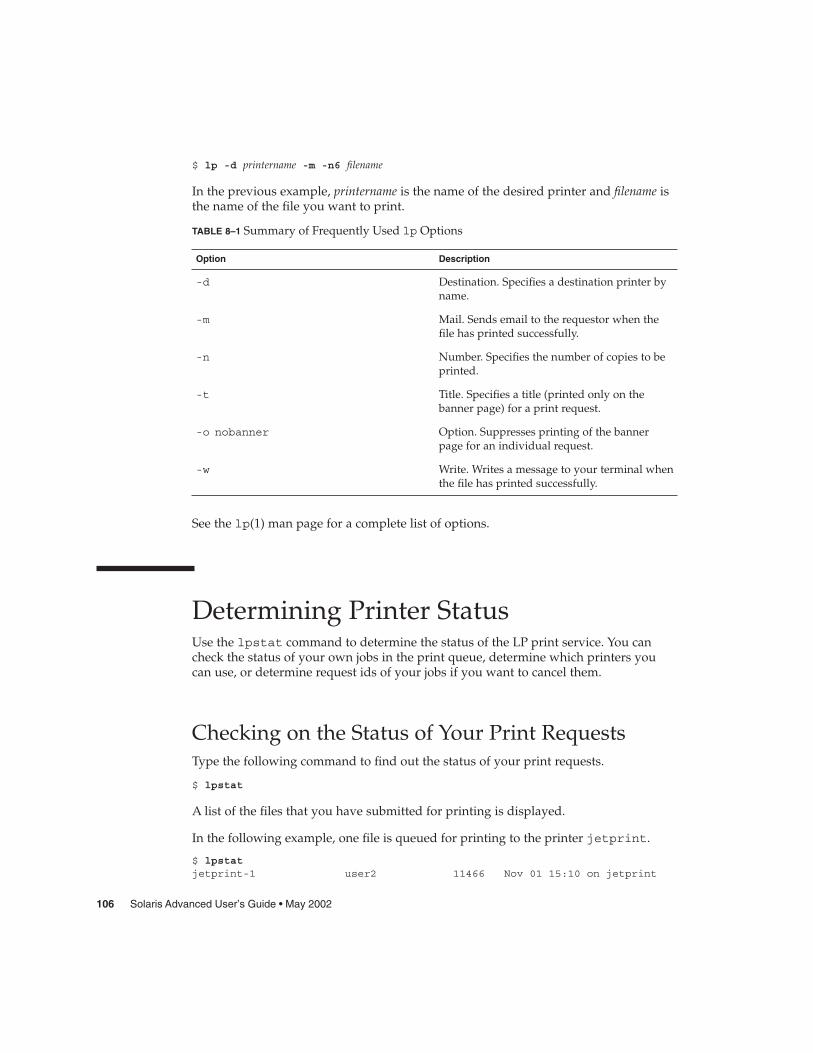
$ lp -d printername -m -n6 filename
In the previous example, printername is the name of the desired printer and filename isthe name of the file you want to print.
TABLE 8–1 Summary of Frequently Used lp Options
Option Description
-d Destination. Specifies a destination printer byname.
-m Mail. Sends email to the requestor when thefile has printed successfully.
-n Number. Specifies the number of copies to beprinted.
-t Title. Specifies a title (printed only on thebanner page) for a print request.
-o nobanner Option. Suppresses printing of the bannerpage for an individual request.
-w Write. Writes a message to your terminal whenthe file has printed successfully.
See the lp(1) man page for a complete list of options.
Determining Printer StatusUse the lpstat command to determine the status of the LP print service. You cancheck the status of your own jobs in the print queue, determine which printers youcan use, or determine request ids of your jobs if you want to cancel them.
Checking on the Status of Your Print RequestsType the following command to find out the status of your print requests.
$ lpstat
A list of the files that you have submitted for printing is displayed.
In the following example, one file is queued for printing to the printer jetprint.
$ lpstatjetprint-1 user2 11466 Nov 01 15:10 on jetprint
106 Solaris Advanced User’s Guide • May 2002
$
The lpstat command displays one line for each print job, showing the request id,followed by the user who spooled the request, the output size in bytes, and the dateand time of the request.
Checking Available PrintersTo find out which printers are configured on your system, type the followingcommand.
$ lpstat -s
The status of the scheduler is displayed, followed by the default destination and a listof the systems and printers you can use.
In the following example, the scheduler is running, the default printer is jetprint,and the print server for the jetprint and fastprint printers is prtsrv1.
$ lpstat -sscheduler is runningsystem default destination: jetprintsystem for jetprint: prtsrv1system for fastprint: prtsrv1
$
Displaying All Status InformationThe -t option for lpstat gives you a complete listing of the status of the LP printservice.
To display a complete listing of all status information, type the following command.
$ lpstat -t
The system displays all available status information.
In the following example, no jobs are in the print queue. When files are spooled forprinting, the status of those print requests is also displayed.
$ lpstat -tscheduler is runningsystem default destination: jetprintsystem for jetprint: prtsrv1system for fastprint: prtsrv1
jetprint accepting requests since Wed Nov 1 15:09:29 MST 2000fastprint accepting requests since Wed Nov 1 15:09:47 MST 2000printer fastprint is idle. enabled since Wed Nov 1 15:09:46 MST 2000.
Chapter 8 • Using Printers 107
jetprint-1 user2 11466 Nov 01 15:10 on jetprint
$
Displaying Status for PrintersYou can use the -p to the lpstat command to request printer status information forindividual printers. This option shows whether the printer is active or idle, when theprinter was enabled or disabled, and whether the printer is available to accept printrequests.
To request status for all printers on a system, type the following command.
$ lpstat -p
In the following example, two printers are idle, enabled, and available.
$ lpstat -pprinter jetprint is idle. enabled since Wed Nov 1 15:09:28 MST 2000.
available.printer fastprint is idle. enabled since Wed Nov 1 15:09:46 MST 2000.
available.
$
If one of those printers had jobs in the print queue, those jobs would also bedisplayed.
To request status for an individual printer by name, type the following command.
$ lpstat -p printername
In this example, printername is the name of the specific printer.
Summary Table of lpstat OptionsYou can use the lpstat command to request different types of printing statusinformation. Table 8–2 summarizes the frequently used options for the lpstatcommand. Use these options individually, or combine them in any order on thecommand line. When you combine options, use a space between each option andrepeat the dash (-).
TABLE 8–2 Summary of Frequently Used lpstat Options
Option Description
-a Accept. Show whether print destinations are accepting requests.
-c Class. Show classes and their members.
108 Solaris Advanced User’s Guide • May 2002
TABLE 8–2 Summary of Frequently Used lpstat Options (Continued)Option Description
-d Destination. Show default destination.
-f Forms. Show forms.
-o Output. Show status of print requests.
-p [list][-D][-l} Printer/Description/Long list. Show status of printers.
-r Request. Request scheduler status.
-R Show position of job in the queue.
-s Status. Show status summary.
-S Sets. Show character sets.
-u [username] User. Show requests by user.
-v Show devices.
See the lpstat(1) man page for a complete list of options.
Canceling a Print RequestUse the cancel command to cancel a print request while it is in the queue or while itis printing. To cancel a request, you need to know the print request id. The request idalways includes the name of the printer, a dash, and the number of the print request.When you submit the print request, the request id is displayed. If you do notremember your request id, type lpstat -o and press Return. Only the user whosubmitted the request, or someone logged in as root or lp can cancel a print request.
Canceling a Print Request by ID NumberTo cancel a print request, type the following command.
$ cancel request_id
In the previous example, request_id is the request id number of the desired printrequest.
A message informs you that the request is cancelled. The next job in the queue beginsprinting.
In the following example two print requests are canceled.
Chapter 8 • Using Printers 109
$ cancel jetprint-6 fastprint-5jetprint-6: cancelledfastprint-5: cancelled
$
Canceling a Print Request by Printer NameYou can also cancel just the job that is currently printing (if you submitted it) bytyping the printer name in place of the request id.
$ cancel printername
In the previous example, printername is the name of the printer to which you sent therequest.
A message informs you that the request is canceled. The next job in the queue beginsprinting
In the following example, the current print request has been canceled.
$ cancel jetprintjetprint7: cancelled
$
Your system administrator can log in as root or lp and cancel the currently printingrequest by using the printer name as the argument for the cancel command.
110 Solaris Advanced User’s Guide • May 2002
CHAPTER 9
Using the Network
A network is a group of computers set up to communicate with one another. Whenyour machine is part of a network, you have the opportunity to use the resources ofother machines on the network while remaining logged in to your own machine. Youcan log in to other machines or you can execute remote commands that affect othermachines from your own workstation.
This chapter describes the following topics.
� “Networking Concepts” on page 111� “Logging In Remotely (rlogin)” on page 112� “Copying Files Remotely (rcp)” on page 115� “Executing Commands Remotely (rsh)” on page 116� “Viewing User Information (rusers)” on page 117� “Running Networked Applications” on page 118
If your machine is not currently attached to a network, the information presented heremight not be relevant to your situation. However, it might be valuable for you toreview this information to get an overall view of the benefits that networking canprovide.
Networking ConceptsA network connection between machines enables these systems to transmitinformation to one another. The following list describes the more common networktypes.
� Local area network (LAN) — A network that ranges over a small area, generallyless than a few thousand feet
� Wide area network (WAN) — A large network that can span thousands of miles� Campus area network (CAN) — An intermediately sized network
111
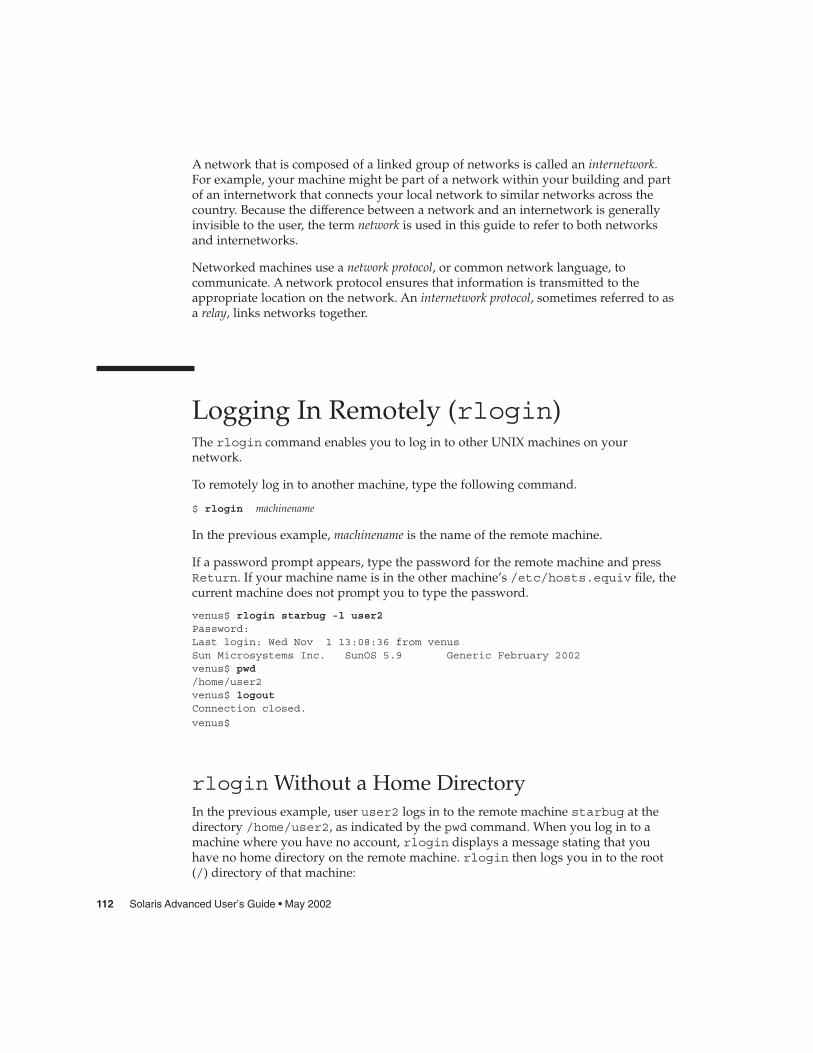
A network that is composed of a linked group of networks is called an internetwork.For example, your machine might be part of a network within your building and partof an internetwork that connects your local network to similar networks across thecountry. Because the difference between a network and an internetwork is generallyinvisible to the user, the term network is used in this guide to refer to both networksand internetworks.
Networked machines use a network protocol, or common network language, tocommunicate. A network protocol ensures that information is transmitted to theappropriate location on the network. An internetwork protocol, sometimes referred to asa relay, links networks together.
Logging In Remotely (rlogin)The rlogin command enables you to log in to other UNIX machines on yournetwork.
To remotely log in to another machine, type the following command.
$ rlogin machinename
In the previous example, machinename is the name of the remote machine.
If a password prompt appears, type the password for the remote machine and pressReturn. If your machine name is in the other machine’s /etc/hosts.equiv file, thecurrent machine does not prompt you to type the password.
venus$ rlogin starbug -l user2Password:Last login: Wed Nov 1 13:08:36 from venusSun Microsystems Inc. SunOS 5.9 Generic February 2002venus$ pwd/home/user2venus$ logoutConnection closed.
venus$
rlogin Without a Home DirectoryIn the previous example, user user2 logs in to the remote machine starbug at thedirectory /home/user2, as indicated by the pwd command. When you log in to amachine where you have no account, rlogin displays a message stating that youhave no home directory on the remote machine. rlogin then logs you in to the root(/) directory of that machine:
112 Solaris Advanced User’s Guide • May 2002
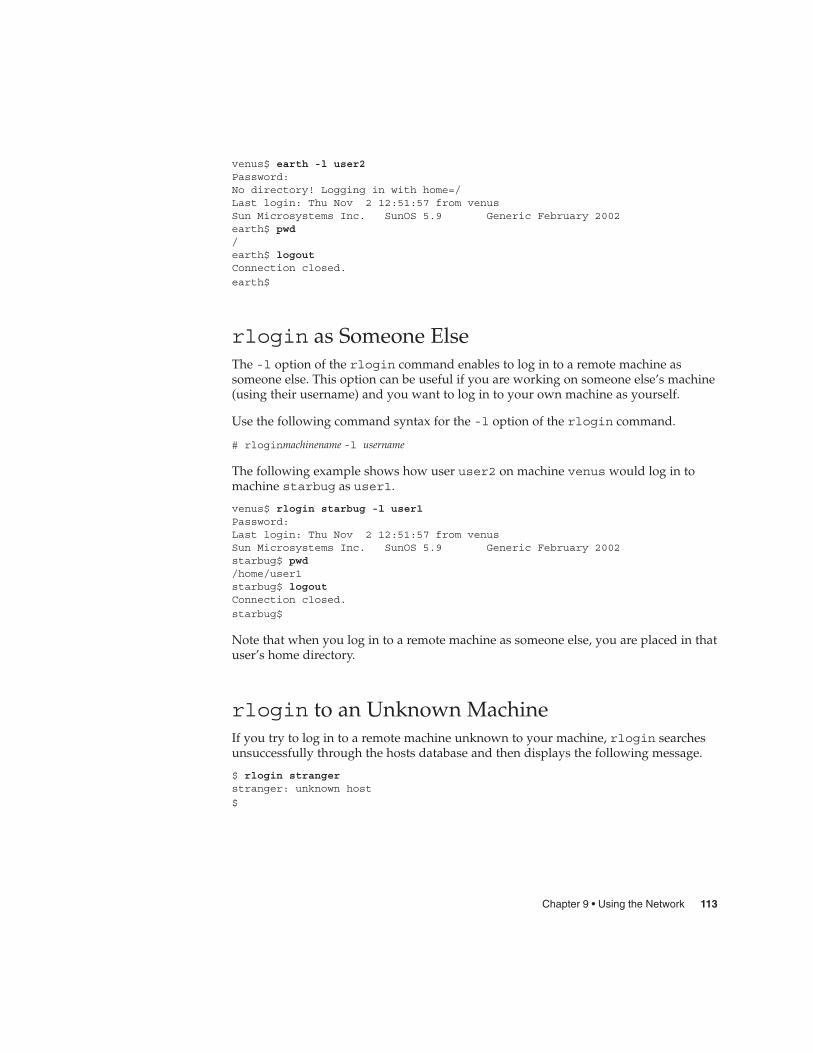
venus$ earth -l user2Password:No directory! Logging in with home=/Last login: Thu Nov 2 12:51:57 from venusSun Microsystems Inc. SunOS 5.9 Generic February 2002earth$ pwd/earth$ logoutConnection closed.
earth$
rlogin as Someone ElseThe -l option of the rlogin command enables to log in to a remote machine assomeone else. This option can be useful if you are working on someone else’s machine(using their username) and you want to log in to your own machine as yourself.
Use the following command syntax for the -l option of the rlogin command.
# rloginmachinename -l username
The following example shows how user user2 on machine venus would log in tomachine starbug as user1.
venus$ rlogin starbug -l user1Password:Last login: Thu Nov 2 12:51:57 from venusSun Microsystems Inc. SunOS 5.9 Generic February 2002starbug$ pwd/home/user1starbug$ logoutConnection closed.
starbug$
Note that when you log in to a remote machine as someone else, you are placed in thatuser’s home directory.
rlogin to an Unknown MachineIf you try to log in to a remote machine unknown to your machine, rlogin searchesunsuccessfully through the hosts database and then displays the following message.
$ rlogin strangerstranger: unknown host
$
Chapter 9 • Using the Network 113
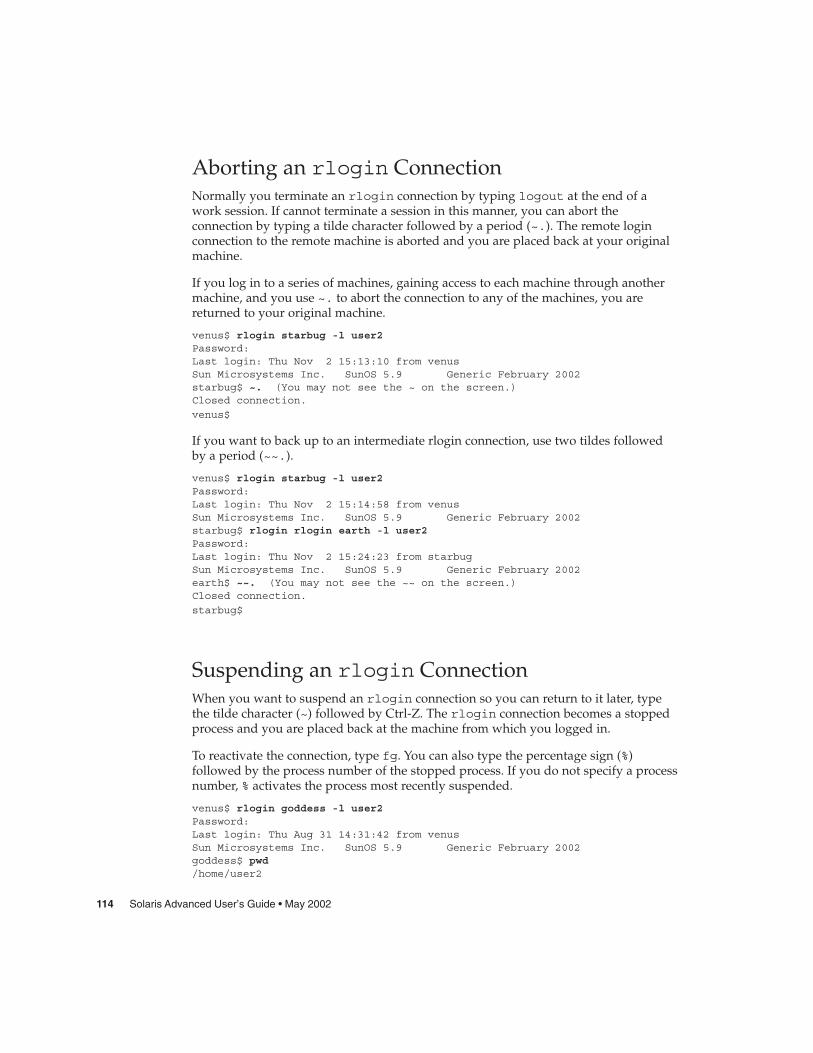
Aborting an rlogin ConnectionNormally you terminate an rlogin connection by typing logout at the end of awork session. If cannot terminate a session in this manner, you can abort theconnection by typing a tilde character followed by a period (~.). The remote loginconnection to the remote machine is aborted and you are placed back at your originalmachine.
If you log in to a series of machines, gaining access to each machine through anothermachine, and you use ~. to abort the connection to any of the machines, you arereturned to your original machine.
venus$ rlogin starbug -l user2Password:Last login: Thu Nov 2 15:13:10 from venusSun Microsystems Inc. SunOS 5.9 Generic February 2002starbug$ ~. (You may not see the ~ on the screen.)Closed connection.
venus$
If you want to back up to an intermediate rlogin connection, use two tildes followedby a period (~~.).
venus$ rlogin starbug -l user2Password:Last login: Thu Nov 2 15:14:58 from venusSun Microsystems Inc. SunOS 5.9 Generic February 2002starbug$ rlogin rlogin earth -l user2Password:Last login: Thu Nov 2 15:24:23 from starbugSun Microsystems Inc. SunOS 5.9 Generic February 2002earth$ ~~. (You may not see the ~~ on the screen.)Closed connection.
starbug$
Suspending an rlogin ConnectionWhen you want to suspend an rlogin connection so you can return to it later, typethe tilde character (~) followed by Ctrl-Z. The rlogin connection becomes a stoppedprocess and you are placed back at the machine from which you logged in.
To reactivate the connection, type fg. You can also type the percentage sign (%)followed by the process number of the stopped process. If you do not specify a processnumber, % activates the process most recently suspended.
venus$ rlogin goddess -l user2Password:Last login: Thu Aug 31 14:31:42 from venusSun Microsystems Inc. SunOS 5.9 Generic February 2002goddess$ pwd/home/user2
114 Solaris Advanced User’s Guide • May 2002
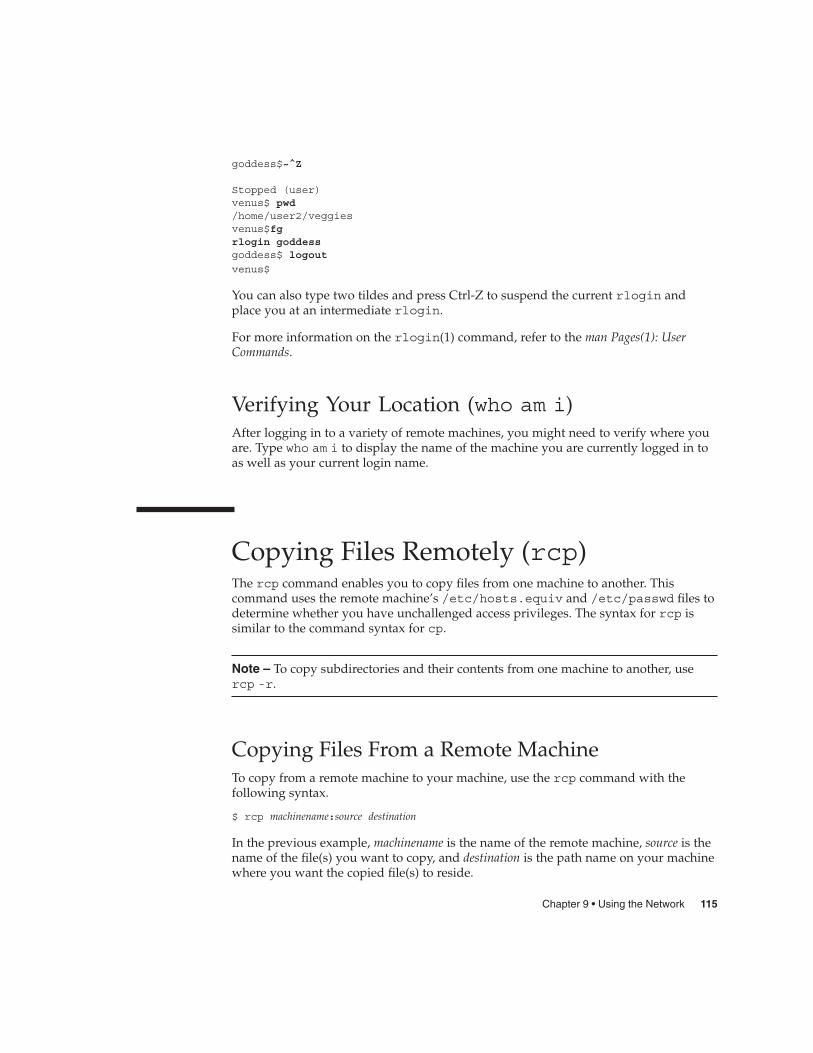
goddess$~^Z
Stopped (user)venus$ pwd/home/user2/veggiesvenus$fgrlogin goddessgoddess$ logout
venus$
You can also type two tildes and press Ctrl-Z to suspend the current rlogin andplace you at an intermediate rlogin.
For more information on the rlogin(1) command, refer to the man Pages(1): UserCommands.
Verifying Your Location (who am i)After logging in to a variety of remote machines, you might need to verify where youare. Type who am i to display the name of the machine you are currently logged in toas well as your current login name.
Copying Files Remotely (rcp)The rcp command enables you to copy files from one machine to another. Thiscommand uses the remote machine’s /etc/hosts.equiv and /etc/passwd files todetermine whether you have unchallenged access privileges. The syntax for rcp issimilar to the command syntax for cp.
Note – To copy subdirectories and their contents from one machine to another, usercp -r.
Copying Files From a Remote MachineTo copy from a remote machine to your machine, use the rcp command with thefollowing syntax.
$ rcp machinename:source destination
In the previous example, machinename is the name of the remote machine, source is thename of the file(s) you want to copy, and destination is the path name on your machinewhere you want the copied file(s) to reside.
Chapter 9 • Using the Network 115
The following example illustrates how to copy the file /etc/hosts from the remotemachine starbug to the /tmp directory on the local machine venus.
venus$ rcp starbug:/etc/hosts /tmp
You can also combine various abbreviations and syntaxes when using rcp. Forexample, to copy all of the files ending in .doc from user hank’s home directory onremote machine fretful to the current directory on local machine venus, type thefollowing command.
venus$ rcp fretful:~hank/*.doc .
venus$
Copying Files From Your Machine to AnotherTo copy files from your local machine to a remote machine, use the followingcommand syntax.
$ rcp source machinename:destination
In the previous example, source is the file(s) you want to copy, machinename is the nameof the remote machine, and destination is the path name on the remote machine whereyou want the copied file(s) to reside.
The following example illustrates how to copy the file newhosts from your /tmpdirectory to the /tmp directory on the remote machine starbug.
venus$ cd /tmpvenus$ rcp newhosts starbug:/tmp
venus$
For more information on the rcp(1) command and its options, refer to the manPages(1): User Commands.
Executing Commands Remotely (rsh)The rsh command (for remote shell) enables you to execute a single command on aremote machine without having to log in to the remote machine. If you know you onlywant to do one thing on a remote machine, rsh enables you to quickly execute onecommand on a remote machine.
To execute a command on a remote machine, use the following command syntax.
rsh machinename command
The following example shows how you would view the contents of the directory/etc/skel on the machine starbug.
116 Solaris Advanced User’s Guide • May 2002
venus$ rsh starbug ls /etc/skel*local.cshrclocal.loginlocal.profile
venus$
Similar to the rlogin and rcp commands, rsh uses the remote machine’s/etc/hosts.equiv and /etc/passwd files to determine whether you haveunchallenged access privileges to the remote machine.
For more information on the rsh(1) command and its options, refer to the manPages(1): User Commands.
Viewing User Information (rusers)The rusers command (for remote users) shows you which users are logged in to othermachines on your network. Type the rusers command by itself to display eachmachine on the network and the user(s) logged in to these machines.
$ rusersstarbug user2 user1 rootearth user1
venus user3
Notice that three users are logged in to the machine starbug.
To display information on a specific remote machine, type the rusers commandfollowed by the name of the machine.
$ rusers starbugstarbug user2 user1 root
$
The -l option to the rusers command displays the following information.
� User names� Machine and terminal names� Time each user logged in� How long each user has been idle (if more than one minute)� Name of the machine that each user logged in from
$ rusers -l starbugroot starbug:console Oct 31 11:19 (:0)user2 starbug:pts/7 Oct 31 11:20 40:05 (starbug)user1 starbug:pts/13 Nov 1 14:42 17:18 (starbug)
$
You can also use the -l option without providing a machine name.
Chapter 9 • Using the Network 117
For more information on the rusers(1) command and its options, refer to the manPages(1): User Commands.
Running Networked ApplicationsNormally, all the applications on your system are programs that are running on yourlocal machine. However, if your workstation is part of a network, you can runapplications on another machine and display them on your local screen. Running anapplication on another machine saves computing cycles on your local machine, andgives you access to an entire network of applications.
This section describes how to run an application on a remote machine and display iton your local screen. See “More About Security” on page 119 for additionalinformation on the complexities of running networked applications.
Note – The process for running a networked application in your computingenvironment might vary.
Using rlogin to Run a Networked ApplicationTo use the following procedure to run a remote application, you must meet theserequirements.
� You must have access rights to the remote machine.� Your home directory must be NFS-mountable on the remote machine.� The application and appropriate libraries must be installed on the remote machine.
Contact your system administrator if you do not understand these requirements.
To run a networked application on a remote machine, set your environment variableswith the following values.
� Set the DISPLAY environment variable in your shell on the remote machine to yourlocal screen.
� Enable the remote machine to display the application program on your localmachine. To enable this display access on the local machine, use the xhostcommand:
$ xhost +remote_machine_name
The following procedure describes how to run an application on a remote machinewith the rlogin command.
118 Solaris Advanced User’s Guide • May 2002

� How to Run an Application on a Remote Machine1. Use the xhost command on the local machine to give the remote machine display
access.
starbug$ xhost + venus
2. Log in to the remote machine.
starbug$ rlogin venus -l user2Password:Last login: Wed Nov 1 16:06:21 from starbug
Sun Microsystems Inc. SunOS 5.9 Generic February 2002
3. Set the DISPLAY variable to the local machine.
venus$ DISPLAY=starbug:0.0
4. Export the DISPLAY variable to the local machine.
venus$ export DISPLAY
5. Run the application.
venus$ bigprogram &
Even though you interact with this application just as you would with any otherapplication on your screen, the application runs on the remote machine.
The benefit from running an application in this way is that it uses fewer computingresources than an application that is installed on your machine. This example showshow to run any remote application to which you have access.
More About SecurityThis section describes some fundamentals of network security that you might finduseful as you run applications across the network, including:
� User-based and host-based access control mechanisms� The MIT-MAGIC-COOKIE-1 and SUN-DES-1 authorization protocols� When and how to change a server’s access control� How to run applications remotely, or locally as a different user
Who Should Read this SectionYou do not need to change the default security configuration in the Solaris operatingenvironment, at minimum, unless you run applications on a remote server.
Chapter 9 • Using the Network 119
Access Control MechanismsAn access control mechanism controls which clients or applications have access to theX11 server. Only properly authorized clients can connect to the server. All other clientsare denied access, and are terminated with the following error message.
Xlib: connection to hostname refused by server
Xlib: Client is not authorized to connect to server
The connection attempt logs to the server console as:
AUDIT: <Date Time Year>: X: client 6 rejected from IP 129.144.152.193port 3485 Auth name: MIT-MAGIC-COOKIE-1
Two different types of access control mechanisms are used: user based and host based.That is, one mechanism grants access to a particular user’s account, while the othermechanism grants access to a particular host, or machine. Unless the -noauth optionis used with Xsun, both the user-based access control mechanism and the host-basedaccess control mechanism are active. For more information see “Manipulating Accessto the Server” on page 122.
User-Based Access
A user-based, or authorization-based, mechanism allows you to give access explicitlyto a particular user on any host machine. The user’s client passes authorization data tothe server. If the data match the server’s authorization data, the user is allowed access.
Host-Based Access
A host-based mechanism is a general-purpose mechanism. This type of mechanismenables you to give access to a particular host, in which all users on that host canconnect to the server. A host-based mechanism is a weaker form of access control. Ifthe host has access to the server, all users on that host are allowed to connect to theserver.
The Solaris environment provides the host-based mechanism for backwardcompatibility.
Note – Relink clients that are linked with older versions of Xlib or libcps to enablethem to connect to the server with the new user-based access control mechanism.
120 Solaris Advanced User’s Guide • May 2002
Authorization ProtocolsTwo authorization protocols are supported in this version of the Solaris operatingenvironment: MIT-MAGIC-COOKIE-1 and SUN-DES-1. They differ in theauthorization data used. The protocols are similar in the access control mechanismused. The MIT-MAGIC-COOKIE-1 protocol that uses the user-based mechanism is thedefault in the Solaris operating environment.
MIT-MAGIC-COOKIE-1
The MIT-MAGIC-COOKIE-1 authorization protocol was developed by theMassachusetts Institute of Technology. At server startup, a magic cookie is created forthe server and the user who started the system. On every connection attempt, theuser’s client sends the magic cookie to the server as part of the connection packet. Thismagic cookie is compared with the servers’ magic cookie. The connection is allowed ifthe magic cookies match, or denied if they do not match.
SUN-DES-1
The SUN-DES-1 authorization protocol, developed by Sun Microsystems, is based onSecure Remote Procedure Call (RPC) and requires Data Encryption Standard (DES)support. The authorization information is the machine-independent netname, ornetwork name, of a user. This information is encrypted and sent to the server as partof the connection packet. The server decrypts the information and, if the netname isknown, allows the connection.
This protocol provides a higher level of security than the MIT-MAGIC-COOKIE-1protocol. No other user can use your machine-independent netname to access a server,but another user can use the magic cookie to access a server.
This protocol is available only in libraries in the Solaris 1.1 and compatibleenvironments. Any applications built with static libraries cannot use this authorizationprotocol.
“Allowing Access When Using SUN-DES-1” on page 124 describes how to allowanother user access to your server by adding that person’s netname to your server’saccess list.
Changing the Default Authorization Protocol
You can change the default authorization protocol, MIT-MAGIC-COOKIE-1, toSUN_DES-1, the other supported authorization protocol, or to no user-based accessmechanism at all. You can change the default authorization protocol by editing theXsun line in the /usr/dt/config/Xservers file. For example, to change thedefault from MIT-MAGIC-COOKIE-1 to SUN-DES-1, add the -auth sun-des optionto the Xsun command by editing the following line in the/usr/dt/config/Xservers file.
Chapter 9 • Using the Network 121
:0 Local local_uid@console root /usr/openwin/bin/Xsun :0 -nobanner -auth sun-des
If you must run the Solaris operating environment without the user-based accessmechanism, add the -noauth option to the Xsun command by editing the followingline in the /usr/dt/config/Xservers file.
:0 Local local_uid@console root /usr/openwin/bin/Xsun :0 -nobanner -noauth
Caution – By using the -noauth option, you weaken security. It is equivalent torunning Solaris software with the host-based access control mechanism only. Theserver inactivates the user-based access control mechanism. Anyone who can runapplications on your local machine is allowed access to your server.
Manipulating Access to the ServerUnless the -noauth option is used with Xsun (see “Changing the DefaultAuthorization Protocol” on page 121), both the user-based access control mechanismand the host-based access control mechanism are active. The server first checks theuser-based mechanism, then the host-based mechanism. The default securityconfiguration uses MIT-MAGIC-COOKIE-1 as the user-based mechanism, and anempty list for the host-based mechanism. Because the host-based list is empty, only theuser-based mechanism is effectively active. Using the -noauth option instructs theserver to inactivate the user-based access control mechanism, and initializes thehost-based list by adding the local host.
You can use either of two programs to change a server’s access control mechanism:xhost and xauth. For more information, see these man pages. These programs accesstwo binary files that are created by the authorization protocol. These files containsession-specific authorization data. One file is for server internal use only. The otherfile is located in the user’s $HOME directory:
� .Xauthority� Client Authority file
Use the xhost program to change the host-based access list in the server. You can addhosts to, or delete hosts from the access list. If you are starting with the defaultconfiguration—an empty host-based access list—and use xhost to add a machinename, you lower the level of security. The server allows access to the host you added,as well as to any user who specifies the default authorization protocol. See“Host-Based Access” on page 120 or an explanation of why the host-based accesscontrol mechanism is considered a lower level of security.
The xauth program accesses the authorization protocol data in the .Xauthorityclient file. You can extract this data from your .Xauthority file so that other userscan merge the data into their .Xauthority files, thus allowing them access to yourserver, or to the server to which you connect.
122 Solaris Advanced User’s Guide • May 2002

See “Allowing Access When Using MIT-MAGIC-COOKIE-1” on page 123 forexamples of how to use xhost and xauth.
Client Authority File
The client authority file is .Xauthority. It contains entries of the form:
connection-protocol auth-protocol auth-data
By default, .Xauthority contains MIT-MAGIC-COOKIE-1 as the auth-protocol, andentries for the local display only as the connection-protocol and auth-data. For example,on host anyhost, the .Xauthority file might contain the following entries:
anyhost:0 MIT-MAGIC-COOKIE-1 82744f2c4850b03fce7ae47176e75localhost:0 MIT-MAGIC-COOKIE-1 82744f2c4850b03fce7ae47176e75anyhost/unix:0 MIT-MAGIC-COOKIE-1 82744f2c4850b03fce7ae47176e75
When the client starts, an entry corresponding to the connection-protocol is read from.Xauthority, and the auth-protocol and auth-data are sent to the server as part of theconnection packet. In the default configuration, xhost returns empty host-basedaccess lists and states that authorization is enabled.
If you have changed the authorization protocol from the default to SUN-DES-1, theentries in .Xauthority contain SUN-DES-1 as the auth-protocol and the netname ofthe user as auth-data. The netname is in the following form:
unix.userid@NISdomainname
For example, on host anyhost the .Xauthority file might contain the followingentries, where [email protected] is the machine-independent netname of theuser:
anyhost:0 SUN-DES-1 ”[email protected]”localhost:0 SUN-DES-1 ”[email protected]”
anyhost/unix:0 SUN-DES-1 ”[email protected]”
Note – If you do not know your network name, or machine-independent netname, askyour system administrator.
Allowing Access When Using MIT-MAGIC-COOKIE-1
If you are using the MIT-MAGIC-COOKIE-1 authorization protocol, follow these stepsto allow another user access to your server:
1. On the machine that is running the server, use xauth to extract an entry thatcorresponds to hostname:0 into a file.
For this example, hostname is anyhost and the file is xauth.info:
myhost% /usr/openwin/bin/xauth nextract - anyhost:0 > $HOME/xauth.info
Chapter 9 • Using the Network 123
2. Send the file that contains the entry to the user who requests access,
Use an email tool, the rcp command, or some other file transfer method to sendthe file.
Note – Mailing the file that contains your authorization information is a safermethod than using rcp. If you do use rcp, do not place the file in a directory thatis easily accessible by another user.
3. The other user must merge the entry into his or her.Xauthority file.
For this example, userhost merges xauth.info into the other user’s .Xauthorityfile:
userhost% /usr/openwin/bin/xauth nmerge - < xauth.info
Note – The auth-data is session-specific. Therefore, it is valid only as long as theserver is not restarted.
Allowing Access When Using SUN-DES-1
If you are using the SUN-DES-1 authorization protocol, follow these steps to allowanother user access to your server.
1. On the machine that runs the server, use xhost to make the new user known tothe server.
For this example, to allow new user somebody to run on myhost:
myhost% xhost + somebody@
2. The new user must use the xauth command to add the entry into his or her.Xauthority file.
For this example, the new user’s machine independent netname [email protected]. Note that this command should be typed on oneline with no carriage return. After the pipe symbol, type a space followed by theremainder of the command.
userhost% echo ’add myhost:0 SUN-DES-1 “[email protected]”’ |
$OPENWINHOME/bin/xauth
Running Clients Remotely, or Locally as Another UserX clients use the value of the DISPLAY environment variable to get the name of theserver to which they should connect.
To run clients remotely, or locally as another user, follow these steps:
124 Solaris Advanced User’s Guide • May 2002
1. On the machine that runs the server, allow another user access.
Depending on which authorization protocol you use, follow the steps outlined ineither “Allowing Access When Using MIT-MAGIC-COOKIE-1” on page 123 or“Allowing Access When Using SUN-DES-1” on page 124.
2. Set DISPLAY to the name of the host that runs the server.
For this example, the host is remotehost:
myhost% setenv DISPLAY remotehost:0
3. Run the client program as shown.
myhost% client_program&
The client is displayed on the remote machine, remotehost.
Chapter 9 • Using the Network 125

126 Solaris Advanced User’s Guide • May 2002
CHAPTER 10
Customizing Your WorkingEnvironment
You can modify the environment variables in your system initialization files to controland adjust many aspects of your working environment. When you log in, your systemreads the initialization files and uses the environment variables to configure yoursystem. By setting the environment variables, you can customize your system to makeit easier and more efficient to do your work.
This chapter describes the following tasks.
� “Modifying Initialization Files” on page 127� “Setting Environment Variables” on page 128� “Command Aliases” on page 131� “Changing Your Command Prompt” on page 132� “Setting Default File Permissions” on page 134
Modifying Initialization FilesThe particular initialization files responsible for your system’s configuration dependon which shell the system administrator has specified as your default shell when yoursystem was first installed. The Bourne shell is the default shell for the Solarisoperating environment, but you can also use the C shell or Korn shell. Each of theseshells has its own initialization file (or files).
To determine your default shell (your login shell), follow these steps.
1. Type echo $SHELL.
$ echo $SHELL
/bin/sh
2. Review the output of the command to determine your default shell.
Refer to the following list to identify your default shell.
127

� /bin/sh – Bourne shell� /bin/bash – Bourne Again shell� /bin/csh – C shell� /bin/ksh – Korn shell� /bin/tcsh – TC shell� /bin/zsh – Z shell
Regardless of the shell you are using, when you first log in your system generally runsthe system profile file, /etc/profile. This file is generally owned by the systemadministrator and is readable (but not writable) by all users.
After your system executes the system profile, it runs the user profile. The user profileis one (or more) initialization files that define your working environment. Forexample, if you’re in the CDE environment your system checks this file (or set of files)each time you start a new terminal or window.
Depending on which shell is set up as your default, your user profile can be one of thefollowing:
� .profile (for the Bourne and Korn shells)� .bash_profile (for the Bourne Again shell)� .login and .cshrc (for the C shell)� .tcshrc and .cshrc (for the TC shell)� .zlogin and .zshrc (for the Z shell)
Your user profile file(s) is located in your home directory and enables you to configureyour working environment to your preference.
Setting Environment VariablesYour system sets up your system environment by using a set of specifications that aredefined in the initialization files. If you want to temporarily modify your environmentfor the current work session, you can issue commands directly at the commandprompt. However, if you want to modify your working environment on a morepermanent basis, you can store “permanent” environment variables in the appropriateuser profile files.
To display the environment variables that are currently set on your system, use theenv command.
� Type the env command and press Return:
$ envHOME=/home/user2PATH=/usr/bin:LOGNAME=user2
128 Solaris Advanced User’s Guide • May 2002
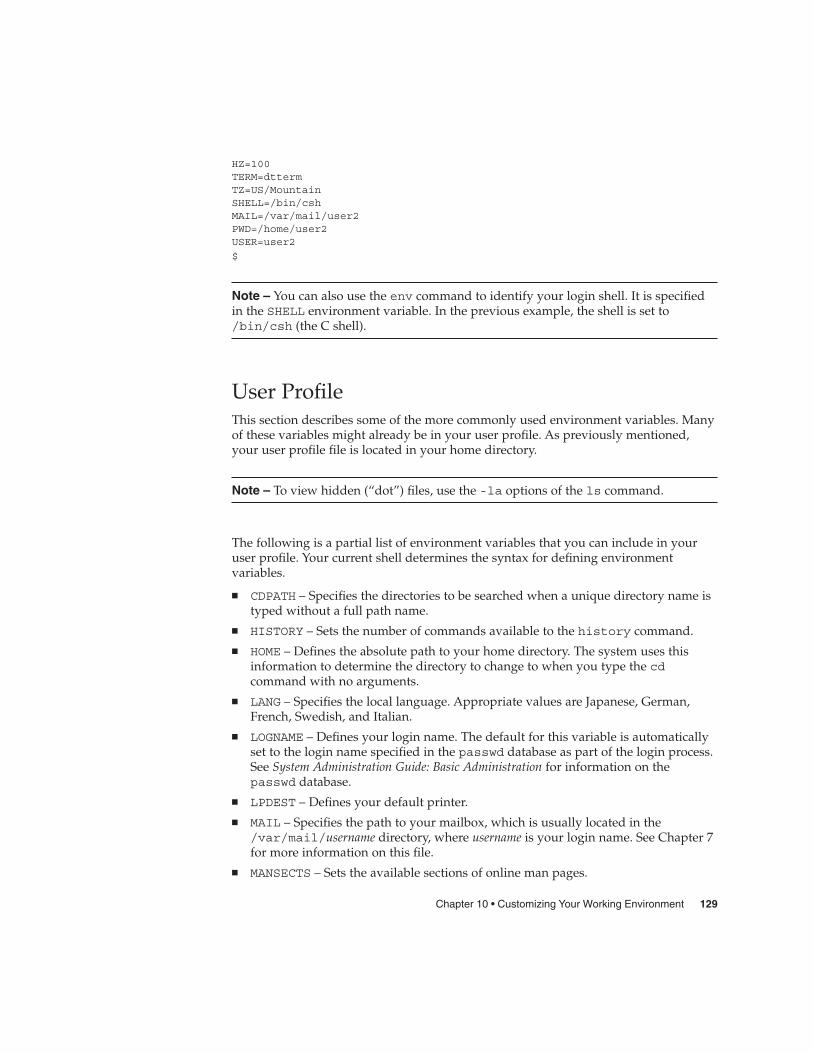
HZ=100TERM=dttermTZ=US/MountainSHELL=/bin/cshMAIL=/var/mail/user2PWD=/home/user2USER=user2
$
Note – You can also use the env command to identify your login shell. It is specifiedin the SHELL environment variable. In the previous example, the shell is set to/bin/csh (the C shell).
User ProfileThis section describes some of the more commonly used environment variables. Manyof these variables might already be in your user profile. As previously mentioned,your user profile file is located in your home directory.
Note – To view hidden (“dot”) files, use the -la options of the ls command.
The following is a partial list of environment variables that you can include in youruser profile. Your current shell determines the syntax for defining environmentvariables.
� CDPATH – Specifies the directories to be searched when a unique directory name istyped without a full path name.
� HISTORY – Sets the number of commands available to the history command.� HOME – Defines the absolute path to your home directory. The system uses this
information to determine the directory to change to when you type the cdcommand with no arguments.
� LANG – Specifies the local language. Appropriate values are Japanese, German,French, Swedish, and Italian.
� LOGNAME – Defines your login name. The default for this variable is automaticallyset to the login name specified in the passwd database as part of the login process.See System Administration Guide: Basic Administration for information on thepasswd database.
� LPDEST – Defines your default printer.� MAIL – Specifies the path to your mailbox, which is usually located in the
/var/mail/username directory, where username is your login name. See Chapter 7for more information on this file.
� MANSECTS – Sets the available sections of online man pages.
Chapter 10 • Customizing Your Working Environment 129
� PATH – Lists, in order, the directories that the system searches to find a program torun when you type a command. If the appropriate directory is not in the searchpath, you have to type it or else type the complete path name when you enter acommand.
The default for this variable is automatically defined and set as specified in youruser profile file as part of the login process.
� PS1 – Defines your command prompt. The default prompt for the Bourne, BourneAgain, and Korn shells is the dollar sign ($). The default prompt for the C, TC, andZ shells is the percent sign (%). The default prompt for root in either shell is thepound sign (#).
� SHELL – Defines the shell that is used by vi and other tools.� TERMINFO – Specifies the path name for an unsupported terminal that has been
added to the terminfo database. You do not need to set this variable for defaultterminals in this database. See System Administration Guide: Advanced Administrationfor information on the terminfo database.
� TERM – Defines the terminal you’re currently using. When you run an editor, thesystem searches for a file with the same name as the definition of this variable. Thesystem first searches the path (if any) referenced by the TERMINFO variable, andthen the default directory, /usr/share/lib/terminfo, to determine thecharacteristics of the terminal. If a definition is not found in either location, theterminal is identified as “dumb.”
� TZ – Defines the time zone for your system clock.
Setting the PATH VariableThe PATH environment variable is used to locate commands within the SunOSdirectory hierarchy. By setting the PATH, you create a fixed set of directories that thesystem always searches whenever you type the name of a command.
For example, if you have no PATH variable set and you want to copy a file, you needto type the full path name for the command, /usr/bin/cp. However, if you have setthe PATH variable to include the directory /usr/bin, then you can simply type cpand your system will always execute the command. This is because your systemsearches for the cp command in every directory that is named in the PATH variable,and executes it when it is found. You can significantly streamline your work by usingthe PATH variable to list the commonly used SunOS command directories.
For the Bourne, Bourne Again, and Korn shells, you can specify the PATH variable inyour user profile file (in your home directory) by using the following syntax.
PATH=.:/usr/bin:/home/bin
In the previous example, home represents the path name of your home directory.
For the C, TC, and Z shells, you can specify the PATH variable in your user profile file(in your home directory) by using the following syntax:
130 Solaris Advanced User’s Guide • May 2002

set path=(/usr/bin home/bin .)
In this command, home is the path name of your home directory.
Note – In the C, Korn, TC, and Z shells you can use the shortcut ~ to represent thepath name of your home directory.
If you modify the PATH variable, and you are running the C, TC, or Z shell, use thesource command to make the changes effective in your current window withouthaving to log out:
example% source user-profile-file
If you are running the Bourne, Bourne Again, or Korn shell, type the following tomake the changes effective in your current window without having to log out:
$ . user-profile-file
Command AliasesCommand aliases are helpful shortcuts for commands you often type. For example,the default setting for the remove command (rm) does not ask for confirmation beforeit removes files. Sometimes this default is inconvenient, as a typing error can removethe wrong file. However, you can use the alias variable to change this setting byediting your user profile file.
In the C and TC shells, add the following line to your user profile file.
alias rm ’rm -i’
In the Bourne Again, Korn, and Z shells, add the following line to your user profilefile.
alias rm=’rm -i’
With this line in your user profile file, typing rm is now the same as typing rm -i,which is the interactive form of the rm command. You will then always be asked toconfirm the command before any files are deleted. The quote marks around rm -i inthe previous example are necessary to include the blank space between rm and -i.Without the quotation marks, the shell cannot correctly interpret the text after thespace.
To make your changes to your user profile file effective immediately in your currentwindow, you need to type an additional command. In the C and TC shells, type thefollowing command to make your alias effective immediately.
example% source user-profile-file
Chapter 10 • Customizing Your Working Environment 131
The source command causes the system to read the current user profile file andexecute the commands in this file.
In the Bourne Again, Korn, and Z shells, type the following command to make youralias effective immediately.
$ . user-profile-file
In the Bourne Again, Korn, and Z shells, the . command performs the same actions asthe source command in the C and TC shells.
Note – Command aliases that are created by using the alias command apply only tothe current session.
Changing Your Command PromptThe syntax you use to change your command prompt depends on what shell you areusing.
Bourne, Bourne Again, Korn, and Z ShellsIn the Bourne, Bourne Again, Korn, and Z shells, use the PS1 command to redefineyour command prompt. The following are three examples:
� To set the prompt to a colon (:), followed by a space, type the following command.
PS1=": "
� To create a prompt that consists of your machine name, followed by a colon and aspace, type the following command.
PS1="‘hostname‘: "
� To set the prompt to your machine name, followed by your login name in braces{}, a colon, and a space, type the following command
PS1="‘hostname‘{‘logname‘}: "
Type any of the previous examples to change your current command prompt. Thischange applies until you change your command prompt again or log out.
If you want to make your changes more permanent, add one of the previous examples(or a prompt of your own creation) to your user profile file. If you follow thisguideline, the prompt you specify appears each time you log in in or start a new shell.
C and TC ShellsFor the C and TC shells, you personalize your command prompt with the setprompt command. The following are three examples:
132 Solaris Advanced User’s Guide • May 2002
� To set the prompt to a percent sign followed by a space, type the followingcommand.
example% set prompt="% "
� To create a prompt that consists of your machine name, followed by the historynumber of the command (hostname1, hostname2, hostname3, and so on), followed bya colon, type the following command.
example% set prompt="‘hostname‘\!: "
� To set the prompt to your machine name, followed by your login name in braces, acolon, and a space, type the following command.
example% set prompt="‘hostname‘{‘logname‘}: "
Type any of the previous examples to change your current command prompt. Thischange applies until you change your command prompt again or log out.
If you want to make your changes more permanent, add one of the previous examples(or a prompt of your own creation) to your user profile file. If you follow thisprocedure, the prompt you specify appears each time you log in or start a new shell.
Other Useful VariablesYou can set many other variables in your user profile file. For a complete list, refer tothe man Pages(1): User Commands. The following sections describe some of the morecommonly used options.
noclobber VariableUse set noclobber to prevent unintentional overwriting of files when you use thecp command to copy a file. This variable affects the Bourne Again, C, Korn, and TCshells. Type the following in your user profile file:
set noclobber
history VariableThe history variable enables you to set the number of commands that you saved inyour history list. The history command is useful to view commands you havepreviously typed. You can also use the history file to repeat earlier commands. Typethe following in your .cshrc or .tcshrc file:
set history=100
You can also affect the Bourne, Bourne Again, Korn, and Z shells in the same mannerby typing the following line in your user profile file.
Chapter 10 • Customizing Your Working Environment 133
HISTORY=100
Setting Default File PermissionsThe umask command sets a default file permission for all the files and directories youcreate. For example, if you are security conscious and you want to grant members ofyour group, and all users, only read and execute permissions (-rwxr-xr-x) on yourdirectories and files, you can set the umask in your user profile file so that every newfile or directory you create is protected with these permissions.
Like the chmod command, umask uses a numeric code to represent absolute filepermissions. However, the method that is used to calculate the code for umask isdifferent from the method for chmod.
For example, if umask is set to 000, all files you create have the following (read andwrite, but not execute) permissions:
rw-rw-rw- (mode 666)
All directories that are created have the following (read, write, and execute)permissions:
rwxrwxrwx (mode 777)
To determine the value to use for umask, you subtract the value of the permissionsyou want (using the value you would specify for the chmod command) from thecurrent default permissions assigned to files. The remainder is the value to use for theumask command.
For example, suppose you want to change the default mode for files from 666(rw-rw-rw-) to 644 (rw-r--r--). Subtract 644 from 666. The remainder, 022, is thenumeric value you would use with umask as follows:
$ umask 022
Similar to the numeric code for the chmod command, the three numbers that are usedwith umask are as follows.
� The first digit controls user permissions
� The second controls group permissions
� The third digit controls permissions for all others
Table 10-1 shows the file permissions that are created for each digit of the umaskcommand’s numeric code.
134 Solaris Advanced User’s Guide • May 2002
TABLE 10–1 Permissions for umask
umask code Permissions
0 rwx
1 rw-
2 r-x
3 r--
4 -wx
5 -w-
6 --x
7 ---(none)
For more information on the umask command, refer to the man Pages(1): UserCommands.
Chapter 10 • Customizing Your Working Environment 135

136 Solaris Advanced User’s Guide • May 2002
APPENDIX A
Modifying the Keyboard
This appendix describes how to remap options for special keyboard keys and how todisable and enable the Compose key on your keyboard.
For information on remapping your mouse buttons (for example, more convenientleft-handed use of the mouse), see the user documentation for your desktopenvironment.
Disabling and Enabling the ComposeKey
IA only – The Compose key is defined to be Ctrl-Shift-F1 on IA-based systems.
If you do not use the Compose key, you can disable it so that you do not press itinadvertently. First, find out the keycode for Multi_key:
$ xmodmap -pk | grep Multi_key
Your system displays a line similar to:
nn 0xff20 (Multi_key)
Use the two-digit keycode number at the beginning of the line, represented by nn, toconstruct the following line in your .xinitrc file.
xmodmap -e ’keycode nn = NoSymbol’
To re-enable the Compose key, comment out the previous line in your .xinitrc fileand restart the OpenWindows software.
137
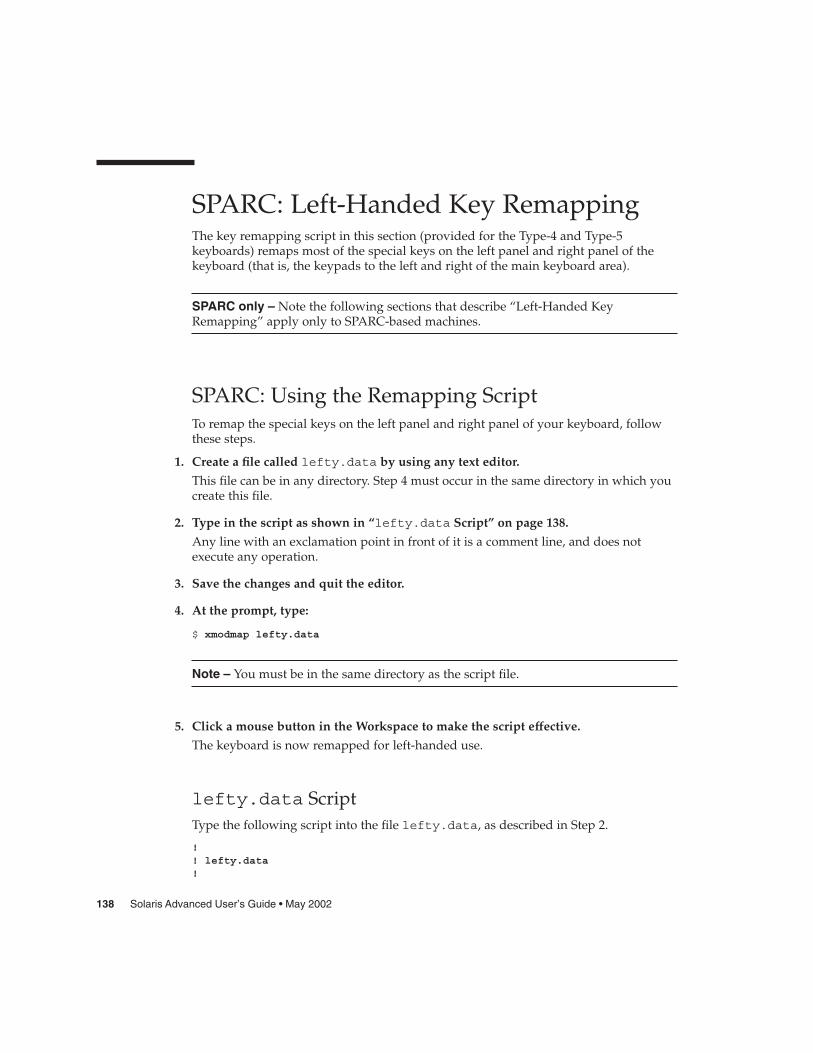
SPARC: Left-Handed Key RemappingThe key remapping script in this section (provided for the Type-4 and Type-5keyboards) remaps most of the special keys on the left panel and right panel of thekeyboard (that is, the keypads to the left and right of the main keyboard area).
SPARC only – Note the following sections that describe “Left-Handed KeyRemapping” apply only to SPARC-based machines.
SPARC: Using the Remapping ScriptTo remap the special keys on the left panel and right panel of your keyboard, followthese steps.
1. Create a file called lefty.data by using any text editor.
This file can be in any directory. Step 4 must occur in the same directory in which youcreate this file.
2. Type in the script as shown in “lefty.data Script” on page 138.
Any line with an exclamation point in front of it is a comment line, and does notexecute any operation.
3. Save the changes and quit the editor.
4. At the prompt, type:
$ xmodmap lefty.data
Note – You must be in the same directory as the script file.
5. Click a mouse button in the Workspace to make the script effective.
The keyboard is now remapped for left-handed use.
lefty.data ScriptType the following script into the file lefty.data, as described in Step 2.
!! lefty.data!
138 Solaris Advanced User’s Guide • May 2002
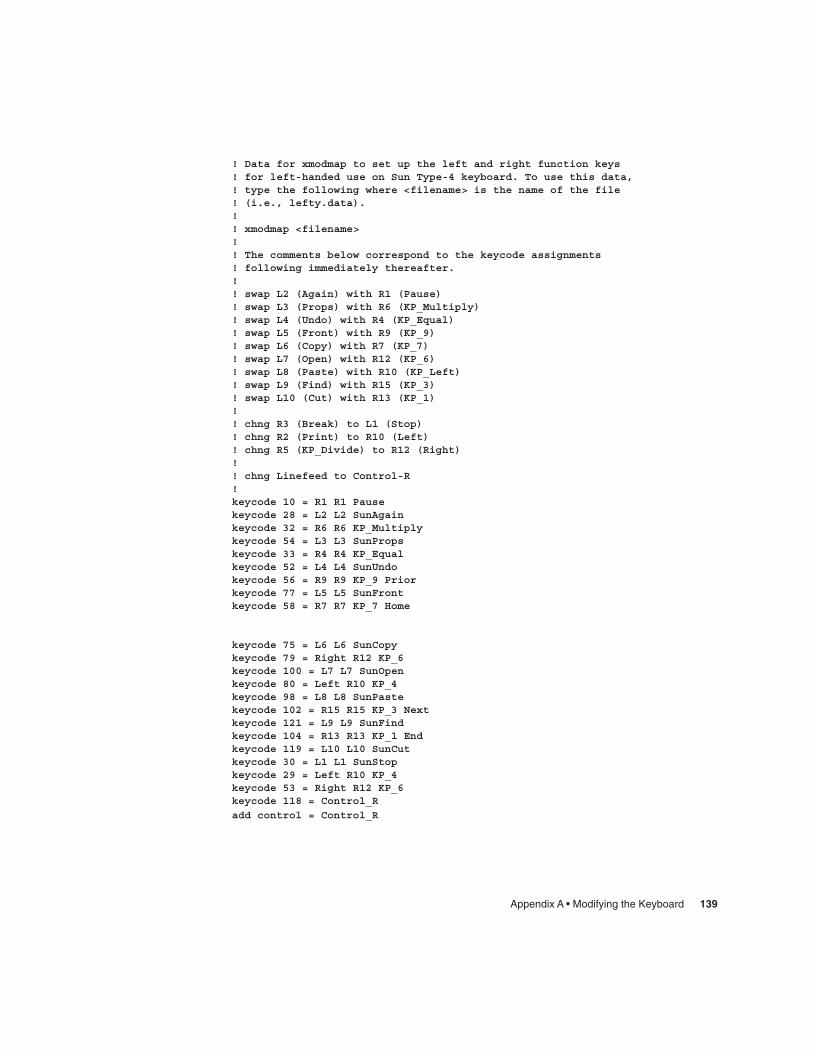
! Data for xmodmap to set up the left and right function keys! for left-handed use on Sun Type-4 keyboard. To use this data,! type the following where <filename> is the name of the file! (i.e., lefty.data).!! xmodmap <filename>!! The comments below correspond to the keycode assignments! following immediately thereafter.!! swap L2 (Again) with R1 (Pause)! swap L3 (Props) with R6 (KP_Multiply)! swap L4 (Undo) with R4 (KP_Equal)! swap L5 (Front) with R9 (KP_9)! swap L6 (Copy) with R7 (KP_7)! swap L7 (Open) with R12 (KP_6)! swap L8 (Paste) with R10 (KP_Left)! swap L9 (Find) with R15 (KP_3)! swap L10 (Cut) with R13 (KP_1)!! chng R3 (Break) to L1 (Stop)! chng R2 (Print) to R10 (Left)! chng R5 (KP_Divide) to R12 (Right)!! chng Linefeed to Control-R!keycode 10 = R1 R1 Pausekeycode 28 = L2 L2 SunAgainkeycode 32 = R6 R6 KP_Multiplykeycode 54 = L3 L3 SunPropskeycode 33 = R4 R4 KP_Equalkeycode 52 = L4 L4 SunUndokeycode 56 = R9 R9 KP_9 Priorkeycode 77 = L5 L5 SunFrontkeycode 58 = R7 R7 KP_7 Home
keycode 75 = L6 L6 SunCopykeycode 79 = Right R12 KP_6keycode 100 = L7 L7 SunOpenkeycode 80 = Left R10 KP_4keycode 98 = L8 L8 SunPastekeycode 102 = R15 R15 KP_3 Nextkeycode 121 = L9 L9 SunFindkeycode 104 = R13 R13 KP_1 Endkeycode 119 = L10 L10 SunCutkeycode 30 = L1 L1 SunStopkeycode 29 = Left R10 KP_4keycode 53 = Right R12 KP_6keycode 118 = Control_R
add control = Control_R
Appendix A • Modifying the Keyboard 139
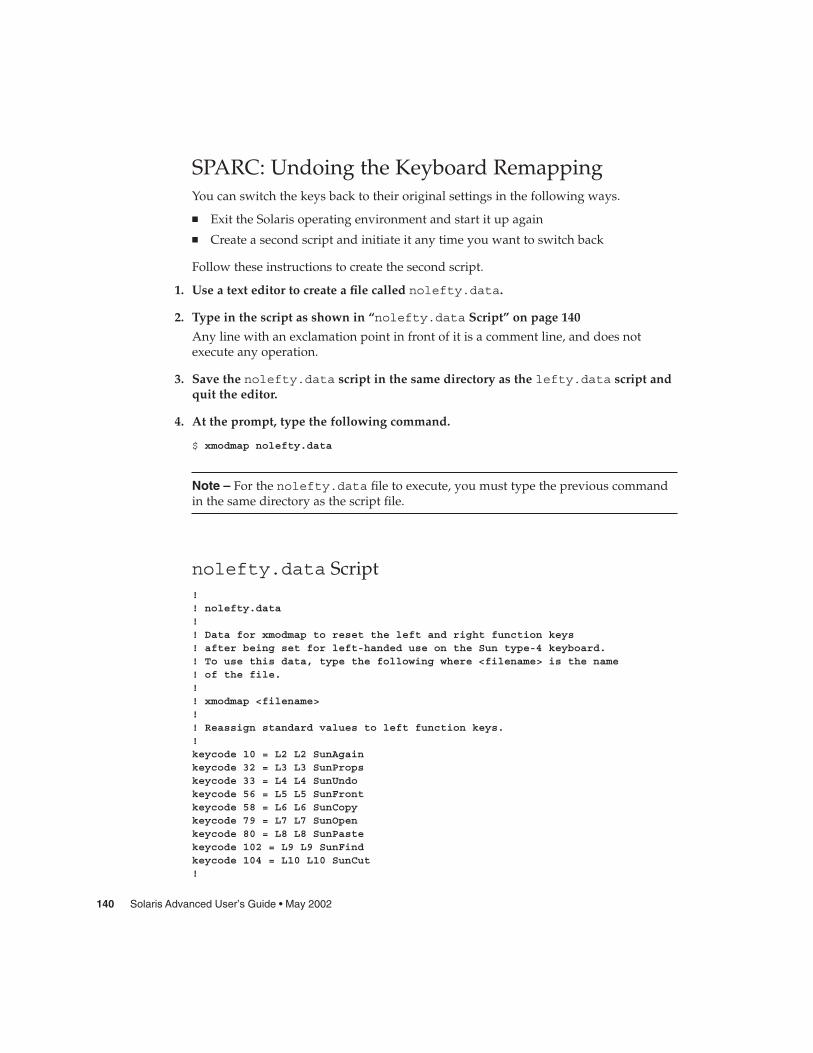
SPARC: Undoing the Keyboard RemappingYou can switch the keys back to their original settings in the following ways.
� Exit the Solaris operating environment and start it up again
� Create a second script and initiate it any time you want to switch back
Follow these instructions to create the second script.
1. Use a text editor to create a file called nolefty.data.
2. Type in the script as shown in “nolefty.data Script” on page 140
Any line with an exclamation point in front of it is a comment line, and does notexecute any operation.
3. Save the nolefty.data script in the same directory as the lefty.data script andquit the editor.
4. At the prompt, type the following command.
$ xmodmap nolefty.data
Note – For the nolefty.data file to execute, you must type the previous commandin the same directory as the script file.
nolefty.data Script!! nolefty.data!! Data for xmodmap to reset the left and right function keys! after being set for left-handed use on the Sun type-4 keyboard.! To use this data, type the following where <filename> is the name! of the file.!! xmodmap <filename>!! Reassign standard values to left function keys.!keycode 10 = L2 L2 SunAgainkeycode 32 = L3 L3 SunPropskeycode 33 = L4 L4 SunUndokeycode 56 = L5 L5 SunFrontkeycode 58 = L6 L6 SunCopykeycode 79 = L7 L7 SunOpenkeycode 80 = L8 L8 SunPastekeycode 102 = L9 L9 SunFindkeycode 104 = L10 L10 SunCut!
140 Solaris Advanced User’s Guide • May 2002
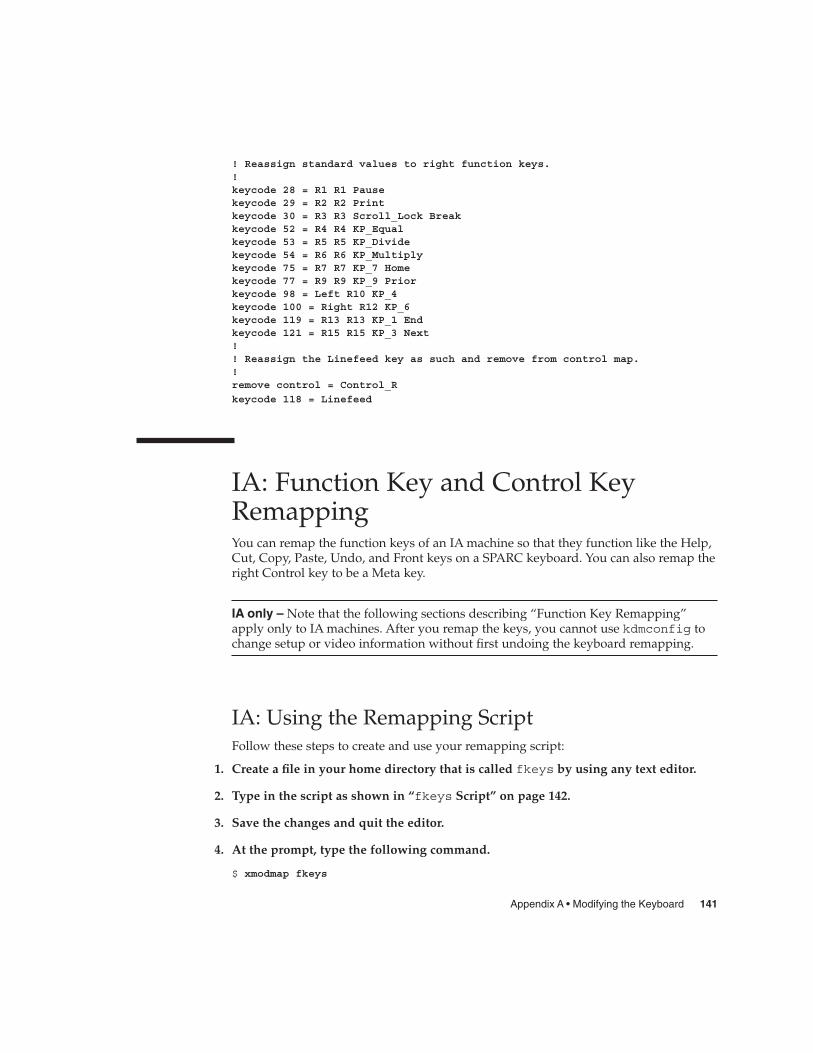
! Reassign standard values to right function keys.!keycode 28 = R1 R1 Pausekeycode 29 = R2 R2 Printkeycode 30 = R3 R3 Scroll_Lock Breakkeycode 52 = R4 R4 KP_Equalkeycode 53 = R5 R5 KP_Dividekeycode 54 = R6 R6 KP_Multiplykeycode 75 = R7 R7 KP_7 Homekeycode 77 = R9 R9 KP_9 Priorkeycode 98 = Left R10 KP_4keycode 100 = Right R12 KP_6keycode 119 = R13 R13 KP_1 Endkeycode 121 = R15 R15 KP_3 Next!! Reassign the Linefeed key as such and remove from control map.!remove control = Control_R
keycode 118 = Linefeed
IA: Function Key and Control KeyRemappingYou can remap the function keys of an IA machine so that they function like the Help,Cut, Copy, Paste, Undo, and Front keys on a SPARC keyboard. You can also remap theright Control key to be a Meta key.
IA only – Note that the following sections describing “Function Key Remapping”apply only to IA machines. After you remap the keys, you cannot use kdmconfig tochange setup or video information without first undoing the keyboard remapping.
IA: Using the Remapping ScriptFollow these steps to create and use your remapping script:
1. Create a file in your home directory that is called fkeys by using any text editor.
2. Type in the script as shown in “fkeys Script” on page 142.
3. Save the changes and quit the editor.
4. At the prompt, type the following command.
$ xmodmap fkeys
Appendix A • Modifying the Keyboard 141
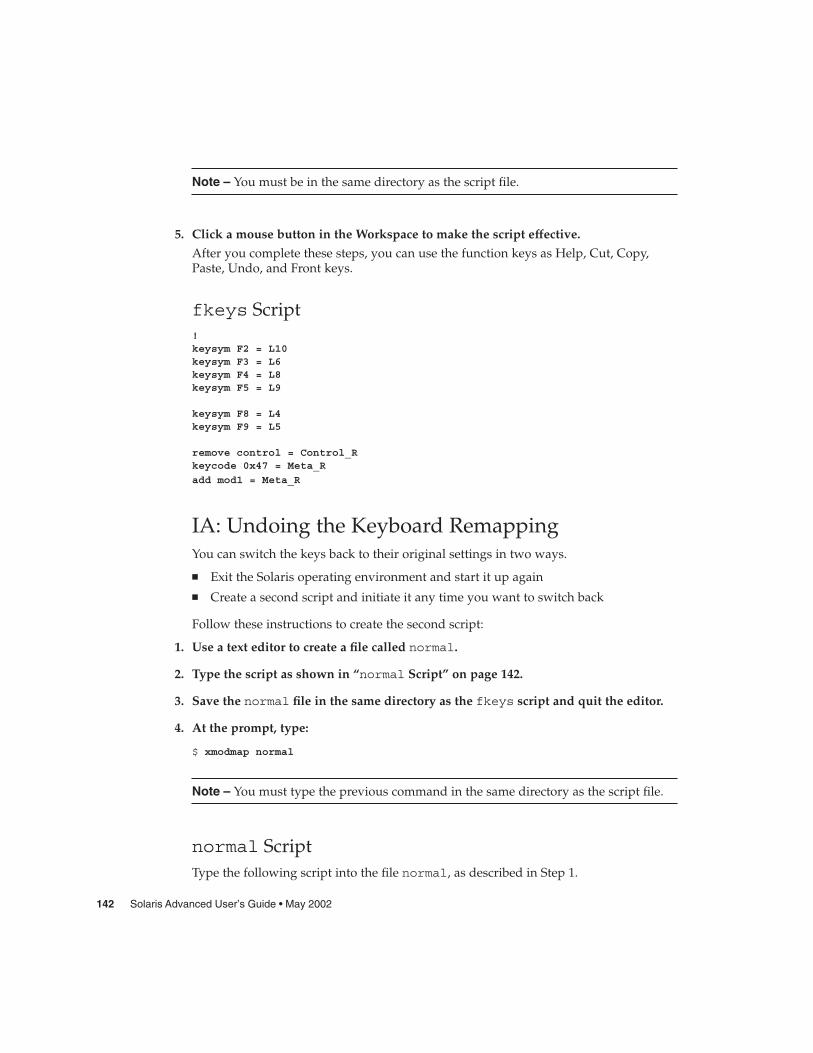
Note – You must be in the same directory as the script file.
5. Click a mouse button in the Workspace to make the script effective.
After you complete these steps, you can use the function keys as Help, Cut, Copy,Paste, Undo, and Front keys.
fkeys Script!keysym F2 = L10keysym F3 = L6keysym F4 = L8keysym F5 = L9
keysym F8 = L4keysym F9 = L5
remove control = Control_Rkeycode 0x47 = Meta_R
add mod1 = Meta_R
IA: Undoing the Keyboard RemappingYou can switch the keys back to their original settings in two ways.
� Exit the Solaris operating environment and start it up again� Create a second script and initiate it any time you want to switch back
Follow these instructions to create the second script:
1. Use a text editor to create a file called normal.
2. Type the script as shown in “normal Script” on page 142.
3. Save the normal file in the same directory as the fkeys script and quit the editor.
4. At the prompt, type:
$ xmodmap normal
Note – You must type the previous command in the same directory as the script file.
normal ScriptType the following script into the file normal, as described in Step 1.
142 Solaris Advanced User’s Guide • May 2002
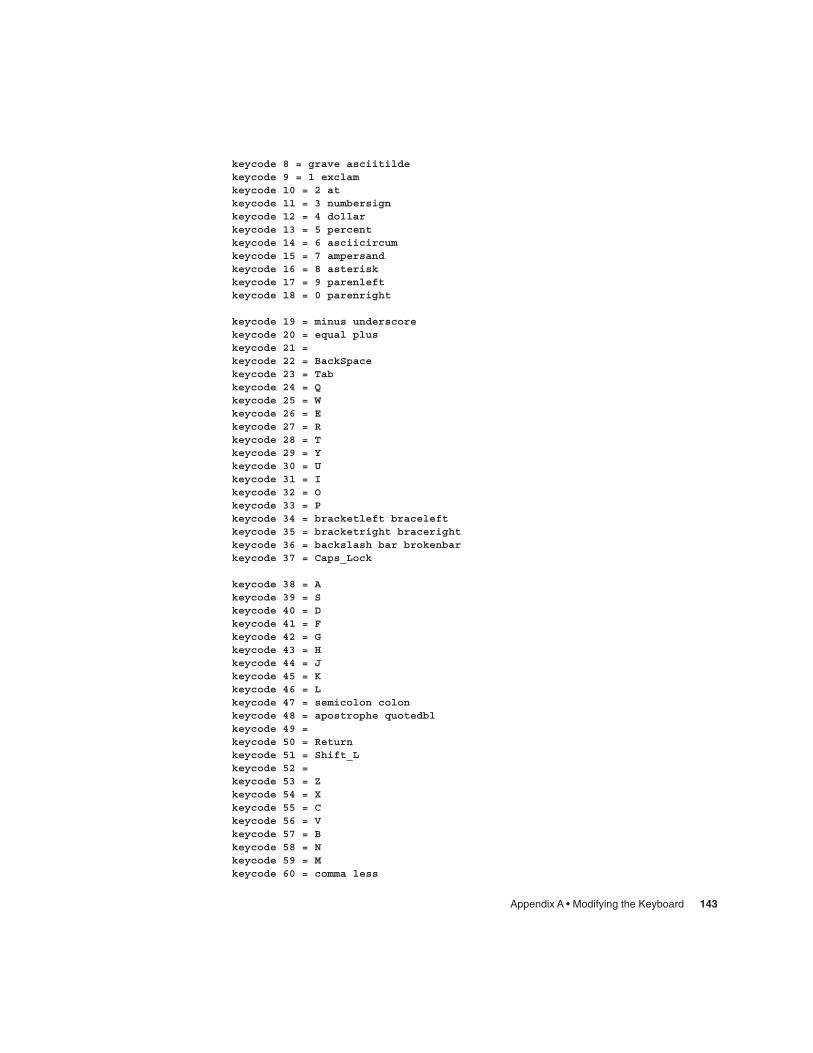
keycode 8 = grave asciitildekeycode 9 = 1 exclamkeycode 10 = 2 atkeycode 11 = 3 numbersignkeycode 12 = 4 dollarkeycode 13 = 5 percentkeycode 14 = 6 asciicircumkeycode 15 = 7 ampersandkeycode 16 = 8 asteriskkeycode 17 = 9 parenleftkeycode 18 = 0 parenright
keycode 19 = minus underscorekeycode 20 = equal pluskeycode 21 =keycode 22 = BackSpacekeycode 23 = Tabkeycode 24 = Qkeycode 25 = Wkeycode 26 = Ekeycode 27 = Rkeycode 28 = Tkeycode 29 = Ykeycode 30 = Ukeycode 31 = Ikeycode 32 = Okeycode 33 = Pkeycode 34 = bracketleft braceleftkeycode 35 = bracketright bracerightkeycode 36 = backslash bar brokenbarkeycode 37 = Caps_Lock
keycode 38 = Akeycode 39 = Skeycode 40 = Dkeycode 41 = Fkeycode 42 = Gkeycode 43 = Hkeycode 44 = Jkeycode 45 = Kkeycode 46 = Lkeycode 47 = semicolon colonkeycode 48 = apostrophe quotedblkeycode 49 =keycode 50 = Returnkeycode 51 = Shift_Lkeycode 52 =keycode 53 = Zkeycode 54 = Xkeycode 55 = Ckeycode 56 = Vkeycode 57 = Bkeycode 58 = Nkeycode 59 = Mkeycode 60 = comma less
Appendix A • Modifying the Keyboard 143
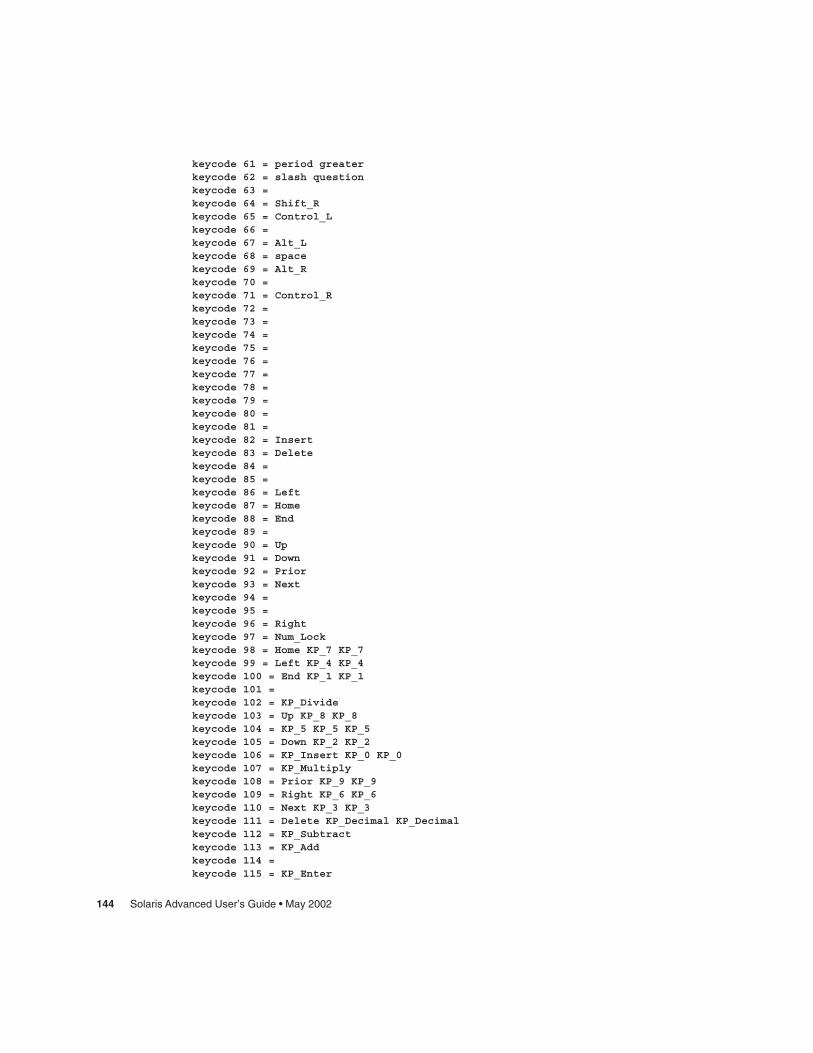
keycode 61 = period greaterkeycode 62 = slash questionkeycode 63 =keycode 64 = Shift_Rkeycode 65 = Control_Lkeycode 66 =keycode 67 = Alt_Lkeycode 68 = spacekeycode 69 = Alt_Rkeycode 70 =keycode 71 = Control_Rkeycode 72 =keycode 73 =keycode 74 =keycode 75 =keycode 76 =keycode 77 =keycode 78 =keycode 79 =keycode 80 =keycode 81 =keycode 82 = Insertkeycode 83 = Deletekeycode 84 =keycode 85 =keycode 86 = Leftkeycode 87 = Homekeycode 88 = Endkeycode 89 =keycode 90 = Upkeycode 91 = Downkeycode 92 = Priorkeycode 93 = Nextkeycode 94 =keycode 95 =keycode 96 = Rightkeycode 97 = Num_Lockkeycode 98 = Home KP_7 KP_7keycode 99 = Left KP_4 KP_4keycode 100 = End KP_1 KP_1keycode 101 =keycode 102 = KP_Dividekeycode 103 = Up KP_8 KP_8keycode 104 = KP_5 KP_5 KP_5keycode 105 = Down KP_2 KP_2keycode 106 = KP_Insert KP_0 KP_0keycode 107 = KP_Multiplykeycode 108 = Prior KP_9 KP_9keycode 109 = Right KP_6 KP_6keycode 110 = Next KP_3 KP_3keycode 111 = Delete KP_Decimal KP_Decimalkeycode 112 = KP_Subtractkeycode 113 = KP_Addkeycode 114 =keycode 115 = KP_Enter
144 Solaris Advanced User’s Guide • May 2002
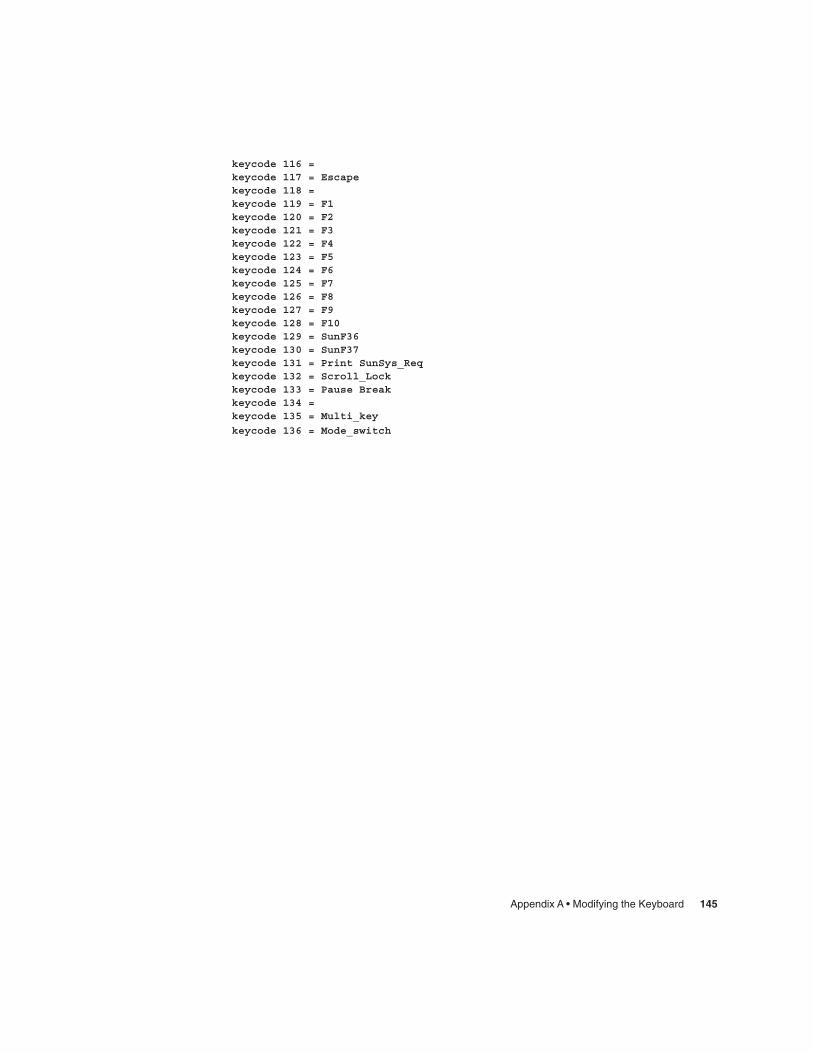
keycode 116 =keycode 117 = Escapekeycode 118 =keycode 119 = F1keycode 120 = F2keycode 121 = F3keycode 122 = F4keycode 123 = F5keycode 124 = F6keycode 125 = F7keycode 126 = F8keycode 127 = F9keycode 128 = F10keycode 129 = SunF36keycode 130 = SunF37keycode 131 = Print SunSys_Reqkeycode 132 = Scroll_Lockkeycode 133 = Pause Breakkeycode 134 =keycode 135 = Multi_key
keycode 136 = Mode_switch
Appendix A • Modifying the Keyboard 145

146 Solaris Advanced User’s Guide • May 2002
Index
Numbers and Symbols., See dot (.)/, See forward slash (/)-, command option designator, 22!, See exclamation point (!)#, See pound sign (#)$, See dollar sign ($)&, See ampersand (&)*, See asterisk (*):, See colon (:);, See semicolon (;)?, See question mark (?)\, See backslash (\)^, See carat (^)~, See tilde (~ )%, See percent sign (%)@, See at sign (@)+, mailx folder designator, 94\, vi search command, 74.., parent directory, 35, 43>, redirect symbol, 22|, pipe symbol, 23-9 option (pkill command), 56
Aa command (vi), 67A command (vi), 67-a option
lpstat command, 108ls command, 43
aborting, See cancelingabsolute permissions, 45, 48accelerators, See keyboard equivalentsaccess control mechanisms, 120accounts, defined, 15Again operation, keyboard equivalent, 18aging of passwords, 25alias environment variable, 131aliases, 131aliases (mail), 96, 100
.mailrc file compared to /etc/aliasesfile, 100
defined, 96private, 97public, 98sending messages to
.mailrc aliases, 97/etc/aliases aliases, 99
setting upin /etc/aliases file, 98, 100in .mailrc file, 97
aliases file, See /etc/aliases fileampersand (&)
background symbol, 23escaping, 53mailx prompt, 85metacharacter, 51searching for, 52
appending text (vi), 67apropos command, 27arrow keys, moving with (vi), 65asterisk (*)
grep command operator, 52
147
asterisk (*) (continued)mailx saved-message designator, 93metacharacter, 51searching for, 52wildcard character
changing permissions with, 45, 47copying files with, 31deleting files with, 32grep command, 52vi search command, 75
at sign (@)in email addresses, 84in passwords, 24
-auth option (Xsun command), 121authorization protocols, 121
MIT-MAGIC-COOKIE-1 authorizationprotocol, 121, 123
SUN-DES-1 authorization protocol, 121autowrap, command entry and, 20
B~b command (mailx), 101b command (vi), 65B command (vi), 65“back” command (vi), 65Back Space key, vi and, 66background, running commands in, 23backslash (\)
command continuation symbol, 20as escape character, 51, 53, 73escaping, 53, 74metacharacter, 51searching for, 52vi search commands, 74
backward searching (vi), 73banner page suppression (lp), 106base names, 40bash command, 128.bash_profile file
environment variables in, 131location of, 128environment variables in
HISTORY, 133set commands, 133umask (file permissions), 135commonly used, 129
.bash_profile file, environment variables in(continued)
PATH, 131Bcc: prompt (mailx), 90, 101bdiff command, 39beginning of line
inserting text at (vi), 67moving to (vi), 65searching for (vi), 74
beginning of wordmoving to (vi), 65searching for (vi), 74
/bin/bash command, 128/bin/csh command, 128/bin/ksh command, 128/bin/sh command, 128/bin/tcsh command, 128/bin/zsh command, 128blind carbon copies (mailx), 90, 101block operations, See copyingbottom of screen, moving to (vi), 66Bourne Again shell
command for, 128command prompt for, 130, 132environment variables for
See .bash_profile filehelp for, 16home directory specification, 34repeating commands and, 20user profile file for
See .bash_profile fileBourne shell
as default shell, 16command for, 128command prompt for, 130, 132environment variables for
See .profile filehelp for, 16home directory specification, 35user profile file for
See .profile filebuffer (vi), 62
C~c command (mailx), 91, 101c command (mailx), 93
148 Solaris Advanced User’s Guide • May 2002
-c optionlpstat command, 108
C shellcommand for, 128command prompt for, 130, 132environment variables for
See .cshrc filehelp for, 16home directory specification, 34repeating commands and, 20user profile for
See .cshrc filecampus area network (CAN), defined, 112CAN (campus area network), defined, 112cancel command, 109canceling
consulted search-and-replace, 75displaying, 27mailx messages
if screen freezes during entry, 90unsent messages, 90, 101
print requests, 109remote connection, 114
Caps Lock key, vi and, 61carat (^)
beginning-of-line command (vi), 65, 74grep command operator, 51, 53searching for, 52
carbon copies (mailx), 90, 101case, changing (vi), 78case sensitivity
command names, 19searching files, 50vi
command names, 62, 65searches, 73
cat command, 32Cc: prompt (mailx), 90, 101cc command (vi), 68cd command, 34, 129CDE (Common Desktop Environment),
described, 14CDPATH environment variable, 129changing
access to server, 122, 124authorization protocol, 121case (vi), 78command prompt, 132
changing (continued)directories, 34, 129keyboard, 137, 145passwords, 25permissions, 43, 48, 134text
from command line, 19email (unsent), 84from vi, 61, 68
vi mode, 61working directory, 34
character strings, defined, 73characters
deleting (vi), 69moving left or right one character (vi), 65replacing (vi), 68substituting (vi), 68
chmod commandabsolute permissions, 45, 48relative permissions, 43, 45umask command vs., 134
clearing screen (vi), 62client authority file, 123client_program program, 125:co command (ex), 72colon (:)
in mail alias names, 98vi commands beginning with, 62
command history, 20, 129, 133command line interface (CLI), described, 13command mode (vi), 62command prompt
changing, 132default, 18, 130described, 18environment variable for defining, 130
Command Toolremote machines, 119typing commands using, 15, 20
commands, 15, 27aliases, 131background running of, 23case sensitivity, 19as executable files, 29executing remotely, 116help for, 16, 26keyword lookup, 27long, 20
Index 149
commands (continued)multiple, 19options, 22PATH environment variable and, 130piping output, 23redirecting output, 22remote execution, 116repeating, 20repeating vi, 70status of, 55syntax, 26typing, 15, 19, 24
correcting typing mistakes, 19long commands, 20multiple commands, 19options, 22overview, 19remote entry, 116repeating previous commands, 20repeating vi commands, 70
commenting out /etc/aliases file lines, 99Common Desktop Environment (CDE),
described, 14comparing, files, 37, 39Compose Key, disabling/enabling, 137concatenating files, 32(continue): message (mailx), 96Control key remapping (IA based systems
only), 141, 145copy
of directories, 37from clipboard, keyboard equivalent, 18to clipboard, keyboard equivalent, 18directories, 37keyboard equivalent for, 18of directories remotely, 115of files
description, 31remotely, 115
of linesin ex, 72in vi, 69
of mailto a file, 93to a folder, 93
of previous commands, 20copy and paste, See copyCopy operation, keyboard equivalent, 18
correcting typing mistakescommand line, 19email (unsent), 84vi, 61
counts, for repeating commands (vi), 70cp command, 31, 37cpu time, 55creation of
directories, 35files
touch command, 30vi command for, 60
csh command, 128.cshrc file
described, 128environment variables in
history, 133listing, 43location of, 128environment variables in, 129
commonly used, 129alias, 131PATH, 130set commands, 132umask (file permissions), 134
Ctrl-B command (vi), 67Ctrl-C command (command line), 27Ctrl-C command (mailx), 90, 101Ctrl characters, in passwords, 24Ctrl-D command
mailx, 85, 101vi, 66
Ctrl-F command (vi), 66Ctrl-L command (vi), 62Ctrl-U command (vi), 67~Ctrl-Z command, suspending remote
connection, 114~~Ctrl-Z command, suspending remote
connection, 115cursor, See moving around in files (vi)customization, 127
of environment variables, 128, 134of file permissions, 134of initialization files, 127overview, 127
cut and paste, See movingCut operation, keyboard equivalent, 18cw command (vi), 68
150 Solaris Advanced User’s Guide • May 2002
D:d command (ex), 73~d command (mailx), 101d command (mailx), 87-d option
lp command, 104, 106lpstat command, 109
dash (-)command option designator, 22file type indicator, 42
date command, 19dd command (vi), 69dead.letter file, 90, 101defaults
authorization protocol, 121See also security
command prompt, 18, 130directory, 30file permissions, 134permissions, 44printer, 129shell, 16, 127vi mode, 61
deletionof command line, 19of directories, 37of files
description, 32temporary work files, 41
of mail, 87of text
ex command, 73vi commands, 69
of typing mistakes, 19devices, 29df command, 57diff command, 37diff3 command, 39directories, 33, 37
changing, 34, 129changing permissions, 43, 48, 134copying, 37copying remotely, 115creation, 35current directory (.), 43default, 30defined, 29deletion, 37
directories (continued)determining current location, 34as files, 29display of directory disk usage, 57display of permissions, 42display of remotely, 116display of status, 42environment variables for, 129folder, 94hierarchy of, 33home directory
changing to, 30, 34defined, 30defining absolute path to, 129remote login and, 112
listing, 57moving, 36overview, 29parent directory (..), 35, 43path names, 36
defined, 33environment variables for, 129
permissions, 48absolute, 45, 48changing, 43, 48, 134default setting, 134defaults described, 44described, 41displaying, 42
print working (pwd), 34renaming, 36root directory (/), 33searching
See searching, files and directoriesstatus, displaying, 42subdirectories, 33working, 34
disabling Compose Key, 137disk storage, managing, 57display
of Command Tool window, 15of directories remotely, 116of directory disk usage, 57of directory permissions, 42of directory status, 42of disk usage, 57of environment variables, 128of file contents, 32
Index 151
display (continued)of file permissions, 42of file status, 42of file type, 32of history list, 20interruption of, 27of mail headers, 86of manual pages, 26of network user information, 117of permissions, 42of printer status, 107, 109of property window, keyboard
equivalent, 18of remote login location, 115of remote user information, 117of Shell Tool window, 15of users on your file server, 89
DISPLAY environment variable, 118, 124ditroff program, 59documents, defined, 29dollar sign ($)
command prompt, 18, 130end-of-file designator (ex), 72end-of-line command (vi), 65, 74escaping, 53grep command operator, 52metacharacter, 51
dot (.)~. command (mailx), 101current directory, 43current line designator (ex), 72escaping, 53file prefix, 43grep command operator, 52listing hidden (dot) files, 43metacharacter, 51search wildcard character (vi), 74searching for, 52
dot-dot (..), parent directory, 35, 43dot files, 43double quotes
grep command and, 51double quotes, grep command and, 53down one line, moving (vi), 65du command, 57dumb terminals, 130duplicating, See copydw command (vi), 69
Ee command (vi), 65echo, passwords and, 16, 25editing, See changingeditor, See vi editorelectronic mail, See mailemail, See mailenabling Compose Key, 137“end” command (vi), 65end of file
copying to in ex, 72marking in mailx, 85, 101
end of lineappending text to (vi), 67moving to (vi), 65searching for (vi), 74
end of word, moving to (vi), 65ending, See quittingentering commands, See commands, typingentry mode (vi), 61env command, 128environment variables, 128, 134
alias, 131CDPATH, 129defined, 127DISPLAY, 118, 124displaying, 128HISTORY, 129, 133HOME, 129LANG, 129LOGNAME, 129LPDEST, 129MAIL, 129MANSECTS, 129networked applications and, 118noclobber, 133PATH, 130PS1, 130, 132SHELL, 130TERM, 130TERMINFO, 130TZ, 130umask, 134user profile, 129, 134
erasing, See deletingerror messages
“Sorry”, 26“Stranger: unknown host”, 113
152 Solaris Advanced User’s Guide • May 2002
error messages (continued)“No write since last change”, 63password, 25
Esc key, vi command mode, 61escape character (\), 51, 53, 73escaping escape character, 53, 74escaping to shell command (mailx), 101/etc/aliases file, 98, 100
.mailrc file compared to, 100sending mail to, 99setting up aliases in, 98, 100
/etc/hosts.equiv file, 112, 115, 117/etc/passwd file, 115, 117/etc/profile file, 128ex commands, 62, 71, 73
case sensitivity on/off (:set ic, :set noic), 73copying lines (:co), 72deleting lines (:d), 73described, 62, 71inserting files (:r), 76line numbering (:set nu, :set nonu), 71moving lines (:m), 72opening files (:n), 76quitting, saving (:wq) and not saving (:q,
:q!), 63saving changes, quitting (:wq) and not
quitting (:w), 63searching and replacing (:g), 75undoing (:u), 78
exclamation point (!)~! command (mailx), 101command repetition operator, 20escaping, 53metacharacter, 51not operator, 40searching for, 52
-exec option (find command), 41executable files, defined, 29execute permission
absolute, 46, 48relative, 41, 44
executing commands remotely, 116exit command (SunOS), 17
exiting, See quitting
F~f command (mailx), 101-f option
lpstat command, 109mailx program, 95
fc -l command, 21fc -s command, command repetition operator
(Korn shell), 22fg command, reactivating remote
connection, 114file command, 32File Manager, 29file systems, managing disk storage for, 57files, 29, 33, 37, 48
changing permissions, 43, 48, 134comparing, 37, 39concatenating, 32copying, 31
remotely, 116copying mail to, 93copying remotely, 115creating
with touch command, 30with vi, 60
defined, 29deleting, 32
permanent files, 32temporary work files, 41
display of contents, 32display of permissions, 42display of status, 42displaying type, 32dot, 43editing
See vi editorexecutable, 29hidden, listing, 43initialization, 127inserting into mail, 91, 101inserting into other files, 76large, comparing, 39length of, displaying, 42listing, 31, 42listing hidden, 43
Index 153
files (continued)loading new, keyboard equivalent, 18moving, 31naming
base name, 40renaming, 31uniqueness requirements, 33
openingwith ex, 76keyboard equivalent, 18with vi, 60
overview, 29overwrite prevention, 133path names, 33, 36permissions, 48
absolute, 45, 48changing, 43, 48, 134default setting, 134defaults described, 44described, 41displaying, 42
printingSee printing
reading mail saved in, 95renaming, 31saving, keyboard equivalent, 18saving mail in, 93searching
See searching, files and directoriessearching for, 39, 41sending mail directly to, 95size of, displaying, 42status, displaying, 42temporary, deleting, 41wildcard characters and, 31
filtering, grep command and, 50find command, 39, 41Find operation, keyboard equivalent, 18finding, See searchingfinger command, 89folders (mailx), 93, 95
listing, 95previous folder, 95reading mail saved in, 95saving and copying mail to, 93sending mail directly to, 95switching to/from mailbox, 95switching to/from mailbox to/from, 95
foreign languages, environment variablefor, 129
forward slash (/)root directory, 33vi search command, 73
forwarding mail, 101function key remapping (IA based systems
only), 141, 145
G:g command (ex), 75G command (vi), 75GNOME desktop, described, 14graphical user interface (GUI), described, 13greater than sign (>), redirect symbol, 22grep command, 49, 54
basic search, 49case sensitivity, 50escape character, 51, 53filter function, 50lines not part of file, 51metacharacters
as operators, 51, 53searching for, 52
multi-word strings, 51multiword strings, 51regular expressions and, 51single or double quotes, 51, 53
-group option (find command), 40Group user category, 41groups
changing permissions for, 45sending mail to, 96, 100
GUI (graphical user interface), described, 13
Hh command
mailx, 87vi, 65
~h command (mailx), 91, 101h- command (mailx), 87H command (vi), 66
154 Solaris Advanced User’s Guide • May 2002
headers, mailx, See mailx program, headershelp
for commands, 16, 26keyboard equivalent for, 18mailx program, 87, 102
hidden files, listing, 43“high” command (vi), 66history command, 20, 129HISTORY environment variable, 129, 133$home command, 35home directory
changing to, 30, 34defined, 30defining absolute path to, 129remote login and, 112
HOME environment variable, 129host-based access control, 120, 122hosts.equiv file, 112, 115, 117hyphen, See dash (-)
Ii command (vi), 61, 67I command (vi), 67IA based machines
Compose Key disabling/enabling, 137keyboard modification
function key remapping, 141, 145undoing remapping, 142, 145
Solaris keyboard equivalents(accelerators), 17
icons, keyboard equivalents, 18ID number, canceling print requests by, 109idle state, 56initialization files, 127inserting
filesmailx, 91, 101vi, 76
messages (mailx), 91, 101text (vi), 61, 67
internetworks, defined, 112interrupting display, 27
Jj command (vi), 65
Kk command (vi), 65-k option (df command), 57keyboard equivalents (accelerators), 17keyboard modification, 137, 145
Compose Key disabling/enabling, 137Control key remapping (IA based systems
only), 141, 145left-handed key remapping (SPARC
only), 138undoing remapping
IA, 142, 145SPARC, 140
keyword lookup, for command help, 27Korn shell
command for, 128command prompt for, 130, 132environment variables for
See .profile filehelp for, 16home directory specification, 34repeating commands and, 21user profile file for
See .profile fileksh command, 128
Ll command (vi), 65L command (vi), 66-l option
ls command, 42ps command, 55rlogin command, 113rusers command, 117
LAN (local area network), defined, 111LANG environment variable, 129large files, comparing, 39last-line mode (vi), 62left
deleting one character to left of cursor(vi), 69
Index 155
left (continued)inserting text to left of cursor (vi), 67moving to (vi), 65
left-handed keyboard remapping (SPARConly), 138
left-handed mouse button remapping, 137lefty.data file, 139length of files, displaying, 42line numbering (vi), 71line printer subsystem, See printingline wrap, command entry and, 20lines
appending text to end (vi), 67changing (vi), 68copying
ex command, 72vi commands, 70
deletingex command, 73vi command, 69
erasing command line, 19inserting text at beginning (vi), 67moving to beginning or end (vi), 65moving
ex command, 72vi commands, 70
moving down one line (vi), 65moving to specific (vi), 75opening (vi), 67undoing changes (vi), 69
listingdirectories, 57files, 31, 42folders (mailx), 95hidden files, 43mail, 86mailx commands, 102tilde commands (mailx), 102
loading new files, keyboard equivalent, 18local area network (LAN), defined, 111local language, 129logging in
basic procedure, 15remotely, 112, 115, 118as someone else, 113
logging out, 17.login file
environment variables in, 129, 134
.login file (continued)described, 128listing, 43location of, 128
login namesdefined, 15defining, 129determining for other users, 89
login shells, 16default shell, 16, 127identifying your login shell, 127, 129remote shell command, 116user profile for, 128
logname command, 19LOGNAME environment variable, 129logout command, 114long commands, typing, 20long files, comparing, 39looking up, See searching“low” command (vi), 66lowercase, See case sensitivitylp command
defined, 103instruction, 64options summary, 105
LP print service, See printingLPDEST environment variable, 129lpstat command, 106, 109
options summary, 108ls command, 31, 42
M:m command (ex), 72~m command (mailx), 91, 101M command (vi), 66-m option (lp command), 105-m time option (find command), 40magic cookie authorization protocol, See
MIT-MAGIC-COOKIE-1 authorizationprotocol
mail, See mailx programmail aliases, See aliases (mail)MAIL environment variable, 129Mail Tool, 97mailbox, 83, 129
156 Solaris Advanced User’s Guide • May 2002
.mailrc filealias setup in, 97/etc/aliases file compared to, 100set askcc variable, 91set folder variable, 94
mailx program, 83, 102address lookup, 89aliases
See aliases (mail)basics, 83, 86blind carbon copies, 90, 101canceling messages
if screen freezes during entry, 90unsent messages, 90, 101
carbon copies, 90, 101copying messages
to a file, 93to a folder, 93
correcting typing errors, 84dead.letter file, 90, 101deleting messages from mbox file
and saving elsewhere, 93without saving, 87
folders, 93, 95listing, 95previous folder, 95reading mail saved in, 95saving and copying mail to, 93sending mail directly to, 95switching to/from mailbox, 95switching to/from mailbox to/from, 95
forwarding messages, 101headers
described, 86, 93displaying, 86prompts for, 84, 91, 101
help, 87, 102inserting files into current message, 91, 101inserting saved messages into current
message, 91, 101listing commands, 102listing messages, 86login name, 84mailbox, 83, 129(continue): message, 96maximum line length, 90mbox file, 83, 86
mailx program (continued)multiple recipients
carbon copies to, 91sending messages to, 89
overview, 83printing messages, 88, 101quitting, 86, 88, 101reading messages
basic procedure, 85in files or folders, 95
replying to messages, 92, 101saving messages
current message, 101in mbox file, 83, 86from mbox file to folder, 93, 95from mbox file to other file, 93
sending messages, 92basic procedure, 84, 89blind carbon copies, 90, 101canceling unsent messages, 90carbon copies, 90, 101directly to a file or folder, 95to /etc/aliases aliases, 99group mailings, 96, 100inserting files into current message, 91,
101inserting saved messages into current
message, 91to .mailrc aliases, 97multiple recipients, 89undeliverable messages, 90
starting, 84tilde commands
See tilde commands (mailx)To: prompt, 91, 101undeleting messages, 88undeliverable messages, 90version number, 85, 87vi usage with, 96
man command, 26MANSECTS environment variable, 129manual pages (man pages)
described, 16displaying, 26setting available sections of, 129
mbox file, described, 83, 86
Index 157
messagesSee error messagesSee mail
Meta key, 17, 141metacharacters (grep command), 51, 53“middle” command (vi), 66middle of screen, moving to (vi), 66MIT-MAGIC-COOKIE-1 authorization protocol
allowing access when using, 123as default, 121, 123described, 121.Xauthorithy file and, 123
mkdir command, 35modes (vi), 61more command, 32mouse buttons, remapping, 137moving
directories, 36files, 31lines
ex command, 72vi commands, 70
moving around in files (vi), 64, 67arrow keys and, 65beginning of line, 65beginning of word, 65bottom of screen, 66down one line, 65end of line, 65end of word, 65left one character, 65left one word, 65middle of screen, 66overview, 64paging, 66right one character, 65right one word, 65scrolling, 66specific line, 75top of screen, 66
multiple commands, typing, 19multiple copies, printing, 105multiple mail recipients, 89multiple vi operations
multiple, simultaneous sessions, 63multiple-file editing, 76
mv command, 31, 36
N:n command (ex, 76N command (vi), 73n command (vi), 73-n option (lp command), 105-name option (find command), 40naming
directories, renaming, 36files
base name, 40renaming, 31uniqueness requirements, 33
passwords, 24navigating, See moving around in filesnetworks, 111, 118
aborting remote connection, 114copying files remotely, 115defined, 111displaying user information, 117executing commands remotely, 116logging in remotely, 112
basic procedure, 112without home directory, 112as someone else, 113to unknown machine, 113
overview, 111protocols, defined, 112running networked applications, 112, 115,
118security fundamentals, 119, 125
access control mechanisms, 120caution, 122manipulating server access, 122, 124MIT-MAGIC-COOKIE-1 authorization
protocol, 121, 123overview, 119running clients remotely or locally as
another user, 124SUN-DES-1 authorization protocol, 121
suspending remote connection, 114verifying your location, 115
New operation, keyboard equivalent, 18-newer option (find command), 40next occurrence, vi search, 73next screen, moving to, 66“No write since last change” message, 63-noauth option (Xsun command), 120, 122nohup command, 24
158 Solaris Advanced User’s Guide • May 2002

not operation (grep command), 51not operator (!), 40nroff program, 59numbering lines (vi), 71
Oo command (vi), 67O command (vi), 67-o flag (find command), 40-o nobanner option (lp command), 106-o option (lpstat command), 109on-line help, See helpOpen File operation, keyboard equivalent, 18Open Window operation, keyboard
equivalent, 18opening
filesex, 76keyboard equivalent, 18vi, 60
lines (vi), 67options, command, 22Others user category, 41
P~p command (mailx), 92, 101P command (vi), 70p command (vi), 70-p option (lpstat command), 108paging (vi), 66parent directory (..), 35, 43passwd command, 25/passwd file, 112, 115, 117password error message, 25passwords, 24, 26
aging, 25changing, 25choosing, 24defined, 15error message, 25overview, 24“Sorry” error message, 26remote login, 112typing, 16
passwords (continued)when to change, 24
Paste operation, keyboard equivalent, 18pasting, See copyPATH environment variable, 130path names, 36
defined, 33environment variables for, 129
percent sign (%)command prompt, 130reactivating remote connection, 114
period (.), See dot (.)permissions, 48
absolute, 45, 48changing, 43, 48, 134defaults
described, 44setting, 134
described, 41displaying, 42wildcard character (*) and, 45, 47
PIDs (process identification numbers), 55piping
command output, 23command output through grep, 50du output through sort, 57mail to lp command, 88
pkill command, 56plus sign (+), mailx folder designator, 94pound sign (#)
/etc/aliases file comment designator, 99in passwords, 24root prompt, 98, 130
previous folder (mailx), 95previous occurrence, vi search, 73previous screen, moving to (vi), 66Print operation, keyboard equivalent, 18-print option (find command), 39printing, 103, 110
banner page suppression, 106canceling, 109command output, 23to default printer, 103default printer environment variable, 129file search results, 39files, 64keyboard equivalent for, 18mail, 88, 101
Index 159
printing (continued)multiple copies, 105options summary for, 105requesting completion notification, 105to specific printer, 104status determination, 106, 109
all status information, 107available printers, 107options summary for, 108overview, 106print requests, 106printer status, 108
submitting print requests, 103titling printout, 106vi files, 64working directory, 34
process identification numbers (PIDs), 55processes, 55.profile file
described, 128environment variables in, 129, 131
commonly used, 129HISTORY, 133PATH, 130PS1 (command prompt), 132set commands, 133umask (file permissions), 134
listing, 43location of, 128
profile file, described, 128prompts, See command promptproperty window, displaying, keyboard
equivalent, 18Props operation, keyboard equivalent, 18protocols, 112ps command, 55PS1 environment variable, 130, 132put command (vi), 70pwd command, 34
Q:q command (ex), 63:q! command (ex), 63~q command (mailx), 101q command (mailx), 86, 88
question mark (?)~? command (mailx), 101escaping, 53mailx help command, 87, 102metacharacter, 51searching for, 52vi search command, 73
quittingmailx program, 86, 88, 101processes, 56SunOS, 17vi, 62, 64
quotation marks, See double quotes
Rr command
mailx, 92vi, 68
:r command (ex), 76~r command (mailx), 92, 101R command (mailx), 92-R option (lpstat command), 109-r option
cp command, 37lpstat command, 109rcp command, 115rm command, 37
rcp command, 115, 124read permission
absolute, 46, 48relative, 41, 43
reading files into files (vi), 76reading mail, See mailx program, reading
messagesrecursive copy, 37recursive removal, 37redirecting command output, 22Redo operation, keyboard equivalent, 18redrawing screen (vi), 62regular expressions, 51relative path names, 36relays, defined, 112remapping
keyboard, 137, 145mouse buttons, 137
remote login, 112, 115, 118
160 Solaris Advanced User’s Guide • May 2002
remote machines, See networksremote shell command, 116renaming
directories, 36files, 31
repeatingcommand line commands, 20operations, keyboard equivalent, 18vi commands, 70
replacing, searching and (vi), 53, 75replying to mail (mailx), 92, 101Return key, vi and, 65right
appending text to right of cursor (vi), 67moving to (vi), 65
rlogin command, 112, 115, 118aborting a connection, 114basic procedure, 112without home directory, 112networked applications and, 118as someone else, 113suspending a connection, 114to unknown machine, 113
rm command, 32, 37rmdir command, 37root directory (/), 33root prompt, 98, 130root user, becoming, 98rsh command, 116runnable state, 55rusers command, 89, 117
S~s command (mailx), 101s command (mailx), 93s command (vi), 68-s option (lpstat command), 107, 109-S option (lpstat command), 109Save operation, keyboard equivalent, 18saving
keyboard equivalent for, 18mail
current message, 101in mbox file, 83, 86from mbox file to folder, 93, 95from mbox file to other file, 93
saving (continued)vi changes
and quitting, 63without quitting, 63
screen, redrawing (vi), 62scrolling (vi), 66searching
command keyword lookup, 27for files, 39, 41files and directories, 49, 54
basic search, 49case sensitivity, 50escape character, 51, 53filtering, 50metacharacters and, 51, 53multi-word strings, 51not operation, 51regular expressions for, 51, 53single or double quotes and, 51, 53
mail addresses, 89for metacharacters, 52vi, 53, 73, 75
searching and replacing (vi), 53, 73, 75security, 119, 125
access control mechanisms, 120caution regarding, 122manipulating server access, 122, 124MIT-MAGIC-COOKIE-1 authorization
protocol, 121, 123overview, 119running clients remotely or locally as another
user, 124SUN-DES-1 authorization protocol, 121xauth program, 122.Xauthority file, 122, 124
semicolon (;)command line concatenator, 19escaping, 53
sending mail, See mailx program, sendingmessages
series of files, editing (vi), 76set askcc variable (.mailrc file), 91set folder variable (.mailrc file), 94set history command, 133:set ic command (ex), 73set noclobber command, 133:set noic command (ex), 73:set nonu command (vi), 71
Index 161
:set nu command (vi), 71set prompt command, 132sh command, 128SHELL environment variable, 130Shell Tool window, typing commands by
using, 15, 20shells, 16
default shell, 16, 127identifying your login shell, 127, 129remote shell command, 116user profile files for, 128
shortcuts, home directory specification, 34single quotes, grep command and, 51, 53size of files, displaying, 42slash, See backslashsleeping state, 55“Sorry” error message, 26sort command, 57source command, 131Space Bar, vi and, 66space on disk, managing, 57SPARC machines
keyboard modificationleft-handed key remapping, 138undoing remapping, 140
Solaris keyboard equivalents(accelerators), 17
standard work sessions, defined, 15start of line, See beginning of linestart of word, See beginning of wordstarting
mailx program, 84vi, 59
statusfile, 42printer, 106, 109process, 55
status line (vi), 60Stop operation, keyboard equivalent, 18“Stranger: unknown host” message, 113strings, defined, 73subdirectories, described, 33Subject: prompt (mailx), 84, 91, 101substituting characters (vi), 68SUN-DES-1 authorization protocol
allowing access when using, 124described, 121.Xauthority file and, 123
SunOS commands, 15, 27suspending remote connection, 114swapping
between files (vi), 76between folders and mailbox (mailx), 95
SXBRK state, 56syntax, commands, 26system administrators, functions of, 15system clock, 130system management, See admintoolsystem profile file, 128
T~t command (mailx), 101-t option (lp command), 106-t option (lpstat command), 107TC shell
command for, 128command prompt for, 130, 133environment variables for
See .tcshrc filehelp for, 16home directory specification, 34repeating commands and, 20user profile file for
See .tcshrc filetcsh command, 128.tcshrc file
environment variables incommonly used, 129alias, 131set commands, 133umask (file permissions), 135, 131history, 133
location of, 128temporary files, deleting, 41TERM environment variable, 130terminals
environment variables for, 130from which command started, 55
terminating, See quittingTERMINFO environment variable, 130text mode (vi), 61tilde (~)
aborting remote connection, 114home directory specifier, 34
162 Solaris Advanced User’s Guide • May 2002
tilde (~) (continued)in mail, 101suspending remote connection, 114vi case toggle, 78vi editing screen marker, 60
tilde commands (mailx)inserting a message, 91listing, 102literal tilde entry, 101overview, 100replying to email, 92sending carbon copies, 91starting vi while composing email, 96summary of, 101viewing a complete message, 92
time zone, setting, 130titling printouts (lp), 106To: prompt (mailx), 91, 101toggling, See changingtop of screen, moving to (vi), 66touch command, 30traced state, 56troff program, 59troubleshooting, vi, 61typing mistakes, See correcting typing mistakesTZ environment variable, 130
Uu command
mailx, 88vi, 68
:u command (ex), 78U command (vi), 69-u option (lpstat command), 109umask command, 134undeleting mail, 88undeliverable messages, 90Undo operation, keyboard equivalent, 18undoing changes (vi), 68undoing keyboard remapping
IA, 142, 145SPARC, 140
undoing undokeyboard equivalent, 18vi, 68
uppercase, See case sensitivityuser-based access control, 120, 122User category, 41user names, defined, 15-user option (find command), 40user profile file
defined, 128environment variables in, 129, 134location of, 128
user types, for setting permissions, 41/usr/openwin/bin/xauth program, 122
V~v command (mailx), 96-v option
grep command, 51lpstat command, 109
/var/mail directory, 83version number, mailx program, 85, 87vertical bar (|), pipe symbol, 23vi editor, 59, 77
appending text, 67buffers, 62Caps Lock key and, 61case sensitivity
command names, 62, 65searches, 73
case toggle, 78changing text, 61, 68command mode, 62commands
case sensitivity, 62, 65entering, 62repeating, 70summary of, 76
copying linesex command, 72vi commands, 70
creating files, 60cursor movement
See moving around in filesdeleting text
ex command, 73vi commands, 69
described, 59editing screen, 60
Index 163
vi editor (continued)entry mode, 61Esc key and, 61ex commands and
See ex commandsinserting files, 76inserting text, 61, 67
repeatedly, 71last-line mode, 62line numbering, 71mailx use of, 96modes, 61moving around in files
See moving around in filesmoving lines
ex command, 72vi commands, 70
multiple, simultaneous sessions, 63multiple-file editing, 76“No write since last change” message, 63opening files, 76opening lines, 67overview, 59paging, 66printing files, 64put command, 69quitting
and saving changes, 63without saving changes, 63
read-only version, 59redrawing screen, 62repeating commands, 70saving changes
and quitting, 63without quitting, 63
scrolling in, 66searching and replacing, 53, 73, 75shell environment variable for, 130starting, 59status line, 60substituting characters, 68text entry, 61troubleshooting unpredictable behavior, 62undoing changes, 68undoing undo, 68yank command, 70
vi search command, 74view command, 59, 77
viewing, See display
W:w command (ex, 63~w command (mailx), 101w command (vi), 65W command (vi), 65-w option (lp command), 105WAN (wide area network), defined, 111whatis command, 26who am i command, remote login, 115who command, 89wide area network (WAN), defined, 111wildcard characters
asterisk (*)changing permissions with, 45, 47copying files with, 31deleting files with, 32grep command, 52vi search command, 75
dot (.), vi search command, 74windows
closing to icons, keyboard equivalent, 18opening icons, keyboard equivalent, 18
“word” command (vi), 65words
changing (vi), 68deleting (vi), 69moving to end of word (vi), 65moving one word (vi), 65searching for beginning of (vi), 74
working directorychanging, 34printing, 34
:wq command (ex), 63wrapped lines, command entry and, 20write permission
absolute, 46, 48relative, 41, 44
Xx command
mailx, 86, 88vi, 69
164 Solaris Advanced User’s Guide • May 2002
~x command (mailx), 101X command (vi), 69X11 server, security fundamentals, 120, 125xauth program, 122.Xauthority file, 122, 124xhost command, running networked
applications with, 119xhost program, 122.xinitrc file, Compose Key
disabling/enabling, 137xmodmap command, 137, 139Xsun command
-auth option, 121-noauth option, 120, 122
YY command (vi), 70yank command (vi), 70yy command (vi), 70
Zz command (mailx), 87Z shell
command for, 128command prompt for, 130, 132environment variables for
See .zshrc filehelp for, 16home directory specification, 34repeating commands and, 20user profile file for
See .zshrc file.zlogin file
location of, 128zombie state, 56zsh command, 128.zshrc file
environment variables incommonly used, 129alias, 131HISTORY, 133set commands, 132umask (file permissions), 135, 131
location of, 128
ZZ command (vi), 63
Index 165

166 Solaris Advanced User’s Guide • May 2002