solid_modeling_project_#2_ reverse engineering of a connecting rod and documentation of its solid...
TRANSCRIPT

City College of New York School of Engineering
Mechanical Engineering Department
Spring-2014
Mechanical Engineering I 6500: Computer-Aided Design Instructor : Prof. Gary Benenson
Student : Mehmet Bariskan
Solid Modeling Project #2 : Reverse engineering of a
connecting rod and documentation of its solid model

2
Connecting Rod
The connecting rod is the intermediate member between the piston and the crankshaft. Its
primary function is to transmit the push and pull from the piston pin to the crank pin, thus
converting the reciprocating motion of the piston into rotary motion of the crank. A schematic
illustration of a connecting rod and its sections and parts are shown in Figure1.
Figure 1: Schematic illustration of a connecting rod.
The most common types of connecting rod materials are steel and aluminum. The most
common types of manufacturing processes are casting, forging and powdered metallurgy. The
rod small end attaches to the piston pin, which is most often press fit into the connecting rod
but can swivel in the piston. The connecting rod is under tremendous stress from the
reciprocating load represented by the piston, stretching and being compressed with every
rotation, and the load increases with increasing the engine speed.
Overview
The purpose of this project is to use a connecting rod as the basis for creating a solid model by
using the reverse engineering method. I will continue the process by performing a static Finite
Element Analysis. I will make several mesh studies. The mesh convergence is going to
monitored and evaluated. I will study of the deflection and deformation of the connecting rod
and find-out maximum stress areas.

3
Process
1- Freehand Drawing
A real object was obtained from a mechanic shop which is a connecting rod. Hand tools such as
a caliper, a ruler, a compass, radius gages and wire are used to capture the dimensions.
The real object was used to trace its edges to a drawing paper by using its projection. After all
edges were copied, I took all dimensions as possible to check and correct if there is any
discrepancy. The linear distances are measured by using either with a ruler or a caliper. The
wire was used to get the curved shapes from the connecting rod to the drawing paper. An
example of prepared a wire template and some of the measurement examples are shown in
Figures 2a, 2b, 2c and 2d. The freehand drawing is shown in Figure 3. (A large scale figure is
attached into the Drawing Section which is shown in Figure 12)
Figure 2 a: Copying the real object’s edge Figure 2 b: Preparing a wire template
Figure 2 c: Measurement Figure 2 d: Measurement

4
Figure 3: Freehand Drawing
SolidWorks software had been used to design the connecting rod by using the aid of the freehand
drawing. The “Grid” option was used to get better results in SolidWorks. I had changed the grid spacing
to 5 mm in the SolidWorks option menu to catch same grid distance with my freehand drawing.
2- Solid Modeling
I had attached the front view of the freehand drawing picture into the SolidWorks’s front plane by using
the “Sketch Picture” command. Firstly, I had created the axis and rings of the rod small end and the rod
bearing sections. The “Boss Extrude” command was used to create the sections with the thickness of 24
mm which are shown in Figure 4.
In the next step, I had created the I-beam, the rod bolt sections and the head of the cap by using the
“Boss-Extrude” and the “Cut-Extrude” commands after creating the sketches by tracing the picture of
the freehand drawing. The completed steps are shown in Figure 5.

5
Figure 4: Attaching the Front View in SolidWorks
Figure 5: Creating I-beam, Bolt Section and Head of the Cap

6
The next step, I had created the rest of the I-beam section by using the cut-extrude, the fillet and the
mirror commands. The process is shown in Figure 6 and Figure 7.
Figure 6: Creating the I-Beam
Figure 7: Creating the I-Beam
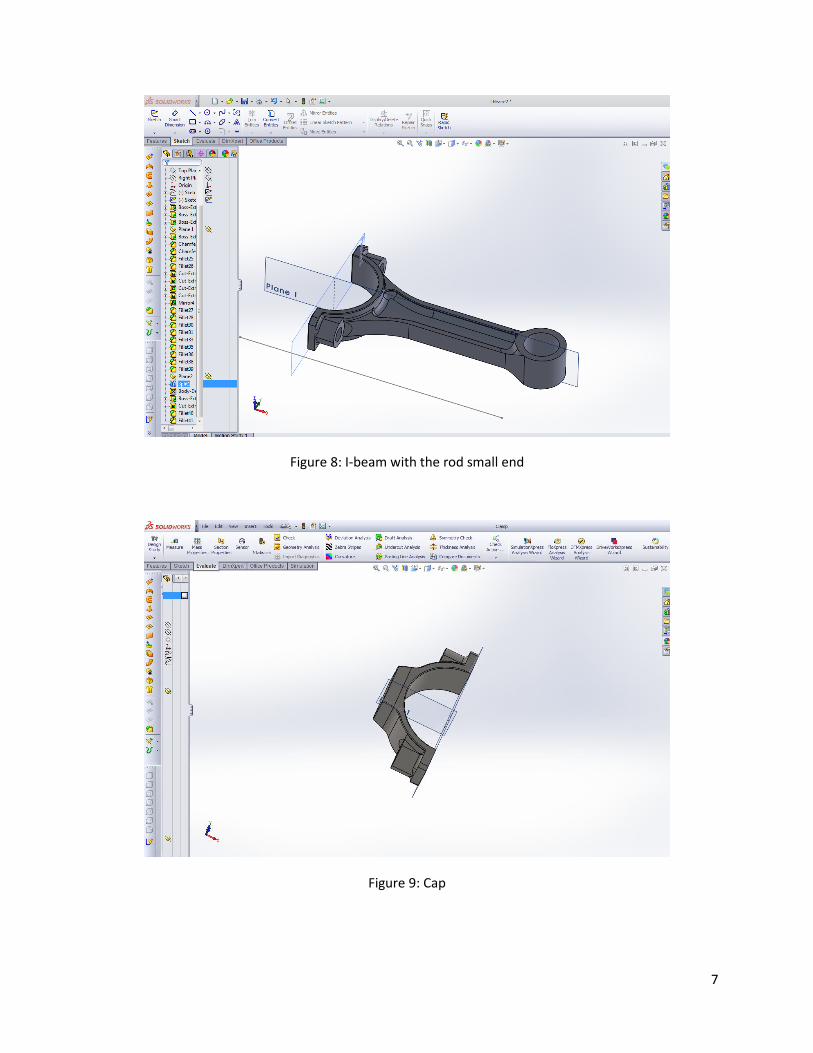
After the I-beam and the rod small end section were completed, I had used the Split command to split
the part and I deleted the cap section by using the delete body command. Then, I did the same
operation for the I-beam part. The parts are shown in Figure 8 and Figure 9.
7
Figure 8: I-beam with the rod small end
Figure 9: Cap

8
3- Drawings
Figure 10: The Technical Drawing of the Cap

9
Figure 11: The Technical Drawing of the I-Beam with small end

10
Figure 12: Freehand Drawing

11
4- Finite Element Modeling
Geometry of the Connecting Rod
The connecting rod was measured using the hand tools are described in the freehand drawing section. A
solid model of the connecting rod is shown in Figure 13. For Finite Element Analysis, the flash along the
entire connecting rod length was eliminated. The connecting rod was considered as a single part. The
split command was used to separate the cap and the I-beam sections in order to choose the surfaces
separately.The contact surfaces were bonded in the analysis section. I had to add some extra fillet to the
sharp edges in the process to avoid the infinite stresses.
Figure 13: Solid Model of the Connecting Rod
Material
The connecting rod has been used in this study is an Eagle branded rod. The material was forged from
AISI 5140 alloy steel. The mechanical properties of annealed AISI 5140 alloy steel are shown in Table 1.
Properties Metric
Tensile Strength 572.3 MPa
Yield Strength 293 MPa
Elastic Modulus 190-210 GPa
Table 1: The Mechanical Properties of Annealed AISI 5140 alloy steel

12
Boundary Conditions
In this study, four finite element models were analyzed. Two for the tensile loads and two for the
compressive loads was conducted. The axial load is 26.7 kN in all cases. The four studies are shown in
Figure 14.
Figure 14: Boundary Conditions
The properties of the material used for linear elastic finite element analysis are listed in Table 1. The
connecting rod was compared under two conditions which were described in the boundary condition
section. First, a 26.7 kN uniformly distributed load was applied at the crank end, while the piston end
was restrained, which is shown in Figure 14: Study 1. Second, a 26.7 kN uniformly distributed load was
applied at the piston end, while the crank end was restrained, which is shown in Figure 14: Study 2. A
similar comparison was also made for compressive load applications, which are shown in Figure 14:
Study 3 and Study 4.
13
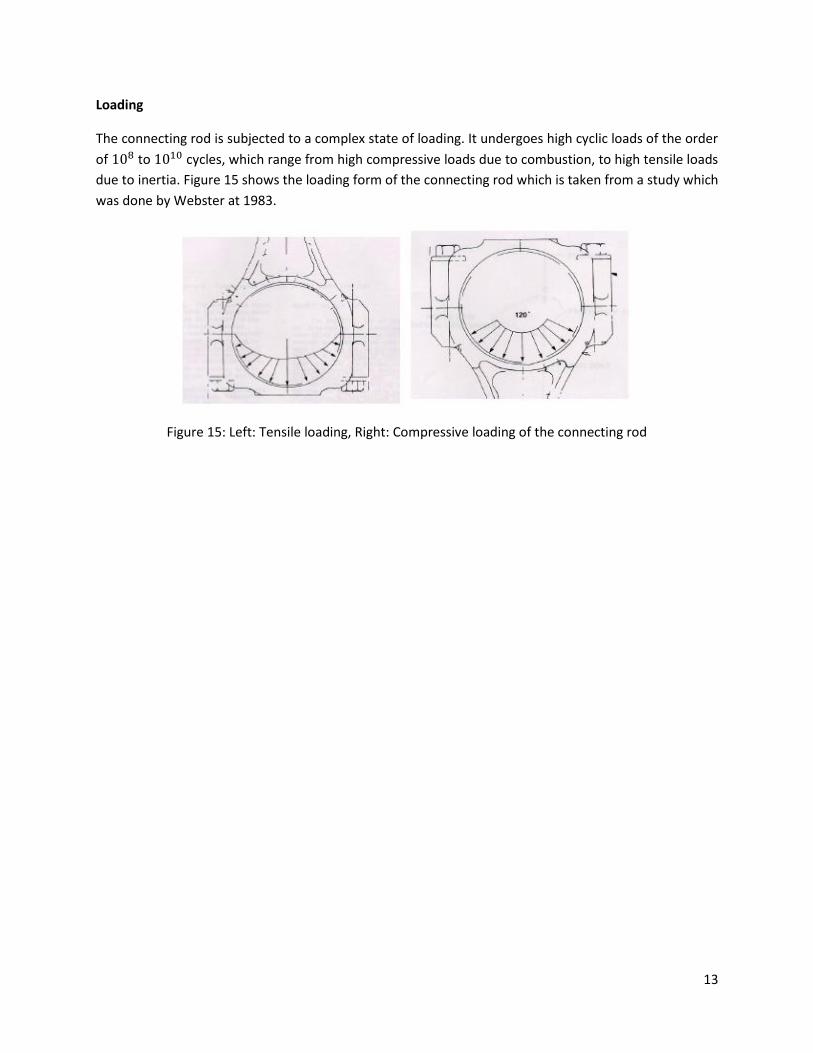
Loading
The connecting rod is subjected to a complex state of loading. It undergoes high cyclic loads of the order
of to cycles, which range from high compressive loads due to combustion, to high tensile loads
due to inertia. Figure 15 shows the loading form of the connecting rod which is taken from a study which
was done by Webster at 1983.
Figure 15: Left: Tensile loading, Right: Compressive loading of the connecting rod

14
Study 1: The tensile load at the crank end, while the piston end is restrained
Figure 16a: von Mises Stress distribution with static tensile load
Figure 16b: Displacement distribution with static tensile load

15
STUDY 1
Max. Stress in
the Axial
Direction
MPa
Max. Axial
Displacement
mm
Total # of
Element
Total # of
Nodes
Total # of
DOF Element
Size (mm)
Running
Time
(second)
Coarse Mesh
& Draft Qlty.
157.71 3698 1140 3506 7.93 1
Coarse Mesh
& High Qlty.
258.55 3698 7005 20655 7.93 1
Medium
Mesh & High
Qlty.
264.85 9810 18151 51486 4 2
Fine Mesh &
High Qlty.
269.50 58242 92616 273708 2 4
Fine Mesh &
High Qlty.
270.02 400104 589427 1751433 1 73
Fine Mesh &
Curvature B.
270.11 532252 776893 2314104 1 60
Curvature B. 270.14 3533176 4976226 14861622 0.5 762
Table 2: The Converge Study for Tensile Load
Graphic 1: Convergence Study Max. von Mises Stress versus Number of Degrees of Freedom (The tensile
load at the crank end, while the piston end is restrained)
0
50
100
150
200
250
300
0 500000 1000000 1500000 2000000 2500000
Max
. Vo
n M
ise
s St
ress
MP
a
Degrees of freedom
Von Mises Stress Convergence Study
Von Mises StressConvergence

16
Study 2: The tensile load at the piston end, while the crank end is restrained.
Figure 17a: von Mises Stress distribution with static tensile load
Figure 17b: Displacement distribution with static tensile load.

17
STUDY 2
Max. Stress in
the Axial
Direction
MPa
Max. Axial
Displacement
mm
Total # of
Element
Total # of
Nodes
Total # of
DOF Element
Size (mm)
Running
Time
(second)
Coarse Mesh
& Draft Qlty.
115.139 3783 1179 3249 7.93 1
Coarse Mesh
& High Qlty.
227.397 3814 7180 20532 7.93 1
Medium
Mesh & High
Qlty.
237.961 10004 17790 50178 4 1
Fine Mesh &
High Qlty.
257.482 58896 93539 267417 2 5
Fine Mesh &
High Qlty.
258.94 129965 199348 574284 1.5 11
Fine Mesh &
High Qlty.
262.07 399159 588130 1712646 1 42
Fine Mesh &
Curvature
261.98 540323 788240 2296524 1 57
Table 3: The Converge Study for Tensile Load
Graphic 2: Convergence Study Max. von Mises Stress versus Number of Degrees of Freedom (Tensile
load at the piston end, while the crank end is restrained.)
0
50
100
150
200
250
-500000 0 500000 1000000 1500000 2000000 2500000
Max
. Vo
n M
ise
s St
ress
MP
a
Degrees of freedom
Von Mises Stress Convergence Study
von Mises StressConvergence

18
Study 3: The compressive load at the crank end while the piston end is restrained
Figure 18a: von Mises Stress distribution with static compressive load
Figure 18b: Displacement distribution with static compressive load

19
STUDY 3
Max. Stress in
the Axial
Direction
MPa
Max. Axial
Displacement
mm
Total # of
Element
Total # of
Nodes
Total # of
DOF Element
Size (mm)
Running
Time
(second)
Coarse Mesh
& Draft Qlty.
153.50 3925 1213 3519 7.93 1
Coarse Mesh
& High Qlty.
208.242 3925 7377 21723 7.93 1
Fine Mesh &
High Qlty.
216.92 60061 95321 281391 2 5
Fine Mesh &
High Qlty.
223.72 131662 201761 597927 1.5 12
Fine Mesh &
High Qlty.
224.26 399716 588650 1749810 1 44
Fine Mesh &
Curvature
229.32 540303 789412 2349525 1 62
Fine Mesh &
Curvature
229.64 3544698 4995201 14906205 0.5 861
Table 4: The Converge Study for Compressive Load
Graphic 3: Convergence Study Max. von Mises Stress versus Number of Degrees of Freedom (The
compressive load at the crank end while the piston end is restrained)
0
50
100
150
200
250
300
0 500000 1000000 1500000 2000000 2500000
Max
. Vo
n M
ise
s St
ress
MP
a
Degrees of freedom
Von Mises Stress Convergence Study
Von Mises StressConvergence

20
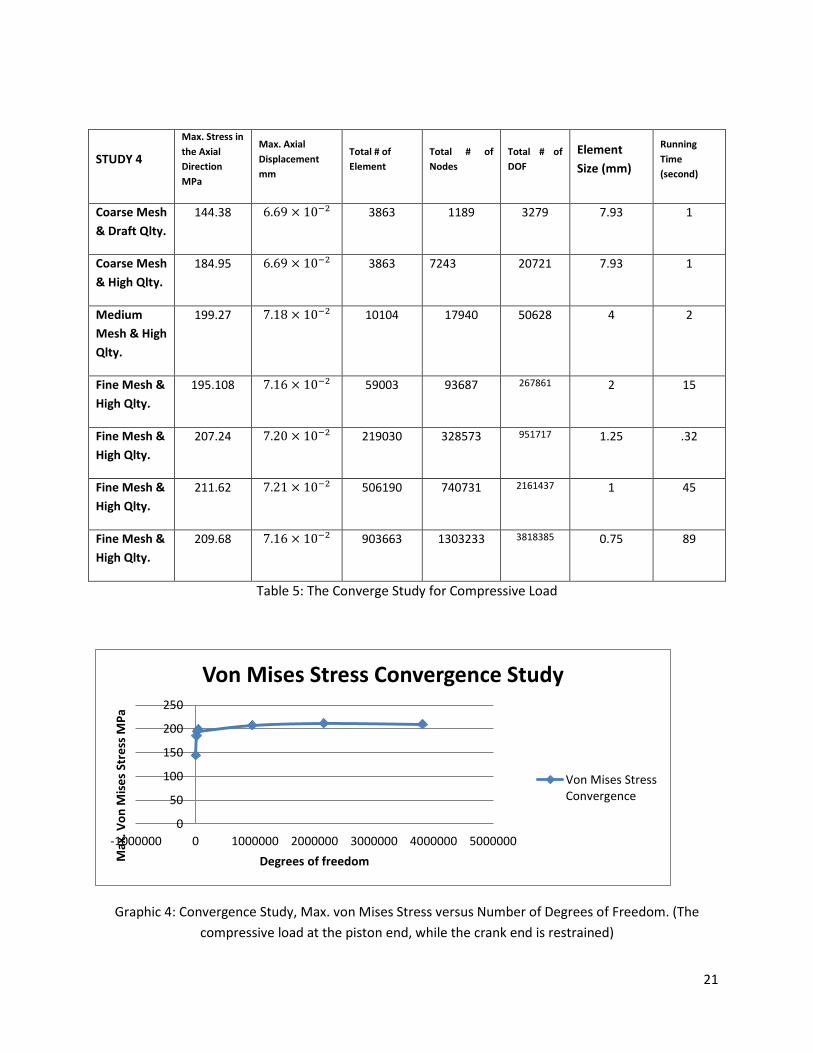
Study 4: The compressive load at the piston end, while the crank end is restrained
Figure 19a: von Mises Stress distribution with static compressive load
Figure 19b: Displacement distribution with compressive tensile load
21
STUDY 4
Max. Stress in
the Axial
Direction
MPa
Max. Axial
Displacement
mm
Total # of
Element
Total # of
Nodes
Total # of
DOF Element
Size (mm)
Running
Time
(second)
Coarse Mesh
& Draft Qlty.
144.38 3863 1189 3279 7.93 1
Coarse Mesh
& High Qlty.
184.95 3863 7243 20721 7.93 1
Medium
Mesh & High
Qlty.
199.27 10104 17940 50628 4 2
Fine Mesh &
High Qlty.
195.108 59003 93687 267861 2 15
Fine Mesh &
High Qlty.
207.24 219030 328573 951717 1.25 .32
Fine Mesh &
High Qlty.
211.62 506190 740731 2161437 1 45
Fine Mesh &
High Qlty.
209.68 903663 1303233 3818385 0.75 89
Table 5: The Converge Study for Compressive Load
Graphic 4: Convergence Study, Max. von Mises Stress versus Number of Degrees of Freedom. (The
compressive load at the piston end, while the crank end is restrained)
0
50
100
150
200
250
-1000000 0 1000000 2000000 3000000 4000000 5000000
Max
. Vo
n M
ise
s St
ress
MP
a
Degrees of freedom
Von Mises Stress Convergence Study
Von Mises StressConvergence

22
Results
The convergence studies were completed for the four cases with at least 5 mesh steps with a different
element size. The tabulated data from studies is shown in Table 6.
Tensile Load = 26.7 kN Compressive Load = 26.7 kN
Load at Piston
End
Load at Crank
End
Table Load at Piston
End
Load at Crank
End
Table
Von Mises Stress
(MPa)
Von Mises Stress
(MPa)
Von Mises Stress
(MPa)
Von Mises Stress
(MPa)
264.85 237.961 2 / 3 216.92 199.27 4 / 5
269.50 257.482 2 / 3 223.72 195.108 4 / 5
270.02 258.94 2 / 3 224.26 207.24 4 / 5
270.11 262.07 2 / 3 229.32 211.62 4 / 5
270.14 261.98 2 / 3 229.64 209.68 4 / 5
Table: 6 von Mises Stresses
Discussion
Study 1 and Study 3 show that the maximum stress occurs near the crank end while piston end is
restrained. Study 2 and Study 4 show that the maximum stress occurs near the piston end while the
crank end restrained. Also, all studies are showing us that the maximum displacement occurs at the
place where the load was applied.
The maximum stress is 270.14 MPa which is found in Study 1. When we consider the material
mechanical properties of the tensile stress which is 572.3 MPa .
(
)

23
This study shows that the current design of the connecting rod has an acceptable design according the
results that we have collected from SolidWorks. But, we have to keep in our minds; there are always
some issues that we neglect which has to enforce us to think more to get more accurate results.
Figure 20 shows two examples of the real connecting rods had been broken almost the same sections
which we inspected as maximum stress areas. Even our design is acceptable, there are different factors
can cause the connecting rods to break. If we are going to continue the reverse engineering process, we
have to consider the fatigue factor as well. Also, considering the complex motion of the connecting rod,
bending stresses caused by inertia loads needs to be determined.
Figure 20: Comparison of the real objects and our designs

24
References
1. “Dynamic Load Analysis and Optimization of Connecting Rod” by Pravardhan S. Shenoy
2. http://www.efunda.com/materials/alloys/alloy_steels/show_alloy.cfm?ID=AISI_5140&prop=all
&Page_Title=AISI%205140
3. http://www.summitracing.com/parts/esp-5700bplw/overview/
4. http://www.eng.utoledo.edu/mime/faculty_staff/faculty/afatemi/papers/2004SAEAfzalFatemi2
004-01-1529.pdf