solvingthe( rubik’s® cube( - nexcess...
TRANSCRIPT

©1974 Rubik’s® Used under license Rubik’s Brand Ltd. All rights reserved. www.youcandothecube.com
Solving the Rubik’s® Cube
Common Core: Mathematical Practice Standards: 1. Make sense of problems and persevere in solving them.2. Reason abstractly and quantitatively.3. Construct viable arguments and critique the reasoning of others.4. Model with mathematics.5. Use appropriate tools strategically.6. Attend to precision.7. Look for and make use of structure.8. Look for and express regularity in repeated reasoning.
Objectives: 1) Students will reference previous knowledge to understand the Rubik’sCube better.
2) Students will learn how to solve the Rubik’s® Cube.
Materials: Introductory Information sheets (Meeting the Cube, Labeling the Cube) Solution Guide sheets “What’s Next?” worksheet Rubik’s Cubes (1 per student) Stopwatches (optional) Internet access (optional)
Procedure: 1) Read through the Introductory Information sheets as a class, or insmall groups. (Meeting the Cube & Labeling the Cube)
2) Have students start working through the Solution Guide with theirRubik’s Cube. Feel free to read through some of these pages as a class.That way if questions come up, students may be able to learn from otherstudents. *Working through the Solution Guide will take multiple days,and some students will progress much faster than others.
3) For students that get done early (succeed in solving the Rubik’s Cube),have them work on the “What’s Next?” worksheet.
Notes to Teacher: The “What’s Next?” worksheet will buy you some time in getting all your students back on the same page. It will keep your speedy learners busy, so that their peers can continue their quest to solve the Rubik’s Cube.

©1974 Rubik’s® Used under license Rubik’s Brand Ltd. All rights reserved. www.youcandothecube.com
Meeting the Cube
In a previous lesson, we discovered that a cube has 6 faces, 12 edges, and 8 corners (vertices). Take a look at this disassembled Rubik’s® Cube and notice those same numbers. The 6 faces are all connected together as one piece called the core. Since they are connected, it means that the alignment of the face colors cannot be changed. The white face will always be opposite of the yellow face, red opposite orange, and green opposite blue.
There are 12 pieces in the middle group. These are our edge pieces. Notice how each
of the edge pieces has two colored tiles on it. That is because an edge of a polyhedron connects two faces. Therefore these 12 edge pieces will always be set between two face components of the core.
On the left side of the picture, we find our corner pieces. Notice how there are 8 of them, and that each of them has 3 colored tiles. This is because a cube has 8 corners (vertices), and each of a cube’s corners connects 3 edges of 3 faces.
Now, when you look at an assembled cube, you may start to see how it is held together. Focus on a piece that has 2 tiles on it (an edge). It is between exactly 2 centers (face pieces). Then focus on a piece that has 3 tiles on it (a corner). It is held in place by 3 edge pieces, and is diagonal from 3 centers.

©1974 Rubik’s® Used under license Rubik’s Brand Ltd. All rights reserved. www.youcandothecube.com
Labeling the Cube In the lessons to follow on solving the Rubik’s® Cube, we will need to be able to read
algorithms. An algorithm is a set of steps one should follow to complete a task. Before we get introduced to these algorithms, we need to label the Rubik’s Cube by the ways that we can turn the different faces.
We are going to label the six faces according to the way that we are holding the cube. As we hold the puzzle, the side that is facing us will be referred to as the Front Face. Then from there, the side to our right will be identified as the Right Face; and to our left, the Left Face. The top and bottom of the cube will be labeled the Up Face and Down Face. The face hidden from our view, opposite the Front Face will be described as the Back Face. The algorithms will use abbreviations to save space by using F, R, L, U, D, and B in place of Front, Right, Left, Up, Down, and Back.
The next thing that we need to identify is which way we want to rotate a particular face.
The algorithms we will learn utilize apostrophes (‘) to indicate a 90° counterclockwise turn. If a step in an algorithm does not have an apostrophe, then we are to make a 90° clockwise turn. These clockwise and counterclockwise turns are based on viewing that particular face (imagine a clock mounted on that face). In the diagram below we can see the difference between a clockwise rotation of the Right Face compared to a clockwise rotation of the Left Face.
Lastly, we may see a 2 in an algorithm. If we do, it will be paired with one of the letters F, R, L, U, D, or B. This will stand for turning that particular face twice (180°). Since a 180° turn of a face clockwise or counterclockwise will end in the same state, you can turn it whichever way you prefer. Here is an example of reading an algorithm: F U2 F’ D’ R
If we were to follow this algorithm, we would turn the front face 90° clockwise, then turn the upper face 180° clockwise (or counter), then turn the front face 90° counterclockwise, then turn the down face (bottom) 90° counterclockwise, and finally turn the right face 90° clockwise.
L U
R
D
F B
R F

©1974 Rubik’s® Used under license Rubik’s Brand Ltd. All rights reserved. www.youcandothecube.com
Layer One – Making a Cross (Plus Sign) The white layer does not need to be solved first, but I will recommend that you start with that face until you develop some consistency with solving the Rubik’s® Cube. To make the cross, first locate the white center and hold the cube so that it is the upper face. Then you need to locate the 4 edge pieces that have a white sticker/tile on them (you are not concerned about the corners with white yet). These 4 white stickers/tiles will be in one of four places: Already on top! Along the equator Along a longitude On the bottom (down face)
*Position O is where we are going to move the white tile to, but before we do that, we want to make sure that we aren’t replacing it with a white tile already on top. 1) If there is a white tile in position O, turn U (upper face) until a nonwhite tile is in that position. If it is already nonwhite, skip to step 2. 2) Turn L’ (left face counterclockwise)
1) If there is a white tile in position O, turn U (upper face) until a nonwhite tile is in that position. If it is already nonwhite, skip to step 2. 2) Turn R (right face clockwise)
Along the equator
Hold the cube so that the white center is on top, and a white tile is on the front face (side facing you).
If the white tile is on the left:
If the white tile is on the right:
©1974 Rubik’s® Used under license Rubik’s Brand Ltd. All rights reserved. www.youcandothecube.com
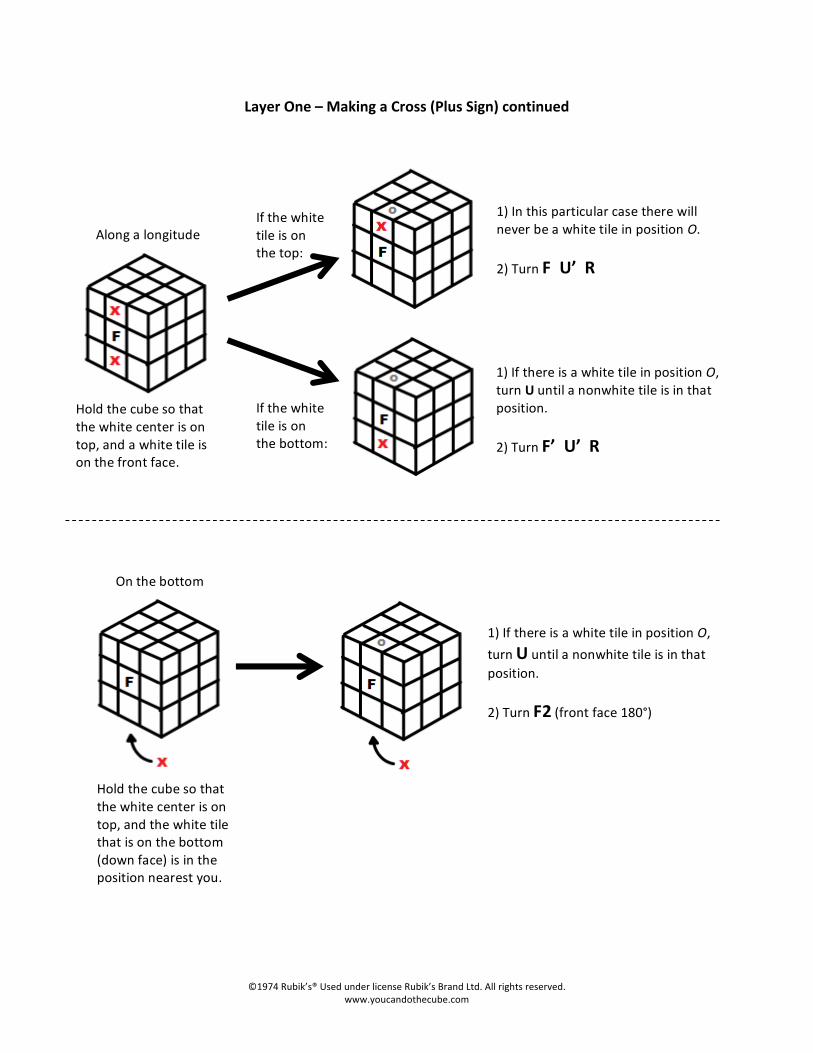
Layer One – Making a Cross (Plus Sign) continued
Along a longitude
Hold the cube so that the white center is on top, and a white tile is on the front face.
If the white tile is on the top:
If the white tile is on the bottom:
1) In this particular case there will never be a white tile in position O. 2) Turn F U’ R
1) If there is a white tile in position O, turn U until a nonwhite tile is in that position. 2) Turn F’ U’ R
On the bottom
Hold the cube so that the white center is on top, and the white tile that is on the bottom (down face) is in the position nearest you.
1) If there is a white tile in position O, turn U until a nonwhite tile is in that position. 2) Turn F2 (front face 180°)

©1974 Rubik’s® Used under license Rubik’s Brand Ltd. All rights reserved. www.youcandothecube.com
Layer One – Permuting the Cross We have made the cross! Now we need to permute the cross. This means that we need our cross to match up with the core. In other words, the four edge pieces that our making up our white cross need to also match the center tiles on the front, right, left, and back sides (assuming white is still on top). When examining how well our cross is permuted (seeing if any of the four edge pieces match on the sides), we will notice one of four cases: none of them match, one of them matches, two of them match, or all four of them match. The following algorithms require that exactly two of the edges are matching (if all four are matching, we get to skip this step). The good news is that by simply by turning the upper face, we can always obtain two or four matching edges. 1) Get two or four matching edges. a. If no edges are matching, turn U, or U’, or U2. One of those three moves will result in two or four
edges matching. b. If one edge is matching, turn U, or U’, or U2. One of those three moves will result in two or four
edges matching. c. If two edges are matching, skip to step 2. d. If four edges are matching, skip to Solving the Corners. 2) Once we have our two matching edges, we need to swap (permute) the other two. We will do this one of two ways:
Permute – to change the order of; rearrange
If the two edges are adjacent: If the two edges are opposite:
R U’ R’ U R R U2 R’ U2 R
©1974 Rubik’s® Used under license Rubik’s Brand Ltd. All rights reserved. www.youcandothecube.com
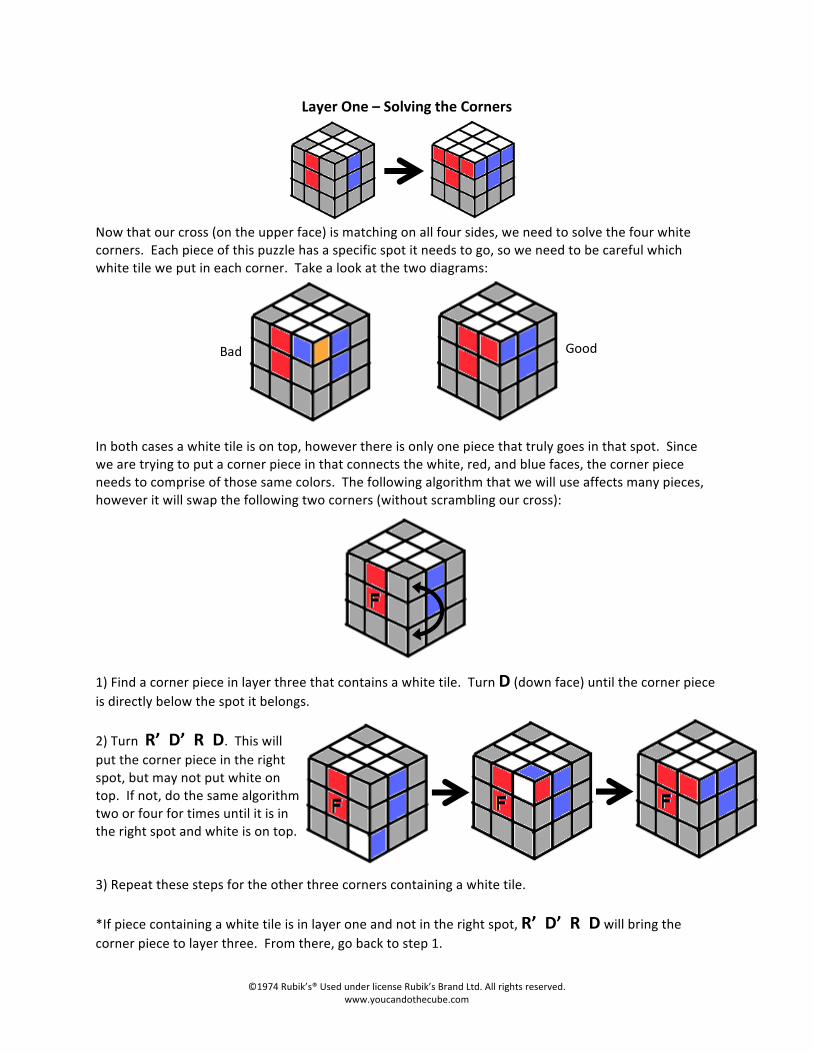
Layer One – Solving the Corners Now that our cross (on the upper face) is matching on all four sides, we need to solve the four white corners. Each piece of this puzzle has a specific spot it needs to go, so we need to be careful which white tile we put in each corner. Take a look at the two diagrams: In both cases a white tile is on top, however there is only one piece that truly goes in that spot. Since we are trying to put a corner piece in that connects the white, red, and blue faces, the corner piece needs to comprise of those same colors. The following algorithm that we will use affects many pieces, however it will swap the following two corners (without scrambling our cross): 1) Find a corner piece in layer three that contains a white tile. Turn D (down face) until the corner piece is directly below the spot it belongs. 2) Turn R’ D’ R D. This will put the corner piece in the right spot, but may not put white on top. If not, do the same algorithm two or four for times until it is in the right spot and white is on top. 3) Repeat these steps for the other three corners containing a white tile. *If piece containing a white tile is in layer one and not in the right spot, R’ D’ R D will bring the corner piece to layer three. From there, go back to step 1.
Good Bad
©1974 Rubik’s® Used under license Rubik’s Brand Ltd. All rights reserved. www.youcandothecube.com
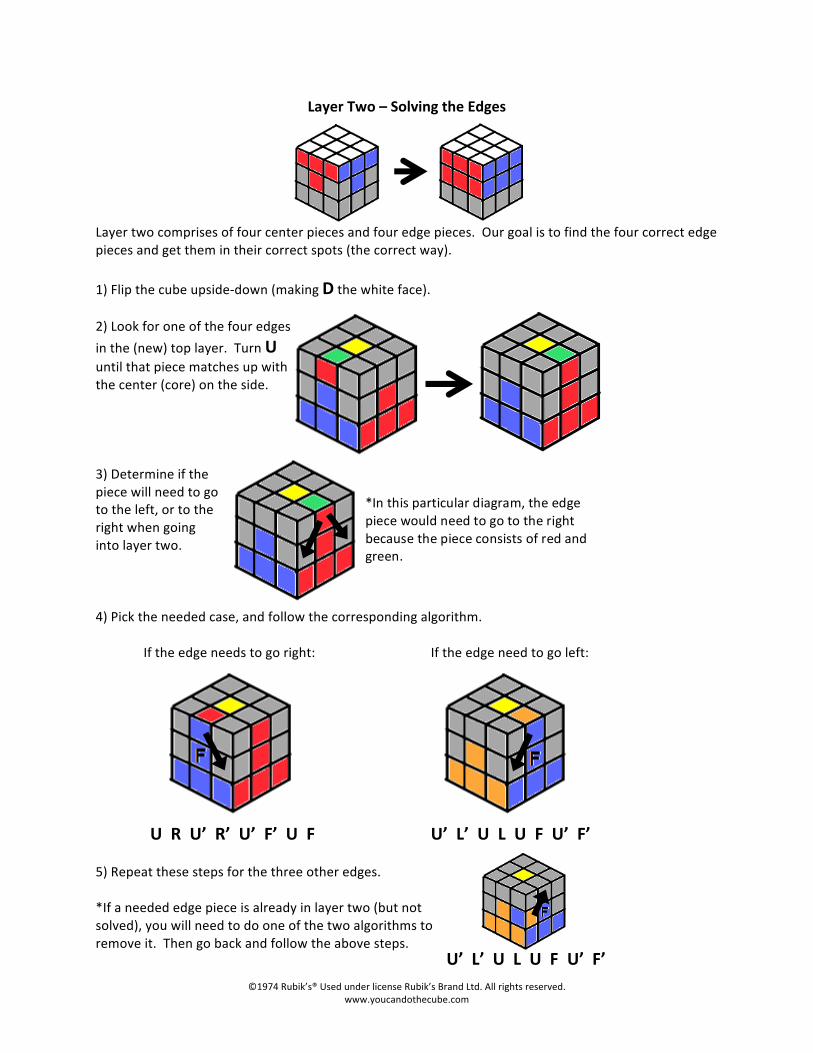
Layer Two – Solving the Edges Layer two comprises of four center pieces and four edge pieces. Our goal is to find the four correct edge pieces and get them in their correct spots (the correct way). 1) Flip the cube upside-‐down (making D the white face). 2) Look for one of the four edges in the (new) top layer. Turn U until that piece matches up with the center (core) on the side. 3) Determine if the piece will need to go to the left, or to the right when going into layer two. 4) Pick the needed case, and follow the corresponding algorithm. If the edge needs to go right: If the edge need to go left: U R U’ R’ U’ F’ U F U’ L’ U L U F U’ F’ 5) Repeat these steps for the three other edges. *If a needed edge piece is already in layer two (but not solved), you will need to do one of the two algorithms to remove it. Then go back and follow the above steps.
*In this particular diagram, the edge piece would need to go to the right because the piece consists of red and green.
U’ L’ U L U F U’ F’

©1974 Rubik’s® Used under license Rubik’s Brand Ltd. All rights reserved. www.youcandothecube.com
Layer 3 – Making a Cross Layer 3, or Last Layer, is actually referring to the top layer with the method we are using (since we flipped the cube over after working on layer 1). When solving this layer, you may notice a similar theme (making a cross, permuting the cross, solving the corners) even though we will see some new algorithms. To make a yellow cross (without scrambling layers 1 or 2) we will need only one algorithm. Looking at the yellow face (ignore corners), we should see one of four cases: Case 1 Case 2 Case 3 Case 4 No yellow edges Two adjacent Two yellow edges Completed showing yellow edges opposite each other Cross! Determine which case you are starting at and skip to that step. *The color of the front face is irrelevant. What matters is the placement of the yellow tiles. 1) Turn F R U R’ U’ F’. This will bring you to case 2, two adjacent yellows. However, we will to either: spin the cube 180°, or turn U2 to be set up for case 2. 2) Turn F R U R’ U’ F’. 3) Turn F R U R’ U’ F’. 4) Done!

©1974 Rubik’s® Used under license Rubik’s Brand Ltd. All rights reserved. www.youcandothecube.com
Layer 3 – Permuting the Cross Now that we have the yellow cross, we need to match it to the core (just like with layer 1). So, similar to before, we are going to turn U until either two or four edges are matching. Below are the three cases that you will encounter and what you should do. 1) Turn U until either two or four edges are matching. Then go to the corresponding case. Case 1: The two matching edges are adjacent. Use the algorithm to the right. Case 2: The two matching edges are opposite each other. You will essentially do the same algorithm as case 1, but twice and with one step in the middle. Case 3: All four edges are matching; done!
R U R’ U R U2 R’ U
R U R’ U R U2 R’ U
R U R’ U R U2 R’ U U2
©1974 Rubik’s® Used under license Rubik’s Brand Ltd. All rights reserved. www.youcandothecube.com
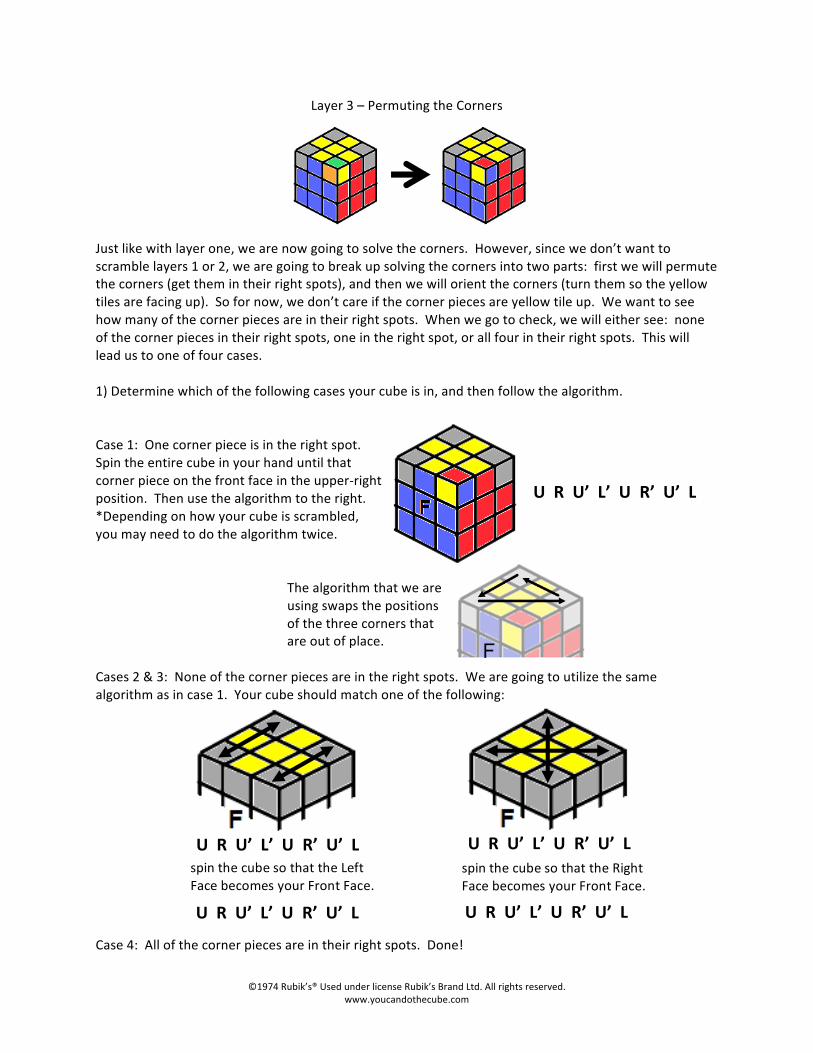
Layer 3 – Permuting the Corners Just like with layer one, we are now going to solve the corners. However, since we don’t want to scramble layers 1 or 2, we are going to break up solving the corners into two parts: first we will permute the corners (get them in their right spots), and then we will orient the corners (turn them so the yellow tiles are facing up). So for now, we don’t care if the corner pieces are yellow tile up. We want to see how many of the corner pieces are in their right spots. When we go to check, we will either see: none of the corner pieces in their right spots, one in the right spot, or all four in their right spots. This will lead us to one of four cases. 1) Determine which of the following cases your cube is in, and then follow the algorithm. Case 1: One corner piece is in the right spot. Spin the entire cube in your hand until that corner piece on the front face in the upper-‐right position. Then use the algorithm to the right. *Depending on how your cube is scrambled, you may need to do the algorithm twice. The algorithm that we are using swaps the positions of the three corners that are out of place. Cases 2 & 3: None of the corner pieces are in the right spots. We are going to utilize the same algorithm as in case 1. Your cube should match one of the following: Case 4: All of the corner pieces are in their right spots. Done!
U R U’ L’ U R’ U’ L
U R U’ L’ U R’ U’ L
U R U’ L’ U R’ U’ L U R U’ L’ U R’ U’ L
U R U’ L’ U R’ U’ L spin the cube so that the Left Face becomes your Front Face.
spin the cube so that the Right Face becomes your Front Face.
©1974 Rubik’s® Used under license Rubik’s Brand Ltd. All rights reserved. www.youcandothecube.com
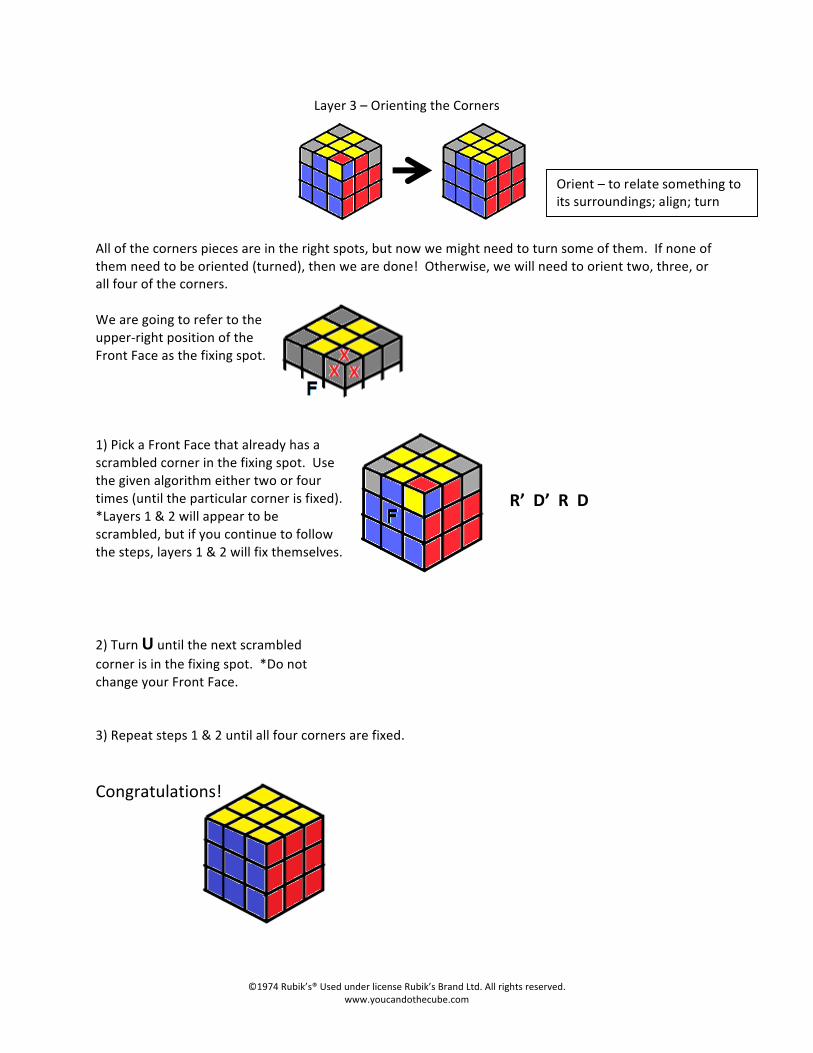
Layer 3 – Orienting the Corners All of the corners pieces are in the right spots, but now we might need to turn some of them. If none of them need to be oriented (turned), then we are done! Otherwise, we will need to orient two, three, or all four of the corners. We are going to refer to the upper-‐right position of the Front Face as the fixing spot. 1) Pick a Front Face that already has a scrambled corner in the fixing spot. Use the given algorithm either two or four times (until the particular corner is fixed). *Layers 1 & 2 will appear to be scrambled, but if you continue to follow the steps, layers 1 & 2 will fix themselves. 2) Turn U until the next scrambled corner is in the fixing spot. *Do not change your Front Face. 3) Repeat steps 1 & 2 until all four corners are fixed. Congratulations!
Orient – to relate something to its surroundings; align; turn
R’ D’ R D

©1974 Rubik’s® Used under license Rubik’s Brand Ltd. All rights reserved. www.youcandothecube.com
“I Can Solve the Rubik’s® Cube! What’s Next?” 1) How fast can you solve the Rubik’s® Cube? Grab a stop watch and find out. You could also go to http://www.cubetimer.com. This site is nice for testing your speed. Besides a timer, this site also gives scrambling instructions and keeps track of your times/attempts. 2) Can you solve the Rubik’s Cube from memory? If not, while practicing, try to notice (focus on) patterns in what you are doing rather than the letters of the algorithm. This could make it easier to remember the turns that need to be made. 3) Can you “unsolve” the Rubik’s Cube? See if you can solve the Rubik’s Cube in a way that you replicate some of the designs below. All of these designs can be replicated without learning any new algorithms. Front Back Front Back