some important things to know when you’re starting in … manual v1 0_dec2012.pdf · some...
TRANSCRIPT

Some important things to know
when you’re starting in Tasars
Version 1.0
Brad Stephens and Simon Reffold
November 2012
Things to know about Tasars V1.0 Nov 2012 P a g e | 2
Contents Page
Page 3
1) Introduction 2) Before you get started...
Page 4 3) The Rig
a. Assembly b. Forestay c. Diamonds
Page 5 d. Side Stays
Page 6 e. Mast Rotator f. Vang
4) Boom & Pole 5) Jib
a. Luff tension
Page 7 b. Clew Plate c. Fairlead position.
6) Traveller
Page 8 7) Mainsheet 8) Hiking straps 9) Foils & cases
a. Daggerboard b. Tiller Extension
Page 9 c. Tiller Fit d. Rudder Blade Angle
10) Marks & Calibrations
Page 10 11) Ropes and Control Lines 12) Go Get Fast
Things to know about Tasars V1.0 Nov 2012 P a g e | 3
1) Introduction
Welcome to the Tasar fleet! You have got into one of the world’s great One Design dinghy classes.
For over 40 years some of the world’s best sailors have battled it out in this class at some stage in
their career and so too have countless fathers and daughters, mums and sons, husbands and wives,
friends and relatives.
The great thing about the Tasar is its simplicity. There aren’t many ropes to mess with and the rig is
pretty simple. In fact we think there are some basic settings you can start with that are “set and
forget” and will serve you well in all conditions.
This is designed to get you going in the Class; enjoying your sailing without worrying about whether
the boat is rigged properly. Sailing is much more fun after all, when you eliminate all the worries and
preparation does that for you.
This guide is a result of the collective experience of the class to date; we hope it helps you get a
great start in this exciting class.
2) Before you get started...
They say preparation prevents poor performance, and they are right.
Preparation starts when you finish racing the week before:-
Caring for your boat
- Making a work list and making sure that list is completed before the next time you go sailing.
- Ensuring you hose your boat out thoroughly, getting rid of all salt and sand from the boat
and its fittings.
- Checking over ropes and wires to make sure they are all good for next time.
- Loosening the battens in your mainsail.
- Rolling them neatly.
- Making sure you pack your rudder and daggerboard well.
- Make sure your boat is well tied down to the trailer or dolly and that the rigging is tight
around the mast or better still, stored separately.
It’s also important you have the right tool kit and spare parts. Try to be self sufficient. A simple tool
kit of electrical tape, pencil, marker pens, note pad, hammer, a couple of adjustable spanners, a
couple of sizes of Phillips head and flat head screw driver, pliers and vice grips will see you in pretty
good shape. Plus make sure you have plenty of shackles, pins, split pins and other parts you
accumulate as you go.
Make sure you have good wash down gear like your own hose and nozzle, a bucket and suitable
detergent as well as a sponge and chamois.

Things to know about Tasars V1.0 Nov 2012 P a g e | 4
3) The Rig
a. Assembly
Your Tasar mast comes in two parts.
The top section needs to fit very snugly
into the bottom to minimise wear and
ensure that it works as one unit.
If you find any wiggle either fore and aft
or side to side, we recommend you add
some 50mm/2” wide Kevlar Tape ( or
similar) to both sides. This will ensure a
snug fit and the tape will not wear out.
b. Forestay
You are able to set your forestay between 4120 and
4160mm. This will include the shackles and rings so be
sure to measure them as well. We recommend you set
your forestay to 4150mm as standard. This setting has
been used by a number of World and National
Champions and does not require alteration in varying
conditions.
The length is measured from the bearing point of the
forestay shackle on the mast hounds fitting to the
deck under the U-bolt at the bow.
c. Diamonds
With an over- rotating mast the diamonds control
the mast bend characteristics upwind.
The tighter the diamonds, the stiffer the rig and the
more powerful it is as it gets windier. The looser
the diamonds the rigs gets softer and gets rid of
power more quickly.
As a rule a heavier crew can have tighter
diamonds/stiffer rig, and a lighter crew needs
looser diamonds/softer rig.
Here are three setting which should fit your weight
range:
Things to know about Tasars V1.0 Nov 2012 P a g e | 5
Total Crew Weight:
110-125kgs – Set your diamonds so that when you squeeze them together at the bottom of the mast
you can just hold them both on the mast 70mm above the pole ring.
125-135kgs - Set your diamonds so that when you squeeze them together at the bottom of the mast
you can just hold them both on the mast 50mm above the pole ring.
135-150kgs - Set your diamonds so that when you squeeze them together at the bottom of the mast
you can just hold them both on the mast 25mm above the pole ring.
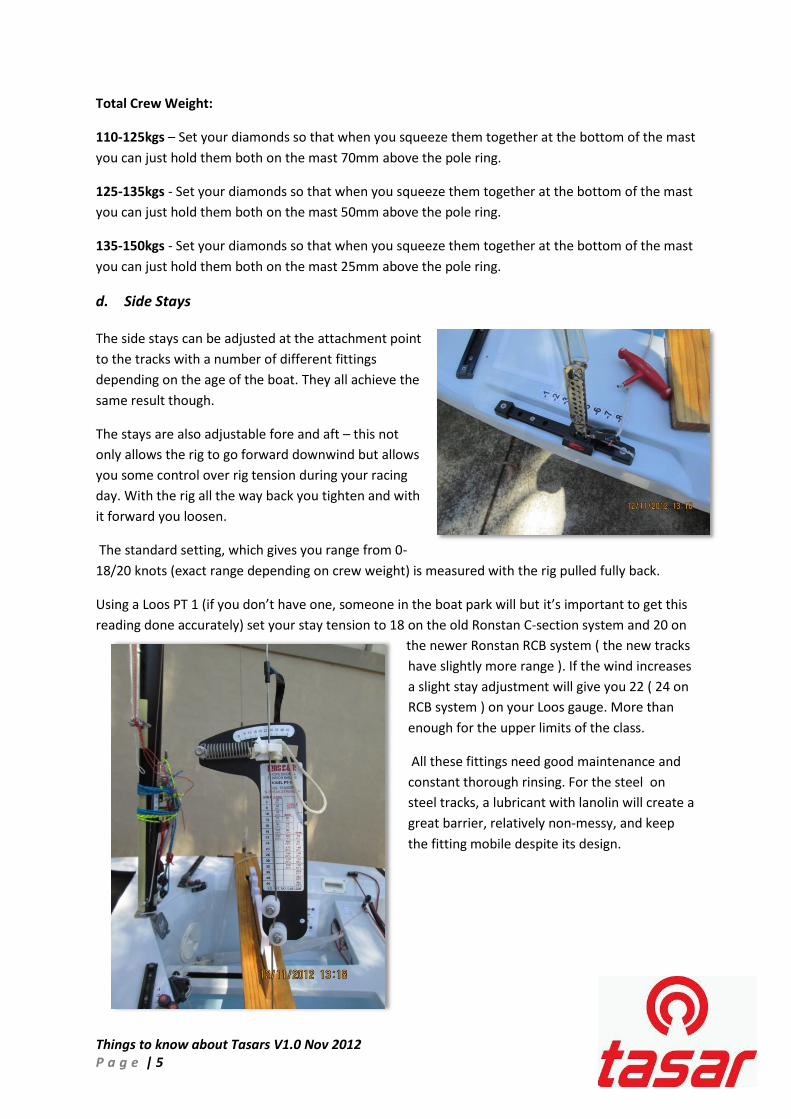
d. Side Stays
The side stays can be adjusted at the attachment point
to the tracks with a number of different fittings
depending on the age of the boat. They all achieve the
same result though.
The stays are also adjustable fore and aft – this not
only allows the rig to go forward downwind but allows
you some control over rig tension during your racing
day. With the rig all the way back you tighten and with
it forward you loosen.
The standard setting, which gives you range from 0-
18/20 knots (exact range depending on crew weight) is measured with the rig pulled fully back.
Using a Loos PT 1 (if you don’t have one, someone in the boat park will but it’s important to get this
reading done accurately) set your stay tension to 18 on the old Ronstan C-section system and 20 on
the newer Ronstan RCB system ( the new tracks
have slightly more range ). If the wind increases
a slight stay adjustment will give you 22 ( 24 on
RCB system ) on your Loos gauge. More than
enough for the upper limits of the class.
All these fittings need good maintenance and
constant thorough rinsing. For the steel on
steel tracks, a lubricant with lanolin will create a
great barrier, relatively non-messy, and keep
the fitting mobile despite its design.

Things to know about Tasars V1.0 Nov 2012 P a g e | 6
e. Mast Rotator
Make sure these are well serviced. The older ones
without the full range of locking often jump out in a
seaway or heavy vang load.
Both the old and new ones are well served with a strong
piece of shock chord looped to the middle of the
gooseneck. This holds the fitting up and creates a positive
action for the crew.
f. Vang
This must be able to be easily reached from the gunwale (tip – tie the bitter
ends to the stays) and a rope that is comfortable for the crew to work
repeatedly, as they should in pressure over 14 knots or so.
4) Boom & Pole
The ideal pole set up is a parrot beak at one end
and “Douglass Pin” at the other. This makes gybing
much simpler. Ideally ensure that the pin that
attaches to the mast is not too deep as this makes
getting it place, especially after gybing the jib, much
harder.
The boom is pretty standard but care should be
kept of the moving parts - the outhaul and
especially the gooseneck.
5) Jib
There are a couple of variables here...
a. Luff tension
With a Mylar sail, set the luff so crinkles are just appearing. With an older Dacron sail you will need
to pull these wrinkles out, the older the sail the firmer you have to pull... but not so tight that you
cannot get a smooth shape in the luff area downwind.

Things to know about Tasars V1.0 Nov 2012 P a g e | 7
b. Clew Plate
There will be arguments a plenty on the boat park about this but the
best recommendation is to put the sheet in the middle hole. Once
you have mastered sailing the boat then you can play with this
setting but the reality is you will need to be well on top of your trim
to do so. The middle hole is a great average setting while you are
getting established. This setting assumes that the jib tack attaches at
a point so that when the jib is fully sheeted on the foot just touch’s
the deck.
c. Fairlead position.
Upwind, inboard all the way until heavier conditions and then progressively move out up to three
holes. Your gauge is when the backwind of the jib is adversely affecting the luff of the mainsail. A
lighter crew may go outboard a bit earlier; a heavier crew may hang on to it a bit longer.
However, in pressure and earlier in a seaway, cracking the jib a few mm’s will achieve good result for
you as well.
Make sure your jib sheets are comfortable for
the crew, not the sort that tangle or twist easily
and are not too long. Also, a metal ring at the
clew end of the sheets is the preferred option
for the pole. Plastic ring is OK but more easily
broken or worse, twisted.
The plate on which the jib cleat is mounted
needs to point to the crews hiking position and
be long enough to allow easy uncleating. The
standard plates are not long enough and do not
point in the correct direction.
6) Traveller
The traveller should be in your hands the whole time sailing upwind. You need to keep the
mainsheet handy of course, but the traveller is your first point of coarse power control.
Older boats may not have ratchet blocks for the traveller control line but all newer boats do and
without them you will not be able to hold the traveller line for sustained periods.
Deck cleats need to work for heavy breeze. Make sure you have some system to locate the traveller
onto the gunwale, such as a ring or small vertically supported block so that the trav is easily located
after a tack.
Again, keep the bearings well cleaned and flushed with fresh water and use a diameter of rope that
is comfortable to hold.

Things to know about Tasars V1.0 Nov 2012 P a g e | 8
7) Mainsheet
With many of the older boats the strop to
the sheet system is on the boom. Change
this to being on top of the traveller. It
cleans up the ropes in the boat and is
better for trimming (in the old
configuration when you drop the boom
down the traveller the sheet tightens).
A neat trick is to tie some shock chord
from the mainsheet cleat arm to the
skippers kicking strap. This serves to both
stop the arm rotating the wrong way and
if you get the tension right, it
automatically swings the exit of the sheet
toward the helm!
8) Hiking straps
Make sure they are well adjusted for your height, leg length and fitness. Hiking hard is important –
you need to be bum-over-the-side at all times in pressure.
You also need to have the hiking straps raised from the cockpit floor so they are easy to find without
looking, especially after you tack. Flopping around the floor or even too low is a no-no.
9) Foils & cases
a. Daggerboard
Your daggerboard should be maintained well. Any dings or divots, no matter how small, should be
repaired immediately.
The daggerboard case should be well packed with soft foam fore and aft and something like front
runner or similar (waterproof carpet) on the sides. You are trying to ensure a firm, tight fit with no
movement or gaps to allow water to enter.
If you have done a good or too good job in packing the daggerboard case, then get some silicone
spray from somewhere like Spotlight (where it is ¼ the price of a Sailing shop) and generously lube
up the board. Be sure to do it well away from the boat though, as the residual silicone can play
havoc if you get it on the boat.
b. Tiller Extension
The tiller extension must pass the tensioned mainsheet cleanly when
tacking without making the rudder turn angle excessive.
Things to know about Tasars V1.0 Nov 2012 P a g e | 9
c. Tiller Fit
The class rules indicate that the tiller must be removable without tools or excessive force. This does
not mean that a loose fit is acceptable. No point having a steady hand on the tiller if the tiller flops
around inside the rudder box.
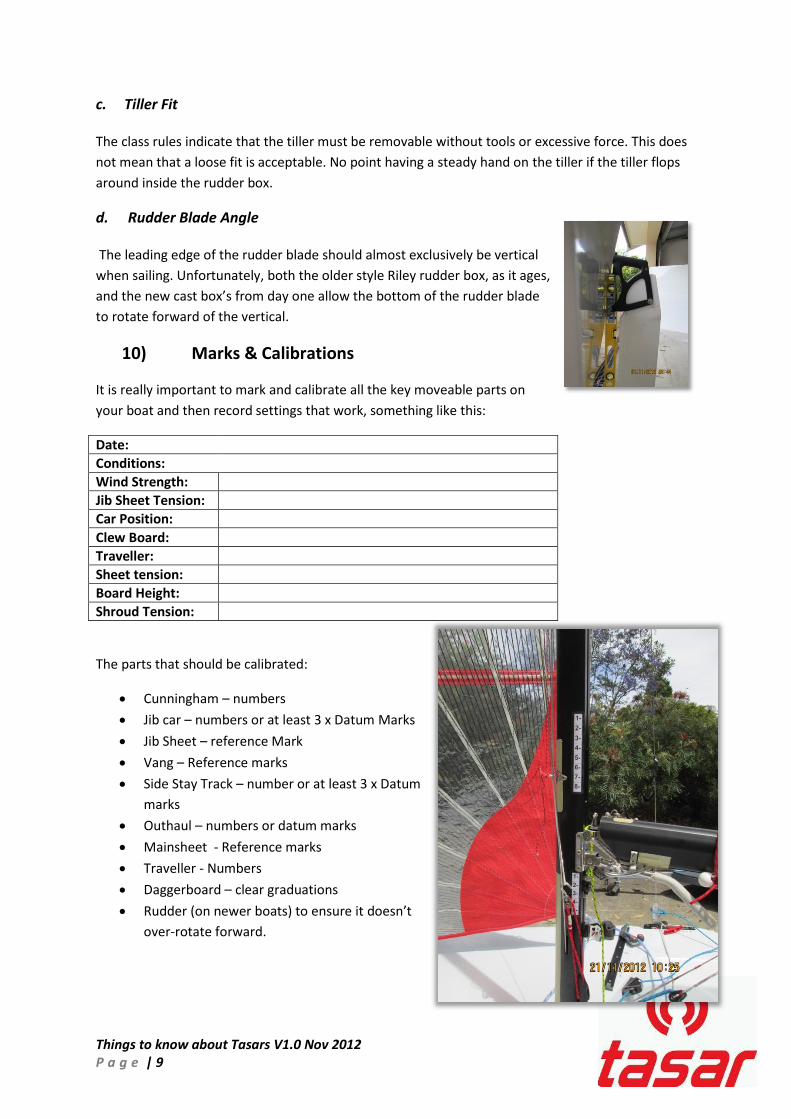
d. Rudder Blade Angle
The leading edge of the rudder blade should almost exclusively be vertical
when sailing. Unfortunately, both the older style Riley rudder box, as it ages,
and the new cast box’s from day one allow the bottom of the rudder blade
to rotate forward of the vertical.
10) Marks & Calibrations
It is really important to mark and calibrate all the key moveable parts on
your boat and then record settings that work, something like this:
Date:
Conditions:
Wind Strength:
Jib Sheet Tension:
Car Position:
Clew Board:
Traveller:
Sheet tension:
Board Height:
Shroud Tension:
The parts that should be calibrated:
Cunningham – numbers
Jib car – numbers or at least 3 x Datum Marks
Jib Sheet – reference Mark
Vang – Reference marks
Side Stay Track – number or at least 3 x Datum
marks
Outhaul – numbers or datum marks
Mainsheet - Reference marks
Traveller - Numbers
Daggerboard – clear graduations
Rudder (on newer boats) to ensure it doesn’t
over-rotate forward.

Things to know about Tasars V1.0 Nov 2012 P a g e | 10
11) Ropes and Control Lines
These are the most trouble when they fail and are generally easy to fix since they are all visible.
There is no excuse for tatty ropes – even on a tight budget if you do your own splicing (see the many
excellent videos on You Tube or ask one of the handier people in the boat park) you should be able
to minimise cost.
12) Go Get Fast
Once you have done all this, and got yourself properly prepared then just go sailing, lots!
There are no short cuts to success in this class. The settings and advice above can be seen on all the
top boats at your next major regatta.
To do well, or indeed just improve will take work – and practice. The more you practice, the better
you’ll get, that’s the great thing about a Tasar - it’s a simple boat that demands the best of its sailors!