sonicwall™ sonicos 6.2.7software.sonicwall.com/firmware/documentation/232-00… · ·...
TRANSCRIPT

SonicWall™ SonicOS 6.2.7.1Release Notes
March 2017
These release notes provide information about the SonicWall™ SonicOS 6.2.7.1 release.
Topics:
• About SonicOS 6.2.7.1
• Supported Platforms
• New Features
• Enhancements
• Resolved Issues
• Known Issues
• System Compatibility
• Product Licensing
• Upgrading Information
• SonicWall Support
About SonicOS 6.2.7.1SonicWall SonicOS 6.2.7.1 provides important new features and fixes many known issues found in previous releases. For more information, see the New Features and Resolved Issues sections.
Supported PlatformsSonicOS 6.2.7.1 is supported on the following SonicWall appliances:
• SuperMassive 9600 • NSA 6600 • TZ600
• SuperMassive 9400 • NSA 5600 • TZ500 / TZ500 Wireless
• SuperMassive 9200 • NSA 4600 • TZ400 / TZ400 Wireless
• NSA 3600 • TZ300 / TZ300 Wireless
• NSA 2600 • SOHO Wireless
SonicWall SonicOS 6.2.7.1Release Notes
1
New FeaturesThis section describes the new features introduced in SonicOS 6.2.7.
Topics:
• High Availability
• PPPoE Unnumbered Interface Support
• Vendor OUI Detection and Logging
• Dell X‐Series Switch Integration Features
• DPI‐SSH
• Support for pcapNG
• TSR FTP for Periodic Backup
• Custom Lists for Geo‐IP and Botnet
• SIP UDP Fragmentation Fixes
• System Logs on AppFlow Server via IPFIX
• NAT64: Stateful NAT from IPv6 Client to IPv4 Server
• DNS Proxy
• FQDN Routing
• Maximum Routes Doubled
• Maximum Zone to Zone Access Rules Increased
• Flow Reporting using IPFIX Extension Version 2
• Syslog Server Profiling
• IPv6 Support
• DPI‐SSL Increased Connection Counts and Enhancements
• Open Authentication Social Login
• Updated SonicPoint Firmware
• SonicPoint Radius Accounting
• 31‐Bit Network
• Threat API
• Biometric Authentication
• VPN Auto Provisioning
High AvailabilitySonicOS 6.2.7 introduces two new features in the area of High Availability:
• HA support with Dynamic WAN interfaces
In SonicOS 6.2.7, PPPoE can be enabled on interfaces in HA Active/Standby mode.
After the active unit connects to the PPPoE server, it synchronizes the PPPoE session ID and server name to the idle unit.
SonicWall SonicOS 6.2.7.1Release Notes
2

During a failover, the active unit terminates the PPPoE HA connection on the client side by timing out. The secondary unit then terminates the original connection on the server side and starts a new PPPoE connection.
When High Availability is enabled and one interface is configured as PPPoE Unnumbered, the following settings are required:
In the High Availability > Settings screen:
• Select the Enable Virtual MAC checkbox
• Clear the Enable Preempt Mode checkbox
In the High Availability > Monitoring screen:
• Select Enable Physical/Link Monitoring
• Set the Primary and Secondary IP address fields to 0.0.0.0
• Clear all other checkboxes
• HA Stateful Synchronization support for DHCP
DHCP can now be enabled on interfaces in HA mode. This feature is supported in both Active/Standby (non‐stateful) and Stateful Synchronization mode.
Only the active unit can get a DHCP lease. It synchronizes the DHCP IP address along with the DNS and gateway addresses to the idle unit. The DHCP client ID is also synchronized, allowing this feature to work even without enabling Virtual MAC.
During a failover, the active unit releases the DHCP lease and the secondary unit renews the DHCP lease using the existing DHCP IP address and client ID as it becomes the active unit. The IP address does not change, and network traffic, including VPN tunnel traffic, continues to pass.
If the active unit does not have an IP address when failover occurs, the secondary unit starts a new DHCP discover.
PPPoE Unnumbered Interface SupportA PPPoE Unnumbered interface allows you to manage a range of IP addresses with only a single PPPoE connection. The Internet Service Provider (ISP) provides multiple static IP addresses that can be allocated within a subnet. The first address is designated as the network address, and the last one as the broadcast address.
SonicWall SonicOS 6.2.7.1Release Notes
3
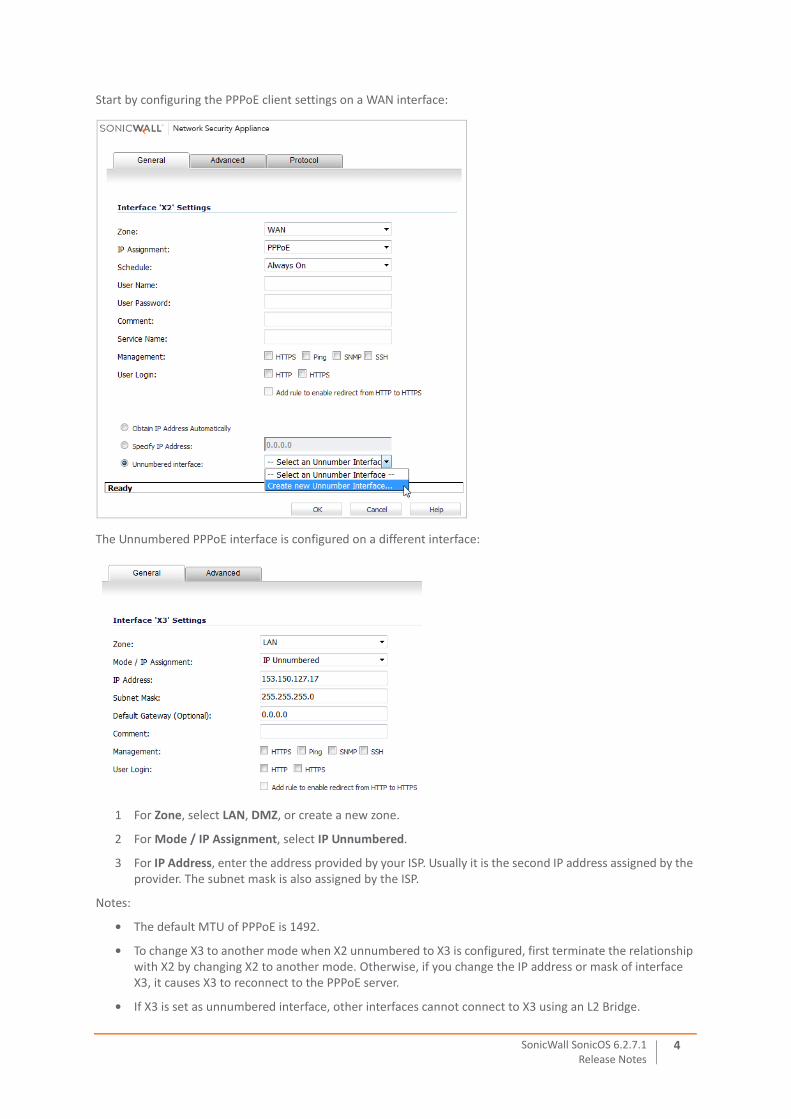
Start by configuring the PPPoE client settings on a WAN interface:
The Unnumbered PPPoE interface is configured on a different interface:
1 For Zone, select LAN, DMZ, or create a new zone.
2 For Mode / IP Assignment, select IP Unnumbered.
3 For IP Address, enter the address provided by your ISP. Usually it is the second IP address assigned by the provider. The subnet mask is also assigned by the ISP.
Notes:
• The default MTU of PPPoE is 1492.
• To change X3 to another mode when X2 unnumbered to X3 is configured, first terminate the relationship with X2 by changing X2 to another mode. Otherwise, if you change the IP address or mask of interface X3, it causes X3 to reconnect to the PPPoE server.
• If X3 is set as unnumbered interface, other interfaces cannot connect to X3 using an L2 Bridge.
SonicWall SonicOS 6.2.7.1Release Notes
4

If High Availability is enabled, High Availability > Settings is configured as shown below with Unnumbered PPPoE:
A sample network topology is shown below:
In this topology, X2 is the PPPoE unnumbered interface and X3 is an unnumbered interface.
SonicOS adds two routes:
SonicWall SonicOS 6.2.7.1Release Notes
5
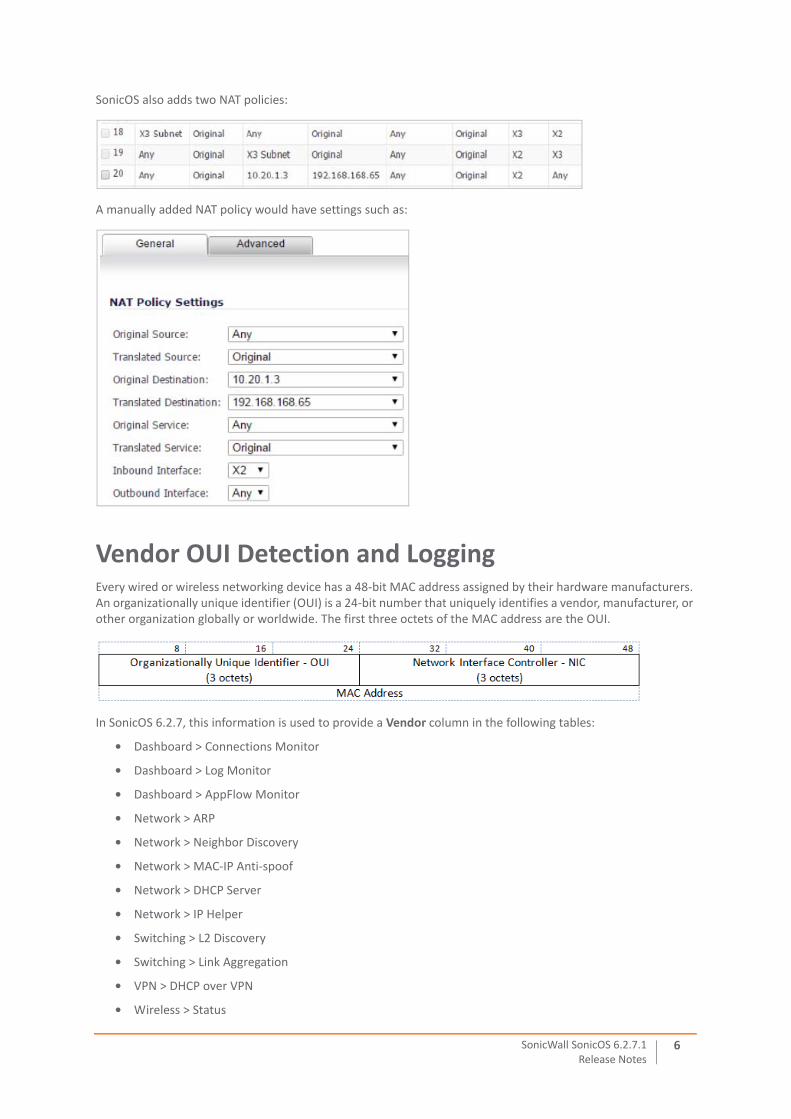
SonicOS also adds two NAT policies:
A manually added NAT policy would have settings such as:
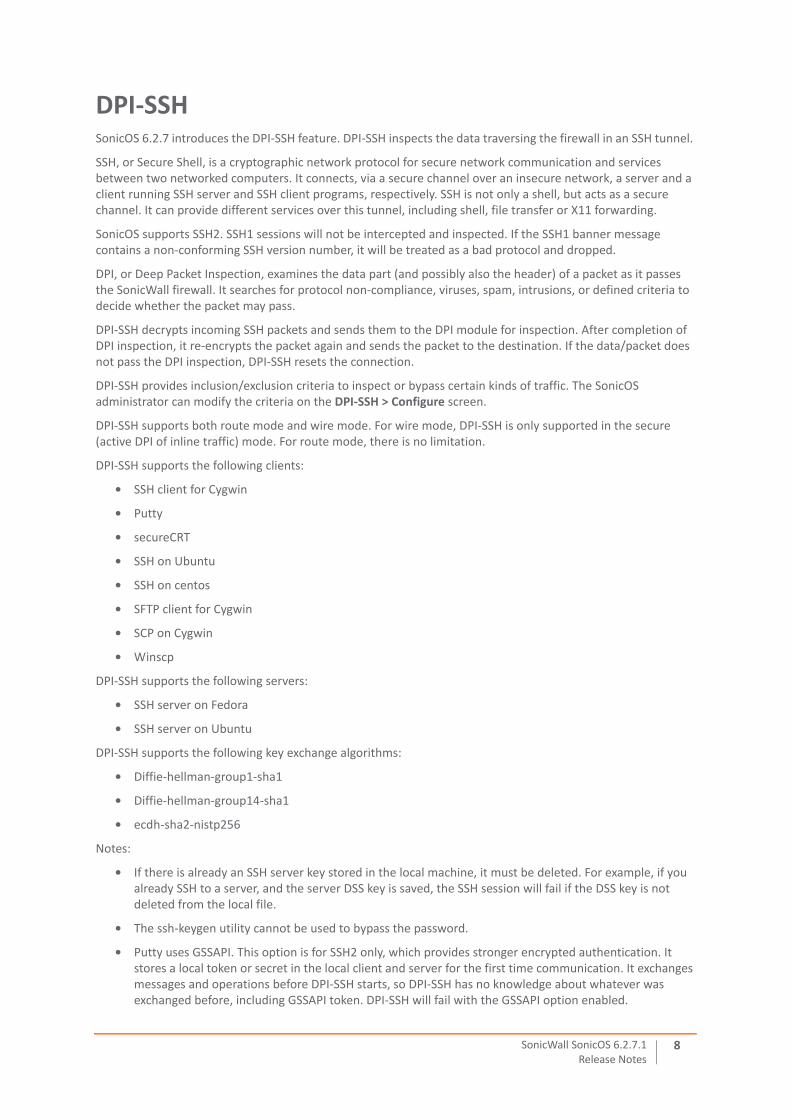
Vendor OUI Detection and LoggingEvery wired or wireless networking device has a 48‐bit MAC address assigned by their hardware manufacturers. An organizationally unique identifier (OUI) is a 24‐bit number that uniquely identifies a vendor, manufacturer, or other organization globally or worldwide. The first three octets of the MAC address are the OUI.
In SonicOS 6.2.7, this information is used to provide a Vendor column in the following tables:
• Dashboard > Connections Monitor
• Dashboard > Log Monitor
• Dashboard > AppFlow Monitor
• Network > ARP
• Network > Neighbor Discovery
• Network > MAC‐IP Anti‐spoof
• Network > DHCP Server
• Network > IP Helper
• Switching > L2 Discovery
• Switching > Link Aggregation
• VPN > DHCP over VPN
• Wireless > Status
SonicWall SonicOS 6.2.7.1Release Notes
6

• Wireless > IDS
• SonicPoint > Station Status
• SonicPoint > RF Analysis
• SonicPoint > IDS
Dell X‐Series Switch Integration FeaturesSonicOS 6.2.7 provides several enhancements and new features for Dell X‐Series integration:
• PortShield and High Availability
Dell X‐Series integration previously supported SonicOS PortShield functionality in HA mode using Dedicated Uplink(s). In SonicOS 6.2.7, support for PortShield functionality in HA mode is available using Common Uplink.
In this configuration, a link between the active/standby firewall and the X‐Series switch serves as a common uplink to carry all the PortShield traffic. In this configuration firewall interfaces which serve as PortShield hosts should be connected to a separate switch and not the same X‐Series switch connected to the active and standby units. This is to avoid looping of packets for the same PortShield VLAN. The PortShield members can be connected to ports on the X‐Series switch which is controlled by the active/standby firewall.
• Single Point of Management over Common Uplink for VLAN Traffic
Dell X‐Series integration previously supported VLANs in a Dedicated Uplink configuration. In SonicOS 6.2.7, VLANs are also supported with Common Uplink. This allows a single link between the firewall and the X‐Series switch to carry management traffic of the firewall managing the X‐Series switch plus PortShield traffic for the Interface Disambiguation via VLAN (IDV) VLANs corresponding to the firewall interfaces plus traffic for the VLAN sub‐interfaces present under the Common Uplink interface.
• Increase X‐Series Switch Maximum to Four
In previous SonicOS releases, a SonicWall firewall could be provisioned for a maximum of two X‐Series switches. In SonicOS 6.2.7, a maximum of four X‐Series switches is supported. All four X‐Series switches must be directly connected to the firewall appliance. Daisy‐chaining of X‐Series switches is not yet supported.
• Support for SonicWall NSA and SuperMassive
In SonicOS 6.2.7, support for the X‐Series solution is extended to include SonicWall NSA and SuperMassive appliances, with the exception of the NSA 2600. The following SonicWall platforms are now supported:
NOTE: Overlapping VLANs cannot exist under appliance interfaces configured as dedicated uplinks or common uplinks to the same switch. This is because the VLAN space is global on the X‐Series switch.
NOTE: PortShield of Extended Switch Interfaces to Common Uplink Interfaces without selecting any VLANs for access/trunk configuration is not supported.
• SuperMassive 9600 • NSA 6600 • TZ600
• SuperMassive 9400 • NSA 5600 • TZ500 / TZ500 Wireless
• SuperMassive 9200 • NSA 4600 • TZ400 / TZ400 Wireless
• NSA 3600 • TZ300 / TZ300 Wireless
SonicWall SonicOS 6.2.7.1Release Notes
7
DPI‐SSHSonicOS 6.2.7 introduces the DPI‐SSH feature. DPI‐SSH inspects the data traversing the firewall in an SSH tunnel.
SSH, or Secure Shell, is a cryptographic network protocol for secure network communication and services between two networked computers. It connects, via a secure channel over an insecure network, a server and a client running SSH server and SSH client programs, respectively. SSH is not only a shell, but acts as a secure channel. It can provide different services over this tunnel, including shell, file transfer or X11 forwarding.
SonicOS supports SSH2. SSH1 sessions will not be intercepted and inspected. If the SSH1 banner message contains a non‐conforming SSH version number, it will be treated as a bad protocol and dropped.
DPI, or Deep Packet Inspection, examines the data part (and possibly also the header) of a packet as it passes the SonicWall firewall. It searches for protocol non‐compliance, viruses, spam, intrusions, or defined criteria to decide whether the packet may pass.
DPI‐SSH decrypts incoming SSH packets and sends them to the DPI module for inspection. After completion of DPI inspection, it re‐encrypts the packet again and sends the packet to the destination. If the data/packet does not pass the DPI inspection, DPI‐SSH resets the connection.
DPI‐SSH provides inclusion/exclusion criteria to inspect or bypass certain kinds of traffic. The SonicOS administrator can modify the criteria on the DPI‐SSH > Configure screen.
DPI‐SSH supports both route mode and wire mode. For wire mode, DPI‐SSH is only supported in the secure (active DPI of inline traffic) mode. For route mode, there is no limitation.
DPI‐SSH supports the following clients:
• SSH client for Cygwin
• Putty
• secureCRT
• SSH on Ubuntu
• SSH on centos
• SFTP client for Cygwin
• SCP on Cygwin
• Winscp
DPI‐SSH supports the following servers:
• SSH server on Fedora
• SSH server on Ubuntu
DPI‐SSH supports the following key exchange algorithms:
• Diffie‐hellman‐group1‐sha1
• Diffie‐hellman‐group14‐sha1
• ecdh‐sha2‐nistp256
Notes:
• If there is already an SSH server key stored in the local machine, it must be deleted. For example, if you already SSH to a server, and the server DSS key is saved, the SSH session will fail if the DSS key is not deleted from the local file.
• The ssh‐keygen utility cannot be used to bypass the password.
• Putty uses GSSAPI. This option is for SSH2 only, which provides stronger encrypted authentication. It stores a local token or secret in the local client and server for the first time communication. It exchanges messages and operations before DPI‐SSH starts, so DPI‐SSH has no knowledge about whatever was exchanged before, including GSSAPI token. DPI‐SSH will fail with the GSSAPI option enabled.
SonicWall SonicOS 6.2.7.1Release Notes
8
• On the client side, either the SSH 2.x or 1.x client can be used if DPI‐SSH is enabled. However, clients with different version numbers cannot be used at the same time.
• Gateway Anti‐Spyware and Application Firewall inspections are not supported even if these options are selected in the DPI‐SSH > Configure screen.
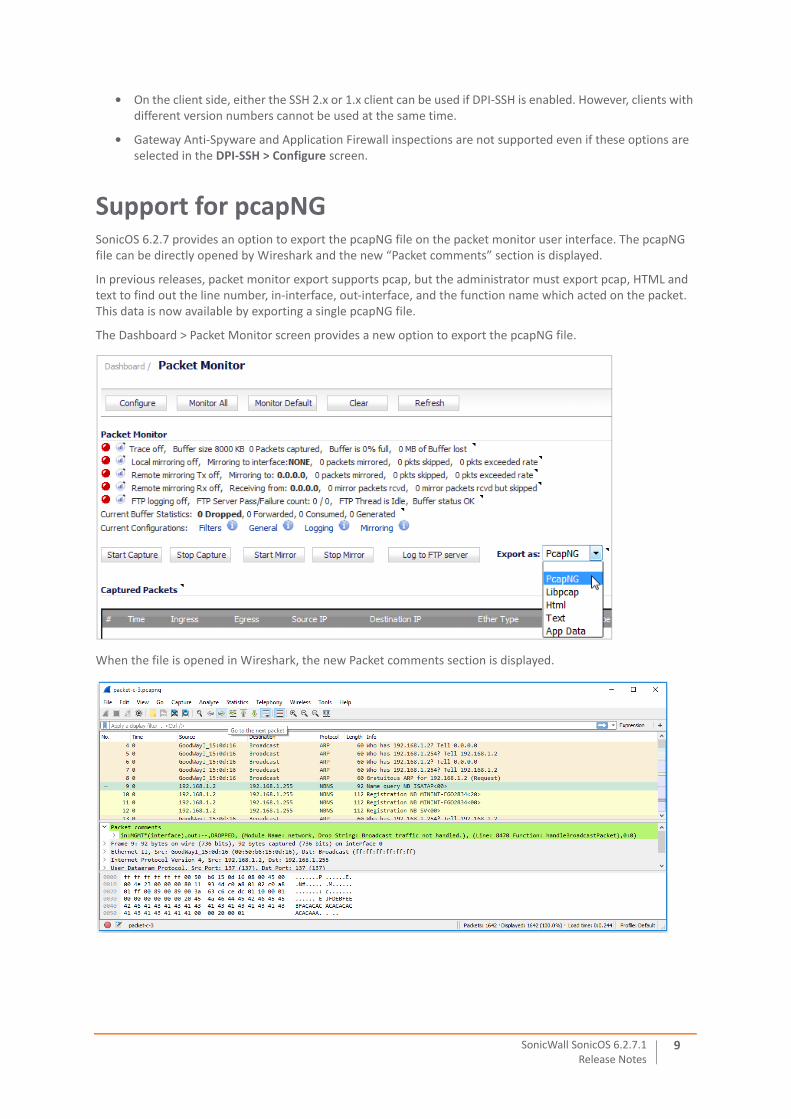
Support for pcapNGSonicOS 6.2.7 provides an option to export the pcapNG file on the packet monitor user interface. The pcapNG file can be directly opened by Wireshark and the new “Packet comments” section is displayed.
In previous releases, packet monitor export supports pcap, but the administrator must export pcap, HTML and text to find out the line number, in‐interface, out‐interface, and the function name which acted on the packet. This data is now available by exporting a single pcapNG file.
The Dashboard > Packet Monitor screen provides a new option to export the pcapNG file.
When the file is opened in Wireshark, the new Packet comments section is displayed.
SonicWall SonicOS 6.2.7.1Release Notes
9

TSR FTP for Periodic BackupThis feature allows administrators to send the configuration settings (prefs) and tech support report (TSR) to a specified FTP server. Admins can configure a schedule for periodic backup of this information to the FTP server.
To enable scheduled prefs and TSR backups:
1 Navigate to the System > Settings page.
2 Click the Send by FTP button. The Schedule Reports page displays.
3 Select the Send Tech Report by FTP checkbox to send TSR.
4 Select the Send Settings by FTP checkbox to send prefs.
5 Enter the required information for the FTP server.
6 Click the Set Schedule button to define a start schedule.
7 Click OK and then click Apply.
Custom Lists for Geo‐IP and BotnetSonicOS 6.2.7 provides new options to configure a custom country list for Geo‐IP Filter and a custom botnet list for Botnet Filter.
An IP address can be associated with a wrong country. This kind of misclassification can cause incorrect/unwanted filtering of an IP address. Having a custom country list can solve this problem. The custom country list overrides the firewall country associated with a particular IP address.
Similarly, an IP address can be wrongly marked as botnet. A custom botnet list can override the botnet tag for a particular IP address.
SonicWall SonicOS 6.2.7.1Release Notes
10

The Security Services > Geo‐IP Filter page is changed for this new feature, and has four tabs with various configuration settings on each.
The Security Services > Botnet Filter page is similarly changed for this new feature, also with four tabs.
SIP UDP Fragmentation FixesIn previous releases, the SIP transformation design and implementation does not handle fragmented SIP packets transported in UDP mode. A SIP/UDP signaling packet is fragmented when the SIP payload length is greater than the maximum MTU size of the network minus the size of the SIP packet headers. For example, for a commonly accepted maximum MTU size of 1514 bytes, if the SIP signaling packet payload length exceeds 1472 bytes, the SIP packet is dropped by SonicOS.
In SonicOS 6.2.7, SIP/UDP payload length is not restricted by the underlying MTU size on the network. This support is completely transparent to users. No configuration is required.
SonicWall SonicOS 6.2.7.1Release Notes
11

System Logs on AppFlow Server via IPFIXIn SonicOS 6.2.7, system logs can be sent to an external server via IPFIX packets and then saved into the database on the disk. The logs only include the ones which are reported WITHOUT connection cache. Users can edit the configuration in the Log > Settings page to indicate which log events should be sent.
System logs include events that are typically not dependent on traffic flowing through the firewall. Such events are mostly flow (session/connection) related events.
System logs typically include, but are not limited to:
• Interface state change
• Fan failure
• User authentication
• HA failover and failback
• Tunnel negotiations
• System events such as configuration changes
Configuration options for this feature are on these pages:
• AppFlow > Flow Reporting > External Collector tab:
An important step is send log properties and some fields of log settings to the external collector. Make sure the connection between SonicOS and the external collector server is ready before clicking the Send All Entries button to send the settings.
SonicWall SonicOS 6.2.7.1Release Notes
12
Click the button again to sync the settings in the following cases:
• SonicOS is upgraded with some NEW added log events.
• The connection between SonicOS and the external server has been down for some time and log settings might have been edited in the period.
• AppFlow > Flow Reporting > GMSFlow Server tab:
Enable Logs in the Include Following Additional Reports via IPFIX drop‐down list.
Click the Synchronize Log Settings button when ready.
• AppFlow > Flow Reporting > AppFlow Server tab:
Enable Logs in the Include Following Additional Reports via IPFIX drop‐down list.
Click the Synchronize Log Settings button when ready.
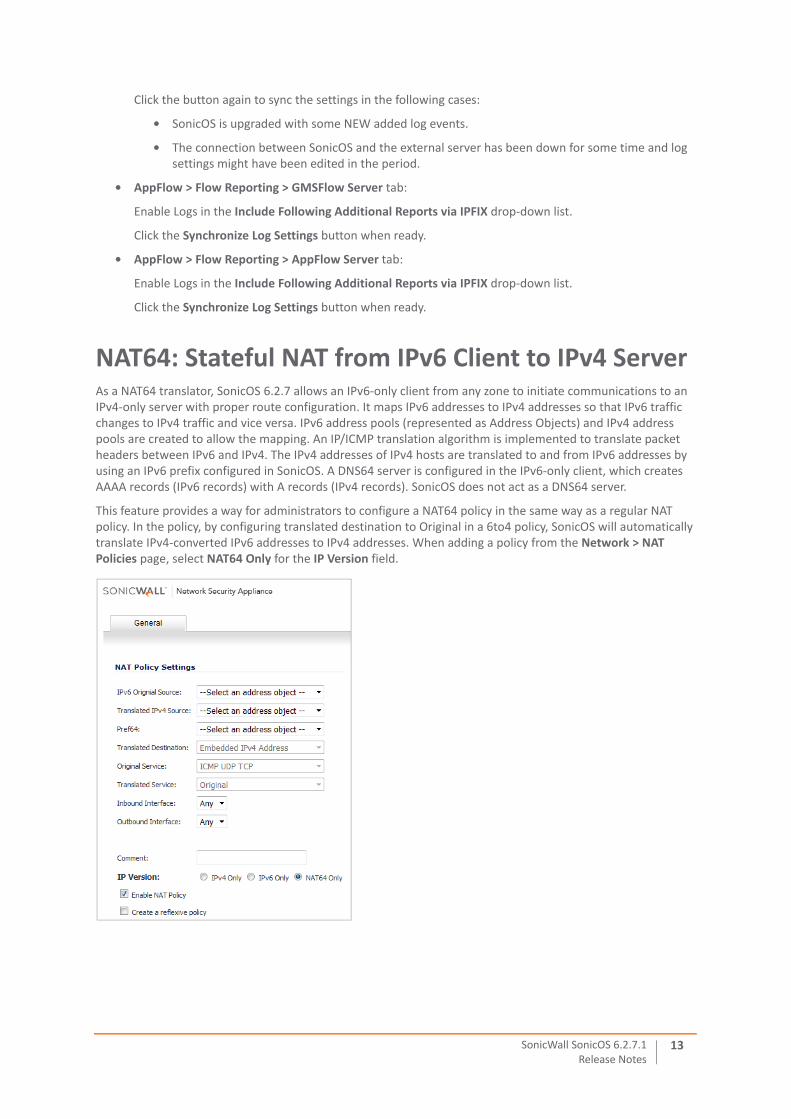
NAT64: Stateful NAT from IPv6 Client to IPv4 ServerAs a NAT64 translator, SonicOS 6.2.7 allows an IPv6‐only client from any zone to initiate communications to an IPv4‐only server with proper route configuration. It maps IPv6 addresses to IPv4 addresses so that IPv6 traffic changes to IPv4 traffic and vice versa. IPv6 address pools (represented as Address Objects) and IPv4 address pools are created to allow the mapping. An IP/ICMP translation algorithm is implemented to translate packet headers between IPv6 and IPv4. The IPv4 addresses of IPv4 hosts are translated to and from IPv6 addresses by using an IPv6 prefix configured in SonicOS. A DNS64 server is configured in the IPv6‐only client, which creates AAAA records (IPv6 records) with A records (IPv4 records). SonicOS does not act as a DNS64 server.
This feature provides a way for administrators to configure a NAT64 policy in the same way as a regular NAT policy. In the policy, by configuring translated destination to Original in a 6to4 policy, SonicOS will automatically translate IPv4‐converted IPv6 addresses to IPv4 addresses. When adding a policy from the Network > NAT Policies page, select NAT64 Only for the IP Version field.
SonicWall SonicOS 6.2.7.1Release Notes
13
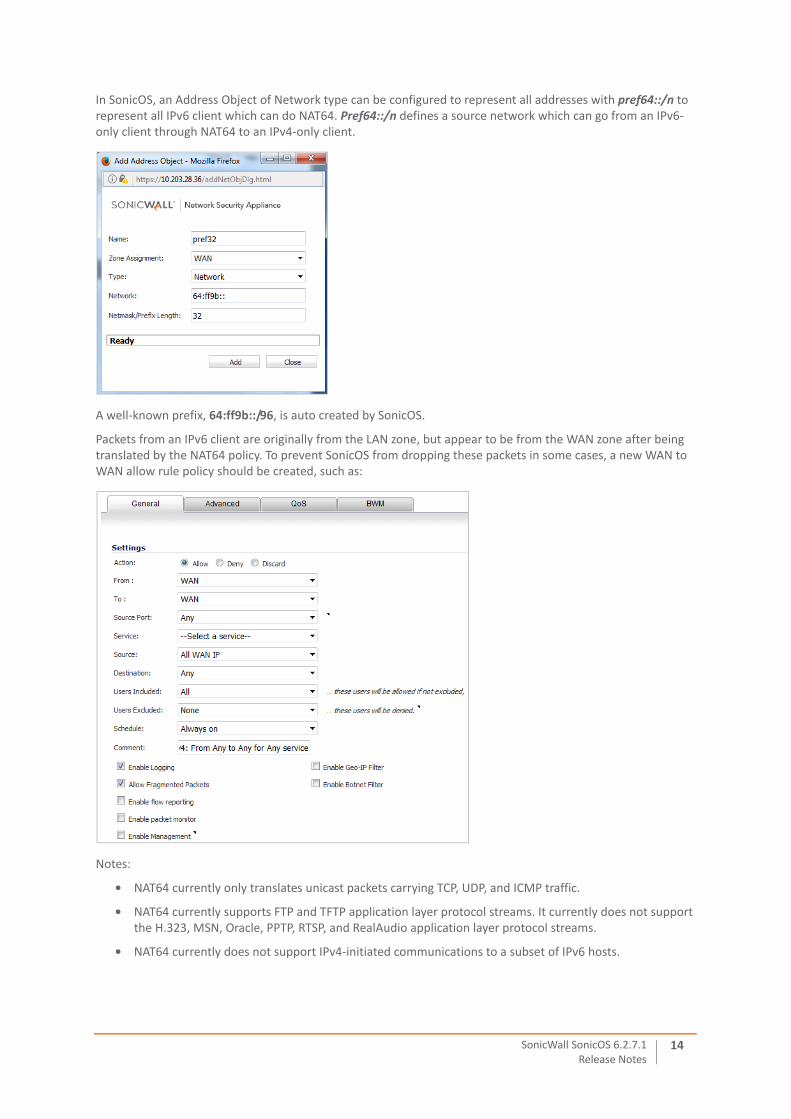
In SonicOS, an Address Object of Network type can be configured to represent all addresses with pref64::/n to represent all IPv6 client which can do NAT64. Pref64::/n defines a source network which can go from an IPv6‐only client through NAT64 to an IPv4‐only client.
A well‐known prefix, 64:ff9b::/96, is auto created by SonicOS.
Packets from an IPv6 client are originally from the LAN zone, but appear to be from the WAN zone after being translated by the NAT64 policy. To prevent SonicOS from dropping these packets in some cases, a new WAN to WAN allow rule policy should be created, such as:
Notes:
• NAT64 currently only translates unicast packets carrying TCP, UDP, and ICMP traffic.
• NAT64 currently supports FTP and TFTP application layer protocol streams. It currently does not support the H.323, MSN, Oracle, PPTP, RTSP, and RealAudio application layer protocol streams.
• NAT64 currently does not support IPv4‐initiated communications to a subset of IPv6 hosts.
SonicWall SonicOS 6.2.7.1Release Notes
14

DNS ProxySonicOS 6.2.7 supports DNS proxy to allow IPv4 clients to access DNS services in a network with mixed IPv4 and IPv6.
In a normal deployment, an IPv4 interface can do name resolution on IPv4 internet, and an IPv6 interface can only do name resolution on IPv6 internet through DNS proxy.
A new page is added to the SonicOS web management interface, Network > DNS Proxy.
Select the Enable DNS Proxy checkbox to globally enable the feature.
There are two modes for DNS proxy: IPv4 to IPv4, and IPv4 to IPv6. The default mode is IPv4 to IPv6, meaning that the firewall redirects queries from clients to upstream IPv6 DNS servers. For IPv4 to IPv4, the firewall redirects the queries to upstream IPv4 DNS servers.
Default option on DNS proxy protocol is UDP and TCP, which means when DNS query is sent over TCP, it will be proxied and retransmitted to outside DNS servers over TCP.
The checkbox Enforce DNS Proxy For All DNS Requests is an enhanced option for DNS proxy. When the option is selected, other types of DNS queries will be hooked by the DNS proxy module, including stack DNS packets sent by SonicOS, and forwarding DNS queries with destination address of outside DNS servers.
Interface Configuration and Allow RulesSonicOS 6.2.7 supports the DNS proxy feature on physical interface, VLAN interface, or VLAN trunk interface, and the zone for each interface can only be LAN, DMZ or WLAN.
In the Advanced tab of the interface configuration page, there is a checkbox named Enable DNS Proxy when the interface permits configuring DNS proxy.
When DNS proxy is enabled on an interface, one Allow Rule is auto‐added by SonicOS for UDP with the settings: From the interface to the interface, source with any and destination with the interface IP, service with DNS, and enable management. When DNS Proxy over TCP is enabled, another Allow Rule is auto‐added.
SonicWall SonicOS 6.2.7.1Release Notes
15
DHCPWhen DNS proxy is enabled on an interface, the device needs to push the interface IP as DNS server address to clients, so the SonicOS administrator needs to configure the DHCP server manually and use the interface address as the DNS Server 1 address in the DHCP server settings on the DNS/WINS tab. The Interface Pre‐populate check box in the DHCP page makes this easy to configure; if the selected interface has enabled DNS proxy, the DNS server IP is auto‐added into the DNS/WINS page.
DNS CacheIn the Network‐> DNS Proxy page, the DNS Cache function can be enabled by selecting the Enable DNS Cache checkbox; the default setting is enabled.
When enabling the function, SonicOS caches the answers from DNS responses during the DNS Proxy process, and will directly respond to clients if a subsequent DNS query matches the DNS cache.
There are two kinds of DNS cache: static DNS cache and dynamic DNS cache. Static DNS cache means that it can be manually created and edited by users, and never expires. Dynamic DNS cache is added automatically during the DNS proxy process, and it is displayed only in the whole DNS cache table. Its type is Dynamic, and has TTL value. Dynamic DNS cache can be flushed by the administrator.
Split DNSSplit DNS is an enhancement for DNS proxy, which allows the administrator to configure a set of name servers and associate them to a given domain name (can be wildcard). When SonicOS receives a query that matches the domain name, it will be transmitted to the designated DNS server.
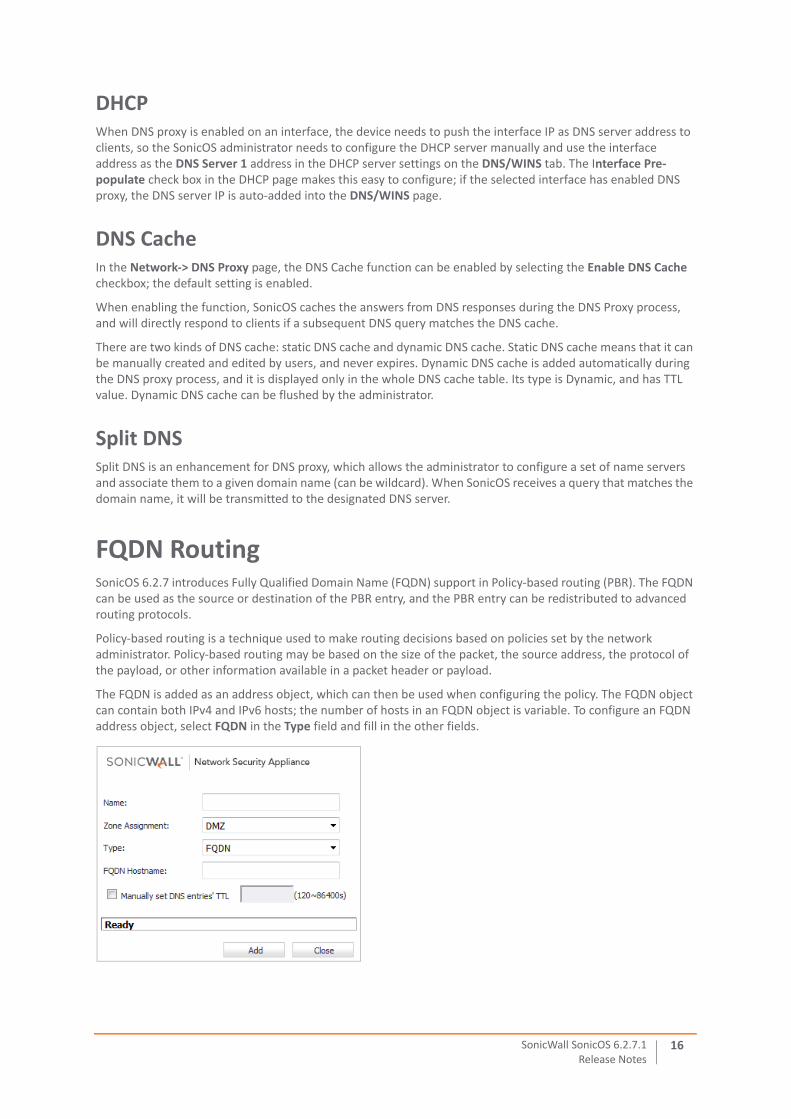
FQDN RoutingSonicOS 6.2.7 introduces Fully Qualified Domain Name (FQDN) support in Policy‐based routing (PBR). The FQDN can be used as the source or destination of the PBR entry, and the PBR entry can be redistributed to advanced routing protocols.
Policy‐based routing is a technique used to make routing decisions based on policies set by the network administrator. Policy‐based routing may be based on the size of the packet, the source address, the protocol of the payload, or other information available in a packet header or payload.
The FQDN is added as an address object, which can then be used when configuring the policy. The FQDN object can contain both IPv4 and IPv6 hosts; the number of hosts in an FQDN object is variable. To configure an FQDN address object, select FQDN in the Type field and fill in the other fields.
SonicWall SonicOS 6.2.7.1Release Notes
16

Maximum Routes DoubledThis feature doubles the maximum number of static and dynamic routes supported by SonicOS. All platforms should maintain reasonable performance while adapting to dynamic routing changes when the maximum number of dynamic and static routes has been exploited. The SonicOS web management interface might respond more slowly during the adaptation period.
The TSR displays the maximum static and dynamic routes.
Maximum Zone to Zone Access Rules IncreasedPrevious versions of SonicOS do not allow the administrator to increase or decrease the Rule Table size. The Rule Table size for all the Zone‐Zone pairs is fixed to a constant value based on the platform.
SonicOS 6.2.7 allows flexible Rule Table size for every Zone‐Zone pair. The Firewall > Access Rules page is refreshed and has a layout similar to the Firewall > Address Objects page. The selected Zone‐Zone rule table size is configured on the Firewall > Access Rules page.
Flow Reporting using IPFIX Extension Version 2SonicOS 6.2.7 introduces support for IPFIX with Extension v2. The flow reporting format to the GMS Flow Server (collector) in earlier SonicOS versions uses the IPFIX with Extension format (version 1) by default. In SonicOS 6.2.7, you can customize flow reporting to report in either IPFIX with Extension (v1) or IPFIX with Extension v2.
The new format uses variable length fields, which is much more memory efficient than sending static fields and will vastly reduce the amount of information transmitted over the network.
In IPFIX with Extension v2, many new fields have been added to convey more information about the firewall, and some redundant or unnecessary fields have been removed. The additional data in these new fields will enrich the GMS Flow Server’s visualization capabilities. The GMS Flow Server supports the IPFIX with Extension v2 format beginning in SonicWall GMS 8.3. SonicWall GMS 8.2 or earlier releases only support the IPFIX with Extension (v1) format.
The administrator can select IPFIX with Extension v2 for the GMS FS Reporting Format option in the AppFlow > Flow Reporting page, GMSFlow Server tab. A similar option is added on the AppFlow Server tab. To see these fields, you must enable an internal setting. Contact SonicWall Support for information about how to enable this. See https://support.sonicwall.com/contact‐support for Support phone numbers.
Syslog Server ProfilingThis feature provides the ability to configure the settings for each Syslog server independently instead of using the global settings for all the servers. In previous releases, the events generated from all the modules in the system are reported to all the configured Syslog servers. Depending on the deployment, this generates a huge amount of Syslog traffic and can cause performance issues or even packet loss.
With Syslog Server Profiling, the following new functionality is available:
• Syslog messages can be sent using different settings for different Syslog servers
Maximum Policies
Platform Max Size per Zone‐Zone Rule Table
SuperMassive 9200/9400/9600 5000 rules
NSA 2600/3600/4600/5600/6600 2500 rules
TZ 300/400/500/600 Series 1250 rules
SOHO Wireless 250 rules
SonicWall SonicOS 6.2.7.1Release Notes
17
• There can be multiple groups of Syslog servers
• Different events can be configured to be reported to different groups of Syslog servers
All the settings in the Log > Syslog page except the Enable NDPP Enforcement for Syslog Server checkbox can now be configured for each row independently in the Syslog Servers table. This allows the Syslog messages to be rendered with different settings for different servers and each server can have its own Rate Limiting options.
The newly added Enable checkbox can be used to enable or disable sending of Syslog messages to a specific Syslog server. The settings for Enhanced Syslog and ArcSight format can also be configured individually and the corresponding buttons are shown in the Log > Syslog page.
All these settings can be configured from the SonicOS web interface and from the command line interface (CLI.) For convenience, the global settings can be used to configure all servers.
Event ProfileThe Event Profile is an integer and can range from 0 to 23. It can be used to combine multiple Syslog servers into a group. All Syslog servers in the group have the same Profile. There can be a maximum of 24 groups (0 to 23) and seven Syslog servers per group. Therefore, in total there can be a maximum of 168 Syslog servers.
A new column called Event Profile is added to the Syslog Servers table. This new field also belongs to the group key in addition to server name and port. So, instead of <Name, Port>, a <Name, Port, Profile> combination must be unique for each row in the Syslog Servers table. This allows multiple rows to have same <Name, Port> combination with different Profiles. This means one Syslog server can be part of multiple groups, if necessary.
The events in the Log > Settings page also have a configurable Event Profile. The Event Profile of an event can be set to any available group, causing the Syslog messages for that event to be sent only to that group of servers. If the Event Profile of an event is set to a group that does not exist in the Syslog Servers table, then no Syslog messages for that event are sent.
GMSThe GMS server has a fixed Syslog Facility (Local Use 0), Syslog Format (Default), and Server ID (firewall). Although the Event Profile value for GMS is set to 0 by default, all events are reported to GMS irrespective of the profile. GMS is also exempted from Rate Limiting. The newly added Enable checkbox does not apply. GMS can be enabled/disabled only in the System > Administration page and not in the Log > Syslog page.
When GMS is enabled, the GMS server is added to the Event Profile 0 group in the Syslog Servers table. It cannot be added to any other Profile groups. Therefore, only the Profile 0 group can have 8 servers in total (7 Syslog servers and 1 GMS server). All other groups can have only 7 servers. The events in the GMS group in the Log > Settings page have Profile 0 and cannot be changed. Other events can have a different Profile.
IPv6 SupportIn SonicOS 6.2.7, IPv6 is supported on a number of additional features, as shown in this section.
SSL ControlSonicOS 6.2.7 introduces IPv6 support for SSL Control. No new options or settings have been added. Both IPv4 and IPv6 network traffic is inspected based on the settings in the Firewall Settings > SSL Control page.
IPv6 DPI‐SSLSonicOS 6.2.7 introduces IPv6 support for DPI‐SSL. No new options or settings have been added. The settings on the DPI‐SSL > Client SSL and DPI‐SSL > Server SSL pages are now applied to both IPv4 and IPv6 network traffic.
NOTE: The Override Syslog Settings with Reporting Software Settings option has been removed. Since the Syslog servers can have their own independent settings, this option is no longer needed.
SonicWall SonicOS 6.2.7.1Release Notes
18

IPv6 NTPSonicOS 6.2.7 introduces support for NTP servers with IPv6 domain names or IP addresses. Administrators can now add IPv6 NTP servers in the NTP Settings section of the System > Time page.
IPv6 DNSSonicOS 6.2.7 introduces IPv6 support for DNS.
To communicate with an IPv6 DNS server, first go to Network > Interfaces and configure a WAN interface with an IPv6 address, either as a static IP or through DHCPv6.
Then on the Network > DNS page, select the IPv6 radio button for View IP Version. The display changes to allow input of IPv6 DNS server addresses, which can be entered manually or obtained dynamically from the WAN zone. Select the Prefer IPv6 DNS Servers checkbox to make SonicOS send DNS requests to the IPv6 DNS servers first, and if that fails, send the request to the configured IPv4 DNS servers.
The DNS Name Lookup diagnostic tool on the System > Diagnostics page can be used to test the DNS servers. All four DNS diagnostic tools in previous releases are now integrated into DNS Name Lookup.
IPv6 MAC Address ObjectSonicOS 6.2.7 introduces IPv6 support for MAC address objects. A MAC address object (AO) binds to the dynamic memory of host IP addresses. It is often used when defining access rules.
To create an IPv6 MAC AO, go to the Network > Address Objects page and click Add. Then select MAC in the Type field and enter the IPv6 MAC address in the MAC Address field. The configuration is basically the same as for an IPv4 MAC AO; no new options or settings have been added for configuring an IPv6 MAC AO.
IPv6 FQDN Address ObjectSonicOS 6.2.7 introduces IPv6 support for FQDN address objects.
First, configure an IPv6 DNS server on the Network > DNS page. See IPv6 DNS for more information about this configuration.
To create an IPv6 FQDN AO, go to the Network > Address Objects page and click Add. Then select FQDN in the Type field and enter the IPv6 FQDN hostname in the FQDN Hostname field. The configuration is basically the same as for an IPv4 FQDN AO; no new options or settings have been added for configuring an IPv6 FQDN AO.
DPI‐SSL Increased Connection Counts and EnhancementsSonicOS 6.2.7 increases the number of DPI‐SSL connections available on TZ500 Series and TZ600 appliances.
In addition to the increase in connection counts, this feature provides the following enhancements for all platforms:
• Stability fixes related to race conditions
• Re‐design of the initialization sequence
• Caching (both Session cache and Spoof cache) enhancements and optimizations
• Memory footprint reduction per connection leading to increased connection counts
SonicWall SonicOS 6.2.7.1Release Notes
19

Open Authentication Social LoginSonicOS 6.2.7 introduces support for Open Authentication Social Login.
OAuth Social Login is supported on SonicWall firewalls with internal wireless and SonicPoint, in the scope of wireless zone guest services. Wireless guest services are widely used in public WiFi hotspots and corporate WiFi for guests.
Facebook, Twitter, and Google Plus are supported in SonicOS 6.2.7. Within the SonicOS scope, social login is supported for wireless guests, not for SonicOS administrator login.
External Authentication Server Topology
SonicOS Settings
To enable social login in SonicOS:
1 Edit the WLAN zone and click the Guest Services tab.
2 Select the Enable Guest Services and Enable External Guest Authentication checkboxes.
3 Click Configure next to the Enable External Guest Authentication checkbox.
4 In the Social Network Login section on the General tab of the popup dialog, select the Social Network Login checkbox and then select one or more of the Facebook, Google, or Twitter checkboxes.
5 On the Auth Pages tab, enter the desired page name such as login.php in the Login Page field.
6 Click OK.
Social Login Also known as social sign‐in, social login is a form of single sign‐on using existing information from a social networking service such as Facebook, Twitter, or Google Plus to sign into a third party website instead of creating a new login account specifically for that website.
Open Authentication (OAuth) OAuth is an open standard for authorization. OAuth provides client applications a secure delegated access to server resources on behalf of a resource owner. It specifies a process for resource owners to authorize third‐party access to their server resources without sharing their credentials.
NOTE: Read the Open Authentication Social Login guidance from FaceBook/Google/Twitter and SonicWall before enabling this feature.
SonicWall SonicOS 6.2.7.1Release Notes
20

SonicOS automatically creates the necessary pass network domains for allowing authentication process traffic between the authentication server and the user. The automatically added address object group is named Default Social Login Pass Group. This address object group is appended to the current configured pass networks, if any, or added into a new group named Social Login Pass Group. The Network > Address Objects page shows these entries.
Facebook Settings
Updated SonicPoint FirmwareNew SonicWall‐branded firmware version 9.0.1.0‐10 is available for SonicPoints connected to appliances running SonicOS 6.2.7.
Supported platforms are:
• SonicPoint ACe
• SonicPoint ACi
• SonicPoint N2
Your SonicPoint is automatically provisioned with the new firmware by SonicOS.
SonicWall SonicOS 6.2.7.1Release Notes
21

SonicPoint Radius AccountingSonicOS 6.2.7 introduces support for Radius Accounting on SonicWall firewalls with a connected SonicPoint ACe, ACi, or N2, in the scope of IEEE 802.11i Enterprise Authentication.
Radius Accounting uses the RADIUS protocol to deliver accounting information from a Network Access Server (NAS, a SonicPoint in our case) to the Radius Accounting Server (RAS). The SonicOS administrator can use the accounting information to apply various billing rules on the Radius Accounting server side, based on session duration time or traffic load being transferred for each individual user. Radius Accounting is the process of collecting and storing the information contained in the following system messages:
• Accounting‐Start
• Accounting‐Stop
SonicOS Settings
To configure Radius Accounting:
1 On the SonicPoint > SonicPoints page, click the Configure button for your SonicPoint.
2 On the Radio 0 Basic tab, select WPA2 ‐ AUTO ‐ EAP for the Authentication Type.
3 Under Radius Server Settings, click Configure.
NOTE: The addition of this feature resolves request for enhancement #159713.
SonicWall SonicOS 6.2.7.1Release Notes
22
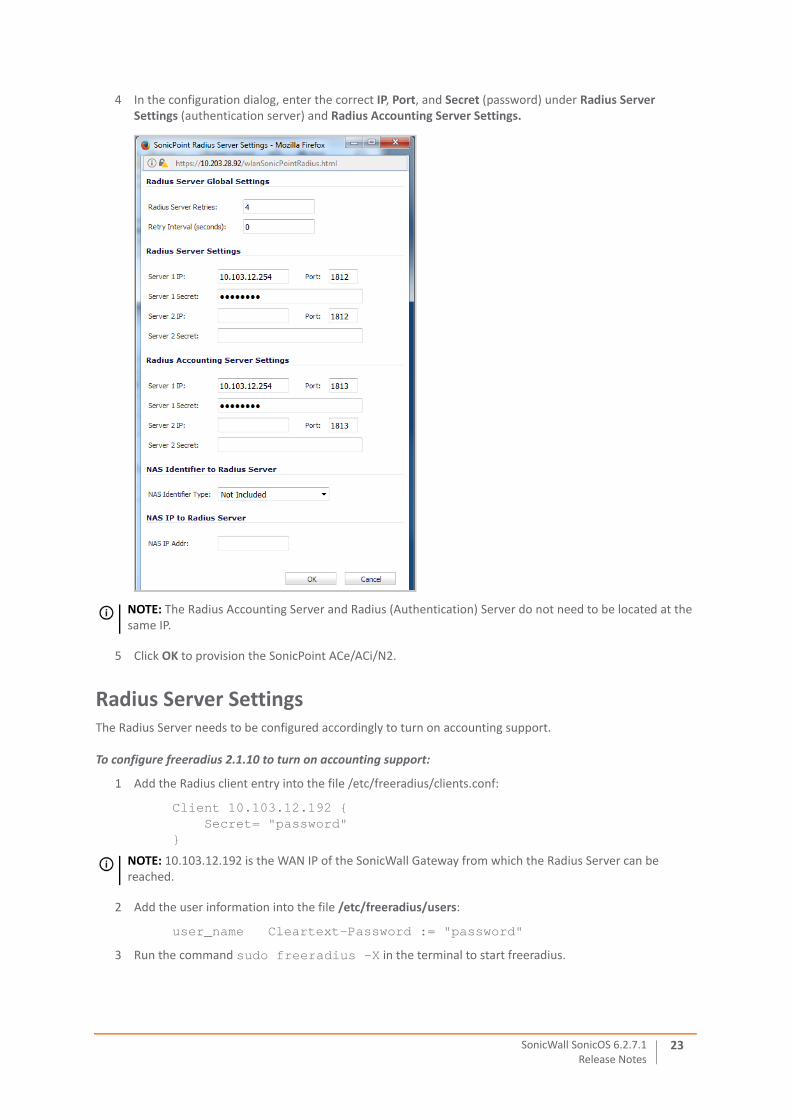
4 In the configuration dialog, enter the correct IP, Port, and Secret (password) under Radius Server Settings (authentication server) and Radius Accounting Server Settings.
5 Click OK to provision the SonicPoint ACe/ACi/N2.
Radius Server SettingsThe Radius Server needs to be configured accordingly to turn on accounting support.
To configure freeradius 2.1.10 to turn on accounting support:
1 Add the Radius client entry into the file /etc/freeradius/clients.conf:
Client 10.103.12.192 { Secret= "password"
}
2 Add the user information into the file /etc/freeradius/users:
user_name Cleartext-Password := "password"
3 Run the command sudo freeradius -X in the terminal to start freeradius.
NOTE: The Radius Accounting Server and Radius (Authentication) Server do not need to be located at the same IP.
NOTE: 10.103.12.192 is the WAN IP of the SonicWall Gateway from which the Radius Server can be reached.
SonicWall SonicOS 6.2.7.1Release Notes
23

31‐Bit NetworkSonicOS 6.2.7 introduces support for RFC 3021, which defines the use of a 31‐bit subnet mask. This mask allows only two host addresses in the subnet, with no “network” or “gateway” address and no broadcast address. Such a configuration can be used within a larger network to connect two hosts with a point‐to‐point link. The savings in address space resulting from this change is easily seen, each point‐to‐point link in a large network would consume two addresses instead of four.
In this context, the point‐to‐point link is not equivalent to PPP (point to point protocol). The point‐to‐point link using a 31‐bit mask can use or not use the PPP protocol. 31‐bit prefixed IPv4 addresses on a point‐to‐point link can also be used in the Ethernet network.
Configuring SonicOS
To configure an interface for a 31‐bit subnet:
1 On the Network > Interfaces page, edit the desired interface.
2 Set the Subnet Mask to 255.255.255.254.
3 Enter one host IP address into the IP Address field.
4 Enter the other host IP address into the Default Gateway field.
5 Set the other fields according to your network, as needed.
6 Click OK.
SonicWall SonicOS 6.2.7.1Release Notes
24

Example Network Environment
In this network environment, Host PC1 and Host PC2 can use visit each other, while hosts in the LAN network can visit Host PC2.
To configure settings for this environment:
1 For Host PC1, add two route entries:
• Route add 10.5.10.0 mask 255.255.255.0 15.6.8.10
• Route add 10.102.234.0 mask 255.255.255.0 15.6.8.10
2 For Host PC2, add two route entries:
• Route add 10.5.10.0 mask 255.255.255.0 10.102.234.70
• Route add 15.6.8.0 mask 255.255.255.0 10.102.234.70
3 On the Cisco router (F0/0):
• interface fastEthernet 0/0
• ip address 10.5.10.120 255.255.255.254
4 On the Cisco 2811, add one route entry:
!
ip route 15.6.8.0 255.255.255.0 10.5.10.120
!
5 On the firewall, add one route entry to enable the WAN zone data flow from X2 to X5, and X5 to X2:
Any 10.102.234.0 Any X2 Default Gateway X2
Threat APISonicOS 6.2.7 introduces support for the Threat API feature. The SonicOS Threat API provides API access to SonicWall firewall services. Compared with current firewall GUI/CLI user interfaces, the Threat API is simple and makes good use of the standard HTTP protocol. With the trend toward cloud deployment, the Threat API can more easily be used than the traditional SonicOS GUI/CLI.
SonicWall SonicOS 6.2.7.1Release Notes
25
Malicious threats can originate from URLs or IP addresses. Lists of these threats can be large and change frequently. SonicOS can already block custom lists of URLs and IP addresses, it’s just inconvenient because a human has to log in and update the lists by hand. Using an API interface makes it much easier.
The Threat list is sent to SonicOS using the Threat API. Threats can be added in either of the following formats:
• URLs (https://malicious123.example.com/malware)
• IP addresses (10.10.1.25)
Third parties can generate the threat list and pass it to the firewall using Threat API.
For IP addresses in the threat list, SonicOS initially creates a default Threat API Address Group and then creates an Address Object (AO) for each IP address in the threat list. The SonicOS administrator configures Firewall Access Rules that reference that Address Group and block the IP addresses.
SonicOS adds the URLs to its CFS Threat URI list. The SonicOS administrator enables Threat API Enforcement in the associated CFS Profile and configures a Content Filtering System (CFS) policy to block the URLs in the threat list.
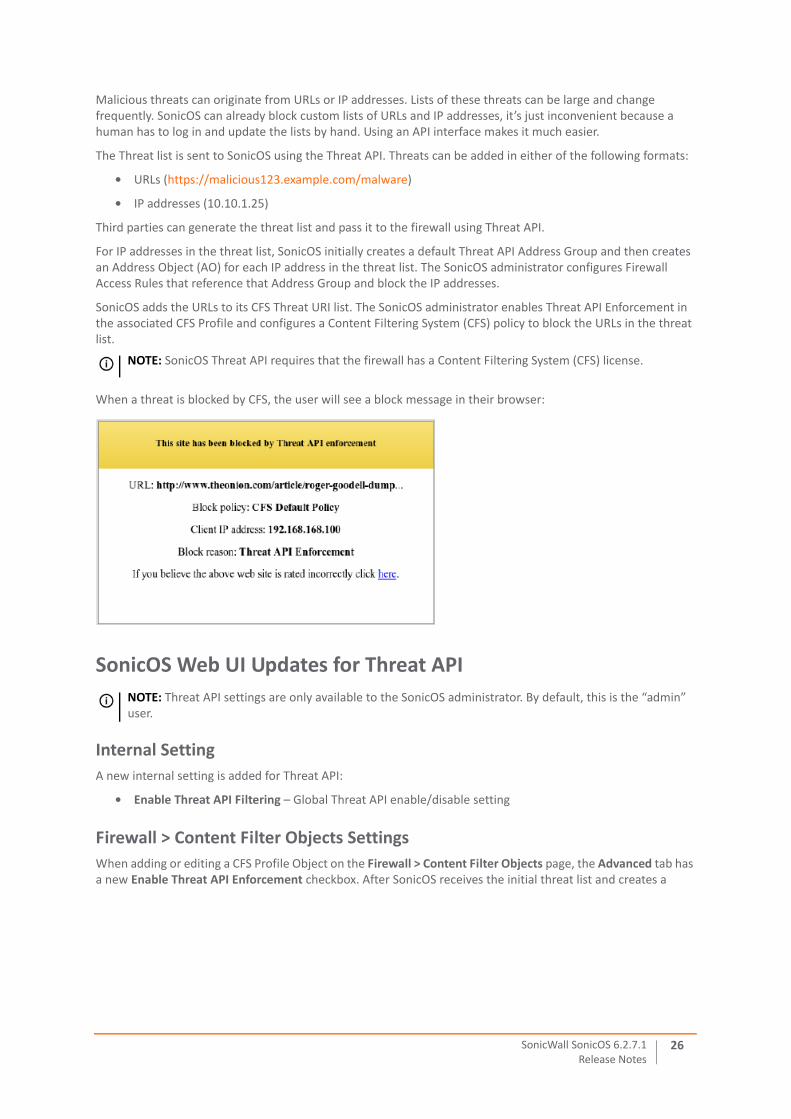
When a threat is blocked by CFS, the user will see a block message in their browser:
SonicOS Web UI Updates for Threat API
Internal Setting
A new internal setting is added for Threat API:
• Enable Threat API Filtering – Global Threat API enable/disable setting
Firewall > Content Filter Objects Settings
When adding or editing a CFS Profile Object on the Firewall > Content Filter Objects page, the Advanced tab has a new Enable Threat API Enforcement checkbox. After SonicOS receives the initial threat list and creates a
NOTE: SonicOS Threat API requires that the firewall has a Content Filtering System (CFS) license.
NOTE: Threat API settings are only available to the SonicOS administrator. By default, this is the “admin” user.
SonicWall SonicOS 6.2.7.1Release Notes
26
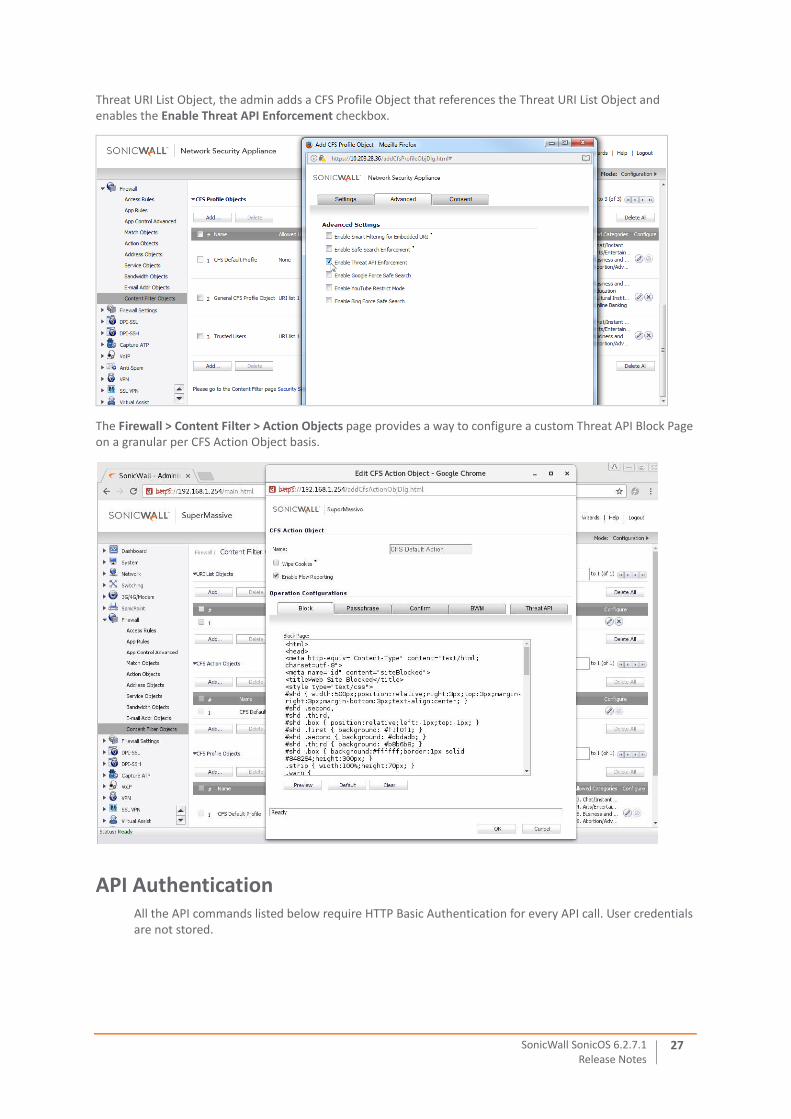
Threat URI List Object, the admin adds a CFS Profile Object that references the Threat URI List Object and enables the Enable Threat API Enforcement checkbox.
The Firewall > Content Filter > Action Objects page provides a way to configure a custom Threat API Block Page on a granular per CFS Action Object basis.
API AuthenticationAll the API commands listed below require HTTP Basic Authentication for every API call. User credentials are not stored.
SonicWall SonicOS 6.2.7.1Release Notes
27
API Commands• GET /threat/block/uri/ – Returns URI blocklist in a simple plain‐text, 1 URI per line format.
• OPTIONS /threat/block/uri/ – Allows restricted resources on a web page to be requested from another domain outside the domain from which the first resource was served.
• POST /threat/block/uri/ – Instantiates the URI blocklist.
• DELETE /threat/block/uri/ – Clears the URI blocklist.
• GET /threat/block/ip/ – Returns host IP blocklist in a simple plain‐text, 1 V4/V6 host per line format.
• OPTIONS /threat/block/ip/ – Allows restricted resources on a web page to be requested from another domain outside the domain from which the first resource was served.
• POST /threat/block/ip/ – Instantiates the host IP blocklist.
• PUT /threat/block/ip/ – Adds host(s) to the IP blocklist.
• DELETE /threat/block/ip/ – Deletes all or specified host(s) from the IP blocklist.
Threat API Examples
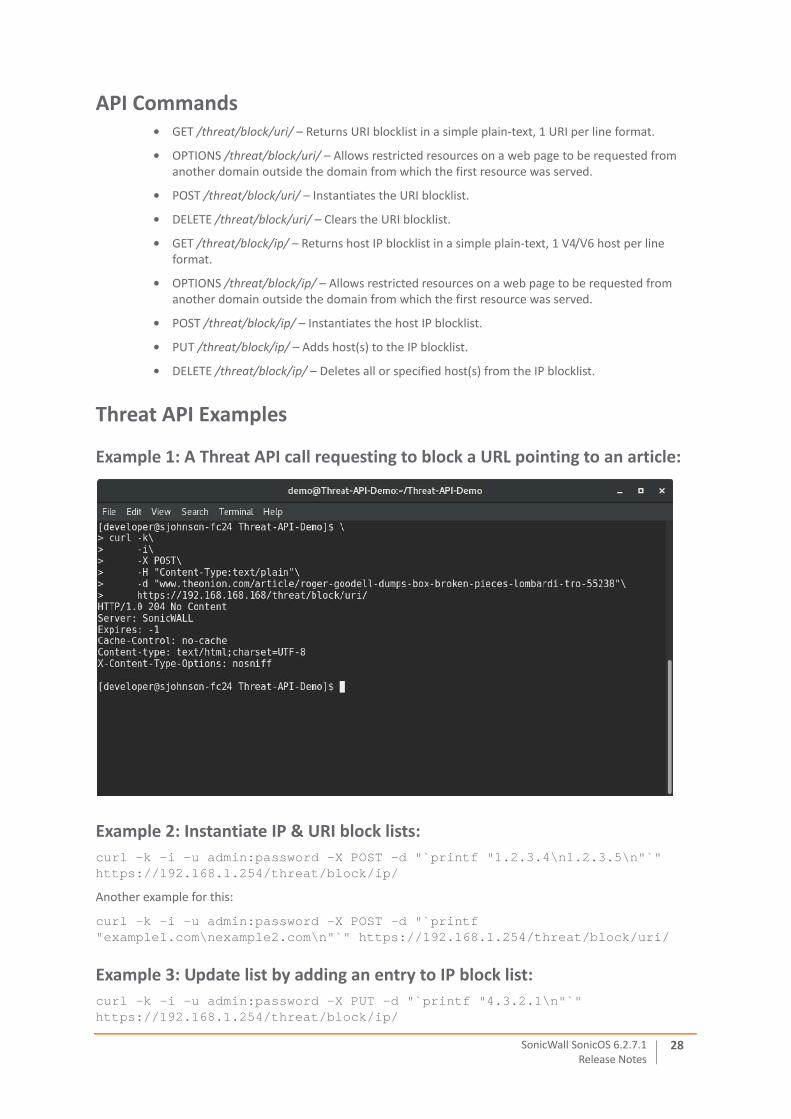
Example 1: A Threat API call requesting to block a URL pointing to an article:
Example 2: Instantiate IP & URI block lists:
curl -k -i -u admin:password -X POST -d "`printf "1.2.3.4\n1.2.3.5\n"`" https://192.168.1.254/threat/block/ip/
Another example for this:
curl -k -i -u admin:password -X POST -d "`printf "example1.com\nexample2.com\n"`" https://192.168.1.254/threat/block/uri/
Example 3: Update list by adding an entry to IP block list:
curl -k -i -u admin:password -X PUT -d "`printf "4.3.2.1\n"`" https://192.168.1.254/threat/block/ip/
SonicWall SonicOS 6.2.7.1Release Notes
28
Example 4: Delete IP & URI entries:
curl -k -i -u admin:password -X DELETE -d "`printf "1.2.3.4\n1.2.3.5\n"`" https://192.168.1.254/threat/block/ip/
Another example for this:
curl -k -i -u admin:password -X DELETE https://192.168.1.254/threat/block/uri/
Biometric AuthenticationSonicOS 6.2.7 introduces support for biometric authentication in conjunction with SonicWall Mobile Connect.
Mobile Connect is an app that allows users to securely access private networks from a mobile device. Mobile Connect 4.0 supports using finger touch for authentication as a substitute for username and password.
SonicOS 6.2.7 provides configuration settings on the SSL VPN > Client Settings page to allow this method of authentication when using Mobile Connect to connect to the firewall.
To enable biometric authentication:
1 On the SSL VPN > Client Settings page, click the Configure button for the Default Device Profile.
2 On the Client Settings tab, select Enabled for one or both of the following settings:
• Allow Touch ID on IOS devices
• Allow Fingerprint Authentication on Android devices
3 On the client smartphone or other mobile device, enable Touch ID (iOS) or Fingerprint Authentication (Android).
Ensure that Mobile Connect 4.0 or higher is installed on the mobile device, and configure it to connect with the firewall.
VPN Auto ProvisioningSonicOS 6.2.7 introduces the VPN Auto Provisioning feature. This feature provides automatic VPN provisioning for box‐to‐box hub‐and‐spoke configurations. The user experience is similar to that seen when using SonicWall Global VPN Client to connect from a client machine to a firewall, in which none of the complexity is visible to the user.
Minimally, only two pieces of information are required to configure a spoke appliance when using VPN Auto Provisioning:
• The peer gateway address or domain name
• The machine authentication credentials
By selecting the Default Provisioning Key option, machine authentication credentials can be based on a default value known to all the appliances. To increase security, user level credentials may also be required.
SonicWall SonicOS 6.2.7.1Release Notes
29

VPN Auto Provisioning can be used when adding a VPN Policy in the VPN > Settings page. In the Add dialog under Security Policy, select either:
• SonicWall Auto Provisioning Client
• SonicWall Auto Provisioning Server
4 Configure the other fields as needed.
EnhancementsThe following enhancements are included in this release.
RADIUS Accounting with WPA2 EAP
Enhancement Issue ID
In SonicOS 6.2.7, RADIUS Accounting works when authenticating wireless users accessing the firewall via a SonicPoint.
159713
SonicWall SonicOS 6.2.7.1Release Notes
30
Resolved IssuesThis section provides a list of resolved issues in this release.
MAC Address Objects with CFS 4.0
Enhancement Issue ID
In SonicOS 6.2.7, MAC address objects are allowed in CFS 4.0 exclusion lists. 179692
AntiVirus
Resolved issue Issue ID
The McAfee AntiVirus enforced installation does not occur
Occurs when the destination interface is PPPoE, rather than a static IP address.
180292
CFS
Resolved issue Issue ID
Web site access fails, links and pictures fail to load, browser just spins, but no CFS block page is displayed.
Occurs when the Forbidden URI in the CFS profile contains any entries.
179393
High Availability
Resolved issue Issue ID
The active primary firewall in an HA Pair goes down, and the active secondary firewall also goes down after upgrading firmware.
Occurs after the firmware is upgraded to SonicOS 6.2.7.1‐21n on an NSA 2600 HA Pair.
184807
Networking
Resolved issue Issue ID
A Dynamic MAC Address Object cannot be used in an access rule and SonicOS displays the error, “Policy Action: Mixed IP Version Address Object and Groups are not allowed in policy.”
Occurs when a LAN MAC AO with a LAN computer MAC address is added and then attempt to create an access rule from LAN to WAN zone using the MAC AO as the Source.
184863
Verifone CC terminals cannot get a DHCP IP address lease.
Occur when using static DHCP scopes.
181648
System
Resolved issue Issue ID
The firewall in a High Availability configuration experiences failovers at random times.
Occurs in a certain case involving a NULL condition in the user level authentication functionality.
182014
SonicWall SonicOS 6.2.7.1Release Notes
31

Known IssuesThis section provides a list of known issues in this release.
The firewall reboots unexpectedly due to Data Plane core exceptions.
Occurs when there is a memory buffer error related to a block page.
180142
The firewall reboots due to task suspension Trace tsfTaskLoc.
Occurs when incorrect NAT policies using range objects are configured and when downloading the Botnet database.
176249
User Interface
Resolved issue Issue ID
Cannot change the BWM type from Advanced to Global and back to Advanced.
Occurs when changing the BWM type from Advanced to Global on the Firewall Settings > BWM page and enabling the “Prevent this page from creating additional dialogs” option in the popup dialog, and then attempting to change the BWM mode back to Advanced.
183586
VPN
Resolved issue Issue ID
An IKEv2 interoperability issue with Cisco IOS causes a “Selector Check Error” log message.
Occurs when Site to Site tunnels connect many TZ firewalls to multiple Cisco 3945 routers which are using dynamic crypto map.
171152
Vulnerability
Resolved issue Issue ID
Testing indicates that the firewall is vulnerable to the HTTProxy Vulnerability.
Occurs when running a Trust Wave PCI scan.
179227
3G/4G
Known issue Issue ID
Sprint card FTP download time is higher on SonicOS 6.2.7.0‐17n than on SonicOS 6.2.6.0.
Occurs when using FTP Binary mode and downloading a 1MB zip file a couple of times.
183961
CFS
Known issue Issue ID
Domains included in the Forbidden URI list in CFS 3.0, but not being blocked, are added to the Forbidden URI List in CFS 4.0 and are then blocked.
Occurs when upgrading from CFS 3.0 to CFS 4.0 after configuring a Forbidden URI list and disabling the Block Access to URL option.
185082
System
Resolved issue Issue ID
SonicWall SonicOS 6.2.7.1Release Notes
32

IPv6
Known issue Issue ID
SonicOS sends IPv4 DNS requests when communicating with SonicWall backend servers such as MySonicWall or the License Manager.
Occurs when the X1 (WAN) interface and the DNS server are only configured with IPv6 addresses.
183975
Networking
Known issue Issue ID
IPv6 FQDN Network Monitor policies are lost after restarting the firewall.
Occurs when the IPv6 FQDN Network Monitor policies have a comment included in their configuration.
185079
When adding an access rule in Firewall > Access Rules, using the option to create a new address object prevents the rule from being saved.
Occurs when using the Internet Explorer 11 browser to manage the appliance.
185057
Active or passive FTP does not work with NAT64 when specifying the outbound interface.
Occurs when the specified outbound interface is affected by a NAT64 policy.
Workaround: Set the outbound interface to Any.
184889
When using NAT64, HTTPS traffic fails in some cases.
Occurs when SSL Client Inspection is enabled.
184830
An access rule with a schedule will change its schedule after rebooting.
Occurs when two schedule objects are available and the access rule is configured to use one of them. After the reboot, the rule table shows the access rule using the other schedule.
184803
The Enable DNS Proxy option becomes disabled or disappears after the WLAN tunnel interface is saved and then edited again.
Occurs when the global Enable DNS Proxy option is enabled and then a WLAN tunnel interface is added with the Enable DNS Proxy option selected in its configuration. After saving the tunnel interface configuration, the Enable DNS Proxy option is shown as disabled or disappeared when checking the tunnel interface settings.
184385
An IPv6 host resolved in an IPv6 MAC Address Object does not disappear after modifying that MAC address to a new value in a static NDP entry.
Occurs when a MAC AO resolves an IPv6 address from a static NDP table, then one NDP entry's MAC address is changed to a new value, and find that the previously resolved IPv6 address is still displayed in the MAC AO.
184318
A specific sub‐domain host IP address cannot be added into a FQDN Address Object.
Occurs when a FQDN AO such as *.e.com is added, then the admin queries 1.e.com, 2.e.com, and 3.e.com on a computer connected to the firewall LAN zone and the IP addresses for those sub‐domains are returned by the server. But, the FQDN AO still only contains the host IP address for e.com.
184156
Traffic is dropped in L2B mode due to IP‐Helper RPF check while its protocol is enabled in IP‐helper but no policy configured, e.g. NetBIOS, DNS.
183632
A sub‐VLAN interface configured in PPPoE/PPTP/L2TP mode and then changed cannot connect again during the enabled schedule.
Occurs when the interface is changed to static mode while connected, and then changed back to iPPPoE/PPTP/L2TP mode.
183607
SonicWall SonicOS 6.2.7.1Release Notes
33

Network monitor policy does not work.
Occurs when select 'All SonicPoints' as probe target.
183567
Cannot manage the secondary unit in an HA Pair from the WAN zone although it is configured to allow management, and all ARP requests are dropped with the error “Drop Code: 31(Invalid HA ARP packet)”.
Occurs when accessing the unit on the HA monitor IP for X1, which is a DHCP address.
173915
SonicPoint
Known issue Issue ID
RADIUS Accounting fails with a SonicPoint NDR access point. 181522
System
Known issue Issue ID
SonicOS cannot disable or enable a NAT64 policy.
Occurs when a few NAT policies already exist.
183304
Switching / X‐Series
Known issue Issue ID
In an HA pair, importing settings after an X‐series switch is deleted clears the VLAN configuration in the switch.
183564
Re‐adding a switch after deleting it throws an error and the switch becomes inaccessible. 181357
User Interface
Known issue Issue ID
Sorting does not work on App Flow Monitor, App Flow reports, Log Monitor tables. Columns are always sorted in descending order. Also, the sort icon does not show up.
184114
VPN
Known issue Issue ID
Only one of two protected subnets behind an Auto Provisioning (AP) client can establish a tunnel to the AP server.
Occurs when the AP server policy has the Require Authentication of VPN AP Clients via XAUTH option enabled. If the Allow Unauthenticated VPN AP Client Access option is enabled instead, both subnets can establish a tunnel.
185074
With VPN Auto Provisioning, the AP Client stops sending Aggressive Mode negotiation requests at regular intervals.
Occurs after the AP Client gets an “IP Pool of the VPN Policy is Full” rejection from the AP Server.
Workaround: When deploying VPN Auto Provisioning, allocate a larger IP pool for the AP Clients.
182214
The VPN Tunnel cannot be negotiated in some cases.
Occurs when the Auto‐Provisioned Server uses a certificate with a wildcard including ID string (DC).
181322
Networking
Known issue Issue ID
SonicWall SonicOS 6.2.7.1Release Notes
34

System CompatibilityThis section provides additional information about hardware and software compatibility with this release.
Wireless 3G/4G Broadband DevicesSonicOS 6.2.7.1 provides support for a wide variety of PC cards, USB devices and wireless service providers. For the most recent list of supported devices, see http://www.sonicwall.com/supported‐wireless‐broadband‐cards‐devices/.
GMS SupportSonicWall Global Management System (GMS) management of SonicWall security appliances running SonicOS 6.2.7.1 requires GMS 8.3 for management of firewalls using the new features in SonicOS 6.2.7.1. SonicWall GMS 8.2 supports management of all other features in SonicOS 6.2.7.1 and earlier releases.
WXA SupportThe SonicWall WXA series appliances (WXA 6000 Software, WXA 500 Live CD, WXA 5000 Virtual Appliance, WXA 2000/4000 Appliances) are supported for use with SonicWall security appliances running SonicOS 6.2.7.1. The recommended firmware version for the WXA series appliances is WXA 1.3.2.
Browser SupportSonicOS with Visualization uses advanced browser technologies such as HTML5, which are supported in most recent browsers. SonicWall recommends using the latest Chrome, Firefox, Internet Explorer, or Safari browsers for administration of SonicOS. This release supports the following Web browsers:
• Chrome 18.0 and higher (recommended browser for dashboard real‐time graphics display)
• Firefox 16.0 and higher
• Internet Explorer 9.0 and higher
• Safari 5.0 and higher running on non‐Windows machines
Wizards
Known issue Issue ID
The Setup Guide wizard contains the incorrect statement, “Since HA is enabled, only Static IP addressing is allowed”. In SonicOS 6.2.7, Dynamic WAN interfaces are supported in High Availability mode.
Occurs in the WAN Mode screen of the wizard.
184891
NOTE: On Windows machines, Safari is not supported for SonicOS management.
NOTE: Mobile device browsers are not recommended for SonicWall appliance system administration.
SonicWall SonicOS 6.2.7.1Release Notes
35
Product LicensingSonicWall network security appliances must be registered on MySonicWall to enable full functionality and the benefits of SonicWall security services, firmware updates, and technical support. Log in or register for a MySonicWall account at https://mysonicwall.com.
Upgrading InformationFor information about obtaining the latest firmware, upgrading the firmware image on your SonicWall appliance, and importing configuration settings from another appliance, see the SonicOS 6.2 Upgrade Guide available on MySonicWall at https://mysonicwall.com or on the Support portal at https://support.sonicwall.com.
SonicWall SupportTechnical support is available to customers who have purchased SonicWall products with a valid support maintenance contract and to customers who have trial versions.
The Support Portal provides self‐help tools you can use to solve problems quickly and independently, 24 hours a day, 365 days a year. To access the Support Portal, go to https://support.sonicwall.com.
The Support Portal enables you to:
• View knowledge base articles and technical documentation
• Download software
• View video tutorials
• Collaborate with peers and experts in user forums
• Get licensing assistance
• Access MySonicWall
• Learn about SonicWall professional services
• Register for training and certification
To contact SonicWall Support, visit https://support.sonicwall.com/contact‐support.
SonicWall SonicOS 6.2.7.1Release Notes
36
Copyright © 2017 SonicWall Inc. All rights reserved.
This product is protected by U.S. and international copyright and intellectual property laws. SonicWall is a trademark or registered trademark of SonicWall Inc. and/or its affiliates in the U.S.A. and/or other countries. All other trademarks and registered trademarks are property of their respective owners.
The information in this document is provided in connection with SonicWall Inc. and/or its affiliates' products. No license, express or implied, by estoppel or otherwise, to any intellectual property right is granted by this document or in connection with the sale of SonicWall products. EXCEPT AS SET FORTH IN THE TERMS AND CONDITIONS AS SPECIFIED IN THE LICENSE AGREEMENT FOR THIS PRODUCT, SONICWALL AND/OR ITS AFFILIATES ASSUME NO LIABILITY WHATSOEVER AND DISCLAIMS ANY EXPRESS, IMPLIED OR STATUTORY WARRANTY RELATING TO ITS PRODUCTS INCLUDING, BUT NOT LIMITED TO, THE IMPLIED WARRANTY OF MERCHANTABILITY, FITNESS FOR A PARTICULAR PURPOSE, OR NON‐ INFRINGEMENT. IN NO EVENT SHALL SONICWALL AND/OR ITS AFFILIATES BE LIABLE FOR ANY DIRECT, INDIRECT, CONSEQUENTIAL, PUNITIVE, SPECIAL OR INCIDENTAL DAMAGES (INCLUDING, WITHOUT LIMITATION, DAMAGES FOR LOSS OF PROFITS, BUSINESS INTERRUPTION OR LOSS OF INFORMATION) ARISING OUT OF THE USE OR INABILITY TO USE THIS DOCUMENT, EVEN IF SONICWALL AND/OR ITS AFFILIATES HAVE BEEN ADVISED OF THE POSSIBILITY OF SUCH DAMAGES. SonicWall and/or its affiliates make no representations or warranties with respect to the accuracy or completeness of the contents of this document and reserve the right to make changes to specifications and product descriptions at any time without notice. SonicWall Inc. and/or its affiliates do not make any commitment to update the information contained in this document.
For more information, visit https://www.sonicwall.com/legal/.
Last updated: 3/30/17
232‐003844‐00 Rev A
Legend
WARNING: A WARNING icon indicates a potential for property damage, personal injury, or death.
CAUTION: A CAUTION icon indicates potential damage to hardware or loss of data if instructions are not followed.
IMPORTANT NOTE, NOTE, TIP, MOBILE, or VIDEO: An information icon indicates supporting information.
SonicWall SonicOS 6.2.7.1Release Notes
37