spear-technique tips making excellent impressions in challenging situations
TRANSCRIPT
Managing soft tissue is often a
difficulty that dentists face. A
variety of possible conditions can
result in significant inflammation,
which is problematic for preparing
teeth and making accurate impres-
sions. Gingival inflammation gives
way to gingival shrinkage when the
tissue heals, which results in an inac-
curate impression and an ill-fitting
restoration. The technique described
below controls the tissue to allow the
construction of an excellent-fitting
temporary. While many products can
be used for this technique, the prod-
ucts listed here are examples of what
the author would use regularly.
Anesthetize the tooth and gingiva.
If the tooth had already been restored,
remove the old restoration and clean
the margins. If the tooth isn’t restored,
prepare the tooth to the gingival mar-
gin. Place a layer of #1 Ultrapack ®
cord (Ultradent Products, Inc, South
Jordan, UT) coated with ViscoStat®
(Ultradent Products, Inc) just apical
to the prepared margin (Figure 1 and
Figure 2). When significant inflam-
mation exists, it is easy to place the
cord through the attachment; there-
fore it is critical to place the cord just
apical to the preparation.
Inject local anesthetic (the author
prefers lidocaine 1:100,000 epi) directly
into the buccal papilla on both the
mesial and the distal, applying pres-
sure until the tissue blanches white.
Repeat this process from the lingual
(Figure 3). Using a fine wire tip on an
electrosurgery unit, place the tip on the
cord previously placed in the sulcus.
Rest the tip against the margin of the
tooth holding the electrosurgery unit
parallel to the path of draw of the
preparation. Turn on the electrosurgery
unit and trace around the preparation,
removing any tissue that is interfering
with access to the margin. When
Technique Tips: Making ExcellentImpressions in Challenging Situations
Frank M. Spear, DDS, MSD
Founder and Director Seattle Institute for Advance
Dental EducationSeattle, Washington
Affiliate Assistant Professor University of Washington
School of Dentistry Seattle, Washington
Private Practice Seattle, Washington
Abstract: Making final impressions can be one of the most challenging phases of a complex restoration.There are many problems that can lead to a frustrating experience, such as:
• Margin location• Soft tissue quality • Location of the teeth to be impressed • Patient’s inability to open the mouth sufficiently • Excess salivary flow • A large tongueThe key to managing these situations is to gain control of the environment and soft tissue before
attempting the impression.
24 Advanced Esthetics & Interdisciplinary Dentistry Vol. 2, No. 1, 2006
Managing soft tissue is often
a difficulty that dentists face. A variety of
possible conditions can result in significant
inflammation, which is problematic for
preparing teeth and making accurate impressions.
finished, the cord in the sulcus should
be completely visible 360° around
the tooth.
Clean the area with hydrogen per-
oxide and pack a second layer of
Ultrapak ® cord— #1 if the sulcus is
relatively shallow, #2 if the sulcus is
deep and the tissue is thick (Figures 4
through 6). The combination of directly
infiltrated anesthetic and two layers
of cord should have completely con-
trolled the gingival environment.
Complete the preparation and any
build-ups that may be necessary.
Finally, pull the top cord and check
for bleeding (Figure 7). If bleeding
does occur, use astringent in the
Dento-Infusor® (Ultradent Products,
Inc) to dab the bleeding area while
running water on the site to avoid any
clotted material building up on the
preparation. When the hemorrhage is
controlled, dry the area and make the
impression using a product such as
Aquasil Ultra XLV syringe material
and Aquasil Ultra Heavy (Dentsply
Caulk, Milford, DE).
The tissue should be evaluated 4 to 8
weeks later to see if recession occurred
with healing (Figure 8 through Figure
10). If it does, the tooth can be re-
prepared dropping the margin apically
before making the new final impres-
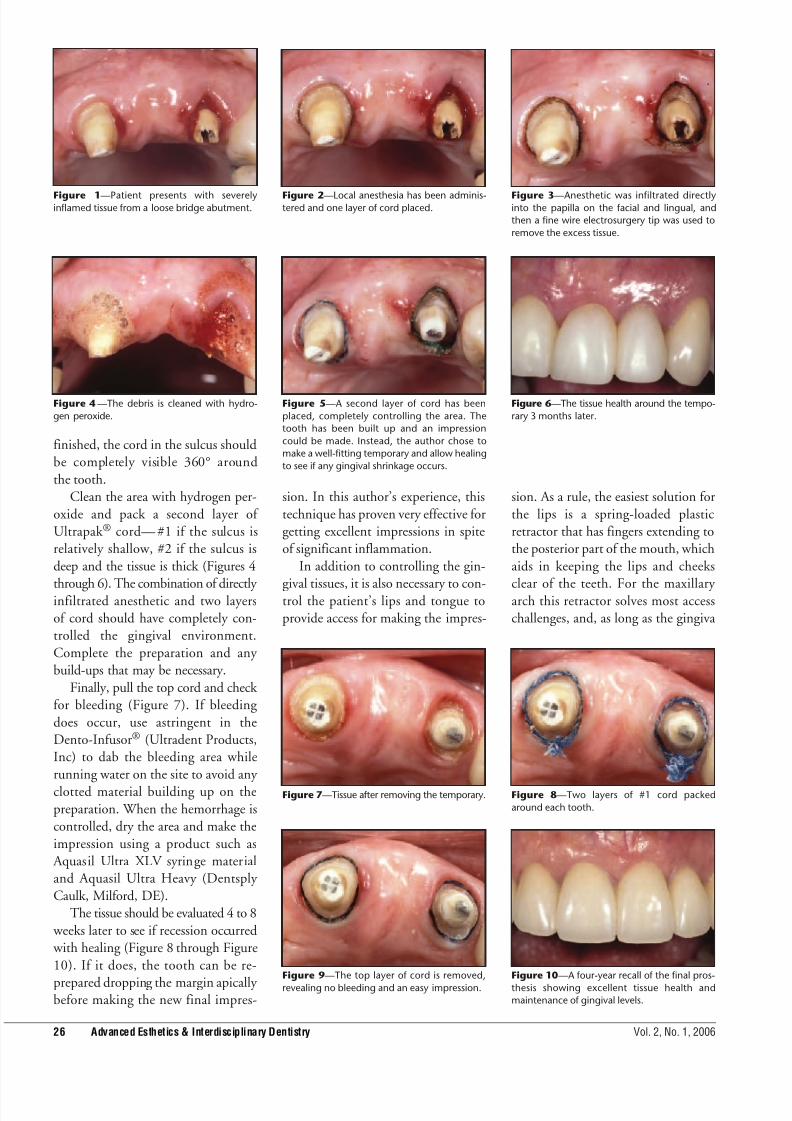
Figure 1—Patient presents with severely
inflamed tissue from a loose bridge abutment.
Figure 2—Local anesthesia has been adminis-
tered and one layer of cord placed.
Figure 4 —The debris is cleaned with hydro-
gen peroxide.
Figure 5—A second layer of cord has been
placed, completely controlling the area. The
tooth has been built up and an impression
could be made. Instead, the author chose to
make a well-fitting temporary and allow healing
to see if any gingival shrinkage occurs.
Figure 6—The tissue health around the tempo-
rary 3 months later.
26 Advanced Esthetics & Interdisciplinary Dentistry Vol. 2, No. 1, 2006
sion. In this author’s experience, this
technique has proven very effective for
getting excellent impressions in spite
of significant inflammation.
In addition to controlling the gin-
gival tissues, it is also necessary to con-
trol the patient’s lips and tongue to
provide access for making the impres-
sion. As a rule, the easiest solution for
the lips is a spring-loaded plastic
retractor that has fingers extending to
the posterior part of the mouth, which
aids in keeping the lips and cheeks
clear of the teeth. For the maxillary
arch this retractor solves most access
challenges, and, as long as the gingiva
Figure 3—Anesthetic was infiltrated directly
into the papilla on the facial and lingual, and
then a fine wire electrosurgery tip was used to
remove the excess tissue.
Figure 7—Tissue after removing the temporary.
Figure 9—The top layer of cord is removed,
revealing no bleeding and an easy impression.
Figure 10—A four-year recall of the final pros-
thesis showing excellent tissue health and
maintenance of gingival levels.
Figure 8—Two layers of #1 cord packed
around each tooth.
is well managed, a maxillary impres-
sion capturing multiple teeth is rela-
tively predictable.
The mandibular arch, however,
presents a unique challenge when the
impression involves preparations on
the left and right posterior. The den-
tist needs to control not only the lips
and cheeks but also the tongue. The
dentist can work on each side of the
mouth separately on different office
visits, but sometimes this is not practi-
cal. For instance, to change the verti-
cal dimension, the dentist needs to
capture an impression of all the teeth
in the arch. In such a case, it is more
efficient to capture all the teeth at once.
Trying to control a patient’s tongue is
sometimes impossible; the dentist can
gain access to one side and inject the
material cleanly, but when he or she
switches to the other side the tongue
often wipes the material off again. In
the author’s experience, the following
process has proved to be helpful.
Complete all the preparations and
pack retraction cord (Figure 11 and
Figure 12). Use a Svedopter to control
the tongue and control moisture on
the side the Svedopter is placed. Pull
the cord and make a quadrant impres-
sion of this side first. Then replace the
Svedopter on the opposite side and
repeat the process. You now have two
quadrant impressions with all the
margins of the posteriors. The author
makes the initial quadrant impres-
sions first because there may be the
potential for distortion of the set
syringe material when it is picked up.
Doing the separate initial quadrant
impressions ensures accurate models
of the margins.
Replace the Svedopter and top
cord on one of the sides. Pull the cord
and inject fast-setting syringe material
(Aquasil Ultra XLV fast set, Dentsply
Caulk) on the side, leaving the
Svedopter in place, and let it harden.
Move the Svedopter to the other side
and repeat this step (Figure 13). Now
that there is hardened syringe material
on both posterior quadrants, inject
syringe material (Aquasil Ultra XLV
regular set, Dentsply Caulk) on the
anterior preparations and over the
hardened material in the posterior.
Immediately after syringing on the wash
material, seat a full arch tray loaded
with regular set monophase material
(Aquasil Ultra Monophase regular set,
Dentsply Caulk). The viscosity of the
monophase material is less likely to
distort the previously set syringe mate-
rial. Finally, remove the full arch
impression, pulling out all the previ-
ously hardened segments of syringe
material (Figure 14 and Figure 15).
These two techniques have allowed
the author to work in awkward envi-
ronments. Using effective techniques
to make challenging situations easier
helps to make the restorative process
not only more enjoyable but also,
more importantly, predictable in pro-
ducing an excellent final impression.
28 Advanced Esthetics & Interdisciplinary Dentistry Vol. 2, No. 1, 2006
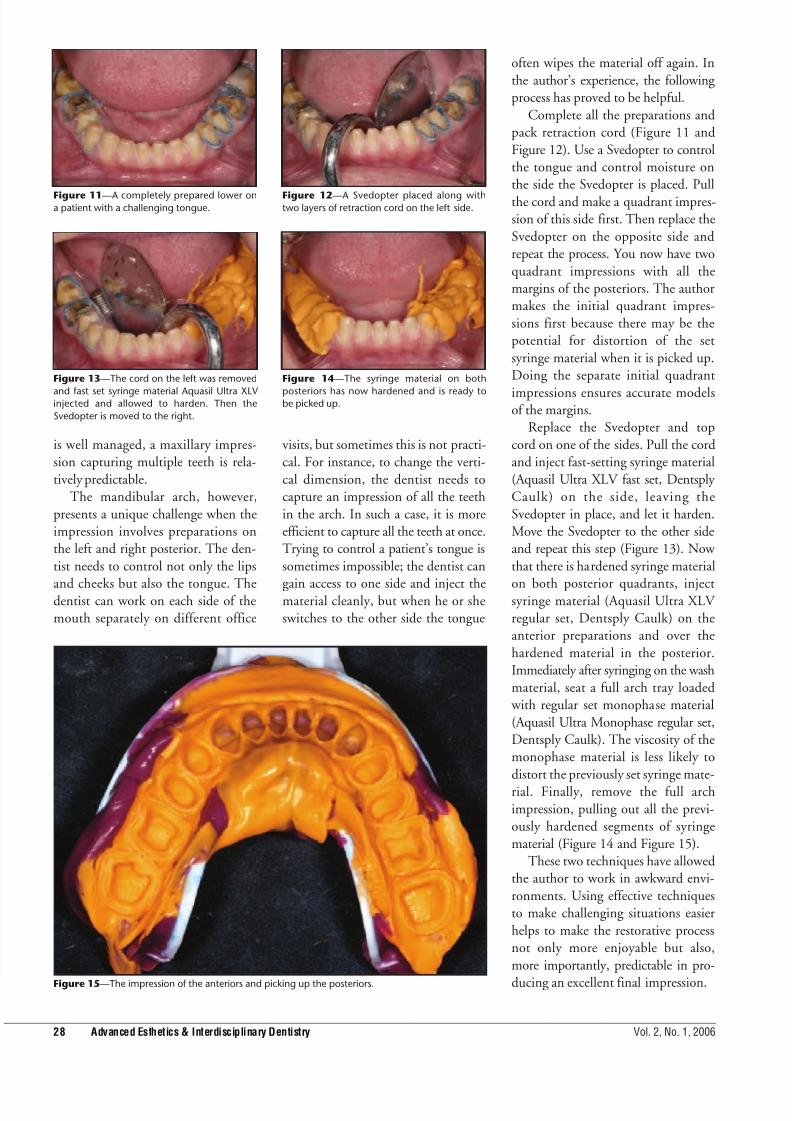
Figure 11—A completely prepared lower on
a patient with a challenging tongue.
Figure 12—A Svedopter placed along with
two layers of retraction cord on the left side.
Figure 14—The syringe material on both
posteriors has now hardened and is ready to
be picked up.
Figure 15—The impression of the anteriors and picking up the posteriors.
Figure 13—The cord on the left was removed
and fast set syringe material Aquasil Ultra XLV
injected and allowed to harden. Then the
Svedopter is moved to the right.
