speedlite - welcome to
TRANSCRIPT

Canon
SPEEDLITE
INSTRUCTION MANUAL MODE D'EMPLOI
MANUAL DE INSTRUCCIONES

SPEEDLITE

Thank you for purchasing a Canon product.
The Canon Speedlite 580EX II is an EOS-dedicated, high-output flash unit automatically compatible with E - T L II, E-TTL, and TTL autoflash. It can serve as an on-camera flash as well as a master unit or a slave unit in a wireless, multiple-Speedlite system. It has the same dust- and water-resistance as EOS-1 D series cameras.
Read this instruction manual while also referring to your camera's instruction manual.
1 Before using the Speedlite, read this instruction manual and your camera's instruction manual to familiarize yourself with the Speedlite operations.
I The basic operation is as easy as with normal AE shooting. When the 580EX II is attached to an EOS camera, almost all automatic exposure control for flash photography is handled by the camera. It is almost the same as using the camera's built-in flash if it has one. You can think of the 580EX II as a built-in, high-output flash, but attached externally.
It becomes automatically compatible with the camera's flash metering mode (E-TTL II, E-lTL, and TTL). In accordance with the camera's flash control system, the Speedlite controls the flash automatically in the respective flash metering mode: 1. E-TTL II autoflash (evaluative flash metering with preflash readingllens
distance information) f
2. E-TTL autoflash (evaluative flash metering with preflash reading) 1 3. TTL autoflash (off-the-film metering for real-time flash metering)
Regarding the camera's available flash metering modes, refer to the "External Speedlite" specification in the "Specifications" of your camera's instruction manual.
The camera instruction manual's chapter on flash photography will refer to cameras having flash metering modes 1 or 2 as a Type-A camera (compatible with E-TTL II or E-TTL). And cameras having flash metering mode 3 (compatible with only TTL) are called Type-B cameras. * This instruction manual assumes that you are using the Speedlite
with a TypeA camera. For Type-B cameras, see page 55.

1 Getting Started and Baslc Operation ................................ 7
....................................................................... 2 Using Flash 13
3 Wireless Flash ................................................................... 33
4 Reference ........................................................................... 47
gonventions Used in this Manual
The <@> symbol in the text refers to the Select Dial. The <@> symbol in the text refers to the SelectISet button. - The symbol in the text refers to a Custom Function. The operatiomprocedures in this instruction manual assume that both the camera and Speedlite's power switches are ON. Icons used in the text to indicate the respective buttons, dials, and settings match the same icons found on the camera and Speedlite. The (64) 1 (66) 1 (616) icons indicate that the respective function remains in effect for 4 sec., 6 sec., or 16 sec. after you let go of the button. Reference page numbers are indicated by (p.**). This instruction manual uses the following alert symbols:
() : The Caution symbol indicates a warning to prevent shooting problems.
@ : The Note symbol gives supplemental information.
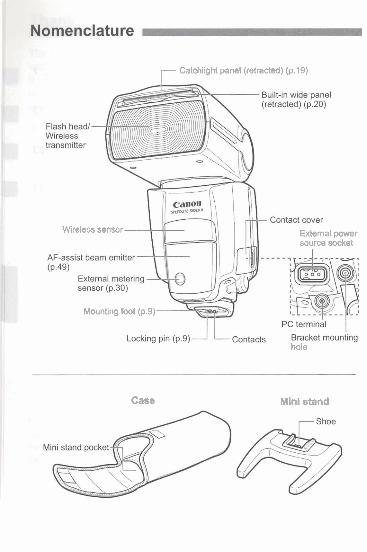
r Catchlight panel (retracted) (p.19)
Wireless sensor External power source socket
Mounting foot (p.9)
hole
Case Mini stand

synchronization button
Battery compartment
Battery compartment
Wireless set button (p.20136. 39,40,41, 42.45)
Power switch (p.10) <OFF> : Power off <ON> : Power on
Lock-release button
Dust- and water-resistant <@> SelectlSet button adapter
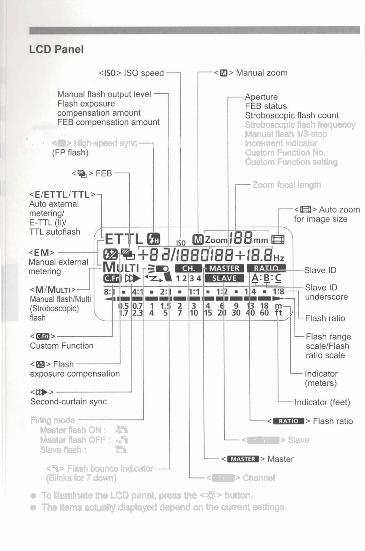
Stroboscopic flash frequency Manual flash 113-stop
' . 4 2 High-speedsync increment indicator Custom Function No. Custom Function setting
Zoom focal length
~lrlng mode MssterfkwhON: 4% M&w Rash OFF : % !
8leveRash: B <9> Flash bounce indimtor (Bllnks for 7 d m )
*-> Slave
-<ME> Channel
TQ Illumhte the LCD panel, press the <#$> button. The Item actual& displayed depend on the current settings.
Getting Started and Basic Operation
I
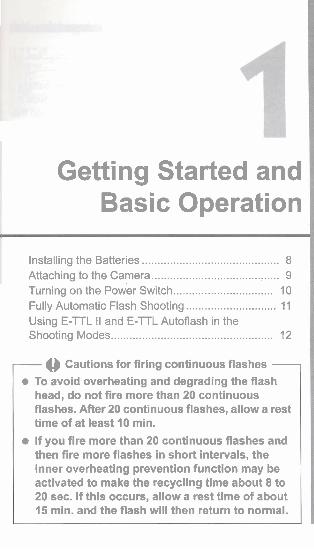
Installing the Batteries ......................................... 8 Attaching to the Camera ........................................ 9 Turning on the Power Switch ................................ 10 Fully Automatic Flash Shooting ............................. 11 Using E-TTL II and E-TTL Autoflash in the Shooting Modes .................................................... 12
- () Cautions for firing continuous flashes - To avoid overheating and degrading the flash head, do not fire more than 20 continuous flashes. After 20 continuous flashes, allow a rest time of at least 10 min.
If you fire more than 20 continuous flashes and then fire more flashes in short intervals, the inner overheating prevention function may be activated to make the recycling time about 8 to 20 sec. If this occurs, allow a rest time of about 15 min. and the flash will then return to normal.

-hg j the Batteries - ur sbe-AA batteries.
Open the cover. a Use your thumb to press the battery
compartment lock lever, then slide it as shown by the arrow 0 to open the cover.
Install the batteries. Make sure the + and -battery contacts are properly oriented as 1 shown in the compartment.
Close the cover. a Close the battery compartment cover
1 and slide it as shown by the arrow. b When the cover cllcks in place, it will
be locked.
k Recydlng Time and Flash Count (vlth size-AA alkallne battehs)
1
Based on new size-AA alkaline batteries and Canon's testing standards. s Quick flash enables a flash to be fired before flash-ready (p.10).
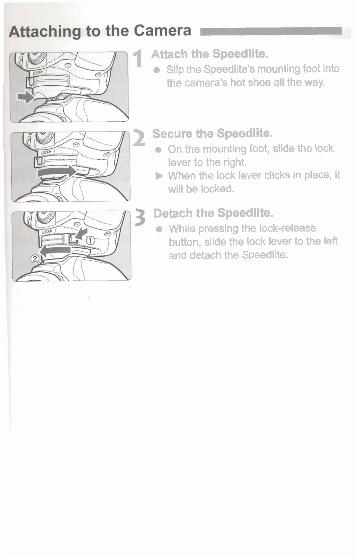
1 Attach the Speedlite. Slip the Speedlite's mounting foot into the camera's hot shoe all the way.
2 Secure the Speedlite. On the mounting foot, slide the lock lever to the right.
b When the lock lever clicks in place, it will be locked.
Detach the Speedlite. While pressing the lock-release button, slide the lock lever to the left and detach the Speedlite.

r hrning on the Power Switch - 1 Set the power switch to <ON>.
b The flash recycling starts.
I 2 Check that the flash is ready. The pilot lamp will first turn green (ready for quick flash), then red (flash ready).
I I Pressing the pilot lamp will fire a test 1
flash.
Quick flash enables a flash to be fired before flash-ready, when the pilot lamp is still green. Although the Guide No. will be 116 to 112 that of the full output, quick flash is effective for near subjects and when you want a shorter recycle time. Set the drive mode to single shooting. Quick flash cannot be used in the continuous shooting, FEB, manual flash, and stroboscopic flash modes.
Quick Rash can also be used during continuous Rash shooting (C.Ffl-06 -t p.27)
'Rwer OPf To save battery power, the power will tum off automatically after a certain period (approx. 1.5 min. to 15 min.) of idle use. To turn on the Speedlite again, press the camera's shutter button halfway. Or press the Speedlite's test firing button.
Auto Power Off can also be disabled. (C.Fn-01 + p.27)

m-- ,
Full tic Flash Shooting -a the camera's shooting mode to <P> (Program AE) or
uto), E-TTL IIIE-TTL fully automatic flash will make it as
1l.C. , . . . . .J <ETTL> is displayed.
2 Focus the subject. Press the shutter button halfway to focus.
b The shutter speed and aperture will be displayed in the viewfinder. Check that the ~ 5 2 icon is lit in the viewfinder.
Take the picture. F- 5.6 Check that the subject Is within the
effective range displayed on the LCD ----- panel. b Right before the shot is taken, a preflash
is fired, then the main flash is fired. b If a standard flash exposure was
obtained, the flash exposure confirmation lamp will light for about 3 sec.
'B-LB will be displayed M the LCD panel even If he w m is k&~U&&th E-mL 11. RW** wmsum @@llmvm mpaOkSLaa right mw ~rTPm sutajaut and Zakd the pWre -ah. Wth a diiW camera, you aan also Irmewe the oamers's IS0 speed.

E=llL II and E-Tn Autoflash in the Shooting Modes 4
he background is dark like a night scene, a slow sync speed will be used to obtain a standard exposure of both the maln subject and background. Standard exposure of the main subject is obtained with the flash, while a standard exposure of the background is obtained with a slow shutter speed.
will be used for low-light scenes, using a
If you use the cDEP> or <A-DEP> shooting mode, the result will be the same as us~ng the <P> (Program AE) mode.
Flash Sync Speeds and Apertures Used
Shutter Speed Setting
1 P I Set automatically (1160 sec. - 1/X sec.) 1 Automatic I
M I Set manually (bulb, 30 sec. - 1IX sec.) I Manual I
lb 1 Set manually (30 sec. - 1IX sec.)
1/X sec. Is the camera's maximum flash sync speed.
Automatic
Av I Set automaticallv 130 sec. - 1/X sec.) 1 Manual

Using Flash
...................... @ Flash Exposure Compensation 14 ............................................................. FEB 15
FEL: FE Lock ...................................................... 16 ............................................. High-speed Sync 17
........................................................ Bounce Flash 18 ZOOM: Setting the Flash Coverage and Using the Wide Panel ................................................... 20
................................................. M: Manual Flash 22 .................................. MULTI: Stroboscopic Flash 24
CC, Second-Curtain Sync ................................... 26 C.Fn. Setting Custom Functions ....................... 27 External Flash Metering ........................................ 30 Speedlite Control with the Camera's Menu Screen ............................................................... 32

Flash Exposure Compensation - In the same way as normal exposure compensation, you can set exposure compensation for flash. The flash exposure compensation amount can be set up to *3 stops in 113-stop increments. (If the camera's exposure compensation is in 112-stop increments, flash
I exposure compensation will be in 112-stop increments.)
1 Select ern>. Press the button so that is displayed.
b The <rn> icon and the flash exposure compensation amount will , blink.
2 Set the flash exposure compensation amount.
Tum the <@> dial to set the amount, To cancel the flash exposure
11 compensation, set the amount to
I 3 Press the s@> button. b Flash exposure compensation will be
set.
Setting the flash exposure compensation can be limited to only the -=a> dial. (C.Fn-13 -t p.27)

k while automatically changiw up to f 3 etops in 113-stop increments
enables only 1/2-stop increments). 'I*~&J&I'.:J [Flet&".w8ure Bracketinn).
I
b The <%> icon and bracketing amount will blink.
2 Set the flash exposure bracketing amount.
Turn the <@> dial to set the amount.
3 Press the <@> button. b FEB will be set.
th flash exposure compensation and FE
.--LC- .
1 You can prevent the FEB from being cancelled automatically affer the three shots are taken (C Fn-03 + p 27)
The FEB shooting sequence can be changed (C Fn-04 -t p 27)

FEL: FE Lock FE (flash exposure) lock locks the correct flash exposure setting for an) part of the scene. With <ETTL> displayed on the LCD panel, you press the camera's <FEL> button. If the camera does not have the <FEL> button, press thc <St> button.
1 Focus the subject.
2 Press the GEL> button. (616) a Aim the subject at the center of the
viewfinder and press the <FEL> button. The Speedlite will fire a preflash and the required flash output for the subject is retained in memory.
b "FEL" will be displayed in the viewfinder for 0.5 sec. Each time you press the <FEL> button, a preflash will be fired and a new flash exposure setting will be locked.
@ . I? thesubJ@ is too far away and underexposure will result, the <!p icon will bllnkin the viewfinder. Move closer to the subject and try the FE lock agarn. If cETTL> is not displayed on the LCD panel, FE lock cannot be set. If the subject is too small, FE lock might not be very effective.

a Highspeed Sync -m With highpeed sync (FP flash), the flash can synchronize with all shutter speeds. This is convenient when you want to use aperture priority for fill-flash portraits.
Select < Ql>. Press the <~H/D> button so that <I> is displayed.
icon is displayed.
WW set a shutter speed that is the same or slower than the cambra's maximum flash qnc epeed, <h> will not be displayed in the viewfinder. With high-speed sync, the faster the shutter spsedpsed the shorter the effective flash range w~ll become. Check the LCD panel far the effective
turn to normal flash, press Um <b./EDt.> button main. The <Q>
bosmpleflssh .Cannot be set.
17
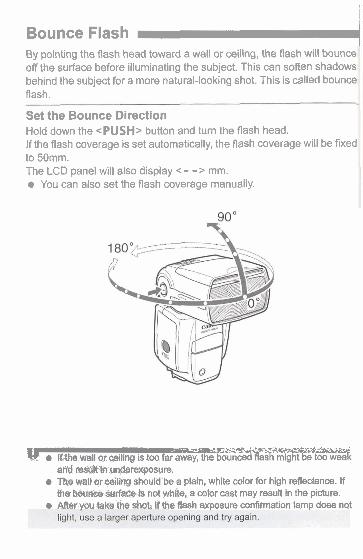
Bounce Flash 1 By pointing the flash head toward a wall or ceiling, the flash will bounce off the surface before illuminating the subject. This can soften shadows behind the subject for a more natural-looking shot. This is called bounce flash.
Set the Bounce Direction Hold down the <PUSH> button and turn the flash head. If the flash coverage is set automatically, the flash coverage will be fixed to 50mm. The LCD panel will also display < - - > mm. a You can also set the flash coverage manually.
-r r ,py. ' - sz$q+--r- - - b a Ifthe wall or wiling is too far a=ou~~abh m i i h 66%%%k and regult in underrucposure.
a The wail or miling should be a plain, white color for high reflectance. If fhe bounmsurfEKse is not whRe, a color cast may result in the picture.
a AReF Vou take fieshot, if the flash exposure mtnimation lamp does not
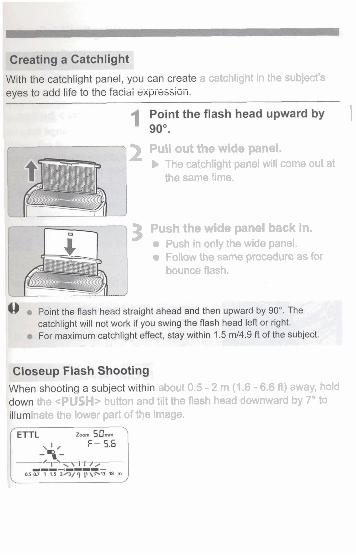
a catchlight in the subject's
I 2 Pull out the wide panel.
b The catchlight panel will come out at the same time.
3 Push the wide panel back in. Push in only the wide panel. Follow the same procedure as for bounce flash.
about 0.5 - 2 m (1.6 - 6.6 ft) away, hold the <PUSH> button and tilt the flash head downward by 7" to
mate the lower part of the image.

I ZOOM : Setting the Flash Coverage and Using the Wide Panel 4 The flash coverage can be set to match the lens focal length from 24mm to 105mm. The flash coverage can be set automatically or manually. Also, with the built-in wide panel, the flash coverage can be expanded for 14mm wide-angle lenses.
Press the <ZOOM/%> button. Turn the <@> dial to change the flash coverage. If <m> is not displayed, the flash coverage will be set automatically.
set the flash werage manually, make sure it covers the lens & so that the picture will not have a dark periphery. u use a commerclally-awllable sync cord to connect the camera to
* .
h Wdrr Panel 1 I Pull out the wide panel and place it over
the flash head as shown. The flash coverage will then be extended for 14mm.
The catchlight panel will come out at the same time. Push the catchlight panel back in. The <ZOOM/%> button will not work.
h coverage will not be compatible .with the EFlBmm f12.8 FisReye 1 bmm- with the wide panel in place, the entire display on
i8kw a warning. Since the subject will be th& Q~unca flCh end direct flash, it will look
I Pull dur i ~ & w%%6 panel gentlgr. Usim excessive force may detach the . - .
wide pane

@&wand automaticaiy sets the flash coverage for lens focal @&m 24mm to 105mm. b 8%- Speedlite is attached to a compatible camera, <=>will
@#an the Speedlite's LCD panel.
Auto zoom can be disabled (C Fn-09 + p 27)
mrneras have one of three image I length will differ depending on the automaticallv recoanizes the EOS
sizes. The lens' camera's image DIGITAL camel
t size. a's
r M: Manual Flash
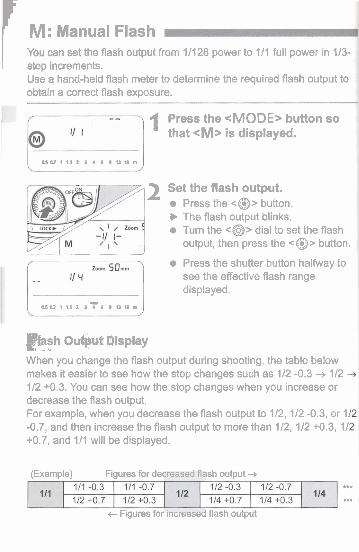
I mu can set the flash output from 11128 power to 111 full power in 113- stop increments.
, Use a hand-held flash meter to determine the required flash output to obtain a correct flash exposure.
1 Press the <MODE> button so that *M> is displayed.
U a 7 + 3 . 5 2 3 4 6 9 D l m
2 Set the flash output. Press the <@> button.
b The flash output blinks. Turn the dial to set the flash output, then press the <@> button.
" I J
Press the shutter button halfway to see the effective flash range displayed.
U W I ~ . S Z 1 7 8 9 n u m
p h , ... 0ubwt Display
When you change the flash output during shooting, the table below makes it easier to see how the stop changes such as 112 -0.3 + 112 - 112 +0.3. You can see how the stop changes when you increase or decrease the flash output. For example, when you decrease the flash output to 112, 112 -0.3, or 11 -0.7, and then increase the flash output to more than 112, 112 +0.3, 11 +0.7, and 111 will be displayed.
(Example) Figures for decreased flash output + I ... ... I
t Figures for increased flash output

-1 D series camera, you can kvsl manually for closeup subjects.
5 camera's shooting mode to <M> or CAW. m % e Soeedllte to manual flash.
up an 18% gray card. lace the gray card at the subject's position.
n the viewfinder, the entire spot metering circle at the center should cover the gray card.
ress the <FEL> button. (616) b The Speedlite will fire a preflash and the required flash output for
the subject is retained in memory. b On the right side of the viewfinder, the exposure level indicator
will show the flash exposure level for the correct flash exposure.
Set the flash exposure level. Adjust the Speedlite's manual flash level and the camera aperture so that the flash exposure level aligns with the standard exposure index.
Take the picture. Remove the gray card and take the picture.
a This @turn ~drl ( s only wlth EX-series Speedlltes with manual flash coupled
I an EOS-1 D s e w camera.
23

I: Stroboscopic Flash WM stroboscopic flash, a rapid series of flashes is fired. It can be use to capture multiple images of a moving subject in a single photograph. You can set the firing frequency (number of flashes per sec. expressed as Hz), the number of flashes, and the flash output.
1 Press the <MODE> button so that <MULTI> is displayed.
2 Select the item to be set. Press the <@> button to select the item (blinks).
3 Set the desired number. a Tum the <@> dial to set the number,
then press the <@> button. b The next item to be set will blink. a After you set the flash output and
press the <@> button, all the settings will be displayed.
e lcTa t ing thatshutter Speed During stroboscopic flash, the shutter remains open until the firing stops. Use the formula below to calculate the shutter speed and set it with the camera.
Number of flashes + Firing frequency = Shutter speed For example, if the number of flashes is 10 and the firing frequency is 5 Hz, the shutter speed should be at least 2 sec.
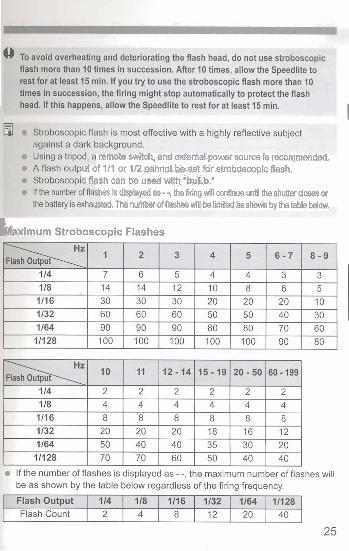
remote switoh, and exbtml power source is recon)mmded. uf of 111 or 112 csannot h&seX for elloboscopic flash. G Rash can b$ u ~ c l v d t h *but&,"
shes is dtspkryed ea- -, the fhiq wfll mlinua until the shutter dosea M
$d, The nurnberoff l~wiUbel i~asshown by thelable below.
baximum Stroboscopic Flashes

m. Second-Curtain Sync Wth.a slow shutter speed, you can create a light trail following the cs&ject. The flash fires right before the shutter closes.
Press the <SH/W> button so thc el$+> is displayed.
staik~*1E Tn the Oamera'a "DtW mode, . ash, press the S%@EiWs bcmdn again.
es will be @#f +n at $lo+ shutter e preflasE,'add nof s maYfunc8on.
I - -
8 !
26

Custom Functions - lite features to suit your shooting preferences.
stom Functions.
m lndloator display I

1 Hold until
2 Select the Custom Function No. Turn the c@> dial to set the Custo Function No.
Change the setting. Press the <@> button.
b The Custom Function No. blinks. b Tum the <@> dial to set the desirt
number, then press the <@> butto b After you set the Custom Function
and press the <MODE> button, tt camera will be ready to shoot.
-3 C.Fn-02-3: Convenientqhen you want to check the depth of field. (p.44) G,Fn-12: If an externahpower source is used, the flash recycling is
powered q u r r e n t l y by the internal batteries and external In this case, when the internal batteries
became,ex austed first, shooting might not be possible. If 1 is set, tlX& flash recycling will be powered only by the I external power source. The internal batteries will thereby last longer. Note that even if you set it to 1, the Speedlite will
internal batteries for flash control.
3 .
5-1 isgeared for EOS-series film cameras. set it if you have a, EOS DIGITAL camera or the EOS REB
300X. If C.Fn-05-1 is set for such cameras, the flash control will no. ..,. 'properly. The Rash might not fire or it might fire only at full output With Type-A cameras, if C.Fn-05-1 is set, wireless autoflash shooting wi
If 'AF-assist beam OFF" is set with the Speedl~te or camera, the AF-

I Fbsh Metering I @@$ash reflected off the subject is metered by an external metering F s a w r in teal time. When the standard flash exposure is attained, the
f l ~ h output is cutoff automatically. Auto external metering compatible the EOS-1 D Mark Ill and manual external metering compatible wi t
I ail EOS cameras are provided.
Set auto external metering. Set the Speedlite Custom Function to C.Fn-052. (p.27)
metdng, the camera's IF speed ,,, , &-w~~>q&&,,@. -.-.
J External Metering
1 Set manual external metering. a Set the Speedlite Custom Function to
C.Fn-053. (p 27)
Set the Speedlite to the camera's
Press the <@> button so the IS0 speed blinks. Turn the <@> dial to set the IS0 speed, then press the <@> button.

Set the Speedlite to the camera's
Press the c@> button so the aperture setting bllnks. Turn the <@> dial to set the aperture, then press the <@> button.
I
nnot connect a Speedllta to anether Speedlite's PC terminal with c cord. The second SpesdlitewilI not fire.

lite Control with the Camera's Menu Screen If the Speedlite is attached to an EOS camera which has a Speedlite control function, it can control the Speedlite as shown below. For the menu operation procedure, refer to your camera's instruction manual
a Setting Speedlite functions The settable functions will vary depending on the flash mode.
Flash mode Shutter sync (Istl2nd curtain)
. FEB Flash exposure compensation Flash metering mode Flash firing Clear Speedlite settings
a Speedlite Custom Functions C.Fn-00 - 13; TotaCl4
a Clear All Speedlite Custom Functions Only C.Fn-00 will not be cleared.
Flash function settings screen' Flash C.Fn settings screen'
0: Enabled I :Disabled
'Screens from the EOS-ID Mark Ill
lready been set with the Speedlite, be set with the camera. To set it with ash exposure compensation to zero.
' , ...-.,- _,
If any Speadllte Custom Functions and flash function settings other than Rash exposure compensation have been set by both the camera and Speedlite, the latest setting will take effect.

Wireless Flash
......................................... About Wireless Flash 34 Wireless Settings ................................................ 36
........................ Fully Automatic Wireless Flash .... 37 ...................................... Flash Ratio with E-TTL 11 41
Setting the Flash Output for Each Slave .............. 45 Setting Manual Flash and Stroboscopic Flash with the Slave .................................................... 46

I
For slave <C>, also set the flash exposure compensation as necessary.
43

2 Set the master unit and shoot Follow "Setting the Master Unit ar Shooting" on page 42. In step 4, select <A: B C>.
&i Bz Is sat, ftie siak u& ln s ~ a { & ~ ~ ; p ' e w i l l d d point the slave unit Inelave group <C> toward the subject, the
w i l ' ~ a v @ @ % $ -, :;:,-I,,<: s t . i t , , -. >,gd
g Flash
If the camera has a depth-of-field preview button, pressing it will fire flash continuously for 1 sec. This is called the modeling flash. It enables you to.see the shadow effects on the subject and the ligh balance. You can fire We modeling flash for both wireless and norm flash shooting.
@~&m&eUng flacsh m m h n IQ c'bhqcu~~e tlmes. If ya J flre the modeling flash 10 consecutive times, allow the Spwdllte to - rest forat least 10 min. to a~nidr),vfqhm.tlng and det4oPating the fia '! head. -
&madell~Q fl& cannot be fired d h the EOS REBEL 20001300 and m e - B cameras (p.2).
Slave group A
m u t Slave Gyup Control
For example, if you have the slave ID to <A> for three slave units, all threc slave units will be controlled as if the were one Speedlite in slave group A.

E m l t h e Flash Outmtar Each Slave ith rnarlcral flash an litcas, you can set a different flash
Press the <MODE> button so that <M> is displayed.
Press the <ZOOM/*4> button so that <-> blinks.
Select the flash ratio. Turn the < @ :. dial to select A: B > or <A: B: C>, then press the <@> button.
Set the flash output. Press the <@> button.
b The slave ID <A> will blink. Turn the <@> dial to set the flash output for <A>, then press the <@> button . The slave ID <B> will blink. Turn the <@> dial to set the flash output for <B>, then press the <@> button. The slave ID <C> will blink. Turn the <@> dial to set the flash output for <G>, then press the <@> button.
b All the slave IDS will light.

Setting Manual Flash and Stroboscopic Flash with the Slave Manual flash or stroboscopic flash can be set manually with the slav unit. As with studio flash units, you can set the flash output individua with the slave units for wireless or manual flash.
Manual Flash Hold down the <MODE> button fc sec. or more.
b <M> will blink. a Set the manual flash output (p.22)
Stroboscopic Flash Hold down the <MODE> button 1 2 sec. or more.
b <M> will blink. Press the <MODE> button again and <MULTI> will blink. Set the stroboscopic flash (p.24).


580EX II System
(D Speedlite 580EX II @n-cameraIMaster unit) @ Speedlite Transmitter ST-E2
Dedicated transmitter for wireless control of 580EX 111430EX set as slave units.
cD Compact Battery Pack CP-E4 Compact, lightweight, and portable extemal power pack. Provide the same level of dust- and water-resistance as the 580EX II. It u: eight size-AA alkaline or Ni-MH batteries. It can also use size-AA lithium batteries.
@ EX-series Speedlite with slave function 0 Off-Camera Shoe Cord OC-E3
Enables the 580EX II to be connected to the camera up to 60 cmlZ away. Provides the same level of dust- and water-resistance as tht 580EX I I . All of the EOS camera's automatic functions can be use(
@ Speedlite Bracket SB-E2
For the external power pa& use @ above. If a nonCanon, external m e r p a o k Is used, tt may cause malfunction.

About
# a@matfcally to make it easier to autofocus. The AF- warIfg'w1th all EOS cameras. The AF-assist beam is @I &mm and longer lenses. The effectwe range is shown
&%;era's white balance is set to <'m> or
Wth your camera, see "White Balance" =% pmf camera's instruction manual.

Troubleshooting Guide - If there is a problem, refer to this Troubleshooting Guide.
*- *am. The batteries are installed in the wrong orientation.
b Install the batteries in the correct orientation. (p.8) The Speedlite's internal batteries are exhausted.
b If the flash recycling time takes 30 sec. or longer, replace the batteries. (p.8)
b Install the Speedlite's internal batteries even when you use ar external power source. (p.8) The Speedlite is not attached securely to the camera.
b Attach the Speedlite's mounting foot securely to the camera. I The electrical contacts of the Speedlite and camera are d
b Clean the contacts. (p.9)
T un& does not fire. The slave's wireless mode is not set to <->.
b Set it to <->. (p.36) The slave unit(s) is not positioned properly.
b Place the slave unit within the master unit's transmission rang (p.38)
b Point the slave unit(s)'s sensor toward the master unit. (p.38)
whe power turns off by Itself.
After 90 sec. of idle operation, auto power off took effect. b Press the shutter button halfway or press the test firing buttor
(P.10)
The entins LCD panel blinks.
The wide panel has been pulled out for bounce flash. b Retract the wide panel. (p.20)

le camera. the camera. (p.9)
&:&wen tllted down by 7'. Ition. (p.19)
d@@ ---A
setting was a higher I dark periphery.
rage that is a lower number than the lens focal
b r n of the plcture looks dark, you were too W b l e c t 13s closer than 2 d6 .6 ft, tilt the flash head downward k? flash). (p.19)
looks very dark or very bright.
I osure compensation, For a dark subject, set a
3d flash exposure. And for a bright subject, set an pa l flash exposure. (p.14)
Ed high-speed sync. bh-speed sync, the effective flash range will be shorter. Make
b e subiect is within the effective flash range displayed. (p.17)
shooting mode was set to CAW, and the scene was dark. a tripod or set the shooting mode to <P>. (p.12)
5 1

Specifications TY Pe
Type: Oncamera. E-TTL I I I E - M L autoflash Speedlite Compatible cameras: Type-A EOS cameras (E-TTL IIIE-TTL autoflash)
Type-B EOS cameras ( T L autoflash) Guide No.: 581190 (at 105mm focal length, IS0 100 in meterslfeet) Flash coverage: 24 - 105mm (14mm wilh wide panel)
Auto zoom (Flash coverage set automatically to match lens focal length and image size) Manual zoom Swinginghilting flash head (bounoe flash)
Flash duration: Normal flash: 1.2 ms or shorter, Quick flash: 2.3 ms or st Color temperature information transmission: Flash color temperature information transmitted to came
when flash is fired
Exposure Control Exposure control system: Erm I I IE-TTmL autoflash, autolmanual external
metering, manual flash Effectwe flash range: Normal flash: Approx. 0.5 - 30 m 1 1.6 - 98.4 R. (With EF5Omm 111.4 lens Quick flash: 0.5 - 7.5 m 1 1.6 - 24.6 R. (min), 0.5 - 21 m I at IS0 100) 68.9 A. (max)
High-speed sync: 0.5 - 15 m 1 1.6 - 49.2 ft. (11250 sec.) Flash exposure compensation: Manual, FEE: *3 stops in 1A-stop increments (Manual E
FEB can be combined) FE lock: With <FEL> button or <*> button High-speed sync: Provided Stroboscopic flash: Provided (1 - 199 Hz) Flash exposure confirmation: Pilot lamp lights
Flash Recycling (with size-AA alkaline batteries) Recycling time1 Flash-ready indicator: Normal flash: Approx 0.1 - 5 sec. I Red pilot lamp lights
Quick flash: Approx. 0.1 - 2.5 sac. I Green pilot lamp ligt

m Wi
Tran Cha Wire nFF, Master, and Slave
Outdoors: 8 - 10 m 126.2 - 32.8 R. Master unit reception angle: t40° horizontal, t30' vertical
1:8 - 1:1 - 8:l in ID-stop increments
Fired with camera's depth-of-field preview button
Periphery: 0.6 - 5 m 12.0 - 16.4 R.
' Size-AA Ni-MH and lithium batteries alsb usable
Power off aRer certain period of idle operatian (Approx. 1.5 min. to 15 min.) (60 min. if set as slave) Compact Battery Pack CP-E4
76 x 137 x 117 mm 13.0 x 5.4 x 4.6 in. (excluding dust- and water-resistant adapter)
fications and external appearance are subject to change without

Mw (at IS0 100, in rneterslfeet)
Normal Flash (Full Output) and Quick Flash
Same - 12 to 116 manual
- 501 1 64 -
flash
Manual Flash I

. autc )flash camera),
autoflash, (With a Type-A
JW manual flash slave @@ with stroboscopic flash
p- rasn lable with Type-B Cameras
wireless slave units

pecified in the instructions. If such changes or modifications should be ma you could be required to stop operation of the equipment.
This equipment has been tested and found to comply with the limits for a cla B digital device, pursuant to part 15 of the FCC Rules. These limits are designed to provide reasonable protection against harmful interference in a
frequency energy and, if not installed and used in accordance with the insbuctions, may cause harmful interference to radio communications.

nshine, flre or the
that this product is not to be disposed of with , according to the WEEE Directive (20021961 law This product should be handed over to