spinal management certificate learner...
TRANSCRIPT

Spinal Management Certificate
Learner Guide

Australian Lifesaving Academy Learner Guide Spinal Management Certificate
SLSA V 8.3 LSV-V1260611 Page 2
Acknowledgments
This education resource has been developed by the Australian Lifesaving Academy.
Surf Life Saving Australia (SLSA) would like to acknowledge the following people who contributed their time and expertise to support the development of this resource:
Bernadene Hansen, Nikki Chubb, Debbi Booth, Roslyn McMahon, Gareth Morgan, and Sports Medicine Australia
Resource Development by:
Robert O’Brien
© Surf Life Saving Australia Ltd 2010.
This work is copyright, but permission is given to SLSA trainers and assessors to make copies for use within their own training environment. This permission does not extend to making copies for use outside the immediate training environment for which they are made, or the making of copies for hire or resale to third parties.
For permission outside these guidelines, apply in writing to:
Surf Life Saving Australia Locked Bag 1010, Rosebery NSW 2018 Ph: (02) 9215 8028 Fax: (02) 9215 8180
Web: www.sls.com.au
For information on other training programs available from the Australian Lifesaving Academy please visit our website at www.ala.edu.au

Australian Lifesaving Academy Learner Guide Spinal Management Certificate
SLSA V 8.3 LSV-V1260611 Page 3
Contents
Acknowledgments ...................................................................................................................... 2
Contents ................................................................................................................................... 3 Terminology .............................................................................................................................. 4
Icons ........................................................................................................................................ 5 Course Introduction .................................................................................................................... 6 Topic 1 - Spinal Cord Injury .......................................................................................................... 8
Topic 2 - Managing a Suspected Spinal Injury ............................................................................... 18
Topic 3 – Types of Spinal Immobilisation and Retrieval Equipment ................................................... 25 Topic 4 - Aquatic Environments .................................................................................................. 41 References .............................................................................................................................. 47
Assessment Information ............................................................................................................ 48 Assessment Tasks ................................................................................................................ 48 Assessment Task 1: Written Questioning .................................................................................. 48
Assessment Task 2: Cervical Collar Application.......................................................................... 48 Assessment Task 3: Log Roll and Transport Patient .................................................................... 48 Assessment Task 4: Full Spinal Immobilisation .......................................................................... 48
Assessment Portfolio .................................................................................................................. 1 Competency Record ................................................................................................................ 1 Assessment Summary ............................................................................................................. 2 Assessment Task 1: Written Questioning .................................................................................... 3
Assessment Task 2: Cervical Collar Application............................................................................ 4 Assessment Task 3: Log roll and transport patient........................................................................ 7 Assessment Task 4: Scenario - full spinal immobilisation .............................................................. 9
Course evaluation form

Australian Lifesaving Academy Learner Guide Spinal Management Certificate
SLSA V 8.3 LSV-V1260611 Page 4
Terminology
The following terms are used throughout this guide.
CSF - Cerebrospinal fluid surrounds brain and spinal cord and acts as a cushion against injury.
Contraindication - is a reason not to use a course of treatment or medication.
Occiput - refers to the bone forming the back of the skull and encloses the hole where the spinal cord reaches the brain
Paraplegia - Described as paralysis of both lower extremities (legs) as a result of damage to the cord
at T1 and below.
SCI - spinal cord injuries.
Supine - casualty is lying flat on their back.
Quadraplegia/ Described as ‘paralysis of four limbs’, usually the result
Tetraplegia - of spinal cord damage between C1 and C7.
Trapezius muscle - is the large superficial muscle that runs across the shoulder to the neck and down the back.
Vertebrae - the bones that make up the spinal column.
Neutral Position - is the position the head is in when a person is standing straight and looking at the
horizon. It is the preferred position in which to stabilise a casualty’s head when spinal injury is suspected.

Australian Lifesaving Academy Learner Guide Spinal Management Certificate
SLSA V 8.3 LSV-V1260611 Page 5
Course Aim and Objectives
This icon is used to bring attention to the course aim and objectives.
Reading
This icon indicates learners are required to undertake an individual reading task.
Individual Learning Activity This icon indicates that learners are required to undertake an individual learning task. This will usually involve the documenting individual thoughts and ideas.
Group Learning Activity
This icon indicates that learners are required to undertake a group learning task. Group activities may be completed in pairs, trios or larger groups.
Case Study This icon indicates that learners are required to undertake an analysis of a particular case or situation used as a basis for drawing conclusions in similar situations.
Remember this!
This icon is used to recap important and critical issues or content that learners should pay particular attention to.
Assessment Activity This icon indicates that learners are required to undertake an individual assessment of their skills and/or knowledge. This may involve completion of a scenario, a set of multiple choice questions and/or an exam.
Icons
The following icons (symbols) are used throughout this guide to indicate the types of activities you will be undertaking as you work through the module.
SLSA V 8.3 LSV-V1260611 Page 6
Australian Lifesaving Academy Learner Guide Spinal Management Certificate
Course Introduction
This Learner’s Guide has been jointly developed by Surf Life Saving Australia (SLSA) and Sports Medicine Australia (SMA) for casualties with suspected spinal injuries. The Spinal Management course focuses on the principles of good spinal care in an emergency situation. It provides a range of management options that can be used, rather than promotion of one specific form of care.
You may already have some skills in first aid and spinal management. Perhaps you have completed similar activities in previous work or you may have attended a training course that included elements of this learning. As you go through this Learner Guide you can draw on these experiences to demonstrate your ability to properly care for a casualty with a suspected spinal injury.
The first responder is often the only trained personnel at the scene until an ambulance or other emergency service arrives at the incident. In this case it is very possible that you will need to draw upon bystanders to perform simple first aid tasks and to assist in managing the casualty and the scene. When evaluating the scene and developing the emergency action plan the first aider should remember that bystanders will be able to follow simple, clear and concise instructions.
The Spinal Management Certificate is also aligned to the nationally recognised unit of competency PUAEME004A Provide emergency care for suspected spinal injury. This unit forms a part of the nationally recognised qualification PUA31310 Certificate III in Public Safety.
Pre-requisites
To commence training for the Spinal Management Certificate you must have met the following course pre- requisites:
• Minimum of 16 years of age on the date of final assessment
• Hold the SLSA awards shown in the table below
Pre-requisite Awards
Surf Australia Commercial
Bronze Medallion OR As per State/Territory requirement
Apply (Senior) First Aid Certificate
Course Outcomes
By the end of this course, you should be able to:
• Describe the possible causes of spinal injuries
• Identify suspected spinal injury
• Describe and demonstrate the management of neck and spinal injuries
• Evaluate the need to move a suspected SCI casualty
• Prepare casualty for transport
• Demonstrate how to move a casualty with suspected spinal injuries
• Perform casualty handover

SLSA V 8.3 LSV-V1260611 Page 7
Australian Lifesaving Academy Learner Guide Spinal Management Certificate
Your current skills and knowledge (RPL)
You may already have some of the required knowledge and/or skills for this course. Perhaps you completed similar training activities in previous work or learned them from performing your job or in another training course.
If you can demonstrate to your Facilitator that you are competent in a particular unit of competency, you will not need to repeat the training for it. This is called Recognition of Prior Learning or RPL. Your prior learning is recognised when you can successfully demonstrate that you are already competent.
If you feel confident you already have some or all of the competencies delivered in this module, ask your Facilitator for a copy of the RPL Information Kit which includes a Self-Assessment Checklist for the course. You can check yourself by completing self-assessment.
If you feel that you can demonstrate competency, talk to your Facilitator/ Assessor about having this formally recognised. Your Facilitator will then help you to provide evidence of competency.
Competency can be demonstrated in a number of ways, and most commonly it is done by:
• showing you already have a recognised qualification which delivered the same unit/s of competency OR
• undertaking the assessment tasks for the course.
Talk to your Facilitator for more information about RPL.
What you need to complete this course
You need:
• This Learner Guide
• A Trainer/Assessor/Facilitator
• Access to a pool/aquatic environment (for Aquatic Spinal Management)
• Access to spinal management devices used in your local environment
How to use this Learner Guide
• This course will be delivered using a variety of strategies for learning.
• Read through the guide carefully. The topics cover the knowledge and skills required to complete this course and to prepare you for the assessment activities.
• Work through the information and complete the activities.
• You will be supported by your Trainer/Facilitator who will show you the correct way to do things.
• There will be opportunities for you to ask questions and seek guidance while working through the guide.
• As you work through the guide ask for feedback.
• On completion of the guide you will be asked for your feedback.
How to supply feedback on improving this resource
All resources developed by the Australian Lifesaving Academy are reviewed at least annually and updated as required. Feedback can be supplied through the online Improvement Requests form on the Resource Development Page at www.sls.com.au or in writing to:
Training Improvement Requests Surf Life Saving Australia Locked Bag 1010 Rosebery, NSW, 2018

SLSA V 8.3 LSV-V1260611 Page 8
Australian Lifesaving Academy Learner Guide Spinal Management Certificate
Topic 1 - Spinal Cord Injury
Introduction
Each year in Australia, approximately 240 persons suffer traumatic spinal cord injuries (SCI). Currently a total of 12,000 persons live in Australia with SCI, at a cost to the Australian community of A$500 million per year for the long term ongoing care of these casualties.
Spinal cord injuries are classified as:
• traumatic — resulting from external causes like motor vehicle or motor cycle accidents, violence (gun shot or stab wounds), falls and water or sport related injury, or
• non-traumatic — caused by medical conditions such as cancer, disc disease and spinal infections.
Traumatic spinal injuries account for the majority of SCI in adults. Although spinal injury in children is rare, the most common causes of paediatric SCI are falls from a height or bicycle or as a result of a motor vehicle accident.
Patient Treatment
Unless an accident has been witnessed, the motionless and unconscious casualty should be treated as having a spinal injury.
When treating a suspected spinal injury the first aider must balance the aim of minimal movement of the spinal column and the requirement to maintain an open airway.
It is not recommended that a casualty with a suspected head, neck or spinal injury is moved. However if danger exists to the casualty and they must be moved, then spinal immobilisation techniques should be applied. The purpose of strapping a casualty to the spine board before transportation is a precaution against the further damage (including complete severing of the spinal cord) by further movement.
The central nervous system cannot regenerate itself. Incorrect management of a suspected spinal injury may result in further damage to the spinal cord, resulting in paralysis of the casualty. Therefore a well coordinated and managed team effort offers the best opportunity to the casualty if moved or transported to specialist medical care.
SLSA and Sports Medicine Australia Policy
Surf Life Saving Australia and Sports Medicine Australia recommends that the minimum equipment used when transporting a SCI casualty would be the fitting of a cervical collar and the use of a back board or spinal board with strapping to secure the casualty on the board.
When training in spinal management techniques the trainer and the learner should reference the policies and procedures for their organisation, and have an understanding of the applicable State/Territory and National legislation for spinal management (ie Australian Resuscitation Council).
For example, Surf Lifesaving State bodies have consulted with stakeholders of their relevant Emergency Management Service (ambulance, paramedics, etc) and immobilisation techniques such as head blocks may be endorsed for use in some States.

SLSA V 8.3 LSV-V1260611 Page 9
Australian Lifesaving Academy Learner Guide Spinal Management Certificate
Anatomy & Physiology of the Spine & Nervous System
The Spine The spine is made up of 33 separate vertebrae — the basic unit of the spinal column. Each vertebra surrounds and protects the spinal cord and together they provide support to the body.
The outer section of the vertebrae is a bony mass that offers a point of attachment for muscles enabling movement and stability of the spine.
The spinal canal in the middle of the vertebrae is surrounded by bone providing a passageway for the spinal cord to run through while being protected.
Figure 1.1 A vertebra
Diagram made available by Queensland Ambulance Service, Education Centre, Spinal Injury Diploma of Paramedical Science
Each vertebra is separated by a tough, pliable disc which absorbs the force produced by movement — walking, running, twisting. The vertebrae and discs are held together by ligaments.
Extending from the skull to the pelvis, in a side view of the spinal cord you will see a natural ‘S’ curve. The spine can be divided into five sections — the first three sections (Cervical, Thoracic and Lumbar) are flexible and allow movement, twisting and bending of the spine.
The two lower sections (Sacrum and Coccyx) are fused and provide attachment points for muscles (such as the gluteus maximus).
• The Cervical region (C1 – C7) comprises seven vertebrae that form the neck region of the spine. The first
vertebra called the Atlas - supports the head. The second is called the Axis and allows rotational movement of the head. There is a great deal of movement available in the cervical region. This makes it vulnerable to injury.

Australian Lifesaving Academy Learner Guide Spinal Management Certificate
SLSA V 8.3 LSV-V1260611 Page 10
• The Thoracic region (T1-T12) has less movement than the cervical section and is formed by 12 vertebrae - larger than the cervical vertebrae.
• The five vertebrae of the lumbar region (L1- L5) are the largest and sturdiest of the entire vertebrae. This
area of the spinal column incurs the greatest stress and is also quite flexible.
• The Sacrum (five sacral vertebrae) are fused together. This triangular shaped area forms the rear of the
pelvis.
• The Coccyx or tailbone. The final section of the spine is made up of four semi-fused vertebrae.
Though there are 33 separate vertebrae, because the sacrum and coccyx are fused, the vertebral column is
composed of 24 separate moving vertebrae.
Figure 1.2 Sections of the spine
The Spinal Cord Is protected within the vertebrae of the spinal column. It is a long tube of nerve tissue running from the base of the brain, down through each vertebrae for the whole length of the back.
Cerebrospinal fluid (CSF) is a clear bodily fluid that surrounds the brain and spinal cord. CSF acts as a cushion against injury during rapid and severe movement.
Branching off the spinal cord are 31 pairs of spinal nerves which communicate with the body as a whole.
Damage to the spinal cord can be caused by:
• Concussion — when a sudden violent jolt injures the tissues around the cord ie surfing or diving injury
• Contusion (bruising) — if bleeding occurs in the spinal column exerting pressure around or onto the cord ie resulting from a blunt force impacting on the head, neck or thoracic region
• Compression — when an object exerts pressure on the spinal cord ie object falls on the spinal column depressing a vertebra
• Tearing or Cutting — when the spinal cord is partially or completely severed due to a force ie penetrating injury or major blunt force to the head, neck or thoracic region.

Australian Lifesaving Academy Learner Guide Spinal Management Certificate
SLSA V 8.3 LSV-V1260611 Page 11
The Nervous System
The nervous system is one of the most complex systems of the body. It is made up of all the nerve tissues in the body including the brain, brain stem, spinal cord, nerves and nerve endings. The brain sends and receives messages via a network of nerves that transmit information as electrical impulses from one part of the body to another. The nervous system is divided into two parts — the Central Nervous System (CNS) and Peripheral Nervous System (PNS).
Central Nervous System (CNS) Is the largest part of the nervous system and comprises the brain and spinal cord. The CNS is protected within the dorsal cavity, cranial subcavity and the spinal cavity.
Peripheral Nervous System
Figure 1.3 Central Nervous System
All nerves that lie outside the brain and spinal cord (the central nervous system) are referred to as the PNS. They carry messages from around the body to the Central Nervous System and vice versa. Unlike the Central Nervous System the PNS is not protected by bone (skull, vertebrae) and will be affected by toxins and mechanical injuries.
The Peripheral Nervous System is divided into subsystems:
• Somatic Nervous System which regulates conscious activities, the coordination of body movements and responses to external stimuli
• Sympathetic Nervous System which responds to impending danger or stress and releases adrenaline into the system creating a sense of excitement. An increased heart rate and blood pressure are physiological changes in the sympathetic nervous system
• Parasympathetic Nervous System is responsible for such things as the constriction of the pupil, the slowing of the heart, the dilation of the blood vessels displayed when a person is resting and feels relaxed.
Mechanisms of Injury (MOI)
The mechanism of injury is the exchange of forces that result in an injury. For example, in a vehicle accident the mechanism of injury is the process by which forces are exchanged between the vehicle and what is struck, the casualty and the vehicle’s interior, and the various tissues and organs as they collide with each other within the body.
When assessing for spinal injury only around 50% of casualties show recognised symptoms or signs of spinal damage. Therefore it is important where an injury may suggest an SCI that a spinal injury is suspected and the casualty is managed with this in mind.

Australian Lifesaving Academy Learner Guide Spinal Management Certificate
SLSA V 8.3 LSV-V1260611 Page 12
Important:
You may not be able to determine if a spinal fracture or damage to the spinal cord has occurred. The spine can be fractured or spinal cord damage incurred, even if there is no evidence of paralysis.
There are five main mechanisms in spinal cord injury:
• Hyperextension
• Hyperflexion
• Compression
• Distraction
• Rotation
Hyperextension injuries occur when the spine is arched backwards beyond its normal limits.
This type of injury is seen most commonly in the upper cervical section of the spinal cord as there is nothing to restrain the head.
Thoracic and Lumbar Hyperextension is less common but often result in fractures.
Common causes are motor vehicle accidents and shallow water diving accidents.
Figure 1.4 Hyperextension injury
Hyperflexion injuries appear when the spine is arched forward beyond its normal limit.
Injuries to the cervical segment occur when the head is pushed forward until the chin makes contact with the chest, fracturing the vertebrae at the front of the cervical spine and tearing the supporting ligaments.
Injuries are often associated with whiplash or falling down stairs. Can also occur during a football/rugby tackle and/or scrum.
Figure 1.5 Hyperflexion injury
Compression injuries occur when the spinal cord is compressed following impact, often resulting in injuries to C5-6 and T12-L1.
This injury often causes a burst vertebral body. Common causes are diving injuries and impacting windscreens in car accidents, jumping from a height and landing feet first or during gymnastic activities.
Figure 1.6 Compression injury

Australian Lifesaving Academy Learner Guide Spinal Management Certificate
SLSA V 8.3 LSV-V1260611 Page 13
Distraction injuries are an overstretching of the spinal cord.
Distraction injuries are often caused by:
• hanging
• playground injuries to children.
• football/rugby tackles
• gymnastics
Rotational injuries occur when head and body rotate in opposite directions resulting in twisting of the muscle, ligaments, vertebrae and/or spinal cord.
Rotational injuries are often caused by:
• motor vehicle Injuries
• ejections from a motor vehicle.
Common causes
Figure 1.7 Rotational injury
In Australia the major cause of SCI is from motor vehicle accidents or water based activities. Twenty five percent of SCI occur in sport and recreation activities.
Spinal injuries in aquatic based activities normally occur in the cervical section of the spine as a result of a traumatic force; such as diving into shallow water, body surfing or during contact sports.
The most common causes of SCI (in order of frequency) are:
1. motor vehicle accident 2. industrial accident (workplace) 3. diving accident 4. sporting accident 5. a fall from a height 6. a significant blow to the head 7. severe penetrating wounds (ie gunshot).

Australian Lifesaving Academy Learner Guide Spinal Management Certificate
SLSA V 8.3 LSV-V1260611 Page 14
Types of Injury
Quadriplegia or Tetraplegia Paraplegia or Biplegia
Described as paralysis of four limbs, usually the result of spinal cord damage between C1 and C7.
An impairment or loss of motor or sensory function in the cervical segments of the spinal cord affecting the trunk and all four limbs.
Described as paralysis of both lower extremities (legs)
as a result of damage to the cord at T1 and below. The term refers to the loss of function and movement in the lower body and legs, not the arms.
Figure 1.8 Types of injury — quadraplegia (left) and paraplegia (right)

Australian Lifesaving Academy Learner Guide Spinal Management Certificate
SLSA V 8.3 LSV-V1260611 Page 15
SCI signs and symptoms
The signs and symptoms of a spinal cord injury depend on two factors:
• the location of the injury
• the extent of the injury — complete or partial injury.
The more acute the sign or symptom, then the more urgent the need to transport/evacuate the casualty to a specialist medical facility promptly.
Signs
• Breathing difficulties
• Loss of consciousness or fading in and out
• Loss of function in hands, fingers, feet or toes
• Loss of bladder or bowel control
• Neck or head in abnormal position
• Dilated pupils
• Fluid leaking from the ears
• Abnormal blood pressure
• Profuse bleeding from the head
• Abrasions or bruising to the head or forehead
• Shock
• Prioprism (erection in males)
Symptoms
• Back or neck pain (often intense)
• Tingling, numbness or lack of feeling in lower or upper limbs
• Increased muscle tone
• Headache or dizziness
• Nausea
Damage to the spinal cord does not stop with the initial injury but continues in the hours following trauma.
The first responders’ primary function is to prevent further injury through the application of sound incident management practices. Such as:
• giving the casualty oxygen therapy can help prevent nerve cell damage
• stop casualty from moving whilst giving constant reassurance
• correctly preparing casualty for transportation (spinal immobilisation)
• accurate recording of the casualty’s vital signs, details of how incident occurred and the first aid given to the casualty
• treat casualty for shock.
Collecting as much information as possible can assist with management on handover to qualified personnel (paramedics)
Secondary SCI includes:
• pathological changes — fluid and swelling in and around the spinal cord
• shock (insufficient oxygen to spinal cord and other parts of the body)
SLSA V 8.3 LSV-V1260611 Page 16
Australian Lifesaving Academy Learner Guide Spinal Management Certificate
• reduced blood flow to the spinal cord
The above may not be seen by the first aider
Spinal cord injuries are classified as complete or incomplete depending on how much of the cord width is damaged.
Complete injuries A complete SCI is defined as the total loss of motor function (paralysis) and sensory perception caused by an interruption of all the nerve tracts in the spinal cord stopping all messages to or from the brain.
Incomplete injuries
Where the spinal cord is able to convey some messages to or from the brain, the injury is defined as incomplete or partial ie there is partial preservation of sensory and/or motor functions. Sixty seven percent of SCIs in Australia are classified as incomplete. Good management of a casualty with incomplete SCI will minimise progressive worsening of spinal cord function.
Special considerations
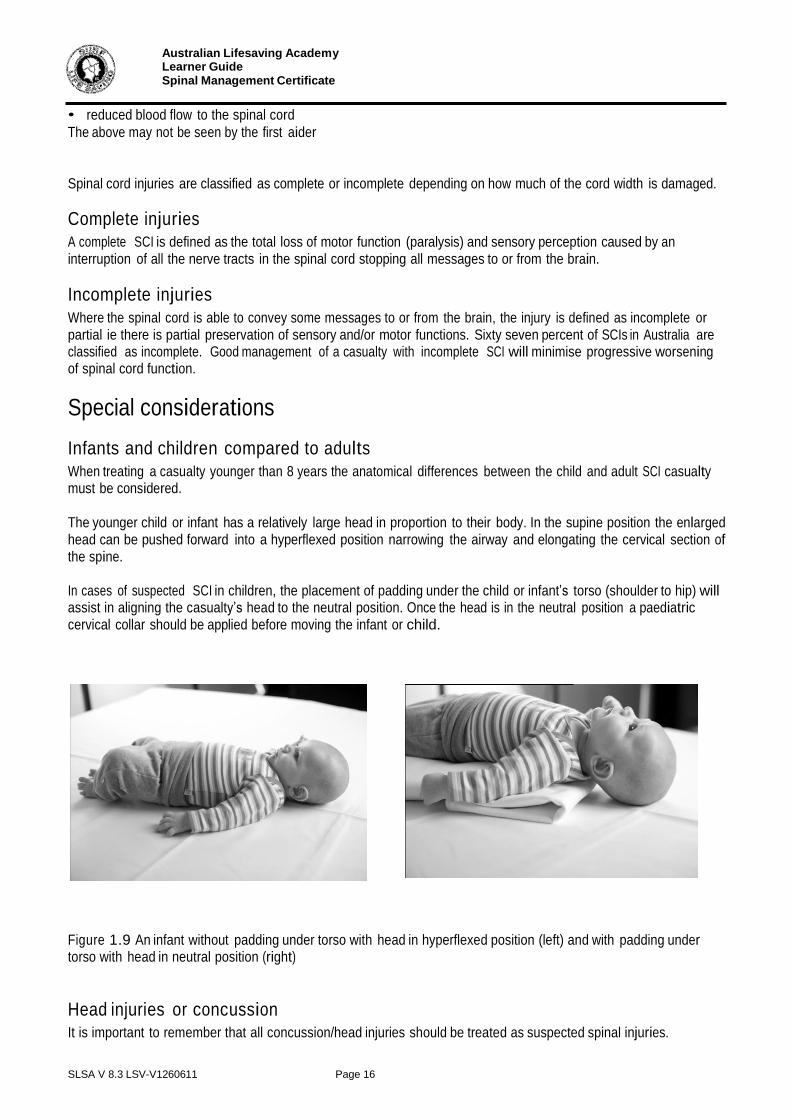
Infants and children compared to adults When treating a casualty younger than 8 years the anatomical differences between the child and adult SCI casualty must be considered.
The younger child or infant has a relatively large head in proportion to their body. In the supine position the enlarged head can be pushed forward into a hyperflexed position narrowing the airway and elongating the cervical section of the spine.
In cases of suspected SCI in children, the placement of padding under the child or infant’s torso (shoulder to hip) will assist in aligning the casualty’s head to the neutral position. Once the head is in the neutral position a paediatric cervical collar should be applied before moving the infant or child.
Figure 1.9 An infant without padding under torso with head in hyperflexed position (left) and with padding under torso with head in neutral position (right)
Head injuries or concussion It is important to remember that all concussion/head injuries should be treated as suspected spinal injuries.

SLSA V 8.3 LSV-V1260611 Page 17
Australian Lifesaving Academy Learner Guide Spinal Management Certificate
Activity (Individual) 1.1: Reflection
Answer the questions below.
1. Name and describe the two classifications for spinal cord injuries (SCI)
a.
b.
2. List three ways a spinal cord can be damaged
a.
b.
c.
3. List three signs of Spinal Cord Injury (SCI)?
a.
b.
c.

SLSA V 8.3 LSV-V1260611 Page 18
Australian Lifesaving Academy Learner Guide Spinal Management Certificate
Topic 2 - Managing a Suspected Spinal Injury
Principles of management
As with all major first aid cases the following should be considered:
• call for an ambulance as soon as possible
• manage the casualty’s airway
• manage the spine.
Unless an accident has been witnessed, or if a neck and/or back injury is highly improbable, motionless and unconscious casualties should always be treated for a suspected spinal injury.
When a casualty is found lying in an awkward or unusual position on the ground, they should not be moved unless under the supervision of an experienced first aider and/or health care worker, and with specific equipment. This may not be possible if the person is either:
• at further risk of danger, i.e. oncoming waves (surf), fire, or traffic
• is found to be not breathing
A clear airway, breathing and circulation take precedence over a spinal injury. However, where a casualty must be moved, minimising movement of the head and spinal column should occur.
It is recommended that a casualty with a suspected head, neck or spinal injury should not be moved. However, if danger exists to the casualty and they must be moved, then spinal immobilisation techniques should be applied. Strapping a casualty to the spinal board before moving is a precaution against further damage (including complete severing of the spinal cord) by further movement.
The minimum equipment to be used when moving a SCI casualty should be a cervical collar, and a back board or spinal board with strapping to secure the casualty on the board.
As with all major first aid, the Primary Assessment – DRSABCD, should be conducted to ascertain the safety of the area and the nature of the casualty’s condition:
D – Danger
R – Response S - Send for help A – Airway management and cervical spine stabilisation B – Breathing (ventilation) C – Compression D – Defibrillation
When treating a casualty with suspected SCI or someone who has suffered a head injury, the first aider must continually observe and monitor the casualty’s condition. Simple steps such as:
• supporting the standing casualty against a back board or spinal board, or
• sitting the casualty on the ground rather than on a chair Can minimise the risk of a casualty fainting and incurring further injury.

SLSA V 8.3 LSV-V1260611 Page 19
Australian Lifesaving Academy Learner Guide Spinal Management Certificate
Manual stabilisation
The first step a first aider should take when attending a suspected spinal or head injury incident, is the manual immobilisation of the casualty’s head and neck in the neutral position.
If the casualty is unconscious or is experiencing breathing difficulties maintenance of a clear airway will take precedence and jaw thrust or head tilt (if jaw thrust is not achievable) techniques will apply. However side to side movement of the head should be limited.
Even when spinal immobilisation equipment is utilised ie cervical collar, manual stabilisation should always be maintained.
Figure 2.1 Head in neutral position
Typically the first aider will offer manual stabilisation from behind the casualty, by either standing behind or lying down above the casualty’s head with the casualty in a supine position. It is important to continually reassure the patient, encourage them to stay still and explain what will be done to assist them.
The first aider should:
• spread their fingers across the side of the casualty’s head to obtain maximum contact
• stabilise their hands by resting their elbows firmly on the ground (supine position), or
• stabilise their hands by locking their elbows
• align the casualty’s head in the neutral position, remembering contraindications.
Trapezius grip technique
The trapezius grip is used to support the casualty’s head and neck whilst allowing the fitting of a cervical collar.
• This is achieved by gripping the upper trapezius muscle between the thumb and fingers, while supporting the head between the forearms (using a vice like grip along the side of the head).
• To allow the cervical collar to be fitted the first
aider grips the trapezius muscle between the extended middle and ring finger (forming a v shape).
• The forearms continue to provide support to the
head.
Figure 2.2 Manual stabilisation of head and neck
Figure 2.3 Trapezius Grip

Australian Lifesaving Academy Learner Guide Spinal Management Certificate
SLSA V 8.3 LSV-V1260611 Page 20
Vice grip technique
Stabilisation from the side can be obtained by:
• clasping the casualty’s head at the back with the hand closest to the arm of the casualty — take care not to push the head forward. The forearm lying against the casualty’s spine
• grip the casualty’s jaw with your opposing hand and position the forearm down the sternum
• both forearms are squeezed together creating a ‘vice’ that supports the neck and head.
Care must be taken to ensure pressure is not applied to the soft tissue of the neck and that the casualty’s head is not pushed backwards out of a neutral position.
Figure 2.4 Head in neutral position
Removal of motorcycle helmet
If attending the scene of a motorcycle accident, it may be necessary to remove the helmet from the casualty. Generally, helmets should remain in place unless there is a need to remove them to perform CPR or maintain the casualty’s airway.
Reasons that it may be necessary to take off a casualty’s helmet at the scene of the accident include:
• no breathing or responsee - CPR
• to obtain a clear airway (conscious or unconscious casualty)
• for oxygen therapy to be administered
A properly fitted motorcycle helmet will not fall off in a crash as it fits firmly to the sides and top of the rider’s head. Removing a well-fitted helmet can potentially result in movement of the cervical spine and should be conducted with extreme caution.
Removing helmets requires two people, one to support the head and neck of the casualty and one to perform the removal.
Open face or bicycle helmets should be removed observing the steps indicated below.
First aider one — positioned behind the casualty’s head:
• supports the casualty’s head and neck in neutral in-line position by placing one hand on each side of the helmet, spreading thumbs and fingers to maximise contact and restrict head movement.
• Inform first aider two when control of the head is established.
First aider two — is positioned to the side of the casualty and will:
Figure 2.5 Supporting casualty’s head in neutral position
Australian Lifesaving Academy Learner Guide Spinal Management Certificate
SLSA V 8.3 LSV-V1260611 Page 21
• undo the chin strap (cut if necessary),
• remove casualty’s glasses or face shield.
For a cycling, climbing, or skateboard type helmet:
• gently lift helmet upwards away from the head.
If the casualty is wearing an open face motorcycle helmet:
• stretch the sides of the helmet away from the face
• lift upwards and then backwards behind the head.
Removing a full face helmet from a casualty needs a systematic and coordinated approach.
Important:
Where a contraindication becomes evident stop the course of action immediately and immobilise the casualty as is.

Australian Lifesaving Academy Learner Guide Spinal Management Certificate
SLSA V 8.3 LSV-V1260611 Page 22
First aider one:
• supports the casualty’s head and neck in a neutral in-line position, by positioning one hand on each side of the head, spreading thumb and fingers to maximising contact, and restricts head movement.
First aider two:
• slide both hands under helmet either side of face until the fingers cover the ears, enabling you to grasp and support the head
• first aider two is now in control of maintaining the casualty’s head stability.
Figure 2.6 First aider two takes control of casualty’s head stability
First aider one:
• removes hands from helmet releasing control of the casualty’s head holding the base of the helmet by the sides, it is stretched away from the casualty’s face
• the helmet is tilted backwards to assist the chin piece to clear the nose
Figure 2.7 First aider one tilts helmet backwards
.
• tilting the helmet forward it is moved around the curve of the back of the head
• the helmet is then lifted upwards and away from the head.
Figure 2.8 First aider one removes the helmet
After removing the helmet, first aider one resumes control and stabilises the casualty’s head by placing one hand on each side of the skull to restrain movement.

Australian Lifesaving Academy Learner Guide Spinal Management Certificate
SLSA V 8.3 LSV-V1260611 Page 23
Figure 2.9 First aider one takes over control of the head
Figure 2.10 First aider one maintains head stability
There are instances where the helmet may push the casualty’s head forward into hyperflexion position creating a narrowed airway or restricting the application of a cervical collar.
A more neutral alignment of the cervical spine can be obtained by placing padding under the thoracic and lumbar sections of the spine. However this technique will require the casualty to be moved onto their side (log rolled) for the padding to be inserted.
Pad torso with a blanket to achieve neutral head position.
Figure 2.11 Padding under torso to achieve neutral head position

Australian Lifesaving Academy Learner Guide Spinal Management Certificate
SLSA V 8.3 LSV-V1260611 Page 24
Activity (Individual) 2.1: Reflection
Answer the questions below.
1. When moving a casualty with a suspected injury, list the first four casualty management priorities?
a.
b.
c.
d.
2. Explain the term ‘contraindication’ and provide three examples to be considered when treating a SCI
casualty.
3. Name two techniques used to support a suspected SCI casualty’s head and neck?

SLSA V 8.3 LSV-V1260611 Page 25
Australian Lifesaving Academy Learner Guide Spinal Management Certificate
Topic 3 – Types of Spinal Immobilisation and Retrieval Equipment
Equipment that can be used for immobilising a casualty’s spine, and retrieving them can include:
• Cervical collar
• Spinal board
• Head blocks
• Stretchers
• Immobilisation strapping
NOTE: check your organisational policies/guidelines to confirm what spinal immobilisation and retrieval
equipment is approved for use within your organisation
Cervical Collar
Constructed from hard plastic with a soft foam surround the cervical collar maintains the cervical spine in a neutral position. In most cases, it serves as a precaution, and is used to keep the neck from moving until it can be proved there is no injury.
Spine Board
(long spine board/backboard/extrication board) The spine board is used to secure and carry an injured casualty both from the water or land based incident. Typically constructed of a material that is translucent to x- rays, the spine board is shaped slightly wider and longer than an adult human. The board will be wide enough for immobilisation strapping to be fitted and has handle grips along each side for carrying purposes.

SLSA V 8.3 LSV-V1260611 Page 26
Australian Lifesaving Academy Learner Guide Spinal Management Certificate
Stretchers
Scoop stretcher
Safe lifting and transfer of a casualty with a suspected spinal injury can be achieved utilising the scoop stretcher.
The stretcher is designed to divide along its centre into two or four sections. Each half section is ‘scooped’ under the casualty with little or no movement to the spinal column resulting. Once in place the sections of the stretcher are locked together creating a rigid and stable base.
Stokes basket (Stokes litter or stretcher)
Used extensively in search and rescue operations, the Stokes litter is designed to hold an adult in a supine position. Constructed in plastic or metal, the casualty is placed in the basket on a backboard, after being fitted with a cervical collar. Strapping is secured across the casualty to complete spinal immobilisation.
Other Extrication Equipment
A range of specialised immobilisation and lifting equipment has been developed for application in specific circumstances. Examples include:
Extrication devices Extrication devices are used to secure a casualty involved in a motor vehicle accident.
The extrication device is slipped behind the injured casualty to support the spinal column. A cervical collar is fitted to the head and neck area.
Extrication stretchers Intended for use in enclosed spaces, the injured casualty can be lifted in either a horizontal or vertical position. Frequently used to retrieve casualties from a mine or lift shaft, underground tunnel or collapsed building.
SLSA V 8.3 LSV-V1260611 Page 27
Australian Lifesaving Academy Learner Guide Spinal Management Certificate
Activity (Individual) 3.1: Investigation
Answer the questions below.
1. List the equipment held by your club/service that is approved spinal immobilisation equipment. (SLSA
members can refer to the SLSA website, http://www.slsa.com.au under Administration & Membership, Gear
& Equipment)
2. Within your organisation find out what equipment is endorsed for use by your governing body. List any equipment that you should have but currently do not have.
3. Name two types of stretchers that can be used to transport a casualty?

SLSA V 8.3 LSV-V1260611 Page 28
Australian Lifesaving Academy Learner Guide Spinal Management Certificate
Fitting and Applying a Cervical Collar
Cervical collars should be applied by trained and experienced personnel only. The first aider should check the manufacturer’s instructions for the procedure on how to correctly fit the specific brand(s) of collar available to them.
When fitted by trained personnel the rigid cervical collar can offer protection to the casualty by reducing up to 50%
of the movement in the head and neck region.
A correctly applied cervical collar is an important step in providing best practice spinal care to a casualty with possible SCI. Combining the cervical collar with sound casualty care and the use of appropriate immobilisation equipment and methods can significantly reduce the possibility of secondary SCI occurring.
Cervical collars can be fitted to casualties in a range of land and aquatic environments. The exact application of a cervical collar will depend on the environment.
The following principles should be followed when applying a cervical collar:
• Communicate actions to the casualty prior to commencing treatment
• Ideally two people should be present when applying a cervical collar. One first aider manually maintains head stability by placing their hands on either side of the casualty’s head, while the second first aider measures, fits and applies the collar.
To size a casualty for a collar you need to measure the key dimensions.
• Ensure the head is maintained in the neutral position, unless due to the nature of the injury, this is not
possible
• The key dimension is between the point of the chin and the top of the trapezius muscle
• Using one hand measure between these two points then using the same measurement on the collar to select the correct size collar.
Figure 3.1 Measuring key dimensions
.
Figure 3.2 Measuring collar
When treating a casualty with suspected SCI or someone who has suffered a head injury, the first aider must continually observe and monitor the casualty’s condition. Simple steps such as
• supporting the standing casualty against a back board or spine board, or
• sitting the casualty on the ground rather than on a chair can minimise the risk of a casualty fainting and incurring further injury.

SLSA V 8.3 LSV-V1260611 Page 29
Australian Lifesaving Academy Learner Guide Spinal Management Certificate
Standing or seated casualty Step 1
• Communicate actions to casualty prior to commencing
Figure 3.3 Communicate your actions to the casualty
Step 2 First aider one
• Is positioned behind the casualty’s head with one hand placed either side of the casualty’s head, fingers are spread to maximize coverage.
• Stabilise the head in the neutral position (unless this is not possible due to the nature of the injury).
Figure 3.4
Step 3 First aider two positioned in front and to the
side of the casualty
• Remove any clothing that may obstruct the application of the collar.
• Measure the ‘key dimension’ between the chin and the trapezius muscle to determine the correct size of the cervical collar.
• Select or adjust the cervical collar to the size measured against casualty.
• Pre-form the cervical collar (roll the ends toward the middle).
Figure 3.6 Measuring the collar
Figure 3.5 Measuring key dimension
Figure 3.7 Pre-forming the collar
Australian Lifesaving Academy Learner Guide Spinal Management Certificate
SLSA V 8.3 LSV-V1260611 Page 30
nn m
Note:
Check the manufacturer’s instructions.
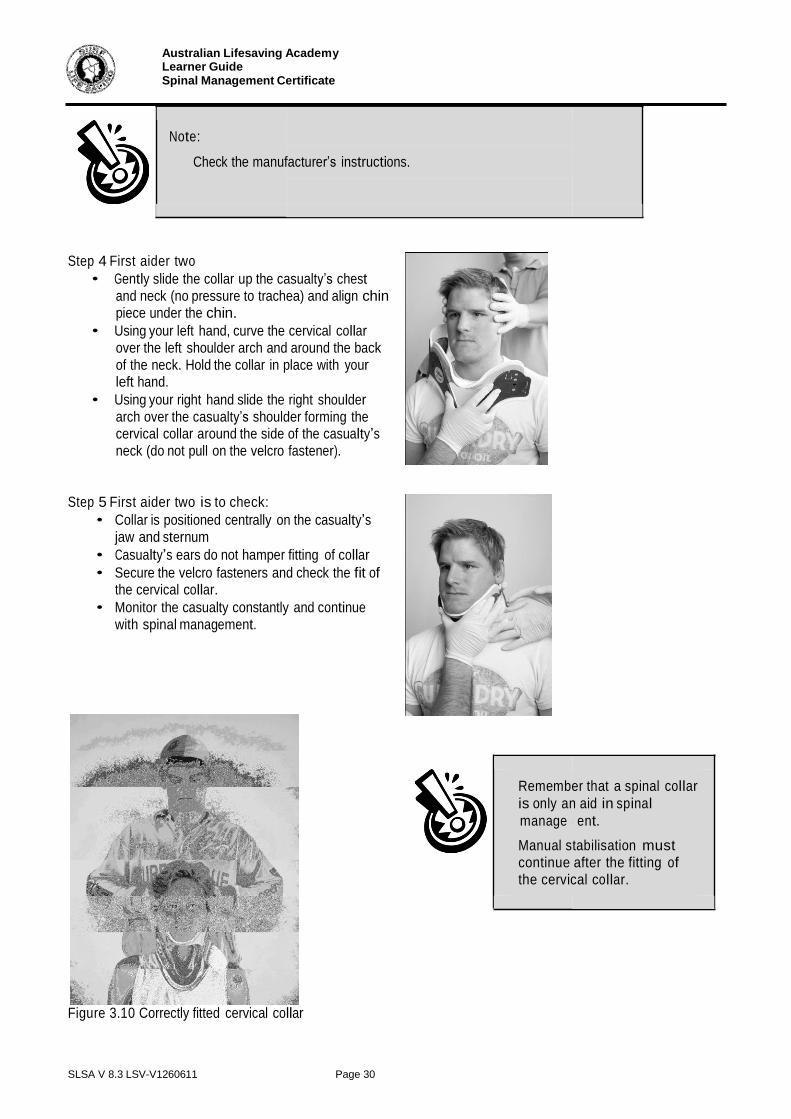
Step 4 First aider two
• Gently slide the collar up the casualty’s chest and neck (no pressure to trachea) and align chin piece under the chin.
• Using your left hand, curve the cervical collar over the left shoulder arch and around the back of the neck. Hold the collar in place with your left hand.
• Using your right hand slide the right shoulder arch over the casualty’s shoulder forming the cervical collar around the side of the casualty’s neck (do not pull on the velcro fastener).
Step 5 First aider two is to check:
• Collar is positioned centrally on the casualty’s jaw and sternum
• Casualty’s ears do not hamper fitting of collar
• Secure the velcro fasteners and check the fit of the cervical collar.
• Monitor the casualty constantly and continue with spinal management.
Remember that a spinal collar
is only an aid in spinal
manage ent.
Manual stabilisation must continue after the fitting of the cervical collar.
Figure 3.10 Correctly fitted cervical collar

Australian Lifesaving Academy Learner Guide Spinal Management Certificate
SLSA V 8.3 LSV-V1260611 Page 31
Supine casualty
If the casualty is in a supine position, the same steps apply as for a standing or seated casualty. In Step 4 the velcro fasteners should be folded inside the edge of the cervical collar to prevent contamination from the road or land surface which may prevent the velcro strips from adhering.
Finally, ensure the collar has been fitted in the neutral position and is a snug fit around the neck, preventing movement.
Note: Remember that a cervical collar is only an aid in spinal management and should not be used as the only form of treatment
Log roll The log roll is an accepted method to position a casualty on their side, allowing for the placement of a blanket, board or litter against the spine. The casualty can then be rolled back onto the blanket or board.
A log roll is best performed using four to six first aiders, however modified versions drawing on two and three people can still be successfully used.
The four person log roll, positions the casualty’s arms down either side of their torso with the casualty’s hands extended against their body. X-ray studies indicate this position supports the thoracic/lumbar area against sag.
Steps to perform a four person log roll include:
Step 1 First aider one manually stabilises the injured casualty’s head with both hands (by placing one hand on
either side of the casualty’s head), positioned behind. A cervical collar is fitted by the other first aider.
Step 2 Two first aiders position on the same side of the injured person — one in line with the chest and one in
line with the pelvis.
Step 3 The fourth first aider places the blanket, pad or litter along the other side of the injured person, as close
to the casualty possible.
Step 4 The first aider positioned at chest reaches across the injured person, securely grasping the upper arm
and hip.
Step 5 The first aider positioned at the pelvis reaches across the injured person and grasps the hip. The first
aider controls the legs either by tying a figure-of-eight bandage around the ankles, or by grasping both trouser cuffs at the ankle.
Step 6 A coordinated roll (patient towards the first aiders) is performed, ensuring head and spine stability is
maintained. The first aider at the head is in charge of coordinating the movement.
Step 7 Slide the board against the casualty’s back, aligning shoulders with shoulder markings on the spinal
board.
Step 8 Lower the casualty and elevated side of the spinal board down onto the ground, the board maintains
body alignment with the casualty. Check first aider’s body position supports casualty’s body from sliding off or away from spinal board.
The first aider on the head is in charge of the operation and the casualty should be rolled on their word.

Australian Lifesaving Academy Learner Guide Spinal Management Certificate
SLSA V 8.3 LSV-V1260611 Page 32
Note:
The log roll can position.
be performed if a casualty presents in a face down
Note: Blanket or Litter Board can be used in place of spine board.
Figure 3.2 Preparing to log roll the casualty Figure 3.3 Roll casualty onto side
Figure 3.4 Position board Figure 3.5 Lower casualty onto board maintaining manual head stabilisation

Australian Lifesaving Academy Learner Guide Spinal Management Certificate
SLSA V 8.3 LSV-V1260611 Page 33
If more people are board at the top un enhances the stab handling procedur
For further informa Safety and Aquati
available to assist, two additional people should der the arms of the person holding the head. Thi ility when lowering the board and is a safer manu e for the first aiders.
tion and illustrations refer the 33rd
Edition of the c Rescue Manual, pg 151-152.
Conscious standing casualty
The following technique is the preferred method for conscious and standing casualties with a suspected spinal injury.
• Advise the patient not to move
• If possible, maintain and support the head in the neutral position by placing hands either side of the casualty’s head
• A cervical collar should be fitted
• Size up a spinal board alongside the casualty for the correct height
• Insert the spine board on an angle in between the casualty’s spine and the first aider’s arms at the head, ensuring that the board is placed as close as possible to the casualty’s heels. Bring the board to the upright position between the first aider and the casualty’s back
• If the casualty feels faint while standing, lie them against the spine board
• Spine Board should be grasped by the 2nd and 3rd rescuers on either side, up under the patients arm pits to prevent the patient from sliding down the board on lowering
• The 2nd and 3rd rescuers should ensure that they grasp holes that are opposite each other on the board to ensure that the board remains level on lowering.
• Grasping the board at spaced positions, the first aiders slowly and smoothly lower the casualty down to the ground. Before lowering the casualty, it is recommended that a first aider place their feet at the base of the front of the spine board to avoid it slipping while lowering the board into the horizontal position.
• Offer constant reassurances to the casualty during this process and keep them informed about what is being done.
• When lowering the casualty all first aiders except the person at the head should be positioned so that they are facing the casualty’s head with the side of their body at right angle to the long axis of the spinal board. This allows safe handling practices when lowering the casualty
• Monitor the casualty’s vital signs and condition until medical help arrives
grasp the s al
Public

Australian Lifesaving Academy Learner Guide Spinal Management Certificate
SLSA V 8.3 LSV-V1260611 Page 34
Sitting Casualty
Sometimes the casualty will be seated on the ground and the response team may need to place the seated person on a spinal board / back board. Using the technique shown below, only a minimal amount of movement will be placed on the casualty’s spinal column.
It is recommended that a minimum of three people perform this technique.
Step 1 — Manually stabilise the casualty, and apply a cervical collar if available.
Figure 3.6 Fitting collar
Step 2 — Insert the spinal board/back board behind the casualty, whilst maintaining manual head control
Figure 3.7 Board placement
Step 3 — Two first aiders kneel either side of casualty. Manual head control is maintained as the spinal board is positioned behind the casualty. The board is supported by gripping with the hand closest to the board, at a position slightly above the casualty’s shoulder. The opposite hand passes under the casualty’s armpit and grips the board.
On a command
• Casualty advised to remain still manual head immobilisation is released.
• Casualty is slowly and carefully lowered to ground.
Figure 3.8 Head is released Figure 3.9 Lowering the casualty

Australian Lifesaving Academy Learner Guide Spinal Management Certificate
SLSA V 8.3 LSV-V1260611 Page 35
Step 4 — Manual head immobilisation is resumed immediately after the casualty is horizontal on the spinal board.
Casualty is slid (in increments) up the spinal board in slow controlled movements until aligned with shoulder markings on board.
Two first aiders placing
• one hand under casualty’s armpit (not pushing shoulders back)
• other hand holds casualty’s hip
• one foot is placed on spinal board to prevent it from sliding
• a triangular bandage can be tied in a Figure 8 around the casualty’s ankles. When sliding up the board, the first aider may grip the bandage to assist in controlling the lower legs.
Figure 3.10 Step four - Slowly move casualty along board
Step 5 — Casualty is immobilised with strapping and/or splints for transportation. Oxygen therapy can be offered.
Immobilisation strapping
Immobilisation strapping is to be fitted before moving the casualty. Medical guidelines advise that the chest strap is the first strap to be secured.
The reasoning behind this sequence is understandable; if the head is secured to the board first, and there is movement of the board or the casualty’s body it can cause movement in the cervical area.
However if the chest is secured first and there is movement to the board and the casualty’s body they move together as one. With the head manually stabilised there should be little or no movement in the cervical area.
As a precaution first aiders should always check the manufacturer’s instructions; yet the usual steps to be followed when applying immobilisation strapping are:
Australian Lifesaving Academy Learner Guide Spinal Management Certificate
SLSA V 8.3 LSV-V1260611 Page 36
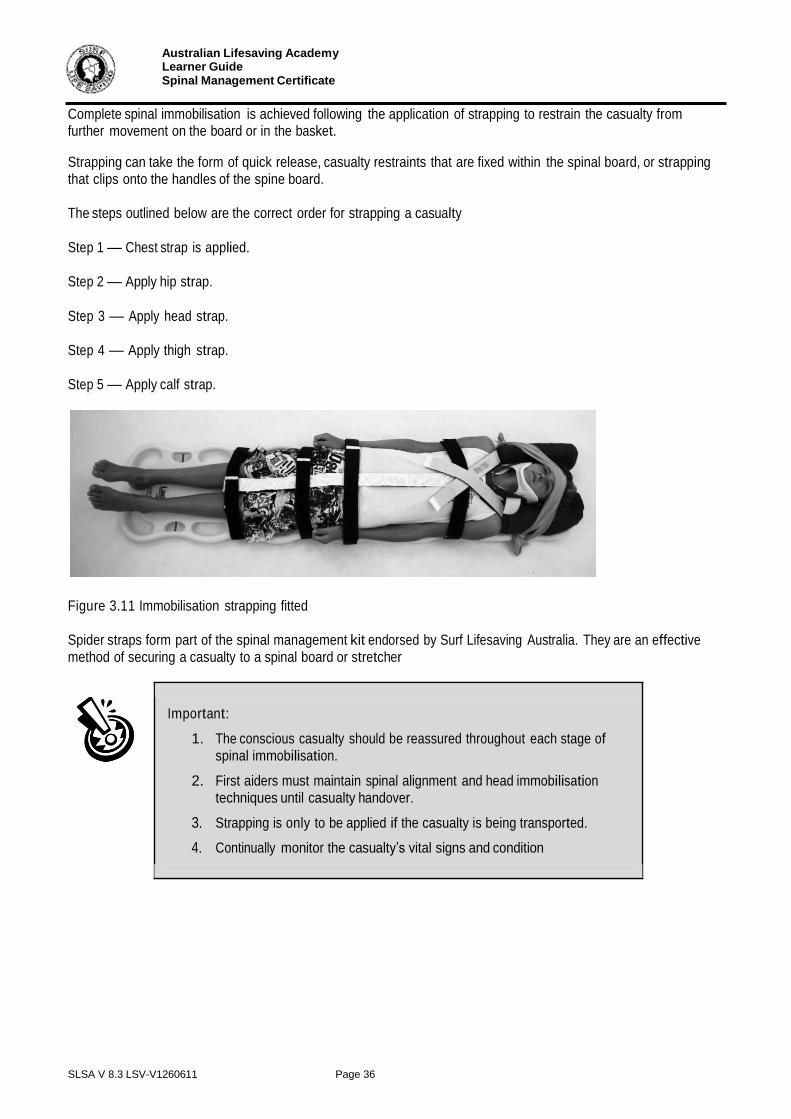
Complete spinal immobilisation is achieved following the application of strapping to restrain the casualty from further movement on the board or in the basket.
Strapping can take the form of quick release, casualty restraints that are fixed within the spinal board, or strapping that clips onto the handles of the spine board.
The steps outlined below are the correct order for strapping a casualty
Step 1 — Chest strap is applied.
Step 2 — Apply hip strap.
Step 3 — Apply head strap.
Step 4 — Apply thigh strap.
Step 5 — Apply calf strap.
Figure 3.11 Immobilisation strapping fitted
Spider straps form part of the spinal management kit endorsed by Surf Lifesaving Australia. They are an effective method of securing a casualty to a spinal board or stretcher
Important:
1. The conscious casualty should be reassured throughout each stage of spinal immobilisation.
2. First aiders must maintain spinal alignment and head immobilisation techniques until casualty handover.
3. Strapping is only to be applied if the casualty is being transported.
4. Continually monitor the casualty’s vital signs and condition

Australian Lifesaving Academy Learner Guide Spinal Management Certificate
SLSA V 8.3 LSV-V1260611 Page 37
Other equipment
Scoop Stretcher Safe lifting and transfer of a casualty with a suspected spinal injury can be achieved utilising the scoop stretcher.
The stretcher is designed to divide along its centre into two or four sections. Each half section is ‘scooped’ under the casualty with little or no movement to the spinal column. Once in place the sections of the stretcher are locked together creating a rigid and stable base.
Figure 3.12 Scoop stretcher Figure 3.13 Unlocking scoop
Figure 3.14 Sizing scoop to casualty Figure 3.15 Each section of scoop is slid under
casualty
Figure 3.16 Head and neck section is locked in place
Figure 3.17 Casualty’s clothing is held taut to stop ‘pinching’ of casualty’s skin between scoop stretcher
Prior to moving the stretcher the casualty is secured with straps.
Stokes basket (Stokes Litter or Stretcher) Used extensively in search and rescue operations, the Stokes litter is designed to hold an adult in a supine position. Constructed in plastic or metal, the casualty is placed in the basket on a backboard, after being fitted with a cervical collar. Strapping is secured across the casualty to complete spinal immobilisation.
For aquatic retrieval the basket can be fitted with floats to keep the casualty’s airway above the water line.

SLSA V 8.3 LSV-V1260611 Page 38
Australian Lifesaving Academy Learner Guide Spinal Management Certificate
Activity (Individual) 3.2: Reflection
Consider the questions below and record your answers
1. To fit a cervical collar it is recommended that two people work together. Explain the roles the two first aiders take and the purpose of that role.
a. First aider one — first person on the scene.
b. First aider two — assistant.
2. After fitting the cervical collar the casualty complains that it is uncomfortable and becomes distressed.
Discuss what actions you can take.
3. Obtaining the key dimension measurement is critical to correctly fitting the cervical collar to the casualty.
Explain the reasons that support this statement.

SLSA V 8.3 LSV-V1260611 Page 39
Australian Lifesaving Academy Learner Guide Spinal Management Certificate
Immobilising a conscious supine casualty
A conscious suspected spinal injured casualty found on land in the supine position (lying face upwards) should be left where they are found unless movement is necessary to remove the casualty from danger.
If the casualty is able to be left where they are found, one first aider should apply manual stabilisation while a second first aider applies a cervical collar, if available. Reassure the casualty and constantly monitor the casualty’s condition.
If the casualty becomes unconscious, or starts to regurgitate/vomit, immediately roll the casualty inot the recovery positions according to the log roll procedure and recommence primary assessment.
Moving a casualty
The Australian Resuscitation Council advises that an injured or unconscious casualty’s condition can be worsened by movement. Movement may result in increased pain to the casualty, secondary spinal injury occurring, blood loss from wounds increasing and advanced symptoms and signs of shock being experienced and observed.
However, circumstances exist where a casualty must be moved away from immediate danger. Transportation to advanced medical care facilities may necessitate carrying the casualty to the ambulance or emergency care vehicle.
Where it is necessary to move a casualty with suspected spinal injury the following steps are recommended.
• Always move casualty in feet first direction.
• Avoid lifting one end of the board higher than the other — keep horizontal, or head higher on stairs.
• Do not slide spine board across the ground or surface, it may catch and jerk or jolt the casualty.
• Ensure hair, jewellery and clothing is clear and cannot catch against surfaces or become caught in the first aiders hands, straps, etc.
• Continue to communicate with and reassure the casualty
To stabilise the casualty for transportation, immobilisation strapping should be fitted over the casualty’s body to secure the casualty to the spine board.
Preparing casualty for transport
Use safe lifting practices and lift in a coordinated manner. When lifting from ground level use a minimum of four people to lift the stretcher. The casualty’s condition is monitored throughout transportation.
Figure 4.16 Casualty immobilised with oxygen therapy Figure 4.17 Preparing to lift the casualty

Australian Lifesaving Academy Learner Guide Spinal Management Certificate
SLSA V 8.3 LSV-V1260611 Page 40
Figure 4.18 Use safe lifting practices Figure 4.19 Continue to monitor signs of life
Ongoing management
It is important to continually monitor a suspected SCI patient’s vital signs, to monitor trends in their condition and assess the effectiveness of management.
Ongoing observation and management while waiting for medical assistance should include:
• Reassessmentt of the casualty’s vital signs at regular intervals • Continue to identify actual or potential problems and plan appropriate care • Notify the ambulance service of any change to the casualty’s status as appropriate • Handover casualty to ambulance personnel
Handover First aiders should introduce themselves and the casualty to the paramedic and detail the following information using the EPIC principle:
EVENT What happened to the casualty? PROBLEM What the presenting problem was. What you found out from vital signs and secondary survey INTERVENTION What you did to assist the casualty (treatment and the effect this had on the casualty) CURRENT CONDITION What their condition is now
Assistance should be given to medical personnel as requested. Documentation must be completed, and where possible, a copy given to the ambulance personnel or paramedics. An operational debrief should be conducted with a supervisor and the operational team, or an external counsellor.
Australian Lifesaving Academy Learner Guide Spinal Management Certificate
SLSA V 8.3 LSV-V1260611 Page 41
Topic 4 - Aquatic Environments
Many spinal injuries result from people diving into shallow water where rocks, sandbanks or foreign objects may be present. Spinal injuries in the aquatic environment have the added complication of possible drowning.
Managing suspected spinal injuries in the aquatic environment is no different from on land - managing the casualty’s airway and breathing is the first priority, whilst immobilising the head and body as much as possible.
In the surf environment, it is highly recommended to position the casualty with the head facing out to sea, and with the first aider’s body between the oncoming waves and the casualty. This will assist in protecting the casualty from oncoming waves as well as keeping the casualty’s body aligned. However, do not turn the casualty to achieve a head to sea alignment while in the surf, as there is a risk of being caught by a wave mid-turn.
Successful removal of a casualty from a pool or shallow water location will require a minimum of three first aiders. When approaching the casualty the first aider should be careful not to disturb the water and should move cautiously towards the casualty.
Methods to stabilise the casualty’s head If the casualty is floating face-down, they can be turned to a face-up position by either:
• vice grip technique or
• extended arm roll-over
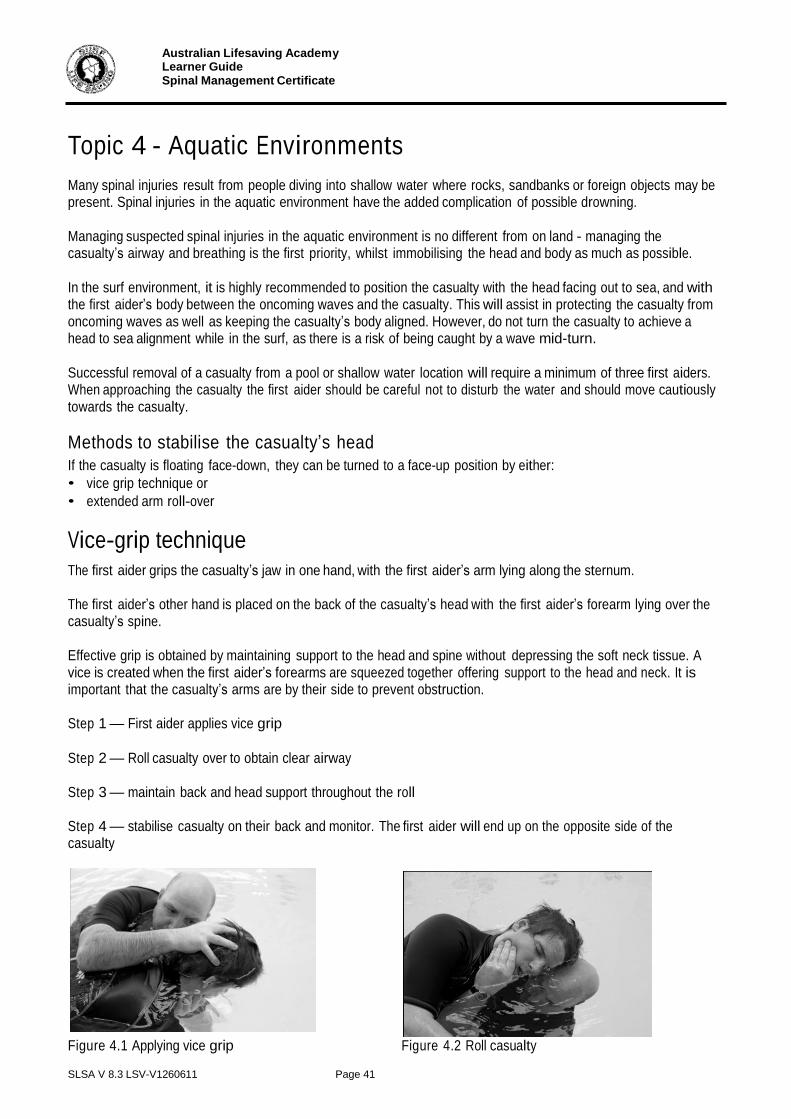
Vice-grip technique
The first aider grips the casualty’s jaw in one hand, with the first aider’s arm lying along the sternum.
The first aider’s other hand is placed on the back of the casualty’s head with the first aider’s forearm lying over the casualty’s spine.
Effective grip is obtained by maintaining support to the head and spine without depressing the soft neck tissue. A vice is created when the first aider’s forearms are squeezed together offering support to the head and neck. It is important that the casualty’s arms are by their side to prevent obstruction.
Step 1 — First aider applies vice grip
Step 2 — Roll casualty over to obtain clear airway
Step 3 — maintain back and head support throughout the roll
Step 4 — stabilise casualty on their back and monitor. The first aider will end up on the opposite side of the casualty
Figure 4.1 Applying vice grip Figure 4.2 Roll casualty

Australian Lifesaving Academy Learner Guide Spinal Management Certificate
SLSA V 8.3 LSV-V1260611 Page 42
Figure 4.3 Maintain head & back support Figure 4.4 Stabilise casualty
Extended arm rollover technique
Where the water depth is too shallow to perform an effective vice grip technique, the extended arm rollover technique can be used.
Step 1 - Call/signal for assistance
Step 2 — place casualty’s arms above their head grasping upper arms to immobilise head and spine
Step 3 — move forwards and slowly roll casualty towards you so they are face up
Figure 4.5 Immobilise head Figure 4.6 Roll casualty to you
Whilst maintaining head stability the first aider should slowly move away from the direction of the casualty’s head to assist in lifting the feet and legs up to the surface.
Alternatively assisting first aiders can gently lift the legs and lower body away from the bottom of the pool or waterway, being cautious not to bend the spine.
Floatation devices, like the rescue tube, can be placed under the casualty’s legs to maintain buoyancy.
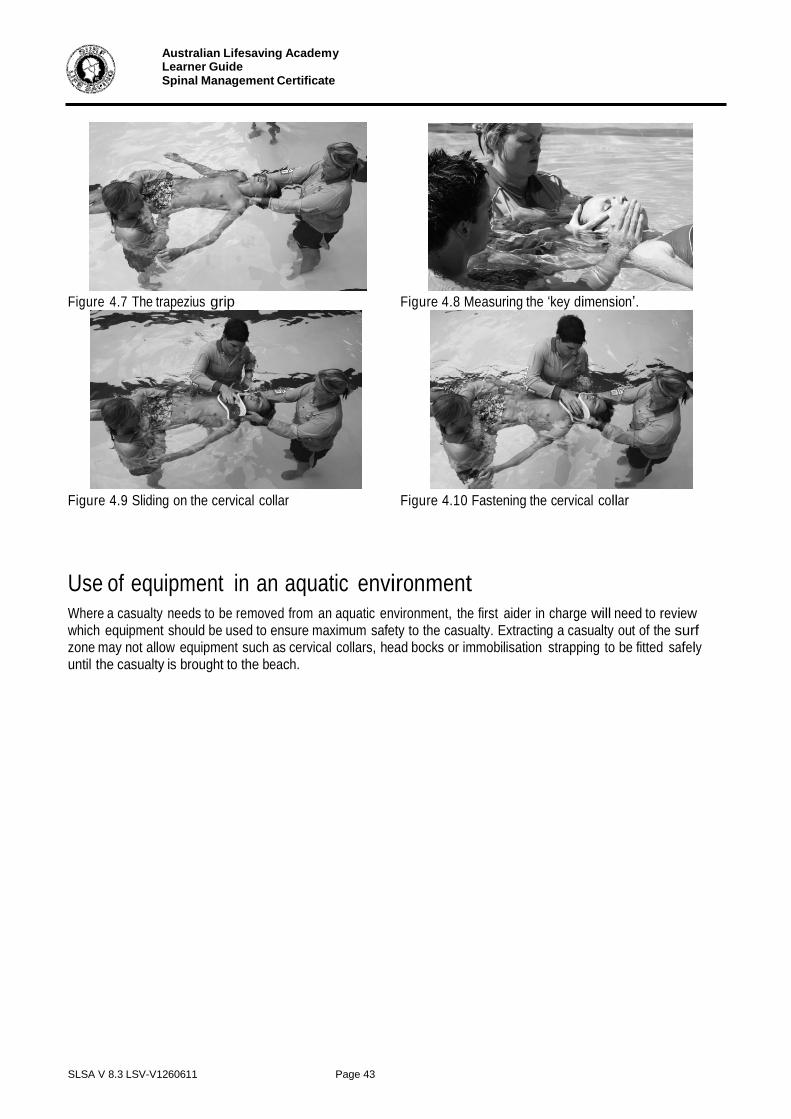
Step 4 — First aider repositions to the ‘trapezius grip’ and stabilises casualty on their back. Ensure that the casualty is ready to be fitted with a cervical collar.
The trapezius grip is used to support the casualty’s head and neck, whilst allowing the fitting of a cervical collar. To attain the trapezius grip the first aider:
1. grips the upper trapezius muscle between thumb and the fingers, supporting the head between the forearms
2. to allow for the cervical collar to be fitted, the first aider grips the trapezius muscle between the extended middle and ring fingers (formed to a V shape). The forearms continue to provide firm support to the head.
Australian Lifesaving Academy Learner Guide Spinal Management Certificate
SLSA V 8.3 LSV-V1260611 Page 43
Figure 4.7 The trapezius grip Figure 4.8 Measuring the ‘key dimension’.
Figure 4.9 Sliding on the cervical collar Figure 4.10 Fastening the cervical collar
Use of equipment in an aquatic environment
Where a casualty needs to be removed from an aquatic environment, the first aider in charge will need to review which equipment should be used to ensure maximum safety to the casualty. Extracting a casualty out of the surf zone may not allow equipment such as cervical collars, head bocks or immobilisation strapping to be fitted safely until the casualty is brought to the beach.

SLSA V 8.3 LSV-V1260611 Page 44
Australian Lifesaving Academy Learner Guide Spinal Management Certificate
Preparing for transport — spine board
Should a spinal injury occur in still water or a low surf zone, the spine board can be floated under a casualty following the application of a cervical collar.
After stabilising the casualty’s head the spinal board can be ‘knifed’ under the casualty into position to support the spine.
Step 1 -— knifing spinal board into position maintaining head support using vice grip
Step 2 — Spine board is gently positioned under casualty
Step 3 — Casualty stabilised on board
Step 4 — Immobilisation straps are fitted securing casualty for transport
Step 5 — Casualty is removed from water in coordinated stages. Carefully moved to pool or water’s edge. Lift spine board and casualty onto pool deck or water’s edge
Figure 4.11 Knifing board Figure 4.12 Positioning spine board
Figure 4.13 Stabilise casualty Figure 4.14 Applying straps
Important:
It is not possible to strap a patient while in moving water/surf.
Figure 4.15 Casualty is removed from the water.

SLSA V 8.3 LSV-V1260611 Page 45
Australian Lifesaving Academy Learner Guide Spinal Management Certificate
Case Study 1
As soon as you arrive on patrol, you see a crowd gathering near a rocky outcrop, about 250 metres to the north of the patrol area. Members of the crowd are shouting and pointing in the direction of the rocks and you observe that the rocks are partially covered by each set of incoming waves.
Grabbing a radio and first aid kit, you and a fellow patrol member run the 250 metres to the rocks. Quickly scanning the scene you see a young woman lying between two rocky platforms. Her left side (from shoulder to thigh) is slightly elevated against one of the rocks and her head is lying on her extended left arm.
Assessing the scene for safety you instruct your fellow team member to perform the casualty assessment. The patrol member advises that the woman has slipped on the rocks, is experiencing some pain between her shoulders and has numbness, pins and needles in both feet. Though the casualty’s breathing is quick, she is not experiencing any difficulty breathing and is fairly relaxed.
The radio officer advises you that it may take up to 30 minutes for the ambulance to arrive at the scene, due to a high volume of incidents occurring in the region.
High tide is in 1 hour and the rocky outcrop is normally fully immersed at high tide.
Activity (Group) 4.1: Case Study Review
Consider case study 1. Divide into two groups and discuss what spinal management practices can be applied in the following instances:
1. Casualty is not to be moved.
2. Casualty is to be moved away from incoming tide.
SLSA V 8.3 LSV-V1260611 Page 46
Australian Lifesaving Academy Learner Guide Spinal Management Certificate
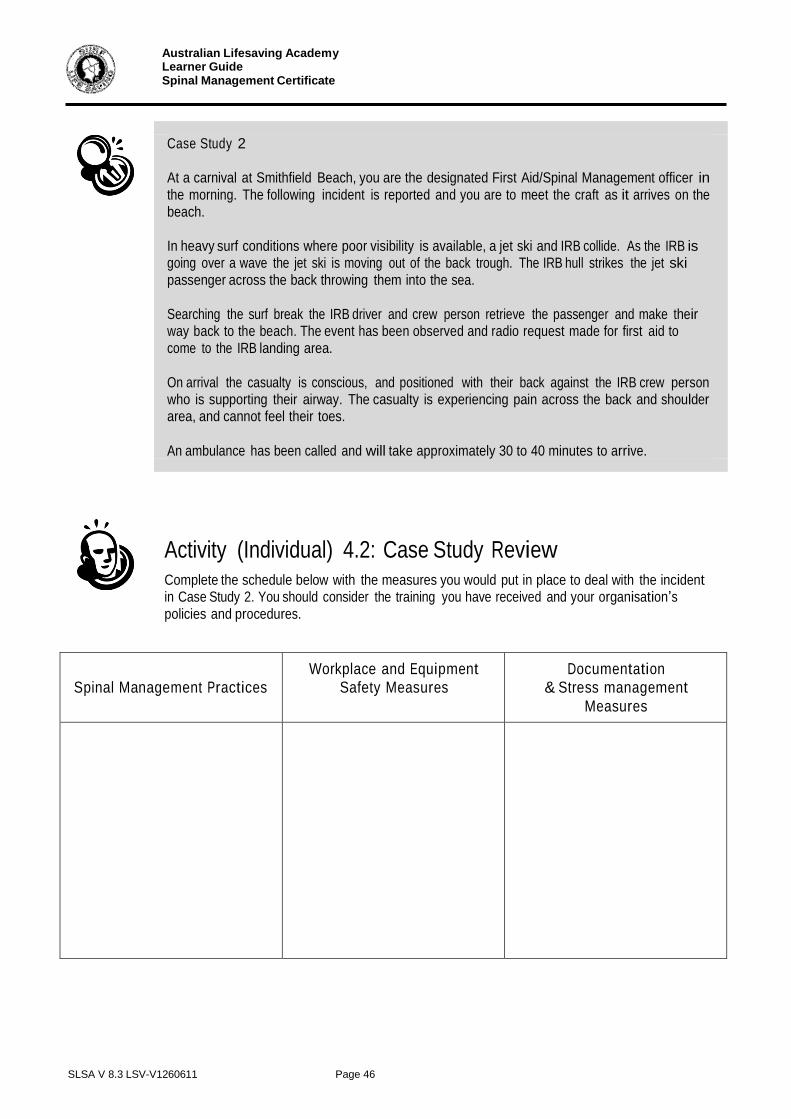
Case Study 2
At a carnival at Smithfield Beach, you are the designated First Aid/Spinal Management officer in the morning. The following incident is reported and you are to meet the craft as it arrives on the beach.
In heavy surf conditions where poor visibility is available, a jet ski and IRB collide. As the IRB is going over a wave the jet ski is moving out of the back trough. The IRB hull strikes the jet ski passenger across the back throwing them into the sea.
Searching the surf break the IRB driver and crew person retrieve the passenger and make their way back to the beach. The event has been observed and radio request made for first aid to come to the IRB landing area.
On arrival the casualty is conscious, and positioned with their back against the IRB crew person who is supporting their airway. The casualty is experiencing pain across the back and shoulder area, and cannot feel their toes.
An ambulance has been called and will take approximately 30 to 40 minutes to arrive.
Activity (Individual) 4.2: Case Study Review
Complete the schedule below with the measures you would put in place to deal with the incident in Case Study 2. You should consider the training you have received and your organisation’s policies and procedures.
Spinal Management Practices
Workplace and Equipment Safety Measures
Documentation & Stress management
Measures

SLSA V 8.3 LSV-V1260611 Page 47
Australian Lifesaving Academy Learner Guide Spinal Management Certificate
References
The Australian Resuscitation Council
Cripps RA 2005. Spinal cord injury, Australia, 2003–04. Injury Research and Statistics Series Number 25. Adelaide: AIHW (AIHW cat no. INJCAT 77).
A Photographic Guide to Pre-hospital Spinal Care, Copyright © Emergency Technologies January 2001

SLSA V 8.3 LSV-V1260611 Page 48
Australian Lifesaving Academy Learner Guide Spinal Management Certificate
Assessment Information
Below is a description of the assessment tasks required to demonstrate competence in this course. This section is for information only. All evidence should be collected in the assessment portfolio section of this learner guide.
Assessment Tasks
Assessment Task 1: Written Questioning
This assessment task will be conducted under exam conditions. The questions paper is in the Assessment Portfolio of this Learner Guide. Write your answers in the spaces provided.
Assessment Task 2: Cervical Collar Application
Demonstrate the appropriate sizing and application of a cervical collar. Your assessor will
observe you as you do this. You will be required to do this for a casualty who is walking and for a casualty who is supine (lying down).
Assessment Task 3: Log Roll and Transport Patient
Demonstrate the appropriate spinal and casualty management techniques for the scenario provided.
Suspected spinal injury casualty is rescued and carried up the beach. The casualty’s condition has been stabilised and he/she is conscious. Emergency services are on the way and the patrol rescue team will need to prepare the casualty for transport across sand approximately 600 metres to the ambulance bay. Casualty is in supine position (back) on sand.
Assessment Task 4: Full Spinal Immobilisation
Demonstrate the appropriate spinal and casualty management techniques for the scenario provided to you by the assessor
Patrol rescue team is to retrieve face down casualty from pool or open water with suspected spinal injury. First aider to use appropriate technique to turn casualty’s face up. Team is to evaluate need to move casualty and use appropriate equipment in the correct manner. Team is to transport and monitor patient and perform casualty handover. Upon completion a debrief is conducted with peers and assessor.

Australian Lifesaving Academy Assessment Portfolio Spinal Management Certificate
SLSA V 8.3 LSV-V1260611 Page 1
Assessment Portfolio
This portfolio includes all of the evidence you are required to submit to your assessor to demonstrate competence in the Spinal Management Certificate and the related competencies listed in the competency record below.
Learner Details
First Name:
Surname:
Date of Birth:
Club / Group:
Telephone:
Email:
Competency Record
SLSA Course
C o
r N
YC
Spinal Management Certificate
Nationally recognised unit of competency
PUAEME004A Provide emergency care for suspected spinal injury
Assessor Name
Assessor Signature
Date

Australian Lifesaving Academy Assessment Portfolio Spinal Management Certificate
SLSA V 8.3 LSV-V1260611 Page 2
Assessment Summary
Participant Name:
Assessment Tasks
Dat
e C
omple
ted
Sa
tisfa
cto
ry/
Not
Sa
tisfa
cto
ry (
N/N
S)
Ass
esso
r Sig
natu
re
Task 1: Written Questioning
Task 2: Cervical Collar Application
Task 3: Log Roll and Transport Patient
Task 4: Full Spinal Immobilisation
Comments:
Australian Lifesaving Academy Assessment Portfolio Spinal Management Certificate
SLSA V 8.3 LSV-V1260611 Page 3
Assessment Task 1: Written Questioning
This task will be conducted under exam conditions supervised by your facilitator. Your facilitator will supply you the assessment questions.

Australian Lifesaving Academy Assessment Portfolio Spinal Management Certificate
SLSA V 8.3 LSV-V1260611 Page 4
Post fitting
• Casualty reassured
• Need to move casualty is evaluated
• Vital signs monitored and recorded
• Handover to ambulance
Assessor’s notes on delivery
Spinal casualty to give candidate verbal feedback on:
1. Cervical collar application (neck and
spinal movement experienced)
2. Casualty management
3. Effectiveness of communication.
During the delivery did the learner demonstrate the following skills:
0 Correct selection and application of cervical collar
0 Compliance to standard operating procedures
0 Effective communication with internal and external personnel
0 Working in a team.
The learner has successfully completed this task
0YES 0NO
Assessor signature:
Date: / /
Assessment Task 2: Cervical Collar Application
Demonstrate the appropriate sizing and application of a cervical collar. Your assessor will observe you as you do this. You will be required to do this for a casualty who is walking and for a casualty who is supine (lying down).
Skill & Knowledge demonstrated Tick
Candidate to
• Identify hazards and risks to self, casualty and bystanders
• Put on appropriate PPE
• Communicate actions clearly to casualty and assisting persons
• Reassure patient
Candidate assesses casualty’s condition
• Breathing and response
• Physical appearance
• Medical history
• Details of incident and other signs & symptoms
• Call for ambulance
Scenario 1 - Supine casualty
• Casualty advised to cease head movement
• Candidate instructs bystander / patrol member to control casualty’s head
• Casualty correctly sized for collar
• Cervical collar pre formed as per manufacturer’s instructions
• Collar appropriately applied
Scenario 2 - Walking casualty
• Casualty managed for possible loss of consciousness (seat casualty, under arm support)
• Spinal management principles observed, seat casualty or use spinal board
• Casualty advised to cease head
movement
• Candidate instructs bystander / patrol member to control casualty’s head
• Casualty correctly sized for cervical
collar
• Cervical collar pre formed as per manufacturer’s instructions
• Collar appropriately applied
• Spinal board used to lower casualty to ground
Tick

Australian Lifesaving Academy Assessment Portfolio Spinal Management Certificate
SLSA V 8.3 LSV-V1260611 Page 7
Skill & Knowledge demonstrated Tick
Candidate to
• Identify hazards and risks to self, casualty and bystanders
• Put on appropriate PPE
• Communicate actions clearly to casualty and assisting persons
• Reassure patient
Candidate assesses casualty’s condition
• Breathing and response
• Physical appearance
• Medical history
• Details of incident and other signs &
symptoms
• Call for ambulance
Log roll– FA = First aider
• FA1 – Manually stabilises casualty’s head
• FA2 & FA3 take positions on same side of the injured person
• FA4 – places spinal board / blanket along opposite side of injured person
• FA2 – securely grasps casualty’s upper arm and shoulder
• FA3 – grasps casualty’s pelvic bone (lying against ground/ sand) and casualty’s ankles / Figure 8 bandage
• FA1 – coordinates roll
• FA4 – slides board / blanket against casualty’s spine
• FA4 – alignment of casualty’s shoulders to spinal board markings checked
• FA1 – coordinates lowering of casualty onto ground
• FA2 – Fits collar and completes immobilisation strapping
Casualty is transported ready for handover
• Casualty lift is coordinated using a minimum of 4 people
Assessment Task 3: Log roll and transport patient
Demonstrate the appropriate spinal and casualty management techniques for the scenario provided.
Suspected spinal injury casualty is rescued and carried up the beach. The casualty’s condition has been stabilised and he/she is conscious. Emergency services are on the way and the patrol rescue team will need to prepare the casualty for transport across sand approximately 600 metres to the ambulance bay. Casualty is in supine position (back) on sand.
• Casualty is monitored during transport
Assessor’s notes on delivery
Candidate assumed the role of First aider 1 –
manual stabilisation of head
The learner has successfully completed this task
0YES 0NO
Candidate assumed the role of Rescue 2 – fitting of spinal collar and placement of immobilisation strapping
The learner has successfully completed this task
0YES 0NO
Assessor signature:
Date: / /

Australian Lifesaving Academy Assessment Portfolio Spinal Management Certificate
SLSA V 8.3 LSV-V1260611 Page 9
Immobilisation strapping fitted
• FA1 positions spinal strapping along casualty’s body
• FA2 maintains manual head stabilisation
• FA1 aligns head strap – not applied
• FA1 fits chest strap & hip strap
• FA1 fits head strap
• FA1 & 3 complete spinal immobilisation strapping – thigh and
calf
• FA team moves casualty to pool edge and lifts spinal board to pool edge
• FA1 & 3 move to pool edge platform and slide casualty fully on to edge
• FA1 checks strapping and casualty comfort
• FA team prepare to lift in a coordinated manner
Transport and handover
• Casualty is lifted and moved to a safe location
• Casualty monitored during transport
• Details of incident communicated to medical personnel
• Documentation completed
• Debrief conducted
Assessor’s notes on delivery
Spinal casualty to give candidate verbal feedback on:
1. Cervical collar application (neck and spinal movement experienced)
2. Casualty management
3. Effectiveness of communication.
Assessment Task 4: Scenario - full spinal immobilisation
Demonstrate the appropriate spinal and casualty management techniques for the scenario provided to you by the assessor
Patrol rescue team is to retrieve face down casualty from pool or open water with suspected spinal injury. First aider to use appropriate technique to turn casualty’s face up. Team is to evaluate need to move casualty and use appropriate equipment in the correct manner. Team is to transport and monitor patient and perform casualty handover. Upon completion a debrief is conducted with peers and assessor.
Skill & Knowledge demonstrated Tick
Candidate to
• Identify hazards and risks to self, casualty and bystanders
• Appropriate PPE put on
• Communicate actions clearly to casualty and assisting persons
• Reassure patient
Candidate assesses casualty’s condition
• Breathing and response
• Physical appearance
• Medical history
• Details of incident and other signs &
symptoms
• Call for ambulance
First aider uses vice grip or extended arm rollover method to turn patient over
• Most suitable method chosen for situation
• Correct technique used
Manual head stabilisation
• FA team reassures conscious casualty and advises casualty of actions to be
taken
• FA2 applies manual head stabilisation
• FA1 & FA2 move slowly towards pool edge floating casualty’s feet upwards
• FA3 supports casualty’s feet and lower legs in horizontal position
• FA4 knifes spinal board under casualty
• FA team controls placement spinal board under casualty
Cervical Collar fitted

Australian Lifesaving Academy Assessment Portfolio Spinal Management Certificate
SLSA V 8.3 LSV-V1260611 Page 12
During the delivery did the learner demonstrate the following skills:
0 Manual inline stabilisation immediately applied and maintained
0 Cervical collar correctly sized and fitted
0 Correct selection and application of spinal strapping
0 Appropriate first aid and shock management applied
0 Compliance to standard operating procedures
0 Effective communication with internal and external personnel
0 Working in a team.
0 Procedure was completed within an appropriate time frame
The learner has successfully completed this task 0YES 0NO
Assessor signature: Date: / /

SLSA V 8.3 LSV-V1260611 Page 13
Australian Lifesaving Academy
Course Feedback
Spinal Management Certificate
Course date: ______________ Location: _______________ Your name: _______________
(Optional)
Trainer(s) & Assessor(s): _______________________________________________________
Your evaluation of this program is very important. It enables us to improve our training programs and the quality of our service.
Statements
Strongly disagree
Disagree
N/A
Agree
Strongly
Agree Course Content
The course was explained to me
prior to commencing and met my expectations.
The course had the right balance between theory and practice.
The course was the right duration and intensity.
General comments on course content
Course Material
The course materials were clear and easy to follow.
The activities were realistic and effective.
The course materials will be a
useful ongoing reference.
General comments on course material
Training Personnel
Knowledge was sufficient to effectively deliver the course.
Kept the course interesting and
interactive.
Provided clear and complete answers to questions.
General comments for the facilitator
Overall outcomes
My knowledge and skills
increased as a result of this course.
This course has helped me meet
or clarify my goals.
Course assessment activities
were fair and realistic.
General comments about the overall outcomes of the course
Thank you for taking the time to provide this feedback