spirion - identity finder install & user guide - mac ... of... · 1 | spirion - identity finder...
TRANSCRIPT
1 | Spirion - Identity Finder
Spirion - Identity Finder Install & User Guide - Mac
Office of Information Technology - OIT

2 | Spirion - Identity Finder
Identity Finder for Mac users
Introduction Identity Finder is a software application designed to help find level 1 data such as Social Security Numbers (SSN) or Credit Card Numbers (CCN). In some cases, this type of data can be found in files that are not easy to find, especially older documents that you may have forgotten about. Identity Finder assists you in preventing identity theft by finding personally identifiable information and providing you with the ability to easily and quickly protect it before it is stolen.
The Identity Finder client application provides the ability to save settings, configuration information, and sensitive data through the use of a profile password. The profile password is not stored anywhere and therefore if it is lost or forgotten, then all of the information in the profile will be lost. As the profile password is not recoverable, some of the user options have been disabled and grayed out from the client window. This is to prevent loss of data in case of lost or forgotten profile passwords.
Installing the software takes just a few minutes. You should create a profile password during this process.
The software location path:
smb://staffdrive.csustan.edu/Departments/_Shared/OIT-Software/Campus Wide/Identity Finder/ MAC/Spirion - New Version Identity Finder
3 | Spirion - Identity Finder
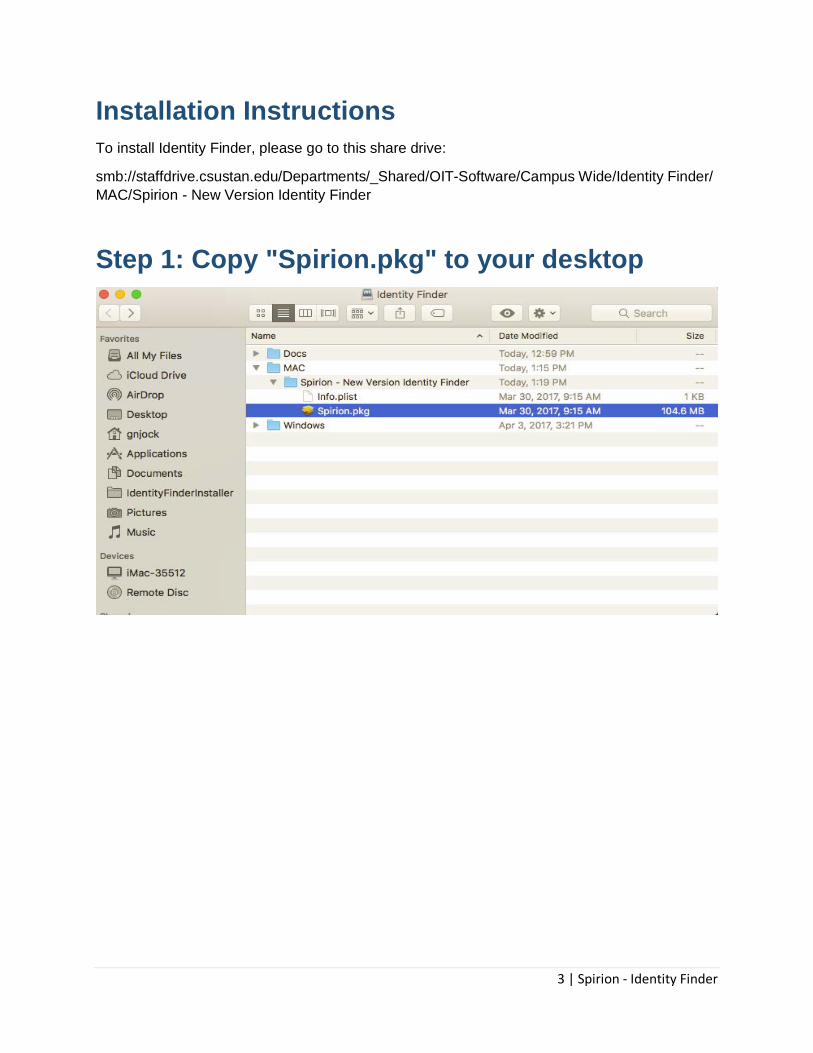
Installation Instructions To install Identity Finder, please go to this share drive:
smb://staffdrive.csustan.edu/Departments/_Shared/OIT-Software/Campus Wide/Identity Finder/ MAC/Spirion - New Version Identity Finder
Step 1: Copy "Spirion.pkg" to your desktop

4 | Spirion - Identity Finder
Step 2: To start the installation, please launch the installer "Spirion.pkg"
5 | Spirion - Identity Finder
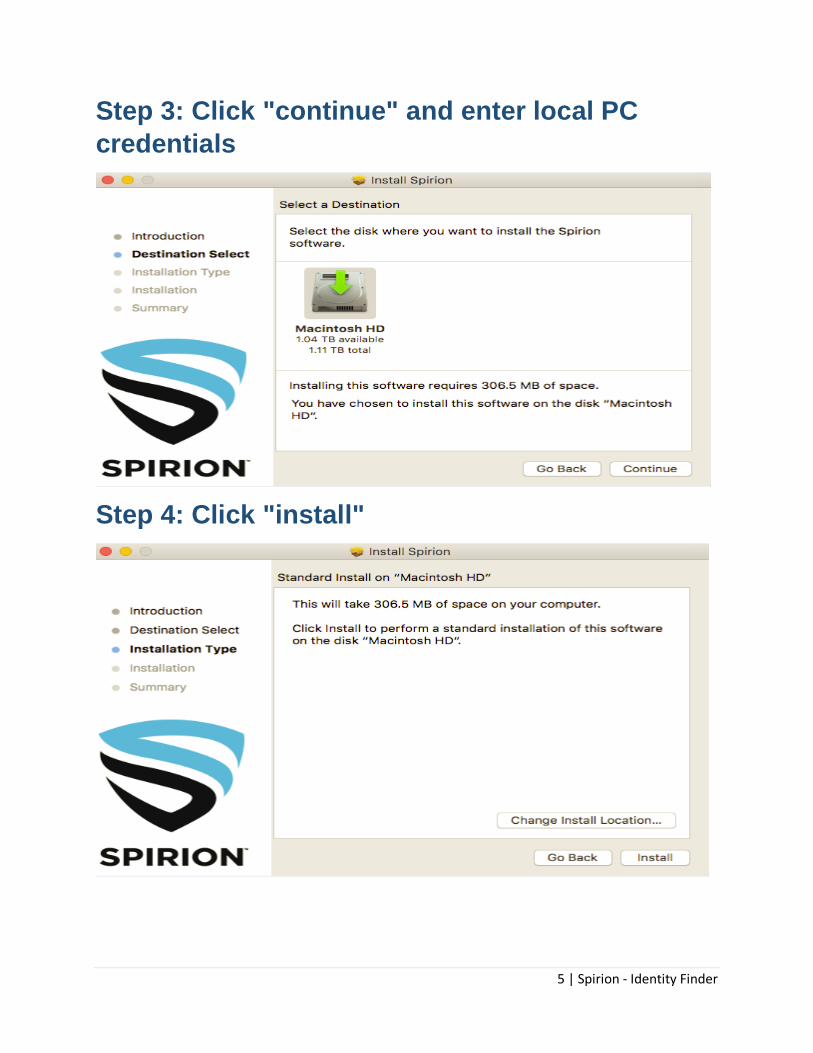
Step 3: Click "continue" and enter local PC credentials
Step 4: Click "install"

6 | Spirion - Identity Finder
Step 5: The Installation will start

7 | Spirion - Identity Finder
Step 6: When the installation process is complete click "close"

8 | Spirion - Identity Finder
Step 7: To launch Spirion, please go to Finder > Applications and choose "Spirion.app"

9 | Spirion - Identity Finder
Step 8: Creating a Profile The first time you use Spirion - Identity Finder you will see a dialog box to create a New Profile. This Profile is unique to the user logged into Mac. A single Mac user may not have multiple profiles. After creating your Profile, you will always be prompted to sign into it to load your settings and any sensitive information that you have chosen to save.
After putting in a matching password you will receive a confirmation message.

10 | Spirion - Identity Finder
Step 9: The Search Assistant is a quick way to begin using Identity Finder. First, choose your options. Then click "Search"
The scan start and the screen below will appear.

11 | Spirion - Identity Finder
The Identity Finder software installation is complete and your first scan is running
Scanning your computer Once open, choose the Start button on the toolbar to start your search. Select the Files button to choose which location you want to search specifically. The first run will take a few hours to a day or longer to complete depending on the data saved on the computer. Even though the scan will run in the background with low priority not to affect your machine’s performance, It is recommend to start your first scan before you leave work in the evening.
Identity Finder will then begin searching for all identity types you have selected via the Identities button on the toolbar. A Status Window will appear to show your current status:

12 | Spirion - Identity Finder
You may interact with results as they appear.
A dialog box will inform you when the search has been completed. Click "OK " to see the search results.

13 | Spirion - Identity Finder
Saving Search Results The search result page is where you get to review and remediate your findings from the File tab. It is recommended to save the results for future review and to avoid another full scan next time you initiate a search. To save a copy of the search results, click File and Save As give a name to the file in this case Search Results.
14 | Spirion - Identity Finder
Remediating discovered Sensitive Data
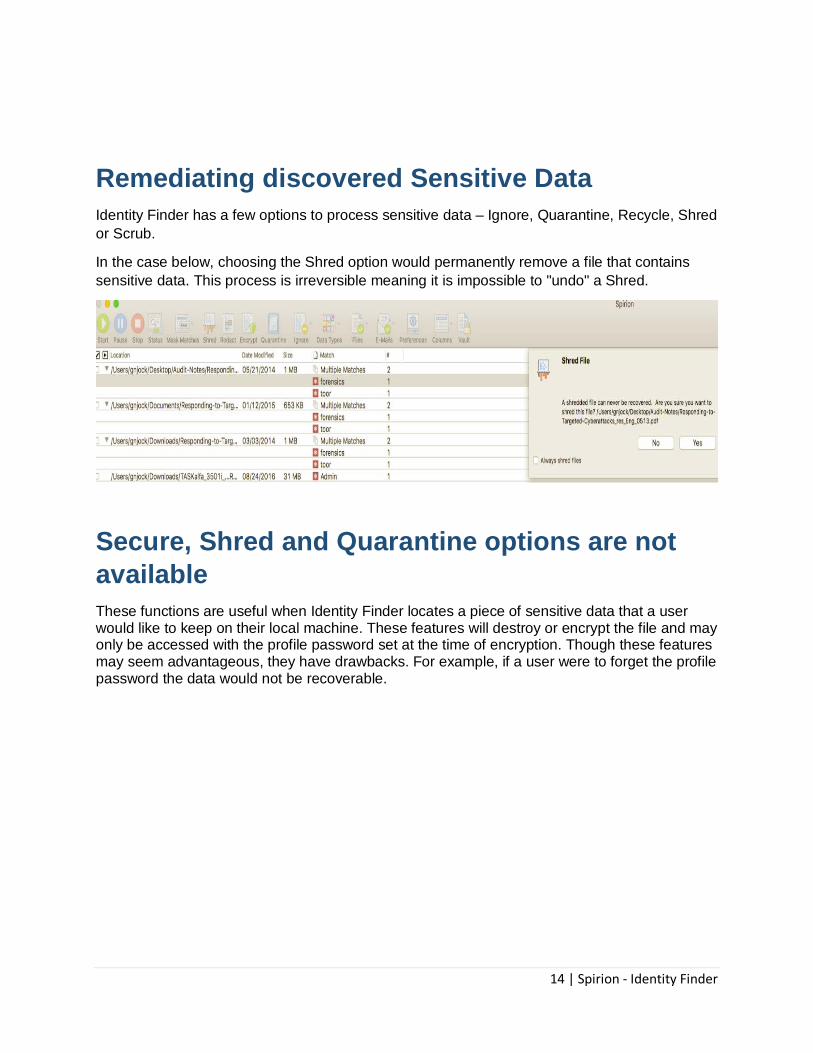
Identity Finder has a few options to process sensitive data – Ignore, Quarantine, Recycle, Shred or Scrub.
In the case below, choosing the Shred option would permanently remove a file that contains sensitive data. This process is irreversible meaning it is impossible to "undo" a Shred.
Secure, Shred and Quarantine options are not available These functions are useful when Identity Finder locates a piece of sensitive data that a user would like to keep on their local machine. These features will destroy or encrypt the file and may only be accessed with the profile password set at the time of encryption. Though these features may seem advantageous, they have drawbacks. For example, if a user were to forget the profile password the data would not be recoverable.

15 | Spirion - Identity Finder
Ignoring Sensitive Data
The Ignore option should be utilized when a false positive result is found. A false positive is when Identity Finder marks a file as sensitive data, when it is really not. An example is when Identity Finder picks up a campus 9 digit employee id as a social security number. The ignore option will allow the user to tell Identity Finder to ignore this piece of data, and for this and all subsequent searches run on that computer. This can be used to manage sensitive data that you plan on securing or disposing of by other means, or the function can be used to handle false positives. There is an option to ignore multiple findings by putting check marks on the left then right-clicking the last choice and choosing Ignore. The same method can be used for the other options.

16 | Spirion - Identity Finder
Redacting Sensitive Data
This option should be used when the file found is still needed but the sensitive part of the file is not.
Reset Profile Password The Identity Finder client application provides the ability to save settings, configuration information, and sensitive data across sessions through the use of a profile password. It is not possible to recover a lost password; however, it is possible to delete a profile and create a new one. When the profile password is created, that password is used to encrypt the profile. The profile password is not stored anywhere and therefore if it is lost or forgotten, then all of the information in the profile will be lost.
Using Identity Finder to Delete a Profile A profile can be deleted by logging into Identity Finder as a guest by skipping the password screen, Select "Preferences".

17 | Spirion - Identity Finder
Managing Your Profile Identity Finder uses a single master password to securely store all your personal information related to Identity Finder inside a Profile. If you want to delete this file and all the information contained within, press the "Delete" button. You can also change your password. To change the password first sign into your profile then click the "Change" button.
Resource links: Identity Finder Knowledge Base http://www.identityfinder.com/kb/
Identity Finder Profile Settings https://www.identityfinder.com/help/client_win/index.htm#ProfileSettings.htm
DLP Endpoint for Windows User Guide http://www.identityfinder.com/Help/Client_Win
DLP Endpoint for Mac User Guide http://www.identityfinder.com/Help/Client_Mac