spring boost - corevalue.net · but let’s deal with things step-by-step. ... will get access to...
TRANSCRIPT

© CoreValue 2018. All rights reserved. 1
SPRING BOOsT
Author
Andrew Petryk CoreValue Software Engineer

© CoreValue 2018. All rights reserved. 2
SPRING BOOsT
SAFE HARBOR (DISCLAIMER)
All information described in this article is delivered with author’s best knowledge. CoreValue Services and the author disclaim all liability of any kind for possible
misuse of provided information. Test it for personal experience before moving to production.
AUTHOR’S NOTE
During recent visits to various Java-conferences, I was able to get some statistics regarding the use of Spring as compared to other Java web frameworks. I found
that Spring owns the market right now, and among all users of Spring, nearly 60% use Spring Boot. If you start a new project from scratch, it is also Spring Boot in most cases.
And then the reasonable question came to mind - why? What do Spring and Spring
Boot offer that others cannot? Let’s try to answer these questions.
THROWBACK
In case you are interested in why Spring Boot came to life, here you is a little sneak
peek: https://jira.spring.io/plugins/servlet/mobile#issue/SPR-9888. Everything started with a “won’t fix” Jira issue, so that the inspiration and
motivation behind Spring Boot creation were community driven.
INTRO
What does a typical programmer not much like while writing the code? Mostly three things.
1. Dependencies. 2. Configuration and tuning. 3. Deployment, because there is supposed to be a devOps team member for that
purpose. Spring Boot takes care of all that stuff for you. Free of charge. That is because
Spring Boot is not a framework itself. Spring Boot is built on top of Spring Framework, but it is mostly all about infrastructure, kindly pre-configured for you.

© CoreValue 2018. All rights reserved. 3
Moreover, with Spring Boot, as much as with simple Spring, you are able to write your code either with Java or Groovy or even Kotlin. First-class support is provided
for all of them. Sounds promising, doesn’t it? Sure it does. Let’s take a look at how we can create a Spring Boot application. You can achieve that with Spring Initializr (can be found at start.spring.io), which
has several options.
You can choose between the two most popular build systems – Maven or Gradle;
choose the language of your application – Java, Groovy, Kotlin; set your project metadata; and add dependencies, which we will touch on later.
After you hit the “Generate Project” button, it will pack a .zip archive for you and
download it to your machine. When unpacking that archive, you will get the following directory tree:

© CoreValue 2018. All rights reserved. 4
As you can see, Spring Initializr creates a default project structure for you. But let’s deal with things step-by-step. Let’s take a look at another way of creating a Spring Boot application. Spring Boot has tremendous integration with modern IDE’s. I will show an example
of how it can be done with IntelliJ IDEA just because I am not a big fan of Eclipse IDE. In case you prefer Eclipse, all you need is a Spring Tool Suite plugin, and further steps are pretty the same.

© CoreValue 2018. All rights reserved. 5
After you start new project in IntelliJ, just select Spring Initializr in menu on the
left, set up project SDK (in my case it’s java 1.8.0_151), then click NEXT.
Then you get to the Project Metadata page. Here you can set up the same
information you previously did at the Spring Initializr web page. You define group id, artifact id, chose build tool, language, and packaging. Note that Spring Boot will pack your app as a .jar by default, but you can override it with .war if you like.
Then provide the version of your App, its name, description and root package name. After all things are settled and ready, click NEXT.

© CoreValue 2018. All rights reserved. 6
And here we come to one of the most fascinating things in Spring Boot – a
dependency block. Here you can choose from predefined options in several categories. You can add AMQP integrations, either SQL or NoSQL database connections and many other cool things. For demo purposes we will use Web
dependency, which allows us to create Controllers, .html page templates, etc. We will also use JPA and PostgreSQL for our DB layer and Lombok, because Lombok
just ROCKS. Try it out if you have not already done so.
And that’s all, folks! We have our project backed and ready for us! Easy as pie!
Important. To make our app work, we need to add something to our
application.properties or application.yml.
That is because we added jpa and postgres dependencies to our pom.xml. We will focus on this later on.
To start your newly created app, all you have to do is:
run method main, located in class annotated with @SpringBootApplication,
which was created for you by Spring Initializr
OR
run terminal command: o mvn spring-boot: run for Maven
o gradle bootRun (for Gradle)
OR
as simply as good old java app: java –jar /path/to/your/app.jar

© CoreValue 2018. All rights reserved. 7
And now let’s see what Class was pre-created for us.
Hmmm, how do all the things get together and work? Where is my Spring Context?!
FLASHBACK
How does Spring Framework its magic? Let’s have a quick reminder.
All the stuff in your Spring Application is bound to ApplicationContext. That is the “place” where your beans live and all magic happens. But how is that Context
created? We can divide Context initialization into the following steps:

© CoreValue 2018. All rights reserved. 8
Let’s take a quick look at every step.
1. Configuration Parsing. Starting from 4th generation of Spring, we have had 4
options to configure our Context.
We can use old and “ugly” .xml. To achieve that, we will pass our “context.xml” to ClassPathXmlApplicationContext.
We can tell Spring where to look for an annotation - AnnotationConfigApplicationContext (“package.name”).
We can use JavaConfig, the configuration inside the java Class annotated with @Configuration, or something that has that annotation inside - AnnotationConfigApplicationContext (JavaConfig.class).
We can use new shiny groovy GenericGroovyApplicationContext (“context.groovy”).
The purpose of this first phase is to create all BeanDefinitions. A BeanDefinition is
an interface that holds all necessary metadata of the future Bean. As the result of this step we will have a Map of BeanDefinitions:

© CoreValue 2018. All rights reserved. 9
private final Map<String, BeanDefinition> beanDefinitionMap = new ConcurrentHashMap<String, BeanDefinition>(64); 2. Bean Tuning. To tune Beans before their initialization, there is an interface called BeanFactoryPostProcessor in Spring’s infrastructure. By implementing it, you will get access to Beans meta-data:
public interface BeanFactoryPostProcessor { void postProcessBeanFactory(ConfigurableListableBeanFactory beanFactory) throws BeansException; } That is the place where all your @Value annotated fields get their real value. 3. FactoryBean. FactoryBean is a generic interface to which you can delegate
the process of creating bean types. Back then, when the configuration was exclusively in .xml, developers needed a mechanism to help manage the process of creating beans. This is exactly what this interface was made for.
4. Creation of Bean Instance. Creation of a Bean instance is handled by
BeanFactory. At the same time, if necessary, the creation of a Bean is delegated to Custom FactoryBean. Bean instances are created based on previously created BeanDefinitions. Let’s look at the typical scheme of how it is done:
5. Tuning of Created Beans. You might have thought that’s all, but no. We
still must tune created Beans. In order to solve that task, interface BeanPostProcessor will come in handy.
public interface BeanPostProcessor {

© CoreValue 2018. All rights reserved.
10
Object postProcessBeforeInitialization(Object bean, String beanName) throws
BeansException; Object postProcessAfterInitialization(Object bean, String beanName) throws
BeansException; }
After all our manipulations, Spring will produce a ContextRefresh event which will
notify that the ApplicationContext is successfully created and our app is ready.
SPRING BOOT
We stopped at the moment the Spring Boot Application launched and have not yet
discovered our Context. How is the Context built in Spring Boot? Pretty much the same way as described above. Remember, Spring Boot is not a framework, but a tooltip, infrastructure to make your life easier.
There is no magic, and we have our Context right here, ready to serve. If you dive deep enough, you will find out that @SprinBootApplication has @Configuration
inside, although well hidden.

© CoreValue 2018. All rights reserved.
11
WARNING! Since @SpringBootApplication has @ComponentScan inside, class with
this annotation (DemoApplication.class in our case) should be in a root directory. Otherwise all packages located higher in directory hierarchy will be missed by
@ComponentScan.
Now that we know where our context is located, what are those arguments that we pass into run method?
What can we pass there? String.class? “context.xml”? new ClassPathResource
(“context.xml”)? Package.getPackage (“your.package.name”)? Actually, all of these options are valid. We can create a context in Spring Boot with old-fashioned .xml.
No problems there.
Now we can see that SpringApplication run method does return ApplicationContext, but ConfigurableApplicationContext itself is an interface. Spring can run a different
context, based on the configuration you provide, but generally it will try to fire Web Context or Generic Context.

© CoreValue 2018. All rights reserved.
12
How will SpringApplication decide on that? If you have Servlet.class at your
classpath, Spring will launch Web Context.
If you have javax.servlet.Servlet + ConfigurableWebApplicationContext, then
AnnotationConfigEmbeddedWebApplicationContext, otherwise AnnotationConfigApplicationContext.
At this point we know quite a bit already, but what is there inside the Context that Spring has built for us? Take a look.
180 Spring Beans, all created due to Spring Boot auto-configuration.
But where was that auto-configuration applied to our project? The answer is pretty
obvious.

© CoreValue 2018. All rights reserved.
13
Let’s dive deeper. What does that @EnableAutoConfiguration do for us, and how
does it work?
AutoConfigurationImportSelector.class is responsible for the Spring Boot auto-configurations done properly. AutoConfigurationImportSelector will also try to load “starters” to our App. Look
closely at your pom.xml (or build.gradle)

© CoreValue 2018. All rights reserved.
14
That AutoConfigurationImportSelector.class will call Spring Factories Loader. The class has been present in Spring since 3.2, but was not widely used until 4.0.
Loader will load all classes that are located opposite to EnableAutoConfiguration in spring.factories file, and which can be treated as a kind of reserved word. But Factories Loader’s purpose is more generic than just to deal with auto-
configuration. With its help we are able to load almost any “property” to our application.
So do you get all of these configs as real beans? You may not want most of them, such as ElasticSearch, Redis, Mongo, Cassandra, Neo4J. If you do not need those,
you can use Spring Boot to filter them out. Spring uses @Conditional which means that only beans that satisfy a dependency will be created. For example, if Mongo is not in your classpath, that bean would not be created.
Here is a link to official Spring documentation if you want to look at how @Conditional works more closely.

© CoreValue 2018. All rights reserved.
15
TALK IS CHEAP. SHOW ME THE CODE.
Let’s take a look at Spring Boot in motion.
NOTE: The code I will provide is not high-end quality and sometimes elementary.
The code here is made only for tutorial purposes and cannot be considered as production-ready. Also, for a real-world project, I would rather create a separate Spring Boot App w; install it to local .m2 or my company artifactory; and then use it as spring-starter
through pom.xml/build.gradle. However, for this demo, I want to keep things simple.
Here is a simple task. Add a default profile to our app if none is present. For our purposes, let’s assume that if no profile is set, then it is a “dev” profile.
We already know that we can tune our beans with BeanPostProcessors. However, we want to create something that will happen before we even start parsing our
configurations. Spring Boot will help with that.
Before proceeding to Context Initialization, Spring does one more thing. It builds Environment. Environment is the place where all properties are gathered and where information is stored, including information pertaining to active profiles. And
Spring-Boot gives you yet another point of extension. We will use EnvironmentPostProcessor (docs can be found by this link).
Creating EnvironmentPostProcessor is easy. We need to implement the EnvironmentPostProcessor interface, where we will be obligated to override the
postProcessEnvironment() method.
With that overridden method, we gain access to ConfigurableEnvironment, which is the place we were looking for. Inside that class we can find the method called
getActiveProfiles(), which returns String [] of the app’s active profiles.

© CoreValue 2018. All rights reserved.
16
However, we cannot mark this class with @Component, because by the time we
need our code to be executed, there are no beans, not even Context. For that we need spring.factories. We just register its fully qualified name in front of spring-boot class name, and Boot will find and run it on application bootstrap.
That is what almost all the spring starters do. In spring.factories we declare our
class as something that has relation to spring infrastructure, but not a default spring bean. Let’s add a little Sysout to see exactly at what point our code will
work. This is what a startup log looks like:
As you see, our work was executed before Spring started config init, and we
successfully added active profile to our application. To run with different profiles, add the “-profileName” suffix to your application.yaml/.properties. Your profile is created. To run with a specific profile, add the VM argument “–
Dspring.active.profile=profileName”. Having added auto-profiling to our app, let’s move on to something more
interesting by building a simple REST web service. This will return the name of the best programming language on GET request to “/language” resource. For prod
profile, it will return “JAVA”, but for the dev profile, it will return “GROOVY”. Why? Java was made for the customer. Groovy was made for developers.

© CoreValue 2018. All rights reserved.
17
We will inject “JAVA/GROOVY” into our Controller from .yaml/.properties file as a String using @Value.
In Spring convention, it is quite easy. All properties files will be merged into one, but in our case, if we choose profile “dev”, application-prod.properties will be
ignored. Keeping in mind this fact, we can have application.properties with common configs for all profiles, such as we have here with DataBase config, and separate individual properties into different files using profiles.
© CoreValue 2018. All rights reserved.
18
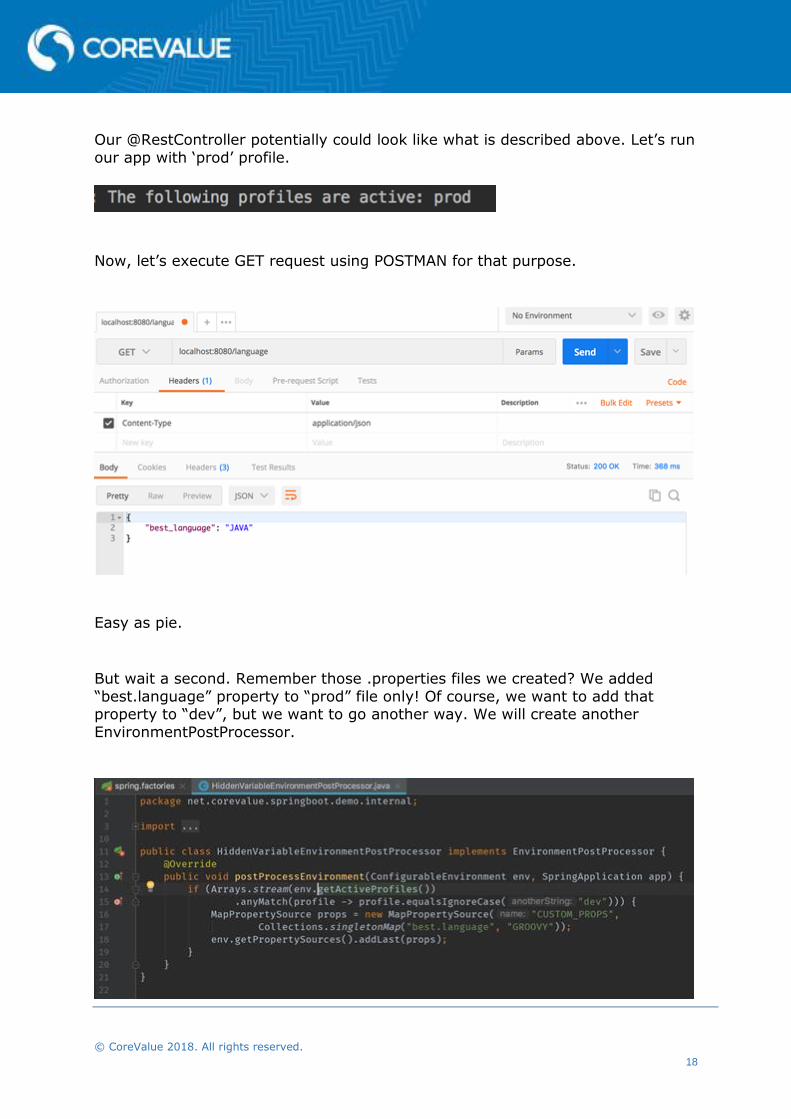
Our @RestController potentially could look like what is described above. Let’s run
our app with ‘prod’ profile.
Now, let’s execute GET request using POSTMAN for that purpose.
Easy as pie.
But wait a second. Remember those .properties files we created? We added
“best.language” property to “prod” file only! Of course, we want to add that property to “dev”, but we want to go another way. We will create another
EnvironmentPostProcessor.

© CoreValue 2018. All rights reserved.
19
Don’t forget to register your EPP in spring.factories.
Now, let’s try to run our app with “dev” profile and check whether everything works correctly.
Voila! Spring Boot added our property to Environment and we are able to use it. That’s not all you can achieve with EPPs, but it is a good background for your own further experimentation.
WHAT’S NEXT? NEW IN SPRING BOOT 2.0
Spring Boot 2.0 was released in November 2017 with a number of dependency upgrades, and requires a more recent version of the following tools and
frameworks.
Spring Boot 2 requires Spring framework 5 or above.
o Spring framework 5 now requires Java 8 and Java EE 7 API. It also has full compatibility with JDK 9.
o Spring 5 also requires Tiles 3 and Hibernate 5 (older versions are no longer supported).
o Spring 5 also introduces a number of features for reactive
programming model. Spring Boot 2 requires JDK 8 or later. It won’t work on JDK 6 and 7!

© CoreValue 2018. All rights reserved.
20
Spring Boot 2 requires Jetty 9.4 or above, Tomcat 8.5 or above, Hibernate 5.2 or above and Gradle 3.4 or above.
Following are some of the core changes in Spring Boot platform:
The Spring security and session filters are now auto-configured with ASYNC, ERROR, and REQUEST dispatcher types. This is to align Spring Boot defaults
with Spring 5 defaults. The @ConditionalOnBean now uses logical AND for combining conditions (this
was OR in Spring Boot 1.x). This is an important change for Spring Boot 1.x to 2.x migration.
With Milestone 5 Initial support for Java 9, OAuth 2.0 Client support from Spring Security, JSON-B Support, Session Actuator endpoint were added. But above all this things, the main feature of version Spring Boot 2.0 is support for
Project Reactor, which is basically the main feature of Spring 5.0. You can read more about it by following this link and by watching an awesome presentation from Stephane Nicoll, co-author of Spring Boot,) at JavaDay2017.
CONCLUSIONS
Spring Boot is already a mature platform that provides you with almost everything you may need for application development, but perhaps its best advantage is the
time you save from starting out at start.spring.io to launching your first working prototype.
I like Spring, I like Spring Boot and I do recommend its use. Spring is not perfect. It has its own gaps and poor architectural decisions. Nor is it the silver bullet for every task you may need to perform. Still, in my opinion, it is still the best we have
for time savings and not needing to reinvent the bicycle every time. ** All code from this article can be found at my github repository **
SPECIAL THX: 1. Evgeniy Borisov for his awesome keynotes about Spring and Spring Boot; 2. Stephane Nicoll for creating cool tool; 3. Josh Long for “start dot spring dot io”.

About CoreValue
CoreValue, a US-based Software
and Technology Services
company, providing traditional
Cloud based CRM implementation
services and Mobile applications
to industries such as Pharmatech,
Healthcare, and Finance.
For more than 10 years, CoreValue has
pioneered agile distributed development to
deliver innovative, dependable and cost-
effective software and technology solutions to
our global clients.
CoreValue Services
18 Overlook Ave, Suite 9
Rochelle Park, NJ 07662 908-312-4070 [email protected]