sql server - enosis learningenosislearning.com/tutorials/sql/1.0 sql-server_n.d… · web viewall...
TRANSCRIPT
SQL SERVER
CONTENTS
SQL Server.................................................................................................................................................................................... 5
SQL Server - Data Types...........................................................................................................................................................5
Create Table................................................................................................................................................................................ 6
SQL Server - SQL Table Basics - Altering/Adding Columns......................................................................................7
Adding column......................................................................................................................................................................7
Alter column.......................................................................................................................................................................... 7
RENAMING COLUMN................................................................................................................................................................ 8
SELECT STATEMENT..........................................................................................................................................................9
Syntax..........................................................................................................................................................................................9
INSERT STATEMENT..........................................................................................................................................................9
Syntax..........................................................................................................................................................................................9
Example......................................................................................................................................................................................9
Syntax....................................................................................................................................................................................... 10
Example................................................................................................................................................................................... 10
SQL TRUNCATE Statement..................................................................................................................................................10
Syntax to TRUNCATE a table:...................................................................................................................................10
SQL DROP Statement:.............................................................................................................................................................10
Copying Data Between Tables.......................................................................................................................................11
INSERT INTO SELECT...................................................................................................................................................11
SELECT INTO....................................................................................................................................................................12
SQL SERVER – Creating Primary Key, Foreign Key and Default Constraint........................................12
Primary Key Constraint:...............................................................................................................................................12
Foreign Key Constraint:.............................................................................................................................................13
unique constraint...........................................................................................................................................................14
SQL UNIQUE Constraint on CREATE TABLE..........................................................................................................14
check CONSTRAINT.......................................................................................................................................................14
Default Constraint:........................................................................................................................................................15
JOINS IN SQL-SERVER............................................................................................................................................................16
2 | P a g e
INNER JOIN............................................................................................................................................................................ 17
OUTER JOIN..................................................................................................................................................................17
LEFT.......................................................................................................................................................................................... 17
RIGHT....................................................................................................................................................................................... 18
FULL.......................................................................................................................................................................................... 18
CROSS JOIN............................................................................................................................................................................ 19
OPERATORS............................................................................................................................................................................... 22
PROGRAMMING WITH OPERATORS..........................................................................................................................23
STORED PROCEDURES..........................................................................................................................................................24
VIEWS............................................................................................................................................................................................25
1. User Defined Views.................................................................................................................................26
1. Simple View.....................................................................................................................................................26
2. Complex View................................................................................................................................................27
Functions..................................................................................................................................................................................... 29
IN-BUILT FUNCTIONS............................................................................................................................................................35
AGGRERIATE FUNCTIONS............................................................................................................................................35
Numeric functions............................................................................................................................................................35
Date Functions................................................................................................................................................................... 37
String Functions................................................................................................................................................................ 38
CONVERT()............................................................................................................................................................................ 40
Converting DATETIME to VARCHAR.....................................................................................................................40
Converting VARCHAR to DATETIME.....................................................................................................................40
TRIGGERS IN SQL SERVER...................................................................................................................................................43
After Triggers..................................................................................................................................................................... 43
Instead Of Triggers..........................................................................................................................................................46
CURSOR....................................................................................................................................................................................... 50
Example SQL Server Cursor : To BackUp all the database in a server.............................................53
SQL Server Cursor Components............................................................................................................................53
INDEXES IN SQL SERVER....................................................................................................................................................56
Why Use an Index?...........................................................................................................................................................56
4. Types of Indexes..........................................................................................................................................................56
4.1 Clustered.................................................................................................................................................................. 57
4.2 Non-Clustered........................................................................................................................................................57
Uniqueness.............................................................................................................................................................................57
3 | P a g e
BULK INSERT MyTable FROM ‘C:\SpreadSheet.csv’ WITH (fieldterminator = ‘,’,rowterminator = ‘\n’)........................................................................................................................................................................................ 59
Temp Tables........................................................................................................................................................................59
Different Types of Temporary Tables..................................................................................................................59
Local Temp Table........................................................................................................................................................60
Global Temp Table......................................................................................................................................................60
Creating Temporary Table in SQL Server 2005..............................................................................................60
Local Temporary Table............................................................................................................................................60
Global Temporary Table.........................................................................................................................................61
Storage Location of Temporary Table..................................................................................................................61
When to Use Temporary Tables?............................................................................................................................62
Points to Remember Before Using Temporary Tables...............................................................................62
Alternative Approach: Table Variable.................................................................................................................62
When to Use Table Variable Over Temp Table..........................................................................................62
EXCEPTION HANDLING........................................................................................................................................................65
Retrieving Error Information...............................................................................................................................66
Errors Unaffected by a TRY…CATCH Construct.........................................................................................66
Using custom error messages...................................................................................................................................70
4 | P a g e

SQL ServerSQL SERVER - DATA TYPES
SQL Server Data PrecisionBIT Integer: 0 or 1TINYINT Positive Integer 0 -> 255SMALLINT Signed Integer -32,768 -> 32,767INT Signed Integer -2^31 -> 2^31-1BIGINT Signed Integer -2^63 -> 2^63-1REAL Floating precision -1.79E + 308 -> 1.79E + 308FLOAT Floating precision -3.40E + 38 -> 3.40E + 38MONEY 4 decimal places, -2^63/10000 -> 2^63-1/10000SMALLMONEY 4 decimal places, -214,748.3648 -> 214,748.3647DECIMAL Fixed precision -10^38 + 1 -> 10^38 – 1NUMERIC Fixed precision -10^38 + 1 -> 10^38 – 1DATETIME Date+Time 1753-01-01 -> 9999-12-31, accuracy of 3.33 msSMALLDATETIME Date+Time 1900-01-01 -> 2079-06-06, accuracy of one minuteCHARn Fixed-length non-Unicode string to 8,000 charactersNCHARn Fixed-length Unicode string to 4,000 charactersVARCHARn Variable-length non-Unicode string to 8,000 charactersNVARCHARn Variable-length Unicode string to 4,000 charactersTEXT Variable-length non-Unicode string to 2,147,483,647 charactersNTEXT Variable-length Unicode string to 1,073,741,823 charactersBINARY Fixed-length binary data up to 8,000 characters
VARBINARY Variable-length binary data up to 8,000 characters
IMAGE Variable-length binary data up to 2,147,483,647 characters
CREATE TABLE
The mechanics of creating a table are relatively straight forward. Being able to design a well thought out database that will scale to meet the needs of a large scale enterprise is a very challenging undertaking. In these examples we will be working through development of a fairly simple three table database. In doing so we will get to cover a good deal of the development basics for creating tables and indexes.
Syntax for Creating Table
5 | P a g e

Create Table table_name(Colname1 datatype,Colname2 datatype,Colname3 datatype,….,…)
Creating the person table
CREATE TABLE person ( num INT NOT NULL , firstname VARCHAR(20) NULL , lastname VARCHAR(30) NULL , gender_code VARCHAR(1) NULL , birth_dttm DATETIME NULL , inactive_date DATETIME NULL )Creating the phone table
CREATE TABLE phone ( person_num INT NOT NULL ,type_code CHAR(3) NOT NULL , area_code CHAR(3) NULL , exchange CHAR(3) NULL , extension CHAR(4) NULL )Creating the address table
CREATE TABLE address ( person_num INT NOT NULL , type_code CHAR(4) NOT NULL , street1 CHAR(30) NULL , street2 CHAR(30) NULL , city CHAR(30) NULL , state CHAR(2) NULL , postal_code CHAR(10) NULL , CONSTRAINT PK_address PRIMARY KEY CLUSTERED (person_num ASC, type_code ASC) ON [PRIMARY] )
SQL SERVER - SQL TABLE BASICS - ALTERING/ADDING COLUMNS
ADDING COLUMNYou can add new columns to an existing table. .
Alter table table_name add column_namedatatypeALTER TABLE [phone]ADD inactive_date DATETIME NULL
6 | P a g e

ALTER COLUMN
You can add modify an existing column
ALTER TABLE [dbo].[person]ALTER COLUMN [lastname] VARCHAR(35) NULL
Considerations for altering a column
Reducing precision (example, going from CHAR(20) to CHAR(15)) can cause data truncation and should be avoided unless you are absolutely sure their will be no impact to the data.
Changing data types should typically be avoided. There are exceptions to this. For example, changing a CHAR(20) to a VARCHAR(20) on columns where the average storage length is 10 can save disk space.
ALTER TABLE [ database_name . [ schema_name ] . | schema_name . ] table_name{ ALTER COLUMN column_name { [ type_schema_name. ] type_name[ ( { precision [ , scale ] | max | xml_schema_collection } ) ] [ COLLATEcollation_name ] [ NULL | NOT NULL ] [ SPARSE ] | {ADD | DROP } { ROWGUIDCOL | PERSISTED | NOT FOR REPLICATION | SPARSE } } | [ WITH { CHECK | NOCHECK } ]
| ADD { <column_definition> | <computed_column_definition> | <table_constraint> | <column_set_definition> } [ ,...n ]
| DROP { [ CONSTRAINT ] constraint_name [ WITH ( <drop_clustered_constraint_option> [ ,...n ] ) ] | COLUMN column_name } [ ,...n ]
| [ WITH { CHECK | NOCHECK } ] { CHECK | NOCHECK } CONSTRAINT { ALL | constraint_name [ ,...n ] }
| { ENABLE | DISABLE } TRIGGER { ALL | trigger_name [ ,...n ] }
| { ENABLE | DISABLE } CHANGE_TRACKING [ WITH ( TRACK_COLUMNS_UPDATED = { ON | OFF } ) ]
| SWITCH [ PARTITIONsource_partition_number_expression ] TO target_table[ PARTITIONtarget_partition_number_expression ]
7 | P a g e

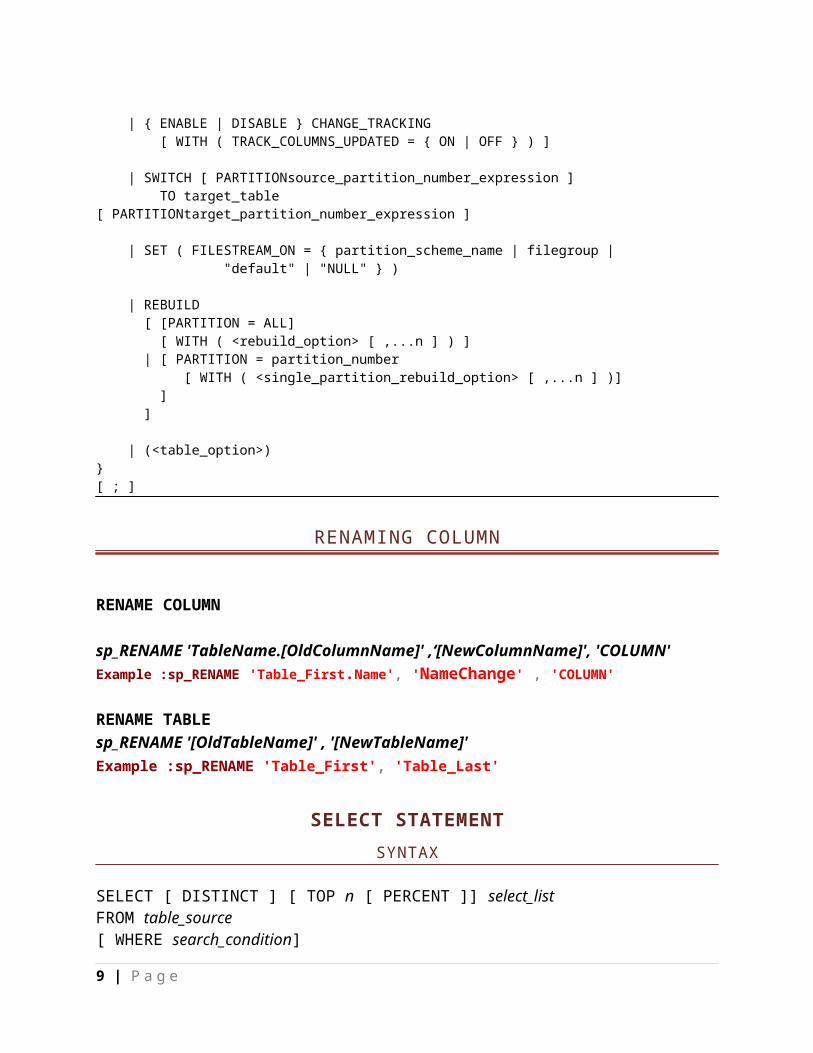
| SET ( FILESTREAM_ON = { partition_scheme_name | filegroup | "default" | "NULL" } )
| REBUILD [ [PARTITION = ALL] [ WITH ( <rebuild_option> [ ,...n ] ) ] | [ PARTITION = partition_number [ WITH ( <single_partition_rebuild_option> [ ,...n ] )] ] ]
| (<table_option>)}[ ; ]
RENAMING COLUMN
RENAME COLUMN
sp_RENAME 'TableName.[OldColumnName]' ,‘[NewColumnName]', 'COLUMN'Example :sp_RENAME 'Table_First.Name', 'NameChange' , 'COLUMN'
RENAME TABLEsp_RENAME '[OldTableName]' , '[NewTableName]'Example :sp_RENAME 'Table_First', 'Table_Last'
SELECT STATEMENTSYNTAX
SELECT [ DISTINCT ] [ TOP n [ PERCENT ]] select_listFROM table_source[ WHERE search_condition][ GROUP BY group_by_expression][ HAVING search_condition][ ORDER BY order_expression [ ASC | DESC ] ]
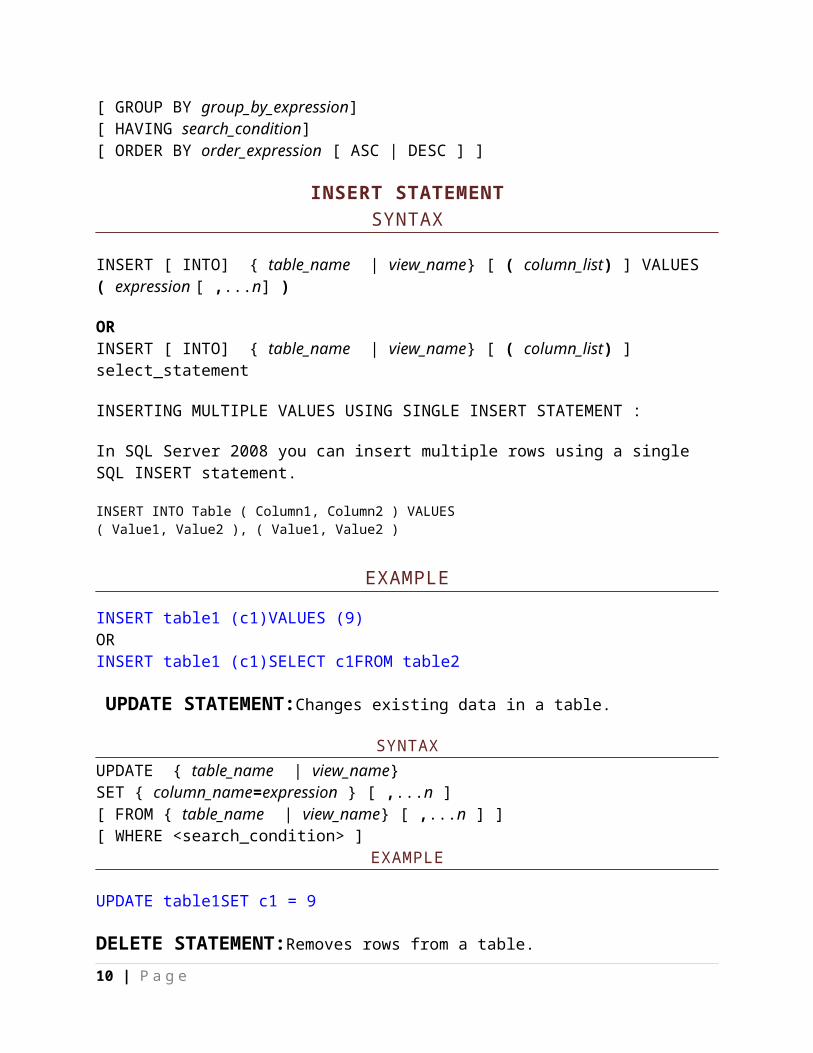
INSERT STATEMENTSYNTAX
INSERT [ INTO] { table_name | view_name} [ ( column_list) ] VALUES ( expression [ ,...n] )
8 | P a g e
ORINSERT [ INTO] { table_name | view_name} [ ( column_list) ] select_statement
INSERTING MULTIPLE VALUES USING SINGLE INSERT STATEMENT :
In SQL Server 2008 you can insert multiple rows using a single SQL INSERT statement.
INSERT INTO Table ( Column1, Column2 ) VALUES( Value1, Value2 ), ( Value1, Value2 )
EXAMPLE
INSERT table1 (c1)VALUES (9)ORINSERT table1 (c1)SELECT c1FROM table2
UPDATE STATEMENT:Changes existing data in a table.
SYNTAXUPDATE { table_name | view_name} SET { column_name=expression } [ ,...n ] [ FROM { table_name | view_name} [ ,...n ] ] [ WHERE <search_condition> ]
EXAMPLE
UPDATE table1SET c1 = 9
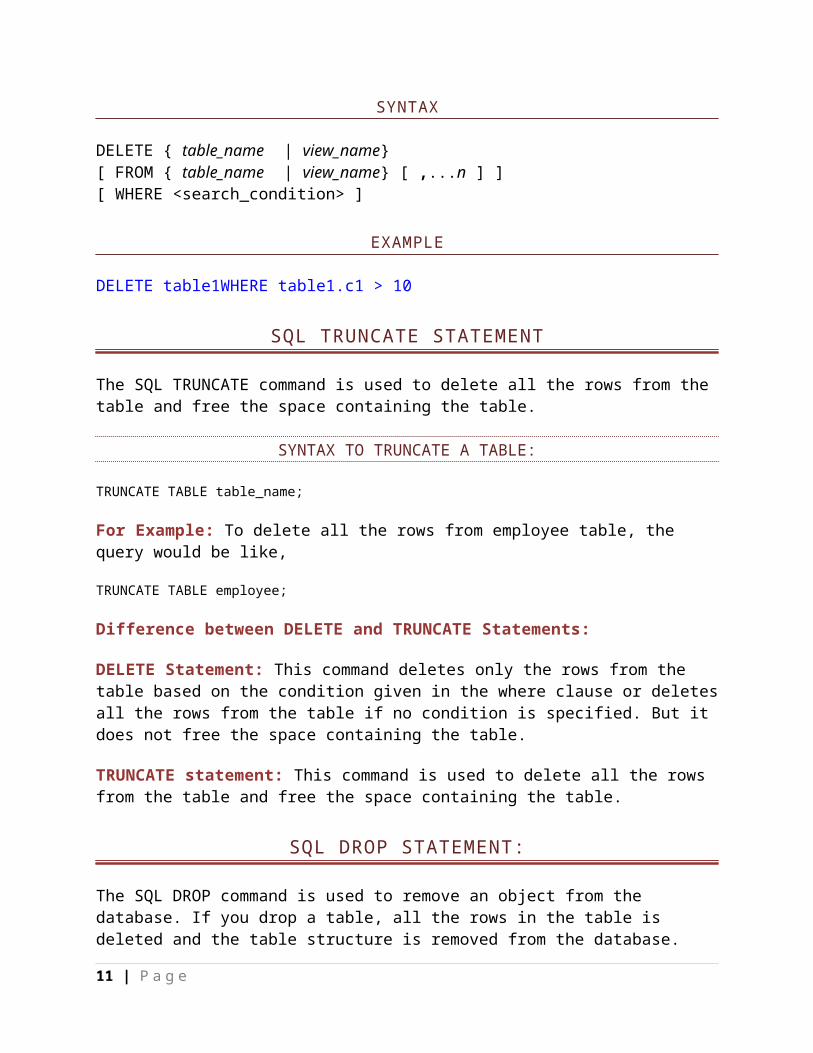
DELETE STATEMENT:Removes rows from a table.SYNTAX
DELETE { table_name | view_name}[ FROM { table_name | view_name} [ ,...n ] ] [ WHERE <search_condition> ]
EXAMPLE
DELETE table1WHERE table1.c1 > 10
SQL TRUNCATE STATEMENT
The SQL TRUNCATE command is used to delete all the rows from the table and free the space containing the table.
9 | P a g e
SYNTAX TO TRUNCATE A TABLE:
TRUNCATE TABLE table_name;
For Example: To delete all the rows from employee table, the query would be like,
TRUNCATE TABLE employee;
Difference between DELETE and TRUNCATE Statements:
DELETE Statement: This command deletes only the rows from the table based on the condition given in the where clause or deletes all the rows from the table if no condition is specified. But it does not free the space containing the table.
TRUNCATE statement: This command is used to delete all the rows from the table and free the space containing the table.
SQL DROP STATEMENT:
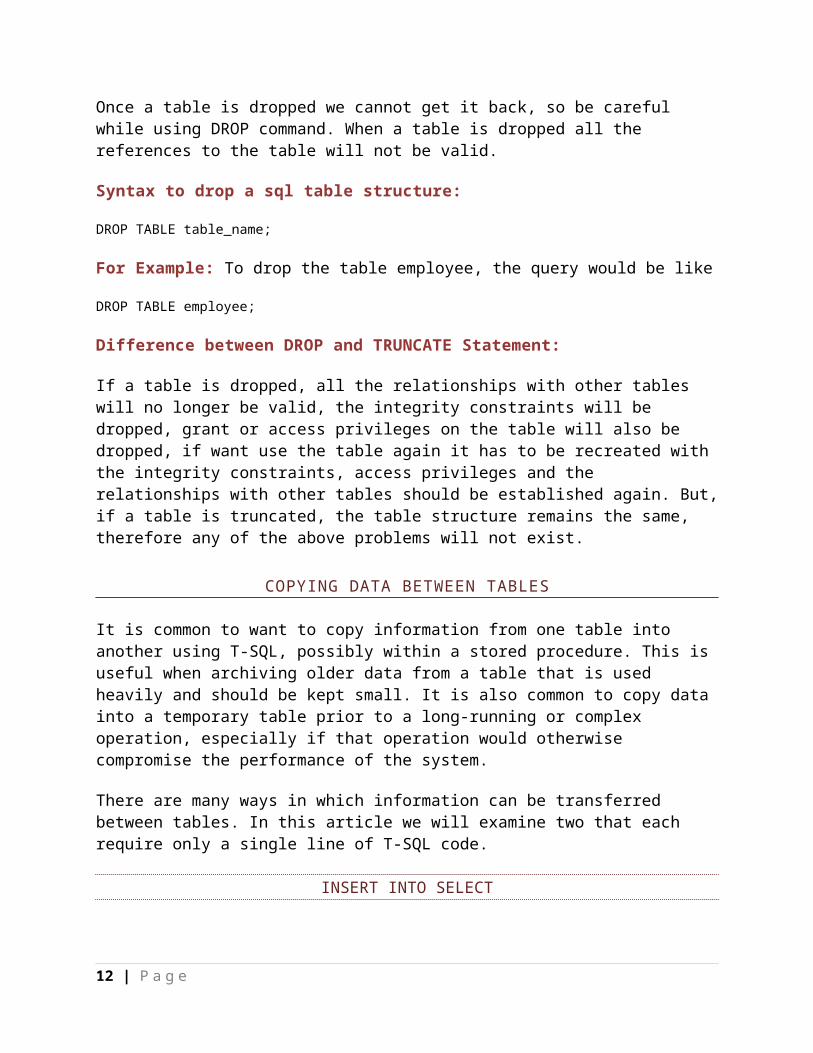
The SQL DROP command is used to remove an object from the database. If you drop a table, all the rows in the table is deleted and the table structure is removed from the database. Once a table is dropped we cannot get it back, so be careful while using DROP command. When a table is dropped all the references to the table will not be valid.
Syntax to drop a sql table structure:
DROP TABLE table_name;
For Example: To drop the table employee, the query would be like
DROP TABLE employee;
Difference between DROP and TRUNCATE Statement:
If a table is dropped, all the relationships with other tables will no longer be valid, the integrity constraints will be dropped, grant or access privileges on the table will also be dropped, if want use the table again it has to be recreated with the integrity constraints, access privileges and the relationships with other tables should be established again. But, if a table is truncated, the table structure remains the same, therefore any of the above problems will not exist.
COPYING DATA BETWEEN TABLES
It is common to want to copy information from one table into another using T-SQL, possibly within a stored procedure. This is useful when archiving older data from a table that is used heavily and should be kept small. It is also common to copy data into a temporary table prior to a
10 | P a g e
long-running or complex operation, especially if that operation would otherwise compromise the performance of the system.
There are many ways in which information can be transferred between tables. In this article we will examine two that each require only a single line of T-SQL code.
INSERT INTO SELECT
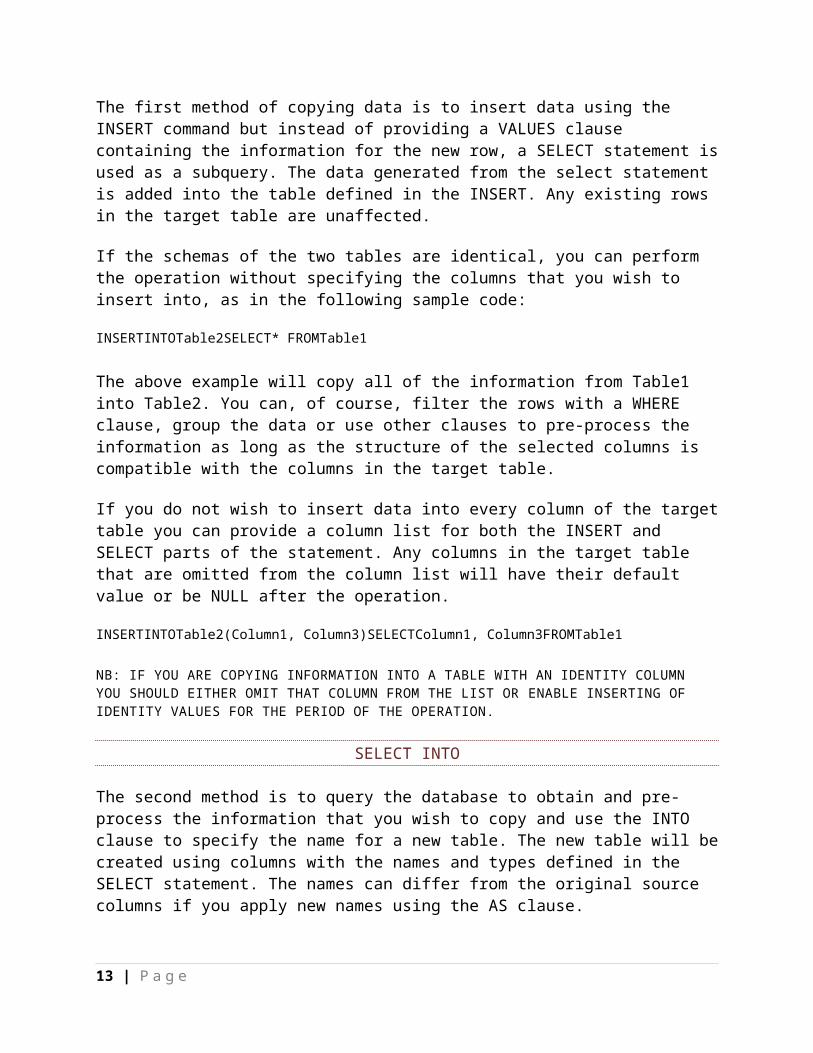
The first method of copying data is to insert data using the INSERT command but instead of providing a VALUES clause containing the information for the new row, a SELECT statement is used as a subquery. The data generated from the select statement is added into the table defined in the INSERT. Any existing rows in the target table are unaffected.
If the schemas of the two tables are identical, you can perform the operation without specifying the columns that you wish to insert into, as in the following sample code:
INSERTINTOTable2SELECT* FROMTable1
The above example will copy all of the information from Table1 into Table2. You can, of course, filter the rows with a WHERE clause, group the data or use other clauses to pre-process the information as long as the structure of the selected columns is compatible with the columns in the target table.
If you do not wish to insert data into every column of the target table you can provide a column list for both the INSERT and SELECT parts of the statement. Any columns in the target table that are omitted from the column list will have their default value or be NULL after the operation.
INSERTINTOTable2(Column1, Column3)SELECTColumn1, Column3FROMTable1
NB: IF YOU ARE COPYING INFORMATION INTO A TABLE WITH AN IDENTITY COLUMN YOU SHOULD EITHER OMIT THAT COLUMN FROM THE LIST OR ENABLE INSERTING OF IDENTITY VALUES FOR THE PERIOD OF THE OPERATION.
SELECT INTO
The second method is to query the database to obtain and pre-process the information that you wish to copy and use the INTO clause to specify the name for a new table. The new table will be created using columns with the names and types defined in the SELECT statement. The names can differ from the original source columns if you apply new names using the AS clause.
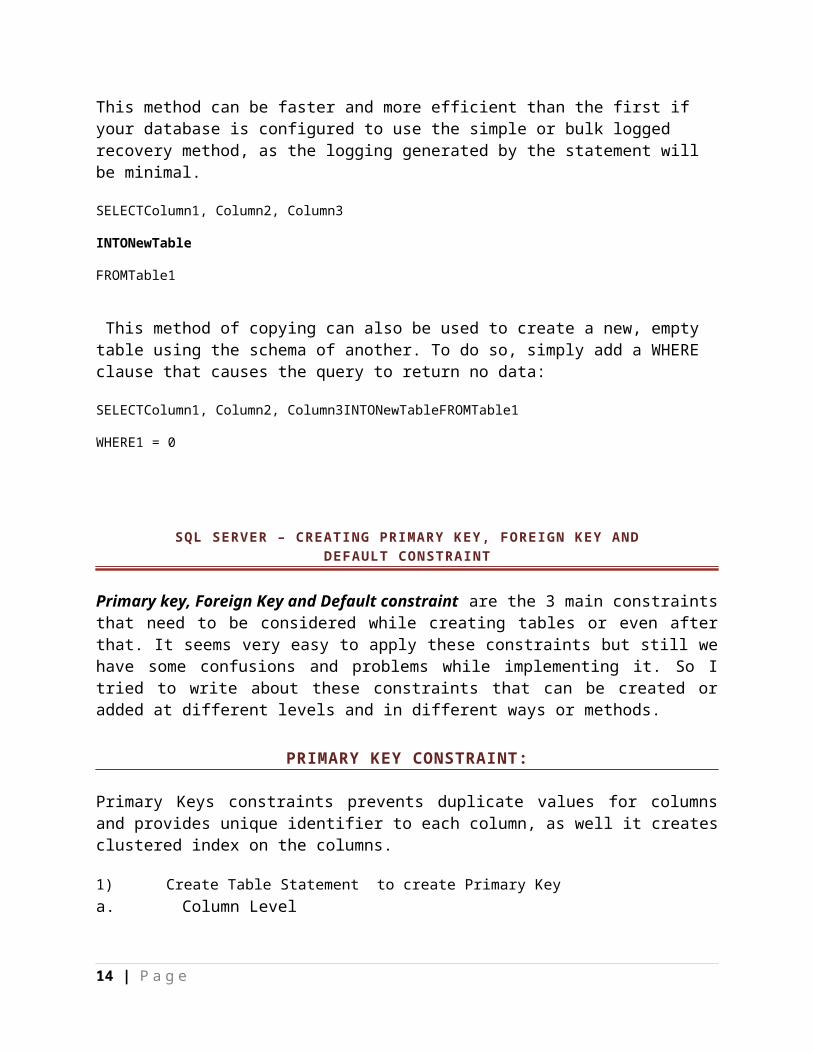
This method can be faster and more efficient than the first if your database is configured to use the simple or bulk logged recovery method, as the logging generated by the statement will be minimal.
SELECTColumn1, Column2, Column3
11 | P a g e
INTONewTable
FROMTable1
This method of copying can also be used to create a new, empty table using the schema of another. To do so, simply add a WHERE clause that causes the query to return no data:
SELECTColumn1, Column2, Column3INTONewTableFROMTable1
WHERE1 = 0
SQL SERVER – CREATING PRIMARY KEY, FOREIGN KEY AND DEFAULT CONSTRAINT
Primary key, Foreign Key and Default constraint are the 3 main constraints that need to be considered while creating tables or even after that. It seems very easy to apply these constraints but still we have some confusions and problems while implementing it. So I tried to write about these constraints that can be created or added at different levels and in different ways or methods.
PRIMARY KEY CONSTRAINT:
Primary Keys constraints prevents duplicate values for columns and provides unique identifier to each column, as well it creates clustered index on the columns.
1) Create Table Statement to create Primary Keya. Column LevelCREATE TABLEProducts(ProductIDINT CONSTRAINT pk_products_pidPRIMARY KEY,ProductNameVARCHAR(25))b. Table LevelCREATE TABLE Products(ProductIDINT,ProductNameVARCHAR(25)CONSTRAINT pk_products_pidPRIMARY KEY(ProductID))
2) Alter Table Statement to create Primary Key
12 | P a g e
ALTER TABLE ProductsADD CONSTRAINT pk_products_pidPRIMARY KEY(ProductID)GO
3) Alter Statement to Drop Primary keyALTER TABLEProductsDROP CONSTRAINT pk_products_pid;
FOREIGN KEY CONSTRAINT:
When a FOREIGN KEY constraint is added to an existing column or columns in the table SQL Server, by default checks the existing data in the columns to ensure that all values, except NULL, exist in the column(s) of the referenced PRIMARY KEY or UNIQUE constraint.
1) Create Table Statement to create Foreign Key
a. Column Level
USE AdventureWorks2008GOCREATE TABLE ProductSales(SalesIDINT CONSTRAINT pk_productSales_sidPRIMARY KEY,ProductIDINT CONSTRAINT fk_productSales_pidFOREIGN KEY REFERENCES Products(ProductID),SalesPersonVARCHAR(25));
b. Table Level
CREATE TABLE ProductSales(SalesIDINT,ProductIDINT,SalesPersonVARCHAR(25)CONSTRAINT pk_productSales_sidPRIMARY KEY(SalesID),CONSTRAINT fk_productSales_pidFOREIGN KEY(ProductID)REFERENCES Products(ProductID));Alter Table Statement to create Foreign Key
ALTER TABLE ProductSales ADD CONSTRAINT fk_productSales_pid FOREIGN KEY(ProductID)REFERENCES Products(ProductID)
13 | P a g e
1) Alter Table Statement to Drop Foreign Key
ALTER TABLE ProductSales DROP CONSTRAINT fk_productSales_pid;
UNIQUE CONSTRAINTThe UNIQUE constraint uniquely identifies each record in a database table.The UNIQUE and PRIMARY KEY constraints both provide a guarantee for uniqueness for a column or set of columns.A PRIMARY KEY constraint automatically has a UNIQUE constraint defined on it.Note that you can have many UNIQUE constraints per table, but only one PRIMARY KEY constraint per table.
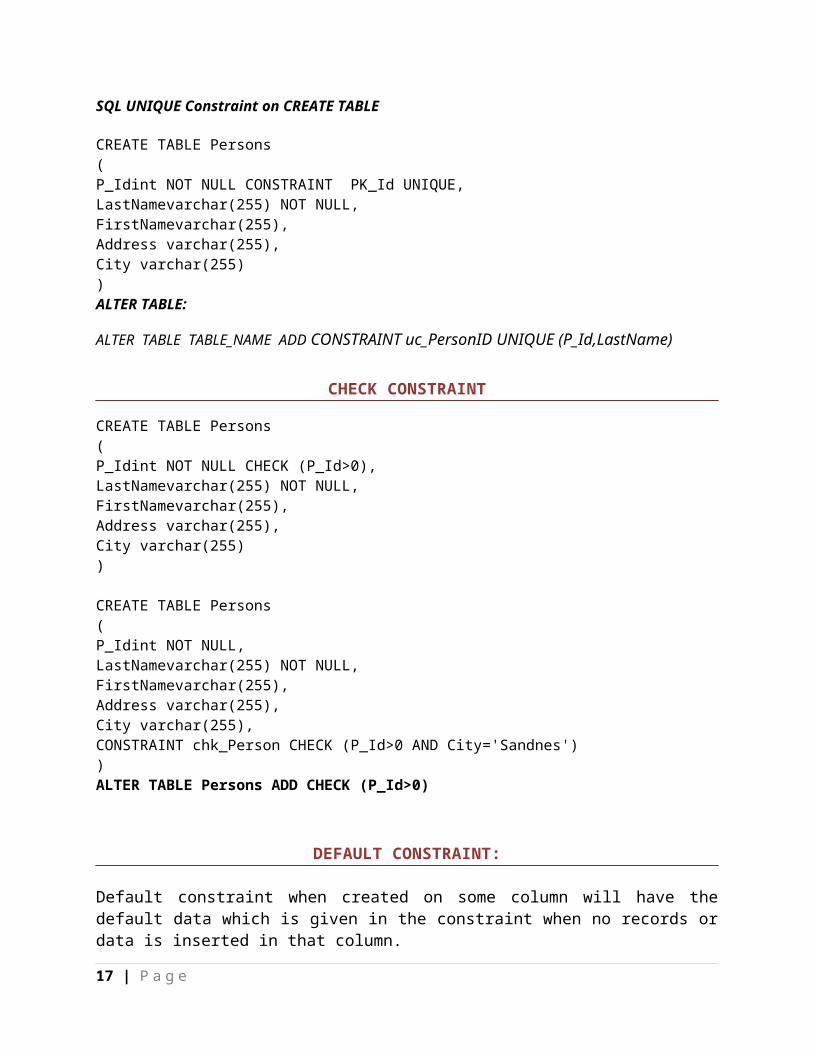
SQL UNIQUE Constraint on CREATE TABLE
CREATE TABLE Persons(P_Idint NOT NULL CONSTRAINT PK_Id UNIQUE,LastNamevarchar(255) NOT NULL,FirstNamevarchar(255),Address varchar(255),City varchar(255))ALTER TABLE:
ALTER TABLE TABLE_NAME ADD CONSTRAINT uc_PersonID UNIQUE (P_Id,LastName)
CHECK CONSTRAINT
CREATE TABLE Persons(P_Idint NOT NULL CHECK (P_Id>0),LastNamevarchar(255) NOT NULL,FirstNamevarchar(255),Address varchar(255),City varchar(255))
CREATE TABLE Persons(P_Idint NOT NULL,LastNamevarchar(255) NOT NULL,FirstNamevarchar(255),Address varchar(255),City varchar(255),CONSTRAINT chk_Person CHECK (P_Id>0 AND City='Sandnes'))ALTER TABLE Persons ADD CHECK (P_Id>0)
14 | P a g e

DEFAULT CONSTRAINT:
Default constraint when created on some column will have the default data which is given in the constraint when no records or data is inserted in that column.
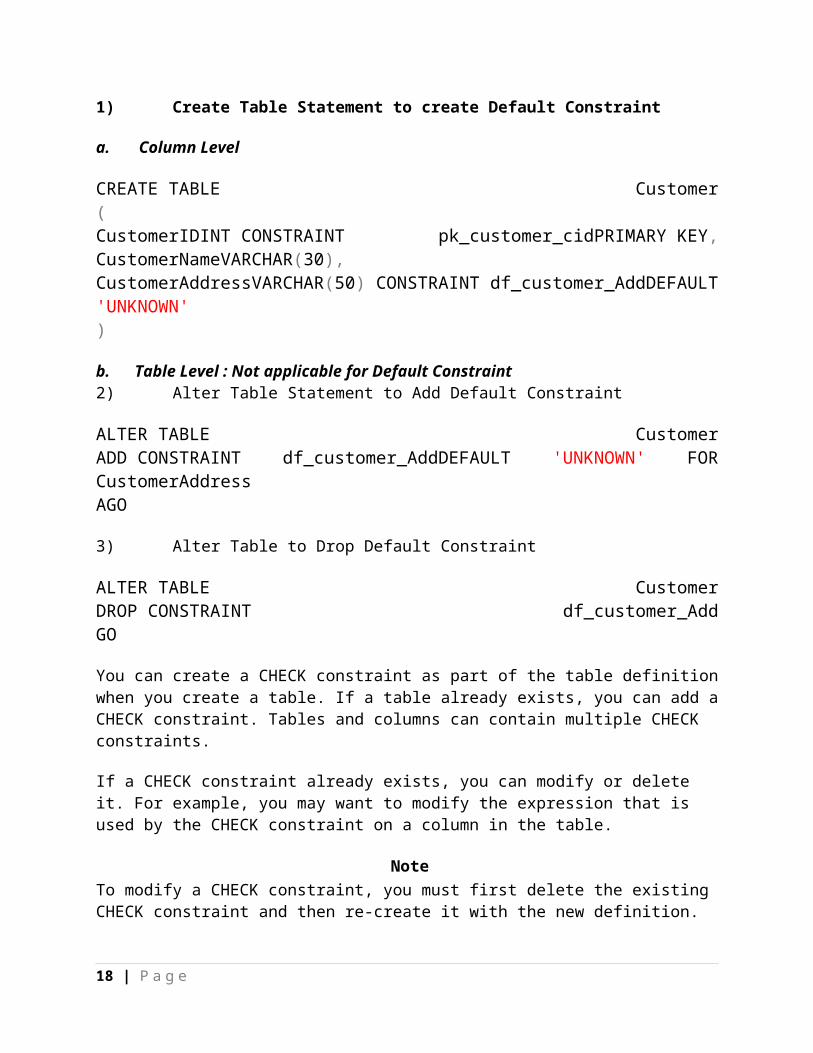
1) Create Table Statement to create Default Constraint
a. Column Level
CREATE TABLE Customer(CustomerIDINT CONSTRAINT pk_customer_cidPRIMARY KEY,CustomerNameVARCHAR(30),CustomerAddressVARCHAR(50) CONSTRAINT df_customer_AddDEFAULT 'UNKNOWN')
b. Table Level : Not applicable for Default Constraint2) Alter Table Statement to Add Default Constraint
ALTER TABLE CustomerADD CONSTRAINT df_customer_AddDEFAULT 'UNKNOWN' FOR CustomerAddressAGO
3) Alter Table to Drop Default Constraint
ALTER TABLE CustomerDROP CONSTRAINT df_customer_AddGO
You can create a CHECK constraint as part of the table definition when you create a table. If a table already exists, you can add a CHECK constraint. Tables and columns can contain multiple CHECK constraints.
If a CHECK constraint already exists, you can modify or delete it. For example, you may want to modify the expression that is used by the CHECK constraint on a column in the table.
NoteTo modify a CHECK constraint, you must first delete the existing CHECK constraint and then re-create it with the new definition.
15 | P a g e

The following Transact-SQL example creates a new table, and then modifies the table by adding a CHECK constraint to the CreditRating column.
IF OBJECT_ID ('dbo.Vendors', 'U') IS NOT NULLDROP TABLE dbo.Vendors;GOCREATE TABLE dbo.Vendors (VendorIDint PRIMARY KEY, VendorNamenvarchar (50), CreditRatingtinyint)GOALTER TABLE dbo.Vendors ADD CONSTRAINT CK_Vendor_CreditRating CHECK (CreditRating>= 1 AND CreditRating<= 5)
JOINS IN SQL-SERVER
INNER JOIN - Match rows between the two tables specified in the INNER JOIN statement based on one or more columns having matching data. Preferably the join is based on referential integrity enforcing the relationship between the tables to ensure data integrity.
Just to add a little commentary to the basic definitions above, in general the INNER JOIN option is considered to be the most common join needed in applications and/or queries. Although that is the case in some environments, it is really dependent on the database design, referential integrity and data needed for the application. As such, please take the time to understand the data being requested then select the proper join option.
Although most join logic is based on matching values between the two columns specified, it is possible to also include logic using greater than, less than, not equals, etc.
LEFT OUTER JOIN - Based on the two tables specified in the join clause, all data is returned from the left table. On the right table, the matching data is returned in addition to NULL values where a record exists in the left table, but not in the right table.
Another item to keep in mind is that the LEFT and RIGHT OUTER JOIN logic is opposite of one another. So you can change either the order of the tables in the specific join statement or change the JOIN from left to right or vice versa and get the same results.
RIGHT OUTER JOIN - Based on the two tables specified in the join clause, all data is returned from the right table. On the left table, the matching data is returned in addition to NULL values where a record exists in the right table but not in the left table.
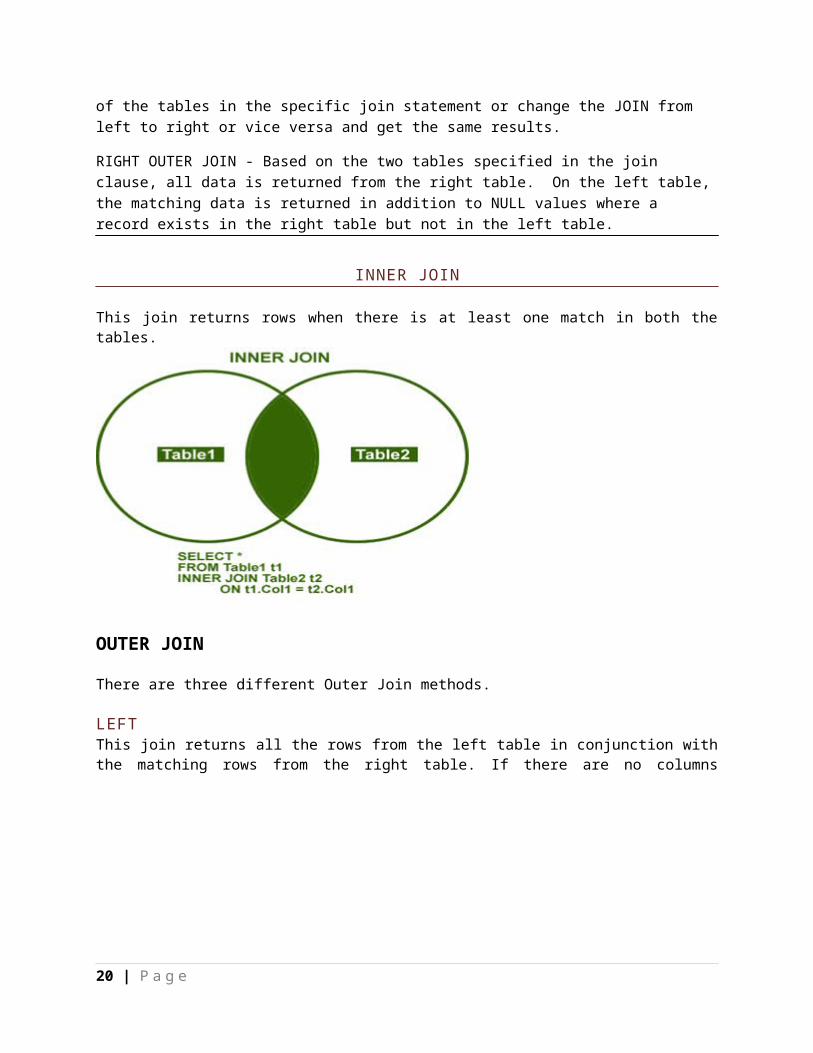
INNER JOIN
16 | P a g e
This join returns rows when there is at least one match in both the tables.
OUTER JOIN
There are three different Outer Join methods.
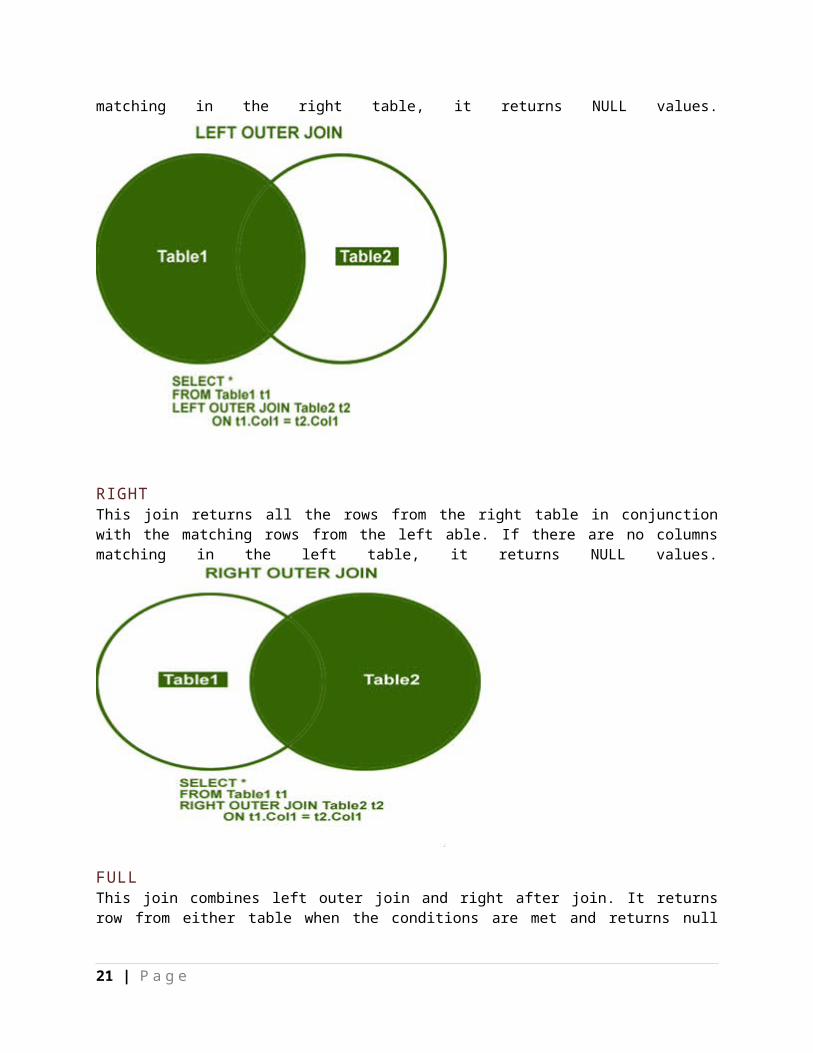
LEFTThis join returns all the rows from the left table in conjunction with the matching rows from the right table. If there are no columns matching in the right table, it returns NULL values.
RIGHTThis join returns all the rows from the right table in conjunction with the matching rows from the
17 | P a g e
left able. If there are no columns matching in the left table, it returns NULL values.
FULLThis join combines left outer join and right after join. It returns row from either table when the conditions are met and returns null value when there is no match.
CROSS JOIN
This join is a Cartesian join that does not necessitate any condition to join. The result set contains records that are multiplication of record number from both the tables.
18 | P a g e
What is Normalization?
Normalization is a process of eliminating redundant data and storing the related information in a table.
1. Eliminating Redundant data.2. Faster update3. Improve performance4. Performance in indexes
Normalization forms1. First Normal Form (1NF) If a Table is said to be 1NF then it should satisfy following rules.
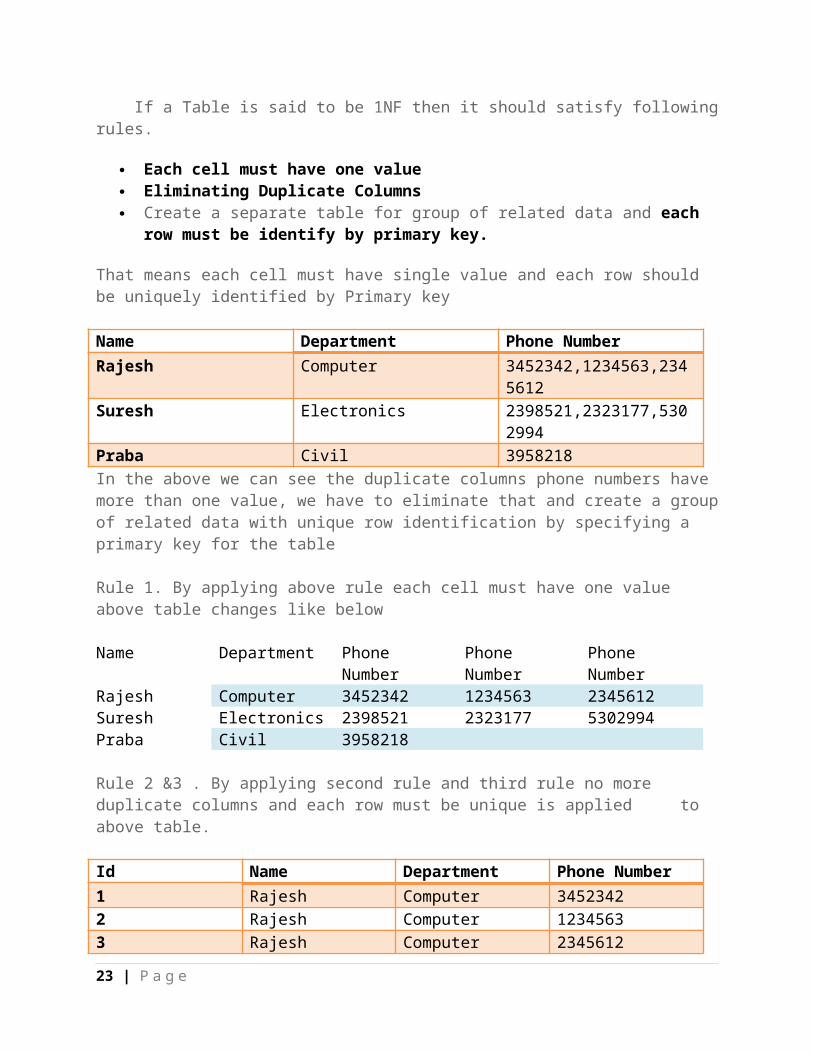
Each cell must have one value Eliminating Duplicate Columns Create a separate table for group of related data and each row must be identify by
primary key.
That means each cell must have single value and each row should be uniquely identified by Primary key
Name Department Phone NumberRajesh Computer 3452342,1234563,2345612Suresh Electronics 2398521,2323177,5302994Praba Civil 3958218In the above we can see the duplicate columns phone numbers have more than one value, we have to eliminate that and create a group of related data with unique row identification by specifying a primary key for the table
Rule 1. By applying above rule each cell must have one value above table changes like below
Name Department Phone Number Phone Number Phone NumberRajesh Computer 3452342 1234563 2345612Suresh Electronics 2398521 2323177 5302994Praba Civil 3958218
Rule 2 &3 . By applying second rule and third rule no more duplicate columns and each row must be unique is applied to above table.
Id Name Department Phone Number1 Rajesh Computer 34523422 Rajesh Computer 12345633 Rajesh Computer 2345612
19 | P a g e
4 Suresh Electronics 23985215 Suresh Electronics 23231776 Suresh Electronics 53029947 Praba Civil 3958218
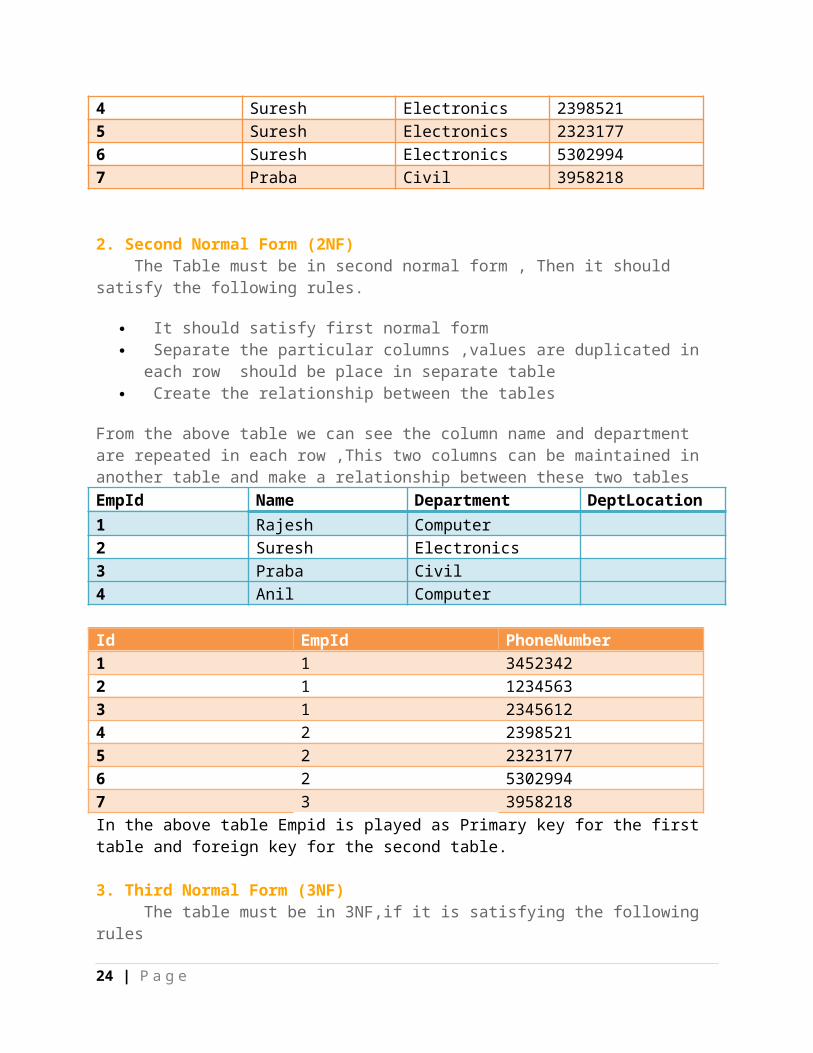
2. Second Normal Form (2NF) The Table must be in second normal form , Then it should satisfy the following rules.
It should satisfy first normal form Separate the particular columns ,values are duplicated in each row should be place in
separate table Create the relationship between the tables
From the above table we can see the column name and department are repeated in each row ,This two columns can be maintained in another table and make a relationship between these two tables EmpId Name Department DeptLocation1 Rajesh Computer2 Suresh Electronics3 Praba Civil4 Anil Computer
Id EmpId PhoneNumber1 1 34523422 1 12345633 1 23456124 2 23985215 2 23231776 2 53029947 3 3958218In the above table Empid is played as Primary key for the first table and foreign key for the second table.
3. Third Normal Form (3NF) The table must be in 3NF,if it is satisfying the following rules
Must be in 2NF Separate the columns that are not dependent upon the primary key of the table.
Product Price TaxLED 23000 20%AC 15000 10%Fridge 12000 15%
20 | P a g e
From the above table you can see that Tax Column is not dependent on Product Primary key column, It is dependent on Price so we separate that in to two different table.
Product PriceLED 23000AC 15000Fridge 12000
Price Tax23000 20%15000 10%12000 15%
4. Fourth Normal Form (4NF)
It should be in 3NF The non key columns should be dependent on full primary key instead of partial key , If
then separate it.
From the following table "EmployeeName" Non-Key column not dependent on full primary key "ManagerId,EmployeeId,TaskID" it depends upon the EmployeeId Partial Key so it can be separated.ManagerId EmployeeId TaskID EmployeeNameM1 E1 T1 RajeshM2 E1 T1 Rajesh
EmployeeId EmployeeNameE1 Rajesh
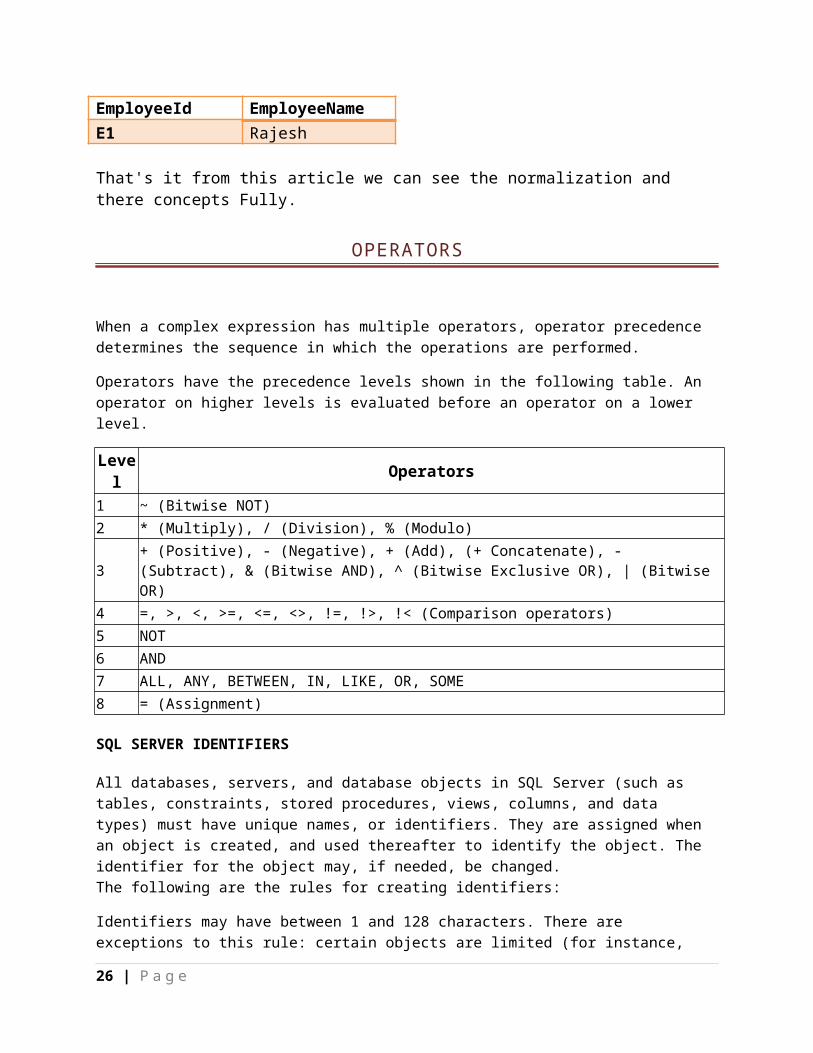
That's it from this article we can see the normalization and there concepts Fully.
OPERATORS
When a complex expression has multiple operators, operator precedence determines the sequence in which the operations are performed.
21 | P a g e
ManagerId EmployeeId TaskIDM1 E1 T1M2 E1 T1

Operators have the precedence levels shown in the following table. An operator on higher levels is evaluated before an operator on a lower level.
Level Operators1 ~ (Bitwise NOT)2 * (Multiply), / (Division), % (Modulo)
3+ (Positive), - (Negative), + (Add), (+ Concatenate), - (Subtract), & (Bitwise AND), ^ (Bitwise Exclusive OR), | (Bitwise OR)
4 =, >, <, >=, <=, <>, !=, !>, !< (Comparison operators)5 NOT6 AND7 ALL, ANY, BETWEEN, IN, LIKE, OR, SOME8 = (Assignment)
SQL SERVER IDENTIFIERS
All databases, servers, and database objects in SQL Server (such as tables, constraints, stored procedures, views, columns, and data types) must have unique names, or identifiers. They are assigned when an object is created, and used thereafter to identify the object. The identifier for the object may, if needed, be changed.The following are the rules for creating identifiers:
Identifiers may have between 1 and 128 characters. There are exceptions to this rule: certain objects are limited (for instance, temporary tables can have identifiers up to only 116 characters long). Before Microsoft SQL Server 7.0, identifiers were limited to 30 characters.
The first character of the identifier must be a letter, underscore ( _ ), at sign (
PROGRAMMING WITH OPERATORS
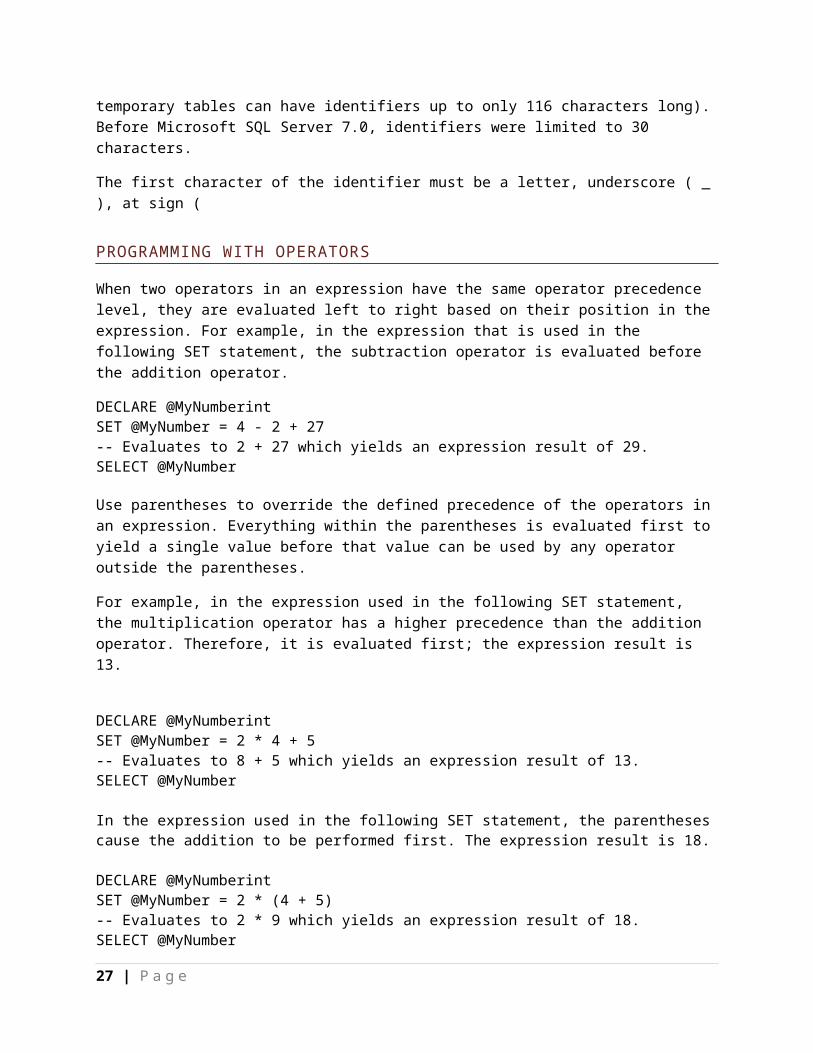
When two operators in an expression have the same operator precedence level, they are evaluated left to right based on their position in the expression. For example, in the expression that is used in the following SET statement, the subtraction operator is evaluated before the addition operator.
DECLARE @MyNumberintSET @MyNumber = 4 - 2 + 27-- Evaluates to 2 + 27 which yields an expression result of 29.SELECT @MyNumber
Use parentheses to override the defined precedence of the operators in an expression. Everything within the parentheses is evaluated first to yield a single value before that value can be used by any operator outside the parentheses.
For example, in the expression used in the following SET statement, the multiplication operator has a higher precedence than the addition operator. Therefore, it is evaluated first; the expression result is 13.
22 | P a g e
DECLARE @MyNumberintSET @MyNumber = 2 * 4 + 5-- Evaluates to 8 + 5 which yields an expression result of 13.SELECT @MyNumber
In the expression used in the following SET statement, the parentheses cause the addition to be performed first. The expression result is 18.
DECLARE @MyNumberintSET @MyNumber = 2 * (4 + 5)-- Evaluates to 2 * 9 which yields an expression result of 18.SELECT @MyNumber
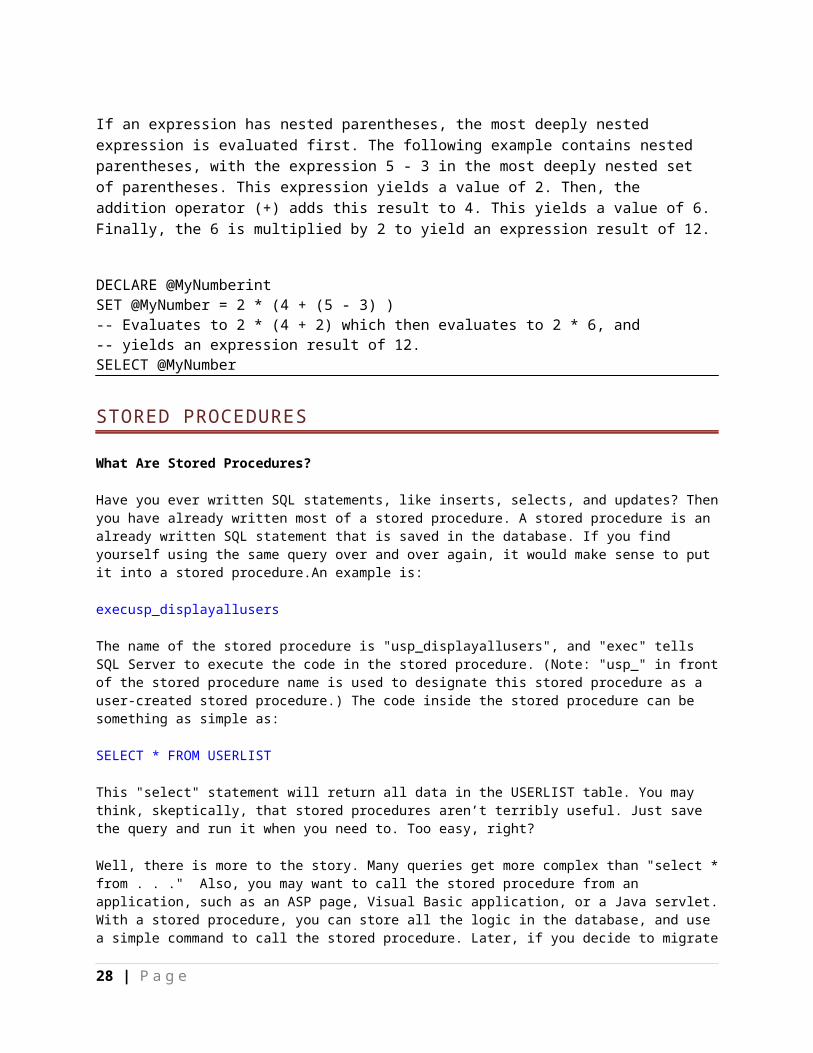
If an expression has nested parentheses, the most deeply nested expression is evaluated first. The following example contains nested parentheses, with the expression 5 - 3 in the most deeply nested set of parentheses. This expression yields a value of 2. Then, the addition operator (+) adds this result to 4. This yields a value of 6. Finally, the 6 is multiplied by 2 to yield an expression result of 12.
DECLARE @MyNumberintSET @MyNumber = 2 * (4 + (5 - 3) )-- Evaluates to 2 * (4 + 2) which then evaluates to 2 * 6, and -- yields an expression result of 12.SELECT @MyNumber
STORED PROCEDURES
What Are Stored Procedures?
Have you ever written SQL statements, like inserts, selects, and updates? Then you have already written most of a stored procedure. A stored procedure is an already written SQL statement that is saved in the database. If you find yourself using the same query over and over again, it would make sense to put it into a stored procedure.An example is:
execusp_displayallusers
The name of the stored procedure is "usp_displayallusers", and "exec" tells SQL Server to execute the code in the stored procedure. (Note: "usp_" in front of the stored procedure name is used to designate this stored procedure as a user-created stored procedure.) The code inside the stored procedure can be something as simple as:
SELECT * FROM USERLIST
This "select" statement will return all data in the USERLIST table. You may think, skeptically, that stored procedures aren’t terribly useful. Just save the query and run it when you need to. Too easy, right?
Well, there is more to the story. Many queries get more complex than "select * from . . ." Also, you may want to call the stored procedure from an application, such as an ASP page,
23 | P a g e
Visual Basic application, or a Java servlet. With a stored procedure, you can store all the logic in the database, and use a simple command to call the stored procedure. Later, if you decide to migrate from ASP to J2EE, you only need to change the application layer, which will be significantly easier. Much of the business logic will remain in the database.
Getting Started with Stored Procedures
will be ready to start coding!
What does the entire stored procedure look like? Let’s pull it all together.
CREATE PROCEDURE usp_adduser
@login varchar(20),@pswdvarchar(20),@f_namevarchar(25),@l_namevarchar(35),@address_1 varchar(30),@address_2 varchar(30),@city varchar(30),@state char(2),@zipcode char(10),@email varchar(50)
AS
INSERT INTO USERLIST (login, pswd, f_name, l_name, address_1, address_2, city, state, zipcode, email)
VALUES (@login, @pswd, @f_name, @l_name, @address_1, @address_2, @city, @state, @zipcode, @email)
Now, we have a stored procedure that can accept external data. What do we do with it? How do we get the data? It’s not that hard; I promise. We’ll start with the "exec" statement we used when we wrote our first stored procedure. Remember?
execusp_displayallusers
We have a new stored procedure to execute, so this time, the command will be: execusp_adduser
There is still the issue of how to get our data into the stored procedure. Otherwise, all those variables will be useless. To get data into our stored procedure, simply add the information (in single quotes ' ') after the execute statement.
execusp_adduser ' '
Remember to pass as many parameters as you have variables, otherwise SQL Server will throw an error. Since we have ten variables, your execute statement should look like this:
exec usp_adduser ' ', ' ', ' ', ' ', ' ', ' ', ' ', ' ', ' ', ' '
24 | P a g e

Next, let’s include the data that we will want to pass to usp_adduser. Your execute statement will look like:
exec usp_adduser 'dnelson', 'dean2003', 'Dean', 'Nelson', '200 Berkeley Street', ' ', 'Boston', 'MA', '02116', '[email protected]'
Running the query should be successful, and SQL Server will tell you that one row has been affected. Now, let’s try using input variables with some other query types.
CODE:
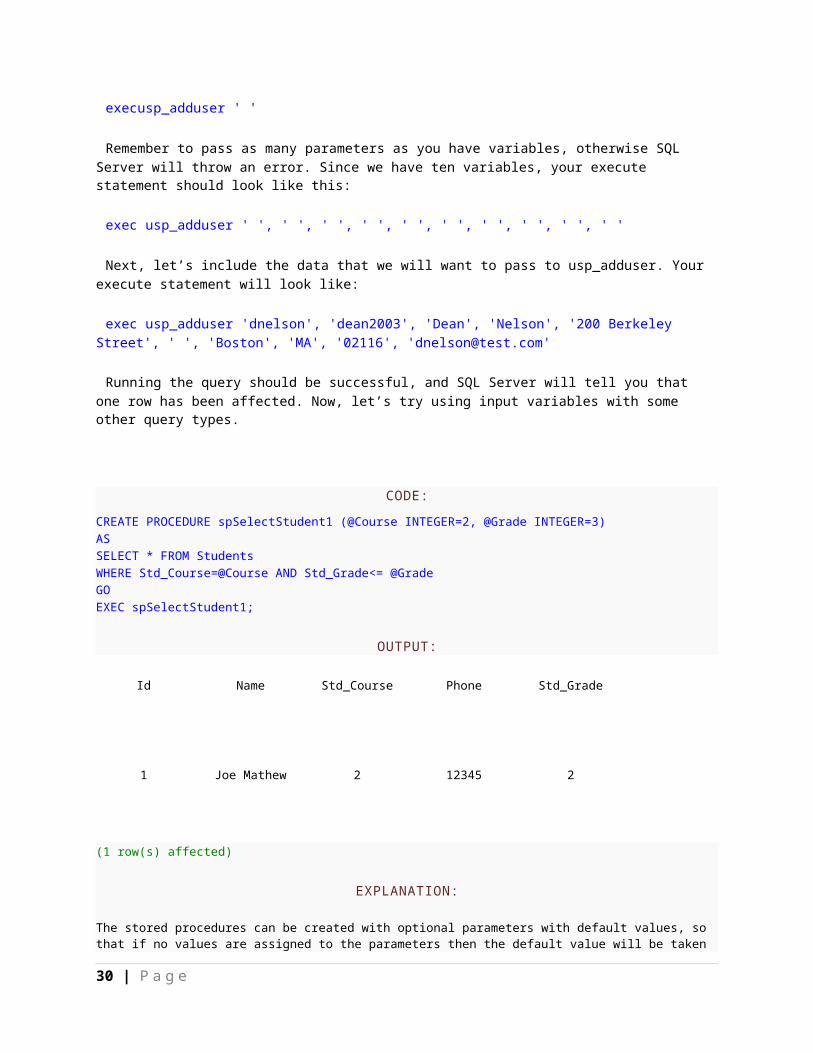
CREATE PROCEDURE spSelectStudent1 (@Course INTEGER=2, @Grade INTEGER=3) AS SELECT * FROM Students WHERE Std_Course=@Course AND Std_Grade<= @Grade GO EXEC spSelectStudent1;
OUTPUT:
Id Name Std_Course Phone Std_Grade
1 Joe Mathew 2 12345 2
(1 row(s) affected)
EXPLANATION:
The stored procedures can be created with optional parameters with default values, so that if no values are assigned to the parameters then the default value will be taken as the value of the parameter.
In the above example, the procedure is executed without any parameter. So it takes the default parameters, which are @Course as 2, @Grade as 3.
LANGUAGE(S): MS SQL SERVER
CODE:
EXEC spSelectStudent1 @Course=4, @Grade=4;
OUTPUT:
Id Name Std_Course Phone Std_Grade
25 | P a g e
2 Rock Feller 4 46565 3
(1 row(s) affected)
EXPLANATION:
In the above example, the procedure takes the specified parameters of @Course as 4, @Grade as 4.
LANGUAGE(S): MS SQL SERVER
VIEWS
A view is a virtual table that consists of columns from one or more tables. Though it is similar to a table, it is stored in the database. It is a query stored as an object. Hence, a view is an object that derives its data from one or more tables. These tables are referred to as base or underlying tables. Once you have defined a view, you can reference it like any other table in a database.
A view serves as a security mechanism. This ensures that users are able to retrieve and modify only the data seen by them. Users cannot see or access the remaining data in the underlying tables. A view also serves as a mechanism to simplify query execution. Complex queries can be stored in the form as a view, and data from the view can be extracted using simple queries.
A view consists of a SELECT statement that stored with a database. Because views are stored as part of the database, they can be managed independently of the applications that use them.
A view behaves like a virtual table. Since you can code a view name anywhere you can code a table name. a view is sometimes called a viewed table.
Views can be used to restrict the data that a user is allowed to access or to present data in a form that is easy for the user to understand. In some database users may be allowed to access data only through views.
1. User Defined ViewsThese types of view are defined by users. We have two types of user defined views.1. Simple ViewWhen we create a view on a single table, it is called simple view.
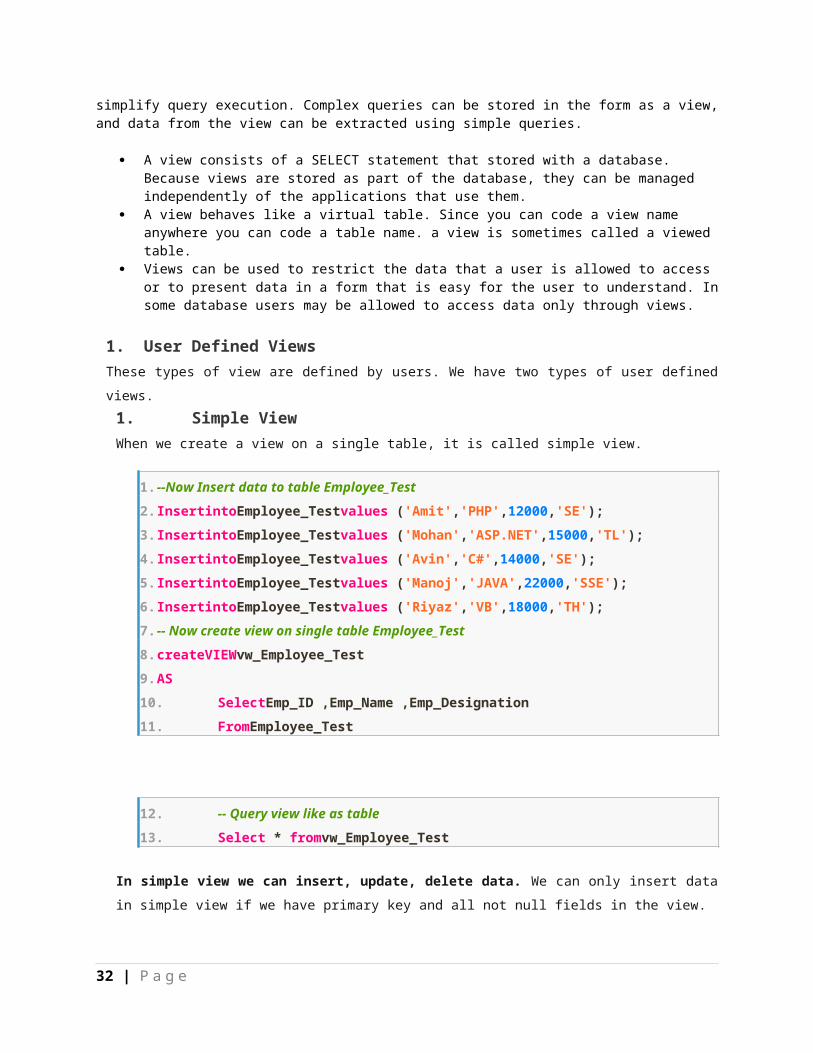
1.--Now Insert data to table Employee_Test
2.InsertintoEmployee_Testvalues ('Amit','PHP',12000,'SE');
26 | P a g e
3.InsertintoEmployee_Testvalues ('Mohan','ASP.NET',15000,'TL');
4.InsertintoEmployee_Testvalues ('Avin','C#',14000,'SE');
5.InsertintoEmployee_Testvalues ('Manoj','JAVA',22000,'SSE');
6.InsertintoEmployee_Testvalues ('Riyaz','VB',18000,'TH');
7.-- Now create view on single table Employee_Test
8.createVIEWvw_Employee_Test
9.AS
10. SelectEmp_ID ,Emp_Name ,Emp_Designation
11. FromEmployee_Test
12. -- Query view like as table
13. Select * fromvw_Employee_Test
In simple view we can insert, update, delete data. We can only insert data in simple view if we have primary key and all not null fields in the view.
14. -- Insert data to view vw_Employee_Test
15. insertintovw_Employee_Test(Emp_Name, Emp_Designation) values
('Shailu','SSE')
16. -- Now see the affected view
17. Select * fromvw_Employee_Test
18. -- Update data to view vw_Employee_Test
19. Updatevw_Employee_TestsetEmp_Name = 'Pawan'whereEmp_ID = 6
20. -- Now see the affected view
21. Select * fromvw_Employee_Test
27 | P a g e
22. -- Delete data from view vw_Employee_Test
23. deletefromvw_Employee_TestwhereEmp_ID = 6
24. -- Now see the affected view
25. Select * fromvw_Employee_Test
2. Complex ViewWhen we create a view on more than one table, it is called complex view.
1.--Create another table
2.createtablePersonal_Info
3.(
4.Emp_Namevarchar(55),
5.FNamevarchar(55),
6. DOB varchar(55),
7. Address varchar(55),
8. Mobile int,
9. State varchar(55)
10. )
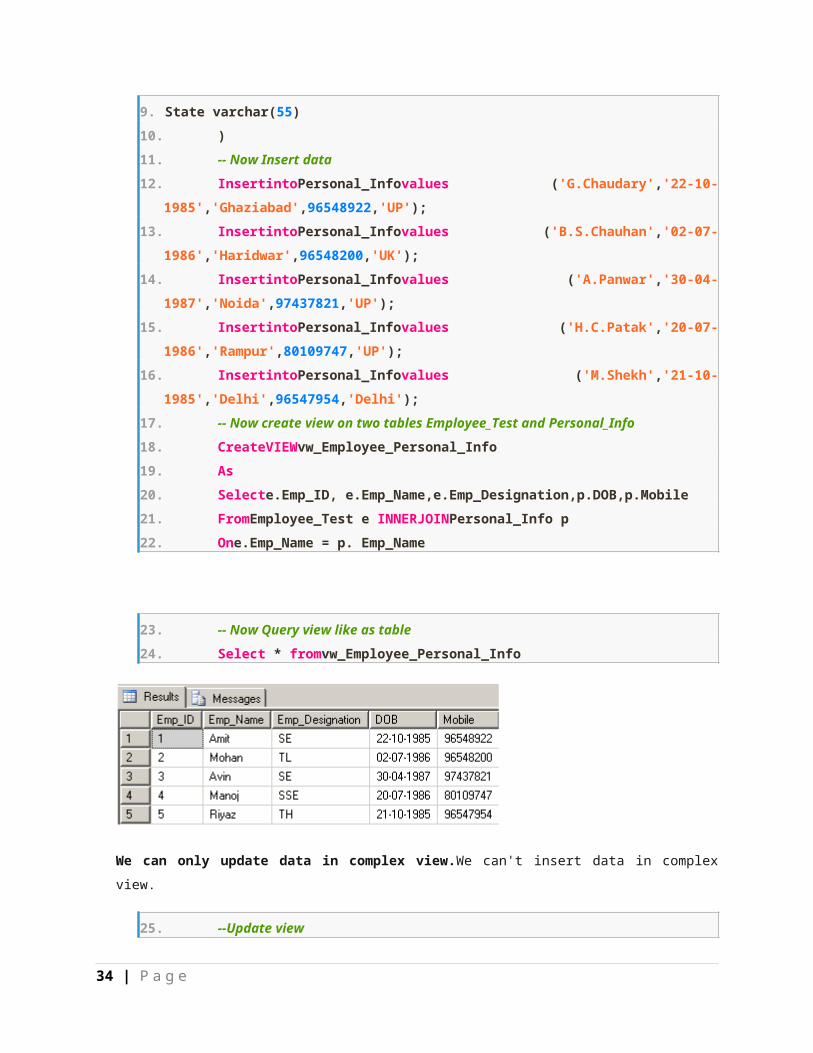
11. -- Now Insert data
12. InsertintoPersonal_Infovalues ('G.Chaudary','22-10-
1985','Ghaziabad',96548922,'UP');
13. InsertintoPersonal_Infovalues ('B.S.Chauhan','02-07-
1986','Haridwar',96548200,'UK');
14. InsertintoPersonal_Infovalues ('A.Panwar','30-04-
1987','Noida',97437821,'UP');
15. InsertintoPersonal_Infovalues ('H.C.Patak','20-07-
1986','Rampur',80109747,'UP');
16. InsertintoPersonal_Infovalues ('M.Shekh','21-10-
1985','Delhi',96547954,'Delhi');
28 | P a g e

17. -- Now create view on two tables Employee_Test and
Personal_Info
18. CreateVIEWvw_Employee_Personal_Info
19. As
20. Selecte.Emp_ID, e.Emp_Name,e.Emp_Designation,p.DOB,p.Mobile
21. FromEmployee_Test e INNERJOINPersonal_Info p
22. One.Emp_Name = p. Emp_Name
23. -- Now Query view like as table
24. Select * fromvw_Employee_Personal_Info
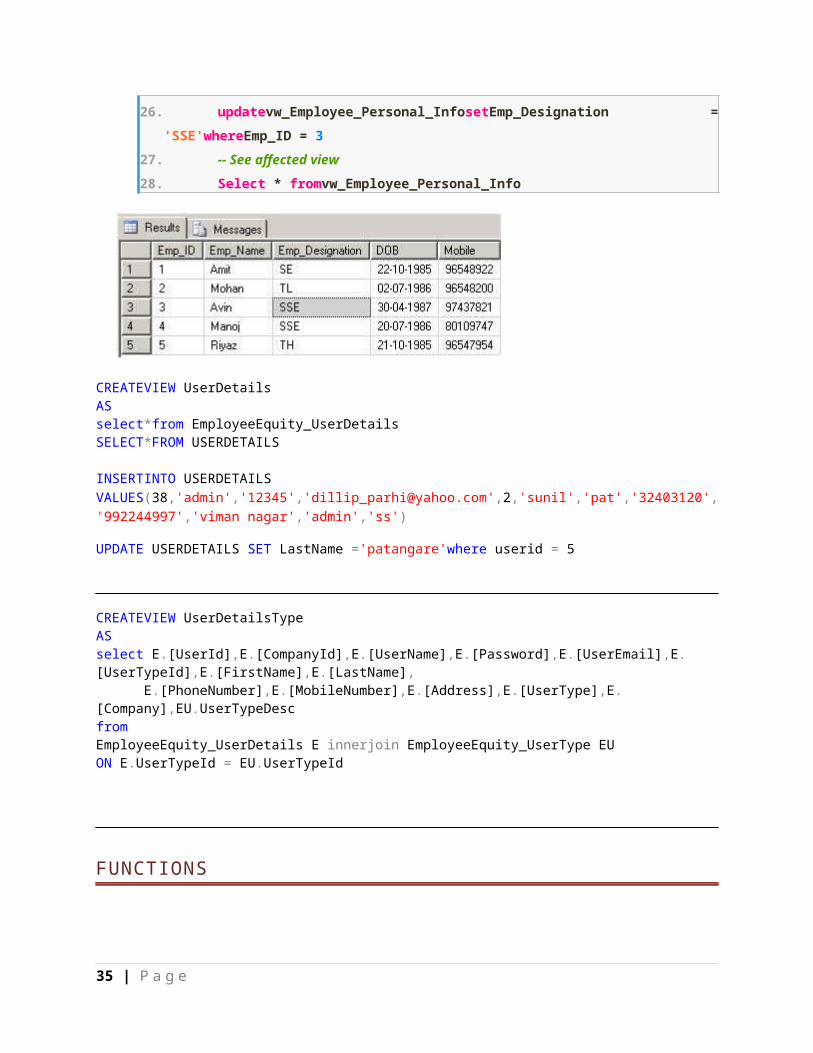
We can only update data in complex view.We can't insert data in complex view.
25. --Update view
26. updatevw_Employee_Personal_InfosetEmp_Designation =
'SSE'whereEmp_ID = 3
27. -- See affected view
28. Select * fromvw_Employee_Personal_Info
CREATEVIEW UserDetailsASselect*from EmployeeEquity_UserDetails
29 | P a g e
SELECT*FROM USERDETAILS
INSERTINTO USERDETAILS VALUES(38,'admin','12345','[email protected]',2,'sunil','pat','32403120','992244997','viman nagar','admin','ss')
UPDATE USERDETAILS SET LastName ='patangare'where userid = 5
CREATEVIEW UserDetailsTypeASselect E.[UserId],E.[CompanyId],E.[UserName],E.[Password],E.[UserEmail],E.[UserTypeId],E.[FirstName],E.[LastName],
E.[PhoneNumber],E.[MobileNumber],E.[Address],E.[UserType],E.[Company],EU.UserTypeDesc fromEmployeeEquity_UserDetails E innerjoin EmployeeEquity_UserType EUON E.UserTypeId = EU.UserTypeId
FUNCTIONS
A stored procedure is like a miniature program in SQL Server. It can be as simple as a select statement, or as complex as a long script that adds, deletes, updates, and/or reads data from multiple tables in a database. (Stored procedures can also implement loops and cursors which both allow you to work with smaller results or row by row operations on data.)
The SQL Server functions are option for doing certain operations in SQL Server. They can not be used to update, delete, or add records to the database.
They simply return a single value or a table value. They can only be use to select records. However, they can be called very easily from within standard SQL, such as:
SELECT dbo.functionname('Parameter1')
OR
SELECT Name, dbo.Functionname('Parameter1') FROM sysObjects
For simple reusable select operations, functions can simply your code. Just be wary of using JOIN clauses in your functions. If your function has a JOIN clause and you call it from another select statement that returns multiple results, that function call with JOIN those tables together for EACH line returned in the result set. So though they can be helpful in simpling some logic, they can also be a performance bottleneck if they're not used properly.
30 | P a g e

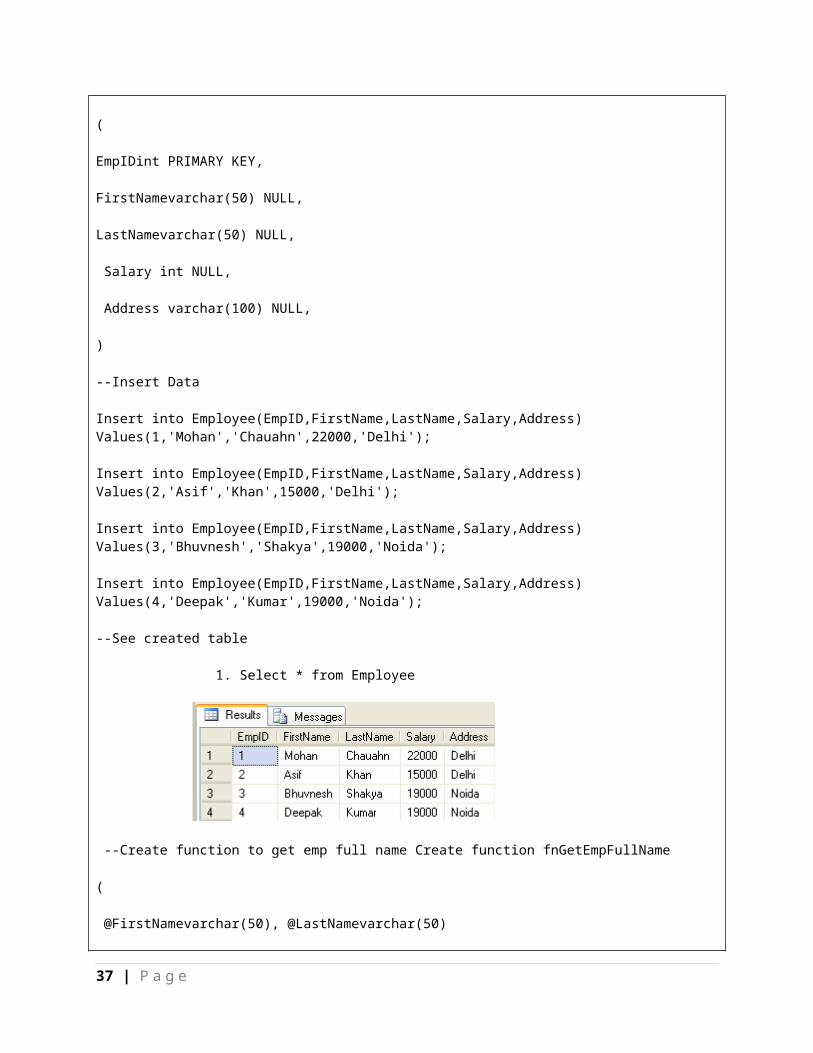
User defined scalar function also returns single value as a result of actions perform by function. We return any datatype value from function.
--Create a table
CREATE TABLE Employee
(
EmpIDint PRIMARY KEY,
FirstNamevarchar(50) NULL,
LastNamevarchar(50) NULL,
Salary int NULL,
Address varchar(100) NULL,
)
--Insert Data
Insert into Employee(EmpID,FirstName,LastName,Salary,Address) Values(1,'Mohan','Chauahn',22000,'Delhi');
Insert into Employee(EmpID,FirstName,LastName,Salary,Address) Values(2,'Asif','Khan',15000,'Delhi');
Insert into Employee(EmpID,FirstName,LastName,Salary,Address) Values(3,'Bhuvnesh','Shakya',19000,'Noida');
Insert into Employee(EmpID,FirstName,LastName,Salary,Address) Values(4,'Deepak','Kumar',19000,'Noida');
--See created table
1. Select * from Employee
31 | P a g e
--Create function to get emp full name Create function fnGetEmpFullName
(
@FirstNamevarchar(50), @LastNamevarchar(50)
)
returns varchar(101)
As
Begin return (Select @FirstName + ' '+ @LastName);
end
--Now call the above created function
Select dbo.fnGetEmpFullName(FirstName,LastName) as Name, Salary from Employee
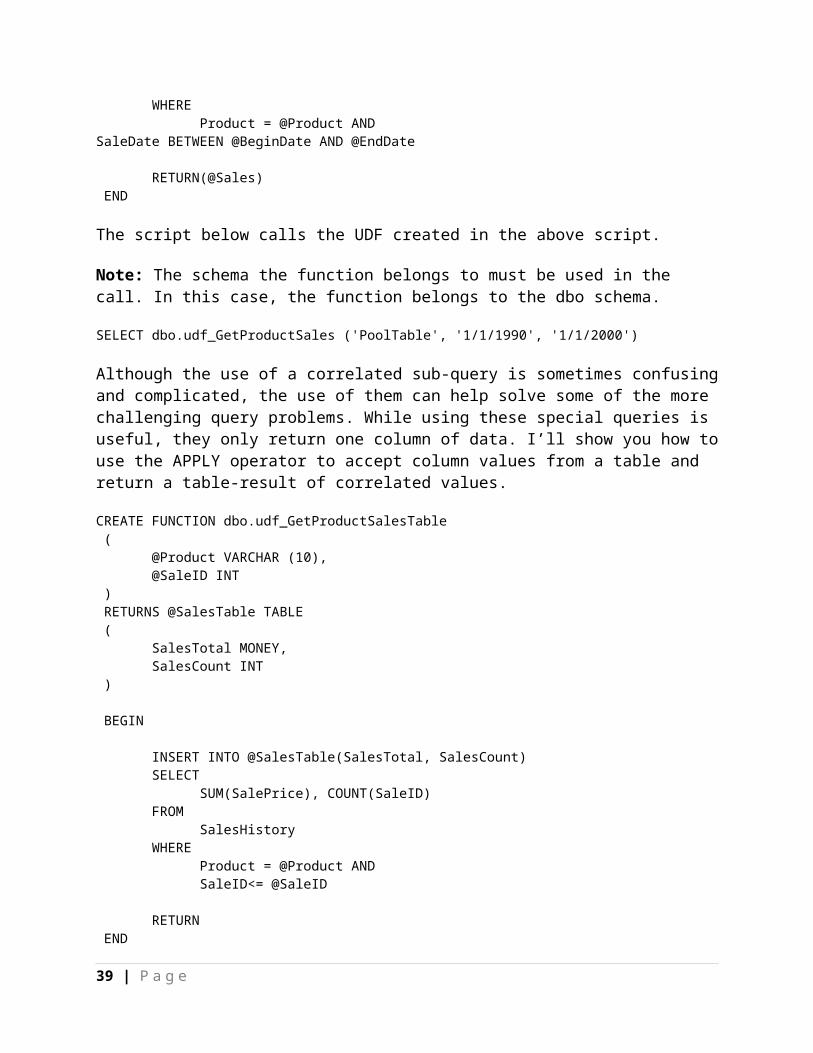
The first UDF I will look at is the scalar-valued UDF. The script below defines a function named dbo.udf_GetProductSales that accepts three parameters and returns a MONEY value. The function uses the three input parameters as criteria in calculating the total sales from the SalesHistory table.
CREATE FUNCTION dbo.udf_GetProductSales ( @Product VARCHAR(10), @BeginDate DATETIME, @EndDate DATETIME ) RETURNS MONEY AS BEGIN DECLARE @Sales MONEY SELECT @Sales = SUM(SalePrice) FROM SalesHistory WHERE
32 | P a g e

Product = @Product AND SaleDate BETWEEN @BeginDate AND @EndDate
RETURN(@Sales) END
The script below calls the UDF created in the above script.
Note: The schema the function belongs to must be used in the call. In this case, the function belongs to the dbo schema.
SELECT dbo.udf_GetProductSales ('PoolTable', '1/1/1990', '1/1/2000')
Although the use of a correlated sub-query is sometimes confusing and complicated, the use of them can help solve some of the more challenging query problems. While using these special queries is useful, they only return one column of data. I’ll show you how to use the APPLY operator to accept column values from a table and return a table-result of correlated values.
CREATE FUNCTION dbo.udf_GetProductSalesTable ( @Product VARCHAR (10), @SaleID INT ) RETURNS @SalesTable TABLE ( SalesTotal MONEY, SalesCount INT )
BEGIN INSERT INTO @SalesTable(SalesTotal, SalesCount) SELECT SUM(SalePrice), COUNT(SaleID) FROM SalesHistory WHERE Product = @Product AND SaleID<= @SaleID
RETURN END GO
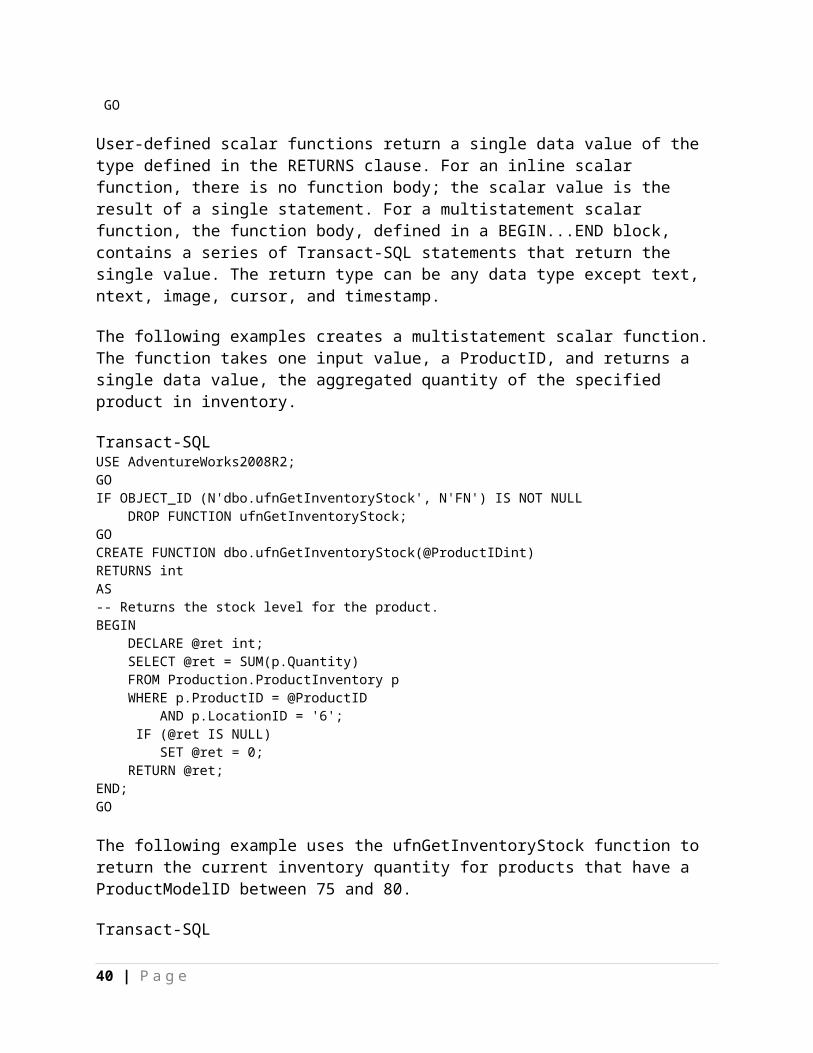
User-defined scalar functions return a single data value of the type defined in the RETURNS clause. For an inline scalar function, there is no function body; the scalar value is the result of a single statement. For a multistatement scalar function, the function body, defined in a BEGIN...END block, contains a series of Transact-SQL statements that return the single value. The return type can be any data type except text, ntext, image, cursor, and timestamp.
33 | P a g e
The following examples creates a multistatement scalar function. The function takes one input value, a ProductID, and returns a single data value, the aggregated quantity of the specified product in inventory.
Transact-SQLUSE AdventureWorks2008R2;GOIF OBJECT_ID (N'dbo.ufnGetInventoryStock', N'FN') IS NOT NULL DROP FUNCTION ufnGetInventoryStock;GOCREATE FUNCTION dbo.ufnGetInventoryStock(@ProductIDint)RETURNS intAS -- Returns the stock level for the product.BEGIN DECLARE @ret int; SELECT @ret = SUM(p.Quantity) FROM Production.ProductInventory p WHERE p.ProductID = @ProductID AND p.LocationID = '6'; IF (@ret IS NULL) SET @ret = 0; RETURN @ret;END;GO
The following example uses the ufnGetInventoryStock function to return the current inventory quantity for products that have a ProductModelID between 75 and 80.
Transact-SQLUSE AdventureWorks2008R2;GOSELECT ProductModelID, Name, dbo.ufnGetInventoryStock(ProductID)AS CurrentSupplyFROM Production.ProductWHERE ProductModelID BETWEEN 75 and 80;GO
Table-Valued Functions
User-defined table-valued functions return a table data type. For an inline table-valued function, there is no function body; the table is the result set of a single SELECT statement.
The following example creates an inline table-valued function. The function takes one input parameter, a customer (store) ID, and returns the columns ProductID, Name, and the aggregate of year-to-date sales as YTD Total for each product sold to the store.
Transact-SQLUSE AdventureWorks2008R2;GOIF OBJECT_ID (N'Sales.ufn_SalesByStore', N'IF') IS NOT NULL
34 | P a g e
DROP FUNCTION Sales.ufn_SalesByStore;GOCREATE FUNCTION Sales.ufn_SalesByStore (@storeidint)RETURNS TABLEASRETURN ( SELECT P.ProductID, P.Name, SUM(SD.LineTotal) AS 'Total' FROM Production.Product AS P JOIN Sales.SalesOrderDetail AS SD ON SD.ProductID = P.ProductID JOIN Sales.SalesOrderHeader AS SH ON SH.SalesOrderID = SD.SalesOrderID JOIN Sales.Customer AS C ON SH.CustomerID = C.CustomerID WHERE C.StoreID = @storeid GROUP BY P.ProductID, P.Name);
The following example invokes the function and specifies customer ID 602.
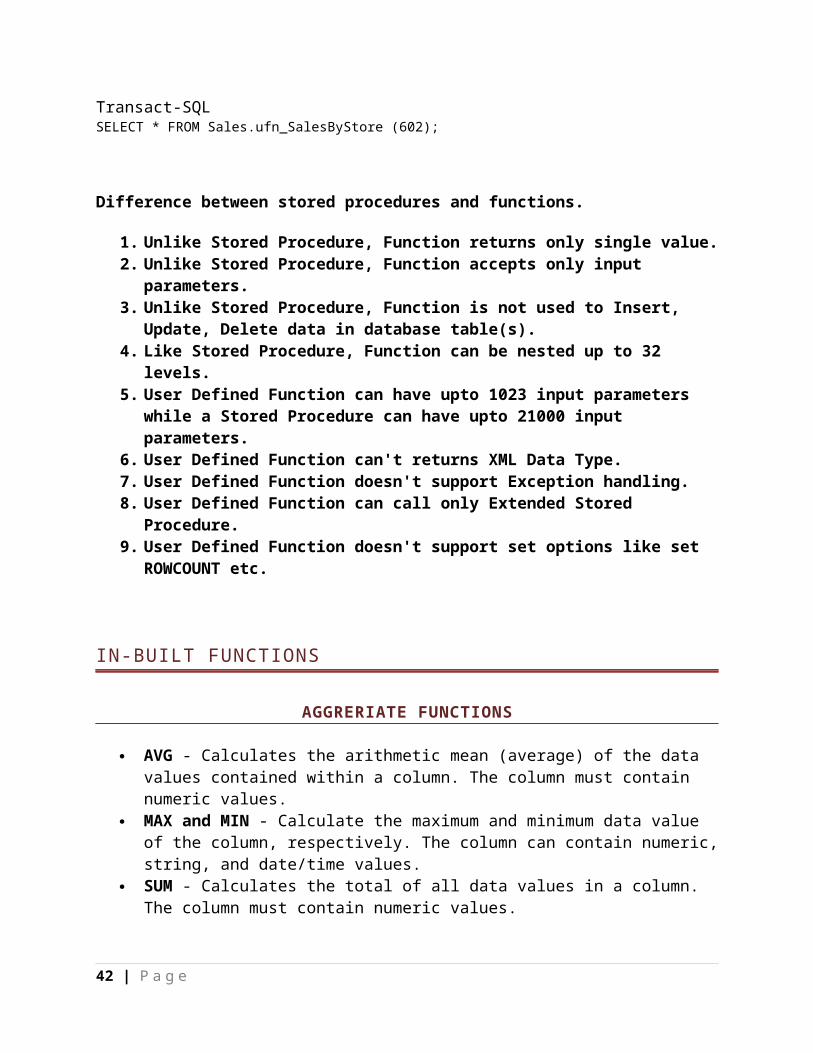
Transact-SQLSELECT * FROM Sales.ufn_SalesByStore (602);
Difference between stored procedures and functions.
1. Unlike Stored Procedure, Function returns only single value.2. Unlike Stored Procedure, Function accepts only input parameters.3. Unlike Stored Procedure, Function is not used to Insert, Update, Delete data in
database table(s).4. Like Stored Procedure, Function can be nested up to 32 levels.5. User Defined Function can have upto 1023 input parameters while a Stored
Procedure can have upto 21000 input parameters.6. User Defined Function can't returns XML Data Type.7. User Defined Function doesn't support Exception handling.8. User Defined Function can call only Extended Stored Procedure.9. User Defined Function doesn't support set options like set ROWCOUNT etc.
IN-BUILT FUNCTIONS
AGGRERIATE FUNCTIONS
AVG - Calculates the arithmetic mean (average) of the data values contained within a column. The column must contain numeric values.
MAX and MIN - Calculate the maximum and minimum data value of the column, respectively. The column can contain numeric, string, and date/time values.
35 | P a g e
SUM - Calculates the total of all data values in a column. The column must contain numeric values.
COUNT - Calculates the number of (non-null) data values in a column. The only aggregate function not being applied to columns is COUNT(*). This function returns the number of rows (whether or not particular columns have NULL values).
NUMERIC FUNCTIONS
Numeric functions within Transact-SQL are mathematical functions for modifying numeric values. The following numeric functions are available:
Function Explanation
ABS(n)Returns the absolute value (i.e., negative values are returned as positive) of the numeric expression n. Example:SELECT ABS(–5.767) = 5.767, SELECT ABS(6.384) = 6.384
ACOS(n) Calculates arc cosine of n. n and the resulting value belong to the FLOAT data type.
ASIN(n) Calculates the arc sine of n. n and the resulting value belong to the FLOAT data type.
ATAN(n) Calculates the arc tangent of n. n and the resulting value belong to the FLOAT data type.
ATN2(n,m) Calculates the arc tangent of n/m. n, m, and the resulting value belong to the FLOAT data type.
CEILING(n)
Returns the smallest integer value greater or equal to the specified parameter. Examples:SELECT CEILING(4.88) = 5SELECT CEILING(–4.88) = –4
COS(n) Calculates the cosine of n. n and the resulting value belong to the FLOAT data type.
COT(n) Calculates the cotangent of n. n and the resulting value belong to the FLOAT data type.
DEGREES(n)Converts radians to degrees. Examples:SELECT DEGREES(PI()/2) = 90.0SELECT DEGREES(0.75) = 42.97
EXP(n) Calculates the value e^n. Example: SELECT EXP(1) = 2.7183
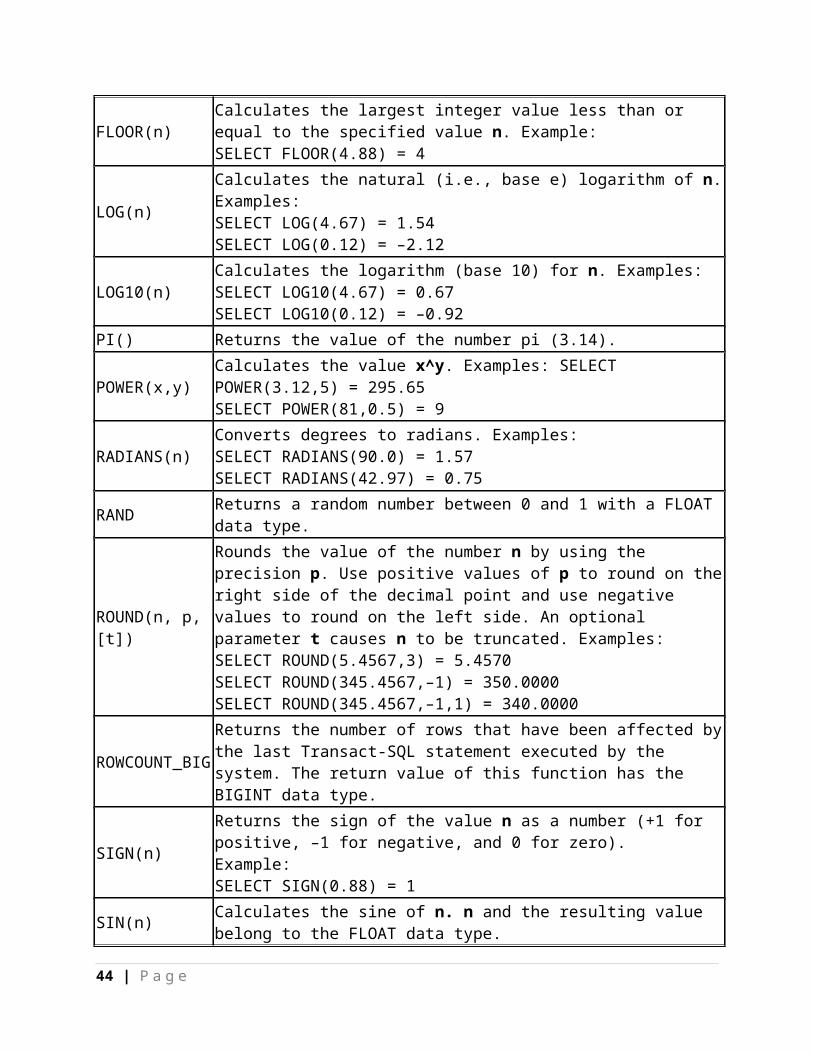
FLOOR(n)Calculates the largest integer value less than or equal to the specified value n. Example:SELECT FLOOR(4.88) = 4
LOG(n)Calculates the natural (i.e., base e) logarithm of n. Examples:SELECT LOG(4.67) = 1.54SELECT LOG(0.12) = –2.12
36 | P a g e
LOG10(n)Calculates the logarithm (base 10) for n. Examples:SELECT LOG10(4.67) = 0.67SELECT LOG10(0.12) = –0.92
PI() Returns the value of the number pi (3.14).
POWER(x,y) Calculates the value x^y. Examples: SELECT POWER(3.12,5) = 295.65SELECT POWER(81,0.5) = 9
RADIANS(n)Converts degrees to radians. Examples:SELECT RADIANS(90.0) = 1.57SELECT RADIANS(42.97) = 0.75
RAND Returns a random number between 0 and 1 with a FLOAT data type.
ROUND(n, p,[t])
Rounds the value of the number n by using the precision p. Use positive values of p to round on the right side of the decimal point and use negative values to round on the left side. An optional parameter t causes n to be truncated. Examples:SELECT ROUND(5.4567,3) = 5.4570SELECT ROUND(345.4567,–1) = 350.0000SELECT ROUND(345.4567,–1,1) = 340.0000
ROWCOUNT_BIGReturns the number of rows that have been affected by the last Transact-SQL statement executed by the system. The return value of this function has the BIGINT data type.
SIGN(n)
Returns the sign of the value n as a number (+1 for positive, –1 for negative, and 0 for zero).Example:SELECT SIGN(0.88) = 1
SIN(n) Calculates the sine of n. n and the resulting value belong to the FLOAT data type.
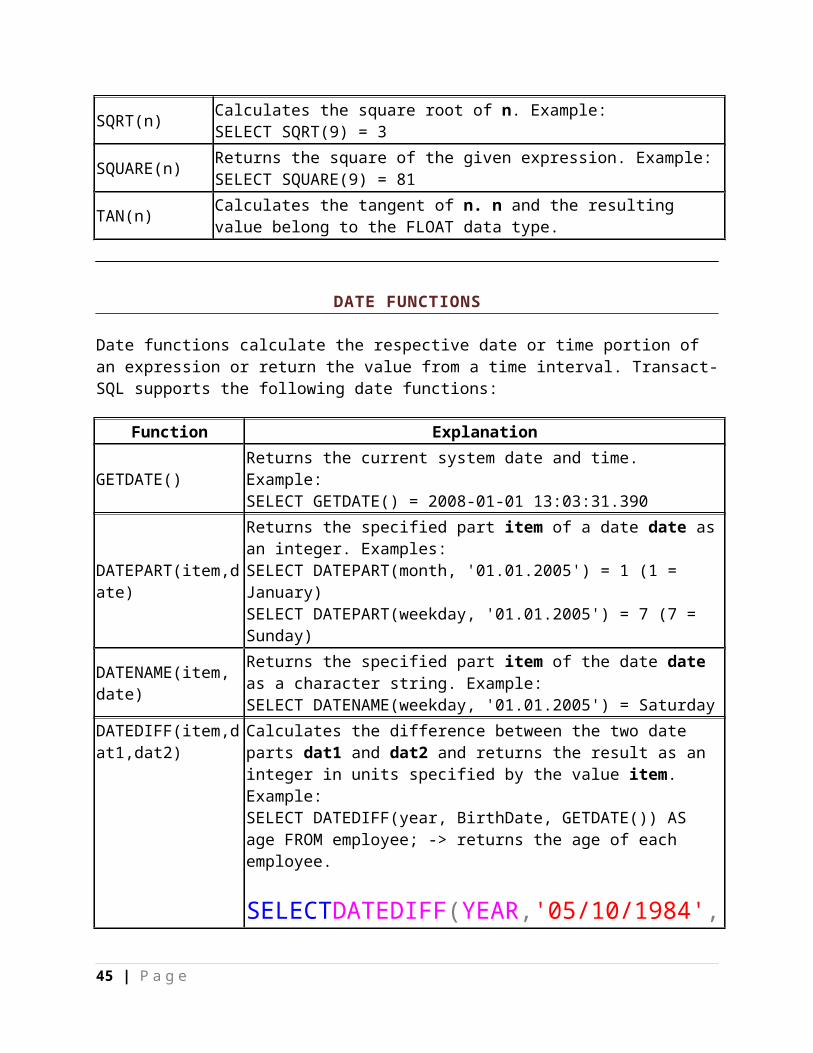
SQRT(n) Calculates the square root of n. Example:SELECT SQRT(9) = 3
SQUARE(n) Returns the square of the given expression. Example:SELECT SQUARE(9) = 81
TAN(n) Calculates the tangent of n. n and the resulting value belong to the FLOAT data type.
DATE FUNCTIONS
Date functions calculate the respective date or time portion of an expression or return the value from a time interval. Transact-SQL supports the following date functions:
Function Explanation
37 | P a g e

GETDATE() Returns the current system date and time. Example:SELECT GETDATE() = 2008-01-01 13:03:31.390
DATEPART(item,date)
Returns the specified part item of a date date as an integer. Examples:SELECT DATEPART(month, '01.01.2005') = 1 (1 = January)SELECT DATEPART(weekday, '01.01.2005') = 7 (7 = Sunday)
DATENAME(item, date)
Returns the specified part item of the date date as a character string. Example:SELECT DATENAME(weekday, '01.01.2005') = Saturday
DATEDIFF(item,dat1,dat2)
Calculates the difference between the two date parts dat1 and dat2 and returns the result as an integer in units specified by the value item. Example:SELECT DATEDIFF(year, BirthDate, GETDATE()) AS age FROM employee; -> returns the age of each employee.
SELECTDATEDIFF(YEAR,'05/10/1984',GETDATE())
SELECTDATEDIFF(MONTH,'05/10/1984',GETDATE())
SELECTDATEDIFF(DAY,'05/10/1984',GETDATE())
SELECTDATEDIFF(HOUR,'05/10/1984',GETDATE())
SELECTDATEDIFF(MINUTE,'05/10/1984',GETDATE())
DATEADD(i,n,d) Adds the number n of units specified by the value i to the given date d.
38 | P a g e
Example:SELECT DATEADD(DAY,3,HireDate) AS age FROM employee; -> adds three days to the starting date of employment of every employee (see the sample database).
DAY()
This function returns an integer representing the day part of the specified date.
select DAY(<date>)
This function returns an integer representing the day part of the specified date.
select DAY(<date>)
MONTH() This function returns an integer representing the month part of the specified date.
select MONTH(<date>)
YEAR() This function returns an integer representing the year part of the specified date.
select YEAR(<date>)
STRING FUNCTIONS
String functions are used to manipulate data values in a column, usually of a character data type. Transact-SQL supports the following string functions:
Function Explanation
ASCII(character)Converts the specified character to the equivalent integer (ASCII) code. Returns an integer. Example:SELECT ASCII('A') = 65
CHAR(integer) Converts the ASCII code to the equivalent character. Example:SELECT CHAR(65) = 'A'.
CHARINDEX(z1,z2)Returns the starting position where the partial string z1 first occurs in the string z2. Returns 0 if z1 does not occur in z2. Example:SELECT CHARINDEX('bl', 'table') = 3.
DIFFERENCE(z1,z2)
Returns an integer, 0 through 4, that is the difference of SOUNDEX values of two strings z1 and z2. (SOUNDEX returns a number that specifies the sound of a string. With this method, strings with similar sounds can be determined.) Example:SELECT DIFFERENCE('spelling', 'telling') = 2 (sounds a little bit similar, 0 = doesn't sound similar)
LEFT(z, length) Returns the first length characters from the string z.Select left(‘Ravi Singh’,4)
39 | P a g e
LEN(z)Returns the number of characters, instead of the number of bytes, of the specified string expression, excluding trailing blanks.Select len(‘Ravi Singh’,4)
LOWER(z1)Converts all uppercase letters of the string z1 to lowercase letters. Lowercase letters and numbers, and other characters, do not change. Example:SELECT LOWER('BiG') = 'big'
LTRIM(z) Removes leading blanks in the string z. Example:SELECT LTRIM(' String') = 'String'
NCHAR(i) Returns the Unicode character with the specified integer code, as defined by the Unicode standard.
QUOTENAME(char_string) Returns a Unicode string with the delimiters added to make the input string a valid delimited identifier.
PATINDEX(%p%,expr)
Returns the starting position of the first occurrence of a pattern p in a specified expression expr, or zeros if the pattern is not found. Examples:1) SELECT PATINDEX('%gs%', 'longstring') = 4;2) SELECT RIGHT(ContactName, LEN(ContactName)-PATINDEX('% %',ContactName)) AS First_name FROM Customers;(The second query returns all first names from the customers column.)
REPLACE(str1,str2,str3) Replaces all occurrences of the str2 in the str1 with the str3. Example:SELECT REPLACE('shave' , 's' , 'be') = behave
REPLICATE(z,i) Repeats string z i times. Example:SELECT REPLICATE('a',10) = 'aaaaaaaaaa'
REVERSE(z) Displays the string z in the reverse order. Example:SELECT REVERSE('calculate') = 'etaluclac'
RIGHT(z,length) Returns the last length characters from the string z. Example:SELECT RIGHT('Notebook',4) = 'book'
RTRIM(z) Removes trailing blanks of the string z. Example:SELECT RTRIM('Notebook ') = 'Notebook'
SOUNDEX(a)
Returns a four-character SOUNDEX code to determine the similarity between two strings.Example:SELECT SOUNDEX('spelling') = S145
SPACE(length) Returns a string with spaces of length specified by length. Example:SELECT SPACE = ' '
STR(f,[len [,d]])
Converts the specified float expression f into a string. len is the length of the string including decimal point, sign, digits, and spaces (10 by default), and d is the number of digits to the right of the decimal point to be returned. Example:SELECT STR(3.45678,4,2) = '3.46'
STUFF(z1,a,length,z2)
Replaces the partial string z1 with the partial string z2 starting at position a, replacing length characters of z1. Examples:SELECT STUFF('Notebook',5,0, ' in a ') = 'Note in a book'SELECT STUFF('Notebook',1,4, 'Hand') = 'Handbook'
SUBSTRING(z,a,length) Creates a partial string from string z starting at the position a with a length of
40 | P a g e

length.Example:SELECT SUBSTRING('wardrobe',1,4) = 'ward'
UNICODE Returns the integer value, as defined by the Unicode standard, for the first character of the input expression.
UPPER(z)Converts all lowercase letters of string z to uppercase letters. Uppercase letters and numbers do not change. Example:SELECT UPPER('loWer') = 'LOWER'
CONVERT()
Explicitly converts an expression of one data type to another.CASTandCONVERTprovide similar functionality.
Syntax :-
CONVERT ( data_type [ ( length ) ] , expression [ , style ] )
Here 'EXPRESSION' can be any validexpression, 'DATA_TYPE' is the target data type and 'LENGTH' is an optional integer that specifies the length of the target data type. The default value is 30. STYLE is an integer expression that specifies how the CONVERT function is to translate expression. If style is NULL then NULL is returned. The range is determined by data_type.
Now we will explore the different styles of date and time formatting with CONVERT.
CONVERTING DATETIME TO VARCHAR
The Transact-SQL (T-SQL) Convert function can be used to convert data between different types. When converting a DATETIME value to a VARCHAR value a style code can be used for getting the output in different format.
SELECTCONVERT(VARCHAR, GETDATE(), 0) -- May 4 2013 2:14PM
CONVERTING VARCHAR TO DATETIME
The style code is equally important when converting a VARCHAR to a DATETIME value. I'm using the output from the previous sql code and different style codes, lets see how it works.
SELECTCONVERT(DATETIME, 'May 4 2013 2:14PM', 0) -- 2013-05-04 14:14:00.000SELECTCONVERT(DATETIME, 'May 4 2013 2:14PM', 130) -- Conversion failed when converting date and/or time from character string.
41 | P a g e
Standard Date Formats
Date Format Standard SQL Statement Sample Output
Mon DD YYYY 1
HH:MIAM (or PM) Default SELECT CONVERT(VARCHAR(20), GETDATE(), 100) Jan 1 2005 1:29PM 1
MM/DD/YY USA SELECT CONVERT(VARCHAR(8), GETDATE(), 1) AS [MM/DD/YY] 11/23/98
MM/DD/YYYY USA SELECT CONVERT(VARCHAR(10), GETDATE(), 101) AS [MM/DD/YYYY] 11/23/1998
YY.MM.DD ANSI SELECT CONVERT(VARCHAR(8), GETDATE(), 2) AS [YY.MM.DD] 72.01.01
YYYY.MM.DD ANSI SELECT CONVERT(VARCHAR(10), GETDATE(), 102) AS [YYYY.MM.DD] 1972.01.01
DD/MM/YY British/French SELECT CONVERT(VARCHAR(8), GETDATE(), 3) AS [DD/MM/YY] 19/02/72
DD/MM/YYYY British/French SELECT CONVERT(VARCHAR(10), GETDATE(), 103) AS [DD/MM/YYYY] 19/02/1972
DD.MM.YY German SELECT CONVERT(VARCHAR(8), GETDATE(), 4) AS [DD.MM.YY] 25.12.05
DD.MM.YYYY German SELECT CONVERT(VARCHAR(10), GETDATE(), 104) AS [DD.MM.YYYY] 25.12.2005
DD-MM-YY Italian SELECT CONVERT(VARCHAR(8), GETDATE(), 5) AS [DD-MM-YY] 24-01-98
DD-MM-YYYY Italian SELECT CONVERT(VARCHAR(10), GETDATE(), 105) AS [DD-MM-YYYY] 24-01-1998
DD Mon YY 1 - SELECT CONVERT(VARCHAR(9), GETDATE(), 6) AS [DD MON YY] 04 Jul 06 1
DD Mon YYYY 1 - SELECT CONVERT(VARCHAR(11), GETDATE(), 106) AS [DD MON YYYY] 04 Jul 2006 1
Mon DD, YY 1 - SELECT CONVERT(VARCHAR(10), GETDATE(), 7) AS [Mon DD, YY] Jan 24, 98 1
Mon DD, YYYY 1 - SELECT CONVERT(VARCHAR(12), GETDATE(), 107) AS [Mon DD, YYYY] Jan 24, 1998 1
HH:MM:SS - SELECT CONVERT(VARCHAR(8), GETDATE(), 108) 03:24:53
Mon DD YYYY HH:MI:SS:MMMAM (or PM) 1
Default + milliseconds SELECT CONVERT(VARCHAR(26), GETDATE(), 109) Apr 28 2006
12:32:29:253PM 1
MM-DD-YY USA SELECT CONVERT(VARCHAR(8), GETDATE(), 10) AS [MM-DD-YY] 01-01-06
MM-DD-YYYY USA SELECT CONVERT(VARCHAR(10), GETDATE(), 110) AS [MM-DD-YYYY] 01-01-2006
YY/MM/DD - SELECT CONVERT(VARCHAR(8), GETDATE(), 11) AS [YY/MM/DD] 98/11/23
YYYY/MM/DD - SELECT CONVERT(VARCHAR(10), GETDATE(), 111) AS [YYYY/MM/DD] 1998/11/23
YYMMDD ISO SELECT CONVERT(VARCHAR(6), GETDATE(), 12) AS [YYMMDD] 980124
YYYYMMDD ISO SELECT CONVERT(VARCHAR(8), GETDATE(), 112) AS [YYYYMMDD] 19980124
DD Mon YYYY HH:MM:SS:MMM(24h) 1
Europe default + milliseconds SELECT CONVERT(VARCHAR(24), GETDATE(), 113) 28 Apr 2006
00:34:55:190 1
HH:MI:SS:MMM(24H) - SELECT CONVERT(VARCHAR(12), GETDATE(), 114) AS [HH:MI:SS:MMM(24H)] 11:34:23:013
42 | P a g e

YYYY-MM-DD HH:MI:SS(24h) ODBC Canonical SELECT CONVERT(VARCHAR(19), GETDATE(), 120) 1972-01-01 13:42:24
YYYY-MM-DD HH:MI:SS.MMM(24h)
ODBC Canonical(with milliseconds) SELECT CONVERT(VARCHAR(23), GETDATE(), 121) 1972-02-19 06:35:24.489
YYYY-MM-DDTHH:MM:SS:MMM ISO8601 SELECT CONVERT(VARCHAR(23), GETDATE(), 126) 1998-11-23T11:25:43:250
DD Mon YYYY HH:MI:SS:MMMAM 1 Kuwaiti SELECT CONVERT(VARCHAR(26), GETDATE(), 130) 28 Apr 2006
12:39:32:429AM 1
DD/MM/YYYY HH:MI:SS:MMMAM Kuwaiti SELECT CONVERT(VARCHAR(25), GETDATE(), 131) 28/04/2006
12:39:32:429AM
Here are some more date formats that does not come standard in SQL Server as part of the CONVERT function.
Extended Date Formats
Date Format SQL Statement Sample Output
YY-MM-DD SELECT SUBSTRING(CONVERT(VARCHAR(10), GETDATE(), 120), 3, 8) AS [YY-MM-DD]SELECT REPLACE(CONVERT(VARCHAR(8), GETDATE(), 11), '/', '-') AS [YY-MM-DD] 99-01-24
YYYY-MM-DD SELECT CONVERT(VARCHAR(10), GETDATE(), 120) AS [YYYY-MM-DD]SELECT REPLACE(CONVERT(VARCHAR(10), GETDATE(), 111), '/', '-') AS [YYYY-MM-DD] 1999-01-24
MM/YY SELECT RIGHT(CONVERT(VARCHAR(8), GETDATE(), 3), 5) AS [MM/YY]SELECT SUBSTRING(CONVERT(VARCHAR(8), GETDATE(), 3), 4, 5) AS [MM/YY] 08/99
MM/YYYY SELECT RIGHT(CONVERT(VARCHAR(10), GETDATE(), 103), 7) AS [MM/YYYY] 12/2005
YY/MM SELECT CONVERT(VARCHAR(5), GETDATE(), 11) AS [YY/MM] 99/08
YYYY/MM SELECT CONVERT(VARCHAR(7), GETDATE(), 111) AS [YYYY/MM] 2005/12
Month DD, YYYY 1
SELECT DATENAME(MM, GETDATE()) + RIGHT(CONVERT(VARCHAR(12), GETDATE(), 107), 9) AS [Month DD, YYYY] July 04, 2006
Mon YYYY 1 SELECT SUBSTRING(CONVERT(VARCHAR(11), GETDATE(), 113), 4, 8) AS [Mon YYYY] Apr 2006 1
Month YYYY 1 SELECT DATENAME(MM, GETDATE()) + ' ' + CAST(YEAR(GETDATE()) AS VARCHAR(4)) AS [Month YYYY] February 2006
DD Month 1 SELECT CAST(DAY(GETDATE()) AS VARCHAR(2)) + ' ' + DATENAME(MM, GETDATE()) AS [DD Month] 11 September
Month DD 1 SELECT DATENAME(MM, GETDATE()) + ' ' + CAST(DAY(GETDATE()) AS VARCHAR(2)) AS [Month DD] September 11
DD Month YY 1 SELECT CAST(DAY(GETDATE()) AS VARCHAR(2)) + ' ' + DATENAME(MM, GETDATE()) + ' ' + RIGHT(CAST(YEAR(GETDATE()) AS VARCHAR(4)), 2) AS [DD Month YY]
19 February 72 1
DD Month YYYY 1
SELECT CAST(DAY(GETDATE()) AS VARCHAR(2)) + ' ' + DATENAME(MM, GETDATE()) + ' ' + CAST(YEAR(GETDATE()) AS VARCHAR(4)) AS [DD Month YYYY]
11 September 2002 1
MM-YY SELECT RIGHT(CONVERT(VARCHAR(8), GETDATE(), 5), 5) AS [MM-YY]SELECT SUBSTRING(CONVERT(VARCHAR(8), GETDATE(), 5), 4, 5) AS [MM-YY] 12/92
MM-YYYY SELECT RIGHT(CONVERT(VARCHAR(10), GETDATE(), 105), 7) AS [MM-YYYY] 05-2006
YY-MM SELECT RIGHT(CONVERT(VARCHAR(7), GETDATE(), 120), 5) AS [YY-MM]SELECT SUBSTRING(CONVERT(VARCHAR(10), GETDATE(), 120), 3, 5) AS [YY-MM] 92/12
YYYY-MM SELECT CONVERT(VARCHAR(7), GETDATE(), 120) AS [YYYY-MM] 2006-05
MMDDYY SELECT REPLACE(CONVERT(VARCHAR(10), GETDATE(), 1), '/', '') AS [MMDDYY] 122506
MMDDYYYY SELECT REPLACE(CONVERT(VARCHAR(10), GETDATE(), 101), '/', '') AS [MMDDYYYY] 12252006
DDMMYY SELECT REPLACE(CONVERT(VARCHAR(10), GETDATE(), 3), '/', '') AS [DDMMYY] 240702
DDMMYYYY SELECT REPLACE(CONVERT(VARCHAR(10), GETDATE(), 103), '/', '') AS [DDMMYYYY] 24072002
Mon-YY 1 SELECT REPLACE(RIGHT(CONVERT(VARCHAR(9), GETDATE(), 6), 6), ' ', '-') AS [Mon-YY] Sep-02 1
Mon-YYYY 1 SELECT REPLACE(RIGHT(CONVERT(VARCHAR(11), GETDATE(), 106), 8), ' ', '-') AS [Mon-YYYY] Sep-2002 1
43 | P a g e
DD-Mon-YY 1 SELECT REPLACE(CONVERT(VARCHAR(9), GETDATE(), 6), ' ', '-') AS [DD-Mon-YY] 25-Dec-05 1
DD-Mon-YYYY 1 SELECT REPLACE(CONVERT(VARCHAR(11), GETDATE(), 106), ' ', '-') AS [DD-Mon-YYYY] 25-Dec-2005
TRIGGERS IN SQLSERVER
What is a Trigger
A trigger is a special kind of a store procedure that executes in response to certain action on the table like insertion, deletion or updation of data. It is a database object which is bound to a table and is executed automatically. You can’t explicitly invoke triggers. The only way to do this is by performing the required action no the table that they are assigned to.
Types Of Triggers
There are three action query types that you use in SQL which are INSERT, UPDATE and DELETE. So, there are three types of triggers and hybrids that come from mixing and matching the events and timings that fire them.
Basically, triggers are classified into two main types:-
(i) After Triggers (For Triggers) (ii) Instead Of Triggers
AFTER TRIGGERS
These triggers run after an insert, update or delete on a table. They are not supported for views.AFTER TRIGGERS can be classified further into three types as:
(a) AFTER INSERT Trigger.(b) AFTER UPDATE Trigger. (c) AFTER DELETE Trigger.
Let’s create Aftertriggers. First of all, let’s create a table and insert some sample data. Then, on this table, I will be attaching several triggers.
CREATE TABLE Employee_Test(Emp_ID INT Identity,Emp_nameVarchar(100),Emp_Sal Decimal (10,2))
44 | P a g e
INSERT INTO Employee_Test VALUES ('Anees',1000);INSERT INTO Employee_Test VALUES ('Rick',1200);INSERT INTO Employee_Test VALUES ('John',1100);INSERT INTO Employee_Test VALUES ('Stephen',1300);INSERT INTO Employee_Test VALUES ('Maria',1400);
I will be creating an AFTER INSERT TRIGGER which will insert the rows inserted into the table into another audit table. The main purpose of this audit table is to record the changes in the main table. This can be thought of as a generic audit trigger.
Now, create the audit table as:- CREATE TABLE Employee_Test_Audit(Emp_IDint,Emp_namevarchar(100),Emp_Sal decimal (10,2),Audit_Actionvarchar(100),Audit_Timestampdatetime)
(a) AFTER INSERT Trigger
This trigger is fired after an INSERT on the table. Let’s create the trigger as:- CREATE TRIGGER trgAfterInsert ON [dbo].[Employee_Test] FOR INSERTAS
declare @empidint;declare @empnamevarchar(100);declare @empsal decimal(10,2);declare @audit_actionvarchar(100);
select @empid=i.Emp_ID from inserted i;select @empname=i.Emp_Name from inserted i;select @empsal=i.Emp_Sal from inserted i;set @audit_action='Inserted Record -- After Insert Trigger.';
insert into Employee_Test_Audit (Emp_ID,Emp_Name,Emp_Sal,Audit_Action,Audit_Timestamp)
values(@empid,@empname,@empsal,@audit_action,getdate());
PRINT 'AFTER INSERT trigger fired.'GO
The CREATE TRIGGER statement is used to create the trigger. THE ON clause specifies the table name on which the trigger is to be attached. The FOR INSERT specifies that this is an AFTER INSERT trigger. In place of FOR INSERT, AFTER INSERT can be used. Both of them mean the same. In the trigger body, table named inserted has been used. This table is a logical table and contains the row that has been inserted. I have selected the fields from the logical inserted table from the row that has been inserted into different variables, and finally inserted those values into the Audit table. To see the newly created trigger in action, lets insert a row into the main table as :insert into Employee_Test values('Chris',1500);
Now, a record has been inserted into the Employee_Test table. The AFTER INSERT trigger attached to this table has inserted the record into the Employee_Test_Audit as:-
45 | P a g e

6Chris 1500.00 Inserted Record -- After Insert Trigger. 2008-04-2612:00:55.700
(b) AFTER UPDATE Trigger
This trigger is fired after an update on the table. Let’s create the trigger as:-CREATE TRIGGER trgAfterUpdate ON [dbo].[Employee_Test] FOR UPDATEAS
declare @empidint;declare @empnamevarchar(100);declare @empsal decimal(10,2);declare @audit_actionvarchar(100);
select @empid=i.Emp_ID from inserted i;select @empname=i.Emp_Name from inserted i;select @empsal=i.Emp_Sal from inserted i;
if update(Emp_Name)set @audit_action='Updated Record -- After Update Trigger.';
if update(Emp_Sal)set @audit_action='Updated Record -- After Update Trigger.';
insert into Employee_Test_Audit(Emp_ID,Emp_Name,Emp_Sal,Audit_Action,Audit_Timestamp)
values(@empid,@empname,@empsal,@audit_action,getdate());
PRINT 'AFTER UPDATE Trigger fired.'GO
The AFTER UPDATE Trigger is created in which the updated record is inserted into the audit table. There is no logical table updated like the logical table inserted. We can obtain the updated value of a field from the update(column_name) function. In our trigger, we have used, if update(Emp_Name) to check if the column Emp_Name has been updated. We have similarly checked the column Emp_Sal for an update. Let’s update a record column and see what happens. updateEmployee_Test set Emp_Sal=1550 where Emp_ID=6
This inserts the row into the audit table as:- 6 Chris1550.00 Updated Record -- After Update Trigger. 2008-04-2612:38:11.843
(c) AFTER DELETE Trigger
This trigger is fired after a delete on the table. Let’s create the trigger as:- CREATE TRIGGER trgAfterDelete ON [dbo].[Employee_Test] AFTER DELETEAS
declare @empidint;declare @empnamevarchar(100);declare @empsal decimal(10,2);declare @audit_actionvarchar(100);
select @empid=d.Emp_ID from deleted d;select @empname=d.Emp_Name from deleted d;select @empsal=d.Emp_Sal from deleted d;set @audit_action='Deleted -- After Delete Trigger.';
insert into Employee_Test_Audit
46 | P a g e

(Emp_ID,Emp_Name,Emp_Sal,Audit_Action,Audit_Timestamp) values(@empid,@empname,@empsal,@audit_action,getdate());
PRINT 'AFTER DELETE TRIGGER fired.'GO
In this trigger, the deleted record’s data is picked from the logical deleted table and inserted into the audit table. Let’s fire a delete on the main table. A record has been inserted into the audit table as:- 6 Chris 1550.00 Deleted -- After Delete Trigger. 2008-04-2612:52:13.867
All the triggers can be enabled/disabled on the table using the statement ALTER TABLE Employee_Test {ENABLE|DISBALE} TRIGGER ALL
Specific Triggers can be enabled or disabled as :- ALTER TABLE Employee_Test DISABLE TRIGGER trgAfterDelete
This disables the After Delete Trigger named trgAfterDelete on the specified table.
INSTEAD OF TRIGGERS
These can be used as an interceptor for anything that anyonr tried to do on our table or view. If you define an Instead Of trigger on a table for the Delete operation, they try to delete rows, and they will not actually get deleted (unless you issue another delete instruction from within the trigger)INSTEAD OF TRIGGERS can be classified further into three types as:-
(a) INSTEAD OF INSERT Trigger. (b) INSTEAD OF UPDATE Trigger. (c) INSTEAD OF DELETE Trigger.
(a) Let’s create an Instead Of Delete Trigger as:- CREATE TRIGGER trgInsteadOfDelete ON [dbo].[Employee_Test] INSTEAD OF DELETEAS
declare @emp_idint;declare @emp_namevarchar(100);declare @emp_salint;
select @emp_id=d.Emp_ID from deleted d;select @emp_name=d.Emp_Name from deleted d;select @emp_sal=d.Emp_Sal from deleted d;
BEGINif(@emp_sal>1200)begin
RAISERROR('Cannot delete where salary > 1200',16,1);ROLLBACK;
endelsebegin
delete from Employee_Test where Emp_ID=@emp_id;COMMIT;
47 | P a g e
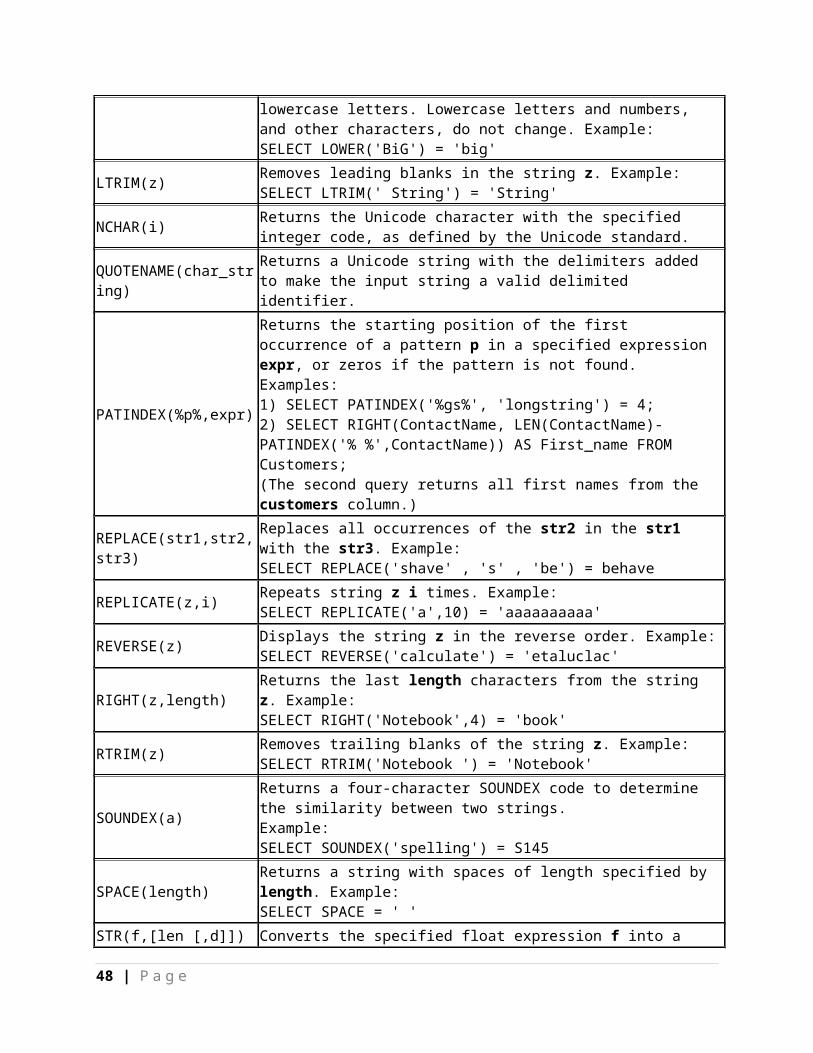
insert into Employee_Test_Audit(Emp_ID,Emp_Name,Emp_Sal,Audit_Action,Audit_Timestamp)
values(@emp_id,@emp_name,@emp_sal,'Deleted -- Instead Of Delete Trigger.',getdate());
PRINT 'Record Deleted -- Instead Of Delete Trigger.'end
ENDGO
This trigger will prevent the deletion of records from the table where Emp_Sal> 1200. If such a record is deleted, the Instead Of Trigger will rollback the transaction, otherwise the transaction will be committed. Now, let’s try to delete a record with the Emp_Sal>1200 as:-
delete from Employee_Test where Emp_ID=4
This will print an error message as defined in the RAISE ERROR statement as:-
Server: Msg50000, Level 16, State 1, Procedure trgInsteadOfDelete, Line 15Cannot delete where salary >1200
And this record will not be deleted. In a similar way, you can code Instead of Insert and Instead Of Update triggers on your tables.
Nested Trigger: - In Sql Server, triggers are said to be nested when the action of one trigger initiates another trigger that may be on the same table or on the different table. For example, suppose there is a trigger t1 defined on the table tbl1 and there is another trigger t2 defined on the table tbl2, if the action of the trigger t1 initiates the trigger t2 then both the triggers are said to be nested. In SQL Server, triggers can be nested up to 32 levels. If the action of nested triggers results in an infinite loop, then after the 32 level, the trigger terminates. Since the triggers are executed within a transaction, therefore failure at any level of within nested triggers can cancel the entire transaction, and it result in total rollback.
Triggers are nested when a trigger performs an action that initiates another trigger, which can initiate another trigger, and so on. Triggers can be nested up to 32 levels, and you can control whether triggers can be nested through the nested triggers server configuration option.
If nested triggers are allowed and a trigger in the chain starts an infinite loop, the nesting level is exceeded and the trigger terminates.
You can use nested triggers to perform useful housekeeping functions such as storing a backup copy of rows affected by a previous trigger. For example, you can create a trigger on titleauthor that saves a backup copy of the titleauthor rows that the delcascadetrig trigger deleted. With the delcascadetrig trigger in effect, deleting title_id PS2091 from titles deletes the corresponding row or rows from titleauthor. To save the data, you create a DELETE trigger on titleauthor that saves the deleted data into another separately created table, del_save. For example:
48 | P a g e

CREATE TRIGGER savedel ON titleauthorFOR DELETEAS INSERT del_save SELECT * FROM deleted
Using nested triggers in an order-dependent sequence is not recommended. Use separate triggers to cascade data modifications.
Note Because triggers execute within a transaction, a failure at any level of a set of nested triggers cancels the entire transaction, and all data modifications are rolled back. Include PRINT statements in your triggers so that you can determine where the failure occurred.
Recursive Triggers
A trigger does not call itself recursively unless the RECURSIVE_TRIGGERS database option is set. There are two types of recursion:
Direct recursion
Occurs when a trigger fires and performs an action that causes the same trigger to fire again. For example, an application updates table T3, which causes trigger Trig3 to fire. Trig3 updates table T3 again, which causes trigger Trig3 to fire again.
Indirect recursion
Occurs when a trigger fires and performs an action that causes another trigger (either on the same table or on another table) to fire. This second trigger performs an action that causes the original trigger to fire again. For example, an application updates table T1, which causes trigger Trig1 to fire. Trig1 updates table T2, which causes trigger Trig2 to fire. Trig2 in turn updates table T1 that causes Trig1 to fire again.
Only direct recursion is prevented when the RECURSIVE_TRIGGERS database option is set to OFF. To disable indirect recursion, set the nested triggers server option to 0, as well.
Examples
A. Use recursive triggers to solve self-referencing relationships
One use for recursive triggers is on a table with a self-referencing relationship (also known as transitive closure). For example, the tableemp_mgr defines:
An employee (emp) in a company.
The manager for each employee (mgr).
49 | P a g e
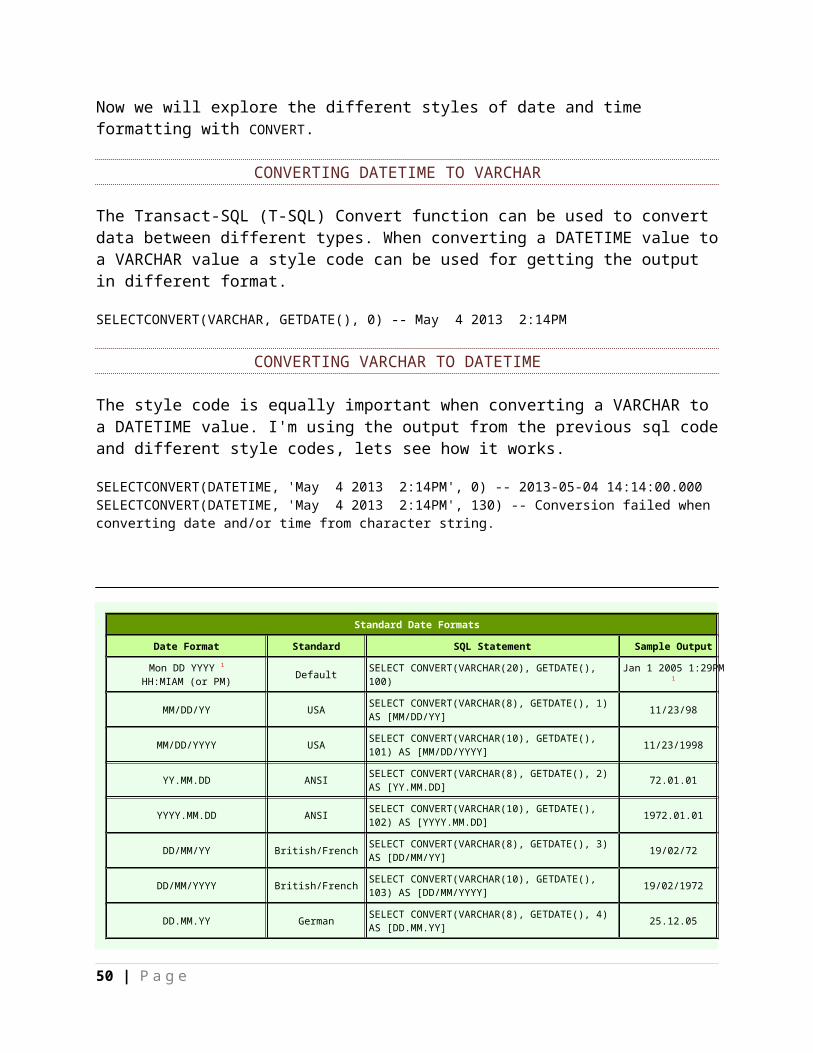
The total number of employees in the organizational tree reporting to each employee (NoOfReports).
A recursive UPDATE trigger can be used to keep the NoOfReports column up-to-date as new employee records are inserted. The INSERT trigger updates the NoOfReports column of the manager record, which recursively updates the NoOfReports column of other records up the management hierarchy.
USE pubsGO-- Turn recursive triggers ON in the database.ALTER DATABASE pubs SET RECURSIVE_TRIGGERS ONGOCREATE TABLE emp_mgr (emp char(30) PRIMARY KEY,mgr char(30) NULL FOREIGN KEY REFERENCES emp_mgr(emp),NoOfReportsint DEFAULT 0)GOCREATE TRIGGER emp_mgrins ON emp_mgrFOR INSERTASDECLARE @e char(30), @m char(30)DECLARE c1 CURSOR FOR SELECT emp_mgr.emp FROM emp_mgr, inserted WHERE emp_mgr.emp = inserted.mgr
OPEN c1FETCH NEXT FROM c1 INTO @eWHILE @@fetch_status = 0BEGIN UPDATE emp_mgr SET emp_mgr.NoOfReports = emp_mgr.NoOfReports + 1 -- Add 1 for newly WHERE emp_mgr.emp = @e -- added employee.
FETCH NEXT FROM c1 INTO @eENDCLOSE c1DEALLOCATE c1GO-- This recursive UPDATE trigger works assuming:-- 1. Only singleton updates on emp_mgr.-- 2. No inserts in the middle of the org tree.CREATE TRIGGER emp_mgrupd ON emp_mgr FOR UPDATEASIF UPDATE (mgr)BEGIN UPDATE emp_mgr SET emp_mgr.NoOfReports = emp_mgr.NoOfReports + 1 -- Increment mgr's FROM inserted -- (no. of reports) by WHERE emp_mgr.emp = inserted.mgr -- 1 for the new report.
UPDATE emp_mgr
50 | P a g e
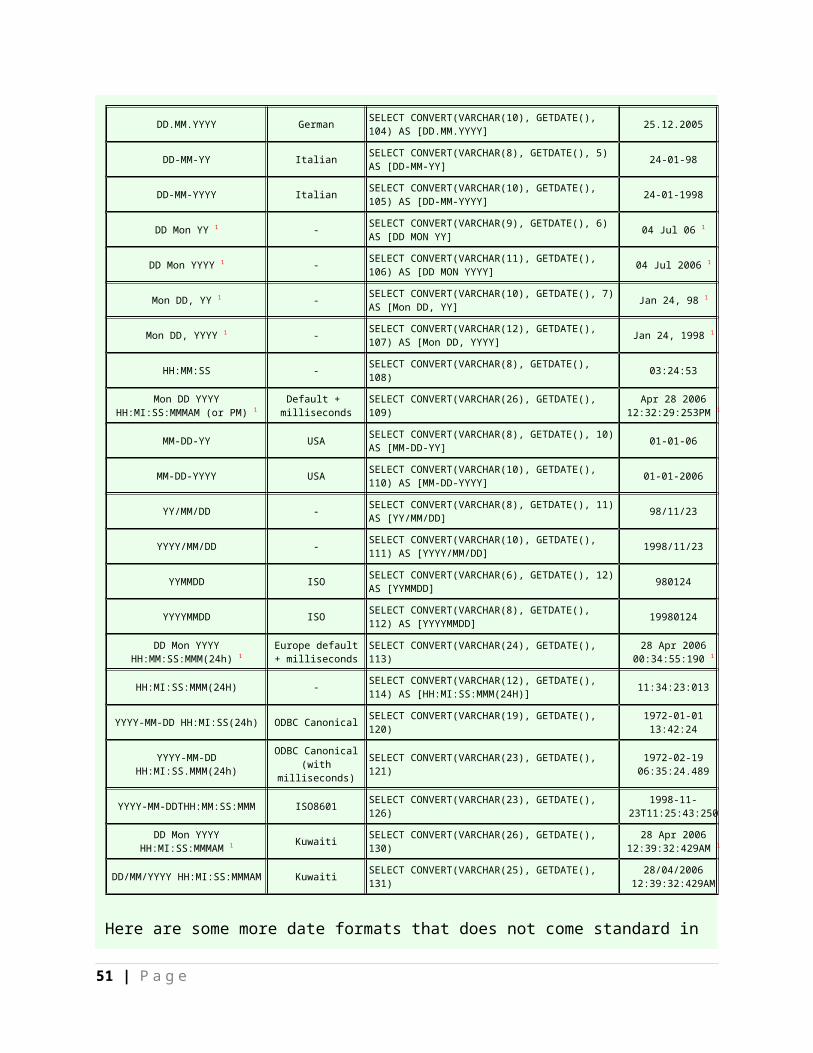
SET emp_mgr.NoOfReports = emp_mgr.NoOfReports - 1 -- Decrement mgr's FROM deleted -- (no. of reports) by 1 WHERE emp_mgr.emp = deleted.mgr -- for the new report.ENDGO-- Insert some test data rows.INSERT emp_mgr(emp, mgr) VALUES ('Harry', NULL)INSERT emp_mgr(emp, mgr) VALUES ('Alice', 'Harry')INSERT emp_mgr(emp, mgr) VALUES ('Paul', 'Alice')INSERT emp_mgr(emp, mgr) VALUES ('Joe', 'Alice')INSERT emp_mgr(emp, mgr) VALUES ('Dave', 'Joe')GOSELECT * FROM emp_mgrGO-- Change Dave's manager from Joe to HarryUPDATE emp_mgr SET mgr = 'Harry'WHERE emp = 'Dave'GOSELECT * FROM emp_mgr
CURSOR
In SQL procedures, a cursor make it possible to define a result set (a set of data rows) and perform complex logic on a row by row basis. By using the same mechanics, an SQL procedure can also define a result set and return it directly to the caller of the SQL procedure or to a client application.
A cursor can be viewed as a pointer to one row in a set of rows. The cursor can only reference one row at a time, but can move to other rows of the result set as needed.
A Cursor impacts the performance of the SQL Server since it uses the SQL Server instances' memory, reduce concurrency, decrease network bandwidth and lock resources. Hence it is mandatory to understand the cursor types and its functions so that you can use suitable cursor according to your needs.
You should avoid the use of cursor. Basically you should use cursor alternatives like as WHILE loop, sub queries, Temporary tables and Table variables.
Type of CURSOR:
Static: This is lowest type of CURSOR and used to use for finding data and generating reports. Once getting the data into the CURSOR you will not identify any modification done in data after retrieving it because it make a copy of your data into the temp table of tempDB.
A static cursor populates the result set at the time of cursor creation and query result is cached for the lifetime of the cursor. A static cursor can move forward and backward direction. A static
51 | P a g e

cursor is slower and use more memory in comparison to other cursor. Hence you should use it only if scrolling is required and other types of cursors are not suitable.
You can't update, delete data using static cursor. It is not sensitive to any changes to the original data source. By default static cursors are scrollable.
Forward_Only: This is the default type of CURSOR and really very similar to Static CURSOR the only difference you will find it, it will move forward only. In short, this CURSOR will scroll from first to last no other movement supported.
Fast_Forward: this is a mixture of Forward Only and Read-only.
Dynamic: this CURSOR will be bit slow as it will accept any data modification done by any user even after you fetch the data because you scroll around the CURSOR. Data membership, value and its order will be changed in each FETCH if any data modification has been done in record set.A dynamic cursor allows you to see the data updation, deletion and insertion in the data source while the cursor is open. Hence a dynamic cursor is sensitive to any changes to the data source and supports update, delete operations. By default dynamic cursors are scrollable.Keyset-Driven: when you open this CURSOR, membership key and order of row are fixed in CURSOR.
Steps for CURSOR:
DECLARE: Defines a CURSOR with standard SELECT statement. This must be done before you open the CURSOR.
OPEN: physically open the CURSOR and received the record set exist in table at the time of opening the CURSOR.
FETCH: CURSOR always points to one row at a time and FETCH is retrieve the value from that row to manipulate it further.
CLOSE: CLOSE will release the lock on table made by CURSOR. If you wish than you can re-open CURSOR after closes it.
DEALLOCATE: Once you are done with CURSOR, do DEALLOCATE it and removes the memory from the server. You can open the CURSOR once you close it but can’t re-open CURSOR once you DEALLOCATE it.
To use cursors in SQL procedures, you need to do the following:
1. Declare a cursor that defines a result set.2. Open the cursor to establish the result set.3. Fetch the data into local variables as needed from the cursor, one row at a time.4. Close the cursor when done
To work with cursors you must use the following SQL statements:
52 | P a g e
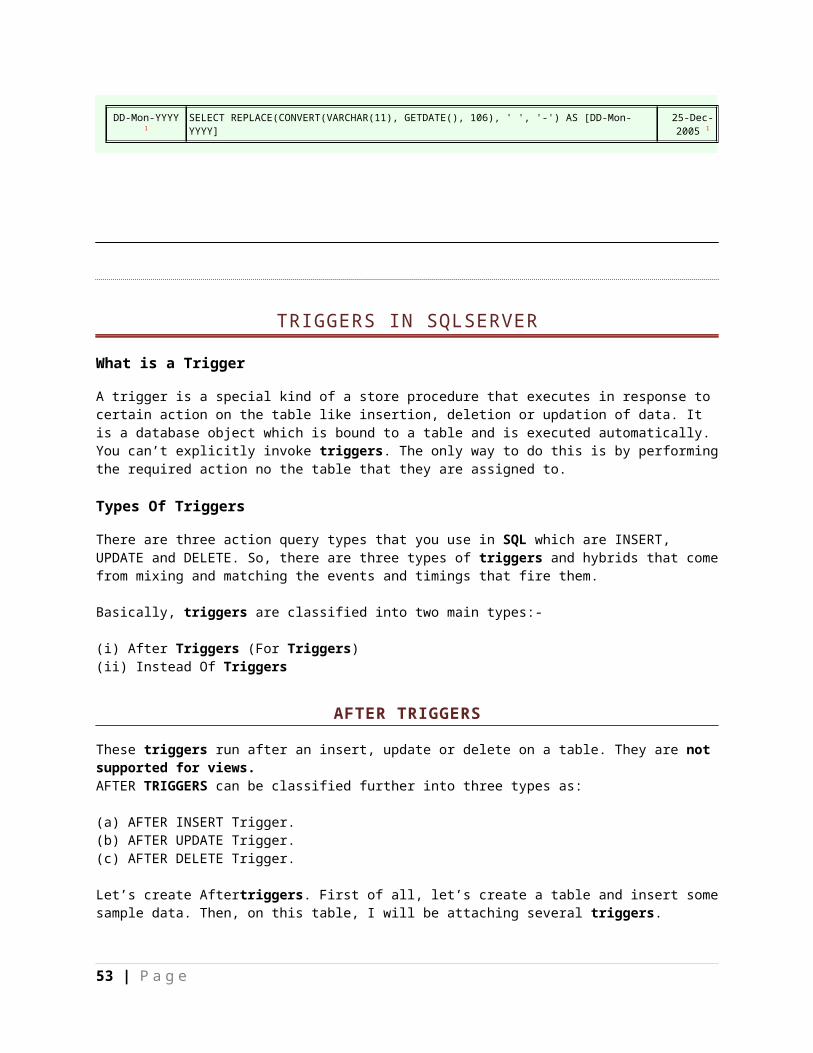
DECLARE CURSOR OPEN FETCH CLOSE
DECLARE @Variable1 INT, @Variable2 INTDECLARE CursorName CURSOR FAST_FORWARDFORSELECT idcol FROM CursorTest
OPEN CursorName
FETCH NEXT FROM CursorNameINTO @Variable1WHILE @@FETCH_STATUS = 0BEGINPRINT CAST(@Variable1 AS VARCHAR(5))FETCH NEXT FROM CursorNameINTO @Variable1ENDCLOSE CursorNameDEALLOCATE CursorName
DECLARE Employee_Cursor CURSOR FORSELECT BusinessEntityID, JobTitleFROM AdventureWorks2008R2.HumanResources.Employee;OPEN Employee_Cursor;FETCH NEXT FROM Employee_Cursor;WHILE @@FETCH_STATUS = 0 BEGIN FETCH NEXT FROM Employee_Cursor; END;CLOSE Employee_Cursor;DEALLOCATE Employee_Cursor;GO
The main option for a cursor is whether the data is on the client or the server.
Client cursors are good for spreading the workload across many workstations.
Server cursors are good for lightweight clients who can't afford to cache a large result set. Server cursors do not support multiple result sets or these SQL keywords: COMPUTE, COMPUTE BY, FOR BROWSE, or INTO.
Types of Cursor
Forward-Only Static Keyset
53 | P a g e
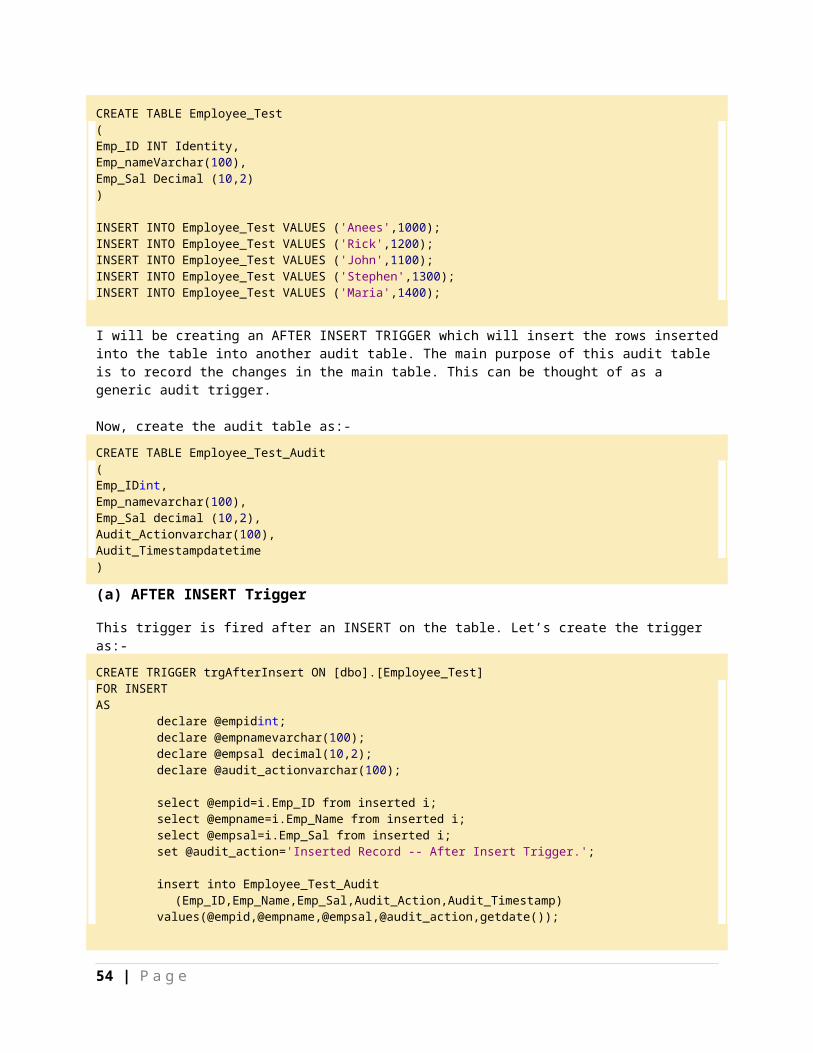
Dynamic
The syntax for specifying a cursor is dependent on the method for making the cursor. SQL Server supports two possible methods for making cursors: via DECLARE CURSOR or via a DB API. Applications should choose one or the other but not both.
USE pubsGODECLARE authors_cursor CURSORFORSELECT au_lname FROM authorsWHERE au_lname LIKE'D%'ORDERBY au_lname OPEN authors_cursorFETCH NEXT FROM authors_cursorWHILE@@FETCH_STATUS= 0BEGINFETCH NEXT FROM authors_cursorENDCLOSE authors_cursorDEALLOCATE authors_cursor
Example SQL Server Cursor :To BackUp all the database in a server
DECLARE @name VARCHAR(50) -- database name DECLARE @path VARCHAR(256) -- path for backup files DECLARE @fileNameVARCHAR(256) -- filename for backup DECLARE @fileDateVARCHAR(20) -- used for file name
SET @path = 'C:\Backup\'
SELECT @fileDate= CONVERT(VARCHAR(20),GETDATE(),112)
DECLARE db_cursorCURSOR FOR SELECT name FROM MASTER.dbo.sysdatabasesWHERE name NOT IN ('master','model','msdb','tempdb')
OPEN db_cursor FETCH NEXT FROM db_cursorINTO @name
WHILE @@FETCH_STATUS = 0 BEGIN SET @fileName= @path + @name + '_' + @fileDate+ '.BAK' BACKUP DATABASE @name TO DISK = @fileName
FETCH NEXT FROM db_cursorINTO @name END
CLOSE db_cursor DEALLOCATE db_cursor
54 | P a g e
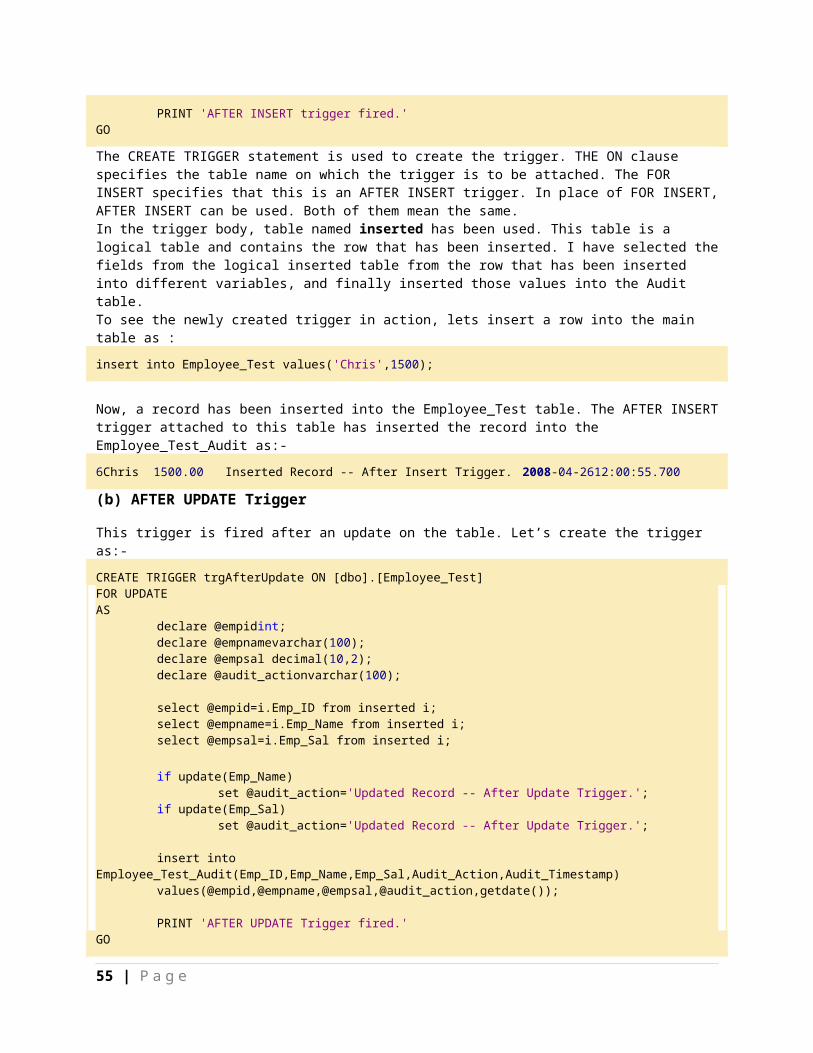
SQL Server Cursor Components
Based on the example above, cursors include these components:
DECLARE statements - Declare variables used in the code block SET\SELECT statements - Initialize the variables to a specific value DECLARE CURSOR statement - Populate the cursor with values that will be evaluated
o NOTE - There are an equal number of variables in the DECLARE <cursor_name> CURSOR FOR statement as there are in the SELECT statement. This could be 1 or many variables and associated columns.
OPEN statement - Open the cursor to begin data processing FETCH NEXT statements - Assign the specific values from the cursor to the variables
o NOTE - This logic is used for the initial population before the WHILE statement and then again during each loop in the process as a portion of the WHILE statement
WHILE statement - Condition to begin and continue data processing BEGIN...END statement - Start and end of the code block
o NOTE - Based on the data processing multiple BEGIN...END statements can be used
Data processing - In this example, this logic is to backup a database to a specific path and file name, but this could be just about any DML or administrative logic
CLOSE statement - Releases the current data and associated locks, but permits the cursor to be re-opened
DEALLOCATE statement - Destroys the cursor
SQL Server 2005
Here is another version of this same process. The overall process is the same, but it uses the new tables in SQL Server 2005. It also uses the Try Catch processing which was discussed in this previous tip, SQL Server 2005 - Try Catch Exception Handling. Both of the examples will produce the same ouput.
BEGIN try DECLARE @table_name VARCHAR(500) ; DECLARE @schema_name VARCHAR(500) ; DECLARE @tab1 TABLE( tablename VARCHAR (500) collate database_default, schemaname VARCHAR(500) collate database_default); DECLARE @temp_table TABLE ( tablename sysname, row_count INT , reserved VARCHAR(50) collate database_default, data VARCHAR(50) collate database_default, index_size VARCHAR(50) collate database_default, unused VARCHAR(50) collate database_default );
55 | P a g e
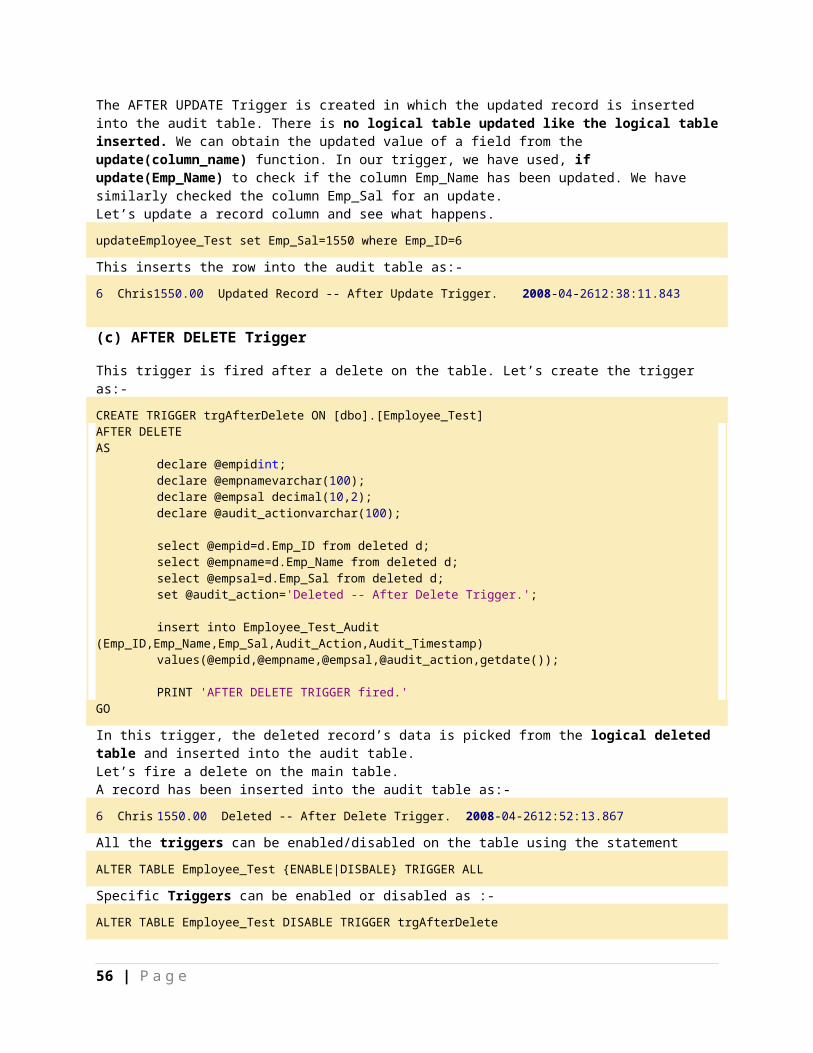
INSERT INTO @tab1 SELECT t1.name , t2.name FROM sys.tables t1 INNER JOIN sys.schemas t2 ON ( t1.schema_id = t2.schema_id );
DECLARE c1 CURSOR FOR SELECT t2.name + '.' + t1.name FROM sys.tables t1 INNER JOIN sys.schemas t2 ON ( t1.schema_id = t2.schema_id );
OPEN c1; FETCH NEXT FROM c1 INTO @table_name; WHILE @@FETCH_STATUS = 0 BEGIN SET @table_name = REPLACE(@table_name, '[',''); SET @table_name = REPLACE(@table_name, ']','');
-- make sure the object exists before calling sp_spacedused IF EXISTS(SELECT OBJECT_ID FROM sys.objects WHERE OBJECT_ID = OBJECT_ID(@table_name)) BEGIN INSERT INTO @temp_table EXEC sp_spaceused @table_name, false ; END FETCH NEXT FROM c1 INTO @table_name; END; CLOSE c1; DEALLOCATE c1; SELECT t1.* , t2.schemaname FROM @temp_table t1 INNER JOIN @tab1 t2 ON (t1.tablename = t2.tablename ) ORDER BY schemaname,tablename; END try BEGIN catch SELECT -100 AS l1 , ERROR_NUMBER() AS tablename, ERROR_SEVERITY() AS row_count, ERROR_STATE() AS reserved , ERROR_MESSAGE() AS data , 1 AS index_size, 1 AS unused, 1 AS schemaname END catch
Here is some sample output after running this against the AdventureWorks database.
56 | P a g e
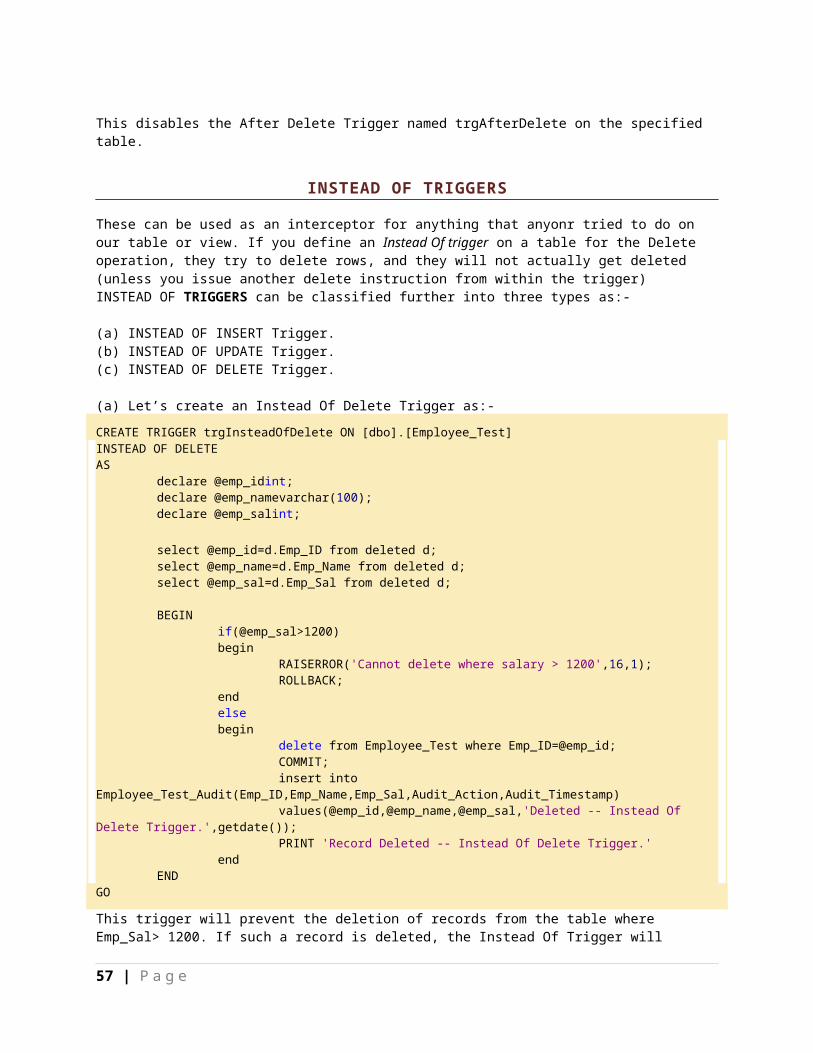
INDEXES IN SQL SERVER
So an index can be defined as:
“An index is an on-disk structure associated with a table or views that speed retrieval of rows from the table or view. An index contains keys built from one or more columns in the table or view”. These keys are stored in a structure (B-tree=) that enables SQL Server to find the row or rows associated with the key values quickly and efficiently.”
“An index is a database object created and maintained by DBMS. It is essentially a list of the contents of a column or group of columns. Indexes are ordered so that extremely first search can be computed through them to find data.”
Why Use an Index?
Use of SQL server indexes provide many facilities such as:
Rapid access of information Efficient access of information Enforcement of uniqueness constraints
Correct use of indexes can make the difference between a top performing database with high customer satisfaction and a non-performing database with low customer satisfaction.
4. Types of Indexes
SQL Server has two major types of indexes:
1. Clustered 2. Non-Clustered
57 | P a g e
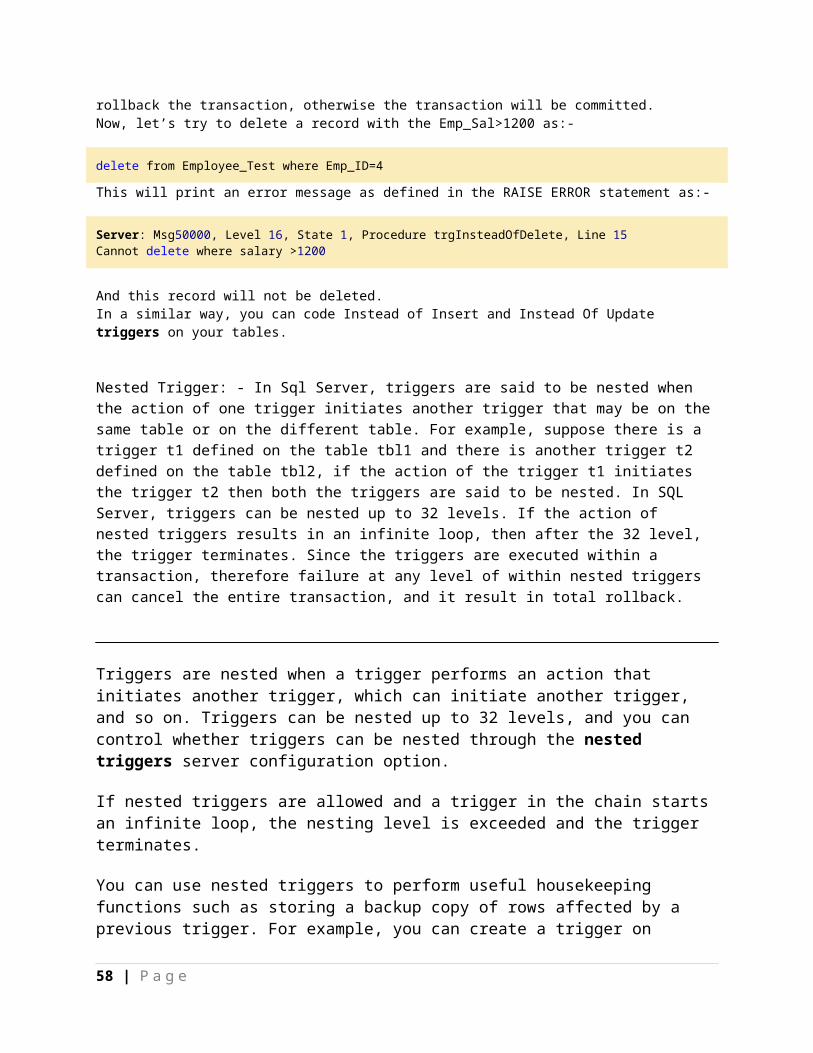
The index type refers to the way the index is stored internally by SQL Server. So a table or view can contain the two types of indexes.
4.1 Clustered
An index defined as being clustered, defines the physical order that the data in a table is stored. Only one cluster can be defined per table. So it can be defined as:
Clustered indexes sort and store the data rows in the table or view based on their key values. These are the columns included in the index definition. There can be only one clustered index per table, because the data rows themselves can be sorted in only one order.
The only time the data rows in a table are stored in sorted order is when the table contains a clustered index. When a table has a clustered index, the table is called a clustered table. If a table has no clustered index, its data rows are stored in an unordered structure called a heap.
4.2 Non-Clustered
As a non-clustered index is stored in a separate structure to the base table, it is possible to create the non-clustered index on a different file group to the base table. So it can be defined as:
Non-Clustered indexes have a structure separate from the data rows. A non-clustered index contains the non-clustered index key values and each key value entry has a pointer to the data row that contains the key value.
The pointer from an index row in a non-clustered index to a data row is called a row locator. The structure of the row locator depends on whether the data pages are stored in a heap or a clustered table. For a heap, a row locator is a pointer to the row. For a clustered table, the row locator is the clustered index key.
You can add nonkey columns to the leaf level of the Non-Clustered index to by-pass existing index key limits, 900 bytes and 16 key columns, and execute fully covered, indexed, queries.
UNIQUENESS
An index can be defined either as unique or non-unique. A unique index ensures that the data contained within the unique index columns appear only once within the table, including “NULL”. A unique index is commonly implemented to support the constraints.
SQLServer automatically enforces the uniqueness of the columns contained within a unique index. If an attempt is made to INSERT a value/data that already exists in the table, then an error will be generated by the SQLServer and finally the attempt to INSERT the data will fail.
A non-unique index is also applicable as there can be duplicate data; a non-unique index has more overhead than a unique index when retrieving data.
CREATING AN INDEX – TRANSACT-SQL
58 | P a g e
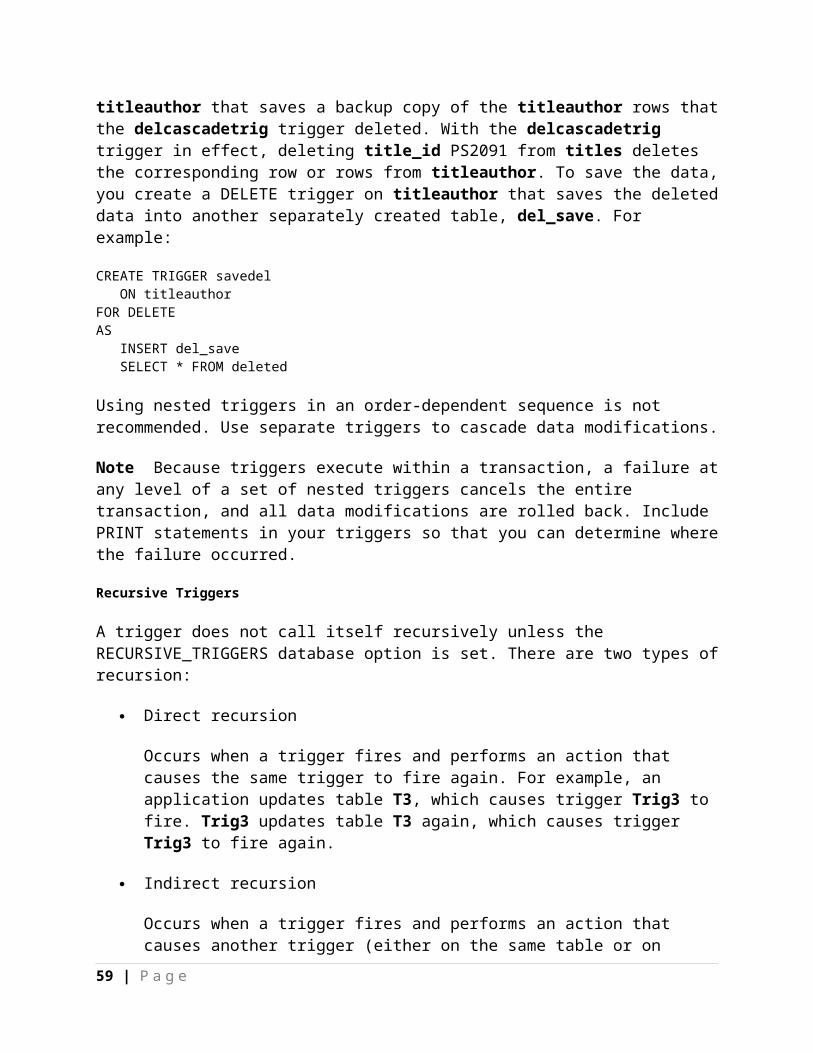
If we want to create an index by using Transact – SQL , we must know the columns detail for index creation. A sample syntax is given below.
SYNTAX
CREATEINDEX<index_type><index_name>ON<table_name> (<column_name1><index_order>,<column_name2><index_order>,)
CREATEUNIQUEINDEX<index_type><index_name>ON<table_name> (<column_name1><index_order>,<column_name2><index_order>,) Syntax:
CREATE [ UNIQUE ] [ CLUSTERED | NONCLUSTERED ] INDEX index_name ON table ( column1, ... )[ WITH [ PAD_INDEX ] [ [ , ] FILLFACTOR = fillfactor1 ] [ [ , ] IGNORE_DUP_KEY ] [ [ , ] DROP_EXISTING ] [ [ , ] STATISTICS_NORECOMPUTE ]][ ON filegroup1 ]
UNIQUEIndicates that a unique index is to be created.
CLUSTEREDIndicates that the index created is a clustered index.
NONCLUSTEREDIndicates that the index created is a nonclustered index.
index_nameIs the name of the index.
tableThe name of the table on which the index is to be created.
column1, ...The column or columns to which the index is to be applied.
PAD_INDEXSpecifies the space to be left open on each page (node) in the intermediate levels of the index. (This is useful only when FILLFACTOR is specified).
FILLFACTOR = fillfactor1Specifies the fillfactor for the index as fillfactor1.
IGNORE_DUP_KEY
CREATE A SINGLE NONCLUSTERED INDEX
CREATEUNIQUENONCLUSTERED INDEXIX_NC_PresidentNumber -- specify index name
59 | P a g e

ONdbo.Presidents (PresidentNumber) -- specify table and column name
CREATE A MULTI-COLUMN (COMPOSITE) NONCLUSTERED INDEX
CREATEUNIQUENONCLUSTERED INDEXIX_NC_PresidentNumber_PresidentName -- specify index name
ONdbo.Presidents (PresidentNumber,PresidentName) -- specify table and column names
CREATE A MULTI-COLUMN (COMPOSITE) CLUSTERED INDEX
CREATEUNIQUECLUSTERED INDEXIX_C_PresidentNumber -- specify index name
ONdbo.Presidents (PresidentNumber,PresidentName) -- specify table and column names
7.3 DROP AN INDEX
Removes one or more indexes from the current database.
The DROP INDEX statement does not apply to indexes created by defining PRIMARY KEY or UNIQUE constraints (created by using the PRIMARY KEY or UNIQUE options of either the CREATE TABLE or ALTER TABLE statements, respectively). For more information about PRIMARY or UNIQUE KEY constraints, see "CREATE TABLE" or "ALTER TABLE" in this volume.
SYNTAX
DROPINDEX'table.index | view.index'[ ,...n ]
BULK INSERT MyTable FROM ‘C:\SpreadSheet.csv’ WITH (fieldterminator = ‘,’,rowterminator = ‘\n’)
Temp Tables
SQL Server provides the concept of temporary table which helps the developer in a great way. These tables can be created at runtime and can do the all kinds of operations that one normal table can do. But, based on the table types, the scope is limited. These tables are created inside tempdb database.
In this article, I am just going to give a quick overview for beginners on those temporary tables. Please give your valuable suggestions and feedback to improve this article.
Different Types of Temporary Tables
SQL Server provides two types of temp tables based on the behavior and scope of the table. These are:
Local Temp Table Global Temp Table
60 | P a g e
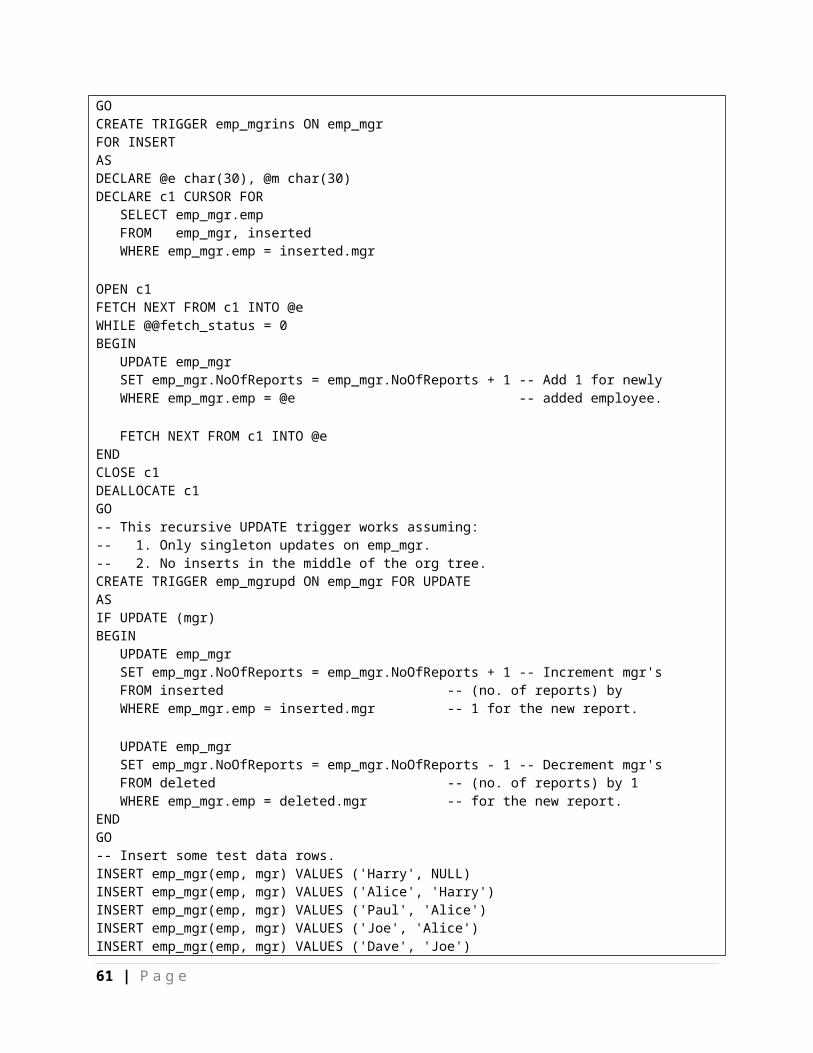
Local Temp Table
Local temp tables are only available to the current connection for the user; and they are automatically deleted when the user disconnects from instances. Local temporary table name is stared with hash ("#") sign.
Global Temp Table
Global Temporary tables name starts with a double hash ("##"). Once this table has been created by a connection, like a permanent table it is then available to any user by any connection. It can only be deleted once all connections have been closed.
Creating Temporary Table in SQL Server 2005
As I have already discussed, there are two types of temporary tables available. Here I am going to describe each of them.
Local Temporary Table
The syntax given below is used to create a local Temp table in SQL Server 2005:
CREATE TABLE #LocalTempTable(UserIDint,UserNamevarchar(50), UserAddressvarchar(150))
The above script will create a temporary table in tempdbdatabase. We can insert or delete records in the temporary table similar to a general table like:
insert into #LocalTempTable values ( 1, 'Abhijit','India');
Now select records from that table:
select * from #LocalTempTable
After execution of all these statements, if you close the query window and again execute "Insert" or "Select" Command, it will throw the following error:
Msg 208, Level 16, State 0, Line 1Invalid object name '#LocalTempTable'.
This is because the scope of Local Temporary table is only bounded with the current connection of current user.
61 | P a g e
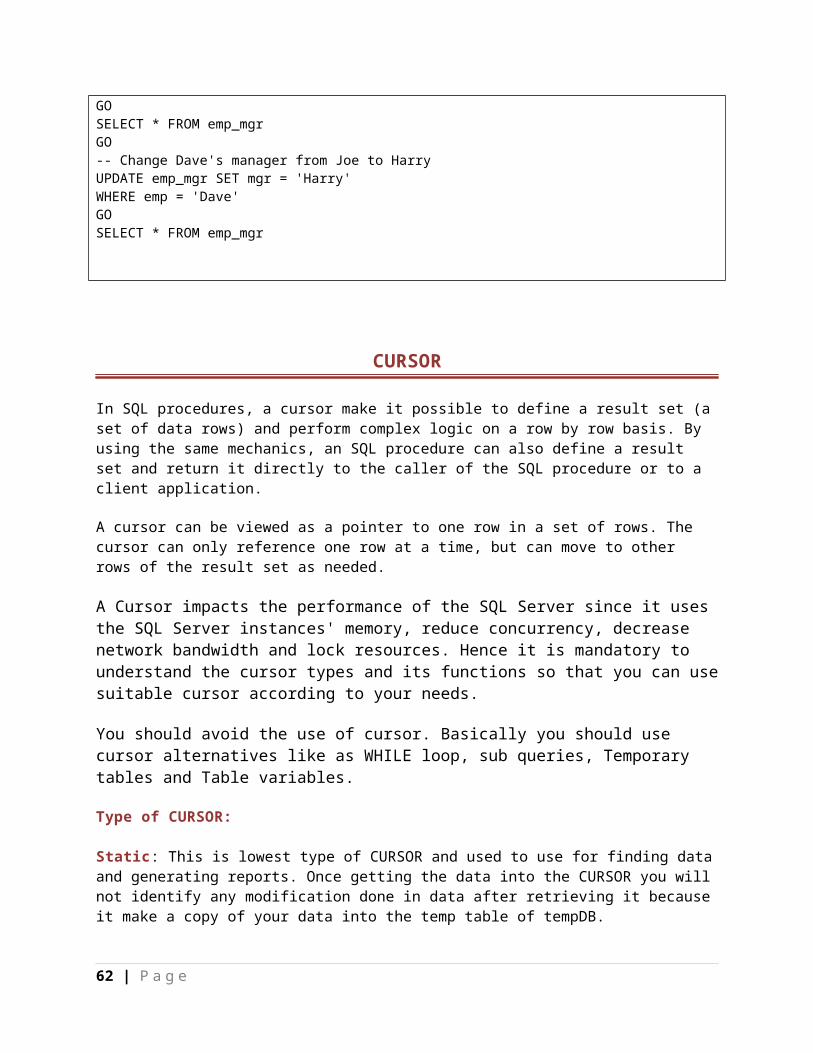
Global Temporary Table
The scope of Global temporary table is the same for the entire user for a particular connection. We need to put "##" with the name of Global temporary tables. Below is the syntax for creating a Global Temporary Table:
CREATE TABLE ##NewGlobalTempTable(UserIDint,UserNamevarchar(50), UserAddressvarchar(150))
The above script will create a temporary table in tempdb database. We can insert or delete records in the temporary table similar to a general table like:
insert into ##NewGlobalTempTable values ( 1, 'Abhijit','India');
Now select records from that table:
select * from ##NewGlobalTempTable
Global temporary tables are visible to all SQL Server connections. When you create one of these, all the users can see it.
Storage Location of Temporary Table
Temporary tables are stored inside the Temporary Folder of tempdb. Whenever we create a temporary table, it goes to Temporary folder of tempdb database.
Now, if we deeply look into the name of Local Temporary table names, a 'dash' is associated with each and every table name along with an ID. Have a look at the image below:
62 | P a g e

SQL server does all this automatically, we do not need to worry about this; we need to only use the table name.
When to Use Temporary Tables?
Below are the scenarios where we can use temporary tables:
When we are doing large number of row manipulation in stored procedures. This is useful to replace the cursor. We can store the result set data into a temp table, then
we can manipulate the data from there. When we are having a complex join operation.
Points to Remember Before Using Temporary Tables
Temporary table created on tempdbof SQL Server. This is a separate database. So, this is an additional overhead and can causes performance issues.
Number of rows and columns need to be as minimum as needed. Tables need to be deleted when they are done with their work.
Alternative Approach: Table Variable
Alternative of Temporary table is the Table variable which can do all kinds of operations that we can perform in Temp table. Below is the syntax for using Table variable.
Declare @TempTableVariable TABLE (UserIDint,UserNamevarchar(50), UserAddressvarchar(150))The below scripts are used to insert and read the records for Tablevariables:
insert into @TempTableVariable values ( 1, 'Abhijit','India');Now select records from that tablevariable: select * from @TempTableVariable
When to Use Table Variable Over Temp Table
Tablevariable is always useful for less data. If the result set returns a large number of records, we need to go for temp table.
DECLARE@TempCustomerTABLE( CustomerIduniqueidentifier, FirstNamenvarchar(100), LastNamenvarchar(100), Email nvarchar(100));INSERTINTO@TempCustomerSELECTCustomerId,FirstName,LastName, Email FROM CustomerWHERECustomerId=@CustomerId
63 | P a g e
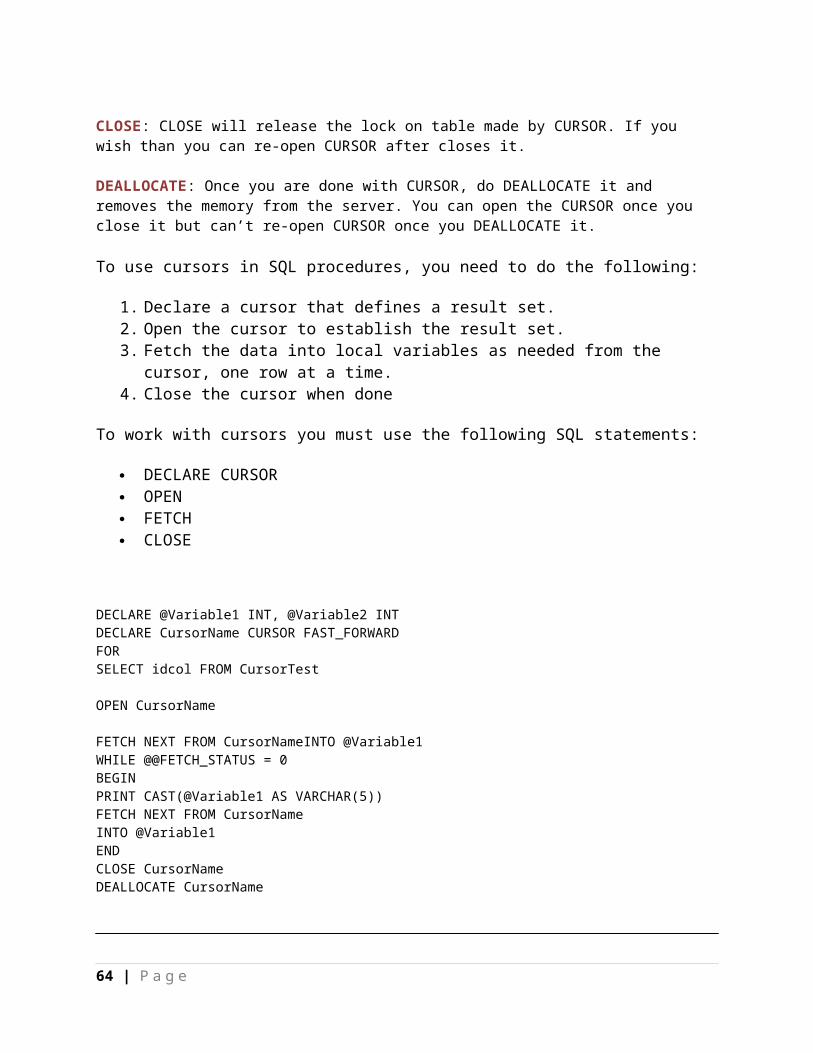
select*from(select cr.name,cr.coursename from candidate_registration cr innerjoin courses_detail cdon cr.COURSEID = CD.COURSEID) emp wherenamelike'eil%'
CASE STATEMENTSThe basic syntax for a simple CASE expressions is shown below: CASE expression
WHEN expression1 THEN expression1[[WHEN expression2 THEN expression2] [...]][ELSE expressionN]
END
Syntax:CASE expressionWHEN expression1 THEN expression1[[WHEN expression2 THEN expression2] [...]][ELSE expressionN]ENDExample:
DECLARE @TestValINTSET @TestVal= 3SELECTCASE @TestValWHEN 1 THEN 'First'WHEN 2 THEN 'Second'WHEN 3 THEN 'Third'ELSE 'Other'END
CASE :
SELECT empID,empname,CASE gender WHEN 'M' THEN 'Male' WHEN 'F' THEN 'Female' ELSE 'NA' END FROM employee
EXAMPLE OF CASE :
SELECT STUDENTID,SUB_SCIENCE,Grade=CASEWHEN SUB_SCIENCE > 60 THEN'FIRST'WHEN SUB_SCIENCE > 45 and SUB_SCIENCE > 60 THEN'SECOND'WHEN SUB_SCIENCE > 45 and SUB_SCIENCE < 35 THEN'THIRD'ENDFROM STUDENTMARKS
WHILE LOOP:
DECLARE @intFlagINTSET @intFlag= 1
64 | P a g e

WHILE (@intFlag<=5)BEGINPRINT @intFlagSET @intFlag= @intFlag+ 1ENDEXAMPLE OF TABLE USING WHILE LOOP
createtablehospitals(IDintidentity(1,1),HospitalIDint,Emailnvarchar(200),Descriptionnvarchar(200))CREATEPROCEDUREpopulateHospitalsASBEGINDECLARE@hidINTSET@hid=16;WHILE@hid< 100BEGININSERThospitals([HospitalID],Email,Description)VALUES(@hid,'user'+LTRIM(STR(@hid))+'@mail.com','Sample Description'+LTRIM(STR(@hid)));SET@hid=@hid+ 1;ENDENDEXECpopulateHospitalsSELECT*FROMhospitals
DECLARE@uniqueIdintDECLARE@TEMPTABLE(uniqueIdint) -- Insert into the temporary table a list of the records to be updatedINSERTINTO@TEMP(uniqueId)SELECTuniqueId FROMmyTable -- Start looping through the recordsWHILE EXISTS (SELECT* FROM@TEMP)BEGIN -- Grab the first record out SELECTTop1 @uniqueId = uniqueId FROM@TEMP PRINT 'Working on @uniqueId = '+ CAST(@uniqueId asvarchar(100)) -- Perform some update on the record UPDATEmyTable SETmyField = 'something or other'WHEREuniqueId = @uniqueId -- Drop the record so we can move onto the next one DELETEFROM@TEMPWHEREuniqueId = @uniqueIdEND
65 | P a g e

EXCEPTION HANDLING
BEGIN TRY { sql_statement | statement_block }END TRYBEGIN CATCH [ {sql_statement | statement_block } ]END CATCH[ ; ]
sql_statementIs any Transact-SQL statement.
statement_blockAny group of Transact-SQL statements in a batch or enclosed in a BEGIN…END block.
A TRY…CATCH construct catches all execution errors that have a severity higher than 10 that do not close the database connection.
A TRY block must be immediately followed by an associated CATCH block. Including any other statements between the END TRY and BEGIN CATCH statements generates a syntax error.
A TRY…CATCH construct cannot span multiple batches. A TRY…CATCH construct cannot span multiple blocks of Transact-SQL statements. For example, a TRY…CATCH construct cannot span two BEGIN…END blocks of Transact-SQL statements and cannot span an IF…ELSE construct.
If any part of the error information must be returned to the application, the code in the CATCH block must do so by using mechanisms such as SELECT result sets or the RAISERROR and PRINT statements.
TRY…CATCH constructs can be nested. Either a TRY block or a CATCH block can contain nested TRY…CATCH constructs. For example, a CATCH block can contain an embedded TRY…CATCH construct to handle errors encountered by the CATCH code.
Errors encountered in a CATCH block are treated like errors generated anywhere else. If the CATCH block contains a nested TRY…CATCH construct, any error in the nested TRY block will pass control to the nested CATCH block. If there is no nested TRY…CATCH construct, the error is passed back to the caller.
TRY…CATCH constructs catch unhandled errors from stored procedures or triggers executed by the code in the TRY block. Alternatively, the stored procedures or triggers can contain their own TRY…CATCH constructs to handle errors generated by their code. For example, when a TRY block executes a stored procedure and an error occurs in the stored procedure, the error can be handled in the following ways:
If the stored procedure does not contain its own TRY…CATCH construct, the error returns control to the CATCH block associated with the TRY block that contains the EXECUTE statement.
If the stored procedure contains a TRY…CATCH construct, the error transfers control to the CATCH block in the stored procedure. When the CATCH block code finishes, control is passed back to the statement immediately after the EXECUTE statement that called the stored procedure.
66 | P a g e

GOTO statements cannot be used to enter a TRY or CATCH block. GOTO statements can be used to jump to a label inside the same TRY or CATCH block or to leave a TRY or CATCH block.
The TRY…CATCH construct cannot be used in a user-defined function.
Retrieving Error Information
In the scope of a CATCH block, the following system functions can be used to obtain information about the error that caused the CATCH block to be executed:
ERROR_NUMBER() returns the number of the error. ERROR_SEVERITY() returns the severity. ERROR_STATE() returns the error state number. ERROR_PROCEDURE() returns the name of the stored procedure or trigger where the error
occurred. ERROR_LINE() returns the line number inside the routine that caused the error. ERROR_MESSAGE() returns the complete text of the error message. The text includes the values
supplied for any substitutable parameters, such as lengths, object names, or times.
These functions return NULL if they are called outside the scope of the CATCH block. Error information can be retrieved by using these functions from anywhere within the scope of the CATCH block. For example, the following script shows a stored procedure that contains error-handling functions. In the CATCH block of a TRY…CATCH construct, the stored procedure is called and information about the error is returned.
USE AdventureWorks2012;-- Verify that the stored procedure does not already exist.IF OBJECT_ID ( 'usp_GetErrorInfo', 'P' ) IS NOT NULL DROP PROCEDURE usp_GetErrorInfo;-- Create procedure to retrieve error information.CREATE PROCEDURE usp_GetErrorInfoASSELECT ERROR_NUMBER() AS ErrorNumber,ERROR_SEVERITY() AS ErrorSeverity,ERROR_STATE() AS ErrorState,ERROR_PROCEDURE() AS ErrorProcedure,ERROR_LINE() AS ErrorLine,ERROR_MESSAGE() AS ErrorMessage;GO
BEGIN TRY -- Generate divide-by-zero error. SELECT 1/0;END TRYBEGIN CATCH -- Execute error retrieval routine. EXECUTE usp_GetErrorInfo;END CATCH; Errors Unaffected by a TRY…CATCH ConstructTRY…CATCH constructs do not trap the following conditions:
67 | P a g e
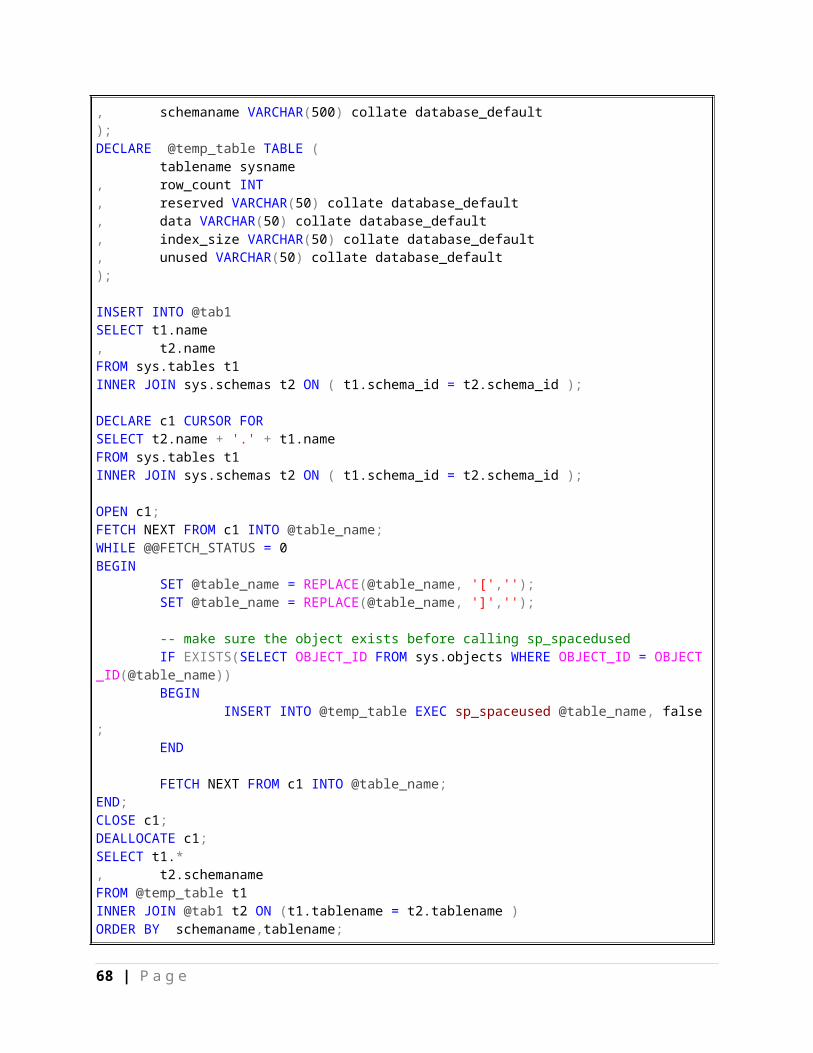
Warnings or informational messages that have a severity of 10 or lower. Errors that have a severity of 20 or higher that stop the SQL Server Database Engine task
processing for the session. If an error occurs that has severity of 20 or higher and the database connection is not disrupted, TRY…CATCH will handle the error.
Attentions, such as client-interrupt requests or broken client connections. When the session is ended by a system administrator by using the KILL statement.
The following types of errors are not handled by a CATCH block when they occur at the same level of execution as the TRY…CATCH construct:
Compile errors, such as syntax errors, that prevent a batch from running. Errors that occur during statement-level recompilation, such as object name resolution errors
that occur after compilation because of deferred name resolution.
These errors are returned to the level that ran the batch, stored procedure, or trigger.
If an error occurs during compilation or statement-level recompilation at a lower execution level (for example, when executing sp_executesql or a user-defined stored procedure) inside the TRY block, the error occurs at a lower level than the TRY…CATCH construct and will be handled by the associated CATCH block.
The following example shows how an object name resolution error generated by a SELECT statement is not caught by the TRY…CATCH construct, but is caught by the CATCH block when the same SELECT statement is executed inside a stored procedure.
BEGIN TRY -- Table does not exist; object name resolution -- error not caught. SELECT * FROM NonexistentTable;END TRYBEGIN CATCH SELECT ERROR_NUMBER() AS ErrorNumber,ERROR_MESSAGE() AS ErrorMessage;END CATCH
The error is not caught and control passes out of the TRY…CATCH construct to the next higher level.
Running the SELECT statement inside a stored procedure will cause the error to occur at a level lower than the TRY block. The error will be handled by the TRY…CATCH construct.
-- Verify that the stored procedure does not exist.IF OBJECT_ID ( N'usp_ExampleProc', N'P' ) IS NOT NULL DROP PROCEDURE usp_ExampleProc;GO-- Create a stored procedure that will cause an -- object resolution error.CREATE PROCEDURE usp_ExampleProcAS SELECT * FROM NonexistentTable;GOBEGIN TRY
68 | P a g e
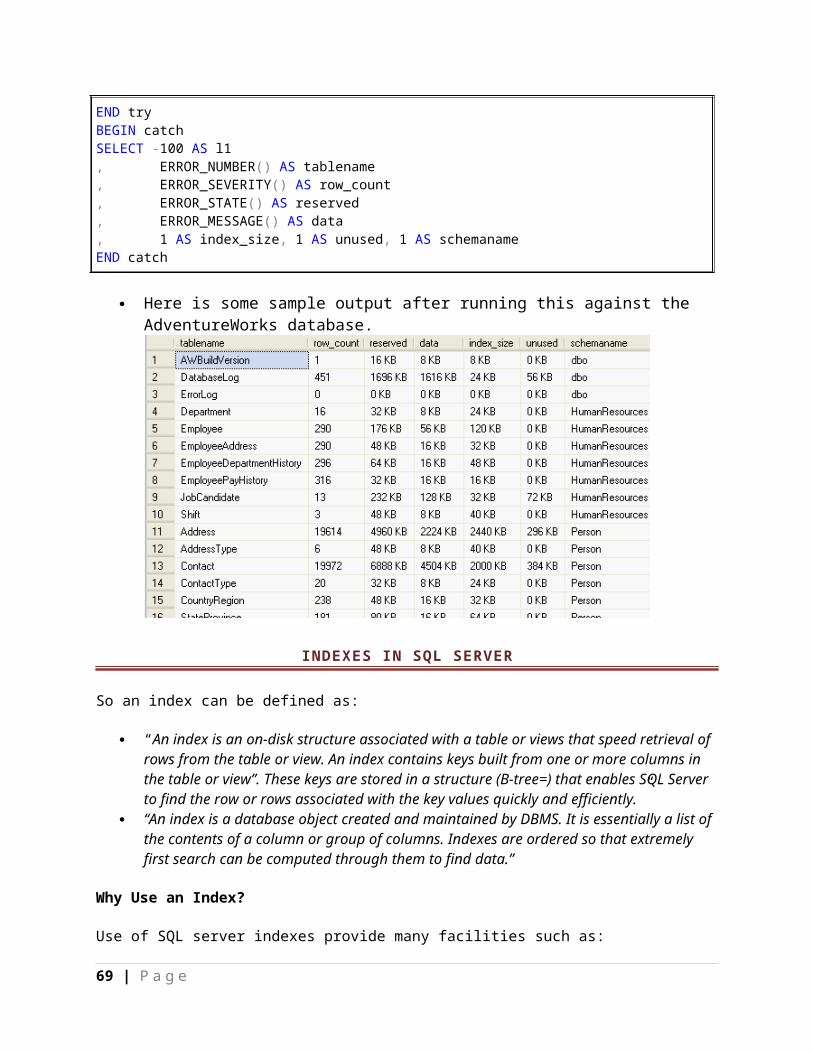
EXECUTE usp_ExampleProc;END TRYBEGIN CATCH SELECT ERROR_NUMBER() AS ErrorNumber,ERROR_MESSAGE() AS ErrorMessage;END CATCH;
ADDING CUSTOM ERROR MESSAGES
SP_addmessage:
We use the SP_admessage Stored Procedure to define a User Defined Custom Error Message. This Stored Procedure adds a record to the sys.message system view.A User Defined message should have a message number of 50000 or higher with a severity of 1 to 25.
Syntax:
sp_addmessage [ @msgnum = ] msg_id ,[ @severity = ] severity ,[ @msgtext = ] 'msg'[ , [ @lang = ] language' ][ , [ @with_log = ] 'with_log' ][ , [ @replace = ] 'replace' ]
Here mcg_id is the id of the message which can be between 50000 and 2147483647.
The severity is the level of the message which can be between 1 and 25. For User Defined messages we can use it a value of 0 to 19. The severity level between 20 to 25 can be set by the administrator. Severity levels from 20 through 25 are considered fatal.
The actual error message is "msg", which uses a data type of nvarchar(255). The maximum characters limit is 2,047. Any more than that will be truncated.
The language is used if you want to specify any language. Replace is used when the same message number already exists, but you want to replace the string for that ID, you have to use this parameter.
RAISERROR:
The RAISERROR statement generates an error message by either retrieving the message from the sys.messages catalog view or constructing the message string at runtime. It is used to invoke the the User Defined error message. First we create a User Defined error message using SP_addmessage and after that we invoke that by the use of RAISERROR.
Syntax:
RAISERROR ( { msg_id }{ ,severity ,state }[ ,argument [ ,...n ] ] )[ WITH option [ ,...n ] ]
Example:
EXECsp_addmessage500021,10,'THis error message is created by ENOSIS LEARNING'goRAISERROR (500021, 10, 1)
69 | P a g e
Output:
Replacement of Message.
EXECsp_addmessage500021,10,'Previous error message is replaced by ENOSIS LEARNING',@lang='us_english',@with_log='false',@replace='replace'GORAISERROR (500021, 10, 1)
Output:
Altering the message:
execsp_altermessage500021,@parameter='with_log', @parameter_value='true'
70 | P a g e

Output:
Droping the message:
execsp_dropmessage500021Output:
USE masterEXEC sp_addmessage 50001, 1, N'This message is not that big of a deal. This is not caught by error handling, and prints this message to the screen.';
EXEC sp_addmessage 50002, 16, N'This actually causes an error, and is caught by error-handling';
EXEC sp_addmessage 50003, 20, N'This causes an error, and stops any further processing. This is not caught by error handling.';
EXECsp_addmessage50001, 1,N'This message is not that big of a deal. This is not caught by error handling, and prints this message to the screen.';EXECsp_addmessage50002, 16,N'This actually causes an error, and is caught by error-handling';EXECsp_addmessage50003, 20,N'This causes an error, and stops any further processing. This is not caught by error handling.';
Using custom error messages
Now that my custom error messages are defined, I can use them inside my database engine. To invoke these errors, I'll use the RAISERROR TSQL construct. RAISERROR accepts an error number, a severity level, and a state number.
The following snippet uses RAISERROR inside of a TRY...CATCH construct. I am including the WITH LOG option of the RAISERROR statement to write the error message to the
71 | P a g e
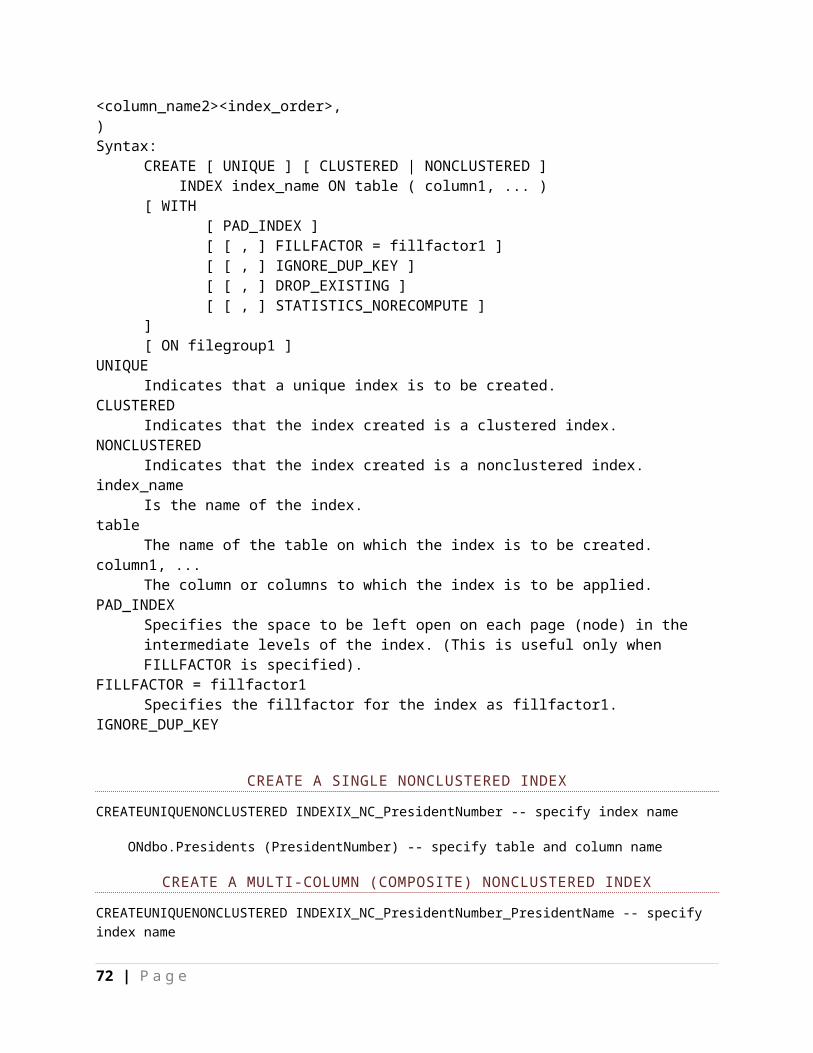
application log so that I can review it later if necessary. (This particular error does not invoke the CATCH block due to the severity of the error.)
BEGIN TRY RAISERROR (50001, 1, 1) WITH LOGEND TRYBEGIN CATCH SELECT ERROR_MESSAGE (), ERROR_NUMBER()END CATCH
This statement invokes the second custom error message I define above. This message has a defined severity of 16, which will get caught by my CATCH statement. These types of error messages are some of the more commonly seen messages inside the SQL Server database engine.
BEGIN TRY RAISERROR (50002,16,1) WITH LOGEND TRYBEGIN CATCH SELECT ERROR_MESSAGE (), ERROR_NUMBER ()END CATCH
This final snippet calls the third custom message defined above. Due to the severity level defined in this custom error, the CATCH block is not invoked; in fact, the statement and connection is immediately terminated.
BEGIN TRY RAISERROR (50003, 20,1) WITH LOGEND TRYBEGIN CATCH SELECT ERROR_MESSAGE(), ERROR_NUMBER ()END CATCH
After I run the above statement, I receive the following error:
Msg 2745, Level 16, State 2, Line 2Process ID 51 has raised user error 50003, severity 20. SQL Server is terminating this process.
Msg 50003, Level 20, State 1, Line 2This causes an error, and stops any further processing. This is not caught by error handling.
Msg 0, Level 20, State 0, Line 0A severe error occurred on the current command. The results, if any, should be discarded.
The error is marked as so severe that if I were to run the same statement again, I receive the following error:
Msg 233, Level 20, State 0, Line 0
72 | P a g e
A transport-level error has occurred when receiving results from the server. (provider: Shared Memory Provider, error: 0 - No process is on the other end of the pipe.)This error states that the connection has been terminated.ExampleALTERprocedure [dbo].[esp_insert](@id int,@name nvarchar(200),@salary int)asbeginbegintryinsertinto emp values(@id,@name,@salary)RAISERROR (50001, 1, 1)WITHLOGendtrybegincatchSELECTERROR_NUMBER()AS ErrorNumber,ERROR_MESSAGE()AS ErrorMessageendcatchendexec esp_insert1,'amit',20000
TRANSACTIONS IN SQL SERVER
CREATE PROCEDURE addTitle(@title_id VARCHAR(6), @au_id VARCHAR(11), @title VARCHAR(20), @title_type CHAR(12))AS
BEGIN TRAN INSERT titles(title_id, title, type) VALUES (@title_id, @title, @title_type)
73 | P a g e
IF (@@ERROR <> 0) BEGIN PRINT 'Unexpected error occurred!' ROLLBACK TRAN RETURN 1 END
INSERT titleauthor(au_id, title_id) VALUES (@au_id, @title_id)
IF (@@ERROR <> 0) BEGIN PRINT 'Unexpected error occurred!' ROLLBACK TRAN RETURN 1 END
COMMIT TRANRETURN 0
BEGIN TRANBEGINTRYinsertinto EMPLOYEE_DETAIL values ('test1',GETDATE())insertinto EMPLOYEE_DETAIL values ('test1','2012/32/32')ENDTRYBEGINCATCHROLLBACK TRANENDCATCHCOMMIT TRANYou can use savepoints in rolling back portions of transactions to predefined locations. A T-SQL savepoint defines a location to which a transaction can return if part of the transaction is conditionally canceled.
Keep in mind that SQL updates and rollbacks generally are expensive operations. So savepoints are useful only in situations where errors are unlikely and checking the validity of an update beforehand is relatively costly.
The syntax for typical server savepoint usage (where SAVE TRANSACTION permissions default to any valid user) is:
SAVE TRANSACTION SavepointNameIF @@error= some ErrorBEGIN ROLLBACK TRANSACTION SavepointNameCOMMIT TRANSACTIONENDA word to the wise: whenever you roll back a transaction to a savepoint, it must proceed to completion or be canceled altogether. Therefore a COMMIT or a complete ROLLBACK should always follow a rollback to savepoint, because the resources used during the transaction (namely the SQL locks) are held until the completion of the transaction. When part of a transaction rolls back to a savepoint, resources continue to be held until either the completion of the transaction or a rollback of the complete transaction. In other words, even after rollback to a midpoint, the transaction is considered open and must be closed by either committing work or rolling back the entire transaction.begintry
74 | P a g e
begintraninsertinto emp values(3,'ravi',56000)insertinto emp values(4,'sandeep',66000)savetransaction s1insertinto emp values(5,'anil',76000)insertinto emp values(4,'rajdeep',36000)insertinto emp values(6,'amitabh',26000)committranendtrybegincatchrollbacktransaction s1
SELECTERROR_NUMBER()AS ErrorNumber,ERROR_SEVERITY()AS ErrorSeverity,ERROR_STATE()AS ErrorState,ERROR_PROCEDURE()AS ErrorProcedure,ERROR_LINE()AS ErrorLine,ERROR_MESSAGE()AS ErrorMessageendcatch
75 | P a g e