srmp dynamic earth curriculum - american museum of natural
TRANSCRIPT

1
Science Research Mentoring Program
Dynamic Eartha look at Earth’s dynamic systems. Students observe minerals and rocks, rock faces, and regions, and learn how such observations can be used to piece together the history of our planet.
Organization:• Each activity and demonstration is explained under its own heading.• if an activity has a handout, you will find that handout on a separate page.• if an activity has a worksheet that students are expected to fill out, you will
find that worksheet on a separate page.• Some additional resources (program and script) are included as separate
files.
Session 1: minerals
Session 2: Silicates
Session 3: rocks
Session 4: rock cycle
Session 5: Geologic time
Session 6: inner Earth
Session 7: Outer Earth
Session 8: theory of Plate tectonics
Session 9: Other Bodies & tectonics
Session 10: Volcanism
Session 11: Seismicity
Session 12: Present!
2
8
17
20
24
28
32
34
36
39
49
51
The Science Research Mentoring Program is supported by NASA under grant award NNX09AL36G.

Science Research Mentoring Program Dynamic Earth
© 2013 american museum of natural history. all rights reserved. 2
Session One: Mineralsl e a r n i n g o b j e c t i v e s Students make observations and learn terminology.
k e y t o p i c s
• Mineral• Mineral properties
c l a s s o u t l i n e
t i M e
40 minutes 10 minutes 25 minutes
40 minutes 5 minutes
t o p i c
Paperwork
Introductions Introduction to Minerals ACTIVITY: Mineral Identification Wrap Up
d e s c r i p t i o n
students complete pre-assessment and attitude survey (not included). introduce instructors. use icebreaker to introduce students. discuss course rules and expectations. introduce earth as a rocky planet. explain that rocks are made up of minerals. define minerals and discuss some of the physical and special properties of minerals can be used to identify them. Hand out copies of periodic table for reference. Hand out examples of crystal shapes for reference. students work in groups to identify a set of minerals by testing their physical properties. journal entry: Why are we starting with minerals? students write for a few minutes, then share with the class. Minerals are the building blocks of rocks!
M a t e r i a l s notebooks, laptop with presentation, Mineral id worksheets, hardness kit (nails, pennies, glass plates), streak plates, acid, eyedroppers, magnet wands (or stronger magnets), black lights, mineral samples (olivine, muscovite, talc, quartz, gypsum, pyrite, fluorite, calcite, magnetite, hematite, apatite, sulfur, copper, graphite), 10 paper plates (or 1 per group) p r e p W o r k copies of assessment, surveys, periodic table (find online), list and images of crystal shapes (find online), Mineral id worksheet, table of Mineral properties, number minerals and arrange 3 minerals per plate per group H a l l s u s e d none
a / v n e e d e d none H o M e W o r k none

Science Research Mentoring Program Dynamic Earth
© 2013 american museum of natural history. all rights reserved. 3
Session One: Minerals
ACTIVITY: Mineral Identification Before class: Set out one paper plate for each group. Draw lines on the plates to divide them into 3-4 sections – one section for each mineral sample. See the list of suggested minerals below. Assign a number to each type of mineral. Write the number of the minerals on the plates as you distribute minerals to the plates. For example, one plate might have Mica (1), sulfur (8), and calcite (4), while another plate has Mica (1), calcite (5), and sulfur (8). Avoid putting more than one mineral from a given class on any plate. I like to use the same number for each class, so that mica, quartz, talc, etc. are all (1). Then when revealing solutions, it’s easy to compare minerals in the same class. You just need to specify which (1) samples are mica, and which are quartz. List of suggested minerals, by class (also see the Table of Properties):
Silicates – olivine, muscovite, talc, quartz
Sulfates – gypsum
Sulfides – pyrite
Halides – fluorite
Carbonates – calcite
Oxides – magnetite, hematite
Phosphates – apatite
Elements – sulfur, copper, graphite
Students work in groups of 2-4, depending on availability of materials. Hand out pre-sorted minerals, worksheets, and materials (as needed). Read through introduction as a class. Discuss the properties tested in part (1) – color and luster. Show some examples (other than the minerals they’ll be identifying), either physical samples, or images of minerals with various lusters. Give groups time to determine and record the properties for their samples. Define cleavage and crystal shape. Explain that students should rate cleavage as Perfect, Distinct, Good, Poor, Indistinct, or None. Show examples or describe ratings (perfect if it’s practically falling apart as you pick it up, none if it looks like it would be very hard to break, and shows no lines of weakness). Show examples of crystal shapes, and encourage students to use their reference sheet. Give groups time to record these properties for each of their samples. Explain that the color of a mineral’s streak (powder form) can be different from the color of the mineral. Show examples. Remind students to be careful with the more delicate samples. Give groups time to record the streak of their samples. Discuss the Moh’s scales, and explain that students won’t be able to determine an exact hardness but a range of possible harnesses (for example, 2.5-3.5). Show a Moh’s scale that gives the hardness of each of the items they use in their hardness kit: fingernail, penny, glass, and steel nail. Give groups time to determine and record the hardness of their samples.

Science Research Mentoring Program Dynamic Earth
© 2013 american museum of natural history. all rights reserved. 4
Session One: Minerals
ACTIVITY: Mineral Identification (Continued) Discuss each of the three special properties that students will be testing for. (Special properties are not common to all.) Pass around magnets. It helps to turn off all the lights in the room, and have students use their black lights all at the same time. Or the teacher can walk around with one, shining it on each groups’ plate of minerals. Use a pipette to dispense a small drop of hydrochloric acid on each sample. Wipe off samples once they are tested, and remind students not to touch those parts Hand out Table of Properties and give groups time to compare their observations to the list. Once groups have identified their minerals, reveal the solutions, showing samples of each for all to see, and noting mineral that are in the same mineral class (especially silicates).
Science Research Mentoring Program Dynamic Earth
© 2013 american museum of natural history. all rights reserved. 5
Session One: Minerals
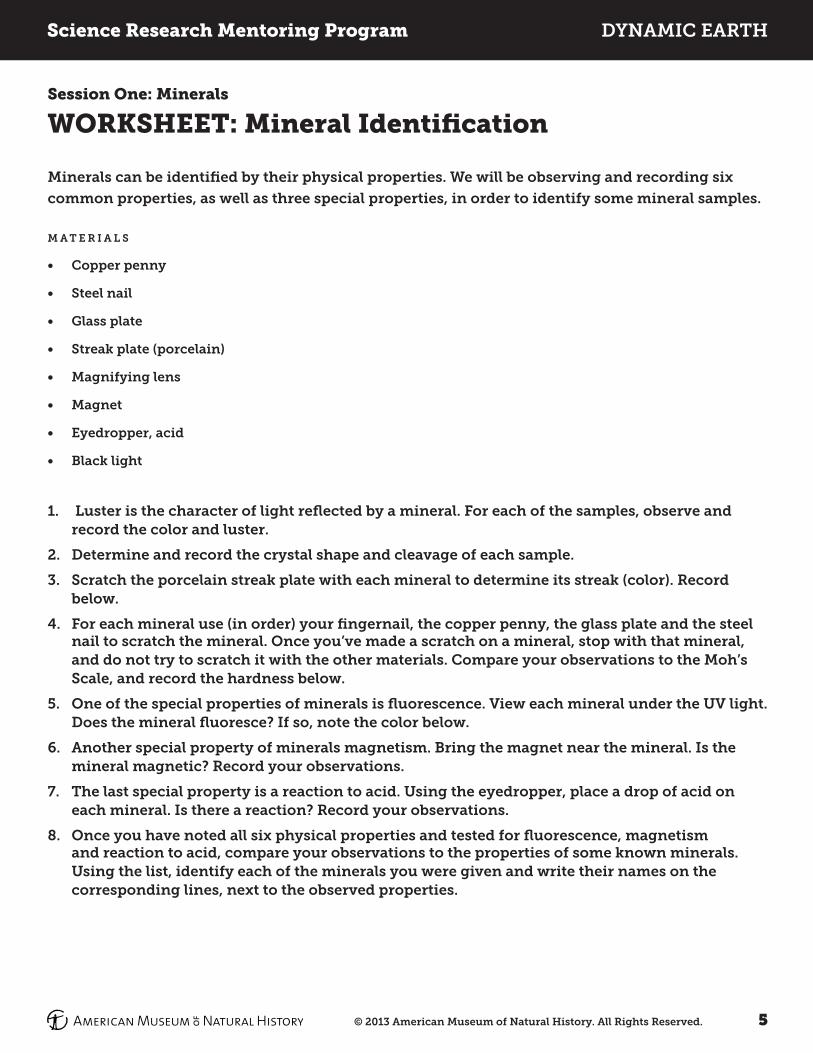
WORKSHEET: Mineral Identification
Minerals can be identified by their physical properties. We will be observing and recording six
common properties, as well as three special properties, in order to identify some mineral samples.
M a t e r i a l s
• copper penny
• steel nail
• glass plate
• streak plate (porcelain)
• Magnifying lens
• Magnet
• eyedropper, acid
• black light
1. luster is the character of light reflected by a mineral. For each of the samples, observe and record the color and luster.
2. determine and record the crystal shape and cleavage of each sample.
3. scratch the porcelain streak plate with each mineral to determine its streak (color). record below.
4. For each mineral use (in order) your fingernail, the copper penny, the glass plate and the steel nail to scratch the mineral. once you’ve made a scratch on a mineral, stop with that mineral, and do not try to scratch it with the other materials. compare your observations to the Moh’s scale, and record the hardness below.
5. one of the special properties of minerals is fluorescence. view each mineral under the uv light. does the mineral fluoresce? if so, note the color below.
6. another special property of minerals magnetism. bring the magnet near the mineral. is the mineral magnetic? record your observations.
7. the last special property is a reaction to acid. using the eyedropper, place a drop of acid on each mineral. is there a reaction? record your observations.
8. once you have noted all six physical properties and tested for fluorescence, magnetism and reaction to acid, compare your observations to the properties of some known minerals. using the list, identify each of the minerals you were given and write their names on the corresponding lines, next to the observed properties.

Science Research Mentoring Program Dynamic Earth
© 2013 american museum of natural history. all rights reserved. 6
Session One: Minerals
WORKSHEET: Mineral Identification - Page 2
Mineral 1 Name:
Crystal Shape: Cleavage:
Color: Luster:
Hardness: Streak:
Fluorescence? Y/N Magnetism? Y/N Reaction to Acid? Y/N
Mineral 2 Name:
Crystal Shape: Cleavage:
Color: Luster:
Hardness: Streak:
Fluorescence? Y/N Magnetism? Y/N Reaction to Acid? Y/N
Mineral 3 Name:
Crystal Shape: Cleavage:
Color: Luster:
Hardness: Streak:
Fluorescence? Y/N Magnetism? Y/N Reaction to Acid? Y/N
Mineral 4 Name:
Crystal Shape: Cleavage:
Color: Luster:
Hardness: Streak:
Fluorescence? Y/N Magnetism? Y/N Reaction to Acid? Y/N

Science Research Mentoring Program Dynamic Earth
© 2013 american museum of natural history. all rights reserved. 7
Session One: Minerals
WORKSHEET: Mineral Identification - Page 3

Science Research Mentoring Program Dynamic Earth
© 2013 american museum of natural history. all rights reserved. 8
Session Two: Silicatesl e a r n i n g o b j e c t i v e s Students will understand that minerals are classified by chemical make-up. They will know that silicates are the most abundant class, and understand how silicates are categorized.
k e y t o p i c s
• Mineral classes• silicates • arrangement of so4 tetrahedron
c l a s s o u t l i n e
t i M e
10 minutes 20 minutes
15 minutes
30 minutes 25 minutes
15 minutes
5 minutes
t o p i c
Review
Mineral classes
ACTIVITY: Guggenheim Hall of Minerals Layouts ACTIVITY: Silicates Galore Silicate subclasses
ACTIVITY: Review of Minerals Wrap Up
d e s c r i p t i o n
review mineral definition and properties. discuss mineral classes, relating to minerals that were identified last time (show examples). explain that silicates are most abundant, and we will see different subclasses in the guggenheim Hall of Minerals. visit the guggenheim Hall of Minerals. students observe the layout, and note what content topics are presented in the hall.
students work in pairs, observing a particular silicate specimen.
ask students how silicates are classified into subclasses. (they should recall from observation in the Hall that silicates are classified by arrangement of so4 tetrahedron.) discuss each subclass, showing examples (images or samples), and noting the tetrahedron arrangement. if available, show samples.
students think about what they’ve learned about minerals, and design an exhibition that conveys key information
review what students have learned about minerals. Hand out article and homework 1.

Science Research Mentoring Program Dynamic Earth
© 2013 american museum of natural history. all rights reserved. 9
Session Two: Silicates (Continued)M a t e r i a l s silicates from collections, samples of types of minerals from session 1 activity p r e p W o r k copies of silicates galore activity sheet, silicate classification chart, copies of article and homework (set up computers for students to work online if guggenheim Hall of Minerals is not available) H a l l s u s e d guggenheim Hall of Minerals
a / v n e e d e d recommend computer, projector, and screen H o M e W o r k read article (recommend article about minerals on other planetary bodies).
c o M p l e t e i n j o u r n a l Write out 10 questions about rock types and minerals that can be answered by studying the Mineral content of igneous rocks chart. For example, “if a rock is rich in silica, does it have a relatively high or low melting point?”

Science Research Mentoring Program Dynamic Earth
© 2013 american museum of natural history. all rights reserved. 10
Session Two: Silicates
ACTIVITY: Guggenheim Hall of Minerals Layout Hand out maps. Instruct students to explore, noting how information is organized. Give students about 10 minutes to explore the Hall, noting the various sections and labeling them on their maps. Meet back together and briefly discuss findings. The organization of minerals by class along one wall leads into the next activity. If the Guggenheim Hall of Minerals is not available, spend more time on the Review of Minerals
activity instead.

Science Research Mentoring Program Dynamic Earth
© 2013 american museum of natural history. all rights reserved. 11
Session Two: Silicates
ACTIVITY: Silicates Galore Before class: Print the names and subclasses of various silicate minerals. Cut the list into strips, and fold them so that students can draw them out of a hat. If available, use a geologists’ hardhat. In the Hall, walk along the wall of mineral classes. When you reach the silicates, ask students how they’re arranged (according to sub-class). Hand out the worksheets. Explain that silicate subclasses are based on the arrangement of SO
4 tetrahedrons.
Have students break into groups of 2-3. Each group draws a mineral name from the hat. Review the directions for the worksheet and give students about 20 minutes to complete them. Students share their observations back in the classroom as each silicate sub-class is discussed. If the Guggenheim Hall of Minerals is not available, students can work on computers (minerals.net or similar site) to view images of and learn about their assigned mineral.

Science Research Mentoring Program Dynamic Earth
© 2013 american museum of natural history. all rights reserved. 12
Session Two: Silicates
ACTIVITY: Silicates Galore (Continued)
Suggested list of silicates, and where to find them in the Hall:
Subclass Family Group Species Location in Hall
Neosilicate Olivine Olivine 1st Neo panel, D
Sorosilicate Epidote Epidote Soro panel, I
Cyclosilicate Turmaline Elbaite Cyclo panel, E Tourmaline
group, opposite
Cyclosilicate Beryl Aquamarine Beryl group, op-posite, but not listed as Berly
Inosilicate Single chain
Pyroxene Diopside Ino panel, B
Inosilicate Double chain
Amphibole Horblende Ino panel, I
Phyllosilicate Mica Muscovite 1st Phyllo panel, G
Phyllosilicate Mica Biotite 1st Phyllo panel G
Tectosilicate Quartz Quartz 1st Tecto panel, A
Tectosilicate Feldspar(alkali-feldspar
Albite 1st Tecto panel, D____, opposite
Tectosilicate Feldspar(plagioclase)
Orthoclase 1st Tecto panel, E
ACTIVITY: Review of Minerals Ask students to think about what they’ve learned, and if they were to design an exhibition about minerals, what concepts and information would they want to convey, and how might they do it? Instruct students to write or draw their design ideas on the back of the Hall Map. If the Guggenheim Hall of Minerals was not available for the first two activities, then show a labeled map of a mineral hall form any natural history museum. Ask students to compare it to their design. Discuss as a class.
Science Research Mentoring Program Dynamic Earth
© 2013 american museum of natural history. all rights reserved. 13
Session Two: Silicates
ACTIVITY: Review of Minerals (Continued)
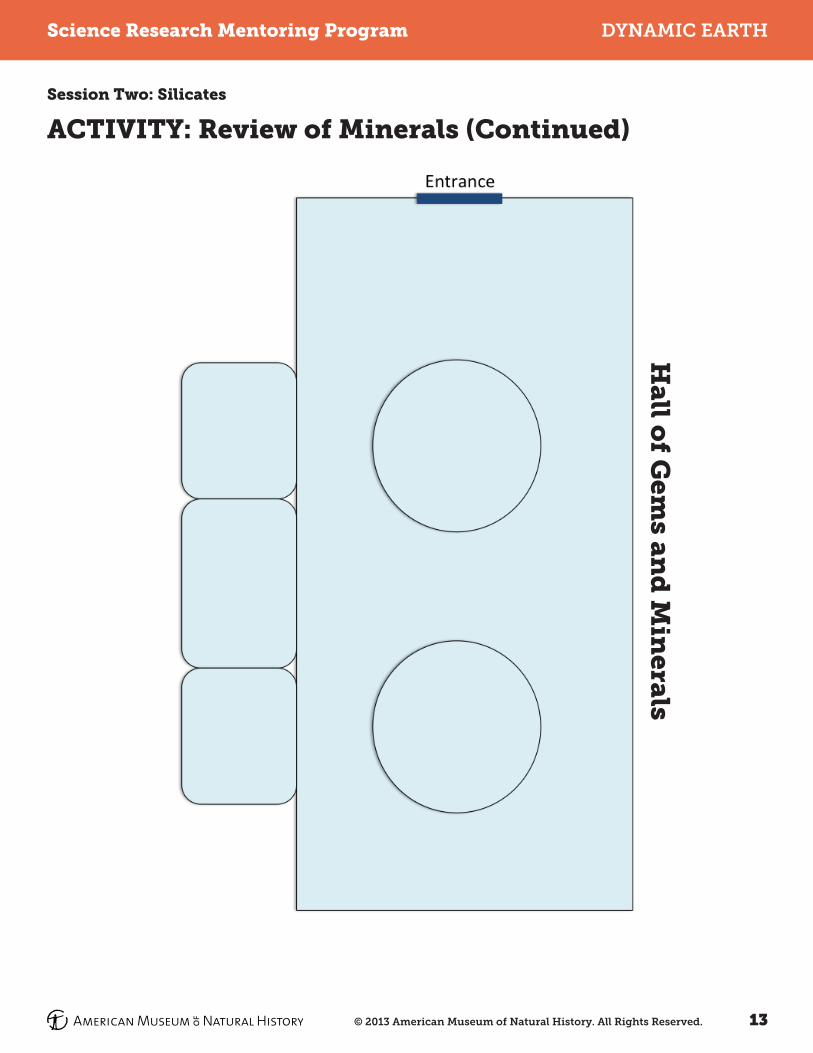
Hall o
f Gem
s and
Min
erals

Science Research Mentoring Program Dynamic Earth
© 2013 american museum of natural history. all rights reserved. 14
Session Two: Silicates
WORKSHEET: Silicates Galore
Of the nine classes of minerals, silicates are by far the most abundant on Earth.
Silicates are divided into six subclasses: tectosilicates, phyllosilicates, inosilicates, cyclosilicates,
sorosilicates, and nesosilicates (aka orthosilicates). These are based on the arrangement of SiO44-
tetrahedra within the crystal structures of the minerals. In the Hall of Minerals, you will identify the
pattern of tetrahedra for each subclass, and further observe a specific species.
Part A
For each subclass of silicates, sketch the arrangement of SiO4 tetrahedra, and note any common
features among minerals in that subclass (color, cleavage, crystal shape, etc.).
Subclass Arrangement of SiO4 Tetrahedra (sketch)
Common Feature(s)
Tectosilicates
Phyllosilicates
Inosilicates
Cyclosilicates
Sorosilicates
Nesosilicates

Science Research Mentoring Program Dynamic Earth
© 2013 american museum of natural history. all rights reserved. 15
Session Two: Silicates
WORKSHEET: Silicates Galore - Page 2
Part B
Answer the following questions about the mineral you drew from the hat.
Mineral species: Mineral class:
Chemical composition: Mineral subclass:
Mineral group:
Sketch the mineral.
Describe the mineral in as much detail as possible (color(s), pattern(s), luster, cleavage, crystal shape,
transparency, any impurities or inclusions, etc.).
How does this mineral resemble others in the same group?
In what ways is this mineral different from others in the same group?

Science Research Mentoring Program Dynamic Earth
© 2013 american museum of natural history. all rights reserved. 16
Session Two: Silicates
ACTIVITY: Review of Minerals Ask students to think about what they’ve learned, and if they were to design an exhibition about minerals, what concepts and information would they want to convey, and how might they do it? Instruct students to write or draw their design ideas on the back of the Hall Map. If the Guggenheim Hall of Minerals was not available for the first two activities, then show a labeled map of a mineral hall form any natural history museum. Ask students to compare it to their design. Discuss as a class.

Science Research Mentoring Program Dynamic Earth
© 2013 american museum of natural history. all rights reserved. 17
Session Three: Rocksl e a r n i n g o b j e c t i v e s Students understand the three different types of rocks, how they are formed, and what they generally look like.
k e y t o p i c s
• igneous, sedimentary, and metamorphic rocks• rocky cycle
c l a s s o u t l i n e
t i M e
15 minutes 45 minutes
40 minutes
15 minutes 5 minutes
t o p i c
Review
Rock Types
ACTIVITY: Identifying Rocks ACTIVITY: Viewing Rock Faces
Wrap Up
d e s c r i p t i o n
collect homework 1. discuss article. review minerals and silicates. discuss igneous, sedimentary, and metamorphic rocks. as part of each discussion view examples of rocks and rock faces. (Hand out multiple labeled images of each rock type for comparison, found online.) note key defining features, and practice identifying each rock type. briefly discuss rock cycle. students use a dichotomous key and pictures of rocks (online images, hand out copies) to identify the samples in a rock kit. as a class, view a series of rock faces on the screen, and identify rock type. discuss each briefly – what are its defining features?
review material from the day.
M a t e r i a l s rock sets (1 per table), acid & dropper, magnifying lenses p r e p W o r k copies of rock examples (pictures showing textures and foliation of some common rocks), copies of dichotomous rock key
H a l l s u s e d none
a / v n e e d e d none H o M e W o r k none

Science Research Mentoring Program Dynamic Earth
© 2013 american museum of natural history. all rights reserved. 18
Session Three: Rocks
ACTIVITY: Identifying Rocks This activity uses a set of 12 rocks (4 of each rock type). Pass out rock sets to students, in groups of 2-3. Hand out magnifying lenses – one per student – and dichotomous keys. Explain the concept of a dichotomous key; walk through one of the samples as a group if necessary. Encourage students to use the magnifying lenses to closely observe the rock samples, and to compare them to the images handed out earlier. While groups work on identifying their rocks, drop diluted hydrochloric acid on each of the samples in question. Once groups have identified all samples, share solutions. Note key features, such as grain sizes of sedimentary rocks, foliation of metamorphic rocks, and crystal size of igneous rocks.
ACTIVITY: Viewing Rock Faces
Files with rock faces and answer key are included in the resources. Other images of rocks faces can be used as well. Include some indication of location and scale in each image. As a class, view rock faces. Students should briefly discuss each rock with a partner. Then poll the class, using a show of hands or ABCD cards, asking which of the three rock types the image shows. If there’s no strong consensus, ask some students to share their reasoning or point out key features. Allow time to discuss before polling the class again.

Science Research Mentoring Program Dynamic Earth
© 2013 american museum of natural history. all rights reserved. 19
Session Three: Rocks
ACTIVITY: Viewing Rock Faces (Continued)Can you see grains or crystals?
Does the rock have crystals (flat shiny surfaces) or grains (pieces of other rocks broken dow
n and maybe w
orn down)?
Does the rock fizz when you put
acid on it?
Are the grains like sand or pebbles?
Are the pebbles rounded or angular?
Are the crystals arranged in layers?
Can you see light and dark bands?
Are the crystals light or dark?
Are the crystals shinny or flaky?
Does the rock break along flat surfaces?
Are the crystals all the sam
e color?
Does the rock fizz when you put acid on it?
Does the rock fizz when you put acid on it?
Are the crystals mostly
coarse or fine? Are the crystals m
ostly coarse or fine?
Mudstone
Limestone
or Shale
Limestone Yes
No
Yes
No
Yes Crystals
Grains
Marble
Sandstone
No
Yes
Yes No
Yes No
Conglomerate
Breccia Gneiss
Basalt Gabbro
Schist
Slate
Rhyolite
Granite Quartzite
Sand
Angular No N
o Yes
Light Dark
Yes
Fine Fine
Coarse
Pebbles
Rounded
No
Yes
Coarse

Science Research Mentoring Program Dynamic Earth
© 2013 american museum of natural history. all rights reserved. 20
Session Four: Rock Cyclel e a r n i n g o b j e c t i v e s Students will understand how processes change rocks from one rock type to another. Students will understand how to read the history of a rock face.
k e y t o p i c s
• rock cycle• rock types of central park
c l a s s o u t l i n e
t i M e
15 minutes
35 minutes
40 minutes
5 minutes
t o p i c
Review Homework
Rock Cycle ACTIVITY: Thin Sections
ACTIVITY: Rock Outcrops in Central Park Wrap Up
d e s c r i p t i o n
return homework 1 (graded) and discuss as necessary. review rock types and features from last class. introduce instructors. use icebreaker to introduce students. discuss course rules and expectations. review how each type of rock is made, and its place in the rock cycle. view thin sections in microscopes. students work in groups to identify a set of minerals by testing their physical properties. look two or more outcrops in central park, and observe the minerals and features present. based on their observations, students reconstruct the history of the rocks.
reflection: We’ve said that rocks tell us the history of earth. How old do you think this rock is, based on all of the changes it’s gone through? What was happening on the earth at various stages of the rock’s history? What evidence of past events might it hold?
Hand out article and homework 2.
M a t e r i a l s Magnifying lenses, thin sections, microscopes p r e p W o r k copies of central park outcrop sheet, article, and homework; set up microscopes with thin sections on them (one per table if possible). H a l l s u s e d gottesman Hall of planet earth if weather is bad
a / v n e e d e d none H o M e W o r k none
Science Research Mentoring Program Dynamic Earth
© 2013 american museum of natural history. all rights reserved. 21
Session Four: Rock Cycle
ACTIVITY: Thin Sections Before class: Set up 5-10 microscopes. At each microscope put one thin section of particular rock type (more if available). If thin sections are not available, view images of thin sections that can be found online. During class: Briefly explain how thin sections are made. Tell students that the slide(s) at each microscope shows a different rock. Instruct student to move to each microscope in turn, view thin section(s), and record the key features in their notebooks. Based on these features, students determine what type of rock is at each microscope. Once students have viewed all of the thin sections and determined rock types, discuss their answers as a class.
ACTIVITY: Rock Outcrops in Central Park Before class: Investigate rock outcrops in Central Park. Pick two or more that show a variety of rock types or features. If Central Park is not available, look for other rock outcrops near the classroom, or take pictures of local rock outcrops and project them on a screen. During class: Explain that geologists have to identify rocks in the field. In this activity, students will have a chance to identify rocks in situ and note their features. These will allow them to reconstruct the history of the rock. Take students to an outcrop and hand out magnifying lenses and worksheets. Ask students to observe the rock and record their observations for Outcrop 1 on the worksheet. Students then share what they see with the class. Point out and further discuss any features that they missed or misinterpreted. Move to a second outcrop. Ask students to observe the rock and record their observations again, this time searching for items on the scavenger hunt. Students follow directions on the worksheet, looking for the features listed, then reconstructing the history of the rock. After students have completed the reconstruction, discuses as a class. If time allows, observe additional outcrops.

Science Research Mentoring Program Dynamic Earth
© 2013 american museum of natural history. all rights reserved. 22
Session Four: Rock Cycle
WORKSHEET: Rock Outcrops in Central Park
Outcrop 1: More than a Glance
What type of rock is this? How can you tell?
Observe, sketch and describe the rock. Be sure to note color, texture, grain size and shape,
identifiable minerals, and any other features you observe.
Outcrop 2: Rock Feature Scavenger Hunt!
Find the following features on or near the outcrop and describe them.
a. a tectosilicate
b. a phyllosilicate
c. an intrusion
d. evidence of bedding (layering)
e. evidence of regional metamorphism
For bonus points: Find evidence of another type of metamorphism.

Science Research Mentoring Program Dynamic Earth
© 2013 american museum of natural history. all rights reserved. 23
Session Four: Rock Cycle
WORKSHEET: Rock Outcrops in Central Park
Outcrop 2: Reconstruction
Recall that “no rock is accidental.” How did this rock outcrop come to have these features? What is its
story? How does the evidence that you’ve observed support your proposed order of events?
Hint: Think about the rock cycle. How was the rock originally formed, and in what order did its
features, mentioned above, develop?
Initial formation:
1st deformation event?
2nd deformation event?
3rd deformation event?
4th deformation event?
Additional events?

Science Research Mentoring Program Dynamic Earth
© 2013 american museum of natural history. all rights reserved. 24
Session Five: Geologic Timel e a r n i n g o b j e c t i v e s Students gain understanding of age of Earth and the timescales over which geological processes occur. Students differentiate between relative and absolute dating, and know methods for each.
k e y t o p i c s
• geologic time• laws of geology• relative and absolute dating
c l a s s o u t l i n e
t i M e
10 minutes 30 minutes
10 minutes
20 minutes
10 minutes
30 minutes
t o p i c d e s c r i p t i o n
collect homework 2. discuss article. review rock topics from previous classes. students should understand that not all rocks are the same age. explain that we can use both relative and absolute dating to understand rocks. define relative dating. introduce and discuss the principles of geology, showing examples of each. students work in pairs, using previous knowledge to put rocks in relative order. optional: discuss how craters on other planetary bodies can be used for relative dating.
introduce geologic time. Hand out international stratigraphic charts (www.stratigraphy.org/index.php/ics-chart-timescale). briefly review the eras of geological time, and what happened on the earth during each. define the units of time on the isc (eons, era, epochs, etc.)
clearly define absolute dating. explain that radioactive dating is used to find ages of non-fossil-bearing rocks. review concepts of elements and isotopes if necessary. discuss primary mother-daughter isotopes and their half-lives. Watch video about zircons and geologic time: http://www.amnh.org/explore/science-bulletins/(watch)/earth/documentaries/zircons-time-capsules-from-the-early-earth/(p)/1 students work in small groups to estimate age of their assigned rocks. view estimates as a class, and compare to actual ages.
review key concepts from the day. reflect on expanse of geological time and of human history.
Review Principles of Geology
ACTIVITY: Ages of Rocks Part 1 – Relative Ages
Geologic Time and Absolute Dating
Zircon Video
ACTIVITY: Ages of Rocks Part 2 – Absolute Ages Wrap up5 minutes

Science Research Mentoring Program Dynamic Earth
© 2013 american museum of natural history. all rights reserved. 25
Session Five: Geologic Time (Continued)M a t e r i a l s long rope; list of old rocks, names of rocks written on separate strips of paper; masking tape p r e p W o r k Measure and label a long rope (ages of rocks part 2); tape long rope up around the classroom; copies international stratigraphic charts, homework, and article H a l l s u s e d Heilbrunn cosmic pathway
a / v n e e d e d recommend computer, projector, and screen H o M e W o r k read the article (recommend recent article about Mercury’s molten core, or similar). given an image of cross-cut layers, ask students to put the layers in order of age, based on the principles of geology. they should include a sentence for each layer, explaining their reasoning.
Science Research Mentoring Program Dynamic Earth
© 2013 american museum of natural history. all rights reserved. 26
Session Five: Geologic Time
ACTIVITY: Ages of Rocks Part 1 - Relative Ages Students can work in pairs or small groups. Give the class a list of rocks (put them in random order):
• Oldest Meteorite found on Earth
• Oldest Terrestrial Rock
• First Stromatolites
• Banded Iron Formation
• Oldest Rock containing Multi-Cellular Algae
• Oldest Trilobite Fossil
• Oldest Dinosaur Fossils
• Oldest Fossils of Mammals
• K-T Boundary
• Oldest Fossils of Modern Humans
The list can be on a handout, or written/projected on the board/screen. Ask students to order the rocks from oldest to youngest, and record the order in their notebooks. Tell students it’s okay if they’re not sure what some of the rocks are. Let them know that the K-T boundary was formed by an impact event that apparently contributed to the dinosaur’s extinction After groups have put rocks in order, review as a class. Clarify any items with which students are unfamiliar, and make sure all understand the correct order. Note that this order represents relative dating; numerical ages have yet to be assigned to the rocks.

Science Research Mentoring Program Dynamic Earth
© 2013 american museum of natural history. all rights reserved. 27
Session Five: Geologic Time
ACTIVITY: Ages of Rocks Part 2 – Absolute Ages Before class: Use the Heilbrunn Cosmic Pathway to measure the distance from the formation of the Earth to the present with a long rope (or use another length appropriate to the history of Earth). Label one end “the present” and the other “formation of Earth.” In class: Break the class into no more than 10 groups. Assign each one a rock from the list above; hand out appropriate slips of paper. Explain to students that the long rope represents the whole history of the Earth, and remind them that Earth is 4.567 billion years old. Students should tape their rock to the rope at the “time” it was formed. It will help for students to work in order, from youngest rock to oldest, or vice versa. Once all groups have taped their rock names to the rope, quickly review the placements. Ask if anyone disagrees with any of the placements. Carefully remove the rope from the wall of the class, and take it to the Heilbrunn Cosmic Pathway. Place the rope along the pathway. Starting with the formation of Earth (look backwards to see the oldest meteorite), compare the estimated ages of rocks to the ages posted on the pathway. Make adjustments as necessary, and discuss along the way. At the end of the rope (the present), challenge students to consider the depth of geologic time. Gather up the rope and return to the classroom. If the Heilbrunn Cosmic Pathway is not available, any long hallway will work. Find the ages of the rocks, measure out the appropriate length of the hall (ratio of age of Earth to length of hall equals age of rock to distance in hall) and place markers at the appropriate intervals for each rock. This can serve as the “answer key” in place of the Heilbrunn Cosmic Pathway.

Science Research Mentoring Program Dynamic Earth
© 2013 american museum of natural history. all rights reserved. 28
Session Six: Inner Earthl e a r n i n g o b j e c t i v e s Students will understand that the inner parts of Earth cannot be directly observed, and that we can learn about it by studying seismic events, the magnetic field, and meteorites.
k e y t o p i c s
• layers of the earth – chemical and mechanical • core • Mantle• convection in the mantle c l a s s o u t l i n e
t i M e
10 minutes 40 minutes 25 minutes
40 minutes 5 minutes
t o p i c
Review
The Core TOUR: Arthur Ross Hall of Meteorites ACTIVITY: Oxygen Isotope Analysis
Wrap Up
d e s c r i p t i o n
return homework 2 (graded) and discuss as necessary. review topics form previous sessions. discuss the mechanical and chemical layers of earth. discuss the core and its effect on the earth’s magnetic field. view parts or all of movie Model of earth’s Magnetic Field, or similar. tour the ross Hall of Meteorites to see how differentiated meteorites correspond to the layers of earth.
students work in groups to plot meteorite ratios of oxygen isotopes in meteorite chondrules. they compare their plots to those of known parent bodies to determine the origin of their meteorites. review key concepts from the day. Hand out article and homework 3.
M a t e r i a l s computers (with excel)
p r e p W o r k copies of activity worksheet, and article; load excel file onto computers H a l l s u s e d ross Hall of Meteorites
a / v n e e d e d computer with excel, projector and screen H o M e W o r k read article (recommend article about ancient plate tectonics, on earth or other solar system bodies). students should respond to the following: explain convention in your own words. Will convention in earth’s mantle continue indefinitely? explain.

Science Research Mentoring Program Dynamic Earth
© 2013 american museum of natural history. all rights reserved. 29
Session Six: Inner Earth
TOUR: Arthur Ross Hall of Meteorites Take students to the Ross Hall of Meteorites. Start at the Origins section. View and discuss chondritic meteorites. (Note that Renazzo has been removed for study.) Explain that they tell us a lot about the early solar system. View the time line of the solar system, pointing out formation of chondrites and formation of planets. View and briefly discuss the comparison of solar and chondrite chemical compositions. Move to the Planets section. View and discuss each type of meteorite:
• Stony looks a lot like Earth rocks. Compare basalt to meteorites from moon and Vesta. Which layer of Earth does this resemble?
• Stony-iron has lots of pyroxene and olivine (point out back-lit sample). Which layer of Earth does this resemble?
• Iron meteorites have crystalline patterns (Widmanstatten Pattern) not found on Earth. Note that some have different crystal sizes – what does this indicate? Which layer of Earth does this resemble?
If time allows, look briefly at impacts. If the Ross Hall of Meteorites is not available, view samples of meteorites (chondrites, stony, stony-iron, and iron) or images of meteorites. Students should have a chance to observe meteorites so that they can compare them (visually) to terrestrial rocks, and to have a better understanding of the make-up of Earth’s inner layers.
ACTIVITY: Oxygen Isotope Analysis
This activity was designed using a set of unpublished data. Published data can be found online (example: Table 2 in Origin of low-Ca pyroxene in amoeboid olivine aggregates: Evidence from oxygen isotopic compositions, by Krot et al. www.sciencedirect.com/science/article/pii/S0016703704007793). Before class: Set up computers. Modify Isotope Analysis Excel file to match data that students will plot, and load the file onto computers. The file can also be modified, depending on how familiar students are with Excel. Worksheet will also require modification to correspond with available data sets. During class: Hand out the (modified) worksheet and a data set to students. Remind them that we learn a lot about the inner layers of the Earth by studying meteorites – especially iron and stony-iron ones. Explain that the activity will focus on a chondritic meteorite. Read though the introduction as a class. Briefly explain per mil notation. Students should follow the worksheet to plot the data and compare to known parent bodies. Discuss the results as a class.

Science Research Mentoring Program Dynamic Earth
© 2013 american museum of natural history. all rights reserved. 30
Session Six: Inner Earth
WORKSHEET: Oxygen Isotope Analysis
Oxygen has three stable isotopes: 16O (99.757%), 18O (0.205%) and 17O (0.038%). Note that 16O
is by far the most abundant of the three. The ratios 17O /16O and 18O /16O describe the relative
abundances of the other two isotopes in rock samples. Rocks that are formed together (at the
same time and place) will have similar ratios of 17O /16O and 18O /16O. The common standard
for measuring these ratios is ocean water; all other ratios of these isotopes are compared to that
standard mean (SMOW). We will be determining the origin of an “unknown” rock specimen by
graphing its ratios of oxygen isotopes and comparing the graph to those of known rocks.
Below is a graph of oxygen isotopes for certain meteorite types and some planets. The delta (δ)
values for the isotopes are calculated from their ratios compared to -16O using the following
equations:
!
"17O =17O 16O
17O 16OSMOW
#1$
% &
'
( ) *1000 000 δ18
18 16
18 160001 1000O
O OO OSMOW
= −⎡
⎣⎢⎢
⎤
⎦⎥⎥×

Science Research Mentoring Program Dynamic Earth
© 2013 american museum of natural history. all rights reserved. 31
Session Six: Inner Earth
WORKSHEET: Oxygen Isotope Analysis - Page 2
We have a sampling of raw (and as of now, unpublished!)
data from a specimen that was analyzed using the
Secondary Isotope Mass Spectrometer (SIMS) in Madison,
Wisconsin. We will be looking at data from just four of the
chondrules.
1. In Excel, enter the d18O and d17O values for chondrule
2. Do not enter the Opx values.
3. As the data is entered, it will be plotted on the graph
(with d18O on the horizontal axis and d17O on the
vertical axis). Each set of data entered has a Series
Name. What name has been given to this series?
Series Name:
We will be comparing this graph to the graph on page 1, so we want them to have similar scales.
Note that the maximum and minimum values on your X and Y-axes correspond roughly to the
maximum and minimum values on page 1.
4. Give your graph a title and label the axes.
Title: Display the Toolbox (icon menu at the top of the window). Click within the chart area.
Under “Chart Options” in the Toolbox is the “Titles” menu. In the top box, “Chart Title” should be
selected. Type “Oxygen Isotopes in Meteorite Chondrules” in the space provided (“click here to
add title”
Axis: Now instead of “Chart Title,” select “Horizontal (Category) Axis.” Type “delta-18O, relative to
SMOW” in the space provided. Select the vertical axis and title it “delta-17O, relative to SMOW.”
This graph represents just one tiny portion of the meteorite. To get a clearer picture of the whole
meteorite, we’ll look at data from some more chondrules.
5. Enter the d18O and d17O values for chondrules 6, 9, and 30 under their respective headings. Do not enter the Opx values.
6. Once you have graphed the new data, you can compare it to known bodies. Recall that rocks
which form together have similar ratios of 17O /16O and 18O /16O. To which (if any) of the bodies
represented in the graph on page 1 is this new sample most likely related?

Science Research Mentoring Program Dynamic Earth
© 2013 american museum of natural history. all rights reserved. 32
Session Seven: Outer Earthl e a r n i n g o b j e c t i v e s Students will understand the concept of convection. Students will understand that processes occurring deep below the Earth’s surface influence events and processes on the surface.
k e y t o p i c s
• convection in earth’s mantle • asthenosphere • lithosphere
c l a s s o u t l i n e
t i M e
10 minutes
20 minutes 30 minutes
30 minutes
25 minutes
5 minutes
t o p i c
Review
Mantle
Upper Layers
ACTIVITY: Region Projects
Plate Tectonics
Wrap Up
d e s c r i p t i o n
collect homework 3. discuss the article. review layers of the earth. discuss layers of the mantle and convection currents. Watch the movie Model of earth’s Mantle convection, or similar. clearly define the chemical composition and physical properties of asthenosphere and the lithosphere. discuss how they interact with each other and their relationship to other layers and spheres of earth (including atmosphere, hydrosphere, biosphere, etc.)
introduce and assign groups. students study the geology of a region.
define tectonic plates. note the major plates on a map. discuss mantle convection and its effect on tectonic plates. note the directions that particular plates are moving. explain that the relative motion of the adjacent plates defines the type of boundary. define convergent, divergent and transform boundaries. given a map that indicates motion of plates, students should identify a boundary of each type. note the geographical features that occur at each boundary type.
talked about the outermost layers of the earth, the part that we see.
M a t e r i a l s 12 computers (or 2 per group), flash drive to save presentations (if necessary) p r e p W o r k copies of region images, set out computers
H a l l s u s e d none
a / v n e e d e d speakers for video; computer, projector, and screen H o M e W o r k none

Science Research Mentoring Program Dynamic Earth
© 2013 american museum of natural history. all rights reserved. 33
Session Seven: Outer Earth
ACTIVITY: Region Projects Explain to students that they will be working in groups to study the geology and geologic processes of a particular region of Earth. Show each region, in turn, on the screen. Ask students to identify the region, and ask what features they observe. Note the “wide view” in the corner and the elevation scale. Point out volcanoes on the first few slides. Break students into no more than 6 groups. Assign a region to each group, or let them choose. Supply each group with images of its region (one copy to each group member) and instructions for researching and taking notes to address parts 1-3 of the Region Project (see Instructor’s Outline of Region Project in Resources folder). Groups should take notes and discuss their ideas. If they locate their region quickly, they might start building a PowerPoint presentation. Save any presentations to bring to session 9.

Science Research Mentoring Program Dynamic Earth
© 2013 american museum of natural history. all rights reserved. 34
Session Eight: Theory of Plate Tectonicsl e a r n i n g o b j e c t i v e s Students will understand that convection currents in the mantle move tectonic plates. Students will be able to identify boundary types and give examples.
k e y t o p i c s
• tectonic plates• oceanic and continental crust• convergent, divergent, and transform boundaries
c l a s s o u t l i n e
t i M e
10 minutes
40 minutes
55 minutes 10 minutes
5 minutes
t o p i c
Review
Plate Boundaries
ACTIVITY: Geoworld Wilson Cycle
Wrap Up
d e s c r i p t i o n
Hand back homework 3 and discuss as necessary. review topics from previous classes. students should understand that the theory of plate tectonics is an encompassing theory of geology. review convergent, divergent, and transform boundaries. define and discuss oceanic and continental crust. discuss what boundary might occur between two oceanic, two continental, or continental and oceanic crusts. analyze hypothetical planet with plate tectonics.
discuss what might happen in the future on geoworld. define
and briefly discuss the Wilson cycle. review key topics. Hand out homework 4 and article.
M a t e r i a l s Highlighters, transparent rulers, calculators p r e p W o r k copies of geoworld part 1, geoworld parts 2 and 3, and article
H a l l s u s e d none
a / v n e e d e d none H o M e W o r k read the article (recommend a recent article about tectonic activity on another planetary body). complete the geoworld parts 2 and 3.

Science Research Mentoring Program Dynamic Earth
© 2013 american museum of natural history. all rights reserved. 35
Session Eight: Theory of Plate Tectonics
ACTIVITY: Geoworld Analysis of hypothetical planet with plate tectonics. http://serc.carleton.edu/sp/library/guided_discovery/examples/geoworld.html This is a free resource; users should email the author indicating where and how the lab is being used. This course divides the lab into two parts. As part of Lesson 8, students complete a modified version of Part 1, sections A,B,C,F,and G. Parts 2 and 3 are assigned as homework. Hand out worksheet and materials (highlighters, rulers, calculators). Read through the instructions and make sure students understand the key showing the reversals of Geoworld’s magnetic field over time. Note that thickness in the key does not match thickness on the map; students need to consider the relative thickness of each layer. Students work individually or in pairs. Start by working slowly though the first calculations in section A as a class. Make sure students understand how to calculate the rates, since they’ll need to do so as part of their homework. Discuss answers as a class. Students who finish early can work on sections F and G.
Possible bodies to view:
Body Features Dynamic ProcessesCallisto Craters, crater line, crater
concentric wrinklesNo volcanoes, or tectonic
features! Crust, salty ocean layer, not completely differentiated
(shutdown of convection)
Mercury Craters, streaks Has been geologically inactive for billions of years
Moon Craters, smooth areas Some shield volcanoes, volcanic domes, presence of water
Ganymede Starburst patterns, some small cra-ters, large slabs of darker material
Evidence of faulting / rifts
Europa Streaks and scratches, some small ridges
Smooth, young surface; tectonically active (water-ice
surface) – possibly driven by warm plumes of water rising form deep
inside the moon
Mars Cratered regions, large canyons, volcanoes, polar caps
Was once tectonically active (straight line along Tharsis region);
likely extinct now
Io Volcanoes See Venus
Venus (Radar, then Elevation) Dendritic patterns, volcanoes Uniformly buoyant lithosphere (instead of negatively buoyant);
melt-down 750 Ma (periodic), covering much of surface with
volcanism of some form

Science Research Mentoring Program Dynamic Earth
© 2013 american museum of natural history. all rights reserved. 36
Session Nine: Other Bodies & Tectonicsl e a r n i n g o b j e c t i v e s Students will recognize that other planetary bodies have or have had tectonic activity, and will be able to give examples. Students identify and interpret features on extraterrestrial surfaces.
k e y t o p i c s
• Features of tectonic activity• surface features of planetary bodies c l a s s o u t l i n e
t i M e
10 minutes
25 minutes
35 minutes 45 minutes
5 minutes
t o p i c
Review
Tectonics on Other Planetary Bodies
ACTIVITY: Magic Planet ACTIVITY: Region Projects
Wrap Up
d e s c r i p t i o n
collect homework 4. discuss article. review plate tectonics topics. review the processes that make earth a dynamic planet. survey the terrestrial planets and the Moon. view and discuss their main surface features, and internal structure (if known). ask students which features indicate tectonic activity (current or in the past). are or were other bodies dynamic? use Magic planet to view and discuss plate tectonics of earth. see and discuss examples of other bodies in the solar system.
students work in groups on the region project (parts 4-7) save group powerpoints to flash drive. review dynamics of other planetary bodies.
M a t e r i a l s 12 computers (or two per group), flash drive for region projects p r e p W o r k set up for Magic planet, set out computers
H a l l s u s e d none
a / v n e e d e d Magic planet, or computer with celestia (or similar), projector and screen H o M e W o r k none

Science Research Mentoring Program Dynamic Earth
© 2013 american museum of natural history. all rights reserved. 37
Session Nine: Other Bodies & Tectonics
ACTIVITY: Magic Planet Use Magic Planet to view Earth and other solar system bodies. If Magic Planet is not available, use Celestia to view other bodies, or download skins from www.mapaplanet.org/explorer/help/data_set.html Students gather around Magic Planet so that all can see. Present as follows. Earth’s Plate Tectonics – Oceans Draining
• Watch as the oceans drain, fill again.
• Look for the deepest parts of the oceans. What did we call these regions?
• When oceans drain the 2nd or 3rd time, pause with the oceans empty.
• Look for plate boundaries. What do they look like?
• Have each student identify a boundary and what type it is. Have groups identify their region (for Region Project), and note the boundaries.
Earth’s Plate Tectonics – Plate boundaries
• Were you right? Do other regions look like plate boundaries? Why? What do you think they are?
Earth’s Plate Tectonics – Oceans draining
• Pause program, go to drained oceans again
• Identify the type of plate boundary. Can you tell which direction the plates are moving?
Earth’s Plate Tectonics – Plate Movement
• Were you right? Groups, note what’s happening in your regions.
Optional: Go back to Drained Oceans to see how each type of boundary looked. Now let’s look for features on other bodies…
View each body in turn. Don’t identify until after students have discussed its features.
• What features do you see?
• Is there evidence of plate tectonics? Of other dynamic processes?
• What type of rocks would you expect to find here?

Science Research Mentoring Program Dynamic Earth
© 2013 american museum of natural history. all rights reserved. 38
Session Nine: Other Bodies & Tectonics
ACTIVITY: Magic Planet (Continued) Possible bodies to view:
Body Features Dynamic ProcessesCallisto Craters, crater line, crater
concentric wrinklesNo volcanoes, or tectonic
features! Crust, salty ocean layer, not completely differentiated
(shutdown of convection)
Mercury Craters, streaks Has been geologically inactive for billions of years
Moon Craters, smooth areas Some shield volcanoes, volcanic domes, presence of water
Ganymede Starburst patterns, some small cra-ters, large slabs of darker material
Evidence of faulting / rifts
Europa Streaks and scratches, some small ridges
Smooth, young surface; tectonically active (water-ice
surface) – possibly driven by warm plumes of water rising form deep
inside the moon
Mars Cratered regions, large canyons, volcanoes, polar caps
Was once tectonically active (straight line along Tharsis region);
likely extinct now
Io Volcanoes See Venus
Venus (Radar, then Elevation) Dendritic patterns, volcanoes Uniformly buoyant lithosphere (instead of negatively buoyant);
melt-down 750 Ma (periodic), covering much of surface with
volcanism of some form
ACTIVITY: Region Projects
Students work in groups on computers. One computer can be used for research while the other one is used for building a PowerPoint presentation. Groups continue work on parts 1-3 if necessary, and begin working on parts 4-7. See Instructor’s Outline for Region Projects in the Resource folder.

Science Research Mentoring Program Dynamic Earth
© 2013 american museum of natural history. all rights reserved. 39
Session Ten: Volcanisml e a r n i n g o b j e c t i v e s Students will understand various types of volcanism and identify volcanic features on Earth.
k e y t o p i c s
• effusive volcanism • explosive volcanism
c l a s s o u t l i n e
t i M e
10 minutes
40 minutes
30 minutes
35 minutes
5 minutes
t o p i c
Review
Volcanism
ACTIVITY: Volcanic Rocks in the Gottesman Hall of Planet Earth ACTIVITY: Volcanic Rock Identification
Wrap Up
d e s c r i p t i o n
Hand back homework 4 (graded) and discuss as necessary. review from previous classes. discuss volcanism – occurrences at plate boundaries, and intraplate. define and discuss volcanic features. review volcanism on other planetary bodies. a guided exploration of volcanism in the gottesman Hall of planet earth.
students graph data for chemical compositions to determine rock types. review volcanism key concepts. Hand out homework 5 and article.
M a t e r i a l s clear rulers, colored pencils or markers p r e p W o r k copies of volcanic rocks in Hope worksheet, volcanic rock id worksheet, article
H a l l s u s e d gottesman Hall of planet earth
a / v n e e d e d recommend computer, projector, and screen H o M e W o r k read the article (recent article about earth’s unique tectonics, or about moon quakes recommended). complete the volcanic rock identification started during class.

Science Research Mentoring Program Dynamic Earth
© 2013 american museum of natural history. all rights reserved. 40
Session Ten: Volcanism
ACTIVITY: Volcanic rocks in HoPE
Hand out worksheets and point out the parts of the Gottesman Hall of Planet Earth that present explosive volcanism, effusive volcanism, and hydrothermal vents. Explain that questions can be answered in any order, and suggest that students start in different places. Students work in small groups. Regroup and discuss highlights from each of the 3 sections. Point out interesting details that students may have missed. If Gottesman Hall of Planet Earth is not available, view images of rocks, and where they were found. You can shorten this to spend more time on the following activity.
ACTIVITY: Volcanic Rock Identification Hand out worksheets, rulers, calculators, and colored pencils or markers. Read though introduction as a class. Work through Part A in pairs, and compare answers as a class. Note that all of the rocks are basalts. (That’s probably why they were all on the same shelf.) Read through the introduction for part B as a class. Explain the concept of normalization. Demonstrate how to plot data on the discrimination diagrams. Optional: use the PowerPoint presentation to show normalization and discrimination diagrams (see Volcanic Rock ID Supplement in Resource folder). Note that plotting all five data sets on the same diagram can get messy and difficult to read. Encourage students to use both diagrams; plotting should yield the same result. They should use one colored pencil or marker for each rock. Also note that only two lines are required for an intersection, but plotting the third line will confirm the point of intersection. As students are working, make sure they’re plotting the normalized data. All students should plot at least one rock during class to show that they understand the process. If necessary, students can complete the activity as homework.

Science Research Mentoring Program Dynamic Earth
© 2013 american museum of natural history. all rights reserved. 41
Session Ten: Volcanism
WORKSHEET: Volcanic Rocks in the Gottesman Hall of Planet Earth
Today we will explore the types of volcanism that occur all over the planet. Answer the following
questions based on your exploration of the Gottesman Hall of Planet Earth:
Explosive Volcanism
1. Where are explosive volcanoes usually found (in what kind of tectonic environment)?
2. What makes one magma more likely to explode than another? What are the key ingredients in
explosive magma?
3. What is a volcanic “bomb”? What does it look like.
4. Name at least three types of volcanic rock that are on display. What are some of the differences
between them?
5. Examine the large cast of the section of rock from Pompeii (behind the glass). Describe what it
looks like. What does it tell you about the composition of volcanic output over time?

Science Research Mentoring Program Dynamic Earth
© 2013 american museum of natural history. all rights reserved. 42
Session Ten: Volcanism
WORKSHEET: Volcanic Rocks in the Gottesman Hall of Planet Earth - Page 2
Effusive Volcanism
6. What type of magma results in effusive volcanism? (What keeps it from being explosive)? Where
are effusive volcanoes normally found?
7. Look at the cast of the black rock behind the glass. What does it show? Can you tell anything about
the sequence of eruption?
8. What are some of the different types of lava on display? How are they different from each other?
9. Why are there no large, individual volcanoes on the ocean floor?
10. What is a flood basalt?

Science Research Mentoring Program Dynamic Earth
© 2013 american museum of natural history. all rights reserved. 43
Session Ten: Volcanism
WORKSHEET: Volcanic Rocks in the Gottesman Hall of Planet Earth - Page 3
Hydrothermal Vents 11. Observer the Finn, Roane, and Gwenen vents. Record your observations of their exteriors, and
the interior of Gwenen.
12. Sketch a hydrothermal vent. Explain how hydrothermal vents grow.
13. Compare and contrast the hydrothermal vents with explosive or effusive volcanism. (How are
they the same? How are they different?)

Science Research Mentoring Program Dynamic Earth
© 2013 american museum of natural history. all rights reserved. 44
Session Ten: Volcanism
WORKSHEET: Volcanic Rock Identification
You will determine a rock type by comparing the chemical abundances in an unknown rock to
values of known rocks. You’ll look at the percent weights and parts per million (ppm) of several
elements.
Suppose you have a collection of 5 rocks that were labeled and stored together on a shelf, along
with tables of their chemical compositions. The labels have been eaten by mice, but the tables of
chemical composition, which were recorded on less tasty paper, remain. You’re asked to identify the
rock type for each specimen, and, if possible, where it came from.
Table 1: Composition by Percent-Weight
SiO2 TiO2 Al2O3 Fe2O3 (T) MnO MgO CaO Na2O K2O P2O5 Cr2O3 NiO Total
wt-% wt-% wt-% wt-% wt-% wt-% wt-% wt-% wt-% wt-% wt-% wt-% wt-%
1 48.96 0.43 15.60 9.69 0.16 10.83 13.24 1.30 0.09 0.02 100.32 2 46.74 2.77 15.35 12.85 0.17 6.80 12.81 2.77 0.80 0.39 0.00 0.00 101.45 3 48.16 1.06 16.79 10.97 0.19 8.60 11.66 2.28 0.17 0.11 4 51.23 1.55 17.45 9.59 0.15 6.17 9.38 3.62 0.65 0.20 99.99 5 49.81 1.91 14.59 11.53 7.48 11.63 2.62 0.13 0.19 99.89
Table 2: Composition by ppm Ti Rb Sr Y Zr Nb La Ce Nd Sm Eu Tb Yb Lu Ppm ppm ppm ppm ppm ppm ppm ppm ppm ppm ppm ppm ppm 1 2577.14 4.00 103.00 9.00 27.00 0.21 0.78 2.13 2.39 0.86 0.36 0.21 1.01 0.16 2 16628.78 14.00 498.00 23.00 173.00 44.00 28.20 57.80 31.10 6.65 2.19 1.03 1.90 0.29 3 6352.94 4.00 189.00 57.00 70.00 51.00 7.00 13.50 2.60 0.90 1.70 4 9289.68 15.00 363.00 27.00 139.00 11.00 10.20 25.00 4.02 1.32 0.77 2.41 0.38 5 11447.28 0.79 124.50 49.34 162.20 4.41 5.42 17.41 15.23 5.33 1.80 1.23 4.76 0.68

Science Research Mentoring Program Dynamic Earth
© 2013 american museum of natural history. all rights reserved. 45
Session Ten: Volcanism
WORKSHEET: Volcanic Rock Identification - Page 2
Identification Part A
Use Table 1 and the TAS diagram on page 2 to identify the type of rock for each of our five
specimens. First find the percent-weight of Na2O, K
2O and SiO
2 on the table. Note that the axes of the
graph are SiO2 and Na
2]O + K
2O.
1. Find the combined percent weight of Na2O and K2O for each rock sample.
Na2O + K
2O for rock 1 = Na
2O + K
2O for rock 4 =
Na2O + K
2O for rock 2 = Na
2O + K
2O for rock 5 =
Na2O + K
2]O for rock 3 =
2. Use the Na2O + K2O (calculated above) and SiO2 percent-weights from Table 1 to determine the
rock types for each specimen.
Rock 1: Rock 4:
Rock 2: Rock 5:
Rock 3:
3. Which of the rocks are volcanic?

Science Research Mentoring Program Dynamic Earth
© 2013 american museum of natural history. all rights reserved. 46
Session Ten: Volcanism
WORKSHEET: Volcanic Rock Identification - Page 3
Identification Part B
Now let’s get even more specific. You can use the Ti-Zr-Y and Zr-Nb-Y discrimination charts on
page 4 to further classify volcanic rocks. Refer to the appropriate data on Table 2. Note that the
discrimination charts may require you to multiply or divide the ppm value by a whole number.
For example, on the Ti-Zr-Y chart, you multiply the ppm of Yttrium by 3, and divide the ppm of
Titanium by 100. This has been done for you in Tables 3 and 4.
However, when all three elements are added up for a given rock sample, the total may not be 100.
Uh-oh! That means that the data needs to be normalized; the total must be 100%, so you need to
know what percent of the total is represented by each of the three elements. These normalized
values appear in the tables below.
Use the Ti-Zr-Y and Zr-Nb-Y discrimination charts on page 4, and the corresponding normalized
values from Tables 3 and 4 above to determine what (if any) type of volcanic rocks the samples are.
4. Place the number for each rock at the appropriate place on either discrimination chart. Record the
letter from the discrimination chart and the corresponding rock types below.
Rock 1: Rock 4:
Rock 2: Rock 5:
Rock 3:
Table 3: Normalizations for Ti-Zr-Y Raw Data (ppm) Totals to be Normalized Normalized Values Y Ti Zr Y*3 Ti/100 Zr Total 3*Y Ti/100 Zr Total 1 9.00 2577.14 27.00 27.00 25.77 27.00 79.77 33.85 32.31 33.85 100.00 2 23.00 16628.78 173.00 69.00 166.29 173.00 408.29 16.90 40.73 42.37 100.00 3 57.00 6352.94 70.00 171.00 63.53 70.00 304.53 56.15 20.86 22.99 100.00 4 27.00 9289.68 139.00 81.00 92.90 139.00 312.90 25.89 29.69 44.42 100.00 5 49.34 11447.28 162.20 148.02 114.47 162.20 424.69 34.85 26.95 38.19 100.00
Table 4: Normalization for Zr-Nb-Y Raw Data (ppm) Totals to be Normalized Normalized Values Y Nb Zr Y 2Nb Zr/4 Totals Y 2Nb Zr/4 Totals 1 9.00 0.21 27.00 9.00 0.42 6.75 16.17 55.66 2.60 41.74 100.00 2 23.00 44.00 173.00 23.00 88.00 43.25 154.25 14.91 57.05 28.04 100.00 3 57.00 51.00 70.00 57.00 102.00 17.50 176.50 32.29 57.79 9.92 100.00 4 27.00 11.00 139.00 27.00 22.00 34.75 83.75 32.24 26.27 41.49 100.00 5 49.34 4.41 162.20 49.34 8.82 40.55 98.71 49.98 8.94 41.08 100.00

Science Research Mentoring Program Dynamic Earth
© 2013 american museum of natural history. all rights reserved. 47
Session Ten: Volcanism
WORKSHEET: Volcanic Rock Identification - Page 4
Identification Part C
Now that you know what types of rocks you have, you should be able to figure out where they were
found. Suppose you’re given the following list of locations: Saint Helena Island in the South Atlantic
Ocean, Mount St Helens in Washington, South Sandwich Island Arc.
5. Identify the location from which specimens 1, 2 and 4 were collected, based on what you know
about the specimens, and the types of rocks that would form at the listed locations.
Rock 1: Rock 3:
Rock 2: Rock 4:

Science Research Mentoring Program Dynamic Earth
© 2013 american museum of natural history. all rights reserved. 48
Session Ten: Volcanism
WORKSHEET: Volcanic Rock Identification - Page 5

Science Research Mentoring Program Dynamic Earth
© 2013 american museum of natural history. all rights reserved. 49
Session Eleven: Seismicityl e a r n i n g o b j e c t i v e s Students will learn that seismic activity generates waves that we can study.k e y t o p i c s
• seismic waves• Faults
c l a s s o u t l i n e
t i M e
15 minutes
30 minutes
30 minutes 35 minutes
5 minutes
t o p i c
Review
Seismicity
TOUR: Seismicity and Review in the Gottesman Hall of Planet Earth
ACTIVITY: Region Projects Wrap Up
d e s c r i p t i o n
collect homework 5. discuss the article. briefly review from previous classes. introduce earthquakes. explain that quakes produce different types of waves. define and discuss p, s, love, and rayleigh waves, and magnitude scales. define faults, and give examples of different types. discuss earthquakes in terms of plate tectonics. tour parts of the gottesman Hall of planet earth, looking at seismic waves sections. review main concepts from the course.
groups work on region projects (part 8).
save group ppt’s to flash drive. review seismicity key concepts.
M a t e r i a l s 12 computers, flash drive with region projects p r e p W o r k set out computers
H a l l s u s e d gottesman Hall of planet earth
a / v n e e d e d none H o M e W o r k none

Science Research Mentoring Program Dynamic Earth
© 2013 american museum of natural history. all rights reserved. 50
Session Eleven: Seismicity
TOUR: Seismicity and Review in HoPE Take students to the Gottesman Hall of Planet Earth. View sections with content that has been covered in the course
• Rock types and thin section viewing,
• Convection of the mantle
• Volcanic rocks (explosive and effusive)
• Rock formation – sedimentary and metamorphic
• Recent seismic activity display
• Seismograph in the floor – students can step on it to see the effect of their motion on the seismograph.
• Brass globe - groups should locate their regions on the globe, and feel the surface of the globe at their plate boundaries.
If the Gottesman Hall of Planet Earth is not available, recent seismic activity can be viewed online: www.iris.edu/seismon/ To review content, groups can be assigned key topics. In 5-10 minutes, groups review that material, and develop a way to present key concepts to the rest of the class – brief lecture, acting out a process, game, etc. Then each group has 2-3 minutes to present.
ACTIVITY: Region Projects Students work in groups, on computers. One computer can be used for research while the other one is used to build a PowerPoint presentation. Groups continue work on parts 1-7 if necessary and begin working on part 8 (see Instructor’s Outline for Region Projects in the Resource folder). If groups finish building their presentations, they should assign parts to each group member and practice presenting.

Science Research Mentoring Program Dynamic Earth
© 2013 american museum of natural history. all rights reserved. 51
Session Twelve: Present!l e a r n i n g o b j e c t i v e s Students will present their projects to the class. k e y t o p i c s
• scientific talks
c l a s s o u t l i n e
t i M e
10 minutes
20 minutes
60 minutes 30 minutes
t o p i c
Review
ACTIVITY: Region Projects Presentations!
Paperwork
d e s c r i p t i o n
Hand back homework 5 (graded) and discuss as necessary. review topics from the course. groups finish and practice presentations. load all files onto one computer for presentation. groups present in standard format: presentation, applause, Q&a, applause.
post-assessments, program evaluations, and attitude surveys.
M a t e r i a l s 6 computers, flash drive with region projects p r e p W o r k set out computers, copies of assessments, evaluations, and surveys
H a l l s u s e d none
a / v n e e d e d screen and projectors to show group presentations H o M e W o r k none

Science Research Mentoring Program Dynamic Earth
© 2013 american museum of natural history. all rights reserved. 52
Session Eleven: Seismicity
ACTIVITY: Region Projects Students work in groups, one computer per group, finishing parts 1-8 if necessary (see Instructor’s Outline for Region Projects in the Resource folder). Instruct groups to assign parts of the presentation to each member, and to practice presenting.