st. patrick's day projects photo booth propsst. patrick's day photo booth props...
TRANSCRIPT

There are so many projects you can create with
a ScanNCut machine, and the only limit is your
imagination! One of my favorite things to do is to look
through the basic shapes and resize and match them
with other shapes to create objects and designs that
are unique. Thanks to the ScanNCut’s capability to
size, resize, and weld designs together, I don’t even
need to access a computer! Everything can be done
directly from the screen. Today, I will be sharing the
“how to” for three different photo booth props.
St. Patrick's DayPhoto Booth Props
May Flaum
MATERIALS: ScanNCut Machine; Deep Cut Blade; Cardstock; Glitter; Glue; Hot Glue; Felt, Buttons and
Embellishments (as desired); Popsicle Sticks; 12" Wooden Sticks (preferably rounded);
Acrylic Paint; Paint Brushes
step 1.
project 1:the shamrock
Choose the basic heart, and select two of them – sized at 3".
Let’s begin with the easiest of projects, the Shamrock. This project simply
requires two sets (of four) hearts, a button, and some hot glue!
projects
Opinion expressed by paid consultant. Color and specifications may vary.
When creating décor (either for home or a party), I recommend taking a ruler and deciding on
measurements for both the finished sizes as well as sizes of individual elements that will work well for you.
Consider making some sketches also, as these notes can be valuable when deciding how large (or small)
to make pieces for your props. Sketching out ideas can also show you inspiration for what basic shapes will
work well with your specific idea and design.

step 2. In the “Edit” screen, select one of the hearts and resize it to 1 1/2", and then increase
the quantity to four. Repeat with the second heart, once again increasing the
quantity to four. Press “OK”.
ST. PATRICK'S DAY PHOTO BOOTHPROPS (CONTINUED)
step 3. Insert your mat into the machine, along with one piece of green paper and one piece
of white paper on the mat. Scan the mat so that you can see where the papers are,
and rearrange the hearts on the screen to work so that the four larger hearts are on
the green paper, with the four smaller hearts on the white paper. Cut out the hearts.
step 4.
step 1.
Assemble the hearts onto the sticks using the hot glue. Finish by adding a button to
the center. This will add stability as well as covering the point where the hearts meet.
Open a rounded oval of your choosing, and then rotate 90 degrees and
resize as desired to create the “pot” of the pot of gold.
Tip: The flat small stick perpendicular to the longer rounded stick will act to stabilize your props, and is worth using. It adds the needed strength to the project without a lot of weight and makes a big difference!
project 2: pot of gold
For this project, you’ll want to use your imagination and basic shapes to weld
together the pot itself, and then cut basic circles for your gold.
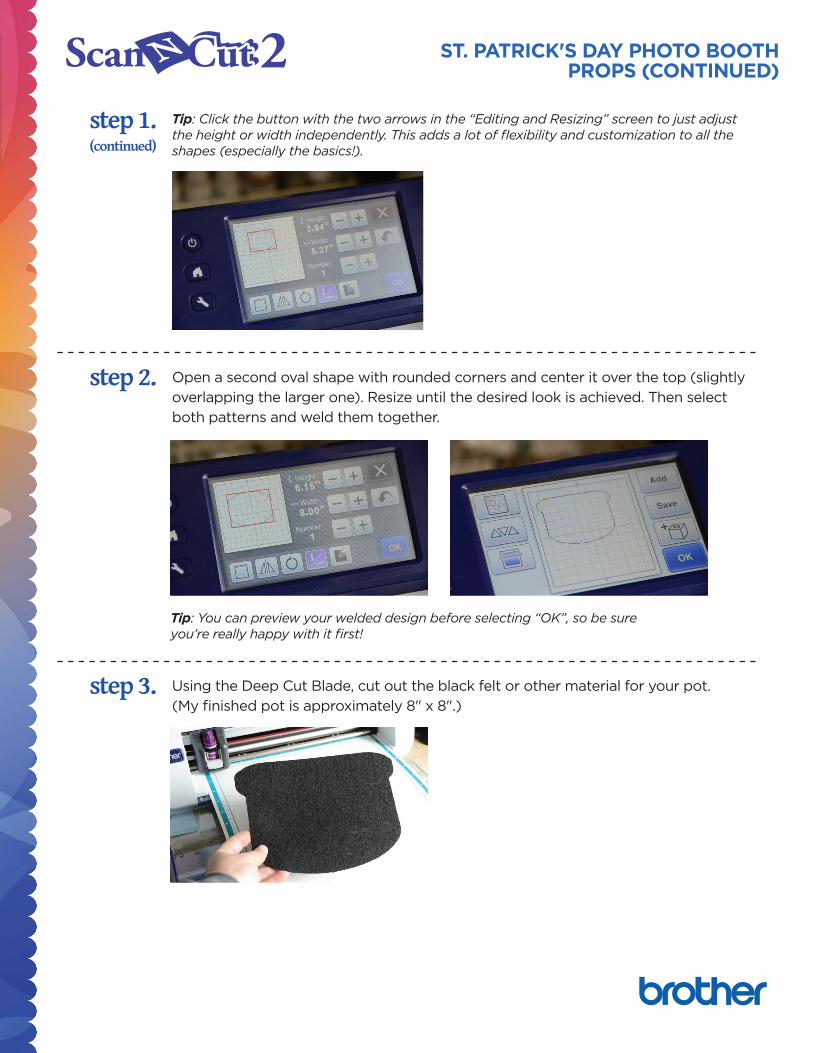
Tip: You can preview your welded design before selecting “OK”, so be sureyou’re really happy with it first!
step 2. Open a second oval shape with rounded corners and center it over the top (slightly
overlapping the larger one). Resize until the desired look is achieved. Then select
both patterns and weld them together.
step 3. Using the Deep Cut Blade, cut out the black felt or other material for your pot.
(My finished pot is approximately 8" x 8".)
ST. PATRICK'S DAY PHOTO BOOTHPROPS (CONTINUED)
step 1.(continued)
Tip: Click the button with the two arrows in the “Editing and Resizing” screen to just adjust the height or width independently. This adds a lot of flexibility and customization to all the shapes (especially the basics!).

step 4.
step 5. Cut a slit in the felt pot (if desired), and then layer and adhere coins using hot glue
to create the desired layered effects. Add buttons, sequins, or beads as well if more
texture is desired.
Insert white cardstock and cut a variety of sizes of circles using the Standard
Blade and Standard Mat. Then paint them with gold acrylic paint, glitter them, or
otherwise decorate the “coins” for the pot of gold.
step 6. Add the flat stick across the center, and then add the rounded “holder” stick
to complete this project.
Tip: By painting and decorating afterward, I’m able to create gold coins from a basic supply as well as have an easier material to cut and work with, and keep my photo prop light.
ST. PATRICK'S DAY PHOTO BOOTHPROPS (CONTINUED)

project 3: bow tie
This is my favorite of the projects, and I love that it was also created using
more of those great basic shapes within the ScanNCut!
step 1.
step 3.
step 4.
Select two of a rounded triangle design, and arrange them using the “Edit” screen
to be turned 90 degrees each in the opposite direction so that the points are
facing each other. Place to the top or bottom edge and align so the points meet.
Color all the elements as desired with paint, ink, or other color mediums.
Then layer together as desired to create your bow tie.
Using a flat stick across the tie, hot glue it into place.
Then add the rounded (holder) stick to complete.
Opinion expressed by paid consultant. Color and specifications may vary.
step 2. Select a square. (I selected a rounded edged one.) Design and create two of the
squares, at approximately half the width size of your triangle. Take one and place it
over the center. Select and weld the three designs together so that you have your bow
tie. Place the second square design off to the side and cut out from white cardstock.
ST. PATRICK'S DAY PHOTO BOOTHPROPS (CONTINUED)
Tip: Try a few different sizes for this. (I cut a 4" and 5" wide design for this and ended up using both layered together. My square centers are 2" and 2 1/2" wide.)