standard operating procedures for volunteer samplers
TRANSCRIPT

South Dakota Volunteer Water Quality Monitoring Program
Standard Operating Procedures for Volunteer Samplers
South Dakota Department of Agriculture and Natural Resources
Watershed Protection Program
May 2021
Revision 1

Standard Operating Procedures for Volunteer Samplers SD DANR May 2021
2 South Dakota Department of Agriculture and Natural Resources Watershed Protection Program
Contents Introduction .................................................................................................................................................. 5
Lake Sampling Methods ................................................................................................................................ 5
Sampling Station Overview ....................................................................................................................... 5
Lake Grab Sampling................................................................................................................................... 7
Equipment List ...................................................................................................................................... 7
Secchi Disc Measurement ..................................................................................................................... 7
Total Depth ........................................................................................................................................... 8
Multi-meter Calibration and Logging Set-up ........................................................................................ 8
Multi-meter Vertical Profile Measurement .......................................................................................... 8
Lake Grab Sample Labeling and Datasheets ......................................................................................... 9
Lake Grab Sample Collection ................................................................................................................ 9
Quality Assurance/Quality Control Sample Collection for Lake Grab Sampling ................................. 10
Lake E. coli Sampling ............................................................................................................................... 11
Equipment List .................................................................................................................................... 11
Lake Bacteria Sample Collection ......................................................................................................... 11
Blank Sample Collection for Lake Bacteria .......................................................................................... 11
Replicate Sample Collection for Lake Bacteria.................................................................................... 12
Microcystin Sampling .............................................................................................................................. 12
Equipment List .................................................................................................................................... 12
Microcystin Collection......................................................................................................................... 12
Microcystin Quality Assurance/Quality Control Sampling .................................................................. 13
Lake Composite Sampling ....................................................................................................................... 13
Equipment List .................................................................................................................................... 13
Data Collection Activities .................................................................................................................... 14
Bottle Labeling and Datasheets for Lake Composite Sampling .......................................................... 17
Composite Sample Processing ............................................................................................................ 18
Quality Assurance/Quality Control Sample Collection for Lake Composite Sampling ....................... 19
Stream Sampling Methods .......................................................................................................................... 20
Equipment List .................................................................................................................................... 20
C Bottle Collection Procedure ............................................................................................................. 21
A Bottle Collection Procedure ............................................................................................................. 21
B Bottle Collection Procedure ............................................................................................................. 21

Standard Operating Procedures for Volunteer Samplers SD DANR May 2021
3 South Dakota Department of Agriculture and Natural Resources Watershed Protection Program
Stream Sampling Using a Van Dorn Sampler ...................................................................................... 21
Bottle Labeling and Datasheets for Stream Sampling ........................................................................ 22
Quality Assurance/Quality Control Sample Collection for Stream Sampling ......................................... 22
Blank Sample Collection Procedure .................................................................................................... 22
Replicate Sample Collection Procedure .............................................................................................. 23
Sample Care, Shipping, and Packaging ....................................................................................................... 23
South Dakota State Health Lab ............................................................................................................... 23
Sample Shipping .................................................................................................................................. 23
Sample Care and Packaging ................................................................................................................ 24
Mid Continent Testing Labs .................................................................................................................... 24
Midwest Laboratories ............................................................................................................................. 25
Sample Holding Times ............................................................................................................................. 25
Laboratory Services ..................................................................................................................................... 25
Benthic Macroinvertebrate Sampling ......................................................................................................... 26
Study Index Period .................................................................................................................................. 26
Sampling During or After Rain Events ..................................................................................................... 26
Equipment List ........................................................................................................................................ 27
Laying Out the Sampling Reach .............................................................................................................. 27
Collecting Macroinvertebrates ............................................................................................................... 28
Sample Collection Procedure .............................................................................................................. 29
Sample Processing .............................................................................................................................. 30
Sample Labeling .................................................................................................................................. 31
Sample Holding and Shipping ................................................................................................................. 31
Appendix ..................................................................................................................................................... 32
Multi-meter Calibration Worksheet ....................................................................................................... 33
SD DANR Field Data Collection Sheet ..................................................................................................... 34
SD DANR Water Quality Sample Labels .................................................................................................. 35
SD DANR Biological Labels for Chlorophyll-a Samples ............................................................................ 36
SD DANR Biological Labels for Benthic Macroinvertebrate Samples ...................................................... 37
Table 1. Lake Station types, examples, and uses. ......................................................................................... 6 Table 2. Courier pickup locations and times in eastern South Dakota. ...................................................... 24 Table 3. Sample holding times, preservation and bottle type information. ............................................... 25

Standard Operating Procedures for Volunteer Samplers SD DANR May 2021
4 South Dakota Department of Agriculture and Natural Resources Watershed Protection Program
Figure 1. Lake sampling station location map example. ............................................................................... 5 Figure 2. Composite sample container. ...................................................................................................... 15 Figure 3. Photo of integrated depth sampler for lakes. .............................................................................. 16 Figure 4. Integrated depth sampler diagram. ............................................................................................. 17 Figure 5. Van Dorn sampler. ....................................................................................................................... 22 Figure 6. Sampling reach layout for collecting macroinvertebrates. .......................................................... 27 Figure 7. Sampling design for collecting benthic macroinvertebrates. ...................................................... 29

Standard Operating Procedures for Volunteer Samplers SD DANR May 2021
5 South Dakota Department of Agriculture and Natural Resources Watershed Protection Program
Introduction The intent of this document is to provide a step by step manual for volunteer water quality monitors participating in the volunteer monitoring program offered by the South Dakota Department of Agriculture and Natural Resources (SD DANR). Only the methods included in this document are approved by SD DANR for volunteer monitors. Methods not included in this document are not authorized by the External Party Quality Assurance Project Plan that addresses quality assurance and quality control for volunteer samplers. Any methods not included in this document must be approved by the SD DANR Volunteer Monitoring Coordinator.
Lake Sampling Methods There are four lake sampling techniques authorized by SD DANR for volunteer collection. These include:
• Grab sampling where water is collected from a single location at the center of the lake. • Shoreline E. coli sampling, which is collected at a designated station on the shoreline. • Composite sampling, where water from three stations located throughout the lake are
composited into a single jug. • Microcystin sampling, where the algal toxin microcystin is collected at a designated station on
the shoreline.
Vertical profile measurements made with a multi-meter sonde are integrated into the lake composite and lake grab sampling sections.
Sampling Station Overview Stations are locations where sampling and data collection activities occur. Your stations each have a unique Station ID that is not shared by any other station. The Station ID is printed on sample bottle labels and datasheets to notify the laboratory that your sample was collected at the station’s location. Sample results are associated with the Station ID in the SD DANR water quality database.
All Station IDs for volunteer monitoring stations begin with a 3 to 4 letter abbreviation of your group’s name, if applicable. Mid-lake grab sampling stations begin with the group name abbreviation and then a 4-digit code unique to each lake. Lake shoreline stations for E. coli and microcystin sampling will have the 4-digit lake code, then a letter ranging from A-D. Stations for lake composite stations will have “COM” between the group name abbreviation and the 4-digit lake code plus a letter ranging
Figure 1. Lake sampling station location map example.

Standard Operating Procedures for Volunteer Samplers SD DANR May 2021
6 South Dakota Department of Agriculture and Natural Resources Watershed Protection Program
from A-C at the end. The composite station ending in B will be at the same location as the mid-lake station.
Stream sampling stations begin with the group name abbreviation, then a string of letters and numbers intended to indicate the station location.
Stations will be customized to your water quality sampling project. For example, if your sampling plan calls for only shoreline bacteria sampling, you will not be provided with a mid-lake station for mid-lake grab sampling.
Table 1. Lake Station types, examples, and uses.
Station Type Example Sampling Uses Location
Mid-Lake Station XXX9702
Grab sampling, composite sample results associated with this station
Center of lake
Composite Stations XXXCOM9702A XXXCOM9702B XXXCOM9702C
Water collected, profile and Secchi measurements for composite samples
Evenly distributed through lake
basin
Bacteria/Microcystin Stations XXX9702A XXX9702B XXX9702C
Bacteria sampling, microcystin
sampling
Swimming beach or boat ramp
Stream Station XXX484ST Stream sampling Station on 484th Street
To accurately locate sampling stations when visiting a lake or stream, enter them in a GPS unit or on a mobile phone or tablet with a mapping application such as Google Maps. Data layers for the Google Maps application containing station locations may be provided by the DANR volunteer monitoring coordinator upon request. These tools may not be necessary if you are familiar with the waterbody and sampling stations but are always useful for locating the mid-lake station and composite stations on a lake.
One alternate method for locating the stations is to print satellite images with the station locations indicated on the map. This allows for using local landmarks to navigate to the stations. A second alternate method for locating stations is to view them on the DANR Water Quality Monitoring Access Portal (WQMAP) at https://apps.sd.gov/NR92WQMAP/ and visually verify that you are at the appropriate location using landmarks. Latitude and longitude for each station is available on WQMAP by clicking on each station on the map or clicking the lake and selecting the Monitoring Data tab, which presents a list of all stations associated with that lake as well as their latitude and longitude.

Standard Operating Procedures for Volunteer Samplers SD DANR May 2021
7 South Dakota Department of Agriculture and Natural Resources Watershed Protection Program
Lake Grab Sampling Equipment List
• Boat/motor or other watercraft • Anchor • Life jackets for all staff • Lake maps and/or GPS with station location • Cooler(s) for holding and shipping samples • Secchi disk • Sulfuric acid for B bottle • Pipettes for acid • Bottles (A, B, chlorophyll-a) • Nitrile Gloves • Ice • Fine-tip Sharpie markers or pencils • Preprinted labels and datasheets
If using multi-meter: • Multi-meter sonde and handheld with depth sensor and logging capability • Conductivity calibration standard • pH calibration standard 7 • pH calibration standard 10
Grab sampling at a mid-lake station is less intensive than composite sampling, requiring the sampler to visit only one station in the middle of the lake rather than three stations spread throughout the lake. This method is useful for volunteers sampling from kayaks, canoes, paddleboats, and other small or non-motorized watercraft, where time limitations and the size of the lake being sampled impact the ability of the sampler to reach the necessary stations. It is also useful for those desiring a less technical method of collecting mid-lake samples.
For lake grab samples, Secchi disc measurements and water will be collected only at the mid-lake station located in the center of the lake (for example, YSC9702 in Figure 1). Vertical profile measurements using a multi-meter will be performed only at the mid-lake station.
Secchi Disc Measurement 1. Confirm that the lowering line is firmly attached to the Secchi disk. 2. Remove sunglasses and hat. Also, do not use view scopes or other visual aids. If wearing
prescription sunglasses, temporarily replace them with regular clear lens prescription glasses. 3. Lower the Secchi disk over the shaded side of the boat until it disappears. Lower it one third of
a meter and then slowly raise the disk until it just reappears. Move the disk up and down until the exact vanishing point is found.
4. Read the depth indicated on the lowering line or use a tape measure to measure the distance from the water surface to the Secchi disk at the disappearance depth. Record the disappearance depth on the SD DANR Field Data Collection Sheet (page 34).

Standard Operating Procedures for Volunteer Samplers SD DANR May 2021
8 South Dakota Department of Agriculture and Natural Resources Watershed Protection Program
5. Note any conditions that might affect the accuracy of the measurement in the field notes section of the datasheet.
Total Depth Measure the total depth at the mid-lake station using a sonar, push pole, multi-meter depth sensor, or any other reliable measuring device. Record the depth in meters at the mid-lake station on the field data collection sheet. Multi-meter Calibration and Logging Set-up Note: Only for crews using a multi-meter. If you are not using a multi-meter, proceed to the next section.
Tutorial video part 1: https://youtu.be/SD-5ievw8zY Part 2: https://youtu.be/4KQzBN9--qE
At the beginning of each day, calibrate specific conductivity in microsiemens (µS), pH, dissolved oxygen (mg/L), and depth (meters). Record the results on the multi-meter calibration sheet (Appendix). Include the pH millivolts, conductivity cell constant, and results of the dissolved oxygen calibration.
Note: If the meter indicates that calibration values are out of range, DO NOT accept the calibration. Start the calibration process over.
Note: Recalibrate dissolved oxygen if the weather changes significantly or if you make a significant change in elevation when travelling from one lake to another.
Note: If meter fails to calibrate within range, clean sensors and try calibration again.
Set up the multi-meter for logging data by creating a file for the mid-lake station on the lake(s) you are sampling. These files will be used to store data when the vertical profile is measured.
Multi-meter Vertical Profile Measurement At the end of the field season, send your results to the DANR volunteer monitoring coordinator. The coordinator may provide you with a MS Excel template to make uploading your data to the DANR water quality database easier.
Tutorial video: https://youtu.be/5eI73EQn7fU
1. With the boat stationary at the mid-lake station, put the multi-meter sonde in the water and lower it until the depth sensor reads 0.5 meters. Allow readings for specific conductivity (microsiemens), pH, dissolved oxygen (mg/L), temperature (C) and depth (meters) to stabilize. Log one sample at a depth of approximately 0.5 meters.
2. Lower the sonde to log additional samples every 1m from the water surface, allowing the sensors enough time to stabilize, until reaching the bottom. Be careful to not drop the sonde rapidly in such a manner that it sticks in the lake substrate and gets fouled by mud.
3. After locating the bottom, raise the sonde 0.5 m from the bottom and log a sample after the sensors have stabilized.
4. Enter the results for specific conductivity (microsiemens), pH, dissolved oxygen (mg/L) and temperature (C) from the surface measurement (logged at 0.5 meters) on the datasheet.

Standard Operating Procedures for Volunteer Samplers SD DANR May 2021
9 South Dakota Department of Agriculture and Natural Resources Watershed Protection Program
Lake Grab Sample Labeling and Datasheets Bottle labeling Note: It is good practice to label sample bottles before filling bottles and preserving samples.
1. Using waterproof labels and a waterproof pen or pencil (fine tip Sharpie recommended), fill out the empty fields on the labels for A, B, and chlorophyll-α bottles. If waterproof labels and pens/pencils are not available, apply packing tape over the top of the label to protect it from getting wet. In most cases when using pre-printed labels, most fields other than sampler initials, date, and time will be filled out. Other fields that may need to be filled include Station ID, Project, Source (the waterbody being sampled), Code or Agency Code (your unique billing ID from the SD Health Lab), whether it is a surface, midwater, or bottom sample (always surface), and the sample bottle type (A, B or Chl A for the chlorophyll-α bottle).
2. For the chlorophyll-α bottle, enter the volume of the composite sample that was put into the chlorophyll-α bottle. Typical volumes for chlorophyll-α sample bottles are 500 mL, 1000 mL, or 2000 mL, depending on the size of the bottle. Place the labels on their corresponding bottles.
3. For algae ID/enumeration sample and cyanotoxin samples, write the date, time, mid-lake station ID, and sampler’s initials on the label using a fine-tip Sharpie or other waterproof pencil or pen.
Filling Out Datasheets 1. Fill out the empty fields on the sample collection datasheets to match the values entered on the
bottle labels for Agency Code, Sample Date, Time, Sampler, Source Water, Station ID, Project, and Project ID.
2. Ensure that the box next to “Grab” is checked on the datasheet has a checkmark to indicate it is a grab sample.
3. If conductivity, dissolved oxygen, pH, water temperature, and/or Secchi disk were measured, write the values for the surface measurements (0.5 m depth) in the appropriate fields on the datasheet.
4. On the datasheet, review the boxes that are checked for each bottle for the parameters to be analyzed by the lab. Ensure they are correct for the parameters you intend to have analyzed.
Lake Grab Sample Collection Note: It is good practice to label sample bottles before filling bottles and preserving samples. See the Bottle Labeling and Datasheets for Lake Grab Sampling section for instructions on bottle labeling.
1. At the mid-lake station (Figure 1), remove the cap from the A bottle and rinse the bottle three times using lake water.
2. With the A bottle inverted so the mouth is facing down, submerge the bottle to a depth of approximately 0.3 meters (1 foot). Tip the bottle so the mouth faces toward the surface and the bottle fills. Try not to let any scum from the water surface enter the bottle. Fill the A bottle to the shoulder, dumping out any excess, and cap the bottle. Place the A bottle in a cooler on ice.
3. Repeat the process in step 2 to fill the B bottle. Using a plastic pipette, add 2 mL of sulfuric acid (H2SO4) to the B bottle if using a 1 liter bottle. If using a 250 mL B bottle, add 0.5 mL H2SO4. Cap the bottle. Invert the bottle several times to mix the contents and place the B bottle in the cooler under loose ice.

Standard Operating Procedures for Volunteer Samplers SD DANR May 2021
10 South Dakota Department of Agriculture and Natural Resources Watershed Protection Program
4. Perform the same process as in step 2 for the chlorophyll-a bottle. Place the chlorophyll-a bottle in a cooler under loose ice.
5. If collecting an algae ID/enumeration sample: Without rinsing the 125 mL pre-preserved algae bottle and keeping the bottle mouth pointed upward so as not to dump out the Lugol’s solution preservative in the bottle, submerge the bottle halfway beneath the water surface and fill to the shoulder. Do not overfill – preservative will flow out of the bottle and the sample integrity will be compromised. Store the algae bottle in an upright position at room temperature or on ice in a cooler. Do not allow this sample bottle to be frozen or become hot.
6. If collecting an algal toxin sample: Without rinsing, submerge the cyanotoxin bottle just beneath the water surface and fill, either 30 mL or 60 mL depending on the bottle type. Cap the bottle and store in a cooler under ice. Proceed immediately to your home/office and put the sample in a freezer. It is vital that the bottle remains frozen up until the time it is shipped to DANR via the health lab courier.
Quality Assurance/Quality Control Sample Collection for Lake Grab Sampling Blank Sample Procedure
1. To submit a blank sample to the lab, triple rinse and fill bottles A, B, and chlorophyll-α with distilled or deionized water.
2. Using a plastic pipette, add 2 mL of sulfuric acid (H2SO4) to the B bottle if using a 1 liter bottle. If using a 250 mL B bottle, add 0.5 mL H2SO4.
3. On the sample labels, indicate that the sample is a blank sample by checking the box or writing “BLANK” on the label.
4. Place the sample bottles in the cooler on ice. 5. Fill out a datasheet as you normally would with the date, time, station ID, and sampler. Check
the box next to “Blank” to indicate it is a blank sample. You may use any real station ID for a blank sample. Do not make up a fake station ID for the blank sample.
6. Ship the blank sample to the South Dakota State Health Lab using the courier in the same manner as a regular sample would be shipped.
Replicate Sample Procedure 1. To submit a replicate sample, triple rinse and fill bottles A, B, and chlorophyll-α with lake water
from the composite jug as you are filling the bottles for the regular sample. Place the A and chlorophyll-α bottle under loose ice in the cooler.
2. Using a plastic pipette, add 2 mL of sulfuric acid (H2SO4) to the B bottle if using a 1 liter bottle. If using a 250 mL B bottle, add 0.5 mL H2SO4. Place the B bottle under loose ice in the cooler.
3. On the sample labels, indicate that the samples are replicate samples by checking the box or writing “REPLICATE” on the label.
4. Fill out a datasheet as you normally would with the date, time, station ID, and sampler. Enter the exact same time on the replicate datasheet that you entered on the regular sample datasheet. Do not enter a time that is slightly different from the normal sample time.
5. On the replicate sample datasheet, check the box next to “Replicate” to indicate it is a replicate sample.
6. Ship the replicate sample to the South Dakota State Health Lab using the courier in the same manner as a regular sample would be shipped.

Standard Operating Procedures for Volunteer Samplers SD DANR May 2021
11 South Dakota Department of Agriculture and Natural Resources Watershed Protection Program
Lake E. coli Sampling E. coli is a bacterial indicator. It shows if there is contamination from fecal bacteria. Lake E. coli samples are collected at stations located along a lake’s shoreline to determine if there is a risk to people engaging in water recreation.
Equipment List • Lake maps and/or GPS with station location • Cooler(s) for holding and shipping samples • Secchi disk • C bottle • Nitrile Gloves • Ice • Fine-tip Sharpie markers or pencils • Preprinted labels and datasheets
Tutorial video: https://youtu.be/DNn5ZoYkoDo
Note: The C bottle is either a 100 mL clear bottle or a 250 mL white bottle that should not be rinsed before sample collection.
Lake Bacteria Sample Collection 1. Put on a pair of nitrile or latex gloves and proceed to the designated bacteria collection station
(Figure 1). 2. Do not rinse the C bottle (100 mL or 250 mL bottle). 3. In water at least 0.3 meters (1 foot) deep, invert the C bottle so the bottle mouth is facing down
and submerge the bottle in the water approximately halfway to the lake bottom. Avoid collecting surface scum or sediment from the lake bed.
4. While holding the bottle underwater, tip upright so the bottle fills. Remove the bottle from the water and screw on the cap.
5. Fill out the label on the C bottle for date, time, and sampler’s initials and place it in a cooler under loose ice.
6. On the lake bacteria datasheet, enter the date, time, and sampler’s initials. 7. Ship the bacteria sample using the health lab courier on the day of collection. The sample must
arrive at the Health Lab within 24 hours of collection.
Blank Sample Collection for Lake Bacteria 1. Wearing nitrile or latex gloves, without rinsing, fill the C bottle to the shoulder using distilled or
deionized water. 2. Fill out the label on the C bottle for date, time, and sampler’s initials. 3. On the sample labels, indicate that the sample is a blank sample by checking the box or writing
“BLANK” on the label. 4. Place the sample bottle in the cooler on ice. 5. On the lake bacteria datasheet, enter the date, time, and sampler’s initials. 6. Check the box on the datasheet to indicate it is a blank sample. 7. Ship the blank sample using the Health Lab courier as you would with a normal bacteria sample.

Standard Operating Procedures for Volunteer Samplers SD DANR May 2021
12 South Dakota Department of Agriculture and Natural Resources Watershed Protection Program
Replicate Sample Collection for Lake Bacteria 1. Without rinsing the bottle, fill the replicate C bottle at the same time using the same technique
as the C bottle for the regular sample. 2. On the sample label, indicate that the samples are replicate samples by checking the box or
writing “REPLICATE” on the label. 3. Fill out the label on the C bottle for date, time, and sampler’s initials and place it in a cooler
under loose ice. 4. Fill out a datasheet as you normally would with the date, time, station ID, and sampler. Enter
the exact same time on the replicate datasheet that you entered on the regular sample datasheet. Do not enter a time that is slightly different from the normal sample time.
5. On the replicate sample datasheet, check the box next to “Replicate” to indicate it is a replicate sample.
6. Ship the blank sample using the Health Lab courier as you would with a normal bacteria sample.
Microcystin Sampling Microcystin is a cyanotoxin that is produced by cyanobacteria, also known as blue-green algae. Microcystin samples will be collected on a routine basis at pre-determined locations along lake shorelines.
Equipment List • Lake maps and/or GPS with station location • Cooler(s) for holding and shipping samples • Bottles (microcystin) • Nitrile Gloves and/or elbow length dishwashing gloves • Rubber boots, hip boots, or waders • Ice • Fine-tip Sharpie markers or pencils • FedEx shipping labels
Microcystin Collection
1. Put on nitrile gloves, or any other type of glove that will prevent water that is potentially containing cyanotoxins from touching your skin.
2. At the station in water approximately 0.3 meters (1 foot) deep, submerge the microcystin bottle so half the bottle’s mouth is submerged. Fill the bottle to the volume line indicating 125 mL.
3. Write the date, time, station ID, and sampler’s initials on the bottle label. 4. Cap the bottle and place it in a cooler under loose ice until reaching your home or office. Ship
the sample the same day it is collected. 5. To ship the microcystin sample, pack it and any other microcystin samples collected that day in a
small cooler with a Ziploc bag filled with ice. Tape the cooler shut. 6. Ship the cooler via FedEx to Midwest Laboratories using the pre-printed FedEx shipping labels
provided to you. You may contact FedEx to schedule a pickup for the cooler by calling 1 800 463-3339 and say “schedule a pickup.”

Standard Operating Procedures for Volunteer Samplers SD DANR May 2021
13 South Dakota Department of Agriculture and Natural Resources Watershed Protection Program
Microcystin Quality Assurance/Quality Control Sampling Blank Microcystin Sample Collection
1. With distilled or deionized water, fill the microcystin bottle to the volume line indicating 125 mL. 2. Write the date, time, station ID, and sampler’s initials on the bottle label. 3. Write “BLANK” on the microcystin bottle label. 4. Cap the bottle and place it in a cooler under loose ice until reaching your home or office. Ship
the sample the same day it is collected. 5. To ship the microcystin sample, pack it and any other microcystin samples collected that day in a
small cooler with a Ziploc bag filled with ice. Tape the cooler shut. 6. Ship the cooler via FedEx to Midwest Laboratories using the pre-printed FedEx shipping labels
provided to you. You may contact FedEx to schedule a pickup for the cooler by calling 1 800 463-3339 and say “schedule a pickup.”
Replicate Microcystin Sample Collection 1. Put on nitrile gloves, or any other type of glove that will prevent water that is potentially
containing cyanotoxins from touching your skin. 2. Collect the replicate microcystin sample at the same time and location as a regular microcystin
sample is collected. 3. At the station in water approximately 0.3 meters (1 foot) deep, submerge the microcystin bottle
so half the bottle’s mouth is submerged. Fill the bottle to the volume line indicating 125 mL. 4. Write the date, time, station ID, and sampler’s initials on the bottle label. 5. Write “REPLICATE” on the microcystin bottle label. 6. Cap the bottle and place it in a cooler under loose ice until reaching your home or office. Ship
the sample the same day it is collected. 7. To ship the microcystin sample, pack it and any other microcystin samples collected that day in a
small cooler with a Ziploc bag filled with ice. Tape the cooler shut. 8. Ship the cooler via FedEx to Midwest Laboratories using the pre-printed FedEx shipping labels
provided to you. You may contact FedEx to schedule a pickup for the cooler by calling 1 800 463-3339 and say “schedule a pickup.”
Lake Composite Sampling Composite samples are an even mix of water collected from three locations evenly spread throughout a lake. The purpose of composite sampling is to provide a sample that is more representative of the entire lake than a grab sample. Water chemistry may vary across a lake. Composite sampling evens out the results of any spatial variability in lake water chemistry. Visiting three locations on the lake also allow for the collection of 3 sets of Secchi measurements and vertical profiles, further enriching the dataset used under the Clean Water Act to assess whether lakes are meeting water quality standards. The drawback to composite sampling is that it requires more gear, time, and travel and makes the use of smaller watercraft such as kayaks impractical or dangerous.
Equipment List • Boat/motor or other watercraft • Anchor • Life jackets for all staff
• Lake maps and/or GPS with station locations
• Integrated depth sampler

Standard Operating Procedures for Volunteer Samplers SD DANR May 2021
14 South Dakota Department of Agriculture and Natural Resources Watershed Protection Program
• Cooler(s) for holding and shipping samples
• Distilled/deionized water • Composite sample container (>3
gallons) • Secchi disk • Sulfuric acid for B bottle • Pipettes for acid • Bottles (A, B, chlorophyll-a) • Supplemental bottles (cyanotoxin, algae
ID/enumeration) • Nitrile Gloves
• Ice • Fine-tip Sharpie markers or pencils • Preprinted labels and SD DANR Field
Data Collection sheets (datasheets)
If using multi-meter: • Multi-meter sonde and handheld with
depth sensor and logging capability • Conductivity calibration standard • pH calibration standard 7 • pH calibration standard 10
Multi-meter Calibration and Logging Set-up Note: Only for crews using a multi-meter.
Tutorial video part 1: https://youtu.be/SD-5ievw8zY Part 2: https://youtu.be/4KQzBN9--qE
At the beginning of each day, calibrate specific conductivity in microsiemens (µS), pH, dissolved oxygen (mg/L), and depth (meters). Record the results on the multi-meter calibration sheet (Appendix). Include the pH millivolts, conductivity cell constant, and results of the dissolved oxygen calibration.
Note: If the meter indicates that calibration values are out of range, DO NOT accept the calibration. Start the calibration process over.
Note: Recalibrate dissolved oxygen if the weather changes significantly or if you make a significant change in elevation when travelling from one lake to another.
Set up the multi-meter for logging data by creating files for the A, B, and C data collection stations in the site list. These files will be used to store data when the vertical profile is measured.
Data Collection Activities Lake data collection stations may be visited in any order so long as resulting data is associated with the appropriate station ID. For example, it is acceptable to start at station C or station B rather than station A. Be sure to save vertical profile measurements to the correct file in the multi-meter handheld and label the Secchi disk results with the correct station in your notes. If you are not able to reach a station due to safety concerns or because you can’t reach the location in your boat, skip that station and proceed with data collection at the other stations. Make a note in the field comments section of the sample data sheet that you were not able to collect water and data at a station. Note: Do your best to locate the A, B, and C stations. It is ok to be not at the exact coordinates of the station when using paper maps to navigate, but you should be relatively close (i.e. in the same water depth and/or distance from shore as the station).
Note: Anchor the boat at the A, B and C stations so you can collect a vertical profile and Secchi disk measurement without significant lateral movement of the boat. This may not be necessary on calm days, but is always necessary on windy days. A trolling motor with an “anchor mode” or “spot lock” is also acceptable.
South Dakota Volunteer Water Quality Monitoring Field Manual January 2021
15 South Dakota Department of Agriculture and Natural Resources Watershed Protection Program
Multi-meter Vertical Profile Measurement Tutorial video: https://youtu.be/5eI73EQn7fU
5. With the boat stationary at the first station (A, B or C), put the multi-meter sonde in the water and lower it until the depth sensor reads 0.5 meters. Allow readings for specific conductivity (microsiemens), pH, dissolved oxygen (mg/L), and depth (meters) to stabilize. Log one sample at a depth of approximately 0.5 meters.
6. Lower the sonde to log additional samples every 1m from the water surface, allowing the sensors enough time to stabilize, until reaching the bottom. Be careful to not drop the sonde rapidly in such a manner that it sticks in the lake substrate and gets fouled by mud.
7. After locating the bottom, raise the sonde 0.5 m from the bottom and log a sample after the sensors have stabilized.
8. Repeat this process at the remaining two lake sampling stations.
Secchi Disk Tutorial video: https://youtu.be/m4fd2_MjCFM
1. Confirm that the lowering line is firmly attached to the Secchi disk. 2. Remove sunglasses and hat. Also, do not use view scopes or other visual aids. If wearing
prescription sunglasses, temporarily replace them with regular clear lens prescription glasses. 3. Lower the Secchi disk over the shaded side of the boat until it disappears. Lower it one third of
a meter and then slowly raise the disk until it just reappears. Move the disk up and down until the exact vanishing point is found.
4. Read the depth indicated on the lowering line or use a tape measure to measure the distance from the water surface to the Secchi disk at the disappearance depth. Record the disappearance depth in a field notebook or enter it in the comments of the SD DANR Water Quality Data lab sheet (see Appendix).
5. Note any conditions that might affect the accuracy of the measurement in your field notes. 6. Repeat this process at the remaining two lake sampling stations.
Total Depth Measure the total depth at the in-lake data collection sites A, B, and C using a sonar, push pole, multi-meter depth sensor, or any other reliable measuring device. On the SD DANR Field Data Collection Sheet (see Appendix), record the depth in meters of the deepest station on the lake (A, B or C). Composite Water Sample Collection Tutorial video: https://youtu.be/GfO0Q8c_gJ0
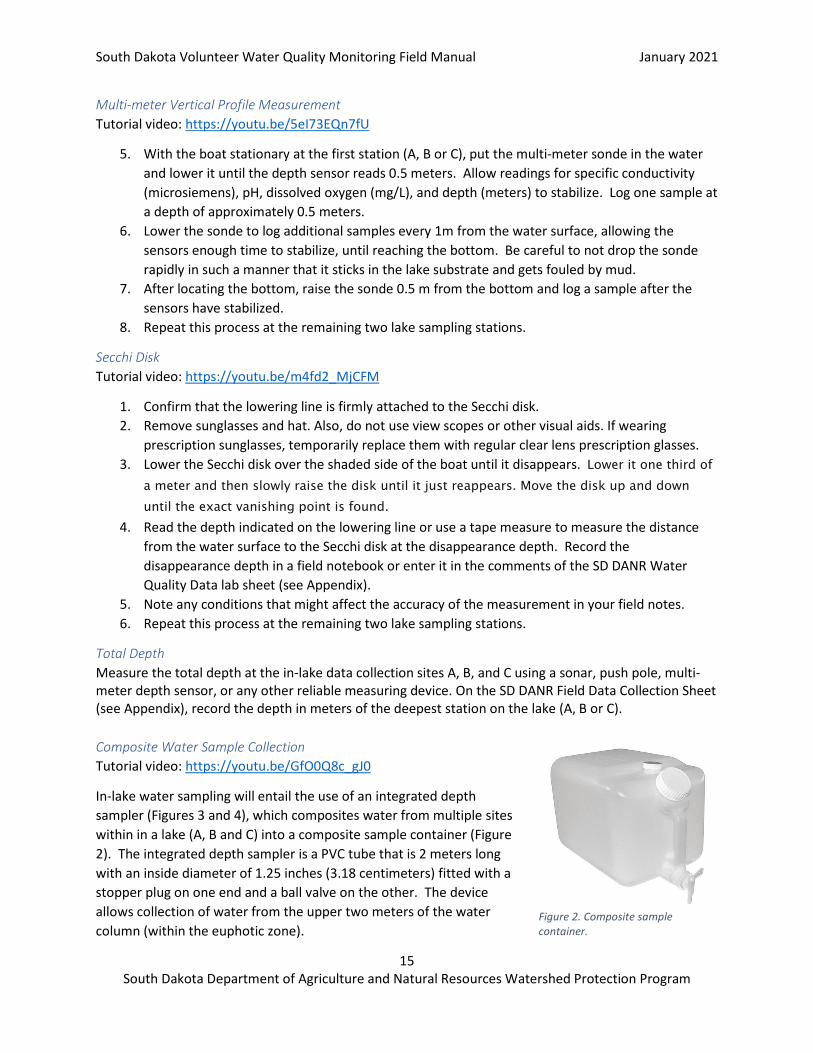
In-lake water sampling will entail the use of an integrated depth sampler (Figures 3 and 4), which composites water from multiple sites within in a lake (A, B and C) into a composite sample container (Figure 2). The integrated depth sampler is a PVC tube that is 2 meters long with an inside diameter of 1.25 inches (3.18 centimeters) fitted with a stopper plug on one end and a ball valve on the other. The device allows collection of water from the upper two meters of the water column (within the euphotic zone).
Figure 2. Composite sample container.

South Dakota Volunteer Water Quality Monitoring Field Manual January 2021
16 South Dakota Department of Agriculture and Natural Resources Watershed Protection Program
Note: The composite sample container should be rinsed on shore three times with distilled or deionized water before use. Do not use lake water to rinse the container as it could spread invasive species.
Note: It is helpful to make depth gradations with a permanent Sharpie marker on the outside of the integrated depth sampler so you can measure the depth you are sampling to using the sampler itself. Mark depths along the sampler tube every 0.1 meters from the bottom of the sampler.
Figure 3. Photo of integrated depth sampler for lakes.
The composite sample container (Figure 2) is used to hold the composite sample until it is transferred to bottles and preserved. Many types of containers may be used for the composite sample container if they do not contaminate the sample. Typically, food grade plastic carboys and drinking water containers with a spout for filling sample bottles are used for the composite sample container.
1. Calculate the euphotic zone depth by multiplying the Secchi disk disappearance depth from the station you are sampling by 2 (see equation below). The resulting value determines the depth to which water samples will be collected at this station with an integrated depth sampler. If the euphotic zone is greater than or equal to 2 meters (Secchi depth is greater than or equal to 1 meter), water samples will be taken from the top 2 meters of the water column.
𝑆𝑆𝑆𝑆𝑆𝑆𝑆𝑆ℎ𝑖𝑖 𝑑𝑑𝑆𝑆𝑑𝑑𝑑𝑑ℎ ∗ 2 = 𝑑𝑑𝑆𝑆𝑑𝑑𝑑𝑑ℎ 𝑜𝑜𝑜𝑜 𝑖𝑖𝑖𝑖𝑑𝑑𝑆𝑆𝑖𝑖𝑖𝑖𝑖𝑖𝑑𝑑𝑆𝑆𝑑𝑑 𝑠𝑠𝑖𝑖𝑠𝑠𝑑𝑑𝑠𝑠𝑆𝑆
2. Note any conditions that might affect the accuracy of the measurement (waves, sun, excessive algal bloom, etc.) in the notes field at the bottom of the datasheet.

South Dakota Volunteer Water Quality Monitoring Field Manual January 2021
17 South Dakota Department of Agriculture and Natural Resources Watershed Protection Program
3. Remove the rubber stopper cap and open the ball valve on the bottom end of the integrated sampler (Figure 4). On the opposite side of the boat you plan to collect the sample from, rinse the integrated sampler by submerging the sampler in the lake three times and draining.
4. In a location away from the boat motor, slowly lower the sampler into the lake as vertically as possible. Stop when the upper end is just above the surface if the euphotic zone is > 2 m deep. SD DANR WPP protocols are to collect two full (2 m) integrated samplers of surface water at each in-lake sampling site (a total of 4 m of euphotic surface water per sampling site). If the euphotic zone is < 2.0 m deep, the integrated sampler will be vertically lowered into the lake to the depth of the previously calculated euphotic zone for that station; additional samples will be taken to collect the total volume needed to equal a total of 4 m of water. Note: If the Secchi depth is less than 0.3 meters (euphotic zone < 0.6 meters) you may lay the integrated sampler in the water horizontally to collect a full tube of water in the euphotic zone. This eliminates the need to fill the sample many times to collect sufficient water from the station.
5. Cap the upper end with the rubber stopper firmly and slowly raise the sampler while holding it as vertical as possible. When the bottom of the sampler is just below the water surface, reach underneath the surface of the water and close the ball valve on the bottom end of the sampler. 6. Lift the sampler into the boat, keeping it as vertical as possible. 7. Dispense the contents of the sampler into the previously rinsed composite sample container by opening the lower ball value to drain contents of the sampler into an appropriate pre-rinsed composite storage container. When the last sample is transferred to the composite container at each station, cap the sample container, and move it to a shaded area of the boat or cover it to avoid exposing the sample to direct sunlight and/or higher temperatures. 8. Proceed to the next sampling location on the lake and repeat the vertical profile measurement, Secchi disk measurement, total depth measurement, and water sample collection. Repeat these steps for all
sample stations on each lake.
Bottle Labeling and Datasheets for Lake Composite Sampling Entering information on datasheets and labels typically occurs on shore at the boat launch.
Bottle Labeling Procedure 1. Using waterproof labels and a waterproof pen or pencil (fine tip Sharpie recommended), fill out
the empty fields on the labels for the A, B and chlorophyll-α bottles. If waterproof labels and pens/pencils are not available, apply packing tape over the top of the label to protect it from getting wet. In most cases when using pre-printed labels, most fields other than Station ID, sampler initials, date, and time will be filled out. Other fields that may need to be filled include Project, Source (the waterbody being sampled), Code or Agency Code (your unique billing ID from the SD Health Lab), whether it is a surface, midwater, or bottom sample (usually surface), and the sample bottle type (A, B or Chl A for the chlorophyll-α bottle).
Figure 4. Integrated depth sampler diagram.

South Dakota Volunteer Water Quality Monitoring Field Manual January 2021
18 South Dakota Department of Agriculture and Natural Resources Watershed Protection Program
2. For the chlorophyll-α bottle, enter the volume of the composite sample that was put into the chlorophyll-α bottle. Typical volumes for chlorophyll-α samples are 500 mL, 1000 mL, or 2000 mL. Larger bottles are used in lakes that typically have less algae.
3. Place the labels on their corresponding bottles. 4. If you are collecting algae ID/enumeration sample and/or cyanotoxin samples, write the date,
time, mid-lake station, and sampler’s initials on the algae ID/enumeration and cyanotoxin bottle labels using a fine-tip Sharpie or other waterproof pencil or pen.
Filling Out Datasheets Note: Datasheets accompany only the A and B bottles. Chlorophyll-a, cyanotoxin and algae ID/enumeration bottles do not have accompanying datasheets because they are not analyzed at the South Dakota State Health Lab.
1. Fill out the empty fields on the sample collection datasheets to match the values entered on the A and B bottle labels for Agency Code, Sample Date, Time, Sampler, Source Water, Station ID, Project, and Project ID.
2. Using a field notebook, iPad, or scratch-paper, calculate the averages of the surface measurements (0.5m depth) from the three lake sampling stations (A, B and C) for specific conductivity, dissolved oxygen, pH, water temperature. Enter the resulting averages on the datasheet in the appropriate fields.
3. Using a field notebook, iPad, or scratch-paper, calculate the average of the three Secchi disk measurements from the A, B and C stations. Enter the resulting value on the datasheet.
4. On the datasheet, review the boxes that are checked for each bottle for the parameters to be analyzed by the lab. Ensure they are correct for the parameters you intend to have analyzed.
5. Be sure to keep a record of Secchi disk results from the individual A, B, and C stations to provide to the volunteer monitoring coordinator for entry into the DANR water quality database. If notes are kept on an iPad or other electronic device, you may email the notes to the volunteer monitoring coordinator.
Composite Sample Processing Tutorial video: https://youtu.be/dg1ZnTue74Y
Bottle Overview In most cases, a total of 3 sample bottles will be filled from the composite container at each lake. The A and B bottle are both white 1 liter narrow-mouth Nalgene bottles. Both the A and B bottle should be triple rinsed with lake water before filling. The chlorophyll-α bottle is a brown bottle with a volume of either 500 mL, 1 liter, or 2 liters and should be triple rinsed with lake water before filling.
In some cases, an algae ID/enumeration sample and/or cyanotoxin sample will be collected from lake composite samples. These samples differ from harmful algal bloom samples collected along a shoreline in the sense that they are representative of the whole lake rather than a localized area near the shoreline. These samples are sent to out-of-state laboratories for analysis and do not follow the same labeling and datasheet convention as the A, B and chlorophyll-α bottles. The algae bottle is a 125 mL brown bottle that is pre-preserved with Lugol’s solution and should not be rinsed before filling. The cyanotoxin bottle is either a 30mL or 60 mL bottle that can be filled directly from the composite jug to the volume line indicated on the bottle (30 mL or 60mL).

South Dakota Volunteer Water Quality Monitoring Field Manual January 2021
19 South Dakota Department of Agriculture and Natural Resources Watershed Protection Program
Note: It is good practice to label sample bottles before filling and preserving samples. See the Bottle Labeling and Datasheets for Lake Composite Sampling section on page 8 for instructions on bottle labeling.
Sample Processing Procedure 1. Mix the composite jug by shaking the jug. 2. Rinse bottles labeled A, B, and chlorophyll-α three times each with a small amount of lake water
from the composite jug. Fill bottles A, B, and chlorophyll-α to the shoulder of the bottle from the composite jug. Place the A bottle and the chlorophyll-α bottle in the cooler under loose ice.
3. Using a plastic pipette, add 2 mL of sulfuric acid (H2SO4) to the B bottle if using a 1 liter bottle. If using a 250 mL B bottle, add 0.5 mL H2SO4.
4. Place the cap on the bottle. Invert the bottle several times to mix the contents and place the B bottle in the cooler under loose ice.
5. If collecting an algae ID/enumeration sample: Without rinsing, fill the 125 mL pre-preserved algae bottle to the shoulder. Store the algae bottle in an upright position at room temperature or on ice in a cooler. Do not allow this sample bottle to be frozen or become hot.
6. If collecting a cyanotoxin sample: Without rinsing, fill the cyanotoxin bottle from the composite jug to the volume line indicated on the bottle, either 30 mL or 60 mL. Cap the bottle and store in a cooler on ice until you return to your home/office, then immediately put the sample in a freezer. It is vital that the bottle remain frozen up until the time it is shipped to DANR via the health lab courier.
Quality Assurance/Quality Control Sample Collection for Lake Composite Sampling Blank Sample Procedure Tutorial video: https://youtu.be/N6BLXkPW8vM
1. To submit a blank sample to the lab, triple rinse and fill bottles A, B, and chlorophyll-α with distilled or deionized water.
2. Preserve the B bottle with 2 mL of sulfuric acid (H2SO4) as you would with a regular sample (add 2 mL H2SO4 if using a 1 liter bottle – if using a 250 mL B bottle, add 0.5 mL H2SO4).
3. Place the sample bottles in the cooler on ice. 4. On the sample labels, indicate that the sample is a blank sample by checking the box or writing
“BLANK” on the label. 5. Fill out a datasheet as you normally would with the date, time, station ID, and sampler. Check
the box next to “Blank” to indicate it is a blank sample. You may use any real station ID for a blank sample. Do not make up a fake station ID for the blank sample.
6. Ship the blank sample to the South Dakota State Health Lab using the courier in the same manner as a regular sample would be shipped.
Replicate Sample Procedure Tutorial video: https://youtu.be/sWRn3_4_7yU
Note: If you are collected a replicate lake composite sample you may need to collect extra lake water at the A, B and C stations. Be sure relatively equal amounts of water are collected at each station.

South Dakota Volunteer Water Quality Monitoring Field Manual January 2021
20 South Dakota Department of Agriculture and Natural Resources Watershed Protection Program
1. To submit a replicate sample, triple rinse and fill bottles A, B, and chlorophyll-α with lake water from the composite jug as you are filling the bottles for the regular sample. Place the A and chlorophyll-α bottle under loose ice in the cooler.
2. Preserve the B bottle with 2 mL of sulfuric acid (H2SO4) as you would with a regular sample (add 2 mL H2SO4 if using a 1 liter bottle – if using a 250 mL B bottle, add 0.5 mL H2SO4).
3. Place the B bottle under loose ice in the cooler. 4. On the sample labels, indicate that the samples are replicate samples by checking the box or
writing “REPLICATE” on the label. 5. Fill out a datasheet as you normally would with the date, time, station ID, and sampler. Enter
the exact same time on the replicate datasheet that you entered on the regular sample datasheet. Do not enter a time that is slightly different from the normal sample time.
6. On the replicate sample datasheet, check the box next to “Replicate” to indicate it is a replicate sample.
7. Ship the replicate sample to the South Dakota State Health Lab using the courier in the same manner as a regular sample would be shipped.
Stream Sampling Methods Stream sampling is conducted at stations located on streams or rivers. Grab sampling is used to collect samples from streams, meaning you simply need to fill the bottles with water from the stream. In a stream that is shallow, you may wade into the middle of the stream to collect the sample. Be sure to face upstream and avoid clouds of sediment created by your footsteps when collecting the sample. You may also collect the water along either shoreline by reaching out into the flowing water and filling the sample bottles. If it is not possible to get to the stream due to safety or access reasons, you may use a Van Dorn sampler to collect the sample from a bridge (page 21).
Equipment List • Cooler(s) for holding and shipping samples • Distilled/deionized Water • Sulfuric acid for B bottle • Pipettes for acid • Bottles (A, B, C) • Nitrile Gloves • Ice (20 lbs) • Waders/hip boots/rubber boots (If needed) • Labels and datasheets • Fine-tip Sharpie markers or pencils
Supplemental Equipment
• Van Dorn Sampler • Multi-meter sonde and handheld • Conductivity calibration Standard • pH calibration standard 7 • pH calibration standard 10

South Dakota Volunteer Water Quality Monitoring Field Manual January 2021
21 South Dakota Department of Agriculture and Natural Resources Watershed Protection Program
C Bottle Collection Procedure Tutorial video for A, B and C bottle collection: https://youtu.be/XtrFUBOC7LU
Note: The C bottle should be collected before the A and B bottles to avoid sample contamination.
Note: The C bottle is a sterile bottle and should never be rinsed with distilled or sample site water.
1. Put on nitrile or latex gloves. 2. Remove lid and position the open end of the bottle towards the flow. 3. Plunge the bottle down into the water (0.5 foot – 1 foot) to avoid introducing surface scum. 4. Fill the bottle to the 250 mL or 100 mL mark, whichever is appropriate for the bottle size. If too
much water enters the bottle, pour out a small amount (~5 mL). 5. Write down the time of collection for the C bottle on the datasheet. 6. Place the C bottle in a cooler with loose ice, making sure most of the sample bottle is in contact
with ice.
A Bottle Collection Procedure 1. Rinse the A bottle with stream water 3 times. 2. Position the open end of the bottle towards the flow. 3. Lower bottle into the stream so the bottle mouth is fully submerged and allow the bottle to fill
up to the shoulder. 4. Place the A bottle in a cooler on loose ice, making sure most of the sample bottle is in contact
with ice.
B Bottle Collection Procedure 1. Rinse bottle with stream water 3 times. 2. Position the open end of the bottle towards the flow. 3. Lower bottle into the stream (0.5 foot – 1 foot) and allow the bottle to fill up to the shoulder. 4. Using a plastic pipette, add 2 mL of sulfuric acid (H2SO4) to the B bottle if using a 1 liter bottle. If
using a 250 mL B bottle, add 0.5 mL H2SO4. 5. Place the cap on the bottle. Invert the bottle several times to mix the contents and place the B
bottle in the cooler under loose ice. 6. Place the B bottle in a cooler on loose ice, making sure most of the sample bottle is in contact
with ice.
Stream Sampling Using a Van Dorn Sampler Tutorial video: https://youtu.be/fQLsJZN633Q
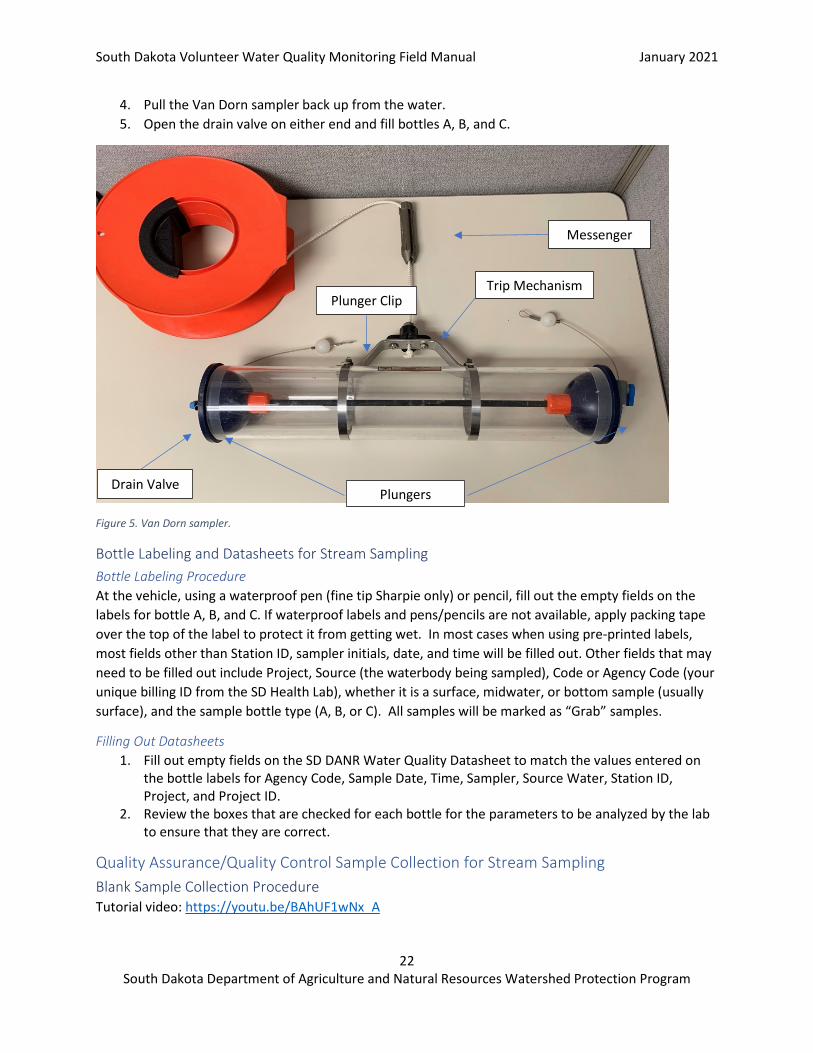
If it is not safe to access the water to collect a sample at a stream site or conditions prevent direct physical access to the water, a Van Dorn sampler may be used. The Van Dorn sampler allows a field sampler to collect water by lowering the device into the water, then sending a heavy weight down the rope that closes the ends of the tube, in turn capturing water from the stream.
1. Open the plungers, attach plunger clips to the trip mechanism and lower the Van Dorn into the water and rinse three times.
2. Lower the Van Dorn sampler back into the water and hold just below the surface. 3. Release the messenger down the rope to trip sampler and close the plungers.
South Dakota Volunteer Water Quality Monitoring Field Manual January 2021
22 South Dakota Department of Agriculture and Natural Resources Watershed Protection Program
4. Pull the Van Dorn sampler back up from the water. 5. Open the drain valve on either end and fill bottles A, B, and C.
Figure 5. Van Dorn sampler.
Bottle Labeling and Datasheets for Stream Sampling Bottle Labeling Procedure At the vehicle, using a waterproof pen (fine tip Sharpie only) or pencil, fill out the empty fields on the labels for bottle A, B, and C. If waterproof labels and pens/pencils are not available, apply packing tape over the top of the label to protect it from getting wet. In most cases when using pre-printed labels, most fields other than Station ID, sampler initials, date, and time will be filled out. Other fields that may need to be filled out include Project, Source (the waterbody being sampled), Code or Agency Code (your unique billing ID from the SD Health Lab), whether it is a surface, midwater, or bottom sample (usually surface), and the sample bottle type (A, B, or C). All samples will be marked as “Grab” samples.
Filling Out Datasheets 1. Fill out empty fields on the SD DANR Water Quality Datasheet to match the values entered on
the bottle labels for Agency Code, Sample Date, Time, Sampler, Source Water, Station ID, Project, and Project ID.
2. Review the boxes that are checked for each bottle for the parameters to be analyzed by the lab to ensure that they are correct.
Quality Assurance/Quality Control Sample Collection for Stream Sampling Blank Sample Collection Procedure Tutorial video: https://youtu.be/BAhUF1wNx_A
Plungers
Messenger
Trip Mechanism Plunger Clip
Drain Valve

South Dakota Volunteer Water Quality Monitoring Field Manual January 2021
23 South Dakota Department of Agriculture and Natural Resources Watershed Protection Program
1. To submit a blank sample to the lab, triple rinse and fill bottles A and B with distilled or deionized water.
2. Using a plastic pipette, add 2 mL of sulfuric acid (H2SO4) to the B bottle if using a 1 liter bottle. If using a 250 mL B bottle, add 0.5 mL H2SO4.
3. Without rinsing, fill the C bottle with distilled or deionized water. 4. Place the sample bottles in the cooler under loose ice. 5. On the sample labels, indicate that the samples are blank samples by checking the box to
indicate a blank sample or writing “BLANK” on the label. 6. Fill out a datasheet as you normally would with the date, time, Station ID, and sampler. Check
the box next to “Blank” to indicate it is a blank sample. 7. Ship the blank sample the same as a regular sample would be shipped.
Replicate Sample Collection Procedure Tutorial video: https://youtu.be/P9VVYgSygh0
1. Without rinsing the bottle, fill the replicate C bottle at the same time while using the same technique as the C bottle for the regular sample.
2. Triple rinse and fill replicate bottles A and B with water from the stream at the same time you are filling the A and B bottles for the regular sample.
3. Preserve the replicate B bottle with 2 mL of sulfuric acid (H2SO4) like you would with a regular sample (if using a 250 mL B bottle, add 0.5 mL H2SO4).
4. On the sample labels, indicate that the samples are replicate samples by checking the box or writing “REPLICATE” on the label.
5. Place the replicate sample bottles in a cooler under loose ice. 6. Fill out a datasheet as you normally would with the date, time, Station ID, and sampler. Enter
the exact same time on the replicate sample datasheet that you entered on the regular sample datasheet.
7. On the replicate sample datasheet, check the box next to “Replicate” to indicate it is a replicate sample.
8. Ship the replicate sample along with the regular sample.
Sample Care, Shipping, and Packaging South Dakota State Health Lab Sample Shipping Tutorial video: https://youtu.be/KlS_9eUpCBI
Sample shipping will primarily be conducted using the South Dakota Health Laboratory courier system, which is conducted by Sameday Express. The courier has scheduled pick-up locations and times throughout eastern South Dakota. Scheduled pick-up locations and times are shown in Table 2. If the courier system is unavailable in your region or does not fit your needs, samples may also be Priority shipped via the US Postal Service. Contact the Volunteer Monitoring Coordinator for information about shipping the samples with the US Postal Service.

South Dakota Volunteer Water Quality Monitoring Field Manual January 2021
24 South Dakota Department of Agriculture and Natural Resources Watershed Protection Program
Table 2. Courier pickup locations and times in eastern South Dakota.
City Address/Location Address Courier
Departure Time
Webster SD Game Fish & Parks office 603 E 8th Ave, Webster, SD 57274 5:00 PM Watertown DANR field office 2001 9th Avenue SW, Suite 500 4:00 PM Aberdeen St. Luke's Hospital 305 S State St, Aberdeen, SD 57401 3:30 PM
Huron Huron Regional Hospital - lab entrance on east side 172 4th St SE, Huron, SD 57350 5:00 PM
Brookings Brookings Regional Hospital 300 22nd Ave S, Brookings, SD 57006 4:00 PM Mitchell Queen of Peace Hospital 1900 Grassland Drive, Mitchell, SD 57301 8:00 PM Yankton Sacred Heart Hospital 501 Summit St, Yankton, SD 57078 3:30 PM
Sioux Falls SF Airport Business Aviation 43 N John Orr Drive, Sioux Falls, SD 57104 7:00 PM If you are not able to reach a scheduled pick-up location, or if it isn’t sensible to use one of the scheduled pick-up locations, you can call Sameday Express to schedule a pick-up nearly anywhere in South Dakota by calling 605-366-3299. Be sure to call early in the morning to schedule your pick-up to allow the courier ample time to coordinate.
Sample Care and Packaging All samples should be held and shipped in a hard-sided cooler with enough loose ice to cover all sample bottles. Samples must be kept at a temperature of <4° C. Datasheets should be sealed in a 1 gallon zip-seal bag and taped to the inside of the cooler lid. Take precautions to ensure the datasheets do not get wet.
Note: Ice in the sample cooler should be removed from the bag it came in and spread over the top of the sample bottles. If ice is left in the bag, the sample bottles will not reach a temperature of <4° C.
The cooler should be taped shut with packing tape. Make sure the cooler drain plug is closed. A shipping label with the South Dakota State Health Laboratory’s address (below) should be taped on the lid of the cooler in such a manner that it will not come off during shipping.
South Dakota State Health Laboratory 615 E. 4th Street Pierre, SD 57501
The cooler should also be labeled with the cooler owner’s organization name, phone number, and address so the cooler can be returned to the owner. Write this information on the cooler with a Sharpie or attach a label with this information to the cooler.
Note: The health lab will ship your coolers back to you with empty sample bottles.
Mid Continent Testing Labs Samples collected in the Rapid City area will be sent to Mid Continent Testing labs for analysis and must be delivered in person. Samples should be transported by the sampler in a cooler under ice with accompanying datasheets to 2381 South Plaza Drive, Rapid City, SD 57709.

South Dakota Volunteer Water Quality Monitoring Field Manual January 2021
25 South Dakota Department of Agriculture and Natural Resources Watershed Protection Program
Midwest Laboratories Microcystin samples will be shipping to Midwest Laboratories in Omaha, NE for analysis. FedEx will be used for shipping. To ship microcystin samples, pack them in the small cooler provided by Midwest Laboratories with a Ziploc bag of ice. Tape the cooler lid shut using packing tape. Schedule a pickup with FedEx by calling 1 800 463-3339. When prompted, say “schedule a pickup.” The cooler will then be picked up by FedEx.
Sample Holding Times Table 3. Sample holding times, preservation and bottle type information.
Laboratory Services The South Dakota State Health Lab will be the primary laboratory service for volunteer samplers. The health lab courier service allows free transport of samples on the day of collection. However, crews operating in the Rapid City/Black Hills area may use Mid Continent Testing Labs in Rapid City because of its proximity to the region and an existing working relationship with SD DANR. All sample collection, processing, and holding procedures outlined in the preceding sections apply to samples sent to Mid Continent Testing Labs, as well as the SD State Health Lab.
Bottle Size & Material Preservative Parameters Holding
Time
A 1,000 mL HDPE or 250 mL HDPE Cool to 4oC
Alkalinity, total solids, TSS, volatile solids, TDS, BOD,
CBOD, CO3, Hardness, K, lab pH, lab conductivity, nitrate, chloride, fluoride, HCO3, SO4
48 hours
B 1,000 mL HDPE or 250 mL HDPE
2 mL H2SO4 pH <2
Cool to 4oC
Ammonia, Nitrate+Nitrate, TKN, Total P, COD 28 days
C 100 mL or 250 mL sterilized
HDPE
Na2SO3 if chlorinated Cool to 4oC
Fecal coliform, E. coli, total coliform, enterococci, fecal PFG 24 hours
Chlorophyll-a 500, 1,000, or
2,000 mL brown HDPE bottle
Cool to 4oC Chlorophyll-a
48 hours (unfiltered)
28 days (filtered)
Algae
125 mL brown HDPE bottle
preserved with Lugol’s
1 year at room temperature
Algal species count, Toxin producing cyanobacteria count
1 year at room
temperature
Microcystin 125 mL HDPE Cool to 4oC Microcystin
14 days at 4oC,
1 year if frozen
South Dakota Volunteer Water Quality Monitoring Field Manual January 2021
26 South Dakota Department of Agriculture and Natural Resources Watershed Protection Program
When using the State Health Lab, sample results are electronically delivered to the SD DANR water quality database. This results in less time between sample collection and the public display of results on the SD DERN Water Quality Monitoring Access Portal. Results from samples sent to the State Health Lab will typically be available for review and approval by the volunteer monitoring coordinator within 1 week. Results from samples sent to Mid Continent Testing will typically be available for review and approval within 1 month because data must be requested from the lab and manually uploaded to the SD DANR water quality database. Using the SD State Health Lab results in less turn-around time between sample collection and public reporting.
Microcystin samples are analyzed by Midwest Laboratories in Omaha, NE. Midwest Laboratories is the closest and most cost effective laboratory that analyzed microcystin samples.
Benthic Macroinvertebrate Sampling The purpose of sampling benthic macroinvertebrates is to quantify the benthic community, evaluate community structure, stream condition, and correlate density with nutrient loading. This requires sampling a certain length of a stream to get a representative picture of the ecological community. A length of 30 times the average wetted width is necessary to characterize the benthic community in the reach. This procedure is designed to give a general overview; subsamples will be composited to eliminate the patchiness of invertebrate populations typically found in streams.
Study Index Period The establishment of a study index period, or the period of time over the course of a year when sampling will be conducted, is necessary to standardize the time of the year when macroinvertebrate samples are collected. The focus on the growing season months allows samples to be comparable and targets the macroinvertebrate community at a time of greatest diversity. The study index period for macroinvertebrates ranges from June 1 to September 30 of any given year.
Sampling During or After Rain Events Avoid sampling during high flow rainstorm events. Use your best professional judgement to determine if the stream has risen above baseflow during this recent rain event. It is often unsafe to be in the water during such times. In addition, biological and chemical conditions during such episodes are often quite different from those during baseflow. On the other hand, sampling cannot be restricted to only strict baseflow conditions. It would be next to impossible to define “strict baseflow” with any certainty at an unstudied site. Such a restriction would also greatly shorten the index period when sampling activities can be conducted. Thus, some compromise is necessary regarding whether to sample a given stream because of storm events. To a great extent, this decision is based on the judgment of the field sampler. Some guidelines to help make this decision are presented below. The major indicator of the influence of storm events will be the condition of the stream itself. If you decide a site is unduly influenced by a storm event, do not sample the site that day.
• If it is running at bank full discharge or the water seems much more turbid than typical for the class of stream do not sample it that day.
• Do not sample that day if it is unsafe to be in the water. • Keep an eye on the weather reports and rainfall patterns. Do not sample a stream during
periods of prolonged heavy rains.

South Dakota Volunteer Water Quality Monitoring Field Manual January 2021
27 South Dakota Department of Agriculture and Natural Resources Watershed Protection Program
• If the stream seems to be close to normal summer flows, and does not seem to be unduly influenced by storm events, sample it even if it has recently rained or is raining.
Equipment List • Landowner permission, if necessary • D-frame macroinvertebrate net with 500 µm mesh • GPS, mapping application, or paper maps • Flags for marking transects • Laser rangefinder or long tape measure • Nalgene wide mouth sample bottle, 1 liter (no more than 3 per site) • 95% ethyl alcohol (for sample preservation) • Sieve bucket with 500 µm mesh • 5 gallon pail • Funnel with large bore spout • Spoon or scoop for transferring sample
Laying Out the Sampling Reach Sampling reach: the length of stream that will be sampled for macroinvertebrates.
Transect: an imaginary line crossing the stream at which macroinvertebrates will be collected. There will be 11 transects at each site.
Sampling reach = average stream width x 30
Distance between transects = sampling reach / 10
Figure 6. Sampling reach layout for collecting macroinvertebrates.

South Dakota Volunteer Water Quality Monitoring Field Manual January 2021
28 South Dakota Department of Agriculture and Natural Resources Watershed Protection Program
1. Locate the site using a GPS, mapping application such as Google Maps, or a paper map. The site location will be at the center of the sampling reach (transect 6). Place a surveyor’s flag on the stream bank where it is easily visible from within the stream to mark transect 6.
2. Use a laser range finder, tape measure, or stadia rod to determine the wetted width of the channel at 5 places of “typical” width within approximately 5 channel widths upstream and downstream from transect 6. Average the five readings together and round to the nearest 1 m.
3. Multiply the average wetted width by 30 to determine the sampling reach length. 4. If the average width is <4 m, use 100 m as a minimum reach length. If the average width is >100
m, use 4 km as a maximum reach length. 5. Divide the sampling reach length by 10. The resulting value is the distance between each
transect. 6. Starting at the site location, use a range finder or long tape to measure a distance upstream the
next transect using the value you calculated in step 5. Place a surveyor’s flag on the bank or shoreline that is visible from within the stream for transect 7. Be careful to measure all of the bends of the river/stream; do not artificially straighten out the line of measurement. Enter the channel to make measurements only when necessary to avoid disturbing the stream channel prior to sampling activities.
7. Continue to transect 8 and set a flag at the appropriate distance. Continue measuring upstream and placing flags at each transect until you reach transect 11.
8. Return to transect 6 and flag transects 1-5 on the downstream side of the site using the transect spacing calculated in step 5.
Collecting Macroinvertebrates Collect a benthic macroinvertebrate composite sample using a D-frame net with 500 µm mesh openings. Take individual samples from the sampling stations at the 11 transects equally distributed along the sampling reach. Multiple habitats will be encountered and sampled using this approach. Habitats will include various types of bottom substrate as well as woody debris, macrophytes, and leaf packs. Composite all sample material from all 11 sampling locations and field preserve with ~95% ethanol.
Note: If a sampling point is in water that is too deep or unsafe to wade, select an alternate sampling point on the transect at random.

South Dakota Volunteer Water Quality Monitoring Field Manual January 2021
29 South Dakota Department of Agriculture and Natural Resources Watershed Protection Program
Figure 7. Sampling design for collecting benthic macroinvertebrates.
Sample Collection Procedure 1. At each transect, beginning with transect 1, randomly locate the first sampling station (Left,
Center, or Right as you face downstream) as 25%, 50%, and 75% of the wetted width, respectively. If you cannot collect a sample at the designated point because of deep water or unsafe conditions, relocate to another random point on the same transect. If there is no location along the transect that is safe to sample, skip that transect.
2. Determine if there is sufficient current in the area at the sampling station to fully extend the net. If so, classify the habitat as “riffle/run” and proceed to Step 3. If not, use the sampling procedure described for “pool/glide” habitats starting at Step 9.
3. With the net opening facing upstream, quickly position the net securely on the stream bottom to eliminate gaps under the frame. Avoid large rocks that prevent the net from seating properly on the stream bottom. Note: If there is too little water to collect the sample with the D-net, randomly pick up 10 rocks from the riffle and pick and wash the organisms off them into a bucket which is half full of water.
4. Holding the net in position on the substrate, visually define an area upstream of the net opening that is about 1 square foot. This is called a quadrat.

South Dakota Volunteer Water Quality Monitoring Field Manual January 2021
30 South Dakota Department of Agriculture and Natural Resources Watershed Protection Program
5. Check the quadrat for heavy organisms, such as mussels and snails. Remove these organisms by hand and place them into the net. Pick up loose rocks or other larger substrate particles in the quadrat. Use your hands to dislodge organisms and wash them into the net. Scrub all rocks that are golf ball sized or larger and which are at least halfway into the quadrat. After scrubbing, place the substrate particles outside of the quadrat.
6. Hold the D-net securely in position. Starting at the upstream end of the quadrat, vigorously kick the remaining finer substrate within the quadrat for 30 seconds.
7. Pull the net up out of the water. Immerse the net in the stream several times to remove fine sediments and to concentrate organisms at the end of the net. Avoid having any water or material enter the mouth of the net during this operation.
8. Go to Step 13. 9. Visually define a quadrat that is one net width wide and long at the sampling point. The area
within this quadrat is 1 square foot. 10. Check the quadrat for heavy organisms, such as mussels and snails. Remove these organisms by
hand and place them into the net. Pick up loose rocks or other larger substrate particles in the quadrat. Use your hands to dislodge organisms and wash them into the net. Scrub all rocks that are golf ball sized or larger and which are at least halfway into the quadrat. After scrubbing, place the substrate particles outside of the quadrat.
11. Vigorously kick the remaining finer substrate within the quadrat with your feet while dragging the net repeatedly through the disturbed area just above the bottom. Keep moving the net all the time so that the organisms trapped in the net will not escape. Continue kicking the substrate and moving the net for 30 seconds. Note: If there is too little water to use the kick net, stir up the substrate with your gloved hands and use a sieve with 500 μm mesh size to collect the organisms from the water in the same way the net is used in larger pools.
12. After 30 seconds, remove the net from the water with a quick upstream motion to wash the organisms to the bottom of the net.
13. Invert the net into a sieve bucket and transfer the sample. Remove as much gravel as possible so that the organisms do not get damaged. Inspect the net for any residual organisms clinging to the net and deposit them into the bucket. Use forceps if necessary, to remove organisms from the net. Carefully inspect any large objects (such as rocks, sticks, and leaves) in the bucket and wash any organisms found off the objects and into the bucket before discarding the object. Remove as much detritus as possible without losing organisms.
14. Thoroughly rinse the net before proceeding to the next sampling station. Proceed upstream to the next transect and repeat steps 1 - 13. Make sure to follow the left, center, right pattern to determine which area along the transect to collect the sample (Figure 6). Combine all kick net samples from riffle/run and pool/glide habitats into the bucket.
Sample Processing Use a 500 µm mesh sieve bucket placed inside a larger bucket full of site water while sampling to carry the composite sample as you travel around the site. Once the composite sample from all stations is sieved and reduced in volume, store in a 1 L wide-mouth bottle and preserve with 95% ethanol. Do not fill bottles more than ½ full of material. Multiple bottles may be required if detritus is heavy. Try to use no more than 3 bottles per site.

South Dakota Volunteer Water Quality Monitoring Field Manual January 2021
31 South Dakota Department of Agriculture and Natural Resources Watershed Protection Program
Sample Labeling With a fine tip sharpie, enter the station, date, bottle number of out total number of bottles, the number of transects sampled out of 11, and your name on the Volunteer Monitoring Benthic Macroinvertebrate label. Place a label on each sample bottle.
Note: It is vital that you label each bottle and enter the bottle number out of the total number of bottles on each label in the case a bottle is lost or gets mixed with other sample bottles.
Sample Holding and Shipping Store the samples at room temperature and out of direct sunlight. Before shipping samples, wrap bottle lids with electrical tape. Ship samples to SD DANR at 523 E Capitol, Pierre, SD 57501 with attention to Paul Lorenzen.

South Dakota Volunteer Water Quality Monitoring Field Manual January 2021
32 South Dakota Department of Agriculture and Natural Resources Watershed Protection Program
Appendix

South Dakota Volunteer Water Quality Monitoring Field Manual January 2021
33 South Dakota Department of Agriculture and Natural Resources Watershed Protection Program
Multi-meter Calibration Worksheet
Date: Sonde SN: Technician:
Pre/Post-Calibration Values
Before After
Conductivity: Cell Constant:
pH 7: pH MV:
(pH 7 MV range: 0 MV ± 50 MV)
pH 10: pH MV:
(pH 10 MV range: -180 MV ± 50 MV. Millivolt span between pH 7 and 10 should be ≈165 to 180 mv)
Optical DO: Was the wiper replaced? Y N Does the wiper park 180° from sensor? Y N
The ACCEPT/REJECT criteria as follows:
The DO output in % must start at a positive number and decrease during the warm up. Should the output display a negative number or start at a low number and climb up to the cal point, the probe is rejected and must not be deployed.
______ ACCEPT _______ REJECT
ODO Gain: _________ Barometric Pressure:___________
DO% Calculated – (BARO mmHg divided by 7.6) = % saturation Example: 760 ÷ 7.6 = 100.0%
DO% Calculated: __________ DO% Before: ___________ DO% After: __________
Depth: If zero was entered, record barometric pressure at time of calibration
If offset depth was entered, record value ____________ meters/feet and pressure
Notes:

Project
Station ID
Surface Bottom Midwater
Agency Code
Project ID
Site Location
Source Water
Samplers
Sample Date Time
Relative Depth
Type of
Sample
SD DENR Water Quality Data
Medium
Rev 06/19
H2O Temp
DO
pH
Field CommentsSample Depth
Total Depth
Gage Stage
Secchi
SPC
Discharge
Width
C
µmho/cm
mg/L
CFS
Ft
Ft
Ft
FtSU
Meters
Grab
Integrated FlowComposite
Integrated VerticalReplicate
Blank
Water / Other
Print/Sign
All Samples must be packed in ice and chilled to 6 C
Lab Cond
Alkalinity
HCO3
CO3
TSOL
TDSOL
TSSOL
VTSS
Hardness
K
Cl
SO4
BOD
CBOD
Fluoride
Ammonia
NO3+NO2-N
TKN
Total P
COD
Fecal Coliform*
E Coli* Entercocci*TDP
A - 1 Liter
B - 1 Liter
C - 100 mL IdexD - 100 mL
R - 4L Cube
pH<2
~2 mL H2SO4
Filtered + pH<2
0.25 mL H2SO4
Na2SO3 if source is Chlorinated
Note: Use 250 mL bottle if requesting multiple tests
Lab Comments
Al
Sb
As
Ba
Be
B
Cr
Cu
Hg
Pb
Ni
Se
Ag
Ti
U
V
Zn
FeMn
Al
Sb
As
Ba
Be
B
Cr
Cu
Hg
Pb
Ni
Se
Ag
Ti
U
V
ZnFeMn
Relinquished By: Date/Time
Received By: Date/Time
Relinquished By: Date/Time
Received By: Date/Time
Relinquished By: Date/Time
Received By: Date/Time
Fecal PFGE
CN - 150 mL
Ra 226 Ra 228
CdCd
Ca
Ca
Mg
Mg
Na
Na
MoMo
CN WADCN
Filtered + pH<2
~1.5 mL HNO3
K
Silica
H - Liter Glass Amber
VOCTPH Gas
TPH Diesel
DIN
TOC DOC
E - 1 Liter
pH >10 ~0.4 mL NAOH
Cl FluorideHCO3 SO4
Filtered
Total Coliform
Oil Grease
pH<2 ~2 mL HCL
pH<2 ~2 mL HCL
OG - Liter Glass Amber
Dissolved Metals -
100 mL
Filtered + pH<2 ~0.5 mL HNO3
V-40mL V1-40 mL V2-120 mL V3-120 mL
Recoverable Metals - 100
mL
pH<2 ~0.5 mL HNO3
Dissolved
Metals - 250
mL
Recoverable
Metals - 250
mL
pH<2
~1.5 mL HNO3
3 - 40 mL Amber
Vials 0.5 mL HCL
Zero Head Space
120 mL Amber
Bottle 1.5 mL
HCL
120 mL Amber
Bottle Filtered 1.5
mL HCL
2 - 40 mL Amber
Vials 0.5 mL HCL
Zero Head Space
Date / Time ReceivedSample Temp (C) Lab #

Surface Bottom Midwater
Date Time
Project:Source:Code:
Station:
Initials
A - 1 Liter HDPE
Preservative: None
Surface Bottom Midwater
Date Time
Project:Source:Code:
Station:
Initials
B - 1 Liter HDPE
Preservative: pH < 2.0 (~2 mL H2SO4)
7
Surface Bottom Midwater
Date Time
Project:Source:Code:
Station:
Initials
A - 1 Liter HDPE
Preservative: None
Surface Bottom Midwater
Date Time
Project:Source:Code:
Station:
Initials
B - 1 Liter HDPE
Preservative: pH < 2.0 (~2 mL H2SO4)
Surface Bottom Midwater
Date Time
Project:Source:Code:
Station:
Initials
A - 1 Liter HDPE
Preservative: None
Surface Bottom Midwater
Date Time
Project:Source:Code:
Station:
Initials
B - 1 Liter HDPE
Preservative: pH < 2.0 (~2 mL H2SO4)
Surface Bottom Midwater
Date Time
Project:Source:Code:
Station:
Initials
A - 1 Liter HDPE
Preservative: None
Surface Bottom Midwater
Date Time
Project:Source:Code:
Station:
Initials
B - 1 Liter HDPE
Preservative: pH < 2.0 (~2 mL H2SO4)
Surface Bottom Midwater
Date Time
Project:Source:Code:
Station:
Initials
A - 1 Liter HDPE
Preservative: None
Surface Bottom Midwater
Date Time
Project:Source:Code:
Station:
Initials
B - 1 Liter HDPE
Preservative: pH < 2.0 (~2 mL H2SO4)

Surface Bottom Midwater
Algae
Chl A
MacroInv Filtered mL
Initials
Date
Time
Project:
Source:
Station:
AFD
Comp mLPeriphyton
Replicate
BlankSurface Area
Nat Sub
Art Sub
Zooplank
Composite
Grab
WPProgram:
Surface Bottom Midwater
Algae
Chl A
MacroInv Filtered mL
Initials
Date
Time
Project:
Source:
Station:
AFD
Comp mLPeriphyton
Replicate
BlankSurface Area
Nat Sub
Art Sub
Zooplank
Composite
Grab
WPProgram:
Surface Bottom Midwater
Algae
Chl A
MacroInv Filtered mL
Initials
Date
Time
Project:
Source:
Station:
AFD
Comp mLPeriphyton
Replicate
BlankSurface Area
Nat Sub
Art Sub
Zooplank
Composite
Grab
WPProgram:
Surface Bottom Midwater
Algae
Chl A
MacroInv Filtered mL
Initials
Date
Time
Project:
Source:
Station:
AFD
Comp mLPeriphyton
Replicate
BlankSurface Area
Nat Sub
Art Sub
Zooplank
Composite
Grab
WPProgram:
Surface Bottom Midwater
Algae
Chl A
MacroInv Filtered mL
Initials
Date
Time
Project:
Source:
Station:
AFD
Comp mLPeriphyton
Replicate
BlankSurface Area
Nat Sub
Art Sub
Zooplank
Composite
Grab
WPProgram:
Surface Bottom Midwater
Algae
Chl A
MacroInv Filtered mL
Initials
Date
Time
Project:
Source:
Station:
AFD
Comp mLPeriphyton
Replicate
BlankSurface Area
Nat Sub
Art Sub
Zooplank
Composite
Grab
WPProgram:
Surface Bottom Midwater
Algae
Chl A
MacroInv Filtered mL
Initials
Date
Time
Project:
Source:
Station:
AFD
Comp mLPeriphyton
Replicate
BlankSurface Area
Nat Sub
Art Sub
Zooplank
Composite
Grab
WPProgram:
Surface Bottom Midwater
Algae
Chl A
MacroInv Filtered mL
Initials
Date
Time
Project:
Source:
Station:
AFD
Comp mLPeriphyton
Replicate
BlankSurface Area
Nat Sub
Art Sub
Zooplank
Composite
Grab
WPProgram:
Surface Bottom Midwater
Algae
Chl A
MacroInv Filtered mL
Initials
Date
Time
Project:
Source:
Station:
AFD
Comp mLPeriphyton
Replicate
BlankSurface Area
Nat Sub
Art Sub
Zooplank
Composite
Grab
WPProgram:
Surface Bottom Midwater
Algae
Chl A
MacroInv Filtered mL
Initials
Date
Time
Project:
Source:
Station:
AFD
Comp mLPeriphyton
Replicate
BlankSurface Area
Nat Sub
Art Sub
Zooplank
Composite
Grab
WPProgram:

SD Volunteer Monitoring Benthic Macroinvertebrate Sample
Station: Date: Bottles: ____ of ____ Transects: ____ of 11 Sampler:
SD Volunteer Monitoring Benthic Macroinvertebrate Sample
Station: Date: Bottles: ____ of ____ Transects: ____ of 11 Sampler:
SD Volunteer Monitoring Benthic Macroinvertebrate Sample
Station: Date: Bottles: ____ of ____ Transects: ____ of 11 Sampler:
SD Volunteer Monitoring Benthic Macroinvertebrate Sample
Station: Date: Bottles: ____ of ____ Transects: ____ of 11 Sampler:
SD Volunteer Monitoring Benthic Macroinvertebrate Sample
Station: Date: Bottles: ____ of ____ Transects: ____ of 11 Sampler:
SD Volunteer Monitoring Benthic Macroinvertebrate Sample
Station: Date: Bottles: ____ of ____ Transects: ____ of 11 Sampler:
SD Volunteer Monitoring Benthic Macroinvertebrate Sample
Station: Date: Bottles: ____ of ____ Transects: ____ of 11 Sampler:
SD Volunteer Monitoring Benthic Macroinvertebrate Sample
Station: Date: Bottles: ____ of ____ Transects: ____ of 11 Sampler:
SD Volunteer Monitoring Benthic Macroinvertebrate Sample
Station: Date: Bottles: ____ of ____ Transects: ____ of 11 Sampler:
SD Volunteer Monitoring Benthic Macroinvertebrate Sample
Station: Date: Bottles: ____ of ____ Transects: ____ of 11 Sampler: