standard practices for mitigating dust on helipads, roads
TRANSCRIPT

U.S Marine Corps Systems Command
PCN 500PCN 500PCN 500PCN 500PCN 5001111111111222224000040000400004000040000
Dust Abatement HandbookDust Abatement HandbookStandard Practices for Mitigating
Dust on Helipads, Roads, Airfields, and Base Camps

i
AUTHORS John F. Rushing Jeb S. Tingle U.S. Army Engineer Research and Development Center (ERDC), Geotechnical and Structures Laboratory (GSL), Vicksburg, MS ACKNOWLEDGEMENT The information in this manual was developed as part of a dust control program funded by the U.S. Marine Corps Systems Command, Quantico, VA. PREFACE This manual contains information for selecting, procuring, and applying dust palliatives for helipads, roads, airfields, and base camps. Recommendations are based upon field testing at Yuma, AZ; Douglas, AZ; and Fort Leonard Wood, MO from 2003 – 2005. DISTRIBUTION Approved for public release; distribution is unlimited.

ii
SAFETY Recommendations provided in this document are intended to provide guidance for selecting dust palliatives and application methods. Approval should be obtained as necessary prior to placing any chemical dust palliative. Check local environmental regulations for more specific requirements. Standard personal protection equipment should be worn while transferring or applying chemical dust palliatives. Personnel should work in well ventilated area, wearing eye protection, dust mask, and skin protection to minimize exposure to product. An organic cartridge respirator should be used for any indoor handling of product. Refer to the individual material safety data sheets (MSDS) for specific products prior to use. Refer to the owner’s manual prior to using the HydroSeeder or 613CWD for necessary safety precautions. Only operate these machines after receiving necessary training.

iii
TABLE OF CONTENTS Recommended Product Applications 1 Detailed Dust Palliative Description 2 Polymer Emulsions 2 Polysaccharide 3 Synthetic Fluids 4 Product and Vendor Information 5 Application Techniques 6 Soil Type 6 Intended Use 6 Application Rates 6 Dilution Ratios 7 Topical Method 7 Admix Method 8 Distribution Equipment and Vendor Information 9 Mitigating Dust on Helipads – CH-53 and CH-46 10 Mitigating Dust on Helipads – UH-1 and AH-1 11 Alternative Method for Mitigating Dust on Helipads – CH-53 and CH-46 13 Alternative Method for Mitigating Dust on Helipads – UH-1 and AH-1 15 Mitigating Dust on Roads 17 Alternative Method for Mitigating Dust on Roads 20 Mitigating Dust in Base Camps and Non-Traffic Areas 22

iv
Finn® HydroSeeder Operation 23 Filling Machine with Product 24 Machine Operation 24 Cleaning and Maintenance 27 Caterpillar 613 CWD Operation 38 Filling Machine with Product 39 Tank Mixing Operation 41 Spraying Operation 42 Flushing/Rinsing Tank 45 Draining and Drying Tank 46 Tips for Selecting Dust Palliatives 58 Tips for Selecting Application Equipment 60 Tips for Applying Dust Palliatives 61 References 64

v
PROCEDURE FOR USING DUST ABATEMENT HANDBOOK
(1) Use Table 1 to select recommended product category for military applications.
(2) Review Detailed Dust Palliative Description (Tab Dust Palliatives)
(3) Select product from recommended product category (Table 2)
(4) Review recommended product application equipment (Table 3 and Tabs HydroSeeder
and 613CWD)
(5) Review product application guidance (Tabs Application Tips and
Helipads/Roads/Base Camps)

RecommendedApplications

Table 1 Recommended Product Applications
Primary Solution Secondary Solution(s)
Application Product Category
Application Rate
Dilution Ratio
Application Type
Product Category
Application Rate
Dilution Ratio
Application Type
Airfields Synthetic Fluid 0.4 gsy n/a topical Polymer
Emulsion 1.2 gsy 3:1 Admix#
Roads Polymer Emulsion 0.8 gsy 3:1 admix Synthetic Fluid 0.6 gsy n/a topical
Helipads Synthetic Fluid 0.4 gsy n/a topical Polymer
Emulsion 1.2 gsy 3:1 topical
Polymer Emulsion 0.6 gsy 3:1 topical
Base Camps Synthetic Fluid 0.4 gsy n/a topical
Polysaccharide 0.6 gsy 3:1 topical
* Should not be used in excessively dry or excessively wet conditions. # Depth of mixing should be minimum 4 inches.
1

DustPalliatives

DETAILED DUST PALLIATIVE DESCRIPTION Polymer Emulsions
Polymer emulsions used for dust control are generally vinyl acetate or acrylic-based copolymers suspended in an aqueous phase by surfactants. They typically consist of 40 to 50 percent solid particles by weight of emulsion. Once they are applied, the polymer particles begin to coalesce as the water evaporates from the system, leaving a soil-polymer matrix that prevents small dust particles from escaping the surface. The polymers used for dust control typically have excellent tensile and flexural strength, adhesion to soil particles, and resistance to water. These materials are often limited by a short shelf life (less than 2 years). Polymer emulsions should not be mixed with gray or salt water for dilution. Polymer Emulsion
Product Description Effective Uses Limitations Shipping Acrylic polymer suspended in water by surfactants. Water evaporates when placed on soil and leaves a bonded soil-polymer matrix. Prevents dust by binding soil grains.
Helipads Roads Base Camps Airfields
May require mixing with soil for roads and airfields Potential for FOD damage on helipads and airfields, especially when light applications are used or thin crusts (< 1 in.) are produced
275-gal containers (2,500 lb)
Product Vendor POC Telephone Number Email
Soiltac Soilworks, Inc Chad Falkenberg 1-800-545-5420 [email protected]
2

Polysaccharide Polysaccharides are solutions or suspensions of sugars, starches, and surfactants in an aqueous medium. They may be diluted with water depending on the intended use. Polysaccharides provide dust abatement by encapsulating soil grains and providing a binding network in the ground. They are considered to be biodegradable materials, and may leach from the soil with exposure to precipitation
Polysaccharide Product Description Vendor Information Effective Uses Limitations Shipping
Mixture of sugar and starches designed to bind soil grains. Product is water soluble, biodegradable, and capable of dilution with water
Surtac Soilworks, Inc. Chad Falkenberg 1-800-545-5420 [email protected]
Helipads Base Camps
Limited effective lifespan Lower strength than polymer emulsions May settle from solution during storage
275-gal containers (2,500 lb)
3

Synthetic Fluids Synthetic organic fluids are applied to a soil “as received.” These fluids are not miscible with water and therefore are unable to be diluted. They consist of isoalkanes that do not dry or cure with time. The reworkable binder is ready for immediate use upon application and maintains effectiveness over extended periods of time. Synthetic Fluid
Product Description Vendor Information Effective Uses Limitations Shipping Blend of isoalkanes that forms a reworkable binder in soil. Will not mix with water. Effective for long-term use.
Durasoil Soilworks, Inc. Chad Falkenberg 1-800-545-5420 [email protected]
Helipads Roads Base Camps Airfields
More expensive than most products
275-gal containers (2,000 lb)
4

Vendors

Table 2 Product and Vendor Information
Product Category Dust Palliative Vendor POC Telephone Email
Soiltac Soilworks Chad Falkenberg 1-800-545-5420 [email protected] Polymer Emulsion
Polysaccharide Surtac Soilworks Chad Falkenberg 1-800-545-5420 [email protected]
Durasoil Soilworks Chad Falkenberg 1-800-545-5420 [email protected] Synthetic Fluid
5

ApplicationTips

Application Techniques Soil Type The soil type will have some effect on the performance of dust palliatives. Of course, finer grained soils present a larger problem with dust generation, but they also may be more difficult to control. The higher specific surface of the soil will require greater quantities of product to treat. Penetration may also be hindered by the small pore sizes between soil grains. Multiple light application rates may be required to treat fine-grained soils (silts and clays) to prevent ponding or surface runoff. Coarse-grained soils (sands and gravels) typically have higher infiltration rates to minimize ponding or runoff. Intended Use Choosing a dust palliative will ultimately be governed by the need for dust control that exists. Some products will work better for helipads, while others will be more effective on roads or airfields. Each type of chemical has benefits and limitations that should be considered before selecting a product. Table 1 lists some of the recommended products for different dust control needs. Application Rates Application rates should be chosen according to the soil type, the intended use of the treated area, and the necessary duration of use. In general, dust palliatives should be applied at a rate of 0.8 gsy. This should be sufficient for most applications. Synthetic fluids may be applied at lower rates for most projects because they contain 100 percent active ingredients. Polymeric materials may require application rates of greater than 1.0 gsy in areas of heavy traffic. For example, using polymer emulsions on helipads
6

will require an application rate of near 1.5 gsy in order to produce thicker surface crusts to reduce FOD potential. Refer to Table 1 for detailed guidance on selecting application rates. Dilution Ratios Some products may require dilution with water. These are typically any emulsified products (polymers, polysaccharide). Diluting the emulsion will reduce the viscosity and improve penetration. In general, 3 parts water should be added for each part product. Adding additional water will not have much impact on the depth of penetration. Synthetic fluids are intended for use “as received” and should be applied in their concentrated form. Topical Method Topical applications are the most commonly used technique for dust control. Spraying the surface of the soil with a dust palliative will effectively solve most dust problems. Alternative methods should be used when the area to be treated is structurally deficient for the anticipated traffic or when greater durability is needed. Topical applications are accomplished by simply spraying the liquid dust palliative onto the native or prepared soil surface. It is imperative to maintain the greatest level of uniformity while dispersing the liquid. Application quantities are determined by estimating the area of ground surface to be treated and multiplying that area by the application rate suggested.
7

Admix Method Admix methods are designed to incorporate dust palliatives deeper into the soil and to provide longer lasting dust abatement. These methods are usually necessary when heavy repetitive loading will be introduced to the soil. Roads and airfields (runways, taxiways, or parking aprons) generally require admix applications to achieve the desired results. Admix depths for roads should be at least 3 in. and 4 in. for airfields. The following procedure (Photos 9 – 12) is recommended for incorporating the dust palliative into the soil: (1) Grade the soil if necessary using a motor grader.
(2) Spray half of total palliative application rate onto the soil surface. (3) Blend into top 3 in. of soil using rotary mixer (Photo 10). (4) Compact using steel-wheeled vibratory roller (for granular materials). (5) Spray remaining product onto compacted surface.
This method will provide optimal performance of most palliatives. Alternative construction methods may not provide sufficient durability.
8

Equipment

Table 3 Distribution Equipment and Vendor Information Equipment Type Model* Vendor POC# Telephone Email
T 90 HydroSeeder
T120 Finn Corp Robert Portney 1-800-543-7166 [email protected]
Water Distributor 613CWD Caterpillar Brent Bargfrede 309-578-6378 [email protected]* Model listed was evaluated by ERDC researchers. Other models are also available that may meet project needs. However, modifications to the commercial version were made, and the military version should be requested for theater applications. # Subject to change
9

Helipads

MITIGATING DUST ON HELIPADS – CH-53 and CH-46
Apply 900 gallons synthetic fluid topically to 150-by 150-ft helipad
What you will need:
1. MTVR 2. HydroSeeder 3. (4) 275-gal totes dust palliative (synthetic fluid) 4. (3) Marines
Procedure:
a. Survey and visibly establish area to be treated. b. Place 900 gallons of synthetic fluid into HydroSeeder (Photo 1). c. Position the MTVR and HydroSeeder on edge of helipad. d. Use the tower gun and a long distance nozzle to spray half of product to half of helipad
(Photo 2). e. Drive the MTVR to opposite side of helipad. f. Spray the remaining product. g. Helicopters can land immediately (best results may occur after one day, Photo 4).
10

MITIGATING DUST ON HELIPADS – UH-1 and AH-1
Apply 450 gallons synthetic fluid topically to 100-by 100-ft helipad
What you will need:
1. MTVR 2. HydroSeeder 3. (2) 275-gal totes dust palliative (synthetic fluid) 4. (3) Marines
Procedure:
a. Survey and visibly establish the area to be treated. b. Place 450 gallons of synthetic fluid into the HydroSeeder (Photo 1). c. Position the MTVR and HydroSeeder on edge of helipad. d. Use the tower gun and a long distance nozzle to spray half of product to half of helipad
(Photo 2). e. Drive the MTVR to the opposite side of helipad. f. Spray the remaining product. g. Helicopters can land immediately (best results may occur after one day, Photo 4).
11

Photo 1. Filling HydroSeeder with product (step b) Photo 2. Spraying helipad using tower gun (step d)
Photo 3. Spraying helipad using hand-held hose Photo 4. UH-1 landing on helipad treated with synthetic fluid
12

ALTERNATIVE METHOD FOR MITIGATING DUST ON HELIPADS – CH-53 and CH-46
Apply 3,000 gallons diluted polymer emulsion topically to 150-by 150-ft helipad
What you will need:
1. MTVR 2. HydroSeeder 3. (3) 275-gal totes dust palliative (polymer emulsion) 4. 2,250 gallons water 5. (3) Marines
Procedure:
a. Survey and visibly establish the area to be treated. b. Place 675 gallons of water into the HydroSeeder. c. Add 225 gallons of polymer emulsion (Photo 1). d. Mix for 5 minutes using mechanical agitation. e. Position the MTVR and HydroSeeder on the edge of the helipad. f. Use the tower gun and a long distance nozzle to spray the product on 1/3 of helipad
(Photo 2). g. Refill HydroSeeder using steps b – d. h. Spray product over the middle 1/3 of helipad.
13

i. Repeat step g. j. Spray product on final 1/3 of helipad. k. Use remaining polymer and water near center of helipad. l. Allow one day cure before use (sooner if hard surface is achieved).
14
ALTERNATIVE METHOD FOR MITIGATING DUST ON HELIPADS – UH-1 and AH-1
Apply 1,350 gallons diluted polymer emulsion topically to 100-by 100-ft helipad
What you will need:
1. MTVR 2. HydroSeeder 3. (2) 275-gal totes dust palliative (polymer emulsion) 4. 1,000 gallons water 5. (3) Marines
Procedure:
a. Survey and visibly establish the area to be treated. b. Place 500 gallons of water into the HydroSeeder. c. Add 175 gallons of polymer emulsion (Photo 1.) d. Mix for 5 minutes using mechanical agitation. e. Position the MTVR and HydroSeeder on the edge of the helipad. f. Use the tower gun and a long distance nozzle to spray product on 1/2 of helipad (Photo 2). g. Refill HydroSeeder using steps b – d. h. Spray product over remaining 1/2 of helipad. i. Allow one day cure before use (sooner if hard surface is achieved).
15

Photo 5. Multiple distribution paths for filling Photo 6. Distributing emulsion onto helipad using HydroSeeder tower gun
Photo 7. Spraying emulsion with hand-held hose Photo 8. Desired crust thickness for emulsions to
prevent FOD
From HydroSeeder Pump
To Storage Tank
To Flush Tank
From External Pump
16

Roads

MITIGATING DUST ON ROADS
Apply 0.8 gallons per square yard polymer emulsion using admix construction procedure
What you will need:
1. MTVR/HMMWV 2. HydroSeeder 3. Polymer emulsion* 4. Water* 5. Rotary mixer 6. Steel-wheeled vibratory compactor 7. (5) Marines * quantities must be calculated based upon length and width of road
Procedure:
a. Determine the length of road that can be treated per tank (HydroSeeder capacity). Length (yd) = HydroSeeder capacity (gal) / [application rate (0.4) * road width (yd)]
b. Place 675 gallons of water into HydroSeeder. c. Add 225 gallons of polymer emulsion (Photo 1). d. Mix for 5 min using mechanical agitation. e. Apply to road surface using distribution bar or wide fan nozzle on tower gun. f. Immediately till road surface to 3-in. depth using rotary mixer (Photo 10). g. Compact soil until desired density is achieved (Photo 11).
17

h. Repeat steps b – d. i. Spray over compacted road surface (Photo 12). j. Repeat steps a – j for subsequent road lengths to be treated.
18
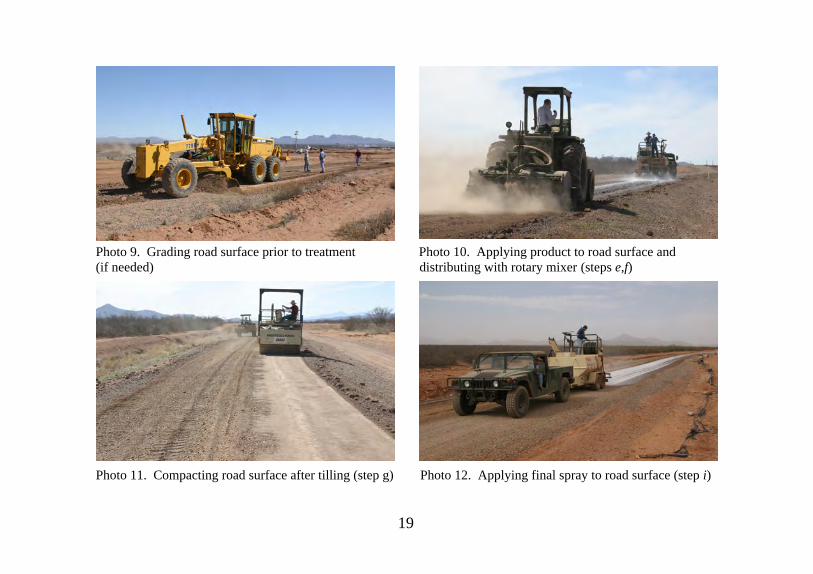
Photo 9. Grading road surface prior to treatment Photo 10. Applying product to road surface and (if needed) distributing with rotary mixer (steps e,f)
Photo 11. Compacting road surface after tilling (step g) Photo 12. Applying final spray to road surface (step i)
19

ALTERNATIVE METHOD FOR MITIGATING DUST ON ROADS
Apply 0.6 gallons per square yard synthetic fluid topically to road surface
What you will need:
1. MTVR/HMMWV 2. HydroSeeder 3. Synthetic fluid* 4. (3) Marines * quantities must be calculated based upon length and width of road
Procedure:
a. Determine the length of road that can be treated per tank (HydroSeeder capacity). Length (yd) = HydroSeeder capacity (gal) / [application rate (0.6) * road width (yd)]
b. Place 900 gallons of synthetic fluid into HydroSeeder (Photo 1). c. Apply to road surface using distribution bar or wide fan nozzle on tower gun (Photos 13, 14). d. Repeat steps a – c for subsequent road lengths to be treated.
20

Photo 13. Applying synthetic fluid to
road surface using wide-fan nozzle on tower gun of HydroSeeder
Photo 14. Applying synthetic fluid to road surface using distribution bar on rear of HydroSeeder
21

BaseCamps

MITIGATING DUST IN BASE CAMPS AND NON-TRAFFIC AREAS
Apply 0.4 gsy synthetic fluid topically What you will need:
1. MTVR/HMMWV 2. HydroSeeder 3. Synthetic fluid* 4. (3) Marines * quantities must be calculated based upon area
Procedure:
a. Determine the area to be treated in square yards. One 900-gal tank will mitigate dust on 2,250 sq yd soil (3,000 sq yd for 1,200 gal tank).
b. Calculate the necessary quantity of synthetic fluid. c. Product (gal) = area (sq yd) * application rate (0.4 gal/sq yd). d. Place 900 gallons of synthetic fluid into HydroSeeder. e. Apply to soil surface using the tower gun or hand-held hose. f. Repeat as necessary.
Example Length ft(yd)
Width ft(yd)
Area ft2(yd2)
Product gal
300 (100) 300 (100) 90,000 (10,000) 4,000
30 (10) 300 (100) 9,000 (1,000) 400
22

FinnHydroseeder

FINN HYDROSEEDER OPERATION Machine Specifications Engine 33.5 HP Kubota V1505 Pump 4 in. x 2 in. Centrifugal Pump – 170 gpm @ 100 psi Dimensions Height* 108 in. (trailer) / 101 in. (skid) Length 194 in. (trailer) / 154 in. (skid) Width 85 in. (trailer) / 80 in. (skid) Empty Weight 5,420 lb (trailer) / 4,480 lb (skid) Working Weight 14,670 lb (trailer) / 16,080 lb (skid) Tank Capacity 920 gal (trailer) / 1,180 gal (skid) Fuel Capacity 14 gal (trailer) / 15 gal (skid) Distribution System Hose, Tower Gun, or Distribution Bar * Height can be reduced by disassembling tower gun
23
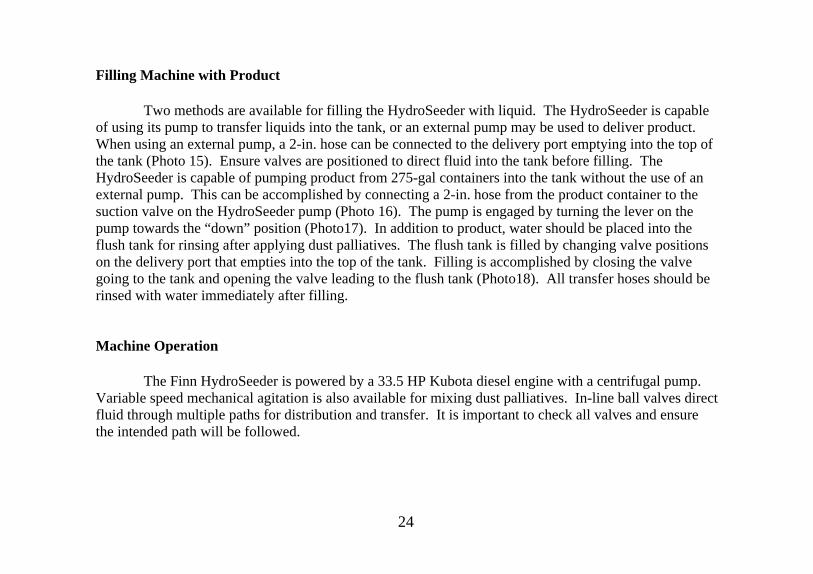
Filling Machine with Product
Two methods are available for filling the HydroSeeder with liquid. The HydroSeeder is capable of using its pump to transfer liquids into the tank, or an external pump may be used to deliver product. When using an external pump, a 2-in. hose can be connected to the delivery port emptying into the top of the tank (Photo 15). Ensure valves are positioned to direct fluid into the tank before filling. The HydroSeeder is capable of pumping product from 275-gal containers into the tank without the use of an external pump. This can be accomplished by connecting a 2-in. hose from the product container to the suction valve on the HydroSeeder pump (Photo 16). The pump is engaged by turning the lever on the pump towards the “down” position (Photo17). In addition to product, water should be placed into the flush tank for rinsing after applying dust palliatives. The flush tank is filled by changing valve positions on the delivery port that empties into the top of the tank. Filling is accomplished by closing the valve going to the tank and opening the valve leading to the flush tank (Photo18). All transfer hoses should be rinsed with water immediately after filling. Machine Operation The Finn HydroSeeder is powered by a 33.5 HP Kubota diesel engine with a centrifugal pump. Variable speed mechanical agitation is also available for mixing dust palliatives. In-line ball valves direct fluid through multiple paths for distribution and transfer. It is important to check all valves and ensure the intended path will be followed.
24
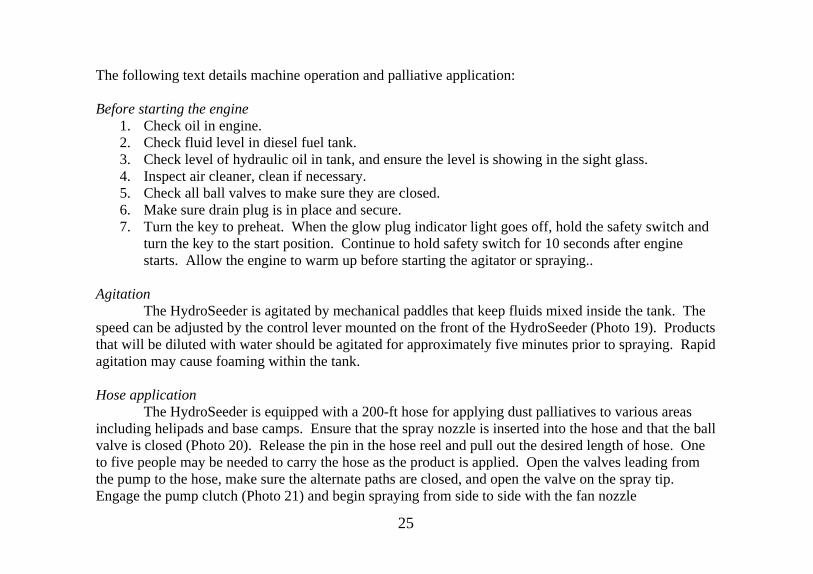
The following text details machine operation and palliative application: Before starting the engine
1. Check oil in engine. 2. Check fluid level in diesel fuel tank. 3. Check level of hydraulic oil in tank, and ensure the level is showing in the sight glass. 4. Inspect air cleaner, clean if necessary. 5. Check all ball valves to make sure they are closed. 6. Make sure drain plug is in place and secure. 7. Turn the key to preheat. When the glow plug indicator light goes off, hold the safety switch and
turn the key to the start position. Continue to hold safety switch for 10 seconds after engine starts. Allow the engine to warm up before starting the agitator or spraying..
Agitation The HydroSeeder is agitated by mechanical paddles that keep fluids mixed inside the tank. The speed can be adjusted by the control lever mounted on the front of the HydroSeeder (Photo 19). Products that will be diluted with water should be agitated for approximately five minutes prior to spraying. Rapid agitation may cause foaming within the tank. Hose application The HydroSeeder is equipped with a 200-ft hose for applying dust palliatives to various areas including helipads and base camps. Ensure that the spray nozzle is inserted into the hose and that the ball valve is closed (Photo 20). Release the pin in the hose reel and pull out the desired length of hose. One to five people may be needed to carry the hose as the product is applied. Open the valves leading from the pump to the hose, make sure the alternate paths are closed, and open the valve on the spray tip. Engage the pump clutch (Photo 21) and begin spraying from side to side with the fan nozzle
25

perpendicular to the ground. Adjust the pressure by changing the throttle position (Photo 22). When the desired product has been applied, slow the engine to idle speed, disengage the pump clutch, close the valves, and press the button located below the hose reel to electrically retrieve the hose. Replace the pin to lock the hose reel. Tower gun application The tower gun can be used to spray road shoulders, embankments, helipads, or most other areas where overspray will not interfere with equipment, structures, or personnel. This method is used to rapidly treat problematic areas. Two long-distance and two wide-fan nozzles (Photo 23) are available depending on the desired spray pattern. The long-distance nozzles can spray approximately 130 ft. Ball valves (foot pedal) should be open to direct fluid only to the tower gun. Insert the appropriate nozzle and aim the tower gun in the desired direction. Be careful to note prevailing wind direction when spraying dust palliatives with the tower gun. Engage the pump clutch to begin spraying. Increase pressure to achieve the desired spray distance and pattern by adjusting the throttle. When finished applying dust palliative, slow the engine to idle speed, disengage the pump clutch, and close the ball valve controlled by the foot pedal on the tower gun. Distribution bar application The distribution bar on the HydroSeeder allows for continual application of dust palliative on roads or other traffic areas as the transport vehicle travels. Five wide fan spray nozzles on the distribution bar spray a total of 50 gal/min (Photo 24). Travel speed should be adjusted according to the desired application rate. The height of the distribution bar should be adjusted to achieve overlapping spray through the fan nozzles. The rubber 2-in. hose in the storage compartment connects the distribution bar to the pump. First, make sure only the fluid lines directing product to the distribution bar are open. Begin forward movement of the vehicle and begin spraying by engaging the pump clutch. Adjust the spray pattern by increasing the engine speed with the throttle. When finished, slow the engine to idle speed,
26

disengage the pump clutch, and close the ball valve leading to the distribution bar. Be sure to turn pump off before indicating for the vehicle driver to stop. Cleaning and Maintenance The HydroSeeder should undergo routine maintenance and inspection at intervals indicated by the owner’s manual. All fluid levels and filters should be checked prior to use. Replacement parts should be ordered from the manufacturer according to the owner’s manual. Proper storage procedures should be followed when exposing the HydroSeeder to cold temperatures to prevent damage from freezing water within the distribution lines. The HydroSeeder should be properly cleaned after each application. The flush tank should be kept full to immediately clean the distribution system after spraying polymers or other crust-forming products. Water should be sprayed until no visual evidence of product remains. The addition of soap may be necessary to clean synthetic fluids from the tank; however, they can remain in the system for prolonged periods of time without concern. Improperly cleaned systems may develop clogs or films of plastic when using polymer emulsions for dust mitigation. The dried material must be removed by mechanical means (i.e. pressure washing, scraping) or by chemical solvents such as paint strippers or JP8 fuel. Proper safety precautions should be taken when using any chemical solvents.
27

Photo 15. Filling HydroSeeder from external pump or water source
Closed Closed
Open
28

Photo 16. Filling HydroSeeder from storage container using onboard hydrostatic pump
29

Photo 17. Hydraulic suction pump engagement lever on Finn HydroSeeder
Engage/disengage lever for transferring palliatives using internal pump
30

Photo 18. Filling flush tank from external water source
Closed Closed
Open
31

Photo 19. Lever for controlling mechanical agitation system
Lever for adjusting speed and direction of mechanical agitation system
32

Photo 20. 200-ft hose with electric reel for multiple-use palliative distribution
33

Photo 21. Clutch lever for operating pump.
34

Photo 22. Engine throttle for Finn HydroSeeder located by tower gun
Throttle for adjusting pump pressure during distribution
35

Photo 23. Spray nozzles for various spray patterns.
Wide Fan Narrow Fan Long Distance / Low Volume
Long Distance / High Volume
36

Photo 24. Distribution bar on rear of HydroSeeder
37
•

613CWD

CATERPILLAR 613CWD OPERATION Machine Specifications Engine 175 HP Caterpillar 3116TA Pump 850 gpm Dimensions Height 9.7 ft (tractor) / 9.0 ft (water distributor) Length 34.9 ft Width 8.5 ft Empty Weight 33,505 lb Working Weight 55,760 lb Tank Capacity 2525 gal Fuel Capacity 66 gal Maximum Travel Speed 23.5 mph (empty) / 21.1 mph (loaded)
38

Filling Machine with Product
Two methods are available for filling the 613CWD with liquid. The 613CWD is capable of using its pump to transfer liquids into the tank, or an external pump may be used to deliver product. When using an external pump, a hose can be placed into the overhead port (Photo 25) emptying into the top of the tank. The 613CWD is capable of drafting water into the tank without the use of an external pump. The following steps should be taken when filling the tank with water using the onboard pump.
1. Park machine close to liquid source, on level ground if possible. Lower tank to the
ground. 2. Place transmission in neutral and lock. Apply parking brake. Block wheels if on a grade. 3. Ensure all control panel switches are in OFF position. 4. Remove suction hoses from stowage tubes (Photo 26). Remove caps and plugs from
hoses. 5. Unlock camlocks, turn, and remove suction hose foot valve (Photo 26) from stowage on
suction loading inlet. Attach foot valve to submerge end of one suction hose and lock camlocks.
6. Assemble hose lengths and lock camlocks. 7. Place foot valve in water source, at least 3 ft below the surface. 8. Connect other end of suction hoses to tank suction loading inlet and lock camlocks. 9. Open suction loading inlet manual valve (Photo 27) by turning handle 90 degrees
clockwise. 10. Start engine and allow engine to idle. 11. Ensure elevator direction control lever (Photo 28) is in FORWARD position. 12. Place pump control lever (Photo 28) to ON position at slow speed. 13. Place primer control switch (Photo 29) to ON position.
39

14. Place TANK FILL SPARGER control switch (Photo 29) to OFF position. 15. Place pump control switch to OFF (suction) position. 16. Raise engine speed to 1700-2200 RPM and move pump control lever to high speed. 17. Once water can be heard entering tank, place primer control switch and vacuum control
to OFF position. 18. Continue to fill tank at high speed. 19. When tank is full, reduce engine RPM’s, place pump control lever to OFF position. 20. Place TANK FILL SPARGER control to OFF position. 21. Close suction loading inlet manual valve by turning handle 90 degrees counterclockwise. 22. Place pump control switch to ON position. 23. Recover foot valve and suction hoses. Disassemble and clean suction hoses and foot
valve. 24. Install caps and plugs on suction hoses. Return hoses to foot valve storage locations.
40

Tank Mixing Operation Some dust palliatives require dilution with water. Do not use salt or grey water for this purpose. The following procedures should be used when mixing dust palliatives with water:
1. Begin with tank at least half full. 2. Raise front of tank. 3. Access top of tank, using stairs and handrails at rear of tank. 4. Remove padlock, release hatch, and open access cover (Photo 26). 5. Add appropriate amount of dust palliative through the use of a transfer pump and hoses. 6. Fill tank as needed to achieve proper concentration of palliative. 7. Close access cover, secure with latch, and install padlock. 8. Place pump control switch to OFF position. 9. Turn TANK FILL SPARGER control (Photo 29) to ON. 10. Move pump control lever to PUMP ON, SLOW. 11. Raise engine speed to 1700-2200 RPM. Move pump control lever (Photo 28) to PUMP
ON, FAST. 12. When mixing is complete, reduce engine RPM and turn off water pump with pump
control lever. 13. Place pump control switch to ON position. 14. Water distributor is ready to discharge load.
41

Spraying Operation Dispersing liquid from the 613CWD can be accomplished through multiple pathways. The water distributor has discharge valves mounted on the rear sides of the tank, a distribution bar across the bottom of the rear of the tank, and also a hose reel capable of low volume spraying (Photo 30). The following text addresses the multiple spraying mechanisms of the 613CWD: Pressure Discharge (Upper Spray Bar)
1. Adjust spray heads, as required. 2. Place pump control switch to ON position. 3. Turn ON at least one spray valve (REAR SPRAY LEFT or REAR SPRAY RIGHT,
Photo 29). 4. Move pump control lever to PUMP ON, SLOW. 5. Begin spraying operation. Set transmission and pump at appropriate speeds for desired
application rate. Make successive passes and ensure overlap of product. 6. When spraying is complete, turn off pump with pump control lever and reduce engine
RPM. 7. Close all spray valves. 8. Place pump control switch to OFF position. 9. Refill tank and repeat operation as required. 10. When spraying operation is complete flush/rinse tank to remove all traces of palliative.
42

Pressure Discharge (Lower Spray Bar)
1. Place pump control switch to ON position. 2. Turn PRESSURE GRAVITY control (Photo 29) to ON. 3. Move pump control lever to PUMP ON, SLOW. 4. Begin pressure discharge operation. Set transmission and pump at appropriate speeds for
desired application rate. Make successive passes and ensure overlap of product. 5. When pressure discharge is complete, turn off pump with pump control lever and reduce
engine RPM. 6. Turn PRESSURE GRAVITY control to OFF. 7. Place pump control switch to OFF position. 8. Refill tank and repeat operation as required. 9. When pressure discharge is complete, flush/rinse tank to remove all traces of palliative.
Gravity Discharge (Lower Spray Bar)
1. Ensure pump control switch is in ON position. 2. Turn TANK FILL SPARGER control to OFF. 3. Turn GRAVITY SPRAY control (Photo 29) to ON. 4. Raise tank to level operating position and allow liquid to discharge by gravity from lower
spray bar.
43

Discharge Using Auxiliary Hose and Reel
1. Begin with tank in operating position. 2. Place transmission in neutral and lock. Apply parking brake. Block wheels. 3. Place pump control switch to ON position. 4. Turn TANK FILL SPARGER control to OFF. 5. Turn REAR SPRAY LEFT, REAR SPRAY RIGHT, and PRESSURE GRAVITY
controls to OFF. 6. Access hose reel at rear of tank. Remove cap from hose reel nozzle. 7. Fully unwind hose from hose reel. 8. Place ball valve handle to OPEN. 9. Turn on hose reel valve, by pulling handle all the way back. 10. Move pump control lever to PUMP ON, SLOW. 11. Raise engine RPM and move pump control lever to PUMP ON, FAST, as required,
depending on the amount of discharge required. 12. When discharging operation is complete, turn off pump with pump control lever and
reduce engine RPM. 13. Place ball valve handle to CLOSE. 14. Stow hose on hose reel. Wipe hose clean as it is manually wound onto reel. Allow water
to drain from hose as hose is stowed on reel. When water is fully drained from hose, close hose reel nozzle valve by pushing handle all the way forward.
15. Install cap on hose reel nozzle. 16. Place pump control switch to OFF postion. 17. When discharge operation is complete, flush/rinse tank to remove all traces of palliative.
44

Flushing/Rinsing Tank The following procedure should be used immediately after dispersing dust palliatives to clean the liquid transfer system:
1. Fill tank 1/3 FULL using suction loading or top loading procedure. 2. Place pump control switch to ON position. Turn TANK FILL SPARGER control to ON.
Turn on pump to low or high speed. 3. Remove front tank drain camlock cap (Photo 31) and lower front of tank. Allow fluid to
discharge onto the ground. Turn TANK FILL SPARGER control to OFF. Pressure discharge all remaining fluid. Use spray bar through which palliative was discharged from tank. This ensures all valves and nozzles are flushed clean.
4. Install front tank drain camlock cap and refill tank to 1/3 FULL. 5. Repeat steps 2-4. 6. Repeat steps as many times as necessary to thoroughly rinse tank. 7. Repeat as required until water discharge is clear and tank is clean. Discharge liquid
through all vlaves to flush/rinse all openings and nozzles. 8. Drain and dry tank in accordance with Draining and Drying Tank.
45

Draining and Drying Tank The tank should be properly drained and dried prior to storage. The following instructions dictate the necessary procedures for preparing the machine: Draining the Tank
1. Begin with tank in raised position. 2. Place transmission in neutral and lock. Apply parking brake. Block wheels. 3. Place pump control switch to ON position. 4. Turn TANK FILL SPARGER control to ON. 5. Remove camlock plug at each end of lower spray bar (Photo 31). 6. Turn the following to ON: GRAVITY SPRAY, PRESSURE GRAVITY, REAR SPRAY
RIGHT, and REAR SPRAY LEFT. 7. Open suction loading inlet manual valve. 8. Allow tank to drain.
Drying the Tank
1. Begin with tank in raised position. 2. Place transmission in neutral and lock. Apply parking brake. Block wheels. 3. Remove plug from foot valve plate under tank (Photo 32). 4. Remove plug from drain at bottom front of water pump (Photo 33). 5. Remove camlock cap from front tank drain. 6. Remove three camlock caps from sparging line outlets (Photo 31). 7. Remove plug from upper spray bar drain (Photo 34).
46

8. Remove cap from hose reel nozzle and unwind auxiliary hose. Place ball valve handle to OPEN and open hose reel valve by pulling handle all the way back.
9. Fully lower front end of tank 10. Allow all remaining water to drain. Leave all drains open to speed drying. 11. When tank is dry, close all valves and reinstall all drain plugs and caps.
47

Photo 25. Overhead fill port on top of 613CWD.
48

Photo 26. Suction hose and foot valve storage locations.
49
uction Hoses

Photo 27. Suction loading inlet manual valve.
50

Photo 28. Levers for controlling tank position.
51
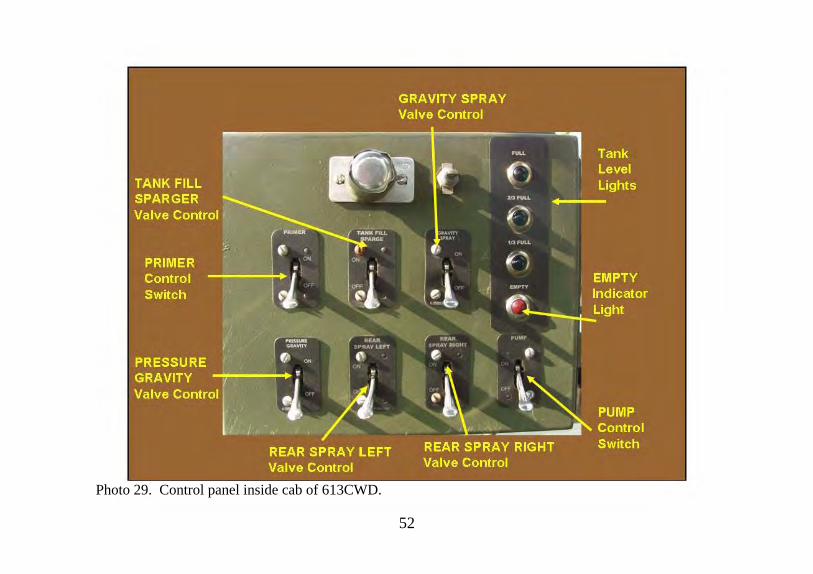
Photo 29. Control panel inside cab of 613CWD.
52

Photo 30. Fluid distribution pathways on 613CWD.
53

Photo 31. Camlock locations to remove when emptying or drying tank.
54

Photo 32. Drain plug on foot valve plate.
55

Photo 33. Drain plug on water pump.
56

Photo 34. Drain plug on upper spray bar.
57

Tips

Tips for Selecting Dust Palliatives Many different vendors offer chemicals that they claim will eliminate dust in any circumstance. Most of the claims mentioned are partially true at best. It is important to rely on experience and product reputation when choosing a product to use. The list of product names included in this document is only a fraction of those available. The task of choosing the best product is not easy.
The first decision should be which chemical type will best suit the project needs. This may be governed by funding, logistics (shipping volumes), performance, or other considerations. Table 1 lists recommended products for different applications based upon field test results from the ERDC. The list is not necessarily inclusive, and other chemical types may be equally effective in certain conditions. It is merely a guide in the decision making process.
Logistical considerations should be made when choosing liquid chemicals for dust control. It is
important to consider the specific gravity of the product and the volume that is required. For example, synthetic fluids weigh around 7.4 pounds per gallon. Polymer emulsions weigh over 9 pounds per gallon. These differences can have a large impact on the shipping weights for a given volume of product. The chemicals will typically be shipped in 275-gallon containers. This brings the total weight for one container to approximately 2,000 pounds for synthetic fluids and 2,500 pounds for polymer emulsions. An additional consideration is the volume of product needed. Synthetic fluids will be used in their concentrated form. Emulsions will be diluted using three parts water to one part product. If water is not available on site, it will have to be shipped also.
58

The difference in products within chemical classes is generally indiscernible, but could be quite significant. The most important aspect for many of the products is the concentration of active ingredients. For example, polymer emulsions generally contain 40 to 50 percent solid polymer. Requesting product specifications can ensure that pre-diluted materials are not being sold for full market value. Other considerations such as viscosity differences and chemical composition have been shown to contain only minor variations by ERDC research. Ultimately, the decision making process will rely on the cost of the material unless relevant objections can be raised to eliminate a particular vendor from consideration. It is important to realize that emulsified products have limited shelf lives. They consist of finely dispersed hydrophobic particles suspended in water. The dispersion is relatively unstable and may result in settling of the solid particles. Normal mixing procedures will not allow these particles to go back into a solution, and the product will not perform to its original properties. Emulsions should be kept away from extreme heat, ultraviolet light, and freezing temperatures. Synthetic fluids do not have limitations on shelf life.
59

Tips for Selecting Application Equipment Application equipment should be selected based upon the types available for the project. Projects occurring on or near military installations are more likely to have a broader range of choices for equipment types. Expeditionary missions in active theaters may preclude the use of many types of machinery. The ultimate goal is to use equipment that will allow the most efficient progress for placing dust palliatives. Larger areas will need dispersions systems with large capacities. Liquid discharge is usually not the most time consuming process. A HydroSeeder can be used to spray over 100 gallons per minute. The 613CWD can spray up to 850 gallons per minute. The process dominating the construction time (for topical applications) is transporting and filling the equipment. For large jobs it is important to use methods that can reduce these steps. For treating small areas, time may not be as critical of a factor.
60

Vehicle_Speedft
min
9 Pump_Outletgalmin
⋅
Application_Rategal
yd2
Spray_Bar_Width ft( )⋅
Tips for Applying Dust Palliatives Dust Palliatives are commonly applied topically to a soil. This technique is a rapid solution to typical dust problems. The distribution equipment available will dictate the method that is used for applying the product. Equipment with distribution bars should be calibrated by adjusting the speed to obtain the desired application rate (Equation 1). Distributing dust palliatives via hose or other spray systems requires the operator to monitor the fluid level of the product in the holding tank to estimate the coverage. These adjustments are relatively easy to regulate. (Eq. 1)
Distribution equipment may have mechanisms that enable the operator to pump dust palliatives directly from their shipping containers to the holding tank. If this is not possible, the ERDC recommends transferring palliatives using a small, multipurpose centrifugal pump with approximately a 5.5 hp engine and 200 gallons per minute discharge capacity through a 2-in. hose. These types of pumps should be sufficient to transfer palliatives and provide adequate durability. The pump should be equipped with a rigid 2-in. hose and quick-connect fittings for rapid hookup/disassembly.
61

Dust palliatives are generally shipped in 275-gallon plastic containers with a discharge valve on the bottom. It is recommended that the procurement contract mandate that these containers are equipped with quick-connect fittings to easily link to suction hoses. It is generally recommended that dust palliatives that consist of emulsified products be added to the container after the necessary dilution water is placed into the tank. If the emulsion is added first, excessive foaming may occur during the addition of dilution water. All equipment should be thoroughly rinsed with water after transferring dust palliatives. Additionally, it is important to flush all distribution systems with water after applying dust palliatives. Film-forming products (polymers) will coagulate within the distribution system and clog equipment. Cleaning the equipment after this occurs may require significant disassembly. Organic solvents may also be required to completely remove remaining polymer. Rinsing may be optional when using synthetic fluids for dust control. They tend to lubricate equipment and have not been found to generate problems. Cleaning will be necessary if other types of liquids are to be placed into the equipment for other purposes. Reapplication of dust palliatives may be necessary as the effectiveness of the products diminishes over time. Areas treated with synthetic fluids may be rejuvenated by applying more palliative at approximately half the original application rate. Additionally, any troublesome area or exposed untreated soil may be fixed by coating that particular region with small quantities of product. Reapplication on polymer-treated soil may require some site preparatory work prior to spraying. The existing polymer film, if undisturbed is some areas, will tend to repel the emulsion and prevent penetration of the new product. Using methods to pulverize or scarify the soil may improve reapplication.
62

Dust mitigation, particularly on roads, may require using the admix method to incorporate the dust palliatives into the soil for better performance. If a rotary mixer is not available, it may be best to simply compact the soil and topically apply the dust palliative. If the surface is hard and palliative ponding or runoff becomes a problem, try applying in successive treatments of lighter application rates until the total recommended rate is achieved. This is particularly true when using polymer emulsions. They have some adhesive properties and are difficult to mix using other techniques such as windrowing with a motor grader. Applying polymer emulsions to the soil prior to compaction may cause the soil/product to stick to the roller of the compactor.
63

References Headquarters, Department of the Army. (2005). “Operator’s Manual for Distributor, Water, Tank Type,
2525 Gallon Capacity, Sectionalized Model 613 CWD,” TM 5-3800-205-10-2, Washington, D.C.
Headquarters, Department of the Army. (1987). “Dust control for roads, airfields, and adjacent areas,” Technical Manual 5-830-3, Washington, D.C.
Rushing, J. F., Harrison, J. A., and Tingle, J. S. (2005). “Evaluation of application methods and products for mitigating dust for lines-of-communication and base camp operations.” Technical Report TR-05-09, U.S. Army Engineer Research and Development Center, Vicksburg, MS.
Rushing, J.F., Moore, V.M., and Tingle, J.S. (2006). “Evaluation of Chemical Dust Palliatives for Helipads,” Technical Report TR-06-02, U.S. Army Engineer Research and Development Center, Vicksburg, MS.
Rushing, J.F., Moore, V.M., Tingle, J.S., Mason, Q., and McCaffrey, T. (2005). “Dust Abatement Methods for Lines-of-Communication and Base Camps in Temperate Climates,” Technical Report TR-05-23, U.S. Army Engineer Research and Development Center, Vicksburg, MS.
Styron, C.R., and Eaves, R.C. (1973). “Investigation of dust control materials,” Miscellaneous Paper S-73-70, U.S. Army Engineer Waterways Experiment Station, Vicksburg, MS.
Tingle, J. S., Harrison, A., and Rushing, J. F. (2004). “Evaluation of expedient methods for mitigating dust on helipads,” Technical Report TR-04-10, U.S. Army Engineer Research and Development Center, Vicksburg, MS.
64