standard specifications for roads and structures
TRANSCRIPT

NORTH CAROLINA DEPARTMENT OF TRANSPORTATION
RALEIGH
STANDARD SPECIFICATIONS FOR
ROADS AND STRUCTURES
JANUARY 2018

FOREWORD
This publication has been prepared to provide a compilation of standard requirements used by
the North Carolina Department of Transportation for construction contracts.
When this publication, entitled Standard Specifications for Roads and Structures, dated January
2018, is incorporated by reference into the Department’s construction bid proposals or
contracts; it is made a part of that document and shall be known as the Standard Specifications.
The requirements stated herein may be revised or amended from time to time by Supplemental
Specifications, by Standard Special Provisions which are unique to a select group of projects
or by Project Special Provisions which are unique to the specific bid proposal or contract.
Working titles have a masculine gender, such as workman, workmen and foreman. Pronouns
such as he, his, and him are used in the Standard Specifications for the sake of brevity and are
intended to refer to persons of either sex or corporate entities.
Reference by title and date will be made to the governing provisions on plans and contract
documents.
GENERAL INFORMATION
For general questions about this publication, please contact the Contract Standards and
Development Unit at [email protected] or (919) 707-6900.
ORDERING INFORMATION
Copies of the Standard Specifications and the Roadway Standard Drawings may be purchased
through the Contract Standards and Development Unit:
North Carolina Department of Transportation
Contract Standards and Development Unit – Manual Distribution
1591 Mail Service Center
Raleigh, NC 27699-1591
Telephone: (919) 707-6944
Website: http://www.ncdot.gov/
The order form is available at http://www.ncdot.gov/business/order/puborder.html.
Electronic copies of the Standard Specifications and the Roadway Standard Drawings are
available for download on the Contract Standards and Development Unit’s website at
https://connect.ncdot.gov/resources/Specifications/Pages/default.aspx.
Section 900
9-1
DIVISION 9 SIGNING
SECTION 900 1 GENERAL REQUIREMENTS FOR SIGNING 2
900-1 DESCRIPTION 3
Furnish, fabricate and erect complete traffic sign systems in accordance with the contract. 4
900-2 ACCEPTANCE OF SIGNS 5
Before final inspection of the signs, clean exposed sign and support surfaces and repair the 6 site as may be deemed necessary to ensure the safety, effectiveness and neat appearance of the 7 work. 8
Maintain responsibility for the signs until accepted. Any damaged sign will not be accepted. 9 Any repairs to the signs before final acceptance of the project are to be approved. 10
Do not perform any repair work without written approval. Make repairs only in the presence 11 of the Engineer. 12
Handle, transport and store all signs in accordance with the sheeting manufacturer’s 13 recommendations. Failure to comply with the manufacturer’s recommendations during the 14 handling, transporting and storing of the signs will be cause for rejection. 15
The Contractor may request early Department acceptance of part or all of the highway signs, 16 including sign panels, retroreflective sheeting and associated hardware, before final project 17 acceptance. Sign supports will not be accepted early. To be accepted before final project 18 acceptance, the signs shall be required for traffic control at that phase of project construction. 19
If the Department accepts the signs, the Contractor will be relieved of the responsibility for 20 any damage or theft that may occur to the signs, retroreflective sheeting or associated 21 hardware, with exception of any damage caused by the Contractor or any subcontractor 22 working on the project. 23
900-3 ALTERNATE DESIGN 24
Standard designs for Types A, B, C, D, E or F signs will be shown in the contract. Instead of 25 the standard design, the Contractor may submit for approval an alternate design for sign 26 panels differing in component parts and construction details from those shown in the contract. 27 Provide any alternate designs that are in accordance with the MUTCD. 28
Submit complete details of the alternate sign designs to the Engineer for approval. Include 29 the dimensions, thickness and alloys of the component parts, and typical shop drawings of all 30 fabrication, erection and construction details. 31
Alternate design for supports and footings will not be permitted. 32
900-4 COVERING OF SIGNS 33
Cover signs or portions of signs with opaque material if erected on roads open to traffic and 34 not yet applicable. Keep signs or portions of signs covered until instructed to remove the 35 covering. Provide covering for entire signs by an approved method provided by sheeting 36 manufacturer that will prevent the messages from being read or seen during both day and 37 night conditions and that will cause no harm to the sheeting face. 38

Section 901
9-2
SECTION 901 1 SIGN FABRICATION 2
901-1 DESCRIPTION 3
Fabricate and furnish signs, including sign face, supporting frames, hardware and package the 4 signs for shipment. 5
901-2 MATERIALS 6
Refer to Division 10. 7
Item Section Retroreflective Sheeting 1092-2 Signs and Hardware 1092-1
901-3 CONSTRUCTION METHODS 8
(A) General 9
Details concerning the fabrication and erection of the signs are shown in the contract. 10 Sign designs not shown in the contract are available from the Engineer. 11
Fabricate all items within 1/8 inch of design measurements. Scribe each sign, shield, 12 arrow, overlay or blank on the back with the month and year. 13
Do not begin fabrication of Type A and B signs until S-dimension verification revisions 14 have been approved. 15
Provide mounting holes in the Z-stringers of the signs in accordance with the details 16 shown in the contract or approved shop drawings. Provide a space between the Z-bar and 17 backing strip not greater than 1/8 inch. 18
Date the erection of all signs and sign assemblies using printed self-adhesive stickers 19 designed for punching the appropriate day, month and year numbers with a hole punch. 20 Place the sticker on the back of each sign in the lower corner nearest the roadway. The 21 Sign Fabricator will provide a sufficient quantity of the stickers for each sign. Print on 22 the back of each sign the size of that sign [e.g. 144 inches x 48 inches] with a black 23 permanent marker with numbers at least 2 inches in height and located near the self-24 adhesive sticker. 25
Ship all multi-panel signs to the project intact, completely assembled and ready to be 26 installed. Fabricate signs taller than 12 feet as two separate signs with a horizontal splice, 27 ready to be spliced and installed. No assembly other than a horizontal splice will be 28 permitted except when a route shield or copy is required to be attached because of the 29 horizontal splice. 30
(B) Department and Contractor Furnished Signs 31
Use the contract to determine whether the signs are to be fabricated and furnished by the 32 Contractor or whether the Department will provide them to the Contractor. 33
For both Department and Contractor Furnished Signs, the Contractor provides all 34 mounting hardware consisting of, but not limited to, shims, backing plates, mounting 35 bolts, washers and nuts. 36
The sign fabricator will provide vertical Z-bars required for attaching secondary signs to 37 the primary signs. 38
Confirm in writing at least 4 months in advance, the actual date the Department furnished 39 signs will be required. The signs will be made available to the Contractor for pickup at 40 the North Carolina Department of Public Safety sign fabrication facility on N.C. 39 near 41 Bunn, North Carolina, unless otherwise indicated in the contract. Provide for all 42 transportation. 43

Section 901
9-3
The Engineer will inspect and approve the signs before they are packaged and crated for 1 shipment. Take delivery of all signs within 60 days of the date requested or the date they 2 are made available, whichever occurs last, and within 96 hours of receiving the first sign. 3 The Engineer shall approve any exception to the above delivery procedure. At the time 4 the signs are delivered to the project, provide to the Engineer one copy of the sales ticket 5 furnished with the signs. 6
After taking possession of the signs, the Contractor is responsible for any damage or theft 7 that occurs to signs before final acceptance by the Engineer. Comply with the reflective 8 sheeting manufacturer's recommendations for handling, transporting, erecting and storing 9 of the signs. Acceptably repair or otherwise correct any damage to the signs or 10 refabricate them. When requested by the Contractor, the Department may have the 11 necessary repairs made or the signs refabricated, and deduct the associated cost thereof 12 from monies due the Contractor. 13
(C) Signs 14
Construct all signs, supporting frames and assemblies in accordance with the details 15 shown in the contract and Tables 901-1 and 901-2. 16
TABLE 901-1 SIGN TYPE PARAMETERS
Sign Type
Vertical and Horizontal Dimensions
144"x 48" Aluminum
Panels
Horizontal Z-Bars
Aluminum Thickness
A Vertical or Horizontal > 144"
or Vertical and Horizontal > 48"
Multiple Yes 0.125"
B Vertical and Horizontal ≤ 144"
and Vertical or Horizontal ≤ 48"
Single Yes 0.125"
D - Single No See Table 901-2
E - Single No See Table 901-2
F - Single No See Table 901-2
(1) Type A Signs 17
Fabricate Type A signs from multiple aluminum sheet increments of the thickness 18 shown in Table 901-1, with welded studs for attachment to the supporting frame. 19
Use aluminum sheets with increments of 4 feet in width; except, for sign widths that 20 are not multiples of 4 feet, a maximum of 2 panels may be cut to less than 4 feet. No 21 panel may be cut to less than one foot. Mount aluminum sheet increments vertically 22 and provide with backing strips at the vertical joints, held firmly in place, to keep the 23 abutting sheets in proper alignment. Leave a space of 0.020 inch to 0.032 inch 24 between each panel sheeted with non-prismatic sheeting. Prismatic sheeting is be 25 trimmed at a 45° angle from the edge of each panel. 26
Fabricate signs with a height of 12 feet or less, without horizontal joints. No more 27 than two horizontal joints will be permitted for signs that are more than 12 feet in 28 height. Locate the joint near the mid-height of the sign. Construct this joint 29 according to the details in accordance with the contract. 30

Section 901
9-4
(2) Type B Signs 1
Fabricate Type B signs from multiple aluminum sheet increments of the thickness 2 shown in Table 901-1, with welded studs for attachment to the supporting frame. 3
(3) Types D, E and F Signs and Milemarkers 4
Fabricate Types D, E and F signs and milemarkers from single sheets of the 5 thickness shown in Table 901-2, with holes for bolting to the supports. 6
Construct Types E and F signs in accordance with the FHWA Standard Highway 7 Signs. Adequately identify each individual sign to the correct assembly. Following 8 the erection of Type E and F sign assemblies, leave the identification markings on 9 the individual signs until Department personnel have verified compliance with these 10 requirements. 11
(4) Overlays for Existing Signs 12
Manufacture all overlays for existing signs of the thickness shown in Table 901-2. 13 Do not make holes for rivets in the overlays during fabrication, but instead field-drill 14 them during the erection process. 15
(D) Aluminum 16
(1) Thickness Requirements 17
TABLE 901-2 ALUMINUM THICKNESS REQUIREMENTS FOR SIGNS
Vertical or Horizontal Dimension Minimum Thickness Inches Inches 0-11.9 0.032
12-35.9 0.063 36-47.9 0.080
48 and larger 0.125 Milemarkers 0.080
Overlays 0.063
(2) Preparation of Aluminum Sign Surfaces 18
Do not handle any metal, except by appropriate handling devices or by workmen 19 wearing clean gloves, between the beginning of the coating operations and the 20 completion of the application of the retroreflective sheeting. Retreat aluminum sign 21 surfaces that come into contact with grease, oils or other contaminants before the 22 application of retroreflective sheeting. 23
Before applying retroreflective sheeting to the aluminum, treat the aluminum sign 24 surfaces with a chromate conversion coating. Such coating shall be applied 25 according to the manufacturer's instruction and shall conform to ASTM B449, 26 Class 2, and should range in color from silvery iridescent to pale yellow. The 27 coating weight shall be 10 mg/sf to 35 mg/sf on the entire surface area including 28 along the edges of the sign substrate with a median of 25 mg/sf as the optimum 29 coating weight. Ensure the coating does not appear dusty when wiped with a clean, 30 lint-free cloth and does not show excessive buildup at edges. Sand smooth all burrs 31 and scratches before applying retroreflective sheeting. Sheet all sanded aluminum 32 within the same day to prevent the formation of corrosion on the metal. Do not sand 33 or use abrasive materials on sheeted faces. Aluminum products shall be randomly 34 tested. 35

Section 901
9-5
(E) Supporting Frames 1
Use supporting frames for Types A and B signs consisting of 2 or more horizontal 2 aluminum Z-stringers with vertical aluminum bar stiffeners in accordance with the details 3 and dimensions shown in the contract. Use a nylon washer to attach all thru bolts with 4 a play of at least 1/16 of an inch and no more than 1/8 of an inch. Provide stringers with 5 necessary holes and slots for bolting stiffeners, attaching aluminum sheet increments and 6 mounting to supports. Do not field drill holes in any part of the structural assembly, 7 except the field drilling of horizontal Z-bars for attaching new signs to existing supports 8 when necessary. 9
(F) Welding 10
Weld studs to aluminum sheets by the capacitor discharge method. If the studs are 11 welded after the retroreflective sheeting has been applied, insure that burn-through does 12 not damage the retroreflective sheeting. 13
Shoot a test stud on each Type A and B sign in the lower left corner of the most left panel 14 facing the back of the sign. 15
(G) Retroreflective Sheeting 16
Apply retroreflective sheeting to the aluminum sign panels in accordance with the 17 retroreflective sheeting manufacturer's recommendations. For each multi-panel 18 increment sign using glass beaded materials, sheet the entire sign from the same roll. 19
If a sign panel needs to be replaced after sign fabrication, the replacement panel may be 20 sheeted with retroreflective materials from a different lot or drum number than the 21 remainder of the sign; however, use material that visually color matches and meets 22 Article 1092-2. 23
Take retroreflectometer readings on all 4 corners of each panel and document the 24 readings on the sign design drawings. 25
Overlap all splices of any encapsulated or enclosed lens sheeting to allow water to run off 26 without running into the splice. All prismatic sheeting will be butt spliced. 27
Remove all foreign materials on the sheeted face with compressed air. 28
Keep a sample of each roll of sheeting and test for retroreflective compliance. 29
Patch wrinkles in the sheeting around thru bolts by removing the affected sheeting from 30 the metal. Then patch this area with a circular patch encompassing an area 1/4 31 inch outside the affected area. This patch shall not exceed the standard patching limits 32 shown in Table 901-3. 33
Ensure that all patches on the sign have a 1 inch minimum width or as recommended by 34 the sheeting manufacturer. 35
Maintain documentation of the lot, drum, inspector, roll size, date received, date sheeted 36 and metal treater on all signs, slip sheeting, copy, borders, shields, overlays, arrows and 37 panels and retroreflectometer readings. 38
Obtain and assign to the Department in writing warranties for sign sheeting used in the 39 fabrication of all permanent signs from the sheeting manufacturer. Warrant the signs 40 against defective sheeting per the requirements outlined in the contract. 41
Define “permanent signs” as Types A, B, C, D, E and F signs, overlays for all sign types 42 and milemarkers, and exclude any signs used only for traffic control while the project is 43 under construction. 44
Section 901
9-6
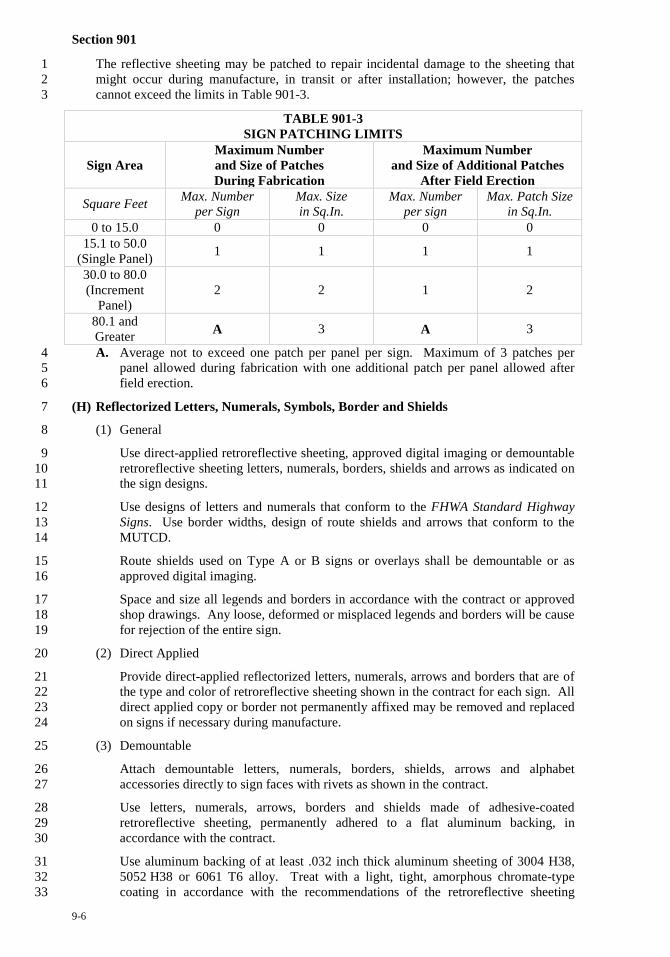
The reflective sheeting may be patched to repair incidental damage to the sheeting that 1 might occur during manufacture, in transit or after installation; however, the patches 2 cannot exceed the limits in Table 901-3. 3
TABLE 901-3 SIGN PATCHING LIMITS
Sign Area Maximum Number and Size of Patches During Fabrication
Maximum Number and Size of Additional Patches
After Field Erection
Square Feet Max. Number per Sign
Max. Size in Sq.In.
Max. Number per sign
Max. Patch Size in Sq.In.
0 to 15.0 0 0 0 0 15.1 to 50.0
(Single Panel) 1 1 1 1
30.0 to 80.0 (Increment
Panel) 2 2 1 2
80.1 and Greater A 3 A 3
A. Average not to exceed one patch per panel per sign. Maximum of 3 patches per 4 panel allowed during fabrication with one additional patch per panel allowed after 5 field erection. 6
(H) Reflectorized Letters, Numerals, Symbols, Border and Shields 7
(1) General 8
Use direct-applied retroreflective sheeting, approved digital imaging or demountable 9 retroreflective sheeting letters, numerals, borders, shields and arrows as indicated on 10 the sign designs. 11
Use designs of letters and numerals that conform to the FHWA Standard Highway 12 Signs. Use border widths, design of route shields and arrows that conform to the 13 MUTCD. 14
Route shields used on Type A or B signs or overlays shall be demountable or as 15 approved digital imaging. 16
Space and size all legends and borders in accordance with the contract or approved 17 shop drawings. Any loose, deformed or misplaced legends and borders will be cause 18 for rejection of the entire sign. 19
(2) Direct Applied 20
Provide direct-applied reflectorized letters, numerals, arrows and borders that are of 21 the type and color of retroreflective sheeting shown in the contract for each sign. All 22 direct applied copy or border not permanently affixed may be removed and replaced 23 on signs if necessary during manufacture. 24
(3) Demountable 25
Attach demountable letters, numerals, borders, shields, arrows and alphabet 26 accessories directly to sign faces with rivets as shown in the contract. 27
Use letters, numerals, arrows, borders and shields made of adhesive-coated 28 retroreflective sheeting, permanently adhered to a flat aluminum backing, in 29 accordance with the contract. 30
Use aluminum backing of at least .032 inch thick aluminum sheeting of 3004 H38, 31 5052 H38 or 6061 T6 alloy. Treat with a light, tight, amorphous chromate-type 32 coating in accordance with the recommendations of the retroreflective sheeting 33
Section 901
9-7
manufacturer. Apply the retroreflective sheeting to the properly prepared aluminum 1 using the method and equipment prescribed by the sheeting manufacturer. 2
Supply each letter, numeral, arrow, border and shield with mounting holes, and 3 secure to the sign surface with non-twist corrosion resistant aluminum rivets. Use 4 letters, numerals, arrows and borders that have rivets on all sides and ends spaced not 5 more than 6 inches on centers, measured along the edges. Make sure that each 6 legend piece has at least one rivet in each corner and at least 2 rivets in each end. 7 Attach route shields as part of Type A or B signs with aluminum rivets spaced not 8 more than 9 inches apart, measured along the edges of the shield. 9
Use a 1/4 inch diameter nylon washer under the head of all pull through type rivets 10 for all demountable copy and shields. 11
(4) If approved, use digital printing equipment to image or reverse image on 12 retroreflective sheeting for letters, numerals, borders, shields and arrows on digitally 13 approved retroreflective sheeting for traffic control signs on aluminum or digitally 14 printed traffic sign faces intended to be applied to a sign substrate. 15
(I) Silk Screening 16
Apply all legends and borders on Type E and F signs by silk-screening or reverse 17 silk-screening after the sheeting is attached to the panels. Perform all screening as 18 recommended by the manufacturer of the retroreflective sheeting. Use the color of all 19 legends, borders and backgrounds, and their placement on the sign, in accordance with 20 the contract. 21
Use opaque black ink for nonreflectorized message application, as manufactured or 22 recommended by the manufacturer of the retroreflective sheeting. 23
Use transparent ink and thinner, for application on signs reflectorized with white 24 retroreflective sheeting, as manufactured or recommended by the manufacturer of the 25 retroreflective sheeting. Use colors that conform to the FHWA Color Tolerance Charts 26 and AASHTO M 268 when thoroughly dry. 27
Test all lots of transparent ink for compliance with the minimum coefficient of 28 retroreflection equal to 70% of the specified minimum retroreflection of the 29 corresponding sheeting color and document the retroreflection value. 30
Inspect the first 5 signs of each screening and then every fifth sign. When unacceptable 31 signs are found, all signs shall be inspected individually. 32
Only 3 nonwets per sf, no larger than 1/16 inch in diameter, covering no more than 1/3 of 33 the total area of the sign are allowable. This includes nonwets from either the sheeting or 34 the screen-printing. 35
Only one tadpole per 6 sf, no longer than 1 1/2 inch and not readily visible under lighted 36 inspection is allowable. 37
(J) Mounting Hardware 38
Provide all mounting hardware consisting of, but not limited to, shims, backing plates, 39 mounting bolts, washers and nuts. Provide mounting holes in the Z-stringers of the 40 ground mounted signs in accordance with the details shown in the contract. 41
(K) Packaging, Shipping and Storing 42
Protect all signs during shipment and storage. Before shipping, make sure that all signs 43 are free of moisture and that all inks are thoroughly dry. Do not apply adhesive tapes to 44 any sign surface. Keep all packaged signs entirely dry. 45
Use assembled or partially assembled signs other than flat sheet signs that have sufficient 46 braces securely attached to prevent buckling or warping at all times. 47

Section 901
9-8
Affix a label outlining the retroreflective sheeting manufacturer's recommendations for 1 handling, transporting and storing all types of signs to each shipping carton or crate. 2 Provide full details of such recommendations with each shipment of signs. 3
Label each crate or package of signs or panels as to the contents (arrows, shields, etc.), 4 WBS number and sequence of packages if more than one package is for a single sign. 5
Maintain documentation of the lot, drum, inspector, roll size, date received, date sheeted, 6 metal treater on all signs, slipsheeting, copy, borders, shields, overlays, arrows, panels 7 and retroreflectometer readings. 8
Individually rack or separate by foam or slip sheeting on A-frame racks all sheeted 9 panels. Do not use spliced, overlapped, ripped or torn slipsheeting or foam. 10
Store all packed signs standing at a 75° to 90° angle. 11
Turn all panels and sign faces to the inside of the crates, whenever possible. 12
When crating a one-panel sign, provide the face side with an extra piece of foam and 13 cardboard taped to the outside of the face side of the package. 14
Pack panels of 102 inches in length or longer in only 2 per package. 15
Ensure all signs are debris free on the back side, with no misplaced writing, tape or 16 extraneous sheeting. 17
Crate to allow a 2 inch space on the inside dimensions larger than the size of the largest 18 package. 19
Store completed Type A and B signs back to back with at least 12 inches between faces. 20
When crating 2 panels of different sizes, place the smaller panel with its face to the back 21 of the larger panel and package with an extra piece of foam and cardboard taped to the 22 outside of the larger panel, with its face to the outside of the crate. Provide extra 23 packaging on both outsides of the package for double-faced signs. 24
Crate packaged panels to allow the passage of a 1/8 inch spacer on the inside of each side 25 of the crate, so that the panels are not overly tight or binding in crate. 26
Inspect all signs and packaging before shipping to assure compliance with the contract 27 and the Standard Specifications. The Department retains the right to inspect the signs 28 and packaging before shipping. 29
(L) Transparent Films 30
Use transparent films instead of silk screening when authorized by the Department. 31 Transparent film is a durable, transparent, acrylic colored film coated with transparent, 32 pressure-sensitive adhesive. When the film is applied over reflective sheeting, the 33 coefficient of retroreflectivity shall meet the color and type of sheeting in Tables 1092-3, 34 1092-4 and 1092-5. Use Department approved transparent film approved by the 35 manufacturer of the reflective sheeting to insure the materials meet the manufacturer’s 36 warranty and obligation in Subarticle 1092-2(B). 37
(M) Digital Printing 38
Use digital Printing instead of silk screening or transparent films when authorized by the 39 Department. Digital print technologies consists of digital reflective sheeting, digital ink 40 systems, and clear overlay film. The manufacturing application process and the materials 41 must be approved by the sheeting manufacturer to insure it meets the manufacturer’s 42 warranty and obligation in Subarticle 1092-2(B). May apply all legends and borders on 43 Type E and F signs using digital printing. 44
Use opaque black ink for nonreflectorized message application, as manufactured or 45 recommended by the manufacturer of the retroreflective sheeting. 46

Section 901
9-9
Retroreflective sheeting shall consist of white or colored sheeting having a smooth outer 1 surface and that essentially has the property of a retroreflector over its entire surface. 2 Retroreflective sheeting shall conform to all requirements to the FHWA Color Tolerance 3 Charts and AASHTO M 268 when thoroughly dry Digital printed ink systems used to 4 print traffic signs must meet and comply with daytime and nighttime chromaticity (color 5 standards) as recognized in ASTM D4956 “Standard Specification for retroreflective 6 Sheeting”. 7
Digital printed ink systems must meet 70% of the initial retroreflectivity in Table 1092-3 8 and the coefficient of retroreflectivity for color and type of sheeting in Tables 1092-3, 9 1092-4 and 1092-5. 10
All digital inks and digital reflective sheeting shall be listed on the NCDOT APL and 11 tested on AASHTO NTPEP test deck for 3 years prior to consideration to insure the 12 digital printed ink system meets the warrant obligation listed in Subarticle 1092-2(B) for 13 the respective sheeting grade. 14
Permanent traffic signs printed with digital ink systems will be fabricated with a full sign 15 Protective Overlay Film designed to protect the entire sign from fading and UV 16 degradation. The over laminate will comply with the retroreflective sheeting 17 manufacturer’s recommendations to ensure proper adhesion and transparency and will 18 also meet the reflective film durability in Subarticle 1092-2(B). 19
Temporary signs printed with black ink only will not require a Protective Overlay Film as 20 long as the finished sign is warranted for a minimum outdoor durability of three years by 21 the sheeting manufacturer. 22
901-4 SIGN QUALITY 23
Provide signs that present a uniform appearance free from color match problems, non-uniform 24 color, streaks, spots, abrasions, blistering or other defects in the sheeting. 25
Sheeting may be inspected before application to sign blanks, after installation to sign blanks, 26 after completion of the sign in the sign fabricator's facility and after installation. Clean all 27 installed signs before final field inspection. 28
The retroreflective sheeting will be unsatisfactory if it has deteriorated due to any cause 29 except defacement resulting from vandalism or damage resulting from impact by a motor 30 vehicle or other object to the extent that: 31
(A) The sign is ineffective for its intended purpose when viewed from a moving vehicle 32 under normal day and night driving conditions, or 33
(B) The coefficient of retroreflection is less than the minimum specified for that sheeting as 34 shown in Tables 1092-3, 1092-4 and 1092-5 when measured by a Department approved 35 retroreflectometer, or 36
(C) The screened message and border or reverse screened background has stained, 37 discolored, streaked, faded, turned dark or has developed cracks, scaling, pitting and/or 38 blistering, or 39
(D) The sign is unsatisfactory with regard to uniform appearance due to cracking, streaking, 40 delamination, blistering, crazing or discoloration of the sheeting, or 41
(E) The sign is unsatisfactory with regard to remaining uniform in color over the entire 42 reflecting surface both day and night and displaying the same color both in daylight and 43 under lights at night. 44
(1) For glass bead material, sheeting will be subjected to a visual test with the human 45 eye as the test instrument. Objectionable non-uniformity of color and reflectivity 46 (retroreflection) under light at night is cause for the sign to be tested for 47 retroreflection to determine compliance with the following requirements: 48

Section 902
9-10
The retroreflection values on any sign shall not vary from each other by more than 1 a ratio of 1.10 (1.20 white) at any 2 points at least 12 inches apart, nor more than 2 1.30 (1.30 white) at any 2 points anywhere on the sign, nor more than, 3 1.10 (1.20 white) at any 2 points on the border or between any 2 adjacent letters, 4 numerals or symbols. Failure to meet the above requirements will result in sign 5 rejection. Retroreflection will be tested using a Delta RetroSign retroreflectometer. 6
(2) For prismatic material, sheeting will be subjected to a visual test with the human eye 7 as the test instrument. 8
901-5 MEASUREMENT AND PAYMENT 9
Sign fabrication will be measured and paid as the actual number of square feet of sign face 10 areas of each type, including milemarkers and overlays acceptably fabricated. In measuring 11 this quantity, the sign face areas will be calculated to the nearest 1/100 of a sf, using the 12 dimensions shown in the contract. 13
The areas of odd-shaped signs (e.g. stop signs and shield-shaped route markers) will be 14 calculated as squares or rectangles using the dimensions shown in the contract. The areas of 15 round, diamond and triangular signs will be calculated for their true shapes using plan 16 dimensions. 17
Repair or otherwise correct any damage to the signs or refabricate them at no cost to the 18 Department. When requested by the Contractor, the Department may have the necessary 19 repairs made or the signs refabricated, and deduct the associated costs thereof from monies 20 due the Contractor. 21
Payment will be made under: 22
Pay Item Pay Unit Contractor Furnished, Type ____ Sign Square Foot
SECTION 902 23 FOUNDATIONS FOR GROUND MOUNTED SIGNS 24
902-1 DESCRIPTION 25
Construct foundations for sign supports including locating, staking, excavating, shoring, 26 backfilling, forming, landscaping and other necessary tasks as required. 27
902-2 MATERIALS 28
Refer to Division 10. 29
Item Section Joint Sealer 1028-2 Organic Non-Aerosol Zinc Repair Paint 1080-7 Portland Cement Concrete Production and Delivery 1000 Reinforcing Steel 1070 Select Material and Borrow Material 1016 and 1018
902-3 CONSTRUCTION METHODS 30
Establish the proper offset, longitudinal location and foundation elevation of each ground 31 mounted sign support. Provide proper level and orientation of all supports. 32
Thoroughly compact all backfill in 6 inch layers. Remove all unneeded excavated material 33 from the site. 34
Perform all excavation necessary for foundation construction to the elevations and dimensions 35 shown in the contract. Place concrete against undisturbed soil. 36
Section 903
9-11
Construct concrete sign foundations in accordance with Section 825. Construct either 1 reinforced or plain Class A concrete foundations in accordance with the contract. Shape the 2 tops of the foundations to conform to finished ground elevations such that water will not 3 collect against the supports. No construction joints will be permitted. 4
Form the top 6 inches of foundations by approved methods. Center the supports in the 5 foundations, securely brace and hold in proper position and alignment during placement of the 6 concrete. Provide an ordinary surface finish to the concrete. 7
902-4 MEASUREMENT AND PAYMENT 8
The quantity of reinforced and plain concrete to be paid will be the actual number of cubic 9 yards of concrete incorporated into the completed and accepted foundation. Computing the 10 number of cubic yards of concrete will be done from the dimensions shown in the contract or 11 from revised dimensions authorized by the Engineer, calculated to the nearest 1/100 of a cy. 12
Payment will be made under: 13
Pay Item Pay Unit Reinforced Concrete Sign Foundations Cubic Yard Plain Concrete Sign Foundations Cubic Yard
SECTION 903 14 GROUND MOUNTED SIGN SUPPORTS 15
903-1 DESCRIPTION 16
Furnish, fabricate, clear for sight distance and install ground mounted and barrier mounted 17 signs supports. 18
The types of supports covered by this section are: 19
(A) Breakaway steel beam sign supports 20
(B) Simple steel beam sign supports 21
(C) 3-lb steel U-channel supports 22
(D) 2-lb steel U-channel supports 23
(E) Barrier sign support assembly 24
(F) Wood supports 25
(G) Steel square tube supports 26
903-2 MATERIALS 27
Refer to Division 10. 28
Item Section Breakaway or Simple Steel Beam Sign Supports
(W- or S-Shapes) 1094-1(A)
Ground Mounted Signs 1094 Joint Sealer 1028-2 Organic Non-Aerosol Zinc Repair Paint 1080-7 Signing Materials 1092 Steel Square Tube Supports 1094-1(D) Steel U-Channel Supports 1094-1(B & C)

Section 903
9-12
903-3 CONSTRUCTION METHODS 1
(A) Location and Field Verification 2
The support lengths and dimensions for steel and wood ground mounted supports shown 3 in the contract are estimated for project bid purposes. 4
The Engineer or contract surveyor will establish the proper offset, longitudinal location; 5 foundation elevation and S-dimension of each ground mounted and barrier mounted sign 6 support. The Signing and Delineation Unit will issue a revision of the Sign Support 7 Chart Sheet following receipt of field-verified S-dimensions. 8
Order supports for ground mounted signs when the revised support lengths, dimensions 9 and sizes have been determined and the appropriate plan revision is completed. 10
Provide the proper vertical plumb, level and orientation of all signs and supports. 11
(B) Clearing for Sign Sight Distance 12
Clear vegetation in front of signs where necessary to achieve proper sight distance to the 13 sign. The sight distance area includes the triangular region of land extending from the 14 edge of the travel lane 800 feet in advance of the sign to 4 feet beyond the furthest edge 15 of the sign from the travel lane. The Engineer will determine where clearing is required 16 and the amount of clearing at the sign locations. Perform the clearing in accordance with 17 Section 200. 18
(C) Breakaway Steel Beam and Simple Steel Beam 19
Fabricate and install the supports in accordance with the contract. Punch, cut or weld 20 supports before galvanizing. Galvanize each component part in accordance with 21 ASTM A123 before assembly. Provide supports that are uniformly straight to within 1/8 22 inch tolerance for pieces less than 20 feet in length and 1/4 inch tolerance for pieces over 23 20 feet in length. 24
Cut the upper and middle sections of breakaway supports from the same member. Bolt 25 the hinge joint in the breakaway supports to ensure true alignment of the 2 sections. 26 After bolting of hinge connections make sure that the 2 sections are in the same position 27 relative to each other, as before being cut. Completely assemble breakaway supports 28 before erection. 29
Provide supports that are plumb. Do not shim the supports. Take adequate care during 30 erection of supports to prevent damage to the surface finish. Use 2 coats of an approved 31 organic non-aerosol zinc repair paint in touching up damaged areas on all galvanized 32 materials. 33
(D) Steel Supports 34
(1) General 35
Drive the supports to the required depth, being sure they are plumb. Drive the 36 supports by hand or by mechanical means. Protect the supports with an appropriate 37 driving cap. Concrete foundations are not required. In island applications, cored 38 holes shall be to the soil depth. 39
Replace any support that is bent, or otherwise damaged in driving. 40
Do not weld supports in the field. Use 2 coats of approved organic non-aerosol zinc 41 repair paint in touching up the tops of U-channel supports that may have been 42 damaged in driving. Cut ends of supports, frames, cross bracing and damaged areas 43 on these and all other galvanized materials. 44
Any steel supports cut in the field shall have two coats of approved organic non-45 aerosol zinc repair paint. 46

Section 903
9-13
Use supports of sufficient length to permit the appropriate sign mounting height. 1 Spliced supports are not permitted on new construction. 2
(2) U-Channel 3
Use 3-lb galvanized steel U-channel supports for Types D, E and F signs. Use 4 2-lb galvanized steel U-channel supports for milemarkers. 5
(3) Perforated Square Tubing 6
Use square tube supports in accordance with the contract. 7
(E) Barrier Supports 8
(1) Small 9
Attach brackets and U-channel supports to the median or shoulder barrier for the 10 erection of Type E or F signs or milemarkers in accordance with the contract. 11
(2) Large 12
Attach brackets, anchorage and pipe supports to the median or shoulder barrier for 13 the erection of Type E signs in accordance with the contract. 14
(F) Wood Supports 15
Use wood supports in accordance with the contract. 16
Replace any support that is damaged during erection. 17
Breakaway wood supports shall be drilled in accordance with the contract. All wood 18 supports larger than 4 inches x 4 inches that have not been drilled shall be behind 19 guardrail. 20
903-4 MEASUREMENT AND PAYMENT 21
The supports, specified in these Standard Specifications, installed and accepted, will be 22 measured for payment as follows: 23
Supports, Breakaway Steel Beam and Supports, Simple Steel Beam will be measured and paid 24 as the actual number of pounds of structural steel installed and accepted. The computed 25 nominal weights shown in the final revised plans will be used in determining this quantity. 26 Measurement will not be made of the weight of nuts, bolts and washers that are part of the 27 sign support, as they will be incidental to the work. 28
Supports, 3-lb Steel U-Channel will be measured and paid as the actual number of linear feet 29 of 3-lb steel U-channel supports incorporated into the completed and accepted supports and 30 assemblies. Measurements of length will be made to the nearest 1/10 of a foot. 31
Supports, 2-lb Steel U-Channel will be measured and paid as the actual number of 32 2-lb steel U-channel support installed and accepted. 33
Supports, Barrier (Small) will be measured and paid as the actual number of small barrier 34 supports installed and accepted. 35
Supports, Barrier (Large) will be measured and paid as the actual number of large barrier 36 supports installed and accepted. 37
Supports, Wood will be measured and paid as the actual number of linear feet of wood support 38 incorporated into the completed and accepted supports. Measurements of length will be made 39 to the nearest 1/10 of a linear foot. The computed linear feet of sign supports, as indicated in 40 the final revised plans will be used in determining this quantity. 41
Supports, Steel Square Tube will be measured and paid as the actual number of linear feet of 42 steel square tube supports incorporated into the completed and accepted supports and 43 assemblies. Measurements of length will be made to the nearest 1/10 of a foot. 44
Section 904
9-14
Payment will be made under: 1
Pay Item Pay Unit Supports, Breakaway Steel Beam Pound Supports, Simple Steel Beam Pound Supports, 3-lb Steel U-Channel Linear Foot Supports, 2-lb Steel U-Channel Each Supports, Barrier (Small) Each Supports, Barrier (Large) Each Supports, Steel Square Tube Linear Foot Supports, Wood Linear Foot
SECTION 904 2 SIGN ERECTION 3
904-1 DESCRIPTION 4
Erect existing and proposed ground mounted and overhead signs to existing and proposed 5 supports and furnish mounting hardware. Relocate existing signs in accordance with the 6 contract and Specifications. 7
The types of signs covered by this section are as follows: 8
Type A signs 9 Type B signs 10 Type D signs 11 Type E signs 12 Type F signs 13 Milemarkers 14 Overlay signs 15 Reposition signs 16 Logo Trailblazer 17 Logo to panel 18 Relocation signs 19
904-2 MATERIALS 20
Refer to Division 10. 21
Item Section Signing Materials 1092 Organic Non-Aerosol Zinc Repair Paint 1080-7
904-3 CONSTRUCTION METHODS 22
(A) General 23
Provide new mounting bolts, washers, hex nuts, backing plates and all hardware for signs 24 to be mounted on existing or proposed supports. Do not weld, cut or fabricate in any 25 manner in the field, except for as allowed under Section 903 and for the drilling of holes 26 for attaching demountable legends and borders that cannot be attached in the shop. Field 27 drill Z-bars for attaching signs to supports as required. 28
Use 2 coats of an organic non-aerosol zinc repair paint in touching up field-drilled holes 29 and damaged areas on all galvanized materials as covered under Section 903. 30
Make sure that the horizontal edges of signs are level and that the faces of signs are 31 vertical. 32
Section 904
9-15
Refer to Sections 900 and 901 for requirements of care and handling of signs, final clean 1 up and covering of signs. 2
(B) Type A and B 3
(1) General 4
Attach the signs to supports in accordance with the contract or the approved shop 5 drawings. Make sure that the face of the sign is flat. Any appreciable buckling or 6 warping of the sign face will be cause for rejection of the entire sign. 7
(2) Ground Mounted 8
Erect ground mounted Type A and B secondary signs by the required method of 9 attachment shown in the contract. Affix these signs by bolting the horizontal 10 Z-stringers directly to the supports or by bolting vertical Z-bars to the horizontal 11 Z-stringers of the primary sign. 12
(3) Overheads 13
For new overhead supports, erect overhead secondary signs in accordance with the 14 approved shop drawings. 15
For existing overhead supports, design and furnish all new structural members and 16 mounting hardware necessary to erect the new signs. Prepare and submit to the 17 Engineer for approval complete shop drawings and design computations for the 18 bracing and accessory hardware required to attach the sign to the existing overhead 19 sign support. Prepare the design in accordance with AASHTO Structural Supports for 20 Highway Signs, Luminaires and Traffic Signals. Upon request, the Engineer will 21 provide the Contractor with copies of the shop drawings for existing overhead sign 22 supports. 23
Attach a new sign above a designated existing overhead sign in accordance with the 24 contract. Furnish all new structural members and mounting hardware necessary to 25 erect the new sign. 26
(C) Type D, E, F and Milemarkers 27
Attach the signs to U-channel or perforated square tube supports 28
(D) Overlay (Ground Mounted and Overhead) 29
Attach overlays to designated existing ground mounted or overhead signs as required by 30 the contract. 31
Remove and dispose of all conflicting demountable legends, borders and overlays before 32 attaching new overlays. Employ any method of removal necessary, provided it does not 33 damage the existing sign or the attached overlay. Perform such minor repairs to existing 34 signs as necessary before the attachment of overlays to ensure a finished sign face that is 35 completely flat. 36
Field-drill 5/32 inch holes in both the overlay and the existing sign simultaneously, 37 according to the rivet spacing requirements shown in the contract. Attach the proposed 38 overlays with 1/8 inch diameter aluminum rivets of the “pull-through” type. Exercise 39 sufficient care in attaching the overlays to ensure that the finished sign face is completely 40 flat and without any ripples and/or buckles. 41
(E) Reposition Overhead Signs 42
Reposition existing signs on existing overhead sign supports as required by the contract. 43 Reposition associated lighting systems and secondary signs along with the signs. 44

Section 904
9-16
When required, drill new holes in the existing vertical attachment members, in order to 1 maintain a minimum clearance of 17 feet to the roadway surface at the new location on 2 the structure. No other field drilling will be allowed. 3
Adjust and relocate conduit and junction boxes as required. 4
(F) Logo Trailblazer 5
All logos will be made available for pick up at the Division Traffic Services’ sign shop. 6 Erect logos on U-channel or perforated square tube supports in accordance with 7 Type F sign details shown in the contract. 8
(G) Logo to Panel 9
All logos will be made available for pick up at the Division Traffic Services’ sign shop. 10 Attach logos to the mainline signs with ten 1/8 inch diameter rivets of the pull through 11 type. Attach logos to the ramp signs with four 1/8 inch diameter rivets of the pull 12 through type. Drill 5/32 inch holes in the background signs to match those in the logos 13 for attaching the logos to the background signs. Place logos as shown on the contract. 14
(H) Relocation (Ground Mounted) Signs 15
Maintain signs in good serviceable condition throughout the duration of the project. 16 Repair any areas or materials within the project limits disturbed or damaged in 17 performance of the work required under this section as directed by the Engineer at no 18 cost to the Department. 19
Remove existing signs from their existing locations and relocate to their new location in 20 accordance with the contract. Repair or replace signs damaged in relocating at no cost to 21 the Department. Refer to Section 907 for disposal of sign components. 22
Erect signs and supports according to requirements of Sections 903 and 904. 23 Immediately relocate all warning and regulatory signs to new locations. Relocate all 24 other signs to new locations in no more than 12 hours. 25
904-4 MEASUREMENT AND PAYMENT 26
Sign Erections (Ground Mounted and Overhead) will be measured and paid as the actual 27 number of ground mounted and overhead signs erected and accepted. Each type F sign 28 assembly will be measured as one sign. 29
Sign Erection, Relocate Type ____ (Ground Mounted) will be measured and paid as the actual 30 number of signs acceptably relocated. Secondary signs will be incidental work in conjunction 31 with the primary sign. Sign assemblies consisting of more than one sign panel will be 32 considered one sign. 33
Payment will be made under: 34
Pay Item Pay Unit Sign Erection, Type ____ (Overhead) Each Sign Erection, Type ____ (Ground Mounted) Each Sign Erection, Type ____ Each Sign Erection, Milemarkers Each Sign Erection, Overlay (Overhead) Each Sign Erection, Overlay (Ground Mounted) Each Sign Erection, Reposition Overhead Each Sign Erection, Logo to Panel Each Sign Erection, Logo Trailblazer Each Sign Erection, Relocate Type ____ (Ground Mounted) Each
Section 906
9-17
SECTION 906 1 OVERHEAD SIGN STRUCTURE 2
906-1 DESCRIPTION 3
Design, fabricate, furnish and erect various types of overhead sign assemblies. Fabricate 4 supporting structures using tubular members of either aluminum or steel. The types of 5 overhead sign assemblies included in this specification are span structures, cantilever 6 structures and sign structures attached to bridges. 7
906-2 MATERIALS 8
Refer to Division 10. 9
Item Section Structural Steel 1072 Overhead Sign Structures 1096 Signing Materials 1092 Organic Zinc Repair Paint 1080-7 Reinforcing Steel 1070 Direct Tension Indicators 440 and 1072-5
906-3 CONSTRUCTION METHODS 10
(A) General 11
Fabricate overhead sign assemblies in accordance with the details shown in the approved 12 working drawings and the requirements of these specifications. 13
No welding, cutting or drilling will be permitted in the field, unless approved by the 14 Engineer. 15
Drill bolt holes and slots to finished size. Holes may also be punched to finish size, 16 provided the diameter of the punched holes is at least twice the thickness of the metal 17 being punched. Flame cutting of bolt holes and slots is not permitted. 18
Erect sign panels in accordance with the requirement for Type A or B signs as indicated 19 in the plans or Roadway Standard Drawings. Field drill two holes per connection in the 20 Z bars for attaching signs to overhead structures. Provide two U-bolts at each U-bolt 21 connection such as each truss chord to sign hanger and each truss chord to walkway 22 support or light support. Provide two U-bolts at each U-bolt connection where ends of 23 truss chords are supported. The minimum diameter of all U-bolts is 1/2 inch. 24
For all U-bolt connections of hanger beams to overhead assembly truss chords, provide 25 all U-bolts with a flat washer and double nuts at each end of the U-bolts. All double nuts 26 that are on any U-bolt shall be the same thickness and weight. When assembled, the 27 double nuts shall be brought tight against each other by the use of two wrenches. 28
Use two coats of a zinc-rich paint to touch up minor scars on all galvanized materials. 29
For high strength bolted connections, use direct tension indicators. When galvanized 30 high strength bolts are required, use bolts, nuts and washers meeting Subarticle 1072-31 5(F). 32
(B) Shop Drawings 33
Design the overhead sign supports, including foundations, prior to fabrication. Submit 34 design calculations and working drawings of the designs to the Engineer for review and 35 acceptance. 36
Have a professional engineer registered in the State of North Carolina, perform the 37 computations and render a set of sealed, signed and dated drawings detailing the 38 construction of each structure. 39

Section 906
9-18
Submit to the Engineer for review and acceptance complete design and fabrication details 1 for each overhead sign assembly, including foundations and brackets for supporting the 2 signs and maintenance walkways, if applicable, electrical control boxes, and lighting 3 luminaires. Base design upon the revised structure line drawings, wind load area and the 4 winds speed shown in the plans, and in accordance with the AASHTO Standard 5 Specifications for Structural Structures for Highway Signs, Luminaires and Traffic 6 Signals, 6th Edition, 2013 and 2015 Interim Revisions. 7
Submit electronic (.pdf) copies of completely detailed working drawings and the design 8 calculations including all design assumptions for each overhead sign assembly to the 9 Engineer for approval prior to fabrication. Working drawings shall include complete 10 design and fabrication details, including foundations, provisions for attaching signs, 11 maintenance walkways, when applicable, lighting luminaires to supporting structures, 12 applicable material specifications, and any other information necessary for procuring and 13 replacing any part of the complete overhead sign assembly. 14
Allow 40 days for initial working drawing review after the Engineer receives them. If 15 revisions to working drawings are required, an additional 40 days shall be required for 16 review and approval of the final working drawings. 17
Approval of working drawings by the Engineer shall not relieve the Contractor of 18 responsibility for the correctness of the drawings, or for the fit of all shop and field 19 connections and anchors. 20
(C) Design and Fabrication 21
(1) The following criteria govern the design of overhead sign assemblies: 22
Design shall be in accordance with the AASHTO Standard Specifications for 23 Structural Structures for Highway Signs, Luminaires and Traffic Signals, 6th 24 Edition, 2013 and 2015 Interim Revisions. 25
There are several design criteria that are specified. They include: 26
(a) Overhead cantilever sign structures shall include galloping loads (exclude four-27 chord horizontal trusses) 28
(b) The Yearly Mean Velocity, Vmean, in North Carolina shall be assumed to be 11.6 29 mph. 30
(c) The Fatigue Importance Category used in the design, for each type of structure, 31 shall be for: 32
(i) Cantilevered structures with span greater than 50 feet - Fatigue Importance 33 Category I. 34
(ii) Cantilevered structures with span less than or equal to 50 feet - Fatigue 35 Importance Category II. 36
(iii) Non-Cantilevered structures – Fatigue Importance Category II. 37
(2) The following interpretations or criteria shall be used in the design of overhead sign 38 assemblies: 39
(a) For design of supporting upright posts or columns, the effective length factor for 40 columns “K”, as provided for in Appendix B, Section B.5 of the AASHTO 41 Standard Specifications for Structural Structures for Highway Signs, Luminaires 42 and Traffic Signals, 6th Edition, 2013 and 2015 Interim Revisions, shall be 43 taken as the following, unless otherwise approved by the Engineer: 44
(i) Case 1: For a single upright post of cantilever or span type overhead sign 45 structure, the effective column length factor, “K”, shall be taken as 2.0. 46

Section 906
9-19
(ii) Case 2: For twin post truss-type upright post with the post connected to one 1 chord of a horizontal truss, the effective column length factor for that column 2 shall be taken as 2.0. 3
(iii) Case 3: For twin post truss-type upright post with the post connected to two 4 truss chords of a horizontal tri-chord or box truss, the effective column length 5 factor for that column shall be taken as 1.65. 6
(b) For twin post truss-type uprights, the unbraced length of the post shall be from the 7 chord to post connection to the top of base plate. 8
(c) For twin post truss-type uprights, when the post is subject to axial compression, 9 bending moment, shear, and torsion, the post shall satisfy the AASHTO Standard 10 Specifications for Structural Structures for Highway Signs, Luminaires and Traffic 11 Signals, 6th Edition, 2013 and 2015 Interim Revisions Equations 5.12.2.1-1, 12 5.12.2.1-2 and 5.12.2.1-5. To reduce the effects of secondary bending, in lieu of 13 Equation 5.12.2.1-2, the following equation may be used: 14
15
Where = Computed axial compression stress at base of post 16
(d) The base plate thickness for all uprights and poles shall be a minimum of 2 inches 17 but not less than that determined by the following criteria and design: 18
(i) Case 1: Circular or rectangular solid base plates with the upright pole welded to 19 the top surface of the base plate with full penetration butt weld, and where no 20 stiffeners are provided. A base plate with a small center hole, which is less than 21 1/5 of the upright diameter, and located concentrically with the upright pole, 22 may be considered as a solid base plate. 23
The magnitude of bending moment in the base plate, induced by the anchoring 24 force of each anchor bolt shall be calculated as 25
M = (PxD1)/2. 26
(ii) Case 2: Circular or rectangular base plate with the upright pole socketed into 27 and attached to the base plate with two lines of fillet weld, and where no 28 stiffeners are provided, or any base plate with a center hole that is larger in 29 diameter than 1/5 of the upright diameter. The magnitude of bending moment 30 induced by the anchoring force of each anchor bolt shall be calculated as 31
M = P x D2 Where:
M = Bending moment at the critical section of the base plate induced by one anchor bolt
P = Anchoring force of each bolt D1 = Horizontal distance between the center of the
anchor bolt and the outer face of the upright, or the difference between the radius of the bolt circle and the radius of the upright
D2 = Horizontal distance between the face of the upright and the face of the anchor bolt nut
(e) The critical section shall be located at the face of the anchor bolt and perpendicular 32 to the radius of the bolt circle. The overlapped part of two adjacent critical sections 33 shall be considered ineffective. 34

Section 906
9-20
(f) The thickness of Case 1 base plate shall not be less than the calculated based on 1 formula for Case 2. 2
(g) Uprights, foundations, and trusses that support overhead signs shall be designed in 3 accordance with the contract for the effects of torsion. Torsion shall be considered 4 from dead load eccentricity of these attachments, as well as for the attachments such 5 as supporting brackets, lights, etc., that add to the torsion in the assembly. Truss 6 vertical and horizontal truss diagonals in particular and any other assembly members 7 shall be appropriately sized for these loads. 8
(h) Uprights, foundations, and trusses that support overhead mounted signs shall be 9 designed for the proposed sign wind area as noted in the contract drawings. Truss 10 vertical and horizontal truss diagonals in particular and any other assembly members 11 shall be appropriately sized for these loads. 12
For non-cantilevered monotube sign support structures, Table 906-1 and Figure 906-1 are 13 considered as a required addition to the AASHTO Standard Specifications for Structural 14 Structures for Highway Signs, Luminaires and Traffic Signals, 6th Edition, 2013 and 2015 15 Interim Revisions: 16
TABLE 906-1
NON-CANTILEVERED MONOTUBE SIGN SUPPORT STRUCTURES
Construction Detail Stress Category
Application Example
Mechanically Fastened
Connections
25. Bolts in tension D
Beam column connection for
monotube structures 16
Fillet-Welded Connections
26. Fillet weld with one side normal to the applied stress
E’ Beam column connection for
monotube structures 16
Mechanically Fastened
Connections
27. High-Strength bolts in
tension D Monotube or truss-
chord splice 17
Fillet-Welded Connections
28. Fillet weld with one side normal to the applied stress
E’ Monotube or truss-chord splice 17
Mechanically Fastened
Connections
29. U-bolts tied to the transverse truss column to keep the chords
in place
D Horizontal truss
connection with the vertical truss
18
Mechanically Fastened
Connections
30. Net section of full-tightened,
high-tension bolts in shear
B Truss-bolted joint 18
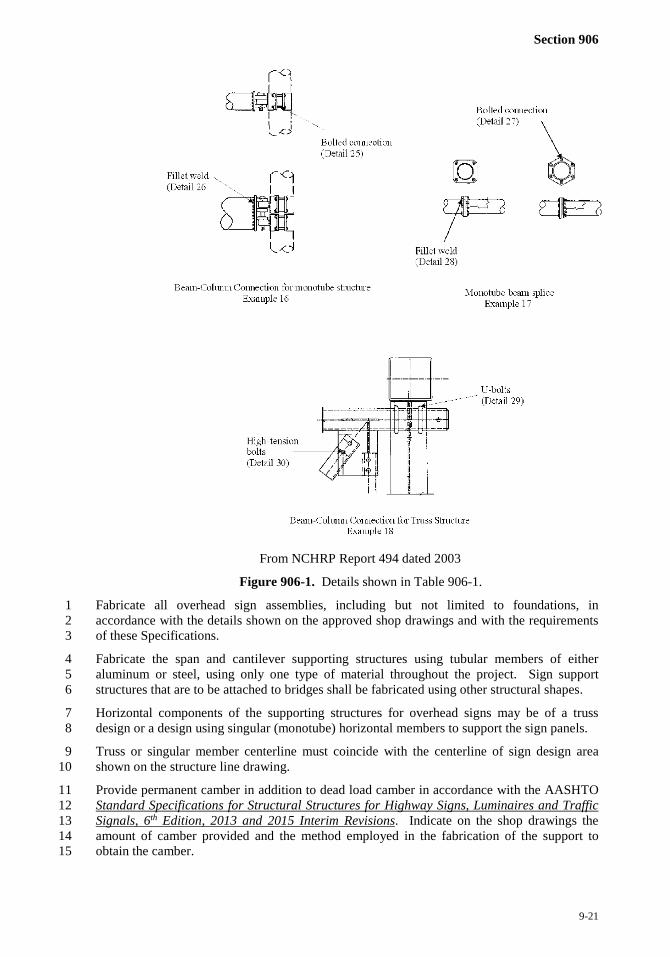
Section 906
9-21
From NCHRP Report 494 dated 2003
Figure 906-1. Details shown in Table 906-1.
Fabricate all overhead sign assemblies, including but not limited to foundations, in 1 accordance with the details shown on the approved shop drawings and with the requirements 2 of these Specifications. 3
Fabricate the span and cantilever supporting structures using tubular members of either 4 aluminum or steel, using only one type of material throughout the project. Sign support 5 structures that are to be attached to bridges shall be fabricated using other structural shapes. 6
Horizontal components of the supporting structures for overhead signs may be of a truss 7 design or a design using singular (monotube) horizontal members to support the sign panels. 8
Truss or singular member centerline must coincide with the centerline of sign design area 9 shown on the structure line drawing. 10
Provide permanent camber in addition to dead load camber in accordance with the AASHTO 11 Standard Specifications for Structural Structures for Highway Signs, Luminaires and Traffic 12 Signals, 6th Edition, 2013 and 2015 Interim Revisions. Indicate on the shop drawings the 13 amount of camber provided and the method employed in the fabrication of the support to 14 obtain the camber. 15

Section 907
9-22
Use cantilever sign structures that meet the following design criteria: 1
(A) Do not exceed an L/150 vertical dead load deflection at the end of the arm due to 2 distortions in the arm and vertical support, where L is the length of the arm from the 3 center of the vertical support to the outer edge of the sign. 4
(B) Do not exceed an L/40 horizontal deflection at the end of the arm due to distortions in the 5 arm and vertical support, as a result of design wind load. 6
Fabricate attachment assemblies for mounting signs in a manner that allows easy removal of 7 sign panels for repair. 8
906-4 MEASUREMENT AND PAYMENT 9
Supports, Overhead Sign Structure @ Sta____ will be paid for at the contract lump sum for 10 each structure. Such price will be full compensation for design, fabrication, construction, 11 transportation, erection of the complete overhead sign structure, supporting structure 12 hardware, lighting support brackets, preparing and furnishing shop drawings, and attaching 13 the signs to the overhead assembly. 14
Payment will be made under: 15
Pay Item Pay Unit Supports, Overhead Sign Structure at Sta. __ _____ Lump Sum
SECTION 907 16 DISPOSAL AND STOCKPILING OF SIGNING COMPONENTS 17
907-1 DESCRIPTION 18
Properly dispose of or stockpile signing components. 19
907-2 CONSTRUCTION METHODS 20
(A) General 21
Repair any areas or materials within the project limits disturbed or damaged in 22 performance of the work required under this section as directed by the Engineer. 23
(B) Removal 24
Do not remove existing signing components until required replacements have been 25 erected and are available for use by traffic or are available for immediate replacement. 26
Remove signing components by methods that will not damage other portions of the 27 project or facility. Repair any damage by methods satisfactory to the Engineer. 28
Cut and remove electrical conduit to at least 18 inches below finished ground elevation. 29 Plug or seal the ends of the cut conduit by methods approved by the Engineer. 30
Remove foundations, including any reinforced steel or anchor bolts, to a minimum depth 31 of 2 feet below the finished ground elevation unless otherwise indicated by the contract. 32
Promptly backfill and compact areas disturbed by removal of foundations with suitable 33 materials and match the finished ground elevation. Seed disturbed areas in accordance 34 with Section 1661. 35
(C) Disposal 36
All materials to be removed and disposed of will become the property of the Contractor. 37 Promptly transport the materials from the project after they have been removed unless 38 otherwise permitted by the Engineer. 39
Promptly dispose of the concrete, reinforcing steel and anchor bolts from the project. 40

Section 907
9-23
(D) Stockpile 1
Before stockpiling, remove signs from supports. The Department maintains ownership of 2 all materials to be stockpiled. Transport and stockpile designated items to locations 3 approved by the Engineer. Sort and stockpile all materials neatly in stacks or storage 4 bins. Repair or replace materials damaged in removal or while in storage. 5
907-3 MEASUREMENT AND PAYMENT 6
Disposal of ____ and Stockpile ____ will be measured and paid as the actual number of 7 signing components acceptably disposed or stockpiled. Removal is incidental to stockpiling 8 and disposal. Secondary signs will be incidental work in conjunction with the primary sign. 9 Sign assemblies consisting of more than one sign panel will be considered one sign. 10 Overhead sign systems include signs, supports, walkways and all electrical components. Sign 11 systems include signs, supports and foundations. Supports include any foundations. 12
Repair or replacement of any materials or areas within the project limits disturbed or damaged 13 in performance of the work required under this section will be at no cost to the Department. 14
Payment will be made under: 15
Pay Item Pay Unit Disposal of Sign System, Overhead Each Disposal of Sign System, Steel Beam Each Disposal of Sign System, U-Channel Each Disposal of Sign System, Wood Each Disposal of Sign, A and B, (Ground Mounted) Each Disposal of Sign, A or B, (Overhead) Each Disposal of Sign, D, E or F Each Disposal of Sign, Milemarker Each Disposal of Sign, Overlay (Overhead) Each Disposal of Sign, Overlay (Ground Mounted) Each Disposal of Support, Overhead Structure Each Disposal of Support, Steel Beam Each Disposal of Support, U-Channel Each Disposal of Support, Wood Each Disposal of Lighting System Each Disposal of Lighting Fixtures Each Disposal of Walkway Each Stockpile Sign System, Overhead Each Stockpile Sign System, Steel Beam Each Stockpile Sign System, U-Channel Each Stockpile Sign System, Wood Each Stockpile Sign, A or B, (Overhead) Each Stockpile Sign, A and B, (Ground Mounted) Each Stockpile Sign, D, E or F Each Stockpile Sign, Milemarker Each Stockpile Support, Overhead Structure Each Stockpile Support, Steel Beam Each Stockpile Support, U-Channel Each Stockpile Support, Wood Each Stockpile Lighting System Each Stockpile Lighting Fixtures Each Stockpile Walkway Each