standards report cards manual 2008 - otis open source ... · pdf filestandards report card 1...
TRANSCRIPT

Standards Based
Report Card
Manual


Version 2008.1.1
This manual created by
Custom Computer Specialists, Inc.
70 Suffolk Court
Hauppauge, NY 11788
www.customonline.com
Copyright © 2006
Custom Computer Specialists, Inc.
All rights reserved

Infinite Campus and Custom Computer Specialists, Inc.
About Infinite Campus Infinite Campus is the nation’s most advanced Education Process Management System
(EPM), powered locally by Custom Computer Specialists, Inc. Infinite Campus is more
dynamic than traditional Student Information Systems, combining the features of
multiple data management programs into a single, integrated application.
Infinite Campus is the result of more than 10 years of market research, product
development and real-world experience. Designed from the ground up to be completely
web-based, district-wide, and fully integrated, Infinite Campus has set a new standard for
education process management solutions.
Infinite Campus uses a single district-wide data warehouse. Its robust Relational
Database Management System (RDBMS) provides shared information across the district
in real time without having to perform tedious import/export procedures. Since the
information is being shared throughout the district common data elements such as student
demographic and enrollment information only need to be entered once, thereby
improving data accuracy.
About Custom Computer Specialists, Inc. Headquartered in Hauppauge, NY, Custom Computer Specialists, Inc., is the leading
privately held Long Island based technology solution provider. Celebrating its 27th year
in business, Custom delivers a wide array of technology services including: project
management, on-site staffing and outsourcing, networking and wireless solutions,
desktop installation, service and support, professional development and product sales and
procurement. Custom has been the recipient of a host of recent industry awards and
recognition including Top 200 Private New York Metro Companies (Crain’s NY
Business), #1 Technical Consultant (LIBN) and a prominent ranking on the
VARBusiness 500.

Table of Contents i
Table of Contents
STANDARDS REPORT CARD 1
SET UP SCORE GROUP 2
SET UP STANDARDS 3
STEPS TO ACTIVATE THE STANDARDS 5
ADDING THE STANDARDS TO COURSES (GRADES) 6
SET UP GRADING COMMENTS 8
SET UP BASIC STANDARDS REPORT CARD 10 Rolling Forward the Report Card to Next Calendar Year .....................................13
GRADE STUDENTS AND RUN REPORT CARDS 14 Activating the Grading Tasks ................................................................................14
Activate Canned Comments (Teacher Task) .........................................................16
Entering Grades (Teacher Task) ............................................................................16
Editing Grades when Grading Window is Closed .................................................17
Print Report Cards..................................................................................................18
GETTING HELP IN THE INFINITE CAMPUS SYSTEM 20 Description.............................................................................................................20
Context Sensitive Help ..........................................................................................20
Search Tab Help Option.........................................................................................21
REFERENCES 23


Standards Report Card 1
STANDARDS REPORT CARD
Description Standards based report cards can be created in Infinite Campus. These types of report
cards allow teachers to report on student abilities and progress towards achieving these
standards rather than subject grades (i.e., Participates in class, Understands Math
concepts).
Target Audience This manual is intended for District and School administrators who determine the
standards requirements for grades.
Objective The purpose of this manual is to assist administrators in creating and maintaining
Standards Based Report Cards.
Vocabulary
Active Mask – Grading Tasks must be ‘activated’ in order for the teachers to post grades.
Usually they will be activated for a short time, and then deactivated. This will prevent the
teachers from changing the grades after the report cards have been printed.
Grading Comments – This is a list of pre-determined comments that can be added to the
report card. They are set up at a School Level.
Score Group – The Score Group is used to create the list of grades to be posted to each
standard (i.e., 4 – Exceeds Standards, 3 – Meets Standards). The Score Group is set up at
a District Level.
Standards – These are the abilities/goals that the student is graded on (i.e., Verbally
expresses ideas clearly, Participates in Math class). The standards are set up at a District
Level.
Standards Bank – In Infinite Campus all Standards are created and stored in the
Standards Bank

2 Set Up Score Group
SET UP SCORE GROUP
Description The Score Group is used to create the list of grades to be posted to each standard (i.e., 4 –
Exceeds Standards, 3 – Meets Standards). The Score Group is set up at a District Level.
1. Navigate to: Grading & Standards > Score Group/List.
2. Click on the <New> button.
3. Type the Name of the Score Group. It is recommended to use names that define
the type of grades being calculated (i.e., Standards, Effort).
4. Type the Name of the first score – this will display for the teacher when grading,
and can print on the report card in a Legend box (i.e., Exceeds Standards, Needs
Improvement). This field has a 30 character limit.
5. Type the Score – the score that will print on the report card (i.e., 1, 2, 3, 4).
6. Type the Sequence – this will determine the order that the scores display.
7. Leave all the other fields blank.
8. Click on the <Add ScoreListItem> button to add another score item.
9. Click on the <Save> button.
If a score group needs to be removed, click on the delete button (�) to the left of the
score group name, and it will be deleted when the changes are saved.

Set up Standards 3
SET UP STANDARDS
Description Standards are the abilities/goals that the students are graded on. They must be set up
under a group (or Parent) heading (i.e., Reading, Mathematics, Work Habits). They will
print on the report card under that group name. A district can choose to create Major (or
Grandparent) groups as well. When the Campus report card is printed, only the highest
group (or grandparent, great-grandparent) will print in a highlighted box.
1. Navigate to: Grading & Standards > Standards Bank.
2. Click on the <New Group> button.
3. Type the Name of the group. This name will display on the report card as the
Header for the group. The groups will display on the report card in alphabetical
order. This can be controlled by typing a number before the name. In addition, in
order to separate out the Groups by Grade Level, it is recommended to input the
Grade Level as well.
4. Choose the Scoring Rubric from the dropdown list. This list will display all the
Score Groups set up. All the Standards attached to this Group will use the same
Scoring Rubric. Therefore, if different Scoring Rubrics need to be used within
the same group, it is recommended to create a ‘child’ group (or sub-group) using
the different Scoring Rubric.
5. If creating a ‘child’ group (or sub-group), choose the Parent Group from the
dropdown box.
6. Enter Comments or Description if needed.
7. Click on the <Save> button.
8. Repeat for all groups.

4 Set Up Standards
9. To add the standards, click on the <New Standard> button.
10. Type in the Name of the standard (75 character limit). Standards can only be
entered in the system once, so if it needs to be included in under several parents
(i.e., Participates in class), the name can be changed subtly to create different
standards. (i.e., Participates in Math class, Participates in Science class). If the
standard is needed in different grades, see the Special Note below for suggestions.
11. Type in the Seq of the standard. This will determine the order that the Standards
display for the teacher when grading and the order they will print on the report
card under their parent group.
12. Choose the Parent Group/Standard from the dropdown list. The Standards will
print on the report card in order within the Parent Group selected (if Seq was not
entered, the standards will print in alphabetical order).
13. Enter Comments or Description if needed.
14. Click on the <Save> button.
15. Repeat for all standards.
���� Special Note: It is recommended to control the parent groups and standards by inputting the
grade, the group number, and the sequence number in brackets before the
name. This will allow for the same standard name to be used several times
(i.e., [1-1-3] Works well with others, [1-2-15] Works well with others).
This recommendation will ease use when assigning standards to Grading Tasks
and printing on the Standards Report Card.
If using a custom report card, the grade in brackets can be easily removed by
the programmers.

Activate the Standards 5
STEPS TO ACTIVATE THE STANDARDS
Description Standards must be activated in order to be attached to a course. All the School Standards
set up for the district will display (in addition to the High School Credit Groups).
1. Choose the Year and School needed on the top bar.
2. Navigate to: System Administration >Resources > Resources.
3. Click on the School Standards tab.
4. Click on all the Standard Groups (parents or grandparents) you created to place a
check on them.
5. Click on the <Save> button. Repeat for all schools needed.

6 Adding Standards to Courses
ADDING THE STANDARDS TO COURSES (GRADES)
Description The Standards must be added to each course they will be used for. In most Elementary
schools, the courses are set up as their grade level (i.e., 01 = Grade 1, 02 = Grade 2). In
addition to adding the standards to the course, the Homeroom checkbox must be checked
in order for the teacher’s name to display on the report card.
1. Navigate to: Scheduling > Courses. Choose the Course (grade level)
2. On the Course tab, click on the Homeroom checkbox. This will display the
teacher’s name from this class on the report card. Then, click on the <Save>
button.
3. On the Standards tab, add all the Standards needed for the report card.
a. Click on the <New> button.
b. Choose the Standard from the list.
c. Check each term the grading task will be needed in the Term Mask
section. Usually Standards have all terms checked off.
d. Check the term to activate the grading task in the Active Mask section.
When the term is active, the teachers can post the grades for that task.
Although the Grading Task can be activated (or deactivated) on each
course individually by checking the box here, the Active Masks are
usually controlled en-masse by using the wizard in Grading & Standards
> Grading Window.

7 Adding the Standards to Courses
e. Click on the <Save> button. Repeat for all Standards.

8 Set up Grading Comments
SET UP GRADING COMMENTS
Description Grading comments can be set up at a School Level and used by all teachers in that school.
They are used to keep comments consistent throughout the school.
1. Navigate to: System Administration > Grading & Standards > Grading
Comments.
2. Select the school on the top bar.
3. Click on the <New> button.
4. Type the Comment – maximum of 200 characters.
5. Code – type in the code if used by the district. The Code allows the teacher to
choose comments by typing in the codes needed instead of choosing from a list.
6. Click on the <Save> button.
7. Once saved, the comments will display in the top section in alphabetical order
(regardless of the Code entered). Repeat for all comments needed.

Set up Grading Comments 9
���� Special Note: 1. These comments can be ‘spell checked’ by pressing <CTRL>-
<SHIFT>-<L>.
2. Many districts need the comments to display ordered by type (i.e.,
positive, negative, improved, behavior). This can be achieved by
putting a ‘code’ in front of the actual comment (i.e., 1.1, 1.2, 1.3, 2.1,
2.2). These ‘codes’ can be edited out of a custom report card but not
the “canned” report cards.
3. Many teachers will choose more than one comment to display on the
report card. In order to separate them, it is recommended to put a
period after each comment. If the district is using a custom report
card, there will be a character limit on the comments entered. If the
district is using a Campus report card, there is no limit on the
comments.

10 Set up Basic Standards Report Card
SET UP BASIC STANDARDS REPORT CARD
Description A basic report card consists of Standards for the quarters needed. Comments can be
added by quarter or for all quarters.
The following must be set up before configuring the grades to print to the report card and
transcript correctly:
• Score Group (see page 2)
• Standards (see page 3)
• Activate the Standards (see page 5)
• Adding Standards to Courses (see page 6)
• Grading Comments, if needed (see page 8)
Report cards must be created before they can be used. While many districts choose to
have a customized report card created for them, most still need to create a standard report
card using the options provided by Campus so “canned” report cards can be printed any
time during the year for parent meetings.
1. Navigate to: System Administration > Preferences > Reports.
2. Click on the <New> button.
3. Type in the report Name (i.e., Grade 1 Report Card, Second Grade Report Card).
4. Choose Report Card from the Type list.
5. Click on the Publish to Portal checkbox if this card should display on the Parent
Portal. Grades will display on the portal as soon as they are posted.
6. Type in a Description if needed.
7. Report Type – Click on the Standard Based Report Card button.
8. Page Layout – Click on the layout needed – Portrait or Landscape .

Set up Basic Standards Report Card 11
9. Display Options –
a. Automatically displays the Attendance Summary by Daily Exact Term
which will print attendance by days on the report card.
b. Cumulative GPA, Class Rank, and Term GPA – Not used for Standards
Based report cards.
c. Student ID, Counselor, and Period – The Student ID is automatically
checked for Standards Based report cards. Click on the Counselor and
Period (the period of the courses) to print them on the report card.
d. Score Comments – Click on the checkbox to print the Score Comments on
the report card. Click on the Terms to print – for all terms, click on all
boxes.

12 Set up Basic Standards Report Card
e. School Comments (printed on all) – Comments entered here will print on
all report cards.
10. Grading Tasks – All the standards as well as the district’s grading tasks will
display. Choose the standards to print on the report card. More than one can be
chosen by using the <CTRL> or <SHIFT> keys. You might need to use the
scroll bar to scroll down to choose all the standards needed.
11. Score Group – All the score groups for the district display. Choose the score
group(s) to print on the report card. More than one can be chosen by using the
<CTRL> or <SHIFT> keys. You might need to use the scroll bar to scroll down
to choose all the score groups needed.
12. Click on the <Save> button. Repeat for all report cards needed.

Set up Basic Standards Report Card 13
Rolling Forward the Report Card to Next Calendar Year
Report cards are created in the current school calendar year. If the report cards are
needed in the next year, they must be ‘rolled forward’ to each year as it is created.
1. Select the Year and School where the reports are currently running.
2. Navigate to: System Administration > Preferences > Reports Roll Forward.
3. Select Source Reports – choose the report(s) needed. More than one can be chosen
by using the <CTRL> or <SHIFT> keys.
4. Select A Target Calendar – choose the next calendar year (this can only be chosen
after the calendar year has been created).
5. Click on the <RUN> button.
6. The system will display the results.
14 Grade Students and Generate Reports
GRADE STUDENTS AND RUN REPORT CARDS
Description Prior to running the report cards, the grading tasks must be activated, and the teachers
must post grades to the students.
Activating the Grading Tasks
In order for the tasks to be active and allow grades to be entered, the Active Mask
checkboxes in the Grading Tasks must be turned on. They are generally turned on by the
Wizard (although they can be turned on or off for a specific course using the Grading
Task tab on the Course).
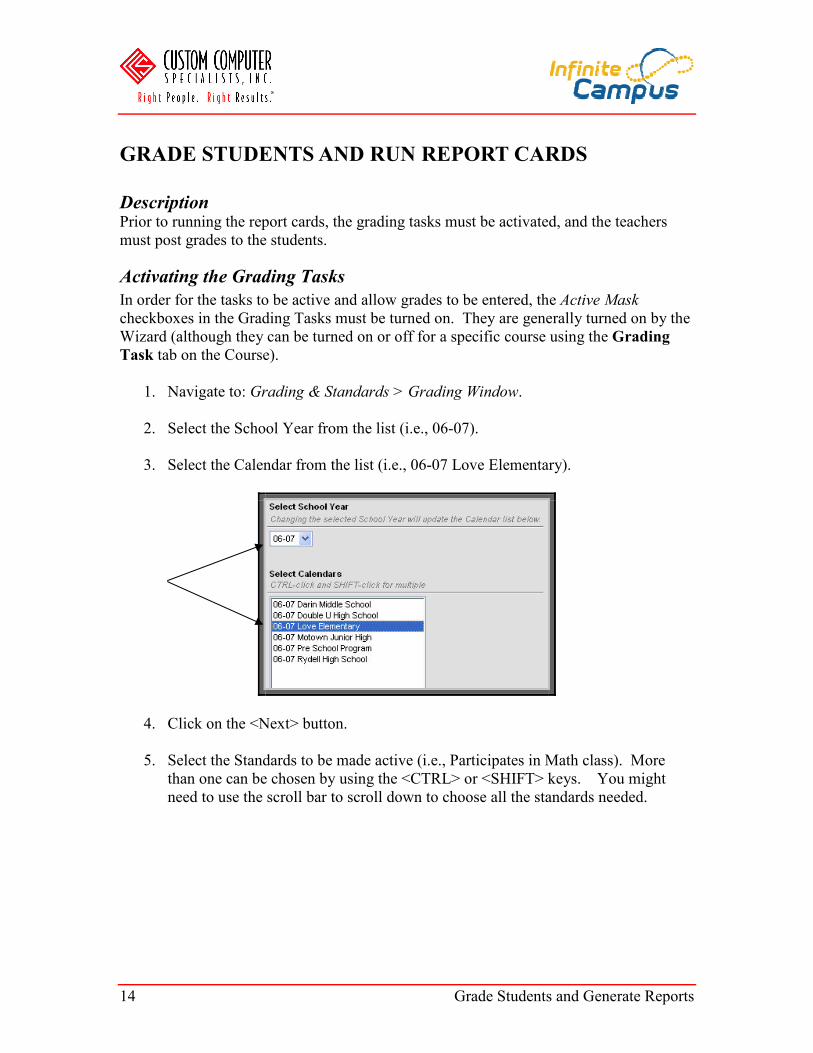
1. Navigate to: Grading & Standards > Grading Window.
2. Select the School Year from the list (i.e., 06-07).
3. Select the Calendar from the list (i.e., 06-07 Love Elementary).
4. Click on the <Next> button.
5. Select the Standards to be made active (i.e., Participates in Math class). More
than one can be chosen by using the <CTRL> or <SHIFT> keys. You might
need to use the scroll bar to scroll down to choose all the standards needed.

Grade Students and Generate Reports 15
6. Click on the <Next> button.
7. Choose the Term(s) you want to be made active (i.e., Term 1 for quarter 1, Term
2 for quarter 2).
8. Click on the <Update Active Masks> button.
All the courses will have the term chosen active for the Standards.
���� Special Note: The Active Masks should be turned off when the grading period has
been completed, before the report cards are printed. This will prevent
the teacher from changing the grade after the report cards have been
mailed out.
You will turn them off by completing all the steps above, but leaving
all the Terms unchecked in step 7.

16 Grade Students and Generate Reports
Activate Canned Comments (Teacher Task)
In order for the teachers to be able to use the comments entered by the administrators,
they must activate them. This is only done once (for each course/section needed) and
will remain in the teacher’s preferences until turned off.
1. Choose the correct section from the list (on the top toolbar). Only teachers
assigned to teach the section will be able change these preferences.
2. Navigate to: Instruction > Admin > Preferences.
3. Click on the Use Canned Comments checkbox.
4. Click on the <Save> button.
5. Repeat all steps for each Course-Section needed.
Entering Grades (Teacher Task)
1. Choose the correct section from the list (on the top toolbar).
2. Navigate to: Instruction > Grading by Student. Grades can be entered using
Grading by Task as well.
3. Select the student to be graded. If the task that has NOT been activated, the term
will display but grades cannot be entered.
4. Choose the correct Score for each student from the list. The grades appearing in
the list are all the grade descriptions entered in the Score Group (i.e., Exceeds
Standards, Meets Standards [see page 2]). The grade (i.e., 1, 2, 3, 4) for the score
will display on the report card.

Grade Students and Generate Reports 17
5. Click on the notepad icon ( ) to choose comments from the Canned Comments
list. More than one comment may be chosen. The teacher can enter customized
comments in the Comments field in place of (or in addition to) the canned
comments. These comments can be ‘spell checked’ by pressing <CTRL>-
<SHIFT>-<L>.
6. Click on the <Save> button.
Editing Grades when Grading Window is Closed
Occasionally, administrators will need to edit grades after the grading window is closed.
This can be accomplished in the Course/Section, Grading by Task or Grading by
Student tab.
1. Navigate to: Scheduling > Courses.
2. Choose the course/section to be edited.
3. Click on the Grading by Task or Grading by Student tab.
4. Choose either the task to be changed (i.e., the standard), or the student to be
changed.
5. Choose the correct Score from the list.
6. Click on the notepad icon ( ) to choose comments from the Canned Comments
list. More than one comment may be chosen. Customized comments can be
entered in the Comments field in place of (or in addition to) the canned comments.
These comments can be ‘spell checked’ by pressing <CTRL>-<SHIFT>-<L>.
7. Click on the <Save> button.
Previous term
grades display
as the grade.
Current grade
displays as the
grade description.

18 Grade Students and Generate Reports
Print Report Cards
Report cards can be printed for a batch of students or for an individual student.
Print report cards for a batch of students:
1. Navigate to: Grading & Standards > Reports > Report Card.
2. Report Options – choose the report card to print from the list. All the report cards
created for the school will display on the list. Choosing Display Options will
allow the user to create a report card for this one time only. The choices are the
same as creating a standard report card, (see page 10).
3. Ad Hoc Filter or Grade – choose an Ad Hoc filter or a grade to limit the number
of students’ report cards printing. This is a very complex report so it is suggested
to limit the number of students printing in a batch. However, All Students for the
school can be chosen as well.
4. Active Only – click on this checkbox to choose only active students’ cards.
5. Effective Date – enter the effective date of the report cards.
6. Sort Options – choose the sort option needed (Alpha, Grade/Alpha, Zip, Teacher).
7. Click the <Generate Report> button.
The report cards for all students selected will display in Adobe Acrobat format. They can
be saved or printed, but not edited.

Grade Students and Generate Reports 19
Print report cards for a single student:
1. Navigate to: Student Information > General.
2. Click on the Grades Tab.
3. Choose a Report Card Format – choose a report card from the list.
The report card for the individual student will display in Adobe Acrobat format. It can be
saved or printed, but not edited.
Sample Report Card

20 Help
GETTING HELP IN THE INFINITE CAMPUS SYSTEM
Description
Infinite Campus help articles are provided to give users a basic understanding of the
module or tab that they are viewing and what steps need to be done to modify that
information.
Infinite Campus has provided articles for all parts of the Campus product. Districts also
have the opportunity to enter their own help article text.
Many areas of the help have a Related Links section that allows users to access a PDF
Quick Reference document that they can save or print out for future use. Most articles
provided by Infinite Campus have a sentence or two describing the area in the product
and then detailed steps about additional features of that area. These steps are listed in the
Related Articles area of the Help tab.
Context Sensitive Help
1. To access Infinite Campus context sensitive help - From the Index, navigate to
the area where you need help. If you want more information on enrollments for
example, navigate to Student Information > General > Search. Search for a
student then click on the Enrollments tab.
2. Click on the Help tab. The help tab is the last tab available on the left hand side,
next to Index and Search. The Enrollments help articles and links will appear
under the Help tab on the left side of your screen.

Help 21
Search Tab Help Option
There are two ways to search for Help, using the ‘Quick Search’ and ‘Advanced
Search’.
1. To search for help articles, click the Search tab on the left-hand side of the
screen.
2. Select the Help option from the dropdown list.
3. Quick Search – Enter a keyword that you want to search by. If the search field is
left blank all help articles available will be returned.

22 Help
Advanced Search – Click on the <Advanced Search> button. The advanced search
options will display in the box on the right. Search for the item needed using the options:
1. Search – choose the Help option from the dropdown list:
a. All of Help – searches for all articles (default)
b. Help Articles – searches for Infinite Campus help articles
c. Documentation/Tutorials – searches for articles that have ‘documents’ or
‘tutorials’ attached
d. Custom Articles – searches for articles marked as ‘custom’
2. For – searches for the module help is required for (i.e., Gradebook, Attendance
Letters).
3. Start Date – searches for Help documentation created or modified after this date.
4. End Date – searches for Help documentation created or modified before this date.
The help articles for some features are not available through context sensitive help,
and can only be accessed using the Search tab option.

References 23
REFERENCES
For more information about Standards Based Report Cards in Infinite Campus refer to the
following Quick Reference Guides.
Quick Reference: Grading & Standards – Score Group
Quick Reference: Grading & Standards – Standards Bank
Quick Reference: System Admin – Resources – Resources – School Standards
Quick Reference: Scheduling – Course Standards
Quick Reference: System Admin – Grading Comments
Quick Reference: System Admin – Preferences – Reports
Quick Reference: Grading / Standards – Grading Window
Quick Reference: Instruction – Preferences
Quick Reference: Instruction – Grading Tasks
Quick Reference: Grading & Standards – Report Cards
Infinite Campus Quick Reference Guides can be accessed via the system Help tab and
Help option under the Search tab or in the Help Library of the Infinite Campus User
Support site.