stanley steemer crew chief fundamentals self … - clean shaven black shoes, uniform issued pants,...
TRANSCRIPT

Stanley SteemerCrew Chief Fundamentals Self Study CourseThe CCF training course is designed to give you an overview of your responsibilities andtechnical information you will need in the field. You will be evaluated on your knowledgeat the end of your training. This course must be passed before you are eligible to becomea crew chief at Stanley Steemer.Section 1Procedural overview
Section 2Basic product knowledge
Section 3Carpet cleaning
Section 4Upholstery cleaning
Section 5Leather cleaning
Section 6Tile and grout cleaning
Section 7Wood cleaning
Section 8Front Door Four
THIS INFORMATION IS PROVIDED TO YOU AS A COURTESY. THESE MATERIALS ARE AREPRESENTATION OF A PROGRAM EMPLOYED BY STANLEY STEEMER INTERNATIONAL, INC. IN THEOPERATION OF ITS CORPORATELY OWNED OPERATIONS. WE ENCOURAGE YOU TO REVIEW THISINFORMATION AND HOPE THAT IT WILL SERVE AS AN EFFECTIVE RESOURCE IN THEDEVELOPMENT OF THE TRAINING METHODS AND POLICIES YOU CHOOSE TO UTILIZE IN THEOPERATION OF YOUR FRANCHISE.
The following and all other data therein are proprietary to Stanley Steemer International and are properly consideredto be trade secrets, and are intended for the use of Stanley Steemer Officers, Supervisory, Employees, FranchiseOwners, and their respective Employee Designees. This information may not be reproduced by or for, or shown to, anyperson other than the above stated without written permission in advance from Stanley Steemer’s Legal Department.Copyright herein claimed as an unpublished work, 2007. 17 U.S.C. Sections 101-2, 407-8.

Section 1Crew Chief Procedures OverviewWelcome to the next step in your career with Stanley Steemer as you prepare for theposition of Crew Chief. At this point you have mastered the fundamental skills necessaryas a partner to the Crew Chief which will give you a working knowledge of what to teachyour future partners so that you can work as a team towards the best outcome for thecustomer, the Company and yourselves. As a Crew Chief, never forget how much of anasset a well skilled partner is to a successful day in the field.This section is dedicated to giving you a broad overview of the daily procedures you willbe expected to complete. Operations differ slightly from each other in how they setuptheir office systems. For instance, some operations restock the trucks in the morning andother operations may stock the trucks when you return in the evening. Your trainer ormanager will point out what is considered vital to success at your operation. Alwaysremember to consult with your local trainer or manager as issues come up in the future.Discuss with them the best ways to resolve an issue according to their past experience atyour particular location.Clocking In When You ArriveClock-in on time in full uniform.Full Uniform is defined as:
Hair - must be trimmed to the neckline Shaven - clean shaven Black shoes, uniform issued Pants, shirt, belt, hat (optional), and coat - uniformed issued.Stocking the TruckEnsure you have the following items on the truck before leaving the shop.These items are vital to having a successful day. Stanley Steemer leave behinds
o OYCG, Carpet, Tile, Wood, Air Ducts, etc. Office Supplies
o Penso Credit Card Imprintero Calculatoro Clip Board / Handheld
Retail Itemso Mats, Spotters, Wood Cleaner, Tile Cleaner and Odor Out Kits
Forms & Product InformationHaving all the necessary forms and product information to hand out to customers isvital to the successful completion of your day. Depending on what is offered throughyour operation, some of the product & service information may include, but is notlimited to:

Tools & ChemicalsOperations vary in what should be on your truck according to the skill level of the CrewChief operating the unit. All chemicals that are available through Stanley Steemer arecovered in Section 2 of this manual. Coordinate with you local trainer or manager for acheck list of chemicals that you should confirm are on your truck on a daily basis.Daily Morning Truck Maintenance ChecklistThe typical truck maintenance checklist may include, but not limited to: Check engine oil and transmission level Headlights, brake lights, horn, turn signals and back up alarm are workingproperly Windshield wipers working and washer fluid full Tires have proper air pressure and tread depth Properly adjust rear view and side view mirrors Brakes are working properly (Good pedal pressure) Start auxiliary engine to ensure its working Visual check for all necessary cleaning tools and materials needed for the day Van body damage inspection Verify that proper discharge equipment is on truckArrival at the Job SiteIn most cases, the van is pulled into the driveway, since traffic flow dictates that this isthe safer approach. However, in low traffic neighborhoods, backing into the drivewayproves to be the safest, as it is easier to exit once the job is finished. Also, your hose accessto customer’s entry point is another consideration. Maintain the proper distance from thevan to point of entry (minimally 25 feet). A doorway should be your first option.If your only access is through the garage, the distance between your van and point ofentry should be increased to 100 feet. The garage door should be lowered to a height justabove our lines/hoses. If necessary, park in the street. The previous considerations willhelp minimize carbon monoxide risks. Set emergency brake/keys out of ignition (not optional); doors locked (notoptional). Put wheel chocks in the proper position (under each wheel on the lower side if thevan is parked on an incline; or one in front and one behind any rear wheel whenparked on level ground; the emergency break is tied to the rear wheel only). Place appropriate caution signs outside to warn of tripping hazards nearpathways.Notify Shop of ArrivalOnce you have safely parked your truck at the job, use the handheld or phone to contactthe office to notify them that you have arrived. This lets the office know that you havemade it, without incident, to the job. This also helps them to coordinate the routes moreefficiently, especially if you also notify dispatch when you see that you will be at the joblonger than anticipated because of additional work.
Safety Requirements & SignaturesOne of the most important issues that you need to communicate to your customer are theSlip and Fall Hazards, during and after the cleaning process. You need to inform allcustomers and occupants of the risks during the initial walk through, during the cleaning,and again before leaving the jobsite. You are required to obtain a signature on the work.Explain to the customer that the signature is required to acknowledge that theconversation has taken place. If you encounter resistance to signing theacknowledgement, explain to the customer that it is important to Stanley Steemer they,the customer(s), understand the possibility of slipping or tripping to guard against anyphysical injuries.Outstanding Walk throughIt is customary to do a walk through with the customer(s) before starting the trucksetup. The goal of an outstanding walk through is to find out exactly what the customerwants/needs are and to find out how we can be sure to give them what they want.Remember 1: take care of the customer, 2: take care of the company, 3: take care ofyourself! Other items to focus on during the walk through are listed below.oo Physical layout of job for most Establish customer(s) preferenceefficient truck setup of first area to be cleanedo Begin to establish a rapport with o Conversation on safety issuesthe customer(s) o (Slip & Fall)o Address problem areas and Product & servicecustomer(s) concerns recommendationsFinal Walkthrough with CustomerAt a minimum, a final walkthrough with the customer should be accomplished.Preferably, the customer should be called to see each area as it is being cleaned to showthe before and after difference. It is an important part of customer satisfaction for themto see what your cleaning has accomplished on their carpet and upholstery. It also givesyou an opportunity to talk about additional products that will preserve the investmentthey have made in their home. During the final walkthrough, if a customer has anyconcerns, do everything possible to handle the issue. Remember that it takes a lot lesstime to handle while you are there, than coming back on a courtesy call and having tosetup and redo it a second time. Simply lay the wand by the door during the finalwalkthrough so that it is easy to grab should there be any areas of concern. A positiveattitude and the willingness to please them the first time will save you a lot of time andmoney in the long run. Once everything is approved by the customer you can then takethe wand out and shut down the cleaning system.

Next Job AssignmentAfter you have finished with the job you must notify the office of the appropriateinformation and they will dispatch you to the next job. Your local trainer(s) ormanagement will have to show you how they handle this at your operation. There aresome operations that dispatch this information through a wireless device to you.Others give you all of the jobs for that day in the morning before you leave. Typically,the information you will receive is:o Invoice number o Scheduled work to be performedo Customer name o Any customer directions or noteso Address of job site o Previous job history (if any)o Customer contact phone o Directions or cross streetsnumber(s)Returning to the OperationThe office will let you know when there are no further jobs that need to be completed andthat you are to return to the shop. Even if you are given all of your jobs in the morning itis important to check if any pickup jobs have be scheduled. Once you are called inremember to stop at the assigned gas station to refuel your truck for the next day.Fueling the TruckEvery operation has their own procedures for where and how to accomplish refuelingyour truck. Make sure that you are clear what the procedure is by asking your trainer ormanager. If your operation is using a gas card make sure you know your gas code andkeep tight control of that at all times. Make sure you turn in all gas receipts daily.Truck Check In DutiesOnce you have returned to the shop you should complete the evening maintenance onthe truck. This should be done with your partner and before your paperwork iscompleted. Empty the dump tank and flush with clean water Dump tank basket must be cleaned and free of debris Clean sprayers, wands and all other equipment Check for any leaking lines and report to office Turn in any towels in need of cleaning Wash truckRoute Check InIf you did not have an opportunity to complete your daily truck log before arriving backat the shop, take the time now to verify your paper work before submitting it to thedesignated person at your operation. Also make sure that all checks and cash balancewith your paperwork and that the designated person agrees.Clocking OutFinally, always make sure that you and your partner have clocked out so that there isnever any misunderstanding of the hours that you worked.

Section 2Basic product knowledge
Standard spot removal agentsStanley Steemer spotter Tannin Protein removerCitrus spotter Antifoam powderOdorless brown-out remover Red wine removerSpecialty spot removal agentsWhink Heat transfer solutionInk remover Stain magicRed relief Power gelPro solve gelA very large portion of the unparalled cleaning service is removing anything the customermay want removed. This at times can be a challenge but with the right tools for the joband the correct attitude we can make virtually any customer happy.
Stanley Steemer ProfessionalCarpet & Upholstery SpotRemoverThis product can be sold to the customer orused by the cleaning technician as a generalpurpose spotter on both carpet and mostupholstery.Pre-spray: Recommended as a pre-treatment before cleaning furniture. Alwaystest fabric for bleeding potential.Application: Spray full strength from thespotter bottle directly on the problem area.Allow sufficient time for the spotter to loosenthe spot. Using a clean absorbent cloth or adull flat object, rub the spot from the outsideedge toward the center. Clean the area withthe cleaning wand or wipe with a damp towelto help remove excess spotter.

Why Our Spotter Works Best
We know that Stanley Steemer Spot Remover is the best thing to use for treating spots andspills on carpet. However, our customers might not know why our product is better than theproducts that they can purchase in the big box stores.
Let’s talk about some of the most common products that are used out in the field. Thoseproducts are Resolve, Oxi-Clean, and Spot Shot. These products have certain characteristicsthat can make them harmful for our customers’ carpet. The most common issue with all of theproducts purchased in the store or those brewed up at home is that they are not rinsed out ofthe carpet thoroughly enough which can leave a residue. Depending on the product this cancause secondary damage that will appear once we run our wand across the area that has beentreated.
We must make sure that we get some important info during our Outstanding Walk-thru; suchas what cleaner, they are using between our cleanings; when was the last time that they usedthe cleaner? Did they make sure that the cleaner was thoroughly rinsed out of the carpet?
Resolve Carpet Triple Action Carpet Stain Remover- Has an oxidizer in the formula whichwill create peroxide when water is introduced and can cause color loss if it is not thoroughlyrinsed out of the carpet. 1-5% Hydrogen Peroxide. Potential for color loss beyond 3%Hydrogen Peroxide
Spot Shot (Instant Stain Remover Aerosol and Professional Aerosol) - Hot Shot issupposed to be a cure all for any spot and or stain. However, we all know that there will befactors in different spots that require different types of spotting agents. We also know that astain is permanent and cannot be removed. This product is also a petroleum based productwhich will cause rapid re-soiling if not completely rinsed from the carpet. This product containsan ingredient called 2-Butoxyethanol that is aerosolized in this delivery system. This put theingredient into the breathing column of those administering it making this ingredient morehazardous. We need to stay away from an aerosolized product when possible, because of thefine droplet size it produces. (Spot Shot Instant Carpet and Odor Eliminator (trigger), SpotShot Pet Instant Carpet Stain and Odor Eliminator (trigger) and Spot Shot Non-Toxic PetAerosol. All of these products are certified by the Carpet and Rug Institute.)
Oxi-Clean- This product poses many issues within the cleaning industry, it is an oxidizer.When Oxi-clean is mixed with water, a peroxide is made, and this can cause color loss; and/orcompletely strip the carpet of its color. Oxi-clean is also an alkaline cleaner (about 10 on thepH scale). If this is not rinsed thoroughly from the carpet, the cleaner will continue to workuntil it is completely rinsed or neutralized.

Citrus Spotter/SolventCitrus Solvent and Citrus Spotter are bothused for the same purpose. They are used toremove oily/greasy spots. They do this bydissolving and emulsifying the spot.Application: Both products should beapplied to a clean towel and gently rubbedonto the spot before extraction. In severecases, CAREFULLY apply product directly tothe spot, aggitate and extract fully. Bothproducts can cause carpet delamination ifallowed to penetrate to the backing of thecaret.Citrus spotter is available everywhere butCitrus Solven is only allowed in certain statesdue to VOC regulations.
Tannin and Protein RemoverStanley Steemer Tannin and ProteinRemover replaced Stan Tan and Progest in an“all in one” product. It is still effective againstyour common spots created by coffee, tea,fruit juices, protein spots from perspiration,urine, blood, food etc. Be sure to test for colorfastness on carpet and upholstery.Application: This product should be usedfull strength. Spray a small amount of theproduct directly on the spot and agitategently from the outside edge in. Allow theproduct to dwell for 3-5 minutes and thenfully extract.

Whink Rust RemoverWhink is a chemical made for rust removal only. DoNOT use on metallic weighted silk or fiberglassfabrics or fabrics containing metallic yarns. Be sureto test first on colored carpet. If a color changeshould occur, rinse and apply ammonia fullstrength. The color should change back to itsoriginal shade. Keep off skin. These productscontain an acid, which can burn you. Hydrofluoricacid can also etch glass so be careful near windowsor porcelain.Application: Whink is used full strength. It isapplied to the rust spot with the nozzle of the bottle.Never rub it in with your fingers or shoes. On veryold spots apply and let stand. As the product dwellsyou will notice the rust color fading away as theHydrofluoric Acid dissolved the iron oxide. Afterthe spot is removed completely flush the productfrom the carpet. This is essential before allowingfabrics to dry.Red Wine RemoverThis is a product specifically for removing red winestains but is also effect against tannin spots like teaor coffee. The product has a color safe amount ofHydrogen Peroxide which enables it to removestains safely from carpet and upholstery. Be sure totest for color fastness on carpet and upholstery.Stains will likely continue to lighten after thecleaning process.Application: This product should be used fullstrength. Spray a small amount of the productdirectly on the spot and agitate gently from theoutside edge in. Allow the product to dwell for 1-3minutes and fully extract.

Odorless Brown-Out RemoverOdorless Brown-Out Remover is used primarilywhen a carpet browns out due to a chemicalimbalance. This can happen when the carpetbecomes too alkaline. By applying Odorless Brown-Out Remover to the carpet, it will reduce thealkalinity of the carpet and the brown discolorationshould disappear. This product should also be usedafter cleaning wool textiles to prevent yellowing.Dilution:Mix 1 part Odorless Brown Out with 7parts water. (18oz. of product to 1 gallon of water)Application:Apply the diluted Odorless Brown-OutRemover with a pressure or power sprayer, at arate of approximately 400 square feet per gallon.Rake into the carpet after spraying.Upholstery ShampooUpholstery Shampoo is formulated to removeground in soil and body oils from upholstery. Itshould be used when steam extraction alone cannotremove the heavily soiled areas and to preventover-wetting. It is also safe for use on all fabrics thatare colorfast.Dilution:Mix 1 Part Upholstery Shampoo to 8 Partswater in a bucket and whip into a damp foam.(16oz. of product to 1 gallon of water)Application: Wring sponge out slightly and workup damp foam. Rub the moist sponge and foam overthe surface of the fabric, doing one small section ata time. Keep the sponge in continuous motion at alltimes so as to prevent over-wetting. Be sure tosteam out thoroughly as the Upholstery Shampoowill leave a residue and will cause rapid re-soiling.

EF-Residential Pre-SprayA concentrated product used on moderately soiled carpets when you just need a little extra detergency. Do not use in cleaning system solution tank.
Dilution: One part Residential Pre-spray to 32 parts water. Application: Pre -spray carpet (8004 spray tip) with one diluted gallon covering 200 square feet. Rake into the carpet and allow 10-15 minutes of dwell time. Then, extract thoroughly during normal cleaning. Do not allow the product to dry before cleaning.
Advanced Commercial Pre-SprayThis product is used in a commercial environment for heavily soiled carpet. This product is designed to break down common soils as well as oily soils that are often found in commercial environments. Do not use on wool carpet or in the cleaning system solution tank.Dilution: 1 part Advanced Commercial Pre-Spray to 16 parts water Application: Pre -spray carpet (8004 spray tip) with one diluted gallon covering 200 square feet. Rake into the carpet and allow 10-15 minutes of dwell time. Then, extract thoroughly during normal cleaning. Do not allow the product to dry before cleaning.

Odor Out PlusStanley Steemer Odor Out Plus uses a naturalbacterial enzyme action to digest organic odorsources such as vomit, feces, urine, milk, blood, etc.It also uses a pairing agent to give immediate relieffrom any odors while the enzyme is working. Thekey to complete removal of an odor is that thisproduct must reach all contaminated surfaces. Inthe event that the odor source has penetrated thecarpet backing, padding, or sub-flooring, additionaltreatment such as replacement of padding andsealing of sub-flooring may be necessary.Dilution: 1 part Odor Out to 7 parts water for spottreatment.1 part Odor Out Plus to 14 parts water for broadcastapplication)Pre-spray: Can be used as a pre-spray to neutralizemalodors.Application: Spray one diluted gallon per 200square feet.Supershield PlusThis is our custom formulated carpet andupholstery protector. This product combines drysoil and water repellency in one product. It does notprevent your carpets from getting dirty, however, itdoes help your vacuuming remove soil efficiently socarpets stay cleaner longer and makes futurecleanings more effective. It also gives the customeran even greater chance to get to certain liquid spillsbefore they become fully absorbed which is vital topreventing stains.Dilution: 1 part Supershield Plus to 7 parts water.(Do not mix with other products. Always rinseequipment before and after use of this product)
Pre-spray: Do not use as a pre-spray.Application: Spray one diluted gallon per 300square feet of freshly cleaned carpet.

Section 3Carpet CleaningCleaning carpet is not as easy as many people think; from chemistry to customerservice you need a significant level of knowledge to make our customers happy. Ourprocess begins with the carpet wand. Though a simple activity, using the wandproperly will make or break the job you do. Hot water extraction cleaning isrecognized as the best and most restorative cleaning process for carpet. If doneproperly you are able to remove all 3 types of soil you will encounter. The 3 soil typesyou need to consider are; Insoluble, cannot be dissolved in water or solvent. Watersoluble, can be dissolved in water based solutions. As well as, Dry solvent soluble,which can only be dissolved in dry solvent chemicals.One at a timeYou first need to focus your attention on a “cleaning path” that is the width of thewand and extends a few feet in front of you. By focusing on one small area at a time,you can be assured that you are thoroughly cleaning the area. Start at the “bottom”of the path near your feet. Move the wand forward a comfortable distance and bringit back toward you. Simple right? The hard part is knowing when to use the triggerand how many strokes to take.Pre-VacAccording to a study done by Proctor and Gamble as much as 79% of the soil in mostcarpeting is dry insoluble soil. This soil category contains such things as dust, petdander, other allergens, plant matter and dirt. The easiest way to remove these soilsis when they are dry. By pre-vacuuming the area you are likely to remove the majorityof soil before you even get the floor wet. The number of dry strokes should be basedon the condition of the carpet.Cleaning StrokesAfter the dry soil is removed you must use the trigger on the wand to removeembedded and water soluble soils. Start by pulling the trigger as you push the wandforward and when you get to the top of the path immediately bring the wand back.There is no need to release the trigger at the top of the path. As you pull the wandback toward you let go of the trigger and pull the wand another 4-6 inches to pick upany residual solution. Continue this until you are satisfied with the result. As withthe pre-vac strokes there is no set number of times you should repeat, keep cleaninguntil the carpet is clean.Be careful around corners and other areas of concern. When cleaning a seam, forexample, clean it at an angle so you do not damage the seam itself. The system we useat Stanley Steemer is very powerful and will allow you to make virtually all of yourcustomers very happy. To get the best performance from your system remember to

keep the cleaning pressure set to 600 PSI or less. Too much pressure will not onlylead to extended dry times but could also lead to flooring damage.Dry StrokesEven though you are constantly extracting solution as you clean you must leave thecarpet as dry as possible. Extended dry times are responsible for the majority ofcustomer complaints we receive. By performing dry strokes you can drastically cutdown on dry times. This also aids in removing residual soil from the carpet andcreating a safe environment for the customer.When cleaning carpet it is important to do the kind of work your customer expects.The majority of the problems you encounter will likely be solved with a littleknowledge and a lot of elbow grease. The effort you put into a job will directly affectthe outcome. Try not to get into the rut of “this is how we do it”. Every job will beunique and should be treated as such, if you don’t your results will be lackluster.Spot TreatmentsTreating spots is a major part of making carpet look good to the customer. Theyexpect spot treatment and in many cases spot removal is all they really care about.Once you have selected the appropriate spotting agent you need to apply it correctlyand give it a chance to do its job. Follow these steps to give yourself the bestpossibility of successStep 1Remove as much of the foreign matter as possible. If there is a large amount ofmaterial on the fibers, the product will not be able to do its job. Cleaning the area firstallows you to concentrate your efforts where they are needed. Also, cleaning firstmay get the spot out; therefore you will not necessarily need the spotting agent.Step 2Apply the product appropriately. Some products like Tannin Protein remover andresidential pre-spray will require liberal application. Products such as Citrus orWhink require very little product to be effective.Step 3Work the product into the network of fibers. This can be accomplished in manydifferent ways, from a brush to a towel to a rake. The goal is to move the productaround so it can contact the problem. Avoid heavy scrubbing actions as this is not thepoint, if agitation were going to work the spot would have already been removed withthe wand. Tamping and gentle agitation with a towel prove to be the best on mostspots you will encounter. If you need to apply more product to get coverage justremember, everything you put in the carpet you must find a way to get out of thecarpet.

Step 4WALK AWAY! Nearly every spotting agent you use requires time to work. Leavingthe product to dwell for 5-10 minutes will allow the required chemical reactions tohappen. Spot removal is very different than general cleaning. General cleaning is allabout force and work on your part, while spot removal is about finesse and chemicalwarfare.Step 5Now it’s time to rinse the product. There are a lot of myths out there about the bestway to remove spotting agents after they have done their job. The most effectivepractice is flushing the area repeatedly. If the product foams up then antifoampowder will help with the removal. Citrus is a different animal. It is an oily productso it will not respond to antifoam powder very well. If you are having troubleremoving citrus first check to see if you have the cleaning solution turned on and thatthe system is working properly. Moreover, try using spotter to break down the citrus.The surfactants in the spotter will “grab” the citrus allowing it to be removed.Step 6If all goes well with the previous 5 steps you won’t need this one, but if not… rinseand repeat! You may choose to try a different product or just another shot of the sameproduct. Nonetheless, if it doesn’t come out the first time don’t just give up. Yourcustomer deserves every effort to make the carpet look as new as possible.C.H.A.T.There are 4 fundamental parts to getting carpet, tile, wood, upholstery and leatherclean. Getting to know these components will allow you to clean faster AND better atevery jobChemical activity:Selecting the proper chemical for the job will increase results and decrease time. Abasic knowledge of your products and the problems you are likely to encounter is ofgreat importance to the professional cleaner. The most common way to measure achemical is with the pH scale. This scale ranges form 0-14. Below 7 is called acidabove 7 is alkaline and 7 itself is neutral.

We want to remove soils that are going to be acidic, such as dirt, food spills and animalexcrement and because of this we use chemicals that are on the alkaline side of the scale.There will be times where it is appropriate to use acidic chemicals to treat spots, forexample rust remover is a very strong acid.
Heat:Heat will accelerate all chemical reactions; yes cleaning is a series of chemical reactions.By heating our cleaning solution we increase its ability to do the work we need in a shortertime. Heat will also allow the solution to penetrate the fibers and even get the deep downsoils.
Agitation:This refers to any physical force used in cleaning. Everything from brushes and towels tothe high pressure solution are considered agitation. Remember there are 2 types ofagitation: one is the force the wand uses to physically remove contaminants, and two theagitation used to distribute chemicals that require time to work.
Time:Whether it’s the time it takes to move the wand or the time it takes residential pre-spray tobreak down soil, you need to consider the clock. Sometimes this can be counterintuitivebut if you understand time you can be faster with equal or sometimes even better results.For example, if you allow 10 minutes of dwell time for your pre-spray it may save you 20minutes of cleaning.

Dry TimeThe vast majority of problems and complaints stem from extended dry time. First andforemost you need to do plenty of dry strokes to remove moisture from the carpet. Nextyou need to utilize the air mover properly, there is more to it than just bringing the fan into be used as a door prop. Once the first room is completed place the blower facing theclean carpet, but don’t just forget about it! Every few minutes move it around so it ispointing in several different directions. This isn’t nearly as hard as it sounds, think abouthow many times someone walks past the blower on the way to get some blocks from thevan or to move a sofa. When you walk past this tool simply take a couple of seconds toreposition it. The air mover can decrease dry time by as much as 40% on most floors.Problems like wicking, ripples and browning all but disappear if we do our best to dry thecarpet. After we are finished advise the customer to turn their HVAC system to the onposition so air can circulate. This will also decrease the dry time significantly and in turnlead to a happier customer.

Section 4UpholsteryUpholstery fabric is one of the most diverse areas of our business. There are somany different types of materials as well as weaves and dying methods that it can beextremely overwhelming. Upholstery fabric should not be viewed the same way ascarpet. When was the last time you went to a job that you were skeptical aboutcleaning an installed piece of carpet? Probably never would be the most commonanswer. On the other hand furniture can be more intimidating if it is something youare not intimately familiar with.You probably know that once you get a customer to let you do a soil test they are very likely to wantthe job done…. right? Next time offer it as a standard service.If you ask them if they “want” you to do a test they may justsay no. So instead you may want to say “as a part of ourservice we include a free dry soil analysis of your furniture,which piece would you like us to perform it on?”A working knowledge of the different materialsand manufacturing methods used in upholsteryfabric can prevent uncertainty. Simply followingthe rules can keep you out of many stickysituations.Rule #1Pre-vacuum the furniture. The majority of soilfound in carpet and upholstery is dry soil. The best way to remove it is when it isstill dry. Once you have introduced water to the fabric you will have a much moredifficult time removing this soil.Rule #2Control your moisture when you clean. This is accomplished by turning down thepressure at the truck. If you try to clean this thin textile at a higher pressure the dirtwill be pushed through the fabric making it more difficult to remove. Controllingmoisture also means knowing when to say when. We cannot simply keep scrubbinga piece that will not clean up or we risk over wetting as well as fiber distortion.Rule #3Control the pH of the cleaning products you use. Though stronger chemicals mayhelp you clean better and faster, it is not worth the risk of destroying the fabric.

Using other means of safely removing soil may take a little more forethought but theeffort is worth it in the end.Rule #4Speed up the drying process. It can be said this is a part of controlling moisture,however this step is important enough to emphasize. Dry strokes are vital to thesafety of the fabrics we clean as well as total quality of workmanship. Also the airmover must be used at all jobs to aid drying.Pre-InspectionThe pre-inspection is the best way to prevent damage (whether we actually causedthem or not) and set the customer’s expectations. Also you should use this time todecide what the safest and most effective cleaning method will be.Things to look for while performing the pre-inspection.
Existing damage Fiber type Fabric construction Existing soils Damage to the structure of the piece Fiber deterioration Pet stains and pet damage Spills Bleeding Fading Cushion shrinkage Zippers Instructional markings on foam inside cushions.Fabric construction is an important factor in the pre-inspection. How the fabric isconstructed lets us know if it is durable or non-durable. In other words, if it is non-durable, a more gentle approach is needed so you do not degrade the fabric. Also,gentle grooming would be necessary. Finally, certain weave types tend to be bleeders.

Plain Weave Simple over and under interlacing (the strongest of all weaves)
Twill Weave Formed by interlacing yarns that forma diagonal pattern. This weave is second in strengthto the plain weave. It is characterized by aherringbone pattern formed by the weavingtechnique used in creating this particular fabric. Thetwill weave normally will stand up well to mostcleaning processes. Denim is a good example of twilla weave.Satin Weave A fabric consisting of float yarns (skips over the surface of a definitenumber of yarns; four or more) which produce a silky, lustrous sheen on the surfaceof the satin fabric. Strength and abrasion resistance is sacrificed. Apply agitation withthe float yarns only (with the warp direction – up and down) not against them.The direction of the float yarns can be easily determined by gently running your handover the surface of the fabric. Resistance will be met when running cross-wise to thefloat yarns, while the texture will feel smooth and silky when running in the samedirection as the float yarns.Velvets These fabrics have a 3rd set of yarns that create a pile or napon the surface. This pile can easily be distorted with excessiveagitation. Velvets can be made of either natural or synthetic fiberso determining the fiber content of the fabric is important.TestingAfter the pre-inspection, specific tests need to be done to ensure fabric and dyesafety. It is easy to get complacent with testing because most of the furniture youwill come in contact with will be safe to clean. It is kind of like wearing a seat belt ina car, you will hopefully never need it but if you need it you will be glad you used it.Be diligent with testing so when you do find that piece that violently bleeds you willknow before cleaning rather than after you clean.

There are 2 different types of dye transfer. First is dry crocking. Dry crocking iswhen the dyes will transfer from one fabric to another fabric as a result of agitation.This is the same thing that happens when you have a new pair of jeans that turnyour shirt or shoes blue. The second type of transfer is bleeding. This is when dyeswill move in a liquid. Bleeding is more common than dry crocking because chemicalactivity can loosen the dyes.Color fastness testing will help us decide if and how a piece can safely be wetcleaned. The first step is to test for dry crocking. Simply rub a dry, clean whitetowel over every color. If the dye is transferred to the towel you will want to modifyyour cleaning method to be sure you are safe. If there is no transfer proceed to wettesting. Using the highest pH product you will be cleaning with, wet on a clean whitetowel. Apply the product to every color on the piece in an inconspicuous area. Thenext step is often overlooked, WALK AWAY! The product needs time to work its evilmagic on the dyes in order to find out if there will be a problem. After the test spotis dry look for evidence of bleeding. Of course after you apply the product it is agood idea to check the towel for evidence of immediate dye transfer.Steps for effective upholstery cleaning
STEP 1CUSTOMER INVOLVEMENTInvolve the customer in the pre-inspection whenever possible. If you have acustomer standing over your shoulder, it is usually because you did not do a properjob of explaining your services to them. The consumer is more likely to go with aprofessional cleaner that takes the time to explain the process.STEP 2UTILIZE CORRECT TERMINOLOGY AND PERFORM A PRE-INSPECTION:
Interview Questions Visual Inspection (Check List) & Documentation Testing Fiber burn test/practical chemical tests (to get you in the ballpark) Color fastness test (crocking or bleeding)The largest percentage of problems that arise when cleaning upholstery could beprevented if the cleaner tests the piece prior to cleaning it. Pre-testing of upholsterymay reveal potential dye bleeding; if the fabric blends may restrict cleaning results,and most importantly, which cleaning agent to use on the fabric. Always pre-testthe fabrics extensively prior to cleaning - even when you are confident that noproblems exist. Don’t rely too much on tags that may exist on the furniture as theyare often inaccurate.

STEP 3DETERMINE METHODDeciding which cleaning method to utilize is very important while cleaningupholstery. What may be the best method may not be the safest, and vice versa.The safest method may not be the best for soil removal. The number one goal inupholstery cleaning is to remove as much soil as possible, without changing thecolor or texture.Manufacturer’s cleaning codes that are sometimes attached to the deck of thefurniture give you a cleaning category by which to clean. You should give littlecredibility to these manufacturer liability codes, the professional should stilldetermine the proper cleaning procedure based on knowledge.The Cleaning Codes are:“W” – Clean only with water based chemicals“S” – Clean only with solvent based dry chemicals“W/S” – Clean with either water or solvent based chemicals“X” – Use neither wet nor dry chemicals, vacuum only!STEP 4SET UPUse a large, absorbent blanket, such as furniture blanket (make sure it is colorfast)to protect flooring. Move furniture, utilizing furniture glides, to the center of theroom or move other items away (avoid over spray; show you care). Change thepressure at the truck to between 250 and 300 PSI. Cleaning at high pressure willonly push soil through the fabric making it very difficult to remove.STEP 5PRE-VACUUMThe majority of soil can be removed through dry soil vacuuming. As the saying goes,“It is easier to remove dust than mud”. Dry soil is relatively easy to remove byvacuuming, but if left in the fabric until the solutions are applied, it becomes mud.Dry vacuuming should always be your first step. If the dry soil is impacted or boundto the fabric it may be necessary to loosen it by pre-grooming with a gentle brushbefore vacuuming. If this step is not preformed it will make cleaning the furnituremore difficult and time consuming, and is likely to set you up for a courtesy call.STEP 6PRE-TREATMENT (if necessary, heavily soiled):With cushions removed, evenly spray a light mist onto the platform and extract anyexcess puddling to avoid staining or water marking the deck.

One of the most important steps in the cleaning process is to pre-treat. Pre-treatments have all the necessary ingredients to emulsify and suspend the majorityof soils found in upholstery. Upholstery shampoo, spotter, or cleaning solution arethe typical pre-treatments used by Stanley Steemer on upholstery. Apply evenlyover the section you are working on with a light mist first followed by heavier sprayin the most soiled areas. This will prevent uneven cleaning and the possibility ofstreaks.Allow 3-5 minutes of dwell time to emulsify oils and suspend soil for removal.Remember that the pre-spray should not dry before extracting or the soil willredeposit on the fiber.STEP 7AGITATEThis step consists of either working in the pre-treatments or adding additionalchemical to aid in cleaning. The agitation step is not utilized to scrub the dirt off ofthe fibers. Agitation helps break surface tension and aids the chemicals to penetratethe soils.Following pre-spraying:
Use the horsehair or a clean towel and gently work the pre-treatment intothe fabric Use heavier scrubbing action if the fabric is heavily soiled and dimensionallystable, but careful not to distort the fabric in the processThe natural sponge is an excellent tool for applying shampoos when control ofmoisture and gentleness is required. Work the sponge into the shampoo to developrich dry foam and then apply to the fabric using back and forth overlapping strokes.Spread the foam evenly and lightly dampen the fabric. This process is best used forfabrics such as Haitian cotton, cotton canvas, and potential bleeders.
STEP 8CHOOSE A CLEANING METHODWhen choosing a cleaning method be sure to consider both safety and effectiveness.We have many options when it comes to cleaning methods.Hot Water Extraction (injection)This method uses the most moisture and is the most aggressive cleaning method.This method is acceptable for most fabrics. However, if the piece is not heavilysoiled it may be overkill and cause the fabric to stay wet longer than needed.

Mist and VacThis method is sometimes very misunderstood. The fabric should be wetthoroughly and evenly; NOT lightly misted as some think. This is not to say thefabric should be dripping wet with a puddle in the middle of a cushion. One of thebiggest differences is the amount of force the water hits the fabric with. If water isnot hitting the fabric with force it will not penetrate the fabric as much. This allowsthe fabric to dry faster.Shampoo cleaningWhether you are using upholstery shampoo or Haitian cotton cleaner, the basicconcepts are the same. These products can be used as a pre-treatment foranother cleaning method or as a cleaning method themselves. The product shouldbe mixed with warm water and worked into dense foam. Apply the foam to thefabric using overlapping back and forth strokes. NEVER apply the shampoo in aliquid form as it will cause extreme foaming and is very difficult to remove. You arein effect “hand cleaning” the piece. Once all of the soil is suspended from the fabricit needs to be extracted. The Haitian cotton cleaner can just be removed withvacuuming while the upholstery shampoo must be rinsed.STEP 9CLEANING THE PLATFORMThe platform, deck, or bedding is the horizontal surface where the cushions rest.The fabric is often prone to show rings from solvent or water. When cleaning theplatform, you should dampen the entire surface evenly before cleaning to avoidcausing these rings. Often times, the platform is not colorfast. This makes it theworst possible surface for cleaning the cushions.Many professional cleaners have had a sad experience cleaning a cushion on theplatform to find that the dye from the platform transferred onto the cushion.Cushions should be cleaned on a drop cloth if being cleaning on location.Once cushions are cleaned, place the damp cushions together in an inverted “V” onKraft (or colorfast) paper or drop cloth with as little of the cushions touching aspossible. Do not put cushions back on the platform/deck until the fabric is dry, asthis fabric tends to be a bleeder. Never lean the cushions against wood surfaces orany surface that may mark the upholstery.STEP 10Post Cleaning Spray DownsProtection and deodorization is a great service to the customer and is veryprofitable for the cleaner. With fabrics as sensitive as they are, it is always a goodidea to apply a quality protector to provide resistance to all different types of soils.

Sometimes it may be necessary to neutralize the pH of the piece after it has beencleaned. Fabrics prefer to be in a slightly acidic state, this keeps the dyes stable andthe texture soft. Sometimes it may even be necessary to prevent problems likebrowning. A simple misting of odorless brown out will neutralize any residualalkalinity and prevent these problems.STEP 11FINISHING (Grooming)
Apply Protector and/or Deodorizer first. Nap grooming (while still damp)SPECIAL CONSIDERATIONS WHEN CLEANING VELVETS To ensure no pile distortion occurs, grooming should be completed on eachsection of the piece immediately after cleaning The grooming step is primarily for velvet fabrics, but is called for on allfabrics Most velvets fall into a delicate category of fabrics because they require extrahandling Velvets are manufactured with synthetics as well as natural fibers and youmay find that some velvets may not require any grooming, and can becleaned using standard cleaning formulas Apply odorless brown out to avoid making the fabric stiffIf you do not set and groom the velvet directly after cleaning, velvet may set itself asyou left it. You will not like the results. Groom the velvet lying down; do not try tostand the velvet up while still wet. This will make the fabric look like a terry clothtowel. Using very hot water and the correct chemicals, you will leave the velvet withonly a slightly stiff feel.
STEP 12FINISHING INSPECTIONAlways perform a post cleaning inspection. This gives you a chance to touch upareas that may not have come out.Ask the customer to examine your results before taking your equipment outThis will save you from having to come back for a courtesy call (redo). One majorcause of customer complaints is improper communication and/or pre-qualificationwith the customer. If the customer asks, you should be very willing to touch up thearea in question. If the spot does not respond, advise them that further aggressioncould cause damage to the fabric. Know when it’s time to stop.

STEP 13DRY THE FURNITURE
Home (HVAC and Fans) Ventilation of humidity Airmovers (across the fabric, not at it – this can force moisture into thebacking) Sunlight How quickly furniture dries will depend on how wet it was in the first place.This step is perhaps the most important of all in regards to fabric safety. Slowdrying leads to problems such as browning and color bleeding. Remember thatmost problems occur during the drying stage, not during the cleaning stage. Yourmain focus should be getting the cushions dried first. This is where the mostpotential for problems exist. Other soiled areas should be given special attentionduring the drying process as well. There is no substitute for a high volume airmover. Use them!

Section 5Leather CleaningLeather cleaning is one of the newest areas of our business. The Stanley Steemermethod of leather cleaning was designed with the intent of being highly effective aswell as safe. Add in the moisturizer and protector and you have a fantastic combo ofvalue for the customer. One of the most important things to remember whenselling leather cleaning to our customers is that the piece is more than likely higherin value than the typical fabric we clean. This means you must be viewed as theprofessional in order to gain the trust of the customer.
Types of LeatherThere are 3 basic types of leather found in upholstery fabrics. Once in a great whileyou may run into a strange piece like brain tanned yak skin. These are by far theexception and will not be addressed in this manual.AnilineNatural, naked, pure, cowboy, and unprotected are all names you may hear fromcustomers describing aniline leather. All pieces of leather start out as anilineleather. The word aniline refers to the dye that is used. The dye penetrates theentire hide, which colors it all the way through. If the hide is high enough quality itmay remain in this state. This is the highest quality of leather we encounter in ourindustry. The natural markings of the beast are visible and only the highest graderaw materials are used.NubuckSuede, reverse-suede, distressed and bomber leather are other names given tonubuck by customers. It starts out as aniline but the surface is sanded and buffed togive it velvet like nap. Nubuck is often confused with suede. This style of leather is aproduct of an aniline leather that had some surface imperfections. Theseimperfections were mechanically removed with the sanding process.Pigmented (protected)Painted, finished and semi-aniline. This leather has a coating or topcoat that coversthe entire finish. This coating has characteristics that make it very desirable tomany consumers. It has a tendency to protect the leather and can create differentlooks and finishes. This is part of the reason that the vast majority of the leather youwill see falls into this category.

SuedeSuede leather comes from the “back side” of a piece of top grain leather or fromeither side of one of the split sections. Many customers will tell you they have suedeleather. However, they are ALWAYS incorrect calling it suede. Polyester can bemanufactured into microfiber that can also look similar to suede or nubuck. Thebottom line is you will NEVER see suede on furniture!Leather IdentificationOne of the major fears technicians have about cleaning leather is identifying whattype of leather they are cleaning. This is actually quite easy and with very littlepractice you will be proficient. Each type of leather has its own uniquecharacteristics you will need to learn to observe.Aniline Protected Nubuck
Scratch Test Scratches easily Does not scratcheasily Usually scratcheseasilyVisual TactileTest
Natural markingsfeels “buttery” soft Uniform color andgrain, feels slick Velvety feel andlookMoistureAbsorbency
Quickly absorbsmoisture Not veryabsorbent Quickly absorbsmoistureScratch TestThe name says it all. See if you are able to easily scratch the surface in aninconspicuous area. NOTE: this is not the try to scratch test; this is the see if itscratches easily test. If you had your mind set too it you could scratch just aboutany surface, right? If the surface scratches easily you are not dealing with protectedleather. If it does you will be dealing with aniline or nubuck.Visual Tactile TestJust by looking at and feeling a piece of leather you are often able to successfully tellwhat you are working with. In an area that does not get much use like the back orsides firmly run your hand across the surface. Each type of leather will also have aunique look as well. The easiest leather to identify is protected leather because ofits uniform color and grain pattern.Moisture Absorbency TestBecause of its finish protected leather does not absorb much moisture while anilineand nubuck will. Apply a small amount of leather cleaner or distilled water to thesurface in an inconspicuous area. Do not use regular tap water because the mineralsin the water can cause permanent rings.

Color Fastness testJust like fabric upholstery leather furniture MUST be tested to identify any possiblecolor change. Among other possible concerns, some protected leathers are coatedusing more than one color. This creates a more interesting effect and is much morevisually appealing. A problem can occur when the process is not done properly. Ifthis problem exists we will literally clean one of the colors off leaving the base colorbehind. The color will be completely different and there is absolutely no way to hidefrom the result. This is a situation that is easily avoided by testing.Soil and Leather FurnitureLeather furniture is subjected to the same level and types of soil as fabricupholstery. There are some differences in how this soil interacts with leather butthe majority of the time it is similar to fabric. With leather most of the removablesoil is near the surface of the fabric. If oily soils have absorbed into the leather theymay not be removable. The manufacturer recommended cleaning frequency forfabric upholstery is 12-24 months while leather is 6-12 months. This means leathermust be cleaned and protected frequently to prevent permanent damage. If acustomer fails to keep up their end and neglects cleaning we need to assignownership of the problem to them before we begin. Though leather usually cleansup very well, there is no guarantee we can make every piece look perfect. Arms,kickboards, and back cushions may be soiled beyond the point of repair. For thisreason it is advisable to do a test clean in a heavily soiled area before we clean theentire piece. If the customer is not happy with the results of the test clean we maynot want to proceed with cleaning the entire piece.
Aniline & Pigmented Cleaning ProcedureThough you may need some practice to become a proficient leather cleaner, thebasics are rather simple. First is dry soil removal (yes you need to hook up the truckto clean leather). The decking and crevices may have substantial dust, cookiecrumbs, and so on. Also the back of most cushions will be fabric and will need to becleaned.Start by selecting the appropriate cleaning agent for the type of leather you aredealing with. In a small bucket pour a small amount of the product. Use less thanyou think the product goes a long way and you can always use more if you need it.With the sponge work the product into a foam. This will allow you to control themoisture being used. Over wetting is not good for leather so always use the foamrather than the liquid product. You may also have foaming bottles at your location.These help to greatly reduce waste and make applying the foam easier.

Now that you have your cleaning product in the form of a foam, apply it using thesponge. The product must be applied evenly to the entire panel you are cleaning. Ifyou only clean half of a panel you may leave a line in the center of the panel.With the panel sufficiently wet out, use the soft bristle brush to agitate the productand loosen the soil. Some pieces will require longer agitation than others. If thepiece is heavily soiled or has a lot of deep texture it will require more than a piecethat looks clean and has little texture. If the leather is aniline it sometimes willabsorb the cleaner before you have a chance to extract it. If this happens just add alittle more foam to the leather.Once the soil has been suspended it must be removed. Using a clean white towel,buff the surface to remove the soil and cleaning agent. If the leather still looks dirtyyou may need to repeat the cleaning process until it looks good.After cleaning the leather it will be slightly damp to the touch. This moisture mustbe removed before proceeding. The best way to dry the leather is with the hairdryer. This tool provides a professional looking touch andis very effective. With the heat set to low, hold the hairdryer at a slight angle to the surface. Your goal should be tohave the air flowing along the surface. Air blowing directlyat the piece it will not work nearly as fast.Heat will also allow the pores in the leather to open up.Open pores will allow the moisturizer to be absorbed intothe leather. To apply the moisturizer use a small lint freetowel. Apply a small amount of the product onto the towel and work it evenly intothe surface. Be sure to evenly apply to all areas of the piece being cleaned. Oncemoisturized use the hair dryer again to warm and dry the leather.If the customer elects to have the protection applied we must again employ the hairdryer to prep the surface. With the surface dry and warm use the same procedureas you used for the moisturizer to apply the protector. After the protector has beenapplied dry the leather one last time with the hair dryer. Once the surface iscompletely dry, buff with a dry towel to improve the overall appearance of theleather.Cleaning NubuckThere are two ways to acceptably clean nubuck leather. The first is with the tackcloth. This method is only useful if the leather is very well maintained and there isvery little soiling. If a piece of nubuck is visibly soiled, wet cleaning will be the bestoption. That’s right I said wet cleaning and nubuck in the same sentence! As long aswe take some care to avoid over wetting (that’s not hard at all) wet cleaning is safefor nubuck. In fact if you look at the bottle of aniline cleaner it says it is for leathertypes P, A, and N. Pigmented, Aniline and Nubuck respectively. However, if we wet

clean nubuck it will change the texture of the surface. In order to restore the napthe piece must first be thoroughly dried. Once dry use the tack cloth to buff thesurface and lift the nap. It’s that easy!Leather Cleaning Makes a DifferenceTechnician: “I noticed you have a very nice leather sofa!”Customer: “Thank you!”Technician: “How long have you had it?” “Because they’re known for lasting manyyears.”ETC. ETC… continued conversation.Technician: “What are you using to maintain the suppleness of the skin?”Customer: (Responds) Customer either has a product that came with the sofa, whichis usually still in the package unused or they use a product purchased from somestore. Better yet, they clean the leather by using old household remedies like vinegarand water, etc.The entire conversation between the technician and the customer has led us to a placein which we must explain the difference between what they currently have (product)versus the process that we offer. Here are a few of the questions that may need to beanswered in order to clean their leather furniture.1. Why does it need to be cleaned?2. How often should it be cleaned?3. Customer cleaning vs. Technician Cleaning4. Customer’s products vs. Stanley Steemer’s productsLet’s start with question #1.
Besides showing the customer the actual visual soil that will be displayed byperforming a cleaning demo, it’s important to stress the fact that leather is askin of an animal. Just like our own skin, we must take care of it on a regularbasis. If a home is too dry or too damp, the leather will become directlyaffected by those conditions due to the leather losing its’ moisture content orholding too much moisture. Both will lead to premature damage. If the pieceis placed in direct sunlight, the UV light will directly affect the condition of theleather; possibly changing the dyes, pigments and/or finish. If the customerhas pets, children, or they just use the piece regularly, oils and spills willdirectly affect the leather as well. The leather often will absorb the oils andspills making removal much more difficult than just normal cleaning.

Question #2 Leather is seen as a durable material and can sometimes be forgotten aboutwhen it comes to cleaning. The standard for leather cleaning states thatleather must be cleaned on average every 6 months. Remember that we arenot talking about a fabric but an actual skin of an animal that must bepreserved. This preservation is accomplished through regular cleaning.
Question #3 Can the customer clean the leather pieces themselves? Absolutely! They canalso clean the carpet, wood, tile and build a house themselves. The question iswhy should they clean the leather themselves? We are professional leathercleaners, who have been trained on the various types and conditions ofleathers. Because of what we do, we have been exposed to multiple scenarios,obstacles and customer cleaning methods. We know what works and what hasdone damage to the leather.
Question#4 With all of the products that are on the market, how do you fight against whatthe customer uses? The answer is that there are many products on the marketthat work well for cleaning leather. At the same time there are many productsthat are proven to cause damage to the leather. Just because a bottle saysleather cleaner, doesn’t mean that it’s the best thing for leather. (For example:Acrylics for wood floor cleaning, Strong alkaline spotters for carpet cleaning,Bleaches for tile and grout cleaning and list goes on and on.) Let’s just say thatMr. or Mrs. Customer has the ideal leather cleaning agent in their possession,are they applying it correctly? Are they removing the product thoroughly? Arethey cleaning a piece that is over dried without adding a moisturizer toreplenish the lost moisture? Are they opening the pores of the leather with aheating tool (hair dryer) to allow the penetration of moisture? What is thecustomer using to combat the direct sunlight and the damage caused by UVlight? Are they applying a protective coating that will help this concern?Bottom line; there are great products on the market, but those products are only asgood as the person who finds them and then uses them on a regular basis. We areprofessionals who use professional products that will give professional cleaningresults.
Common concerns with leather cleaners:Silicone- products containing some silicones are known to be water repellant butprevent moisture from passing through the leather. Leather is supposed to breathein order to gain and release moisture. Silicone is also known to cause re-soiling; thisis why it is no longer used in carpet protectors.

Alcohols- products containing alcohol will remove oils from the leather. However, ifnot followed by a moisturizing method we will leave the leather dry and stiff. Alcoholscan break down the protective coating on leather over time, if used incorrectly.Acidic Products- Vinegar is a common household acidic cleaning agent that canproduce good results if used in the right manner. This is one problem with acidiccleaners, they are not best for removing oils and heavy soils. This means there is apotential for over wetting.

Section 6Tile CleaningBecoming proficient at cleaning tile is one of the best ways to increase your jobaverage. More and more homes are being built with tile flooring. It is resilient andeasy to maintain. Tile is a great choice for many homeowners. There is one downside. It is fairly easy to clean so some tile floors get neglected. Not to mention, thecleaning products used on tile floors often have unforeseen side effects. From filmformer to sticky residue, these cleaners cause buildup that can be very difficult toremove.Grout is the primary portion of the floor the customer has trouble cleaning. Withour system we are usually able to clean the grout easily and effectively. However,this is not always the case. Often times the grout does not want to cooperate andwill not clean up. There could be a film or sealer that is making the soil inaccessible.There could even be damage to the floor that is hindering our efforts. Whatever thereason for our hard work not yielding results, the best way to avoid a biggerproblem is to offer a test clean. By showing the customer a small area we can makesure they are happy with the result. Would you rather find out a customer is nothappy with the results before cleaning 1,000 square feet or after?
Tile IdentificationA Visual inspection of the tile and the acid sensitivity test are two primary means ofidentifying the type of tile. It is very important to familiarize yourself with thecharacteristics of various stones. Colors, textures, finishes, and other uniquefeatures related to a specific stone type are all very critical in a successful pre-inspection.When it comes to natural stone tiles, no two pieces will ever be exactly the same.Although you may find some that are similar there are variations throughout therocks that the tiles are derived from that make each tile different. This is just onereason natural stone tiles are so sought after.Most ceramic and porcelain tiles are glazed with a pattern of 2-4 different patternsand you will find identical tiles. Some companies are becoming more creative andmaking Ceramics that never have a repeating pattern, so make sure that you doother tests before cleaning if you are not completely sure of what you are dealingwith.If you are unable to determine the tile origin through a visual inspection, try tolocate a floor vent that you can remove to expose the side of the tile or ask thecustomer if they have any extra tile that you may inspect. If the tile is the same

material all the way through or you see cut marks on the side it is usually a naturalstone. If you can see a distinct surface glaze you know you have a ceramic tile.Many natural stone floors will have narrow non-sanded grout joints to preventabrasions. This is usually the case with marble, limestone, and travertine tiles. Alsonatural stones are acid sensitive and will fizz when acid is applied. This indicatesthat calcium carbonate is present. If the acid reacts, you know that the tile floorshould not be cleaned using ceramic tile and grout cleaning methods.Acid Sensitivity Test
Begin by mixing 50% Stanley Steemer Acid Cleaner to 50% Water in a 2 ouncebottle. Apply a small drop to the tile in an inconspicuous area. The solution will fizzif calcium carbonate is present, verifying that the tile is a natural stone and that it isacid sensitive.Remember, not all natural stones are acid sensitive so you will still need to use othermeans to help you identify the tile. Once you have determined the tiles sensitivity,quickly wipe down the tile to minimize the possibility of etching the stone.Ceramic tiles are a mixture of clays that are pressed, shaped and then fired in a kilnat very high temperatures to form a hard body or bisque.Ceramic tiles can be glazed or unglazed. To form a glazed ceramic tile, liquid glasses(frit) along with metallic oxides are added to the bisque of the tile. This is then firedin a kiln. Glazed tiles will have a low absorption rate and will be hard. Since they areman-made they can come in a variety of colors and patterns. Often times they aremade to look like natural stone.Porcelain Tile are an unglazed ceramic tile. They are generally made from acomposition which results in a tile that is dense, impervious, fine grained and smooth,with a sharply formed face. Porcelain tile is available in matte, unglazed or a high

polished finish. It is the same hard fired material and color all through the body.Porcelain tile is more scratch resistant than ceramic tile. Porcelain is made from finer,denser clay which results in a denser, harder body. Also, porcelain tile is fired at highertemperatures than ceramic, resulting in superior durability and stain resistance.
Marble Tiles are available in a wide range of colors; marble is often used for its beauty.However it is more porous, softer, and chemically sensitive than granite. Marble surfacesshow wear sooner than granite, but can be restored with honing and polishing moreeasily. Marble is easily etched by acids which include soft drinks. Marble and many othernatural stones have what is called “Thirst” which cause them to absorb oils and otherliquids. They are also easily stained. Marble is an alkaline based stone composed ofCalcite and Calcium Carbonate. One of the best ways to identify marble is the veins oncrystal through the tiles.
Granite Tiles are very dense, hard and brittle. Granite stands up well against heavyfoot traffic, making it preferable for commercial lobbies and walkways. The best wayto identify granite is its peppery or speckled appearance.True granite is the hardest of the polished stones. Granite is commonly seen incommercial settings and in high stress situations. Granite is resistant to mostchemicals, except for oils. Oils can permeate the stone. Granite is also ideal forcounters and bar tops. Granite is composed of quartz and feldspar. Granite may notbe etched by most acids, but can be etched by hydrofluoric acid.

Terrazzo Tile is a pre-manufactured tile consisting of marble or granite chips in aPortland cement or epoxy setting in various thicknesses and sizes.Terrazzo is a type of agglomerate flooring and should be treated as marble since themarble chips can been etched by acids.Terrazzo does not normally need from wear and is mostly seen in airports with ametal or aluminum grout line. The natural stone chips do absorb water easilybecause of the “Thirst” level.
Slate Tiles are very dense, but soft and easily scratched. Slate can be usedeffectively outdoors as well as indoors. The composition is made of grains of micaand quartz, plus smaller amounts of chlorite, hematite, and other minerals. Mostslate is gray to black. Nonetheless, the rock may be red or purple, depending on itsmineral content.The surface of slate is generally uneven and may have layers showing on top thatcan be easily chipped. Slate tile has a low to medium absorption rate of oils andother liquids. Most slate floors will be sealed with an oil-repellant penetrating sealerto prevent staining and reduce soiling.

Travertine Tile can be left in its natural state, with no polishing. It is highly porouswith many visible holes, often filled with epoxy or non-sanded grout. Whentravertine is polished it is considered to be in the same classification as marble.Travertine is a very popular tile along with Mexican tile in the southwest region ofAmerica. Some homes will have travertine as borders along walls or a decorativetrim on the outside of their home. It is easily etched by acid cleaners.
Mexican Tiles are a hard-baked, brownish red earthen ware. It is usually hand-made and varies in color, texture and appearance. It may come prefinished orrequire application of various types of sealers or coatings on site to provide awearing surface.Mexican tiles are also known as Saltillo or Terra-Cotta tile. These tiles are veryporous and are sun dried instead of fire-hardened like ceramic tiles. For some ofthese tiles the drying process is done out in the open desert. Coyotes will walkacross the tiles leaving a very desirable foot print effect that many homeowners willpay a premium for. These tiles will often have a very wide, uneven grout line to helpidentify them and are often round on top. Stanley Steemer does NOT clean this typeof tile with our standard tile cleaning process!

Common Grout TypesSanded GroutSanded Grout contains sand to add strength to a larger grout joint. It stops the largergrout joints from cracking or shrinking. Generally grout joints with a width of 1/8 ofan inch or greater will be sanded. Sanded grout is porous and responds well to andshould be sealed. Whether it is color seal or clear we only seal sanded grout withour process.Sanded Grout Mixture:
Portland Cement Fine Sand Grains Polymer or Latex (Additive for strength and flexibility)Sanded Grout Characteristics: Porous with a high absorption rate Used in grout joints 1/8 an inch or greater Course and sandy texture Alkaline based (Contains Calcium Carbonate)
Non Sanded GroutNon Sanded grout is commonly used in natural stone floors and wall or counter topinstallations because of its non abrasive texture. It is generally used in grout joints1\8 of an inch or less.Non Sanded Grout Mixture: Portland Cement Fine Fillers (Silica) Polymer or Latex (Additive for strength and flexibility)Non Sanded Grout Characteristics: Porous with a high absorption rate Used in grout joints 1/8 an inch or greater Smooth Texture Alkaline based (Contains Calcium Carbonate)

Pre Inspection Check ListOnce the type of tile and grout has been identified, the next step is to complete the“Pre-Cleaning Inspection Checklist located on the Tile and Grout Cleaning Invoice.Before we begin the cleaning process we need to inspect the floor for pre-existingconditions.Does the floor have any pre-existing film formers (sealants andwaxes)?The identification of a pre-existing film former is important when choosing acleaning agent and method. Our alkaline cleaner will need to be used to effectivelyremove the sealant or wax. The two most common types of sealants are topical andpenetrating (impregnating).Topical waxes and seals may have a glossy appearance and a smooth texture. First,ask the customer if they applied any wax or sealant to the floor. Next, conduct the“Scratch Test” on a grout joint. Scratch the grout joint with a sharp object.
A film flaking off the grout line will indicate the presence of a seal or wax.The acid sensitivity test may also be performed on grout joints. The fizzing ordiscoloring of the acid solution on the grout joint may indicate that there is notopical pre-existing film former, simply stated, the grout is exposed. The grout fizzesdue to the calcium carbonate in the grout.
Does the floor have raised grout joints?Raised grout joints exist when the grout joints are even with or above the tilesurface. Grout lines should be slightly below the tile surface. If the grout lines are

raised, our topical color grout sealant should not be offered. The product will wearquickly, offering short term protection to the grout. Our penetrating clear groutsealant may be applied to high grout lines but application time will be lengtheneddue to pre-existing conditions of the grout.Are there any cracked or chipped tiles?Remember that cracks in the tile could also indicate loose grout lines and youshould adjust your pressure to make sure you don’t blow out any grout.Are there any loose tiles?Loose tiles could be easily sucked up from the floor if you don’t prepare for them.Adjust your cleaning to be able to go around tiles that may be loose.Is there any cracked or missing grout?If grout is missing you will always want to make the customer aware of the situationbefore hand so that you are not blamed for the damage after the cleaning. If there ismissing grout it is also a good time to let the customer know that there could be apotential for more grout to be removed.How long ago was the floor installed?The floor will take 28-30 days to cure or set. If the floor is a new install, do not cleanor seal until the floor has had adequate time to cure. To err on the side of caution,wait at least 45-60 days.
Cleaning Products
Alkaline Cleaner: PH of 12
Removal (Stripping) of film formers, waxes or sealers Soap scum Oil based stains Grease Dry soil Soap scumOur Alkaline cleaner can take care of everyday spills that would occur in aresidential or commercial setting.

Acid Cleaner: PH less than 1
Phosphoric acid Will etch or dull natural stones such as Travertine, Marble or Limestone May cause discoloration to color grout Grout Haze Calcium based stains/ Calcium Carbonate/Hard water stains Efflorescence- White residue on tile and grout that is caused by deposits ofminerals in the grout that wick to the surface due to moisture. Stain removal- the acid cleaner will dissolve a thin layer of the sanded or nonsanded grout releasing the stain from the grout. The acid cleaner will alsoopen the pores of the grout.The tile and grout cleaners we use should all be mixed at a 7:1 ratio with water.Inappropriate mixing can lead to damage and problems with cleaning.
Stanley Steemer Neutral Tile andGrout Cleaner• Neutral PH (7)• Won’t Cause your sealant “penetrating ortopical” to wear pre-maturely• Won’t leave any kind of residue on thefloor• Increases the longevity of our groutsealants• Concentrated cleaner compared to overthe counter ready to use cleaners – bettervalue – mixes 2oz to a gallon of water• The ability to use at a stronger strength forheavily soiled areas

Why our cleaner works bestA lot of the products you will find in the store are all going to be relatively the same.They are going to be higher in PH and be some sort of film former. The mostimportant part of cleaning is the extraction process. It is going to be difficult for theaverage homeowner to do so. Our Neutral Tile Cleaner is much better than the overthe counter cleaners for the fact that it does not leave any type or residue or filmformer on the floor. Its neutral PH will not weaken any of the sealants applied to thefloor, increasing the longevity of the sealants. Other cleaners will, due to they are ahigher PH.Holloway House – Quick Shine
PH between 8.5 – 9.0 Because of its PH it can cause any type of sealant “penetrating or topical” toweaken over time Will leave a film on your floor and will cause adhesion issues when it comestime to apply a sealant to the grout If the floor is not cleaned properly you will seal in dirt between layers ofAcrylics
Pledge Multi Surface Squirt and Mop PH Between 8.5 – 9.0 It is a Film Former that will leave a residue on the floor Spills can cause the floor to become cloudy and hazy If the floor is not cleaned properly you will seal in dirt between layers ofAcrylics
Tile and Grout Cleaning ToolsWhen it comes to cleaning tile and grout there are several different types of cleaningtools along with brushes that you will use.Tile & Grout BrushesThe brushes you will use are an important step in working your cleaning agent intothe tile and grout.Once the cleaning agent has been applied to the floor the stiff bristled brush (left)and the grout brush (right) will be used to aggressively agitate the soiled areas,under cabinets, and any other hard to reach areas.

Tile & Grout Rotary Tool (Cyclone)The set-up and basic components of the rotary tile and grout tool are similar to thatof the carpet cleaning wand. The rotary tile and grout tool utilizes a combination ofhigh pressure, heated water, and vacuum to thoroughly clean and rinse the floor.The tool consists of two jets that are on a swivel. These jets spin as high pressuredwater is released.
This tool is primarily used to clean the open areas of the floor. When cleaning withthe rotary tile and grout tool, it is important to overlap your cleaning path as youwork across the floor. Additional cleaning strokes may be necessary to thoroughlyclean the grout joints. It is very important to dry the floor with the rotary tool toremove excess moisture. Multiple dry strokes may be necessary to remove moisturethat has penetrated into the pores of the grout joints.Care should be taken if the following exist: Uneven or raised tiles cracked or chipped tiles Cracked or missing grout.If any or all of the above conditions exist, you must decide if cleaning the floor willcause additional damage. If the areas of concern are minor and isolated, the cleaningprocess for those specified areas may consist primarily of a cleaning agentapplication and the use of your tile and grout brushes.

The rotary tile and grout tool should be inspected for the following prior to andduring every cleaning: The Teflon ring should be checked for imbedded rocks, debris and jaggededges that may cause scratches to the tile. The Teflon ring should bereplaced on an as needed basis. If the ring is damaged or dirty this will leadto damage to the floor. Verify that the jets are positioned below the Teflon ring to prevent contactand damage to the tile.
Gekko WandThe single jet Gekko is mainly used to clean along baseboards, corners, undercabinets, and any other hard to reach areas. In many cases, it may be necessary touse the single jet Gekko wand in the removal of waxes or sealants, heavily stainedareas, or tight areas.The Gekko also has a head attachment with 4 jets. Much like the carpet wand thejets are stationary and set up in line with each other. This tool is used to clean theopen areas of the floor and is more maneuverable than the cyclone. When cleaningwith the 4 jet Gekko, it is important to overlap your cleaning path as you workacross the floor. Additional cleaning strokes may be necessary to thoroughly cleanthe grout joints. It is very important to dry the floor to remove excess moisture.Multiple dry strokes may be necessary to remove moisture that has penetrated thepores of the grout joints.The tool should be inspected before each use to ensure it is setup properly and noforeign objects have become attached to the tool. Proper care and inspection willensure that we do not damage anything during the cleaning.

Single Jet Gekko Head 4 Jet Gekko HeadCleaning ProcessOnce you have inspected the floor, cleaning begins with an application of theappropriate cleaning agent. In the majority of situations this will be the alkalinecleaner. Alkaline cleaner is the best choice for everyday dirt and grime.Apply the product liberally to the floor. Take care not to get any overspray onadjacent flooring, appliances, or woodwork. Use a deck brush to work the productinto areas that may be difficult to reach. Moreover, if the surface of the tiles areheavily soiled it is a good idea to work the product in with the deck brush. Also usethe grout brush to work the product into the grout lines. This is where your effortsare sure to be rewarded during the cleaning. If there is a heavy buildup of soils yourcleaning will go much faster if the cleaner is scrubbed into the grout lines. Allow theproduct anywhere from 5-15 minutes to work under normal situations. If the flooris extremely soiled longer dwell time may be necessary.After the product has had adequate dwell time use the Gekko with the single jethead or the 4 jet head to clean the edges of the room. The Cyclone can be used toclean the open areas. However, it will not clean all the way up to the wall.The Cyclone or 4 jet Gekko are used in basically the same way. Moving the toolforward and back with slower strokes will usually produce the best results. If thetool is moved too fast you will likely leave streaks or swirls in the grout especiallywith the Cyclone.Dry strokes are just as important on tile as they are on carpet. Removal of theexcess water will produce better results and reduce safety hazards. If puddlesdevelop after the cleaning have your partner use a towel under the deck brush towipe up these areas.

Clear seal applicationAfter the tile and grout has been thoroughly cleaned, it is important to remove asmany grout discolorations as possible. Blemishes within the grout will still be visibleafter the cleaning. Remember, our clear seal can only be applied to sanded grout.After cleaning the tile you must allow at least 10-15 minutes of dry time before youcan apply sealer.The tools you will need for clear sealing are:
Clear seal bottle with either a Brush applicator tip or a rolling wheelattachment.
Knee rollers White terry cloth towels
Start by adding the pre-mixed clear seal to the applicator bottle. Rotate the nozzle ofthe brush applicator to the open position and place the tip in the grout line.Designate a starting point and work yourself out of a room. It is very important tostart at one side of a room and work in only one direction at a time. Apply slightlydownward pressure and follow the grout joint. Wipe off any excess sealer from thetile floor with the white terry cloth towels. We recommend the customer stay offthe floor for 30 minutes and not clean or maintain the floor for 24 hoursPre-Color Sealing InspectionBefore offering color seal to a customer, a proper pre-inspection will help you avoidfuture problems. These problems will include application, wearing, and many otherissues.

There are 4 basic points to this pre-inspection:1. Color sealant can only be applied to sanded grout. Make sure to use theproper testing procedures we discussed earlier to make sure the customerhas sanded grout.
2. The grout lines must be set slightly below the tile surface, not even or above.High grout lines will increase application time and decrease the longevity ofthe sealant.3. Make sure to inspect the grout for any sort of film former. Prior to cleaning,ask the customer if they are aware of the existence of a film former. Next,complete the “Scratch Test” to see if there is any flaking from a wax, clearsealant, or color seal.4. Inspect the surface for the following conditions: chipped or cracked tile andgrout, missing grout or loose tiles.Application of Color SealTrim approximately 1/8 of an inch from the color seal brush bristles. This keeps thebrush closer to the grout lines to help prevent product from squeezing onto the tile.For best results, hold the bottle of color seal that is attached to the brush handlewith your fingertips.Place the brush in the grout line, then gently apply pressure to the applicator bottleallowing color sealant to flow into the grout line.Push yourself across the floor, maintaining a consistent even pressure to theapplicator bottle. Do not apply too much product. This will create a longer wipingand buffing process.Alternatively, you can apply a small bead of the product to the grout line and use abrush such as a Tee jet brush to spread the product on the line. This method is

easier to learn and will yield the same results. Once again, it is very important thatthe product is not over applied.BuffingDuring your wiping process a light color seal haze will remain on the tile. Try towipe up dark or heavy spots. The remaining haze will be lifted during the buffingprocess. Allow the grout lines to dry for a minimum 10-15 minutes after sealing.Lightly mist a small area of the floor with clean water or a diluted neutral cleaner.Use a low speed buffer with a white buffing pad. The white pads are generally theleast aggressive and will not remove color sealant from the grout. Buffing willloosen the haze from the surface of the tile.Next, place a clean terry cloth towel on the floor. Place the pad and the buffer on topof the towel and dry buff the area. This last step removes the haze from the floor andinto the towel. You will need to complete this step with new towels until the towelcomes out clean.If grout lines are stained and cannot be made to look new with our cleaning process,color sealant is a great option. The product however, is not bullet proof and willstart to show signs of wear after 2-3 years. Sometimes these areas can simply betouched up but many times the floor will need to have the product reapplied. If thecustomer uses a neutral pH cleaner the color seal will have a longer life span as wellas the floor looking better between cleanings.Touch UpPerform your touch up at the end of the color sealing process using a clean, dampterry-cloth towel to wipe down all baseboards, doors, and appliances that may haveexcess cleaning agent or color seal on them. Walk through the entire area slowly toidentify areas that were missed. These areas may not be uniform in coverage orhave excess color seal haze.The key to touch-up is to use only a small amount of color sealant. Use your finger orthe applicator brush with a small amount of product.

Section 7Hardwood CleaningThere are three types of hardwood floors that Stanley Steemer.Solid Wood Floor:
Solid wood from top to bottom. Can come Pre-Finished or can be Finished in the home. (Site Finished) Comes in all shapes and sizes. Can be Cleaned and Maintenance Coated or Cleaned and Poly Coated.
Engineered Floor: Has multiple layers of plywood with a layer of Hardwood on top. It is very stable and less prone to moisture related issues. Can come Pre-Finished or Site Finished. Can be Cleaned and Maintenance Coated or Cleaned and Poly Coated.
Laminate Flooring: High density fiberboard sandwiched between two melamine (Laminate)coatings. Has a high quality photographic paper with a picture of wood flooring belowthe top layer of melamine. (Laminate) CAN ONLY BE CLEANED
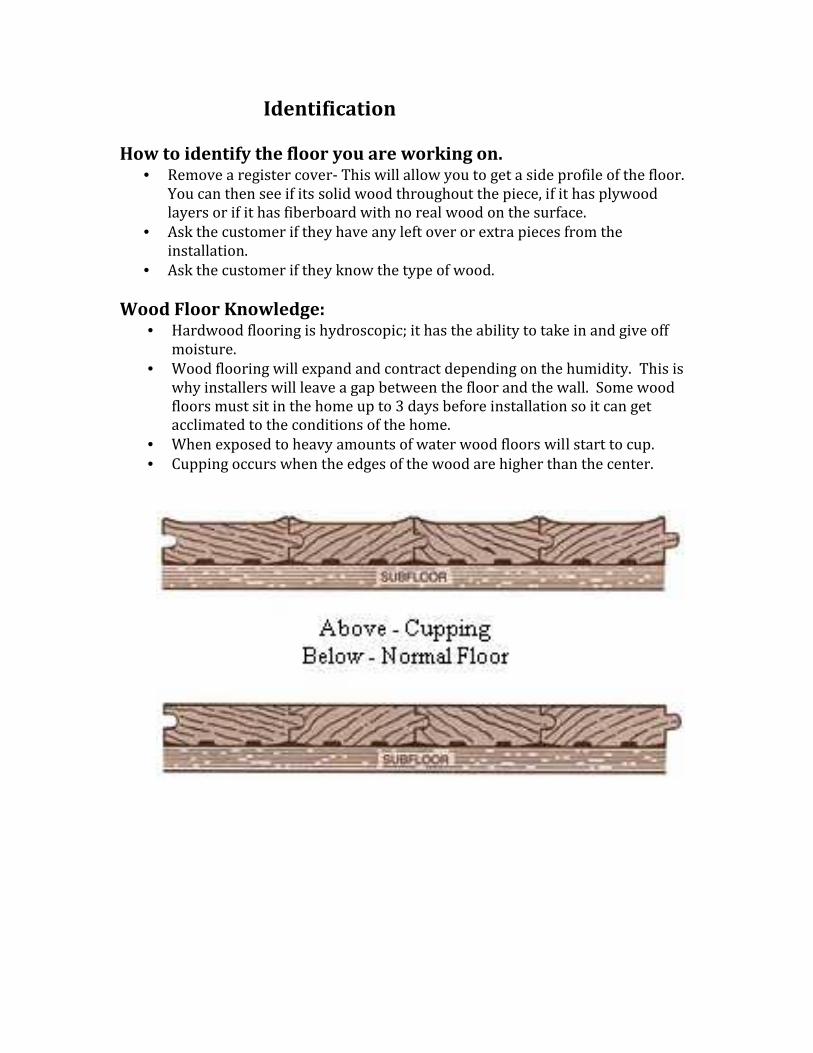
Identification
How to identify the floor you are working on. Remove a register cover- This will allow you to get a side profile of the floor.You can then see if its solid wood throughout the piece, if it has plywoodlayers or if it has fiberboard with no real wood on the surface. Ask the customer if they have any left over or extra pieces from theinstallation. Ask the customer if they know the type of wood.
Wood Floor Knowledge: Hardwood flooring is hydroscopic; it has the ability to take in and give offmoisture. Wood flooring will expand and contract depending on the humidity. This iswhy installers will leave a gap between the floor and the wall. Some woodfloors must sit in the home up to 3 days before installation so it can getacclimated to the conditions of the home. When exposed to heavy amounts of water wood floors will start to cup. Cupping occurs when the edges of the wood are higher than the center.

Why should it be professionally cleaned?
Retail products can actually build up on the floor causing it to look dull andlifeless. Normal everyday cleaning cannot remove the tough dirt that day to dayliving brings into the home. Dirt and Debris on the floor acts like sandpaper and overtime will damagethe floor. Regular Deep Cleanings will help prevent the need for a full sand andrefinish. Our Deep Cleaning Process safely and effectively extracts build up.
Cleaning Options:
Clean Only: This process scrubs the floor to extract dirt and other contaminants,prolonging the amount of time needed before a full sand and refinish isneeded. This can be performed alone as a routine maintenance option. This will not remove pre-existing scratches or heavy traffic areas.
Maintenance Coat Application: Floor must be cleaned prior to application. Is a fast drying application that provides a uniform sheen to the floor. The maintenance coating will help extend the life of the floor. The maintenance coating is a durable water based urethane coating. This will not cover up any pre-existing scratches or traffic areas. However, itdoes help hide these imperfections.
Poly Coat Application: Floor must be cleaned prior to application. This polyurethane coating creates a barrier against water and chemicaldamage. Is more durable than the maintenance coating. Will help floors resist everyday scratches and scuffs. An application of the poly coat preserves the beauty of your hardwood floor.

Products:
Stanley Steemer Alkaline Cleaner:This is the first cleaner to be used during the cleaning process. It is an aggressivecleaner that easily removes, ground-in dirt, body oils, shoe marks, beverages, etc. Ithas a PH of 12-14 and must be diluted at a rate of 7 parts water to 1 part Alkalinecleaner.
Stanley Steemer Neutral Cleaner:This is the second cleaner to be used during the cleaning process. Using thisproduct will neutralize the floor and remove any residue left from the AlkalineCleaner. This product will not leave any residue on the floor. It has a PH of 7-9 andmust be diluted at a rate of 7 parts water to 1 part Neutral Cleaner.

Maintenance Coat:This is an additional product that can be applied to certain floors after our cleaningprocess is completed. It is an easy way to revitalize already finished hardwoodfloors by giving them a uniform sheen. It is a durable water based urethane coatingthat is easily applied. The maintenance coat will not cover up deep scratches andgouges, but it does add a thin layer of protection to the floor. Before application thisproduct should be rocked gently back and forth several times to mix the contents.One Quart will cover 500 sq ft. Allow the floor to dry for at least one hour beforewalking on it with socks. A second coating may be applied after two hours.Furniture and area rugs may be replaced after the product has fully cured which isusually 24 hours.
Poly Coat:This product is applied post cleaning to help give the floor protection and a greatlook. Poly coating is more difficult to apply than the maintenance coating andrequires multiple application techniques as well as practice. This product shouldnever be shaken, it must be rocked gently and stirred for 30 seconds. The poly coatis 90% cured in 24 hours, has a UV inhibitor to minimize sunlight color damage andprovides superior scratch and scuff resistance. It is available in 4 sheens (SupperMatte, Satin, Semi-Gloss and Gloss). The coverage rate is 500 – 700 sq ft per gallonof product. The coating should be safe to walk on after 3-4 hours and furniture canbe placed back after 24 hours.

Why use our Retail Wood Cleaner? Is a neutral p.h. cleaner Cleans without leaving a harmfulresidue behind. Safe for Laminate, Engineered andSolid Wood floors.
Typical Cleaning Products Customer Use:
Orange Glo – Is an acrylic which leaves a plasticizedcoating which does not allow the polyurethane to performproperly. It restores the shine of floors but only temporary.The film will start to build up overtime and appear dull.
Murphy’s Oil Soap – Leaves a sticky vegetableresidue that attracts dirt and leaves the floor dull and lifeless.
Vinegar and Water – Vinegar is an acid on the p.h.scale. Overtime it will breakdown the existing polyurethane.
Testing:Customers use many different items while cleaning their own floor. We must verifywhat has been used on the floor. Some waxes and polishes, if not removed, will notallow the maintenance coat to adhere to the floor. You must verify that the wax orpolish has been removed through the cleaning process if you wish to apply themaintenance coat. Below are some tests that can be performed in order todetermine if the floor has a wax or polish on it.Testing for Paste Wax:
First lightly clean the area with Stanley Steemer Neutral Cleaner. Use a small amount of mineral spirits on a clean white cloth and rub an areaof the floor that has NOT been exposed to high traffic. If a discoloration of film appears on the cloth, then paste wax is likelypresent. The floor should NOT be maintenance coated.
Testing for Acrylic Polish: Use the product included in the acrylic test kit. Apply a few drops on the floor in the corner of the room. If the spot turns white, acrylic polish is likely present. Clean with SS Alkaline and then recheck the floor. Continue these steps until the polish has been removed. If the polish cannot be removed we should NOT apply the maintenancecoating.*If you cannot remove the wax or polish you can add one cup ofammonia to one full tank of diluted alkaline cleaner.
Cleaning Steps:
Step 1: Identify Solid Wood Engineered Wood Laminate
Step 2: Note Existing Problems Bare Wood, Scratches, Gouges, Pet Stains, Delamination, Etc………
Step 3: Determine Maintenance Products Mop & Glo, Orange Glo, Murphy’s Oil etc…
Step 4:Test for Acrylic and Paste Wax

Use Stanley Steemer Test kit for Acrylic Test, Mineral Spirts for Paste Waxtest as previously mentionedStep 5: Customer Expectations
Determine expectations to provide desired service line e.g…Clean only Cleanand Maintenance coatStep 6: Vacuum
Vacuum all loose dust, dirt and debris from the floor. This will keep themachine from getting clogged up and will help prevent larger items fromscratching the floor.Step 7: Clean with Alkaline (Skip this step if you’re cleaning a laminate floor)
Mix 1 part Alkaline Cleaner with 7 parts water in the machines solutionstank. Engage solution, brush and vacuum. (Once the brush is turned on themachine must start moving, if not the brush can damage the finish on thewood) Make multiple passes in a straight line with the machine until the entire floorhas been cleaned. It is important to go with the grain of the wood, whenpossible. Pay special attention to corners and edges, these will have to be cleaned byhand using a micro fiber mop and diluted alkaline cleaner. For stubborn spots use the diluted alkaline cleaner and a sponge. (Alkalinecleaner may have to dwell) Empty dirty solution from the recovery tank into a sanitary sewer. (Toilet) Show the customer the dirty solution so they can see the results. It may be necessary to repeat these steps more than once for best cleaningresults.
Step 8: Clean with Neutral This step is developed to neutralize the floor and remove any residue leftfrom the alkaline cleaning step. Neutral cleaner is designed to remove different contaminants and shouldnever be mixed with the alkaline cleaner. Mix 1 part Neutral Cleaner with 7 parts water in the machines solution tank. Engage solution, brush and vacuum. Make multiple passes in a straight line with the machine until the entire floorhas been cleaned. Pay special attention to corners and edges, these will have to be cleaned byhand using a micro fiber mop and diluted neutral cleaner. (don’t use thesame micro fiber mop that was used with the alkaline cleaner) Empty dirty solution from the recovery tank into a sanitary sewer. (Toilet)

Step 9: Micro Fiber Mop Use the micro fiber mop and mop the entire floor, working your way out ofthe room.
Step 10: Maintenance Coat (Optional) Determine the type of floor it is, you can only apply the maintenance coat tosolid and engineered wood floors, it cannot be put on laminate flooring. Perform steps 1 through 3. Gently rock the bottle of maintenance coating back and forth to mix thecontents. Apply an ample amount of maintenance coating to a clean microfiber mop . Apply maintenance coating in a line across the floor and spread evenly. Work in small sections and go with the grain of the wood. One quart of maintenance coating will cover 500 SqFt. Once the maintenance coat is applied take the microfiber mop pad, rinse itout and place it in a Ziploc baggie to prevent from drying. Allow the product to dry for 1 hour before walking on it with socks. A second coat can be applied 2 hours after the first coat. This will addanother layer of protection on to the floor especially in high traffic areas. Wait 24 hours before moving furniture and area rugs back on the floor.
Step 10: Poly Coat (Optional) Determine the type of floor it is, you can only apply the poly coat to solid andengineered wood floors, it cannot be put on laminate flooring. Perform steps 1 through 3. Gently rock poly coating, add XL catalyst and stir product for 30 seconds. Apply poly in a line across the floor and spread evenly with any of thefollowing application methods.
o Cut in pad, T-Bar and ¼ inch nap roller. Allow product to dry for at least 3-4 hours. Clean all equipment. A second coating can be applied after the 3-4 hour wait has elapsed. This willadd another layer of protection on to the floor especially in high traffic areas. Wait 24 hours before moving furniture back on the floor. Wait 2 weeks before having rugs placed back on floor.

Machine Maintenance:
Daily: Clean and inspect: tanks, hoses, brush, squeegees and filters. Check power supply cable for damage.
Weekly: Check spray nozzles.
Yearly: Inspect vacuum motor brushes.
Preventing Moisture Damage:Wood is a hygroscopic material and we need to be very careful with moisture.Standing water should never be allowed to sit on the floor longer than 5 minutes. Use a clean towel to remove spills and puddles quickly. Bring in the air mover to help dry the floor. (You cannot use an air mover tohelp dry the maintenance coat) Empty the recovery tank before it is full. Place a towel under the brush when not cleaning. If you follow these guidelines you should not have any moisture relatedissues.

Section 8Front Door Four
The Front Door Four is a basic approach to customer service that, when performedcorrectly, creates a customer experience that cannot be matched. It has beenimplemented into our branch system and has been received with great excitement.Its simple message of First Impression, Outstanding Walk-Thru, Unparalled Cleaningand Retention Focused Close has given our staff the ability to easily remember thekey aspects to providing great customer service. The Front Door Four bestdescribes our expectations of how a job should go. These four steps give thetechnicians a simple reference tool to help them remember the 4 basic steps ofproviding excellent customer service. Quite simply it is Stanley Steemer and MUSTbe the expectation that we strive for.FirstImpressionOutstandingWalkthruUnparalleledCleaningServiceRetentionFocusedClose

First Impression- Smile- Look great
- A crew should not leave the shop unless in complete uniform andready to perform. Not something that is established at the frontdoor.
- Polite and positive- Great Introduction
- We do not have “partners or assistants” We are a team. A properintroduction would be: Mrs. Jones, good afternoon! I’m Ron andthis is James, we’ll be your team today. Thank you so much forhaving us out today!
- Thank the customer- Be on-time
- Front of the time frame is on time.
- Communicate with the customer
- If there is an issue, do not rely on the crew to resolve the problem.
Focus groups and polling has told us customers want tofeel safe and comfortable with the crew in their home. Thefirst impression sets the tone for a great customerexperience.
Outstanding Walk Thru- Review work order
- Accuracy
- Icebreaker for the walk through
- Actively Engage/Listen- Make eye contact; give the customer your full attention. Put the
handheld down, that is not your focus, the customer is!
- Explain process- Deep Steam cleaning, carefully move your furniture, treat spots
and groom the carpet.

- We normally work from the furthest point in the home and workour way out.
- Identify problem areas/ observe- Set expectations
- Do this upfront, at the end is an excuse.
- Tell how long it will take to dry
- Tell them how long you think you will be there!
- Additional product and services- A clean home is a healthy home!
- AAFA Certification
- Engage with the customer and share our results. This could changeall perception of what we do and why we’re there. Added valuegoes through the roof!
- “Healthy Home Report”Have energy, be prepared to put on a show and be willing to do whatever isnecessary to provide an exceptional service and experience
UnparalleledCleaningService- Involvethecustomer- Respecttheirproperty- Movethefurniture
- Informthecustomerthatwearegoingtomoveeverythingpossibleandthatweneedtoknowifanythingisdamagedortheywouldn’tlikemoved.- Not–Whatdoyouwantustomove.
- Removespotsandstains- UtilizetherightproductfortherightspotanduseCHAT.
- Cleaningbestpractices- Dry, wet, dry- SS Wand Stroke
- No pooling or puddles
- CHAT
- Groomthecarpet

- Nojobiscompleteuntilthecarpetisgroomed- Appearance
- Evenappearance- Shineswiththenap- Removesfootprints- Revivestrafficpatterns
- Functionality- Removeshair- Distributespreandposttreatments- DECREASESDRYTIME- Lastchancetoinspectthecleaning
Focusgroupsandpollingshowcustomerswantthejobcleanedright,thefirsttime.Allspotsandstainsremoved.Theywanttheirhomesfreeofallergensandgerms.Theyexpectaprofessionalwelltrainedtechnicianthatworksquicklyandefficiently.
RetentionFocusedClose
60%ofourcustomersneveruseusagain!22%ofOYCGrenew.
- Postcleanwalkthru- Truck is still on, you are in clean mode- Walk the entire job- Pretty good is not good enough, it must be great.
- Reviewinvoice- Recommendations
- Take your time, sit with the customer.
- Use history and general knowledge to address future cleanings
- Consider other products and services for transition areas.
- SCHEDULE THEIR NEXT SRVICE
- Leavebehinds- Show them what we do, give them the visual.
- Get an email address, talk about future promotions.
- SPEND THE TIME!
- PHA/emailaddress- Customer Referral- “CarpetGuys”THANKTHECUSTOMER