statim 2000s 2006b - home | scicanusa · 2.1 disclaimers use only steam-process distilled water in...
TRANSCRIPT
STATIM2000/5000 Operator’s Manual 95-108027 Rev 7.0. Copyright 2012 SciCan Ltd . All rights reserved.
STATIM 2000/5000 CASSETTE AUTOCLAVE™
• Operator’s Manual
• Manuel de l’utilisateur
• Manual del Operador
• Manual do Operação
•
1
Table of Contents1. Introduction . . . . . . . . . . . . . . . . . . . . . . . 22. Important Information . . . . . . . . . . . . . . . 32.1 Disclaimers2.2 Statim 2000 - Unit Overview2.3 Statim 5000 - Unit Overview3. Installation . . . . . . . . . . . . . . . . . . . . . . . . 63.1 Environmental Considerations3.2 Unit Placement3.3 Connecting the Waste Bottle3.4 Filling the Reservoir3.5 Priming the Statim Pump3.6 Setting the Time and Date3.7 Language Selection3.8 Assigning Unit Identifier Number3.9 Adjusting the Cycle Drying Time3.10 Preparing the Unit for Use3.11 Shipping the Unit4. Instructions for Use . . . . . . . . . . . . . . . . 114.1 Statim 2000 - Cassette4.2 Statim 5000 - Cassette4.3 Statim 5000 - STAT-DRI Plates4.4 Preparing and Loading Instruments4.5 Using Biological/Chemical Indicators4.6 Instrument Weight Table4.7 Statim 2000 - Selecting a Cycle4.8 Statim 2000 - Running a Cycle4.9 Statim 5000 - Selecting a Cycle4.10 Statim 5000 - Running a Cycle4.11 Stopping a Cycle
5. Maintenance . . . . . . . . . . . . . . . . . . . . . . 285.1 Cleaning the Cassette5.2 Cleaning the Water Reservoir Filter5.3 Cleaning the Reservoir5.4 Cleaning the Exterior Surfaces5.5 Changing the Statim 2000 Air Filter5.6 Changing the Bacteria Retentive Air Filters5.7 Replacing the Cassette Seal5.8 Maintaining Fluid Levels5.9 Reading Water Quality5.10 Preventative Maintenance Schedule6. The Communication Port . . . . . . . . . . . . 326.1 The RS232 Communication Port6.2 Installing the Statim Data Logger6.3 Cycle Printout Overview7. Internal Printer . . . . . . . . . . . . . . . . . . . . 377.1 Installing Paper on the Internal Printer7.2 Removing Internal Printer Paper Jams8. Troubleshooting . . . . . . . . . . . . . . . . . . 419. Spare Parts List . . . . . . . . . . . . . . . . . . . 4510. Warranty . . . . . . . . . . . . . . . . . . . . . . . . 4611. Specifications . . . . . . . . . . . . . . . . . . . 4711.1 Statim 2000 - Specifications11.2 Statim 5000 - Specifications
STATIMCassette Autoclave and Statim are registered trademarks and STAT-DRI, Your Infection Control Specialist, DriTecR and DriTecC logos aretrademarks of SciCan Ltd. All other trademarks referred to in this manualare the property of their respective owners.
For all service and repair inquiries:In Canada 1-800-870-7777United States: 1-800-572-1211Germany: +49 (0) 7561-98343-620International: (416) 446-4500Email: [email protected]
Manufactured by:SciCan Ltd.1440 Don Mills Road,Toronto ON M3B 3P9CANADAPhone: (416) 445-1600Fax: (416) 445-2727Toll free: 1-800-667-7733
EU RepresentativeSciCan GmbHWangener Straße 7888299 LeutkirchGermanyTel.: +49 (0)7561 98343 - 0Fax: +49 (0)7561 98343 - 699
SciCan Inc.701 Technology DriveCanonsburg, PA 15317USAPhone: +1 724 820 1600Fax: +1 724 820 1479Toll free: 1-888-632-6031
SciCan MedtechAlpenstrasse166300 ZugSWITZERLANDPhone: +41 (0) 41 727 7027Fax: +41 (0) 41 727 702

2
1. Introduction
Congratulations on your selection of the STATIM Cassette Autoclave®. We are confidentthat you have purchased the finest equipment of its type. The Statim is a compact,counter-top unit that features a number of sterilizing cycles designed to meet your needsand suitability for steam sterilization. The details of installing, operating and servicing your Statim® are all contained within thisoperator’s manual. To ensure years of safe, trouble-free service please read theseinstructions before operating this unit and keep them for future reference. Operational,maintenance and replacement instructions should be followed for the product to performas designed. Contents of this manual are subject to change without notice to reflect changes and improvements to the Statim product.The Statim is suitable for the sterilization of dental and medical instruments designed to withstand steam sterilization. The Statim is not designed to sterilize liquids, clothloads, biomedical waste or materials not compatible with steam sterilization. The processing of such loads may result in incomplete sterilization and / or damage tothe autoclave. For more information about instrument suitability for steam sterilization,consult the manufacturers’ reprocessing instructions.
Statim 5000
Statim 2000
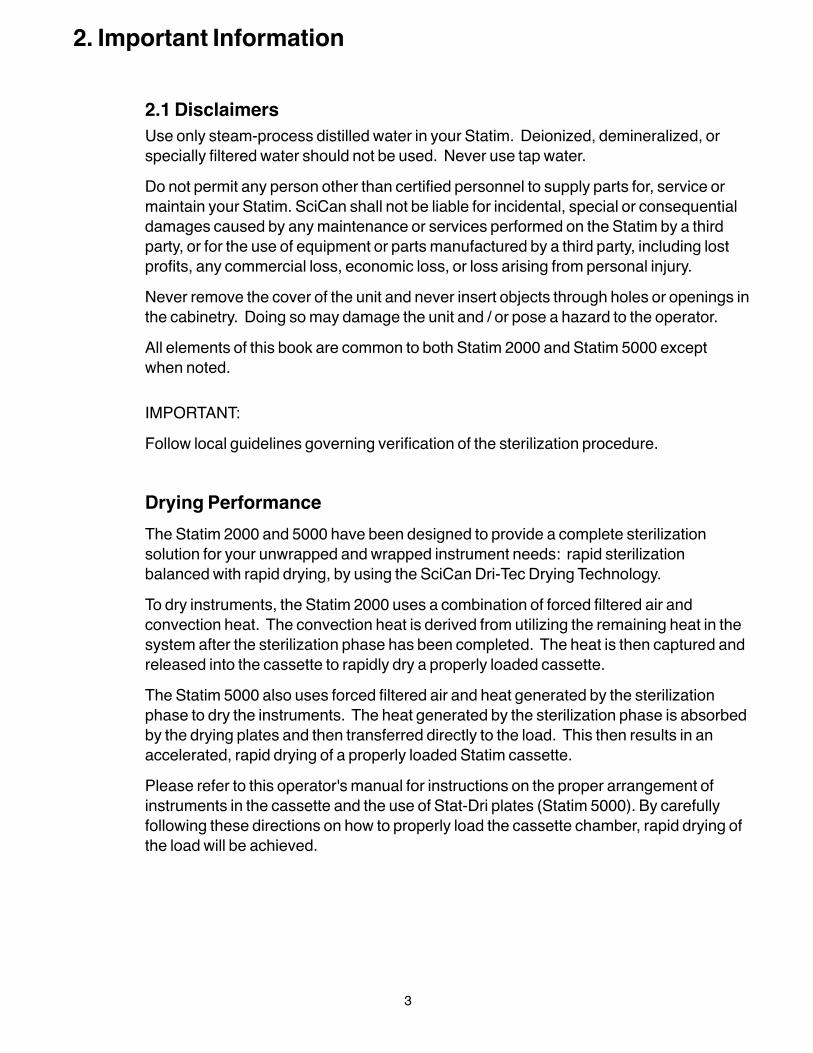
2.1 DisclaimersUse only steam-process distilled water in your Statim. Deionized, demineralized, orspecially filtered water should not be used. Never use tap water. Do not permit any person other than certified personnel to supply parts for, service ormaintain your Statim. SciCan shall not be liable for incidental, special or consequentialdamages caused by any maintenance or services performed on the Statim by a thirdparty, or for the use of equipment or parts manufactured by a third party, including lostprofits, any commercial loss, economic loss, or loss arising from personal injury. Never remove the cover of the unit and never insert objects through holes or openings inthe cabinetry. Doing so may damage the unit and / or pose a hazard to the operator.All elements of this book are common to both Statim 2000 and Statim 5000 except when noted.
IMPORTANT:Follow local guidelines governing verification of the sterilization procedure.
Drying PerformanceThe Statim 2000 and 5000 have been designed to provide a complete sterilizationsolution for your unwrapped and wrapped instrument needs: rapid sterilizationbalanced with rapid drying, by using the SciCan Dri-Tec Drying Technology.To dry instruments, the Statim 2000 uses a combination of forced filtered air andconvection heat. The convection heat is derived from utilizing the remaining heat in thesystem after the sterilization phase has been completed. The heat is then captured andreleased into the cassette to rapidly dry a properly loaded cassette.The Statim 5000 also uses forced filtered air and heat generated by the sterilizationphase to dry the instruments. The heat generated by the sterilization phase is absorbedby the drying plates and then transferred directly to the load. This then results in anaccelerated, rapid drying of a properly loaded Statim cassette.Please refer to this operator's manual for instructions on the proper arrangement ofinstruments in the cassette and the use of Stat-Dri plates (Statim 5000). By carefullyfollowing these directions on how to properly load the cassette chamber, rapid drying ofthe load will be achieved.
3
2. Important Information
4
2. Important Information
The following symbolsappear in the marginsof this book.
The following symbolsmay appear on the unit:
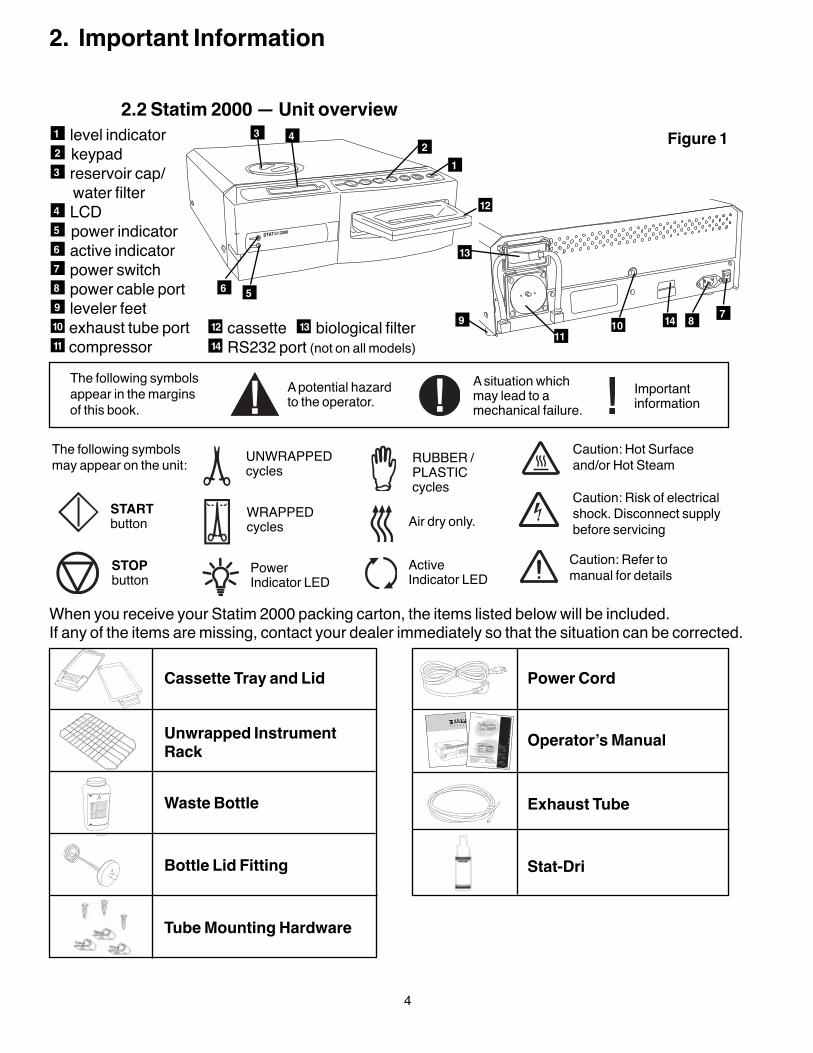
2.2 Statim 2000 — Unit overview
When you receive your Statim 2000 packing carton, the items listed below will be included. If any of the items are missing, contact your dealer immediately so that the situation can be corrected.
n1 level indicatorn2 keypadn3 reservoir cap/
water filtern4 LCDn5 power indicatorn6 active indicatorn7 power switchn8 power cable portn9 leveler feetn10 exhaust tube portn11 compressor
n12 cassette n13 biological filter n14 RS232 port (not on all models)
Cassette Tray and Lid
Unwrapped InstrumentRack
Waste Bottle
Bottle Lid Fitting
Power Cord
Operator’s Manual
Exhaust Tube
Tube Mounting Hardware
Stat-Dri
n2n1
n12
n13
n14 n9
n6
n4 n3
n5
n8 n7 n10
n11
Figure 1
www.scican.com
¥ OperatorÕs Manual
¥ Benutzerhandbuch
¥ Manuel de lÕutilisateur
¥ Manual del Operador
¥ Manuale per operatori
STATIM 2000S/5000S Operator’s Manual 95-108430 Rev 1.0.
Copyright 2003 SciCan. All rights reserved.
STATIM 2000S/5000SC a s s e t t e A u t o c l a v e ™
A potential hazard to the operator.
A situation which may lead to a mechanical failure.
Importantinformation
STARTbutton
RUBBER /PLASTICcycles
UNWRAPPEDcycles
WRAPPEDcycles
STOPbutton
Air dry only.
PowerIndicator LED
ActiveIndicator LED
Caution: Hot Surfaceand/or Hot Steam
Caution: Risk of electricalshock. Disconnect supplybefore servicing
Caution: Refer tomanual for details
5
2. Important Information
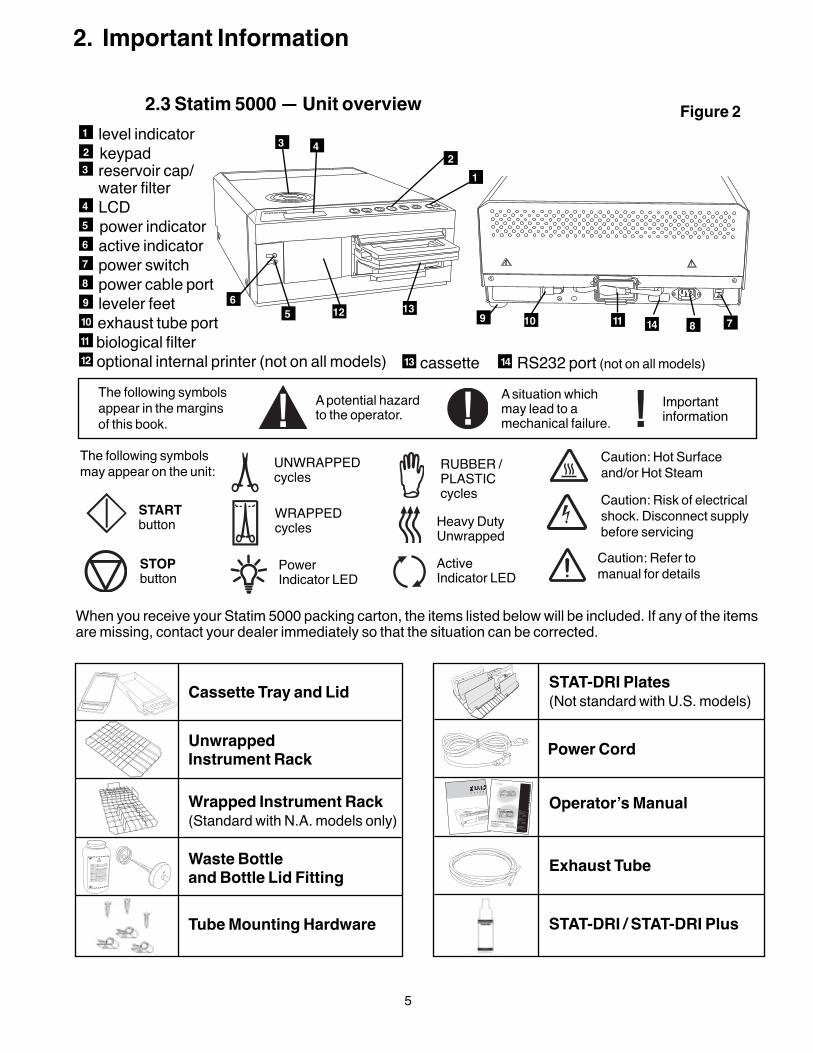
When you receive your Statim 5000 packing carton, the items listed below will be included. If any of the itemsare missing, contact your dealer immediately so that the situation can be corrected.
n1 level indicatorn2 keypadn3 reservoir cap/
water filtern4 LCDn5 power indicatorn6 active indicatorn7 power switchn8 power cable portn9 leveler feetn10 exhaust tube portn11 biological filtern12 optional internal printer (not on all models) n13 cassette n14 RS232 port (not on all models)
Cassette Tray and Lid
Unwrapped Instrument Rack
Wrapped Instrument Rack(Standard with N.A. models only)
Waste Bottle and Bottle Lid Fitting
STAT-DRI Plates (Not standard with U.S. models)
Power Cord
Operator’s Manual
Exhaust Tube
Tube Mounting Hardware STAT-DRI / STAT-DRI Plus
n2n1
n9 n6
n4 n3
n5 n8 n7 n10
n13 n12 n11 n14
Figure 22.3 Statim 5000 — Unit overview
The following symbolsappear in the marginsof this book.
The following symbolsmay appear on the unit:
A potential hazard to the operator.
A situation which may lead to a mechanical failure.
Importantinformation
STARTbutton
RUBBER /PLASTICcycles
UNWRAPPEDcycles
WRAPPEDcycles
STOPbutton
Heavy DutyUnwrapped
PowerIndicator LED
ActiveIndicator LED
Caution: Hot Surfaceand/or Hot Steam
Caution: Risk of electricalshock. Disconnect supplybefore servicingCaution: Refer tomanual for details
www.scican.com
¥ OperatorÕs Manual
¥ Benutzerhandbuch
¥ Manuel de lÕutilisateur
¥ Manual del Operador
¥ Manuale per operatori
STATIM 2000S/5000S Operator’s Manual 95-108430 Rev 1.0.
Copyright 2003 SciCan. All rights reserved.
STATIM 2000S/5000SC a s s e t t e A u t o c l a v e ™
6
3. Installation
3.1 Environmental ConsiderationsThere are several factors that may affect the performance of your Statim. Please review these factors, and select a suitable location in which to install the unit.
• Temperature and HumidityAvoid installing your Statim in direct sunlight or close to a heat source (e.g. vents or radiators). The recommended operating temperatures are 15-25˚C (59˚F to 77˚F) with humidity of 25-70%.• SpacingThe vents and openings on the Statim should remain uncovered and unobstructed.Leave a minimum of 50 mm/2˝ between the top, sides and back of the unit and any wall or partition.• VentingThe Statim should be operated in a clean, dust free environment.• Work SurfaceThe Statim should be placed on a flat, level, water-resistant surface. Never install and operate the unit on a sloped surface.• Electromagnetic EnvironmentThe Statim has been tested and meets applicable standards for electromagneticemissions. While the unit does not emit any radiation, it may itself be affected by otherequipment which does. We recommend that the unit be kept away from potentialsources of interference.• Electrical RequirementsUse properly grounded and fused power sources with the same voltage rating asindicated on the label at the back of your Statim. Avoid multiple outlet receptacles. Ifusing a surge suppressor power bar, plug in one Statim only.
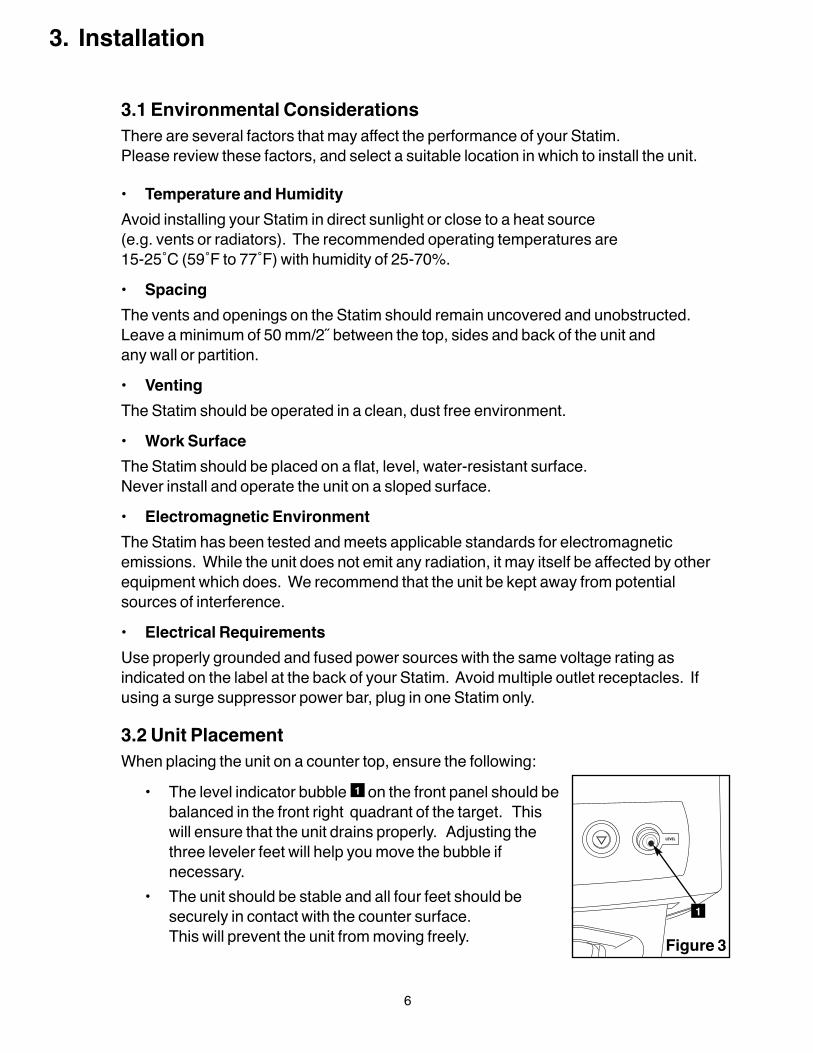
3.2 Unit Placement When placing the unit on a counter top, ensure the following:
• The level indicator bubble n1 on the front panel should bebalanced in the front right quadrant of the target. Thiswill ensure that the unit drains properly. Adjusting thethree leveler feet will help you move the bubble ifnecessary.
• The unit should be stable and all four feet should besecurely in contact with the counter surface. This will prevent the unit from moving freely.
n1
Figure 3
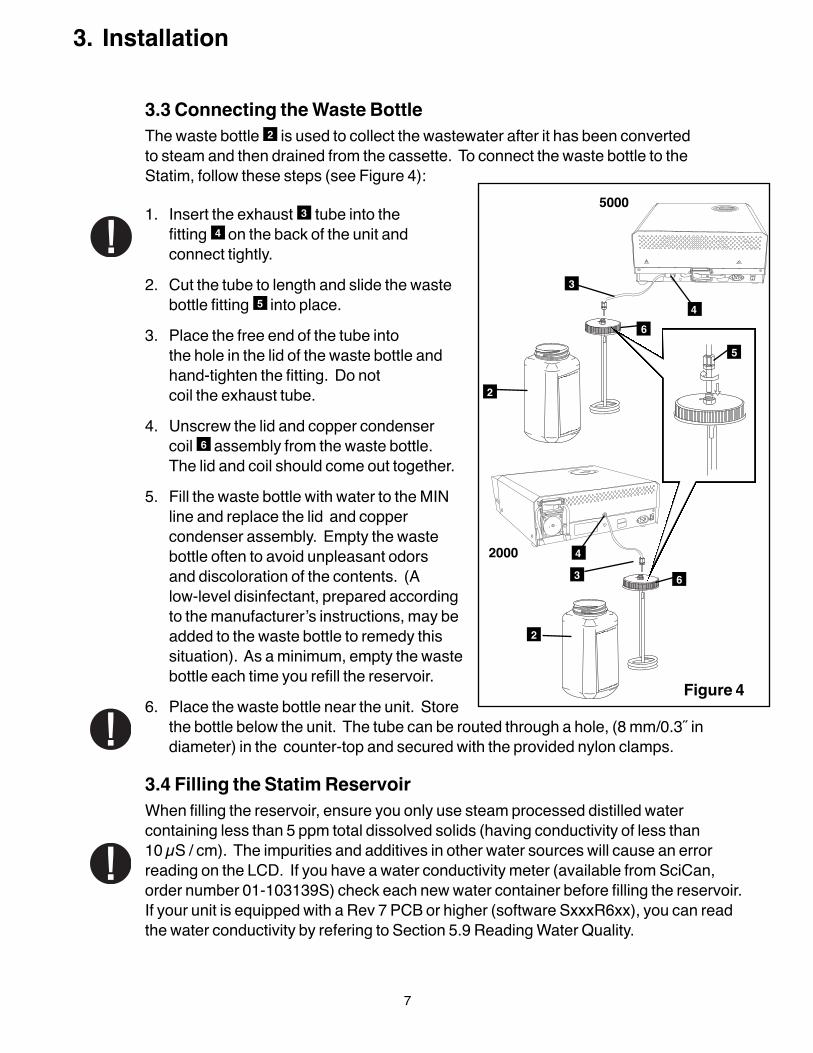
3.3 Connecting the Waste BottleThe waste bottle n2 is used to collect the wastewater after it has been converted to steam and then drained from the cassette. To connect the waste bottle to the Statim, follow these steps (see Figure 4):
1. Insert the exhaust n3 tube into the fitting n4 on the back of the unit and connect tightly.
2. Cut the tube to length and slide the wastebottle fitting n5 into place.
3. Place the free end of the tube into the hole in the lid of the waste bottle andhand-tighten the fitting. Do not coil the exhaust tube.
4. Unscrew the lid and copper condenser coil n6 assembly from the waste bottle. The lid and coil should come out together.
5. Fill the waste bottle with water to the MINline and replace the lid and coppercondenser assembly. Empty the wastebottle often to avoid unpleasant odors and discoloration of the contents. (A low-level disinfectant, prepared accordingto the manufacturer’s instructions, may beadded to the waste bottle to remedy thissituation). As a minimum, empty the wastebottle each time you refill the reservoir.
6. Place the waste bottle near the unit. Storethe bottle below the unit. The tube can be routed through a hole, (8 mm/0.3˝ indiameter) in the counter-top and secured with the provided nylon clamps.
3.4 Filling the Statim ReservoirWhen filling the reservoir, ensure you only use steam processed distilled watercontaining less than 5 ppm total dissolved solids (having conductivity of less than 10 µS / cm). The impurities and additives in other water sources will cause an errorreading on the LCD. If you have a water conductivity meter (available from SciCan, order number 01-103139S) check each new water container before filling the reservoir. If your unit is equipped with a Rev 7 PCB or higher (software SxxxR6xx), you can readthe water conductivity by refering to Section 5.9 Reading Water Quality.
7
3. Installation
n2
Figure 4
n3 n6n42000
n2
n3
n6n4
5000
n5
8
3. Installation
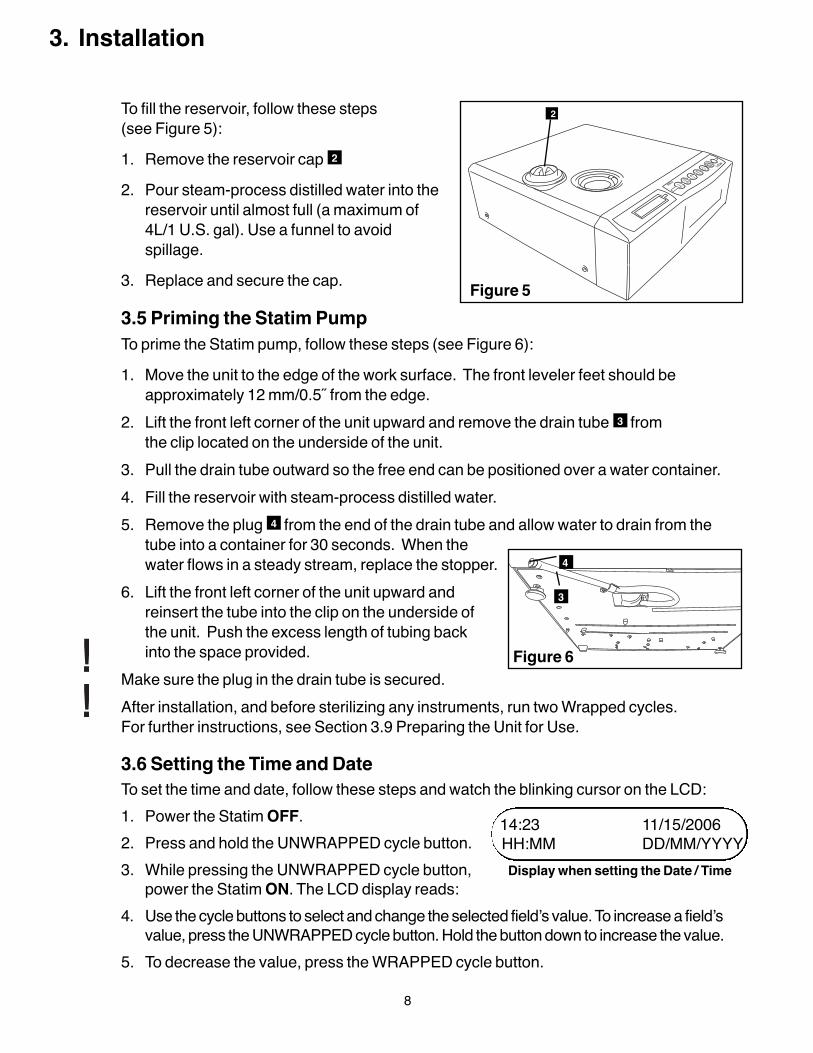
To fill the reservoir, follow these steps (see Figure 5):1. Remove the reservoir cap n2
2. Pour steam-process distilled water into thereservoir until almost full (a maximum of4L/1 U.S. gal). Use a funnel to avoidspillage.
3. Replace and secure the cap.
3.5 Priming the Statim PumpTo prime the Statim pump, follow these steps (see Figure 6):1. Move the unit to the edge of the work surface. The front leveler feet should be
approximately 12 mm/0.5˝ from the edge.2. Lift the front left corner of the unit upward and remove the drain tube n3 from
the clip located on the underside of the unit.3. Pull the drain tube outward so the free end can be positioned over a water container.4. Fill the reservoir with steam-process distilled water.5. Remove the plug n4 from the end of the drain tube and allow water to drain from the
tube into a container for 30 seconds. When thewater flows in a steady stream, replace the stopper.
6. Lift the front left corner of the unit upward andreinsert the tube into the clip on the underside of the unit. Push the excess length of tubing back into the space provided.
Make sure the plug in the drain tube is secured. After installation, and before sterilizing any instruments, run two Wrapped cycles. For further instructions, see Section 3.9 Preparing the Unit for Use.
3.6 Setting the Time and DateTo set the time and date, follow these steps and watch the blinking cursor on the LCD:1. Power the Statim OFF.2. Press and hold the UNWRAPPED cycle button.3. While pressing the UNWRAPPED cycle button,
power the Statim ON. The LCD display reads:4. Use the cycle buttons to select and change the selected field’s value. To increase a field’s
value, press the UNWRAPPED cycle button. Hold the button down to increase the value.5. To decrease the value, press the WRAPPED cycle button.
n2
Figure 5
Figure 6
n3
n4
14:23 11/15/2006HH:MM DD/MM/YYYYDisplay when setting the Date / Time
6. To select the next field, press the RUBBER AND PLASTICS cycle button.7. To save changes and return to the regular operating mode, press the STOP button.8. To quit without making changes, power the Statim OFF.
3.7 Language SelectionThe messages displayed on the LCD can be changed to a number of different languages.To change the current language selections, follow these steps:1. Turn the power switch at the back of the unit OFF.2. Press and hold the WRAPPED cycle button.3. While depressing the WRAPPED
cycle button, turn the power switch at the back of the unit to ON.
4. Press the UNWRAPPED cycle button to scroll to the next language selection.5. Press the WRAPPED cycle button to scroll to the previous language.6. When the desired language is displayed, press the STOP button to save the selection
and return to the regular operating mode.
3.8 Assigning Unit Identifier Number1. Power the Statim OFF.2. Press and hold the RUBBER / PLASTIC cycle button.3. While pressing the RUBBER / PLASTIC cycle button, power the Statim ON.4. Using the cycle buttons, select a maximum of 3 digits to be used as the unit’s identifier.
The UNWRAPPED button will increase the selected value and the WRAPPED cyclebutton will decrease it. Use the RUBBER / PLASTIC to move to the next digit.
5. To save changes and return to the regular operating mode, press the STOP button.
3.9 Adjusting the Cycle Drying TimeThe Statim has a preset drying time of 30 minutes. You can adjust this time between 15 to60 minutes in increments of 1 minute.1. Power the Statim OFF.2. While pressing and holding the STOP cycle button, power the Statim ON.3. Using the WRAPPED and UNWRAPPED cycle buttons scroll to AIR
DRYING and press the RUBBER / PLASTIC button.4. Using the WRAPPED and UNWRAPPED cycle buttons, scroll to
the desired drying time and select it by pressing the RUBBER / PLASTICbutton.
9
3. Installation
N.A. ENGLISH
Display when scrolling through languages
STATIM 2000 S2S2R601#323
Display when assigning unit number
10
3. Installation
3.10 Preparing Unit for UseOnce the unit is installed and before any instruments are sterilized, run two Wrapped Cycles(see Section 4.8 Statim 2000 - Running a Cycle and 4.10 Statim 5000 - Running a Cycle).Remove the cassette once it has cooled. Clean the top (lid) and bottom (tray) sections usinga soft cloth to wipe the inside surfaces and then rinse thoroughly with tap water. Once thecassette is clean and dry, coat the inside surfaces with STAT-DRI.
3.11 Shipping the UnitBefore you move the unit, you will need to drain the reservoir. To do so, follow these steps: 1. Place a water container below the unit.2. Using the drain tube (see Section 3.5 Priming the Statim Pump, Figure 6) empty the
contents of the reservoir into the water container.3. Remove any remaining water from the reservoir with a non-linting, absorbant towel.4. Screw-in the three leveler feet found underneath the unit.5. Repack the unit in the original packing materials and include all accessories originally
included with the unit.6. Specify heated and insured shipping.
11
4. Instructions For Use
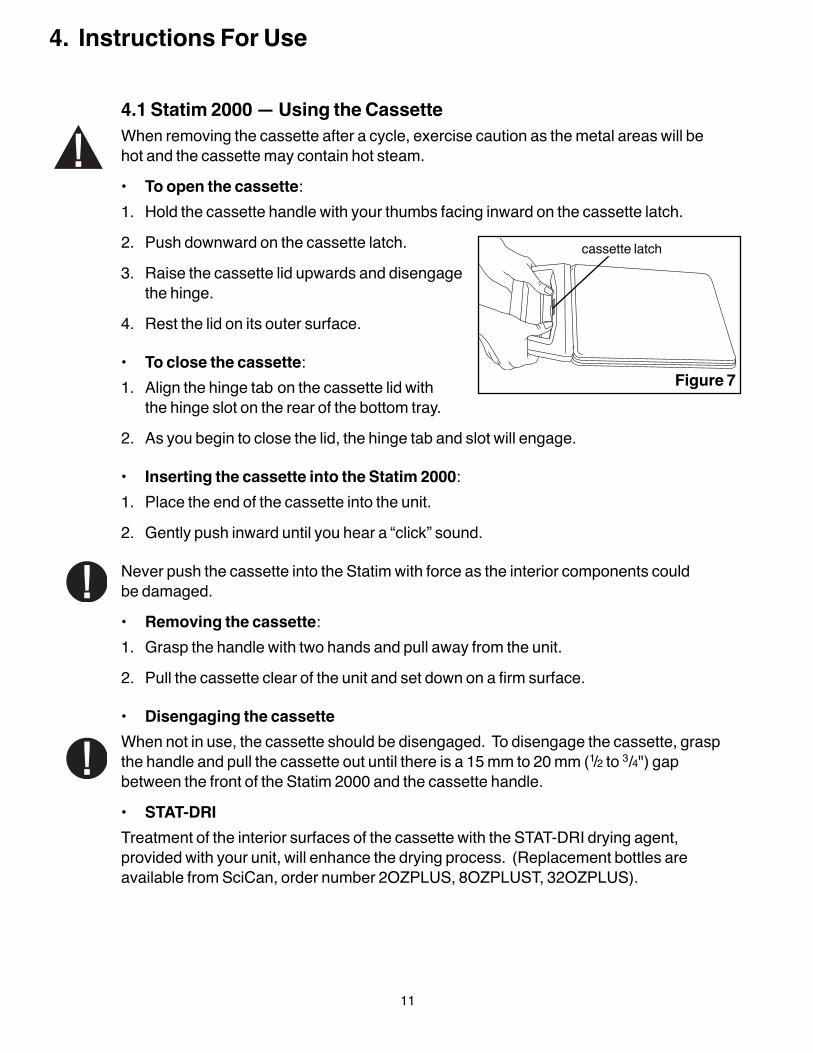
4.1 Statim 2000 — Using the CassetteWhen removing the cassette after a cycle, exercise caution as the metal areas will behot and the cassette may contain hot steam.• To open the cassette:1. Hold the cassette handle with your thumbs facing inward on the cassette latch.2. Push downward on the cassette latch.3. Raise the cassette lid upwards and disengage
the hinge. 4. Rest the lid on its outer surface.
• To close the cassette:1. Align the hinge tab on the cassette lid with
the hinge slot on the rear of the bottom tray.2. As you begin to close the lid, the hinge tab and slot will engage.
• Inserting the cassette into the Statim 2000:1. Place the end of the cassette into the unit.2. Gently push inward until you hear a “click” sound.
Never push the cassette into the Statim with force as the interior components could be damaged.• Removing the cassette:1. Grasp the handle with two hands and pull away from the unit.2. Pull the cassette clear of the unit and set down on a firm surface.
• Disengaging the cassetteWhen not in use, the cassette should be disengaged. To disengage the cassette, graspthe handle and pull the cassette out until there is a 15 mm to 20 mm (1/2 to 3/4") gapbetween the front of the Statim 2000 and the cassette handle.• STAT-DRI Treatment of the interior surfaces of the cassette with the STAT-DRI drying agent,provided with your unit, will enhance the drying process. (Replacement bottles areavailable from SciCan, order number 2OZPLUS, 8OZPLUST, 32OZPLUS).
Figure 7
cassette latch
12
4. Instructions For Use
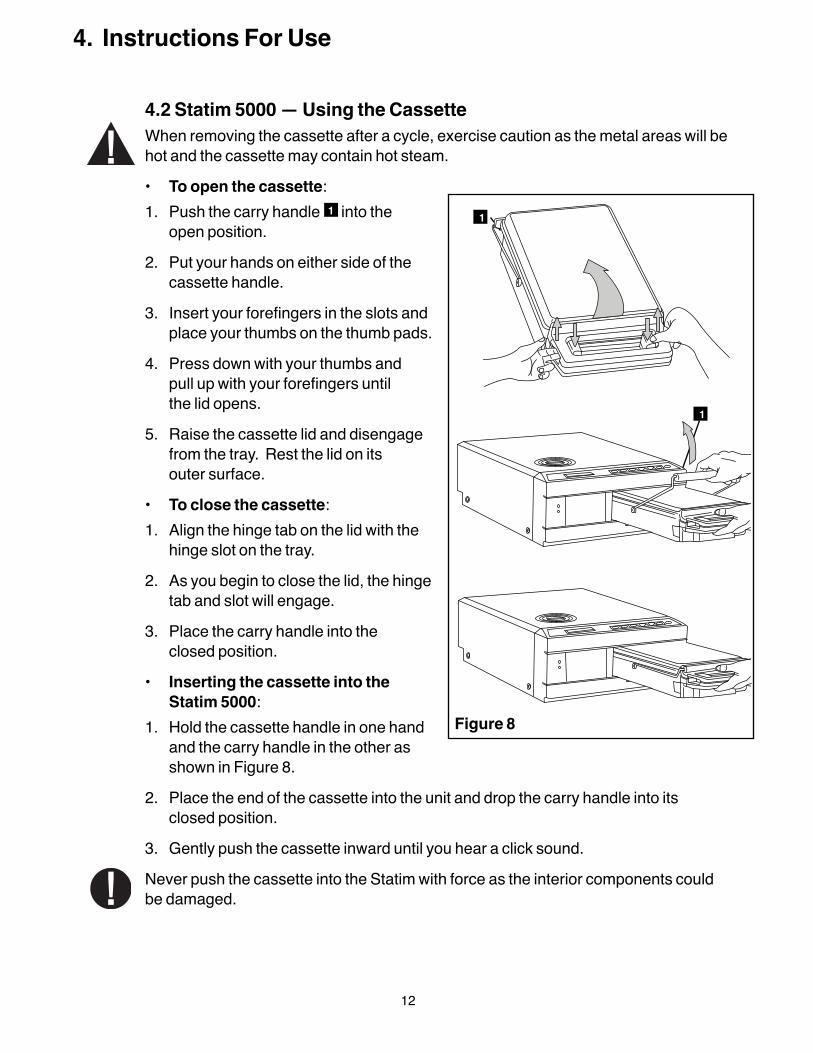
4.2 Statim 5000 — Using the CassetteWhen removing the cassette after a cycle, exercise caution as the metal areas will behot and the cassette may contain hot steam. • To open the cassette:1. Push the carry handle n1 into the
open position.2. Put your hands on either side of the
cassette handle.3. Insert your forefingers in the slots and
place your thumbs on the thumb pads.4. Press down with your thumbs and
pull up with your forefingers until the lid opens.
5. Raise the cassette lid and disengagefrom the tray. Rest the lid on its outer surface.
• To close the cassette:1. Align the hinge tab on the lid with the
hinge slot on the tray.2. As you begin to close the lid, the hinge
tab and slot will engage. 3. Place the carry handle into the
closed position.• Inserting the cassette into the
Statim 5000:1. Hold the cassette handle in one hand
and the carry handle in the other asshown in Figure 8.
2. Place the end of the cassette into the unit and drop the carry handle into its closed position.
3. Gently push the cassette inward until you hear a click sound.Never push the cassette into the Statim with force as the interior components could be damaged.
Figure 8
n1
n1

13
4. Instructions For Use
• Removing the cassette:1. Grasp the cassette handle with one hand and pull out from the unit.2. As the cassette emerges from the unit, grasp the carry handle with your free hand
and lift it upwards.3. Pull the cassette clear from the unit and set down on a firm surface.
• Disengaging the cassetteWhen not in use, the cassette should be disengaged. To disengage the cassette, graspthe handle and pull the cassette out until there is a 15 mm to 20 mm (1/2 to 3/4") gapbetween the front of the Statim 5000 and the cassette handle.
4.3 Statim 5000 — STAT-DRI PlatesThe Statim 5000 cassette uses STAT-DRI plates to enhance the drying process for wrapped instruments. The adjustable plates are designed for the unwrappedinstruments rackand eliminate the need for a separate wrapped instrument rack. Up to ten plates can be arranged along the length of the rack. Each unit is shipped with five STAT-DRI plates. Additional plates may be ordered from SciCan (SciCan part number 01-103935).
To install and adjust a STAT-DRI plate, follow these steps:1. Hold a plate over the desired position, tilted slightly
forward with the tabs down.2. Insert the tabs between the mesh of the
unwrapped instrument rack.3. Each tab has an elongated slot. Slide the plate until
the wire is at the end of each slot.4. Release the plate to the resting position.5. Prepare and load instruments for sterilization.
4.4 Preparing and Loading InstrumentsBefore loading any instruments into the Statim, consult the manufacturer’s reprocessinginstructions.• Clean InstrumentsClean and rinse all instruments before loading them into the cassette. Disinfectantresidues and solid debris may inhibit sterilization and damage the instruments, thecassette, and the Statim. Lubricated instruments must be wiped thoroughly and anyexcess lubricant should be removed before loading.
14
4. Instructions For Use
• Unwrapped InstrumentsArrange unwrapped instruments on the instrument rack in the tray so that they do not touch one another. This ensures that steam reaches all surfaces and will promotedrying.Instruments must not be stacked or piled in the cassettes, as this will impede thesterilization process.
• Wrapped Instruments (single wrapped)Place the instruments into single layer autoclave bags according to the manufacturer'sinstructions. Orient the instrument rack in the cassette to ensure that wrappedinstruments rest approximately 6 mm / 0.25" above the cassette base. Place thewrapped instruments on the rack and arrange them to avoid overlap. Ensure that allwrapped loads are dry before handling and /or storage to maintain sterility. The use of cloth wraps in the Statim is not recommended.SciCan recommends the use of plastic / paper autoclave bags such as SPS™, Medi-Plus™ and Chex All II™. Steri-Stik™ paper / paper autoclave bags may alsobe used. The use of cloth wraps in the Statim is not recommended. Loosely packinstruments in the bags to allow steam penetration to all instrument surfaces.The wrapped instrument rack for the Statim 5000 is designed to hold a maximum of 12 autoclave bags. Care must be taken to ensure that the combined weight of theloaded bags does not exceed 1.5 kg (3.3 lbs).The Unwrapped instrument rack fitted with a maximum of 10 Stat-Dri plates will hold 10 autoclave bags.
• Rubber and Plastic InstrumentsThe following materials can be sterilized in the Statim:Nylon, polycarbonate (Lexan™), polypropylene, PTFE (Teflon™), acetal (Delrin™),polysulfone (Udel™), polyetherimide (Ultem™), silicone rubber, and polyester.When loading rubber and plastic instruments in the tray, leave a space between theinstruments and the cassette walls. This ensures that steam reaches all surfaces, andwill promote drying.The following materials cannot be sterilized in the Statim:Polyethylene, ABS, styrene, cellulosics, PVC, Acrylic (Plexiglas™), PPO (Noryl™),latex, neoprene, and similar materials. Use of these materials may lead to instrument or equipment damage. If you are unsureof your instrument’s material or construction, do not load into your Statim until you havechecked with the instrument manufacturer.
15
4. Instructions For Use
• All InstrumentsThe Statim is NOT intended for sterilizing textiles, liquids or biomedical waste.Instruments will remain sterile after a successful cycle until the cassette is disengagedfrom the unit. Unwrapped instruments, once exposed to ambient or external conditions,cannot be maintained in a sterile state. If sterile storage is desired, wrap the instrumentsto be sterilized in autoclave bags, according to the instrument manufacturer’sinstructions, and then allow the wrapped cycle to run until the air-dry phase is complete.Best Practice: Allow instruments (wrapped or unwrapped) to dry completely prior tohandling. Wrapped or pouched instruments must not touch each other to promotedrying and enable effective sterilization.
SciCan recommends the final user carefully choose the most appropriate sterilizationcycle according to the recommendations of their leading infection control authorities andlocal regulatory guidelines / recommendations.
• Routine MonitoringChemical process indicators suitable for steam sterilizers should be included in or oneach package or load being sterilized. In addition, the weekly use of biologicalindicators, which allow you to ascertain whether the instruments have been exposed to sterilization conditions, is recommended. For Statim 5000 units in the United States,SciCan recommends using the 3M Attest™ biological monitoring system for routinemonitoring. This system consists of self contained biological indicators and incubators. It is important to select the correct biological indicator for the cycle being tested.
4.5 Using Biological/Chemical IndicatorsFor detailed instructions on how to handle, use and dispose of both the biological and chemical indicators, please consult the product literature accompanying the 3M Attest™ biological indicators or contact the manufacturer directly.To use the indicators with the Statim, follow these steps:1. Place the appropriate biological indicator in the Statim chamber.2. Process the load in the sterilizer according to your usual practice.3. Ensure that the message “Cycle Complete” is displayed on the LCD after the
cycle is finished.

4. Recover the biological and / or chemical indicator and process further according to theliterature that accompanied the indicator.
At the first indication of a potential sterilization failure:1. Do not process any more instruments until favourable test results have been returned.2. Ensure the correct indicator type was chosen.3. Ensure the cassette was not overloaded. Consult the earlier portion of this section for
proper loading instructions.4. If the results do not change, do not process any more instruments within theStatim and contact your SciCan dealer for further assistance. Because the turnaround time for the 3M Attest™ is up to 48 hours, it is recommendedthat the tests be conducted so that the incubation period occurs during a period ofplanned downtime such a the last cycle before a weekend.
4.6 Instrument Weight Guide
NOTE: The above weights are to be used as reference only. For exact weights of yourinstruments, consult the manufacturer’s specifications.
16
4. Instructions For Use
InstrumentScissorsDental scalersForcepsDental handpieceWrapped instrument rackUnwrapped instrument rackSuction cannulaPlastic mouth mirrorImpression trayPlastic x-ray positioning ring
Typical Instrument Weight30 g / 0.96 oz20 g / 0.64 oz15 g / 0.48 oz40 to 60 g / 1.29 to 1.92 oz260 g / 8.35 oz225 g / 7.23 oz10 g / 0.32 oz8 g / 0.25 oz15 to 45 g / 0.48 to 1.45 oz20 g / 0.64 oz
4.7 Statim 2000 — Selecting a CycleThe Statim 2000 has three sterilization cycles, each designed to sterilize a specific type of instrument. The instruments will remain sterile after a successful cycle until the cassette is removed from the autoclave. At the end of each sterilization cycle,microbiologically filtered air-drying will commence for 1 hour. Air-drying can beinterrupted at any time. Unwrapped instruments, once exposed to ambient or external conditions, cannot bemaintained in a sterile state. If sterile storage is desired, wrap the instruments to besterilized in autoclave bags according to the instrument manufacturer’s instructions, and allow the wrapped cycle to run until the air-dry phase is complete. The types of instruments, sterilization requirements, and a graph depicting each cycleare described over the next few pages. Consult the Instrument Weight Guide in Section4.6 for information on how to make up an appropriate load for the masses specified forindividual cycles.
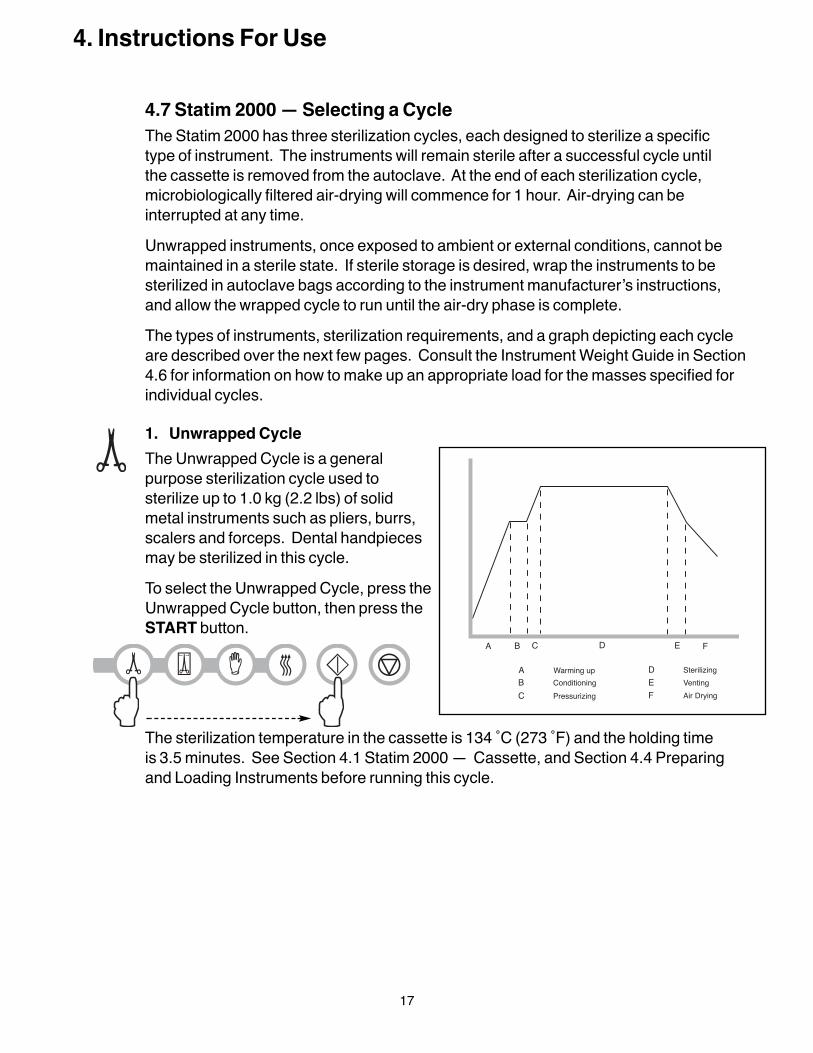
1. Unwrapped CycleThe Unwrapped Cycle is a generalpurpose sterilization cycle used tosterilize up to 1.0 kg (2.2 lbs) of solidmetal instruments such as pliers, burrs,scalers and forceps. Dental handpiecesmay be sterilized in this cycle.To select the Unwrapped Cycle, press theUnwrapped Cycle button, then press theSTART button.
The sterilization temperature in the cassette is 134 ̊ C (273 ̊ F) and the holding time is 3.5 minutes. See Section 4.1 Statim 2000 — Cassette, and Section 4.4 Preparing and Loading Instruments before running this cycle.
4. Instructions For Use
A B C D E F
A Warming upB ConditioningC Pressurizing
D SterilizingE VentingF Air Drying
3.5 MIN.*
17
4. Instructions For Use
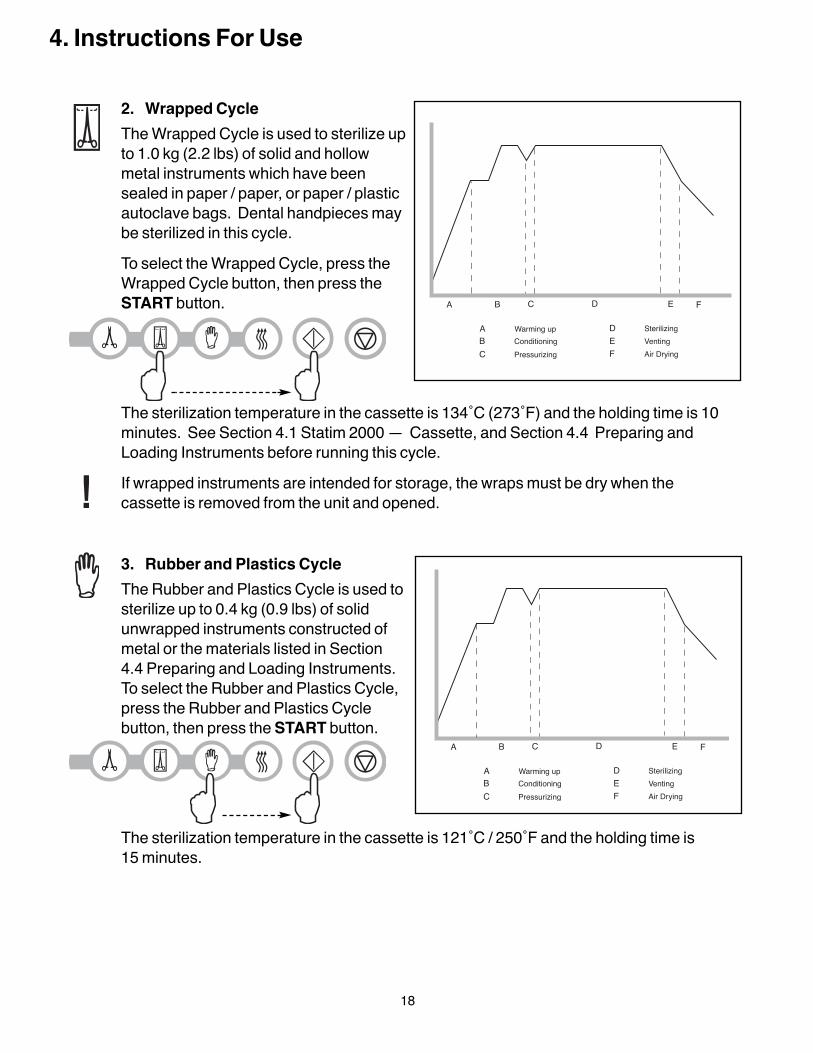
2. Wrapped CycleThe Wrapped Cycle is used to sterilize upto 1.0 kg (2.2 lbs) of solid and hollowmetal instruments which have beensealed in paper / paper, or paper / plasticautoclave bags. Dental handpieces maybe sterilized in this cycle.To select the Wrapped Cycle, press theWrapped Cycle button, then press theSTART button.
The sterilization temperature in the cassette is 134˚C (273˚F) and the holding time is 10minutes. See Section 4.1 Statim 2000 — Cassette, and Section 4.4 Preparing andLoading Instruments before running this cycle.If wrapped instruments are intended for storage, the wraps must be dry when thecassette is removed from the unit and opened.
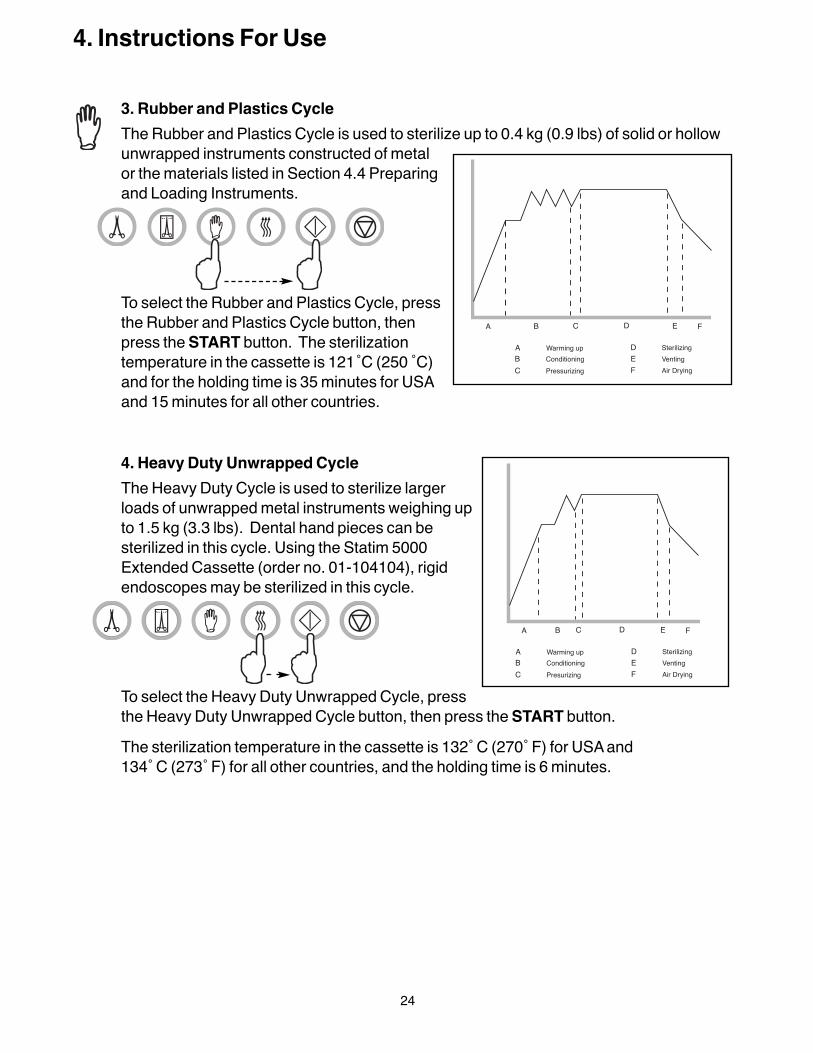
3. Rubber and Plastics CycleThe Rubber and Plastics Cycle is used tosterilize up to 0.4 kg (0.9 lbs) of solidunwrapped instruments constructed ofmetal or the materials listed in Section 4.4 Preparing and Loading Instruments. To select the Rubber and Plastics Cycle,press the Rubber and Plastics Cyclebutton, then press the START button.
The sterilization temperature in the cassette is 121˚C / 250˚F and the holding time is 15 minutes.
A B C D E F
A Warming upB ConditioningC Pressurizing
D SterilizingE VentingF Air Drying
A B C D E F
A Warming upB ConditioningC Pressurizing
D SterilizingE VentingF Air Drying
10 MIN.
18
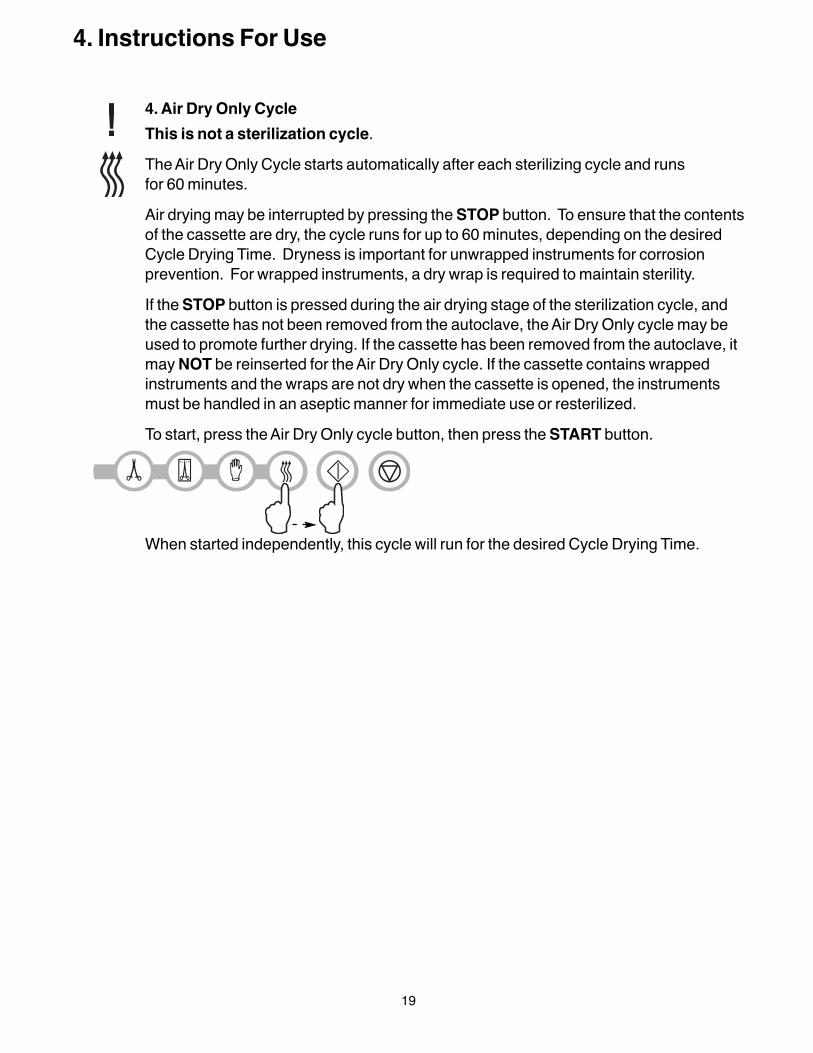
4. Air Dry Only Cycle This is not a sterilization cycle.The Air Dry Only Cycle starts automatically after each sterilizing cycle and runs for 60 minutes.Air drying may be interrupted by pressing the STOP button. To ensure that the contentsof the cassette are dry, the cycle runs for up to 60 minutes, depending on the desiredCycle Drying Time. Dryness is important for unwrapped instruments for corrosionprevention. For wrapped instruments, a dry wrap is required to maintain sterility.If the STOP button is pressed during the air drying stage of the sterilization cycle, andthe cassette has not been removed from the autoclave, the Air Dry Only cycle may beused to promote further drying. If the cassette has been removed from the autoclave, itmay NOT be reinserted for the Air Dry Only cycle. If the cassette contains wrappedinstruments and the wraps are not dry when the cassette is opened, the instrumentsmust be handled in an aseptic manner for immediate use or resterilized.To start, press the Air Dry Only cycle button, then press the START button.
When started independently, this cycle will run for the desired Cycle Drying Time.
4. Instructions For Use
19
4. Instructions For Use
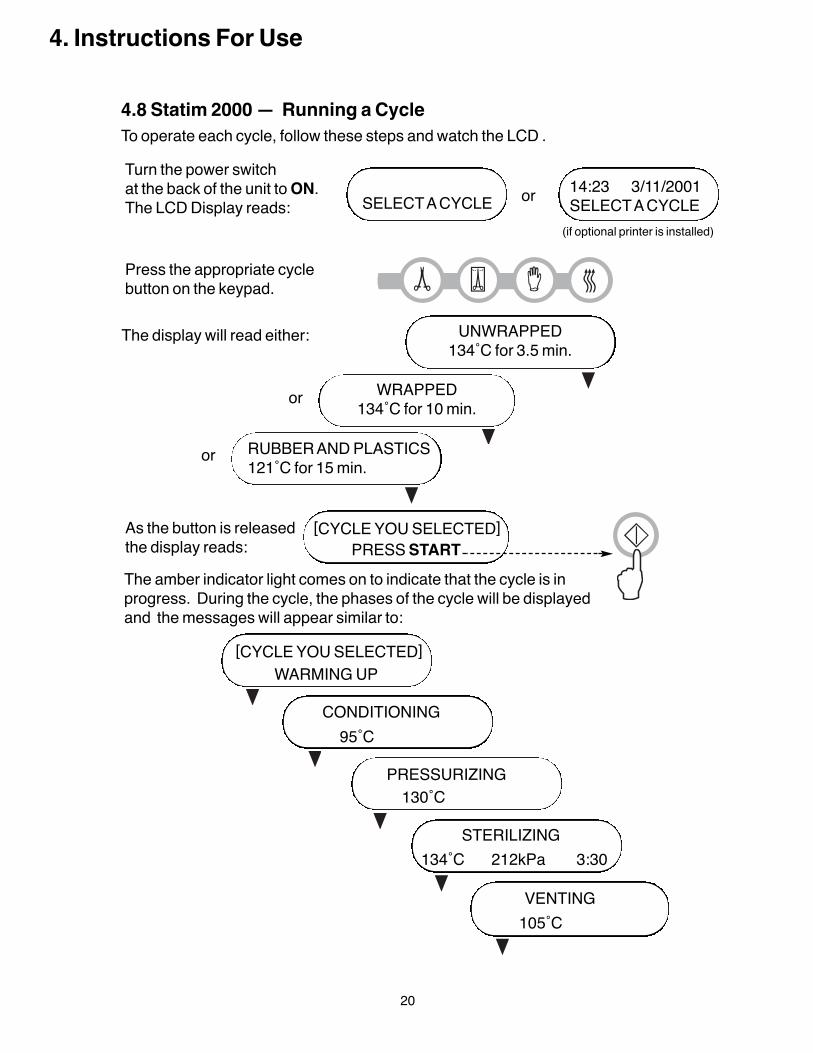
4.8 Statim 2000 — Running a CycleTo operate each cycle, follow these steps and watch the LCD .
or
or
or 14:23 3/11/2001SELECT A CYCLESELECT A CYCLE
PRESS START
WARMING UP
UNWRAPPED134˚C for 3.5 min.
WRAPPED134˚C for 10 min.
RUBBER AND PLASTICS121˚C for 15 min.
Turn the power switch at the back of the unit to ON. The LCD Display reads:
(if optional printer is installed)
Press the appropriate cyclebutton on the keypad.
The display will read either:
As the button is releasedthe display reads:
The amber indicator light comes on to indicate that the cycle is inprogress. During the cycle, the phases of the cycle will be displayedand the messages will appear similar to:
[CYCLE YOU SELECTED]
[CYCLE YOU SELECTED]
95˚C
130˚C
134˚C 212kPa 3:30
105˚C
CONDITIONING
PRESSURIZING
STERILIZING
VENTING
20
As the cycle is running, an intermittent buzzing sound will be apparent as the pumpinjects water into the steam generator. A random clicking sound will also be heard as theexhaust valve opens and closes.Once the sterilization cycle is complete, a reminder tone will sound and the amber lightwill flash as the cycle moves into the Air Drying phase.The buzzing noise during the air drying stage is the compressor operating. The airdrying phase of the cycle may be interrupted at any time by pressing the STOP button.The display will appear similar to:
[CYCLE YOU SELECTED]REMOVE CASSETTE
When the automatic 60-minute air drying stage is finished the display reads:[CYCLE YOU SELECTED]
CYCLE COMPLETEIf a sterilization cycle is successful, the reminder tone sounds and the amber lightflashes until the STOP button is pressed, or the cassette is removed from the unit.Be careful. The metal parts will be hot, and the cassette will contain hot steam. After thecassette is removed from the unit, it should be opened to hasten drying of unwrappedinstruments.If a message is displayed which gives a CYCLE FAULT code or a NOT STERILEmessage, the cassette contents are not sterile. See Section 8 Troubleshooting for more information.
4. Instructions For Use
21

4. Instructions For Use
4.9 Statim 5000 — Selecting a CycleThe Statim 5000 has four sterilization cycles, each designed to sterilize a specific type ofinstrument. It is important not to overload the chamber as this can inhibit steam accessto all instrument surfaces. The instruments will remain sterile after a successful cycleuntil the cassette is removed from the autoclave housing. At the end of each sterilizationcycle, microbiologically filtered air-drying will commence for up to 60 minutes,depending on the desired Cycle Drying Time. Air-drying can be interrupted at any time. Once unwrapped instruments are exposed to ambient or external conditions, theycannot be maintained in a sterile state. If sterile storage is desired, wrap the instrumentsto be sterilized in autoclave bags according to the instrument manufacturer’sinstructions, and allow the wrapped cycle to run until the air-dry phase is complete.The types of instruments, sterilization requirements, and graphs depicting each cycleare described on the next few pages. Consult the Instrument Weight Table in Section4.6 for information on how to make up an appropriate load for the masses specified forindividual cycles.
22
4. Instructions For Use
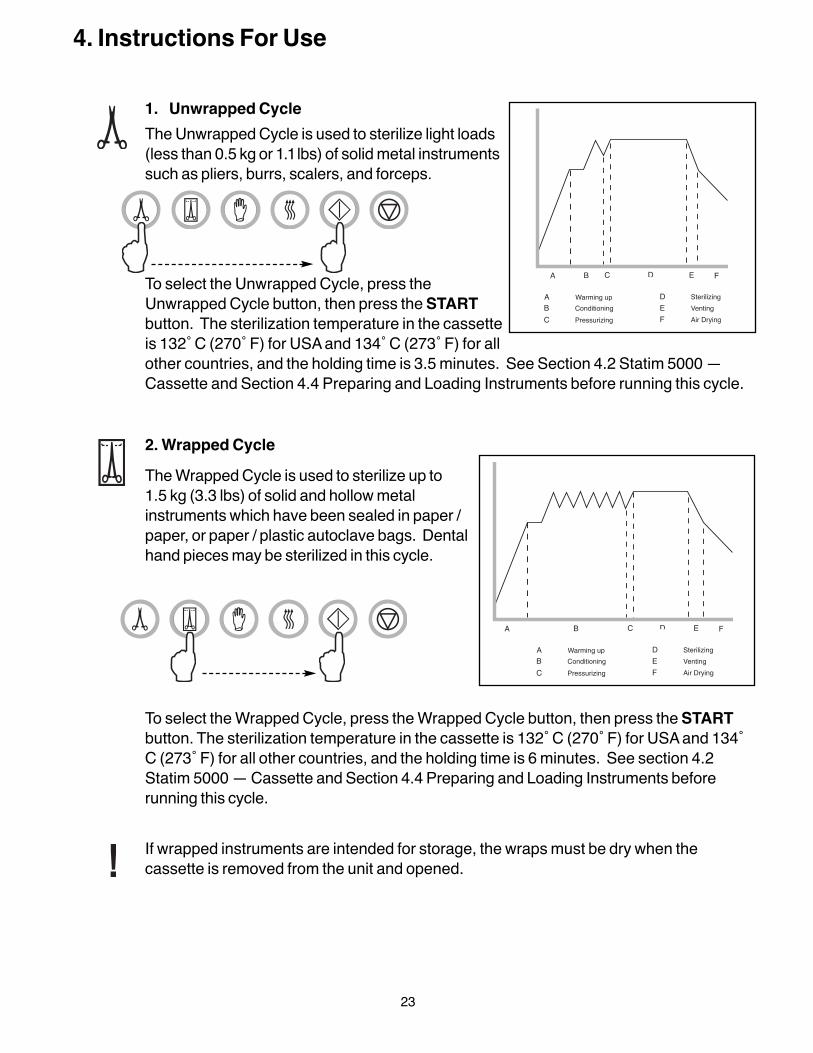
1. Unwrapped CycleThe Unwrapped Cycle is used to sterilize light loads(less than 0.5 kg or 1.1 lbs) of solid metal instrumentssuch as pliers, burrs, scalers, and forceps.
To select the Unwrapped Cycle, press theUnwrapped Cycle button, then press the STARTbutton. The sterilization temperature in the cassetteis 132˚ C (270˚ F) for USA and 134˚ C (273˚ F) for allother countries, and the holding time is 3.5 minutes. See Section 4.2 Statim 5000 —Cassette and Section 4.4 Preparing and Loading Instruments before running this cycle.
2. Wrapped CycleThe Wrapped Cycle is used to sterilize up to 1.5 kg (3.3 lbs) of solid and hollow metalinstruments which have been sealed in paper /paper, or paper / plastic autoclave bags. Dentalhand pieces may be sterilized in this cycle.
To select the Wrapped Cycle, press the Wrapped Cycle button, then press the STARTbutton. The sterilization temperature in the cassette is 132˚ C (270˚ F) for USA and 134˚C (273˚ F) for all other countries, and the holding time is 6 minutes. See section 4.2Statim 5000 — Cassette and Section 4.4 Preparing and Loading Instruments beforerunning this cycle.
If wrapped instruments are intended for storage, the wraps must be dry when thecassette is removed from the unit and opened.
A B C D E F
A Warming upB ConditioningC Pressurizing
D SterilizingE VentingF Air Drying
3.5 MIN.*
A B C D E F
A Warming up
B Conditioning
C Pressurizing
D Sterilizing
E Venting
F Air Drying
23
3. Rubber and Plastics CycleThe Rubber and Plastics Cycle is used to sterilize up to 0.4 kg (0.9 lbs) of solid or hollowunwrapped instruments constructed of metalor the materials listed in Section 4.4 Preparingand Loading Instruments.
To select the Rubber and Plastics Cycle, pressthe Rubber and Plastics Cycle button, thenpress the START button. The sterilizationtemperature in the cassette is 121˚C (250 ̊ C)and for the holding time is 35 minutes for USAand 15 minutes for all other countries.
4. Heavy Duty Unwrapped CycleThe Heavy Duty Cycle is used to sterilize largerloads of unwrapped metal instruments weighing upto 1.5 kg (3.3 lbs). Dental hand pieces can besterilized in this cycle. Using the Statim 5000Extended Cassette (order no. 01-104104), rigidendoscopes may be sterilized in this cycle.
To select the Heavy Duty Unwrapped Cycle, pressthe Heavy Duty Unwrapped Cycle button, then press the START button.The sterilization temperature in the cassette is 132˚ C (270˚ F) for USA and 134˚ C (273˚ F) for all other countries, and the holding time is 6 minutes.
4. Instructions For Use
A B C D E F
A Warming upB ConditioningC Pressurizing
D SterilizingE VentingF Air Drying
A B C D E F
A Warming upB ConditioningC Presurizing
D SterilizingE VentingF Air Drying
24

4. Instructions For Use
4.10 Statim 5000 — Running a CycleTo operate each cycle, follow these steps and watch the LCD.
or 14:23 3/11/2001SELECT A CYCLESELECT A CYCLE
PRESS START
65 C̊ WARMING UP
Turn the power switch at the back of the unit to ON. The LCD Display reads:
(if optional printer is installed)Press the appropriate cyclebutton on the keypad.
The display will read either:
As the button is released thedisplay appears similar to:The amber indicator light comes on and the display will appear similar to:
[CYCLE YOU SELECTED]
[CYCLE YOU SELECTED]
110˚C
130˚C
134˚C 212 kPa 3:30
105˚C
CONDITIONING
PRESSURIZING
STERILIZING
VENTING
or
or
UNWRAPPED134˚C for 3.5min.
WRAPPED134˚C for 6 min.
RUBBER AND PLASTICS121˚C for 15 min.
or HEAVYDUTY UNWRAPPED134˚C for 6 min.
As the cycle progresses, the cycle stage and temperature of the chamber are displayed. During sterilization, the pressure of the chamber and the time remaining for that stage is also displayed. During the air drying phase, the time remaining is displayed.
25
4. Instructions For Use
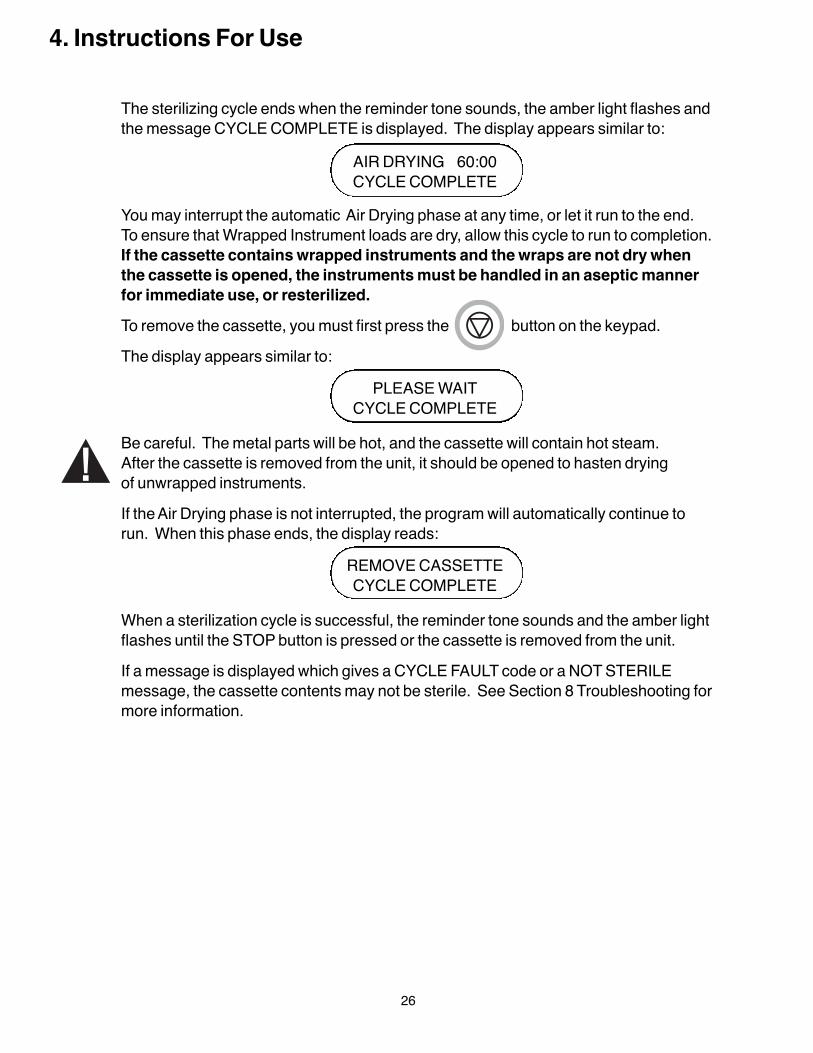
The sterilizing cycle ends when the reminder tone sounds, the amber light flashes andthe message CYCLE COMPLETE is displayed. The display appears similar to:
AIR DRYING 60:00CYCLE COMPLETE
You may interrupt the automatic Air Drying phase at any time, or let it run to the end. To ensure that Wrapped Instrument loads are dry, allow this cycle to run to completion. If the cassette contains wrapped instruments and the wraps are not dry when the cassette is opened, the instruments must be handled in an aseptic manner for immediate use, or resterilized.To remove the cassette, you must first press the button on the keypad. The display appears similar to:
PLEASE WAIT CYCLE COMPLETE
Be careful. The metal parts will be hot, and the cassette will contain hot steam. After the cassette is removed from the unit, it should be opened to hasten drying of unwrapped instruments.If the Air Drying phase is not interrupted, the program will automatically continue to run. When this phase ends, the display reads:
REMOVE CASSETTECYCLE COMPLETE
When a sterilization cycle is successful, the reminder tone sounds and the amber lightflashes until the STOP button is pressed or the cassette is removed from the unit.If a message is displayed which gives a CYCLE FAULT code or a NOT STERILEmessage, the cassette contents may not be sterile. See Section 8 Troubleshooting formore information.
26
4. Instructions For Use
4.11 Stopping a CycleTo stop a cycle press the STOP button. If the STOP button is pushed, the cassette isremoved, or the unit detects a problem while operating, the cycle will stop and the amber active light will flash. Once a cycle has been stopped, the STOP button must be pressed before another cycle can be started. The display reads any of the following messages:
If the display shows the message, CYCLE FAULT or NOT STERILE, the cassettecontents are not sterile! See Section 8 Troubleshooting for more information. If the air drying stage of the cycle is interrupted, do not store wrapped instruments thatwere in the cassette unless they are dry.
CYCLE FAULT xxxNOT STERILE
CASSETTE REMOVEDNOT STERILE
or
27

5. Maintenance
5.1 Cleaning the CassetteKeeping the Statim cassette clean is good clinical practice and assists in the function ofthe unit. SciCan recommends that the interior surface be cleaned at least once a week.Use dishwashing soap or a mild detergent that does not contain chlorine. Scrub theinside of the cassette with a cleaning pad designed for use with Teflon™ coatedsurfaces. After scouring, rinse thoroughly with water to remove all traces of thedetergent. Cleaning the inside of your cassette is very important if you regularly sterilizelubricated instruments. Coating the entire inside surface with STAT-DRI/STAT-DRIPLUS drying agent induces water to form an even coat on the inside surface, withoutbeading. The water in contact with the hot cassette surfaces also evaporates muchmore efficiently. Spotting is minimized and instruments dry much better. STAT-DRI/STAT-DRI PLUS should be applied every 10 cycles, and after every cassette cleaning.
5.2 Cleaning the Water Reservoir FilterThe water reservoir filter should be cleaned at least once a week or when required. Thefilter can easily be removed and cleaned by placing the filter upside down under runningwater to wash away the particles until clean, and then placed back into the reservoiropening. If a replacement water reservoir filter is required, order part number 01-109300S.
5.3 Cleaning the ReservoirCheck the reservoir for dirt or particles. The reservoir may be cleaned by drainingfollowed by cleaning and rinsing with steam process distilled water ONLY. Use ofchemicals or cleaning agents is not reccommended and could cause the unit damage.
5.4 Cleaning the Exterior SurfacesUse a soft cloth moistened with soap and water to clean all exterior surfaces. Do not use harsh cleaning chemicals or disinfectants.
5.5 Changing the Statim 2000 Air FilterThe filter should be replaced every six months in order to maintain an adequate supplyof clean air during the air drying cycle.To change the filter, follow these steps:1. Turn the power switch at the back of the unit OFF. 2. Remove and discard the old foam air filter n4 .3. Install the new filter n4 (SciCan part no. 01-100207S).4. Secure the filter plate n2 to the back of the
compressor using the screw n1 retained during the disassembly procedure.
n4
n1n2
Figure 10
2000
28

5.6 Changing the Bacteria Retentive Air FiltersThe filters should be replaced every six months or after 500 cycles to maintain an adequate supply of clean air during the air drying cycle.To change the bacteria retentive air filter on the Statim 2000 and 5000, follow these steps:1. Power the Statim OFF.2. Disconnect tube A n1 from the bacteria
retentive filter n2 and remove the filter from the filter bracket n3 . As you remove the filter from the bracket, note the orientation of the arrow mark on the filter.
3. When the filter is free of the bracket, carefullydisconnect tube B n4 from the filter.
4. Before installing the replacement bacteria retentive filter n2 (SciCan order no. 01-102119S) check that the arrowmark on the filter matches the direction of the arrow on the bracket. Push the lefthand filter fitting into tube B n4 .
5. Gently press the replacement filter into the filter bracket n3 . The arrow mark of the filter should be facing out and pointingto the left.
6. Re-connect tube A n1 to the right hand filter fitting.
5.7 Replacing the Cassette SealTo ensure optimum performance of your Statim cassette autoclave, change the cassette seal every 500 cycles or every six months, whichever comes first.Replacement seals are available from SciCan (order number 01-100028S for Statim 2000 and 01-101649S for Statim 5000).To change the cassette seal, follow these steps:Place the cassette lid and the new seal on a clean work surface. Examine the position of the old seal in the cassette lid and arrange the new seal in the same orientation, next to the lid.
5. Maintenance
Figure 11n4
n1
n2 n3
Figure 12n4 n3
n1n2
5000
2000
29

5. Maintenance
Remove the old seal and discard. Clean any residue out of the seal channel and flush out the channel with distilled water.
Lubricate the new seal with the liquid seal lubricant provided.
Insert the rounded edge of the seal under the round lip of the lid. Align the holes in the new seal with the holes in the lid.NOTE: At every corner and at the holes in the lid, two square nibs should be visible. The nibs should fit flush with the lid’s outer surface.
Ensure the seal is completely inserted. Feel around the periphery to ensure the seal is securely in place.NOTE: During a cycle, steam may appear between the lid and the tray. If this persists, remove the cassette and check that the seal is correctly installed.
Be careful. The metal parts will be hot, and the cassette may contain hot steam.
5.8 Maintaining Fluid LevelsUse only steam-process distilled water containing less than 5 ppm total dissolved solids (having conductivity of less than 10 µS / cm) in the Statim. To fill the reservoir,remove the cap from the top of the unit and fill the reservoir. We recommend using a funnel to minimize spills. Each time you refill the reservoir, empty the waste bottle and refill with water to the MIN line. Empty the waste bottle often to avoid unpleasantodors and discoloration of the contents. (A low-level chlorine-free disinfectant, prepared according to the manufacturer’s instructions, may be added to the waste bottle to remedy this situation).
5.9 Reading Water Quality (units equipped with Rev7 PCB (software SxxxR6xx) or higher)
1. Power up unit while pressing the STOP button to access the User Setup menu.2. Using the UNWRAPPED and WRAPPED buttons, scroll to Water Quality and select it
by pressing the RUBBER AND PLASTIC button.CD=conductivity XX= micro S. valueyyy= engineering value z.z= parts per million value
Figure 13
>Water QualityCD=XXluS / yyy / z.z ppm
30
5. Maintenance
The schedules below describe the necessary actions.
Dai
lyW
eekl
yE
very
6
mo
nths
Operator
Onc
e a
year
Technician
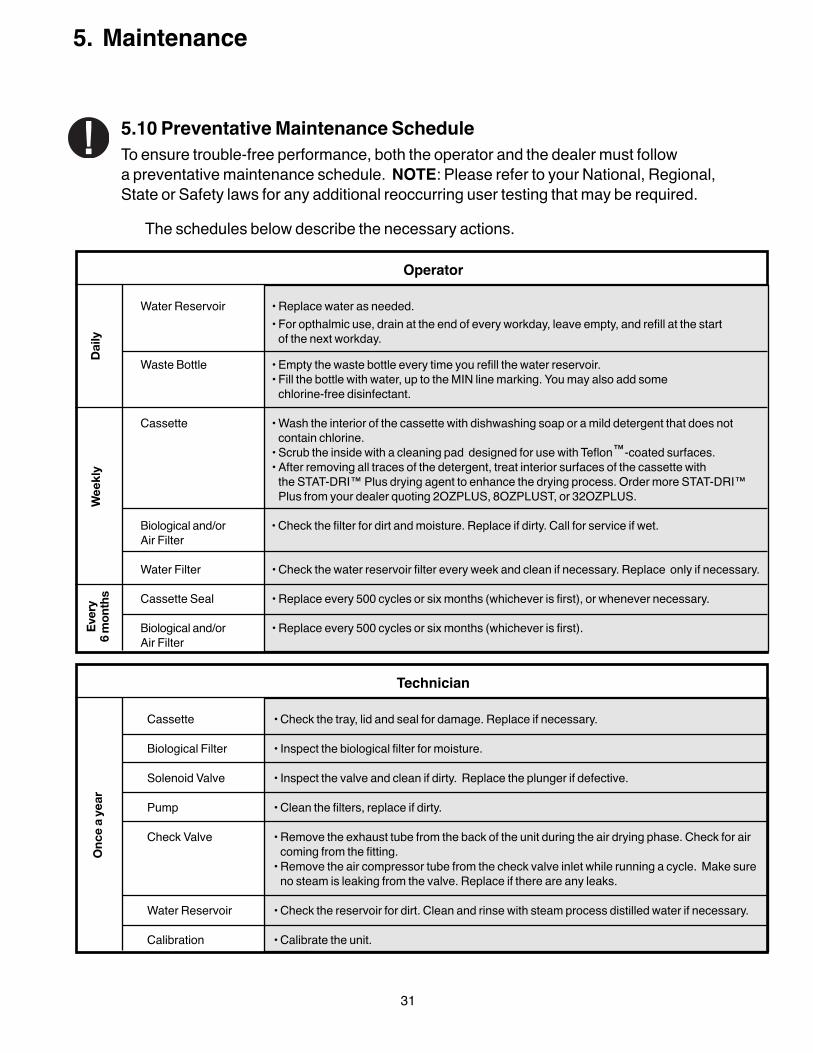
5.10 Preventative Maintenance ScheduleTo ensure trouble-free performance, both the operator and the dealer must follow a preventative maintenance schedule. NOTE: Please refer to your National, Regional,State or Safety laws for any additional reoccurring user testing that may be required.
31
Water Reservoir • Replace water as needed. • For opthalmic use, drain at the end of every workday, leave empty, and refill at the start of the next workday.
Waste Bottle • Empty the waste bottle every time you refill the water reservoir.• Fill the bottle with water, up to the MIN line marking. You may also add some chlorine-free disinfectant.
Cassette • Wash the interior of the cassette with dishwashing soap or a mild detergent that does notcontain chlorine.
• Scrub the inside with a cleaning pad designed for use with Teflon™-coated surfaces. • After removing all traces of the detergent, treat interior surfaces of the cassette with the STAT-DRI™ Plus drying agent to enhance the drying process. Order more STAT-DRI™Plus from your dealer quoting 2OZPLUS, 8OZPLUST, or 32OZPL US.
Biological and/or • Check the filter for dirt and moisture. Replace if dirty. Call for service if wet.Air Filter
Water Filter • Check the water reservoir filter every week and clean if necessary. Replace only if necessary.
Cassette Seal • Replace every 500 cycles or six months (whichever is first), or whenever necessary.
Biological and/or • Replace every 500 cycles or six months (whichever is first).Air Filter
Cassette • Check the tray, lid and seal for damage. Replace if necessary.
Biological Filter • Inspect the biological filter for moisture.
Solenoid Valve • Inspect the valve and clean if dirty. Replace the plunger if defective.
Pump • Clean the filters, replace if dirty.
Check Valve • Remove the exhaust tube from the back of the unit during the air drying phase. Check for aircoming from the fitting.
• Remove the air compressor tube from the check valve inlet while running a cycle. Make sureno steam is leaking from the valve. Replace if there are any leaks.
Water Reservoir • Check the reservoir for dirt. Clean and rinse with steam process distilled water if necessary.
Calibration • Calibrate the unit.
6. The Communication Port (Not on all models)
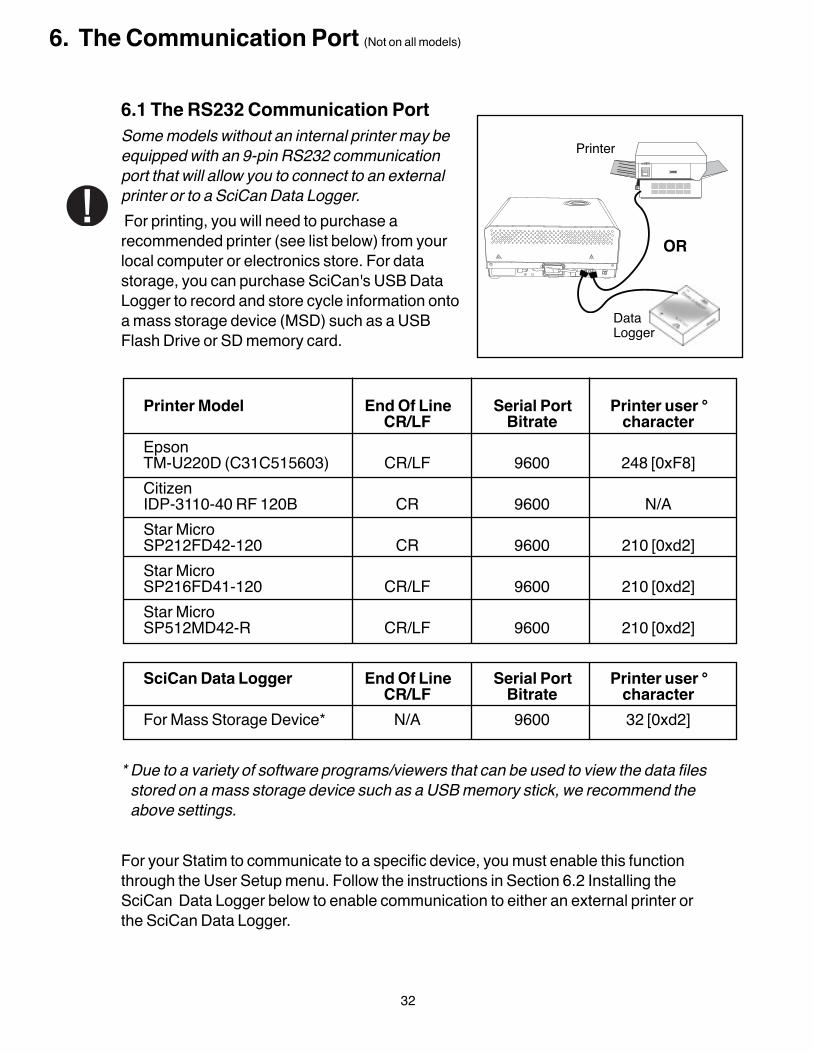
6.1 The RS232 Communication PortSome models without an internal printer may beequipped with an 9-pin RS232 communication port that will allow you to connect to an external printer or to a SciCan Data Logger.For printing, you will need to purchase arecommended printer (see list below) from yourlocal computer or electronics store. For datastorage, you can purchase SciCan's USB DataLogger to record and store cycle information ontoa mass storage device (MSD) such as a USBFlash Drive or SD memory card.
* Due to a variety of software programs/viewers that can be used to view the data filesstored on a mass storage device such as a USB memory stick, we recommend theabove settings.
For your Statim to communicate to a specific device, you must enable this functionthrough the User Setup menu. Follow the instructions in Section 6.2 Installing the SciCan Data Logger below to enable communication to either an external printer or the SciCan Data Logger.
OR
Printer Model End Of Line Serial Port Printer user ° CR/LF Bitrate character
Epson TM-U220D (C31C515603) CR/LF 9600 248 [0xF8]Citizen IDP-3110-40 RF 120B CR 9600 N/AStar MicroSP212FD42-120 CR 9600 210 [0xd2]Star MicroSP216FD41-120 CR/LF 9600 210 [0xd2]Star MicroSP512MD42-R CR/LF 9600 210 [0xd2]
SciCan Data Logger End Of Line Serial Port Printer user ° CR/LF Bitrate character
For Mass Storage Device* N/A 9600 32 [0xd2]
Printer
DataLogger
32
6. The Communication Port (Not on all models)
6.2 Installing the SciCan Data LoggerSciCan’s USB Data Logger can record and store cycle information onto a mass storagedevice (MSD) such as a USB Flash Drive or SD memory card.
These instructions are for units with a 9-pin communication (RS232) port located at the back of the unit.Follow the steps below before connecting the Data Logger.
STEP 1
Selecting the USB Flash/MSD Option
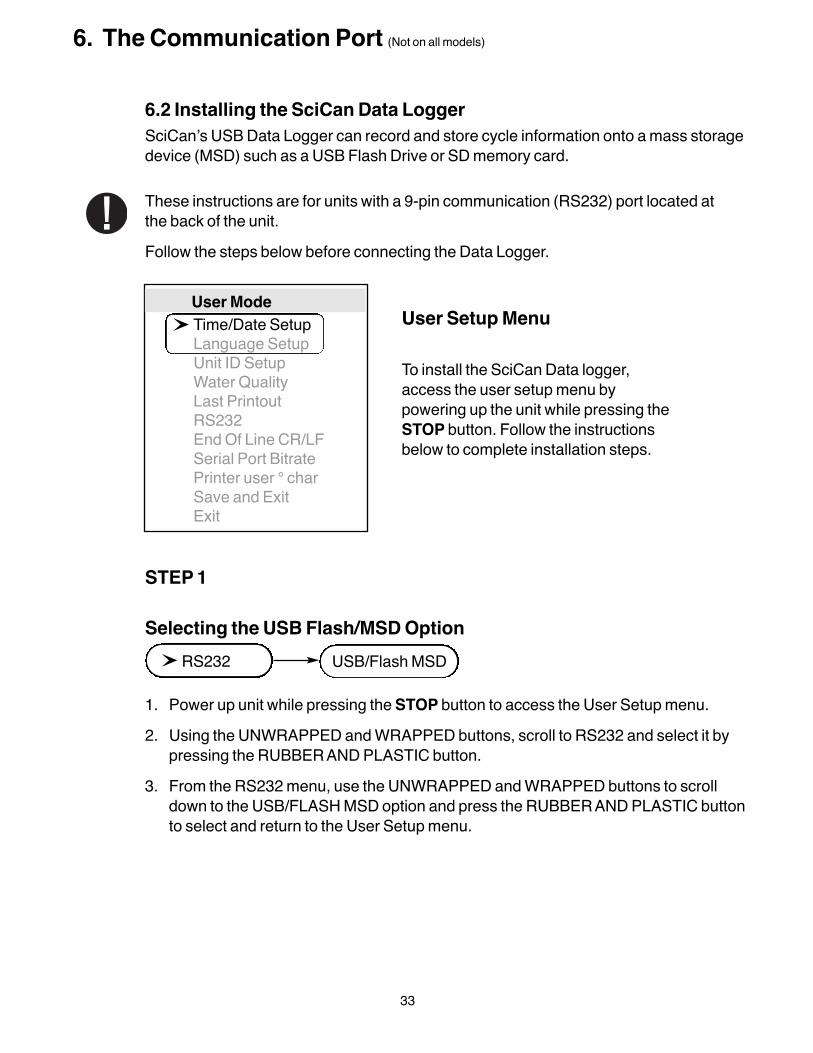
1. Power up unit while pressing the STOP button to access the User Setup menu. 2. Using the UNWRAPPED and WRAPPED buttons, scroll to RS232 and select it by
pressing the RUBBER AND PLASTIC button. 3. From the RS232 menu, use the UNWRAPPED and WRAPPED buttons to scroll
down to the USB/FLASH MSD option and press the RUBBER AND PLASTIC buttonto select and return to the User Setup menu.
User ModeUser Setup Menu
To install the SciCan Data logger,access the user setup menu bypowering up the unit while pressing theSTOP button. Follow the instructionsbelow to complete installation steps.
Time/Date SetupLanguage SetupUnit ID SetupWater QualityLast PrintoutRS232End Of Line CR/LFSerial Port BitratePrinter user ° charSave and ExitExit
RS232 USB/Flash MSD
33

6. The Communication Port (Not on all models)
Setting the Serial Port Bitrate to 9600
1. From the User Setup menu, use the UNWRAPPED and WRAPPED buttons to scrollto the Serial Port Bitrate menu and select it using the RUBBER AND PLASTICbutton.
2. From the Serial Port Bitrate menu, use the UNWRAPPED and WRAPPED buttons toscroll down to 9600 and press the RUBBER AND PLASTIC button to select andreturn to the User Setup menu.
Setting the Printer user Character; (example: 134°C)
1. From the User Setup menu, use the UNWRAPPED and WRAPPED buttons to scrollto the Printer user ° char menu and select it using the RUBBER AND PLASTICbutton.
2. From the Printer user ° char menu, using the UNWRAPPED button to increase thedisplayed value by one, and the WRAPPED button to increase that value by ten,enter the value 32 [0x20] and press the RUBBER AND PLASTIC button to acceptand return to the User Setup menu.
Save and Exit
A Save and Exit must be performed after the above settings are completed. If this is notdone, the information will revert to its prior settings.1. From the User Setup menu, use the UNWRAPPED and WRAPPED buttons to scroll
to Save and Exit. 2. Select it by pressing the RUBBER AND PLASTIC button.
The LCD will display time and date information and a sequence of messages:
Save and Exit
HH:MM DD/MM/YYYY“MSD NOT DETECTED”/”INSERTMSD/FLASH”/”SELECT A CYCLE”
Serial Port Bitrate 9600
Printer user ° char 32 [0x20]
34
6. The Communication Port (Not on all models)
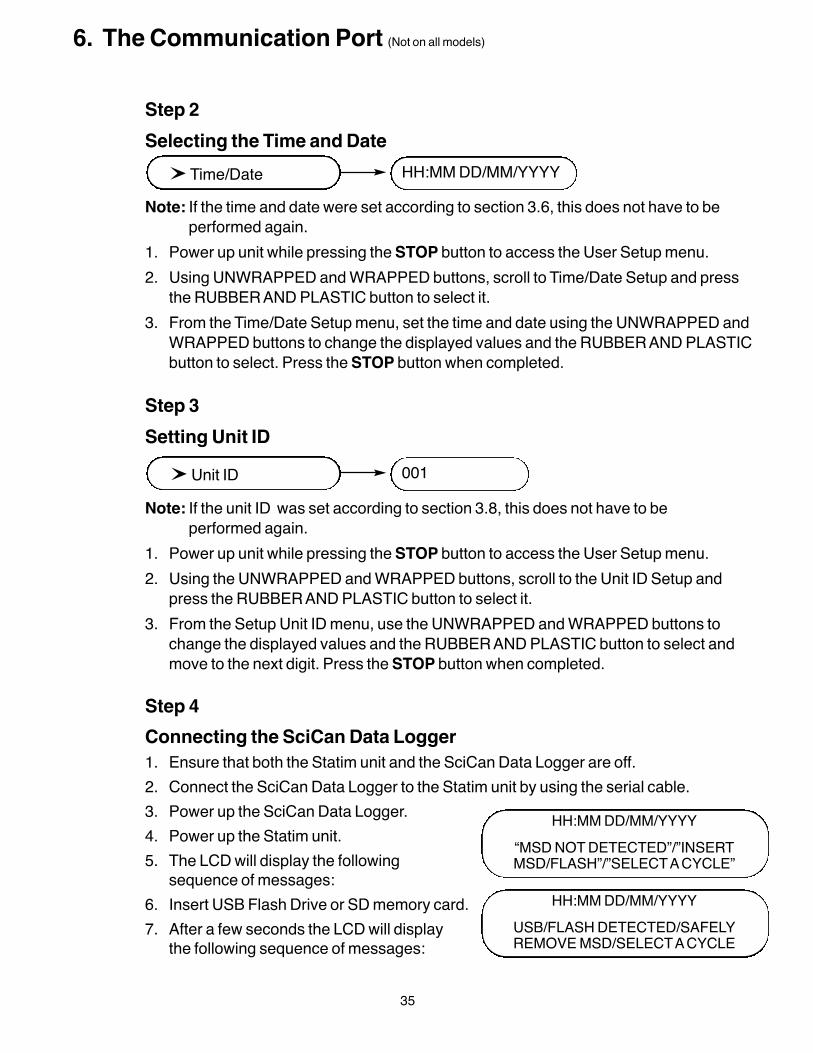
Step 2Selecting the Time and Date
Note: If the time and date were set according to section 3.6, this does not have to beperformed again.
1. Power up unit while pressing the STOP button to access the User Setup menu. 2. Using UNWRAPPED and WRAPPED buttons, scroll to Time/Date Setup and press
the RUBBER AND PLASTIC button to select it. 3. From the Time/Date Setup menu, set the time and date using the UNWRAPPED and
WRAPPED buttons to change the displayed values and the RUBBER AND PLASTICbutton to select. Press the STOP button when completed.
Step 3Setting Unit ID
Note: If the unit ID was set according to section 3.8, this does not have to be performed again.
1. Power up unit while pressing the STOP button to access the User Setup menu. 2. Using the UNWRAPPED and WRAPPED buttons, scroll to the Unit ID Setup and
press the RUBBER AND PLASTIC button to select it. 3. From the Setup Unit ID menu, use the UNWRAPPED and WRAPPED buttons to
change the displayed values and the RUBBER AND PLASTIC button to select andmove to the next digit. Press the STOP button when completed.
Step 4Connecting the SciCan Data Logger1. Ensure that both the Statim unit and the SciCan Data Logger are off.2. Connect the SciCan Data Logger to the Statim unit by using the serial cable.3. Power up the SciCan Data Logger.4. Power up the Statim unit. 5. The LCD will display the following
sequence of messages:6. Insert USB Flash Drive or SD memory card.7. After a few seconds the LCD will display
the following sequence of messages:
Time/Date HH:MM DD/MM/YYYY
Unit ID 001
HH:MM DD/MM/YYYY“MSD NOT DETECTED”/”INSERTMSD/FLASH”/”SELECT A CYCLE”
HH:MM DD/MM/YYYYUSB/FLASH DETECTED/SAFELYREMOVE MSD/SELECT A CYCLE
35
36
6. The Communication Port (Not on all models)
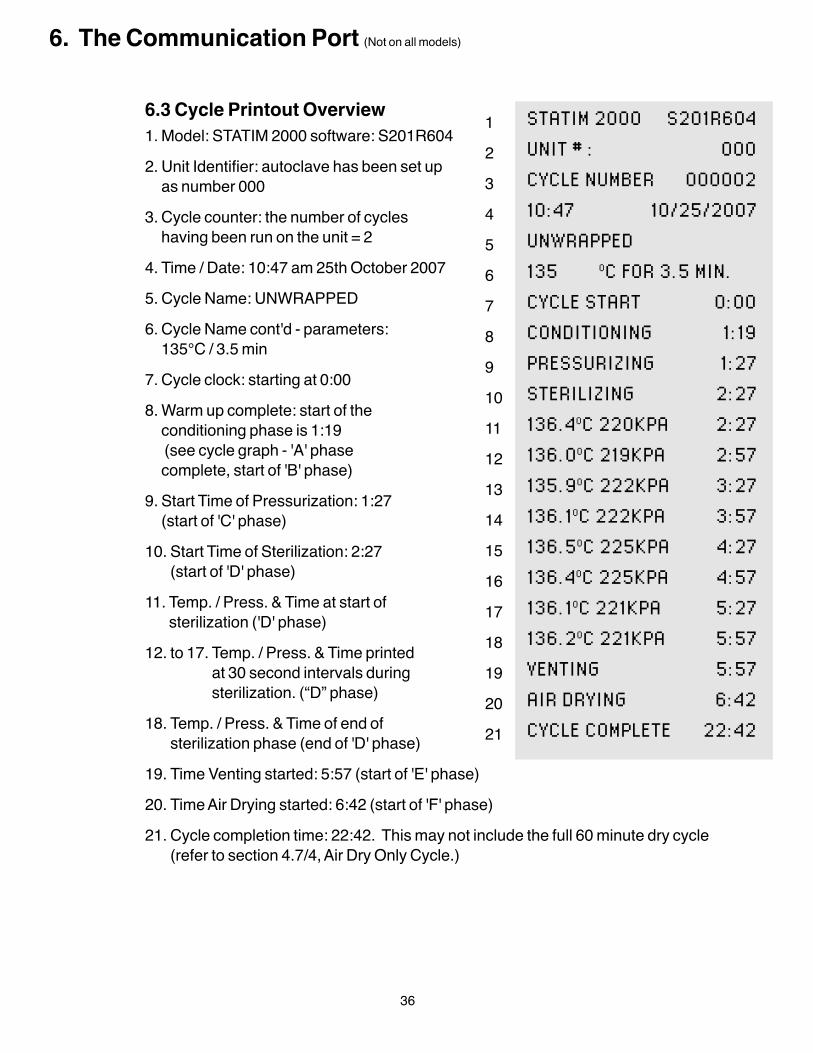
6.3 Cycle Printout Overview1. Model: STATIM 2000 software: S201R6042. Unit Identifier: autoclave has been set up
as number 0003. Cycle counter: the number of cycles
having been run on the unit = 24. Time / Date: 10:47 am 25th October 20075. Cycle Name: UNWRAPPED6. Cycle Name cont'd - parameters:
135°C / 3.5 min7. Cycle clock: starting at 0:008. Warm up complete: start of the
conditioning phase is 1:19(see cycle graph - 'A' phase complete, start of 'B' phase)
9. Start Time of Pressurization: 1:27 (start of 'C' phase)
10. Start Time of Sterilization: 2:27 (start of 'D' phase)
11. Temp. / Press. & Time at start ofsterilization ('D' phase)
12. to 17. Temp. / Press. & Time printed at 30 second intervals duringsterilization. (“D” phase)
18. Temp. / Press. & Time of end ofsterilization phase (end of 'D' phase)
19. Time Venting started: 5:57 (start of 'E' phase)20. Time Air Drying started: 6:42 (start of 'F' phase)21. Cycle completion time: 22:42. This may not include the full 60 minute dry cycle
(refer to section 4.7/4, Air Dry Only Cycle.)
STATIM 2000 S201R604UNIT # : 000CYCLE NUMBER 00000210:47 10/25/2007UNWRAPPED135º º OC FOR 3.5 MIN.CYCLE START 0:00CONDITIONING 1:19PRESSURIZING 1:27STERILIZING 2:27136.4OC 220KPA 2:27136.0OC 219KPA 2:57135.9OC 222KPA 3:27136.1OC 222KPA 3:57136.5OC 225KPA 4:27136.4OC 225KPA 4:57136.1OC 221KPA 5:27136.2OC 221KPA 5:57VENTING 5:57AIR DRYING 6:42CYCLE COMPLETE 22:42
123456789101112131415161718192021
7.1 Installing Paper on the Internal PrinterUse only paper approved for use with the optional internal printer on the Statim 5000. The use of any other paper will damage the printer and will void the warranty. Thermalpaper is available from your dealer (SciCan order no. 01-101657S).Do not operate the printer without paper. If you run out of thermal paper, or if you do notwish to use the printer, turn it OFF.Never pull the paper backwards through the printer. This will damage the printer mechanism.To install the paper into the printer, follow these steps:1. Power the Statim 5000 ON.2. Open the printer door n1 by pushing on the top half of the door.3. Power the printer ON.4. Unroll some paper from the thermal paper roll n3 and trim the corners using the
paper cutting template included with each box.5. Move the paper roll arm n4 into the loading position. Place the paper roll n3 on the arm
so the paper strip feeds from the top of the roll and then carefully insert it into the paper feed slot n5 until it stops.
If the paper does not feed from the top, the heat sensitive side of the paper will not be incontact with the print head and the printer will not print. 6. With one hand, continue to gently feed the paper strip into the paper feed slot. With the
other hand, press the paper advance button until the paper feeds by itself.Keep the paper straight when feeding it into the printer or it may jam. Do not force thepaper into the slot! If the paper will not feed into the slot, pre-cut the end of the roll againand reload the paper.
7. Internal Printer (Not on all models)
37
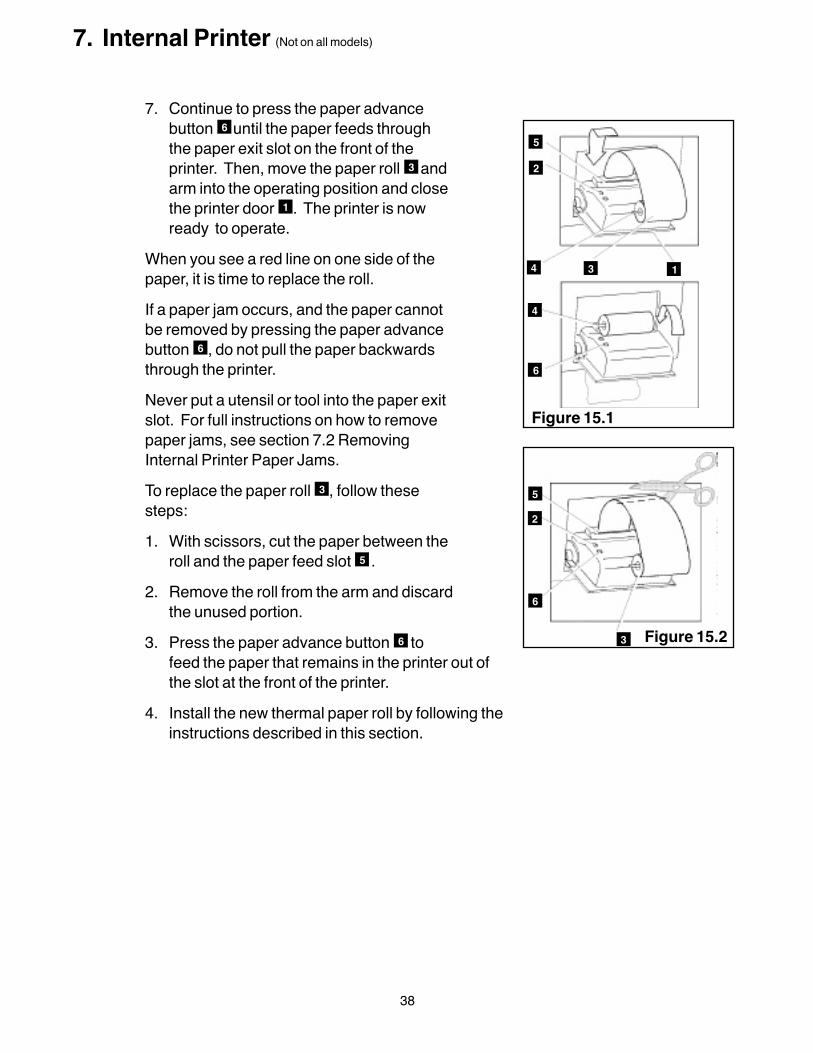
7. Continue to press the paper advancebutton n6 until the paper feeds throughthe paper exit slot on the front of theprinter. Then, move the paper roll n3 andarm into the operating position and closethe printer door n1 . The printer is nowready to operate.
When you see a red line on one side of thepaper, it is time to replace the roll.If a paper jam occurs, and the paper cannotbe removed by pressing the paper advancebutton n6 , do not pull the paper backwardsthrough the printer.Never put a utensil or tool into the paper exitslot. For full instructions on how to removepaper jams, see section 7.2 RemovingInternal Printer Paper Jams.To replace the paper roll n3 , follow thesesteps:1. With scissors, cut the paper between the
roll and the paper feed slot n5 .2. Remove the roll from the arm and discard
the unused portion.3. Press the paper advance button n6 to
feed the paper that remains in the printer out ofthe slot at the front of the printer.
4. Install the new thermal paper roll by following theinstructions described in this section.
7. Internal Printer (Not on all models)
Figure 15.1
Figure 15.2
n5
n2
n4
n4
n3
n6
n5
n2
n6
n3
n1
38

7.2 Removing Internal Printer Paper JamsIf paper jams in the printer and cannot beremoved by pressing the paper advance button n6 , the printer must be disassembled. Do not pull the paper backwards through theprinter and never put utensils or tools into thepaper exit slot.When paper is jammed in the printer, follow these steps to remove the jam:1. Power the Statim 5000 OFF and unplug the
unit.2. Using scissors, cut the paper between the
roll and the paper feed slot n5 .3. Remove the paper roll n3 from the paper
roll arm n4 and leave the arm in the loading position.
4. Using a #1 Phillips screwdriver, remove thethree screws n7 from the printer cover n8 andremove the cover.
5. Note the orientation of the exposed printedwiring board and the paper roll arm n4assembled on the printer door n1 .
6. Gently lift the printed wiring board upwards and away from the printer door. Exercisecare while handling the board. The printer is integral to the wiring board. Do notplace strain on the connections of the ribbon cable soldered to the board. Do notremove the connector of the flexible cable from the connector header on the board.The paper drive mechanism on the underside of the wiring board is now exposed.
7. Using a pair of tweezers or fine needle-nosed pliers, carefully remove the paper from the mechanism.
When the paper is removed, reassemble the printer:1. Carefully snap the paper roll holder, in the loading position, back into the clips on the
printer door n1 .
7. Internal Printer (Not on all models)
Figure 16
n1
n10
n11
n12
n4
n10
n14
n15n9
n8
n7
n13
39

7. Internal Printer (Not on all models)
2. Place the printed wiring board back into position on the printer door. Note thealignment of the mounting holes n9 in the wiring board and the mounting bosses n13
on the printer door. The black plastic printer body rests between the locating ribs n10
on the inside of the printer door.3. Ensure that the flexible cables n11 , n14 are not pinched between the printer door
and the wiring board.4. Place the printer cover on the printer door. Ensure that the flexible cables are not
pinched between the cover and the door. The power button and the paper advancebutton must protrude through the openings in the cover and operate freely.
5. Using a #1 Phillips screwdriver, secure the printer cover to the printer door with the three screws retained during the disassembly procedure. Do not over-tightenthese screws.
6. Plug your Statim 5000 into the wall receptacle. Turn the power switch to the ONposition.
7. Press the printer power button to the ON position. Load paper into the printerfollowing the procedures in Section 7.1 Installing Paper on the Internal Printer.
40

8. Troubleshooting
Problem
Unit does not power ON.
There is water under the machine.
Instruments do not dry.
Check that water has not spilled when refilling thereservoir. Make sure the plug in the exhaust tube issecured. Remove and reinsert the cassette . Attempt another cycle.
Be careful. The metal parts will be hot, and the cassettewill contain hot steam.
The cassette is leaking. If water drips from theunderside of the unit during operation, check thecassette seal for misalignment or damage and replacethe seal if required.
Be careful. The metal parts will be hot, and the cassettewill contain hot steam.
Attempt another cycle. If it still leaks attempt anothercycle using a different cassette if possible.
If the leak persists, turn the unit OFF, remove andunload the cassette, unplug the unit, and call your dealer.
Solution
Check that the unit is plugged into a properlygrounded outlet and that the power cord is firmlyseated at the rear of the machine.
Try another circuit. Power unit OFF for 10 secondsand then power ON again.
Check the condition of the line circuitbreaker or fuse.
41
Best drying occurs when the cycle continues tocompletion. Allow the cycle to finish. Make sure theinstruments are loaded correctly in the cassette. Refer to section 4.4 Preparing and Loading Instruments.
Check the unit leveling.
Check air filters and replace if dirty.
Clean the inside of the cassette and treat with Stat-Dridrying agent. Refer to section 5.1 Cleaning the Cassette.
Examine the exhaust tube (tube to the waste bottle) for kinks.
8. Troubleshooting
Cycle interrupted — NOT STERILE, Cycle aborted — NOT STERILE and CYCLE FAULT messages.
If kinked, straighten the tube. If the tube cannot bestraightened, remove it from the push-in fitting attachedto the Statim. Depress the collar on the fitting and withthe other hand pull firmly on the tube. Once the tube isfree of the fitting, cut the damaged section of tubingaway using a sharp instrument. Be sure that you leaveenough tube to reach the unit when you re-attach thetube to the exhaust fitting. If the tube is too short toremove a section, contact your SciCan dealer fora replacement.
Make sure the compressor is working. To check,remove the exhaust tube from the waste bottle. Start the Air Drying Only Cycle, and place the free endinto a glass of water. If there is not a strong, steady flow of bubbles, the compressor is not functioning properly. Contact your SciCan dealer.
Record the CYCLE FAULT number. Wait a few minutesand attempt another cycle before proceeding to the nextsolution. Remove the cassette. Be careful. The metalparts will be hot and the cassette will contain hot steam.Inspect the cassette to ensure that the holes in the backof the seal are perfectly aligned, and that the flexible lipof the seal is completely free. Check the exhaust tubefor kinks or obstructions. If kinked, straighten the tube. If the tube can not be straightened, remove it from thepush-in fitting attached to the Statim. Depress the collar on the fitting and, with the other hand pull firmly on the tube. Once the tube is free of the fitting, cut the damaged section of tubing away using a sharpinstrument. Be sure that you leave enough tube to reach the unit when you re-attach the tube to theexhaust fitting. If the tube is too short to remove asection, contact your SciCan dealer for a replacement.
Check that the Statim has not inadvertently beenexposed to any electrical interference. Refer to the Installation section dealing withEnvironmental Considerations. (Section 3.1)
Try running another cycle. If the problem persists,record the cycle fault message number and contactyour dealer.
42
8. Troubleshooting
Excessive steam issuing from the front of the machine.
Message REFILL RESERVOIR, Machine will not start.
Message PRINTER FAULT displayed on LCD Printer is not printing.
The printer does not work.
The printer appears to work, but nothing isprinted on the paper.
Time and date are incorrect.
Message WATER QUALITY IS NOTACCEPTABLE. Machine will not start.
Remove and reinsert the cassette. Attempt anothercycle. Remove and check the cassette seal formisalignment or damage. Replace the seal if required.Be careful as the metal parts will be hot and the cassettewill contain hot steam.
If the leak persists, turn the unit OFF, remove andunload the cassette and contact your SciCan dealer.
The level of the water in the reservoir is low. Refill thereservoir. Refer to the steps described in Section 3.4Filling the Reservoir.
Make sure that the printer cable is connected securelywith the connector on the back of the Statim and the Statprinter. Make sure that the printer ispowered ON. Power unit OFF for 10 seconds and then power ON again.
The time and date have not been set. See Section 3.6Setting the Time and Date.
43
You have used water which is not steam-processdistilled or is improperly distilled.
Empty the reservoir and refill with steam-processdistilled water containing less than 5 ppm total disolvedsolids (having conductivity of less than 10 µS / cm). If you have the water conductivity meter, check thequality of the water before refilling the reservoir. Refer to the steps described in Section 3.10 Shipping the Unit to empty the reservoir.
Check for a paper jam. If the paper is jammed, follow the paper removal procedures outlined in Section 7.2.Power unit OFF for 10 seconds and then power ON again. If the paper is still jammed, follow thedisassembly procedures outlined in Section 7.2Removing Paper Jams.
Ensure that the paper is loaded properly (refer to Section7.1 Installing Paper on the Internal Printer). Check to see that the paper leaves the paper roll from the top of the roll. This means that the treated surface of thecoated thermal paper will be in contact with the thermalprint head.

Message MSD NOT CONNECTED <>INSERT MSD/FLASH
Message Missing lines of Data on MSD/FLASH
Refer to the STATIM screen to confirm successfulsterilization.Reset the Data Logger by unplugging its power,disconnecting the MSD and waiting 10 seconds. Thenre-connect the power adapter and insert the MSD intothe Data Logger.If the problem persists, contact the SciCan ServiceCenter.
Message: The file or directory in the MSDis corrupted or unreadable.
Refer to the STATIM screen to confirm successfulsterilization.The MSD may have been unplugged while data wasbeing written to it. The MSD should not be unpluggeduntil after “SAFELY REMOVE MSD <> MSD/FLASHDETECTED” is displayed.The corrupted files or directories may be lost. Reformatthe MSD on your computer.
Message MSD/FLASH FULL <> REPLACE MSD
The MSD is full. Export the data.
Check the serial cable connection.Check the power connection.Ensure the lower red LED is lit.Check that the Mass Storage Device is properlyinserted.Repeat the instructions for Installing the SciCan DataLogger on your Statim.
44
8. Troubleshooting
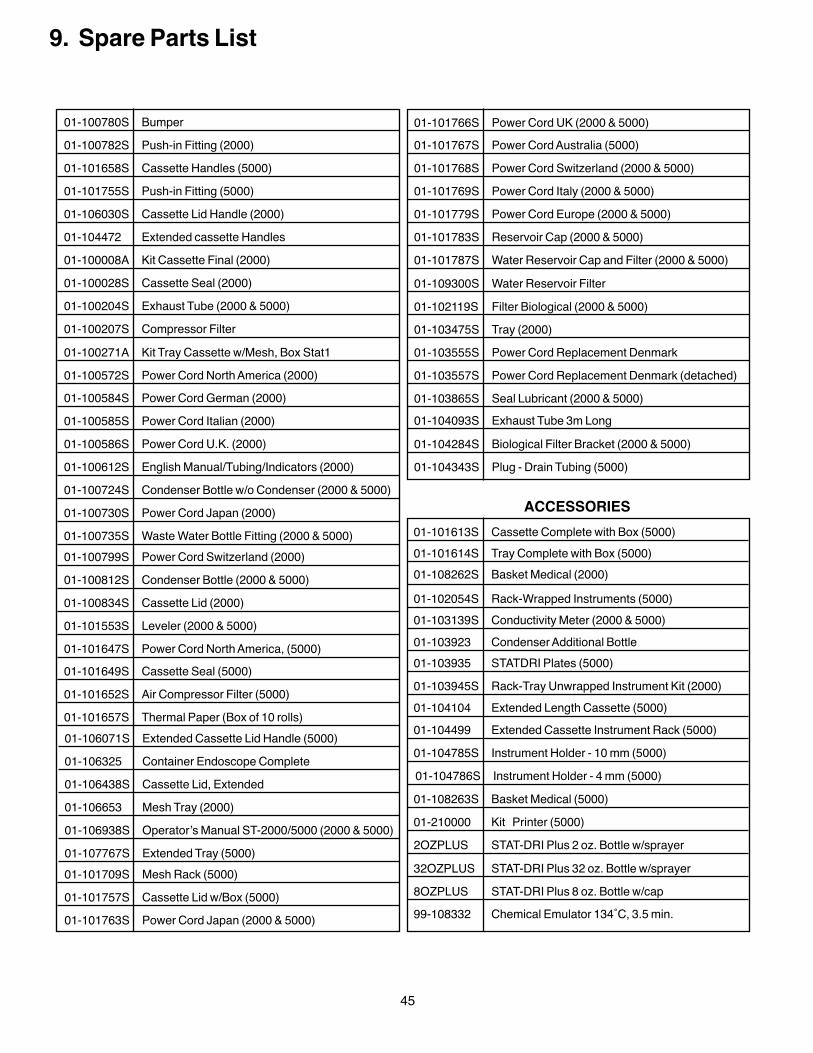
01-100780S Bumper01-100782S Push-in Fitting (2000)01-101658S Cassette Handles (5000)01-101755S Push-in Fitting (5000)01-106030S Cassette Lid Handle (2000)01-104472 Extended cassette Handles01-100008A Kit Cassette Final (2000)01-100028S Cassette Seal (2000)01-100204S Exhaust Tube (2000 & 5000)01-100207S Compressor Filter01-100271A Kit Tray Cassette w/Mesh, Box Stat101-100572S Power Cord North America (2000)01-100584S Power Cord German (2000)01-100585S Power Cord Italian (2000)01-100586S Power Cord U.K. (2000)01-100612S English Manual/Tubing/Indicators (2000)01-100724S Condenser Bottle w/o Condenser (2000 & 5000)01-100730S Power Cord Japan (2000)01-100735S Waste Water Bottle Fitting (2000 & 5000)01-100799S Power Cord Switzerland (2000)01-100812S Condenser Bottle (2000 & 5000)01-100834S Cassette Lid (2000)01-101553S Leveler (2000 & 5000)01-101647S Power Cord North America, (5000)
01-101613S Cassette Complete with Box (5000)01-101614S Tray Complete with Box (5000)
01-101649S Cassette Seal (5000)01-101652S Air Compressor Filter (5000)01-101657S Thermal Paper (Box of 10 rolls)
01-101709S Mesh Rack (5000)01-101757S Cassette Lid w/Box (5000)01-101763S Power Cord Japan (2000 & 5000)
01-101767S Power Cord Australia (5000)01-101766S Power Cord UK (2000 & 5000)
01-101768S Power Cord Switzerland (2000 & 5000)01-101769S Power Cord Italy (2000 & 5000)01-101779S Power Cord Europe (2000 & 5000)01-101783S Reservoir Cap (2000 & 5000)01-101787S Water Reservoir Cap and Filter (2000 & 5000)01-109300S Water Reservoir Filter
01-102054S Rack-Wrapped Instruments (5000)
01-102119S Filter Biological (2000 & 5000)
01-103139S Conductivity Meter (2000 & 5000)
01-103475S Tray (2000)01-103555S Power Cord Replacement Denmark01-103557S Power Cord Replacement Denmark (detached)01-103865S Seal Lubricant (2000 & 5000)
01-103923 Condenser Additional Bottle01-103935 STATDRI Plates (5000)01-103945S Rack-Tray Unwrapped Instrument Kit (2000)
01-104093S Exhaust Tube 3m Long
01-104104 Extended Length Cassette (5000)
01-104284S Biological Filter Bracket (2000 & 5000)01-104343S Plug - Drain Tubing (5000)
01-104499 Extended Cassette Instrument Rack (5000)01-104785S Instrument Holder - 10 mm (5000)01-104786S Instrument Holder - 4 mm (5000)
01-106071S Extended Cassette Lid Handle (5000)01-106325 Container Endoscope Complete01-106438S Cassette Lid, Extended01-106653 Mesh Tray (2000)01-106938S Operator’s Manual ST-2000/5000 (2000 & 5000)01-107767S Extended Tray (5000)
01-108262S Basket Medical (2000)
01-108263S Basket Medical (5000)01-210000 Kit Printer (5000)2OZPLUS STAT-DRI Plus 2 oz. Bottle w/sprayer32OZPLUS STAT-DRI Plus 32 oz. Bottle w/sprayer8OZPLUS STAT-DRI Plus 8 oz. Bottle w/cap99-108332 Chemical Emulator 134˚C, 3.5 min.
45
ACCESSORIES
9. Spare Parts List
Limited WarrantyFor a period of one year, SciCan guarantees that the Statim 2000 / 5000, whenmanufactured by SciCan in new and unused condition, will not fail during normalservice due to defects in material and workmanship that are not due to apparent abuse,misuse, or accident.The one year warranty will cover the performance of all components of the unit exceptconsumables such as the cassette seal, the compressor filter and the microbiologicalfilter, provided that the product is being used and maintained according to thedescription in the user’s manual.In the event of failure due to such defects during this period of time, the exclusiveremedies shall be repair or replacement, at SciCan’s option and without charge, of anydefected part(s) (except gasket), provided SciCan is notified in writing within thirty (30)days of the date of such a failure and further provided that the defective part(s) arereturned to SciCan prepaid.This warranty shall be considered to be validated, if the product is accompanied by theoriginal purchase invoice from the authorized SciCan dealer, and such invoice identifiesthe item by serial number and clearly states the date of purchase. No other validation isacceptable. After one year, all SciCan’s warranties and other duties with respect to thequality of the product shall be conclusively presumed to have been satisfied, all liabilitytherefore shall terminate, and no action or breach of any such warranty or duty maythereafter be commenced against SciCan.Any express warranty not provided hereon and any implied warranty or representationas to performance, and any remedy for breach of contract which, but for this provision,might arise by implication, operation of law, custom of trade or course of dealing ,including any implied warranty of merchantability or of fitness for particular purpose withrespect to all and any products manufactured by SciCan is excluded and disclaimed bySciCan. If you would like to learn more about SciCan products and features, visit ourwebsite at www.scican.com.
46
10. Warranty
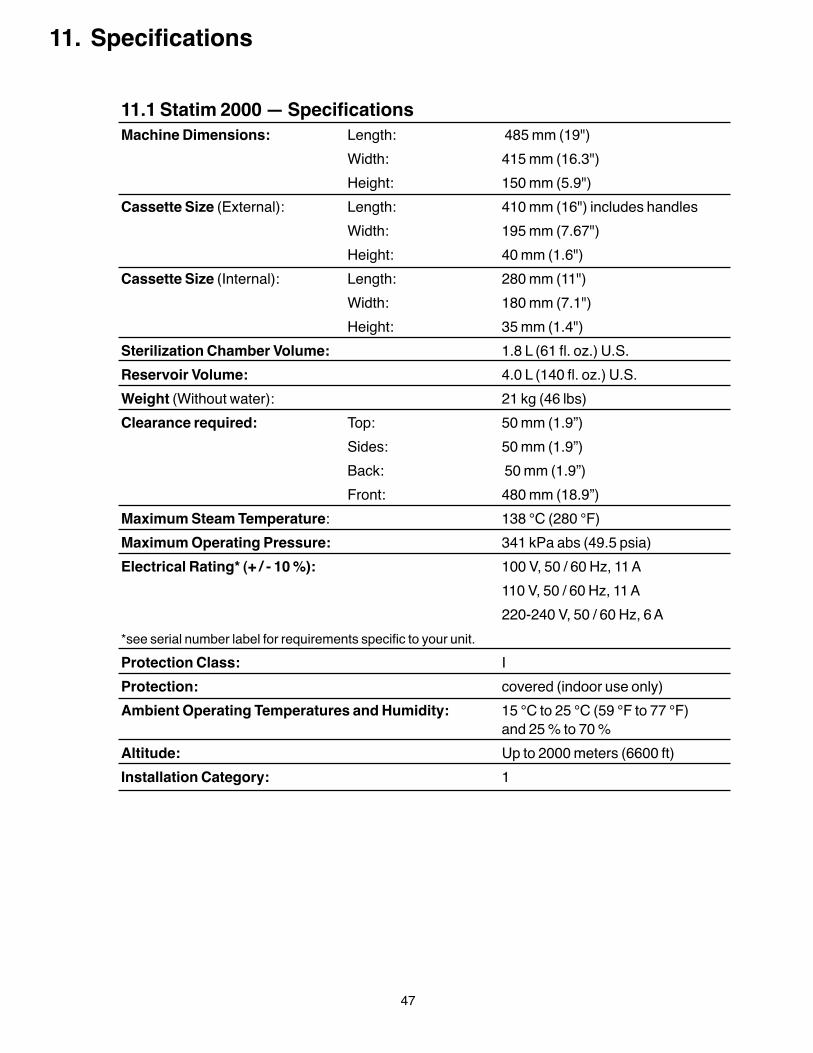
11.1 Statim 2000 — SpecificationsMachine Dimensions: Length: 485 mm (19")
Width: 415 mm (16.3")Height: 150 mm (5.9")
Cassette Size (External): Length: 410 mm (16") includes handlesWidth: 195 mm (7.67")Height: 40 mm (1.6")
Cassette Size (Internal): Length: 280 mm (11")Width: 180 mm (7.1")Height: 35 mm (1.4")
Sterilization Chamber Volume: 1.8 L (61 fl. oz.) U.S.Reservoir Volume: 4.0 L (140 fl. oz.) U.S.Weight (Without water): 21 kg (46 lbs)Clearance required: Top: 50 mm (1.9”)
Sides: 50 mm (1.9”)Back: 50 mm (1.9”)Front: 480 mm (18.9”)
Maximum Steam Temperature: 138 °C (280 °F)Maximum Operating Pressure: 341 kPa abs (49.5 psia)Electrical Rating* (+ / - 10 %): 100 V, 50 / 60 Hz, 11 A
110 V, 50 / 60 Hz, 11 A220-240 V, 50 / 60 Hz, 6 A
*see serial number label for requirements specific to your unit.Protection Class: IProtection: covered (indoor use only)Ambient Operating Temperatures and Humidity: 15 °C to 25 °C (59 °F to 77 °F)
and 25 % to 70 %Altitude: Up to 2000 meters (6600 ft)Installation Category: 1
47
11. Specifications
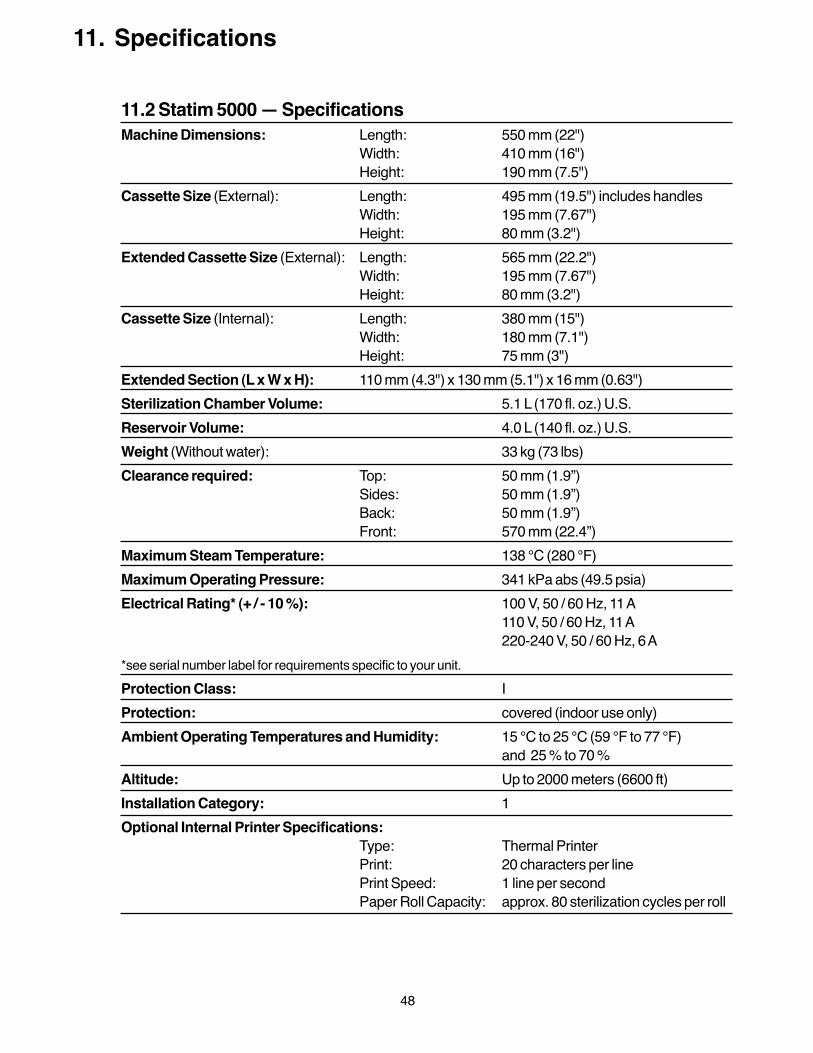
11.2 Statim 5000 — SpecificationsMachine Dimensions: Length: 550 mm (22")
Width: 410 mm (16")Height: 190 mm (7.5")
Cassette Size (External): Length: 495 mm (19.5") includes handlesWidth: 195 mm (7.67")Height: 80 mm (3.2")
Extended Cassette Size (External): Length: 565 mm (22.2")Width: 195 mm (7.67")Height: 80 mm (3.2")
Cassette Size (Internal): Length: 380 mm (15")Width: 180 mm (7.1")Height: 75 mm (3")
Extended Section (L x W x H): 110 mm (4.3") x 130 mm (5.1") x 16 mm (0.63")Sterilization Chamber Volume: 5.1 L (170 fl. oz.) U.S.Reservoir Volume: 4.0 L (140 fl. oz.) U.S.Weight (Without water): 33 kg (73 lbs)Clearance required: Top: 50 mm (1.9”)
Sides: 50 mm (1.9”)Back: 50 mm (1.9”)Front: 570 mm (22.4”)
Maximum Steam Temperature: 138 °C (280 °F)Maximum Operating Pressure: 341 kPa abs (49.5 psia)Electrical Rating* (+ / - 10 %): 100 V, 50 / 60 Hz, 11 A
110 V, 50 / 60 Hz, 11 A220-240 V, 50 / 60 Hz, 6 A
*see serial number label for requirements specific to your unit.Protection Class: IProtection: covered (indoor use only)Ambient Operating Temperatures and Humidity: 15 °C to 25 °C (59 °F to 77 °F)
and 25 % to 70 %Altitude: Up to 2000 meters (6600 ft)Installation Category: 1Optional Internal Printer Specifications:
Type: Thermal PrinterPrint: 20 characters per linePrint Speed: 1 line per secondPaper Roll Capacity: approx. 80 sterilization cycles per roll
48
11. Specifications