stay safe in an earthquake
TRANSCRIPT

LESSON PLAN 3
Stay Safe in anEarthquakeTo stay safe before, during and after an earthquake, young children andtheir families need to identify and remove hazards. They also mustknow what to do when an earthquake strikes.
Key Terms and Concepts
aftershock debris
Purposes
To have the students and their families identify conditions thatincrease hazards during an earthquakeTo help the students and their families learn what to do during anearthquake
Objectives
The students will—• Define the word “hazard” and look at photographs of schools after
an actual earthquake to recognize the damage caused by unmiti-gated hazards.
• Identify and mitigate earthquake hazards in their classroom.
• Find and lessen (mitigate) earthquake hazards in their home withthe handout Home Hazard Hunt as a guide. (Home Connection)
• Look for earthquake hazards within the community. (LinkingAcross the Curriculum)
• Learn safe behavior during an earthquake and practice Drop,Cover and Hold On during an earthquake simulation.
• Use Drop, Cover and Hold On to help families discuss safebehavior during an earthquake, at school or at home. (HomeConnection)
• Create and implement plans to teach others in the school commu-nity about earthquake safety. (Linking Across the Curriculum)
Activities
“Find the Hazards”
“What Should I Do?”
Earthquakes K-2
Earthquake Safety
1Masters of Disaster® Earthquakes, Earthquake Safety, Lesson Plan 3/Stay Safe in an EarthquakeCopyright 2007 The American National Red Cross
Visit the American Red Cross Web site at www.redcross.org/disaster/masters
Drop, Cover and Hold On
hazard
Earthquakes K–2
LESSON PLAN 3
Stay Safe in anEarthquake
Materials
• Chalkboard and chalk or largechart paper and markers
• “California Schools After aQuake” (optional) on theMasters of Disaster CD-ROM
• Home Hazard Hunt, 1 copyper student (HomeConnection)
“Find the Hazards”
SET UP 10 minutes CONDUCT 35–45 minutes
Science: Health; Social Studies: Community
1. Ask the students what they think harms people when an earthquakeoccurs and give them time to express themselves. After some discussion,tell the students that the movement of the ground during an earthquakeseldom directly causes people to get hurt. Explain that most people arehurt from things falling on them, such as pieces that break off buildings.
2. Ask the children if they know the meaning of the word“hazard.” (A source of danger.) After listening to their answers,explain the meaning of “hazard” and its relation to earthquakes.
These photographs could frighten very young children. Look at the photosbefore deciding whether or not to show them to your class. You maychoose to show only a few photos that you feel address issues and hazardsyour students can understand—fallen books and bookcases, boxes toppledfrom shelves, etc.
3. Make a class list of the types of hazards that can result from an earth-quake at school. Draw a large square on the chalkboard, divided intofour sections and labeled as the following example. As the students givetheir ideas, write them on the chalkboard. For example:
2Masters of Disaster® Earthquakes, Earthquake Safety, Lesson Plan 3/Stay Safe in an EarthquakeCopyright 2007 The American National Red Cross
Visit the American Red Cross Web site at www.redcross.org/disaster/masters
Damage inside the classrooms and hallwaysOverturned bookcases, furniture and appli-
ancesFalling objects from shelves and wallsFlying glass from broken windowsCollapsing wallsFalling pieces of ceiling and light fixtures
Damage outside the school buildingFalling brick from walls and chimneysFalling roof shinglesFlying glass from broken windows
Other damage within the school buildingFires from broken gas lines and electrical wiresFlooding from broken water pipesToxic fumes from spilled chemicals
Damage around the communityFallen power linesDamage to buildings, bridges, highways and
railroad tracksFlooding from dam failures, damage to reser-
voirs and water towersFires from spilled gasoline and other chemicalsLandslidesTsunamis
TEACHING NOTE Photos that illustrate earthquake hazards in schools are includedon your CD-ROM “California Schools After a Quake.” All the photographs depictearthquakes that occurred when schools were not in session, and no one was hurt.The most common damage in these photos resulted from fallen ceilings. PracticingDrop, Cover and Hold On would have prevented injuries had children been in theschool buildings. Safe evacuation would have been possible, although the darkenedhallways would have been challenging for students to navigate.

Earthquakes K–2
LESSON PLAN 3
Stay Safe in anEarthquake
3
Wrap-Up
Ask the students to examine their own classroom, imaginingwhat would happen if they picked up the classroom and shook it.
Have student teams walk around the classroom and note anyhazards that might hurt them during an earthquake. Share theclass list. (Answers will vary, but may include—Make sure thebulletin boards and bookcases are bolted to the wall. Move the
boxes from the top of the bookcase. Latch the cabinet that holds thesupplies. Relocate the globe from the unsturdy shelf. Make sure the TVmonitor and other electronic gear are bolted securely to the wall support.Move the aquarium or animal cages away from desks. Make sure computermonitors and other electronics are secured to the desks or tables.)
Explain to the students that there may be some hazards at school or homethat we cannot correct. However, there are many others that we can correct.From the class list, tell the students to determine which hazards they cancorrect and which they should report to the office. For example: removeboxes and stored items from the top of the cabinet and tie the cupboarddoors shut; but, ask the office to send maintenance staff to bolt bookcasesto the wall or attach straps for computer monitors.
Home Connection
Distribute Home Hazard Hunt to students. While talking aboutthe pictures, explain that they show many potential hazards, but
not all. And, of course, their own homes may not have many of them.
Have the students work with their families to discuss potential hazards andhow to fix them. It’s even better to look around each room in their homes tosee what might happen in case of an earthquake. Tell them to look carefullyat the areas where family members are most likely to be—at the dinnertable, watching TV or in bed. What could happen? How can they fix it?
Linking Across the Curriculum
Social Studies: Community; Science: HealthHave the students identify earthquake hazards throughout the
community. With the help of an adult at home, the students can make a listof hazards they find when shopping, eating out or playing in the park.
Have the students send simple letters or e-mail messages to the appropriateshop owners or city officials suggesting ways to correct the hazards theyidentified in their community.
Masters of Disaster® Earthquakes, Earthquake Safety, Lesson Plan 3/Stay Safe in an EarthquakeCopyright 2007 The American National Red Cross
Visit the American Red Cross Web site at www.redcross.org/disaster/masters
TEACHING NOTE You might give the students a Masters of Disaster earthquakesticker after completing this activity.

Earthquakes K–2
LESSON PLAN 3
Stay Safe in anEarthquake
Materials
• Noisemakers (e.g., pans,pencils, musical instruments)
• Earthquake Simulation, 1 copy
• Drop, Cover and Hold On, 1copy per student (HomeConnection)
“What Should I Do?”
SET UP 5 minutes CONDUCT 30 minutes, plus time to practice
safety position
Language Arts: Reading; Fine Arts: Dramatic Arts; Science: Health
1. Ask the students if they would know what to do if an earthquake startedright now. Have them share their answers.
2. Explain and demonstrate to the students the correct behavior. In theevent of an earthquake students should—
• Drop: Get under the desk or table, positioning as much of theirbodies as possible under cover.
• Cover their eyes by leaning their faces against an arm as theyhold on.
• Hold On to a leg of the desk or table. (Their hands and headsshould be about halfway between the floor and the top of thedesk or table.)
4. Explain to the students that you want them to practice when you say,“Drop, Cover and Hold On.” Have the students drop. Keep them quiet.Once they have mastered the position, you should drop as well. After 15to 30 seconds in place, ask them to get up carefully and check them-selves and their neighbors. Ask, “Is everyone all right?” Wait for theiranswers and look around to visually check the students and the room.Wait for the students to calm down.
5. Repeat the drill regularly until the students have mastered it. When youthink that the class is comfortable with the drop drill, conduct an imagi-nary earthquake exercise. Explain that you are going to create an imagi-nary earthquake by reading a story to help the students understand whatto do if a real earthquake were to happen. Remind the students that“imaginary” means “pretend.”
6. Appoint student helpers for the simulation:• One student to flick the lights on and off a few times and then
eventually turn them off
• One student to be the “timer” to count the seconds to see howlong the earthquake lasted
4Masters of Disaster® Earthquakes, Earthquake Safety, Lesson Plan 3/Stay Safe in an EarthquakeCopyright 2007 The American National Red Cross
Visit the American Red Cross Web site at www.redcross.org/disaster/masters
TEACHING NOTE The point of Drop, Cover and Hold On is to take cover immedi-ately in the closest safe place. (For example, under a desk at school; under a sturdytable at home; or against an interior wall in an office building. If you are in bed, staythere and protect your head with a pillow.) The phrase Duck, Cover and Hold meansthe same as Drop, Cover and Hold On. Use the terminology approved by yourschool or district.

Earthquakes K–2
LESSON PLAN 3
Stay Safe in anEarthquake
5
• Several students to create earthquake sound effects, such aswindows rattling, desks or tables scraping, drawers opening, dogs barking, books falling, trees scraping the building, peopleshouting, babies crying, car alarms sounding and doors bangingshut.
Wrap-Up
Before you read the simulation, remind the students at theirdesks to follow the Drop, Cover and Hold On procedure.
Remind your helpers to complete their assigned tasks when you cue themin the story. After the simulation, ask the timer to report how long the“earthquake” lasted. In tsunami-risk zones, be sure to remind students thatthey will go to high ground after an earthquake that lasts 20 seconds ormore.
While narrating the simulation, note the students’ ability toDrop, Cover and Hold On at the appropriate times. After thesimulation, allow the students to share their feelings during theimaginary earthquake. Were they scared? Why? Did they feel
safer in the Drop, Cover and Hold On position? Challenge them to givereasons why each step in the procedure is important to their safety.
Repeat the simulation, selecting different students to provide the effects sothat each student has an opportunity to practice the Drop, Cover and HoldOn procedure.
In the days following the activity, explain to the students that you maywithout warning say, “Earthquake. Drop!” You and the students will reactby following the Drop, Cover and Hold On procedure.
Home Connection
Distribute Drop, Cover and Hold On. Have the students take thepictures home to color and share. Challenge them to practice the
Drop, Cover and Hold On procedure at home. The next day in class, askthem to share their experiences practicing the procedure with their families.
Masters of Disaster® Earthquakes, Earthquake Safety, Lesson Plan 3/Stay Safe in an EarthquakeCopyright 2007 The American National Red Cross
Visit the American Red Cross Web site at www.redcross.org/disaster/masters
TEACHING NOTE The simulation can get out of hand if you do not set it up care-fully. Warn neighboring teachers before the drill. The sound effects might be toointense for younger students and/or students who are not familiar with earthquakedrills. The scenario can be read without special effects and will still be effective.

Earthquakes K–2
LESSON PLAN 3
Stay Safe in anEarthquake
Linking Across the Curriculum
Social Studies: Community; Science: Health; Fine Arts:Dramatic Arts and Visual Arts; Language Arts: Writing
Invite the students to find ways to help others in their school communitylearn about the importance of Drop, Cover and Hold On. They can—
• Create pictures to illustrate each step.
• Create and perform simple skits for other classes.
• Write simple stories or directions that teachers can read to otherclasses to spread the word about this important safety procedure.
6Masters of Disaster® Earthquakes, Earthquake Safety, Lesson Plan 3/Stay Safe in an EarthquakeCopyright 2007 The American National Red Cross
Visit the American Red Cross Web site at www.redcross.org/disaster/masters

Home Hazard HuntPage 1 of 3
Name ________________________________________________________________________
HOME HAZARD HUNTMasters of Disaster® Earthquakes, Earthquake Safety, Lesson Plan 3/Stay Safe in an Earthquake
Copyright 2007 The American National Red Cross
Visit the American Red Cross Web site at www.redcross.org/disaster/masters
Dear Parent or Guardian,
Anything that can move, fall, break or cause a fire could be a hazard duringan earthquake. Imagine what would happen if you picked up each room inyour home and shook it.
Think about where family members spend the most time and make surethese areas are safe from falling objects. Make sure exits are clear, too. Usethe following pictures to help you consider the hazards you might find.
For more information, use the Earthquake Safety Checklist (from theMasters of Disaster CD-ROM, visit www.redcross.org or contact your localAmerican Red Cross chapter.
Are bookshelves fastenedsecurely to the wall?
Are mirrors or pictures hung awayfrom beds and chairs?

Home Hazard HuntPage 2 of 3
HOME HAZARD HUNTMasters of Disaster® Earthquakes, Earthquake Safety, Lesson Plan 3/Stay Safe in an Earthquake
Copyright 2007 The American National Red CrossVisit the American Red Cross Web site at www.redcross.org/disaster/masters
Are entertainment cabinetsbolted to the wall and electronicequipment secure on the shelvesand behind cabinet doors?
Are beds or chairs a safe distancefrom big windows? Are there no heavy objects
on shelves above beds orchairs?

Home Hazard HuntPage 3 of 3
HOME HAZARD HUNTMasters of Disaster® Earthquakes, Earthquake Safety, Lesson Plan 3/Stay Safe in an Earthquake
Copyright 2007 The American National Red CrossVisit the American Red Cross Web site at www.redcross.org/disaster/masters
Are cabinets or cupboardsfastened to the wall? Are thedoors locked shut?
Is the water heatersecured to studs?

Earthquake SimulationPage 1 of 2
Name ________________________________________________________________________
EARTHQUAKE SIMULATIONMasters of Disaster® Earthquakes, Earthquake Safety, Lesson Plan 3/Stay Safe in an Earthquake
Copyright 2007 The American National Red Cross
Visit the American Red Cross Web site at www.redcross.org/disaster/masters
Directions: This is a story about an imaginary earthquake. As you read it, time theevent and simulate the sounds. Most important, practice Drop, Cover and Hold Onto stay safe.
First, you hear low, rumbling sounds. The noise grows louder and louder, forabout 1 or 2 seconds. Then, wham! There’s a terrific jolt. You feel as if someonesuddenly slammed on the brakes in the car or a truck just rammed into the sideof the building.
The floor seems to be moving beneath you. You hear someone say, “Earthquake!Drop, Cover and Hold On!” It’s hard to get under the desk. You feel as if youare riding a raft down a fast river.
Drop, Cover and Hold On! Get under your desk as quickly and quietly as youcan, right now. Cover your eyes and hold on.
The building is creaking and rattling. Books are falling from the bookcase.Hanging lamps are swinging. Suddenly a light falls to the floor and smashes.The windows are rattling.
Be sure to stay in the Drop, Cover and Hold On position under your desk.
You hear noises outside. A car alarm sounds. Dogs are barking. A baby iscrying. People are shouting. The shaking is making church bells ring. You hearcrashing sounds from bricks falling to the ground. Trees outside are swayingand scraping against the walls.

Earthquake SimulationPage 2 of 2
EARTHQUAKE SIMULATIONMasters of Disaster® Earthquakes, Earthquake Safety, Lesson Plan 3/Stay Safe in an Earthquake
Copyright 2007 The American National Red Cross
Visit the American Red Cross Web site at www.redcross.org/disaster/masters
Inside the room, the floor keeps rocking. Tables and chairs are sliding. Oh!Something just fell and crashed to the floor. The lights begin to flicker on andoff... They just went out! Now the door swings back and forth. Bang! It slamsshut. There’s silence now. Just as suddenly as the noise and shaking began, theroom falls quiet and still.
(Stop timing.)
Please, everyone stay where you are for a few more seconds. We want to makesure the shaking has stopped and nothing else is going to fall.
Okay, everyone may come out slowly and stand up. It is important to remainvery quiet and wait for instructions. Is everyone all right? Check yourself andthose around you. Look at me and tell me if anyone is hurt. How long did ourearthquake last?
Be ready to take cover again at any moment because the shaking may startagain. Sometimes more earthquakes can happen shortly after the first one.Those are called aftershocks. Now, let’s sit and talk about how we plan andpractice to be safe in an earthquake.
Drop, Cover and Hold OnPage 1 of 2
Name ________________________________________________________________________
DROP, COVER AND HOLD ONMasters of Disaster® Earthquakes, Earthquake Safety, Lesson Plan 3/Stay Safe in an Earthquake
Copyright 2007 The American National Red Cross
Visit the American Red Cross Web site at www.redcross.org/disaster/masters
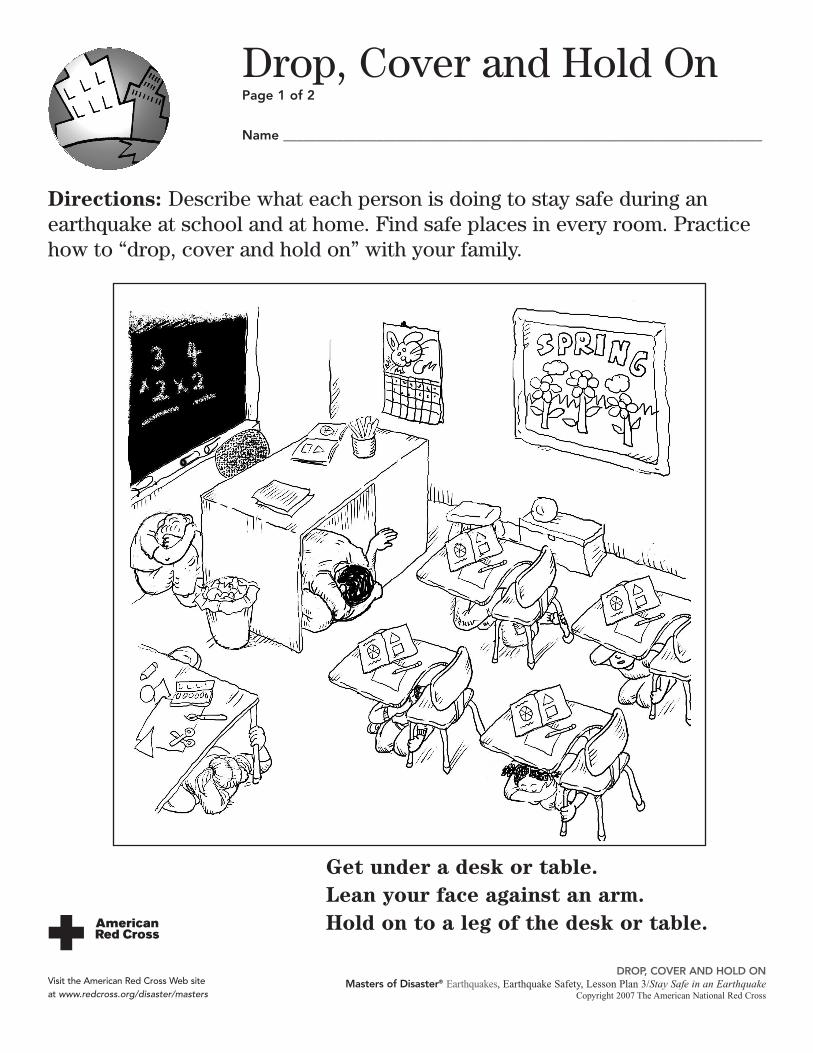
Directions: Describe what each person is doing to stay safe during anearthquake at school and at home. Find safe places in every room. Practicehow to “drop, cover and hold on” with your family.
Get under a desk or table.Lean your face against an arm.Hold on to a leg of the desk or table.

Drop, Cover and Hold OnPage 2 of 2
DROP, COVER,AND HOLD ONMasters of Disaster® Earthquakes, Earthquake Safety, Lesson Plan 3/Stay Safe in an Earthquake
Copyright 2007 The American National Red CrossVisit the American Red Cross Web site at www.redcross.org/disaster/masters