steam craft 5 - parts towndownload.partstown.com/is-bin/intershop.static/wfs/reedy...steam craft 5.1...
TRANSCRIPT

Steam Craft 5.1
COUNTER TYPE CONVECTION
STEAMER
Cleveland Range, Inc. •UNITED STATES CANADA 1333 East. 79th St. Garland Commercial Ranges • 1177 Kamato Rd. Cleveland.Olno-
UlHI Mi',sissauua. Ontariu CM.4\V 1X4 Phone: (216) 4Sl-4y(ll» • 1 cle\: ^.1)54^ • FAX: (216) 4S1-37S2 Phone: (416) 64-026» • FAX: 1416) 624-(1623
CTS-02
SERVICE MANUAL
Model21-CET-16
Printed 12/90

PROTECTING WARRANTY COVERAGE
The warranty printed to the left specifies the owner/user's responsibility for proper installation, operation, and maintenance of the SteamCraft 51 If these respon-sibilities are not met, the Limited Warranty and/or Extended Limited Warranty coverage may be adversely affected The following table is provided to assist the owner/user in meeting these responsibilities In addition, the warranty advantages of installing a SteamerGard water treatment system are explained after the table
The Warranty Protection Table lists installation, operation, and maintenance factors that have in the past adversely affected warranty coverage The owner/user of a SteamCraft 51 should pay particular attention to these factors to protect his warranty coverage This table is not a comprehensive list of the owner/user's responsibilities Cleveland Range steam products are intended for use only by professionally trained personnel To meet his responsibilities, the owner/user must supplement this guide with any additional actions consistent with the operation of steam generating food preparation equipment by a trained professional
Warranty Protection Table SUBJECT PAGE
REFERENCE
Electrical Power Requirements and Line Voltage 6 and 17 Water Quality Requirements and Analysis 6 Water Pressure 18 Vented Drain 14 Level Operation 10 Blowdown Frequency 41 and 52 Steam Generator Maintenance and Maintenance Records 55 Descaling Frequency and Procedure 56 Approved Chemical Cleaners 56 Authorized Maintenance and Repair 61
SteamerGard Water Treatment System
A Steamer Gard water treatment system protects the SteamCraft 51 from impurities contained in regular tap water, especially Total Dissolved Solids (TDS) which cause lime and scale deposits in steamer equipment The protection is so effective that Cleveland Range increases the warranty coverage on a SteamCraft 51 installed in conjunction with a SteamerGard system to five years for parts and three years for labor on water related components, elements, valves, generators, piping, etc How-e'ver, even with a SteamerGard system installed, the owner/user should follow the guidance of the Warranty Protection Table
Model 21-CET-16 Service Manual Page i
Table of Contents CHAPTER PAGE
CHAPTER 1 PRODUCT IDENTIFICATION 1 MODEL NUMBER 1 SERIAL NUMBER 1 PRODUCT INFORMATION PLATE 1 CHAPTER 2 INSTALLATION INSTRUCTIONS 3 INTRODUCTION 3 INSTALLATION POLICIES 3 INSTALLATION OVERVIEW 4 PREPARATION FOR INSTALLATION 6 Electric Power Requirements 6 Water Quality Requirements 6 Water Supply System 7 Selecting The Operating Location 7 INSTALLATION INSTRUCTIONS 9 Unpacking and Inspection 9 Shipping Damage Instructions 10 Position and Level The Steam Craft 51 10 Leg Mounting and Leveling 10 Surface Mounting and Leveling 11 Stand Mounting and Leveling 12 Install Slide Racks 14 Install the Free Air Vented Drain Lines 14 Connect Drain Line 16 Install Electric Power Lines 16 Connect Electrical Line 17 Install Water Supply Lines 18 Connect Water Supply Lines 20 General Connection Requirements 21 Untreated Water Connection (Without SteamerGard) 21 Treated Water Connection (With SteamerGard) 21 Testing Water Supply Lines 21 Final Setup and Checkout 22 Setup and Blowdown Inspection - All SteamCraft 51's 22 Operating Tests - Key Pad Control Panel 24 Operating Tests - Dial Timer Control Panel 26
Page ii Model 21 -CET-16 Service Manual
Table of Contents (continued)
CHAPTER PAGE CHAPTER 3 OPERATION 29 INTRODUCTION 29 OPERATIONAL SAFETY 29 CONTROL, PANELS 30 KEY PAD CONTROL PANEL SUMMARY 31 COOKING OPERATIONS -KEYPAD CONTROL PANEL 32 Manual and Timed Modes 32 Main Power Switch 32 Power ON (Automatic Fill) 34 Inspect the Cooking Compartment 34 Preheating the SteamCraft 51 35 Operating Procedure - Timed Mode 36 Operating Procedure - Manual Mode 39 Manual Timer 39 Temperature Compensation 39 Manual Cooking Procedure 40 Power OFF (Automatic Blowdown) 41 Blowdown Frequency 41 Blowdown Procedure 42 Shut Down and Cleaning (At end of day or shift) 42 DIAL TIMER, CONTROL PANEL SUMMARY 44 COOKING OPERATIONS-DIAL TIMER CONTROL PANEL 44 Manual and Timed Modes 46 Main Power Switch 46 Power ON (Automatic Fill) 46 Inspect the Cooking Compartment- 47 Preheating the SteamCraft 5-1 47 Operating Procedure - Timed Mode 48 Operating Procedure - Manual Mode 50 Manual Timer 50 Manual Cooking Procedure 50 Power OFF (Automatic Blowdown) 52 Blowdown Frequency 52 Blowdown Procedure 52 Shut Down and Cleaning (At end of day or shift) 53

Model 21-CET-16 Service Manual Page iii
Table of Contents (continued) CHAPTER PAGE CHAPTER 4 PREVENTATTVE MAINTENANCE AND TROUBLESHOOTING 55 INTRODUCTION 55 MAINTENANCE RECORDS 55 DAILY MAINTENANCE 55 Clean SteamCraft 51 55 WEEKLY MAINTENANCE 55 MONTHLY MAINTENANCE 56 YEARLY MAINTENANCE 59 TROUBLESHOOTING NOTES 61 CHAPTER 5- ELECTRICAL SYSTEM 63 INTRODUCTION 63 Figures And Illustrations 63 STEAMCRAFT 51 ELECTRICAL CIRCUITS 63 High Voltage Circuit 63 120 VAC Circuit 63 Timer Circuits 64 CIRCUIT OPERATION 64 MANUAL Mode Circuit Operation 64 TIMED Mode, Circuit Operation 67 Electronic Key Pad Timer Units 68 Mechanical Dial Timer Unit 68 Shutdown, Steam Generator Blowdown and Float Cylinder Rinse 68 ELECTRICAL CIRCUIT COMPONENTS 70 Terminal Block (4, Figure 6-7) 70 Heater Element (4, Figure 6-9) 70 Dryer Element (7, Figure 6-8) 71 Fuses(8, Figure 6-7) 71 ON/OFF Switch (10, Figure 6-5) 71 TIMED/MANUAL Switch (11, Figure 6-5) 72 Relay K1 (9, Figure 6-5) 72 3 Minute Timer (14, Figure 6-5 ) 73 Rinse Solenoid Valve (1, Figure 6-11) 73 Drain Solenoid Valve (4 Figure 6-12) 73 Fin Solenoid Valve (1, Figure 6-11) 73 Condenser Solenoid Valve (1, Figure 6-11) 74 Timer 74 Electronic Key Pad Timer (3, Figure ) 74 Compartment Thermal Switch (electronic key pad units only) (17, Figure ) 75
Page iv Model 21-CET-16 Service Manual
Table of Contents (continued)
CHAPTER PAGE
CHAPTER 5 ELECTRICAL SYSTEM (continued) Mechanical Timer (3, Figure 6-6) 75 3-Second Timer and Buzzer (mechanical timer units only) (11,15, Figure 6-6) 75 High Temperature Limit Switch (1, Figure 6-9) 75 Float Assembly (Figure 6-10) 75 COMPONENT TESTING GUIDE INTRODUCTION 77 Nominal Voltage 77 FUNDAMENTAL COMPONENT TESTING 77 Visual Check 77 Fuses 78 Connection Points and Wiring 78 Solenoid Valves 78 Timers 79 Thermostatic Snap Switches 79 Heater Element 80 Resistance Measurements 80 Insulation Resistance Measurements 80 Voltage Measurements 80 COMPONENT TEST PROCEDURES 81 Initial conditions for all testing 81 Fuses 81 Transformer 82 ON/OFF Switch 83 Relay K1 83 Fill Solenoid Valve 84 3-Minute Timer 85 Drain Solenoid Valve -86 Rinse solenoid-valve -87 Condenser Solenoid Valve 88 TIMED/MANUAL Switch 89 High Temperature Limit Switch 90 Electronic Key Pad Timer 90 Compartment Thermal Switch (key pad timer units only) 92 Mechanical Timer 93 Heater Contactor 93 Heater and Dryer Elements 95 Float Assembly 96 3-Second Timer and Buzzer (mechanical timer units only) 99
Model 21 -CET-16 Service Manual Page v
Table of Contents (continued)
CHAPTER PAGE CHAPTER 6. ILLUSTRATED PARTS LISTS 101 INTRODUCTION 101 Parts Differences Among SteamCraft 5.1 Steamers 101 Electrical Schematics and Wiring Diagrams 101

Model 21-CET-16 Service Manual Page 1
CHAPTER 1. PRODUCT IDENTIFICATION Cleveland Range, Inc. assigns two product identification numbers to each SteamCraft 5.1: a model number and a serial number. The model number identifies the product characteristics. The serial number identifies the individual unit.
MODEL NUMBER All-SteamCraft 5.1 steamers are identified by the same model number, 21-CET-16. Each character of this model number identifies a charac-teristic of the steamer. The SteamCraft 5.1 is a Convection steamer, .Electric powered, and Table-mounted with an input energy rating of 16.5 kW. This manual covers all standard features and options available on SteamCraft 5.1 steamers.
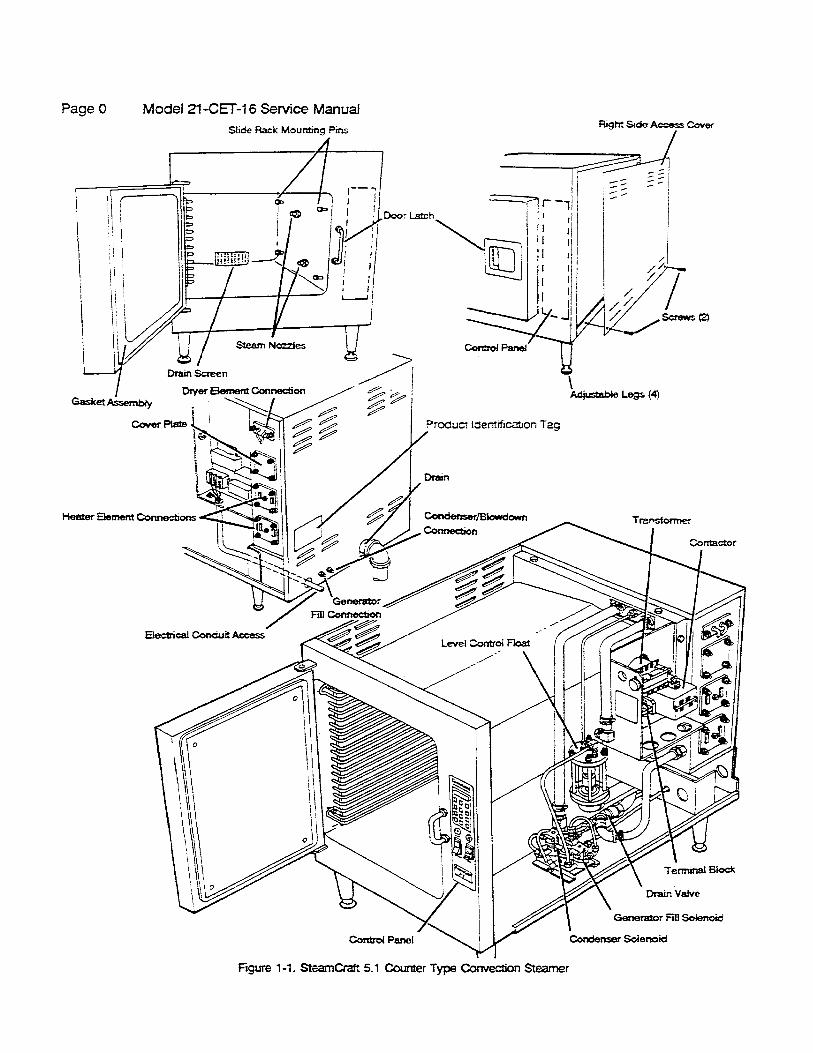
Other than selection of options, there are presently no significant design, parts, or operating differences among steamers with this model number. Figure 1-1 illustrates the SteamCraft 5.1 and identifies the major com-ponents.
SERIAL NUMBER During manufacture, SteamCraft 5.1's are assigned individual serial numbers. A typical SteamCraft 5.1 serial number is: WC-7350-90G-02. The left half of the number carries design information. The right half of the number contains the manufacturing date and the unit of the manufac-turing lot The date of our sample number is 90G-02:90= 1990, G=July. 02=the second unit of the manufacturing lot. Serial numbers are used when explaining differences in design, parts, or operation among units with the same model number. For example: a particular part may be used on SteamCraft 5.1's with serial numbers before WC-7350-90G-02, and a different part used on steamer WC-7350-90G-02 and those manufactured after it
PRODUCT INFORMATION PLATE The Product Information Plate on the back of the unit lists the model and serial number of the steamer. Refer to Figure 1-1 for the location of the plate. Figure 1-2 illustrates a typical SteamCraft 5.1 Product Information Plate. The plate also fists power and wiring requirements.
Figure 1-2. SteamCraft 5.1 Product Information Plate

Model 21-CET-16 Service Manual Page 3
CHAPTER 2. INSTALLATION INSTRUCTIONS
INTRODUCTION This chapter is a guide for installation of the SteamCraft 5.1, model number 21-CET-16. The instructions are written for qualified, professional plumbers, pipe fitters, and electricians. This guide does not include all procedures and precautions in the common domain of licensed plumbers, pipe fitters, and electricians, or experienced food service equipment installers.These instructions must be used in conjunction with a thorough understanding of the Basic PIumbing Code of the Building Officials and Code Administrators International, Inc. (BOCA), the National Fuel Gas Code, ANSI Z223.1-1984, and the Food Service Sanitation Manual of the Food and Drug Administration (FDA).
Before starting installation, the owner and the installer should read through this chapter and thoroughly understand and agree upon: • The installation policies of Cleveland Range, Inc. as stated in
Installation Policies. • Responsibility for electric power requirements as described in
Preparation for Installation, Electric Power Requirements. • Responsibility for feed water quality and its testing as described in
Preparation For Installation, Water Quality Requirements.
WARNING DEATH, INJURY, AND EQUIPMENT DAMAGE could result from improper installation of the SteamCraft 5.1, or from installation of a unit damaged during shipment or storage- Either of these conditions could also void the equipment warranty.
DO NOT INSTALL a SteamCraft 5.1 suspected of damage.
Install the SteamCraft 5.1 according to the policies and procedures outlined in this manual.
INSTALLATION POLICIES
The SteamCraft 5.1 must be installed by qualified plumbing and electrical personnel, working to all applicable national and local codes. Equipment installation must comply with the Basic Plumbing Code of the Building Officials and Code Administrators International, Inc. (BOCA) and the Food Service Sanitation Manual of the Food and Drug Administration (FDA). Cleveland Range designs and manufactures equipment to comply with applicable standards for manufacturers. Included among these certification agencies are: UL, A.G.A., ASME/N.Bd., NSF, CSA, CGA, ETL, and others.
Page 4 Model 21 -CET-16 Service Manual
• This equipment is designed and certified for safe operation only when permanently installed in accordance with local and/or national codes.Many local codes east, and it is the responsibility of the owner and installer to comply with these codes.
• In no event shall the manufacturer assume any liability for damage or injury resulting from installations which are not in strict compliance with the Installation Instructions and the codes cited above.Specifically, the manufacturer will not assume any liability for damage or injury resulting from improper installation of equipment, including, but not limited to, temporary or mobile installations.
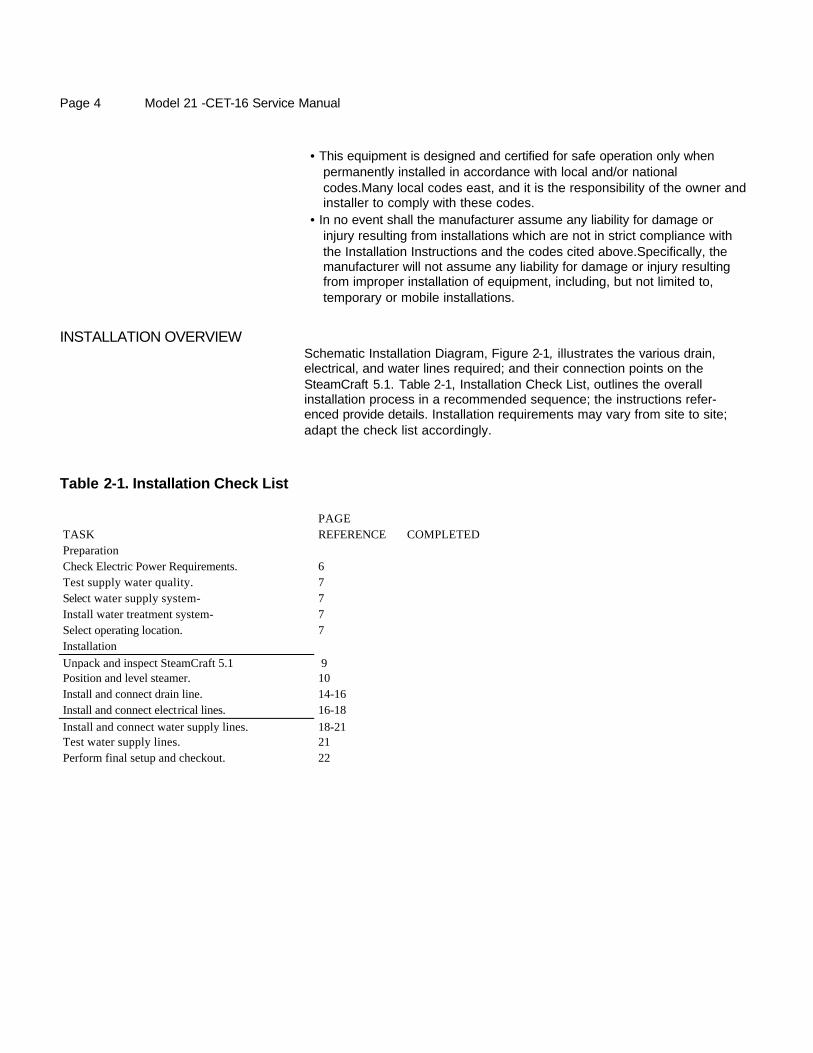
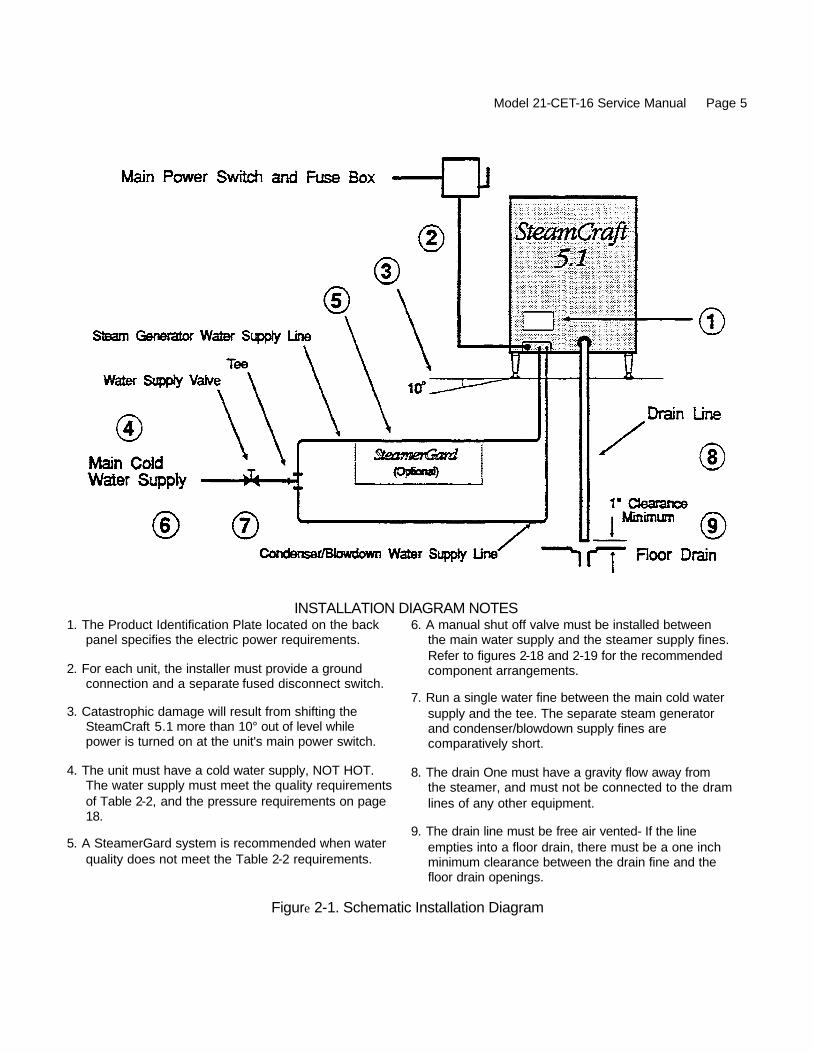
INSTALLATION OVERVIEW Schematic Installation Diagram, Figure 2-1, illustrates the various drain, electrical, and water lines required; and their connection points on the SteamCraft 5.1. Table 2-1, Installation Check List, outlines the overall installation process in a recommended sequence; the instructions refer-enced provide details. Installation requirements may vary from site to site; adapt the check list accordingly.
Table 2-1. Installation Check List
PAGE TASK REFERENCE COMPLETED Preparation Check Electric Power Requirements. 6 Test supply water quality. 7 Select water supply system- 7 Install water treatment system- 7 Select operating location. 7 Installation Unpack and inspect SteamCraft 5.1 9 Position and level steamer. 10 Install and connect drain line. 14-16 Install and connect electrical lines. 16-18 Install and connect water supply lines. 18-21 Test water supply lines. 21 Perform final setup and checkout. 22
Model 21-CET-16 Service Manual Page 5
INSTALLATION DIAGRAM NOTES 1. The Product Identification Plate located on the back
panel specifies the electric power requirements.
2. For each unit, the installer must provide a ground connection and a separate fused disconnect switch.
3. Catastrophic damage will result from shifting the SteamCraft 5.1 more than 10° out of level while power is turned on at the unit's main power switch.
4. The unit must have a cold water supply, NOT HOT. The water supply must meet the quality requirements of Table 2-2, and the pressure requirements on page 18.
5. A SteamerGard system is recommended when water quality does not meet the Table 2-2 requirements.
6. A manual shut off valve must be installed between the main water supply and the steamer supply fines. Refer to figures 2-18 and 2-19 for the recommended component arrangements.
7. Run a single water fine between the main cold water supply and the tee. The separate steam generator and condenser/blowdown supply fines are comparatively short.
8. The drain One must have a gravity flow away from the steamer, and must not be connected to the dram lines of any other equipment.
9. The drain line must be free air vented- If the line empties into a floor drain, there must be a one inch minimum clearance between the drain fine and the floor drain openings.
Figure 2-1. Schematic Installation Diagram

Page 6 Model 21-CET-16 Service Manual
PREPARATION FOR INSTALLATION
Before unpacking the SteamCraft 5.1, check the electric power and water quality requirements and select the operating location-
Electric Power Requirements
The characteristics of the electric power supply must match the power requirements specified on the SteamCraft 5.1 product identification plate. The plate is located on the back of the unit as illustrated in Figure 2-2.
Water Quality Requirements
CAUTION Using water not within the limits specified in this manual could void or adversely affect Cleveland Range's warranty coverage of the SteamCraft 5.1.
As with any steam generating equipment, poor water quality degrades SteamCraft 5-1 performance. If feed water is low in Total Dissolved Solids (TDS) and free of particulate matter, the steam generator, heating element, and valves of the SteamCraft 5.1 will give years of trouble-free service with a minimum of maintenance.
In some areas, even potable tap water contains a variety of impurities that can cause costly problems in steam generating equipment. Of primary concern are mineral salts and other impurities which remain behind as lime or scale deposits during the steam generating process. These deposits have caused components to fail, including heating elements, probes and solenoid valves. Of equal importance is the decrease in heat transfer efficiency caused by lime and scale deposits. Decreased heat transfer increases water and power consumption. Use of the SteamCraft 5.1 in areas with poor water quality requires installation of a SteamerGard water treatment system or increased frequency of maintenance, cleaning, and descaling.

Model 21 -CET-16 Service Manual Page 7
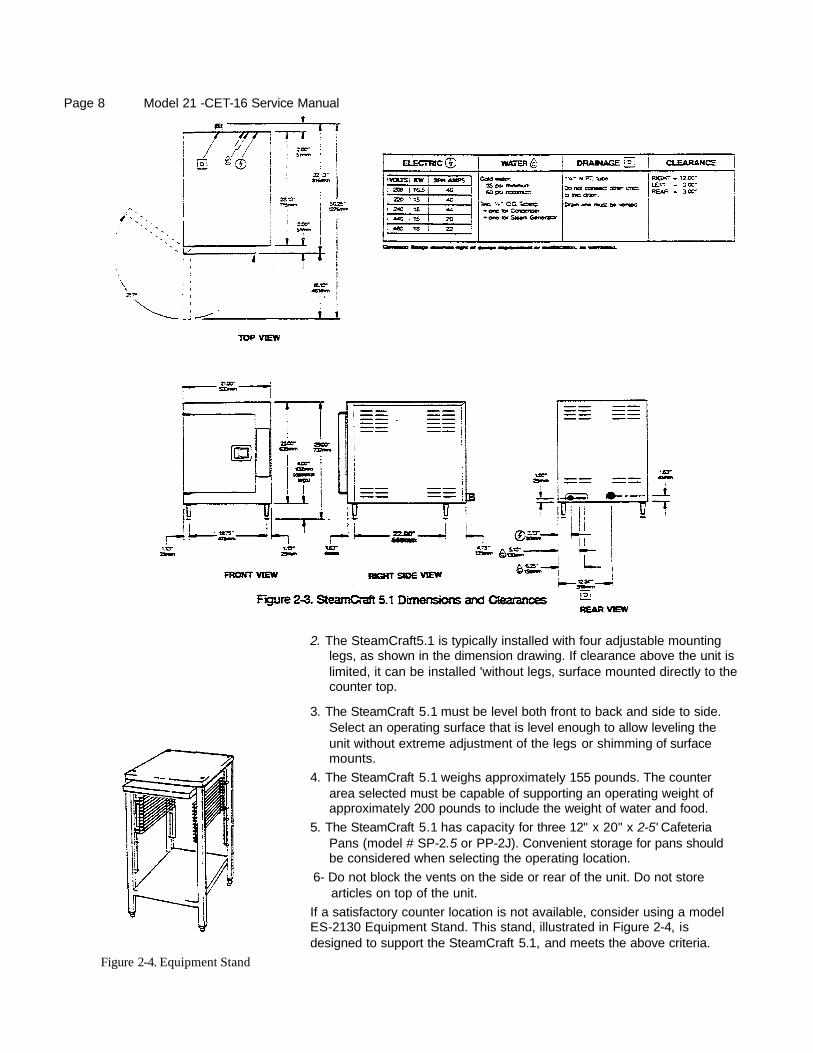
For safe and efficient operation, observe the following criteria when selecting an operating location for the SteamCraft 5.1. 1. The SteamCraft 5.1 fits in a small counter space- Figure 2-3 illustrates
the dimensions and clearances required. Maintain the following minimum dimensions around the unit for safe and efficient operation, maintenance and service.
• A 3 inch clearance around the unit for ventilation. • A 12 inch clearance on the right side for removing the service panel
during descaling, maintenance and repair. • A 3 inch clearance at the rear for the water inlet fittings, and the
maximum size (2-inch NPT) drain fittings. • Approximately 22 inches in front of the unit for opening the door and
cafeteria pan clearance.
Selecting The Operating Location
Check the quality of supply water as described below before starting construction of the water supply lines. If a SteamerGard water treatment system must be installed to achieve acceptable water quality, install it before connecting the water supply lines to the SteamCraft 5.1.
Contact a local water treatment specialist for an on-the-premises water analysis. The recommeoded minimum feed water quality requirements for the SteamCraft 5.1 are listed in Table 2-2.
Table 2-2. Minimum Water Quality Requirements
Total Dissolved Solids less than 60 parts per million Silica less than 13 parts per million Alkalinity less than 20 parts per million ph factor greater than 7.5
Water Supply System
Select a water supply system that fulfills the requirements of the limits listed in Table 2-2. The supply must provide a minimum dynamic pressure of 35 psi (2.4 kg/cm2) and a maximum static pressure of 60 psi (4.1 kg/cm). Refer to page 18 for detailed pressure and fitting requirements, and recommended plumbing layouts. • If analysis shows that the supply water is within the required limits, a
single line water system can be installed. A single water line system is illustrated in Figure 2-18 on page 18,
• If analysis shows that the supply water is NOT within the required limits, install a SteamerGard water treatment system- Figure 2-19 on page 19 illustrates a treated water supply arrangement.
• If analysis shows that the supply water is NOT within the required limits, and it is not possible to install a SteamerGard water treatment system; plan on increasing the frequency of maintenance, cleaning, and descaling beyond that recommended in the maintenance schedule (Chapter 4).
Page 8 Model 21 -CET-16 Service Manual
2. The SteamCraft5.1 is typically installed with four adjustable mounting legs, as shown in the dimension drawing. If clearance above the unit is limited, it can be installed 'without legs, surface mounted directly to the counter top.
3. The SteamCraft 5.1 must be level both front to back and side to side. Select an operating surface that is level enough to allow leveling the unit without extreme adjustment of the legs or shimming of surface mounts.
4. The SteamCraft 5.1 weighs approximately 155 pounds. The counter area selected must be capable of supporting an operating weight of approximately 200 pounds to include the weight of water and food.
5. The SteamCraft 5.1 has capacity for three 12" x 20" x 2-5' Cafeteria Pans (model # SP-2.5 or PP-2J). Convenient storage for pans should be considered when selecting the operating location.
6- Do not block the vents on the side or rear of the unit. Do not store articles on top of the unit.
If a satisfactory counter location is not available, consider using a model ES-2130 Equipment Stand. This stand, illustrated in Figure 2-4, is designed to support the SteamCraft 5.1, and meets the above criteria.
Figure 2-4. Equipment Stand

Model 21 -CET-16 Service Manual Page 9
INSTALLATION INSTRUCTIONS After selecting the SteamCraft 5.1 operating location, the steamer can be unpacked, positioned, and installed. After Final Setup and Checkout, the SteamCraft 5.1 will provide years of reliable operation.
Unpacking and Inspection 1. Before unpacking the shipping carton, visually inspect it for damage.
• If the shipping carton appears damaged, do not open the carton. Refer to the Shipping Damage Instructions on page 10.
• If the shipping carton is undamaged, proceed with step 2. 2. Slit the four comers of the carton and peel carton sides away from the
SteamCraft 5.1. The slide racks and legs are shipped in separate packing on top of the unit. Be careful not to damage or throw away these unassembled parts.
3. Remove the carton from the top of the unit The package contains two slide racks as illustrated in Figure 2-5. These racks are snipped in separate packing on top of the unit
4. The SteamCraft 5.1 adjustable legs are also shipped on top of the unit in pockets at the edges of the packing. Refer to Figure 2-6.
5. Open the door of the SteamCraft 5.1. Several pre-assembled parts can be seen inside the unit Refer to Figure 2-7. Do not remove the Drain Screen, Steam Nozzles, and Slide Rack Mounting Pins.
6. Inspect the SteamCraft 5.1 and parts for damage or loss. • If you discover or suspect shipping damage or loss, refer to the
Shipping Damage Instructions on page 10. • If all items are accounted for and undamaged, place the packaged
slide racks inside the cooking compartment, and proceed to Position and Level The SteamCraft 5.1.
Page 10 Model 21 -CET-16 Service Manual
Shipping Damage Instructions
If shipping damage to the SteamCraft 5.1 is discovered or suspected, observe the following guidelines in preparing a shipping damage claim. • Write down a description of the damage or the reason for suspecting
damage as soon as it is discovered. This will help in filling oat the claim forms later.
• As soon as damage is discovered or suspected, notify the carrier that delivered the shipment.
• Arrange for carrier representative to examine damage. • Fill out all appropriate claims forms and have the examining carrier sign
and date each farm.
Position and Level The SteamCraft 5.1
The SteamCraft 5.1 is typically counter top mounted on four adjustable legs. To compensate for height limitations, the steamer can be surface mounted directly to the counter top. If a suitable counter is not available, the unit can be secured to a Cleveland Range ES-2130 Equipment Stand. The following instructions cover each of these mounting methods.
CAUTION Malfunctions and equipment damage may result from improper mounting. Malfunctions and/or damage resulting from improper mounting are not covered by the equipment warranty.
The SteamCraft 5.1 MUST BE LEVEL BOTH FRONT TO BACK AND SIDE TO SIDE in all mounting arrangements.
Catastrophic damage will result from shining the SteamCraft 5.1 more than 10° out of level while power is turned on at the unit's main power supply switch.
Leg Mounting and Leveling
The supporting legs of the SteamCraft 5.1 are four inches long when the adjustable feet are fully retracted. This provides the four inch space below the unit required by NSF sanitary standards. The adjustable feet can be extended approximately two inches for leveling the steamer.
Assembly 1. Check that the feet are fully retracted into the legs. Do not over-
tighten. The feet should easily screw in and out using fingers only.

Model 21 -CET-16 Service Manual Page 11
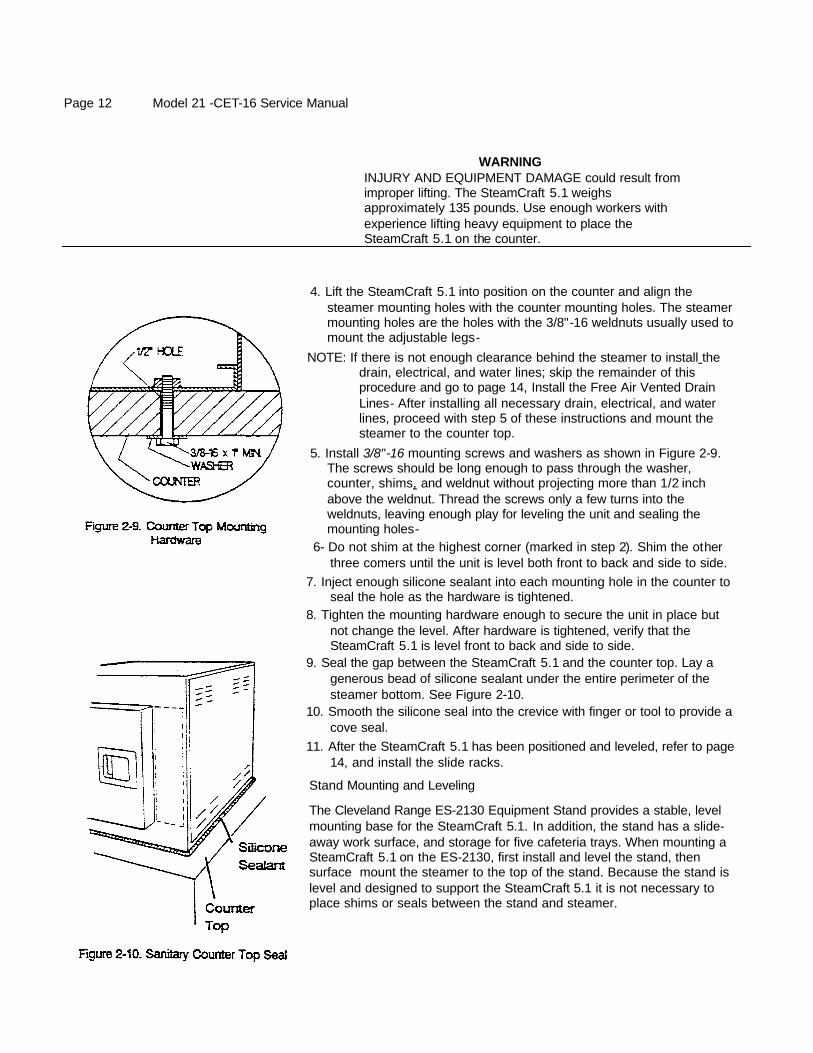
WARNING INJURY AND EQUIPMENT DAMAGE could result from improper lifting. The SteamCraft 5.1 weighs approximately 135 pounds. Use enough workers with experience lifting heavy equipment to place the SteamCraft 5.1 on the counter.
2. Be sure electric power is turned off at the main power switch. Place the SteamCraft 5.1 on its left side.
3. Screw the four legs into the weldnuts mounting holes- All four lees must be installed for proper mounting of the SteamCraft 5.1.
4. Place the steamer upright on its four legs.
Positioning and Leveling
1. Thoroughly clean the counter top area that will support the steamer.
2. Using a level, determine and mark the highest comer of the counter top area that will support the steamer.
3. Lift the SteamCraft 5.1 into position on the counter. 4. Do not adjust the retractable foot of the leg in the highest comer
(marked in step 2). Using a level, adjust the other three legs until the unit is level both front to back and side to side.
5. After the SteamCraft 5.1 has been positioned and leveled, refer to page 14, and install the slide racks.
Figure 2-8. Counter Top Mounting Holes
Surface Mounting and Leveling
When a SteamCraft 5.1 is surface mounted (without legs), NSF standards require a sanitary counter top seal between the counter surface and the bottom of the unit. This seal closes any gap between the unit and counter top. A sanitary seal closing a gap greater than 1/4 inch may not meet NSF sanitation standards. Therefore, do not surface mount the SteamCraft 5.1 to a surface out of level more then 1/4 inch over the length or width of the unit. Shimming the unit level may leave a gap too large to seal within NSF standards.
1. Thoroughly dean the bottom perimeter of the steamer and the counter top area that will support the steamer.
2. Using a level, determine and mark the highest comer of the counter top area that will support the steamer- At each of the other three comers, measure and note the shim thickness required to level the SteamCraft 5-1 both front to back and side to side.
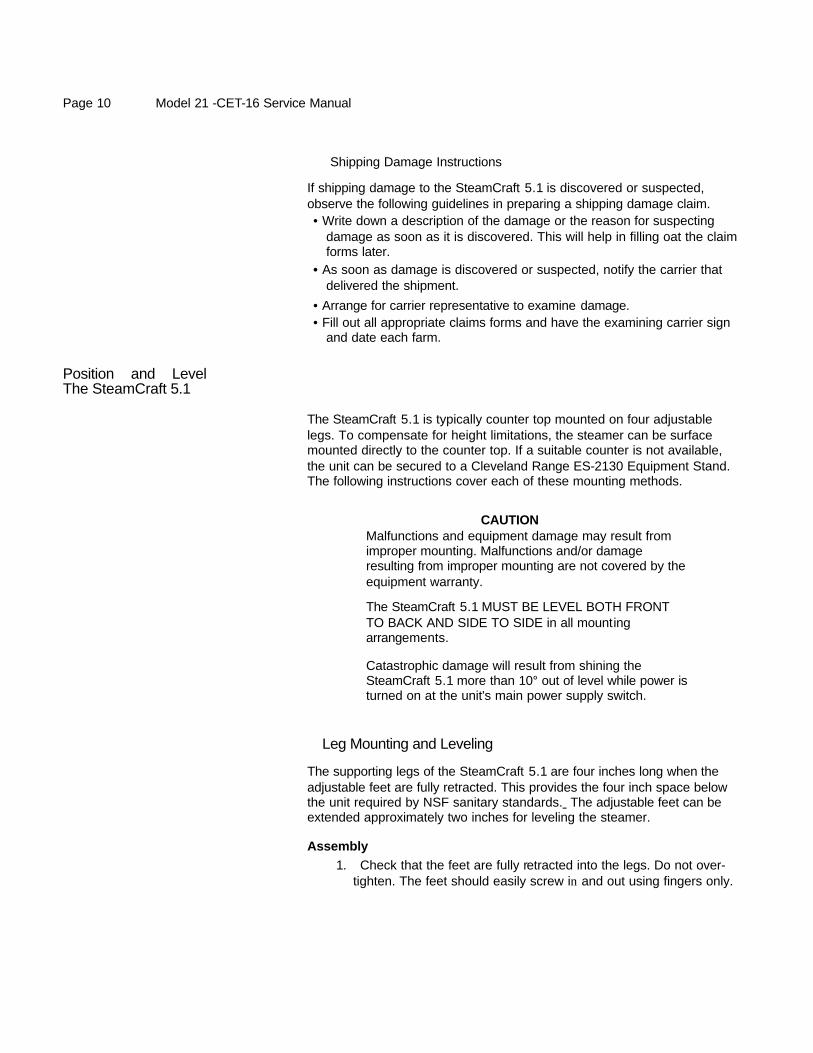
3. Refer to Figure 2-8. Leaving the required clearance (shaded area) around the unit, determine the exact front, back, and side lines of the SteamCraft 5.1 on the counter top. From these lines, locate and drill four 1/2 inch diameter mounting holes in the counter, as shown in the diagram.
Page 12 Model 21 -CET-16 Service Manual
WARNING INJURY AND EQUIPMENT DAMAGE could result from improper lifting. The SteamCraft 5.1 weighs approximately 135 pounds. Use enough workers with experience lifting heavy equipment to place the SteamCraft 5.1 on the counter.
4. Lift the SteamCraft 5.1 into position on the counter and align the steamer mounting holes with the counter mounting holes. The steamer mounting holes are the holes with the 3/8"-16 weldnuts usually used to mount the adjustable legs-
NOTE: If there is not enough clearance behind the steamer to install the drain, electrical, and water lines; skip the remainder of this procedure and go to page 14, Install the Free Air Vented Drain Lines- After installing all necessary drain, electrical, and water lines, proceed with step 5 of these instructions and mount the steamer to the counter top.
5. Install 3/8"-16 mounting screws and washers as shown in Figure 2-9. The screws should be long enough to pass through the washer, counter, shims, and weldnut without projecting more than 1/2 inch above the weldnut. Thread the screws only a few turns into the weldnuts, leaving enough play for leveling the unit and sealing the mounting holes-
6- Do not shim at the highest corner (marked in step 2). Shim the other three comers until the unit is level both front to back and side to side.
7. Inject enough silicone sealant into each mounting hole in the counter to seal the hole as the hardware is tightened.
8. Tighten the mounting hardware enough to secure the unit in place but not change the level. After hardware is tightened, verify that the SteamCraft 5.1 is level front to back and side to side.
9. Seal the gap between the SteamCraft 5.1 and the counter top. Lay a generous bead of silicone sealant under the entire perimeter of the steamer bottom. See Figure 2-10.
10. Smooth the silicone seal into the crevice with finger or tool to provide a cove seal.
11. After the SteamCraft 5.1 has been positioned and leveled, refer to page 14, and install the slide racks.
Stand Mounting and Leveling
The Cleveland Range ES-2130 Equipment Stand provides a stable, level mounting base for the SteamCraft 5.1. In addition, the stand has a slide-away work surface, and storage for five cafeteria trays. When mounting a SteamCraft 5.1 on the ES-2130, first install and level the stand, then surface mount the steamer to the top of the stand. Because the stand is level and designed to support the SteamCraft 5.1 it is not necessary to place shims or seals between the stand and steamer.

Model 21 -CET-16 Service Manual Page 13
Equipment Stand Installation 1. The equipment stand is shipped assembled except for the slide racks. The
racks and the steamer mounting hardware are shipped in separate packing within the equipment stand packing. Refer to the Unpacking and Inspection instructions on page 9, and unpack the equipment stand,
NOTE: If there is not enough clearance behind the stand and steamer to install the drain, electrical, and water lines; skip the remainder of this procedure and go to page 14, Install the Free Air Vented Drain Lines. After installing all necessary dram, electrical, and water lines, proceed with step 2 of these instructions and install the equipment stand.
2- Thoroughly clean the floor area that will support the equipment stand. 3. Using a level, determine and mark the highest corner of the floor area that will
support the equipment stand. 4- Move the stand into position and level it. Do not adjust the retractable foot of
the leg in the highest comer (marked in step 3). Using a level, adjust the feet on the other three legs until the unit is level both front to back and side to side.
5. Once the stand is level, secure the rear two feet to the floor.
6. After the stand has been positioned, leveled, and secured in place; install the slide racks. The racks are mounted to the stand in the same manner as the slide racks are mounted inside the steamer. Refer to Install Slide Racks, below.
Mount the Steamcraft 5.1 on the Stand 1. Thoroughly clean the bottom perimeter of the steamer and the mounting
surface of the equipment stand.
WARNING INJURY AND EQUIPMENT DAMAGE could result from improper lifting. The SteamCraft 5.1 weighs approximately 135 pounds. Use enough workers with experience lifting heavy equipment to place the SteamCraft 5.1 on the stand.
2. Lift the SteamCraft 5.1 onto the equipment stand and align the steamer mounting holes with the stand mounting holes. The steamer mounting holes are the holes with the 3/8"-16 weldnuts usually used to mount the adjustable legs.
3. Install mounting screws and washers supplied with the stand, as illustrated in Figure 2-11.
4. Tighten the mounting hardware to secure the steamer to the stand, and verify that the SteamCraft 5.1 is level front to back and side to side. If the steamer is not level, re-adjust the STAND level. DO NOT place shims between the stand and the steamer.

Page 14 Model 21-CET-16 Service Manual
5. After the steamer and stand have been positioned and leveled. install the slide racks in the steamer as explained below.
Install Slide Racks 1. Refer to Figure 2-12. Each rack has four loops: two at the top and two
at the bottom- Hold the slide rack so the ends of the hanger loops point down, as shown in the figure.
2. Slide one rack into the compartment with loops toward one side.
3. Hook the loops over the top and bottom pins.
4. Repeat steps 1 through 3 for the other rack.
Install the Free Air Vented Drain Lines
WARNING DEATH, INJURY, AND EQUIPMENT DAMAGE could result from improper installation of the drain outlet lines.
Improper installation of these lines could void the SteamCraft 5.1 warranty. The following restrictions are critical to the safety of personnel and equipment, and must not be violated under any circumstances.
Do not connect the drain fine into PVC pipe, or any other drain material that cannot sustain 180° F.
Do not connect drains from any other equipment to the SteamCraft 5.1 drain line.
Do not connect the drain outlet extension line directly to a floor drain or sewer line.
Furnishing and installing the drain line is the responsibility of the owner and/or installer. Figure 2-13 illustrates a drain layout recommended by Cleveland Range. Observe the following instructions to determine the pipe size, the number of fittings required, and the layout of the drain line.
Model 21-CET-16 Service Manual Page 15
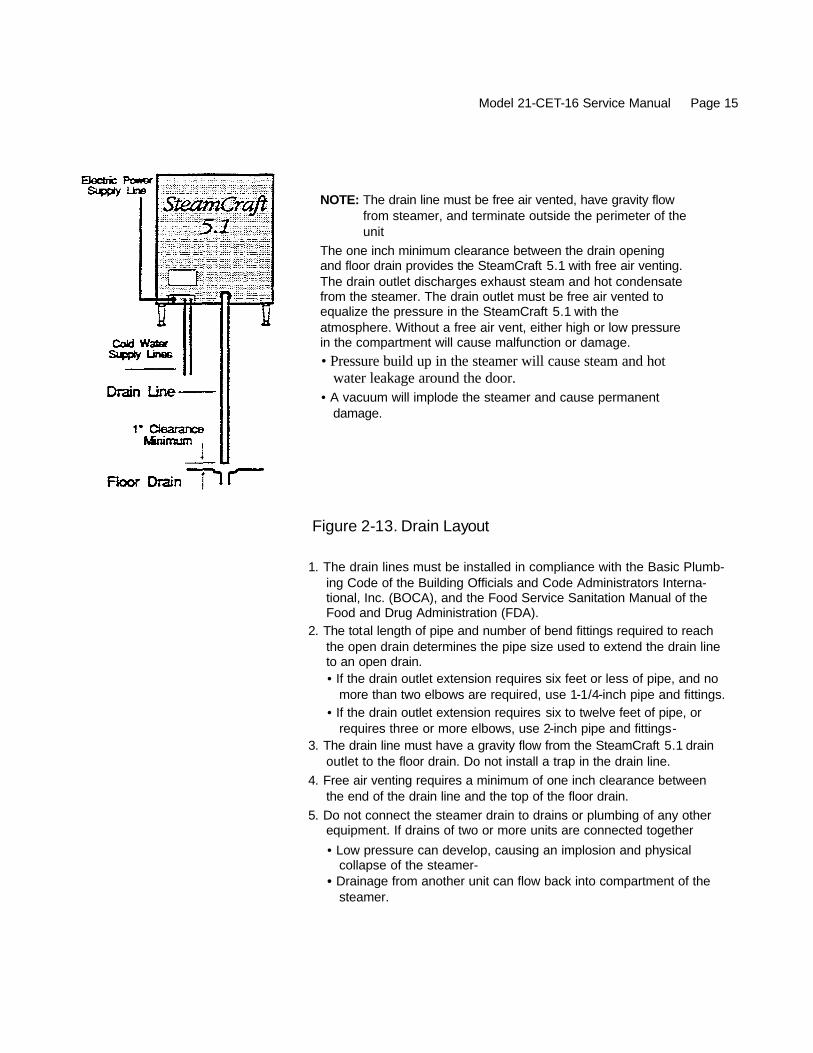
NOTE: The drain line must be free air vented, have gravity flow from steamer, and terminate outside the perimeter of the unit
The one inch minimum clearance between the drain opening and floor drain provides the SteamCraft 5.1 with free air venting. The drain outlet discharges exhaust steam and hot condensate from the steamer. The drain outlet must be free air vented to equalize the pressure in the SteamCraft 5.1 with the atmosphere. Without a free air vent, either high or low pressure in the compartment will cause malfunction or damage. • Pressure build up in the steamer will cause steam and hot
water leakage around the door. • A vacuum will implode the steamer and cause permanent
damage.
Figure 2-13. Drain Layout
1. The drain lines must be installed in compliance with the Basic Plumb-ing Code of the Building Officials and Code Administrators Interna-tional, Inc. (BOCA), and the Food Service Sanitation Manual of the Food and Drug Administration (FDA).
2. The total length of pipe and number of bend fittings required to reach the open drain determines the pipe size used to extend the drain line to an open drain. • If the drain outlet extension requires six feet or less of pipe, and no
more than two elbows are required, use 1-1/4-inch pipe and fittings. • If the drain outlet extension requires six to twelve feet of pipe, or
requires three or more elbows, use 2-inch pipe and fittings- 3. The drain line must have a gravity flow from the SteamCraft 5.1 drain
outlet to the floor drain. Do not install a trap in the drain line. 4. Free air venting requires a minimum of one inch clearance between
the end of the drain line and the top of the floor drain. 5. Do not connect the steamer drain to drains or plumbing of any other
equipment. If drains of two or more units are connected together
• Low pressure can develop, causing an implosion and physical collapse of the steamer-
• Drainage from another unit can flow back into compartment of the steamer.

Page 16 Model 21 -CET-16 Service Manual
Connect Drain Line Connect the drain to the steamer as described below. 1. The SteamCraft 5.1 is supplied with a 1-1/4-inch pipe connection at the rear of
the unit (Figure 2-14). 2. When assembling the pipes and fittings of the drain outlet extension, apply a
hardening type pipe sealant to the threads, and thread them together FINGER TIGHT ONLY. DO NOT USE A WRENCH-
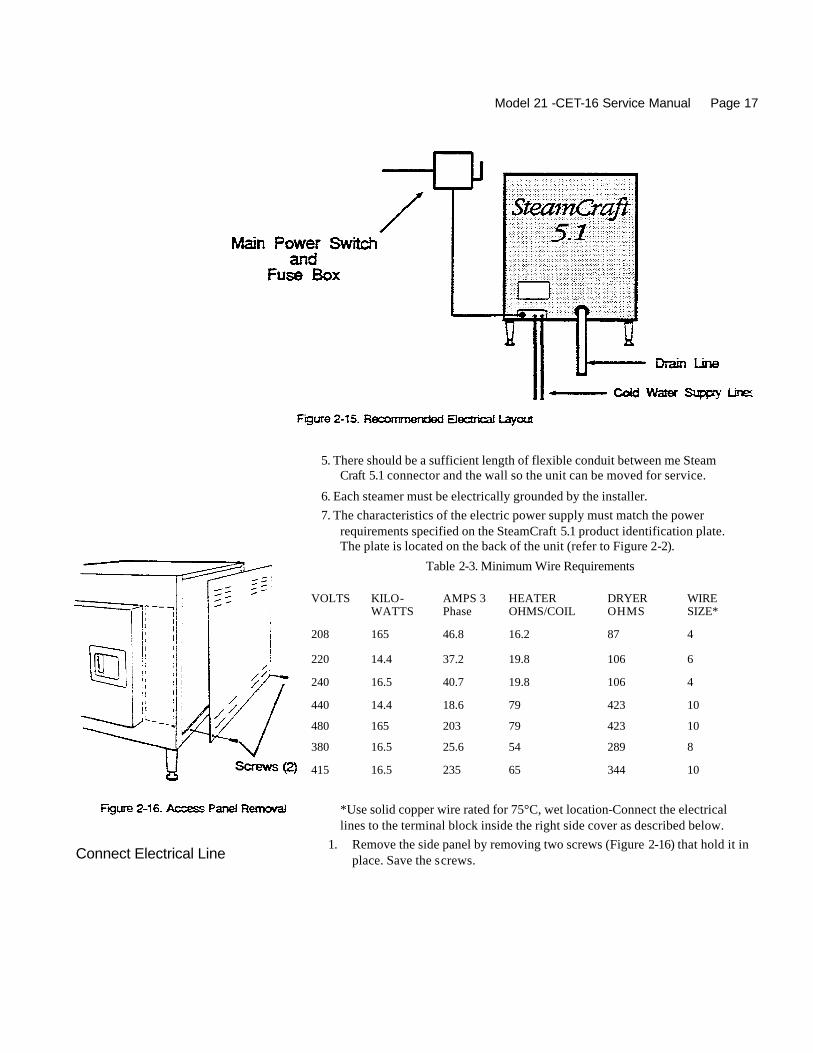
Install Electric Power Lines Furnishing and installing the electrical power lines, switches, fuse boxes, connectors and accessories is the responsibility of the owner and/or installer. Figure 2-15 illustrates an electrical layout recommended by Cleveland Range. When installing the electrical power lines and acces-sories, observe the following instructions.
1. In the United States, install the electrical power lines in accordance with local codes and/or the National Electric Code, ANSI/NFPA No. 70-1990 (USA).
2. In Canada, install the electrical power Lines in accordance with local codes and/or the Canadian Electrical Code, CSA Standard C22.1 (Canada).
3. Install the proper size disconnect switch, circuit breaker or fuses, and wire and conduit to conform to all local codes and the national codes cited above. See Table 2-3 for wire requirements.
4. install a separate disconnect switch and fuses or breakers sized to meet the line amps required by the SteamCraft 5.1 (see Table 2-3). The fuses or breakers maybe an integral part of the disconnect switch or in a separate fuse box. Install the disconnect switch for easy access as needed for daily startup and shutdown. Throughout the remainder of this manual the fused disconnect switch is referred to as the main power switch.
Model 21 -CET-16 Service Manual Page 17
5. There should be a sufficient length of flexible conduit between me Steam Craft 5.1 connector and the wall so the unit can be moved for service.
6. Each steamer must be electrically grounded by the installer. 7. The characteristics of the electric power supply must match the power
requirements specified on the SteamCraft 5.1 product identification plate. The plate is located on the back of the unit (refer to Figure 2-2).
Table 2-3. Minimum Wire Requirements
VOLTS KILO-WATTS
AMPS 3 Phase
HEATER OHMS/COIL
DRYER OHMS
WIRE SIZE*
208 165 46.8 16.2 87 4
220 14.4 37.2 19.8 106 6
240 16.5 40.7 19.8 106 4
440 14.4 18.6 79 423 10
480 165 203 79 423 10
380 16.5 25.6 54 289 8
415 16.5 235 65 344 10
*Use solid copper wire rated for 75°C, wet location-Connect the electrical lines to the terminal block inside the right side cover as described below.
1. Remove the side panel by removing two screws (Figure 2-16) that hold it in place. Save the screws.
Connect Electrical Line

Page 18 Model 21 -CET-16 Service Manual
2. Mechanically secure the flexible conduit to the electrical access hole (Figure 2-17).
3. The terminal block and ground connection are near the center of the side opening
4. Refer to the connection diagrams in Figure 2-17, and connect the wires to the terminal block and ground connector accordingly.
5- The steamer must be electrically grounded by the installer. 6- If no further work inside the side panel is required at this time, such as plumbing
and leak checks, secure the side panel with the two mounting screws (Figure
2-16).
Install Water Supply Lines Furnishing and plumbing the water supply lines is the responsibility of the owner and/or installer. This section illustrates plumbing layouts recommended by Cleveland Range. When installing water supply lines, observe the following instructions. 1. Always connect a cold water supply to the SteamCrart5.1 water supply
lines.DO NOT USE HOT WATER. The steamer will not function properly or within design safety limits if hot or warm water is supplied to either the condenser connection or the steam generator fill connection.
2. Supply water must have a minimum dynamic pressure of 35 psi (2.4 kg/cm2) and a maximum static pressure of 60 psi (4.1 kg/cm2). If static pressure exceeds 60 psi, a pressure regulator must be installed in the supply lines. For best results, set the regulator for 50 psi dynamic pressure. Water pressure greater than 60 psi will cause damage to the solenoid valves. Local water pressure can be 100 psi or more. If possible, check supply pressure at non-peak demand time. A local water company can assist in this check.
3. Refer to the recommended plumbing layouts in Figures 2-18 and 2-19, and install the water supply lines and fittings in accordance with all local and national codes. Pay particular attention to the following requirements and recommendations.
Model 21 -CET-16 Service Manual Page -19
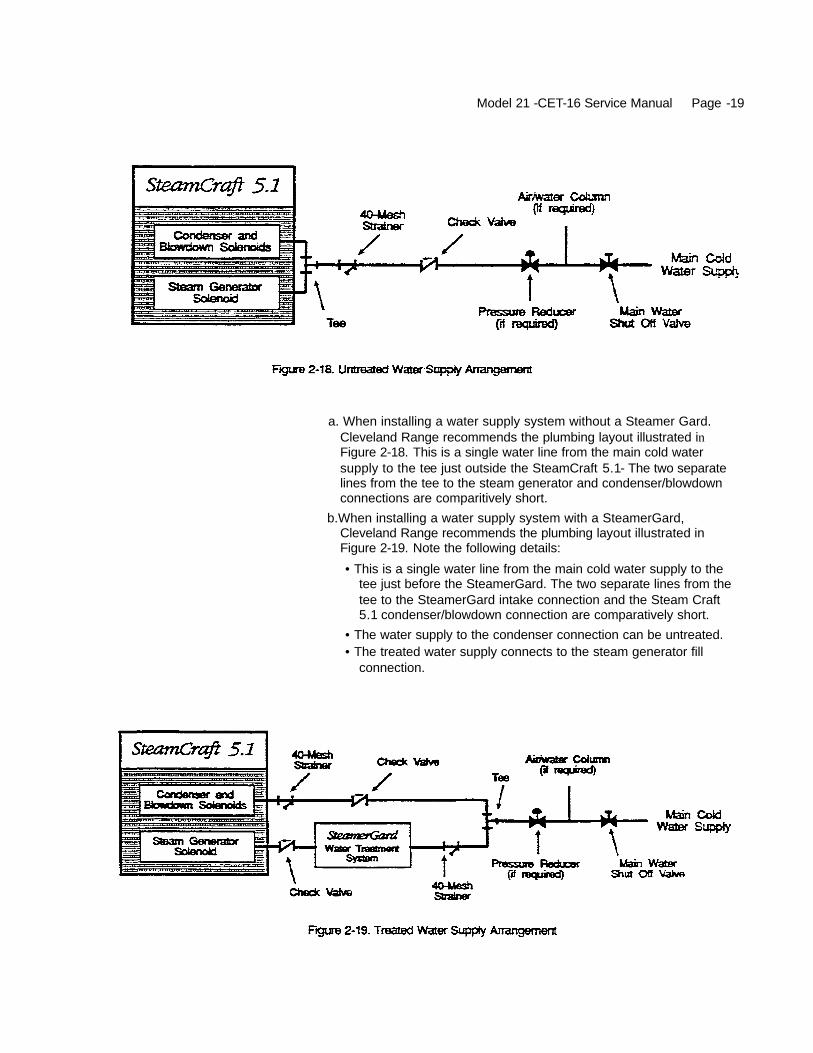
a. When installing a water supply system without a Steamer Gard. Cleveland Range recommends the plumbing layout illustrated in Figure 2-18. This is a single water line from the main cold water supply to the tee just outside the SteamCraft 5.1- The two separate lines from the tee to the steam generator and condenser/blowdown connections are comparitively short.
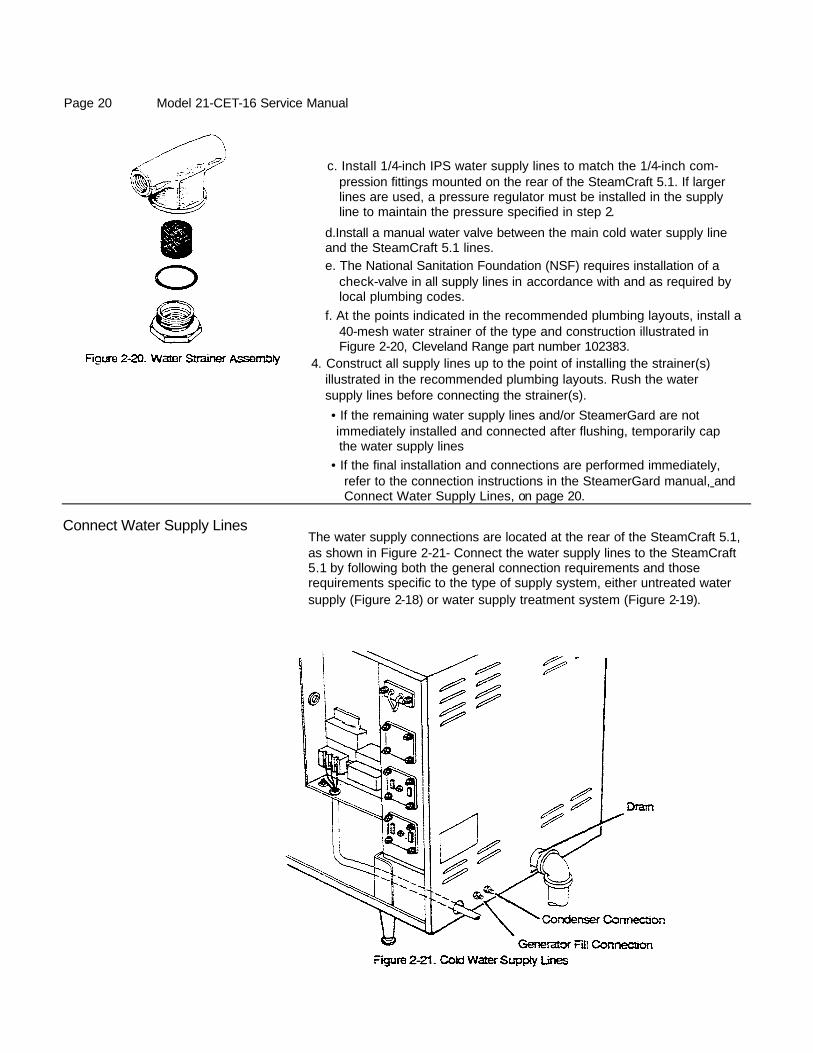
b.When installing a water supply system with a SteamerGard, Cleveland Range recommends the plumbing layout illustrated in Figure 2-19. Note the following details:
• This is a single water line from the main cold water supply to the tee just before the SteamerGard. The two separate lines from the tee to the SteamerGard intake connection and the Steam Craft 5.1 condenser/blowdown connection are comparatively short.
• The water supply to the condenser connection can be untreated. • The treated water supply connects to the steam generator fill
connection.
Page 20 Model 21-CET-16 Service Manual
c. Install 1/4-inch IPS water supply lines to match the 1/4-inch com-pression fittings mounted on the rear of the SteamCraft 5.1. If larger lines are used, a pressure regulator must be installed in the supply line to maintain the pressure specified in step 2.
d.Install a manual water valve between the main cold water supply line and the SteamCraft 5.1 lines. e. The National Sanitation Foundation (NSF) requires installation of a
check-valve in all supply lines in accordance with and as required by local plumbing codes.
f. At the points indicated in the recommended plumbing layouts, install a 40-mesh water strainer of the type and construction illustrated in Figure 2-20, Cleveland Range part number 102383.
4. Construct all supply lines up to the point of installing the strainer(s) illustrated in the recommended plumbing layouts. Rush the water supply lines before connecting the strainer(s).
• If the remaining water supply lines and/or SteamerGard are not immediately installed and connected after flushing, temporarily cap
the water supply lines • If the final installation and connections are performed immediately,
refer to the connection instructions in the SteamerGard manual, and Connect Water Supply Lines, on page 20.
Connect Water Supply Lines The water supply connections are located at the rear of the SteamCraft 5.1, as shown in Figure 2-21- Connect the water supply lines to the SteamCraft 5.1 by following both the general connection requirements and those requirements specific to the type of supply system, either untreated water supply (Figure 2-18) or water supply treatment system (Figure 2-19).

Model 21 -CET-16 Service Manual Page 21
Figure 2-22- Water Strainer installation
General Connection Requirements
1. Apply pipe dope or teflon tape to any threaded connection. 2. Flush the water supply lines before connecting the strainer(s), and again before
connecting the lines to the SteamCraft 5-1 connections. 3. When installing water strainer(s), use a strainer with a 40 mesh screen as
illustrated in Figure 2-22. • Make sure the arrow on the strainer body points in the direction of flow into
the steamer.
• Install the strainer so the access nut points down- 4. If incoming line pressure exceeds 60 psi static pressure, install a pressure
regulator to maintain the SteamCraft 5.1 pressure requirements specified in Install Water Supply Lines (page 18).
Testing Water Supply Lines
Untreated Water Connection (Without SteamerGard) 1. Refer to Figure 2-18. Verify that a suitable check valve is installed according to
NSF and local codes. 2. Look. at the flow indicating arrows on the strainer and check valve and verify
that flow is toward the steamer. 3. Install the tee and connecting Iines Hush these ones before connecting them to
the water supply fittings on the steamer.
Treated Water Connection (With SteamerGard) 1. Verify that the SteamerGard water treatment system has been installed
according to the SteamerGard installation manual The 40-mesh strainer supplied with the SteamerGard must be installed at the SteamerGard water inlet.
2. Refer to Figure 2-19. Verify that suitable check valves are installed according to NSF and local codes. The condenser line check valve should be installed between the tee and the steamer. The steam generator line check valve should be installed between the SteamerGard and the steamer.
3. Look at the flow indicating arrows on the strainers and check valves. Verify that flow is toward the steamer.
4. Install the connecting lines and flush them before connecting them to the water supply fittings on the steamer. Be sure the line from the SteamerGard water treatment system connects to the steam generator fitting on the SteamCraft 5.1.
1. Check all connections for proper tightness. Remove the side panel to inspect water connections inside the steamer (Figure 2-16).
2. Open the water supply valves.

Page 22 Model 21 -CET-16 Service Manual
3- Check all lines and connections for leakage, both inside and outside the steamer. 4. If Final Setup and Checkout win be performed next, leave the right side panel
off; otherwise, replace the side panel and secure it to the unit with the two screws (Figure 2-16).
NOTE: If the steamer has not been mounted yet: For surface mounting, return to page 12, step 5, and finish the mounting procedure.
For equipment stand installation and steamer mounting, return to page 13, step 2, install the stand and mount the steamer.
Final Setup and Checkout The Final Setup and Checkout procedures prepare a recently installed or repaired SteamCraft 5.1 for operation- The procedures check proper electrical, water, and drain connections to the SteamCraft 5.1, and verify basic steamer operation.
Model 21-CET-16 SteamCraft 5.1's have an electronic control panel with a key pad timer control. This control panel is illustrated in Figure 2-23 on page 23. An electro-mechanical control panel is also available. This panel has a dial timer control, as illustrated in Figure 2-24 on page 26. There are a few operating differences between steamers with the dial timer controls and steamers with the key pad controls. To avoid confusion during testing, there are two sets of testing instructions: one labeled Operating Tests - Key Pad Control Panel for the electronic control panel, and one labeled Operating Tests-Dial Timer Control Panel for the electro-mechanical control panel. After performing the setup procedure, perform the test procedure appropriate to the control panel on the SteamCraft 5.1 being tested.
Setup and Slowdown Inspection - All SteamCraft 5.1 's
This procedure is appropriate for SteamCraft 5.1's with either key pad control panels or dial timer control panels. Read through all steps of this procedure before starting. Complete this setup procedure before starting the operating tests.
1. Check that the water supply line valves are open. 2. If using a SteamerGrard water treatment system, refer to the Steamer-Gard
manual and start the system. Check that all valves between the SteamerGard and the SteamCraft 5.1 are open.
3. Open the steamer door. Check for proper installation of the drain screen, slide racks, and door gasket assembly. Be sure the drain is not blocked. Shut the steamer door.
4. Refer to electrical layout, Figure 2-15, and Table 2-3. Be sure the main power switch is in the off position. Verify installation of proper size fuses or breakers.

Model 21 -CET-16 Service Manual Page 23
5. Set the control panel as follows: a. Press the OFF (bottom) end of the ON/OFF switch.
b. Press the TIMED (top) end of the TIMED/MANUAL switch.
c. The timer setting is not important while the ON/OFF switch is in the OFF position.
• The key pad timer display is blank without power. • Even if the dial timer is not zeroed (pointing to the 0 mark), the timing
circuits are not powered.
6. Remove the right side access cover (see Figure 2-16).
WARNING Death, severe electrical shock or equipment damage can result from touching any component inside unit when main power switch is in the on position. Use extreme caution during testing with the access cover removed.
7. Turn on electric power to the SteamCraft 5.1 at the main power switch. The steamer will immediately start a blowdown cycle. During blowdown, the condenser and drain valves are fully open while the steam generator and float assembly are flushed with fresh water. The blowdown cycle lasts 3 minutes During the automatic blowdown cycle, make the following checks. • Look at the top of the float control. There should be a steady flow of water
entering the top of the float chamber through the spray nozzle.
• Look at the one inch vent gap between the steamer drain pipe and the floor drain- A steady stream of water should be draining from the steamer.
* After about 3 minutes, the cycle is complete- Check the two points listed above; there should be no water flow at any of the points.
NOTE: If it is necessary to stop the blowdown cycle before it is finished, do so by pressing the ON end of the ON/OFF switch.This energizes the operating control circuits, the red ON/OFF indicator lights, blowdown stops, and the steam generator fills with water. When the ON/OFF switch is tamed OFF. the blowdown cycle will start again.
8. If operating tests will be performed next, leave the right side panel off and perform step a below; otherwise perform step b.
a- Begin the operating tests appropriate to the control panel on the SteamCraft 5.1 being tested. The key pad control panel tests start after this procedure. The dial timer control panel tests start on page 26.

Page 24 Model 21-CET-16 Service Manual
b. Turn off electric power to the SteamCraft 5.1 at the main power switch. Install the right side access cover and secure it to the unit with the two screws (Figure 2-16).
Operating Tests - Key Pad Control Panel
This procedure is followed for SteamCraft 5.1's with key pad control panels (Figure 2-23). The test consists of observing and timing various steamer functions in the MANUAL operating mode, and in the TIMED operating mode. To become familiar with the functions observed and timed, read through all steps of the procedure before starting the steamer.
The times listed in the procedure are approximate and may vary with the temperature of the equipment, the temperature and pressure of the supply water, heater supply voltage, and pipe lengths. A stopwatch. wrist watch with a second hand, or one with a digital readout in seconds is required for timing the functions.
1. Remove the right side access cover.
2. Perform the Setup and Blowdown Inspection procedure. Leave the control settings as they are at the end of the procedure.
• The main power switch is ON.
• The ON/OFF switch is OFF (indicator not lighted). • The TIMED/MANUAL switch is in the TIMED (top) position.
• The timer display is blank while the ON/OFF switch is set to OFF. 3. If the timer is not zeroed (00:00) when power is turned on in step 4,
press and hold the CLEAR key on the key pad control panel to zero the timer.
4. When the ON/OFF switch is turned ON, the steam generator com-partment fills with water. Start timing upon pressing the top of the ON/OFF switch to ON. Check and time the following functions.
• Immediately: The red ON/OFF switch light turns on. The fill valve opens and water begins to fill the steam generator.
• After 3 Minutes: Water appears in the bottom of the float cylinder as the water level in the steam generator rises. Check that no water flows from the drain opening. Check for plumbing leaks.
• After 4 Minutes: The fill valve closes (click sound). Water level in the float cylinder stops rising, about one inch from the top of the cylinder. If the water level continues to rise above the top of the float cylinder, have a qualified service representative check the float circuit.

Model 21 -CET-16 Service Manual Page 25
5. When the TIMED/MANUAL switch is set to MANUAL, the steam generating cycle starts. Start timing upon pressing the MANUAL end of the TIMED/MANUAL switch- Check and time the following functions-
• Immediately: The condenser solenoid clicks open and condenser flow starts- With the float cylinder water level above one inch, the heater coil turns on.
• After 2-5 seconds: A small stream of water flows from the drain pipe. If no drain water flows, check that the water supply valves are open.
• After 2 minutes: A dull roaring sound indicates the heater is working and the unit is beginning to generate steam
• After 3-4 minutes: Steam begins to enter the compartment from the nozzles. A small quantity of water may drip from the nozzles until steam clears the lines-
• After 4-5 minutes: Steam from nozzles begins to fill compartment:
6. When the TIMED/MANUAL switch is set to TIMED (timer zeroed). the steam generating cycle stops. Press the TIMED end of the TIMED/MANUAL switch.
• Immediately: The heaters turn off, and the condenser flow stops. • After about 30 seconds: Steam stops entering the cooking
compartment. 7. Open the cooking compartment door to vent the steam and allow the
compartment to cool slightly. After 2 or 3 minutes, close the door and continue testing.
8. With the TIMED/MANUAL switch set to TIMED, use the timer key pad to set the timer for 10 minutes. press the number keys 1 0 0 0 in sequence. The display reads 10:00 (ten minutes and zero seconds).
9. When the START/STOP key is pressed, the steam generating cycle starts. This is the same sequence observed in steps 5 and 6, except:
• The electronic timer controls the cycle. • The elapsed times are shorter because the water in the steam
generator and the cooking compartment were preheated during step 5.
• The electronic timer automatically starts the step 6 functions after counting down to zero.
10. Press the START/STOP key and observe the following steam generating functions.
a. The timer display changes to PAUS until the cooking compartment reaches cooking temperature. When it does, the timer begins counting down to zero.
b. The condenser solenoid clicks open and condenser flow starts. A small stream of water flows from the drain pipe.
Page 26 Model 21 -CET-16 Service Manual
c. If the float cylinder water level drops below the initial fill level, the water fill valve opens and fills the generator. When the float cylinder water level is above one inch, the heater coil turns on. A dull roaring sound indicates the heater is working and the unit is beginning to generate steam-
d. As the unit generates steam, the water level fluctuates and a clicking sound is heard as the solenoid opens and closes the fill valve. The level in the float cylinder rises and falls about 1/4 inch as the fill valve operates.
e. Check for steam leaks around the door. f. When the timer counts down to zero (00:00), the heaters turn off, the
condenser flow stops, and the buzzer sounds continuously. Press the START/STOP key to silence the buzzer.
g. After about 30 seconds, steam stops entering the cooking compartment 11. Turn the SteamCraft 5.1 off by pressing the OFF (bottom) end of the ON/OFF switch. The red indicator on the switch turns off immediately, and the automatic blowdown cycle starts. DO NOT turn off the power at the main power switch until blowdown is complete. The cycle takes about 3 minutes.
12. When blowdown is complete, turn the steamer off at the main power switch. 13. Install the side panel and secure it in place with two screws (see Figure 2-16). After completing the Initial Setup and Blowdown Inspection procedure, and the Operating Test procedure; the SteamCraft 5.1 is ready for service. Refer to Chapter 3 for complete operating instruc-tions.
Operating Tests - Dial Tuner Control Panel
This procedure is followed for SteamCraft 5.1's with dial timer control panels (Figure 2-24). The test consists of observing and timing various steamer functions in the MANUAL operating mode, and in the TIMED operating mode. To become familiar with the functions observed and timed, read through all steps of the procedure before starting the steamer.
The times listed in the procedure are approximate and may vary with the temperature of the equipment, the temperature and pressure of the supply water, heater supply voltage, and pipe lengths. A stopwatch, wristwatch with a second hand, or one with a digital readout in seconds is required for timing the functions.
1. Remove the right side access cover.
2. Perform the Setup and Blowdown Inspection procedure. Leave the control settings as the are at the end of the procedure.
• The main power switch is ON.
• The ON/OFF switch is OFF (indicator not lighted).

Model 21 -CET-16 Service Manual Page 27
• The TIMED/MANUAL switch is in the TIMED (top) position.
• The Timer is zeroed, dial pointing to the 0 mark. 3- If the Timer is not zeroed, turn the dial counter clockwise until it points to the 0
mark. 4- When the ON/OFF switch is turned ON, the steam generator compartment fills
with water. Start timing upon pressing the top of the ON/OFF switch to ON. deck and time the following functions. • Immediately: The red ON/OFF switch light turns on. The fill valve opens and
water begins to fin the steam generator. The buzzer sounds for 3 seconds. • After 3 Minutes: Water appears in the bottom of the float cylinder as the
water level in the steam generator rises. Check that no water flows from the drain opening. Check for plumbing leaks.
• After 4 Minutes: The fill valve closes (click sound). Water level in the float cylinder stops rising, about one inch from the top of the cylinder. If the water level continues to rise above the top of the float cylinder, have a qualified service representative check the float circuit.
5. When the TIMED/MANUAL switch is set to MANUAL, the steam generating cycle starts. Start timing upon pressing the MANUAL end of the TIMED/MANUAL switch- Check and time the following functions. • Immediately: The condenser solenoid clicks open and condenser flow starts.
With the float cylinder water level above one inch, the heater coil turns on. • After 2-5 seconds : A small stream of water flows from the drain pipe. If no
drain water flows, check that the water supply valves are open. • After 2 minutes: A dull roaring sound indicates the heater is working and the
unit is beginning to generate steam. • After 3-4 minutes: Steam begins to enter the compartment from the nozzles.
A small quantity of water may drip from the nozzles until steam clears the lines.
• After 4-5 minutes: Steam from nozzles begins to fill compartment. 6. When tile TIMED/MANUAL switch is set to TIMED (timer at 0), the steam
generating cycle stops. Press the TIMED.) end of the TIMED/MANUAL switch. • Immediately: The heaters turn off, the condenser flow stops, and the buzzer
sounds for 3 seconds. • After about 30 seconds : Steam stops entering the cooking compartment.
7. Open the cooking compartment door to vent the steam and allow the compartment to cool slightly. After 2 or 3 minutes, close the door and continue testing.
Page 28 Model 21 -CET-16 Service Manual
8. With the TIMED/MANUAL switch set to TIMED, turn the dial of the timer to 10 minutes.
9. As soon as the dial is released, the steam generating cycle starts. This is the same sequence observed in steps 5 and 6, except:
• The dial timer controls the cycle. • The elapsed times are shorter because the water in the steam
generator and the cooking compartment were preheated during step 5.
• The dial timer automatically starts the step 6 functions after counting down to zero.
10. After setting and releasing the timer dial, observe the following steam generating functions.
a. The dial timer immediately begins counting down to zero. b.The condenser solenoid clicks open and condenser flow starts. A small stream of water flows from the drain pipe. c. If the float cylinderwater level drops below the initial fill level, the
water fill valve opens and fills the generator. When the float cylinder water level is above one inch, the heater coil turns on. A dun roaring sound indicates the heater is working and the unit is beginning to generate steam
d. As the unit generates steam, the water level fluctuates and a clicking sound is heard as the solenoid opens and closes the fill valve. The level in the float cylinder rises and falls about 1/4 inch as the fill valve operates.
e. Check for steam leaks around the door.
f. When the timer counts down to zero, the heaters turn off, the condenser flow stops, and the buzzer sounds for 3 seconds. g. After about 30 seconds steam stops entering the cooking compart ment.
11. Turn the SteamCraft 5.1 off by pressing the OFF (bottom) end of the ON/OFF switch. The red indicator on the switch turns off immediately, and the automatic blowdown cycle starts. DO NOT turn off the power at the main power switch until blowdown is complete. The cycle takes about 3 minutes.
12. When blowdown is complete, turn the steamer off at the main power switch.
13. Install the side panel and secure it in place with two screws (see Figure 2-16). After completing the Initial Setup and Blowdown Inspection procedure, and the Operating Test procedure; the SteamCraft 5.1 is ready for service. Refer to Chapter 3 for complete operating instruc-tions.
Model 21 -CET-16 Service Manual Page 29
CHAPTER 3. OPERATION INTRODUCTION
The SteamCraft 5.1 is as safe and easy to operate as a touch tone phone or a kitchen timer. To use the steamer safely and effectively, each operator must read and understand this chapter completely before start-ing operation. The owners and operators of the SteamCraft 5.1 should retain these instructions in an easily accessible location for future refer-ence and training.
The owner(s) and operators) of the Steam Craft 5.1 must be aware that steam can cause serious injuries and equipment damage. Pay particular attention to the Operational Safety section of this chapter, and the WARNINGS and CAUTIONS displayed in this manual and on the equipment.
WARNING DEATH, INJURY, AND EQUIPMENT DAMAGE could result from the improper installation of a SteamCraft 5.1. Before starting a recently installed or repaired steamer, be sure it is installed according to the instructions in Chapter 2.
OPERATIONAL SAFETY The safe and effective operation of any steamer depends upon proper installation, use, maintenance, and repair. Operational safety must encompass all of these factors. This Operational Safety section outlines the minimum safety policies that should be considered when using one or more SteamCraft 5.1 's. It is assumed that any operational safety program must be tailored to the specific site and use of the equipment. Such a program will pay handsome dividends in equipment life, performance. and reduced down-time.
Bum hazards are present in any professional food service operation. This is especially so when steam is used in the cooking process. When using the SteamCraft 5.1 steamer, observe the following precautions.
• Remember at all times that steam can cause severe burns.
• Do not open the steamer door before steam flow stops. • Stand back when opening the compartment door. Open the door slightly to allow
steam to vent before looking or reaching into cooking compartment. • Do not reach into the cooking compartment until the steam has cleared. • Do not reach into steamer or handle hot items without wearing heat-proof gloves.
Wet or damp gloves conduct heat, and may cause bums when touching hot items.

Page 30 Model 21 -CET-16 Service Manual
OPERATIONAL SAFETY (continued)
The SteamCraft 5.1 requires a minimum of service if properly operated and maintained by trained personnel. The following steps will help keep the steamer in a safe, efficient operating condition.
1- Train all personnel who will use the steamer. Make sure personnel know how to operate the steamer, clean the interior and exterior, drain the unit, and descale the steam generator.
2. Operating personnel must be able to recognize problems and know how to take corrective action as outlined in the Chapter 4 troubleshooting chart
3. Conduct reguIar steamer inspections. Check for water line leaks, door seal and drain leaks, clogged drain, steam generator scale buildup, and steamer control malfunctions.
4. Follow the instructions for steamer maintenance in Chapter 4.
5. Before each use of the SteamCraft 5.1, inspect the drain and screen for blockage. Inspect the door gasket assembly, and slide racks for proper installation and cleanliness.
6. Allow only Cleveland Range authorized service representatives to service the SteamCraft 5.1. 7. Use only factory authorized repair parts. This will maintain Underwriters
Laboratories (UL) and/or Canadian Standards Association (CSA) certification, and all approvals to protect warranty coverage.
8. Maintain written recordsof steamer maintenance and service. These records will be helpful if warranty coverage is ever in question. Each record should include at least:
• The date of the service or maintenance. • A description of the service, maintenance or repair performed.
Include part numbers if applicable. • Copies of purchase order(s) and invoice(s) for repair parts and
service.
• The name and signature of the person performing the maintenance or service.
CONTROL PANELS The standard SteamCraft 5.1 control panel, illustrated in Figure 3-1 has an electronic key pad timer with a temperature compensation circuit. The circuit allows the timer to count down only while the cooking compartment is at cooking temperature. An optional electro-mechanical control panel, illustrated in Figure 3-6 on page 44, is also available. This panel has a dial timer without a temperature compensation feature. The timer starts counting down when set. Operating details and cooking procedures differ between units with standard and optional panels. For clarity, two sets of operating instructions are provided. The standard key pad control instructions start on page 31. Instructions for the optional dial timer control panel start on page 44.

Model 21 -CET-16 Service Manual Page 31
KEY PAD CONTROL PANEL SUMMARY
CAUTION Press switches with finger tips only. Do not use kitchen utensils or anything sharp to operate the switches.
1. TIMER Display
This four-digit display indicates the minutes and seconds remaining in the count down. The display reads from zero (00:00) to 99 minutes and 99 seconds (99:99). It reads pause (PAUS) when the count down is halted either by the START/STOP key or by the temperature compensating circuit.
2. Number Pad Keys
These keys set the number of minutes and seconds in the timer count down. Pressing the number keys 12 3 4 in this sequence, sets the timer for 12 minutes and 34 seconds (12:34).
3. START/STOP Key
This key starts and stops the timer. In TIMED mode the steaming functions are linked to the timer. In MANUAL mode, the steaming functions are independent of the timer.
4. CLEAR Key
This key resets the timer to zero (00:00), after it has been stopped. The timer must be zeroed by pressing this key before a new time can beset.
5. TIMED/MANUAL Switch
The TIMED/MANUAL switch selects the manual or timed operating mode. • Pressing the MANUAL (bottom) end of the switch selects the manual mode. • Pressing the TIMED (top) end of the switch selects the timed mode.
6. ON/OFF switch
The ON/OFF switch controls electric power to the control panel. • Pressing the ON (top) end of the switch energizes the steamer control panel.
A red indicator on the switch lights, and water fills the steam generator. • Pressing the OFF (bottom) end of the ON/OFF switch turns the steamer
control panel OFF. The red indicator goes out, and the 3-minute blowdown cycle starts.
Page 32 Model 21 -CET-16 Service Manual
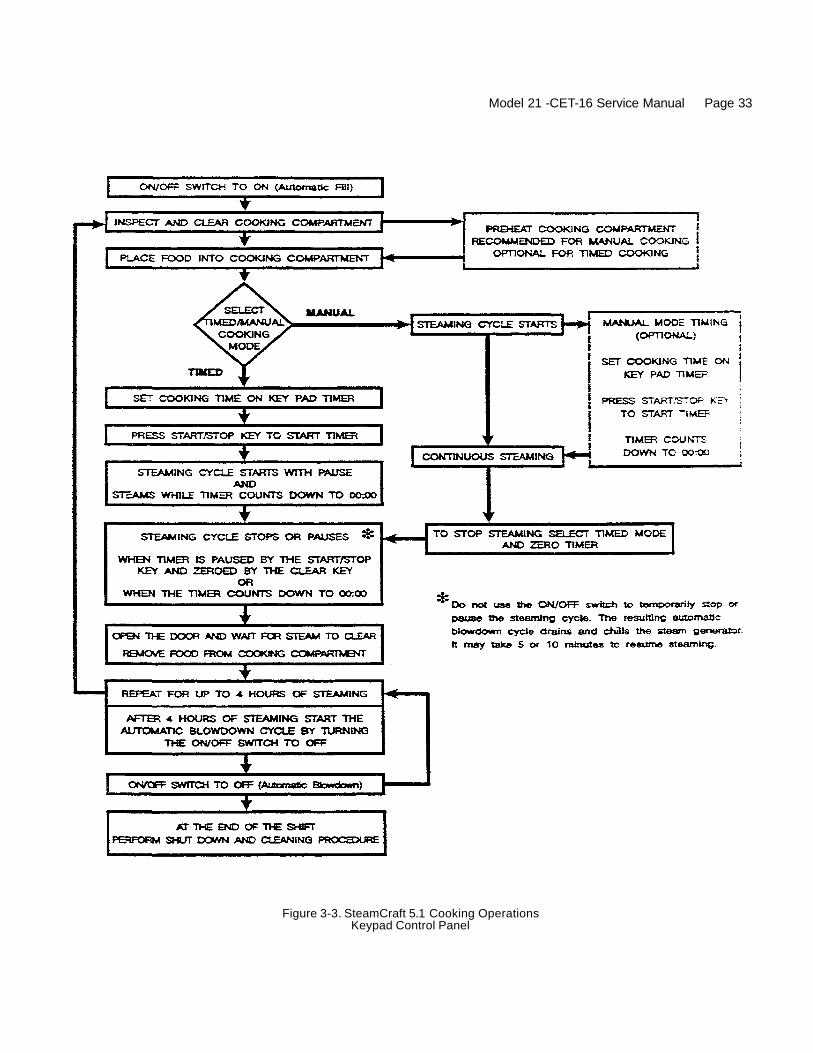
COOKING OPERATIONS - KEY PAD CONTROL PANEL
SteamCraft 5.1 cooking operations are simple and direct. Figure 3-3, to the right, shows the operations that can be performed during a four-hour shift. Each operation in the diagram is covered in a procedure in this chapter. The diagram, in conjunction .with the control panel summary on page 31, contains enough information for rudimentary (quick start) operation of the SteamCraft 5.1. However, to maintain full warranty coverage, and for safe, efficient operation of the SteamCraft 5.1. the operator must, at a minimum, comply with all cautions, warnings and instructions in the detailed operating procedures. The operator must be familiar with all the operating features explained in this chapter before attempting to operate the SteamCraft 5.1 steamer.
Manual and Timed Modes The SteamCraft 5-1 has two operating modes: manual and timed. The TIMED/MANUAL rocker switch selects the operating mode. Pressing the MANUAL end of the switch selects the manual operating mode. Pressing the TIMED end of the switch selects the timed (automatic) operating mode. • Manual Mode provides continuous steaming. The operator starts and stops
steaming operations manually. • Timed Mode provides automatic control of steaming operations. The timer control
starts and stops steaming operation, and monitors cooking time and compartment temperature for accurate, efficient uniform steam cooking.
Cooking procedures are slightly different for each mode. The diagram in Figure 3-3 illustrates which procedures are common to both modes and which are specific to each mode.
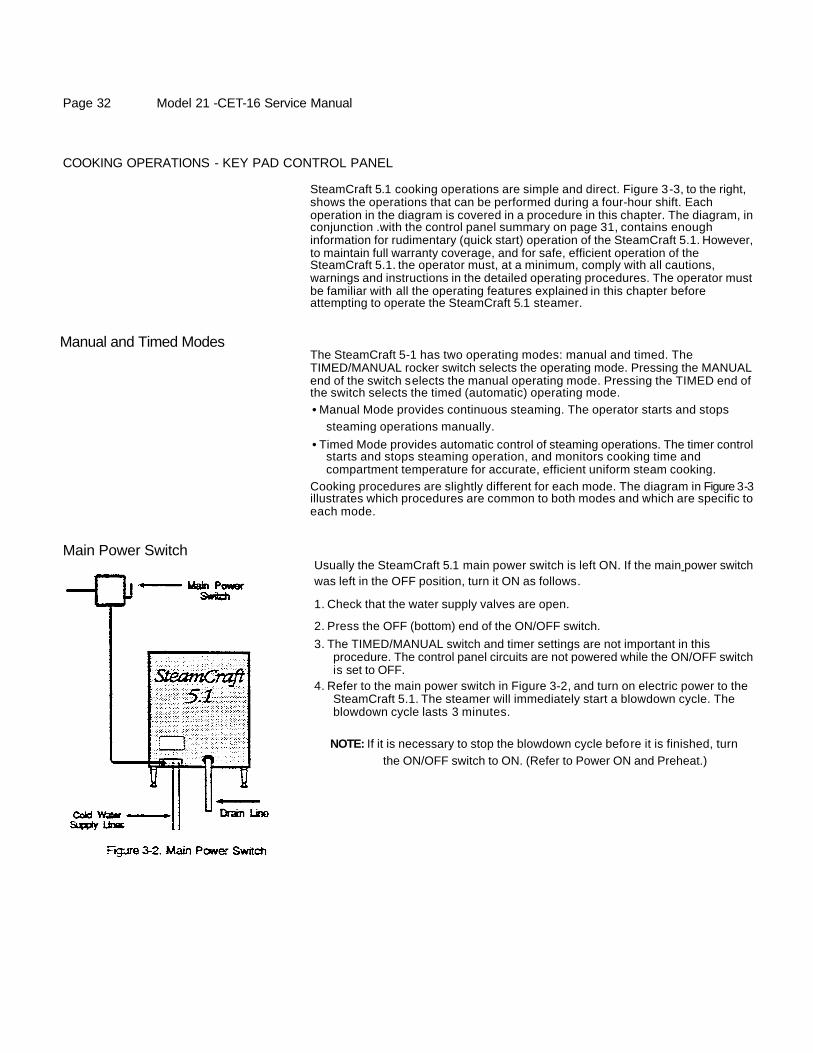
Main Power Switch Usually the SteamCraft 5.1 main power switch is left ON. If the main power switch was left in the OFF position, turn it ON as follows.
1. Check that the water supply valves are open.
2. Press the OFF (bottom) end of the ON/OFF switch. 3. The TIMED/MANUAL switch and timer settings are not important in this
procedure. The control panel circuits are not powered while the ON/OFF switch is set to OFF.
4. Refer to the main power switch in Figure 3-2, and turn on electric power to the SteamCraft 5.1. The steamer will immediately start a blowdown cycle. The blowdown cycle lasts 3 minutes.
NOTE: If it is necessary to stop the blowdown cycle before it is finished, turn the ON/OFF switch to ON. (Refer to Power ON and Preheat.)
Model 21 -CET-16 Service Manual Page 33
Figure 3-3. SteamCraft 5.1 Cooking Operations Keypad Control Panel
Page 34 Model 21 -CET-16 Service Manual
CAUTION Steam leaks around the door, cooking oompart-ment flooding, reduced cooking performance, and compartment implosion can be caused by a blocked drain or drain screen. Inspect and dean the drain and drain screen before each use. Never operate the steamer without the screen in place.
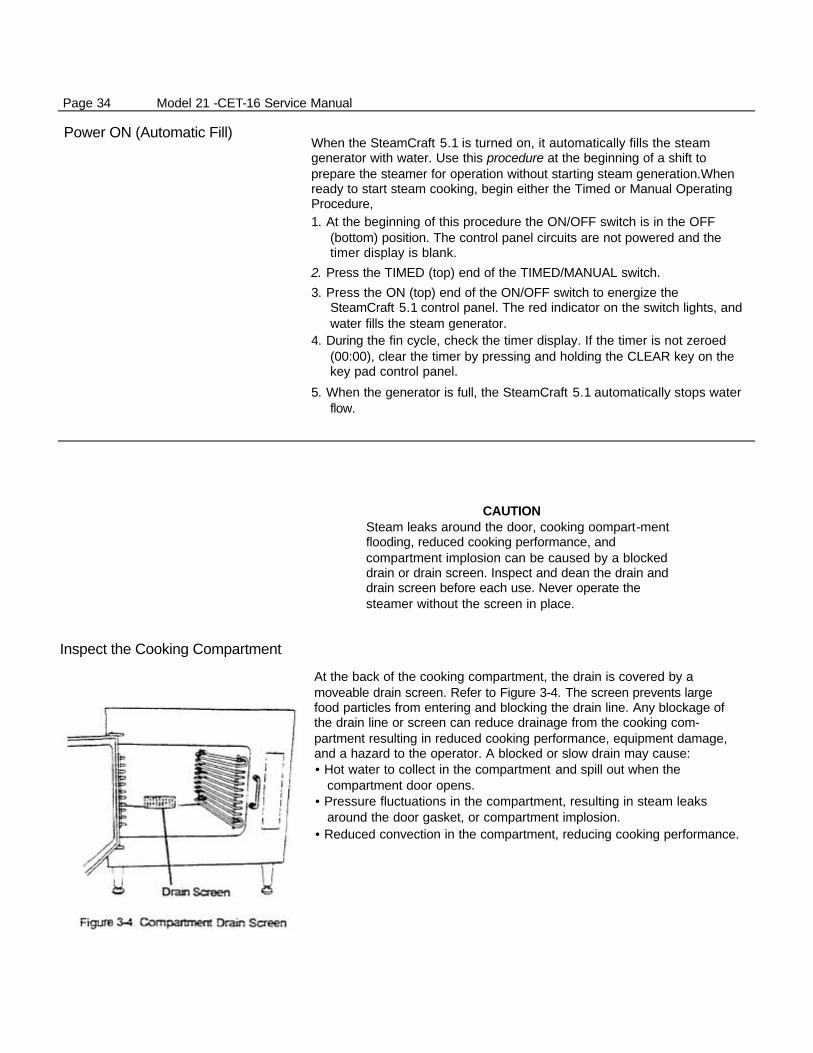
Inspect the Cooking Compartment
At the back of the cooking compartment, the drain is covered by a moveable drain screen. Refer to Figure 3-4. The screen prevents large food particles from entering and blocking the drain line. Any blockage of the drain line or screen can reduce drainage from the cooking com-partment resulting in reduced cooking performance, equipment damage, and a hazard to the operator. A blocked or slow drain may cause: • Hot water to collect in the compartment and spill out when the
compartment door opens. • Pressure fluctuations in the compartment, resulting in steam leaks
around the door gasket, or compartment implosion. • Reduced convection in the compartment, reducing cooking performance.
Power ON (Automatic Fill) When the SteamCraft 5.1 is turned on, it automatically fills the steam generator with water. Use this procedure at the beginning of a shift to prepare the steamer for operation without starting steam generation.When ready to start steam cooking, begin either the Timed or Manual Operating Procedure, 1. At the beginning of this procedure the ON/OFF switch is in the OFF
(bottom) position. The control panel circuits are not powered and the timer display is blank.
2. Press the TIMED (top) end of the TIMED/MANUAL switch.
3. Press the ON (top) end of the ON/OFF switch to energize the SteamCraft 5.1 control panel. The red indicator on the switch lights, and water fills the steam generator.
4. During the fin cycle, check the timer display. If the timer is not zeroed (00:00), clear the timer by pressing and holding the CLEAR key on the key pad control panel.
5. When the generator is full, the SteamCraft 5.1 automatically stops water flow.
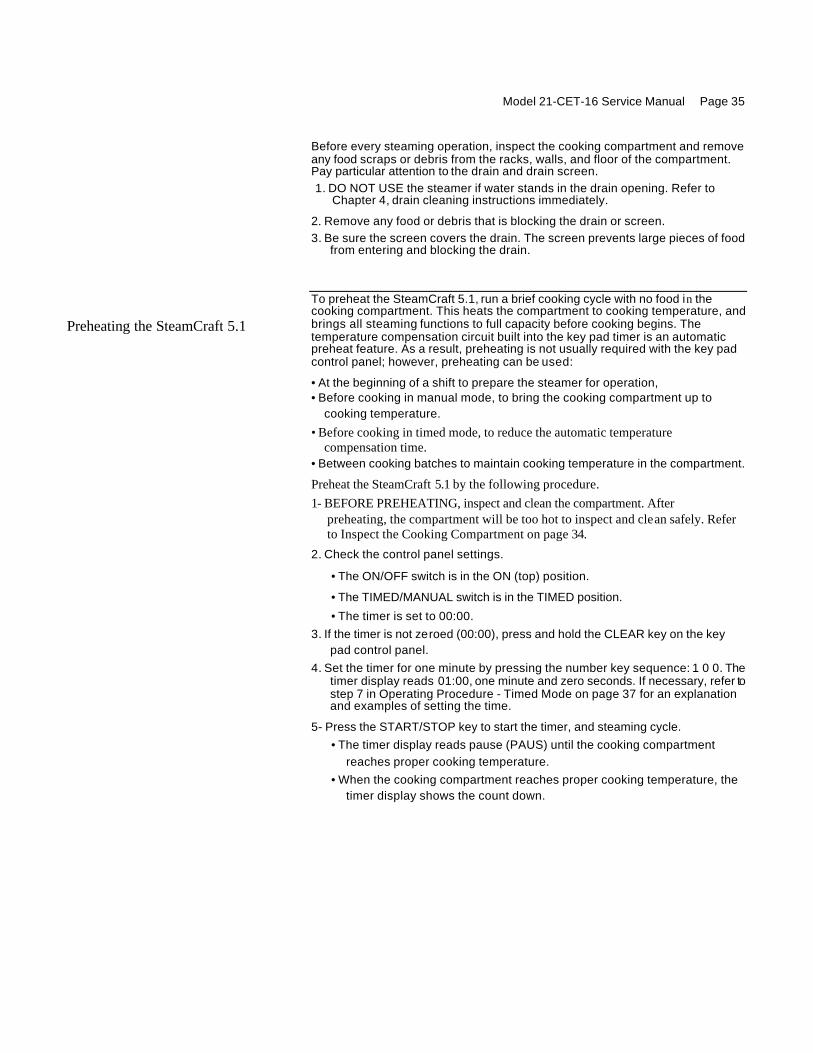
Preheating the SteamCraft 5.1
Model 21-CET-16 Service Manual Page 35
Before every steaming operation, inspect the cooking compartment and remove any food scraps or debris from the racks, walls, and floor of the compartment. Pay particular attention to the drain and drain screen. 1. DO NOT USE the steamer if water stands in the drain opening. Refer to
Chapter 4, drain cleaning instructions immediately.
2. Remove any food or debris that is blocking the drain or screen. 3. Be sure the screen covers the drain. The screen prevents large pieces of food
from entering and blocking the drain.
To preheat the SteamCraft 5.1, run a brief cooking cycle with no food in the cooking compartment. This heats the compartment to cooking temperature, and brings all steaming functions to full capacity before cooking begins. The temperature compensation circuit built into the key pad timer is an automatic preheat feature. As a result, preheating is not usually required with the key pad control panel; however, preheating can be used:
• At the beginning of a shift to prepare the steamer for operation, • Before cooking in manual mode, to bring the cooking compartment up to
cooking temperature.
• Before cooking in timed mode, to reduce the automatic temperature compensation time.
• Between cooking batches to maintain cooking temperature in the compartment.
Preheat the SteamCraft 5.1 by the following procedure. 1- BEFORE PREHEATING, inspect and clean the compartment. After
preheating, the compartment will be too hot to inspect and clean safely. Refer to Inspect the Cooking Compartment on page 34.
2. Check the control panel settings.
• The ON/OFF switch is in the ON (top) position.
• The TIMED/MANUAL switch is in the TIMED position.
• The timer is set to 00:00. 3. If the timer is not zeroed (00:00), press and hold the CLEAR key on the key
pad control panel. 4. Set the timer for one minute by pressing the number key sequence: 1 0 0. The
timer display reads 01:00, one minute and zero seconds. If necessary, refer to step 7 in Operating Procedure - Timed Mode on page 37 for an explanation and examples of setting the time.
5- Press the START/STOP key to start the timer, and steaming cycle. • The timer display reads pause (PAUS) until the cooking compartment
reaches proper cooking temperature. • When the cooking compartment reaches proper cooking temperature, the
timer display shows the count down.

Page 36 Model 21 -CET-16 Service Manual
6. When the timer reaches zero, a buzzer sounds continuously. Press the START/STOP key to silence the buzzer.
7. Preheat is now complete. The SteamCraft 5.1 steam generating functions are at full capacity, and the cooking compartment is at proper cooking temperature- Steam cooking can begin in either manua] or timed mode.
CAUTION Steam leaks around the door, cooking compartment flooding, reduced cooking performance, and compartment implosion can be caused by a blocked drain or drain screen. Inspect and dean the drain and drain screen before each use.
Operating Procedure - Timed Mode
Use the timed operating mode for completely automatic, unattended cooking. In timed mode, the temperature compensation circuit and the cooking compartment temperature sensor are active- They allow the timer to count down ONLY WHILE THE COOKING COMPARTMENT IS AT COOKING TEMPERATURE. This assures uniform cooking as the timer automatically compensates for food product defrosting and/or compartment heat-up time. 1. Refer to Inspect the Cooking Compartment on page 34. Inspect and dean the drain and cooking compartment as required. 2. In timed mode, the temperature compensation circuit performs automatic
preheating- Manual preheating is not usually required. If the operator chooses to manually preheat the cooking compartment. refer to page 35, Preheating the SteamCraft 5.1.
CAUTION Some foods drip juices. Use a solid catch pan under perforated pans when steaming food that wffl drip juices. Failure to use a catch pan can cause a dogged drain.
3. Put food into the pans and slide the pans into the slide racks inside the steamer. Do not place pans or anything else on the bottom of the compartment. • When cooking foods that will drip, such as meat, poultry, or fish, put a solid
catch pan in the bottom slide of the racks. • For best cooking results, use shallow, 2-1/2 inch deep, perforated pans
without covers (Cleveland Range model number PP-2-5). These give the best heat transfer and shortest cooking time.
4. Close the steamer door. Select the timed (automatic) mode by pressing the TIMED end of the TIMED/MANUAL rocker switch.

Model 21 -CET-16 Service Manual Page 37
5. Check the control panel settings. At this point the settings should be:
• The ON/OFF switch is in the ON (top) position.
• The TIMED/MANUAL switch is in the TIMED (top) position.
• The timer is set to (00:00).
6. If the timer is not zeroed (00:00), press and hold the CLEAR key on the key pad control panel. The timer can be set only when the cooking time display is clear (00:00).
7. Set the required cooking time. The cooking time display contains four digits. The left two digits are minutes, and the right two digits are seconds. The display 12:34 is set for 12 minutes and 34 seconds. To set the cooking time:
a. Change the required cooking time to minutes and seconds.
b. Press the number keys for the minutes, and then press the number keys for the seconds.
c. If the cooking time is 99 seconds or less, only press the number keys for seconds.
Example 1 . Set the timer for 1 hour and 15 minutes. Change 1 hour (60 mm) and 15 minutes to 75 minutes. Press the fo llowing number keys in sequence: 75 0 0- The display reads 75:00 when set for 1 hour and 15 minutes. Example 2. Set the timer for 1.5 minutes. Change the time to 1 minute and 30 seconds. Press the following number keys in sequence: 130. The display
reads 01:30, when set for 1.5 minutes.
All seconds method: Change the 1.5 minutes to 90 seconds and press 9 0. The display reads 00:90 when set for 1.5 minutes. When the timer starts, the display automatically changes to minutes and seconds (01:30).
8. Press the START/STOP key to start the timer. When the START/STOP key is pressed, the steam generator begins heating the water to steam. Shortly, steam fills the cooking companment. a. The timer display reads PAUS until the cooking compartment reaches proper cooking temperature.
b. When the cooking compartment reaches proper cooking tempera-ture, the timer display shows the count down. NOTE: A timer setting of 10 minutes may in fact take 11 or 12 minutes for the
timer to count down and the alarm to sound. This is normal. Heating the compartment and food to cooking temperature uses the additional time.

Page 38 Model 21 -CET-16 Service Manual
c. To stop or reset the timer, press and hold the START/STOP key. The cooking time display returns to the last time setting.
• To restart the same time, press the START/STOP key. • To set a new time, press and hold the CLEAR key and set the new time.
9. When the timer counts down to zero, the alarm sounds continuously. the generator stops steaming, and steam flow to the cooking compartment gradually stops.
10. Press the START/STOP key to silence the alarm. The cooking time display returns to the last time set. Either run this same setting again or dear and reset the timer. Example 3. Cook two 14 minutes cycles. a. Press and hold the
CLEAR key to clear the timer.
b. Press the following number keys in sequence: 1400. The display shows 14:00. c. Press the START/STOP key to start the timer. When the display counts down to zero, the alarm sounds. d. Press the START/STOP key to stop the buzzer and the display returns to 14:00.
e. Press the START/STOP key to start the second 14 minute cycle.
WARNING SEVERE BURNS may result from exposure to steam. Do not open the steamer door before steam flow stops. Stand back when opening the compartment door. Open the door slightly to allow steam to vent before looking or reaching into cooking compartment Do not reach into cooking compartment until the steam has cleared. Do not reach into steamer or handle hot items without wearing heat-proof gloves. Wet or damp gloves conduct heat, and may cause bums when touching hot items.
11. Carefully open the cooking compartment door, and remove the pans from the slide racks.
• If the SteamCraft 5.1 .will be used again in a few minutes, shut the door to maintain the cooking compartment temperature.
* If another use is not planned for more than half an hour, leave the cooking compartment door slightly open to reduce internal pressure while the steam condenses and the compartment cools.
• If the SteamCraft 5.1 is not being used again during this shift, perform the Power OFF and Shut Down and Cleaning Procedures.

Model 21-CET-16 Service Manual Page 39
Operating Procedure - Manual Mode
Manual mode allows the operator to personally control the cooking functions. The operator starts and stops the steaming operations, and sets the cooking time including time for steam generator, compartment and food heat-up time. Use the manual cooking mode for • A continuous supply of steam • Cooking times longer than the timer can measure (over 99 minutes and 99
seconds).
• Maintaining the compartment temperature between cooking batches.
Manual Timer
In manual mode, the timer does not start and stop the steaming cycle. I: is not necessary to set the timer, and the timer display can be ignored. However, the timer can be used in manual mode to monitor cooking time and temperature. The timer functions exactly as it does in timed mode.
When using the timer in manual mode, clear, set, and start the timer as in steps 6,7, and 8 of the Timed Mode Operating Procedure. As described in steps 8,9 and 10, the timer pauses (PAUS) until the cooking compartment reaches cooking temperature, then counts down the set period, and sounds the buzzer. In manual mode, turning off the buzzer with THE START/STOP KEY DOES NOT TURN OFF THE STEAM.
Temperature Compensation
The temperature compensation circuit effects only the timer, and in manual mode, the timer has no effect on the steaming cycle. The operator must compensate for defrosting time, and compartment, utensil, and food heat-up times by: • Running a preheat cycle (page 35) to bring the compartment up to cooking
temperature. • Cooking the food longer. • Using the timer manually to monitor how long the compartment is at
cooking temperature.
CAUTION Steam leaks around the door, cooking compartment flooding, reduced cooking performance, and compartment implosion can be caused by a block-ed drain or dram screen. Inspect and dean the drain and drain screen before each use.

Page 40 Model 21 -CET-16 Service Manual
Manual Cooking Procedure
Follow this procedure when cooking with the SteamCraft 5.1 in manual mode.
1. Refer to Inspect the Cooking Compartment on page 34- Inspect and clean the drain and cooking compartment as required.
2. In manual mode, the operator can bring the compartment to cooking temperature by either preheating or increasing the cooking time. If the operator chooses to preheat the cooking compartment manually, refer to page 35, Preheating the SteamCraft 5.1.
CAUTION Some foods drip juices. Use a solid catch pan under perforated pans when steaming food that will drip juices. Failure to use a catch pan can cause a dogged drain.
3- Put food into the pans and slide the pans into the slide racks inside the steamer. Do not place pans or anything else on the bottom of the compartment. • When cooking foods that will drip, such as meat, poultry, or fish, put a
solid catch pan in the bottom slide of the racks. • For best cooking results, use shallow, 2-1/2 inch deep, perforated
pans without covers (Cleveland Range model number PP-2.5). These give the best beat transfer and shortest cooking time.
4. Close the steamer door. Select the manual mode by pressing the MANUAL (bottom) end of the TIMED/MANUAL rocker switch.The steaming cycle starts as soon as the switch is pressed.
• The steam generator begins beating the water to steam-
• Steam fills the cooking compartment and begins cooking the food.
5. If the timer is used to manually monitor how long the compartment is at cooking temperature, dear, set, and start the timer.
a. Press and hold the CLEAR key to zero the timer display. b. Set the cooking time using the number keys. For example set the
timer to 10 minutes and 30 seconds by pressing the 10 30 number key in sequence. For more details and examples refer to step 7 of the Timed Mode Operating Procedure.
c. Press the START/STOP key to start the timer count down. When the timer reaches zero, a buzzer sounds continuously. d. Press the START/STOP key to silence the buzzer. Remember, in manual mode, the timer does not control the steaming functions.

Model 21 -CET-16 Service Manual Page 41
6. To stop manual mode steaming, press the TIMED (top) end of the TIMED/MANUAL rocker switch. Press and hold the CLEAR key to zero the timer (00:00). The controls will now be set so: • The ON/OFF switch is in the ON (top) position.
• The TIMED/MANUAL switch is in the TIMED (top) position.
• The timer is set to (00:00). The generator stops steaming, and steam flow to the cooking compartment gradually stops.
WARNING SEVERE BURNS may result from exposure to steam. Do not open the steamer door before steam flow stops. Stand back when opening the compart-ment door. Open the door slightly to allow steam to vent before looking or reaching into cooking compartment Do not reach into cooking compartment until the steam has cleared. Do not reach into steamer or handle hot items without wearing heat-proof gloves. Wet or damp gloves conduct heat, and may cause bums when touching hot items.
7. Carefully open the cooking compartment door, and remove the pans from the slide racks.
• If the SteamCraft 5.1 will be used again in a few minutes, shut the door to maintain the cooking compartment temperature.
• If another use is not planned for more than half an hour, leave the cooking compartment door slightly open to reduce internal pressure while the steam is condensing and cooling.
• If the SteamCraft 5.1 is not being used again during this shift, perform the Power OFF and Shut Down and Cleaning Procedures.
Power OFF (Automatic Blowdown)
Blowdown occurs automatically when the unit is turned off at the ON/OFF switch. During blowdown, the steam generator and float control are rinsed with fresh water, flushing deposits from the beating elements and generator bottom. Blowdown at frequent intervals helps decrease mineral buildup in the steam generator, and reduces the frequency of descaling and other maintenance.
Blowdown Frequency
The supply water quality determines how often blowdown must be performed. The higher the feed water TDS and particulates, the more frequently blowdown must be performed. Refer to Table 2-2. Minimum.

Page 42 Model 21 -CET-16 Service Manual
Supply Water Quality on page 7. If the local water supply meets the minimum supply water quality standards, observe the following guidelines to establish proper blowdown scheduling, and maintain warranty coverage.
• For units without a SteamerGard water treatment system. blowdown must be performed after every 4 hours of operation and at the end of each shift as specified in the Shut Down and Cleaning, procedure.
• For units with a SteamerGard water treatment system, blowdown must be performed after each shift as specified in the Shut Down and Cleaning procedure.
Blowdown Procedure
When the SteamCraft 5.1 is turned off, the blowdown cycle starts and runs automatically. The complete cycle takes approximately 3 minutes. 1. Press the OFF (bottom) end of the ON/OFF switch to turn off the
SteamCraft 5.1. The red indicator on the ON/OFF switch turns off. Do not turn power off at the main power switch during blowdown.
2. Automatically, the drain valve begins to draw water from the steam generator.
3. The fill and drain valves operate simultaneously for 3 minutes.
4. At the end of the 3-minute blowdown cycle, the fin valve doses, 5. When blowdown is complete, the SteamCraft 5.1 can be restarted, or
the shut down procedure completed.
• To restart the unit. Power ON (Automatic Fill) on page 34.
• To shut down the unit refer to Shut Down and Cleaning, below.
Shut Down and Cleaning (At end of day or shift)
This procedure must be performed at the end of each day or shift to maintain warranty coverage. 1- Refer to Power OFF (Automatic Blowdown), and turn off the Steam-
Craft 5.1. Allow 3 minutes for complete blowdown cycle. 2. Open the steamer door and allow steamer to cool.
WARNING Inside of steamer stays hot for a long time. Be careful when cleaning inside steamer compartment
3. Remove the slide racks. Wash and rinse racks separately or clean them in a dishwasher according to health requirements. Do not remove the drain screen.
4. Remove any spilled food from inside compartment and clear any residue from the drain screen. Clean the interior of the compartment.

Model 21 -CET-16 Service Manual Page 43
thoroughly. Use a soft bristle brush to remove stubborn food particles. Do not use abrasive cleaning compounds or steel wool. Rinse inside of steamer compartment with clean water.
WARNING Let rinse water drain through compartment drain opening, If water does not drain freely, drain lines must be cleaned before cooking again. Clogged or stow drains are dangerous because hot water can collect in compartment and spill out when opening compartment door.
5. Clean the door assembly
• Remove the door gasket assembly (see Figure 3-5). • Note the keyhole slots on the door and the retaining pins on me gasket
assembly. Grasp the gasket assembly at the sides and lift up and towards you to remove the assembly.
• Clean all surfaces of the gasket assembly, as well as the inside of the door, by wiping with a damp cloth.
• Replace the gasket assembly by sliding the retaining pins into the keyhole slots. Either long edge of the gasket assembly can be positioned at the top.
6. Replace the cleaned slide racks. 7. Wipe the exterior with a damp cloth only- NEVER HOSE DOWN THE
STEAMER. Electrical components inside the unit will not function correctly if wet or damp.
8. After cleaning, leave the steamer door open until the next steamer operation. This prevents compartment odor buildup and increases gasket life.
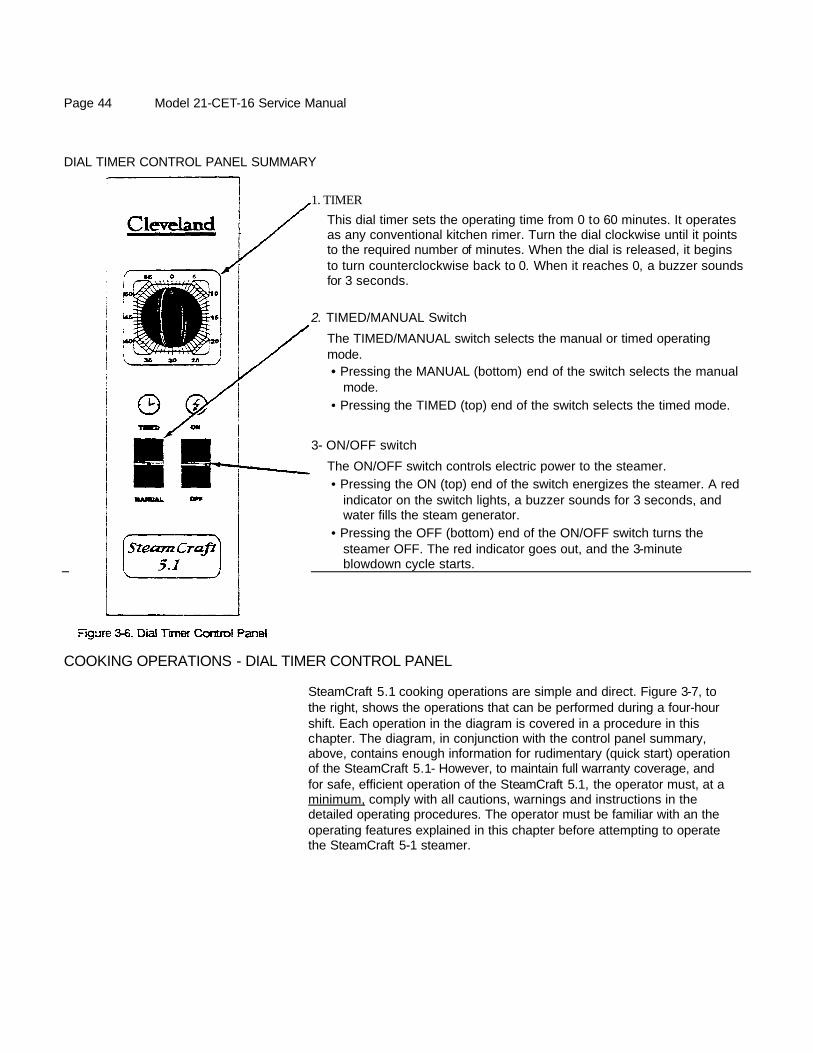
Page 44 Model 21-CET-16 Service Manual
DIAL TIMER CONTROL PANEL SUMMARY
1. TIMER
This dial timer sets the operating time from 0 to 60 minutes. It operates as any conventional kitchen rimer. Turn the dial clockwise until it points to the required number of minutes. When the dial is released, it begins to turn counterclockwise back to 0. When it reaches 0, a buzzer sounds for 3 seconds.
2. TIMED/MANUAL Switch
The TIMED/MANUAL switch selects the manual or timed operating mode. • Pressing the MANUAL (bottom) end of the switch selects the manual
mode. • Pressing the TIMED (top) end of the switch selects the timed mode.
3- ON/OFF switch
The ON/OFF switch controls electric power to the steamer. • Pressing the ON (top) end of the switch energizes the steamer. A red
indicator on the switch lights, a buzzer sounds for 3 seconds, and water fills the steam generator.
• Pressing the OFF (bottom) end of the ON/OFF switch turns the steamer OFF. The red indicator goes out, and the 3-minute blowdown cycle starts.
COOKING OPERATIONS - DIAL TIMER CONTROL PANEL
SteamCraft 5.1 cooking operations are simple and direct. Figure 3-7, to the right, shows the operations that can be performed during a four-hour shift. Each operation in the diagram is covered in a procedure in this chapter. The diagram, in conjunction with the control panel summary, above, contains enough information for rudimentary (quick start) operation of the SteamCraft 5.1- However, to maintain full warranty coverage, and for safe, efficient operation of the SteamCraft 5.1, the operator must, at a minimum, comply with all cautions, warnings and instructions in the detailed operating procedures. The operator must be familiar with an the operating features explained in this chapter before attempting to operate the SteamCraft 5-1 steamer.

Model 21 -CET-16 Service Manual Page 45
Figure 3-7. SteamCraft 5.1 Cooking Operations
Dial Timer Control Panel
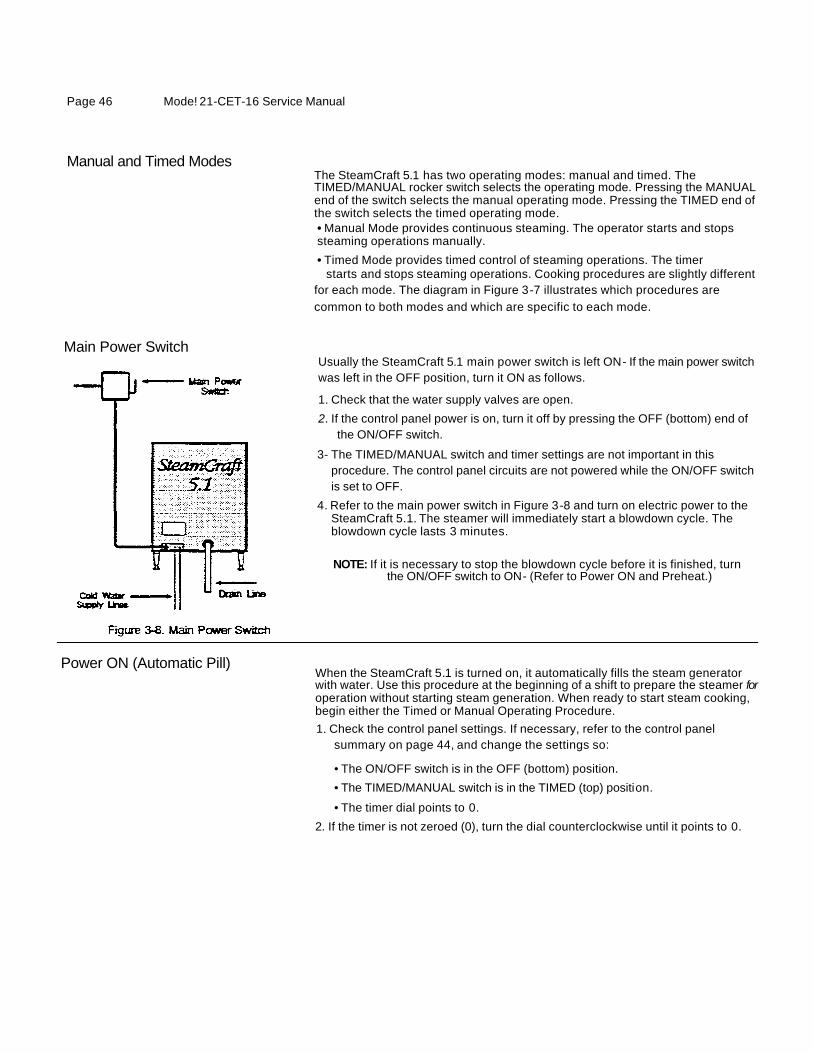
Page 46 Mode! 21-CET-16 Service Manual
Manual and Timed Modes The SteamCraft 5.1 has two operating modes: manual and timed. The TIMED/MANUAL rocker switch selects the operating mode. Pressing the MANUAL end of the switch selects the manual operating mode. Pressing the TIMED end of the switch selects the timed operating mode. • Manual Mode provides continuous steaming. The operator starts and stops steaming operations manually.
• Timed Mode provides timed control of steaming operations. The timer starts and stops steaming operations. Cooking procedures are slightly different
for each mode. The diagram in Figure 3-7 illustrates which procedures are common to both modes and which are specific to each mode.
Main Power Switch Usually the SteamCraft 5.1 main power switch is left ON- If the main power switch was left in the OFF position, turn it ON as follows.
1. Check that the water supply valves are open.
2. If the control panel power is on, turn it off by pressing the OFF (bottom) end of the ON/OFF switch.
3- The TIMED/MANUAL switch and timer settings are not important in this procedure. The control panel circuits are not powered while the ON/OFF switch is set to OFF.
4. Refer to the main power switch in Figure 3-8 and turn on electric power to the SteamCraft 5.1. The steamer will immediately start a blowdown cycle. The blowdown cycle lasts 3 minutes.
NOTE: If it is necessary to stop the blowdown cycle before it is finished, turn the ON/OFF switch to ON- (Refer to Power ON and Preheat.)
When the SteamCraft 5.1 is turned on, it automatically fills the steam generator with water. Use this procedure at the beginning of a shift to prepare the steamer for operation without starting steam generation. When ready to start steam cooking, begin either the Timed or Manual Operating Procedure. 1. Check the control panel settings. If necessary, refer to the control panel
summary on page 44, and change the settings so:
• The ON/OFF switch is in the OFF (bottom) position.
• The TIMED/MANUAL switch is in the TIMED (top) position.
• The timer dial points to 0.
2. If the timer is not zeroed (0), turn the dial counterclockwise until it points to 0.
Power ON (Automatic Pill)

Model 21 -CET-16 Service Manual Page 47
3. Press the ON (top) end of the ON/OFF switch to energize the SteamCrafi.5.1- The red indicator on the switch lights, a buzzer sounds for 3 seconds, and water fills the steam generator. When the generator is full, the SteamCraft 5-1 automatically stops water flow.
CAUTION Steam leaks around the door, cooking compartment flooding, reduced cooking performance, and compartment implosion can be caused by a blocked drain or drain screen. Inspect and dean the drain and drain screen before each use. Never operate the steamer without the screen in place.
inspect the Cooking Compartment
At the back of the cooking compartment, the drain is covered by a moveable drain screen. Refer to Figure 3-9. The screen prevents large food particles from entering and blocking the drain line- Any blockage of the drain line or screen can reduce drainage from the cooking compartment resulting in reduced cooking performance, equipment damage, and a hazard to the operator. A blocked or slow drain may cause: • Hot water to collect in the compartment and spill out when the compartment
door opens. • Pressure fluctuations in the compartment, resulting in steam leaks around the
door gasket, or compartment implosion. • Reduced convection in the compartment, reducing cooking performance. Before every steaming operation, inspect the cooking compartment and remove any food scraps or debris from the racks, walls, and floor of the compartment. Pay particular attention to the drain and drain screen. 1. DO NOT USE the steamer if water stands in the drain opening. Refer to
Chapter 4, drain cleaning instructions immediately.
2. Remove any food or debris that is blocking the dram or screen.
3- Be sure the screen covers the drain. The screen prevents large pieces of food from entering and blocking the drain.
Preheating the SteamCraft 5.1 To preheat the SteamCraft 5.1, run a brief cooking cycle with no food in the cooking compartment. This heats the compartment to cooking temperature, and brings all steaming functions to full capacity before cooking begins. Preheating is performed: • At the beginning of a shift to prepare the steamer for operation. • Before cooking in either mode, to bring the cooking compartment up to
cooking temperature. • Between cooking batches to maintain cooking temperature in the compartment.
Page 48 Model 21 -CET-16 Service Manual
Preheat the SteamCraft 5.1 by the following procedure.
1. BEFORE PREHEATING, inspect and clean the compartment. After preheating, the compartment will be too hot to inspect and clean safely- Refer to Inspect the Cooking Compartment on page 47.
2. Check the control panel settings.
• The ON/OFF switch is in the ON (top) position. • The TIMED/MANUAL switch is in the TIMED position.
• The timer dial points to 0. 3. If the timer is not zeroed (0), turn the dial counterclockwise until it points to 0.
4. Set the timer for ten minutes by turning the dial clockwise until it points to the 10 minute mark- The timer begins counting down when the dial is released.
5. When the dial turns back to zero, a buzzer sounds for 3 seconds. Preheat is now complete. The SteamCraft 5.1 steam generating functions are at full capacity, and the cooking compartment is at proper cooking temperature. Steam cooking can begin in either manual or timed modes.
CAUTION Steam leaks around the door, cooking compartment flooding, reduced cooking performance, and compartment implosion can be caused by a blocked drain or drain screen. Inspect and dean the drain and drain screen before each use.
Operating Procedure - Timed Mode
In timed mode, the timer starts and stops the steaming operations, Use the timed mode for unattended cooking for a specific amount of time, 1. Refer to Inspect the Cooking Compartment on page 47- Inspect and clean the
drain and cooking compartment as required,
2. Refer to Preheating the SteamCraft 5.1, on page 47, and preheat the cooking compartment.
CAUTION Some foods drip juices. Use a solid catch pan under perforated pans when steaming food that will drip juices. Failure to use a catch pan can cause a dogged drain.
3. Put food into the pans and slide the pans into the slide racks inside the steamer. Do not place pans or anything else on the bottom of the compartment.

Model 21-CET-16 Service Manual Page 49
• When cooking foods that will drip, such as meat, poultry, or fish, put a solid catch pan in the bottom slide of the racks.
* For best cooking results, use shallow, 2-1/2 inch deep, perforated pans without covers (Cleveland Range model number PP-2.5). These give the best heat transfer and shortest cooking time.
4. Close the steamer door. Select the timed mode by pressing the TIMED end of the TIMED/MANUAL rocker switch.
5. Check the control panel settings.
• The ON/OFF switch is in the ON (top) position.
• The TIMED/MANUAL switch is in the TIMED (top) position.
• The timer dial points to 0. 6. Set the required cooking time by turning the rimer dial clockwise until it points
to the right time mark. When the time is set. the steam generator begins heating the water to steam. Shortly, steam fills the cooking compartment
7. When the dial points to zero, a buzzer sounds for 3 seconds, the generator stops steaming, and steam flow to the cooking compartment gradually stops. The cooking cycle is complete.
WARNING SEVERE BURNS may result from exposure to steam. Do not open the steamer door before steam flow stops. Stand back when opening the compartment door. Open the door slightly to allow steam to vent before looking or reaching into cooking compartment Do not reach into cooking compartment until the steam has cleared. Do not reach into steamer or handle hot items without wearing heat-proof gloves. Wet or damp gloves conduct heat, and may cause bums when touching hot items.
8. Carefully open the cooking compartment door, and remove the pans from the slide racks.
• If the SteamCraft 5.1 will be used again in a few minutes, shut the door to maintain the cooking compartment temperature.
• If another use is not planned for more than half an hour, leave the cooking compartment door slightly open to reduce internal pressure while the steam condenses and the compartment cools.
• If the SteamCraft 5.1 is not being used again during this shift, perform the Power OFF and Shut Down and Cleaning Procedures.

Page 50 Model 21 -CET-16 Service Manual
Operating Procedure - Manual Mode
In manual mode the operator starts and stops the steaming operations. Use the manual cooking mode for • A continuous supply of steam. • Cooking times longer than the timer can measure (over 60 minutes). • Preheating the cooking compartment-
Manual Timer
Although the timer does not control steaming functions in manual mode, it can be used as a conventional cooking timer. The timer will count down the set period and sound the buzzer, but IT WILL NOT TURN OFF THE STEAM AFTER THE ALARM SOUNDS.
CAUTION Steam leaks around the door, cooking compartment flooding, reduced cooking performance, and compartment implosion can be caused by a blocked dram or drain screen. Inspect and dean the drain and drain screen before each use.
Manual Cooking Procedure
Follow this procedure when cooking with the SteamCraft 5.1 in manual mode. 1. Refer to Inspect the Cooking Compartment on page 47. Inspect and dean
the drain and cooking compartment as required. 2. Refer to Preheating the SteamCraft 5.1, on page 47, and preheat the
cooking compartment
CAUTION Some foods drip juices. Use a solid catch pan under perforated pans where steaming food that will drip juices. Failure to use a catch pan can cause a dogged drain.
3. Put food into the pans and slide the pans into the slide racks inside the steamer. Do not place pans or anything else on the bottom of the compartment. • When cooking foods that will drip, such as meat, poultry, or fish, put a solid catch pan in the bottom slide of the racks.

Model 21 -CET-16 Service Manual Page 51
• For best cooking results, use shallow, 2-1/2 inch deep, perforated pans without covers (Cleveland Range model number PP-2.5). These give the best heat transfer and shortest cooking time.
4. Close the steamer door and start manual mode steaming by pressing the MANUAL (bottom) end of the TIMED/MANUAL switch.
• The steam generator begins hearing the water to steam. • Steam fills the cooking compartment and begins cooking the food.
5. If the timer is used as a conventional kitchen timer:
a. Set the required cooking time by turning the timer dial clockwise until it points to the correct time mark. b. When the dial points to zero, a buzzer sounds for 3 seconds. The cooking time is complete. Remember, in manual mode, the timer does not stop the steaming functions.
6. To stop manual mode steaming, press the TIMED (top) end of the TIMED/MANUAL rocker switch, and turn the timer dial to the 0 mark. The controls will now be set so:
• The ON/OFF switch is in the ON (top) position.
• The TIMED/MANUAL switch is in the TIMED (top) position.
• The timer dial points to 0. The generator stops steaming, and steam flow to the cooking compartment gradually stops.
WARNING SEVERE BURNS may result from exposure to steam. Do not open the steamer door before steam flow stops. Stand back when opening the compartment door. Open the door slightly to allow steam to vent before looking or reaching into cooking compartment Do not reach into cooking compartment until the steam has cleared. Do not reach into steamer or handle hot items without wearing heat-proof gloves. Wet or damp gloves conduct heat, and may cause burns when touching hot items.
7. Carefully open the cooking compartment door, and remove the pans from the slide racks.
• If the SteamCraft 5-1 will be used again in a few minutes, shut the door to maintain the cooking compartment temperature.

Page 52 Model 21 -CET-16 Service Manual
• If another use is not planned for more than half an hour, leave the cooking compartment door slightly open to reduce internal pressure while the steam is condensing and cooling.
• If the SteamCraft 5.1 is not being used again during this shift, perform the Power OFF and Shut Down and Cleaning Procedures-
Power OFF (Automatic Blowdown)
Blowdown occurs automatically when the unit is tamed off at the ON/OFF switch. During blowdown, the steam generator and float control are rinsed with fresh water, flushing deposits from the hearing elements and generator bottom. Blowdown at frequent intervals helps decrease mineral buildup in the steam generator, and reduces the frequency of descaling and other maintenance.
Blowdown Frequency
The supply water quality determines how often blowdown must be performed. The higher the feed water TDS and particulates, the more frequently blowdown must be performed. Refer to Table 2-2. Minimum Supply Water Quality on page 7. If the local water supply meets the minimum supply water quality standards, observe the following guidelines to establish proper blowdown scheduling, and maintain warranty coverage.
• For units without a SteamerGard water treatment system, blowdown must be performed after every 4 hours of operation and at the end of each shift as specified in the Shut Down and Cleaning, procedure.
• For units with a SteamerGard water treatment system, blowdown must be performed after each shift as specified in the Shut Down and Cleaning procedure.
Blowdown Procedure
When the SteamCraft 5.1 is turned off, the blowdown cycle starts and runs automatically. The complete cycle takes approximately 3 minutes.
1. Press the OFF (bottom) end of the ON/OFF switch to turn off the SteamCraft 5.1. The red indicator on the ON/OFF switch turns off Do not turn power off at the main power switch during blowdown.
2. Automatically, the drain valve begins to draw water from the steam generator.
3. The fill and drain valves operate simultaneously for 3 minutes.
4. At the end of the 3-minute blowdown cycle, the fill valve closes. 5. When blowdown is complete, the SteamCraft 5.1 can be restarted, or
the shut down procedure completed.
• To restart the unit, Power ON (Automatic Fill) on page 46.
• To shut down the unit, refer to Shut Down and Cleaning, below.

Model 21 -CET-16 Service Manual Page 53
Shut Down and Cleaning (At end of day or shift) This procedure must be performed at the end of each day or shift to maintain
warranty coverage. 1. Refer to Power OFF (Automatic Blowdown), and turn off the Steam-Craft 5.1.
Allow 3 minutes for complete blowdown cycle.
2. Open the steamer door and allow steamer to cool.
WARNING Inside of steamer stays hot for a long time. Be careful when cleaning inside steamer compartment.
3. Remove the slide racks. Wash and rinse racks separately or clean them in a dishwasher according to health requirements. Do not remove the drain screen.
4. Remove any spilled food from inside compartment and clear am residue from the drain screen, Clean the interior of the compartment thoroughly. Use a soft bristle brush to remove stubborn food particles. Do not use abrasive cleaning compounds or steel wool. Rinse inside of steamer compartment with dean water.
WARNING Let rinse water drain through compartment drain opening. If water does not drain freely, drain lines must be cleaned before cooking again. Clogged or slow drains are dangerous because hot water can collect in compartment and spill out when opening compartment door.
Figure 3-10. Door Gasket Assembly

Page 54 Model 21 -CET-16 Service Manual
5. Clean the door assembly
• Remove the door gasket assembly (see Figure 3-9). • Note the keyhole slots on the door and the retaining pins on the gasket
assembly. Grasp the gasket assembly at the sides and lift up and towards you to remove the assembly.
• Clean all surfaces of the gasket assembly, as well as the inside of the door, by wiping with a damp cloth.
• Replace the gasket assembly by sliding the retaining pins into the keyhole slots. Either long edge of the gasket assembly can be positioned at the top.
6. Replace the cleaned slide racks.
7. Wipe the exterior with a damp cloth only. NEVER HOSE DOWN THE STEAMER. Electrical components inside the unit will not function correctly if wet or damp.
8. After cleaning, leave the steamer door open until the next steamer operation. This prevents compartment odor buildup and increases gasket life.

Model 21-CET-16 Service Manual Page 55
CHAPTER 4. PREVENTATIVE MAINTENANCE AND TROUBLESHOOTING
INTRODUCTION Maintenance on the SteamCraft 5-1 must be performed on a regular basis to keep the unit running properly. Follow the maintenance instructions in this chapter and problems will be kept to a minimum. As with any preventative maintenance schedule, the frequency of steamer maintenance may need to be increased, depending on equipment usage and water quality. If problems do occur, refer to the Troubleshooting Guide in this chapter. For more information on product and services, contact your nearest authorized service representative. The inside rear cover of this manual lists service centers nationwide.
MAINTENANCE RECORDS Make a file solely for maintenance records. Keep a written record of daily, weekly, monthly, and yearly maintenance. These records will protect warranty coverage, help personnel to know when to perrons various maintenance procedures, and assist service personnel
DAILY MAINTENANCE Blowdown Steam Generator
Blowdown the steam generator at least every four hours according to steam generator blowdown instructions in Chapter 3. Clean SteamCraft 5.1 clean interior and exterior of the SteamCraft 5.1 according to shut down instructions in Chapter 3.
WEEKLY MAINTENANCE Clean Drain
CAUTION Steam leaks, pressure buildup in the cooking com-partment and poor steaming performance can be caused by a blocked drain fine or screen. Blocked or slow drains are dangerous because hot water can collect in the compartment and spill out when opening the compartment door.
The SteamCraft 5.1 is equipped with a drain screen in the back of the cooking compartment. Never operate the steamer without the screen in place. The screen prevents large food particles from entering and blocking the drain line. Any blockage of the drain line can cause a pressure buildup in the compartment, resulting in. steam leaks around the door gasket. Drain line blockage also adversely affects convection action of the steam in the compartment, which is necessary for optimum performance.
Page 56 Model 21 -CET-16 Service Manual
1. Inspect the drain screen and drain line for blockage. Rotate the drain screen 90 degrees to inspect the drain opening. Clean the opening and restore the screen to its operating position.
2. Clean drain with a USDA approved drain cleaner once a week. Follow the instructions of the manufacturer of the cleaner.
3. Rush drain with clean water.
MONTHLY MAINTENANCE Descale Steam Generator
Steam generator should be descaled at least once a month, depending on scale buildup. If you have serious steam generator scale buildup, install a water treatment system for the steamer. Cleveland Range, Inc. recommends use of the descaling kit, part number 104394, which consists of liquid phosphoric add. Full descaling may take several hours, or more than one acid process. Perform descaling until all scale buildup is cleaned out. Do not use powdered sulphonic acid descaling material, old pan number 101751.
Follow hazard and leak cleanup procedures on acid container label. If the label is not readable or has been removed, refer to the following hazard and emergency instructions as a minimum safety precaution.
THESE INSTRUCTIONS ARE FOR USE WITH PHOSPHORIC ACID ONLY. • Health Hazard Data, Effects of Overexposure - Product is extremely
irritating to the eyes and may result in eye burns. Product is severely irritating to skin and can result in skin burns; repeated or prolonged contact with more dilute solutions may result in dermatitis. Aerosol mist or vapors are irritating to respiratory tract, eyes and throat.Prolonged exposure to high concentration may result in pulmonary edema. If ingested, may result in abdominal hemorrhage with severe abdominal pain, nausea, vomiting or loss of consciousness; necrosis of stomach and gastrointestinal tract may also occur.
• Emergency and First Aid Procedures - In case of eye contact, immediately flush eyes with plenty of water for at least 15 minutes. Seek medical aid. In case of skin contact immediately wash with soap and plenty of water for at least 15 minutes while removing contaminated clothing. Seek medical aid. If inhaled, remove to fresh air. If not breathing, give artificial respiration. If breathing is difficult, give oxygen. Seek medical aid. If swallowed, do not induce vomiting. Give large quantities of water. Seek medical aid. Never give anything by mouth to an unconscious person.
• Spill or Leak Procedures - Contain spill. Cover the contaminated surface with sodium bicarbonate or a soda ash-slaked lime mixture (50-50). Mix and add water if necessary to form slurry. Scoop up slurry and wash residue down drain with excess water. Wash site with soda ash solution.
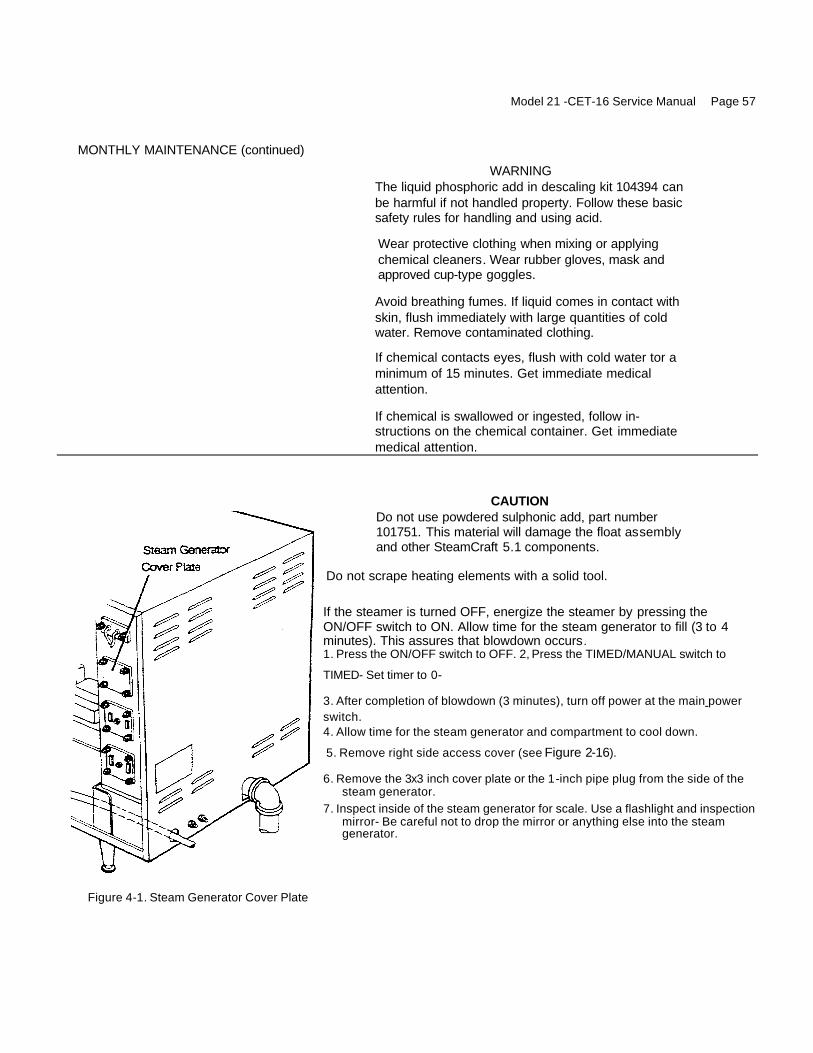
Model 21 -CET-16 Service Manual Page 57
MONTHLY MAINTENANCE (continued)
WARNING The liquid phosphoric add in descaling kit 104394 can be harmful if not handled property. Follow these basic safety rules for handling and using acid.
Wear protective clothing when mixing or applying chemical cleaners. Wear rubber gloves, mask and approved cup-type goggles.
Avoid breathing fumes. If liquid comes in contact with skin, flush immediately with large quantities of cold water. Remove contaminated clothing.
If chemical contacts eyes, flush with cold water tor a minimum of 15 minutes. Get immediate medical attention.
If chemical is swallowed or ingested, follow in-structions on the chemical container. Get immediate medical attention.
CAUTION Do not use powdered sulphonic add, part number 101751. This material will damage the float assembly and other SteamCraft 5.1 components.
Do not scrape heating elements with a solid tool.
If the steamer is turned OFF, energize the steamer by pressing the ON/OFF switch to ON. Allow time for the steam generator to fill (3 to 4 minutes). This assures that blowdown occurs. 1. Press the ON/OFF switch to OFF. 2, Press the TIMED/MANUAL switch to
TIMED- Set timer to 0-
3. After completion of blowdown (3 minutes), turn off power at the main power switch. 4. Allow time for the steam generator and compartment to cool down.
5. Remove right side access cover (see Figure 2-16).
6. Remove the 3x3 inch cover plate or the 1-inch pipe plug from the side of the steam generator.
7. Inspect inside of the steam generator for scale. Use a flashlight and inspection mirror- Be careful not to drop the mirror or anything else into the steam generator.
Figure 4-1. Steam Generator Cover Plate

Page 58 Model 21 -CET-16 Service Manual
WARNING DEATH, BURNS, OR ELECTRIC SHOCK can occur by touching electrical components and wires inside the access cover when the main power switch is in the on position. Use extreme caution when performing this procedure.
8. Turn the main power switch to the on position, check that water supply valves are open, and turn the steamer on by pressing the ON/OFF switch to ON. The red switch indicator turns ON and the generator begins to fill.
9. When the steam generator stops filling, pour 2 or 3 cups of phosphoric acid into the water in the steam generator.
10. Check that the water level is above scale buildup. Add water until water covers all scale.
11. Energize heater by pressing the TIMED/MANUAL switch to the MANUAL position. Allow water to heat to 140 to 160 degrees.
12. When water heats to 140 to 160 degrees, turn OFF the heater by pressing the TIMED/MANUAL switch to TIMED. Leave the ON/OFF switch ON. A bubbling and hissing sound indicates that the add is dissolving the scale.
13- Leave acid in the steam generator for at least 1-1/2 hours. Full descaling may take several hours, depending upon the amount of scale buildup. If add is consumed (bubbling and hissing stops), add one or two more cups of add to the steam generator solution. NOTE: If steam generator is too full to add more add, press the
ON/OFF switch to OFF for a few seconds to drain some solution- Then press ON/OFF switch back ON.
14. After the time listed in step 13 elapses, switch the ON/OFF switch to OFF, thus starting the steam generator drain and blowdown.
15. Inspect the steam generator as described in step 7. If scale is com-pletely removed, go to step 16, otherwise repeat steps 7 through 15 until all scale is removed.
16. Refill the steam generator with cold water. Press the TIMED/MANUAL switch to the TIMED position and press the ON/OFF switch to ON. 17. Add three or four tablespoons of baking soda to the water to neutralize any remaining add. 18. Replace the cover plate or pipe plug and secure the right side access
cover with the two screws.
19. Set timer for 10 minutes.
20. At the end of the timed cycle, the buzzer sounds and the unit stops steaming.
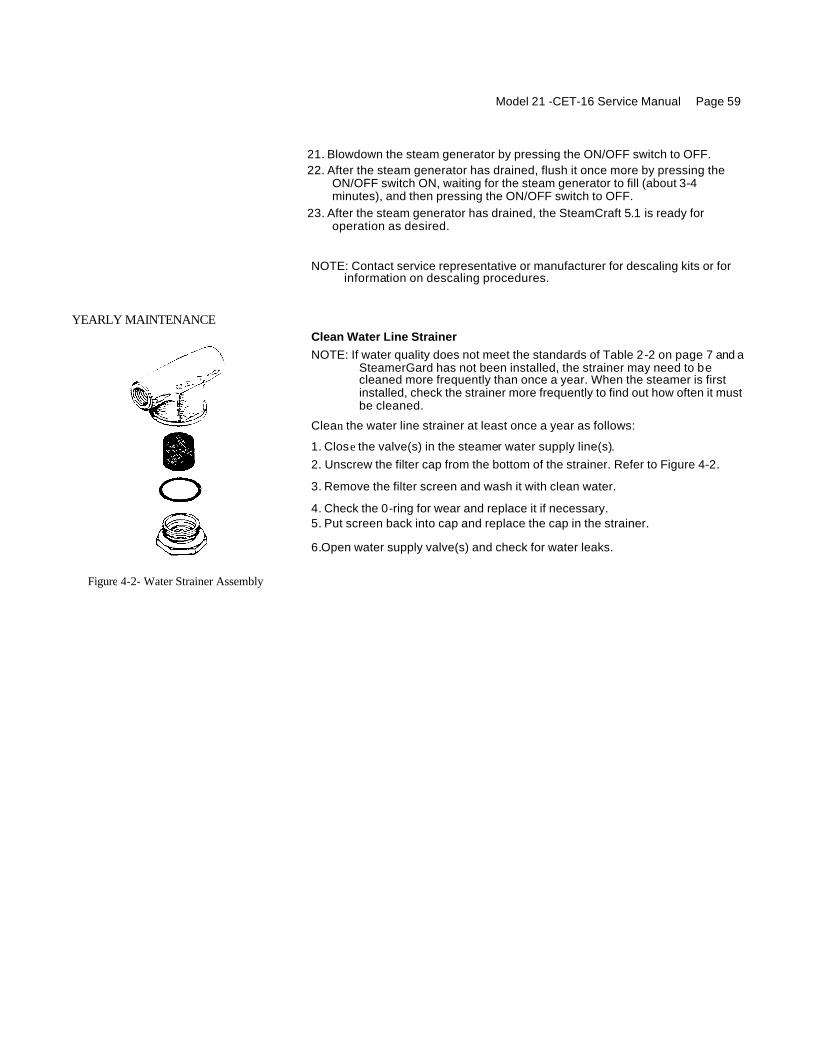
Model 21 -CET-16 Service Manual Page 59
21. Blowdown the steam generator by pressing the ON/OFF switch to OFF. 22. After the steam generator has drained, flush it once more by pressing the
ON/OFF switch ON, waiting for the steam generator to fill (about 3-4 minutes), and then pressing the ON/OFF switch to OFF.
23. After the steam generator has drained, the SteamCraft 5.1 is ready for operation as desired.
NOTE: Contact service representative or manufacturer for descaling kits or for information on descaling procedures.
YEARLY MAINTENANCE
Figure 4-2- Water Strainer Assembly
Clean Water Line Strainer NOTE: If water quality does not meet the standards of Table 2-2 on page 7 and a
SteamerGard has not been installed, the strainer may need to be cleaned more frequently than once a year. When the steamer is first installed, check the strainer more frequently to find out how often it must be cleaned.
Clean the water line strainer at least once a year as follows:
1. Close the valve(s) in the steamer water supply line(s). 2. Unscrew the filter cap from the bottom of the strainer. Refer to Figure 4-2.
3. Remove the filter screen and wash it with clean water.
4. Check the 0-ring for wear and replace it if necessary. 5. Put screen back into cap and replace the cap in the strainer.
6.Open water supply valve(s) and check for water leaks.

Page 60 Model 21-CET-16 Service Manual
OPERATOR'S TROUBLESHOOTING GUIDE This troubleshooting guide includes a list of symptoms that may be encountered during routine operation and maintenance. The first column on the left (problem) describes these symptoms. The second column lists possible causes for the problem listed in column one. The third column lists remedies and or references for the problems and causes in columns one and two. The causes and remedies are listed in the order they should be
checked, with the least costly and easiest to repair listed first. The third column also refers to notes that are grouped at the end of the troubleshooting guide. Refer to these notes when instructed to do so. Do not try to correct a problem that requires an authorized service representative as this may adversely affect warranty coverage.
PROBLEM POSSIBLE CAUSE REMEDY/REFERENCE
Switch light does not turn on when ON/OFF switch is pressed on.
Power turned off at main power switch.
Turn on power at main power switch.
Water supply to steamer shut off. Open water supply valves.
Water line strainer is dogged. Clean water supply strainer.
ON/OFF switch light on and steamer does not make any steam in manual or timed mode.
Inoperative controls or solenoid. See note #1.
Hot water instead of cold water connected to condenser fitting.
Make proper connections. See page 20.
Water supply to condenser turned off-
Open water supply valve.
Condenser water line strainer is clogged.
Clean out condenser water supply strainer.
Water supply line to the condenser blocked, broken, or leaking.
Repair or replace water supply line. See note #1.
Inoperative condenser solenoid- Replace solenoid. See note #1..
Abnormal amount of steam coming from drain.
Inoperative controls. Turn off electricity at main power switch. See note #1.
Drain clogged or covered. Clean drain with USDA approved drain cleaner.
Door gasket or door parts worn. See note #1.
Steam and/or water draining around compartment door.
Steamer not level. See note #2.
Operating in manual mode. Switch to timed mode for timer to be effective. Steam flow does not stop when timer stops.
Inoperative controls inside cabinet. Turn off electricity at main power switch. See note #1.
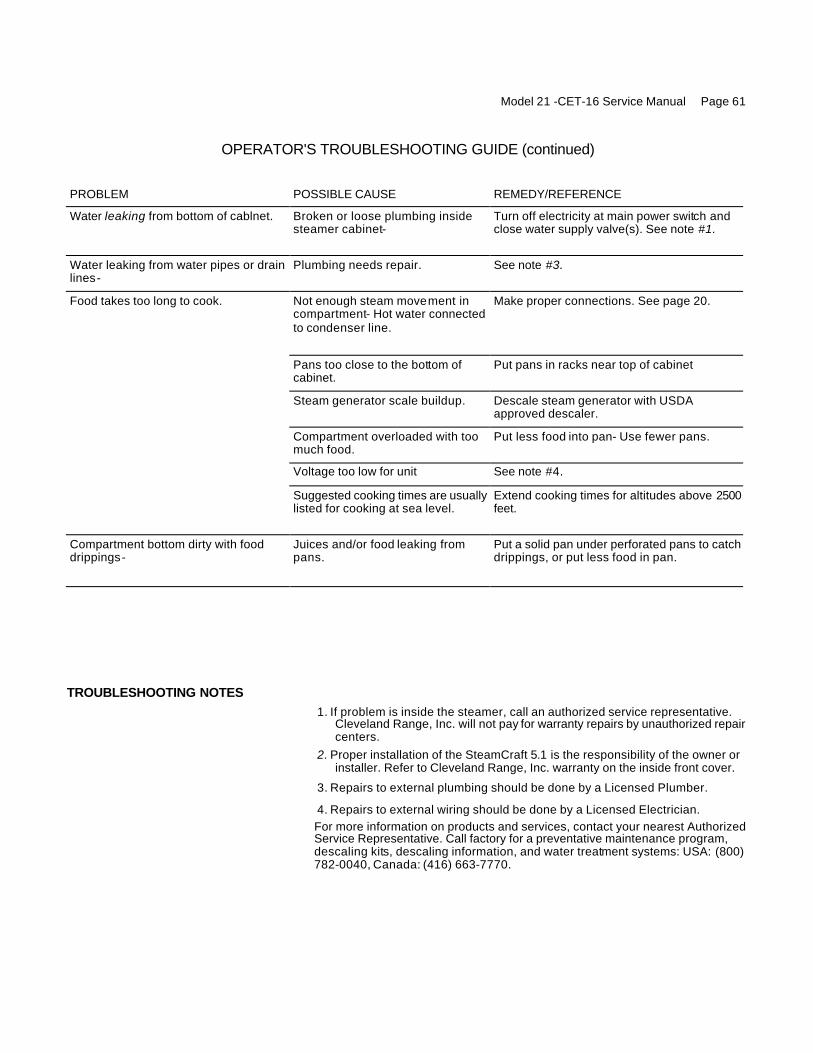
Model 21 -CET-16 Service Manual Page 61
OPERATOR'S TROUBLESHOOTING GUIDE (continued)
PROBLEM POSSIBLE CAUSE REMEDY/REFERENCE
Water leaking from bottom of cablnet. Broken or loose plumbing inside steamer cabinet-
Turn off electricity at main power switch and close water supply valve(s). See note #1.
Water leaking from water pipes or drain lines-
Plumbing needs repair. See note #3.
Not enough steam movement in compartment- Hot water connected to condenser line.
Make proper connections. See page 20.
Pans too close to the bottom of cabinet.
Put pans in racks near top of cabinet
Steam generator scale buildup. Descale steam generator with USDA approved descaler.
Compartment overloaded with too much food.
Put less food into pan- Use fewer pans.
Voltage too low for unit See note #4.
Food takes too long to cook.
Suggested cooking times are usually listed for cooking at sea level.
Extend cooking times for altitudes above 2500 feet.
Compartment bottom dirty with food drippings-
Juices and/or food leaking from pans.
Put a solid pan under perforated pans to catch drippings, or put less food in pan.
TROUBLESHOOTING NOTES
1. If problem is inside the steamer, call an authorized service representative. Cleveland Range, Inc. will not pay for warranty repairs by unauthorized repair centers.
2. Proper installation of the SteamCraft 5.1 is the responsibility of the owner or installer. Refer to Cleveland Range, Inc. warranty on the inside front cover.
3. Repairs to external plumbing should be done by a Licensed Plumber.
4. Repairs to external wiring should be done by a Licensed Electrician. For more information on products and services, contact your nearest Authorized Service Representative. Call factory for a preventative maintenance program, descaling kits, descaling information, and water treatment systems: USA: (800) 782-0040, Canada: (416) 663-7770.

Model 21 -CET-16 Service Manual Page 63
CHAPTER 5. ELECTRICAL SYSTEM
INTRODUCTION This chapter is exclusively for Cleveland Range authorized service repre-sentatives. These representatives should be experienced in the service, repair and maintenance of food service equipment in general, and with Cleveland Range equipment specifically. The service representative most thoroughly understand Chapters 1 through 4 of this manual before applying any of the information or instructions in this chapter. This chapter includes:
• An overview of the SteamCraft 5-1 electrical circuits
• Functional Block Diagrams
• A detailed description of circuit operations
• A functional description of the major components
• A guide for testing the major components
Figures And Illustrations Most illustrations in this chapter are on the same page or near the text in which they are first referenced. However, the Electrical Schematics and Wiring Diagrams arc included with the other service drawings in Chapter 6. These electrical drawings are Figures 6-14 through 6-17.
STEAMCRAFT 5.1 ELECTRICAL CIRCUITS
There are two parts to the SteamCraft 5.1 circuitry: the high voltage circuits and the 120 VAC circuits. In the electronic key pad units, a 24 VAC circuit powers the timer.
High Voltage Circuit The high voltage circuit draws power directly from the external supply lines to power the heater elements, the dryer element, and the primary of the transformer. The high voltage value depends on local supply line voltage. The required characteristics of the external power supply are listed on the Product Identification Plate, as described in Chapter 1.
While the main power switch is ON, Iine power energizes the primary of the transformer through 2-amp fuses. When the control circuits call for operation. contacts of the heater contactor close to power the heater elements .
120 VAC Circuit The transformer secondary supplies power to the 120 VAC components through the ON/OFF switch. The 120 VAC components include:
• Fill Solenoid Valve • Healer Contactor
• Condenser Solenoid Valve • Relay K1
• Rinse Solenoid Valve • Timer control circuits
• Drain Solenoid Valve • 3-minute timer
Float assembly switches, the timer, and the TIMED/MANUAL switch control operation of the 120 VAC components.

Page 64 Model 21-CET-16 Service Manual
Timer Circuits SteamCraft 5.1.'s come with either of two types of timer control circuits, electronic key pad or mechanical dial • In units with the electronic key pad timer, a 24 VAC transformer supplies control power to
the timer. The compartment thermal switch prevents countdown of the timer until the temperature in the compartment rises above 190°F. A buzzer in the timer panel signals the end of the cooking cycle.
• Units with the mechanical dial timer use a separate 3-second timer and buzzer to signal the end of the cooking cycle.
CIRCUIT OPERATION This section describes circuit operation during a typical steaming cycle in manual,
mode. The circuit operations specific to timed mode are also explained. For clarity while reading the description, refer to the block diagrams, Figure 5-1 or 5-2, and the schematic and wiring diagrams in Chapter 6.
MANUAL Mode Circuit Operation
Before starting the manual mode steaming cycle, the SteamCraft 5.1 controls are set as follows.
• The main power switch is in the ON position.
• The water supply valves to the unit are open.
• The ON/OFF switch is in the OFF position.
• The TIMED/MANUAL switch is in the MANUAL position.
• The timer is set to 0. With these control settings, the SteamCraft 5.1 component conditions are as follows.
• The steam generator is empty.
• The water fin, condenser, and rinse solenoid valves are closed.
• The dram solenoid valve is open.
• The high level float switch is closed.
• The low level float switch is open.
• The high temperature limit switch is dosed.
• The compartment thermal switch is open (key pad units only). With the TIMED/MANUAL switch in the MANUAL position, the ON/OFF switch controls power to the operating circuits. Switching the ON/OFF switch to the ON position:
1. Energizes the red indicator on the ON/OFF switch. 2. Provides power to one side of the condenser and drain solenoids, beater
contactor, and the TIMED/MANUAL switch. With this switch in the MANUAL position, component operation is controlled by the action of the float switches, which open and dose as the generator water level fluctuates.

Model 21 -CET-16 Service Manual Page 65
Figure 5-1. Block Diagram - Key Pad Control Panel

Page 66 Model 21 -CET-16 Service Manual
Figure 5-2. Stock Diagram - Dial Tuner Control Panel

TIMED Mode Circuit Operation
Model 21 -CET-16 Service Manual Page 67
3. Provides power to relay K1.
Contacts of relay K1 dose to energize the dram solenoid and open the drain valve. Another set of relay K1 contacts close to supply power to the fill solenoid valve through the high level switch of the float. The fill valve opens to fill the steam generator.
4a. (Electronic key pad timer units only) Supplies power to one side of the condenser solenoid and heater contactor.
After approximately 15 minutes, the water level rises to cover the heater elements. The float low level switch doses and completes the circuit to energize the condenser solenoid and heater contactor. The contactor doses its contacts to supply line power to the heater and dryer elements. The unit begins to heat the water in the generator.
4b. (Mechanical timer units only) Completes the circuit to the condenser solenoid. The condenser valve doses and supplies water flow to cool the steam-water drainage from the steamer compartment.
After approximately 1.5 minutes, the water level rises to cover the heater elements. The float low level switch doses and completes the circuit to energize the healer contactor. The contactor doses its contacts to supply line power to the heater and dryer elements. The unit begins to heat the water in the generator.
5. The water level in the generator continues to rise until the float high level switch opens. This opens the circuit to the fin solenoid The fill valve doses and the generator stops filling. After 4 to 5 minutes, the generator produces steam, and the water level in the generator drops As the water level drops, the high level float doses the high level switch The high level switch reenergizes the fill solenoid. The float and high level switch cycle the fill valve to maintain the proper water level for steaming.
The heater remains energized and the unit continuously produces steam until the operator sets the TIMED/MANUAL switch to TIMED or turns the steamer OFF with the ON/OFF switch • Circuit operations with the TIMED/MANUAL switch set to TIMED are described in the
TIMED Mode Circuit Operations section
• Circuit operations with the ON\OFF switch set to OFF are described in the Shutdown Circuit Operations section.
Circuit operations in timed mode are similar to those in MANUAL mode. The major difference between the two modes is control of the heater contactor and condenser solenoids. With the TIMED/MANUAL switch in the TIMED position, the timer circuits control power to the beater contactor and condenser solenoid There are differences between the timed mode circuit operations in units with key pad timers, and units with dial timers.
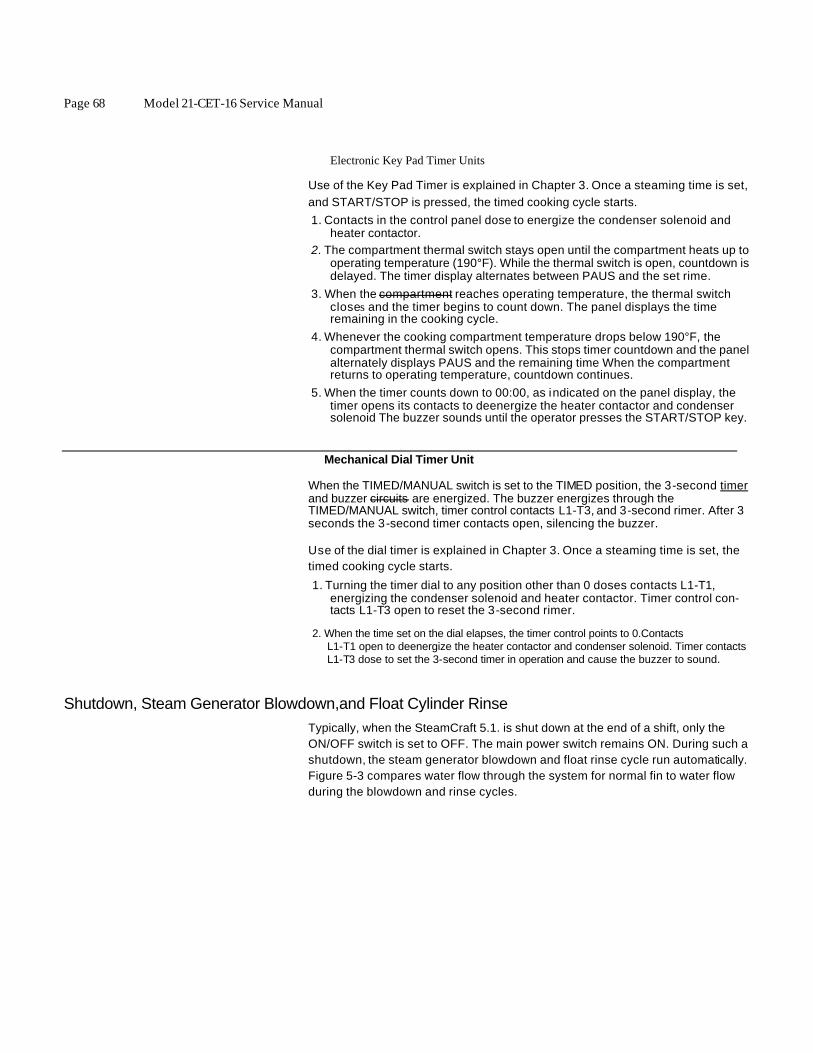
Page 68 Model 21-CET-16 Service Manual
Electronic Key Pad Timer Units
Use of the Key Pad Timer is explained in Chapter 3. Once a steaming time is set, and START/STOP is pressed, the timed cooking cycle starts. 1. Contacts in the control panel dose to energize the condenser solenoid and
heater contactor. 2. The compartment thermal switch stays open until the compartment heats up to
operating temperature (190°F). While the thermal switch is open, countdown is delayed. The timer display alternates between PAUS and the set rime.
3. When the compartment reaches operating temperature, the thermal switch closes and the timer begins to count down. The panel displays the time remaining in the cooking cycle.
4. Whenever the cooking compartment temperature drops below 190°F, the compartment thermal switch opens. This stops timer countdown and the panel alternately displays PAUS and the remaining time When the compartment returns to operating temperature, countdown continues.
5. When the timer counts down to 00:00, as indicated on the panel display, the timer opens its contacts to deenergize the heater contactor and condenser solenoid The buzzer sounds until the operator presses the START/STOP key.
Mechanical Dial Timer Unit
When the TIMED/MANUAL switch is set to the TIMED position, the 3-second timer and buzzer circuits are energized. The buzzer energizes through the TIMED/MANUAL switch, timer control contacts L1-T3, and 3-second rimer. After 3 seconds the 3-second timer contacts open, silencing the buzzer.
Use of the dial timer is explained in Chapter 3. Once a steaming time is set, the timed cooking cycle starts.
1. Turning the timer dial to any position other than 0 doses contacts L1-T1, energizing the condenser solenoid and heater contactor. Timer control con-tacts L1-T3 open to reset the 3-second rimer.
2. When the time set on the dial elapses, the timer control points to 0.Contacts L1-T1 open to deenergize the heater contactor and condenser solenoid. Timer contacts L1-T3 dose to set the 3-second timer in operation and cause the buzzer to sound.
Shutdown, Steam Generator Blowdown,and Float Cylinder Rinse Typically, when the SteamCraft 5.1. is shut down at the end of a shift, only the ON/OFF switch is set to OFF. The main power switch remains ON. During such a shutdown, the steam generator blowdown and float rinse cycle run automatically. Figure 5-3 compares water flow through the system for normal fin to water flow during the blowdown and rinse cycles.

Switching the ON/OFF switch to OFF removes power from most of the 120 VAC circuit components, and activates the 3-minute timer. The following circuit operations occur.
1. The transformer and high voltage circuits on the line side of the neater contactor remain energized.
2. The red indicator light on the ON/OFF switch turns OFF.

Page 70 Model 21 -CET-16 Service Manual
3. The condenser solenoid deenergizes, closing the condenser valve.
4. The drain solenoid deenergizes, opening the drain valve.
5. The 3-minute timer circuit is energized and the timer starts to count down. While the timer counts down, the blowdown and rinse cycles occur.
a. The fin solenoid is energized, opening the fin valve. This injects a high velocity water stream from the fin valve into the drain valve, causing rapid draining (blowdown) of the steam generator. Rapid draining causes turbulence in the generator to mix and remove bottom sediments with the drain water.
b. The rinse solenoid is energized, opening the rinse valve. The rinse valve injects water into the top of the float cylinder. Rinse Bow through the cylinder flushes sediment that collects during operation.
c. The contacts of relay K1 open during blowdown/rinse. d. After the 3-minute timer counts down to zero, the timer opens the circuit to
the fin and rinse solenoids, closing these valves. The drain valve remains open to drain any residual water from the system.
ELECTRICAL CIRCUIT COMPONENTS
This section briefly describes the major SteamCraft 5-1 components and their functions. Refer to the drawings in Chapter 6 for the installation location, assembly details, and parts ordering information for each of these components. The Chapter 6 figure and item number is included for each component described in this section.
When servicing, repairing, or replacing any component, use only Cleveland Range authorized repair parts and procedures. Check that the repair part has the correct part number and is compatible with the power supply rating on the SteamCraft 5-1 Product Identification Plate (Chapter 1). Verify proper wiring connections of newly replaced parts before energizing the unit. Refer to the schematic and wiring diagrams on the unit or at the end of Chapter 6.
Terminal Block (4, Figure 6-7)
The terminal block provides connection points from the external electrical supply to the
steamer. The three-terminal block has connections to the transformer and heater contactor.
Heater Element (4, Figure 6-9)
The heater assemblies, located inside the generator near the bottom, come as three-coil elements. In this text, beater element refers to a complete heater assembly. Heater coil refers to each of the three coils in each heater assembly. For proper operation of the SteamCraft5.1, the rating of the healer element must match the external supply voltage.

Model 21 -CET-16 Service Manual Page 71
The heater coils, connected in a delta configuration, provide 8-kW heating power. Each heater coil supplies one third of this power (2.67 kW). Table 5-1 lists electrical characteristics of elements supplied for various voltages.
Table 5-1. Steam Generator Heater Elements
PART NO. WATTS VOLTS OHMS/COIL +1-5%
103881 8000 208 16
1038811 8000 240 22
1038815 8000 380 54
1038812 8000 415 65
1038814 8000 480 86
The 300-W dryer element mounts inside the generator near the top. The dryer element eliminates any droplet carryover as the steam exits the generator. Carryover of small water droplets results in improper cooking and soggy food.Optimum steam convection cooking demands dry steam with no carryover. Carryover also erodes and enlarges the nozzle holes.
Table 5-2. Steam Generator Dryer Elements
PART NO. WATTS VOLTS OHMS +/-5%
104306 300 208 144
1043061 300 240 192
1043062 300 480 768
Some early SteamCraft 5.1 models use 500-watt dryer elements When needed, use 300-watt elements listed in Table 5-2 as replacements.
Fuses are located in fine between the terminal block and the main transformer. These fuses protect the steamer from damage in case of an overcurrent in the primary of the transformer. Overcurrent conditions may occur from a short in any of the 120 VAC components or wiring in the steamer. Moisture from leaky plumbing or hosedown of the steamer may be the cause. Fuses used in the SteamCraft 5-1 must be rated at 2 amps.
Power from the main transformer connects to the terminals of the double-
pole/double-throw ON/OFF switch. In the ON position, as shown in Figure 5-4, the. switch connects the center terminals to the bottom Terminals as viewed from the terminal side (rear) of the switch.
Dryer Element (7. Figure 6-8)
Fuses (8. Figure 6-7)
ON/OFF Switch (10, Figure 6-5)

Page 72 Model 21-CET-16 Service Manual
Setting the ON/OFF switch to ON supplies power to relay K1 and power to one side of the:
- heater contactor - heater condenser - fill solenoid - drain solenoid - rinse solenoid
These components can be activated by control components: - relay K1 - TIMED/MANUAL switch - timer control - high level float switch - low level float switch
• In units with the electronic key pad timer, the ON/OFF switch in the ON position supplies power to one side of the timer countdown circuits through the compartment thermal switch. The ON/OFF switch also supplies power to the 24-volt transformer which provides control power to the keypad timer.
• In units with the mechanical dial timer, the ON/OFF switch set to ON supplies power to one side of the 3-second timer and buzzer for operation by the timer control.
Setting the ON/OFF switch to OFF removes power from the 120 VAC components that control the steaming cycles, and starts the 3-minute timer circuit, which starts steam generator blowdown and float cylinder rinse.
Setting the ON/OFF switch to ON supplies power to the center terminals of the TIMED/MANUAL switch. In the TIMED position (Figure 5-5), the TIMED/MANUAL switch energizes the timer control circuit. In the MANUAL position, the TIMED/MANUAL switch energizes the heater contactor and condenser solenoid, unless either the float low level switch or the high temperature limit switch is open, • When electronic key pad units are in MANUAL mode, the opening of either the
float low level switch or the high temperature limit switch interrupts power to the condenser solenoid and heater contactor.
• When mechanical timer units are in MANUAL mode, the opening of either the float low level switch or the high temperature limit switch interrupts power to the heater contactor only; the condenser solenoid remains energized.
Setting the ON/OFF switch to ON energizes relay K1 closing the contacts of the relay. This energizes the drain solenoid closing the dram valve. Energizing relay K1 also energizes one side of the fin solenoid. The fin solenoid can be activated by the high level float switch.
Setting the ON/OFF switch to OFF deenergizes relay K1 opening its contacts. This prevents power from the 3-minnte timer circuit from energizing the drain solenoid, and closing the valve, daring generator blowdown.
Model 21-CET-16 Service Manual Page 73
During shutdown, the 3-minute timer controls the fin and rinse solenoids. Setting the ON/OFF switch to OFF starts the 3-minute timer and energizes timer terminals 2-3. The timer contacts dose, opening the fill valve for steam generator blowdown and the rinse valve to flush the float cylinder. After 3 minutes, the contacts of the timer open to remove power from the fill and rinse solenoids. closing the valves.
The rinse solenoid valve controls water flow to the float cylinder during general or blowdown. The rinse solenoid operates only with the ON/OFF switch in the OFF position. The '3 minute timer controls operation of the rinse solenoid valve. Refer
to 3-minute timer text above.
During steaming operations, sediment collects in the float cylinder- Sediment build up in the cylinder impedes smooth operation of the floats as the water level rises and falls. The rinse flow flushes sediment from the cylinder that collects during operation. Without this rinse, sticky float operation will cause improper water levels, heater burnout, and other malfunctions and damage.
The drain solenoid valve controls water flow from the steam generator to the condenser. • Daring normal steaming operation, (ON/OFF in the ON position), the drain solenoid is
energized closing the drain valve. Water does not drain from the steam generator.
• At shutdown (ON/OFF switch OFF) the solenoid deenergizes, the valve opens, and the generator drains.
The En solenoid valve controls water flow into the steam generator. The valve opens and doses as the water level fluctuates in the float cylinder and generator. During steaming operations, the fin valve cycles approximately two to five times each minute. • While the water level in the float cylinder is below the upper limit, the high level float
switch is dosed. This energizes the solenoid, which opens the valve. • When the water level in the float cylinder reaches the upper limit the high level float
switch opens. This deenergizes the solenoid, which doses the valve.
The valve operates at a maximum water pressure of 60 psi. Higher pressures cause unnecessary valve w ear and require frequent valve replacement. If necessary, install a pressure regulator set at 50 psi.
3-Minute Timer (14, Figure 6-5)
Rinse Solenoid Valve (1, Figure 6-11)
Drain Solenoid Valve (4, Figure 6-12)
Fill Solenoid Valve (1, Figure 6-11)

Page 74 Model 21-CET-16 Service Manual
Condenser Solenoid Valve (1, Figure 6-11) The condenser solenoid valve controls cold water flow to the condenser tee at the bottom of
the unit The valve injects cold water into the condenser to cool the vapor and f luid draining from the steamer. This reduces pressure in the compartment drain. Low pressure in the drain maintains optimum performance of the steamer. With a hot or warm water supply connected to the condenser solenoid valve, the condenser WILL NOT function properly, and equipment damage may result.
The condenser solenoid valve energizes when the healer contactor energizes. The
condenser solenoid and heater contactor energize through the TIMED/MANUAL switch.
• During manual operation (TIMED/MANUAL switch set to MANUAL), the condenser
solenoid and heater contactor energize directly through the TIMED/MANUAL switch.
• During timed operation (TIMED/MANUAL switch set to TIMED), the condenser solenoid
and heater contactor energize through the timer control.
• In units with an electronic key pad timer, setting the timer for more then 00:00 and pressing the START/STOP key energizes the condenser solenoid. When
the timer counts down to 00:00, timer contacts open to deenergize the solenoid
and open the valve. • In units with an mechanical dial timer, setting the dial to a time greater than doses contacts
L1-T1, energizing the solenoid. When the time elapses and the dial points to 0, timer
control contacts L1-T1 open to deenergize the condenser solenoid and open the valve.
Timer The timer controls the condenser solenoid and heater contactor during timed operation (the TIMED/MANUAL switch in the TIMED position). In timed mode, the timer starts and stops the SteamCraft 5.1 steaming cycle automatically. The timer circuit is slightly different for electronic key pad timers and dial timers
Electronic Key Pad Tuner (3, Figure 6-5) Operating the electronic keypad timer is
explained in Chapter 3. After setting the steaming time and pressing the START/STOP
key the steaming cycle starts
.
1. Contacts in the timer dose to energize the healer contactor and condenser solenoid.
2. While the compartment temperature is lower than 190°F, the timer pause circuit delays the countdown. PAUS and the set time alternately display on the panel.
3. When the compartment temperature rises above 190°F, the compartment thermal switch closes and the timer begins to count down, as indicated on the panel display.
4. When the timer counts down to 00:00, timer contacts open to deenergize the heater
contactor and condenser solenoid. The panel buzzer sounds to indicate the end of the
steaming cycle.
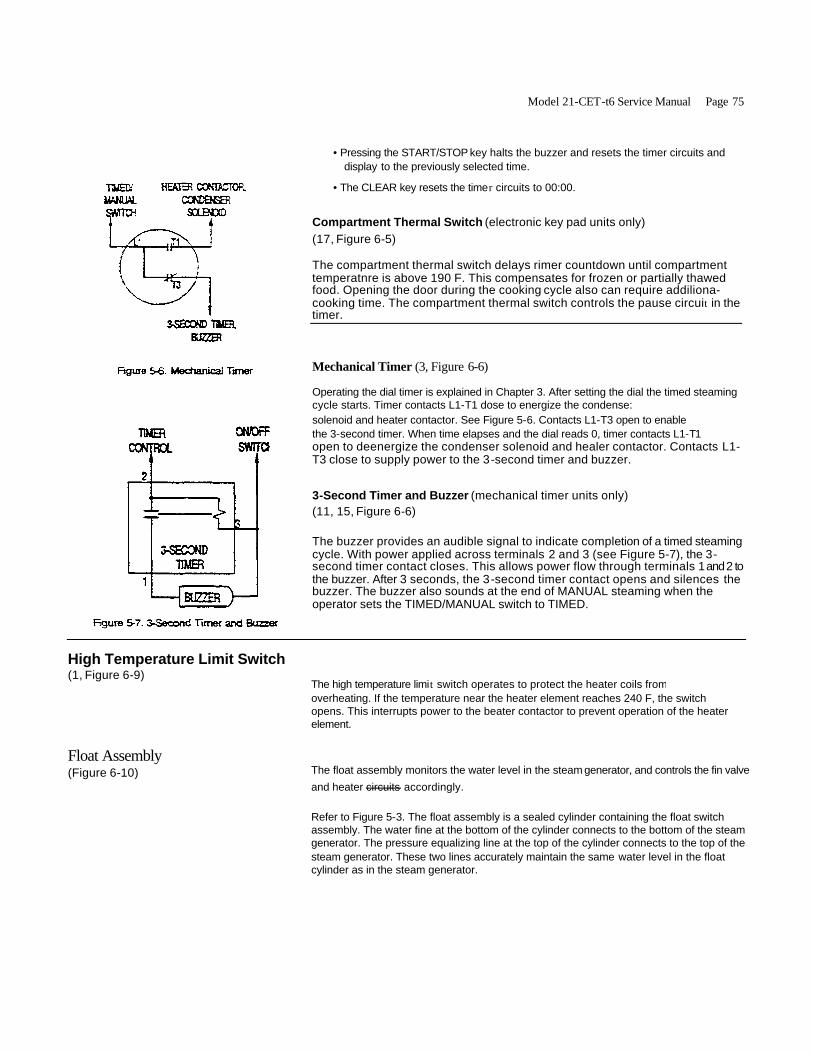
Model 21-CET-t6 Service Manual Page 75
• Pressing the START/STOP key halts the buzzer and resets the timer circuits and display to the previously selected time.
• The CLEAR key resets the timer circuits to 00:00.
Compartment Thermal Switch (electronic key pad units only) (17, Figure 6-5)
The compartment thermal switch delays rimer countdown until compartment temperatnre is above 190 F. This compensates for frozen or partially thawed food. Opening the door during the cooking cycle also can require addiliona-cooking time. The compartment thermal switch controls the pause circuit in the timer.
Mechanical Timer (3, Figure 6-6)
Operating the dial timer is explained in Chapter 3. After setting the dial the timed steaming cycle starts. Timer contacts L1-T1 dose to energize the condense: solenoid and heater contactor. See Figure 5-6. Contacts L1-T3 open to enable the 3-second timer. When time elapses and the dial reads 0, timer contacts L1-T1 open to deenergize the condenser solenoid and healer contactor. Contacts L1-T3 close to supply power to the 3-second timer and buzzer.
3-Second Timer and Buzzer (mechanical timer units only) (11, 15, Figure 6-6)
The buzzer provides an audible signal to indicate completion of a timed steaming cycle. With power applied across terminals 2 and 3 (see Figure 5-7), the 3-second timer contact closes. This allows power flow through terminals 1 and 2 to the buzzer. After 3 seconds, the 3-second timer contact opens and silences the buzzer. The buzzer also sounds at the end of MANUAL steaming when the operator sets the TIMED/MANUAL switch to TIMED.
High Temperature Limit Switch (1, Figure 6-9)
Float Assembly (Figure 6-10)
The high temperature limit switch operates to protect the heater coils from overheating. If the temperature near the heater element reaches 240 F, the switch opens. This interrupts power to the beater contactor to prevent operation of the heater element.
The float assembly monitors the water level in the steam generator, and controls the fin valve
and heater circuits accordingly.
Refer to Figure 5-3. The float assembly is a sealed cylinder containing the float switch assembly. The water fine at the bottom of the cylinder connects to the bottom of the steam generator. The pressure equalizing line at the top of the cylinder connects to the top of the steam generator. These two lines accurately maintain the same water level in the float cylinder as in the steam generator.
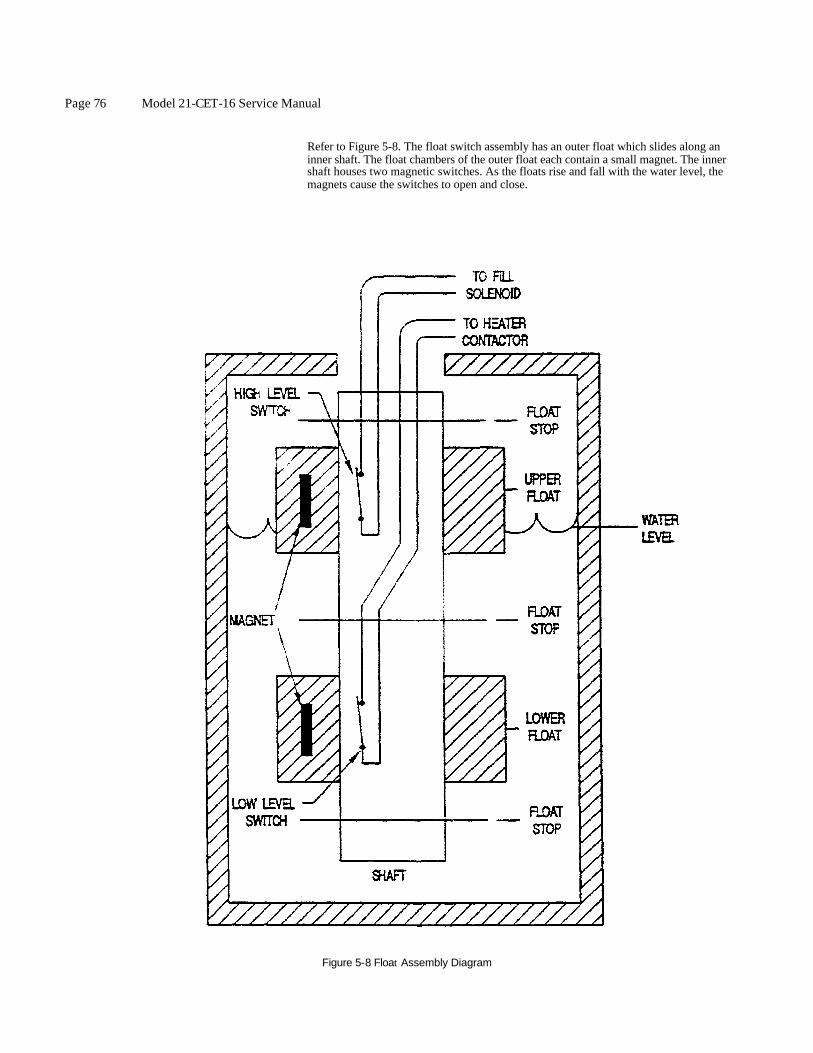
Page 76 Model 21-CET-16 Service Manual
Refer to Figure 5-8. The float switch assembly has an outer float which slides along an inner shaft. The float chambers of the outer float each contain a small magnet. The inner shaft houses two magnetic switches. As the floats rise and fall with the water level, the magnets cause the switches to open and close.
Figure 5-8 Float Assembly Diagram

Model 21-CET-16 Service Manual Page 77
The lower float magnet controls the low water level switch. When the water level in the generator rises to safely cover the hearer elements, the magnet closes the low water level switch to allow heater operation. During normal operation the low level switch remains dosed. If a malfunction occurs and water level decreases below a safe operating level, the lower float magnet opens the low water level switch to remove power from the heater contactor.
During steaming operations, the high level float switch operates to maintain the proper water level in the steam generator.
• While the upper float chamber is below the upper switch set point, the high level Boat switch, is dosed. While the switch is closed, water fills the generator.
• When the water level in the float cylinder raises the upper float chamber to the upper switch set point, the magnet in the upper chamber opens the high level switch. This shuts the fill valve and stops water flow into the generator.
COMPONENT TESTING GUIDE INTRODUCTION
The component testing guide helps qualified service personnel test SteamCraft 5.1. components and determine which are operating properly. By first identifying the systems that are operable, service personnel can quickly isolate malfunctions without unnecessary testing and component replacement. The guide has two sections:
• Fundamental Component Testing
• Component Test Procedures If components must be replaced, use only Cleveland Range authorized replacement parts to maintain complete warranty coverage.
Nominal Voltage Throughout the testing guide and instructions, the text uses 230 VAC as the typical or nominal voltage. Refer to the Product Identification Plate (Chapter 1). and determine the voltage characteristics of the SteamCraft 5.1. being serviced (i.e. 208 or 460 VAC). Use this voltage in place of the nominal voltage cited in the text.
FUNDAMENTAL COMPONENT TESTING
This section summarizes the fundamentals of testing SteamCraft 5.1. components. An occasional review of this material is advisable, even for the most experienced service representative. Keep the principles of this section in mind while testing and servicing the SteamCraft 5.1. and its components.
Visual Check Before starting any detailed troubleshooting, visually check the unit for obvious damage or other faults. Often malfunctions can quickly be isolated by inspecting for water Ieaks, loose connections, and burned or melted wiring insulation.

Page 78 Model 21-CET-16 Service Manual
Fuses If a fuse is blown and there is no other apparent damage, replace the fuse and try to start the unit. This blown fuse may be the only damage. Normal current flow through a fuse over time can weaken the fuse, eventually causing it to blow. If the replacement fuse blows immediately, some other trouble exists. The unit must then be thoroughly checked before trying to restart it.
Connection Points and Wiring Any component malfunction can result from loose connections or open wiring Be sure to check for these conditions before replacing any component.
Discoloration of wire insulation near connection points usually indicates loose connections. Current How through loose connections causes oxidation and increased resistance of the connection. The resistance can increase to a point where the connection can no longer dissipate the heat generated and the terminal burns.
High current connections, such as at the terminal block and contactor terminals.
are particularly susceptible to damage when loose. Using wire that is too small in diameter also yields the same results. Be sure that any wiring meets the amperage requirements of the circuit.
As connections should have no resistance and measure 0 VAC across them. Any voltage reading greater than 0 VAC across a connection indicates a faulty connection and must be corrected.
The SteamCraft 5.1 uses some pressure type connections. Be sure to tighten screw and nut connections securely and that threads are not cross threaded. Special care must be used to secure the high voltage contactor connections. If loose, these high current connections will bum or explode and cause extensive damage.
Solenoid Valves ATI solenoid valves in the SteamCraft 5.1. energize to open the valves. The solenoid energizes at a nominal 120 VAC. Power applied to a properly operating solenoid causes an audible click sound. While energized, the solenoid burns at low volume. The click sound usually indicates a properly operating valve. If water does not flow with the valve energized, check for a solenoid valve stuck dosed, clogged inlet or outlet in the valve body or in the plumbing external to the valve. Check that external supply valves are open. If water flows through the valve when the solenoid is deenergized, check for a stuck open valve, worn valve seat, or foreign material blocking valve closure.
When testing or replacing any solenoid valve, check the valve for correct flow direction. Markings on the valve body indicate IN for the inlet, OUT for the outlet, or both. Some valves may use an arrow to indicate the proper flow direction. Valves installed backwards will not work correctly.
Energized solenoids generate a magnetic field that can be detected with a steel screw driver. Note that some stainless steels, brass, and aluminum alloys are not magnetic and will not sense the magnetic field.

Model 21-CET-16 Service Manual Page 79
Low voltage, below about 90 VAC, will cause the solenoid to burn loudly or chatter. Check transformer secondary for 120 VAC nominal. Check for loose connections.
The resistance of a good solenoid coil measures about 600 ohms.
The SteamCraft 5-1 solenoid valves operate at a maximum pressure of 60 psi. Higher pressure causes unnecessary valve wear and requires frequent valve replacement. If necessary, install a pressure regulator set at 50 psi.
Timers If an electronic key pad timer or mechanical dial timer fink the SteamCraft 5.1 can usually be operated in MANUAL mode (TIMED/MANUAL switch set to MANUAL). This allows continued operation while waiting for a replacement timer.
The 3-minute timer (all units) and the 3-second timer (mechanical timer only) operate identically except for the time delay. When 120 VAC is applied across terminals 2-3 (INPUT), the timer circuits provide 120 VAC across terminals 1-3 (LOAD). When the time elapses (3 minutes or 3 seconds), the timer sets the LOAD terminals to 0 VAC.
A timer contains electronic components which work Eke a relay and contact. Refer to Figure 5-9. When the switch doses, the timing circuit (shown as a relay and contact) energizes. The timing circuit closes its contact to energize the solenoid. When the delay time of the timer elapses (3 minutes or 3 seconds), the timing circuit opens the contact and the solenoid deenergizes
A load must be connected to the LOAD terminals of the timer during testing. Use a spare solenoid or buzzer as the test load. Without a load connected to the LOAD terminals, the voltage across the LOAD terminals will read 120 VAC when the timer energizes and will remain at 120 VAC indefinitely.
Because the LOAD terminals remain energized only for a short time, connect the voltmeter across the LOAD terminals before energizing the timer and leave it connected during the test. Watch for the LOAD voltage to read 120 VAC when the timer energizes and 0 VAC at the end of the proper delay (3 minutes or 3 seconds).
Thermostatic Snap Switches Thermostatic snap switches, the high temperature limit switch that protects the heater elements and the compartment temperature thermal switch (electronic timer units only) can be tested by voltage or resistance measurements. Closed switches should always measure 0 ohms. Resistance of any open switches should always measure infinity.
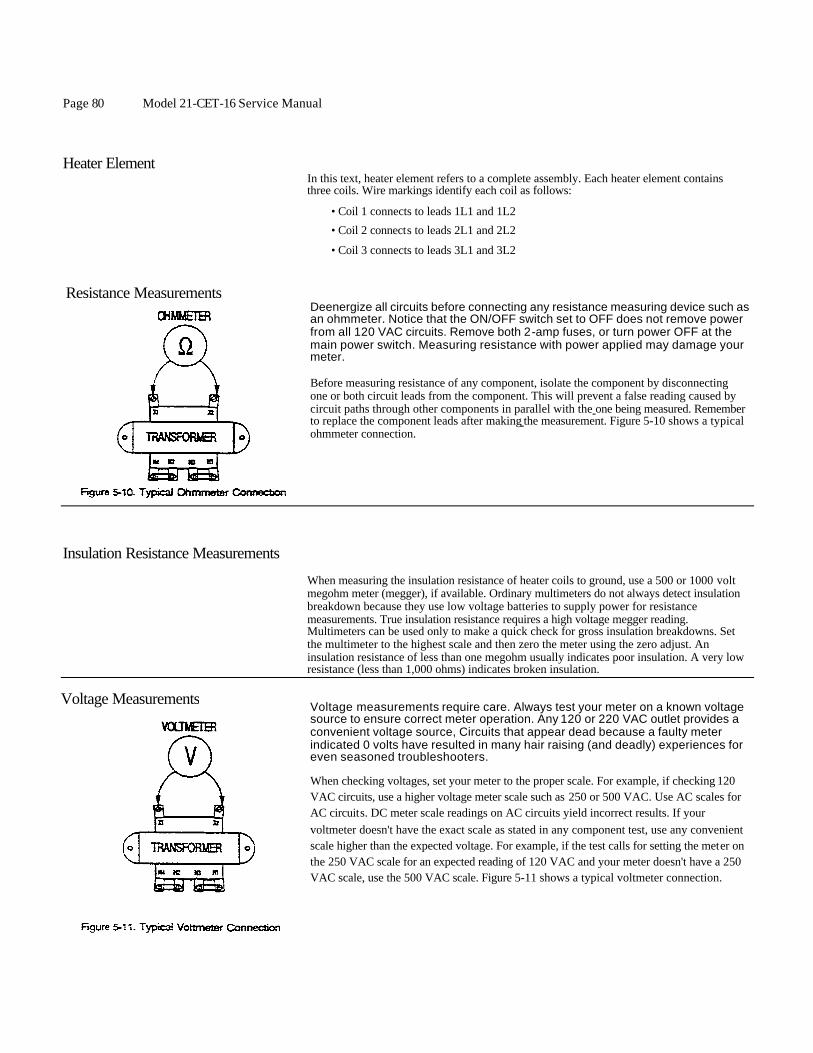
Page 80 Model 21-CET-16 Service Manual
Heater Element In this text, heater element refers to a complete assembly. Each heater element contains three coils. Wire markings identify each coil as follows:
• Coil 1 connects to leads 1L1 and 1L2
• Coil 2 connects to leads 2L1 and 2L2
• Coil 3 connects to leads 3L1 and 3L2
Resistance Measurements Deenergize all circuits before connecting any resistance measuring device such as an ohmmeter. Notice that the ON/OFF switch set to OFF does not remove power from all 120 VAC circuits. Remove both 2-amp fuses, or turn power OFF at the main power switch. Measuring resistance with power applied may damage your meter.
Before measuring resistance of any component, isolate the component by disconnecting one or both circuit leads from the component. This will prevent a false reading caused by circuit paths through other components in parallel with the one being measured. Remember to replace the component leads after making the measurement. Figure 5-10 shows a typical ohmmeter connection.
Insulation Resistance Measurements
When measuring the insulation resistance of heater coils to ground, use a 500 or 1000 volt megohm meter (megger), if available. Ordinary multimeters do not always detect insulation breakdown because they use low voltage batteries to supply power for resistance measurements. True insulation resistance requires a high voltage megger reading. Multimeters can be used only to make a quick check for gross insulation breakdowns. Set the multimeter to the highest scale and then zero the meter using the zero adjust. An insulation resistance of less than one megohm usually indicates poor insulation. A very low resistance (less than 1,000 ohms) indicates broken insulation.
Voltage Measurements
Voltage measurements require care. Always test your meter on a known voltage source to ensure correct meter operation. Any 120 or 220 VAC outlet provides a convenient voltage source, Circuits that appear dead because a faulty meter indicated 0 volts have resulted in many hair raising (and deadly) experiences for even seasoned troubleshooters.
When checking voltages, set your meter to the proper scale. For example, if checking 120 VAC circuits, use a higher voltage meter scale such as 250 or 500 VAC. Use AC scales for AC circuits. DC meter scale readings on AC circuits yield incorrect results. If your voltmeter doesn't have the exact scale as stated in any component test, use any convenient scale higher than the expected voltage. For example, if the test calls for setting the meter on the 250 VAC scale for an expected reading of 120 VAC and your meter doesn't have a 250 VAC scale, use the 500 VAC scale. Figure 5-11 shows a typical voltmeter connection.

Model 21-CET-16 Service Manual Page 81
COMPONENT TEST PROCEDURES
The following procedures are detailed tests to determine whether or not particular SteamCraft 5.1 components are operable. Before starting the individual component procedures, refer to Chapter 2 and complete the Final Setup and Checkout Procedures. Daring these procedures, observe component performance. Then perform the appropriate component tests to check specific parts.
• All exterior drains and drain valves are open.
• All exterior water supply valves are open.
• The main power switch is in the on position.
• The right side access cover is removed (Figure 5-12).
1.Set the ON/Off switch in the ON/OFF position and observe the red indicator light.
• If the indicator lights, the fuses are good. End this procedure here.
• If the indicator docs not light, continue this procedure with step 2.
2. Set the voltmeter for the 500 VAC scale. 3. Refer to Figure 5-13, and check the voltage reading from fuse-to-fuse on the
line side (line side. connections go to the terminal block).
• If the reading is 0 VAC or a low voltage: a. Test the main power switch. b. Test and
inspect the 230 VAC wiring.
• If the reading is 230 VAC, proceed to step 4. 4. Check 230 VAC from fuse-to-fuse on load side. The load side connections go
to the transformer. • If the reading is 230 VAC, the fuses are OK.
a. Test the transformer.
b. Check the wiring line and load side of transformer.
c. Test the ON/OFF switch.
• If the reading is 0 VAC or a low voltage, proceed to step 5.
5. Check voltage across each fuse, line side to load side.
• If the readings are 0 VAC across both fuses, test the transformer for an open primary.

Page 82 Model 21-CET-16 Service Manual
• If the readings are 230 VAC across one fuse and 0 VAC across the other fuse, the fuse with the 230 VAC reading is blown. The fuse with 0 VAC is good. Replace the blown fuse with a new 2 amp fuse, and proceed to step 6.
6. With the ON/OFF switch in the ON position, check the indicator light
• If the indicator is lighted, the blown fuse was malfunctioning. Perform the Final Setup and Checkout Procedure, and check for any other malfunctions.
• If the indicator still does not light, recheck voltage across each fuse. A 230 VAC across either fuse indicates problems in other areas. a. Deenergize the SteamCraft 5.1 at the main power switch.
b. Test the transformer for shorted primary or secondary coil.
c. Check for shorted wiring or components.
Transformer
1. Check that the main power switch is in the ON position.
2. Set the voltmeter to the 250 VAC scale. 3. Refer to Figure 5-14, and check for 120 VAC across transformer primary terminals X1-X2.
• If the meter reads 320 VAC, the transformer is good. End this procedure here.
• If the meter reads no or low voltage across terminals X1-X2, continue this procedure with step 4.
4. Set the voltmeter to the 500 VAC scale.
5. Check power at main power switch.
• If the meter does not read 230 VAC at the main power switch: a. Verify that the main power switch is in the ON position.
b. Check breakers or fuses in the main power switch.
• If the meter reads 230 VAC at the main power switch, sufficient power is being supplied, and the switch box is good. Continue this procedure with step 6.
6. Check for 230 VAC across the transformer secondary terminals H1-H4.
• If the reading is 230 VAC across terminals H1-H4, replace the transformer.
• If the meter does not read 230 VAC, check for open wires and loose connections at and between the main power switch, the terminal block, and the transformer.

Model 21-CET-16 Service Manual Page S3
ON/OFF Switch 1. Set the voltmeter to the 250 VAC scale.
2. Set the ON/OFT switch to the ON position.
• If the red indicator lights, proceed to step 3.
• If the red indicator does not light, proceed to step 4. 3. Set the ON/OFF switch to the OFF position. Refer to Figure 5-15, and check for 320
VAC across the top terminals of the ON/OFF switch (white/gray and gray wires).
• If the meter reads 320 VAC, the ON/OFF switch is good. End this procedure here.
• If the meter does not read 320 VAC, replace the ON/OFF switch and end this procedure here.
4. Refer to Figure 5-15, and check for 320 VAC across the center terminals of the ON/OFF switch (white and black wires).
• If the meter reads 120 VAC, continue this test with step 5. • If the meter does not read 320 VAC, the fault is not in the switch.
a. Test transformer.
b. Check the wiring and connections between the transformer terminals X1-X2 and the ON/OFF switch.
5. Refer to Figure 5-15, and check for 120 VAC across the bottom terminals of the ON/OFF switch (white/black and tan wires).
• If the meter reads 320 VAC, continue this procedure with step 6.
• If the meter does not read 320 VAC, replace the ON/OFF switch and end this procedure here.
6. Set the ON/OFF switch to the OFF position. Refer to Figure 5-15, and check for 320 VAC across the top terminals of the ON/OFF switch (white/gray and gray wires).
• If the meter reads 120 VAC, the indicator light is burned out. Replace ON/OFF switch
when convenient.
• If the meter does not read 320 VAC, replace the ON/OFF switch.
Relay K1 1. Set the voltmeter to the 250 VAC scale.
2. Set the ON/OFF switch to the ON position.
• If the fin and drain solenoids energize, relay K1 is good. End this procedure here.
• If the fill and dram solenoids do not energize, proceed to step 3. 3. Refer to Figure 5-16, and check for 320 VAC across relay K1 coil terminals 13-14.
• If the meter reads 320 VAC, continue this test w ith step 4.
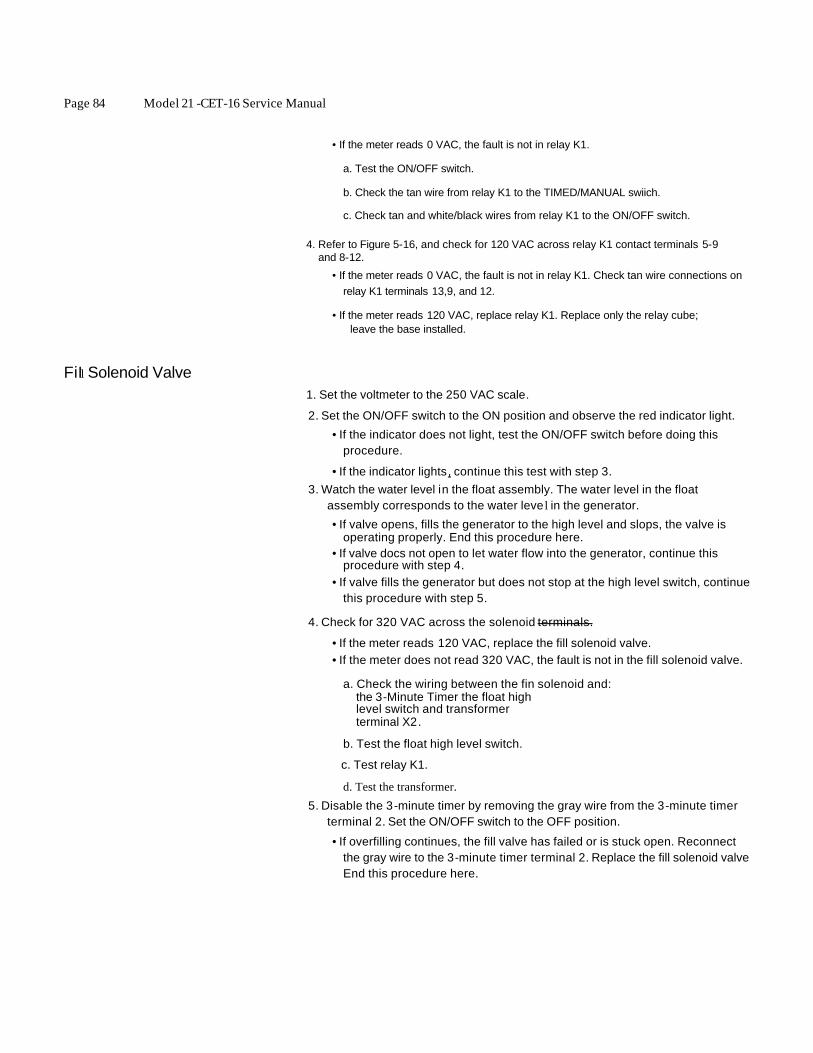
Page 84 Model 21 -CET-16 Service Manual
• If the meter reads 0 VAC, the fault is not in relay K1.
a. Test the ON/OFF switch.
b. Check the tan wire from relay K1 to the TIMED/MANUAL swiich.
c. Check tan and white/black wires from relay K1 to the ON/OFF switch.
4. Refer to Figure 5-16, and check for 120 VAC across relay K1 contact terminals 5-9 and 8-12.
• If the meter reads 0 VAC, the fault is not in relay K1. Check tan wire connections on relay K1 terminals 13,9, and 12.
• If the meter reads 120 VAC, replace relay K1. Replace only the relay cube; leave the base installed.
FiIl Solenoid Valve
1. Set the voltmeter to the 250 VAC scale.
2. Set the ON/OFF switch to the ON position and observe the red indicator light.
• If the indicator does not light, test the ON/OFF switch before doing this procedure.
• If the indicator lights, continue this test with step 3. 3. Watch the water level in the float assembly. The water level in the float
assembly corresponds to the water leve l in the generator.
• If valve opens, fills the generator to the high level and slops, the valve is operating properly. End this procedure here.
• If valve docs not open to let water flow into the generator, continue this procedure with step 4.
• If valve fills the generator but does not stop at the high level switch, continue this procedure with step 5.
4. Check for 320 VAC across the solenoid terminals.
• If the meter reads 120 VAC, replace the fill solenoid valve. • If the meter does not read 320 VAC, the fault is not in the fill solenoid valve.
a. Check the wiring between the fin solenoid and: the 3-Minute Timer the float high level switch and transformer terminal X2.
b. Test the float high level switch.
c. Test relay K1.
d. Test the transformer. 5. Disable the 3-minute timer by removing the gray wire from the 3-minute timer
terminal 2. Set the ON/OFF switch to the OFF position.
• If overfilling continues, the fill valve has failed or is stuck open. Reconnect the gray wire to the 3-minute timer terminal 2. Replace the fill solenoid valve End this procedure here.
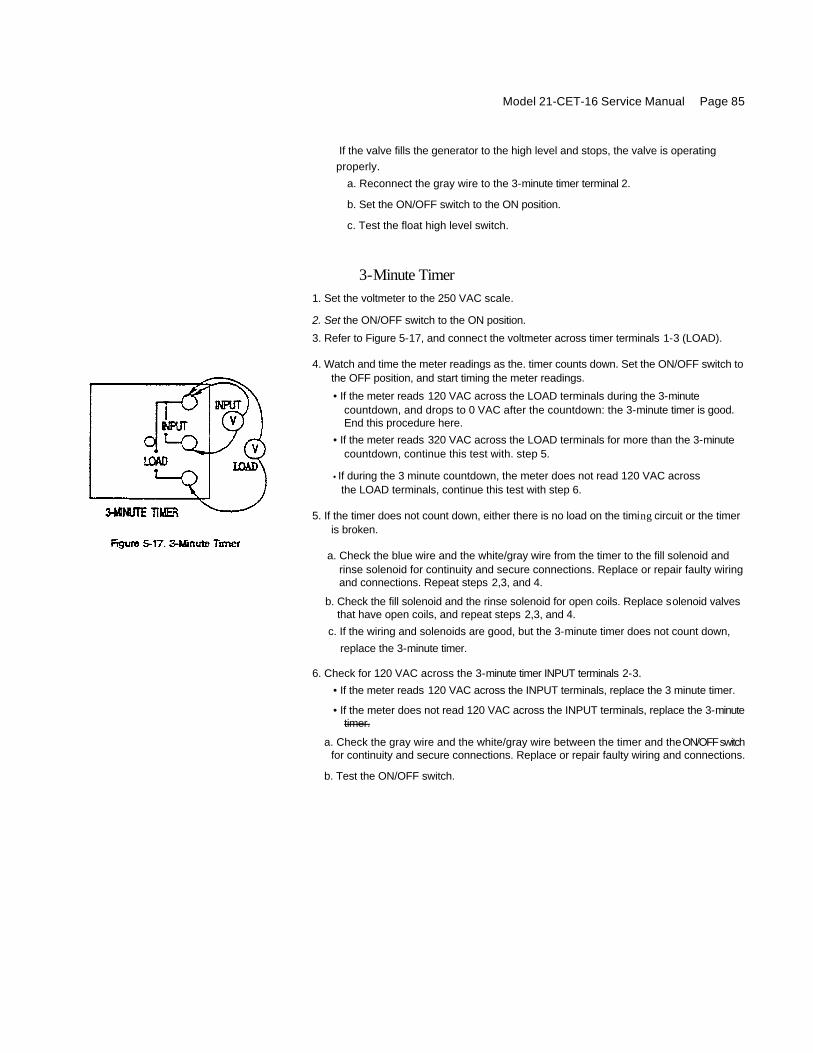
Model 21-CET-16 Service Manual Page 85
If the valve fills the generator to the high level and stops, the valve is operating properly.
a. Reconnect the gray wire to the 3-minute timer terminal 2.
b. Set the ON/OFF switch to the ON position.
c. Test the float high level switch.
3-Minute Timer 1. Set the voltmeter to the 250 VAC scale.
2. Set the ON/OFF switch to the ON position.
3. Refer to Figure 5-17, and connect the voltmeter across timer terminals 1-3 (LOAD).
4. Watch and time the meter readings as the. timer counts down. Set the ON/OFF switch to the OFF position, and start timing the meter readings.
• If the meter reads 120 VAC across the LOAD terminals during the 3-minute countdown, and drops to 0 VAC after the countdown: the 3-minute timer is good. End this procedure here.
• If the meter reads 320 VAC across the LOAD terminals for more than the 3-minute countdown, continue this test with. step 5.
• If during the 3 minute countdown, the meter does not read 120 VAC across the LOAD terminals, continue this test with step 6.
5. If the timer does not count down, either there is no load on the timing circuit or the timer is broken.
a. Check the blue wire and the white/gray wire from the timer to the fill solenoid and rinse solenoid for continuity and secure connections. Replace or repair faulty wiring and connections. Repeat steps 2,3, and 4.
b. Check the fill solenoid and the rinse solenoid for open coils. Replace solenoid valves that have open coils, and repeat steps 2,3, and 4.
c. If the wiring and solenoids are good, but the 3-minute timer does not count down,
replace the 3-minute timer.
6. Check for 120 VAC across the 3-minute timer INPUT terminals 2-3.
• If the meter reads 120 VAC across the INPUT terminals, replace the 3 minute timer.
• If the meter does not read 120 VAC across the INPUT terminals, replace the 3-minute timer.
a. Check the gray wire and the white/gray wire between the timer and the ON/OFF switch for continuity and secure connections. Replace or repair faulty wiring and connections.
b. Test the ON/OFF switch.
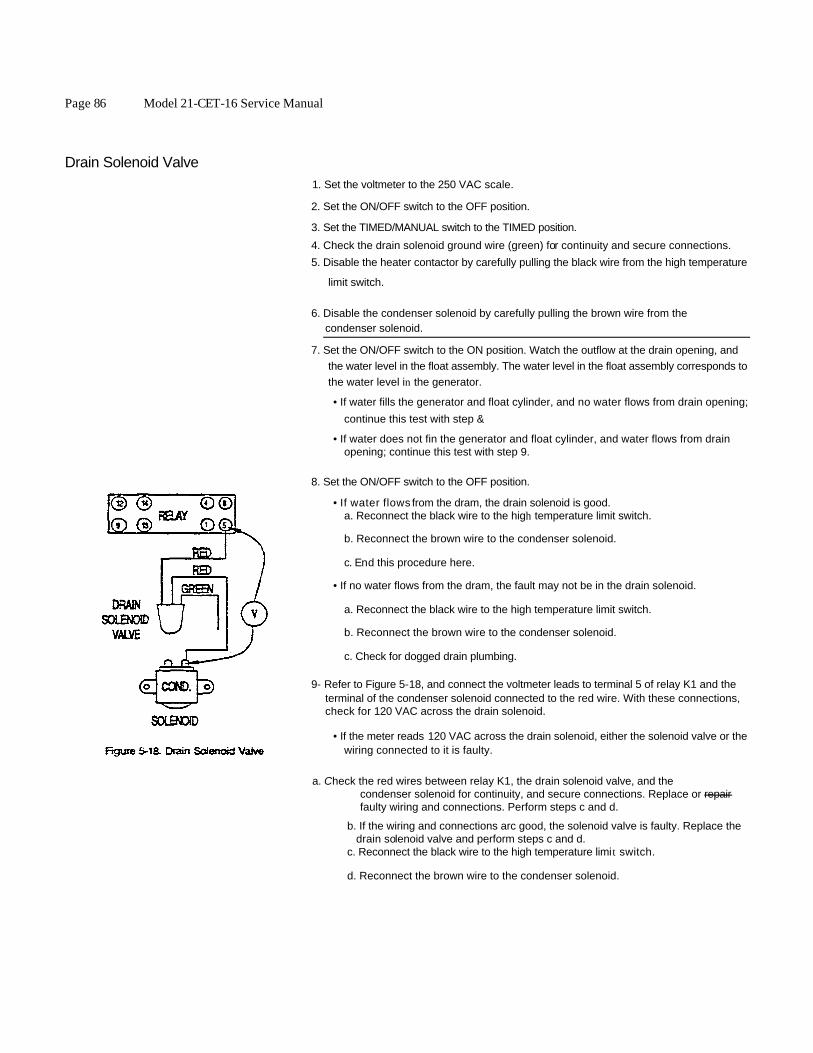
Page 86 Model 21-CET-16 Service Manual
Drain Solenoid Valve
1. Set the voltmeter to the 250 VAC scale.
2. Set the ON/OFF switch to the OFF position.
3. Set the TIMED/MANUAL switch to the TIMED position.
4. Check the drain solenoid ground wire (green) for continuity and secure connections.
5. Disable the heater contactor by carefully pulling the black wire from the high temperature
limit switch.
6. Disable the condenser solenoid by carefully pulling the brown wire from the condenser solenoid.
7. Set the ON/OFF switch to the ON position. Watch the outflow at the drain opening, and the water level in the float assembly. The water level in the float assembly corresponds to the water level in the generator.
• If water fills the generator and float cylinder, and no water flows from drain opening;
continue this test with step &
• If water does not fin the generator and float cylinder, and water flows from drain opening; continue this test with step 9.
8. Set the ON/OFF switch to the OFF position.
• If water flows from the dram, the drain solenoid is good. a. Reconnect the black wire to the high temperature limit switch.
b. Reconnect the brown wire to the condenser solenoid.
c. End this procedure here.
• If no water flows from the dram, the fault may not be in the drain solenoid.
a. Reconnect the black wire to the high temperature limit switch.
b. Reconnect the brown wire to the condenser solenoid.
c. Check for dogged drain plumbing.
9- Refer to Figure 5-18, and connect the voltmeter leads to terminal 5 of relay K1 and the terminal of the condenser solenoid connected to the red wire. With these connections, check for 120 VAC across the drain solenoid.
• If the meter reads 120 VAC across the drain solenoid, either the solenoid valve or the wiring connected to it is faulty.
a. Check the red wires between relay K1, the drain solenoid valve, and the condenser solenoid for continuity, and secure connections. Replace or repair faulty wiring and connections. Perform steps c and d.
b. If the wiring and connections arc good, the solenoid valve is faulty. Replace the drain solenoid valve and perform steps c and d. c. Reconnect the black wire to the high temperature limit switch.
d. Reconnect the brown wire to the condenser solenoid.

Model 21 -CET-16 Service Manual Page 87
• If the meter reads 0 VAC across the dram solenoid, the fault is not in the solenoid valve.
a. Reconnect the black wire to the high temperature limit switch.
b. Reconnect the brown wire to the condenser solenoid.
c. Check the red wires between relay K1, the drain solenoid valve, and the condenser solenoid for continuity, and secure connections. Replace or repair faulty wir ing and connections.
d. Test relay K1.
The rinse solenoid valve energizes for 3 minutes only daring the blowdown cycle. If testing takes longer than 3 minutes, restart the blowdown cycle by setting the ON/OFF switch first to ON and then to OFF.
1. Set the voltmeter to the 250 VAC scale. 2. The rinse nozzle is located at the top of the float cylinder. Watch and time the
water spray from the nozzle. Start timing immediately upon starting the blowdown cycle. To start blowdown, set the ON/OFF switch first to ON and then to OFF. • If valve opens, sprays water into the cylinder for 3 minutes and stops, the
valve is operating properly. End this procedure here. • If valve opens, sprays water into the cylinder and continues to spray after 3
minutes, continue this procedure with step 3. • If there is no rinse flow into the cylinder, continue this procedure with step 4.
3. Check voltage across the rinse solenoid terminals. • If the meter reads 0 VAC, the valve has failed open. Replace the rinse
solenoid valve. • If the meter reads 120 VAC for more than 3 minutes after starting the
blowdown cycle, replace the 3-minute timer.
4. Check for 120 VAC across the rinse solenoid terminals. • If the meter reads 120 VAC across the solenoid terminals, either the
solenoid valve is faulty or the plumbing between the valve and the float cylinder is blocked. a. Check the tubing and fittings between the valve and the float cylinder,
and the spray nozzle for blockage or damage. Replace faulty fittings or tubing.
b. If the tubing and fittings are good, the solenoid valve is faulty- Replace the rinse solenoid valve.
• If the meter reads 0 VAC across the rinse solenoid, the fault is not in the solenoid valve. a. Check the rinse solenoid circuit wiring for continuity, and secure
connections. Replace or repair faulty wiring and connections.
b. Test the 3-minute timer.
Rinse solenoid valve
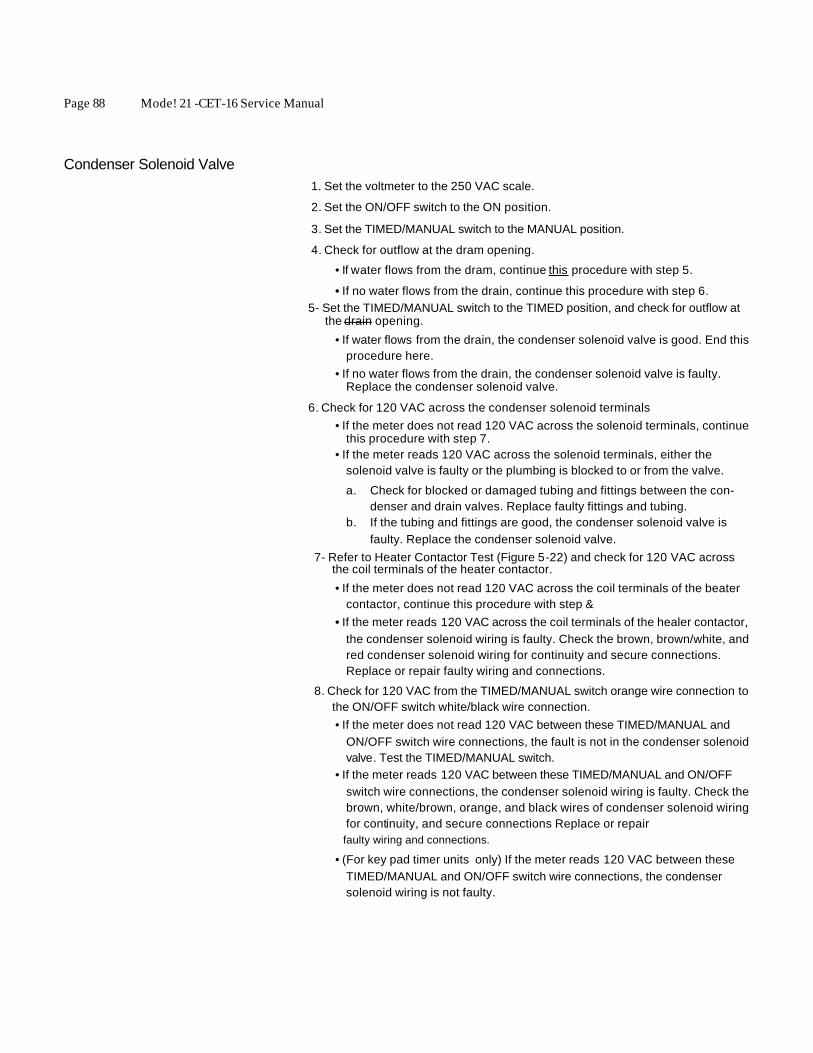
Page 88 Mode! 21 -CET-16 Service Manual
Condenser Solenoid Valve
1. Set the voltmeter to the 250 VAC scale.
2. Set the ON/OFF switch to the ON position.
3. Set the TIMED/MANUAL switch to the MANUAL position.
4. Check for outflow at the dram opening.
• If water flows from the dram, continue this procedure with step 5.
• If no water flows from the drain, continue this procedure with step 6. 5- Set the TIMED/MANUAL switch to the TIMED position, and check for outflow at the drain opening.
• If water flows from the drain, the condenser solenoid valve is good. End this procedure here.
• If no water flows from the drain, the condenser solenoid valve is faulty. Replace the condenser solenoid valve.
6. Check for 120 VAC across the condenser solenoid terminals • If the meter does not read 120 VAC across the solenoid terminals, continue
this procedure with step 7. • If the meter reads 120 VAC across the solenoid terminals, either the
solenoid valve is faulty or the plumbing is blocked to or from the valve.
a. Check for blocked or damaged tubing and fittings between the con-denser and drain valves. Replace faulty fittings and tubing.
b. If the tubing and fittings are good, the condenser solenoid valve is faulty. Replace the condenser solenoid valve.
7- Refer to Heater Contactor Test (Figure 5-22) and check for 120 VAC across the coil terminals of the heater contactor.
• If the meter does not read 120 VAC across the coil terminals of the beater contactor, continue this procedure with step &
• If the meter reads 120 VAC across the coil terminals of the healer contactor, the condenser solenoid wiring is faulty. Check the brown, brown/white, and red condenser solenoid wiring for continuity and secure connections. Replace or repair faulty wiring and connections.
8. Check for 120 VAC from the TIMED/MANUAL switch orange wire connection to the ON/OFF switch white/black wire connection. • If the meter does not read 120 VAC between these TIMED/MANUAL and
ON/OFF switch wire connections, the fault is not in the condenser solenoid valve. Test the TIMED/MANUAL switch.
• If the meter reads 120 VAC between these TIMED/MANUAL and ON/OFF switch wire connections, the condenser solenoid wiring is faulty. Check the brown, white/brown, orange, and black wires of condenser solenoid wiring for continuity, and secure connections Replace or repair faulty wiring and connections.
• (For key pad timer units only) If the meter reads 120 VAC between these TIMED/MANUAL and ON/OFF switch wire connections, the condenser solenoid wiring is not faulty.

Model 21 -CET-16 Service Manual Page 89
a. Test the float low level switch.
b. Test the high temperature limit switch.
TIMED/MANUAL Switch
1. Set the voltmeter to the 250 VAC scale.
2. Set the ON/OFF switch to the ON position,
3- Set the TIMED/MANUAL switch to the TIMED position.
4. Zero and dear the timer.
5- Set the TIMED/MANUAL switch to MANUAL, and check that the condenser solenoid and heater contactor energize. • If both the condenser solenoid and the heter contactor energize, continue this
procedure with step 6.
• If both the condenser solenoid and heater contactor do not energize, continue this procedure with step 7.
6. Set the TIMED/MANUAL switch to the TIMED position. Refer to Figure 5-19. Check for 120 VAC from the TIMED/MANUAL switch orange wire connection (top terminal) to the ON/OFF switch white/black wire connection.
• If the meter does not read 120 VAC between these TIMED/MANUAL and ON/OFF switch wire connections, replace the TIMED/MANUAL switch.
• If the meter reads 120 VAC between these TIMED/MANUAL and ON/OFF switch wire connections, the fault is not in the TIMED/MANUAL switch. Test the timer and timer wiring.
7. Refer to Figure 5-19. Check for 120 VAC from the TIMED/MANUA L switch orange wire connection (bottom terminal) to the ON/OFF switch white/black wire connection (bottom terminal). For dial timer units, a light blue wire is connected to the ON/OFF switch test point.
• If the meter reads 120 VAC between these TIMED/MANUAL and ON/OFF switch
wire connections, the fault is not in the TIMED/MANUAL switch. Check wiring to condenser solenoid and heater contactor.
• If the meter does not read 120 VAC between these TIMED/MANUAL and ON/OFF switch wire connections, either the TIMED/MANUAL switch or the wiring connected to it is faulty.
a. Check the TIMED/MANUAL switch wiring for continuity, and secure connections. Replace or repair faulty wiring and connections.
b. If the wiring and connections are good, the TIMED/MANUAL switch is faulty.Replace the TIMED/MANUAL switch.
Page 90 Model 21 -CET-16 Service Manual
High Temperature Limit Switch 1. Set the voltmeter to the 250 VAC scale.
2. Set the ON/OFF switch to the ON position. 3- Before proceeding to step 4, wait until water fills the float cylinder to normal operating
level.
4. Set TIMED/MANUAL switch to MANUAL. Check that the heater contactor energizes: 320 VAC from the heater contactor black wire connection to the heater contactor white/black wire connection. • If the meter reads 120 VAC, the high temperature limit switch is good. End this
procedure here,
•If the meter does not read 120 VAC, continue this procedure with step 5.
5. Check for 120 VAC across the high temperature limit switch terminals.
• If the meter reads 120 VAC, replace the high temperature limit switch.
• If the meter reads 0 VAC, continue this procedure with step 6.
6. Check for 120 VAC from the TIMED/MANUAL switch orange wire connection to the ON/OFF switch white/black wire connection. • If the meter does not read 120 VAC between these, test points, test the
TIMED/MANUAL switch. • If the meter reads 120 VAC between these test points, the fault is not in the
high temperature l imit switch. a. Check the black and white/black wires to the high temperature limit switch, float
assembly, and the contactor for continuity, and secure connections. Replace or repair faulty wiring and connections.
b. Test float low limit switch.
c. Test the contactor for an open coil.
Electronic Key Pad Timer The electronic key pad timer is a sealed unit. Replacement of this unit is the remedy for most timer malfunctions. A few timer malfunctions are caused by other SteamCraft 5.1. components. The symptoms of these malfunctions. and the associated testing are listed below.
1. Remove all food and trays from compartment 2. Refer to the Final Setup and Checkout section at the end of Chapter 2-Observe
the operation of the SteamCraft 5.1 components during these operations. a. Perform the Setup and Blowdown Inspection, and steps 1 through 5 of the
Operating Tests - Key Pad Control Panel section. These tests cover blowdown and manual operations. Malfunctions observed during these operations are due to component faults outside of the timer and timer circuits.
b. Perform steps 6 through 10 of the Operating Tests - Key Pad Control Panel section. These steps cover timed operations. Malfunctions ob-served during these operations may be caused by faulty timer or timer

Model 21 -CET-16 Service Manual Page 91
circuits. Note any opera ring malfunctions, and continue this procedure with step 3.
3. If the timer display is blank, the timer is either not receiving power from the 24 VAC transformer, or the timer is faulty. The timer may not be receiving 24 VAC power from the transformer due to faulty wiring.
a. Check the black and yellow wires between the transformer output and the timer input for continuity and secure connections. Inspect the black to yellow connections. Replace or repair faulty wiring and connections.
b. Check the black and tan wires between the transformer input and the TIMED/MANUAL switch for continuity and secure connections. In-spect the black to tan connection. Replace or repair faulty wiring and connections.
c. Check the white and white/black wires between the transformer input and the ON/OFF switch for continuity and secure connections. Inspect the white to white/black connection. Replace or repair faulty wiring and connections.
d. When the wiring and connections of steps a through, c are good, continue this procedure with step 4.
4. The timer may not be receiving power due to a faulty 24 VAC transformer or lack of 120 VAC to the transformer.
a. Check for 120 VAC across the transformer input terminals (black wires).
• If the meter does not read 120 VAC. the transformer is not receiving power. Test the ON/OFF and TIMED/MANUAL switches.
• If the meter reads 120 VAC, continue this procedure with step b. b. Check for 24 VAC across the transformer output terminals (yellow wires).
• If the meter reads 24 VAC, the transformer and wiring are performing correctly.
Replace the timer.
• If the meter does not read 24 VAC, the transformer is faulty. Replace the 24 VAC transformer.
5. If the PAUS indication does not start after pressing the START/STOP key, or if the
indication continues longer than 5 minutes; test the compartment thermal switch.
• Repair or replace the compartment thermal switch according to that test procedure.
• If the compartment thermal switch tests good, replace the timer.
6. If the condenser solenoid and heater contactor do not energize, check the two orange wires between the timer and the TIMED/MANUAL switch for continuity and secure connections.
• Replace or repair faulty wiring and connections. • If the wiring and connections are in good condition, test the TIMED/MANUAL
Switch.

Page 92 Mode! 21-CET-16 Service Manual
• If the wiring, connections, and TIMED/MANUAL switch are all in good condition, replace the timer.
7. If the SteamCraft 5.1 continues to generate steam after Timer counts down to 00:00, replace the timer.
Compartment Thermal Switch (key pad timer units only)
1. Set the ON/OFF switch to the OFF position.
2. Set the TIMED/MANUAL switch to the MANUAL position.
3. Open the cooking compartment door and allow the compartment to cool. Leave the door open while preparing the test leads and ohmmeter.
WARNING Severe electrical shock and equipment damage may result from uncovered compartment thermostat leads. One lead remains hot (120 VAC) when the ON/OFF switch is ON.
4. Carefully disconnect leads (purple wires) from the compartment thermal switch. Tape the ends of both leads to void shocks and short circuits daring testing.
5. Adjust the ohmmeter for a zero reading on lowest scale.
6. Refer to Figure 5-20, and connect the ohmmeter leads across the compartment thermal switch.
7. After about 5 minutes the compartment will be cool enough for this test. Close the compartment door, and check the ohmmeter reading.
• If the meter reads 0 ohms across compartment thermal switch terminals, replace the thermal switch.
• If the meter reads infinite nhms across compartment thermal switch terminals, continue this procedure with step 8.
8. Set the ON/OFF switch to the ON position. Watch the meter readings as the SteamCraft 5.1 heats up and generates steam.
• If the meter reads 0 ohms across the switch terminals after 10 minutes, the compartment thermal switch is good. Perform steps a through c below and end the procedure here.
a. Set the ON/OFF switch to the OFF position.
b. Disconnect the ohmmeter leads from the thermal switch terminals.
c. Connect the black thermal switch leads to the thermal switch terminals.
• If the meter reads high or infinite resistance after 10 minutes, carefully open compartment door and check that the unit is generating steam.

Model 21 -CET-16 Service Manual Page 93
a. If the unit is generating steam, and the cooking compartment is hot, replace the compartment thermal switch. b. If the unit is not generating steam, the test results are inconclusive. Repair the
steam generating capabilities of the SteamCraft 5.1 and repeat this test procedure.
Mechanical Timer 1. Set the voltmeter to the 250 VAC scale.
2. Set the ON/OFF switch to the ON position.
4. Set the TIMED/MANUAL switch to the MANUAL position. Operate the SteamCraft 5.1 for about 10 minutes, or until it is steaming continuously.
5. Set the TIMED/MANUAL switch to the TIMED position, and zero the timer. Steam generation will stop- When the water level in the float cylinder stabilizes at the high level switch, perform step 6.
6. Set the rimer dial to 10 minutes. Compare the actual steamer operation to that described in steps 8 through 10 of the Operating Tests - Dial Timer Control Panel section of Chapter 2. • If actual operation matches the described operation, continue this
procedure with step 7. • Thetimer fails the 10 minute test if actual operation does not match the
described operation. Replace the timer and end the procedure here.
Typical failures are:
a. Steaming continues after the preset time on the dial elapses to 0.
b. The dial time is fast or slow compared to real time. (10 minutes on the dial elapses after 5 or 20 minutes real time.)
c. The timer dial does not complete the countdown to zero. 7. Set the timer dial to 0. Refer to Figure 5-21. Check for 120 VAC across timer
terminals L1-T1, and 0 VAC across timer terminals L1-T3. • If the meter reads 120 VAC across L1-T1 and 0 VAC across L1-T3,
continue this procedure with step 8. • If the meter reads 0 VAC across L1-T1, the contacts L1-T1 are shorted
within the timer. Replace the dial timer. • If the meter reads 120 VAC across L1-T3, the contacts L1-T3 are open
within the timer. Replace the dial timer.
8. Set the timer dial to 10 minutes. Refer to Figure 5-21 Check for 0 VAC across timer terminals L1-T1, and 120 VAC across timer terminals L1-T3-
• If the meter reads 0 VAC across L1-T1, and 120 VAC across L1-T3, the dial timer is good. End this procedure here.
• If the meter reads 120 VAC across L1-T1, replace the dial timer.
• If the meter reads 0 VAC across L1-T3, replace the dial timer.
Heater Contactor

Page 94 Model 21 -CET-16 Service Manual
1. Set the voltmeter to the 250 VAC scale.
2. Set the ON/OFF switch to the ON position. 3. Set the TIMED/MANUAL switch to the MANUAL position. Operate the
SteamCraft 5.1 for about 10 minutes, or unti l it is steaming continuously,, and the water in the float cylinder is at operating level.
4. Refer to Figure 5-22, and check for 120 VAC across the heater contactor coil terminals. • If the meter reads 320 VAC across the test points, and the heaters are
heating, the heater contactor is good. End this procedure here. • If the meter reads 120 VAC across the test points, and the healers are not
heating, continue this procedure with step 5. • If the meter reads 0 VAC or a low voltage across the test points, the fault is
not in the heater contactor. a. Check the black, white/black, brown, and white/brown wires connected to
the heater contactor for continuity and secure connections. Replace or repair faulty wiring and connections.
b. Test the high temperature limit switch.
c. Test the float low level switch.
d. Test the TIMED/MANUAL switch.
5. Set the voltmeter to the 500 VAC scale. Refer to Figure 5-22, and check the voltage across the contact pairs.
• If the meter reads 230 VAC across one or more contact pairs, replace the heater contactor.
• If the meter reads 0 VAC across all contact pairs, the fault is not in the heater contactor.
a. Check the wires and connections from the contact pairs to the healer elements for continuity and secure connections. Replace or repair faulty wiring and connections.
b. Check the wires and connections from the terminal block to the contacts for continuity and secure connections. Replace or repair faulty wiring and connections.
c. Test heater elements.
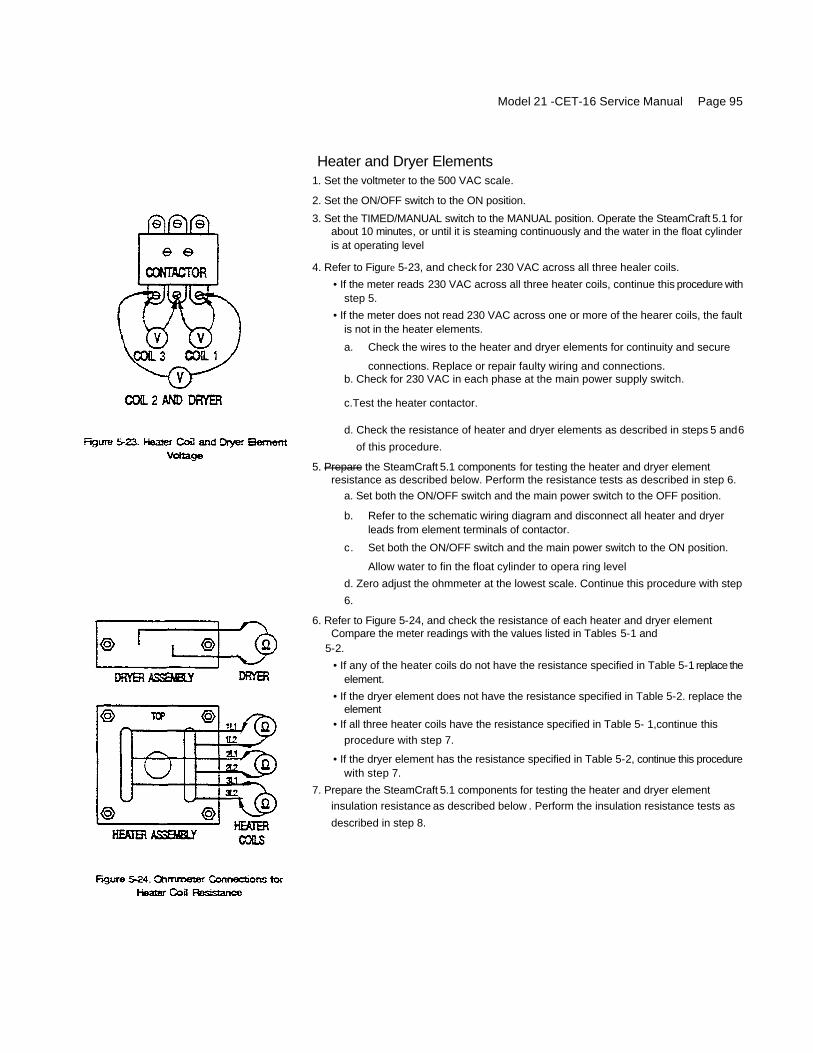
Model 21 -CET-16 Service Manual Page 95
Heater and Dryer Elements 1. Set the voltmeter to the 500 VAC scale.
2. Set the ON/OFF switch to the ON position.
3. Set the TIMED/MANUAL switch to the MANUAL position. Operate the SteamCraft 5.1 for about 10 minutes, or until it is steaming continuously and the water in the float cylinder is at operating level
4. Refer to Figure 5-23, and check for 230 VAC across all three healer coils.
• If the meter reads 230 VAC across all three heater coils, continue this procedure with step 5.
• If the meter does not read 230 VAC across one or more of the hearer coils, the fault is not in the heater elements.
a. Check the wires to the heater and dryer elements for continuity and secure
connections. Replace or repair faulty wiring and connections. b. Check for 230 VAC in each phase at the main power supply switch.
c.Test the heater contactor.
d. Check the resistance of heater and dryer elements as described in steps 5 and 6
of this procedure.
5. Prepare the SteamCraft 5.1 components for testing the heater and dryer element resistance as described below. Perform the resistance tests as described in step 6.
a. Set both the ON/OFF switch and the main power switch to the OFF position.
b. Refer to the schematic wiring diagram and disconnect all heater and dryer leads from element terminals of contactor.
c. Set both the ON/OFF switch and the main power switch to the ON position.
Allow water to fin the float cylinder to opera ring level
d. Zero adjust the ohmmeter at the lowest scale. Continue this procedure with step
6.
6. Refer to Figure 5-24, and check the resistance of each heater and dryer element Compare the meter readings with the values listed in Tables 5-1 and
5-2.
• If any of the heater coils do not have the resistance specified in Table 5-1 replace the element.
• If the dryer element does not have the resistance specified in Table 5-2. replace the element
• If all three heater coils have the resistance specified in Table 5- 1,continue this procedure with step 7.
• If the dryer element has the resistance specified in Table 5-2, continue this procedure with step 7.
7. Prepare the SteamCraft 5.1 components for testing the heater and dryer element insulation resistance as described below . Perform the insulation resistance tests as
described in step 8.

Page 96 Model 21-CET-16 Service Manual a. Set megohm meter (megger) at 500 or 1000 volts. If a megger is not available, zero adjust an ohmmeter on the highest scale. b. Check that the water in the float cylinder is at operating level c. Continue this
procedure with step 8.
8. Refer to Figure 5-25, and check the insulation resistance of each heater and dryer element lead to ground Use the element assembly stud as ground.
• If the resistance is infinite (greater than 1 megohm) on all coils of the heater element, the heater element is good. If the resistance is infinite (greater than 1 megohm) for the dryer element, the dryer element is good. Reconnect heater and dryer leads.
Make sure the connections are tight.
• If the resistance is low (less than 1 megohm) on all coils of the heater element, replace the healer element If the resistance is low (less than 1 megohm) for the dryer element, replace the dryer element. Connect the heater and dryer leads. Make sure
the connections are tight.
Before testing the float assembly, inspect the cylinder for sediment. Sediment in the float assembly cylinder often appears as white sludge. As sediment builds up in the cylinder, the floats cease to slide up and down smoothly on the shaft. The float assembly does not property respond to water level changes.
If there is heavy sediment build up in the float cylinder:
a. Refer to Figure 6-10- Disassemble and dean the Coal switch assembly, the float cylinder, and the spray nozzle. If the components cannot be cleaned, replace them with new parts. Reassemble the cleaned components.
b. If the float cylinder required cleaning, test the rinse solenoid valve for proper
operation.
When the float assembly is free of sediment, perform these test procedures.
1. Set the voltmeter to the 250 VAC scale.
2. Set the TIMED/MANUAL switch to the MANUAL position.
3. SettheON/OFFswitch to the OFF position.Wait for the 3-minute blowdown cycle to finish, and the generator and float assembly to drain completely.
4. Connect the voltmeter across the float low level switch.
• For key pad timer units refer to Figure 5-26 and connect the voltmeter leads to the black wire connections at the high temperature limit switch and the contactor.
• For mechanical timer units, refer to Figure 5-27 and connect the voltmeter leads to the black wire connections at the high temperature limit switch and the
TIMED/MANUAL switch.
5. Set the ON/OFF switch to the ON position, and check the voltmeter readings with no water in the float cylinder.
• If the meter reads 120 VAC, continue this procedure with step 7.
• If the meter reads 0 VAC, continue this procedure with step 6.
Float Assembly
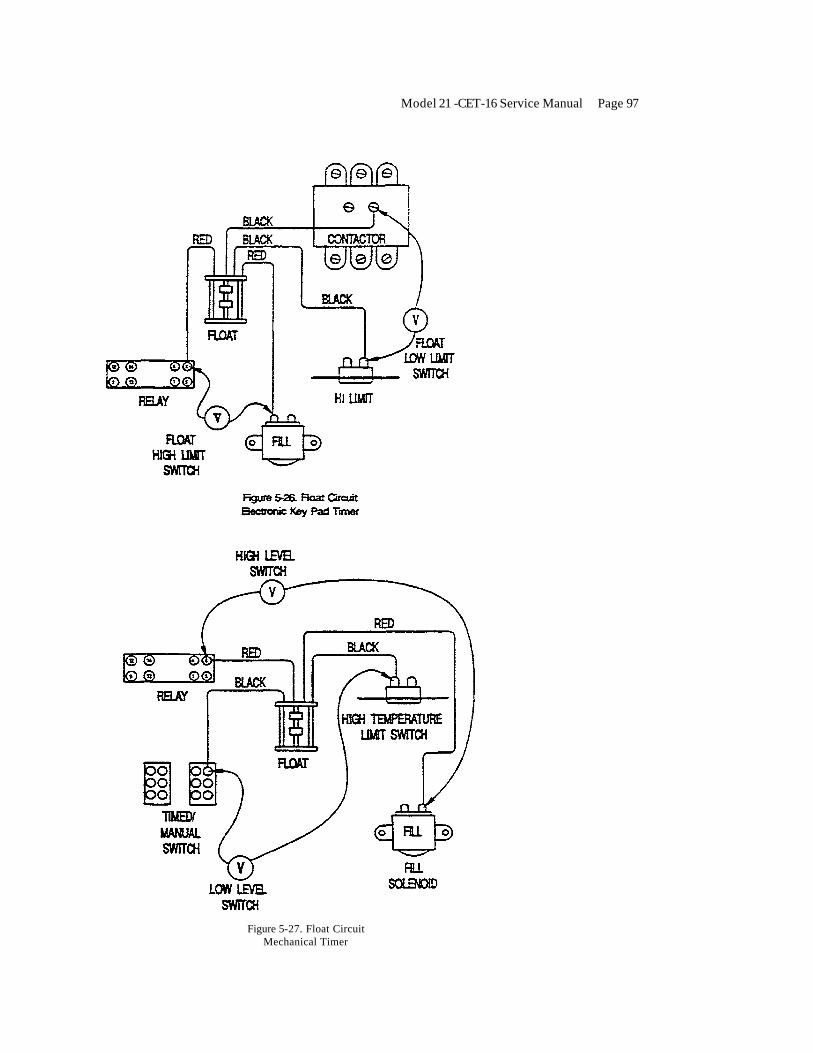
Model 21 -CET-16 Service Manual Page 97
Figure 5-27. Float Circuit Mechanical Timer

Page 98 Model 21-CET-16 Service Manual
6. Check for 120 VAC from the TIMED/MANUAL switch orange wire to the ON/OFF switch white/black wire connection. • If the meter does not read 120 VAC, the fault is not in the float assembly.
a. Test the ON/OFF switch.
b. Test the TIMED/MANUAL switch.
c. Test the contactor for an open coil.
• If the meter reads 120 VAC, either the float or the float wiring circuit is faulty. a. Check the wiring between the TIMED/MANUAL switch, the float, the
contactor, and the ON/OFF switch for continuity, and secure connections. Replace or repair faulty wiring and connections.
b. If the wiring and connections are good, the float assembly is faulty. Replace the float assembly.
7. About one minute after the fin solenoid valve opens, the water begins to fill the float cylinder- Check the bottom of the cylinder.
• If water begins to fin the float cylinder, continue this procedure with step 9. • If water does not begin to fin the float cylinder, continue this procedure with
step 8.
8. Connect the voltmeter across the float high level switch.
Refer to Figure 5-26 and connect the voltmeter leads to the red wire connections at the fill solenoid and relay K1. Check for 120 VAC across these test points.
• If the meter reads 320 VAC across these test points, the high level switch is faulty. Replace the float assembly.
•If the meter reads 0 VAC, test the fin solenoid valve. 9. As the water level rises to about one inch in the float cylinder, the lower float
begins to move up the shaft. Check the voltage readings across the float low level switch. • If the meter reads 120 VAC across the float low level switch, the switch is
faulty. Replace the float assembly. • If the meter reads 0 VAC across the float low level switch and the contactor
does not energize, the float low level switch is good. Test the contactor. • If the meter reads 0 VAC across the float low level switch and the contactor
energizes, continue this procedure with step 10. 10. As the water level continues to rise in the float cylinder, the lower float
reaches its stop. The upper float starts to move up with the water level When the water level is about one inch from the top of the float, cylinder the upper float magnet opens the upper level switch and deenergizes the fill solenoid valve. The valve doses and the water level stops rising. As the unit begins to generate steam, the water level drops, the upper float energizes the fill solenoid, and the water fills to the upper level. The water level and upper float cycle up and down two to five times per minute.
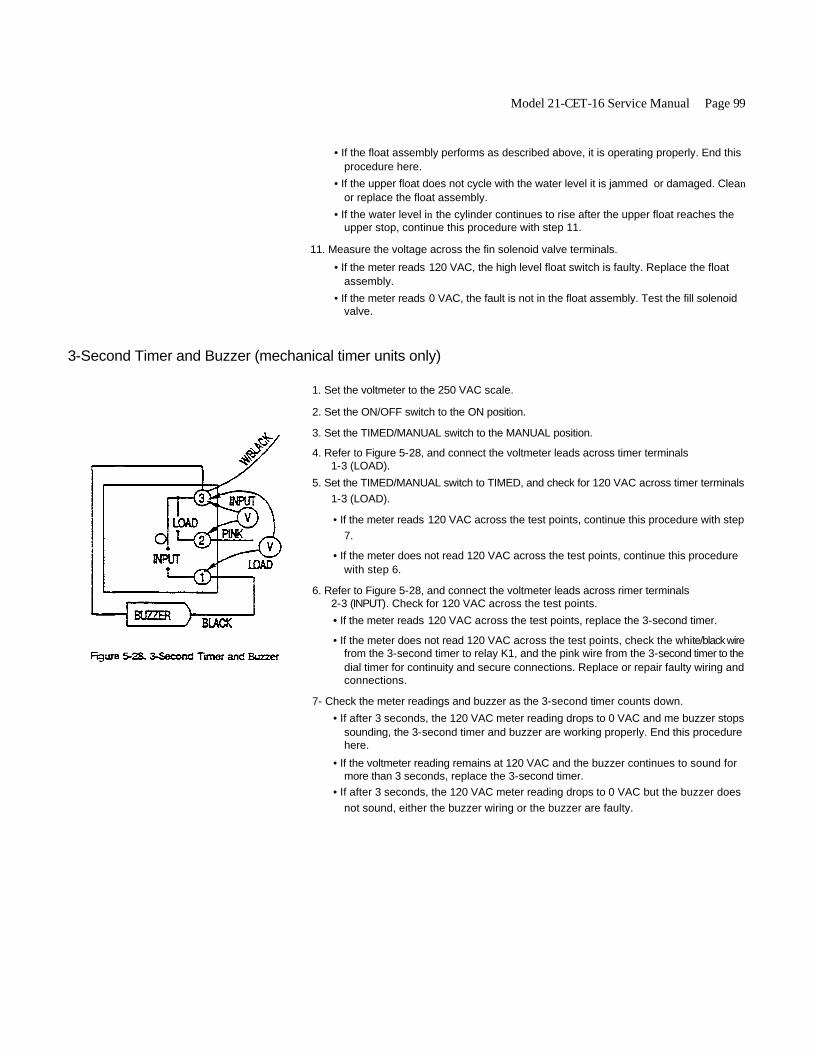
Model 21-CET-16 Service Manual Page 99
• If the float assembly performs as described above, it is operating properly. End this procedure here.
• If the upper float does not cycle with the water level it is jammed or damaged. Clean or replace the float assembly.
• If the water level in the cylinder continues to rise after the upper float reaches the upper stop, continue this procedure with step 11.
11. Measure the voltage across the fin solenoid valve terminals.
• If the meter reads 120 VAC, the high level float switch is faulty. Replace the float assembly.
• If the meter reads 0 VAC, the fault is not in the float assembly. Test the fill solenoid valve.
3-Second Timer and Buzzer (mechanical timer units only)
1. Set the voltmeter to the 250 VAC scale.
2. Set the ON/OFF switch to the ON position.
3. Set the TIMED/MANUAL switch to the MANUAL position.
4. Refer to Figure 5-28, and connect the voltmeter leads across timer terminals 1-3 (LOAD).
5. Set the TIMED/MANUAL switch to TIMED, and check for 120 VAC across timer terminals 1-3 (LOAD).
• If the meter reads 120 VAC across the test points, continue this procedure with step 7.
• If the meter does not read 120 VAC across the test points, continue this procedure with step 6.
6. Refer to Figure 5-28, and connect the voltmeter leads across rimer terminals 2-3 (INPUT). Check for 120 VAC across the test points.
• If the meter reads 120 VAC across the test points, replace the 3-second timer.
• If the meter does not read 120 VAC across the test points, check the white/black wire from the 3-second timer to relay K1, and the pink wire from the 3-second timer to the dial timer for continuity and secure connections. Replace or repair faulty wiring and connections.
7- Check the meter readings and buzzer as the 3-second timer counts down.
• If after 3 seconds, the 120 VAC meter reading drops to 0 VAC and me buzzer stops sounding, the 3-second timer and buzzer are working properly. End this procedure here.
• If the voltmeter reading remains at 120 VAC and the buzzer continues to sound for more than 3 seconds, replace the 3-second timer.
• If after 3 seconds, the 120 VAC meter reading drops to 0 VAC but the buzzer does not sound, either the buzzer wiring or the buzzer are faulty.

Page 100 Model 21 -CET-16 Service Manual
a. Check the black wires from the 3-second timer to the buzzer for continuity and secure connections. Replace or repair faulty wiring and connections.
b. If the wiring and connections are good, replace the 3-minute timer.
Printed 12/90
Model 21 -CET-16 Service Manual Page 101
CHAPTER 6. ILLUSTRATED PARTS LISTS
INTRODUCTION This chapter illustrates replacement parts for the Cleveland Range model 21-CET-16 counter type convection steamer known as the SteamCraft 5.1. Each figure illustrates a group of functionally related components. Figure 6-1. identifies these component groups, and the figure(s) on which they are illustrated. Each figure is accompanied by a component parts list which includes the pan name part ordering number, and quantity used in that component group.
Parts Differences Among SteamCraft 5.1 Steamers
In the normal course of product improvement, component differences develop. Usually improved components are designed to be compatible with the existing structures. When this happens, the improved parts are provided automatically under the old part numbers. When this is not possible, the parts differences are tracked and identified by steamer serial numbers. These differences are noted in the illustrated parts lists. Refer to Chapter 1 for an explanation of Cleveland Range serial number notation.
Electrical Schematics and Wiring Diagrams. In addition to parts illustrations, SteamCraft 5.1 electrical schematics and wiring diagrams are included at the end of the chapter.

21 -CET-16 Service Manual Page 103
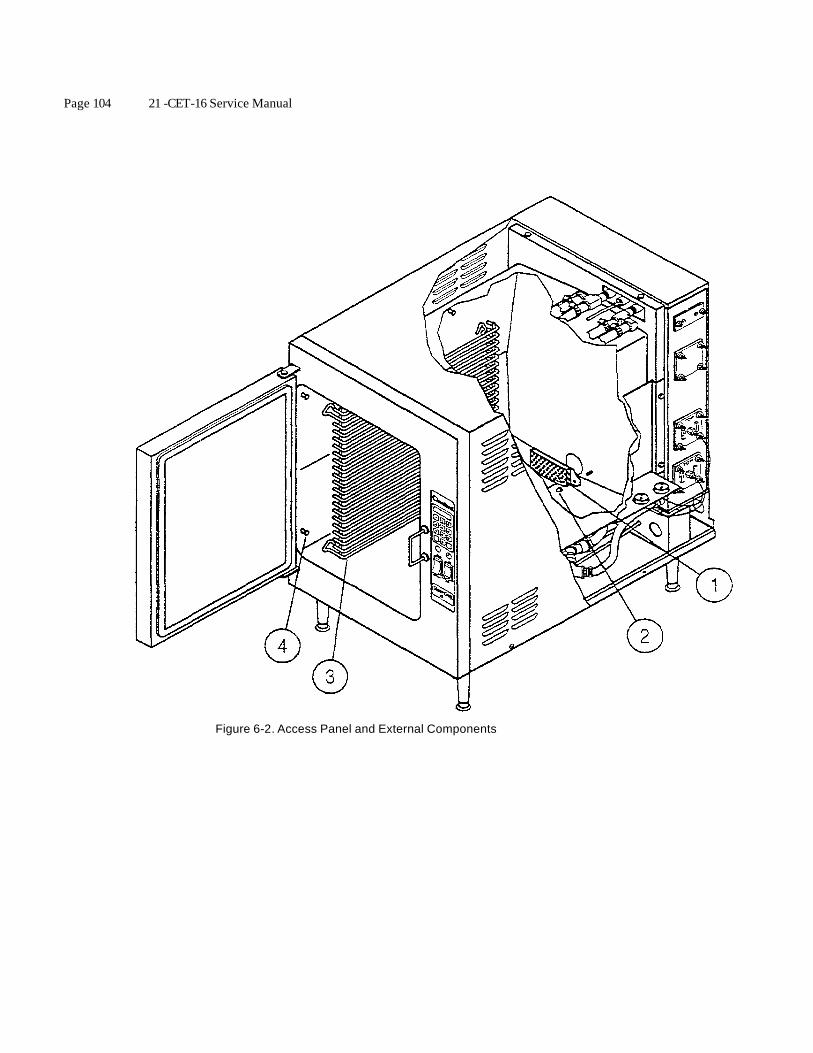
Page 104 21 -CET-16 Service Manual
Figure 6-2. Access Panel and External Components
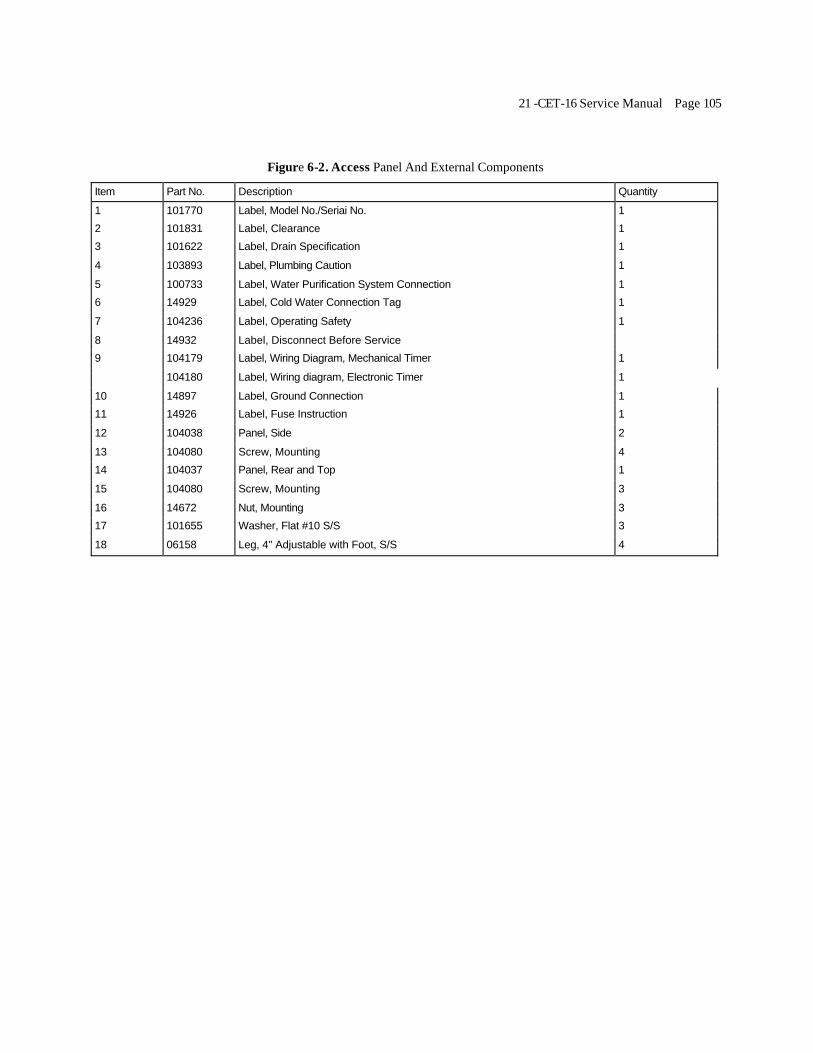
21 -CET-16 Service Manual Page 105
Figure 6-2. Access Panel And External Components
Item Part No. Description Quantity 1 101770 Label, Model No./Seriai No. 1 2 101831 Label, Clearance 1 3 101622 Label, Drain Specification 1 4 103893 Label, Plumbing Caution 1 5 100733 Label, Water Purification System Connection 1 6 14929 Label, Cold Water Connection Tag 1 7 104236 Label, Operating Safety 1 8 14932 Label, Disconnect Before Service
9 104179 Label, Wiring Diagram, Mechanical Timer 1
104180 Label, Wiring diagram, Electronic Timer 1 10 14897 Label, Ground Connection 1 11 14926 Label, Fuse Instruction 1 12 104038 Panel, Side 2 13 104080 Screw, Mounting 4 14 104037 Panel, Rear and Top 1 15 104080 Screw, Mounting 3 16 14672 Nut, Mounting 3 17 101655 Washer, Flat #10 S/S 3 18 06158 Leg, 4" Adjustable with Foot, S/S 4

Page 106 21 -CET-16 Service Manual
Figure 6-3. Steamer Compartment Group

21 -CET-16 Service Manual Page 107
Figure 6-3. Steamer Compartment Group
Item Part No. Description Quantity 1 69298 Drain Screen 1 2 14677 Nut, Acorn 1 3 414232 Rack, Slide 2 4 101305 Pin, Rack Mounting (Not replaceable) 8

Page 108 21 -CET-16 Service Manual
Figure 6-4. Compartment Door and Hinge Assemblies
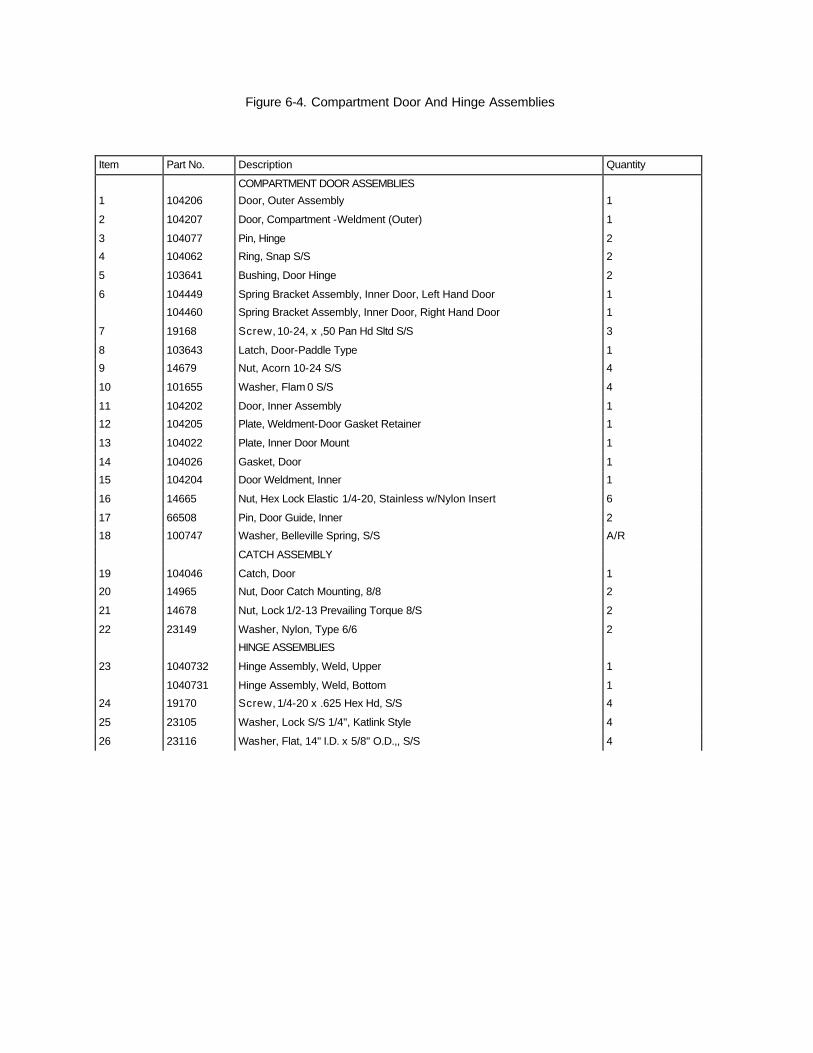
Figure 6-4. Compartment Door And Hinge Assemblies
Item Part No. Description Quantity
COMPARTMENT DOOR ASSEMBLIES 1 104206 Door, Outer Assembly 1
2 104207 Door, Compartment -Weldment (Outer) 1 3 104077 Pin, Hinge 2 4 104062 Ring, Snap S/S 2 5 103641 Bushing, Door Hinge 2 6 104449 Spring Bracket Assembly, Inner Door, Left Hand Door 1
104460 Spring Bracket Assembly, Inner Door, Right Hand Door 1 7 19168 Screw, 10-24, x ,50 Pan Hd Sltd S/S 3 8 103643 Latch, Door-Paddle Type 1 9 14679 Nut, Acorn 10-24 S/S 4 10 101655 Washer, Flam 0 S/S 4 11 104202 Door, Inner Assembly 1 12 104205 Plate, Weldment-Door Gasket Retainer 1 13 104022 Plate, Inner Door Mount 1 14 104026 Gasket, Door 1 15 104204 Door Weldment, Inner 1 16 14665 Nut, Hex Lock Elastic 1/4-20, Stainless w/Nylon Insert 6 17 66508 Pin, Door Guide, Inner 2 18 100747 Washer, Belleville Spring, S/S A/R
CATCH ASSEMBLY 19 104046 Catch, Door 1
20 14965 Nut, Door Catch Mounting, 8/8 2 21 14678 Nut, Lock 1/2-13 Prevailing Torque 8/S 2 22 23149 Washer, Nylon, Type 6/6 2
HINGE ASSEMBLIES 23 1040732 Hinge Assembly, Weld, Upper 1
1040731 Hinge Assembly, Weld, Bottom 1 24 19170 Screw, 1/4-20 x .625 Hex Hd, S/S 4 25 23105 Washer, Lock S/S 1/4", Katlink Style 4 26 23116 Washer, Flat, 14" I.D. x 5/8" O.D.,, S/S 4
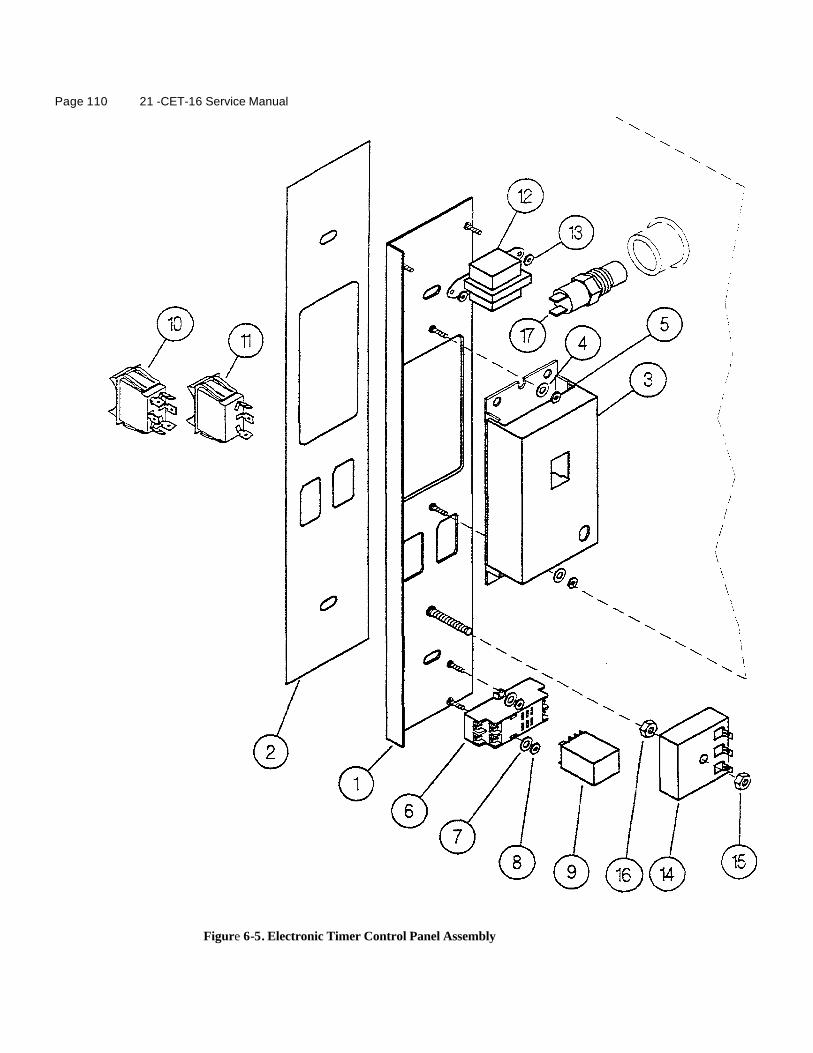
Page 110 21 -CET-16 Service Manual
Figure 6-5. Electronic Timer Control Panel Assembly
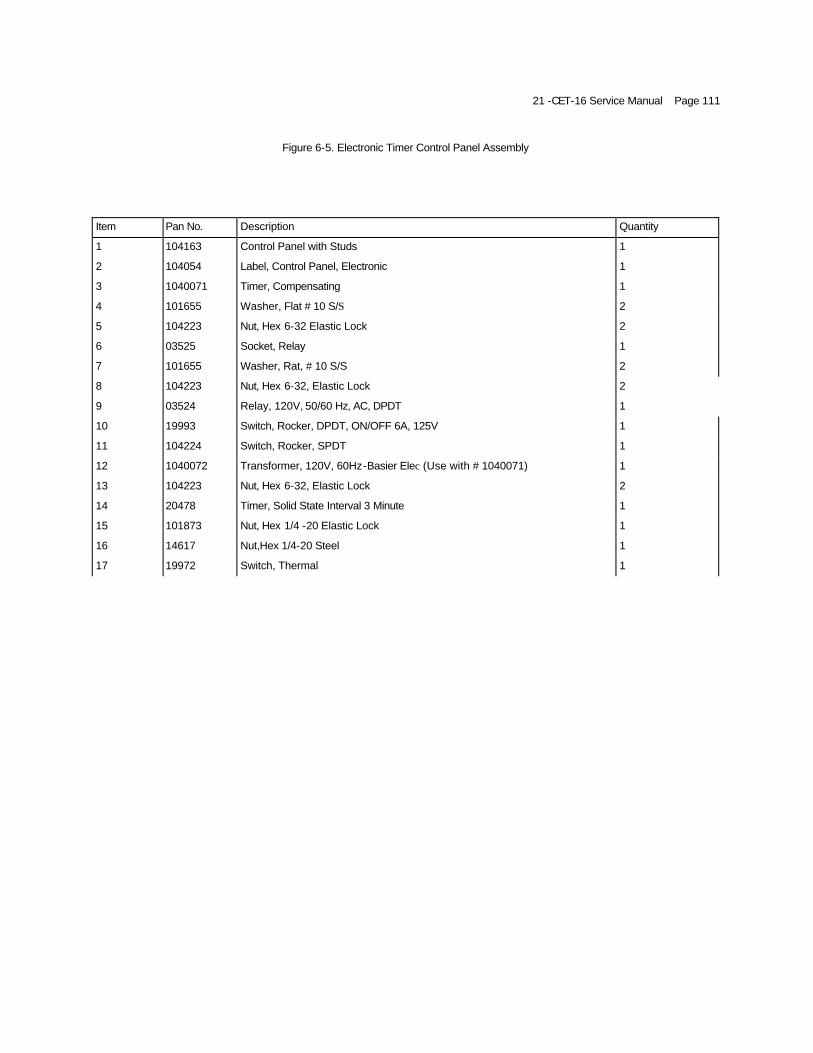
21 -CET-16 Service Manual Page 111
Figure 6-5. Electronic Timer Control Panel Assembly
Item Pan No. Description Quantity
1 104163 Control Panel with Studs 1
2 104054 Label, Control Panel, Electronic 1
3 1040071 Timer, Compensating 1
4 101655 Washer, Flat # 10 S/S 2
5 104223 Nut, Hex 6-32 Elastic Lock 2
6 03525 Socket, Relay 1
7 101655 Washer, Rat, # 10 S/S 2
8 104223 Nut, Hex 6-32, Elastic Lock 2
9 03524 Relay, 120V, 50/60 Hz, AC, DPDT 1
10 19993 Switch, Rocker, DPDT, ON/OFF 6A, 125V 1
11 104224 Switch, Rocker, SPDT 1
12 1040072 Transformer, 120V, 60Hz-Basier Elec (Use with # 1040071) 1
13 104223 Nut, Hex 6-32, Elastic Lock 2
14 20478 Timer, Solid State Interval 3 Minute 1
15 101873 Nut, Hex 1/4 -20 Elastic Lock 1
16 14617 Nut,Hex 1/4-20 Steel 1
17 19972 Switch, Thermal 1

Page 112 21-CET-16 Service Manual
Figure 6-6. Mechanical Timer Control Panel Assembly

21 -CET-16 Service Manual Page 113
Figure 6-6. Mechanical Timer Control Panel Assembly
Item Part No. Description Quantity
1 104085 Control Panel with Studs 1
2 103722 Label, Control Panel, Manual 1
3 20476 Timer with Mounting Screws (2) 1
4 113071 Timer Knob 1
5 03525 Relay Socket 1
6 101655 Washer, Flat #10 2
7 104223 Nut, #6-32 Hex, Elastic Lock 2
8 14617 Nut, 1/4-20 Hex, Black Oxide 2
9 101873 Nut, 1/4-20 Elastic Lock 2
10 03524 Relay 1
11 20477 Timer, 3-Second 1
12 20478 Timer, 3-Minute 1
13 19993 Switch, Power 1
14 104224 Switch, Manual 1
15 41350 Buzzer 1
16 14672 Nut, #10-32 Hex, Locking 1
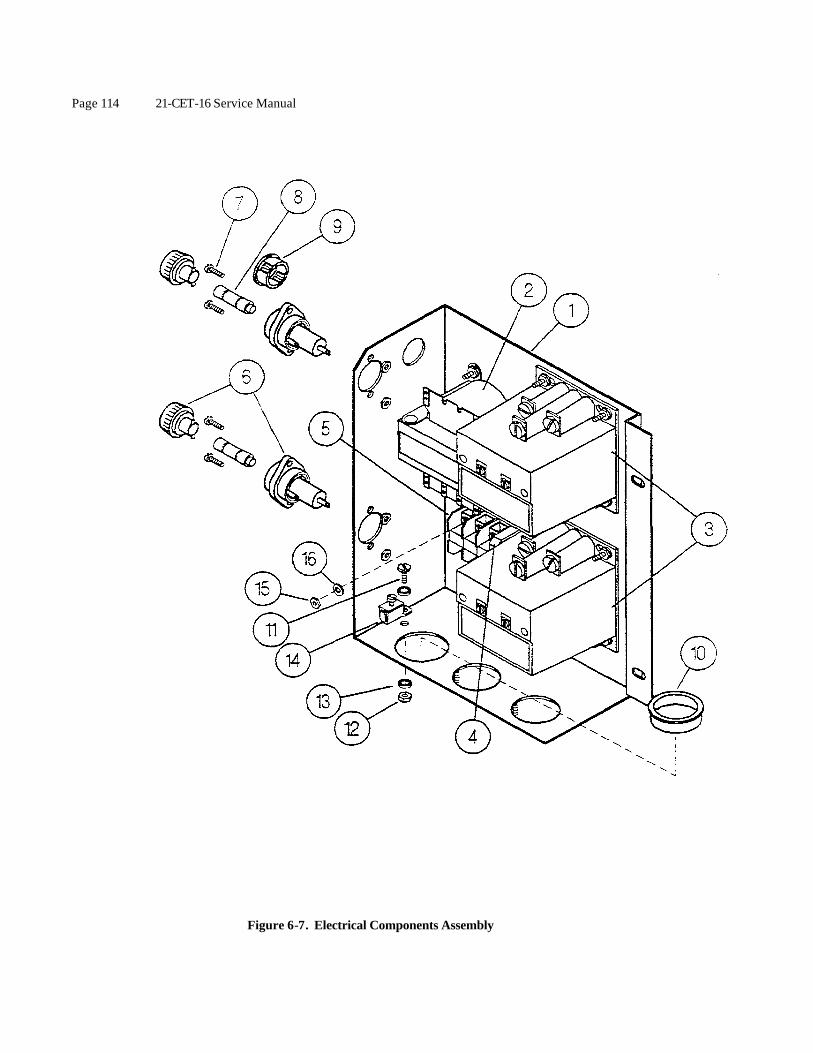
Page 114 21-CET-16 Service Manual
Figure 6-7. Electrical Components Assembly
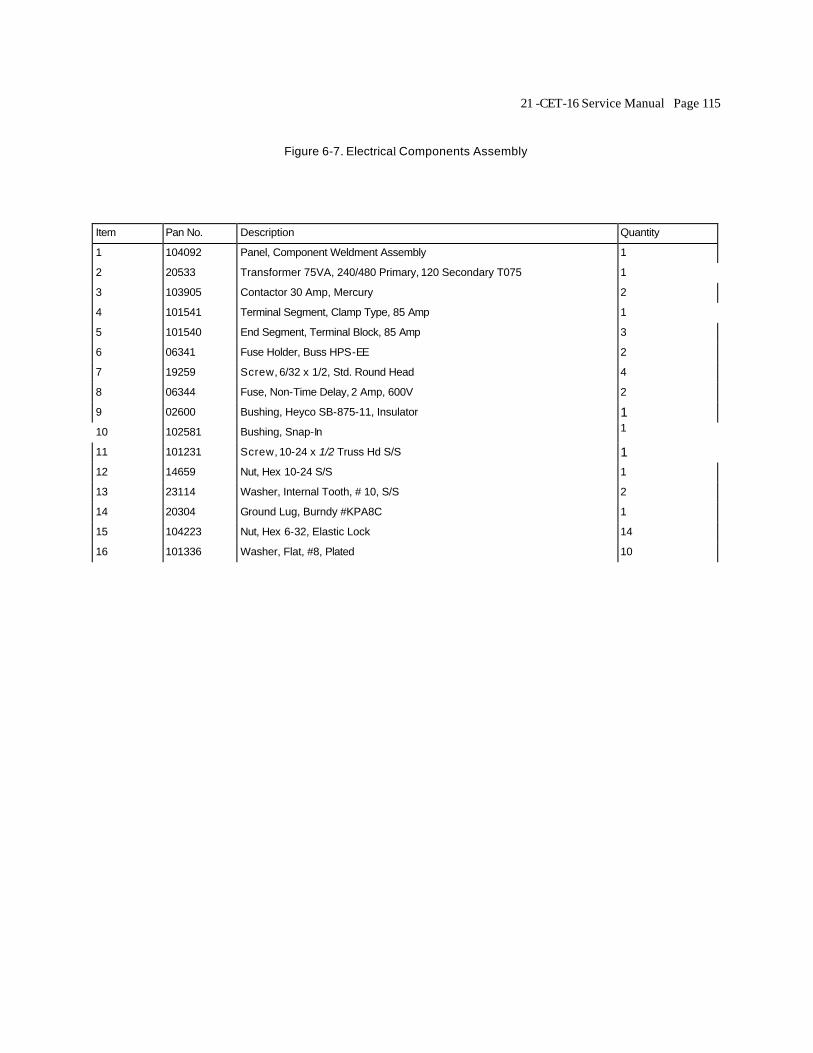
21 -CET-16 Service Manual Page 115
Figure 6-7. Electrical Components Assembly
Item Pan No. Description Quantity
1 104092 Panel, Component Weldment Assembly 1
2 20533 Transformer 75VA, 240/480 Primary, 120 Secondary T075 1
3 103905 Contactor 30 Amp, Mercury 2
4 101541 Terminal Segment, Clamp Type, 85 Amp 1
5 101540 End Segment, Terminal Block, 85 Amp 3
6 06341 Fuse Holder, Buss HPS-EE 2
7 19259 Screw, 6/32 x 1/2, Std. Round Head 4
8 06344 Fuse, Non-Time Delay, 2 Amp, 600V 2
9 02600 Bushing, Heyco SB-875-11, Insulator 1 10 102581 Bushing, Snap-In 1 11 101231 Screw, 10-24 x 1/2 Truss Hd S/S 1 12 14659 Nut, Hex 10-24 S/S 1
13 23114 Washer, Internal Tooth, # 10, S/S 2
14 20304 Ground Lug, Burndy #KPA8C 1
15 104223 Nut, Hex 6-32, Elastic Lock 14
16 101336 Washer, Flat, #8, Plated 10
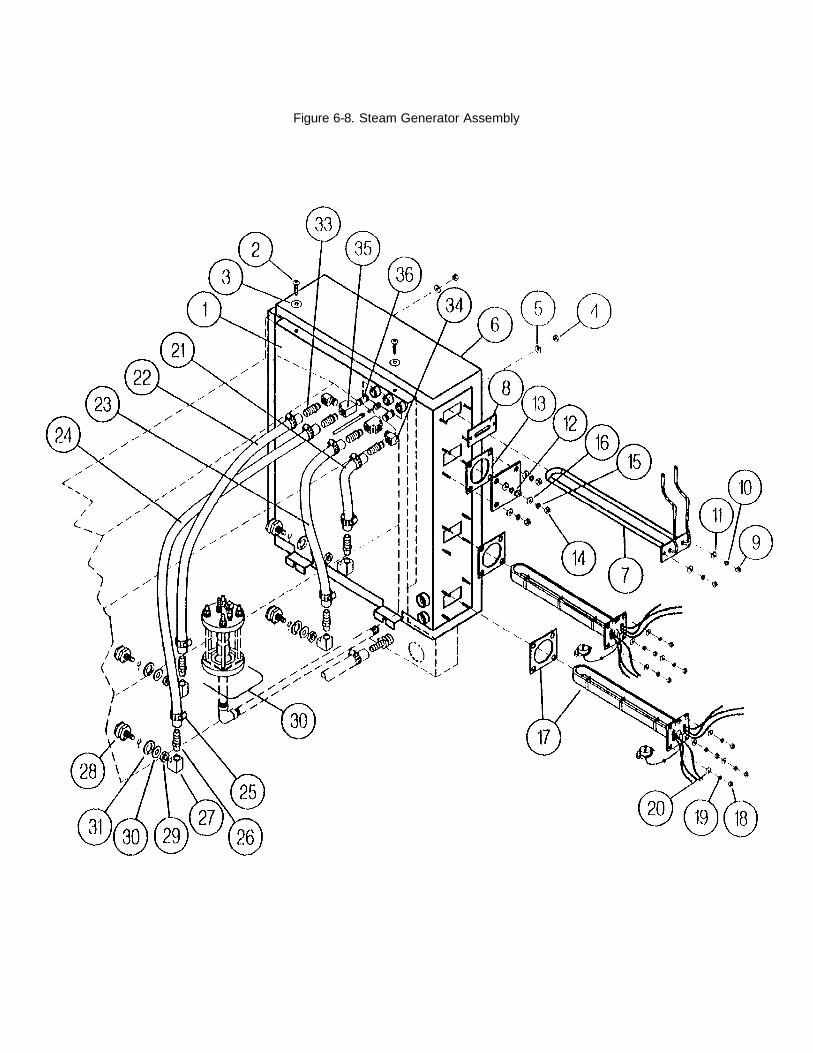
Figure 6-8. Steam Generator Assembly
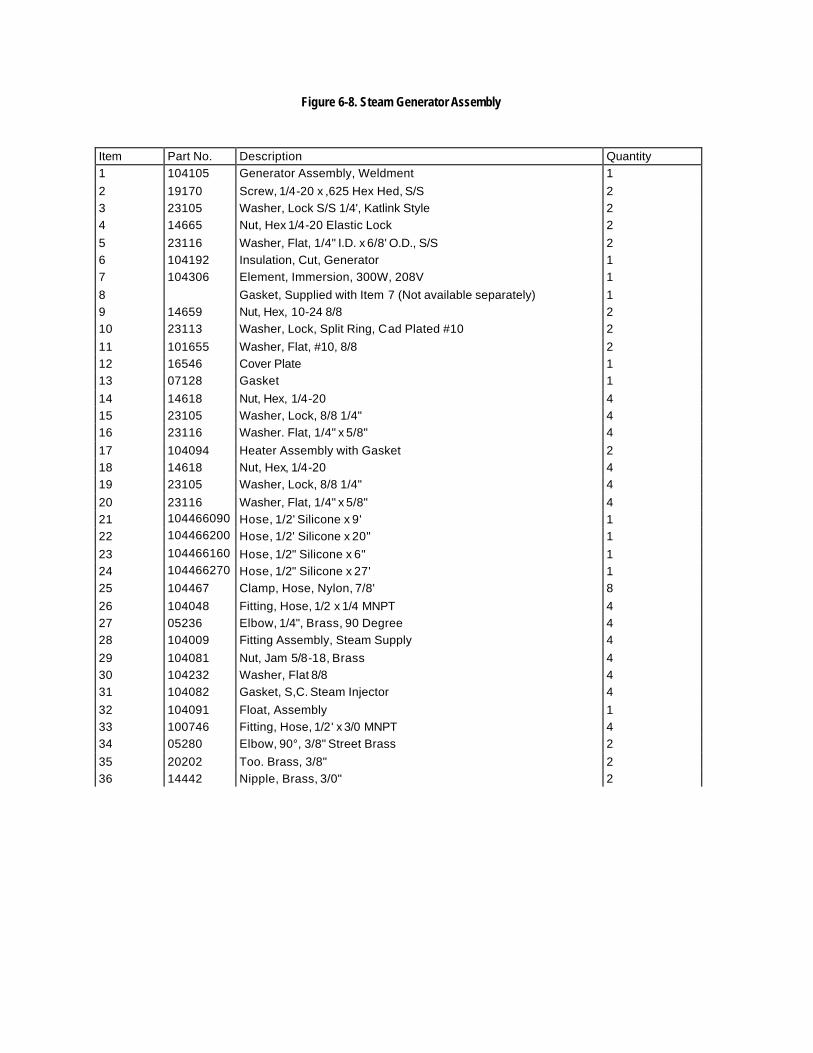
Figure 6-8. Steam Generator Assembly
Item Part No. Description Quantity 1 104105 Generator Assembly, Weldment 1 2 19170 Screw, 1/4-20 x ,625 Hex Hed, S/S 2 3 23105 Washer, Lock S/S 1/4', Katlink Style 2 4 14665 Nut, Hex 1/4-20 Elastic Lock 2 5 23116 Washer, Flat, 1/4" I.D. x 6/8' O.D., S/S 2 6 104192 Insulation, Cut, Generator 1 7 104306 Element, Immersion, 300W, 208V 1 8
Gasket, Supplied with Item 7 (Not available separately) 1
9 14659 Nut, Hex, 10-24 8/8 2 10 23113 Washer, Lock, Split Ring, Cad Plated #10 2 11 101655 Washer, Flat, #10, 8/8 2 12 16546 Cover Plate 1 13 07128 Gasket 1 14 14618 Nut, Hex, 1/4-20 4 15 23105 Washer, Lock, 8/8 1/4" 4 16 23116 Washer. Flat, 1/4" x 5/8" 4 17 104094 Heater Assembly with Gasket 2 18 14618 Nut, Hex, 1/4-20 4 19 23105 Washer, Lock, 8/8 1/4" 4 20 23116 Washer, Flat, 1/4" x 5/8" 4 21 104466090
0 Hose, 1/2' Silicone x 9' 1
22 1044662000
Hose, 1/2' Silicone x 20" 1 23 104466160
0 Hose, 1/2" Silicone x 6" 1
24 1044662700
Hose, 1/2" Silicone x 27' 1 25 104467 Clamp, Hose, Nylon, 7/8' 8 26 104048 Fitting, Hose, 1/2 x 1/4 MNPT 4 27 05236 Elbow, 1/4", Brass, 90 Degree 4 28 104009 Fitting Assembly, Steam Supply 4 29 104081 Nut, Jam 5/8-18, Brass 4 30 104232 Washer, Flat 8/8 4 31 104082 Gasket, S,C. Steam Injector 4 32 104091 Float, Assembly 1 33 100746 Fitting, Hose, 1/2' x 3/0 MNPT 4 34 05280 Elbow, 90°, 3/8" Street Brass 2 35 20202 Too. Brass, 3/8" 2 36 14442 Nipple, Brass, 3/0" 2
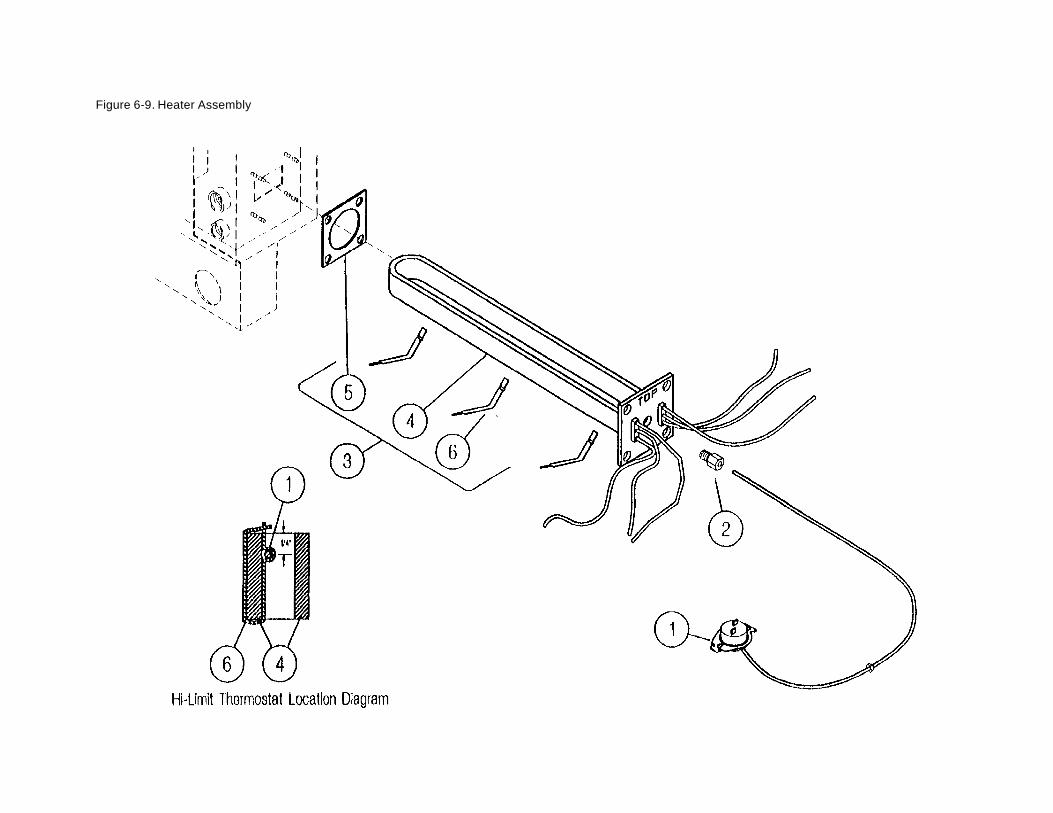
Figure 6-9. Heater Assembly

Figure 6-9. Heater Assembly
Item Part No. Description Quantity 1 103731 Thermostat, Hi-Limit, Capillary 1 2 103736 Adapter, Extended Compression 1 3
Heater Element Replacement Kits
104461 200V kit with Element 103081 (Item 4) and Items 5 and 6
1044611 240V kit with Element 1038811 (Item 4) and Items 5 and 6
1044612 415V kit with Element 1038812 (Item 4) and Items 5 and 6
1044614 480V kit with Element 1038814 (Item 4) and Items 5 and 0
1044615 380V kit with Element 1038815 (Item 4) and Items 5 and 6 4 per kit Heater Element 1
5 07128 Gasket 1 6 103989 Clip, Capillary Retainer 3

Page 120 21 -CET-16 Service Manual
Figure 6-10A. Float Assembly - Before Serial #WC11359-901-01
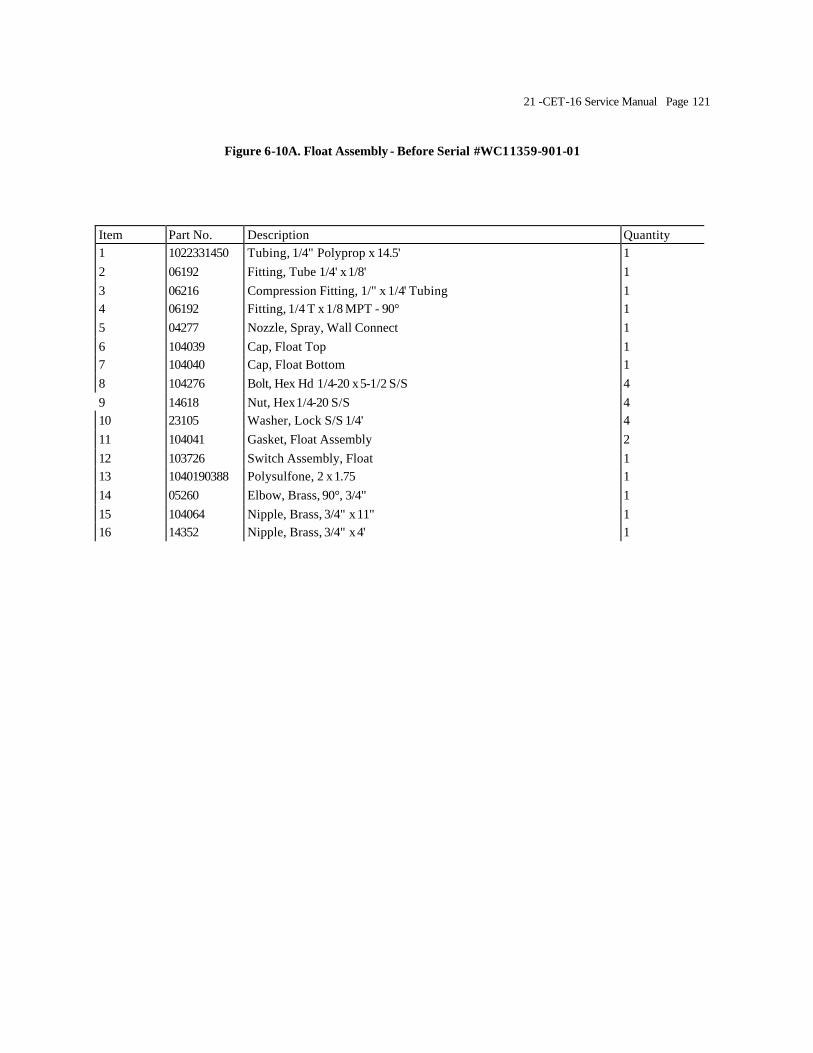
21 -CET-16 Service Manual Page 121
Figure 6-10A. Float Assembly - Before Serial #WC11359-901-01
Item Part No. Description Quantity 1 1022331450 Tubing, 1/4" Polyprop x 14.5' 1 2 06192 Fitting, Tube 1/4' x 1/8' 1 3 06216 Compression Fitting, 1/" x 1/4' Tubing 1 4 06192 Fitting, 1/4 T x 1/8 MPT - 90° 1 5 04277 Nozzle, Spray, Wall Connect 1 6 104039 Cap, Float Top 1 7 104040 Cap, Float Bottom 1 8 104276 Bolt, Hex Hd 1/4-20 x 5-1/2 S/S 4 9 14618 Nut, Hex 1/4-20 S/S 4 10 23105 Washer, Lock S/S 1/4' 4 11 104041 Gasket, Float Assembly 2 12 103726 Switch Assembly, Float 1 13 1040190388 Polysulfone, 2 x 1.75 1 14 05260 Elbow, Brass, 90°, 3/4" 1 15 104064 Nipple, Brass, 3/4" x 11" 1 16 14352 Nipple, Brass, 3/4" x 4' 1
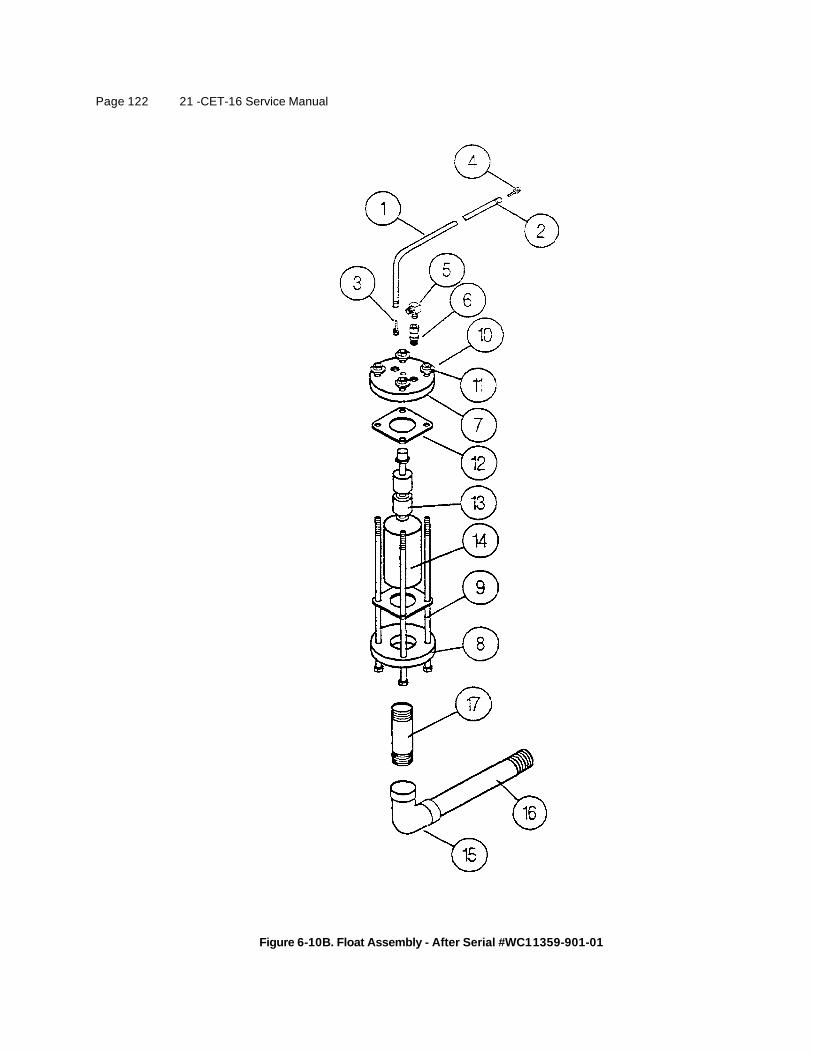
Page 122 21 -CET-16 Service Manual
Figure 6-10B. Float Assembly - After Serial #WC11359-901-01

21-CET-16 Service Manual Page 123
Figure 6-10B. Float Assembly - After Serial #WC11359-901-01
Item Part No. Description Quantity
1 1043791550 Hose, 1/4' I.D., Silicone Rubber x 15.5' 1
2 104383 Clamp, Hose, Nylon, 1/2" 2
3 104380 Fitting, Hose Barb, 1/4" Hose to 1/8' MPT 1
4 104382 Fitting, Hose Barb, 1/4" Hose to 3/8" MPT 1
5 06192 Fitting, 1/4 T x 1 /8* MPT - 90° 1
6 04277 Nozzle, Spray, Wall Connect 1
7 104039 Cap, Float Top 1
8 104040 Cap, Float Bottom 1
9 104276 Bolt, Hex Hd 1/4-20 x 5-1/2 S/S 4
10 14618 Nut, Hex 1/4-20 S/S 4
11 23105 Washer, Lock S/S 1/4' 4
12 104041 Gasket, Float Assembly 2
13 103726 Switch Assembly, Float 1
14 1040190388 Polysulfone, 2 x 1.75 1
15 05260 Elbow, Brass, 90°, 3/4" 1
16 104064 Nipple, Brass, 3/4' x 11" 1
17 14352 Nipple, Brass, 3/4' x 4' 1
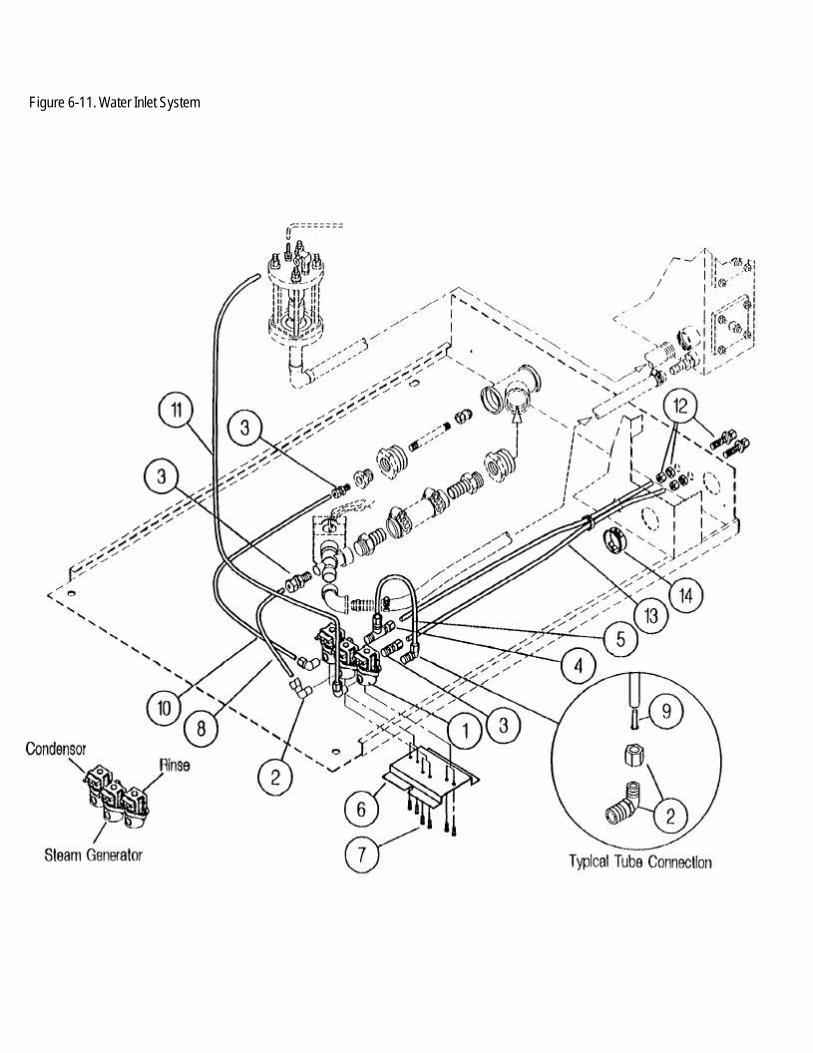
Figure 6-11. Water Inlet System
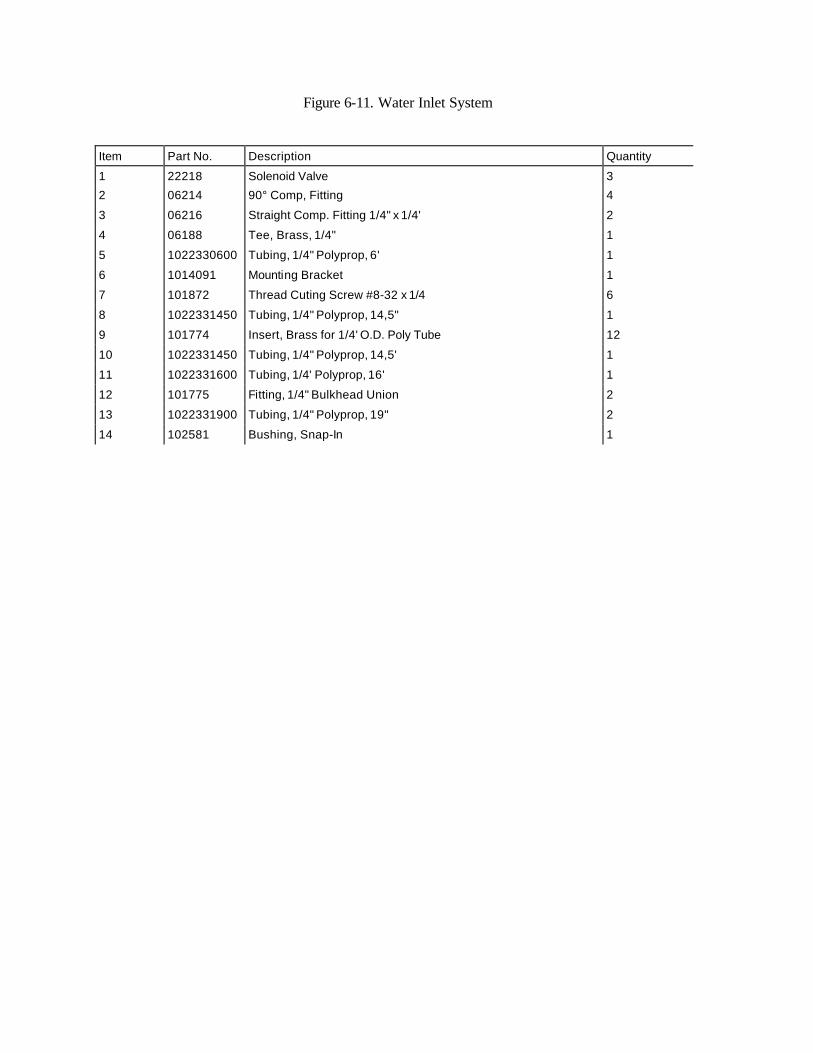
Figure 6-11. Water Inlet System
Item Part No. Description Quantity 1 22218 Solenoid Valve 3 2 06214 90° Comp, Fitting 4 3 06216 Straight Comp. Fitting 1/4" x 1/4' 2 4 06188 Tee, Brass, 1/4" 1 5 1022330600 Tubing, 1/4" Polyprop, 6' 1 6 1014091 Mounting Bracket 1 7 101872 Thread Cuting Screw #8-32 x 1/4 6 8 1022331450 Tubing, 1/4" Polyprop, 14,5" 1 9 101774 Insert, Brass for 1/4' O.D. Poly Tube 12 10 1022331450 Tubing, 1/4" Polyprop, 14,5' 1 11 1022331600 Tubing, 1/4' Polyprop, 16' 1 12 101775 Fitting, 1/4" Bulkhead Union 2 13 1022331900 Tubing, 1/4" Polyprop, 19" 2 14 102581 Bushing, Snap-In 1
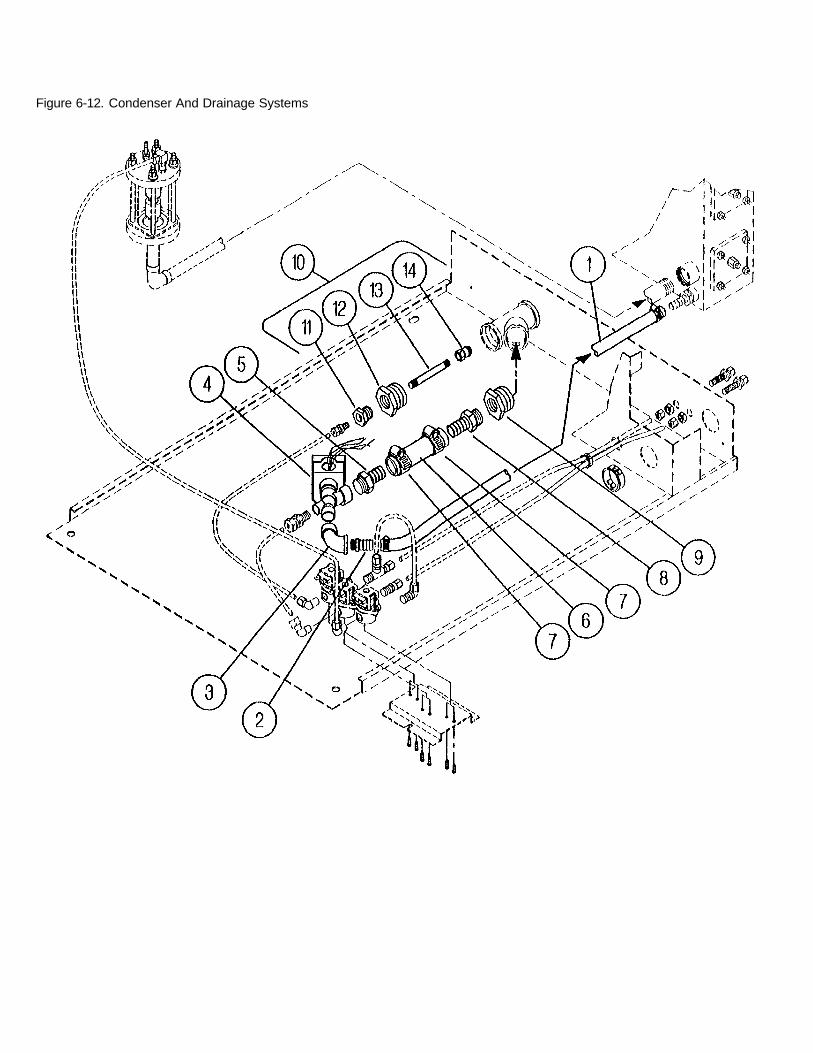
Figure 6-12. Condenser And Drainage Systems

Figure 6-12. Condenser And Drainage Systems
Item Part No. Description Quantity
1 085040750 Hose, 1/2" Darl Preen x 7.5' 1 2 06237 Hose Barb, 1/2' x 1/2' NPT Fitting 1
3 05253 Elbow, 1/2' Street, Brass 1
4 22221 Valve, Drain, Asco 1
5 06241 Hose Barb, 3/4" x 1/2" NPT Fitting 1
6 085050450 Hose, 3/4" Darl Preen x 4,5 1
7 03204 Hose Clamp, 3/4' 2
8 06240 Filling, Hose Barb, 3/4" I.D. Hose x 3/4" MPT 1
9 02570 Bushing 1
10 104201 Condenser Assembly, Spray 1
11 104055 Bushing. Pipe Reducer, 1" Male x 1/2' Female 1
12 02549 Bushing, Condenser 1
13 104056 Nipple, Brass, 1/8 x 4-1/2' 1
14 104057 Nozzle, Spraying Systems 1/8 G5, Brass 1

Figure 6-13, Equipment Stand
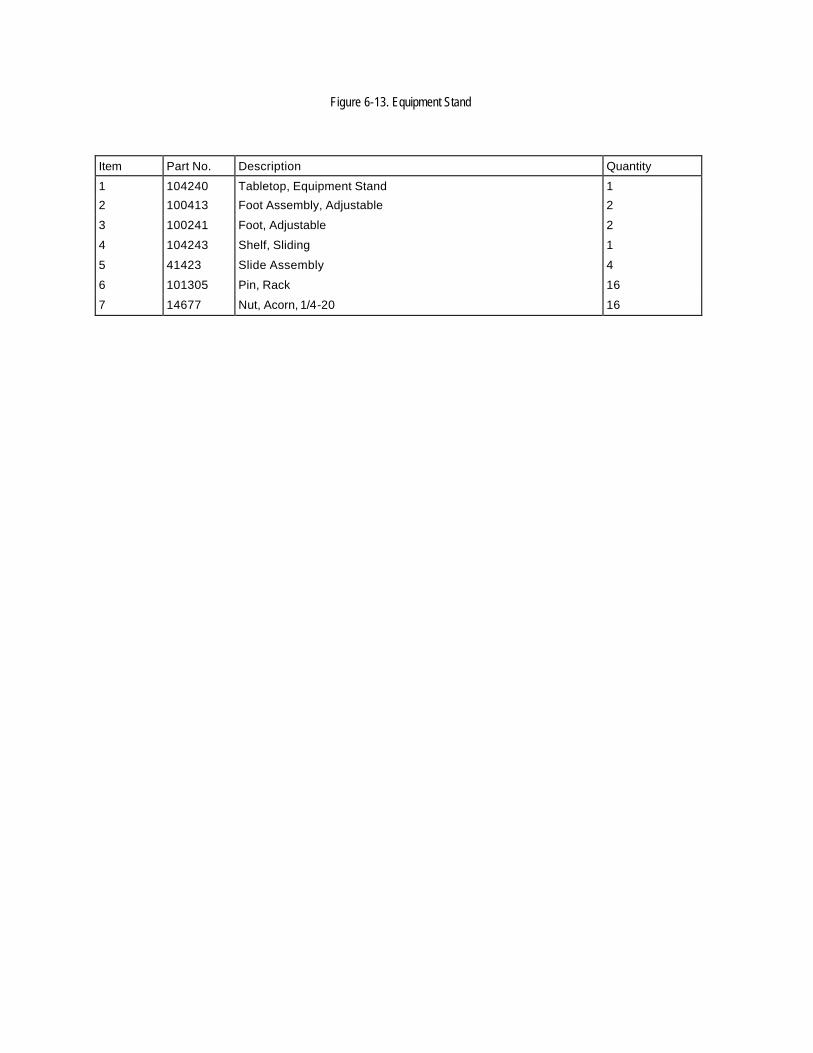
Figure 6-13. Equipment Stand
Item Part No. Description Quantity
1 104240 Tabletop, Equipment Stand 1 2 100413 Foot Assembly, Adjustable 2
3 100241 Foot, Adjustable 2
4 104243 Shelf, Sliding 1
5 41423 Slide Assembly 4
6 101305 Pin, Rack 16
7 14677 Nut, Acorn, 1/4-20 16

Figure 6-14. SleamCraft 3.1 Wiring Diagram • Electronic Timer

Figure 6-15. SteamCraft 3.1 Schematic Diagram - Electronic Timer
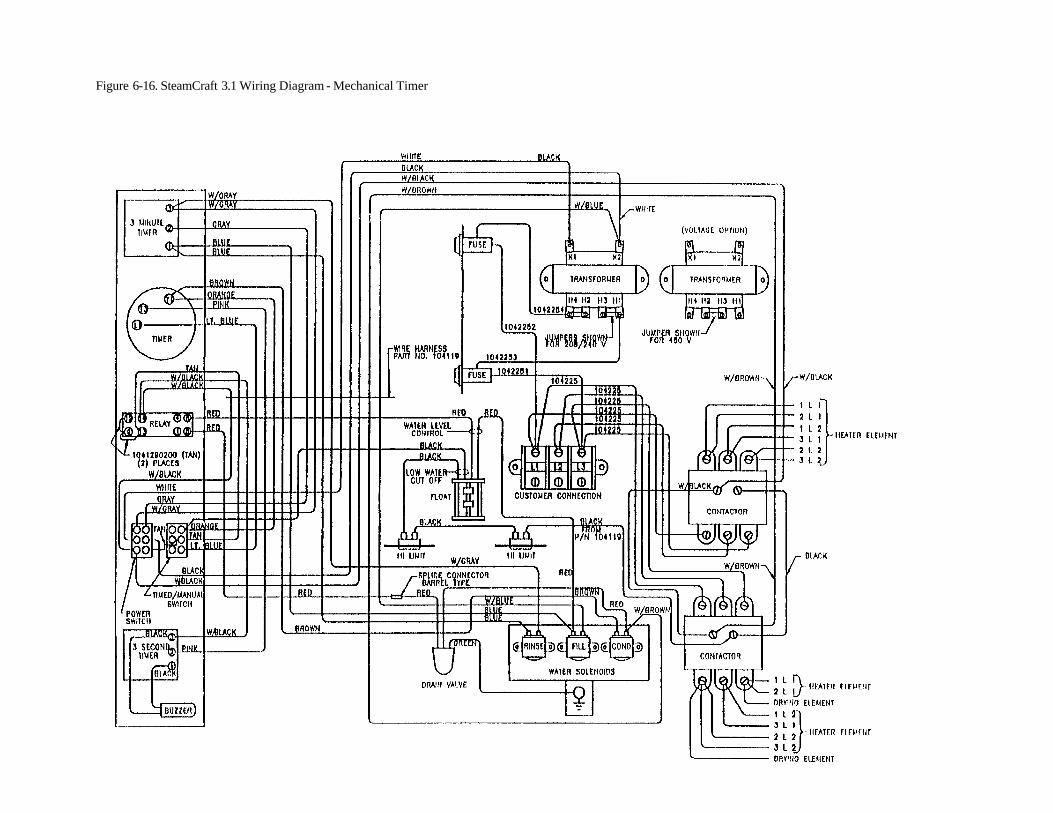
Figure 6-16. SteamCraft 3.1 Wiring Diagram - Mechanical Timer

Figure 6-17. SteamCraft 3.1 Schematic Diagram - Mechanical Timer