steam iron - philips...you are holding the iron in vertical position. this is useful for removing...
TRANSCRIPT

Steam IronGC2652, GC2650, GC2640, GC2620, GC2560, GC2530, GC2528, GC2522, GC2520, GC2510
L J
A D F GECB
I
H
K
2 3 4 5
6 7 8 9
10 11 12 13
14 15 16 17
1

ENGLISHGeneral description (Fig. 1)
A SpraynozzleB CapoffillingopeningC Steamcontrol
O=nosteaml=minimumsteam;=maximumsteam1=Calc-Cleanfunction
D Shot-of-steambutton9E SpraybuttonTF Automaticshut-offlight(GC2560only)G MainscordH Anti-Calctablet(alltypesexceptGC2510)I TemperaturelightJ TypeplateK WatertankL Temperaturedial
ImportantReadtheseinstructionsforusecarefullybeforeusingtheapplianceandsavethemforfuturereference.
Check if the voltage indicated on the type plate corresponds to the local mains voltage before you connect the appliance.If the appliance is provided with an earthed plug, it must be plugged into an earthed wall socket.Do not use the appliance if the plug, the cord or the appliance itself shows visible damage, or if the appliance has been dropped or is leaking.Check the cord regularly for possible damage.If the mains cord is damaged, it must be replaced by Philips, a service centre authorised by Philips or similarly qualified persons in order to avoid a hazard.Never leave the appliance unattended when it is connected to the mains.Never immerse the iron and the stand, if provided, in water.This appliance is not intended for use by persons (including children) with reduced physical, sensory or mental capabilities, or lack of experience and knowledge, unless they have been given supervision or instruction concerning use of the appliance by a person responsible for their safety.Children should be supervised to ensure that they do not play with the appliance.The soleplate of the iron can become extremely hot and may cause burns if touched.Do not allow the cord to come into contact with the soleplate when it is hot.When you have finished ironing, when you clean the appliance, when you fill or empty the water tank and also when you leave the iron even for a short while: set the steam control to position O, put the iron on its heel and remove the mains plug from the wall socket.Always place and use the iron and the stand, if provided, on a stable, level and horizontal surface.This appliance is intended for household use only.Electromagnetic fields (EMF)
ThisPhilipsappliancecomplieswithallstandardsregardingelectromagneticfields(EMF).Ifhandledproperlyandinaccordancewiththeinstructionsinthisinstructionmanual,theapplianceissafetouseaccordingtoscientificevidenceavailabletoday.
Preparing for useFilling the water tank
1 Remove the mains plug from the wall socket. 2 Set the steam control to position O (= no
steam) (Fig. 2). 3 Open the cap of the filling opening. 4 Tilt the iron and fill the water tank up to maximum
level (Fig. 3).If the tap water in your area is very hard, we advise you to use distilled water. Do not use chemically descaled water.Do not fill the water tank beyond the MAX indication.Do not put perfume, vinegar, starch, descaling agents, ironing aids or other chemicals in the water tank. 5 Close the cap of the filling opening (‘click’).
----
,
,
,
,,
,
,
,
,
,
,
,
,
,
Setting the temperature
The iron may give off some smoke when you use it for the first time. This will cease after a short while.
1 Put the iron on its heel and set the temperature dial to the required ironing temperature by turning it to the appropriate position (Fig. 4).Checkthelaundrycarelabelfortherequiredironingtemperature.1Syntheticfabrics(e.g.acrylic,viscose,polyamide,polyester)1Silk2Wool3Cotton,linenIfyoudonotknowwhatkindorkindsoffabricanarticleismadeof,determinetherightironingtemperaturebyironingapartthatwillnotbevisiblewhenyouwearorusethearticle.Silk,woollenandsyntheticmaterials:ironthereversesideofthefabrictopreventshinypatches.Avoidusingthesprayfunctiontopreventstains.
2 Put the mains plug in an earthed wall socket. 3 When the temperature light has gone out, wait a
while before you start ironing.
Note: The temperature light will go on from time to time during ironing.
Using the applianceSteam ironing
Makesurethatthereisenoughwaterinthewatertank.
1 Set the temperature dial to the recommended position (see section ‘Setting the temperature’).
2 Set the steam control to the appropriate steam position (Fig. 2).çforminimumsteam(temperaturesettings2and3).éformaximumsteam(temperaturesettings3toMAX).
Note: The iron will start steaming as soon as the set temperature has been reached.
GC2640/GC2620/GC2530/GC2528/GC2522/GC2520/GC2510 only:
Watermayleakfromthesoleplateifthesettemperatureistoolow(MINto2).
Ironing without steam
1 Set the steam control to position O (= no steam). 2 Set the temperature dial to the recommended
position (see section ‘Setting the temperature’).FeaturesSpray function
Youcanusethesprayfunctiontoremovestubborncreasesatanytemperature
1 Make sure that there is enough water in the water tank.
2 Press the spray button several times to moisten the article to be ironed (Fig. 5).Shot of steam
Apowerfulshotofsteamhelpstoremoveverystubborncreases.Theshot-of-steamfunctiononlyworksattemperaturesettingsbetween2andMAX.
1 Press and release the shot-of-steam button (Fig. 6).Vertical shot of steam (all types except GC2510)
1 The shot-of-steam function can also be used when you are holding the iron in vertical position. This is useful for removing creases from hanging clothes, curtains, etc (Fig. 7).
Never direct the steam at people.Drip stop (GC2652/2650/GC2560 only)
Thisironisequippedwithadripstopfunction:theironautomaticallystopsproducingsteamwhenthetemperatureistoolowtopreventwaterfromdripping
,
-
-
----
-
-
-
outofthesoleplate.Whenthishappensyouwillhearaclick.
Automatic shut-off (GC2560 only)
Theelectronicshut-offfunctionautomaticallyswitchestheheatingelementoffiftheironhasnotbeenmovedforawhile.
The automatic shut-off light starts blinking to indicate that the heating element has been switched off. (Fig. 8)
Tolettheironheatupagain,picktheironupormoveitslightly.Theautomaticshut-offlightgoesout.
1 If the temperature light goes on, wait for it to go out before you start ironing.
2 If the temperature light does not go on, the iron is ready for use.Cleaning and maintenanceDouble-Active Calc System
All types except GC2510: The Anti-Calc tablet prevents scale from clogging the steam vents. The tablet is constantly active and does not need to be replaced (Fig. 9).The Calc-Clean function removes the scale particles.Calc-Clean function
UsetheCalc-Cleanfunctiononceeverytwoweeks.Ifthewaterinyourareaisveryhard(i.e.whenflakescomeoutofthesoleplateduringironing),theCalc-Cleanfunctionshouldbeusedmorefrequently.
1 Set the steam control to position O. 2 Fill the water tank to the maximum level. Do not pour vinegar or other descaling agents into the water tank.. 3 Set the temperature dial to MAX (Fig. 10). 4 Put the plug in the wall socket. 5 Unplug the iron when the temperature light has
gone out. 6 Hold the iron over the sink and set the steam
control to the Calc-Clean position ( 1). The steam control will spring up slightly.
7 Pull the steam control upwards and remove it (Fig. 11).
8 Hold the iron over the sink and move it to and fro (Fig. 12).
Note: Steam and boiling water will come out of the soleplate. Impurities and scale (if any) will be flushed out. 9 Use vinegar to remove scale, if any, from the steam
control needle (Fig. 13).Do not bend or damage the steam control needle. 10 Put the steam control back into the iron by
inserting the point of the needle exactly in the centre of the hole and by fitting the small projection on the side of the needle into the slot. Press down the steam control while turning it to position O (Fig. 14).
11 Repeat the Calc-Clean process if the iron still contains a lot of impurities.After the Calc-Clean process
1 Put the plug in the wall socket and let the iron heat up to allow the soleplate to dry.
2 Unplug the iron when the temperature light has gone out.
3 Move the iron gently over a piece of used cloth to remove any water stains that may have formed on the soleplate. Storage
1 Set the steam control to position O, remove the plug from the wall socket and let the iron cool down.
2 Clean the appliance and wipe scale and any other deposits off the soleplate with a damp cloth and a non-abrasive (liquid) cleaner.
Keep the soleplate smooth: avoid hard contact with metal objects.
,
,
,
423900061493 2/9
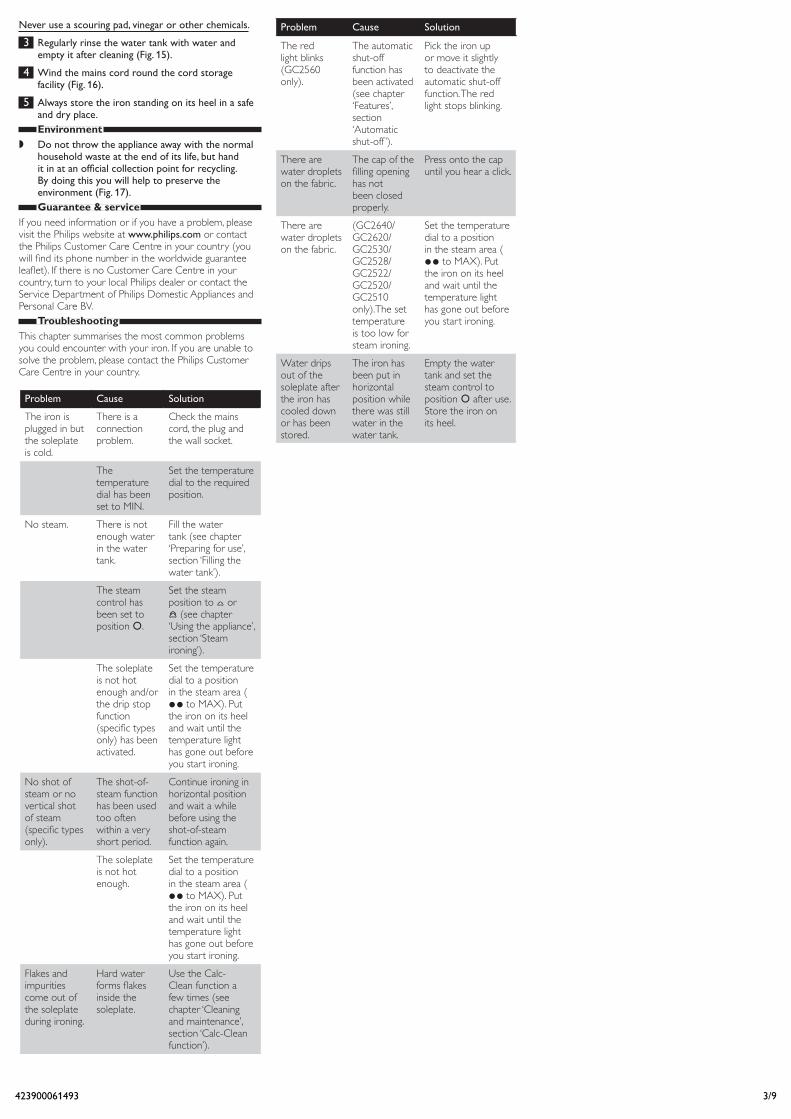
Never use a scouring pad, vinegar or other chemicals. 3 Regularly rinse the water tank with water and
empty it after cleaning (Fig. 15). 4 Wind the mains cord round the cord storage
facility (Fig. 16). 5 Always store the iron standing on its heel in a safe
and dry place.EnvironmentDo not throw the appliance away with the normal household waste at the end of its life, but hand it in at an official collection point for recycling. By doing this you will help to preserve the environment (Fig. 17).Guarantee & service
Ifyouneedinformationorifyouhaveaproblem,pleasevisitthePhilipswebsiteatwww.philips.comorcontactthePhilipsCustomerCareCentreinyourcountry(youwillfinditsphonenumberintheworldwideguaranteeleaflet).IfthereisnoCustomerCareCentreinyourcountry,turntoyourlocalPhilipsdealerorcontacttheServiceDepartmentofPhilipsDomesticAppliancesandPersonalCareBV.
TroubleshootingThischaptersummarisesthemostcommonproblemsyoucouldencounterwithyouriron.Ifyouareunabletosolvetheproblem,pleasecontactthePhilipsCustomerCareCentreinyourcountry.
Problem Cause SolutionTheironispluggedinbutthesoleplateiscold.
Thereisaconnectionproblem.
Checkthemainscord,theplugandthewallsocket.
ThetemperaturedialhasbeensettoMIN.
Setthetemperaturedialtotherequiredposition.
Nosteam. Thereisnotenoughwaterinthewatertank.
Fillthewatertank(seechapter‘Preparingforuse’,section‘Fillingthewatertank’).
ThesteamcontrolhasbeensettopositionO.
Setthesteampositiontoçoré(seechapter‘Usingtheappliance’,section‘Steamironing’).
Thesoleplateisnothotenoughand/orthedripstopfunction(specifictypesonly)hasbeenactivated.
Setthetemperaturedialtoapositioninthesteamarea(2toMAX).Puttheirononitsheelandwaituntilthetemperaturelighthasgoneoutbeforeyoustartironing.
Noshotofsteamornoverticalshotofsteam(specifictypesonly).
Theshot-of-steamfunctionhasbeenusedtoooftenwithinaveryshortperiod.
Continueironinginhorizontalpositionandwaitawhilebeforeusingtheshot-of-steamfunctionagain.
Thesoleplateisnothotenough.
Setthetemperaturedialtoapositioninthesteamarea(2toMAX).Puttheirononitsheelandwaituntilthetemperaturelighthasgoneoutbeforeyoustartironing.
Flakesandimpuritiescomeoutofthesoleplateduringironing.
Hardwaterformsflakesinsidethesoleplate.
UsetheCalc-Cleanfunctionafewtimes(seechapter‘Cleaningandmaintenance’,section‘Calc-Cleanfunction’).
,
Problem Cause Solution
Theredlightblinks(GC2560only).
Theautomaticshut-offfunctionhasbeenactivated(seechapter‘Features’,section‘Automaticshut-off ’).
Picktheironupormoveitslightlytodeactivatetheautomaticshut-offfunction.Theredlightstopsblinking.
Therearewaterdropletsonthefabric.
Thecapofthefillingopeninghasnotbeenclosedproperly.
Pressontothecapuntilyouhearaclick.
Therearewaterdropletsonthefabric.
(GC2640/GC2620/GC2530/GC2528/GC2522/GC2520/GC2510only).Thesettemperatureistoolowforsteamironing.
Setthetemperaturedialtoapositioninthesteamarea(2toMAX).Puttheirononitsheelandwaituntilthetemperaturelighthasgoneoutbeforeyoustartironing.
Waterdripsoutofthesoleplateaftertheironhascooleddownorhasbeenstored.
Theironhasbeenputinhorizontalpositionwhiletherewasstillwaterinthewatertank.
EmptythewatertankandsetthesteamcontroltopositionOafteruse.Storetheirononitsheel.
423900061493 3/9

BAHASA MELAYUPerihalan umum (Gamb. 1)
A MuncungsemburB TukupbukaanisianC Kawalanstim
O=tiadastiml=stimminimum;=stimmaksimum1=fungsiPembersihanKerak
D Butangpancutanstim9E ButangsemburTF Lampupematianautomatik(GC2560sahaja)G KordsesalurkuasaH TabletAntikerak(semuajeniskecualiGC2510)I LampusuhuJ PlatjenisK TangkiairL Tombolsuhu
PentingBacaarahaninidengantelitisebelummenggunakanperkakasdansimpanarahaniniuntukrujukanpadamasadepan.
Periksa sama ada voltan yang ditunjukkan pada plat jenis sepadan dengan voltan sesalur kuasa tempatan sebelum anda menyambungkan perkakas.Jika perkakas disediakan dengan plag yang dibumikan, ia mesti dipasangkan ke dalam soket dinding yang dibumikan.Jangan gunakan perkakas jika plag, kord atau perkakasnya sendiri menunjukkan kerosakan yang nyata, atau jika perkakas telah terjatuh atau bocor.Periksa kord dengan kerap untuk mencari apa-apa kerosakan.Jika sesalur kuasa rosak, ia mesti digantikan oleh Philips, pusat servis yang dibenarkan oleh Philips atau pihak-pihak yang telah diluluskan bagi mengelakkan bahaya.Jangan sekali-kali biarkan seterika tanpa diawasi pada bila-bila masa ia tersambung dengan punca kuasa.Jangan sekali-kali menenggelamkan seterika dan diriannya, di dalam air.Perkakas ini bukan dimaksudkan untuk digunakan oleh orang (termasuk kanak-kanak) yang kurang upaya dari segi fizikal, deria atau mental, atau kurang berpengalaman dan pengetahuan, kecuali mereka diawasi atau diberi arahan berkenaan penggunaan perkakas ini oleh orang yang bertanggungjawab atas keselamatan mereka. Kanak-kanak kecil harus diawasi untuk memastikan mereka tidak bermain dengan perkakas itu.Bahagian plat tapak seterika boleh menjadi amat panas dan mungkin menyebabkan kelecuran jika tersentuh.Jangan biarkan kord tersentuh plat tapak semasa seterika masih panas.Apabila anda selesai menyeterika, apabila anda membersihkan perkakas, apabila anda mengisi atau mengosongkan tangki air dan juga apabila anda meninggalkan seterika tanpa dijaga biarpun sebentar: tetapkan kawalan stim pada kedudukan O, berdirikan seterika pada tumitnya dan cabutkan palam sesalur dari soket dinding.Sentiasa tempatkan dan gunakan seterika dan tempat letaknya, jika disediakan, pada permukaan yang stabil, rata dan mendatar.Perkakas ini dimaksudkan untuk penggunaan di rumah sahaja.Medan Elektro Magnet (EMF)
PerkakasPhilipsinimematuhisemuapiawaiyangberhubungdenganmedanelektromagnet(EMF).Jikadikendalikandenganbetuldanmematuhiarahandalammanualarahanini,perkakasselamatuntukdigunakanmenurutbuktisaintifikyangbolehdidapatipadamasaini.
Bersedia untuk menggunakannyaMengisi tangki air.
1 Tanggalkan palam utama dari soket dinding. 2 Tetapkan kawalan stim pada kedudukan O (=tanpa
stim) (Gamb. 2). 3 Bukakan tukup bukaan isian. 4 Condongkan seterika dan isikan tangki air sehingga
paras maksimum (Gamb. 3).
----
,
,
,
,
,
,
,
,
,
,
,
,
,
,
Jika air paip di kawasan anda sangat liat, kami nasihatkan supaya anda menggunakan air suling. Jangan gunakan cuka, kanji atau air yang dinyahkerak secara kimia.Jangan isikan tangki air melepasi tanda MAKSIMUM.Jangan masukkan minyak wangi, cuka, kanji, agen penanggal kerak, bahan bantu penyeterikaan atau bahan kimia lain ke dalam tangki air. 5 Tutup tukup bukaan isian (‘klik’).
Menetapkan suhu
Seterika mungkin mengeluarkan sedikit asap semasa anda menggunakannya pada kali pertama. Ini akan berhenti selepas beberapa ketika.
1 Berdirikan seterika pada tumitnya dan tetapkan tombol suhu pada suhu penyeterikaan yang dikehendaki dengan memutarkannya ke kedudukan yang betul (Gamb. 4).Periksalabelpenjagaankainuntukmengetahuisuhuseterikayangsesuai:1Fabriksintetik(contohnyaakrilik,viskos,poliamida,poliester).1Sutera2Benangbulu3Kainkapas,linenJikaandatidaktahujenisfabriksesuatupakaian,tentukansuhupenyeterikaanyangbetuldenganmenyeterikabahagianpakaianyangtidakkelihatanapabilaandamemakainya.Kainsutera,buludansintetik:seterikakanbahagiandalamfabrikuntukmengelakkantompokberkilau.Elakkanpenggunaanfungsisemburuntukmencegahtanda.
2 Memasang palam wayar di soket dinding yang dibumikan.
3 Apabila lampu suhu padam, tunggu sebentar sebelum anda mula menyeterika.
Nota: Lampu suhu akan menyala dari masa ke masa masa menyeterika.
Menggunakan perkakasMenyeterika dengan stim
Pastikanairdidalamtangkiairmencukupi.
1 Tetapkan suhu dial ke kedudukan yang disyorkan (lihat bahagian ‘Mengeset suhu’).
2 Tetapkan kawalan stim pada posisi stim yang sesuai (Gamb. 2).çbagistimminimum(setingsuhu2dan3).ébagistimmaksimum(setingsuhu3hinggaMAX).
Nota: Seterika akan mula membebaskan stim sebaik sahaja suhu yang ditetapkan dicapai.
GC2640/GC2620/GC2530/GC2528/GC2522/GC2520/GC2510 sahaja:
Airmungkinbocordariplattapakjikasuhuyangditetapkanterlalurendah(MINhingga2).
Menyeterika tanpa stim
1 Setkan pengawal stim pada kedudukan O (= tanpa stim).
2 Tetapkan suhu dial ke kedudukan yang disyorkan (lihat bahagian ‘Mengeset suhu’).Ciri-ciriFungsi sembur
Andabolehmenggunakanfungsisemburuntukmelicinkankedutyangdegilpadaapa-apasuhu.
1 Pastikan air di dalam tangki air mencukupi. 2 Tekan butang sembur beberapa kali untuk
melembapkan kain yang hendak digosok (Gamb. 5).Pancutan stim
Pancutanstimyangkuatmenolongmelicinkankedutyangsangatdegil.Fungsipancutanstimhanyaberkesanpadasetingsuhuantara2denganMAX.
1 Tekan dan lepaskan butang pancutan stim (Gamb. 6).
,
-
-
----
-
--
Pancutan menegak stim (semua jenis kecuali GC2510)
1 Fungsi pancutan stim boleh juga digunakan apabila anda memegang seterika dalam kedudukan menegak. Ini berguna untuk melicinkan kedut pada pakaian yang tergantung, langsir, dsb (Gamb. 7).
Jangan sekali-kali halakan stim ke arah orang.Penghenti titisan (GC2652/2650/GC2560 sahaja)
Seterikainidilengkapifungsipenghentititisan:seterikaberhentimenghasilkanstimsecaraautomatikapabilasuhuterlalurendahsupayaairtidakmenitiskeluardariplattapak.Apabilainiberlaku,bunyiklikakankedengaran.
Pematian automatik (jenis GC2560 sahaja)
Perantikeselamatanelektronikakanmematikanunsurpemanassecaraautomatikjikaseterikatidakdigerakkanuntukbeberapawaktu.
Lampu pematian automatik mula berkelip untuk menandakan bahawa unsur pemanasan telah dimatikan. (Gamb. 8)
Untukmembiarkanseterikapanassemula,angkatseterikadangerakkannyasedikit.Lampupematianautomatikakanpadam.
1 Jika lampu suhu menyala, tunggu sehingga ia padam sebelum anda mula menyeterika.
2 Jika lampu suhu tidak menyala, seterika sedia untuk digunakan.Pembersihan dan penyenggaraanSistem Kerak Dwiaktif
Semua jenis kecuali GC2510: Tablet antikerak mencegah kerak menyumbat liang stim. Tablet ini sentiasa aktif dan tidak perlu digantikan (Gamb. 9).Fungsi Pembersihan Kerak menanggalkan zarah kerak.Fungsi Pembersihan Kerak
GunakanfungsiPembersihan-Keraksekalisetiapduaminggu.Jikaairdikawasanandasangatliat(contohnyaapabilaempingkeluardaritapakseterikasemasamenyeterika),fungsiPembersihanKerakharusdigunakandenganlebihkerap.
1 Setkan kawalan stim pada kedudukan O. 2 Isikan tangki air sampai paras maksimum. Jangan tuangkan cuka atau agen penanggal kerak yang lain ke dalam tangki air. 3 Tetapkan suhu tombol pada MAX (Gamb. 10). 4 Pasangkan plag di soket dinding. 5 Cabut plag seterika apabila lampu suhu padam. 6 Pegang seterika di atas singki dan setkan kawalan
stim pada Pembersihan-Kerak ( 1). Kawalan stim akan terkeluar sedikit.
7 Tarik kawalan stim ke atas dan tanggalkannya (Gamb. 11).
8 Pegang seterika bertadahkan sink dan gerakkannya secara berulang-alik (Gamb. 12).
Nota: Stim dan air yang mendidih akan keluar dari tapak plat. Kekotoran dan kerak air (jika ada) akan mengalir keluar. 9 Gunakan cuka untuk menanggalkan kerak, jika ada,
dari jarum kawalan stim (Gamb. 13).Jangan bengkokkan atau rosakkan jarum kawalan stim. 10 Masukkan semula kawalan stim dengan menyisipkan
hujung jarum betul-betul di tengah-tengah lubang dan memuatkan unjuran kecil di sisi jarum ke dalam alur. Tekan kawalan stim ke bawah pada kedudukan O (Gamb. 14).
11 Ulangi proses Pembersihan-Kerak jika seterika masih mengandungi banyak kekotoran.Selepas proses Pembersihan Kerak
1 Masukkan palam ke dalam soket dinding dan biarkan seterika memanas supaya plat tapak menjadi kering.
2 Cabut plag seterika apabila lampu suhu padam.
,
,
,
423900061493 4/9

3 Gerakkan seterika perlahan-lahan di atas sehelai kain terpakai untuk mengeluarkan apa-apa kesan air yang mungkin terbentuk pada plat tapaknya. Penyimpanan
1 Setkan kawalan stim pada kedudukan O, tanggalkan plag dari soket dinding dan biarkan seterika menyejuk.
2 Bersihkan perkakas dan kesatkan kerak atau mendapan lain pada plat tapak dengan menggunakan kain lembap dan (cecair) pencuci yang tidak melelas.
Pelihara plat tapak agar licin: elakkan daripada tersentuh dengan kuat dnegan bahan logam.Jangan sekali-kali gunakan pad penyental, cuka atau bahan kimia yang lain. 3 Bilas tangki air secara kerap dengan air dan
kosongkan selepas dibersihkan (Gamb. 15). 4 Lilitkan kord sesalur di sekeliling bahagian
penyimpanan kord (Gamb. 16). 5 Sentiasa tempatkan seterika pada tumitnya di
tempat yang selamat dan kering.Alam sekitarJangan buang perkakas bersama sampah rumah pada akhir hayatnya, tetapi bawanya ke pusat pungutan rasmi untuk dikitar semula. Dengan melakukan sedemikian anda akan membentu memelihara alam sekitar (Gamb. 17).Jaminan dan servis
Jikaandamemerlukanmaklumatataumenghadapimasalah,silakunjungilamanwebPhilipsdiwww.philips.comatauhubungiPusatLayananPelangganPhilipsdinegaraanda(andabolehmendapatkannombortelefonnyadidalamrisalahjaminansedunia).JikatiadaPusatLayananPelanggandinegaraanda,hubungiwakilpengedarPhilipstempatanatauJabatanServisSyarikatPerkakasDomestikdanPenjagaanDiriPhilips.
Menyelesaikan masalahBabinimeringkaskanmasalahpalinglazimyangmungkinandahadapidenganseterikaanda.Sekiranyaandatidakdapatmenyelesaikanmasalah,hubungiPusatLayananPelanggandinegaraanda.
Masalah Penyebab PenyelesaianAlatseterikadisambungtetapiplattapakdingin.
Terdapatmasalahsambungan.
Periksakordsesalurkuasa,palamdansoketdinding.
TombolsuhuditetapkandiMIN.
Tetapkantombolsuhudikedudukanyangdikehendaki.
Tiadastim. Airdidalamtangkiairtidakmencukupi.
Isikantangkiair(lihatbab‘Bersediauntukmenggunakannya’,bahagian‘Mengisitangkiair’.)
PengawalstimdisetkanpadakedudukanO.
Setkankedudukanstimpada,çataué(lihatbab‘Menggunakanperkakas’,bahagian‘Menyeterikadenganstim’).
Plattapaktidakcukuppanasdan/ataufungsicegahtitis(jenistertentusahaja)diaktifkan.
Setkantombolsuhupadakedudukandidalamlingkunganstim(2hinggaMAX).Berdirikanseterikapadatumitnyadantunggusehinggalampusuhupadamsebelumandamulamenyeterika.
,
Masalah Penyebab Penyelesaian
Tiadapancutanstimatautiadapancutanstimmenegak(jenistertentusahaja).
FungsiSemburanStimdigunakanterlalubanyakdalammasayangterlalusingkat.
Terusmenyeterikadalamkedudukanmendatardantunggubeberapalamasebelummenggunakanfungsipancutanstim(menegak)sekalilagi.
Plattapaktidakcukuppanas.
Setkantombolsuhupadakedudukandidalamlingkunganstim(2hinggaMAX).Berdirikanseterikapadatumitnyadantunggusehinggalampusuhupadamsebelumandamulamenyeterika.
Empingdankotorankeluardariplattapaksemasamenyeterika.
Airliatmembentukempingdidalamplattapak.
GunakanfungsiPembersihanKerakbeberapakali(lihat‘Membersihdanmenyelenggara’,bahagian‘PembersihanKerak’).
Lampumerahberkelip(GC2560sahaja).
Fungsipematiankuasaautomatikdiaktifkan(lihat‘Ciri’,bahagian‘Pematiankuasaautomatik’).
Angkatkanseterikaataugerakkannyasedikituntukmenyahaktifkanfungsipematiankuasaautomatiknya.Lampumerahakanberhentiberkelip.
Terdapattitisanairpadafabrik.
Tukupbukaanisiantidakditutupdenganbetul.
Tekantukupsehinggaandamendengarbunyiklik.
Terdapattitisanairpadafabrik.
(GC2640/GC2620/GC2530/GC2528/GC2522/GC2520/GC2510sahaja).Suhuyangdisetadalahterlalurendahuntukmenyeterikadenganstim.
Setkantombolsuhupadakedudukandidalamlingkunganstim(2hinggaMAX).Berdirikanseterikapadatumitnyadantunggusehinggalampusuhupadamsebelumandamulamenyeterika.
Airmenitisdariplattapaksetelahseterikasejukatausetelahdisimpan.
Seterikadiletakkandalamkedudukanmendatarsemasamasihadaairdidalamtangkiair.
KosongkantangkiairdansetkanpengawalstimpadakedudukannyaOselepasdigunakan.Simpanseterikadalamkeadaanberdiripadatumitnya.
423900061493 5/9

繁體中文
一般說明 (圖 1)
A 噴水噴嘴B 注水口蓋子C 蒸汽控制鈕
O=無蒸汽l=最小蒸汽;=最大蒸汽1=除鈣清洗功能
D 強力噴射蒸汽鈕9E 噴水按鈕TF 自動斷電指示燈(限GC2560機型)G 電線H 除鈣錠(除GC2510外所有型號)I 溫度指示燈J 機型標籤K 水箱L 溫度控制設定
重要事項
在使用本產品前,請先仔細閱讀說明並保留說明書,以供日後參考。
在使用前,請先檢查標籤上所標示的電壓是否與當地的電源系統電壓一致。如果產品附有接地插頭,則必須插入吻合的接地插座上。插頭、電線或產品本身受損時,抑或是產品曾摔落或漏電時,請勿使用。定期檢查電線看看是否受損。如果電線損壞,必須交由飛利浦、飛利浦授權之服務中心,或是具備相同資格的技師更換,以免發生危險。當本產品連接到電源時,必須有人看顧。請勿將熨斗與底座 (如有提供) 浸入水中。本產品不適合供下列人士 (包括小孩) 使用:身體官能或心智能力退化者,或是經驗與使用知識缺乏者。他們需要有負責其安全的人員在旁監督,或指示產品的使用方法,方可使用。請勿讓孩童將本產品當成玩具。熨斗的底盤可能會變得很燙,如果碰到可能會燙傷。當底盤處於高溫時,不可讓電線碰到底盤。每當您熨燙完畢、清理熨斗、倒乾水箱的水或加水,或即使短暫離開熨斗時,請將蒸汽控制鈕設定到 O 的位置,將熨斗直立在其跟部上,並且將電源插頭從插座拔出。請在平穩的水平面上使用熨斗或底座 (如有提供)。本電器用品僅供家用。
電磁場 (EMF)本飛利浦產品符合電磁場(electromagneticfields,EMF)所有相關標準。若正確處理及依照本使用手冊之說明進行操作,根據現有之科學文獻來看,使用本產品並無安全顧慮。
使用前準備
加水至水箱內
1 從插座拔下電源插頭。
2 將蒸汽控制鈕設定到 O 的位置 (= 無蒸汽)。 (圖 2)
3 將注水口的蓋子打開。
4 將熨斗向後傾斜,將水注入水箱至最高刻度。 (圖 3)
如果當地自來水質的硬度很高,我們建議您使用蒸餾水。請勿使用經化學除垢的水。
切勿注入超過「MAX」的水位指示。
請勿將香水、醋、澱粉、除水垢劑、熨燙添加劑或其他化學物質加入水箱中。
5 蓋上加水蓋 (可聽見喀噠聲)。
設定溫度
第一次使用時,熨斗可能會產生一些煙霧,煙霧會在不久後消失。
1 將熨斗直立,將溫度控制鈕轉到適當位置,以設定所需的熨燙溫度。 (圖 4)關於適當的熨燙溫度,請檢查洗濯指示標籤。1合成纖維(例如,壓克力纖維、人造絲、聚醯胺、聚酯纖維)1絲
----
,
,
,
,,
,,,
,,
,,
,
,
,
--
-
2毛料3棉、亞麻布如果您不知道衣料是由哪一種纖維製成,請先在該衣料不起眼的部份試燙,以判斷適當的熨燙溫度。絲質、毛料和合成纖維:熨燙該布料的背面以防止衣料發亮。避免使用噴水功能防止產生印漬。
2 將電源線插頭插入接地插座中。
3 當溫度指示燈熄滅時,請先稍待一會兒再開始熨燙。
注意: 熨燙期間,指示燈會間歇性地亮起。使用此電器
蒸汽熨燙
確認在水箱中有足夠的水。
1 將溫度控制鈕設定到建議的位置 (請參閱「設定溫度」)。
2 將蒸汽控制鈕設定到適當的蒸汽位置。 (圖 2)ç最小蒸汽(溫度設定從2到3)。é最大蒸汽(溫度設定從3到MAX)。
注意: 到達設定溫度時,熨斗便會立即開始產生蒸汽。
限 GC2640/GC2620/GC2530/GC2528/GC2522/GC2520/GC2510 機型:
如果設定的溫度太低(MIN到2),底盤可能會漏水。
無蒸汽熨燙
1 將蒸汽控制鈕設定到 O (= 無蒸汽) 的位置。
2 將溫度控制鈕設定到建議的位置 (請參閱「設定溫度」)。功能
噴水功能
您可以在任何溫度下使用噴水功能,以燙平頑固的縐褶。
1 確認在水箱中有足夠的水。
2 按噴水按鈕數下,以潤溼衣服。 (圖 5)
強力噴射蒸汽
強力噴射蒸汽有助於熨平頑固的縐褶。強力噴射蒸汽功能僅可在2到MAX之間的溫度設定下作用。
1 按下並放開強力噴射蒸汽鈕。 (圖 6)
垂直噴射蒸汽 (除 GC2510 外所有型號)
1 當您垂直握住熨斗時,也可以使用強力噴射蒸汽功能,對熨平吊掛衣服、窗簾之類的縐褶很有用。 (圖 7)
切勿直接對著人噴射蒸汽。
特殊底盤防漏功能 (除 GC2652/2650/GC2560 外所有型號)
本熨斗配有特殊底盤防漏功能:當溫度太低時熨斗會自動停止產生蒸汽,以避免水從底盤滴下。當您聽到聲音時,表示已開啟此功能。
自動斷電 (限 GC2560 機型)
如果熨斗放置一段時間未被移動,自動斷電功能會自動關閉熨斗電源。
自動斷電指示燈開始閃爍,代表熨斗電源已經關閉。 (圖 8)
若要讓熨斗再次加熱:拿起熨斗或稍微移動。自動斷電指示燈會熄滅。
1 如果溫度指示燈亮起,請等指示燈熄滅後再開始熨燙
2 如果溫度指示燈並未亮起,表示熨斗可開始熨燙。清潔與維護
雙效抗鈣除垢系統
除 GC2510 外所有型號:除鈣錠能預防蒸汽孔沈積水垢。此除鈣錠能持續作用,不需更換。 (圖 9)除鈣清洗功能可去除水垢微粒。
---
-
--
,
,
,
除鈣清洗功能每兩週使用一次除鈣清洗功能。如果居住地的水質非常硬(亦即在熨燙過程中有小薄片從底盤產生),則必須更頻繁地使用除鈣清洗功能。
1 設定蒸汽控制到 O 的位置。
2 將水倒入水箱到最高的刻度。
切勿在水箱中倒入醋或其他除垢劑。
3 將溫度控制設定到「MAX」。 (圖 10)
4 將插頭插入插座。
5 溫度指示燈熄滅時,請拔除熨斗的插頭。
6 在洗手槽上握住熨斗,並將蒸汽控制設定到除鈣清洗的位置 ( 1)。
7 將蒸汽控制鈕向上拉並取下。 (圖 11)
8 在洗手槽上握住熨斗,並前後移動熨斗。 (圖 12)
注意: 蒸汽和滾水將從底盤流出,雜質和水垢 (如果有的話) 將會被沖出來。
9 使用醋清除蒸汽控制針上的水垢 (如果有的話)。 (圖 13)
請勿彎折或損壞蒸汽控制針。
10 將蒸汽控制針放回熨斗:將針頭插入小孔的正中心,並把針側的小突出物放入孔中。當蒸汽控制鈕設定到 O 的位置時將其向下壓。 (圖 14)
11 如果熨斗內仍有許多雜質,請重複除鈣清洗的過程。
除鈣清洗之後
1 將插頭插入插座中使熨斗加熱,讓底盤變乾。
2 溫度指示燈熄滅時,請拔除熨斗的插頭。
3 將熨斗輕輕地在用過的布料上摩擦,以將底盤上已形成的水漬擦拭乾淨。 收藏
1 設定蒸汽控制鈕到 O 的位置。將電源插頭從插座上拔除並讓熨斗冷卻。
2 用濕布和非磨蝕性的 (液體) 清潔劑清潔熨斗,及擦掉底盤上的水垢和其他任何沈積物。
保持底盤平滑:避免撞擊金屬物體。
禁止使用鋼絲絨、醋或其他的化學物質。
3 定期使用清水沖洗熨斗水箱。在清潔水箱後,請將水倒乾。 (圖 15)
4 將電源線捲繞在熨斗捲線裝置上。 (圖 16)
5 務必以直立放置的方式將熨斗貯存在安全乾燥的地方。環境保護
電器壽命結束時請勿與一般家庭廢棄物一併丟棄。請將該產品放置於政府指定的回收站,此舉能為環保盡一份心力。 (圖 17)保固與服務
若您需要相關資訊或有任何問題,請瀏覽飛利浦網站www.philips.com,或連絡您當地的飛利浦客戶服務中心(您可以在全球保證書上找到連絡電話)。如果您當地沒有客戶服務中心,請洽詢當地飛利浦經銷商,或與飛利浦小家電服務部門聯繫。
故障排除
本單元概述使用本熨斗最常會遇到的問題。詳情請參閱相關單元之說明。如果問題無法解決,請與您所在國家的飛利浦客戶服務中心聯繫。
問題 原因 解決方法
熨斗已經插電,但是底盤仍是冷的。
電源連接有問題。
檢查電源線,插頭和插座。
溫度控制設定到「MIN」。
將溫度控制設定到所需的溫度。
沒有蒸汽 水箱中的水量不足。
加水至水箱(請參閱「使用前準備」章節的「水箱加水」)。
,
423900061493 6/9

問題 原因 解決方法
蒸汽控制鈕設定到O的位置。
將蒸汽控制鈕設定到ç或é的位置(請參閱「使用本產品」章節的「蒸汽熨燙」)。
底盤不夠熱且(或)特殊底盤防漏功能(僅適用於特定型號)已經啟用。
將溫度控制鈕旋轉到適合蒸汽熨燙的溫度(從2到MAX)。將熨斗直立在其跟部上,並靜待溫度指示燈熄滅後再開始熨燙。
沒有強力噴射蒸汽或垂直強力噴射蒸汽(僅適用於特定型號)。
在非常短的時間內使用強力噴射蒸汽(或垂直蒸汽)次數太多。
保持水平的位置繼續熨燙,靜待數分鐘後再使用強力噴射蒸汽(或垂直蒸汽)功能。
底盤不夠燙。
將溫度控制鈕旋轉到適合蒸汽熨燙的溫度(從2到MAX)。將熨斗直立在其跟部上,並靜待溫度指示燈熄滅後再開始熨燙。
在熨燙過程中會有小薄片和雜質從底盤產生。
硬水在底盤內側形成小薄片。
請使用除鈣功能數次(請參閱「清潔與維護」單元的「除鈣清洗功能」)。
紅色指示燈閃爍(限GC2560機型)。
自動斷電功能已啟用(請參閱「功能」章節的「自動斷電」)。
拿起熨斗或稍微移動,以關閉自動斷電功能。紅色指示燈會停止閃爍。
有水滴落在布料上。
注水口的蓋子並沒有關好。
按壓注水口的蓋子,直到聽到喀搭聲。
有水滴落在布料上。
(限GC2640/GC2620/GC2530/GC2528/GC2522/GC2520/GC2510機型)。設定蒸汽熨燙的溫度太低。
將溫度控制鈕旋轉到適合蒸汽熨燙的溫度(從2到MAX)。將熨斗直立在其跟部上,並靜待溫度指示燈熄滅後再開始熨燙。
熨斗冷卻後或在儲藏時,底盤會滴水。
當熨斗置於水平位置時,水箱內有水。
使用完畢後,請將水箱清空,並設定蒸汽控制鈕到O的位置。將熨斗直立儲藏。
423900061493 7/9

简体中文
一般说明 (图 1)A 喷雾嘴B 注水口盖C 蒸汽控制
O=无蒸汽l=最小蒸汽量;=最大蒸汽量1=除水垢功能
D 蒸汽束喷射按钮9E 喷雾按钮TF 自动关熄指示灯(仅限GC2560)G 电源线H 防水垢片(除GC2510型号)I 温度指示灯J 型号牌K 水箱L 温度旋钮
注意事项使用本产品前,请仔细阅读本使用说明书,并妥善保管以备日后参考。
连接产品电源前,请检查型号铭牌所标示的电压与当地电源电压是否一致。如果产品附带的是接地插头,则必须将其插至接地线的插座。如果插头、电源线或产品本身已经明显损坏,或产品曾坠落或出现渗漏,请勿再使用。定期检查电源线是否损坏。如果电源软线损坏,为避免危险,必须由制造厂或其维修部或类似的专职人员来更换。在电熨斗接通电源期间,使用者不得离开。切勿将熨斗或熨斗座(如有提供)浸入水中。本产品不打算由肢体不健全、感觉或精神上有障碍或缺乏相关经验和知识的人(包括儿童)使用,除非有负责他们安全的人对他们使用本产品进行监督或指导。应照看好儿童,确保他们不玩耍本产品。应照看好儿童,确保他们不会玩耍本产品。电熨斗的底板会变得非常烫,如触摸底板,可能会导致烫伤。不要让电源线触及高温电熨斗底板。当完成熨烫、清洁产品、注水或倒空水箱以及短时间离开熨斗时:请将蒸汽控制旋钮调至位置 O,竖放熨斗,并从插座中拔下电源插头。一定要在稳固、平整且水平的表面上放置和使用熨斗及熨斗座(如有提供)。本产品仅限于家用。
电磁场 (EMF)这款飞利浦产品符合关于电磁场(EMF)的相关标准。据目前的科学证明,如果正确使用并按照本手册中的说明进行操作,本产品是安全的。
使用准备给水箱注水
1 将插头从电源插座中拔下:
2 将蒸汽控制旋钮调至位置 O(=无蒸汽)。 (图 2)
3 打开注水口的盖子。
4 倾斜熨斗,将水加注至最高水位。 (图 3)
如果自来水水质很硬,我们建议您使用蒸馏水。切勿使用化学除垢剂。
切勿让水位超过最高水位标志。
不要将香水、醋、淀粉、除垢剂、烫衣剂或其它化学品放入水箱。
5 关闭注水口的盖子(可听到喀哒一声)。
设定温度
首次使用时,熨斗可能冒烟。过一会就会停止。
1 将熨斗竖立,并将温度旋钮转到适当位置,以将其设定到所需的熨烫温度。 (图 4)检查衣服标签以了解所需熨烫温度。1合成纤维(例如丙烯酸、粘胶、尼龙和涤纶纤维)1丝绸2羊毛3棉,亚麻如果您不知衣物是由何种纤维组成,找一处穿时看不见的地方熨,试试何种温度最合适。
----
,
,
,
,,
,,,
,,
,,
,
,
,
--
----
真丝织品,羊毛及合成纤维:要翻到内面熨烫以防发亮。避免使用喷雾功能,以免产生斑迹。
2 将插头插入有接地的电源插座。
3 如果温度指示灯亮着,应等一会再开始熨烫。
注: 在熨烫期间,温度指示灯会时亮时灭。
使用本产品蒸汽电熨斗
确保水箱中有足够的水。
1 将温度旋钮设定至建议的位置。(见“设定温度”部分)。
2 将蒸汽控制旋钮设定到适当位置。 (图 2)ç表示最小蒸汽量(温度设定为2和3)。é表示最大蒸汽量(温度设定从3到最大(MAX))。
注: 只要达到设定的温度,就立即开始喷出蒸汽。
仅限 GC2640/GC2620/GC2530/GC2528/GC2522/GC2520/GC2510:
如果设定温度过低(最低为2),水可能从底板漏出。
无蒸汽熨烫
1 将蒸汽控制旋钮设定到 O(= 无蒸汽)。
2 将温度旋钮设定至建议的位置。(见“设定温度”部分)。
功能喷雾装置
您可在任何温度下使用喷雾功能去除顽固褶皱
1 确保水箱中有足够的水。
2 按几次喷雾按钮,把要熨烫的布料弄湿。 (图 5)
超强力蒸汽喷射
强劲的蒸汽束喷射有助于去除顽固皱褶。蒸汽束喷射功能只适用于2和最高(MAX)之间的熨烫温度。
1 按下并松开蒸汽束喷射按钮。 (图 6)
垂直蒸汽喷射(除 GC2510 型号)
1 当您竖直握住熨斗时,也可以使用蒸汽束喷射功能。此功能可用于去除悬挂衣物、窗帘上的褶皱。 (图 7)
不要将蒸汽直接对着他人。
防滴漏功能(仅限 GC2652/2650/GC2560)
该熨斗具有防漏水功能,防止水从底板滴下:当温度太低时,熨斗将自动停止生产蒸汽。当此现象发生时,会听到咔哒一声。
自动关熄(仅限 GC2560)
如果熨斗一段时间内没有被移动,电子关熄功能将自动关熄加热元件。
当自动关熄指示灯开始闪烁时,即表明加热元件已经关闭。 (图 8)
为使熨斗再次加热,只需拿起熨斗或微移动一下熨斗即可。自动关熄指示灯将会熄灭。
1 如果温度指示灯亮着,则应等待其熄灭,再开始熨烫。
2 如果温度指示灯熄灭,则可开始熨烫。
清洁和保养双效除垢系统
除 GC2510 型号:防水垢片可防止水垢堵塞蒸汽输出口。防水垢片持续有效,无须更换。 (图 9)除垢功能可除去水垢颗粒。
除水垢功能应每两周使用一次除水垢功能。如果当地的水特别硬(如:熨烫时底板上出现水垢薄片),则应增加使用除水垢功能的频率。
1 将蒸汽控制旋钮设定到位置O。
-
--
,
,
,
2 将水箱注满至最高水位 (MAX)。
请勿将醋或其它除垢剂注入水箱。
3 将温度转盘调至最大 (MAX)。 (图 10)
4 将插头插入插座。
5 当温度指示灯熄灭时,拔下熨斗的电源插头。
6 在水池上方手持熨斗,将蒸汽控制旋钮设定到除水垢位置 ( 1)。蒸汽控制旋钮将轻轻弹起。
7 上拉蒸汽控制旋钮并将其取下。 (图 11)
8 在水池上方手持熨斗,来回晃动。 (图 12)
注: 蒸汽和沸腾的水将从底板流出。杂质和水垢(如果有)也将随之冲出。
9 如果蒸汽控制针上有水垢,请用醋将其除去。 (图 13)
不要弄弯或损坏蒸汽控制针。
10 将蒸汽控制旋钮装回熨斗的方法是将针尖准确插入孔的中央,同时将针侧面的凸缘安装到插槽中。按下蒸汽控制旋钮,同时将其设定到位置 O。 (图 14)
11 如果熨斗中仍存在大量杂质,请重复执行除水垢步骤。
完成除水垢过程后
1 将插头插入插座,让熨斗加热,以将底板烘干。
2 当温度指示灯熄灭时,拔下熨斗的电源插头。
3 将熨斗放在一块用过的布上轻轻地前后移动,以除去留在底板上的水渍。
存放 1 将蒸汽控制旋钮设定到位置 O,从插座中拔下
电源插头,让熨斗充分冷却。
2 用湿布和非腐蚀性(液体)清洁剂清洁产品并擦去底板上的水垢和其它沉积物。
保持底板光滑:请避免与金属物体碰撞。
切勿使用磨砂布、醋或其它化学药剂。
3 定期用水冲洗水箱。并在清洗之后将水箱中的水全部倒出。 (图 15)
4 将电源线绕在存线装置上。 (图 16)
5 务必将熨斗直立放在安全干燥的地方。
环保弃置产品时,请不要将其与一般生活垃圾堆放在一起;应将其交给官方指定的回收中心。这样做有利于环保。 (图 17)
保修与服务如果您需要详细信息或有任何问题,请浏览飞利浦网站,地址为www.philips.com。您也可以与贵国的飞利浦顾客服务中心联系(您可以从全球保修卡中找到电话号码)。如果贵国没有飞利浦顾客服务中心,请与当地的飞利浦经销商或与飞利浦家庭小电器的维修中心联系。
故障种类和处理方法本章归纳了您的熨斗在使用时最常遇到的问题。如果您还不能解决问题,请与您所在国家/地区的飞利浦客户服务中心联系。
问题 原因 解决方法
熨斗已经插好插头,但底板仍是凉的。
接触不良。
检查电源线、插头和电源插座。
温度转盘设在MIN。
将温度转盘转到所需位置。
没有蒸汽。 水箱中水不足。
给水箱注水(见“使用准备”一章的“给水箱注水”一节)。
,
423900061493 8/9

问题 原因 解决方法
蒸汽控制设在O位置。
将蒸汽位置设定为ç或é(请参阅“使用本产品”一章的“蒸汽熨烫”一节)。
底板不够热,并且/或防滴漏功能(仅限特殊型号)已经启动。
将温度旋钮设定到蒸汽区域中的某个位置(从2到MAX)。将熨斗竖立,等到温度指示灯熄灭后再开始熨烫。
没有蒸汽束喷射或垂直蒸汽束喷射(仅限特殊型号)。
在短时间内频繁使用蒸汽束喷射功能。
继续在水平位置熨烫,稍等片刻后再使用蒸汽束喷射功能。
底板热度不够。
将温度旋钮设定到蒸汽区域中的某个位置(从2到MAX)。将熨斗竖立,等到温度指示灯熄灭后再开始熨烫。
在熨烫过程中底板内冒出水垢和杂质。
硬水会在底板内形成水垢。
请多次使用除水垢功能(见“清洁和保养”一章的“自动除垢功能”一节)。
红色指示灯闪烁(仅限GC2560)。
自动关熄功能已经启动(见“功能”一章中的“自动关熄”一节)。
将熨斗拿起或稍微移动一下熨斗,以关闭自动关熄功能。红色指示灯将停止闪烁。
衣物上有水滴。 注水孔盖没有盖好。
按下盖子,直到听到喀哒一声。
衣物上有水滴。 (仅限GC2640/GC2620/GC2530/GC2528/GC2522/GC2520/GC2510)设定温度太低,无法进行蒸汽熨烫。
将温度旋钮设定到蒸汽区域中的某个位置(从2到MAX)。将熨斗竖立,等到温度指示灯熄灭后再开始熨烫。
熨斗冷却后或存放期间,有水从底板漏出。
水箱中还有水时,熨斗被水平放置。
使用后,将水箱中的水倒空,并将蒸汽控制旋钮设定到位置O,并将熨斗竖立存放。
423900061493 9/9